Warning Order - WFHGS · called Ogre from a new company called Metagam- ... would rise up yet...
28
-
Upload
truonghuong -
Category
Documents
-
view
215 -
download
0
Transcript of Warning Order - WFHGS · called Ogre from a new company called Metagam- ... would rise up yet...

One of the first wargames I ever owned was a “pocket” game called Ogre from a new company called Metagam-ing. At that time I read a lot of sci-fi anthology maga-zines (they were big at the time) and I saw ads for this game as well as SPI’s Sixth Fleet, which was the first wargame I ever owned. For $2.95 you got a map, some very thin counters, and a rulebook, plus some-thing else...a tremendous amount of game play and fun.
As the years went by a second game was intro-duced called GEV, then Shockwave, followed by a Reinforcements supple-ment. The Ogre world was doing well and there were so many scenarios, coun-ters, variants, Space Gamer articles, etc., that you could literally just play this game for weeks on end and not get bored. Over the last 35+ years Ogre has seem-ingly come to the fore and then retreated to the rear of the gaming hobby. Minia-tures, various boxed sets, a GURPS module, and more continued to gain new gamers. Every time you
thought the system re-ceived its final nail in the proverbial coffin, it would rise up yet again! I myself would take the game out for a few sce-narios every now and then as it is still a good system, plus it is great for bringing in new
gamers.
This takes us to the pre-sent day where Steve Jack-son Games (Steve is the original designer) decided to run a Kickstarter pro-gram to produce the ulti-mate Ogre game. Not be-ing a big Kickstarter fan I checked in every so often and surprisingly the pro-gram exceeded beyond their stated goals. There were some design delays, changes in components, printing issues, etc., and I unfortunately missed out on the Kickstarter version.
When I finally saw that it was coming together and actually shipped I was for-tunate enough to find one online at a good deal, alt-
hough I missed out on the Kickstarter extras.
With only 12,000 being produced and no more, this game will no doubt turn into a collectible item. Not only that, the company must have come close to bankrupting themselves as the price for the game in no way equates to what you get in the game or what the printing costs must have been! My guess is that there is easily $400 in com-ponents in a game that re-tails for right around $100!
The first thing you no-tice is that this is a big game! I’m talking in terms of having never seen any-thing close to this in my almost 40 years in the gam-ing hobby! The box weighs in around 28 pounds and I certainly got a great deal on the shipping
charge. When you open the carton there is a ;large poster sized sheet that says, “Read This First” and this is definitely what you should do. Just opening up things and punching counters is a recipe for disaster, so you should
prepare yourself and take a long term view of getting this game ready. By that I mean open the box, look over the components, then
Ogre Designer’s Edition
Special points of interest:
Several battle reports using F&F ACW, Age of Discovery, Warmaster Ancients/Medieval, and Blitzkrieg Commander 2.
Large BKC 2 scenario using Google Earth maps for planning.
Several board wargame reviews.
Regular features and an editorial.
Ogre Designer Edition 2-4
WMM: Crusaders vs. Saracens 6
Engagements 3 & 4-Scenarios for gamers 8
Annual WMA Tournament Report 12
BKC2: Night Attack on the Oder 16
F&F ACW: Battle of Chantilly 20
AOD; Two Renaissance Battle Reports 26
Inside this issue:
Wa
rnin
g O
rde
r
WA
SA
TC
H F
RO
NT
HI
ST
OR
IC
AL
GA
MI
NG
SO
CI
ET
Y
Issue #37
Spring 2014

pace yourself by doing a few things at a time, aiming for a goal of getting every-thing finished over a number of days, not hours.
Besides the 36 (yes, that’s 36) sheets of counters and 3D models, there are two Ogre mapboards, four GEV/Shockwave mapboards, rules, reference cards, Ogre log sheets, dice, the two main counter trays, plus the two large Ogre garages. Impressive does not even begin to de-scribe what you get in this game. The counter sheets are broken into three main types of components; first, there are the basic vehicle/infantry counters, second, the terrain overlays, and finally, the 3D models themselves.
There are three main factions repre-sented by the counters. There is the North American Combine, PanEuropean Union, and the Black Rose mercenaries. Each faction gets a variety of heavy tanks, GEVs, missile tanks, infantry, howitzers, and more. The counters are in a very interesting shape, being made to fit about half a hex for most of them with some, such as the artillery, having round-ed parts as well. Although there have
been some complaints, I like the designs and it sets this game apart from most others. There are also a large number of hex overlays, rang-ing from destroyed cities to rail lines, to marsh hexes. In fact, there are so many options that you should be able to represent almost any ter-rain combination that you can think of.
Then you come to the 3D models and again, there is a wide variety. Each faction gets a number of com-mand posts, laser turrets, laser tow-ers, strongpoints, and admin build-
ings in their faction colors. Finally, there are the Ogres themselves, with models for Mk. IIs all the way up to the massive Mk. VI. The Ogres will take up to two hexes on the boards, although only the front hex is considered where they are actually located for movement, attacks, and defense. Again, to each their own, but I had no problem with this and it helps to visualize the size of these be-homeths. For those who don’t like using the 3D models for the Ogres there are a number of one hex flat counters provided as well. Also, there aren’t just a few of these models, but sheet after sheet with each sheet hold-ing around 6-8 models each!
I decided to have a long term view on the 3D models and after reading a number of articles and postings on BGG I decided to go all out. I went out and bought a set of colored Sharpie pens and filled in the cardboard edges of the 3D models, then used white glue to permanently assemble them. Yes, there is some Gaming OCD involved here, but the look of the models was enhanced 100%. True, it did take me about 10 days to punch, color, and assemble all of the 3D models, but to me it was definitely worth it.
Another incredible thing is that the 36 or so counter sheets you get with the game aren’t the only sheets available! Yes, in case you think that you didn’t get enough in the box there are several sheets that only came in the Kickstarter set and
there are what are termed Sponsored Counter Sheets as well. Many of these add more Ogres, buildings, terrain over-lays, etc., as well as new factions. At the time of this writing I purchased the two sheets of terrain overlays and one of BGG colored models from Boardgamegeek, the Nihon Empire sheets, and the Nightfall pack. With these plus the components in the game you have enough variety for a lifetime of gaming and I’m sure that there is more to come. My guess is that within a year all of the additional counter sheets will be for sale in some form or another, which will give the Ogre gamers who strive for completeness their chance to collect eve-rything printed for the game.
Finally, there are the rules, scenario book, two game reference sheets, and laminated Ogre records that finish out the game components. Overall, it is one of the most impressive games I’ve ever laid eyes on. The garage and counter storage trays are an engineering achievement, the game oozes quality, and there is so much that comes with the game that it is hard to find anything else to compare it to! Overall, this is a huge bargain and my advice is to get one while you still can.
So, what of the game itself? For those who are unfamiliar with Ogre, it is a sci-ence-fiction armored warfare game set around the year 2070-2100 with war breaking out across the (cont. on p. 5)
Page 3
Ogre Designer’s Edition (cont.) Game Review
WARNING ORDER
Just two of the 36 counter sheets included in the box. There are more than a dozen add on sheets available as well through other sources!
The Ogre Garage where the various 3D models are stored. These two trays fit into the top of the box and are clearly labeled with which models go where. You get more than enough to do even the largest games.
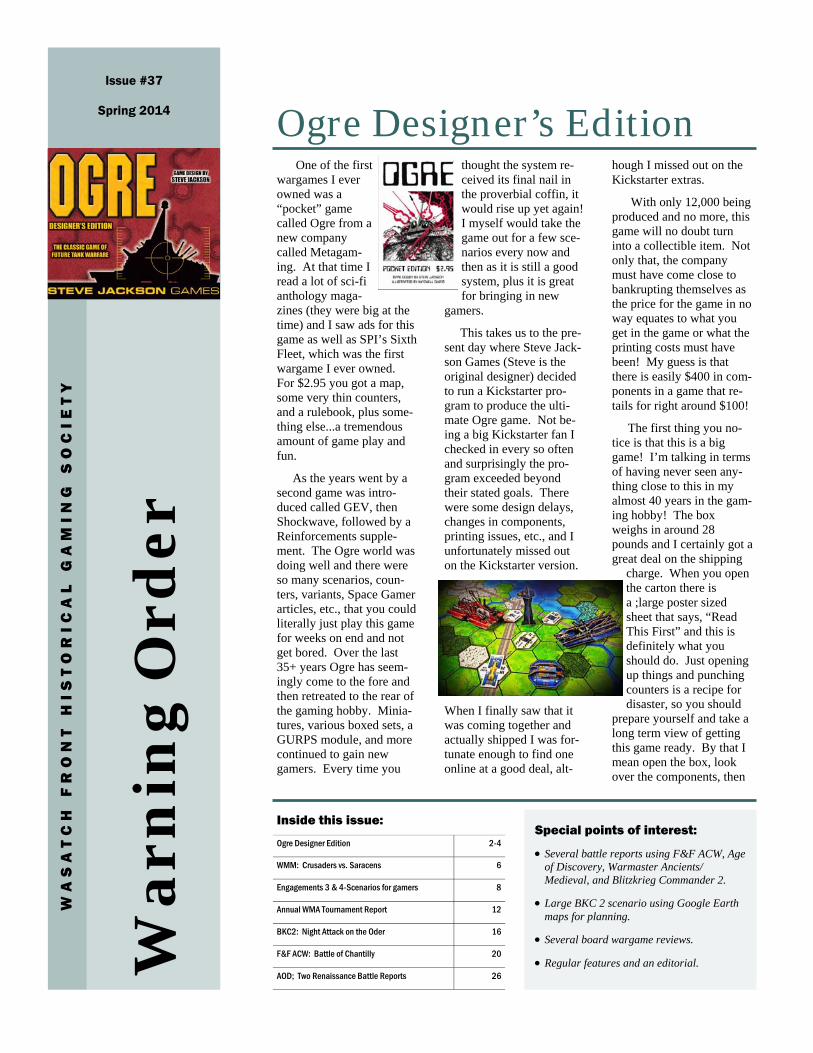
Roads to Moscow: Battles of Mozhaysk and Mtsensk 1941 is GMT’s latest release in the Roads series by noted designer Vance Von Borries. This series of games focuses on key battles in the early stages of Operation Barbarossa at an operational level, with these two bat-tles occurring during Operation Typhoon, which was supposed to be the final drive to seize Moscow in late 1941.
It sounds repetitive to say this over and over again, but you get the standard, high quality components that GMT Games is now noted for. In fact, it would be quite the scandal if the components were anything less than outstanding! You get a back printed, 22 x 34 map of the two battle areas, a rule book, play book with extensive notes on the battles, three sheets of some 500+ counters, refer-ence card with game tables on it, and several set up/play aids. The map is very well done, with trails, roads, bridges, etc., clearly laid out and the counters are clear-ly defined, which is good as there are many colors and numbers that need to be used for various things in the game.
The rules are going to take some time getting used to. They’re not poorly writ-ten, but it is a new system and quite un-like many other operational level games I’ve played in the past. It is important to note the various colors on the movement
boxes, what the chits are used for, how artillery and fuel points work, etc., before even attempting a game. I had to review some sections a few times to make sure that I understood everything before mov-ing on. This is definitely not one of those games where you put the pieces out on the map and just start playing as my
guess is that you would be hopelessly lost.
Roads to Moscow uses a chit pull activation system, but there are a lot of rules governing the chits such as putting formations in reserve, what the for-mations can do in terms of combat, and so on. Understanding how the various formations activate, move, and attack is the key element to understanding the game itself. The movement system is fairly standard, although the concept of having to fuel the German armored for-mations needs to be clearly understood as well. The designer does a great job of simulating the German supply issues in 1941 with this rule, so the Germans need to get organized and plan out their move-ments and attacks to make the best use of
their limited fuel. You also have to choose between a Mobile or an As-sault sequence, with each one giving you different options for using units in combat. There is some strategy to this, but I found that the choice was pretty obvious on which one to use each turn.
Then you get to the combat system and here’s where there are major dif-ferences with probably most games that you’ve played. Fortunately, there isn’t a lot of combat each turn, but each single combat has a step by step procedure that must be followed.
There’s no figuring the odds, shifting a column for terrain, then rolling a die to get a DR or EX result here! In fact you first start off with assigning air units and having combat with those, with the survi-vors contributing to the attack or defense. You then compare Efficiency Ratings of the units, modifiers for combined arms,
artillery and air support coordination, engineers, and much more. Yes, each combat becomes its own little game and when you add in things like combat refusal, reaction movement, no retreat, armor attrition, etc., you have quite the involved process. In fact, combat takes up around 5 1/2 pages of the rules!
You also have rules for weather, lead-ers, supply, fuel units, and more. The use of fuel units is critical as at this stage of the campaign the panzers were running on fumes and the German ad-vance only goes as far as the panzers
since they provide most of the Germans combat punch. There is a number of strategies for using the fuel units with the activations of the formations and it will take a few plays to get the panzers rolling successfully so as to win the scenarios.
There are four scenarios with two scenarios for each battle. Two are short-ened versions of the battle while the re-maining two scenarios are the full battles. The full battle type scenarios will take some time to play as there are a large number of units. Ii was struck by how similar some things were to the designers other GMT series, which is the East Front Series, or EFS as it is known. Several of the features in this game appear to have been lifted out of those games and used here.
Overall, this is a hard game to rate. The two battles are interesting and the combat system is unique, plus the game has outstanding components. I think the question is do you want to learn a com-pletely new system for two scenarios? By learn I mean “unlearn” a lot you know about wargaming and get immersed in this system by playing it multiple times? It’s a tough call with so many games already out there waiting to be played.
Page 4
Roads to Moscow by GMT Game Review
NEWSLETTER TITLE
VOLUME 1, ISSUE 1
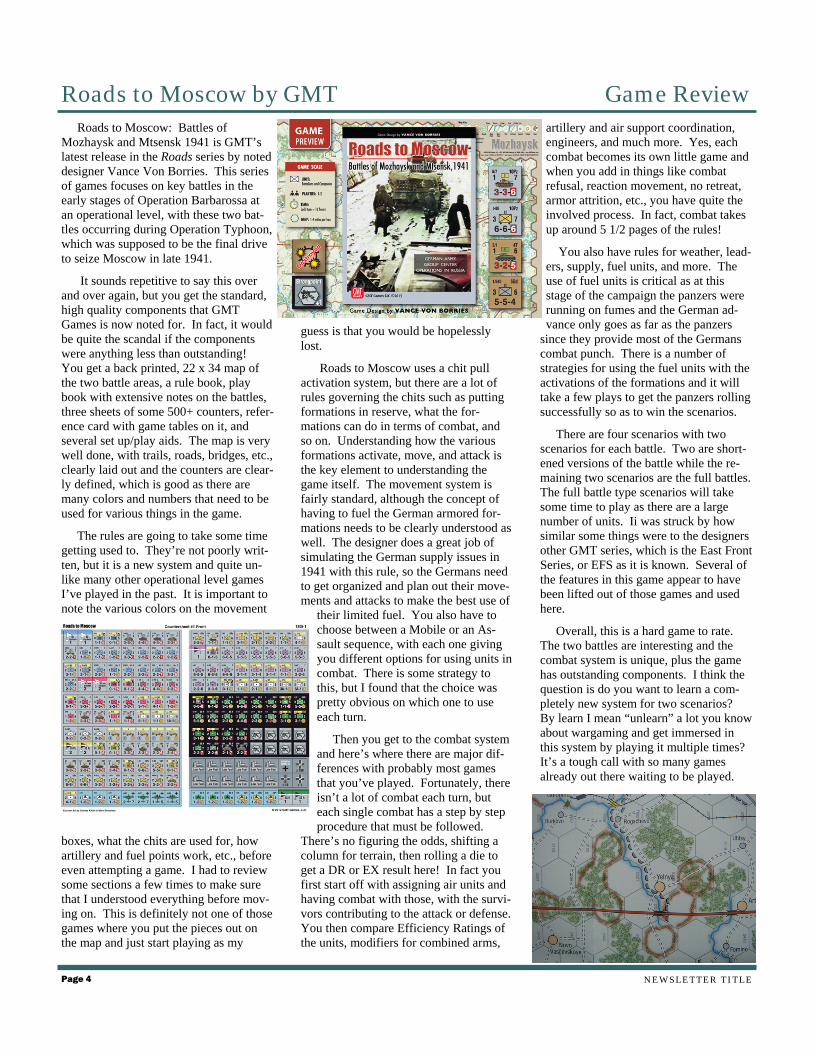
planet, but primarily focusing on the Combine (North America and England) against the PanEuropean forces (Europe and Russia). While there are large con-ventional forces which feature tanks, infantry, GEVs (hovercraft), howitzers, etc., the most feared piece of equipment on the battlefield are what are called Ogres. Basically an artificial intelligence in a football field sized tank with enough firepower to devastate a small city, Ogres are the kings of the battlefield. It takes a lot to stop one and there are various marks of Ogres, ranging from the early Mk. IIs to the massive, almost unstoppa-ble Mk. VI’s.
The game system is the classic
IGOUGO with hex move-ment and an odds based combat table. Compare the attack strength to the defense strength to get the odds, roll the die, and you get either a miss, disabled (knocked out for a turn), or destroyed. When fighting Ogres you target the individual weap-ons or treads on the Ogre in an attempt to stop it.
Simple, easy to learn, and games play fast. There is a lot of combat, units die in droves, but there is surprising-ly a lot of strategy in
the game, which is why gamers keep coming back to the system time and time again over the last 37 years. There are a several scenarios available in the box as well as online with many variations for each one. Ogre is also a very good “gateway” type wargame to intro-duce newcomers to the hobby.
Once you get the basics down you can start adding in more interesting elements
such as missile crawlers, heavy weapons teams, ma-rines, laser towers, and more. There is literally no end to the countless varia-tions in forces and terrain that can be developed for a scenario. Surprisingly, for the game being around for so long you would think that there would be more scenarios, campaigns, etc., but there aren’t and this is one of the few complaints I have about the system. There are a few online, but what this system really needs is a series of cam-paigns and/or additional scenarios to keep the inter-
est going, especially with this new re-lease.
Are there any problems with this edi-tion other than the scenario issue de-scribed above? Not really. The game reference cards should have come on cardstock or have been laminated. Paper versions are a strange choice when every-thing else in the box just oozes high qual-ity. The selection of buildings, Ogres, etc., for the 3D models is unusual as you get quite a few of some, but only one or two of others. The roads and railways are nice pieces, but there’s no way that they will sit still on the boards during game
play and they should just have been print-ed on terrain hexes. These are all very small issues and some gamers will defi-nitely think that I’m complaining for the sake of having something to write about! Finally, I’m not sold on the sponsored and Kickstarter sheets, which have prov-en difficult to track down, understanding what is available, and from who, not to mention when they will be out for sale. This could have been done a better way and the company needs to take the lead in this.
Overall, however, this has proven to be one of the most incredible wargames I’ve ever owned. The components, stor-age, accessories, etc., have proven to be well thought out, very high quality, and you definitely get your money’s worth! My advice would be to get one of these at all costs as you won’t be sorry.
Page 5
Ogre Designer’s Edition (cont.)
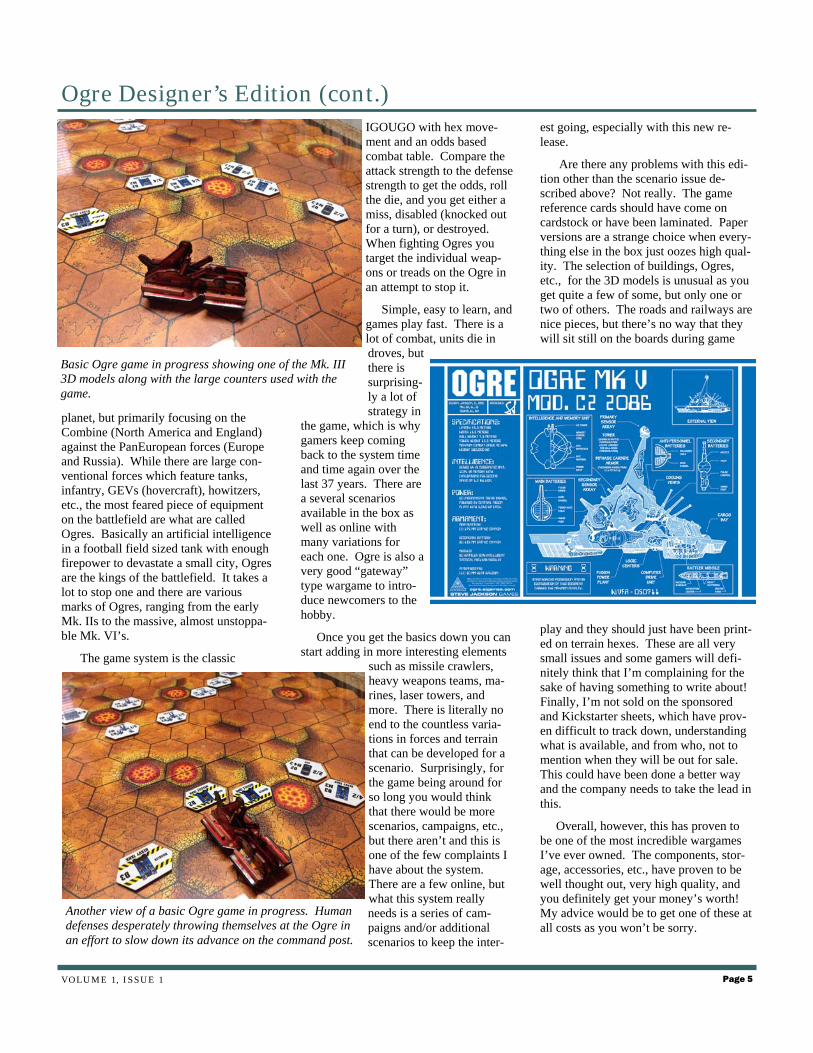
Basic Ogre game in progress showing one of the Mk. III 3D models along with the large counters used with the game.
Another view of a basic Ogre game in progress. Human defenses desperately throwing themselves at the Ogre in an effort to slow down its advance on the command post.

For our last gaming night before the Christmas holidays we only had a few of us available and we played at GAJO, which is an outstanding gaming store in Sandy, Utah. We needed something for about a three hour battle (the store closes at 9pm) that could handle up to four play-ers if needed. I had just finished a few 10mm Crusader units, so we decided to pull out Warmaster Medieval and have a Crusades battle.
With the new units both sides were pushing close to 2000 points, which gives the Saracens a lot of units, but the Cru-saders, being more heavily armored (and costing much more per unit) would be outnumbered. The Saracens went with a mix of heavy cavalry along with some skirmish cavalry units backed by a large number of regular infantry units, plus archers and skirmishers. Several of the infantry units were rated as fanatics, which have better unit stats, so they were used to form a second line that would engage once the Crusaders were softened up and weakened by the initial combats.
The Crusaders went with the usual
mix of heavy knights and cavalry, plus armored infantry, crossbowmen, and a few units of pilgrims. Although it was a smaller force than the Saracen army ar-rayed against it, the mounted knights are the main threat that can be very tough to deal with if you’re the opposition. After setting up by brigades the game began.
The Saracens got off to a surprising start and were able to move almost every-one, which rarely happens! The Crusader first turn did not go so well, with only one or two units moving before all the commanders failed their command rolls. In fact, this was the recur-ring theme for the Crusader side all night, although in the end it didn’t hurt them that much.
The first set of combats were the knights charging into anything that they could find. As we had seen before, the first enemy unit that is contacted disintegrates and you have to hope that the second line formations can do some damage. After several of these charges the knights had destroyed several Saracen units, but had been severely damaged themselves. The action now moved to the center and the right where both sides were maneuvering to come to grips. The Saracen light cavalry and the Crusader sergeants started a series of
charges that went back and forth for several turns.
In the center the skirmishers, arch-ers, and crossbow-men of both sides were busy shooting each other to pieces. The Crusaders were once again ham-pered by their com-mand rolls and could not get all of their units into posi-tion to inflict maxi-mum damage. The infantry were mov-ing up for the main
event even as the flanks were still seeing major action.
In fact, the units on both flanks had fought themselves into exhaustion and many units were withdrawn lest they be finished off and count for too many with-drawal factors that could lead to one side or the other breaking. The Saracens al-
ways seemed to have just enough units to hang on and they would inflict enough damage to push the Crusaders back. The Saracens, having large numbers of units, could afford these losses while the Cru-saders could not. At the three quarter point in the game both sides were even, so it would come down to the infantry.
Sure enough, the infantry on both sides moved towards the center and be-gan a series of charges and counterattacks that went on for several turns. At one point it looked as if the Saracens were going to break through and go on a win-ning rampage, but several bad series of die rolls halted them and allowed the Crusaders to come back from the verge of losing. The battle was quickly turning into a “last survivor” type of affair with hardly any full strength units still around. In fact, there was a brigade of fresh Cru-sader units that were still in reserve as they had only been able to move once in the entire game! Finally, the Crusaders attacked one last time and carried the day, eliminating a few damaged Saracen units that failed to roll well in their attacks during their turn.
Definitely a slugfest of epic propor-tions! The Saracens just kept feeding units into the battle and grinding away a the higher quality Crusader army. The Saracens certainly had their chances as the Crusaders had a brigade of units that hardly moved during the game. In the end, however, the initial Crusader heavy cavalry charges and the bad Saracen com-bat rolls at the start came back to haunt them at the end of the game.
Page 6
Warmaster Medieval: Saracens vs. Crusaders Battle Report
NEWSLETTER TITLE

VOLUME 1, ISSUE 1
Page 7
WMM: Saracens vs. Crusaders (cont.) Battle Report
Several images of the WMM battle where you can clearly see that the Saracens had the edge in numbers. The Saracen heavy cavalry and Gazi infantry are the backbone of the army, with better stats than the average Saracen units. The Crusader knights, however, usu-ally offset that advantage by being able to launch devastating charges, which obliterate entire units in a single round!

ISSUE #37
Situation: Red is trying to seize a river crossing during a major offensive. The plan is to use airborne forces to seize a crossing, then the leading mechanized elements of Red’s army can quickly cross to resume the attack.
Period: Designed primarily for WW2, but could be used for modern operations with a few changes.
Table Size: 4x8 for larger games, but a 6x4 could be used with smaller scale figures.
Terrain Notes: The green double arrow represents an operational ferry crossing. It takes one complete turn to move across the river using the ferry and ca-pacity is one infantry company or one platoon of vehicles.
Blue can blow the bridge once Red forc-es move adjacent to it, but the roll de-pends upon how many turns it takes Red to reach that position. If Red gets to the bridge on Turns 1 or 2, only a 6 on 1D6 will destroy the bridge. On turns 3 and 4 a 4, 5, or 6 will destroy the bridge and after turn 4 it can be blown up at any time by Blue. Note: Blue does not have to destroy the bridge in case it is to be used in planning for a counterattack or retak-ing objectives elsewhere on the board.
Red Forces: Two battalions of para-troops, each consisting of three compa-nies. This force airdrops onto the board on Turn 1 according to the rules used by the gamers.
Assault force: One company of airborne troops in gliders. Too simulate the shock and surprise aspects of the assault, the gliders attempt to land prior to Turn 1 and get one free move from the gliders’ land-ing location, then the game begins with Turn 1.
Heavy/Support Weapons force: One towed battery of AT guns, one mortar platoon, and one machine gun platoon arrive in gliders on Turn 1.
Relief force: Two companies of armor and one company of mechanized infantry arrive at the R location on the map. Be-ginning on Turn 10, roll 1D6 and on a 6 the relief force arrives. Add a +1 modifi-er for each turn after 10. Ex., on turn 13 roll 1D6 with a +3, needing a 6 or better
for the relief force to arrive.
Red Orders: Seize and hold at least one of the river crossings until the relief force arrives and makes contact.
Blue Forces: On Turn 1 the two infantry companies marked on the map may make a half move. Also, on Turn 2 an alert force of one mechanized infantry compa-ny appears as a reinforcement that does not have to be rolled for. Starting on Turn 2 Blue additional reinforcements may begin to arrive. Roll 1D6 for each group and on the roll of a 6 that group appears on that turn.
Group 1: One heavy weapons company with mortars and MGs.
Group 2: One mech infantry company.
Group 3: Two companies of infantry.
Group 4: One armored recon company with an armored car platoon, platoon of mech infantry, and one platoon of armor.
Group 5: Armored battlegroup consisting of one platoon of armor, one platoon of heavy armor, and two platoons of mech infantry.
Group 6: One company of infantry and one either self-propelled or towed anti-tank platoon.
Ex., on Turn 2 Blue checks for reinforce-ments, rolling a 6 when checking for
group 2 and 4. Those groups immediate-ly are checked for where they enter the board and arrive as reinforcements. On Turn 3 Blue would still have groups 1,3, 5, and 6 to check for.
Beginning on Turn 8 Blue needs a 5 or 6 on 1D6 to bring in any remaining groups each turn.
On Turn 8 Blue receives two batteries of medium off board artillery.
Reinforcement arrival: For each group of Blue reinforcements, roll 1D6 for the entry point. The number rolled corre-sponds to the numbers marked on the game map. If a 6 is rolled that reinforce-ment group is delayed a turn and must roll again next turn.
Blue Orders: Counterattack and retake any river crossing seized by Red’s air-borne forces.
Initiative: Red is first each turn
Game Length: 15 turns
Victory Conditions: Victory is deter-mined by how many of the objectives (marked as red stars on the game map) that Red controls at the end of the game.
Three stars-Major victory
Two stars-Operational victory
One star-Tactical Victory
No stars-Defeat
Page 8
Engagement 3: Airborne Assault

ISSUE #37
Situation: Red has been holding an im-portant river crossing for quite some time and the campaigning season is coming to an end. Blue decides to make one pure push to cross the river and destroy the Red forces by deception.
Period: Primarily for the Medieval/Renaissance era, but could easily be used for ancients or the horse & musket peri-ods with little to no modification.
Table size: 4x8 for larger games, but a 6x4 is the smallest acceptable size.
Terrain Notes: The river can only be crossed at the bridge held by Red and the bridge put in place by Blue. There are twelve inches of earthworks/gun plat-forms available to Red to guard the bridge.
Red Forces: There are three infantry and one artillery units guarding the bridge and they must be deployed within 12 inches of the bridge marked on the map. There are also two cavalry units posted as flank guards . The remaining forces are garri-soning the town. On Turn 2 roll 1D6 for each of the following units and on a result of a 6 they are positioned on the road in the town and may move. There is a +1 modifier for each turn after 2.
4 infantry units
1 cavalry unit
1 artillery battery
Starting on Turn 6 reinforcements may arrive from off board. Roll 1D6 and on a 5 or a 6 roll a second time to see what type of unit arrives. Units that arrive as reinforcements may start at either loca-tion 1 or 2 as marked on the map.
Roll Unit Type
1-3 Infantry
4-5 Cavalry
6 Artillery
Red Orders: Hold the town as long as possible as well as the bridge. Prevent Blue from exiting any forces off the roads at points 1 and/or 2. Counterattack to destroy the temporary bridge or to retake the river bridge if it is lost.
Blue Forces: Blue starts with a pinning
force of three infantry units and one artil-lery unit within 12 inches of the river bridge. This force must remain in place until at least Turn 3 where it is then free to move anywhere.
A temporary bridge has been built and put into place overnight. Blue may posi-tion the bridge anywhere along the length of the river. The following units com-prise the assault/flanking force:
8 infantry units
4 cavalry units
2 artillery units
One unit of Blue’s choice may start on Red’s side of the river at the end of the temporary bridge. Another unit may begin on the bridge with the remaining units lined up behind ready to cross.
Blue Orders: Seize the river bridge and if possible, seize the town. Move forces quickly over the bridge to seize the objec-tives before Red’s defenses get stronger. Exit forces off of the roads at points 1 and 2 marked on the map.
Initiative: Blue has the first turn.
Game Length: 12 turns
Victory Conditions: If Blue takes either the town or the river bridge the game will at least end in a draw. If Blue takes the town, then exits at least four units off the roads, the game ends in a Blue tactical
victory. If Blue takes both the river bridge and town, the game ends as a ma-jor victory for Blue. Red wins a major victory by holding the river bridge, town, and destroying the temporary bridge.
Strategy: Naturally, the placement of the bridge will dictate Blue’s offensive strat-egy and whether they go for the river bridge or the town first. Red will slowly build up forces and the randomness of the reinforcements will provide some good replay value. Red’s challenge will be to hold on long enough for a sufficient de-fense in depth to be established and then a possible counterattack. The key here for Blue is speed and getting to good positions before Red’s forces all arrive.
Play Balance: Feel free to modify the reinforcements and die rolls needed to activate the garrison. One of the prob-lems with random activation and rein-forcements is that if there is a series of bad die rolls Red can get quickly over-whelmed, which while it may be fun for Blue, it may not make the best game!
Other periods: Although designed for the Medieval and Renaissance periods, you could easily convert this to Ancients or the Horse & Musket periods. My sug-gestion would be to use medium or heavy infantry for the standard infantry unit, but perhaps give two for one or three for two units if replaced by light cavalry or infan-try.
Page 9
Engagement 4: Surprise River Assault

Weird Wargamers & Other Tales Pt. 1
All of us have known some, well let’s just say, unusual gam-ers over the years. After playing in four or five different clubs, conventions, game days at stores, etc., I’ve ac-cumulated quite the number of tales that probably many of you have probably experi-enced yourselves. Gamers have quirks or they probably wouldn’t be in the hobby in the first place! The question is wheth-er those quirks can have an adverse effect on the rest of your gaming group or not.
My first example was a particular gamer who was heavy into WW2 and modern armor, plus he was well known (OK, maybe not in a good way) around the area. I was running a Command De-cision II game at a local con and sure enough, he chose to play in my game. Not only that, he brought along one of his gaming buddies who had a reputation equal to his own. Since it was a conven-tion game and we were under a time limit I stated that this was a straight up fight with no hidden movement and the game began.
After a few turns I noticed some of the forest models and lichen was being moved around the board by these two and I asked them what was going on. In a hushed voice they told me that was how they were marking the advance of their armor as they were using hidden move-ment. I responded that was not for this game and put their models back on the table. A few turns later I noticed what looked like pieces of the trees I made moving around the board and sure enough, they had broken them off and were using them as hidden markers for their armor! When I put their armor back on the board they complained loudly that the game was stupid, unfair, and they were never coming back, which was a good thing as everyone else had a good time after they left!
I later found out that at another game this gamer would press his knuckles into
the foam terrain boards to create hull down positions for his micro-armor!
For those that played Empire back in the day, I’m sure this next story is right up your alley. For the uninitiated, Empire used an order system that invit-ed abuse and coupled with the “teleporting” feature of the rules, things could get out of hand quickly. The problem we had at that time is that we had two gamers that were at the oppo-site ends of the spectrum using these rules. The first guy simply abused the rules, issuing orders that would
make any lawyer proud, with enough loopholes to cover everything from a rear guard action to a major attack! The second guy just didn’t pay atten-tion to the orders and did whatever he wanted to each turn, always claiming that he forgot, didn’t under-stand, or that he was trying to make the game more interesting!
At yet another convention I was tasked with running some The Sword & the Flame games. At one of them a gam-er joined the game just as we were about to start and was there just in time for the rules explanations. The game was set in the early Sudan campaign and featured a few units of British and Egyptians going up against the Dervishes. I suspected that there might be trouble when he kept ask-ing about grenadiers forming up on the right and front to flank maneuvers.
The game started and he kept trying to form tightly packed attack columns for what was a skirmish game. The other gamers and I tried to gently help him by explaining things, but he wanted no part
of it. He aimed for the largest part of the Dervish force and shoved off in Napoleonic attack columns with the figures that he thought were painted best as the grenadiers formed up on the right wing! His forty men in two attack columns charged into about 120 Dervishes, were surrounded, then wiped out to the man. He stormed
off complaining that was the worst Napo-leonic game he had ever played in!
Then there are the gamers who just can’t take a hint. We had been contacted by some local gamers who were interest-ed in trying out our club, so they came over for a 15mm Battles For Empire co-lonial game. They didn’t cause any prob-lems and seemed like OK guys. After the game they were excited and explained that next time they would bring over their large collection of colonials and add it to ours. When I asked them who made their miniatures they said, “ESCI”. Uh oh. I explained that those were 20mm, not
15mm, plus their bas-ing wouldn’t be the same as ours. They said that was fine as they didn’t paint theirs or have them based anyway! They then showed us their home grown colonial rules, which were a cross between 54mm skir-
mish and toy soldier combat from the H.G. Wells era! Suffice to say, things didn’t work out and we never saw them again.
This happened a year or so later when we were contacted by a guy who had seen our web site and joined us for a game. This first visit went fine, but then he started calling me and others all the time about gaming stuff and his ideas. The weird thing was that it seemed as if he had fallen off the planet for about 20 years. All of his ideas, comments, sug-gestions, etc., were based off of things from 1978-1982! There was no mention of anything gaming related from 1983-2008, which was then the current year. When I pointed out new revisions of rules, miniatures that were now out for certain periods (instead of converting things), and so on, he pretended like he didn’t hear me. Weird.
Needless to say, this didn’t end well. He was frustrated that we didn’t want to do any of his gaming ideas, which were impractical and based on things we couldn’t even find any longer. He also had a penchant for “fudging” movement, tracking sheets, etc., and the club quickly grew tired of him. Yet, somehow these people live on longer in our memories than most of the games we played!
Page 10
Memoirs of a Miniatures & Board Wargamer Pt. 24
NEWSLETTER TITLE

VOLUME 1, ISSUE 1
When thinking about wargames that I’ve had fun playing my mind always seems to go back to the 70s and 80s when there were a lot of NATO vs. Warsaw Pact games about. While many of them have not aged well, had clunky systems, below average components, etc., some of them were pretty good games. One of them was NATO by Victory Games and I had a chance to pick up a copy recently (I sold mine in the great WWIII game purge in the mid-90s!) so I could give it one more spin.
Armed with my tenth or so re-reading of Sir John Hackett’s great Third World War books and the excellent WWIII al-ternative documentary on YouTube (features a NATO drive on Berlin after a Warsaw Pact attack) I sat down with the
game to get ready to play.
The map is pret-ty good by 80s standards and it’s a shame that Victory Games didn’t last longer than they did as many of the games that they made are still well thought of today.
The one odd thing is that it covers from Denmark in the north to about half of Austria in the south. Yes, there’s no Nor-way, Italy, drive to the Med, or invading England as the game focuses on the main attack to possibly reach the Rhine. The rule book was written in that love it or hate it style that VG had with the rules in one column and the notes/side explanations in another. I didn’t have too many problems with it, but I could see how others would not care for that kind of layout. Finally, the counters are a mixed blessing. While they are certainly colorful and enable you to pick out the various formations easily, the font is pretty small and it can be
hard to read the set up and rein-forcement hex numbers at times on the counters themselves. Over-all, the components are pretty av-erage, especially by today’s stand-ards.
You get three scenarios with the game which portray different types of attacks into Western Eu-rope. There is a Strategic Sur-prise, Tactical Surprise, and Ex-tended Buildup type scenarios, all with their own advantages and
disadvantages for both sides. The sys-tems are pretty basic and if you have experience with classic hex and counter type games you should be able to get into this game with few problems. The only differences are chemical weapons, the use of airstrikes, zones of control and delay, plus a few other odds and ends. The best way to get going is to set up a scenario, then slowly walk through the first turn as the sequenced of play is quite long. Once you’ve finished a few turns and get used to the system, the turns go by pretty fast.
Two of the most interesting aspects of the game are the use of Offensive Sup-port chits which give certain HQs each turn the ability to have their combat units strength double for attack that turn. There’s some interesting strategies here as the Warsaw Pact forces only start with three of these (NATO only gets one all game), so choosing where to mass an attack with this support is critical. The other interesting aspect is the use of chemical and nuclear weapons. Chemical weapons give the Warsaw Pact forces huge advantages the first few turns they
are used, but at a cost in victory points. Nuclear options can rapidly escalate to end the game and in my opin-ion should best be avoided!
For my replay I chose the Tactical Sur-prise scenario where NATO forces are on alert, but not fully de-ployed. This finds US V and VII Corps ready,
the British I Corps moving up, and the various West German corps spread out over the countryside and moving into blocking positions. The Russians and Warsaw Pact forces look formidable and they are, but good use of terrain by NATO forces near the border areas can severely attrite the attacking forces. Den-mark gets overrun by a deluge of airborne and marine forces, with little that can be done about it.
On the southern front the West Ger-mans and US VII Corps are in good posi-tions and will be tough to push back. This means that the main Warsaw Pact thrust usually occurs in the center and the north, which is where most of the action will be. Most games feature a series of desperate attacks and defense moves in this area as one mistake and the whole thing can come to an end for one side or the other. The combat results table is pretty bloody and both sides get severely worn down by attrition. In some games the Warsaw Pact forces flood across the Rhine while in others I’ve seen NATO holds and counterattacks into East Ger-many and Czechoslovakia.
I still think that this game deserves some merit, despite the alternative history premise for a war that never happened. I take issue with the ratings assigned the US forces as they should be much higher and I think chemical weapons would affect both sides, not just the NATO side. It would be interesting to see someone come up with a new set of counters using modern printing techniques as there is some good game play here. I’m not sure how many times this will hit the table in the future, but for a few days it was fun reliving the late 70s/80s WWIII gaming era.
Page 11
Blast From The Past Pt. 23: Victory Games’ NATO

As many of you know who have been reading this magazine for awhile, we have a Warmaster Ancients tournament at the end of the year. We usually pick a date, go to lunch or dinner, then play three games each in the tournament. It’s a great time, we get in some interesting battles, and it has proven to be a lot of fun for all involved.
The format is quite simple as we usu-ally only have four players each time. Each player is matched up against one of the other players in a round robin type tournament, which means three games each. Victory is determined by breaking your opponent’s army or in the case of elapsed time (games can go anywhere from 6-8 turns) by casualty points. In
case of a tie, then the player with the highest casualty points inflicted is declared the winner. We also give out a Master of Mayhem award to the player who caused the most cas-ualty points over the tournament.
We’ve experimented with differ-ent sized armies the last few years,
but this year we went with 750 point armies plus a free general. Each player also starts our with three free territories from the campaign system in the second Warmaster book, which gives players additional units. When all is said and done, each player generally has between 14-20 units, which is perfect for getting in games under 90 minutes, which is our goal. Once a game is done, the winner can either roll up a new territory or take one from the loser, but everyone still needs to have three territories for the
beginning of the next game.
For this year we again had an unusual selection of armies, going with Assyrians, Hittites, Early Crusaders, and Late Ro-mans. Naturally, the ahistorical match ups are very interesting, often pitting forces against each other that you don’t see every day. This often causes a re-thinking of usual tactics, which is a re-
freshing change and keeps everyone pay-ing attention during the tournament games! It’s also pretty hard to come up with an army list that will be able to com-pete against vastly different opponents in each game. You may design your forces to compete against a heavily armored opponent like the Successors, then find yourself greatly outnumbered by large numbers of Hittites that come at you in waves!
There were some great battles during the tournament, which included a true “to the death” type struggle between the As-syrians and the Hittites. The Romans and Early Crusaders never really got going, even when they played each other! I’ve had those kind of days in this tournament, but usually with my Indian army! The day definitely belonged to the chariot era armies as in the end the Hittites won the tournament with the Assyrians a close second. The Hittites, who had been in the tournament for the last few years, but never did much of anything, really tram-pled over everything in their path this year. Everyone took note that maybe the trend for next year is to find an army that will give you a ton of units and just try to overwhelm the opponent!
Overall, it was another good tourna-ment and a fun time for all. We pretty much have this format down and were able to complete all of the games, set up, take down, etc., in just under five hours. If you have not tried a club tournament then by all means you should really try to organize one and choose a game that the club knows well. It is definitely worth the effort as you get some very interest-ing games that you would not ordinarily see on your regular gaming night.
Page 12
6th Annual Warmaster Ancients Tournament
NEWSLETTER TITLE

VOLUME 1, ISSUE 1 Page 13
Overwhelmed? Editorial
You could say that 2013 was a productive year for our group (and myself in some ways) in terms of gaming new products. For new miniatures rules we tried Firefight Nor-mandy, I Ain’t Been Shot Mum 3, Battles For Empire II, Guns at Gettysburg, and Ronin. For new board games either the group or a few of us tried the following new games; Mr. Madison’s War, Pursuit of Glory, Bloody April, Roads to Mos-cow, The Supreme Commander, Sword of Rome, Case Yellow, Fading Glory, Breakout Normandy, Heights of Courage, and many more. This also should include the hybrid games Sails of Glory and X-Wing (I’ve still yet to try this!). Now, you’re probably asking yourself, “How many of those did you play a second time?”
Ouch. The truthful answer is not many. In fact, a few of my group have played X-Wing a few times, we tried Ronin and ISABSM3 twice, but that’s about it. In fact, “one and done” seems to have been our theme for the past year. This leads to another interesting question in that is this good or bad/? Are we wasting our time learning new things, spending too much money on new games, or is it the simple fact that we can’t avoid “shiny new things?”
The answer to the first and second questions is maybe, while the third is a definite yes. There are so many products coming out so fast, that at times it feels that you are being overwhelmed. For every gamer who has fiscal discipline or who stays true to the few periods that they continuously play over the years, I’ll show you a gamer who has bought every sin-gle rules set that came out last year! Now add this to the group dynamic where you have several individu-als and you have quite the gaming agenda. So, is this a perplexing problem or not?
Granted, for many gamers who email me about this magazine and what they like about our group, namely all the games that we play, this kind of a situation is paradise! But is it, real-ly? While we definitely have the financial re-
sources to buy all of these products, take the time to try them all, and generally have fun (probably the most important aspect of them all), where is all of this going?
First, you need to consider the time element. For our IABSM 3 game, for example, the rules needed to be purchased, read, cheat sheets pre-pared, etc., then you need to ex-plain to everyone how the game works. Fortunately, I had a large force of early war Germans, but I spent two months painting up Rus-sian infantry and tanks for the games. We play the game twice and then that’s it. Now I spent well over $200 on rules and figs, plus my painting time, plus learn-ing and teaching the system, only to play it twice in one month and now it may never get back on the schedule?
Then there’s the confusion aspect and although it may be because we’re getting up there in years, we seem to have a real-ly bad problem in not remembering rules or confusing them with other rules! When you’re playing this many games it really turns into a challenge to remember the rules clearly and how things work during a game. I can remember when I was trying to teach everyone IABSM3 while I was at the same time preparing for an upcoming Battles for Empire II
game, learning Case Yellow to teach another gamer, plus I had just bought an old copy of SPI’s Seelowe and had that set up on my gaming table! Little won-der that I spent most of the night refer-ring back and forth in the rule book during the game that night!
I can remember a long, long time ago when a new set of rules came out or the gaming group decided to go in a new direction. Most people would buy the
rules, we would paint up the armies, talk about things at the local store or on the phone, then play the heck out of that game for several months. By that time everyone knew the rules pretty well and by the time you were ready to move on to something else, you at least had a pretty good sense of accomplishment.
Fast forward to today where for many of our new games it’s almost a surprise if anyone else in the group even owns the rules! This does make it hard in that you are basically relying on one person to learn the rules, prep the game, teach eve-ryone how to play, then run the game. Also, and this can’t be stressed enough, there’s no incentive for most people to
buy the rules for two rea-sons. First, what are the chances that the group will ever play it again? Second, there are so many other rules sets and new periods coming out, why would you want to get stuck playing something that you’re really not in-terested in?
This, in essence is a blessing and curse within
the hobby. Unlike in the 70s, 80s, and early 90s where new rules and figure lines came out in terms of years between each other, we are today fed a continuous conveyor belt of products along with marketing for said products. I’ve talked about this several times in previous edito-rials, but in my mind nothing has changed. In fact, I think it’s gotten worse. It’s great to have 100 sets of beautiful looking Napoleonics or An-cients rules available, but good luck find-ing someone else in your area who shares your love for a particular set! Also, it can be a challenge even finding those who are interested in trying a new set out. After all, the person who you’re talking to probably already has a dozen other rules sets that they can’t find someone to play with, so why should they be interested in yours?
This definitely needs more thought, but we’ll see what transpires here in 2014.

I will admit that I’m not a very good Paths of Glory (POG) player, having lost pretty much every game I’ve ever played of it! However, that doesn’t stop me from acknowledging that it is one of the greatest wargames ever made and very challeng-ing. When I saw that a version of the game was coming out for the Middle East during WW1, I was ini-tially cool to the proposal as I was frus-trated by POG and didn’t want to get something else with the same system until I fully grasped the original system. So, I received this for Christmas and after watching the restored version of Law-rence of Arabia on TCM, I decided to dive right in and get started with it.
First, the map is a thing of beauty, even if at first appearance it appears to be cluttered. It uses the standard POG terrain for mark-ing spaces, forts, etc., but there are a lot of new types of areas that in-clude off map boxes and far more tracks than on POG. Then you glance at the counters and see all of the various markers for events, unrest, beachheads, etc., and you start to think that this may be a little more involved than what POG is. Finally, you pick up the rulebook and playbook which con-firms your suspicions that this is going to take a little more work than POG did!
In fact, they’ve enclosed a fold out card for first time players new to the sys-tem and for those who have played POG. There is also a fold out card for the vari-ous units and just by looking through the various components you can see that it is based upon POG or Shifting Sands, but probably closer to Triumph of Chaos (which uses the POG system) in terms of complexity. I did a cursory reading through the rules and noticed that while it was basically the POG system, there were pages and pages of special rules that
would be impossible to memorize, so I decided to just set up a solo game (not easy with card driven games) to get the hang of it before I tried a face to face game.
Pursuit of Glory is a card driven wargame, or CDG, where the cards can be used for operations (movement and combat), replacements, events, or to strategically reposition forces. This is where the decision making is so
different than in other war-games. Cards can only be played for one thing each ac-tion round (six in a turn), so there are some agonizing choices that need to be made on a continual basis. Does this card need to be played for the event to bring in extra forces? Should it be used to repair all of the damaged units on a par-ticularly front? Could it be used to move units and coun-
terattack in a sector, or to bring in re-serves from another front. These questions and others come at you continuously, so if you’re use to standard hex and counter games you’re in for a shock.
Movement and combat, however, are pretty standard, it’s just that you can only do
these things if the units are activated, which means using a card for Ops. The issue here, however, is that most cards are rated from 2-4 for Ops, so you won’t be moving too many forces each round. Again, card management, having a plan for the turn, etc., can go a long way into getting the most out of your forces each turn.
Something else that complicates the game is the unusual situation in this part of the world during WW1. Not only do you have the Turks and the Russians fighting it out, but the British and their allies on the opposite end. Throw Greece, Serbia, Romania, and Bulgaria into the mix along with various tribes, potential uprisings, a large number of unusual units, etc., and you have quite the mess. In fact, trying to make heads or
tails out of what is hap-pening is going to be a challenge! I’m not say-ing this in a bad way, but it is difficult to say the least in trying to plan when bizarre events and situations are continually occurring!
My feelings after playing this game is that it is not for everyone and many Paths of Glory gamers are not going to get invested in this as
well. The reasons are many, but the big-gest is that there are a lot of special rules and you will spend a large amount of time in your first few games just trying to find things in the rules. In fact, I think I spent more time learning about the vari-ous events and how to play them then I spent on strategy! There are so many fires to put out across the board that it makes focusing on one area difficult to say the least and at times you feel that the game is playing you rather than you play-ing the game. This is, however, a prob-lem that you see in many card driven games where there simply aren’t enough cards to do all the things you want to each turn. The problem with this game is that it seems magnified by at least a fac-
tor of two or three!
Overall, it is a beautiful game on a very interesting situation and it does play well, despite the requirement to constantly check the rules. Whether or not you want to invest the time in this game is the big question. If you liked Paths of Glory you should give this a try, but you will need patience as there is a lot of ground to cover. Also, if you like chaos in your games then this is right up your alley.
Page 14
Pursuit of Glory by GMT Games Game Review
NEWSLETTER TITLE
VOLUME 1, ISSUE 1
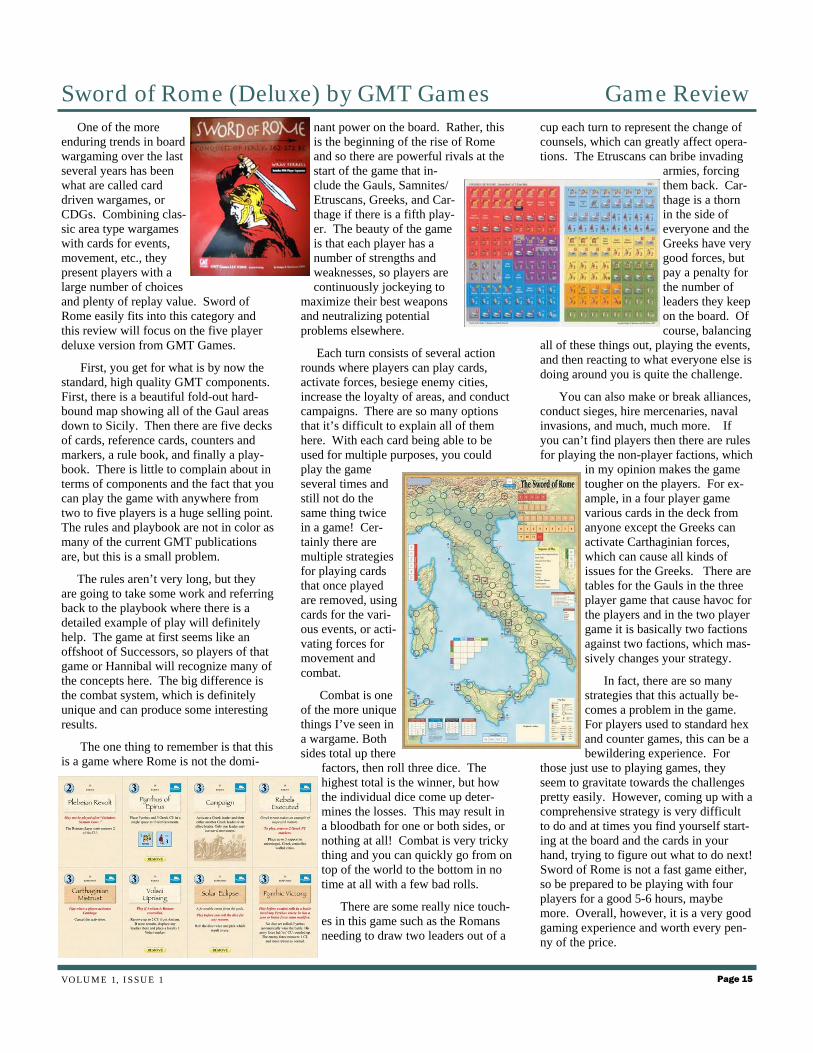
One of the more enduring trends in board wargaming over the last several years has been what are called card driven wargames, or CDGs. Combining clas-sic area type wargames with cards for events, movement, etc., they present players with a large number of choices and plenty of replay value. Sword of Rome easily fits into this category and this review will focus on the five player deluxe version from GMT Games.
First, you get for what is by now the standard, high quality GMT components. First, there is a beautiful fold-out hard-bound map showing all of the Gaul areas down to Sicily. Then there are five decks of cards, reference cards, counters and markers, a rule book, and finally a play-book. There is little to complain about in terms of components and the fact that you can play the game with anywhere from two to five players is a huge selling point. The rules and playbook are not in color as many of the current GMT publications are, but this is a small problem.
The rules aren’t very long, but they are going to take some work and referring back to the playbook where there is a detailed example of play will definitely help. The game at first seems like an offshoot of Successors, so players of that game or Hannibal will recognize many of the concepts here. The big difference is the combat system, which is definitely unique and can produce some interesting results.
The one thing to remember is that this is a game where Rome is not the domi-
nant power on the board. Rather, this is the beginning of the rise of Rome and so there are powerful rivals at the start of the game that in-clude the Gauls, Samnites/Etruscans, Greeks, and Car-thage if there is a fifth play-er. The beauty of the game is that each player has a number of strengths and weaknesses, so players are continuously jockeying to
maximize their best weapons and neutralizing potential problems elsewhere.
Each turn consists of several action rounds where players can play cards, activate forces, besiege enemy cities, increase the loyalty of areas, and conduct campaigns. There are so many options that it’s difficult to explain all of them here. With each card being able to be used for multiple purposes, you could play the game several times and still not do the same thing twice in a game! Cer-tainly there are multiple strategies for playing cards that once played are removed, using cards for the vari-ous events, or acti-vating forces for movement and combat.
Combat is one of the more unique things I’ve seen in a wargame. Both sides total up there
factors, then roll three dice. The highest total is the winner, but how the individual dice come up deter-mines the losses. This may result in a bloodbath for one or both sides, or nothing at all! Combat is very tricky thing and you can quickly go from on top of the world to the bottom in no time at all with a few bad rolls.
There are some really nice touch-es in this game such as the Romans needing to draw two leaders out of a
cup each turn to represent the change of counsels, which can greatly affect opera-tions. The Etruscans can bribe invading
armies, forcing them back. Car-thage is a thorn in the side of everyone and the Greeks have very good forces, but pay a penalty for the number of leaders they keep on the board. Of course, balancing
all of these things out, playing the events, and then reacting to what everyone else is doing around you is quite the challenge.
You can also make or break alliances, conduct sieges, hire mercenaries, naval invasions, and much, much more. If you can’t find players then there are rules for playing the non-player factions, which
in my opinion makes the game tougher on the players. For ex-ample, in a four player game various cards in the deck from anyone except the Greeks can activate Carthaginian forces, which can cause all kinds of issues for the Greeks. There are tables for the Gauls in the three player game that cause havoc for the players and in the two player game it is basically two factions against two factions, which mas-sively changes your strategy.
In fact, there are so many strategies that this actually be-comes a problem in the game. For players used to standard hex and counter games, this can be a bewildering experience. For
those just use to playing games, they seem to gravitate towards the challenges pretty easily. However, coming up with a comprehensive strategy is very difficult to do and at times you find yourself start-ing at the board and the cards in your hand, trying to figure out what to do next! Sword of Rome is not a fast game either, so be prepared to be playing with four players for a good 5-6 hours, maybe more. Overall, however, it is a very good gaming experience and worth every pen-ny of the price.
Page 15
Sword of Rome (Deluxe) by GMT Games Game Review

We had not had a chance to play Blitz-krieg Commander 2 in quite some time, so for this occasion I decided to go all out. Instead of our usual thrown together at the last moment type of scenario, this one would be quite involved and some-thing far different in terms of what we usually do with this set of rules.
I had been re-reading Zhukov at the Oder, which is about the final Russian drive to take Berlin from January of 1945 to the end of the War in May of that same year. When the Russians reached the Oder they had basically outrun their sup-plies, units were spread all over the place, the air units had no bases near by, and a host of other issues. Still,, they pressed on and created bridgeheads wherever possible. The Germans, quite naturally, tried to counterattack and drive them back across the river, but were plagued by lack of fuel and ammo, a large number of hastily thrown together units, and no real plan at this stage.
Some of the fiercest fighting occurred outside the fortress town of Kustrin. The Russians eventually surrounded the town and overwhelmed the defenders, but not before several large German counterat-tacks to reopen the corridor to the town had occurred. This scenario would repre-sent one of those attacks and although there was info on the larger combat for-mations in the area, everything else re-
garding unit compo-sition at this stage is just guesswork.
As you can see from the Google Earth map I created of the area (not much has actually changed there since 1945) there isn’t a lot of cover from Golzow (the Ger-man assembly area) to Golgast, which is the town on the road to Kustrin, which itself sits astride the Oder River. This would be a night attack and the objective is for the Germans to seize the areas on the map designated by a gold star by daylight or they would be inviting targets for the Red Air Force as well as all of the artillery near the Oder.
Both the Russians and the Germans, however, had other problems as well, namely that the forces on hand would not accomplish the mission. The Germans would have to stage their reinforcements in assembly areas and the Russians would be bringing units in over the river ice and makeshift bridges. It would definitely be a race to see who could get enough com-bat power at a few decisive points on the
board to make a difference to win the scenario.
I did a bit of research and found that the sunrise in Germany at that time of year is right about 6am and the scenario would begin at 3am. BKC 2 has a flexi-ble time scale, so for this battle I assigned twenty minute turns, which meant the Germans did not have a lot of time to accomplish their objectives. Night fighting in BKC 2 infers a –1 command penalty (which is a lot in this game) and visibility would be 40cm as it was a 3/4 moon phase.
The Germans had one infantry battal-ion holding Golzow, (cont. on p. 17)
Page 16
BKC2: Night Attack on the Oder Battle Report
NEWSLETTER TITLE

VOLUME 1, ISSUE 1
(cont. from p. 16) but all of their other forces had to arrive in staging areas for the attack. Their were three staging are-as; the first in the lower section of Gol-zow, the second in the northern section of the town, and third on the other side of the river above the town. The Germans first placed their units in the staging areas (off board), the rolled a D6 to see if they arrived at 3am, needing a 6 to show up. If not, each turn there was a +1 die roll modifier until all the forces arrived. There were some decisions to be made about where to stage units and what to do if not everyone showed up!
The Germans had the following forces for the attack:
Heavy Tank Battalion-3 Tiger I
Attachment-1 Tiger II
SPG unit-4 Stug III
Tank Hunting Unit-3 Jgpz IV
Panther Battalion-5 Pz V
Panzergrenadier Battalion-10 Sdkfz 251, 7 infantry stands, 1 HMG, 1 mortar, and 1 75mm AT gun.
Pz IV unit-4 Pz IVH
Support-1 FAO w/3 batteries of
105mm artillery, 1 Sdkfz 251/22, 1 Sdkfz 251/8, 1 combat engineer stand, and two trucks with HMGs and mortars.
The Russians had a full strength infan-try battalion in Golgast, an understrength infantry battalion guarding a factory north of the town and covering that ap-proach with two 76mm infantry guns, and
there was one infantry battalion in trucks positioned as a reserve near the pontoon bridge that could react to the German direction of attack. The Russians also had 30 inches of minefields (depth of 5cm) that could be laid out up to 10cm from their starting positions. There was a Russian FAO with access to three batter-ies of 122mm artillery.
The Russians also had reinforcements coming over the river ice and makeshift bridges that would be rolled for. At the end of each turn the Russians would roll 5D6 and each 6 rolled allowed them to choose one vehicle or command stand that would arrive on the road outside the town. The units available were:
Twelve T-34/85s and two command stands.
Three Su-100
Four SU-76s and one command stand.
At 6am (when daylight appears) the Russians would get to roll 2D6 each turn and each 6 rolled would result in a Sturmovik air strike. Also, an additional 2D6 would be rolled and a 6 on either would result in a battery of 122mm rock-ets and three batteries of 152mm artillery becoming available for (cont. on p. 18)
Page 17
BKC2: Night Attack on the Oder (cont.) Battle Report

(cont. from p. 17) that turn. In other words, if the Germans weren’t under cover by daylight, bad things were going to happen to anything in the open!
The German objectives were to seize the two crossings on the map, the center of Golgost, and the factory on the other side of the branch of the Oder River as well as the woods on the opposite side for cover and as a staging area for an attack towards Kustrin later on. The Russians needed to hold on to Golgast, then coun-terattack and seize the marked objects on the map in Golzow.
The game began with the Germans only getting the Panther battalion at the start of the game. They decided to take this and the overall commander, then plunge down the table. This was joinded
next turn by the panzergrenadier battal-ion, but the rest of the German forces were already two turns late into their assembly areas. By the 4am turn the Germans made their first rush at Golgast and promptly ran into a minefield. A group of T-34/85s counterattacked and it looked like ti might be a short game!
However, the German attack and the Russian problems were just beginning. First off, the Russian FAO blundered, then the T-34s were knocked out in a brutal, close range slugfest. The pan-zergrenadiers then tried to rush the road leading into the town and ran into another minefield. The Russians unloaded MGs, infantry fire, and mortars into the Ger-mans, but they had little effect. The re-maining German forces were making
their way towards their objectives, but kept only getting one good command roll a turn. The –1 modifier because of the night and the 40cm visibility meant that the Germans could not use their superior long range fighting capabilities.
The Russians did not receive any rein-forcements for two consecutive turns, so the mech infantry battalion was commit-ted to the defense, crossing the pontoon bridge and taking over the northern area of the town. They arrived just in time as the Germans launched a major attack against the western side of the town, gaining entrance to two of the blocks and forcing the Russians to counterattack.
By this time more German units were arriving, but bad command rolls prevent-ed them from being (cont. on p. 19)
Page 18
BKC2: Night Attack on the Oder (cont.) Battle Report
NEWSLETTER TITLE

VOLUME 1, ISSUE 1
(cont. from p. 18) deployed effectively. The Russian FAO blundered again, send-ing a barrage down upon his own troops! The King Tiger and Tigers rolled up and began to engage the Su-100s that had just arrived and were blocking the northern end of the town near the factory.
The Germans continued the attack, using a combined arms assault and slow-ly, but surely securing the town, despite a high number of casualties. The Panthers got across the river and engaged some blocking T-34s, but knocked those out as well, then came under fire from the re-cently arrived SU-76s. The Russian FAO tried once again and amazingly, rolled a D12 for another blunder! Every time the Russian artillery could have been deci-sive something bad happened and no artillery arrived.
The Germans now consolidated the position, clearing the remaining re-sistance in the village and pouring more Panthers across the bridge. Two SU-100s were burning and more German armor was moving to circle around the river and towards the factory. Even with two turns past daylight the Russians could not roll any airstrikes, additional artillery, or rein-forcements. At that the game was called a German victory.
It was a fun and exciting scenario that saw plenty of heavy fighting around the town. The night rules definitely made things interesting for both sides and the assembly/staging areas for the Germans did a good job of simulating trying to move forces around for a counterattack at a specific time. Both sides made poor use of their artillery and the Germans
never even got close to 75% of their en-tire force engaged due to traffic jams, bad command rolls, and time delays.
For the Russians not much went right. The FAO will be shot at sundown, the first T-34/85 counterattack did not go well, and the die rolls for additional units, air strikes, etc., were pretty bad. The initial defense held up well, but the sup-porting cast let the town’s defenders down and this resulted in a loss.
Overall, it does show that a well pre-pared scenario is worth the time and ef-fort. Of course this isn’t going to happen all the time, but it was great playing over real terrain and in a historical situation, especially with a different ending as his-torically the German counterattacks all failed in one form or another.
Page 19
BKC2: Night Attack on the Oder (cont.) Battle Report
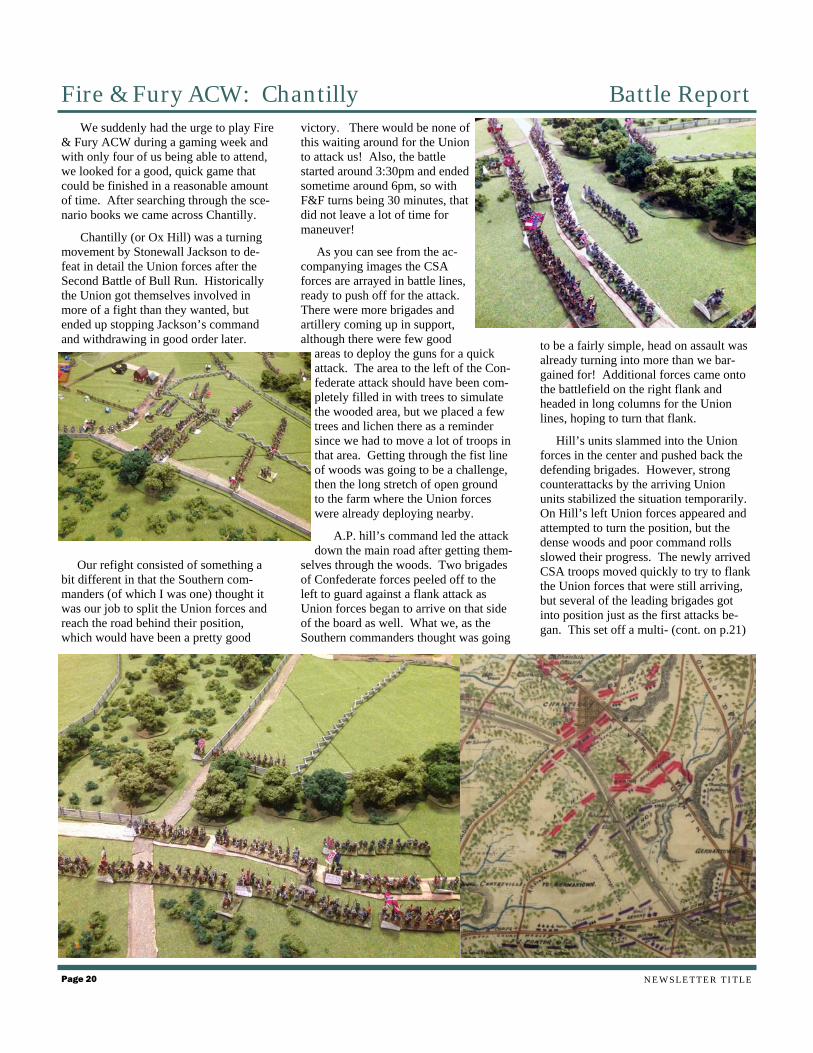
We suddenly had the urge to play Fire & Fury ACW during a gaming week and with only four of us being able to attend, we looked for a good, quick game that could be finished in a reasonable amount of time. After searching through the sce-nario books we came across Chantilly.
Chantilly (or Ox Hill) was a turning movement by Stonewall Jackson to de-feat in detail the Union forces after the Second Battle of Bull Run. Historically the Union got themselves involved in more of a fight than they wanted, but ended up stopping Jackson’s command and withdrawing in good order later.
Our refight consisted of something a bit different in that the Southern com-manders (of which I was one) thought it was our job to split the Union forces and reach the road behind their position, which would have been a pretty good
victory. There would be none of this waiting around for the Union to attack us! Also, the battle started around 3:30pm and ended sometime around 6pm, so with F&F turns being 30 minutes, that did not leave a lot of time for maneuver!
As you can see from the ac-companying images the CSA forces are arrayed in battle lines, ready to push off for the attack. There were more brigades and artillery coming up in support, although there were few good
areas to deploy the guns for a quick attack. The area to the left of the Con-federate attack should have been com-pletely filled in with trees to simulate the wooded area, but we placed a few trees and lichen there as a reminder since we had to move a lot of troops in that area. Getting through the fist line of woods was going to be a challenge, then the long stretch of open ground to the farm where the Union forces were already deploying nearby.
A.P. hill’s command led the attack down the main road after getting them-
selves through the woods. Two brigades of Confederate forces peeled off to the left to guard against a flank attack as Union forces began to arrive on that side of the board as well. What we, as the Southern commanders thought was going
to be a fairly simple, head on assault was already turning into more than we bar-gained for! Additional forces came onto the battlefield on the right flank and headed in long columns for the Union lines, hoping to turn that flank.
Hill’s units slammed into the Union forces in the center and pushed back the defending brigades. However, strong counterattacks by the arriving Union units stabilized the situation temporarily. On Hill’s left Union forces appeared and attempted to turn the position, but the dense woods and poor command rolls slowed their progress. The newly arrived CSA troops moved quickly to try to flank the Union forces that were still arriving, but several of the leading brigades got into position just as the first attacks be-gan. This set off a multi- (cont. on p.21)
Page 20
Fire & Fury ACW: Chantilly Battle Report
NEWSLETTER TITLE

VOLUME 1, ISSUE 1
(cont. from p.20) turn battle where the Union not only held on, but counterat-tacked, driving the leading CSA units back onto their supports.
In the center Hill’s command pushed forward again. With little to no room to maneuver, the attacks went straight ahead, grinding down the defending Un-ion forces, but taking a toll on the attack-ers as well. With no room for artillery to deploy and being almost impossible to pass forward fresh troops, there was a series of attacks and counterattacks as both sides jockeyed for position.
Finally, and just for a moment, there was a breakthrough. Two of Hill’s bri-gades smashed through the defenders and the way seemed clear to the Union rear and splitting the enemy forces into two.
However, the last Union reserve was sent forward and it blocked the advance of the victorious Confederates. There were another two assaults to break this unit, but both failed and with it the end of the game. The Union was now counterat-tacking across the length of the board and there was no way that the Confederates were going to reach the Union rear in the time remaining. Still, they gave it one more go, but the leading brigades had been fought to the point of exhaustion and could not force their way through. With that the battle ended as a Union victory.
It had been a close run affair and the short time limit was a major obstacle to the Confederate attack. With no time to get artillery into position to hammer some
of the defenders, then attack, it was left to the infantry brigades to force the action. The restrictive nature of the terrain also played a huge part in the failure of the attack. Both sides knew where the main effort would be made and the defenders were able to concentrate there. Even with those disadvantages, the South side did have their chances, but could not capital-ize at the right time in the game.
Overall, it was a very good and well fought game with plenty of excitement. Both sides played very well in both attack and defense, making it one of our closest and most bitterly fought contests in quite some time! It does show you that you can still have fun doing small, short bat-tles with large scale rules such as Fire & Fury as well as Age of Eagles.
Page 21
Fire & Fury ACW: Chantilly (cont.) Battle Report

Sea Lion is the sixth supplement for the Combat Com-mander series and it is not a standalone games as you need both CC: Europe and CC: Med to play. The package in-cludes five new dou-ble-sided maps and ten new scenarios, but no new counters are provided. My guess is that is to save costs, but I think many gamers, including myself, would have paid a bit extra.
For those familiar with Operation Sea Lion, this is a package of maps and sce-narios for a hypothetical German inva-sion of England set in 1940. Although the subject has been popular with war-gamers for quite some time, most games, scenarios, etc., don’t follow a standard narrative. CC: Sea Lion, however, fol-lows a narrative through the scenarios and this is where some gamers may have some issues with this supplement.
First, the scenarios begin with an air-borne attack against scattered British forces. Then comes an attack against the docks and port facilities at Portsmouth, followed by fighting in London itself. There are then scenarios covering Fascist uprisings, partisan warfare, British coun-teroffensives, and finally American inter-vention. The scenarios follow the stand-ard CC template and are well done, with a few new wrinkles here and there in the special rules to cover the invasion.
We’ve tried a few of the scenarios so far and they have been very good and definitely a change of pace from the usual WW2 fare. Both games went down to the wire, so in our estimation the scenar-ios are pretty balanced, but I have no idea how long they were playtested or whether or not our experience will be the norm for everyone else.
This does, however, call into question the narrative used and the scenarios cho-sen for this supplement. My own view is that there are not enough “invasion” type scenarios where German airborne forces are trying to seize bridges, where are the assaults on RAF airfields, counterattacks against beachheads, etc.? Good question. Instead, you’re left with what feels like ten scenarios culled from a 50 scenario package, meaning that you seem to be playing parts of a larger whole. It’s not
that bad, but it does make you wonder .
Hopefully there will be more scenarios in the GMT C3I magazine that fill in these gaps as this is an interesting topic. Overall, I think it is a good supplement and well worth the money, espe-cially for the new maps. However, you have the feeling that it could have been much, much more.
I had already painted quite a few units for F&F ACW using Blue Moon 15mm figures, so I pretty much knew what to expect. The figures are sold 30 to a bag and if you belong to the Old Glory Army with a 40% off discount, it puts them mat just under $10 a bag, which is a great deal.
The figures are well proportioned, although they are closer to 17-18mm than they are 15 and will definitely be larger if
you use Peter Pig or any other company that has true 15mm sizes. The sculpting is well done, clean, and the figures are de-signed to be painted en masse. By that I mean that there is not so much detail that it will take you hours to fin-
Blue Moon (sold through Old Glory 25s in the U.S.) has begun releasing a large number of packs in 15mm for the Victorian Colonial period. So far there are quite a few packs for both the North-west Frontier and the two major cam-paigns in the Sudan. Since I have quite large forces in 15mm for the Early Sudan period I thought it would be a good idea to order in some figures and see how they fit with Old Glory and Essex 15s.
ish each one. Rather, there is a minimum of equipment and accesso-ries on them, so you can paint up large units very quickly.
There are already quite a few offerings for the Sudan, ranging from Egyptians to Camel Corps to artillery. I’ve purchased several packs of early British advancing, command, Indian infantry, and Dragoons/Hussars. All are well done with minimal clean up and can be ready for primer in no time at all. A wide variety of artillery just came out and Blue Moon seems com-mitted to expanding this range. Overall, a great start and a good range if you are thinking about getting into this period.
Page 22
Combat Commander: Sea Lion by GMT Games Game Review
15mm Blue Moon Colonial British Figure Review
NEWSLETTER TITLE
15mm Blue Moon British with an Essex mounted officer.

VOLUME 1, ISSUE 1
A fascinating period of WW2 history is the Battle for Berlin in the spring of 1945. While most books focus on either the fight for the city itself or in the case of The Last Battle by Cornelius Ryan, the drive by the Allies across Germany in those fateful months.
With Zhukov at the Oder, author Tony Le Tissier takes a very different path. Although the sub title of the book says “The Deci-sive Battle for Berlin”, there is actually very little about the fighting in the city itself. The contention is that once the Russians breached the Seelow Heights defenses everything else was just a matter of time.
The book begins towards the end of the destruction of Army Group Center, Russian forces are approaching the Oder quickly, but having problems of their own. Lack of fuel and ammo, units scat-tered about, and strong German for-mations still on the flanks of the main drives. Zhukov decides to go for the jugular and tries to cross the Oder on the run to initiate the final attack on Berlin. However, the reality on the ground dic-tates that this is simply beyond the capa-bility of the Russian Army at that time.
You also get the view from the Ger-man side as well, which includes the first counterattacks against Russian bridge-heads and the utter confusion about how Russian forces got there in the first place! You see the German high command try-ing to shift reserves, poorly coordinated counterattacks, and an unrealistic view of the situation.
From there the book switches gears, going into extensive detail about the Rus-sian build up for the final assault, which
would come a few months later. Zhukov continues to hammer the Germans where possible, trying to capture Frankfurt on der Oder and the fortress of Kustrin, plus expanding the bridgeheads.
It is this part of the book that I found fascinating, with endless operations to outflank the Ger-mans coupled with armored counterattacks by German pan-zer forces. The desperation on
both sides is show time and time again,, with the author doing a very good job of keeping the reader constantly updated on the overall situa-tion.
The operations then turn towards the Russian attack on the Seelow Heights and the German prepara-tions for the defense. This book definitely goes into far more detail than other books on this battle, inferring to the reader about the large scope of the operation and the many units involved. The defenses, which were quite considerable, are fully described as well as the planning by both sides.
Finally, you come to the brutal, no holds barred battle that was the attack on the Seelow Heights. With an artillery bombardment that was probably the most massive in history, the Russian forces pushed off into the teeth of the German defenses. The book now switches to actions at the platoon and company level where the Germans face off against a virtual horde of Russian infantry and armor. The failed Russian first attempts, desperate German counterattacks, and finally Zhukov throwing two tank armies into the swirling chaos on the Heights on the first day.
That the Germans held at all was a minor miracle, but soon cracks begin to appear in the defenses and the German shortage in manpower, armor, ammuni-tion, and the endless waves of Russians begins to take its toll. By the third day the situation is beyond desperate and the
book switches gears again, detailing the final Russian push as well as action on the flanks.
It is at this point that the book for the most part unfortunately comes to an end, although this author has several other books on the battle for Berlin. The au-thor’s point seems to be that once the main defensive lines were breached, the war was pretty much over, which it was. Berlin never became a Stalingrad, but unfortunately there were still several weeks of combat left and tens of thou-sands left to be killed before it was over.
I thought this was a very good book, although it can be a bit dry at times, especially detailing the oper-ations of most of the units involved. However, it was a very good insight into Zhukov’s operations and the overall battle on the Seelow
Heights.
For wargamers there is a depth of information here as well as numerous scenario ideas. In fact, the BKC 2 sce-nario in this issue is based upon some of the actions described in this book. The chaotic view of combat, how operations are coordinated, and differing objectives at times for both sides are here to give the wargamer another viewpoint in how their scenarios are conducted. You can easily find this book on the secondary market or through Amazon and the price is hard to beat. Highly recommended.
Page 23
Zhukov at the Oder Book Review

With all of the times that we’ve played Age of Discovery over the years, it’s surprising that we have rarely used the scenarios in the rules themselves. Well, this time we chose the scenario based upon Fornovo in 1495 with a force attacking across a fordable river along with a few modifications. I had created two different army lists; one based on armies from the 1525 (Pavia) period and one from the early French Wars of Reli-gion. I put it to a vote and the group chose the army lists from 1525.
The scenario was quite simple, but difficult in execution for both sides. A defending force is in place to protect a baggage train that is travelling along a road towards an exit in a mountain pass. The attacking force needs to cross the river and defeat the defending force. The river has no bridges, but is fordable. The issue is that a unit must move into the river, then roll a 1-3 on a D6 to find a crossing. Once a crossing is found, other units can move to cross in that same place after first having to stop in the river for a turn.
The French were the attackers and had the following forces:
5 units Swiss Pike
1 unit Gendarmes
2 units Archers (heavy cavalry)
3 units light cavalry
2 medium artillery batteries
1 unit of arquebus armed skirmishers
1 unit of arquebus
2 units French pike
The defending Imperi-alist forces were 25% smaller than the attack-ing force and consisted of the following:
3 units German pike
2 units Spanish pike
1 unit light cavalry
1 unit heavy cavalry/Gendarmes
2 units Spanish lancers
2 medium artillery batteries
1 unit arquebus skirmishers
In AOD you use a unique set up pro-cedure where each side breaks their forc-es up into three “battles” or divisions, then you roll on a chart that determines the order of placement. Unfortunately for the Imperialists this meant that they need-ed to place two of their three divisions first, so the attacking French had a good view of where the main defenses where going to be. This had the unfortunate effect of the Imperialists placing their heavy cavalry on the left flank when it would be needed elsewhere.
The Imperialist plan was to defend back from the river line, forcing the French to cross in a disorganized matter and then attack them hopefully driving them off before their superior numbers
could mass for a decisive push. The French, for their part, were hoping to find several crossings early in the battle, get across the river, form up, then attack en masse and carry the day.
The French left came into action first, finding a crossing early and getting two light cavalry units across before the Im-perialists knew what happened. When the French light cavalry charged and cleared the Imperialist left on Turn 3 it set off a panic in the Imperialist camp! The heavy cavalry on the Imperialist left turned around and moved across the front of the defense along with some of the artillery to shore up the right, which threw everything into chaos.
Meanwhile, the French were having a hard time getting across the river. Artil-lery, a counterattack by the (cont. on p24)
Page 24
AOD: Defense of a River Line Battle Report
NEWSLETTER TITLE

VOLUME 1, ISSUE 1
(cont. from p. 23) Imperialist arquebus unit, and repositioning of the Spanish and German pike kept the French busy. The Imperialist right flank finally straightened itself out when the French light cavalry had a catastrophic morale failure and fled back across the river. By this time the French heavy cavalry had crossed and moved out for the decisive action against the Imperialist heavies.
This battle went on for quite some time. The initial charge crushed the French gendarmes, who fell back on the archer units (basically heavy cavalry, but without the horse armor) for support. The Imperialist cavalry crashed into them during pursuit, but attrition began to take its toll. The ensuing melee, counterat-tacks, and more melee, ground down all
five units until there were barely any figures left in any of the units.
While all this was going on the Swiss finally got across the river, shook them-selves out into a line of battle, and ad-vanced. They were met by the German and Spanish pike, who got the better of them for the first couple of rounds. The game was hanging in the balance at this point as the troops on the flank had fought themselves out.
In fact, on the Imperialist left a French light cavalry unit had broken through and could take the baggage train at any time. The Imperialists were out of reserves and prepared for an all around defense if the light cavalry continued further. In the center the Swiss began to grind down the Germans and Spanish. After another few
round several of the Imperialist units broke and that was for all intentional purposes the end of the game. Both sides had suffered heavily and there were quite a few units in rout.
Another fast paced and exciting game from this colorful era. This was an unu-sual battle and full of drastic shifts of momentum. The large number of low morale grade troops on both sides meant that many ran away at the first opportuni-ty, often times carrying away others along with them! At the end of the day it was the heavy cavalry and pike units of both sides that determined the outcome, with several high casualty rate battles. Definitely one of the better Renaissance games that we’ve played and a change of pace for the set up and deployment.
Page 25
AOD: Defense of a River Line (cont.) Battle Report

We played two Renaissance battles right in a row, which shows that we really do like this period, even though no one has come up with any tactics that actu-ally work for it! There have been calls for quite some time to use my 128 figure Spanish tercio, so this was the chance to finally see it in action. Although we had used parts of it in an FOGR play-test a few issues back, this was our first time using it with the AOD rules.
This battle would be a head on affair, with both sides being about equal strength. However, the French definitely had the qualitative edge over the Imperialists, meaning that they would have to suffer almost 20% more casualties before withdrawing. The or-ders of battle were the following:
French
4 units of new Swiss-Grade 3
2 units of new Swiss-Grade 4
1 unit of French pike-Grade 2
2 units of Italian pike-Grade 1
1 unit of Gendarmes-Grade 4
2 units of Archers (heavy cav)-Grade 3
1 unit of mounted arquebus-Grade 1
1 unit of mntd. crossbow-Grade 2
1 heavy and 1 medium gun batteries
Imperialist
1 Tercio-Grade 2
3 units of German pike-Grade 3
2 units of Italian pike-Grade 1
1 unit German heavy cavalry-Grade 3
1 mounted arquebus unit-Grade 1
1 unit of Stradiots-Grade 2
1 heavy and 2 medium guns
The Imperialist were outnumbered in cavalry and with the village in the center of the board decided to anchor the ad-vance of the tercio on the right of the village. The other flank would have the Imperialist cavalry, a few pike units, and
some artillery. A smaller force was as-signed to watch the bridge in case the French tried to turn the flank from that side.
The tercio advanced as quickly as possible, trying to pull even with the vil-lage and protect that flank. At first the French were unsure about how to ap-proach the tercio as the masses of arque-bus arrayed on the edges of it looked daunting. The French cavalry charged the two medium guns, forcing the gun-ners to flee (one of the great things about these rules is how artillery is handled), but then the tercio opened fire and deci-mated one of the cavalry units.
The other cavalry units charged into the Imperialists, setting off a series of running battles that saw the Imperialist heavy cavalry defeated, but the light cav-alry did not fare so well and fled back towards the French camp. On the other side the Swiss moved up to the river and despite getting shelled, began to move across it to engage the units on that side of the Imperialist line.
Finally, the Swiss attacked the tercio and remarkably got past the firepower of the outer edges. Once inside the pike units
they began to grind down the Spanish pike. The other French pike units faltered, were blasted by the tercio, and fell back with a few in rout. This meant it came down to the Swiss vs. the Spanish and the Swiss prevailed. The Spanish simply could not get back into the fight and bad die rolls during the three turn melee didn’t help any.
As we surveyed the scene after ten turns things didn’t look good for the Imperialist side. The ter-cio was broken into three parts, the left flank was falling apart, and while parity had been
achieved on the right, there were too few units to do anything meaningful to save the overall situation. With that assess-ment the game was called as a French victory.
Overall, it was a very fun game with some interesting units and situations. The tercio was not as invulnerable as we were led to believe and once the Swiss got to the Spanish pike it was just a mat-ter of time. I had some questions about how the tercio functions in the rules and have sent them into the Yahoo AOD group, so hopefully something good comes out of it. We definitely need more low grade pike units as I had to fudge the army list percentages, so that could have been one of the problems. The other issue is what to do with the tercio? This period is definitely hard to come up with suitable tactics!
Page 26
AOD: The Tercio Attacks! Battle Report
NEWSLETTER TITLE

VOLUME 1, ISSUE 1 Page 27
AOD: The Tercio Attacks! (cont.) Battle Report
These images show the advance of the tercio until it is met by several Swiss pike units, which break into the tercio and start grinding down the Spanish pike. The tercio was trying to clear all the opposition in front of the enemy camp before the more numerous French cavalry could threaten the Imperialist left flank and the remaining Swiss attacking the left flank.

Looking back, 2013 was a strange gaming year, both in the hobby and in our
club. Despite all of the new rules that came out last year, I really only purchased one
and that was Ronin. The others were new editions of Battles For Empire and IABSM,
but we were already playing earlier versions of those. I’m not sure if it’s just old
age, I’m locked into what rules I know, or disinterest in new rules, but my rules buy-
ing has taken a massive plunge the last few years. As I scroll through TMP’s threads
I see that I’m not alone as many gamers seem to be revolting at the “cult of the new”,
which leads me to wonder what the future is of designers generating new rules and if
we’ve hit a saturation point in the hobby.
While we had many fun games on club nights in 2013, there were few prepared
scenarios which is our own fault. Most games were hastily thrown together affairs
that seem to succeed through sheer willpower alone! Again, not sure if it is the old
age syndrome, been there-done that, or time constraints, but you get the feeling that
we’re not playing what we really want, but rather what works at the last minute. I
thought for awhile that our club was maybe different, but I seem to be seeing this
occurring throughout the gaming hobby. It’s an incredible paradox; back in the 70s
and early 80s we had time, but were limited on figures, terrain, rules, and periods.
Today, we have everything a gamer could ever want, but don’t seem to have the same
time, will, or dedication that we use to have!
that adds problems to the superhero team so that not only are you fighting the villain and their henchmen, but also trying to save the city, deal with base defenses, etc.
The game plays fast and is a lot of fun. There are several supple-ments already out for it, but the base game gives you several villains, four
different environments, and plenty of superheroes to choose from. The average game takes anywhere from 45 minutes to an hour, so it’s great for those times where your historical wargame finishes early or you need a fast game.
The second game is called Mice & Mystics, which is sort of a “dungeon crawl” type game com-plete with miniatures. High quality compo-nents and some well presented ideas are the first things you notice about this game. Play-
I’ve often stated that we’ll play almost anything once and that does extend to non-wargames or games right on the fringe of the wargaming hobby. Most of the times these are games we pull out when our Friday night plans go horribly wrong! In that case we find something someone knows or has tried with their friends/family and sets it up for the group.
The first of these is entitled Sentinels of the Multiverse. Sentinels is a card driven superhero game where the players choose a hero from those supplied in the game and take on an evil villain. Each hero and villain has their own card deck that features their unique skills and/or weapons. Up to four players can play at once, so usually the game involves two to four of you taking on a villain who is played by the system. Standard fare, but there is also an environment deck with places like Atlantis, a base on Mars, etc.,
ers take the roles of various castle dwell-ers turned into mice, who have to save the king from an evil enchantress.
The mice have to explore and fight their way through various chapters, which can be played as a campaign or standalone missions. Each mouse is rated for their movement, attack, defense, lore, and can carry a range of weapons and equipment. Along the way they have to fight rats, spiders, cockroaches, centi-pedes, and the house cat (a tough mon-ster in this game!) plus there is a very unique system where the players are on the clock, so you need to hurry.
Overall, this is a very good game and playing the entire campaign will take
some time. I liked it so much that I painted the plastic miniatures! There’s already one supplement out for this game and more are planned.
Other Games We’ve Been Playing
WFHGS
Meets every other Friday night in the SLC, Utah area. We play a wide variety of games in 1/300th, 10mm, 15mm, and 25mm, including Age of Reason, Age of Discovery, Age of Eagles, Fire
& Fury, General de Brigade, Warmaster Ancients, TSATF, Phantoms, Mustangs, BKC2, and more...
WASATCH FRONT HISTORICAL GAMING SOCIETY
Email the editor: [email protected]
The best in historical miniatures gaming
Visit us on the web:
www.wfhgs.com