
Wansview Pro HD - Rosewill.com
53
Transcript of Wansview Pro HD - Rosewill.com

Support Email:[email protected] 2
CONTENT
1. Web Access ..................................................................................................................................................... 6
1.1 Live Video .............................................................................................................................................. 8
1.2 Playback Video ...................................................................................................................................... 9
1.3 Set Up .................................................................................................................................................... 9
1.3.1 System ........................................................................................................................................ 9
1.3.1.1 Device Status ................................................................................................................... 9
1.3.1.2 Time Setting ................................................................................................................... 10
1.3.1.3 Pan &Tilt Setting ............................................................................................................ 10
1.3.1.4 Other Settings ................................................................................................................ 11
1.3.1.5 Multiple Settings ............................................................................................................ 11
1.3.1.6 Maintenance .................................................................................................................. 12
1.3.1.7 Device Information ........................................................................................................ 12
1.3.2 Network .................................................................................................................................... 13
1.3.2.1 IP Address Setting .......................................................................................................... 13
1.3.2.2 Port Setting .................................................................................................................... 13
1.3.2.3 Wi-Fi Set Up ................................................................................................................... 14
1.3.2.4 UPNP .............................................................................................................................. 14
1.3.2.5 DDNS Setting .................................................................................................................. 15
1.3.2.6 RTSP Setting ................................................................................................................... 15
1.3.2.7 Onvif Setting .................................................................................................................. 16
1.3.2.8 FTP Setting ..................................................................................................................... 16

Support Email:[email protected] 3
1.3.2.9 SMTP (E-mail) Setting .................................................................................................... 17
1.3.3 Video and Audio ....................................................................................................................... 18
1.3.3.1 Video .............................................................................................................................. 18
1.3.3.2 Audio Setting ................................................................................................................. 19
1.3.3.3 Image Setting ................................................................................................................. 19
1.3.3.4 On Screen Display Setting .............................................................................................. 20
1.3.3.5 Night Vision Setting ....................................................................................................... 20
1.3.4 Safety ........................................................................................................................................ 21
1.3.4.1 User Setting .................................................................................................................... 21
1.3.4.2 IP Filtering ...................................................................................................................... 23
1.3.4.3 Mask Area ...................................................................................................................... 23
1.3.5 Alarm ........................................................................................................................................ 24
1.3.5.1 IO Detector .................................................................................................................... 24
1.3.5.2 Motion Detection........................................................................................................... 24
1.3.5.3 Audio Detection ............................................................................................................. 25
1.3.5.4 Alarm Action .................................................................................................................. 25
1.3.5.5 Armed Time ................................................................................................................... 26
1.3.6 Storage...................................................................................................................................... 26
1.3.6.1 SD Card Management .................................................................................................... 26
1.3.6.2 SD Card Capture (Timed snapshot) ................................................................................ 27
1.3.6.3 SD Card Recording ......................................................................................................... 27
1.3.7 Log ............................................................................................................................................ 28
1.3.8 Local Configuration ................................................................................................................... 28
1.4 Mac Web Access ................................................................................................................................. 29
2. Windows PC Software Access ....................................................................................................................... 30

Support Email:[email protected] 4
2.1 About SHIELDeye................................................................................................................................. 30
2.2 Operational Requirements .................................................................................................................. 30
2.3 SHIELDeye Installation ........................................................................................................................ 31
2.4 SHIELDeye Operation .......................................................................................................................... 31
2.4.1 CMS Interface ........................................................................................................................... 31
2.4.2 Access to camera ...................................................................................................................... 32
2.4.2.1 Add Camera ................................................................................................................... 32
2.4.2.2 Edit / Delete Device ....................................................................................................... 34
2.5 Play Video ........................................................................................................................................... 34
2.6 System Settings ................................................................................................................................... 35
2.7 Local menu bar .................................................................................................................................... 36
3. Mac Software Access .................................................................................................................................... 38
3.1 About SHIELDeye................................................................................................................................. 38
3.2 Operational Requirements .................................................................................................................. 38
3.3 Installation .......................................................................................................................................... 38
3.4 SHIELDeye MAC Operation ................................................................................................................. 39
3.4.1 Interface ................................................................................................................................... 39
3.4.2 Device Library ........................................................................................................................... 39
Add ............................................................................................................................................. 41
Delete ......................................................................................................................................... 41
Set .............................................................................................................................................. 42
Device Edit ................................................................................................................................. 42
Device information .................................................................................................................... 42
User Setting ................................................................................................................................ 42
Time Setting ............................................................................................................................... 42

Support Email:[email protected] 5
Alarm setting .............................................................................................................................. 43
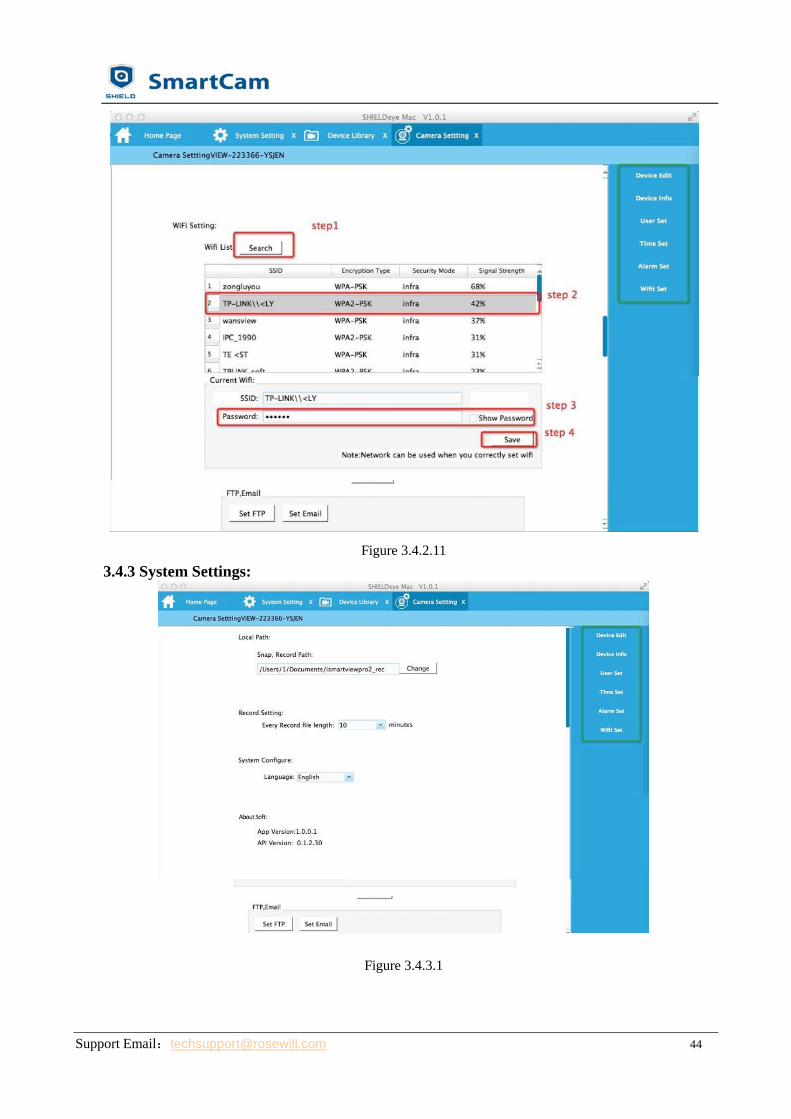
WiFi Setting ............................................................................................................................... 43
3.4.3 System Settings......................................................................................................................... 44
3.4.4 Video Library ............................................................................................................................ 45
Live Video .................................................................................................................................. 45
Local Recording .......................................................................................................................... 45
Remote Recording...................................................................................................................... 45
3.4.5 Camera Log: .............................................................................................................................. 46
4. FAQs/Troubleshooting .................................................................................................................................. 47
4.1 Compatibility Settings for Internet Explorer ....................................................................................... 47
4.2 Plugin Issues ........................................................................................................................................ 47
4.3 Install IE Tab for Chrome 43 ................................................................................................................ 49
4.4 Install IE Tab for Firefox 42 .................................................................................................................. 50
4.5 Port Forwarding .................................................................................................................................. 51
4.6 SHIELDeye Exit Abruptly on Windows XP ........................................................................................... 53
Support Email:[email protected] 6
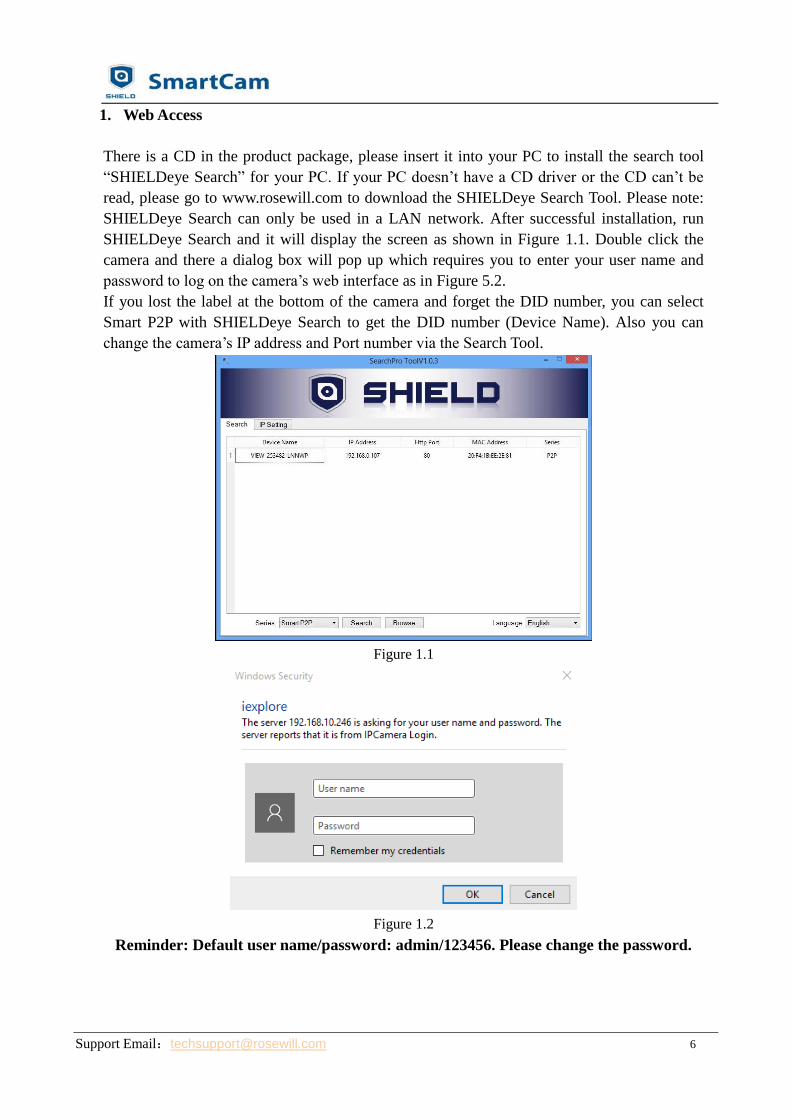
1. Web Access
There is a CD in the product package, please insert it into your PC to install the search tool
“SHIELDeye Search” for your PC. If your PC doesn’t have a CD driver or the CD can’t be
read, please go to www.rosewill.com to download the SHIELDeye Search Tool. Please note:
SHIELDeye Search can only be used in a LAN network. After successful installation, run
SHIELDeye Search and it will display the screen as shown in Figure 1.1. Double click the
camera and there a dialog box will pop up which requires you to enter your user name and
password to log on the camera’s web interface as in Figure 5.2.
If you lost the label at the bottom of the camera and forget the DID number, you can select
Smart P2P with SHIELDeye Search to get the DID number (Device Name). Also you can
change the camera’s IP address and Port number via the Search Tool.
Figure 1.1
Figure 1.2
Reminder: Default user name/password: admin/123456. Please change the password.

Support Email:[email protected] 7
Figure 1.3
View Video-Mode 1: APNPI viewing mode (OCX plugin)
● You must download the OCX plugin at the first time you start View Video Mode 1. Click
“Download Plugin” to download and install the plugin as below Figure.
Figure 1.4
● When you select Video Viewing Mode 1 with Google Chrome or Firefox, please ensure to
use the right version: (since they do not support the APNPI plugin)
● When you select View Video Mode 2 Flash Player mode (Adobe Flash Player plugin), if
the Flash Player plugin is not installed, the browser will automatically prompt you to
download and install the file.
● When you select Flash Player mode, the multiple image function is not supported, not is
multiple region motion detection. The Microsoft Edge browser is supported.

Support Email:[email protected] 8
1.1 Live Video
Video will play after enter the video browsing interface.
Figure 1.1.1
/ Play/Stop Listen Talk
Snapshot Record Digital Zoom
Show/Hide Control Panel Multi-screen Switching 1920x1080
640x360 320x180 Cruise Horizontally
Cruise Vertically Stop Center
Homepage Preset Setting and Go to Preset
Notes:
Digital zoom: Image magnification, 1x, 2x, 3x and 4x magnification.

Support Email:[email protected] 9
1.2 Playback Video
Click "Playback Video" to enter the SD card and choose the video dates then click "Search"
to list the video files of the selected day. Click the listed files to play back. The files can be
downloaded by clicking the download button.
Figure 1.2.1
1.3 Set Up
1.3.1 System
1.3.1.1 Device Status
Tap "System Settings". You can check how many users are accessing the camera, connection
method/ MAC address of the device/ SD card status and Recording status /Internet IP address
viewing etc. In "Device Status", "On-line Users" will only the number of current users
watching the real-time videos on the camera; "Recording Status" will show only when
Record Planning is on.
Figure 1.3.1.1

Support Email:[email protected] 10
1.3.1.2 Time Setting
You can enter "Time Setting" in "Time Zone Setting". Start to adjust settings such as
"Synchronization with PC”.
Figure 1.3.1.2
1.3.1.3 Pan &Tilt Setting (Not applicable for RSCM-121001W)
Pan & Tilt Setting: users can control Speed (slow, medium and fast) of pan and tilt, cruise
laps (1-10 circles), auto-check after booting, go center or disable the motion detection.
Preset Function: When the self-test centering button is off, preset positions can be activated.
There are eight preset positions and the position angle will be there after power is on. While
selecting preset position 9, pan/tilt position will return to the state before restart, after power
on self-test, the equipment will return to the position after power off or restart.
Figure 1.3.1.3
Support Email:[email protected] 11
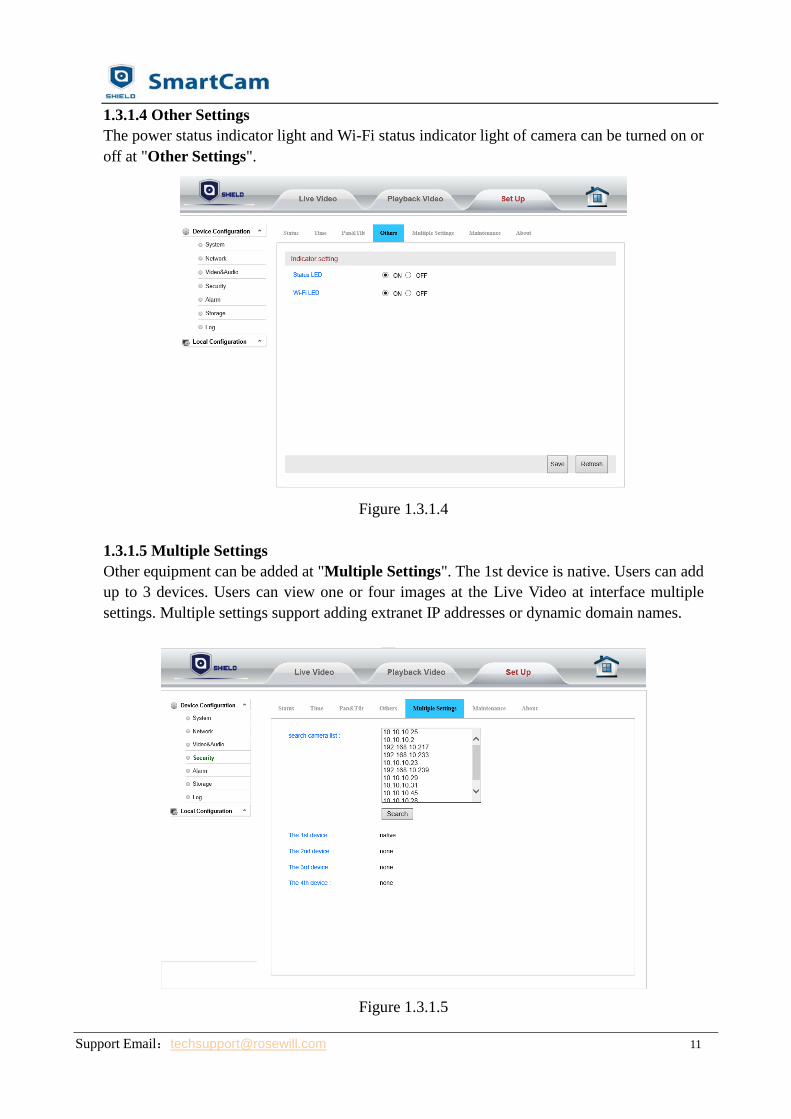
1.3.1.4 Other Settings
The power status indicator light and Wi-Fi status indicator light of camera can be turned on or
off at "Other Settings".
Figure 1.3.1.4
1.3.1.5 Multiple Settings
Other equipment can be added at "Multiple Settings". The 1st device is native. Users can add
up to 3 devices. Users can view one or four images at the Live Video at interface multiple
settings. Multiple settings support adding extranet IP addresses or dynamic domain names.
Figure 1.3.1.5
Support Email:[email protected] 12
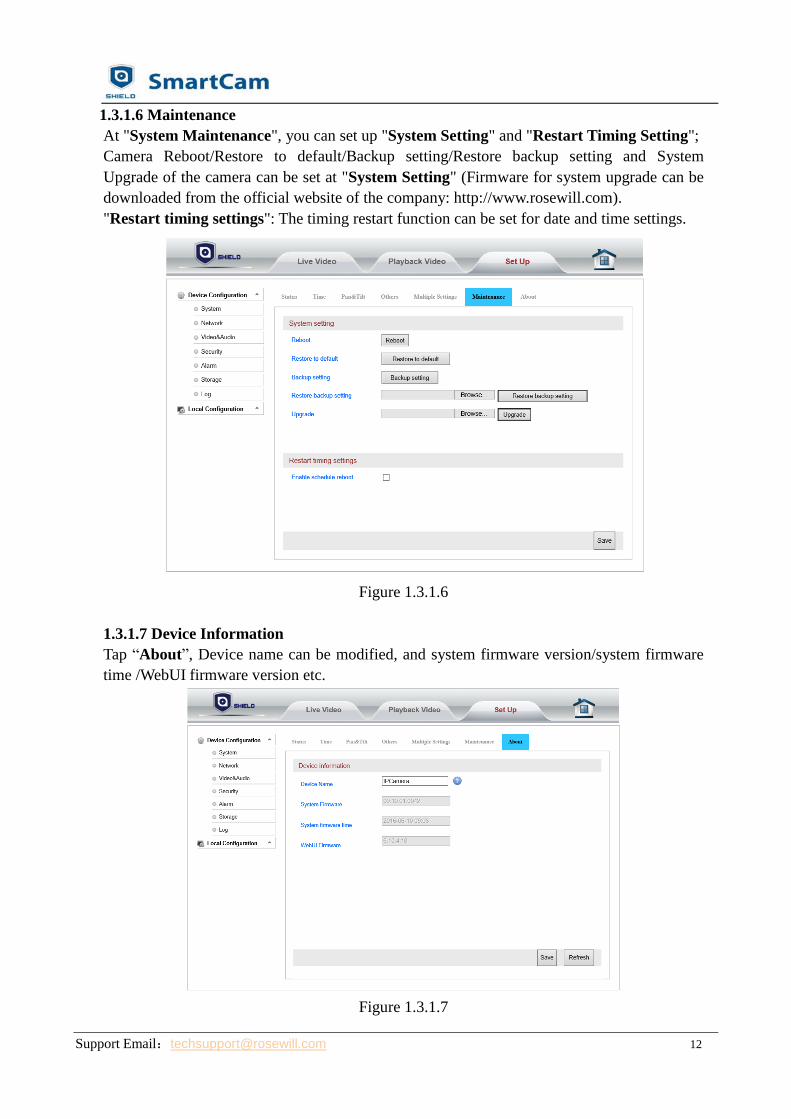
1.3.1.6 Maintenance
At "System Maintenance", you can set up "System Setting" and "Restart Timing Setting";
Camera Reboot/Restore to default/Backup setting/Restore backup setting and System
Upgrade of the camera can be set at "System Setting" (Firmware for system upgrade can be
downloaded from the official website of the company: http://www.rosewill.com).
"Restart timing settings": The timing restart function can be set for date and time settings.
Figure 1.3.1.6
1.3.1.7 Device Information
Tap “About”, Device name can be modified, and system firmware version/system firmware
time /WebUI firmware version etc.
Figure 1.3.1.7

Support Email:[email protected] 13
1.3.2 Network
1.3.2.1 IP Address Setting
In "IP Address Setting", Network information of the camera can be modified. The factory
default value is DHCP (Automatically acquired)
Reminder: Please keep the network segment consistent so the IP address will not conflict.
Figure 1.3.2.1
1.3.2.2 Port Setting
In "Port Setting", users can change web access port (http port). Port setting range: 80-65535.
Pay attention not to conflict with other port values. (port: 8000 is suggested)
Figure 1.3.2.2
Support Email:[email protected] 14
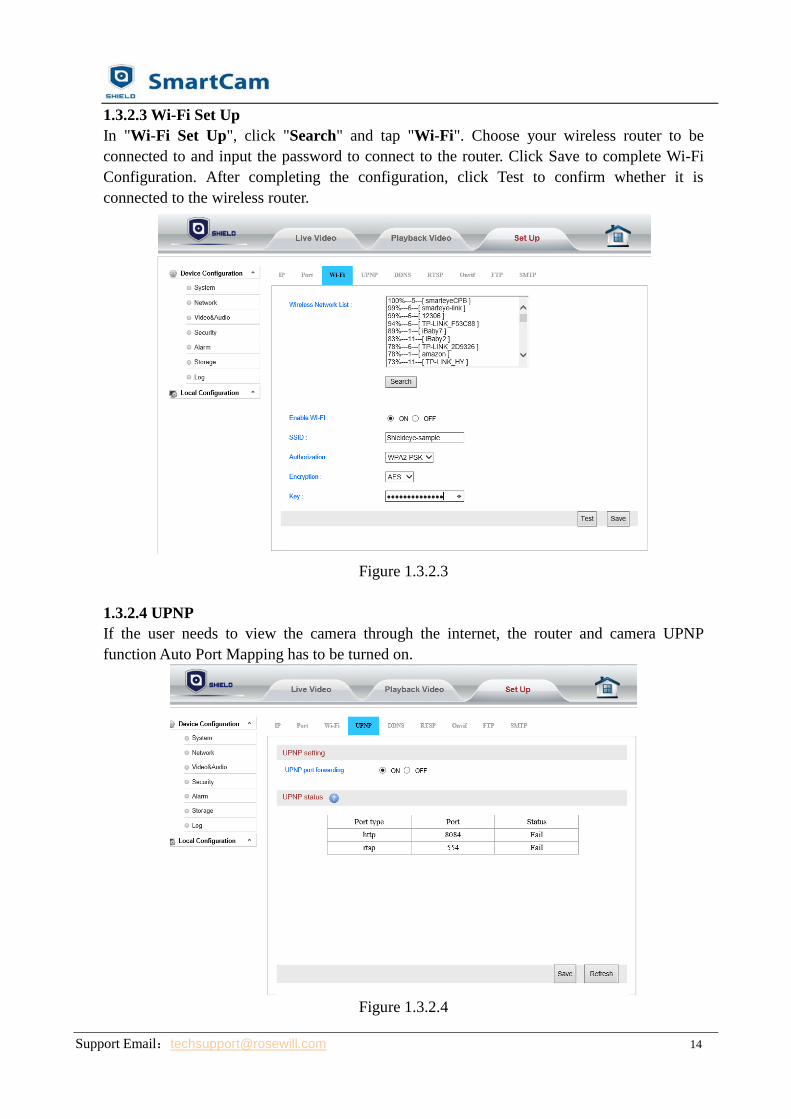
1.3.2.3 Wi-Fi Set Up
In "Wi-Fi Set Up", click "Search" and tap "Wi-Fi". Choose your wireless router to be
connected to and input the password to connect to the router. Click Save to complete Wi-Fi
Configuration. After completing the configuration, click Test to confirm whether it is
connected to the wireless router.
Figure 1.3.2.3
1.3.2.4 UPNP
If the user needs to view the camera through the internet, the router and camera UPNP
function Auto Port Mapping has to be turned on.
Figure 1.3.2.4
Support Email:[email protected] 15
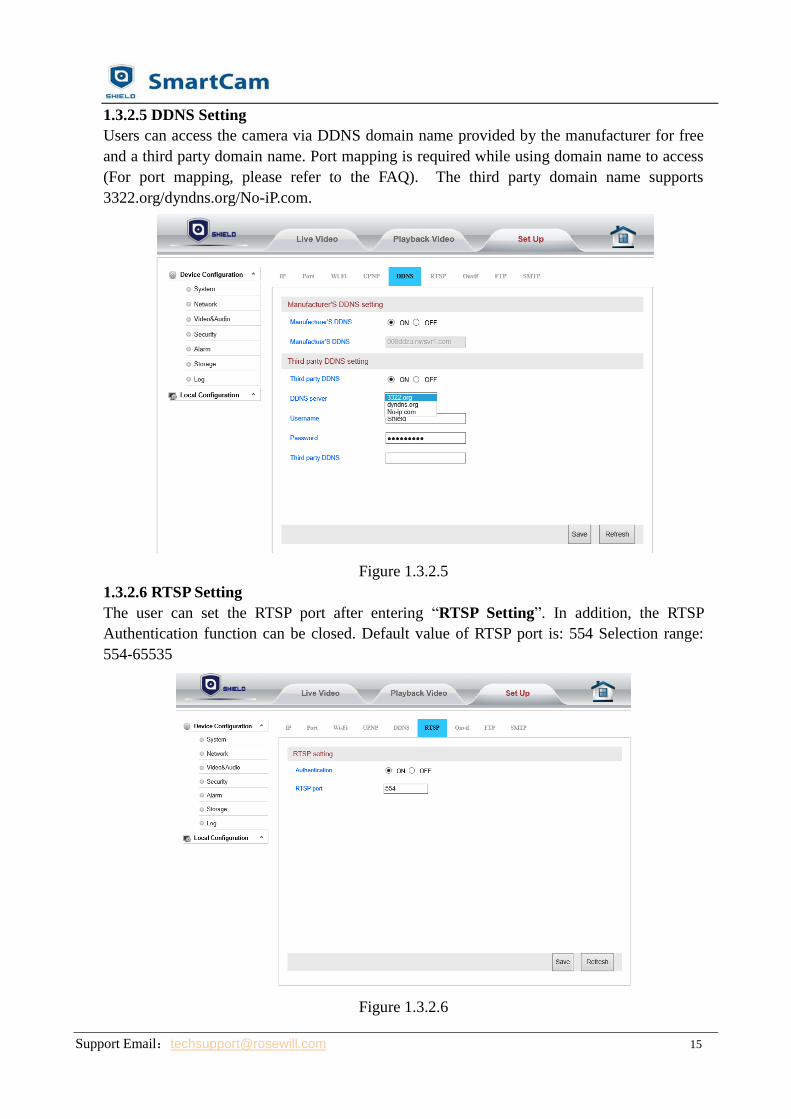
1.3.2.5 DDNS Setting
Users can access the camera via DDNS domain name provided by the manufacturer for free
and a third party domain name. Port mapping is required while using domain name to access
(For port mapping, please refer to the FAQ). The third party domain name supports
3322.org/dyndns.org/No-iP.com.
Figure 1.3.2.5
1.3.2.6 RTSP Setting
The user can set the RTSP port after entering “RTSP Setting”. In addition, the RTSP
Authentication function can be closed. Default value of RTSP port is: 554 Selection range:
554-65535
Figure 1.3.2.6

Support Email:[email protected] 16
Some general RTSP streaming media software can be adapted to access video on the device,
such as VLC. Access links are as shown below:
The first bit stream: rtsp://user: password @IP:rtsp port /live/ch0
The second bit stream: rtsp://user: password @IP:rtsp port /live/ ch1
The third bit stream: rtsp://user: password @IP:rtsp port /live/ ch2
1.3.2.7 Onvif Setting
In “Onvif Setting”, users can start up and calibrate Onvif functions. The default setting for
Onvif calibration is on. NVR devices of some manufacturers do not support camera access
with Onvif calibration. The device supports Onvif versions 2.5 and below.
Figure 1.3.2.7
1.3.2.8 FTP Setting
Enter “FTP Setting”. Fill out relevant FTP parameters according to the set up example as
shown in the figure below to achieve FTP document delivery.
Figure 1.3.2.8
Support Email:[email protected] 17
Server Address: This field allows the user to designate a DDNS address for the FTP
server.
Server Port: This field allows the user to designate the port number for the FTP server.
User Name: Input FTP user name.
Password: Input FTP password.
Path: This field allows the user to specify a save path. For example: ./RSCM
Note: If you want to save alerted pictures and videos to FTP, you must build an FTP server;
then create an FTP account with a password (not an anonymous account) on your FTP server.
The FTP account must have, create and delete file rights.
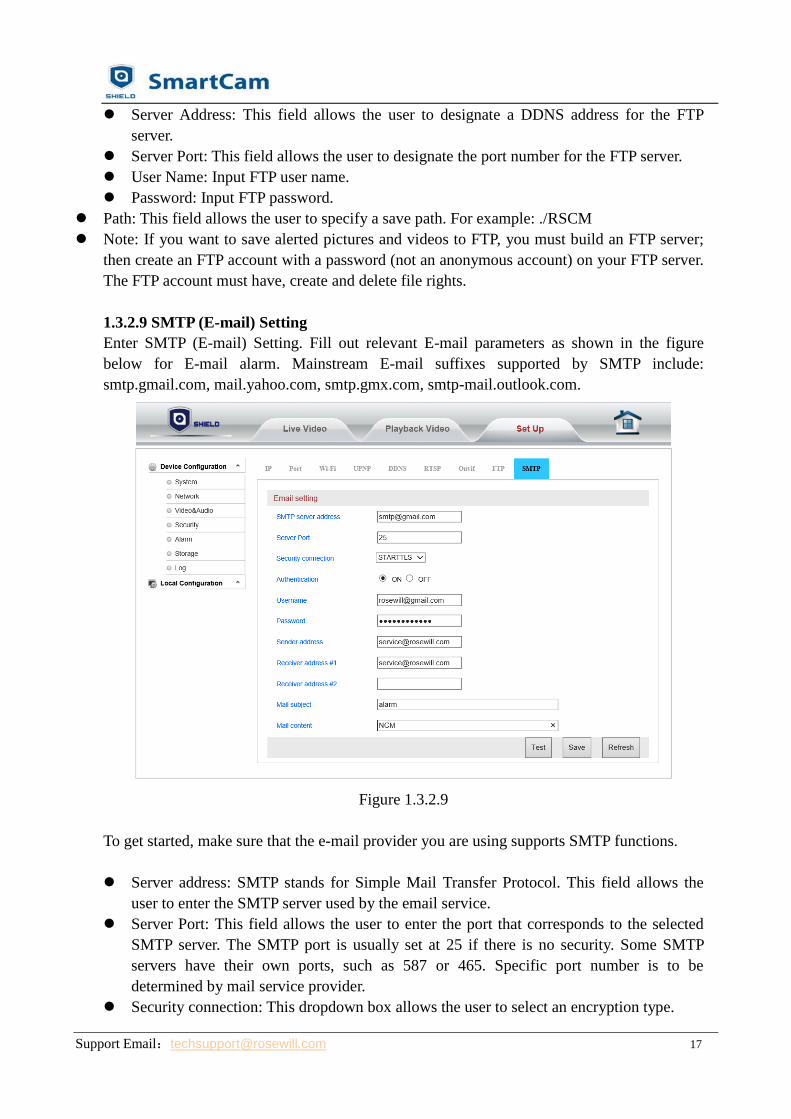
1.3.2.9 SMTP (E-mail) Setting
Enter SMTP (E-mail) Setting. Fill out relevant E-mail parameters as shown in the figure
below for E-mail alarm. Mainstream E-mail suffixes supported by SMTP include:
smtp.gmail.com, mail.yahoo.com, smtp.gmx.com, smtp-mail.outlook.com.
Figure 1.3.2.9
To get started, make sure that the e-mail provider you are using supports SMTP functions.
Server address: SMTP stands for Simple Mail Transfer Protocol. This field allows the
user to enter the SMTP server used by the email service.
Server Port: This field allows the user to enter the port that corresponds to the selected
SMTP server. The SMTP port is usually set at 25 if there is no security. Some SMTP
servers have their own ports, such as 587 or 465. Specific port number is to be
determined by mail service provider.
Security connection: This dropdown box allows the user to select an encryption type.

Support Email:[email protected] 18
Authentication: It should be on.
User name: Input FTP user name..
Password: Input FTP password.
Sender Address: This field allows the user to enter the email address to which alarms are
sent. This email address should be consistent with the above Email address for the User
name.
Receiver Address #1: These fields allow the user to enter the receiver email address
which will receive any emails pertaining to alert and alarm emails.
Mail subject: This field allows the user to define the subject line of the email.
Mail content: This field allows the user to define the mail content.
1.3.3 Video and Audio
1.3.3.1 Video
Enter “Video Encoding Settings” to adjust camera power frequency and video stream
settings. Power frequencies include: 50HZ, 60HZ; (220V voltage selection 50HZ. 110V
voltage selects 60HZ, and 60HZ in Japan, Canada etc.) Bit stream settings include:
Resolution(1920*1080 or 1280*720), Bit rate (256~4096kbps), frame rate (1~30fps), steam
control or stream type etc.;
Reminder: Audio transmission video can be controlled through the on/off button.
Figure 1.3.3.1
Support Email:[email protected] 19
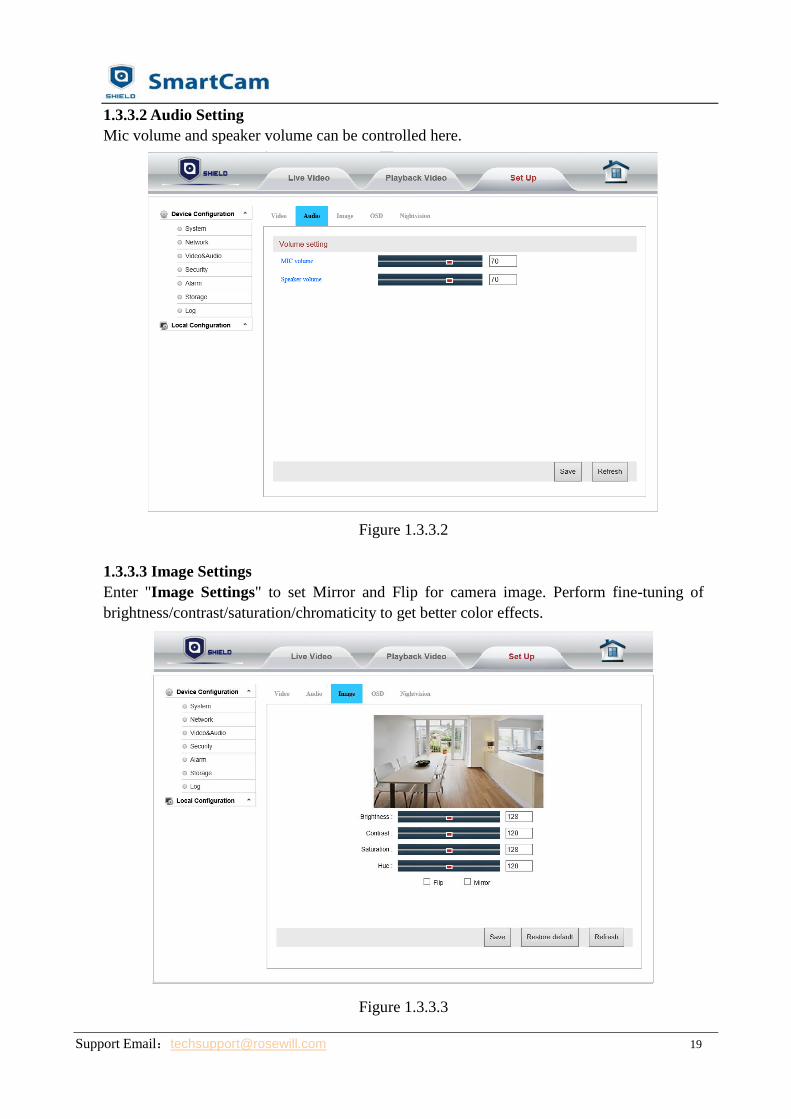
1.3.3.2 Audio Setting
Mic volume and speaker volume can be controlled here.
Figure 1.3.3.2
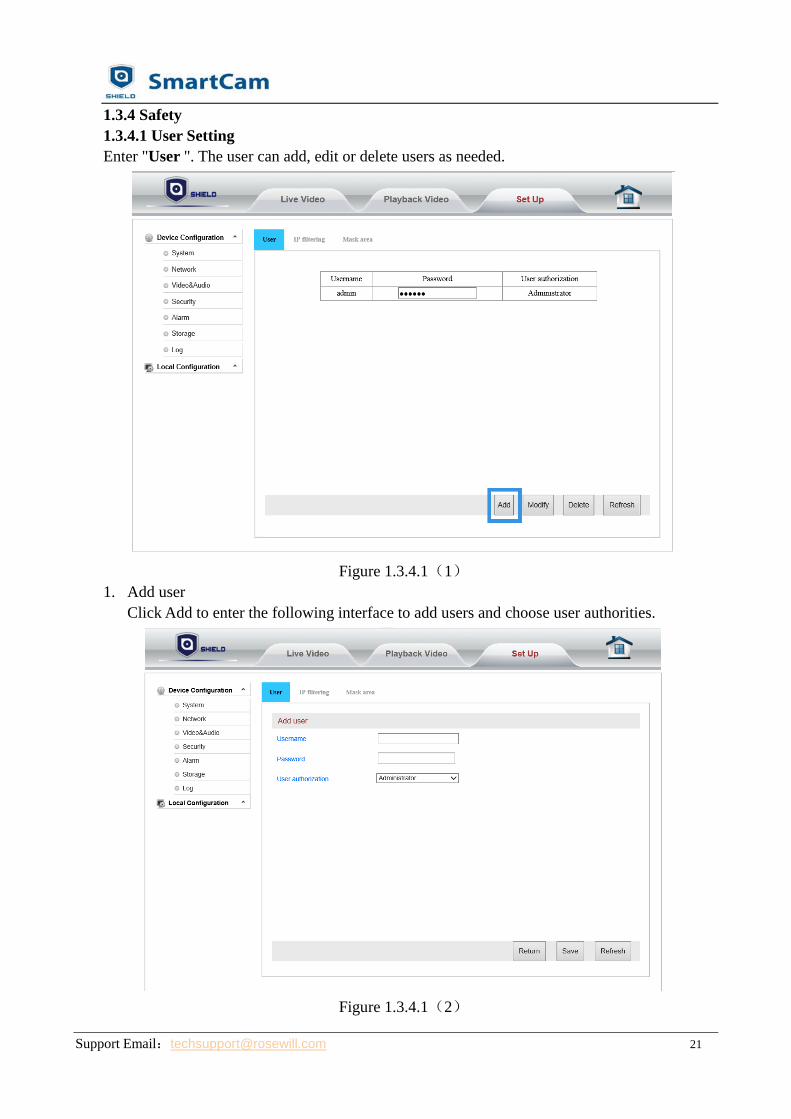
1.3.3.3 Image Settings
Enter "Image Settings" to set Mirror and Flip for camera image. Perform fine-tuning of
brightness/contrast/saturation/chromaticity to get better color effects.
Figure 1.3.3.3

Support Email:[email protected] 20
1.3.3.4 On Screen Display Setting
Enter "OSD Settings" to overlay the time and name on the video image.
Figure 1.3.3.5
1.3.3.5 Night Vision Settings
Enter "Night Vision Settings" to set IR LED and IRCUT. Once IR LED is off, the LED will
not work any longer.
Figure 1.3.3.5
Support Email:[email protected] 21
1.3.4 Safety
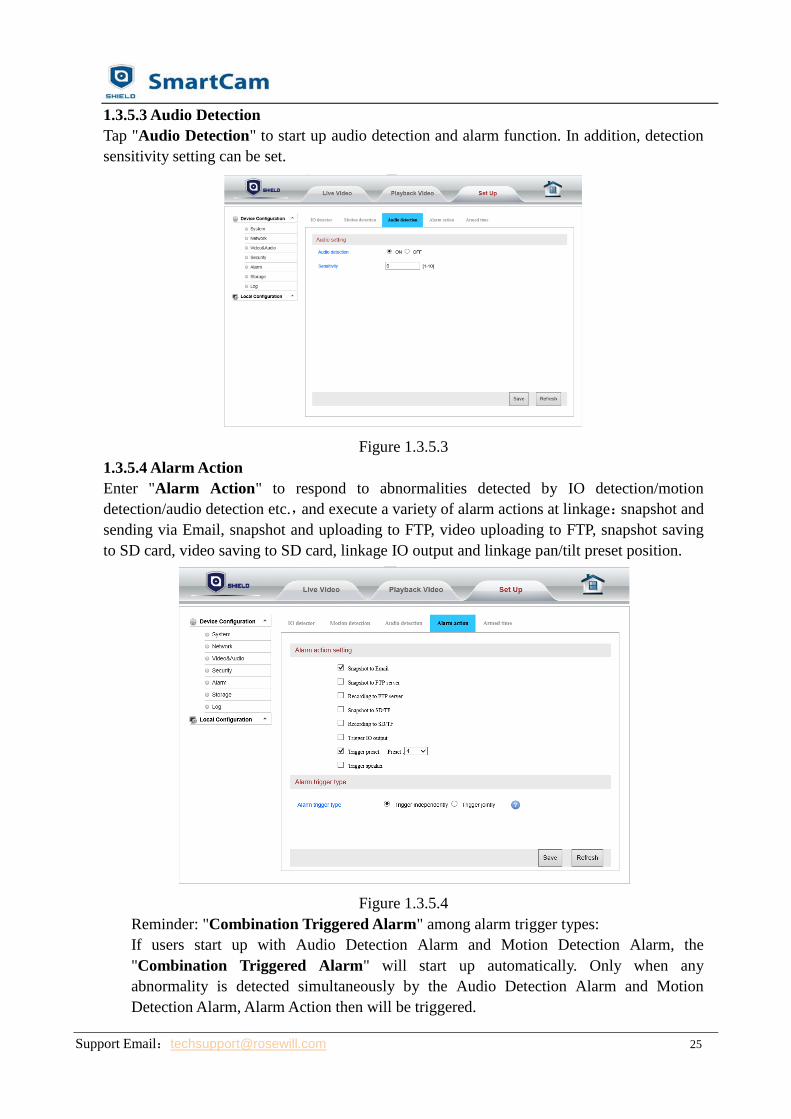
1.3.4.1 User Setting
Enter "User ". The user can add, edit or delete users as needed.
Figure 1.3.4.1(1)
1. Add user
Click Add to enter the following interface to add users and choose user authorities.
Figure 1.3.4.1(2)

Support Email:[email protected] 22
2. Modify the user: Tapping admin, it will turn blue. Click Modify and enter Figure 1.3.4.1
(3). The user can modify the user name, password or user authority.
Figure 1.3.4.1(3)
Figure 1.3.4.1(4)
Reminder: After the operation, click Save. Then click Refresh so that the edited content will
be displayed on the web page.

Support Email:[email protected] 23
1.3.4.2 IP Filtering
IP Filtering helps to filter the IP addresses, either blocking them or granting them access to
the camera. It secures the camera more by limiting remote access only to approved users.
Figure 1.3.4.2
1.3.4.3 Mask Area
Users can set their privacy in the Mask Area to be excluded from monitoring. Tap Start
Setting and check the windows and the red box will show out. Click the red boxes till it turns
green. Use the mouse to move and modify the size of the box; then Save to complete settings.
Figure 1.3.4.3

Support Email:[email protected] 24
1.3.5 Alarm
1.3.5.1 IO Detector
Enter "IO Detector" to start up the detection function and set sensor type.
Figure 1.3.5.1
User need to check IO Detector to start. And users need to check “Open is valid” to enable
the alarm device, and only when alarm trigger is connected, the external alarm can work then.
If “Close is valid” is checked, the camera itself will be alarmed continuously per 30 second.
1.3.5.2 Motion Detection
In "Motion Detection", users can set 4 detective areas and sensitivity for each area ranging
from 1-100. The higher the value, the higher sensitivity will be.
Figure 1.3.5.2
Support Email:[email protected] 25
1.3.5.3 Audio Detection
Tap "Audio Detection" to start up audio detection and alarm function. In addition, detection
sensitivity setting can be set.
Figure 1.3.5.3
1.3.5.4 Alarm Action
Enter "Alarm Action" to respond to abnormalities detected by IO detection/motion
detection/audio detection etc.,and execute a variety of alarm actions at linkage:snapshot and
sending via Email, snapshot and uploading to FTP, video uploading to FTP, snapshot saving
to SD card, video saving to SD card, linkage IO output and linkage pan/tilt preset position.
Figure 1.3.5.4
Reminder: "Combination Triggered Alarm" among alarm trigger types:
If users start up with Audio Detection Alarm and Motion Detection Alarm, the
"Combination Triggered Alarm" will start up automatically. Only when any
abnormality is detected simultaneously by the Audio Detection Alarm and Motion
Detection Alarm, Alarm Action then will be triggered.

Support Email:[email protected] 26
1.3.5.5 Armed Time
After setting the type of “Alarm Detection” and “Alarm Action’, you can then enter
“Armed Time setting”. “Alarm Action” can only be triggered when armed; the time system
is 7d*24h, 15min. intervals. The camera default is open 24 hours. The user can drag the
mouse to perform continuous selection of the arming time.
Figure 1.3.5.5
1.3.6 Storage
1.3.6.1 SD Card Management
In "SD Card Management", you can view and download the video files/picture files in SD
card, check the capacity usage of the SD card and perform SD card formatting.
Figure 1.3.6.1

Support Email:[email protected] 27
1.3.6.2 SD Card Capture (Timed snapshot)
Enter "SD Card Capture" for SD card setting. You can start up the SD Card Capture
function with a time interval of 5-2000s. Snapshot time frame will be set as well; the time
system is 7d*24h, 15min. intervals. The camera default is 24 hours.
Figure 1.3.6.2
1.3.6.3 SD Card Recording
In "SD Card Recording", you can enable the recording function. You can set the time span
of each video file (range: 15-900s/file). The time frame of the video shall be set as well; the
time system is 7d*24h, 15min. intervals. The camera default is 24 hours.
Figure 1.3.6.3
Reminder: The system default is automatic overwriting for the SD card video. After the
storage space is full, the new video will automatically overwrite the earliest video file.

Support Email:[email protected] 28
1.3.7 Log
Users can check the functional operation log of the camera in “Log”.
Figure 1.3.7
1.3.8 Local Configuration
In "Local Configuration", you can set the saving path for videos and pictures on your PC as
well as the recording duration.
Figure 1.3.8
Reminders:
● When using IE9 or higher, please run the browser video path and picture path as "
administrator" so that you can save the files successfully. The default video path is
"HYRec" on disk C. The default picture path is “HYSnap” on disk C.
● Users can start “Motion Detection Alarm” and view the flashing box on the screen.

Support Email:[email protected] 29
1.4 Mac Web Access
For specific setup steps, please refer to section 5.3.
If no CD driver is available on a Mac computer, please go to
http://www.rosewill.com to download the search tool.
When accessing the camera via Mac, the following three functions will not be available:
1. When accessing the camera via Mac, the following icons will not be available for camera
setting. (As shown in Figure 1.4.1)
/ Play/Stop Listen Talk
Snapshot Record Digital Zoom
(Figure 1.4.1)

Support Email:[email protected] 30
2. No motion detection box is available under mode 1 or mode 2. Click Window 1, it will
show the full screen motion detection box. (As shown in Figure 5.4.3)
Figure 1.4.2
3. When accessing the camera via Mac, no local storage path is available.
2. Windows PC Software Access
2.1 About SHIELDeye
SHIELDeye is an IP centralized monitoring software provided by the SmartCloud IP Camera
centralized monitoring software manufacturer. It supports monitoring, intercom, video
recording, alarm detection and other functions on a LAN and internet environment.
Features of SHIELDeye:
Supports P2P cloud camera connection;
Supports DDNS dynamic domain name connection;
Supports multinational language switching;
Supports local schedule video recording;
Supports alarm recording and snapshot;
Supports audio monitoring and intercom;
Supports image settings;
Supports pan & tilt setting;
User smart "skin changing".
2.2 Operational Requirements
For stable operation of SHIELDeye,
Internal storage: Over 1G
CPU: Dual-core CPU
Internal storage: Over 1G
Hard disk: Over 500G
Operating system: Windows XP or above (When using XP, please use Compatibility
mode. Kindly check FAQ 8.6).
Screen resolution: ≥1024*768
Support Email:[email protected] 31
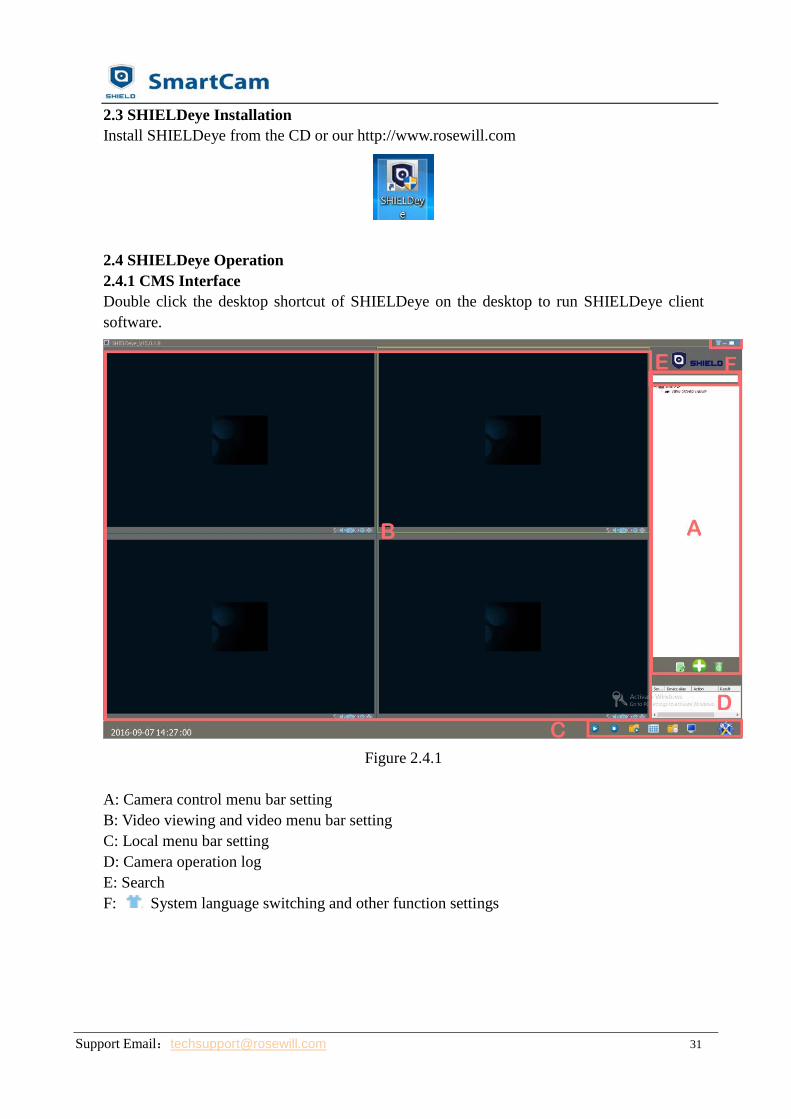
2.3 SHIELDeye Installation
Install SHIELDeye from the CD or our http://www.rosewill.com
2.4 SHIELDeye Operation
2.4.1 CMS Interface
Double click the desktop shortcut of SHIELDeye on the desktop to run SHIELDeye client
software.
Figure 2.4.1
A: Camera control menu bar setting
B: Video viewing and video menu bar setting
C: Local menu bar setting
D: Camera operation log
E: Search
F: System language switching and other function settings

Support Email:[email protected] 32
2.4.2 Access to camera
2.4.2.1 Add Camera
Click the following icon to add cameras
Add device icon
Figure 2.4.2.1
Search to Add (recommended)
Select "Search to Add" to access the search page. Select corresponding device type for
searching. Fill in the correct user name and password for the detected device.
Reminder: After saved, the device will be displayed in the device list.
Figure 2.4.2.2
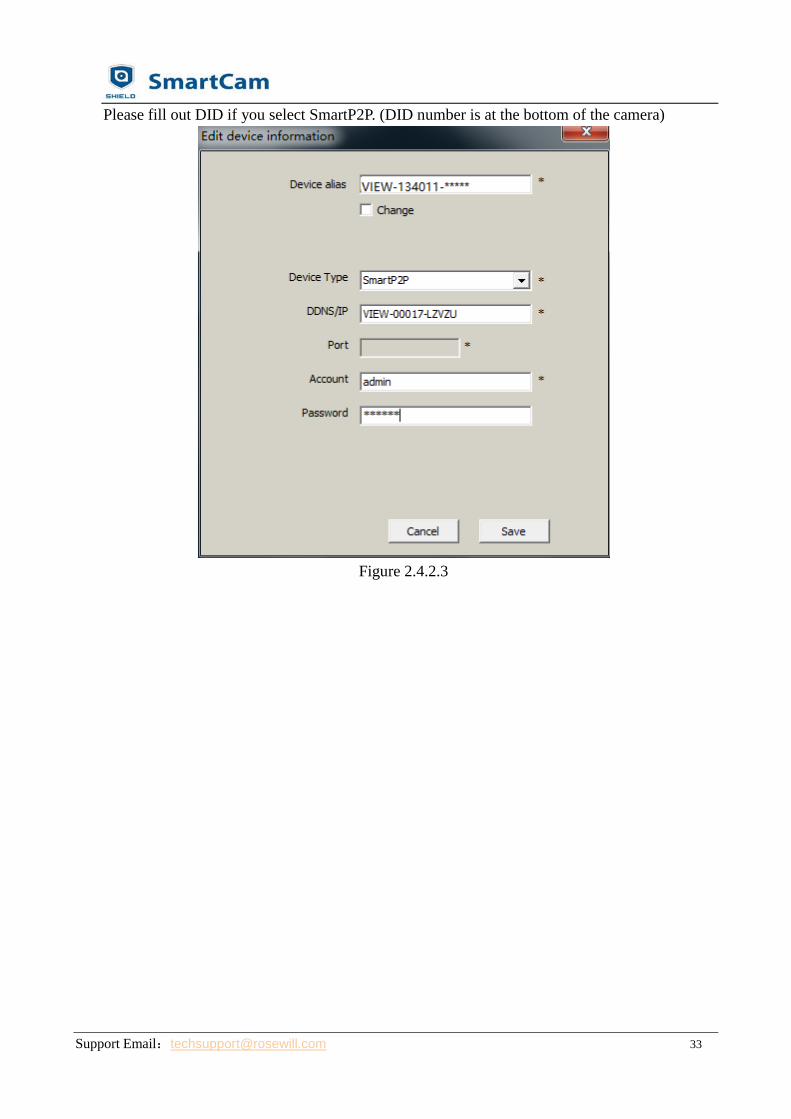
Add device manually
Select "Add device manually" to access the add page. Cells marked with * are required to be
filled in.
Reminder: Please select correct corresponding "device type" to Smart P2P.
Support Email:[email protected] 33
Please fill out DID if you select SmartP2P. (DID number is at the bottom of the camera)
Figure 2.4.2.3

Support Email:[email protected] 34
2.4.2.2 Edit / Delete Device
Edit Device icon Delete Device icon
Select a camera being added into the device list and click "Edit Device" or "Delete Device" to
modify user management parameters or delete the device.
2.5 Play Video
Select the camera to play from the device list. Double-click or "Play Video" with the mouse.
Figure 2.5.1
Voice intercom icon Audio monitor icon Snapshot icon
Video and video status display (divided into two types: manual video display status and
scheduled video display status);
Brightness and contrast of the camera can be adjusted through the image parameter setting.
Users can change resolution, frame rate and bit rate, and can perform mirror or Flip the image.
Figure 2.5.2
Pan/Tilt control icon
UP DOWN LEFT RIGHT
Support Email:[email protected] 35
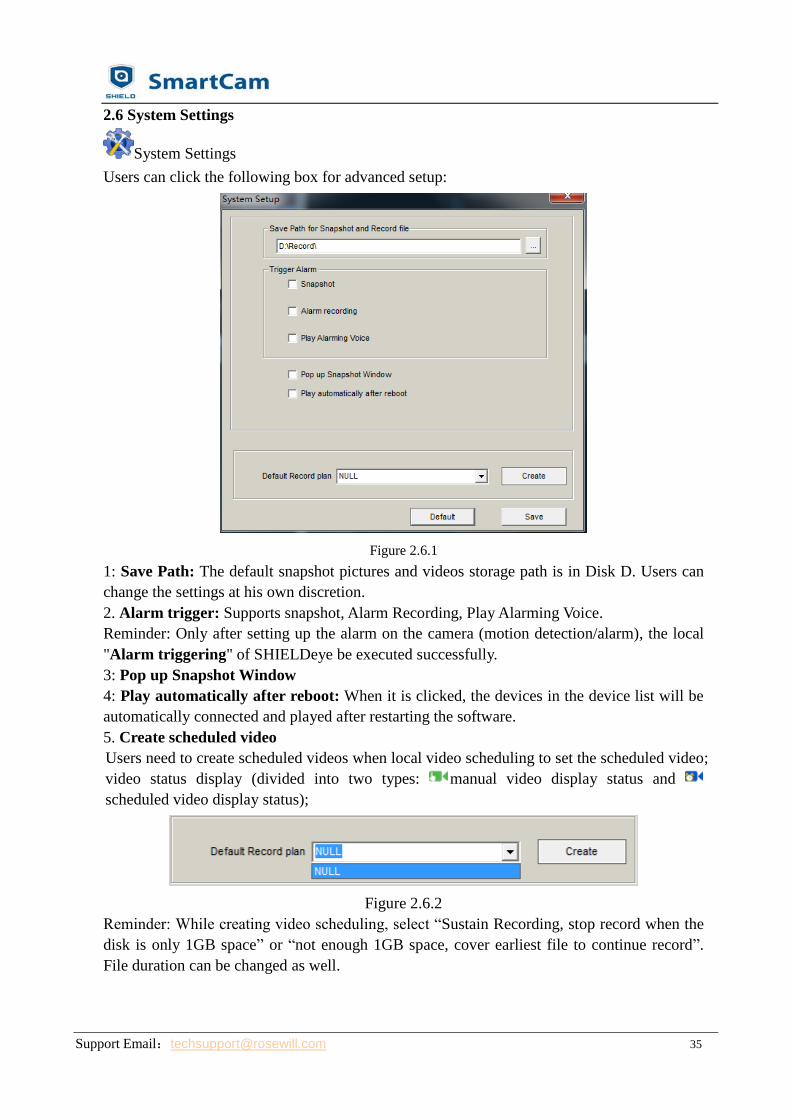
2.6 System Settings
System Settings
Users can click the following box for advanced setup:
Figure 2.6.1
1: Save Path: The default snapshot pictures and videos storage path is in Disk D. Users can
change the settings at his own discretion.
2. Alarm trigger: Supports snapshot, Alarm Recording, Play Alarming Voice.
Reminder: Only after setting up the alarm on the camera (motion detection/alarm), the local
"Alarm triggering" of SHIELDeye be executed successfully.
3: Pop up Snapshot Window
4: Play automatically after reboot: When it is clicked, the devices in the device list will be
automatically connected and played after restarting the software.
5. Create scheduled video
Users need to create scheduled videos when local video scheduling to set the scheduled video;
video status display (divided into two types: manual video display status and
scheduled video display status);
Figure 2.6.2
Reminder: While creating video scheduling, select “Sustain Recording, stop record when the
disk is only 1GB space” or “not enough 1GB space, cover earliest file to continue record”.
File duration can be changed as well.

Support Email:[email protected] 36
Figure 2.6.3
2.7 Local Menu
Play all devices in device list Close all devices in device list
Playback and Query Recorded video View Camera on Multiple windows
Open the video playback player so that the user can directly access corresponding video files
of each camera according to the video path. Please refer to the figure below.
Figure 2.7.1 Figure 2.7.2
Support Email:[email protected] 37
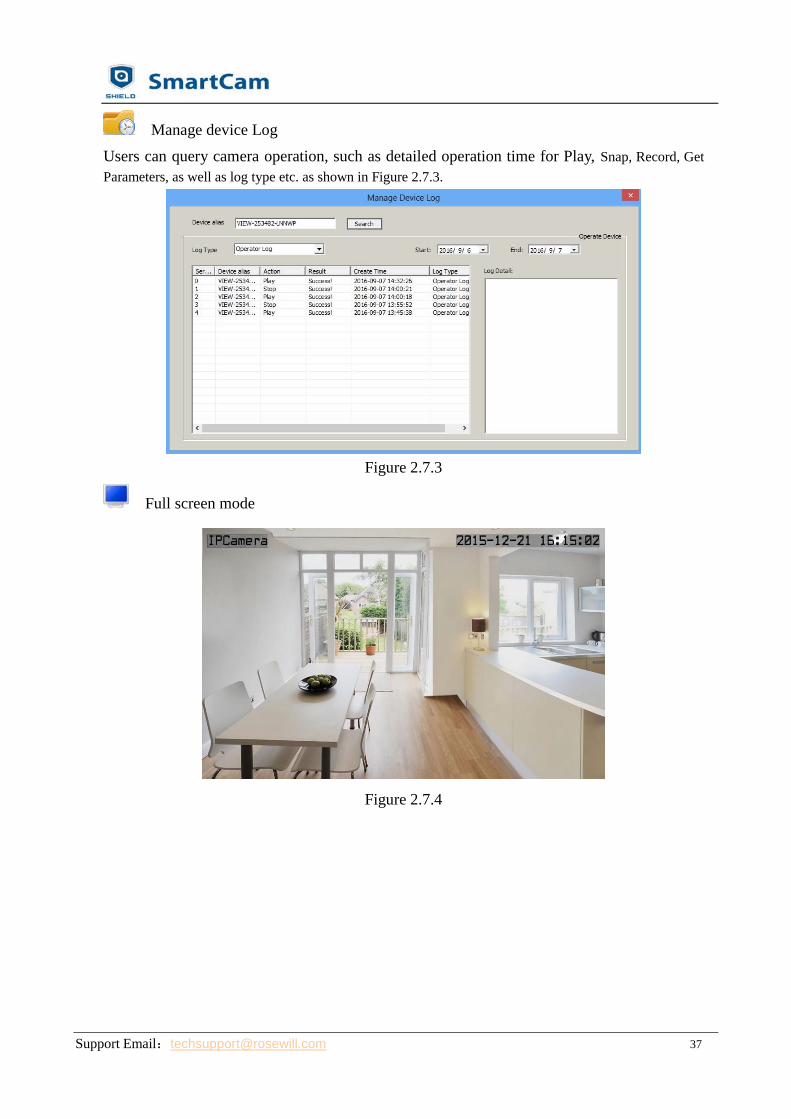
Manage device Log
Users can query camera operation, such as detailed operation time for Play, Snap, Record, Get
Parameters, as well as log type etc. as shown in Figure 2.7.3.
Figure 2.7.3
Full screen mode
Figure 2.7.4

Support Email:[email protected] 38
3. Mac Software Access
3.1 About SHIELDeye Mac
SHIELDeye MAC is an IP centralized monitoring software provided by the SmartCloud IP
Camera software manufacturer. It supports monitoring, intercom, video recording, alarm
detection and other functions on IP cameras in a LAN and internet environment.
SHIELDeye MAC supports the Mac OS operating system.
Features of SHIELDeye MAC:
Supports SmartP2P smart cloud platform camera;
Supports multinational language switching;
Supports local video;
Supports local video playback;
Supports remote SD card video playback
Supports audio monitoring and intercom;
Supports image settings;
Support pan & tilt setting, preset positions;
3.2 Operational Requirements
For stable operation of SHIELDeye Mac, the following minimum system parameters are
suggested:
CPU: Dual-core CPU
Internal storage: Over 4G
Hard disk: Over 500G
Operating system: Mac OS*10.9 or above
Screen resolution: ≥1024*768
3.3 Installation
You can download the software from the CD or our website: www.rosewill.com. Double click
to open the .dmg file. Drag SHIELDeye MAC software to copy to the PC according to the
direction of the arrow.
Figure 3.3.1

Support Email:[email protected] 39
3.4 SHIELDeye MAC Operation
3.4.1 User Interface
Run SHIELDeye Mac client software on the computer as shown in the figure below:
Figure 3.4.1
3.4.2 Device Library
Check setting list, add, delete and advanced settings of the camera
Figure 3.4.2.1

Support Email:[email protected] 40
Icon: Show camera list by Icon;
Figure 3.4.2.2
List: Show camera list by List. Local Image and Record can be showed.
Figure 3.4.2.3

Support Email:[email protected] 41
Add
Click to enter Add Camera. Cameras can be added manually or Lan Search
Figure 3.4.2.4
Delete
Select a specified camera. Click to delete the camera from the list.
Figure 3.4.2.5
Support Email:[email protected] 42
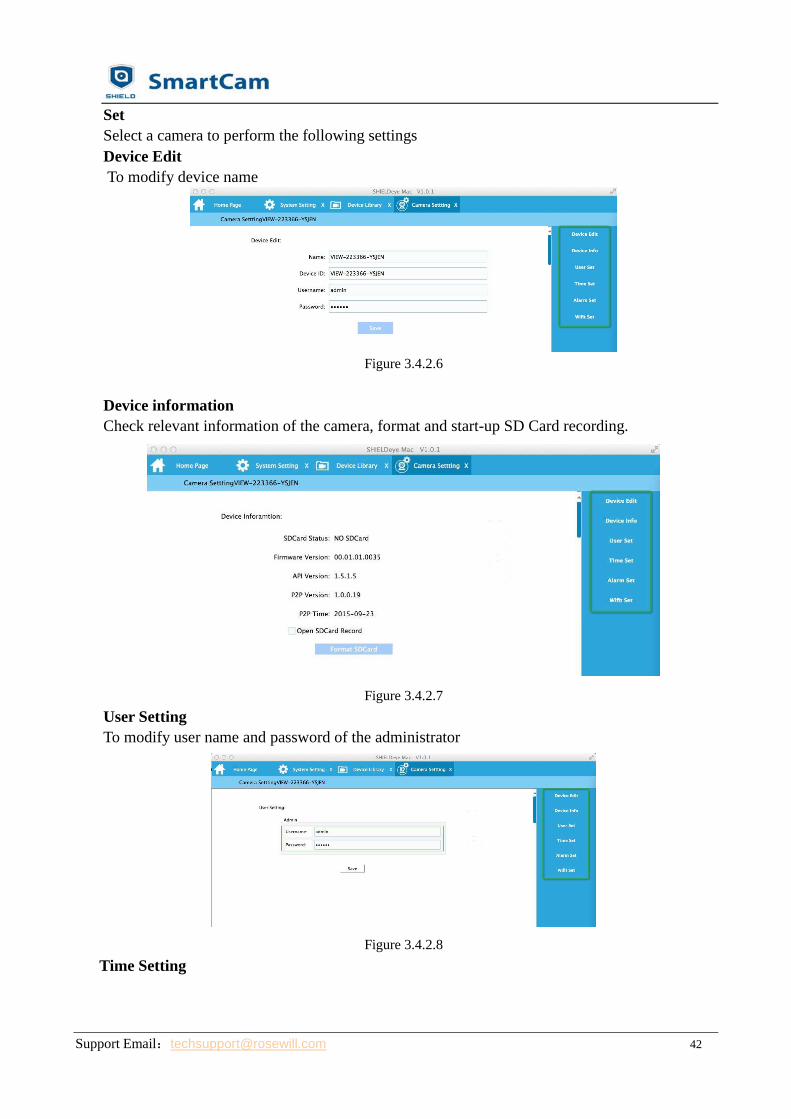
Set
Select a camera to perform the following settings
Device Edit
To modify device name
Figure 3.4.2.6
Device information
Check relevant information of the camera, format and start-up SD Card recording.
Figure 3.4.2.7
User Setting
To modify user name and password of the administrator
Figure 3.4.2.8
Time Setting

Support Email:[email protected] 43
Figure 3.4.2.9
Alarm setting
Figure 3.4.2.10
Note: 1. External alarm equipment is required for IO alarm.
2. The higher the motion detection value, the higher the sensitivity will be.
WiFi Setting

Support Email:[email protected] 45
3.4.4 Video Library
Click the cameras being added to the list at the right side for real-time viewing
Figure 3.4.4.1
Live Video
Real-time Live video, user can pan/tilt, Listen, Talk, Snap, Record for the camera, and choose
Resolution and IR led ON/OFF.
Local Recording
Check local recorded files or playback the local recorded video.
Remote Recording
Check video files on the SD card of the camera. Remote Playback SD Card Recording is
available as well.
One Window Four Windows Nine Windows Full screen
Color Adjust:

Support Email:[email protected] 46
Preset:
3.4.5 Camera Log:
Users can get online information of the device through a camera log query, such as alarm
information etc..
Figure 3.4.4.2

Support Email:[email protected] 47
4. FAQs/Troubleshooting
4.1 Compatibility Settings for Internet Explorer
When using Internet Explorer 9 and higher to view the camera, if you already downloaded a
plug-in for camera, but still have no live video, please complete the following steps:
Click Compatibility View Setting (Figure 4.1.1) ----- you will see Figure 4.1.2, click Add,
then click Close.
Figure 4.1.1 Figure 4.1.2
4.2 Plugin Issues
Question: I’ve already installed a Plug-in for the browser, but the live stream shows
messy code like the image below:
Figure 4.2.1
Support Email:[email protected] 48
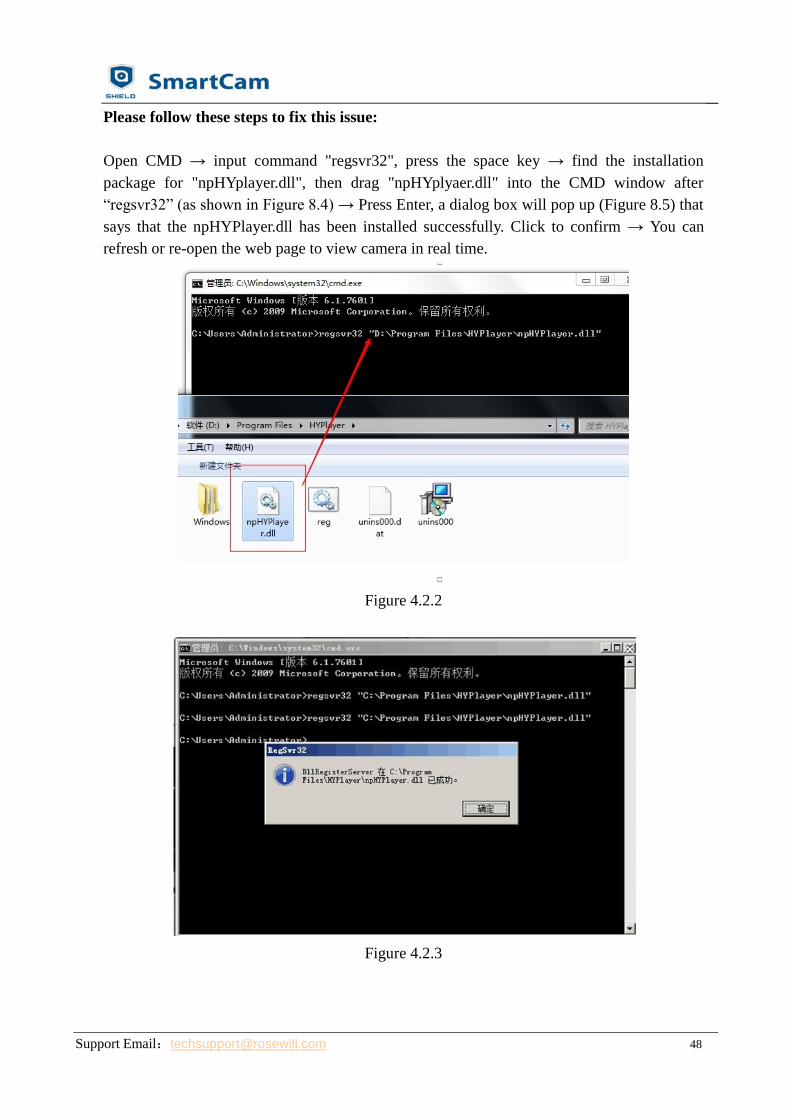
Please follow these steps to fix this issue:
Open CMD → input command "regsvr32", press the space key → find the installation
package for "npHYplayer.dll", then drag "npHYplyaer.dll" into the CMD window after
“regsvr32” (as shown in Figure 8.4) → Press Enter, a dialog box will pop up (Figure 8.5) that
says that the npHYPlayer.dll has been installed successfully. Click to confirm → You can
refresh or re-open the web page to view camera in real time.
Figure 4.2.2
Figure 4.2.3

Support Email:[email protected] 49
4.3 Install IE Tab for Chrome 43
Due to the fact that Chrome43 and higher no longer supports NPAPI plug-in, the user needs
to add an IE tab for Chrome.
Here is how to install an IE tab for Chrome:
1. Visit https://chrome.google.com/webstore/search/IE%20tab●hl=en to go to the Chrome
web store to download and install an IE tab.
Figure 4.3.1
2. Open Chrome, right-click on a blank place, choose the IE Tab option-- click Open in IE
Tab
Figure 4.3.2

Support Email:[email protected] 50
4.4 Install IE Tab for Firefox 42
Due to the fact that Firefox42 and higher no longer supports NPAPI plug-in, the user needs to
add an IE tab for Firefox.
Here is how to install an IE Tab for Firefox:
1. Please visit https://addons.mozilla.org/en-US/firefox/addon/ie-tab/ to download the IE Tab
for Firefox.
Figure 4.4.1
2. Open Firefox, right click and choose "View Page in IE Tab". Then you can view the live
stream of the camera.
Figure 4.4.2

Support Email:[email protected] 51
4.5 Port Forwarding
Every time you reboot the camera, the Local IP Address will be changed, so you’d better set the
camera’s local IP by using the SHIELDeye Search tool (on the CD).
There are two ways to do port forwarding:
1. One router connected (only one router is being used, and the router is directly connected
to the WAN)
Log on the router, find the Port forwarding (or Port Mapping or Virtual Server), then add the
camera’s local IP and Port as in the figure below:
Figure 4.5.1
Figure 4.5.2

Support Email:[email protected] 52
2 .Multiple routers connected (there are 2 or more routers being used, and your camera is
not directly connected to the router that is connected to the WAN port)
For example, there are two routers. Router 1 is directly connected to the WAN port, and router 2
is connected to router 1. The camera and computer are connected to router 2.
Router 1 Local IP: 192.168.0.5
Router 2 Local IP: 192.168.10.12
WAN IP: 192.168.0.10
Camera IP : 192.168.10.14 Port :255
First, please log on to router 2, find port forwarding, then add the camera’s IP and port.
Second, please log on to router 1, find port forwarding, then add the Router 1 IP and camera’s
Port number.
Note: Because each brand of router is different, port forwarding methods may be different,
please consult the user manual of your router to carry out port forwarding.

Support Email:[email protected] 53
4.6 SHIELDeye Exit Abruptly on Windows XP
1: Right click the SHIELDeye shortcut, and select Properties as below.
Figure 4.6.1
2. Select Compatibility and tap “run this program in compatibility mode for”
Figure 4