Walled garden for onboarding user devices to eduroam · Download the Captive Portal PHP code from...
84
Walled garden for on-boarding user devices to eduroam Technical Deployment Guide Changelog Walled garden for on- boarding user devices to eduroam Technical Deployment Guide
Transcript of Walled garden for onboarding user devices to eduroam · Download the Captive Portal PHP code from...

Walled garden for on-boarding user devices to eduroam
Technical Deployment Guide
Changelog
Walled garden for on-boarding user devices to eduroam Technical Deployment Guide
Walled garden for on-boarding user devices to eduroam
Contents
Contents
Walled garden for onboarding user devices to eduroam ................................................. 1
Background ...................................................................................................................... 1
Considerations ................................................................................................................. 2
Preparing ......................................................................................................................... 4
Creating a VMware Virtual Machine for pfSense ............................................................. 5
Uploading the ISO Image ............................................................................................................................ 15
Attaching ISO Image to the VM .................................................................................................................. 20
pfSense Installation........................................................................................................ 23
Configuring pfSense ...................................................................................................... 35
Adding a LAN Interface .............................................................................................................................. 45
VMWare ESXi Networking Configuration................................................................................................. 45
Virtual Machine Networking Configuration .............................................................................................. 50
Adding the interface into pfSense ........................................................................................................... 53
Captive Portal configuration ....................................................................................................................... 60
Installing Open VM Tools ............................................................................................................................ 70
Access Point configuration ............................................................................................ 78
Testing the user experience ........................................................................................... 79
Walled garden for on-boarding user devices to eduroam
Background 1
Background One of the key barriers in successful deployment of eduroam, is around ensuring that users are adequately
supported. 802.1x/WPA2 Enterprise configuration on the majority of devices is a little more complex than PSK-
based Wireless solutions, which users are familiar with at home. As a result there is a need for on-boarding tools
to be made available to users, such as eduroam CAT.
Organisations providing eduroam will need to provide access to their chosen on-boarding tool; typically they will
be available via the organisations eduroam support web page. The challenge for many organisations is that
devices need Internet access to visit to the organisations eduroam support web page, this usually isn’t a problem
for mobile phones which usually have access to the Internet via the mobile network.
However, there are other situations which require an Internet connection or local network access to gain access
to the on-boarding tools. This includes where organisations have poor mobile coverage, but also for tablets and
laptop devices, which may not have access to the mobile network.
The solution deployed by many organisations is that of a ‘Walled Garden’, this is a network connection that
enables sufficient access to download on-boarding tools, gain access to support webpage and any other relevant
access, but it should fall short of providing full internet access.
Our work with the Further Education sector has highlighted the need for organisations deploying eduroam to
also deploy a ‘Walled Garden’ to on-board large numbers of users onto eduroam, and to enable users to ‘self-
service’. The ‘Walled Garden’ is typically made available by broadcasting an open wireless SSID.
The following guide is aimed to help you in configuring a walled garden network. This uses the Open-source
product pfSense, which is a Firewall solution based on FreeBSD. It’s a viable solution, even for organisations
which typically don’t use Unix-based operating systems, since it is almost entirely configured through a web
page, is comparable to appliance-based solutions, and is relatively easy to maintain and update.
pfSense can be configured to run in a Virtual Machine, this guide covers using VMware, but it can also be
deployed in a Xen environment, or on physical hardware.
Since the completion of this guide, there has been an update to pfSense from 2.2 to 2.3, and has is now known as
the pfSense Community Edition. Since the update the user interface has improved, but there is very little change
to the menu options and pages. These instructions have been tested with version 2.2.4 and 2.3.2, we recommend
using the latest stable version of the software.
Author: Jon Agland, Subject specialist (network technologies and infrastructure), Jisc
Document - Version 0.5
Date 9th August 2016

Walled garden for on-boarding user devices to eduroam
Background 2
Changelog
Version Modification Author Date
0.2 Initial version Jon Agland 19th January 2016
0.3 Updating following feedback from
eduroam (UK) team
Jon Agland 20th April 2016
0.4 Added eduroam CAT website list Jon Agland 6th July 2016
0.5 Update Background related to new
pfSense 2.3 release
Added missing Network screenshot from
Create New Virtual Machine
Changelog added
Jon Agland 9th August 2016

Walled garden for on-boarding user devices to eduroam
Considerations 3
Considerations You should take some time to consider and even design the solution, security is one of the key areas to think
about. Opening up an open wireless network is a significant risk. Whilst we have some confidence that pfSense
can provide a secure solution, you may wish to consider additional safeguards. We would suggest the following
LAN port of pfSense must be into a dedicated network (VLAN)
o VLAN should have no IP address on other Routers, Switches, Firewall
o DHCP/IP Helper/Directed-Broadcast is not required, DHCP will be provided by pfSense
o VLAN may need IP addressing (an SVI) on the Wireless controller
We know this to be true for Wireless controllers from Cisco and Meru.
o If you need multiple controllers at different locations, which then use different VLANs, then you
may need multiple pfSense units
o This VLAN will be your ‘walled garden’ where untrusted devices will be connected.
o The IP subnet used should be unique on your network
WAN port of pfSense
o Should be into a dedicated network (VLAN)
o Could be a ‘DMZ’, restricted network, or the perimeter/Internet edge network
o Ensure that pfSense Web and SSH interfaces are secured appropriately.
o The corresponding IP interface e.g. on a Router, Layer 3 Switch or Firewall, should have an
appropriate Access-List to offer further protection to your infrastructure
o Consider that a failure or misconfiguration of the pfSense could expose this network to untrusted
devices.
o The IP subnet used must be unique on your network, and be routable out the Internet but can
utilise NAT
Further usage of pfSense;
o You could utilise to provide a Captive Portal for non-eduroam users
Janet connected sites should consider our guidance on guest and public access.
o If using dynamic VLANs in your eduroam/RADIUS configuration, your ‘walled-garden’ could be
elected as the default VLAN for the controller or for RADIUS in the event of a configuration issue.
o A separate network and interface could be used to provide the eduroam visitor network, this will
need to be compliant with the eduroam (UK) Technical Specification.

Walled garden for on-boarding user devices to eduroam
Preparing 4
Preparing Start by downloading the latest ISO image from the pfSense website. Whilst a 32-bit version is available for
most installations you should use the 64-bit version.
The pfSense ISO image is compressed using gzip, therefore you may need a package such as 7Zip or you could
gunzip the file on a Linux/Unix system.
Download the Captive Portal PHP code from Gist/Github.
RAW PHP version for download (RAW PHP version of file)
Code version for info/comment/contribution (Gist/Github of captiveportal.php)

Walled garden for on-boarding user devices to eduroam
Creating a VMware Virtual Machine for pfSense 5
Creating a VMware Virtual Machine for pfSense Open up your VMware vSphere Client, Right click on your Host/Cluster/Resource Pool and choose ‘New Virtual
Machine’
Walled garden for on-boarding user devices to eduroam
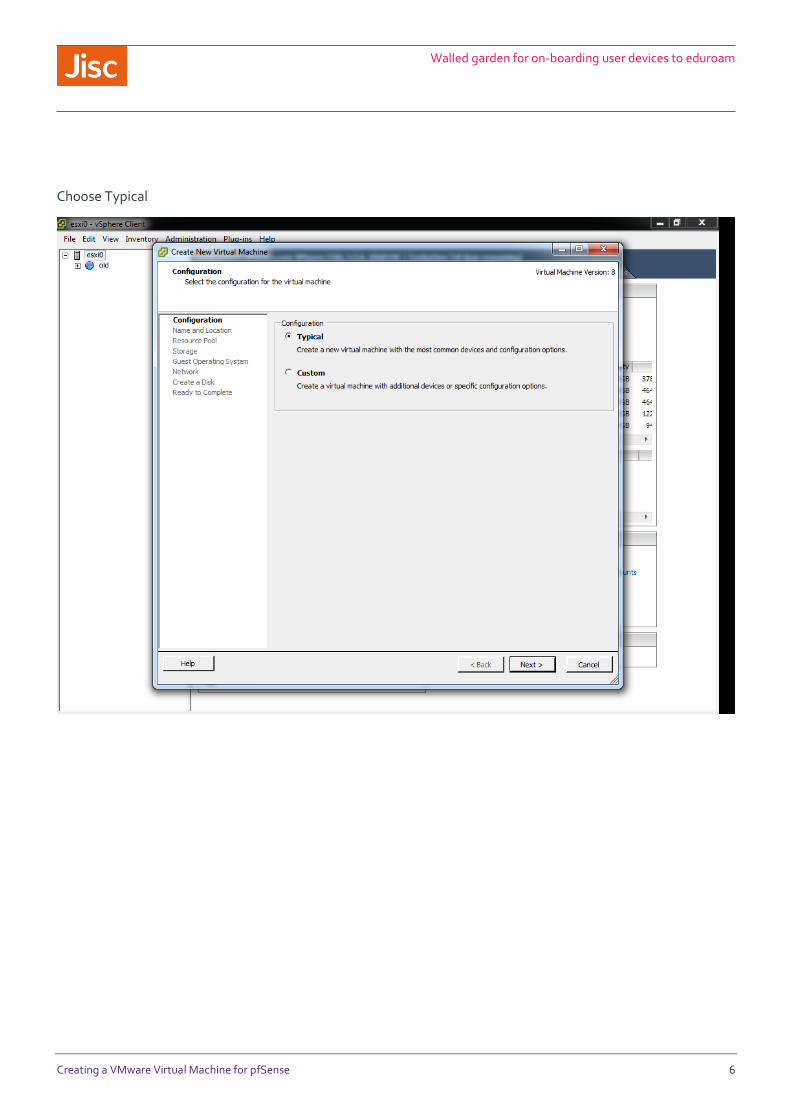
Creating a VMware Virtual Machine for pfSense 6
Choose Typical

Walled garden for on-boarding user devices to eduroam
Creating a VMware Virtual Machine for pfSense 7
Enter a name for your virtual machine (in this instance we chose pfsense-wg)
Walled garden for on-boarding user devices to eduroam
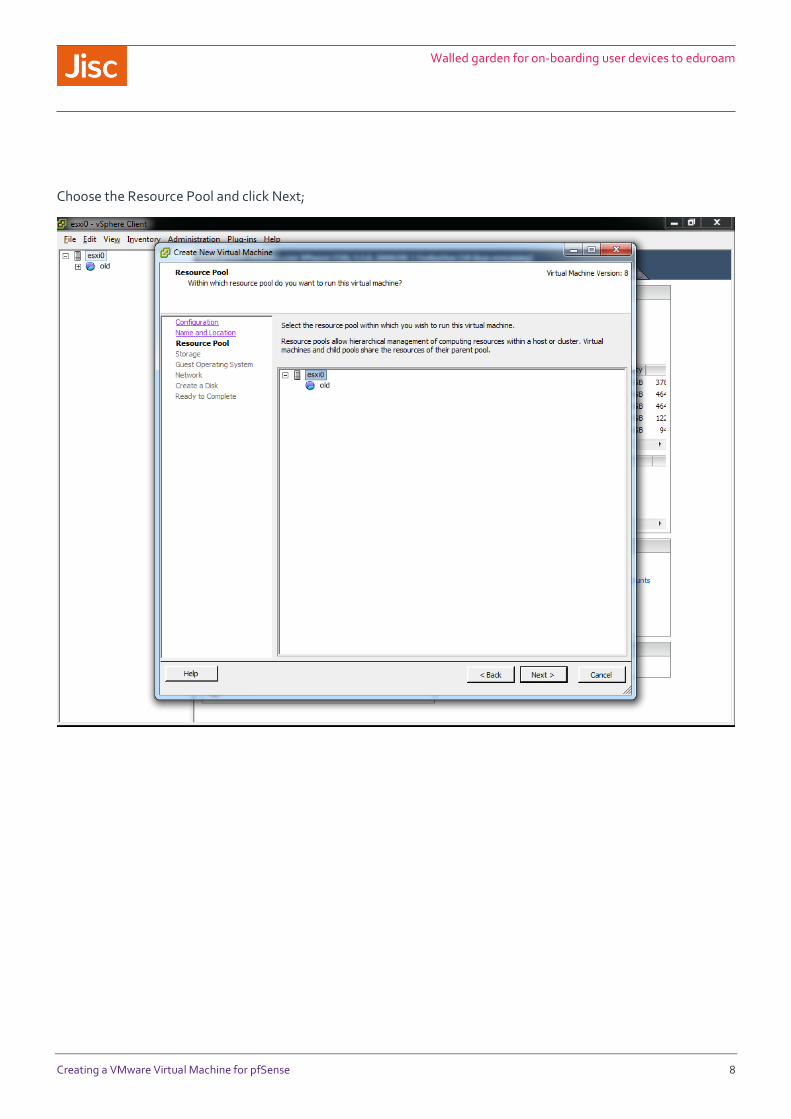
Creating a VMware Virtual Machine for pfSense 8
Choose the Resource Pool and click Next;

Walled garden for on-boarding user devices to eduroam
Creating a VMware Virtual Machine for pfSense 9
Choose an appropriate storage location. In most environments a SAN or NAS are used, rather than local disks,
you will require ~8GB of storage to start. The storage needn’t be your Highest Tier (e.g.. SSD/SAS), Lower Tier
storage (e.g. SATA) will be more than sufficient for most usage.

Walled garden for on-boarding user devices to eduroam
Creating a VMware Virtual Machine for pfSense 10
Choose the number of network interfaces and their connections, at this stage choose just one interface for
example on a LAN or DMZ. At a later stage we will add an additional interface for the ‘Walled Garden’, do not
add it now.
Walled garden for on-boarding user devices to eduroam
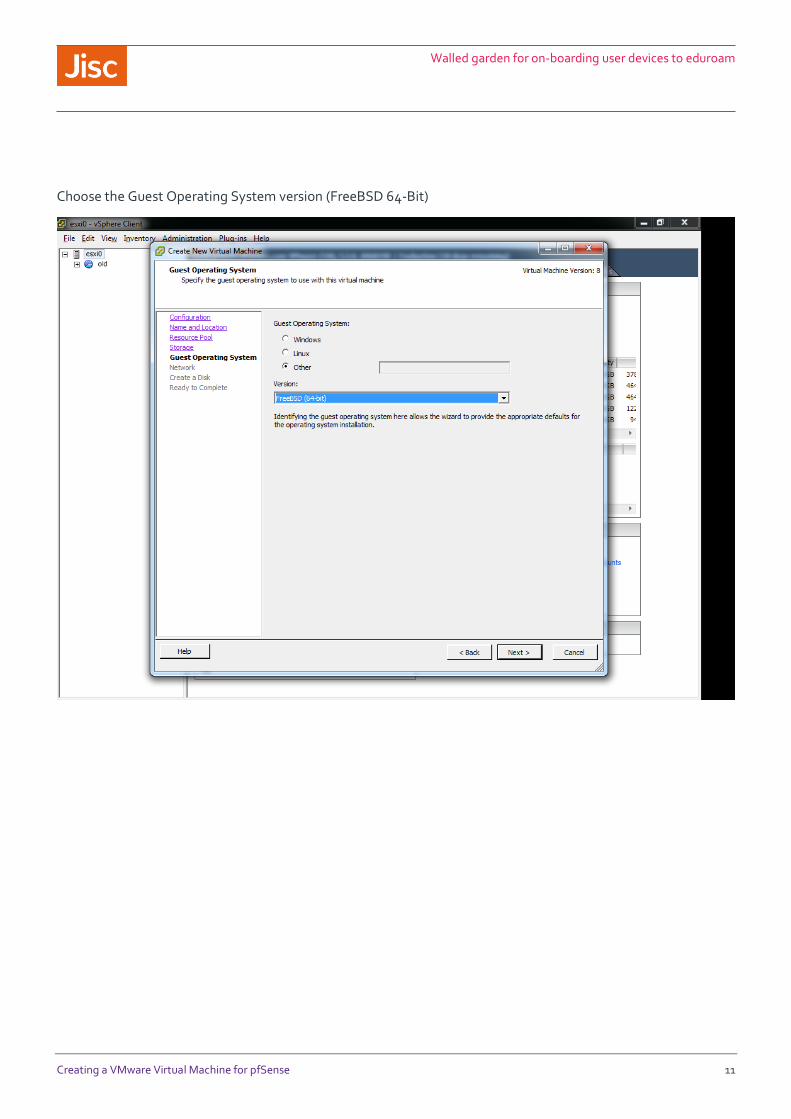
Creating a VMware Virtual Machine for pfSense 11
Choose the Guest Operating System version (FreeBSD 64-Bit)

Walled garden for on-boarding user devices to eduroam
Creating a VMware Virtual Machine for pfSense 12
Select the size of the disk. This can remain at the default of 8GB. The type i.e. Thick Provision or Thin Provision
will depend on your procedures;

Walled garden for on-boarding user devices to eduroam
Creating a VMware Virtual Machine for pfSense 13
On this screen, remember to tick ‘Edit the virtual machine settings before completion

Walled garden for on-boarding user devices to eduroam
Creating a VMware Virtual Machine for pfSense 14
Complete the following changes
Memory - adjust as required (for small installations 256MB may be suitable).
CPUs – adjust as required (for most installations 1 CPU will be sufficient)
Floppy – can be removed
NIC – Check that the Interface is set correctly, this will become the ‘WAN Interface’ within pfSense.
Walled garden for on-boarding user devices to eduroam
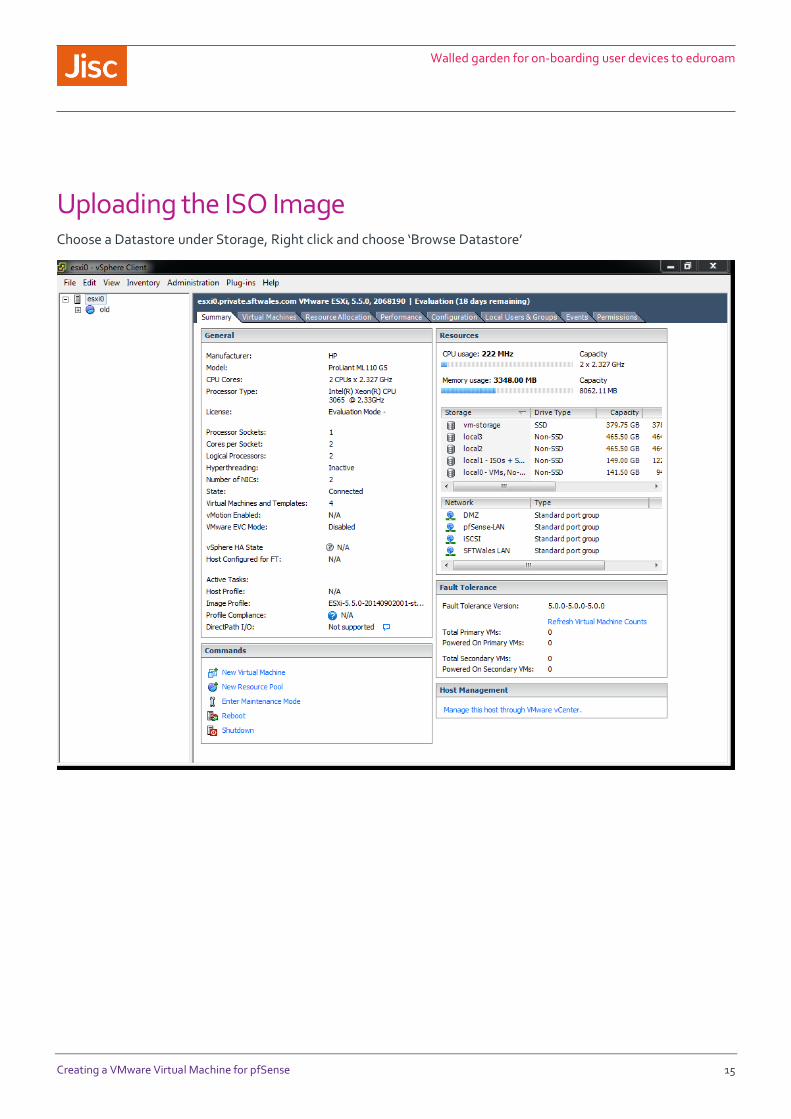
Creating a VMware Virtual Machine for pfSense 15
Uploading the ISO Image Choose a Datastore under Storage, Right click and choose ‘Browse Datastore’
Walled garden for on-boarding user devices to eduroam
Creating a VMware Virtual Machine for pfSense 16
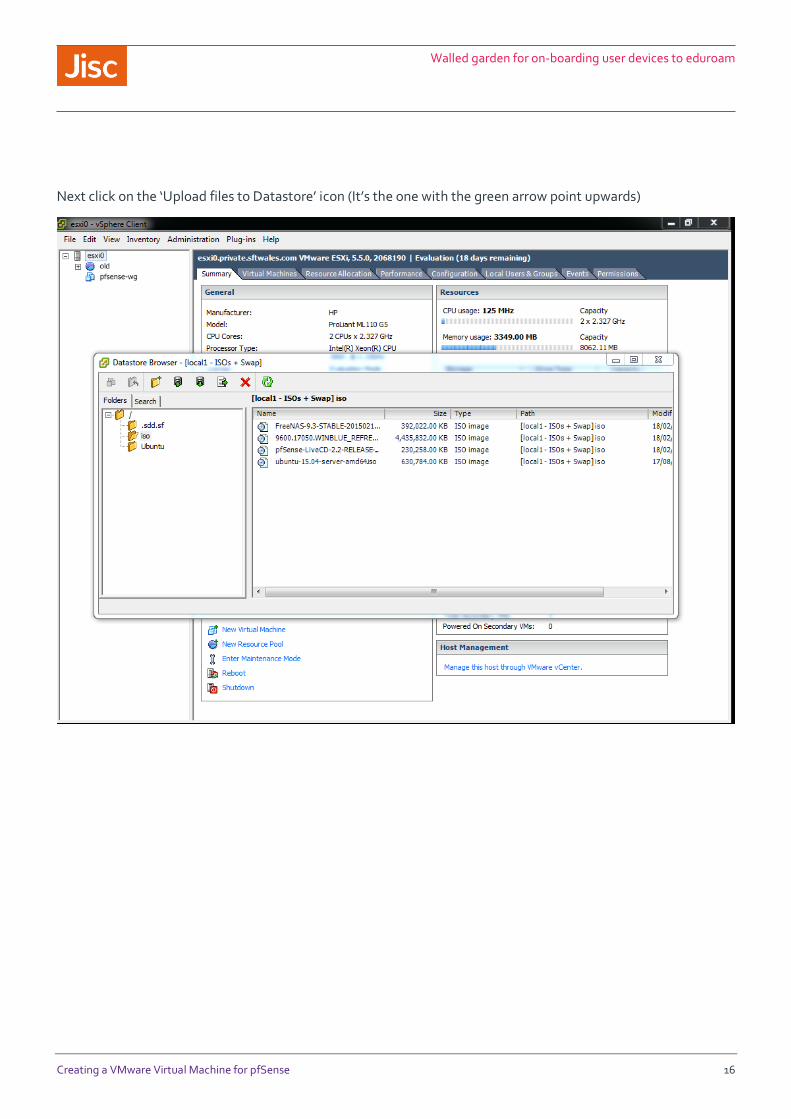
Next click on the ‘Upload files to Datastore’ icon (It’s the one with the green arrow point upwards)
Walled garden for on-boarding user devices to eduroam
Creating a VMware Virtual Machine for pfSense 17
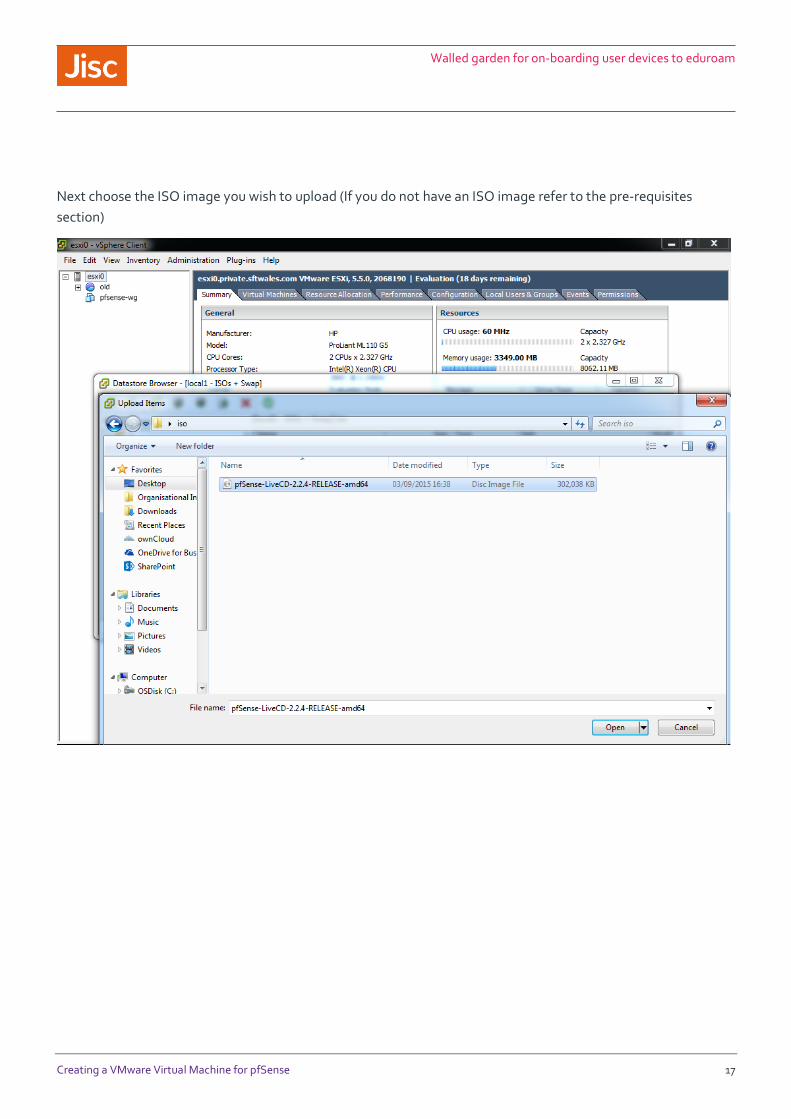
Next choose the ISO image you wish to upload (If you do not have an ISO image refer to the pre-requisites
section)
Walled garden for on-boarding user devices to eduroam
Creating a VMware Virtual Machine for pfSense 18
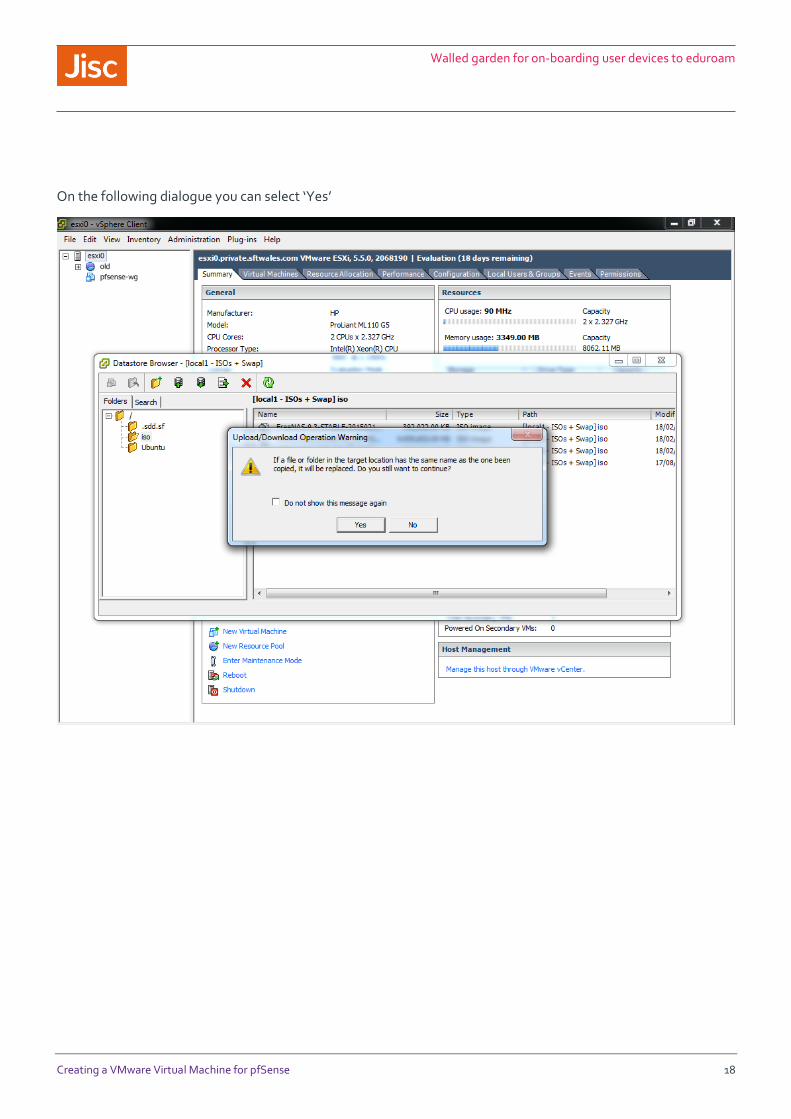
On the following dialogue you can select ‘Yes’
Walled garden for on-boarding user devices to eduroam
Creating a VMware Virtual Machine for pfSense 19
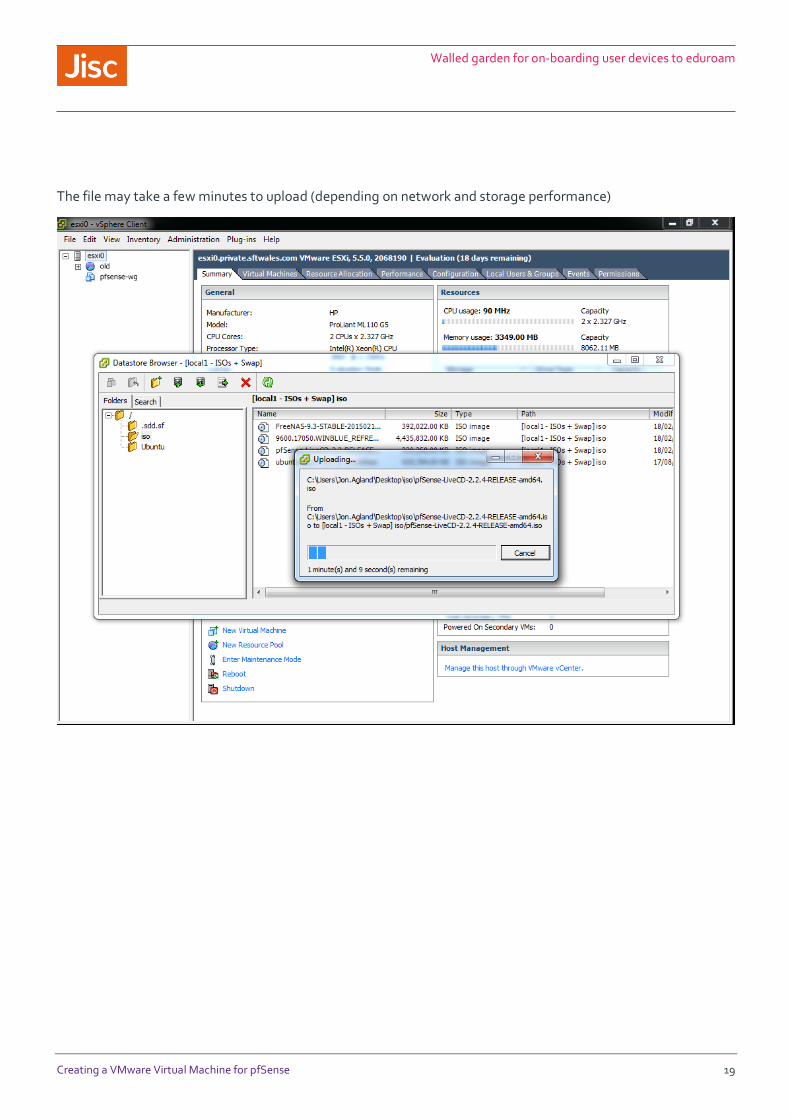
The file may take a few minutes to upload (depending on network and storage performance)

Walled garden for on-boarding user devices to eduroam
Creating a VMware Virtual Machine for pfSense 20
Attaching ISO Image to the VM We now need to select the Virtual Machine (‘pfsense-wg’ in this case) and under Commands choose ‘Edit
Settings’
Walled garden for on-boarding user devices to eduroam
Creating a VMware Virtual Machine for pfSense 21
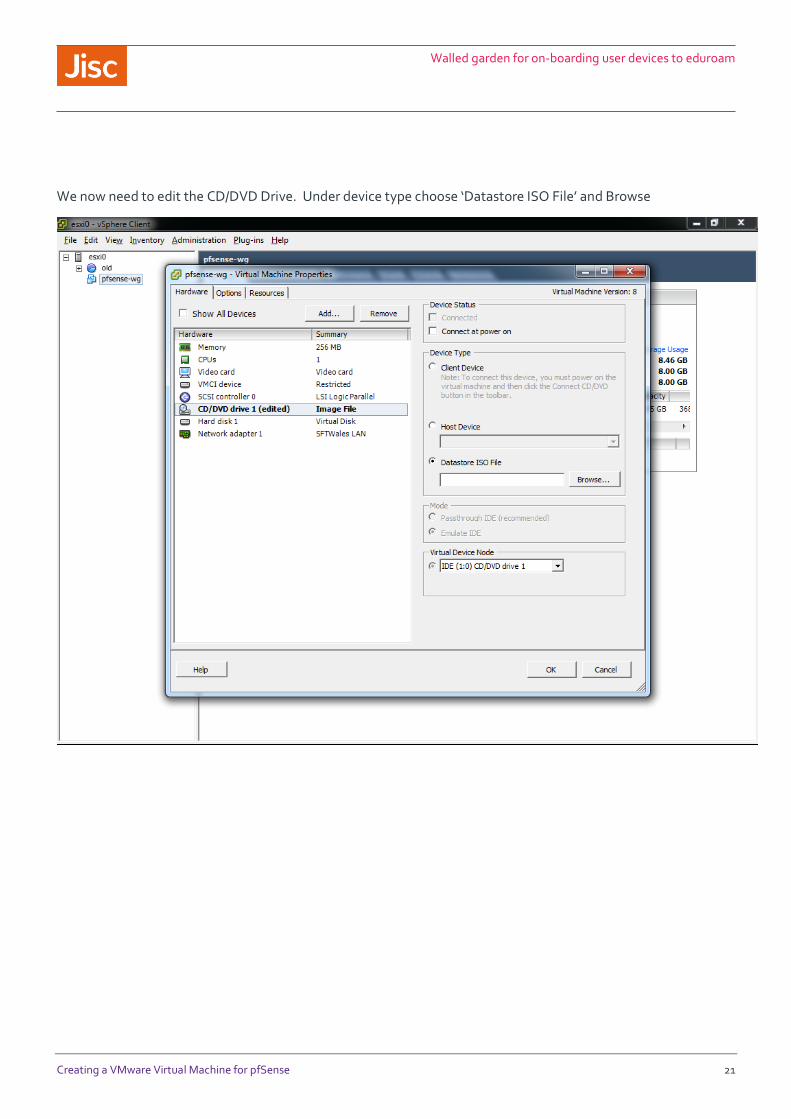
We now need to edit the CD/DVD Drive. Under device type choose ‘Datastore ISO File’ and Browse

Walled garden for on-boarding user devices to eduroam
Creating a VMware Virtual Machine for pfSense 22
Ensure that the option for ‘Connect at power on’ is ticked

Walled garden for on-boarding user devices to eduroam
pfSense Installation 23
pfSense Installation Within a VM installation you are unlikely to want to setup VLANs, these can be handled within the
Hypervisor i.e. VMWare, in this case choose ‘n’
Within a Physical server you may need to setup VLANs, In this case choose ‘y’
Walled garden for on-boarding user devices to eduroam
pfSense Installation 24
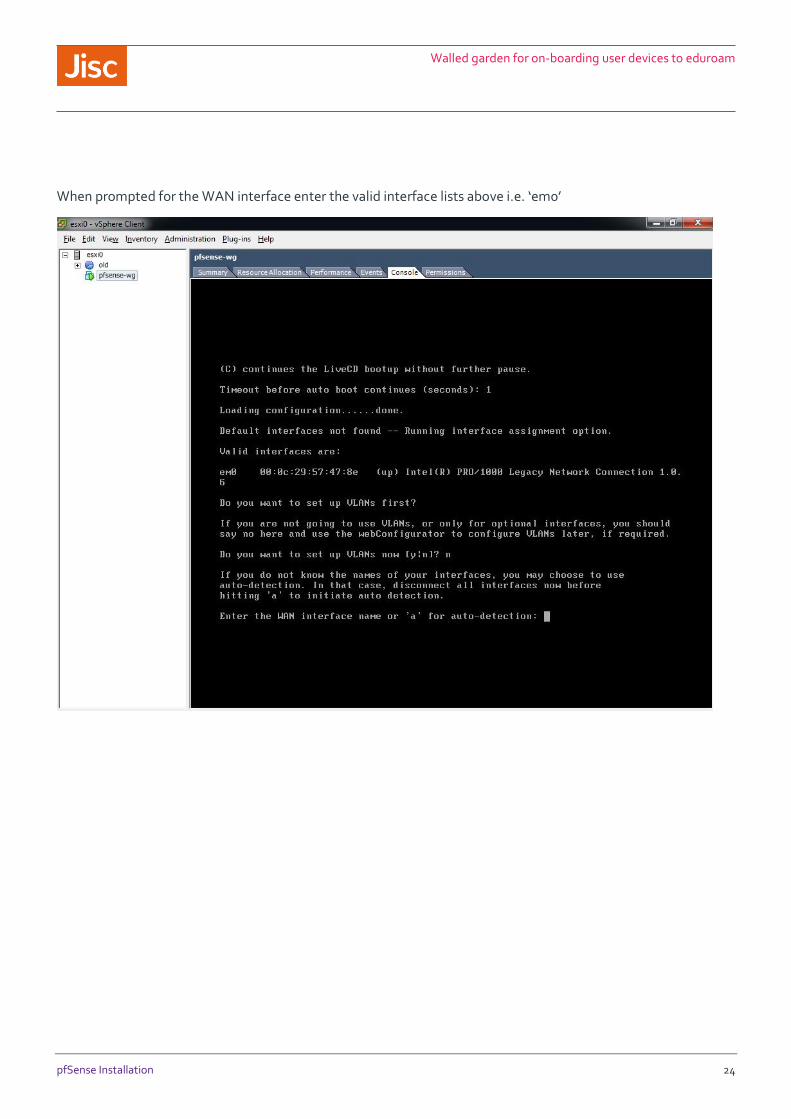
When prompted for the WAN interface enter the valid interface lists above i.e. ‘em0’
Walled garden for on-boarding user devices to eduroam
pfSense Installation 25
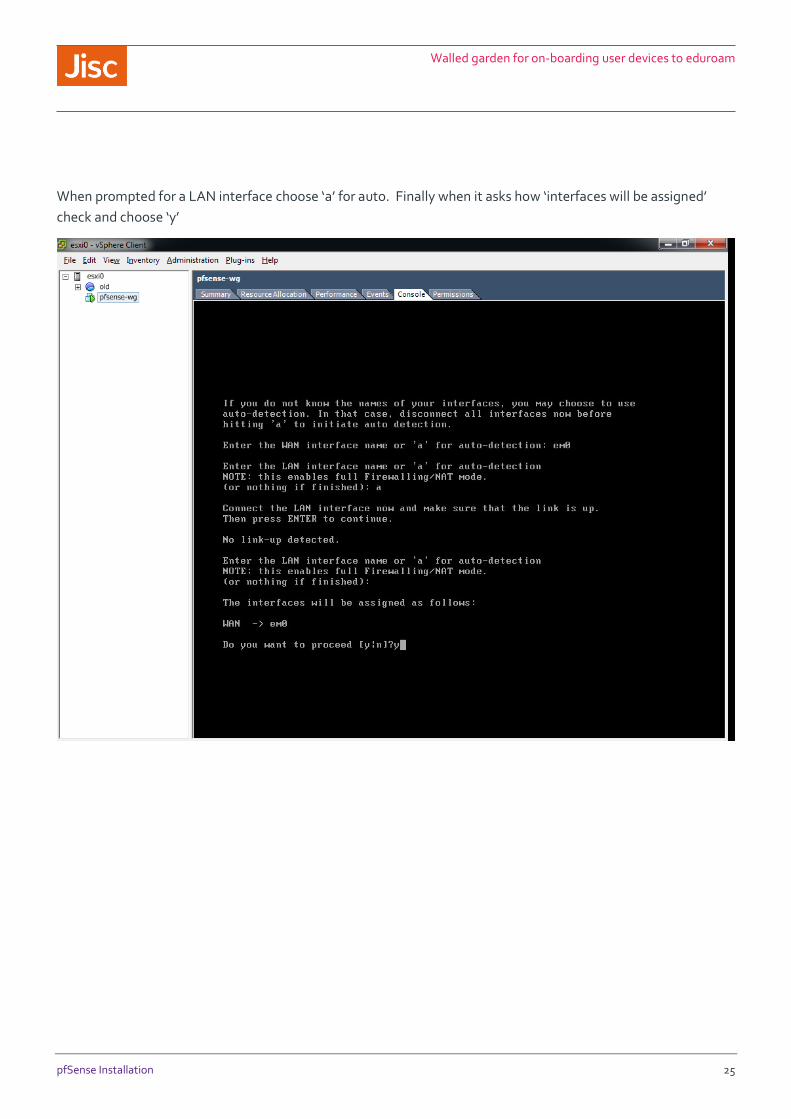
When prompted for a LAN interface choose ‘a’ for auto. Finally when it asks how ‘interfaces will be assigned’
check and choose ‘y’
Walled garden for on-boarding user devices to eduroam
pfSense Installation 26
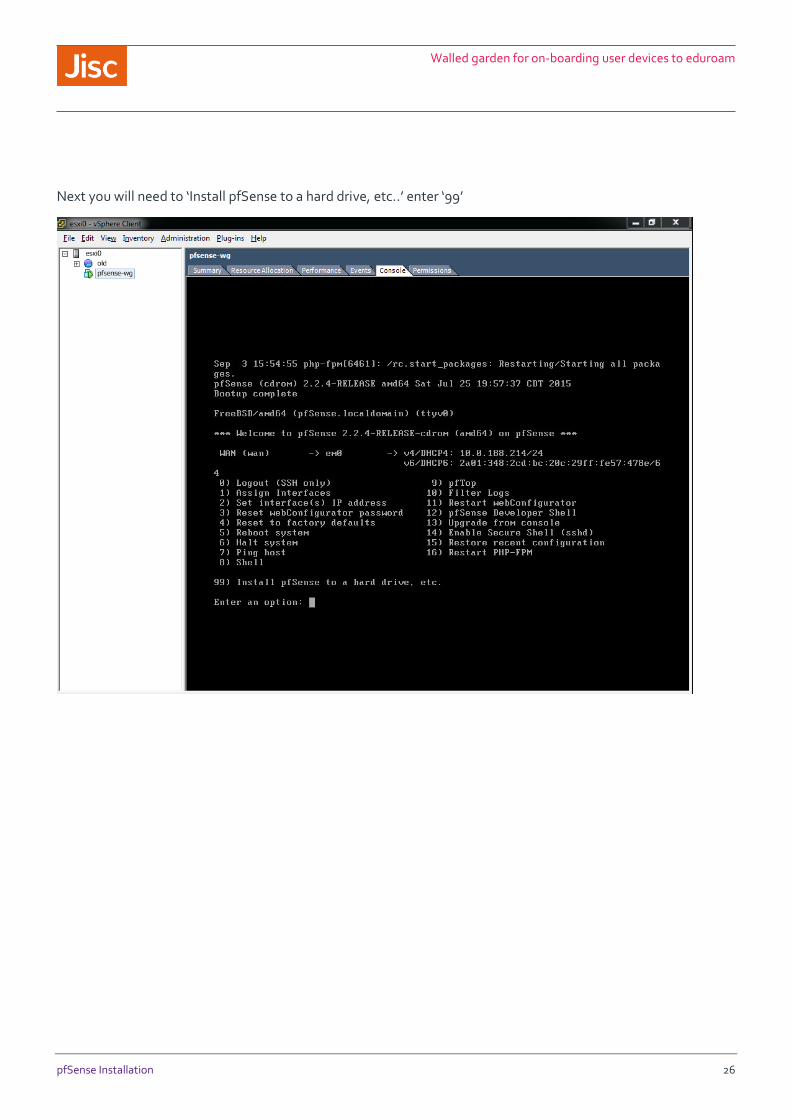
Next you will need to ‘Install pfSense to a hard drive, etc..’ enter ‘99’
Walled garden for on-boarding user devices to eduroam
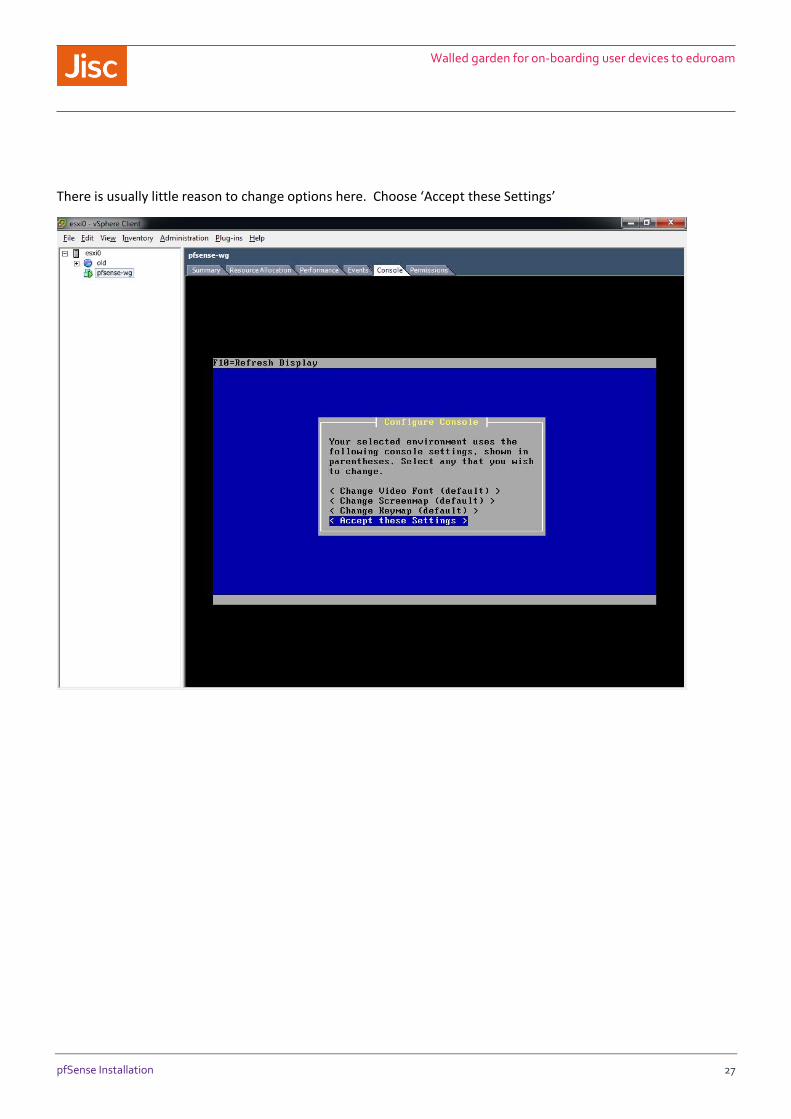
pfSense Installation 27
There is usually little reason to change options here. Choose ‘Accept these Settings’
Walled garden for on-boarding user devices to eduroam
pfSense Installation 28
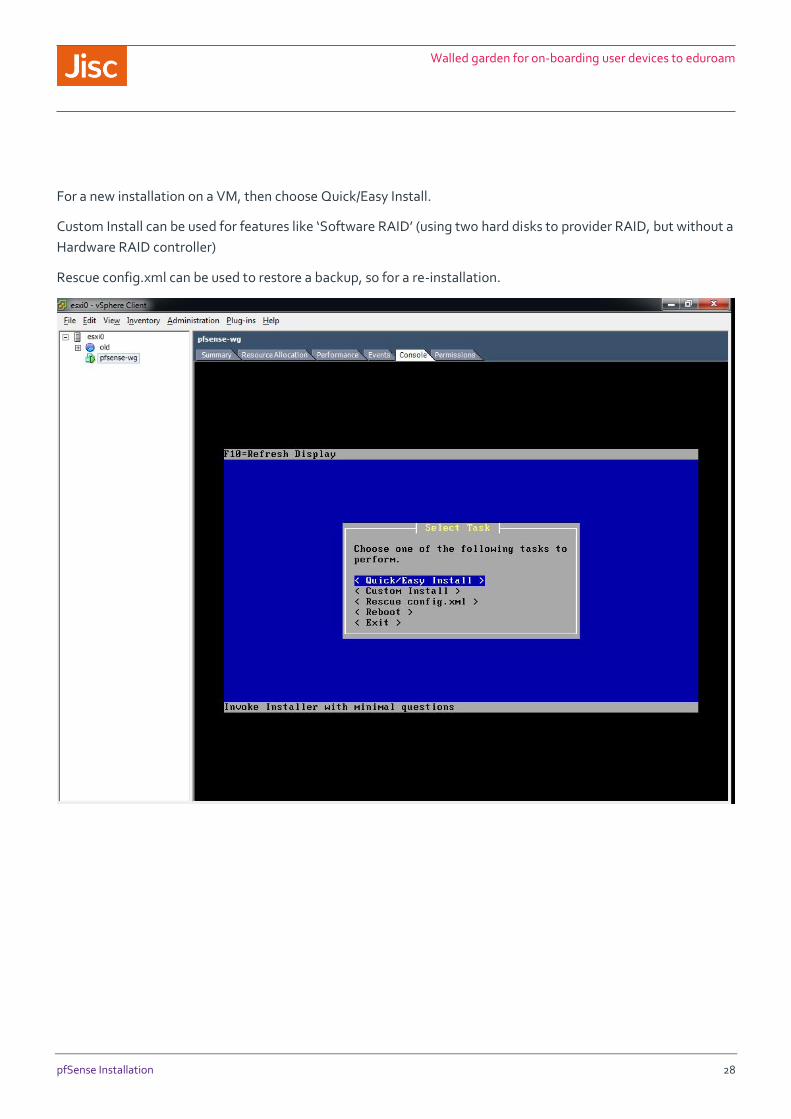
For a new installation on a VM, then choose Quick/Easy Install.
Custom Install can be used for features like ‘Software RAID’ (using two hard disks to provider RAID, but without a
Hardware RAID controller)
Rescue config.xml can be used to restore a backup, so for a re-installation.

Walled garden for on-boarding user devices to eduroam
pfSense Installation 29
For a new VM installation there should be nothing to consider here, just choose ‘OK’
For any other installation take more notice, especially if you have any disks containing data you may wish to
retain.
Walled garden for on-boarding user devices to eduroam
pfSense Installation 30

Walled garden for on-boarding user devices to eduroam
pfSense Installation 31
Once again for a VM installation we can go with the default, so choose ‘Standard Kernel’. For some physical
hardware installations you may want to use the ‘Embedded kernel’
Walled garden for on-boarding user devices to eduroam
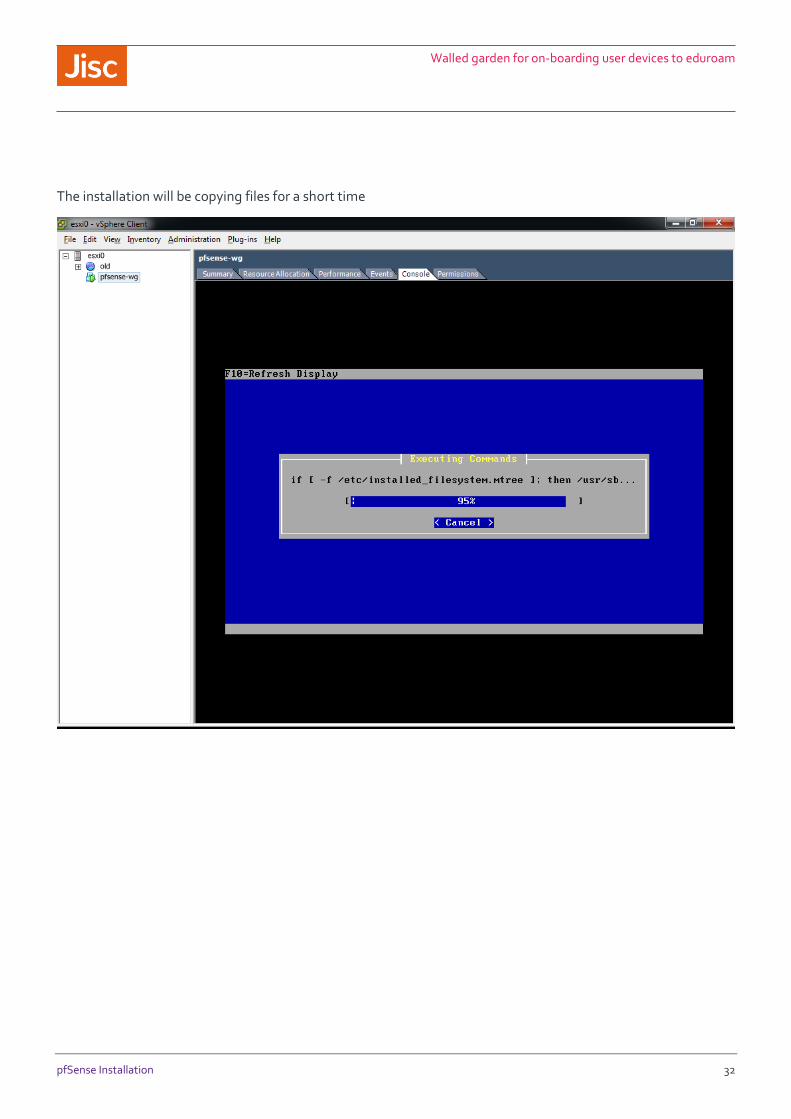
pfSense Installation 32
The installation will be copying files for a short time
Walled garden for on-boarding user devices to eduroam
pfSense Installation 33
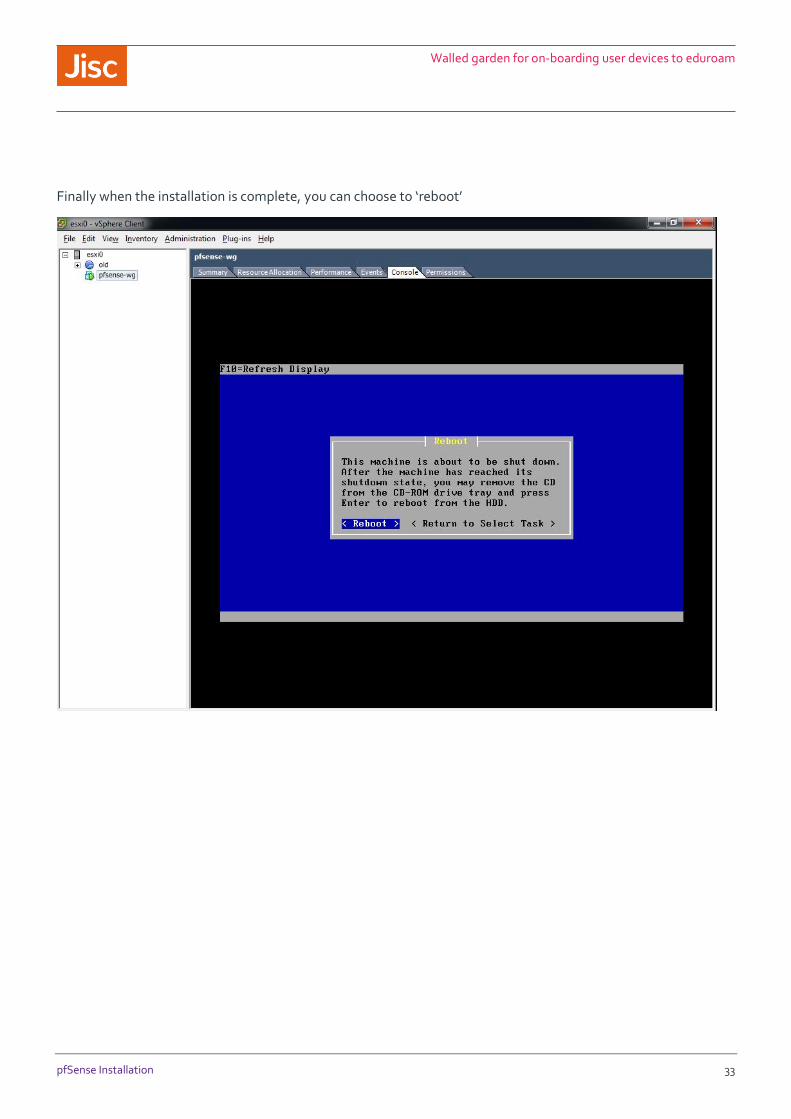
Finally when the installation is complete, you can choose to ‘reboot’

Walled garden for on-boarding user devices to eduroam
pfSense Installation 34
After a reboot, you should be presented with a screen similar to the following, showing that pfSense is now
installed. Make a note of the WAN IP address, as you will need to visit this in a Web Browser.
Walled garden for on-boarding user devices to eduroam
Configuring pfSense 35
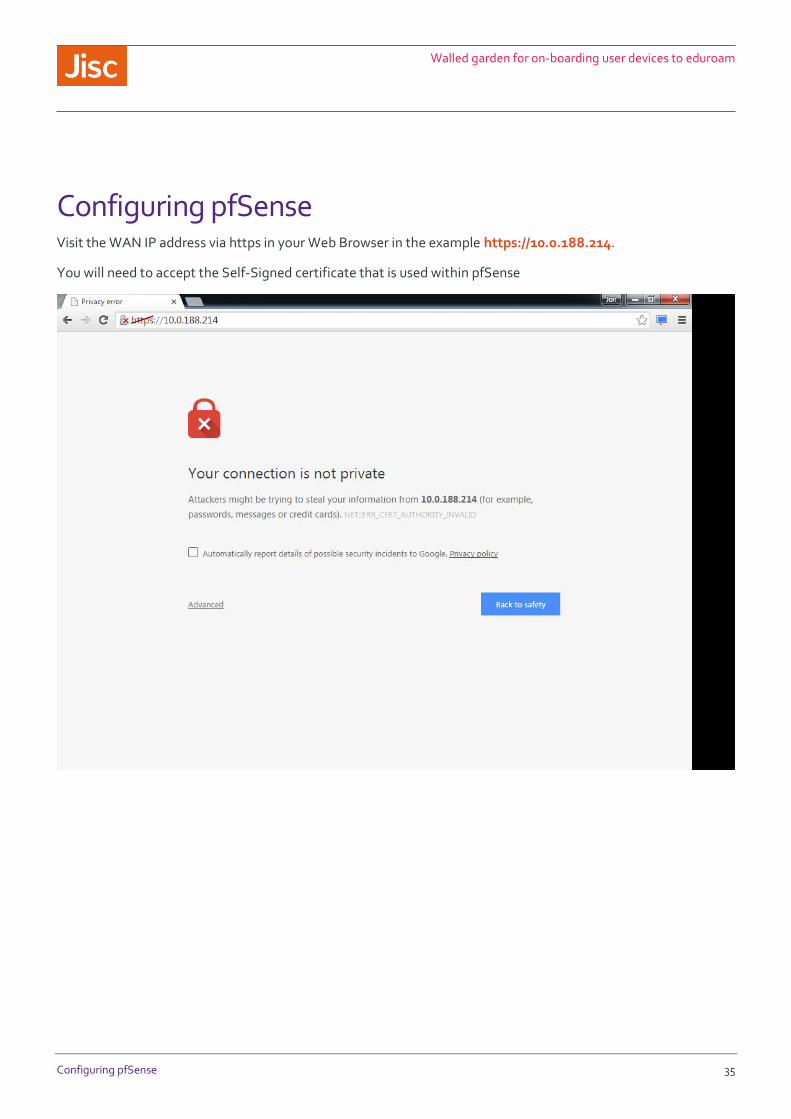
Configuring pfSense Visit the WAN IP address via https in your Web Browser in the example https://10.0.188.214.
You will need to accept the Self-Signed certificate that is used within pfSense

Walled garden for on-boarding user devices to eduroam
Configuring pfSense 36
On the initial screen click ‘Next’
Walled garden for on-boarding user devices to eduroam
Configuring pfSense 37
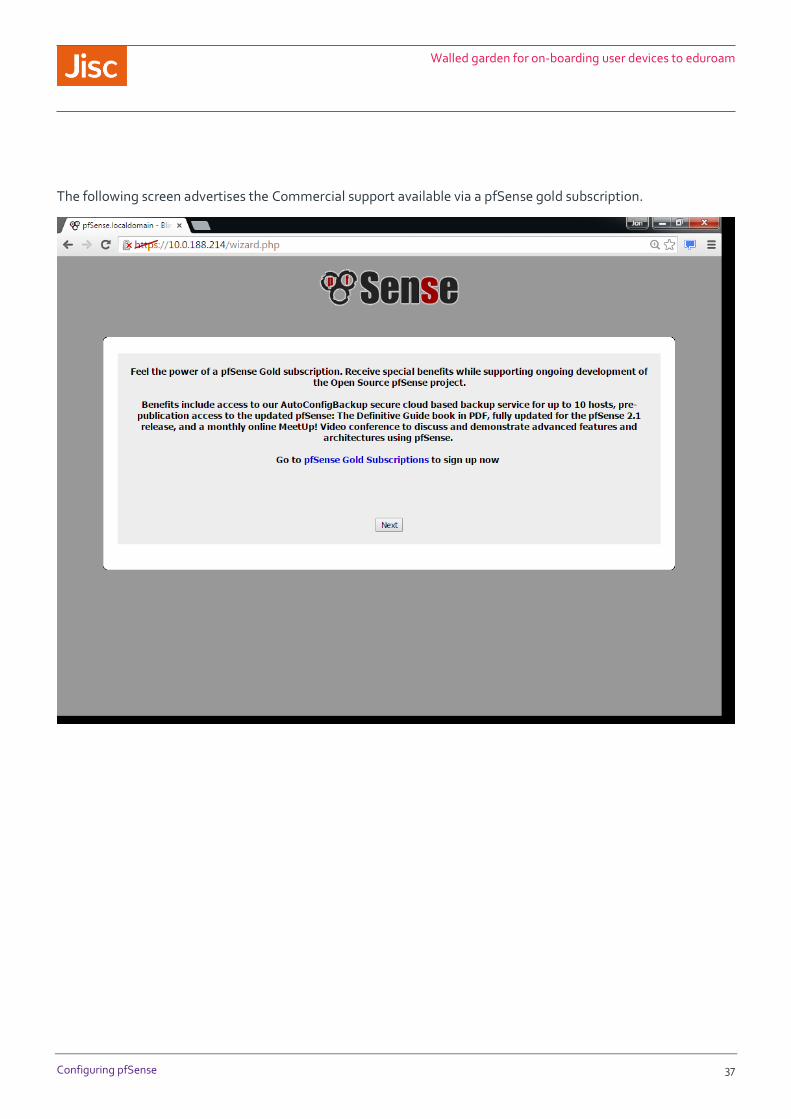
The following screen advertises the Commercial support available via a pfSense gold subscription.
Walled garden for on-boarding user devices to eduroam
Configuring pfSense 38
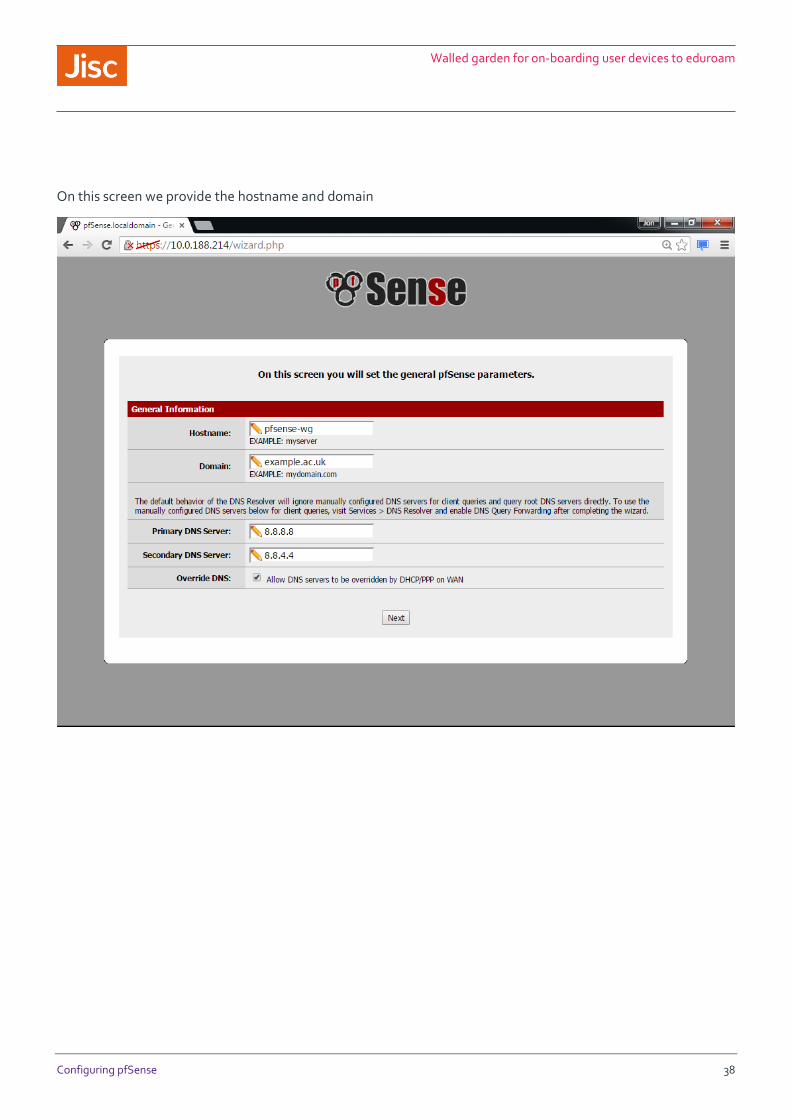
On this screen we provide the hostname and domain
Walled garden for on-boarding user devices to eduroam
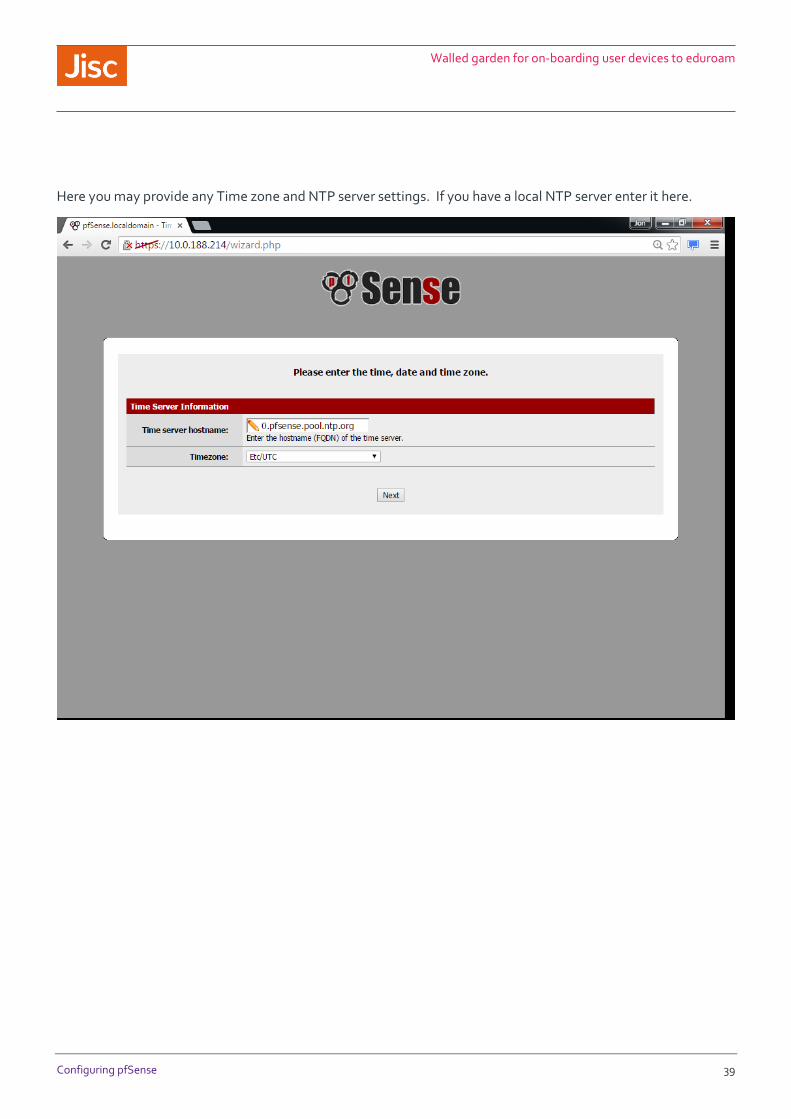
Configuring pfSense 39
Here you may provide any Time zone and NTP server settings. If you have a local NTP server enter it here.

Walled garden for on-boarding user devices to eduroam
Configuring pfSense 40
On this screen you may wish to remove the tick related to ‘Block RFC1918 Private Networks’, especially if the
WAN interface is on such a network.
Walled garden for on-boarding user devices to eduroam
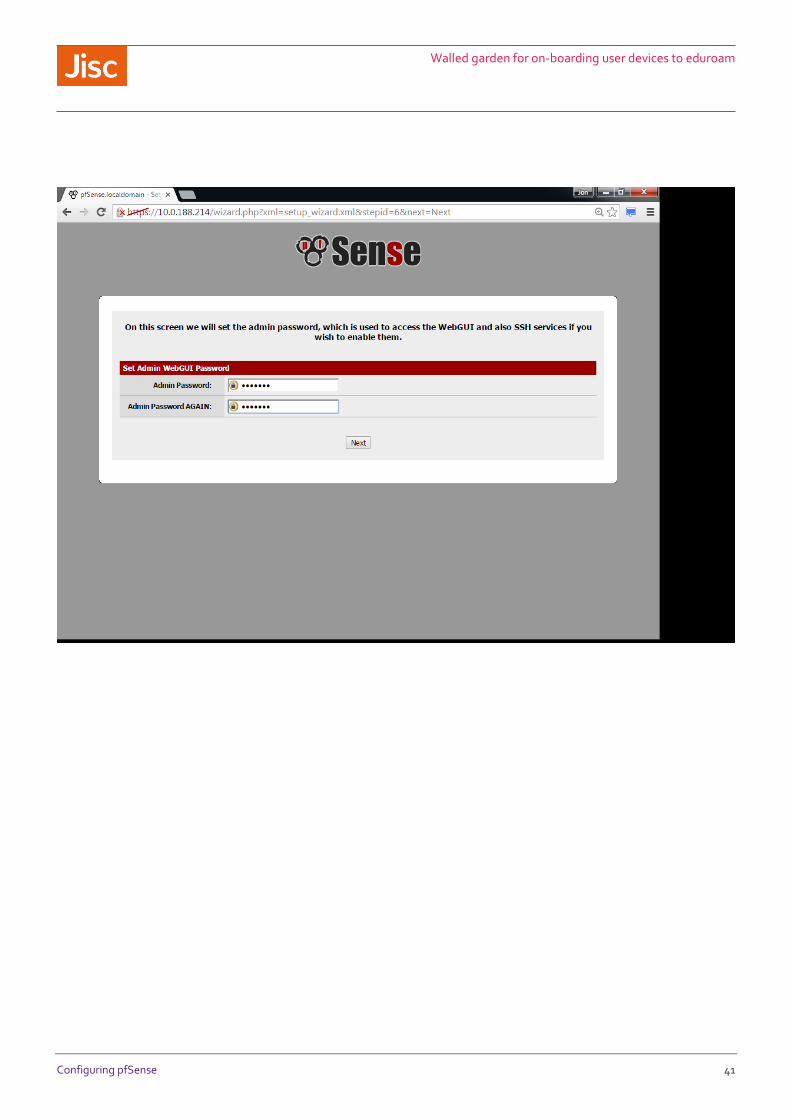
Configuring pfSense 41
Walled garden for on-boarding user devices to eduroam
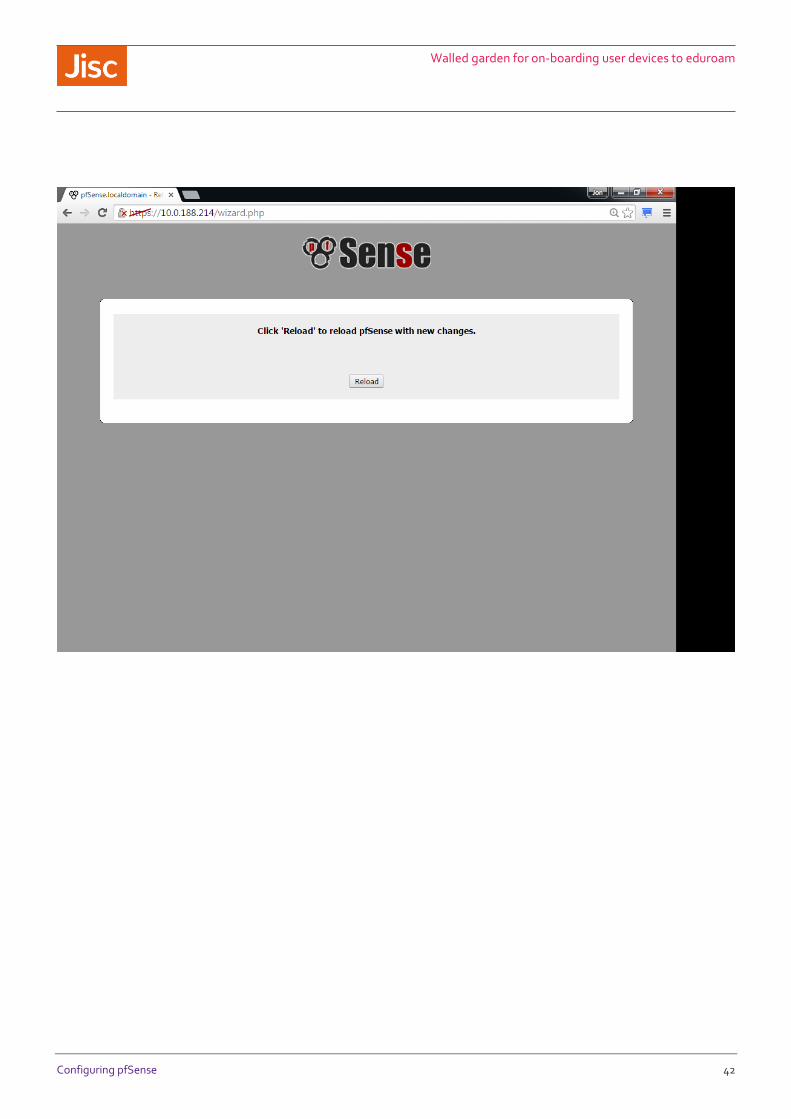
Configuring pfSense 42

Walled garden for on-boarding user devices to eduroam
Configuring pfSense 43

Walled garden for on-boarding user devices to eduroam
Configuring pfSense 44

Walled garden for on-boarding user devices to eduroam
Configuring pfSense 45
Adding a LAN Interface
VMWare ESXi Networking Configuration
Firstly confirm that you have the required LAN or VLAN configured as a Virtual Machine Port Group in VMWare.
If you do then you can skip to the section on ‘Virtual Machine Networking Configuration’. If you are using a
Virtual Machine cluster then you should ensure that all Virtual Machine hosts (Hypervisors) are configured
identically, or at least consistently.

Walled garden for on-boarding user devices to eduroam
Configuring pfSense 46
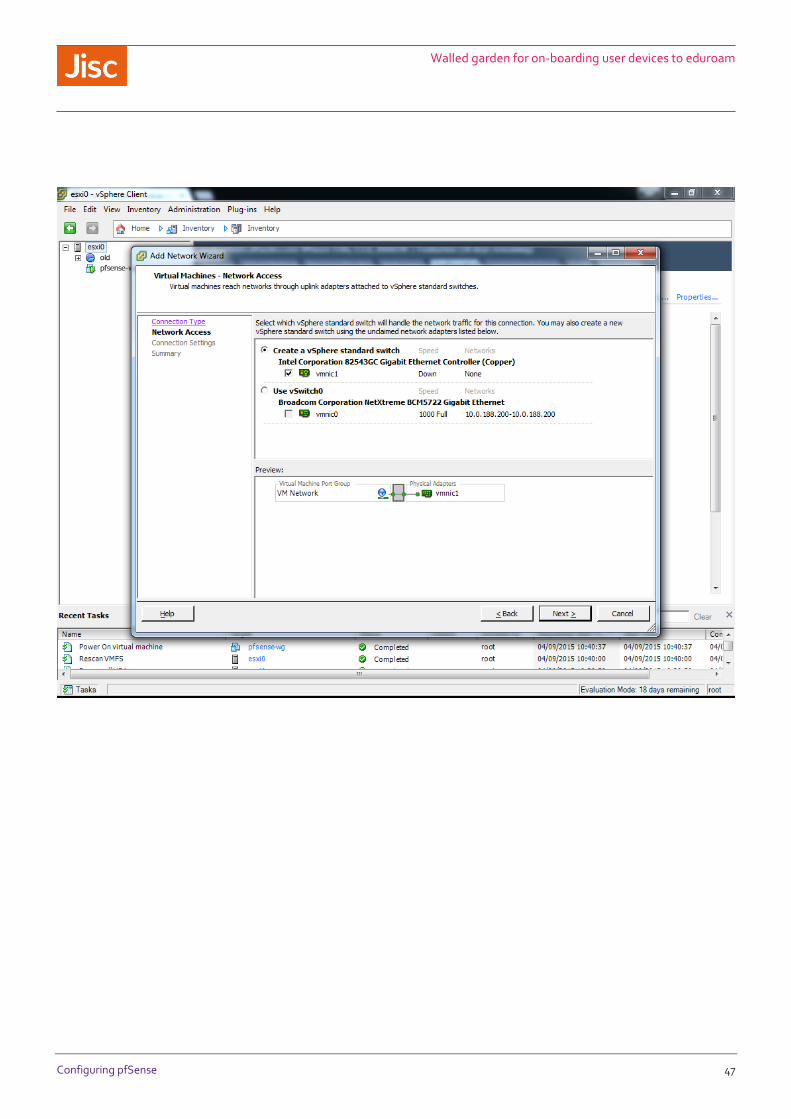
Choose Add, and Virtual Machine
This screen is where you select the vmnic or vSwitch concerned.
In this scenario we are using physical NIC on the ESXi server, this plugged directly into the wireless
AP/Controller. You may see this in a production environment, where you are using a physical NIC to the
VMWare server and untagged/access VLAN on the corresponding switch
In most production environments you will be making use of existing NICs, and therefore an existing
vSwitch and select the correct VLAN ID.
Walled garden for on-boarding user devices to eduroam
Configuring pfSense 47
Walled garden for on-boarding user devices to eduroam
Configuring pfSense 48
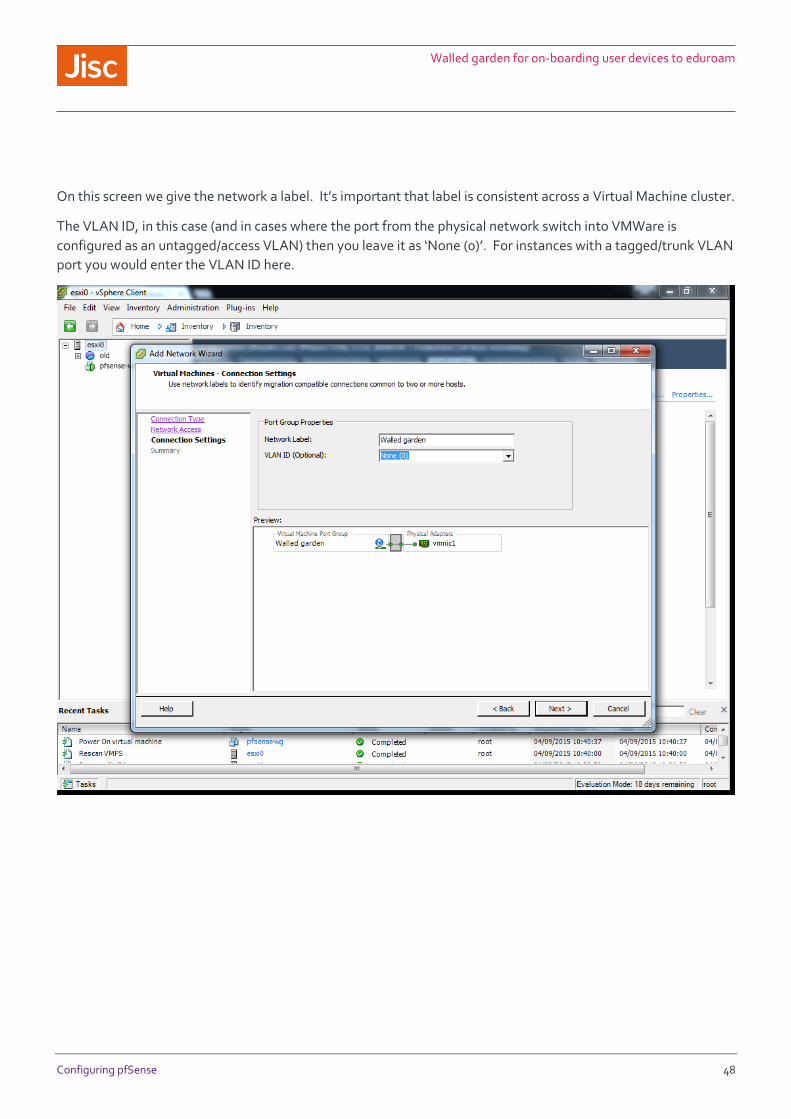
On this screen we give the network a label. It’s important that label is consistent across a Virtual Machine cluster.
The VLAN ID, in this case (and in cases where the port from the physical network switch into VMWare is
configured as an untagged/access VLAN) then you leave it as ‘None (0)’. For instances with a tagged/trunk VLAN
port you would enter the VLAN ID here.
Walled garden for on-boarding user devices to eduroam
Configuring pfSense 49
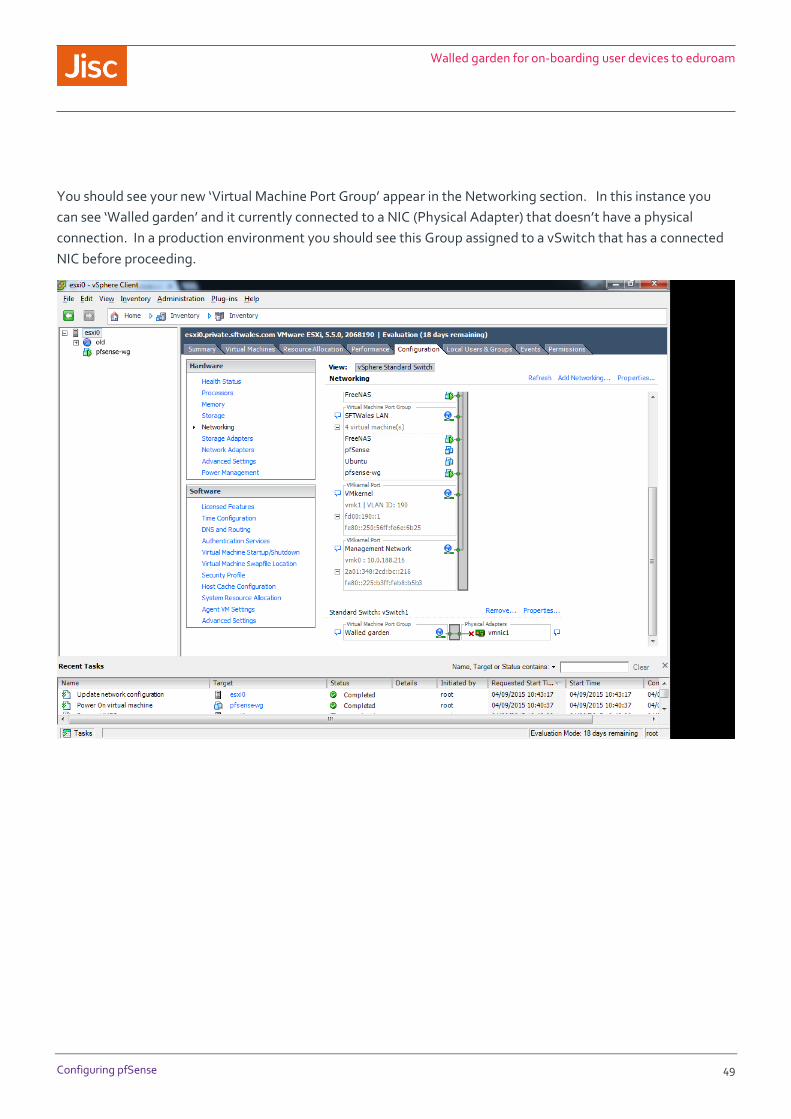
You should see your new ‘Virtual Machine Port Group’ appear in the Networking section. In this instance you
can see ‘Walled garden’ and it currently connected to a NIC (Physical Adapter) that doesn’t have a physical
connection. In a production environment you should see this Group assigned to a vSwitch that has a connected
NIC before proceeding.

Walled garden for on-boarding user devices to eduroam
Configuring pfSense 50
Virtual Machine Networking Configuration
Click Edit Settings, on the pfSense VM
Walled garden for on-boarding user devices to eduroam
Configuring pfSense 51
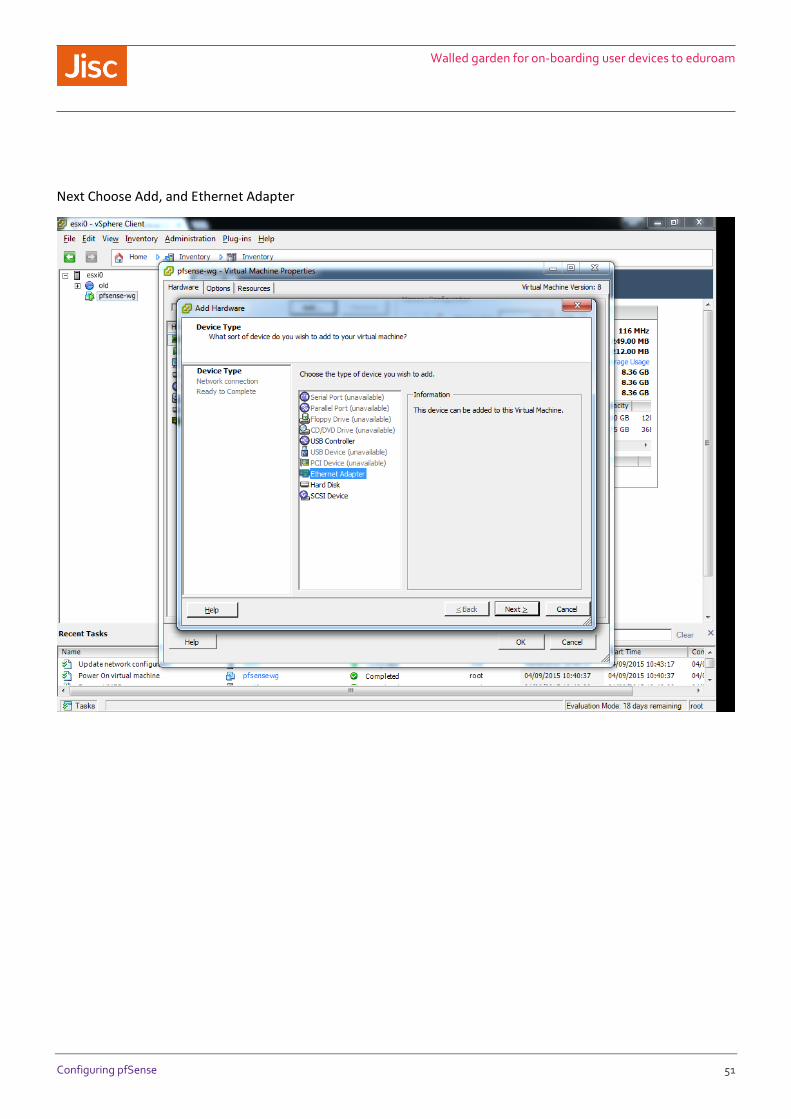
Next Choose Add, and Ethernet Adapter

Walled garden for on-boarding user devices to eduroam
Configuring pfSense 52
You will be asked to select the Adapter Type, E1000 is the default and can be used with pfSense.
Network Label – here you will choose the Virtual Machine Port group you configured earlier. In this case example
we select ‘Walled garden’

Walled garden for on-boarding user devices to eduroam
Configuring pfSense 53
Adding the interface into pfSense
Log back into pfSense and choose Reboot system
Walled garden for on-boarding user devices to eduroam
Configuring pfSense 54
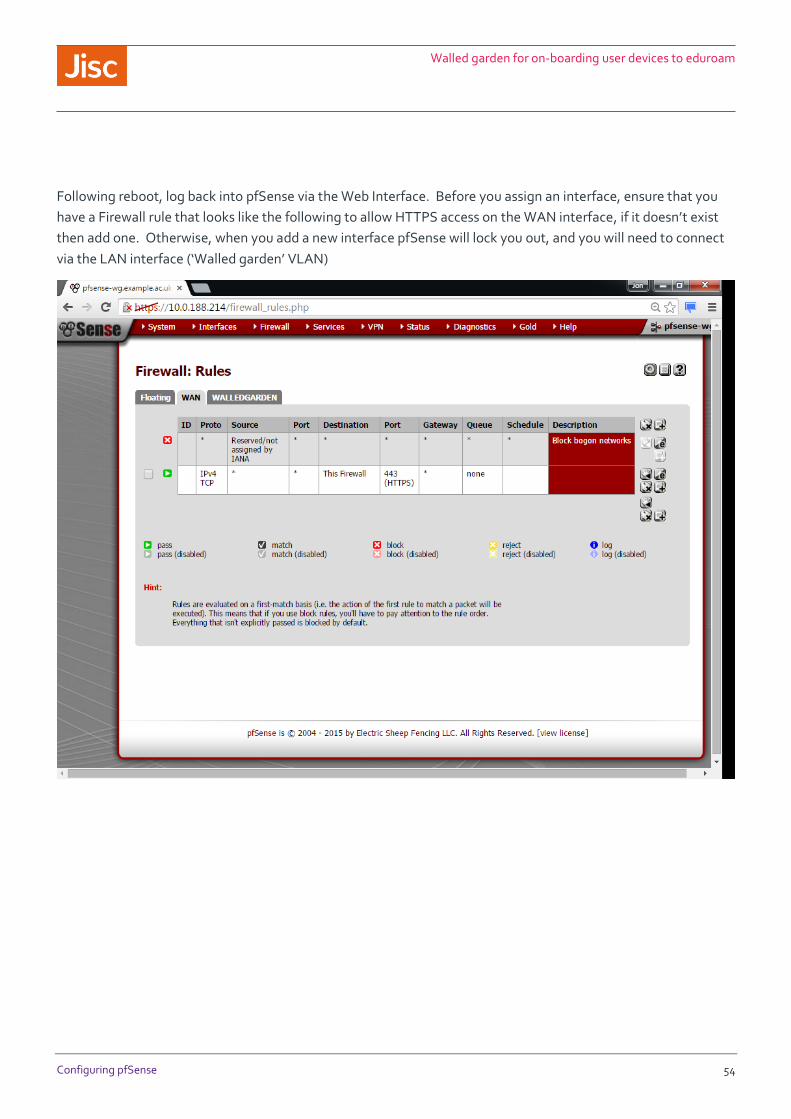
Following reboot, log back into pfSense via the Web Interface. Before you assign an interface, ensure that you
have a Firewall rule that looks like the following to allow HTTPS access on the WAN interface, if it doesn’t exist
then add one. Otherwise, when you add a new interface pfSense will lock you out, and you will need to connect
via the LAN interface (‘Walled garden’ VLAN)
Walled garden for on-boarding user devices to eduroam
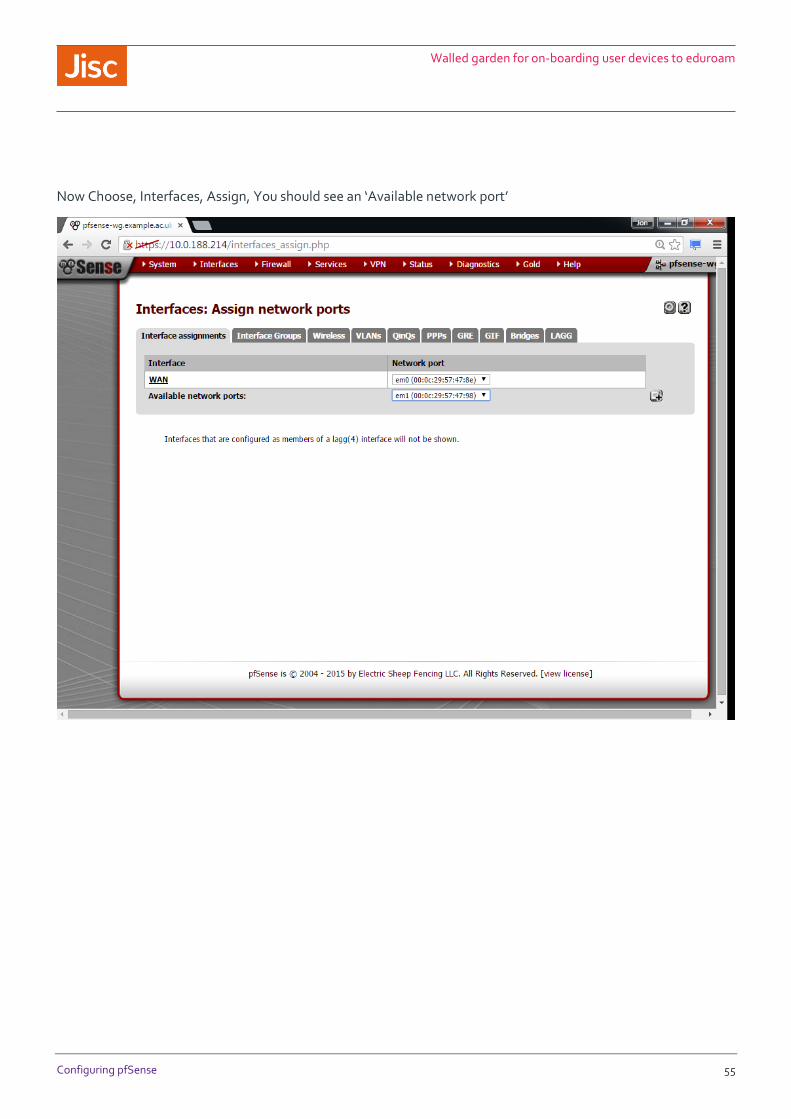
Configuring pfSense 55
Now Choose, Interfaces, Assign, You should see an ‘Available network port’

Walled garden for on-boarding user devices to eduroam
Configuring pfSense 56
Choosing add will create a LAN interface

Walled garden for on-boarding user devices to eduroam
Configuring pfSense 57
Click on LAN to edit the interface. We would recommend changing the description to something like ‘Walled
Garden’ reflecting the Network Label/VLAN name used on the network. The same can be done for the WAN
interface.
Walled garden for on-boarding user devices to eduroam
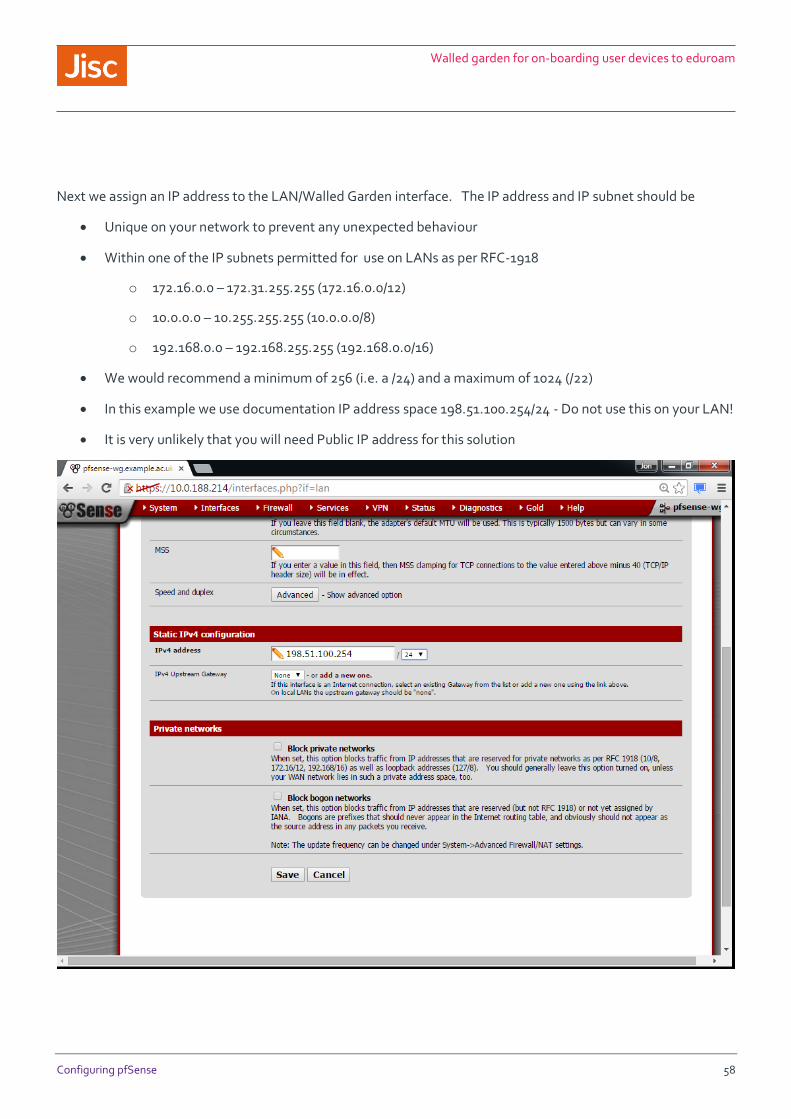
Configuring pfSense 58
Next we assign an IP address to the LAN/Walled Garden interface. The IP address and IP subnet should be
Unique on your network to prevent any unexpected behaviour
Within one of the IP subnets permitted for use on LANs as per RFC-1918
o 172.16.0.0 – 172.31.255.255 (172.16.0.0/12)
o 10.0.0.0 – 10.255.255.255 (10.0.0.0/8)
o 192.168.0.0 – 192.168.255.255 (192.168.0.0/16)
We would recommend a minimum of 256 (i.e. a /24) and a maximum of 1024 (/22)
In this example we use documentation IP address space 198.51.100.254/24 - Do not use this on your LAN!
It is very unlikely that you will need Public IP address for this solution

Walled garden for on-boarding user devices to eduroam
Configuring pfSense 59
Next reconfigure the DHCP server. By going to Services, DHCP. You will need to enter the IP range to be
assigned via DHCP.
Generally you can assign almost the complete ‘Available range’. We would recommending keeping some IPs
free if you are aware that your wireless controller(s) require SVIs (Meru and Cisco do).

Walled garden for on-boarding user devices to eduroam
Configuring pfSense 60
Captive Portal configuration Under Services, you will find Captive Portal
Walled garden for on-boarding user devices to eduroam
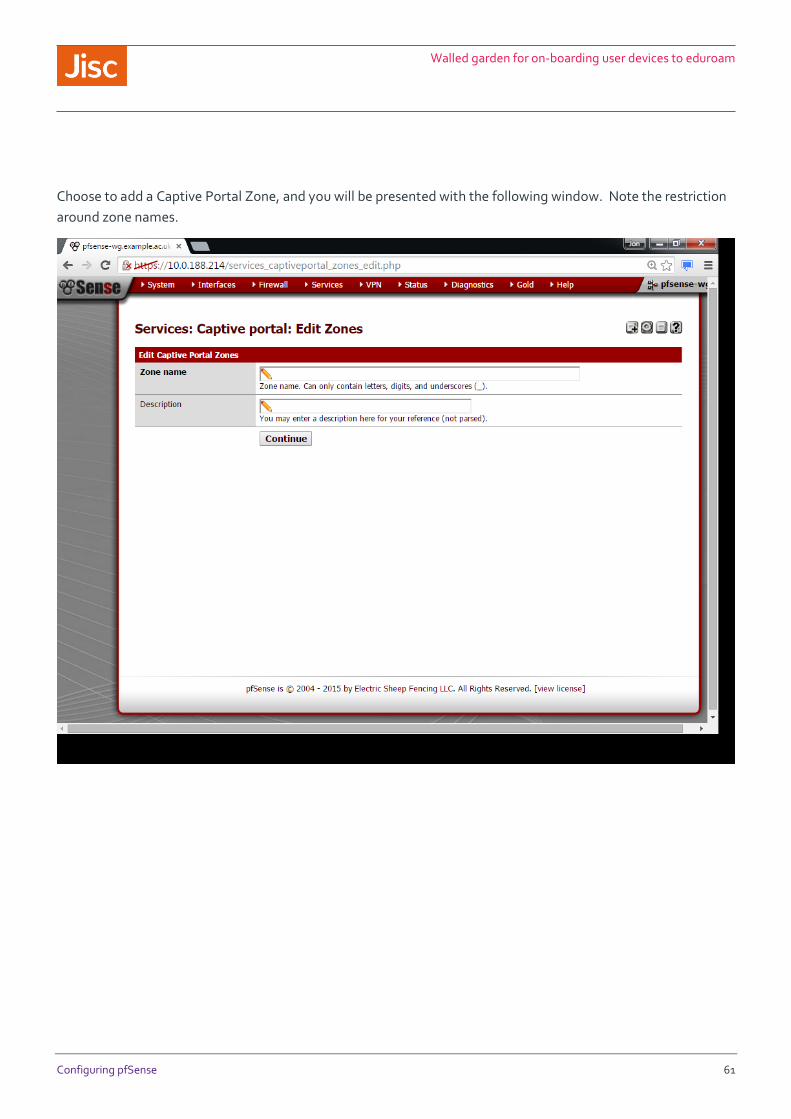
Configuring pfSense 61
Choose to add a Captive Portal Zone, and you will be presented with the following window. Note the restriction
around zone names.
Walled garden for on-boarding user devices to eduroam
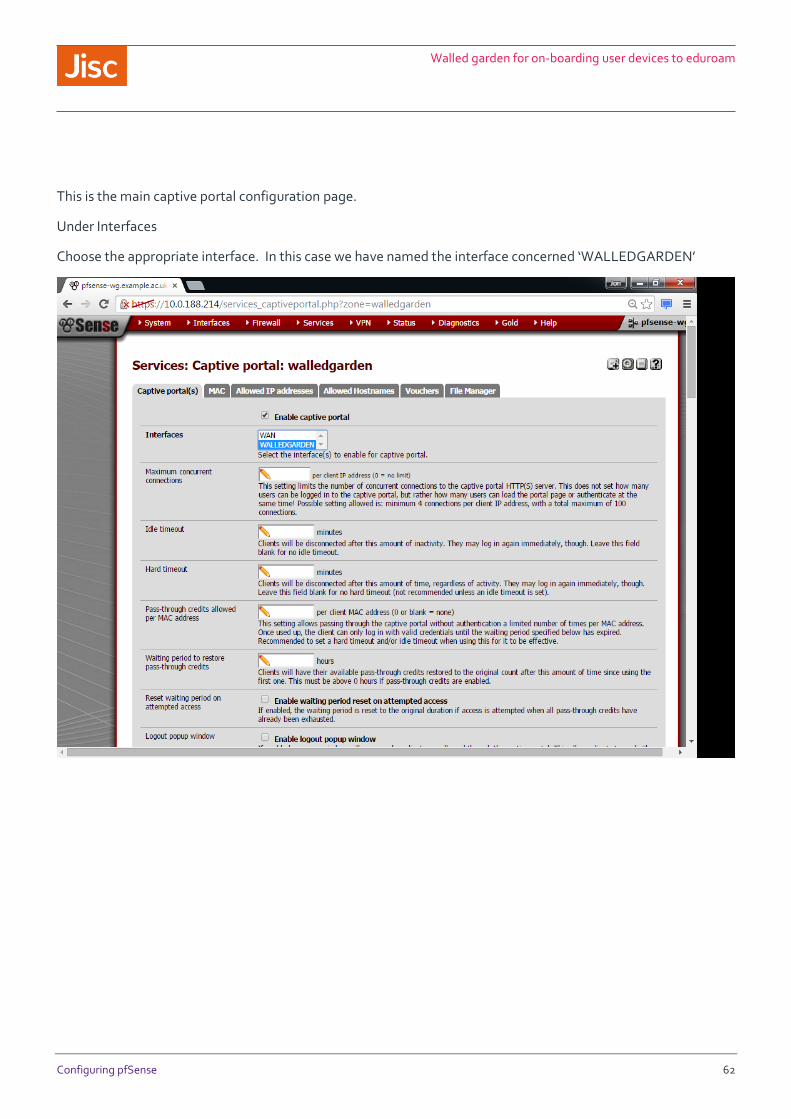
Configuring pfSense 62
This is the main captive portal configuration page.
Under Interfaces
Choose the appropriate interface. In this case we have named the interface concerned ‘WALLEDGARDEN’
Walled garden for on-boarding user devices to eduroam
Configuring pfSense 63
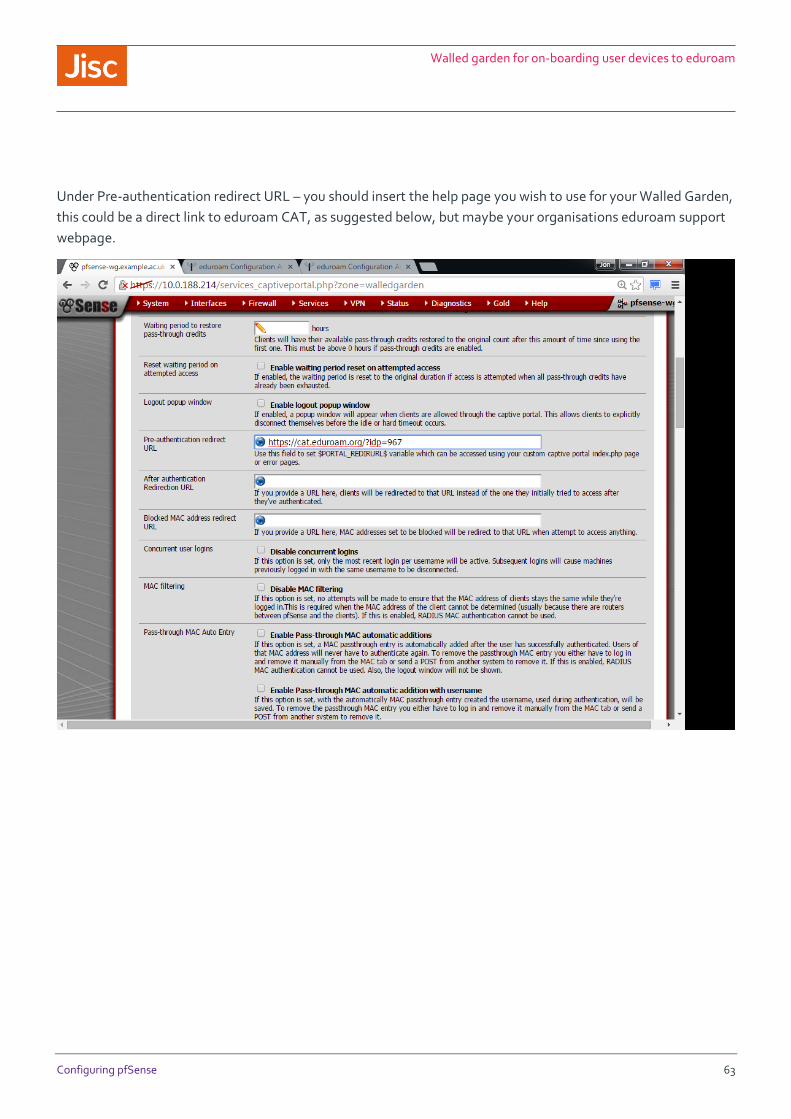
Under Pre-authentication redirect URL – you should insert the help page you wish to use for your Walled Garden,
this could be a direct link to eduroam CAT, as suggested below, but maybe your organisations eduroam support
webpage.
Walled garden for on-boarding user devices to eduroam
Configuring pfSense 64
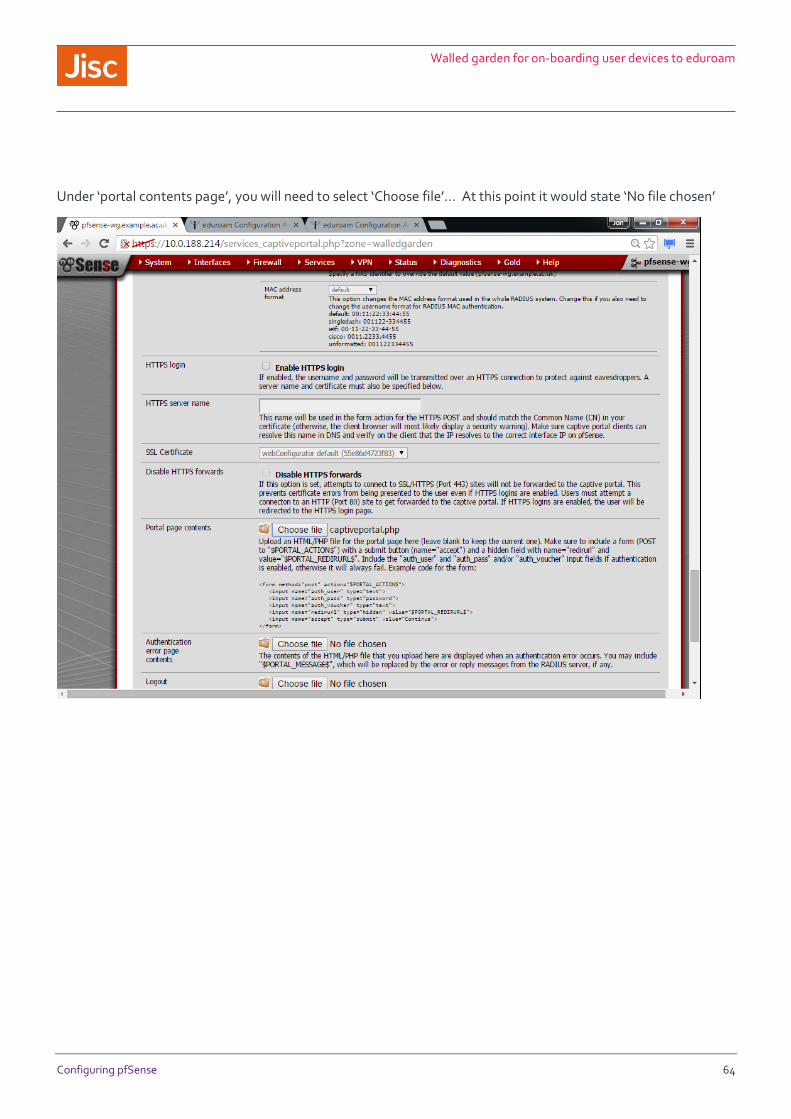
Under ‘portal contents page’, you will need to select ‘Choose file’… At this point it would state ‘No file chosen’
Walled garden for on-boarding user devices to eduroam
Configuring pfSense 65
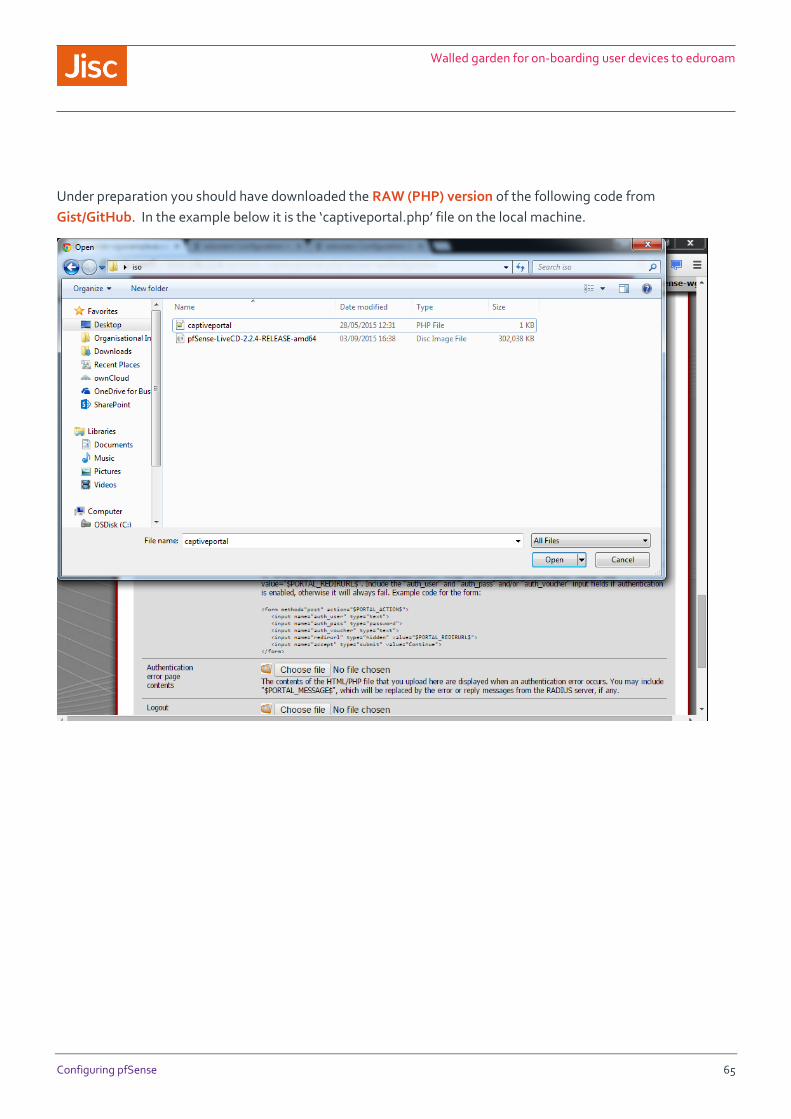
Under preparation you should have downloaded the RAW (PHP) version of the following code from
Gist/GitHub. In the example below it is the ‘captiveportal.php’ file on the local machine.
Walled garden for on-boarding user devices to eduroam
Configuring pfSense 66
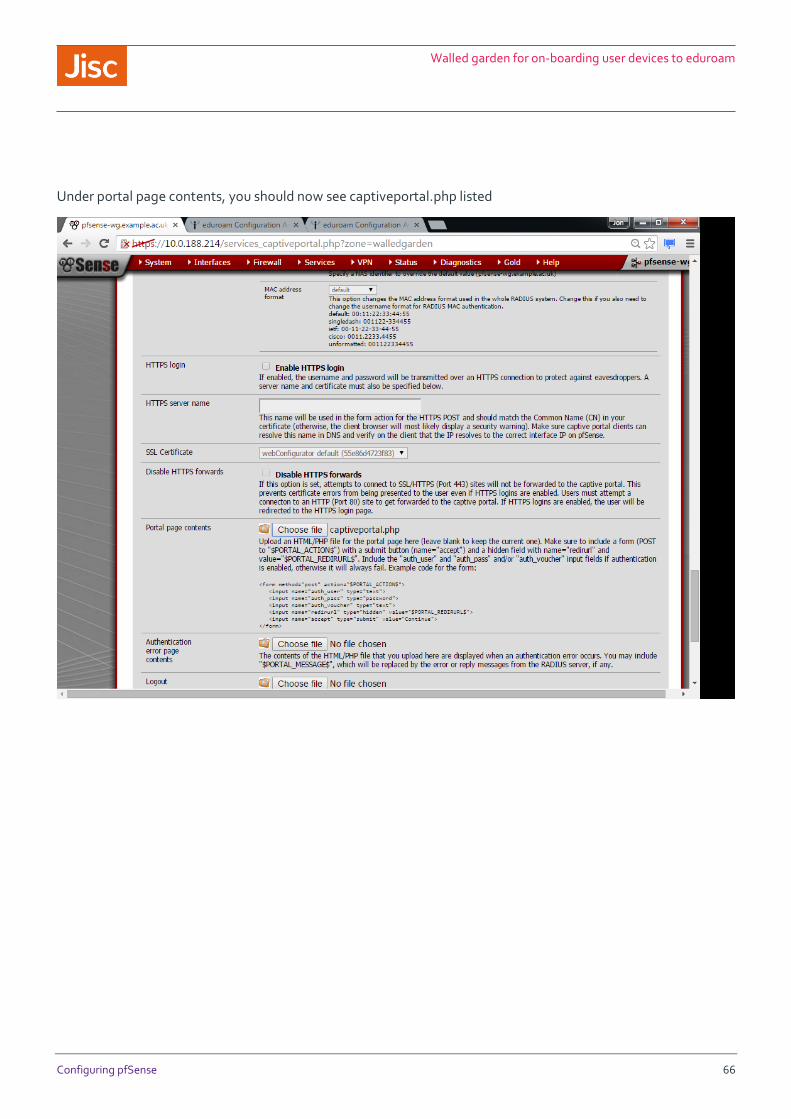
Under portal page contents, you should now see captiveportal.php listed

Walled garden for on-boarding user devices to eduroam
Configuring pfSense 67
Under the Allow Hostnames tab, you should now be able to add hostnames of websites which you want to be
accessible via the Walled Garden. The next section discusses this further.
Walled garden for on-boarding user devices to eduroam
Configuring pfSense 68
Configuring allowed websites
We would suggest the following as a minimum;
The ‘Required’ list from the eduroam CAT (Configuration Assistance Tool) website (the list is recreated
in the next section)
Your organisations eduroam support web page.
eduroam support web page of any partners who may make regular use of your network.
Note: webpages will be available over an open public Wi-Fi network, and so you should avoid sites that may pass
sensitive information e.g. authentication, and pay close attention to any sites which may open up wider access
e.g. Google which are part of the recommendations from eduroam CAT

Walled garden for on-boarding user devices to eduroam
Configuring pfSense 69
eduroam CAT website list
The following are a list of websites that should be opened via a walled garden. These are taken directly from the
eduroam CAT website, and are available on the ‘About eduroam CAT’ link. The screenshot and tables below
were taken on 6th July 2016.
Screenshot
Lists
Required Recommended
cat.eduroam.org
crl3.digicert.com
crl4.digicert.com
ocsp.digicert.com
android.l.google.com
android.clients.google.com
play.google.com
ggpht.com
photos-ugc.l.google.com
googleusercontent.com
ajax.googleapis.com
play.google-apis.com
googleapis.l.google.com
apis.google.com
gstatic.com
www.google-analystics.com
wallet.google.com
plus.google.com
checkout.google.com
Walled garden for on-boarding user devices to eduroam
Configuring pfSense 70
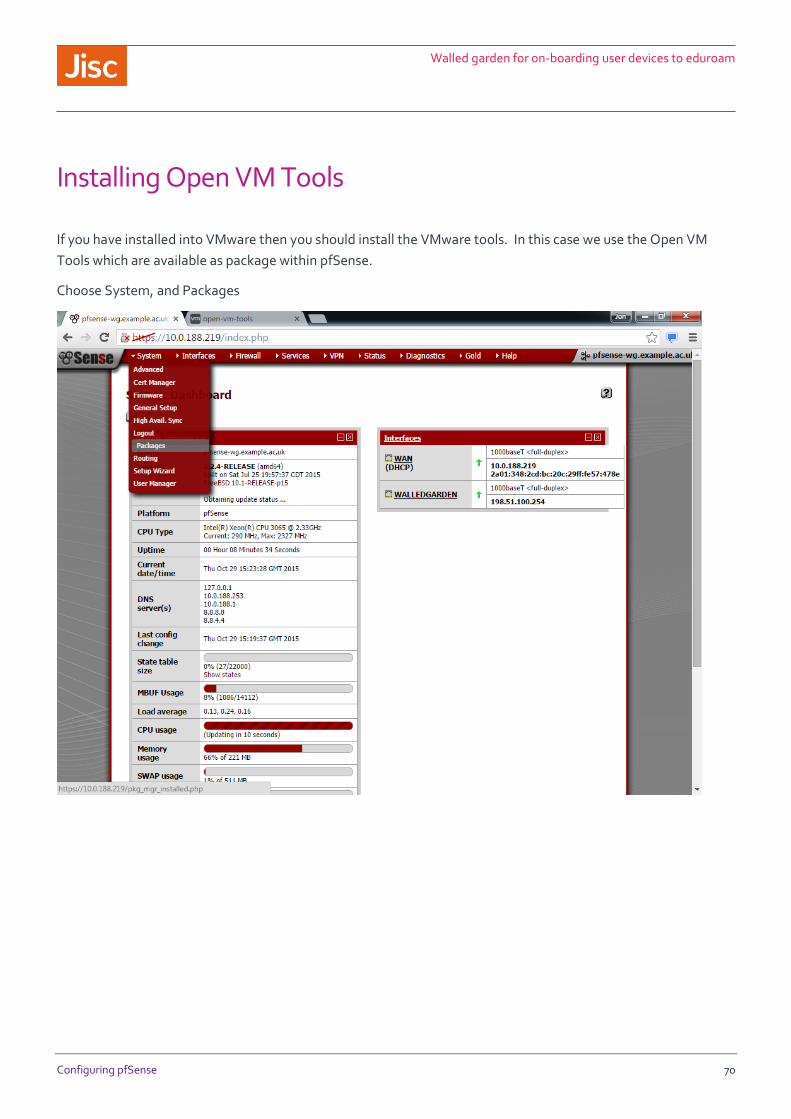
Installing Open VM Tools
If you have installed into VMware then you should install the VMware tools. In this case we use the Open VM
Tools which are available as package within pfSense.
Choose System, and Packages

Walled garden for on-boarding user devices to eduroam
Configuring pfSense 71
From within Package Manager choose Available Packages.
Walled garden for on-boarding user devices to eduroam
Configuring pfSense 72
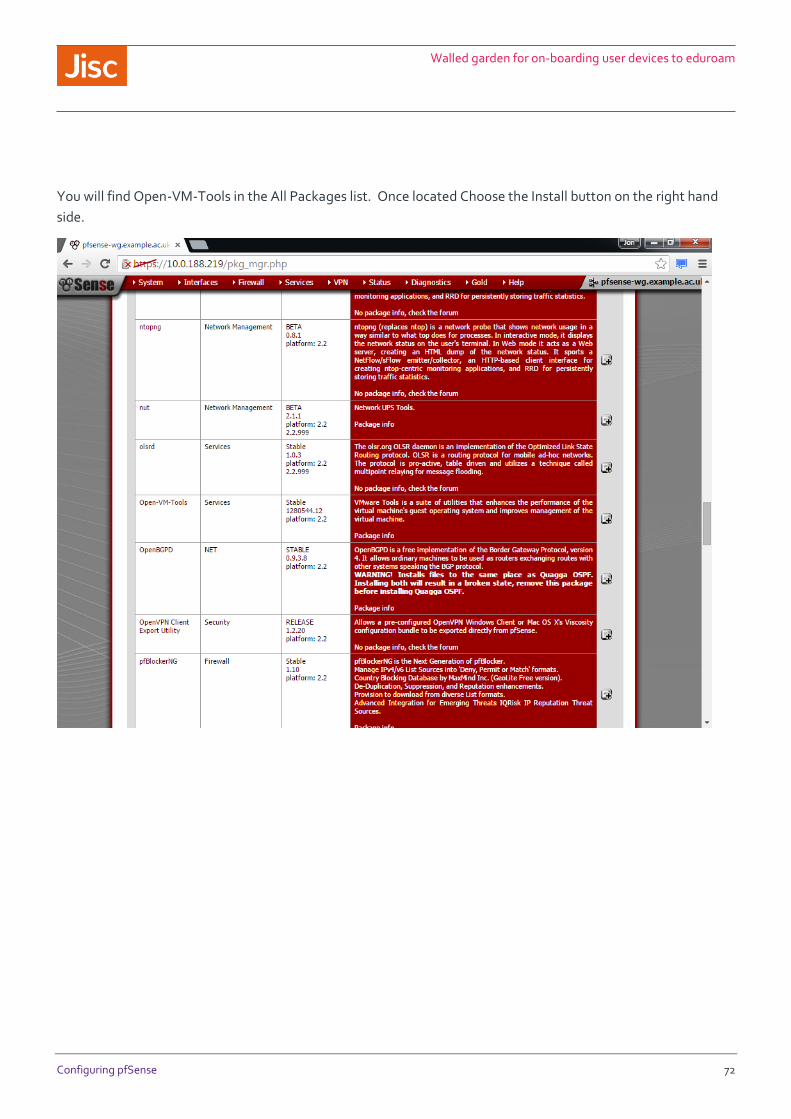
You will find Open-VM-Tools in the All Packages list. Once located Choose the Install button on the right hand
side.
Walled garden for on-boarding user devices to eduroam
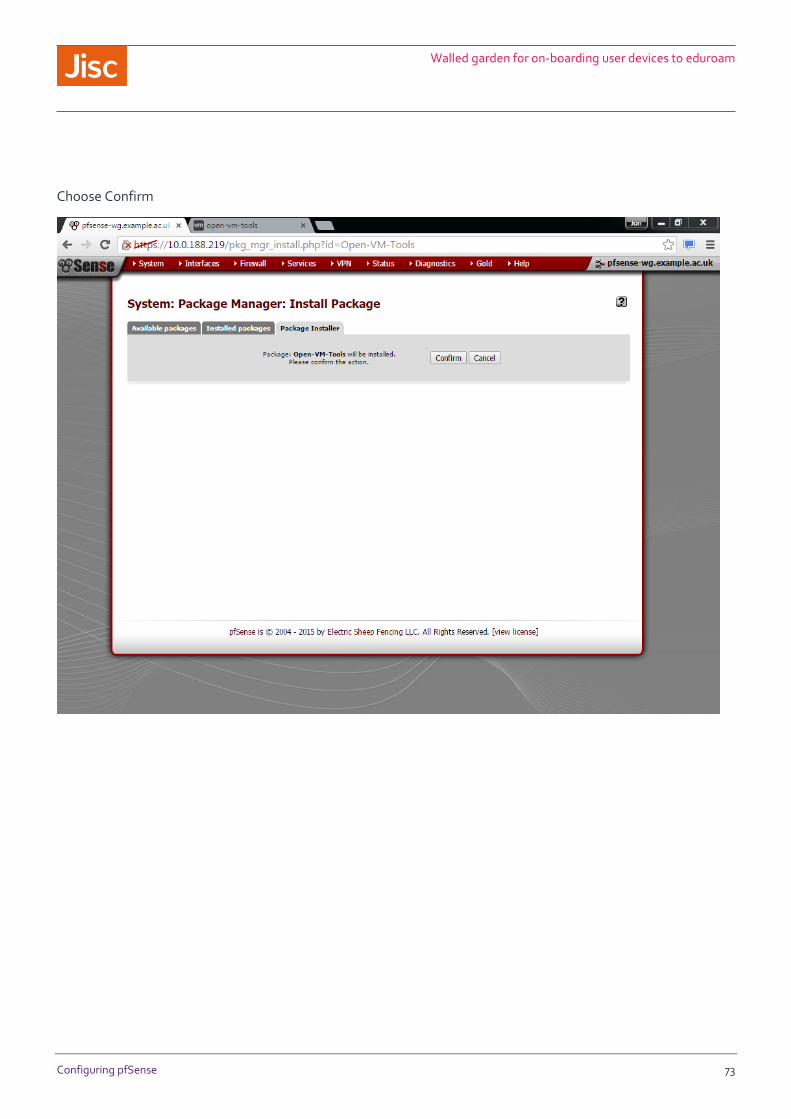
Configuring pfSense 73
Choose Confirm
Walled garden for on-boarding user devices to eduroam
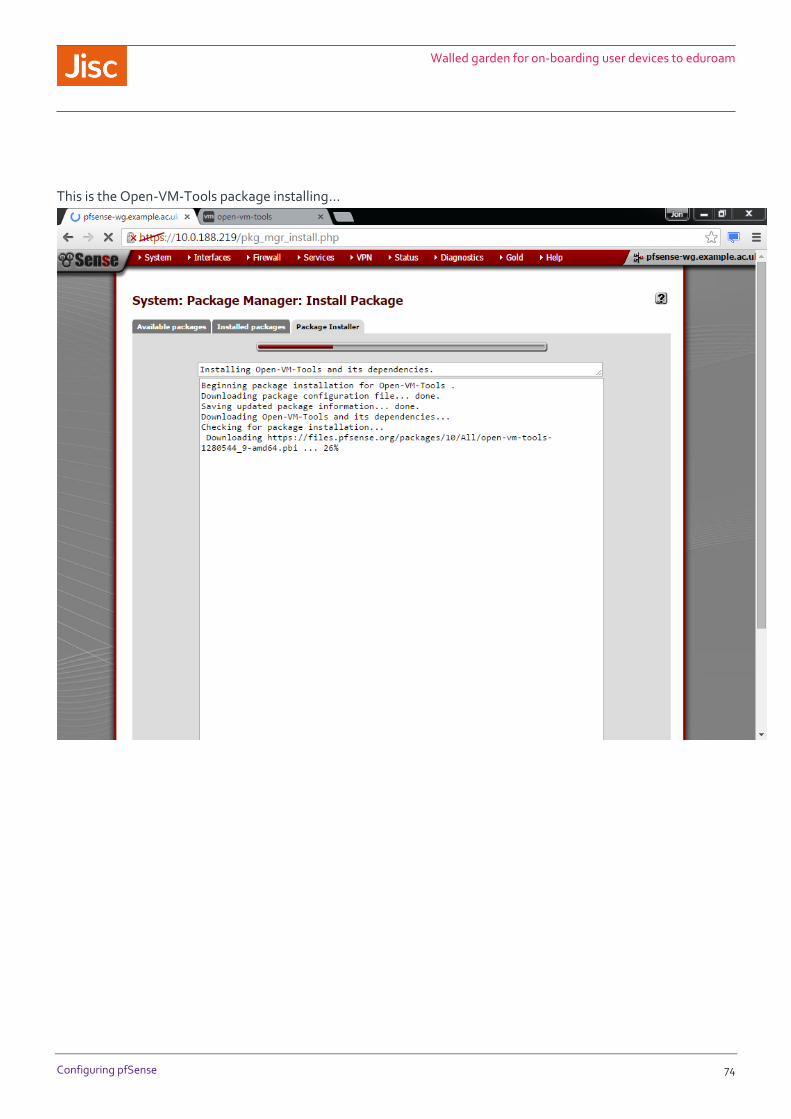
Configuring pfSense 74
This is the Open-VM-Tools package installing…
Walled garden for on-boarding user devices to eduroam
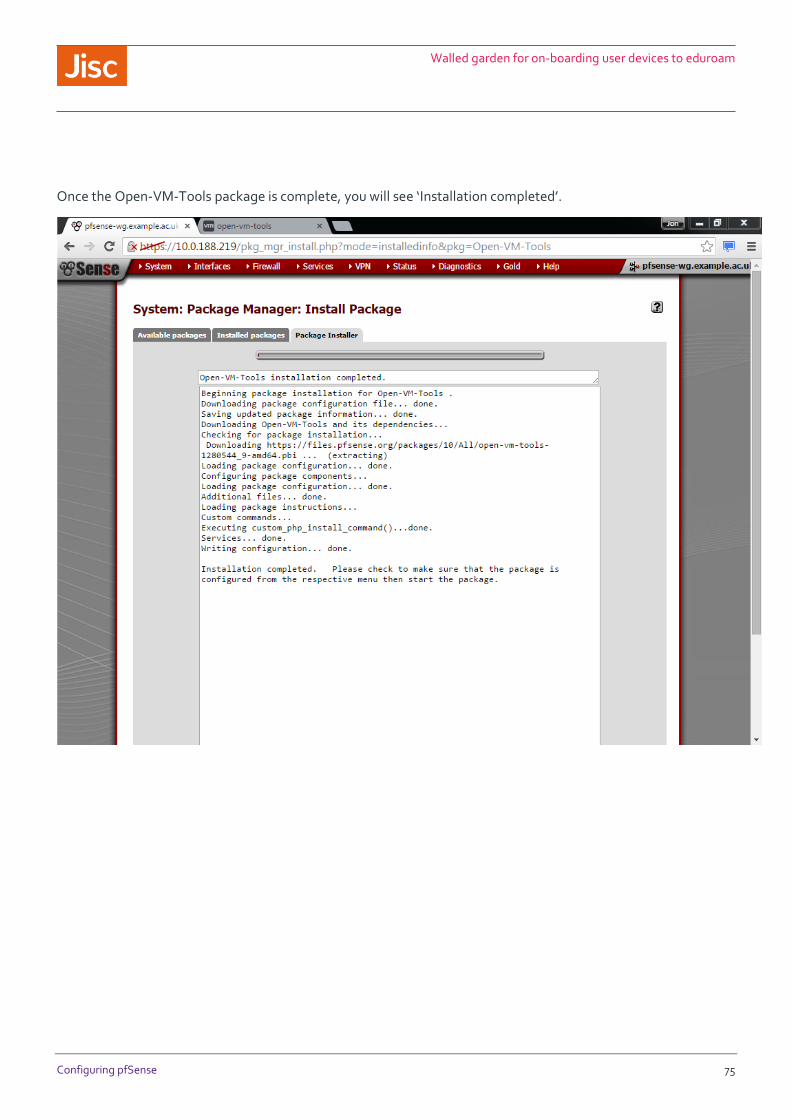
Configuring pfSense 75
Once the Open-VM-Tools package is complete, you will see ‘Installation completed’.
Walled garden for on-boarding user devices to eduroam
Configuring pfSense 76
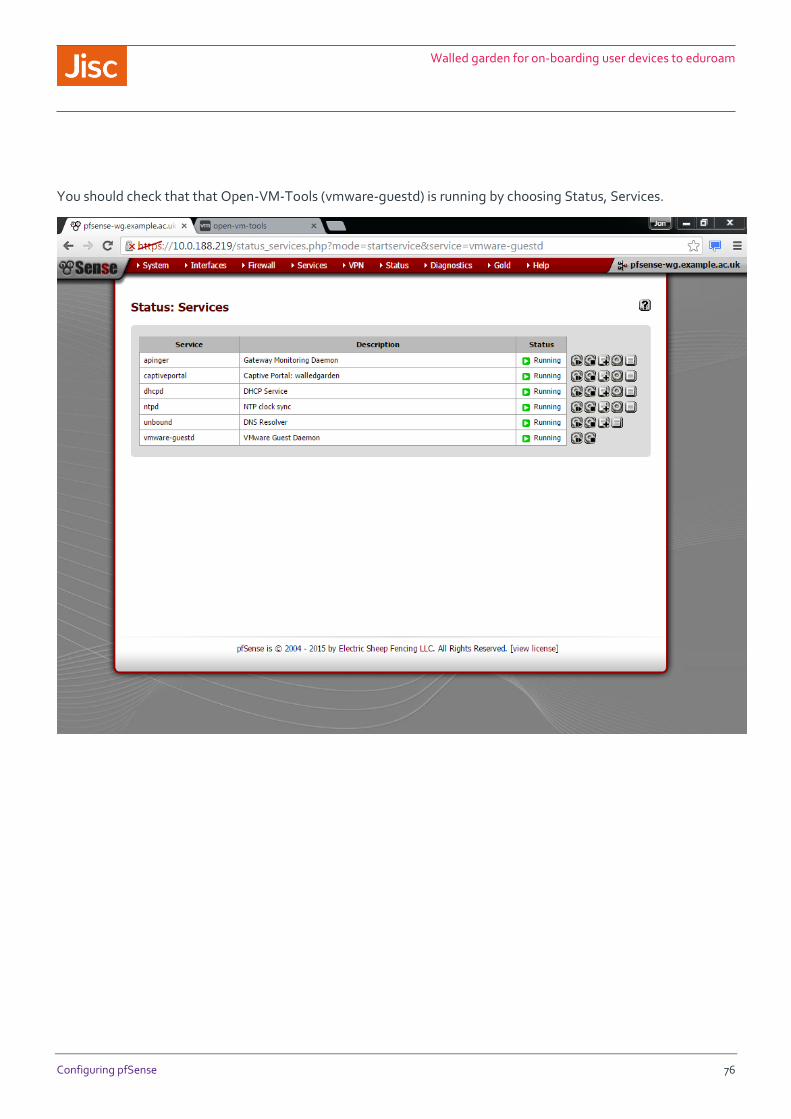
You should check that that Open-VM-Tools (vmware-guestd) is running by choosing Status, Services.
Walled garden for on-boarding user devices to eduroam
Configuring pfSense 77
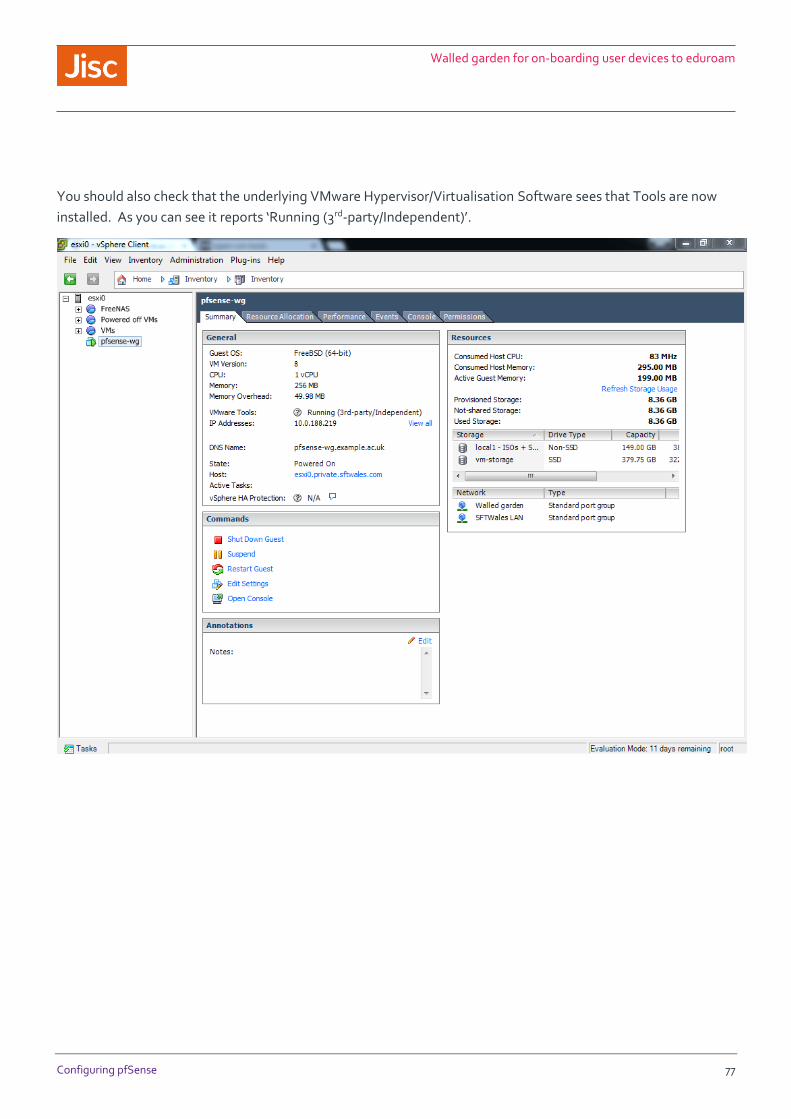
You should also check that the underlying VMware Hypervisor/Virtualisation Software sees that Tools are now
installed. As you can see it reports ‘Running (3rd-party/Independent)’.
Walled garden for on-boarding user devices to eduroam
Access Point configuration 78
Access Point configuration There are many access points and potential configurations that you may have. The following points should assist
you in considering those steps
For VM installations (particularly VMWare)
o Ensure that you have added the Walled Garden VLAN to all VMware Servers in your Cluster, and
across all interfaces that connect to that vSwitch.
o Ensure that all interfaces between the VMware Nodes (Hypervisors) have added the Walled
Garden VLAN to all Switch ports that connect with VMware.
These can be problematic to trace. Neighbour discovery protocols such as LLDP and
CDP can help here.
For physical installations
o Ensure that you have added the Walled Garden VLAN to the LAN port of the pfSense
device/server. You will (unless you configured VLANs in pfSense) need to use a port with no
802.1q VLAN tagging in place (untagged / access VLAN)
For all installations
o Ensure that the Walled Garden VLAN is tagged between the pfSense server/VM and your Access
Point or Access Point Controller.
o Create a single Open SSID with no authentication, and ensure that it allocates devices to the
Walled Garden VLAN.
o For this Open SSID ensure that Client Isolation is turned on, such that devices can only
communicate with the pfSense LAN interface within the Walled Garden VLAN, and not with
each other

Walled garden for on-boarding user devices to eduroam
Testing the user experience 79
Testing the user experience This is an example from an Android device; the user will see an open network – in this case ‘exampleorg-setup’.
You must not call this ‘eduroam-setup’ as it violates the eduroam(UK) Technical specification, ideally you
should put your organisation name (or a fairly unique derivative of that your users will recognise)

Walled garden for on-boarding user devices to eduroam
Testing the user experience 80
Once connected they should receive an IP address. Ensure this is consistent with what you have configured
within pfSense on the LAN interface.
Walled garden for on-boarding user devices to eduroam
Testing the user experience 81
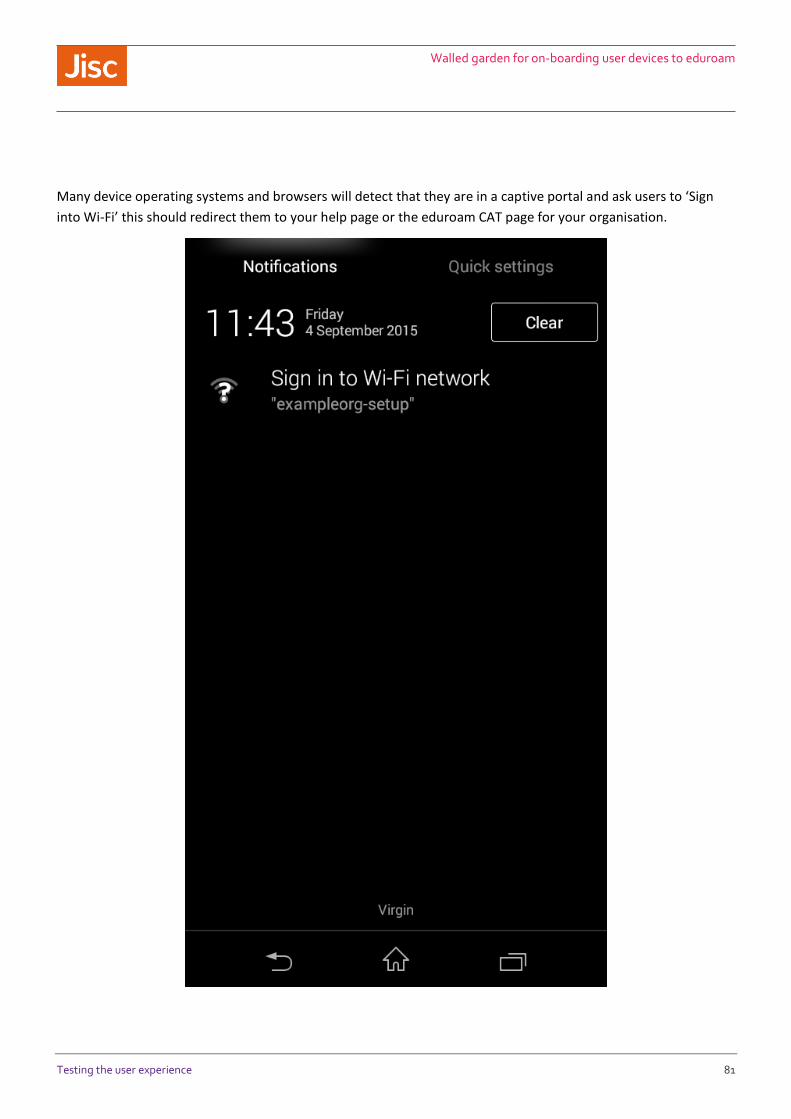
Many device operating systems and browsers will detect that they are in a captive portal and ask users to ‘Sign
into Wi-Fi’ this should redirect them to your help page or the eduroam CAT page for your organisation.

Walled garden for on-boarding user devices to eduroam
Testing the user experience 82
This is an example of a device being directed to your help page or the eduroam CAT page for your organisation.