W Welcome to
57
Welcome to W e want to thank you for choosing your Renegade motorhome. We think you made an excellent choice. Why? Because at Renegade, we use the highest quality materials and workmanship to build your motorhome. We designed it to ensure that you are provided with stylish, comfortable, and safe transportation. The RVIA sticker applied to your unit certifies that we meet or exceed Recreational Vehicle Industry Association (RVIA) standards. Your motorhome also complies with the requirements of the Federal Motor Vehicle Safety Standards (FMVSS) for seating and seat belt installation; as well as the American National Safety Institute standard (ANSI) 1192 for installation of plumbing, heating, electrical systems and state regulations and the chassis manufacturers’ requirements. The wheelbase of this vehicle may have been altered from the chassis manufacturers’ original wheelbase as part of the manufacturing process of your motorhome. Whether you have owned a motorhome before or are a first-time buyer, it is important to understand that a motorhome is a complex collection of systems that need to be handled carefully to avoid injury. Please take time to review this owner’s manual to become familiar with the features of your new motorhome. It has been our experience that the more you know and understand your vehicle, the greater your pleasure and enjoyment. ABOUT THIS MANUAL This manual is to be used in conjunction with/and a supplement to your chassis manufacturers’ manual, as well as the appliance and other accessories manufacturers’ manuals. It has been prepared to ensure that you are provided with basic instructions for safely operating and maintaining your motorhome. Throughout this owner’s manual we call attention to specific safety issues and hazards. Please follow the safety instructions and/or information and observe and comply with proper operating practices. Failure to do so could cause you or other people to be seriously injured or killed. For easy reference, this manual is divided into areas or what we refer to as “sections”. You will find a section called specifications. This section contains floor plans, diagrams, locations of features and items that pertain to your specific motorhome. Please note: This manual explains many of the options and features that are available through Renegade RV that may not be included in your motorhome. Keep all manuals, in a convenient place so they will be there whenever you need them. If you sell or trade your motorhome, please leave all the manuals with the vehicle so the new owner can use them. IMPORTANT NOTICE Information in the Owner’s Manual is NOT to be construed as a warranty term. The specifications and descriptions provided in this publication provide no warranty, expressed or implied. The terms of the Renegade warranty are set forth in your limited warranty document. If you did not receive your Renegade RV Limited Warranty upon delivery, contact your dealer immediately. IMPORTANT NOTICE The descriptions and specifications provided in this manual were in effect at the time of printing and are subject to revision and editions without notice. Renegade RV reserves the right to discontinue models and/or change designs, options, and specifications at any time without notice and without incurring obligation.
Transcript of W Welcome to

Welcome to W e want to thank you for choosing your Renegade motorhome. We think you made an excellent
choice. Why? Because at Renegade, we use the highest quality materials and workmanship to
build your motorhome. We designed it to ensure that you are provided with stylish,
comfortable, and safe transportation.
The RVIA sticker applied to your unit certifies that we meet or exceed Recreational Vehicle
Industry Association (RVIA) standards. Your motorhome also complies with the requirements of the
Federal Motor Vehicle Safety Standards (FMVSS) for seating and seat belt installation; as well as the
American National Safety Institute standard (ANSI) 1192 for installation of plumbing, heating, electrical
systems and state regulations and the chassis manufacturers’ requirements. The wheelbase of this vehicle
may have been altered from the chassis manufacturers’ original wheelbase as part of the manufacturing
process of your motorhome.
Whether you have owned a motorhome before or are a first-time buyer, it is important to understand
that a motorhome is a complex collection of systems that need to be handled carefully to avoid injury.
Please take time to review this owner’s manual to become familiar with the features of your new
motorhome. It has been our experience that the more you know and understand your vehicle, the greater
your pleasure and enjoyment.
ABOUT THIS MANUAL This manual is to be used in conjunction with/and a supplement to your chassis manufacturers’ manual, as well
as the appliance and other accessories manufacturers’ manuals. It has been prepared to ensure that you are
provided with basic instructions for safely operating and maintaining your motorhome.
Throughout this owner’s manual we call attention to specific safety issues and hazards. Please follow the safety
instructions and/or information and observe and comply with proper operating practices. Failure to do so could
cause you or other people to be seriously injured or killed.
For easy reference, this manual is divided into areas or what we refer to as “sections”. You will find a section
called specifications. This section contains floor plans, diagrams, locations of features and items that pertain
to your specific motorhome.
Please note: This manual explains many of the options and features that are available through Renegade RV that
may not be included in your motorhome.
Keep all manuals, in a convenient place so they will be there whenever you need them. If you sell or trade your
motorhome, please leave all the manuals with the vehicle so the new owner can use them.
IMPORTANT NOTICE Information in the Owner’s Manual is NOT to be construed as a warranty term. The
specifications and descriptions provided in this publication provide no warranty, expressed or implied. The terms of
the Renegade warranty are set forth in your limited warranty document. If you did not receive your Renegade RV
Limited Warranty upon delivery, contact your dealer immediately.
IMPORTANT NOTICE The descriptions and specifications provided in this manual were in effect at the time of
printing and are subject to revision and editions without notice. Renegade RV reserves the right to discontinue
models and/or change designs, options, and specifications at any time without notice and without incurring
obligation.

2
A
Warranty and Responsibility BE RESPONSIBLE It is the owner’s responsibility to use the motorhome for its intended design purposes, which is for private,
single family recreational travel, camping, and seasonal usage.
Providing a safe comfortable quality product is our responsibility. Performing a pre-delivery inspection to assure
your unit is in proper working order before delivery is the dealer’s responsibility. Your dealer is also responsible
to assist you in understanding your motorhome. They will provide you with an orientation on the general use,
operations, and safety features of the motorhome, which includes the containment system and components. Your
responsibility is to use the vehicle and components as instructed and to provide proper maintenance and care for
the complete unit and its components.
Be a responsible owner. Observe and comply with proper operating practices and safety regulations listed on the
applied safety labels in this owner’s manual, the other manuals, and/or operating practices and safety
regulations required by law.
PROVIDE PROPER MAINTENANCE We cannot emphasize enough the value of providing proper maintenance. By providing proper maintenance
you will not only minimize downtime but assure that you will safely and comfortably enjoy your unit for many
years to come. Be sure to read the maintenance requirements throughout this manual, the chassis manuals, and
the individual component manuals to become familiar with the programs.
INSURANCE COVERAGE As an owner it is your responsibility to carry proper insurance coverage. Individual states mandate the minimum
amount of coverage required to register your motorhome, but to fully protect you and your investment, there are
many other types of coverages to consider.
The same principles you used in selecting your motorhome should also be used to evaluate insurance coverage that
will best protect you, your unit, and its components. There are many insurance companies that understand the
motorhome lifestyle and have customized policies that will meet your needs.
Protect yourself and your investment. Do not put off insuring your motorhome with proper RV coverage.
LET’S GET YOUR MOTORHOME AND IT’S COMPONENTS WARRANTED
s an original purchaser it is important that you review all warranty information. Be
sure you fill out and mail any required warranty and registration cards provided from the
various manufacturers. Some are required to be mailed within ten (10) days after delivery.
If you are unsure on how to fill out any of the paperwork or are unclear on any of the
instructions be sure to contact your dealer for assistance. If you did not receive the owner’s packets
or are missing any of the warranty registrations, manuals, and/ or the pre-delivery checklist please
contact your dealer immediately.
NOTE: Failure to fill out and send in your warranty cards or various registrations within the required
amount of time could void your warranty. So please fill out and mail the information immediately.
The pre-delivery checklist should be in your owner's packet, if you do not find it in the packet please
contact your dealer.

3
B Safety Warnings, Notices, and Labels
ecause we care about you and your passengers this manual will call your attention
to specific safety issues and hazards that need to be observed every time you use
your motorhome. As an owner you are responsible for your safety, the safety of your
passengers and the people around your motorhome.
Please review and follow all safety warnings and precautions listed throughout this manual, on
safety labels applied though out the motorhome, and those listed in the chassis and appliance
manuals.
WARNING SYMBOL
We use a yellow box with WARNING to alert you when something could cause you or other
people harm and/or death.
NOTICE SYMBOL
We use a gray box with NOTICE when something could cause damage to your vehicle and/or components, or that
could void warranties.
Please read all warnings and notices and follow instructions. Failure to regard the information and instructions
provided could result in costly repairs that may not be covered by your warranty or injury/ death.
WARNING LABELS Located throughout the coach, you will find INFORMATION and WARNING labels. These have been provided for your safety and to furnish useful information where it is needed. The National Fire Protection Association and the American National Standards Institute require many of these labels.
These are a permanent part of the coach and must not be removed.
For your safety and safety of others, do not remove these labels from your motorhome.
WARNING
NOTICE

4
General Safety List These general safety precautions assure that you and your passengers are safe. Failure to follow these
suggestions could result in you or other people to be seriously injured or killed.
1 Read your vehicles (chassis) owner’s manual concerning chassis operations, features and safety information.
2 Always wear your seat belts while driving and make sure your passengers do the same. Young children and infants must be seated and restrained in proper safety seats as required by law.
3 Never place an infant or child seat in the front passenger seat. Any vehicle that is equipped with an airbag can injure or kill a child if the airbag should deploy.
4 Never relocate alter or modify seat belts. All seat belts are mounted per the FMVSS Federal requirements. Anyone relocating, altering, or modifying a seat belt will assume full responsibly for the consequences.
5 Do not allow anyone to lie on the sofa or the bed or sit anywhere a seat belt is not provided, while in transit.
6 Periodically inspect seat belts and seat components. If any of the seat belts and /or seat components are not functioning properly have them inspected by a competent service facility.
7 All seat releases, slides, and recline mechanisms must be fully engaged and locked before putting the vehicle in motion. Keep fingers and hands away from any pivot points or moving components to avoid injury.
8 Do not store items under seats. Objects could damage the airbag module under the seats or obstruct or loosen locking mechanisms under driver’s and passenger seat(s).
9 NEVER disconnect safety devices installed on your motorhome. These devices are for your protection and should not be tampered with.
10 Have your motorhome checked by a competent service facility if any of the electrical components are not functioning properly.
11 Do not use a cheater plug (a plug with the ground wire pin removed) to hook up into a 110-Volt plug. Doing this could cause an electrical shock.
12 Do not use an extension cord with a lower current rating than that of the power cord provided with your motorhome. This could cause a hazard in the electrical system.
13 Test the Carbon Monoxide and smoke detectors operation after your motorhome has been in storage, before each trip, and at least once every few weeks during use.
14 Never use stove or cooking appliances for comfort heating, it is extremely dangerous. Refer to the appropriate section for proper operations and safety information for appliances.
15 Never use portable fuel burning equipment, including wood and charcoal grills and stoves inside the motorhome. The use of this type of equipment inside an enclosed space may cause asphyxiation and creates a fire hazard.
WARNING

5
16 Do not touch outlets or exhaust ports or allow any material to touch or cover the air intake or exhaust ports while operating the water heater and/or furnace. You can be burnt.
17 Never place or store LP gas containers inside the vehicle. LP gas containers are equipped with safety devises that relieve excessive pressure by discharging gas to the atmosphere. Refer to the LP section in this manual and in the LP manual for proper safety instructions and operations.
18 Do not allow the LP bottle(s) to be filled beyond 80% liquid level. Overfilling will eliminate the safety cushion for expansion which, in turn can result in the discharge of gas through the pressure relief valve.
19 Before filling the LPG tank, turn off all pilot lights and appliances. During fueling do not smoke, strike matches or use lighters.
20 Before refueling your motorhome close the LP Tank service valve. Turn off all pilot lights and appliances. During fueling do not smoke, strike matches or use lighters.
21 Do not attempt to adjust the regulators on your LPG tank. If adjustment is necessary, it must be made by qualified LP service technician using special equipment.
22 Use only NON-TOXIC antifreeze made specifically for potable water systems. Automotive antifreeze, if ingested, can cause blindness, deafness, or death. Please refer to the water system section or more information on the safety of using the potable and contained systems.
23 Before traveling check all emergency exits and windows, to assure they are in proper working order and are not obstructed.
24 The driver must remain in the driver’s seat with complete control of the motorhome whenever the vehicle is in motion. Cruise control is used to maintain a speed level and the driver must remain seated and completely in control of the vehicle at the time of use.
25 Never overload your motorhome. Overloading can cause substandard vehicle handling, performance, and a loss of control. Refer to weight and loading restrictions listed in this manual.
26 The steps or running boards many become slippery during wet, snowy, or icy condition. Use them with caution. Be sure your foot is firmly placed on the running board or step when using them.
27 Check clearances of any overhead obstructions such as bridges, branches, garage doors, overhangs, canopies, low hanging wires, etc.
28 Keep all windows free of obstructions and have window treatments open before driving.
29 Make sure luggage, sports equipment, and other cargo items are stored securely before putting the motorhome in motion.
30 When backing up in congested areas, have someone outside the motorhome check to be sure the way is clear.
31 Stay alert, do not drive for long periods of time without stopping. On long trips, allow plenty of time to stop for rest and refreshments.
32 Please DO NOT drink and drive.
WARNING CONTINUED
6
Emergencies and Fire Extinguishers BE PREPARED FOR EMERGENCIES It is important that everyone using and riding in the vehicle be familiar with emergency features, such as the location of exits and fire extinguishers.
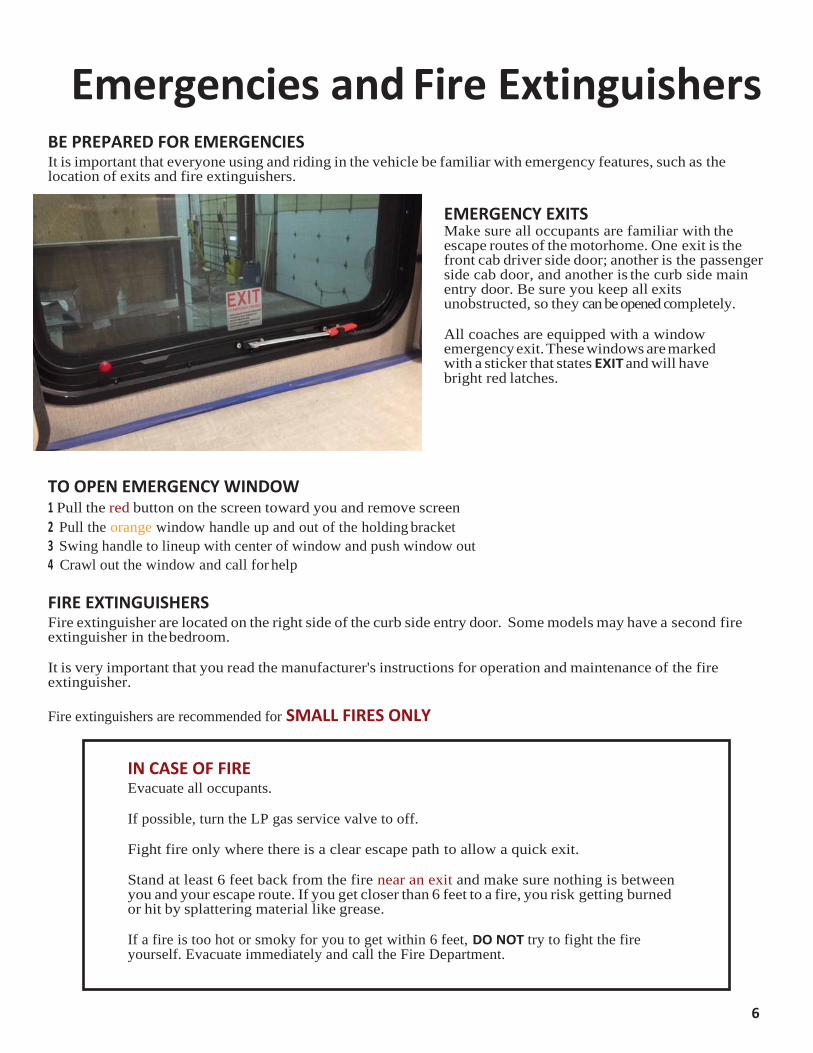
EMERGENCY EXITS Make sure all occupants are familiar with the escape routes of the motorhome. One exit is the front cab driver side door; another is the passenger side cab door, and another is the curb side main entry door. Be sure you keep all exits unobstructed, so they can be opened completely.
All coaches are equipped with a window emergency exit. These windows are marked with a sticker that states EXIT and will have bright red latches.
TO OPEN EMERGENCY WINDOW 1 Pull the red button on the screen toward you and remove screen
2 Pull the orange window handle up and out of the holding bracket
3 Swing handle to lineup with center of window and push window out
4 Crawl out the window and call for help
FIRE EXTINGUISHERS Fire extinguisher are located on the right side of the curb side entry door. Some models may have a second fire extinguisher in the bedroom.
It is very important that you read the manufacturer's instructions for operation and maintenance of the fire extinguisher.
Fire extinguishers are recommended for SMALL FIRES ONLY
IN CASE OF FIRE Evacuate all occupants.
If possible, turn the LP gas service valve to off.
Fight fire only where there is a clear escape path to allow a quick exit.
Stand at least 6 feet back from the fire near an exit and make sure nothing is between you and your escape route. If you get closer than 6 feet to a fire, you risk getting burned or hit by splattering material like grease.
If a fire is too hot or smoky for you to get within 6 feet, DO NOT try to fight the fire yourself. Evacuate immediately and call the Fire Department.

7
Remove the fire extinguisher from the mounting bracket. You will not be able to discharge the powder to fight a fire if the mounting bracket is attached.
Be sure the safety seal on the extinguisher is broken. You will not be able to squeeze the trigger to discharge the powder if the seal is not broken.
Protect yourself. Stand back at least 6 feet from the fire and make sure the fire is not between you and your exit.
AFTER A FIRE HAS BEEN EXTINGUISHED After any fire it is advisable to have your motorhome inspected by the Fire Department.
The powder sprayed from the extinguisher may have spread over a wide area and soiled the furniture, carpets, and walls. Clean up all the powder as soon as possible.
Never turn on the electrical power or plug in an appliance until all the powder is removed completely from the area. If the powder has become wet, it can conduct electricity. This may worsen an electrical leakage problem, impair the equipment’s insulation, or create an electrical shock hazard.
IF A FIRE HAPPENS ON THE KITCHEN STOVE For fires on a kitchen stove, if possible, turn oven or burner off immediately. If you cannot reach the oven or burner controls safely, extinguish the fire first, then turn them off.
Remove all the powder and ventilate the area before turning any of the items back on, this is especially important for a self-cleaning oven.
IF THE FIRE HAD AN ELECTRICAL ORIGIN If possible, shut off all electrical power. Do not touch any electrical wire or appliances.
Leave the motorhome and close all doors behind you. Call the Fire Department and have them inspect the premises.
After the inspection and when it is safe to return be sure to ventilate the area thoroughly.
Have a licensed electrician or authorized dealer inspect your electrical system. Do not turn the power back on or
plug in electrical equipment until inspection has been completed.
Never turn on electrical power or plug in an appliance until all powder from the extinguisher is removed completely from the area.
If the powder has become wet, it can conduct electricity. This may worsen an electrical leakage problem, impair the equipment’s insulation, and create an electrical shock hazard. These conditions could result in you or others being seriously injured or killed.
WARNING
WARNING

8
PROPERLY DISPOSE OF THE FIRE EXTINGUISHER The type of fire extinguisher supplied with the motorhome is a disposable device and cannot be re- charged. Although you may not have fully discharged the fire extinguisher it cannot be used more than once. After using, discharge completely and discard it.
Never puncture or burn the fire extinguisher doing this could cause it to rupture or explode. Immediately replace your discarded extinguisher with a new extinguisher.
Read the information in the fire extinguisher
manual for proper disposal.
Do not puncture or burn a discarded fire extinguisher.
Puncturing or subjecting the extinguisher to temperatures over 150 degrees Fahrenheit (66 degrees Celsius) could cause it to rupture or explode which could result in you or others being seriously injured or killed.
FIRE PREVENTION AND SAFETY SUGGESTIONS Taking proper precautions to prevent a fire from starting is the best method of fire safety. Use the same
principles in your motorhome as you would in your home. Below are a few suggestions for fire prevention.
Failure to follow these suggestions, as well as the ones in all other manuals, could result in you or others
being seriously injured or killed.
Follow the instructions for the proper care and operation of all your appliances. Check your fire extinguisher on a regular basis to make sure it is properly charged.
Inspect fuel-burning appliances often and keep them in good working condition. Do not smoke in bed.
Do not overload electrical circuits. Do not let children handle LP gas or electrical appliance controls. Do not store flammable liquids inside your unit.
Do not use portable fuel burning equipment inside the motorhome.
Never replace a fuse with one of a higher amp rating.
Follow all rules and regulations regarding the use of LP gas and pilot lights.
Avoid parking over dry leaves, dry grass, or other flammable material that can be ignited by the hot exhaust system under your coach.
When fueling your vehicle do not smoke, strike matches or use lighters.
WARNING
WARNING

9
C Carbon Monoxide (CO)
arbon monoxide gas is a by-product of the incomplete burning process of any fuel, including, but not limited to, gasoline, propane, natural gas, oil, charcoal, or wood. All appliances that burn fuel such as cooking stoves, lamps, space heaters, furnaces, water heaters, RV generators, or the engine from an RV, car or truck can produce CO.
When appliances are in good working condition with proper combustion and ventilation, lethal carbon monoxide gas is vented outdoors where it quickly disperses. A safety hazard can occur when an appliance malfunctions and produces CO that is not fully vented. CO polluted air inside an RV can quickly build to lethal levels.
Unlike smoke or LP gas, carbon monoxide cannot be smelled or seen. If a person is exposed to enough CO, the results can be permanently disabling or fatal. The CO detector installed will warn you of its presence. Before each trip test your alarm as specified in the manual.
It important that you read the manufacturer’s instructions for operating and maintaining the CO detector.
Carbon monoxide (CO) can cause unconsciousness and death. You cannot see it or smell it, so you may not know it is in your vehicle. Use your detector to help assure the safety of you and your passengers.
CO PREVENTION AND SAFETY SUGGESTIONS As a safety precaution, learn the early symptoms of CO exposure and regularly test and maintain your CO alarm to ensure it is in good working order. If you suspect CO poisoning, move outside to fresh air, and seek emergency help. Below are suggestions to help assure everyone’s safety. Failure to follow these suggestions or the instructions in your other manuals could result you or others to be seriously injured or killed.
Before each trip make sure power is supplied to the CO detector. Learn the early symptoms of CO exposure.
Inspect fuel-burning appliances and vents often and keep them in good working condition. Regularly test and maintain your CO alarm to ensure it is good working order.
Check your exhaust system to ensure it is in good working order. A damaged and /or rusty exhaust could allow engine exhaust containing CO to leak into your vehicle. When parking in snowy conditions make sure that snow does not block exhaust pipes from the engine, furnace, or water heater. Clear the way and check around from time to time.
If the alarm goes off or you suspect carbon monoxide may be in your vehicle, let in as much fresh air as possible, leave the unit and call the fire department. Never restart appliances until the source of the carbon monoxide leak has been repaired.
WARNING
WARNING

10
LP Gas Safety SAFETY REGULATIONS FOR LP GAS SYSTEM AND GAS APPLIANCES We are required to furnish the following consumer information as provided by the National Fire Protection
Association and the American National Standards Institute. The information and warnings found here might
also be found in other sections of this Owner’s manual.
WARNING: LP gas containers shall not be placed or stored inside the vehicle. LP gas containers are equipped
with safety devices, which relieve excessive pressure by discharging gas to the atmosphere.
WARNING: Portable fuel-burning equipment, including wood and charcoal grills and stoves, cannot be used
inside the recreational vehicle. The use of this equipment inside the recreational vehicle may cause fires or
asphyxiation.
WARNING: Do not bring or store LP gas containers, gasoline, or other flammable liquids inside the vehicle
because a fire or explosion may result.
A warning label has been located near the LP Gas container. This label reads DO NOT FILL CONTAINER(S)
MORE THAN 80 PERCENT OF CAPACITY. Overfilling the LP Gas container may result in uncontrolled gas
flow which can cause fire or explosion. A properly filled container will contain approximately 80 per cent of its
volume as liquid LP Gas.
11
T Smoke Alarms and Fires
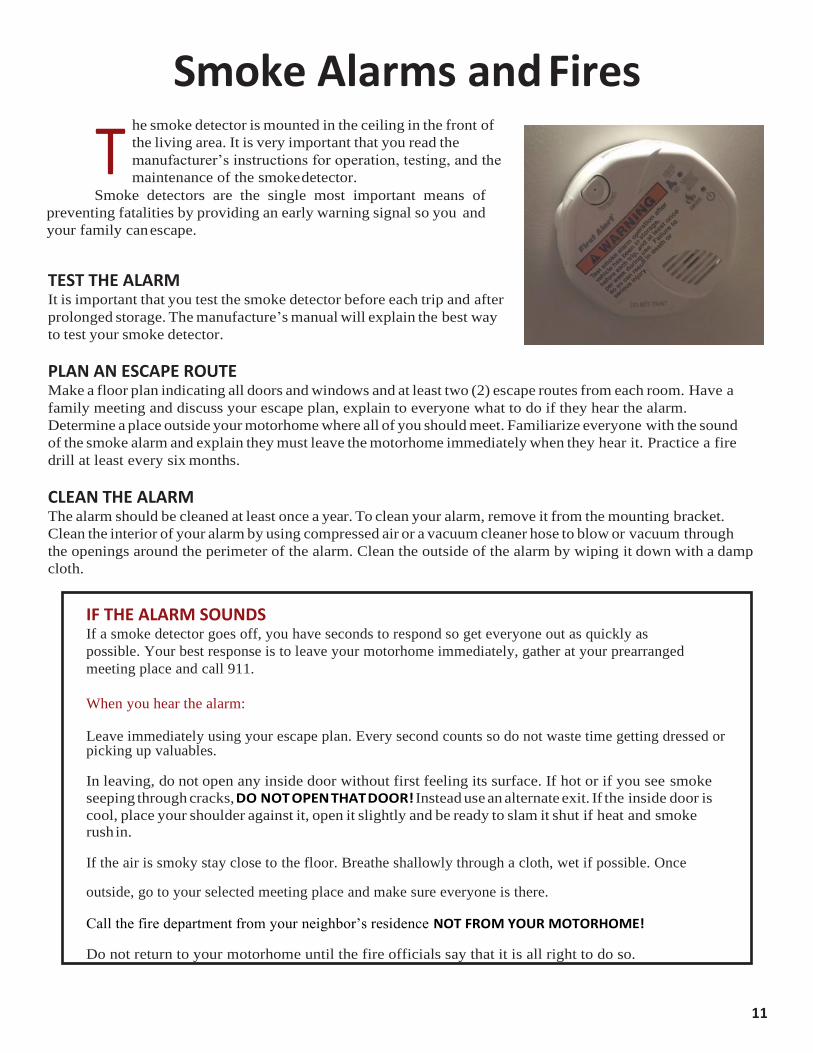
he smoke detector is mounted in the ceiling in the front of
the living area. It is very important that you read the
manufacturer’s instructions for operation, testing, and the
maintenance of the smoke detector.
Smoke detectors are the single most important means of
preventing fatalities by providing an early warning signal so you and
your family can escape.
TEST THE ALARM It is important that you test the smoke detector before each trip and after
prolonged storage. The manufacture’s manual will explain the best way
to test your smoke detector.
PLAN AN ESCAPE ROUTE Make a floor plan indicating all doors and windows and at least two (2) escape routes from each room. Have a
family meeting and discuss your escape plan, explain to everyone what to do if they hear the alarm.
Determine a place outside your motorhome where all of you should meet. Familiarize everyone with the sound
of the smoke alarm and explain they must leave the motorhome immediately when they hear it. Practice a fire
drill at least every six months.
CLEAN THE ALARM The alarm should be cleaned at least once a year. To clean your alarm, remove it from the mounting bracket.
Clean the interior of your alarm by using compressed air or a vacuum cleaner hose to blow or vacuum through
the openings around the perimeter of the alarm. Clean the outside of the alarm by wiping it down with a damp
cloth.
IF THE ALARM SOUNDS If a smoke detector goes off, you have seconds to respond so get everyone out as quickly as
possible. Your best response is to leave your motorhome immediately, gather at your prearranged
meeting place and call 911.
When you hear the alarm:
Leave immediately using your escape plan. Every second counts so do not waste time getting dressed or picking up valuables.
In leaving, do not open any inside door without first feeling its surface. If hot or if you see smoke
seeping through cracks, DO NOT OPEN THAT DOOR! Instead use an alternate exit. If the inside door is
cool, place your shoulder against it, open it slightly and be ready to slam it shut if heat and smoke rush in.
If the air is smoky stay close to the floor. Breathe shallowly through a cloth, wet if possible. Once
outside, go to your selected meeting place and make sure everyone is there.
Call the fire department from your neighbor’s residence NOT FROM YOUR MOTORHOME!
Do not return to your motorhome until the fire officials say that it is all right to do so.

12
Do not remove your smoke detector unless replacing it with a new one. Never make alterations to the smoke detector. Make sure it is in good working order.
Test the smoke detector before each trip and after prolonged storage. Without a working smoke detector to alert you or others, the chances of dying if a fire breaks out are extremely increased.
WARNING

13
BUCKLE UP
Seat Belt Systems
It is very important that you read the chassis manufacturer’s seat belt information section. This section will have vital information concerning proper use, operation, and safety information of seat belts. Seat belts work for everyone. They are designed to secure a person in the vehicle helping to reduce the chance of injury or the amount of injury resulting from accidents or sudden stops. Do not allow anyone to ride on the sofa, recliner (unless a seat belt is provided within the unit) or the bed or anywhere there is not a seat belt to properly secure them. You never know if you will be involved in an accident or crash so please make sure that you and all your passengers use the three-point and/or lap seat belts while your vehicle is in motion.
IMPORTANT NOTICE: Anyone relocating, altering, or modifying a seat belt in anyway is assuming the responsibility for any consequences.
The seat belts are mounted per the Federal motor Vehicle Safety Standards (FMVSS). Never relocate or make alterations or modify the seat belts. Relocating, altering, or modifying seat belts could result in improper operation resulting in someone being seriously injured or killed.
Never allow anyone to ride on the bed, cargo area or anywhere he or she cannot wear a seat belt properly. If you are in a crash and not wearing a safety belt, you could hit things inside the vehicle or be ejected from it. Always fasten your safety belt and check that your belts are fastened properly.
SEAT RESTRAINTS FOR BABIES, TODDLERS AND OLDER CHILDREN Be aware that there are special things to know about safety belts concerning babies, toddlers, and older children. Failure to follow the rules for babies, toddlers and older children could result in them being seriously injured or killed.
In every state in the United States and in the Canadian providence the law states children up to a specified age must be restrained while in a vehicle. Babies and smaller children should always be restrained in a child or infant restraint and never held on someone's lap. It is against the law in most states to hold a baby or child or allow them to be unbuckled while the vehicle is in motion. Follow the requirement of the state/providence laws that govern the state/providence you are driving in. Follow the manufacturer’s instructions when installing and using an infant and child restraint.
Improper installation of an infant or child restraint can lead to improper protection. If the child is not secured properly it could allow the child to move about or come out of the restraint and become airborne in a collision. In either case the child could sustain serious or fatal injuries.
Always follow the manufacturer’s instructions when installing and using the restraint to properly protect the infant or child.
SEAT BELT OPERATION Again, we stress that it is very important that you read the chassis manufacturer’s seat belt information section to find the complete information concerning the proper use and operations of seat belts as well as detailed safety information.
WARNING
WARNING

14
THREE-POINT (LAP-SHOULDER COMBINATION) The chassis manufacturer provides the driver and passenger front seat belts. Refer to the chassis manufacture for proper operations of this type seat belt.
LAP BELT These belts maybe located in the sofa area or recliner.
Pick up the tongue plate portion of the belt (the loose end) pull it across you.
Lengthen the belt by turning the tongue to the right angle and pull across until it reaches the buckle. Push the
tongue plate into the buckle until it clicks. Pull up on the latch plate to make sure it is secure. To tighten the
belt, pull the loose end of the belt through the tongue until it fits snugly across the hips. If your lap belts are not
long enough contact Renegade Customer Service at 1-800-295-7859.
In an accident, you can be seriously injured if your seat belt is loose or twisted. A loose belt could allow you to move forward too much, which could increase the chance of injury.
During an accident, a twisted belt may not be able to provide the full protection.
MAINTENANCE Periodically make sure the safety belt reminder light and all your belts, buckles, latch plates, and retractors are working properly and are anchored correctly. Look for any torn, frayed, loose, or damaged belts or attachments. If you find any items that may be defective or loose have the component of the seat belt repaired or replaced immediately.
If your motorhome has been involved in an accident have the seat belts inspected for proper operation by an authorized technician and to make sure the components have not been damaged in any way. If any of the belts have been stretched and/or their components have been damaged they must be replaced. Do not attempt to disassemble or modify the seat belt system at any time.
Frayed, torn, stretched or damaged belts, as well as, loose, or broken attachments, could come apart in an accident leaving you without protection. You must have any defective or loose component of the seat belt repaired or replaced immediately.
If the seat belt is not out of the way of the door you can damage both the belt and your vehicle.
WARNING
WARNING
NOTICE

15
T Captain’s Chairs
hese seats can be adjusted so you maintain correct height position and should aid the driver’s visibility and vehicle control. When adjusted properly and under normal driving conditions set the seat to make sure you have enough head clearance.
Please read your chassis driver’s manual for more information on the captain chairs operating instructions.
Due to the maximum adjusting capabilities of the mid and high back air suspension seats, it is possible to combine the seat back recline adjustment and the seat slide adjustment so that the seat back contacts the sidewall.
Your Captain’s chairs may also have a factory added option to swivel. To swivel the chair reach underneath the front of the seat and move the lever to the left. And release the lever when you have achieved the position you desire. When the coach is in motion both captain’s chairs must be locked in the forward-facing position.
When adjusting the seats make all adjustments while seated and before the engine is started. Seat belts should be always worn when operating the vehicle.
Make sure the front seat releases are in their locked forward position before moving the coach. The forward/locked position is the only one certified for safety and to be used while the vehicle is in motion.
Serious injury may occur if head clearance is not adequate. Before driving or riding in the vehicle, ensure that there is adequate head clearance at maximum upward travel of seat.
It is the responsibility of the driver to adjust the seat to prevent damage to the seat and the cab interior. Rotate the seat back into place by going the same direction you came.
Do not turn the seat 360 degrees. This will damage wires that are behind the seat.
It may be necessary to move the seat forward or backward to clear the vehicle walls and dash as it turns.
WARNING
NOTICE
16
FUEL TYPE
Fuel Tank Safety
Always use the recommended fuel listed in your chassis manual. Fuel vapor burns violently. To avoid a fuel fire, turn your engine off when you are refueling. Never allow open flames near the filler neck and never smoke while refueling.
FUEL CAP When removing the gasoline fill cap, rotate it slowly to release any built-up pressure that may have occurred within the fuel tank. You will hear the hissing sound of the pressure being released, when the noise has stopped, you can completely remove the cap. Always replace a lost or damaged fuel cap with the same style as the original one.
Always remove the fuel cap slowly to allow any internal pressure to be slowly released.
The use of the vehicle or on hot days the fuel may warm up causing vapor to build up
within the fuel tank. A sudden release in the pressure could cause the fuel to spray out
creating a potential hazard and result in you or someone being seriously injured or
killed.
Using a different style of gas cap as the original could cause a malfunction indicator lamp to light and may damage
your fuel tank and emissions system.
WARNING
NOTICE

17
Y Vehicle weight, loading, and leveling
our Renegade motorhome is designed to allow for a reasonable weight of passengers and/or cargo items. The weight of the empty vehicle will vary based on the equipment and options that are installed.
It is very important that you know the various weight limits/ratings of your motor home. The driving ability and handling for the unit could be greatly altered or affected if your unit is overloaded.
A motorhome is designed to carry loads that are specified by the chassis manufacturer. These load and weight limit signs are posted on the labels affixed to the driver’s and passenger’s door jams.
The Gross Vehicle Weight Rating (GVWR) is a combination of the structure and the suspension components.
The Gross Combination Weight Rating (GCWR) is the maximum amount of weight allowable for your fully loaded vehicle (passenger, food, fuel, water systems, supplies etc.), and if applicable the weight of any towed vehicle.
LOADING THE VEHICLE When loading the outside storage compartments, try to distribute the load as evenly as possible, from side to side, and front to back. Note that gray, black, and freshwater tanks need to be considered, as they will significantly change the balance due to their weight.
Inside the cargo should be distributed as evenly as possible from side to side and front to back. Store heavier items on or close to the floor as possible. Lighter items may be stored in overhead cabinets, closets, and drawers. Secure items and cabinet latches to avoid sudden shifting of cargo during travel, sudden stops, or emergency maneuvers.
Do not exceed the GVWR or GCWR. Overloading can cause a serious potential safety hazard. The driving ability and the handling of the unit could be greatly altered or affected if your unit is overloaded resulting in an accident which could cause someone to be seriously injured or killed.
Do not modify your vehicle by adding additional equipment or racks to carry additional cargo. This could cause you to exceed your weight limit and/or place the vehicle out of balance, altering the handling of the vehicle, causing a loss of control, which could lead to you or others being seriously injured or killed.
Overloading can cause parts to break and/or shorten the life of your vehicle or could lead to costly repairs that may not be covered by your warranty.
WARNING
NOTICE

18
WEIGHING THE UNIT Any vehicle can have the potential of being overloaded and it may be necessary to remove some of the weight or redistribute items to make the load even. You may want to weigh the unit from time to time to make sure you are staying within the weight limitations specific to your motorhome.
When weighing your motorhome, it must be weighed when it is fully loaded. This includes passengers, food, clothing, water, fuel, supplies, any towed vehicles behind a motorhome, and the tow vehicle. It is important to weigh your motorhome at a location that can provide axle-end specific weights.
You should not expect to measure equal loads at both ends of the same axle, because floor plans and component locations vary significantly, however, you should distribute the load to obtain the best balance possible.
HOW TO WEIGH YOUR VEHICLE When weighing the motorhome at a public scale the scale operator will recommend the method to use to determine the weight values. It is very important that you read the chassis owner’s manual. It will also give additional information on the complete procedures for weighing and loading your vehicle.
Procedure 1 Drive only the front axle of the motorhome onto the scale compare this weight to the GAWR (Gross Axle Weight Restrictions) listed on the federal label.
Procedure 2 Pull forward until both front and rear axles are on the scale. Compare this weight to the GVWR (Gross Vehicle Weight Restrictions) listed on the federal label.
Procedure 3 Pull forward until only the rear axle is on the scale. Compare this weight to the GAWR listed on the federal label.
NOTE After weight determination, if there is any weight excess, relocate or remove portions of the cargo until proper tolerances are obtained. Cargo should be distributed evenly from side-to-side and front- to-back. Store heavier items on or close to the floor as possible. Light items may be stored in cabinets, closets, and drawers. Secure items to avoid damage in sudden stops and/or accidents.
Whenever hauling cargo be sure it is secured in position to avoid shifting during quick stops, cornering, or in case of an accident. Unsecured cargo could cause you to lose control of your vehicle and result in you or others being seriously injured or killed.
Overloading can cause your tires to overheat resulting in too much friction and you could have an air-out which could result in a serious accident. Be sure that the overall weight, including passengers, equipment and supplies etc., does not cause your motorhome to exceed axle loads as well as the overall vehicle loads specific to your motorhome.
Overloading can cause your tire to overheat, wear prematurely and/or damage the tire.
WARNING
NOTICE

19
LEVELING JACKS It is very important that you read the leveling system manufacturer's manual before operating leveling jacks for the first time.
The jacks need to be kept in good condition. In rainy, snowy, or icy weather the jacks may become caked with mud and/or ice causing problems with its operations. Periodically check the leveling jacks, use water to spray away the mud or break away the ice before you try to use them.
The leveling system should be cycled once a month or whenever the vehicle is used to keep the system in operating smoothly.
At the beginning of the season check the oil level in the jacks and check the hydraulic lines and wiring for damage and wear. It is advisable to check the oil again before you leave on a trip.
Yearly check the framework for rust or damage. Periodically inspect the hoses and lines. Before moving the vehicle make sure the jacks are completely stored. Never move the vehicle with the jacks down on the ground.
Refer to your owners-manual for the proper procedures for manually retracting your jacks should you lose power to the pump. A handle is provided to perform this task.
SLIDE OUT MECHANISMS Your coach is equipped with electric slide out systems to move the slide rooms in and out. The slide out system is powered by your batteries. Your batteries are very important to the operating system. Maintaining your batteries is crucial. The batteries should be fully charged, and the cable terminals and battery posts should be clean to avoid erratic operations due to low voltage. The switch for the 12-volt electrical service is located on the side panel of the counter in the step well area.
The slide mechanism must be kept in good condition. Watch closely as you extend the room to make sure the slides are not binding. To move the slide room in or out hold the button continuously until the room has reached its inner or outermost position.
OPERATING The slides are controlled through the multiplex system. Please make yourself familiar with the use of this system.
Before you extend the slide room, make sure the level jacks are in place and the unit is level. If the unit is not level the mechanism can bind and if the weight is not distributed properly the slide-out can lean. These types of situations can damage the slide out mechanism.
By using a level (small bubble type should work) either on a counter, dining room table, or other areas in the RV can help assure the vehicle and the slide rooms are level.
When you are parking the RV, make sure that the slide out can move freely and that the area is clear of any obstructions. Watch closely as you extend the room.
Refer to your owner’s manual on the proper procedures for manually extending or retracting your slides should you lose power to the actuator.
Before moving check around the inside slide room area to ensure that personal items such as ceramic flowerpots, small tables, plants, etc. are not going to fall as the unit moves out.
A manual override is installed to assist you in case there is a failure with the electrical power. Refer to your manual for more information on this feature.

20
MAINTENANCE Keep the slide-out mechanisms clean. Road grime such as dirt, salt, ice, can build up on the mechanism impairing operation. You can clean them by using a mild soap and water solution.
Avoid damage to the slide out mechanism. Before you slide the room, make sure the leveling jacks are in place to avoid improper weight distribution or leaning.
To avoid damage to the slide out be sure the unit can slide freely, and the area is clear of any obstructions.
Your slides are equipped with rubber wiper blades located at the top, along the sides, and across the bottom of the slide out opening that will assist in wiping off debris when the slide out is being operated. Periodically check the wiper seals to ensure they are free of debris.

21
Tires, wheels, and towing TIRES The tires (original) supplied are designed to meet the federal specifications and to provide a reliable and safe mode of transportation. Since the tires are the sole component between the road and your vehicle you must provide the proper care and maintenance to help ensure your safety and helps to maximize the life of the tires. When a tire is replaced be sure to stay within the guidelines listed on the Federal ID tag.
TIRE PRESSURE Keeping your RV tire pressure at the proper levels will help ensure your safety and the life of your tire. Under inflated or over inflated tires can result in damaging the tire and causing a handling problem with the vehicle. Inflation pressure should be adjusted to handle the maximum tire load, and all tires on the axle should carry the same inflation pressure.
Never reduce the tire pressure below the vehicle manufacturer’s recommended levels to support load conditions to try to improve the ride quality of a vehicle. The difference will not significantly change and or the value of tire durability and optimum operation will be affected. Inflate the tire pressures to specification listed on the Certification Label, located in the driver’s door.
Check when tires are cold, this is either when the motor home has not been driven more than one mile or that has sat at least 3 or more hours. Failure to keep the tires properly inflated can cause damage or premature wear of tires and waste gasoline.
Under inflated tires can cause the tire to overheat, which can result in the tire losing air suddenly and could catch on fire.
Over inflated tires are more likely to be cut or punctured by sudden impact (such as a pothole) and result in a serious accident. Check all tires frequently to maintain the recommended pressure.
Either of these conditions can result in bad handling resulting in a serious accident.
TIRE MAINTENANCE Motorhome tires need extra care and attention and must be properly maintained to help ensure safe transportation and maximize the life of the tire.
TIRE INSPECTION A visual inspection of the tires should be performed monthly, more often when camping, before leaving on a trip, and after an extended storage period.
Check each tire for proper inflation.
Check the valve stems and caps for damage.
Check for any type of road or curb damage to tread or sidewall areas.
Check both the inside and outside of the sidewalls and tread for tire of wear, cracking penetrations and/or cuts in the tread or sidewalls.
Check for signs of overloaded or under inflated tire use. This can show up as unusual discoloration or waviness in the side walls, bulging in the bead area near the rim flange or a progressive tread wear on one tire more than the others.
WARNING

22
CLEANING TIRES Do not allow sand, mud, or dirt to build up on your tires.
Regularly wash using with a mild soap, water and a soft brush or use a cleaner that is especially made for tires.
Do not use tire cleaners that contain petroleum-based substances or solvents. Any cleaner that contains alcohol or petrochemicals can cause and accelerate deterioration and cracking. Silicone oil-based cleaners can dissolve the protective wax that protects the tire against the damage.
REPLACING TIRES Read all the information supplied in the original tire manufacturer's owner’s manual concerning tires and their use and when they should be replaced.
Use the recommended tire size listed on the Safety Compliance Certification Label.
Do not replace a new tire with a different tire type and/or tire brand than the other tires on your unit.
Poorly maintained, badly worn, or damaged tires are dangerous. They can alter the handling of the vehicle or have an air out causing a loss of control resulting in a crash. To help avoid serious injuries or death resulting from an accident maintained and replace tires as needed.
Mixing different sizes or types (radial and bias-belted tires) can cause the vehicle to handle improperly causing you to lose control while driving and crash. Be sure to use the same size and types of tires on all wheels.
STORING TIRES It is best for the tires if the motorhome can be stored in a cool dry area away from any major heat source the sun or from the extreme cold conditions.
Cover the tires if they are going to be stored in the sun.
WHEELS Maintaining wheels on your motorhome will not only enhance the appearance, but it is also essential for safety. Periodically checking one’s lug nuts for tightness, wear, and tear, especially before you start out on a trip, will help assure that you will have a safer trip plus help you avoid unnecessary damage.
Inspect your wheels Check the lug nuts and bolts for security and tightness. If the wheel bolt or nuts keep coming loose, you should replace them.
Inspect and replace wheels that are bent, cracked, rusted, or corroded.
Replacing your wheels Each wheel should have the same load-carrying capacity, diameter, width, offset, and be mounted the same way as the one it replaces.
Refer to the chassis owner's manual for information on wheel replacement and torque specifications.
NOTICE
WARNING

23
Using the wrong replacement wheels, bolts or nuts can affect the braking and handling of your vehicle and could cause an accident resulting in you or someone being seriously injured or killed.
GETTING A TOW Under extreme circumstances it might be necessary to tow your vehicle. Caution should be taken when
towing. Improper towing can cause damage to the front skin and structure of the motorhome, including the
fiberglass cap and bumper. Towing should only be done by a competent towing service.
It is important that you read the chassis owner’s manual on complete towing information.
TRAILER TOWING Before you tow any vehicle behind your motorhome you need to understand that the towed vehicle tongue
weight will reduce your load capacity. If you are towing a vehicle or trailer, never exceed the maximum gross
weight rating.
For specific towing restrictions and guidelines refer to the trailer guidelines published by the chassis
manufacture and refer to your specifications and the information in the chassis owner’s manual.
Never ride or never allow anyone to ride in a towed vehicle. This could result in
someone being seriously injured or killed.
WARNING
WARNING
24
D Before You Hit the Road
riving your motorhome is comparable to driving your family car once you become accustomed to the feel of the controls and to the reference points from the driver’s seat relating to the position of the RV traffic. Planning your trip and preparing as much as you can before you leave will help ensure that you will
have a safe and enjoyable time. Refer to the Safety Section in this manual regarding captain chairs seat adjustment.
Make sure the seat is positioned so you can see all the instruments, reach the gas and brake pedals, and have a good view of the road in front and behind you. Make sure everyone is wearing a seat belt.
Chart your route by consulting maps and guidebooks that are available as to the condition of roads, and other circumstances such a low bridges and tunnels. Remember that the weather can change quickly and alter the road conditions. Listening to radio stations or weather monitor channels both in route and at your finale destination can you help you stay abreast of the conditions. Listed below are a few recommendations when driving your motorhome.
NOTE: You must be familiar with the height and width of your coach. There are many low bridges and narrow roads on which your coach will not fit. Review your route for any of these conditions before you start your travels
DRIVING TIPS Read your chassis manual for information on proper driving skills, operations, use and safety. Drive with consideration on the highway by following the rules of the road and observing all applicable speed and safety regulations. Keep pace with the average traffic flow and at the proper speed limits. The best cruising speed for your RV will vary with the road and weather conditions. Higher speeds may result in a sharp increase in fuel consumption. Allow a safe distance in which to stop. Allow more time to brake, or change lanes, and to merge onto a busy highway. Larger vehicles do take more time to accelerate and slow down. Watch the road ahead and around you. Check either side for vehicles, animals, or children that could suddenly dart in front of you. Allow for the length and width of the vehicle. Always allow extra room in cornering and when changing lanes. Make it a habit to frequently check the side mirrors. Learn to use the view of the roadway behind as a gauge in keeping a good lane position. When passing, avoid sudden maneuvers. Check rear view mirrors and signal lane change. Remember that additional time and distances are required to pass safely. Never follow another vehicle closer than one vehicle length for each 10 m.p.h. Pump the brake pedal lightly to stop on wet or icy roads. Observe proper vehicle speeds when ascending or descending a hill and always operate in the proper transmission range. Down shift on hills to avoid overheating or undue engine loads. Allow for the extra height of your RV and check for low hanging tree branches. Avoid low roofs and canopies when pulling in for fuel or service. Keep headlights, taillights, and windshield (both inside and out) clean as well as side windows. Keep your headlights properly adjusted. Allow extra time when the weather conditions are less than favorable for driving. It may be necessary to pull off the road when the weather becomes severe.
TRAVEL CHECK LIST The following are items you should check before you leave on a trip. Check the tire pressure and the condition of the tires. Check air bags for the proper pressure. Check the battery(s) for proper charge, proper cable connections, and no physical damage. Check the coolant level. Check all fluid levels including, transmission fluid, power steering fluid, master cylinder brake fluid,

25
radiator recovery system reservoir, windshield washer reservoirs; etc. (depending on equipment). Check engine oil. Check marker lights, turn signals, flashers, backup lights, headlight, running light, etc. Close and secure windows, awnings, vents, exterior access door, electric doorstep, and other exterior items. Close and lock dead bolt in security door when traveling. Crank down TV antenna, check for any overhead clearance problems. Stow electrical power, water hook-up hose and sewer hose. Turn off gas line shut-off valves to appliances. Make sure all control knobs on range, etc. are off. Turn off LP gas tank. Drain toilet bowl. Turn off living area water pump. Adjust window treatments for maximum visibility. Close and latch/lock all cabinet doors. Remove all loose objects from counter tops, sinks and other surfaces. Make sure both front captain’s chairs are locked in the forward position. Check vehicle fuel level.
SUPPLIES AND EQUIPMENT The following is a list of supplies considered as normal necessities to be carried in your motorhome. Bedding, pillows Collapsible clothesline, laundry bag, laundry soap Scissors, sewing kit Stick matches, flashlight, extra batteries, lantern Litter bags, wastebasket Portable barbecue grill, charcoal, firewood First aid kit, snake bite kit, insect repellent, sunscreen, Paper towels, napkins, aluminum foil, plastic bags, small ice chest Skillet, two pans with lids, hot pads, cooking fork, spatula, Carving and paring knives, mixing bowls, measuring spoons, containers Coffee pot and coffee cups Corkscrew, bottle opener, can opener salt and pepper shakers, sugar, spices Tablecloth for picnic table, folding chairs Plastic or paper plates, bowls, glasses, silverware Scoring pads and sponges, cleanser, dish washing soap Broom, dustpan, mop, small vacuum cleaner, whisk broom, washcloths, hand towels, bath towels, kitchen towels Toilet tissue, soap, shampoo, toothbrushes, toothpaste, Kleenex
EQUIPMENT AND TOOLS Listed below are general tools or equipment that are commonly packed when traveling. High pressure water hose Sewer hose extension Wheel chocks Road flares and reflectors Tow chain, strap or cable Shovel, ax, bucksaw Scissors or hydraulic jack Tire gauge Spare fuses and light bulbs for interior and exterior lights Tool kit Trouble light with a long cord Engine oil, transmission fluid, power steering fluid, and engine coolant Water pressure regulator Extension cord Tire pressure gauge
NOTE We do not recommend the use of power cord adapters.
26
T Electrical system and batteries
he coach’s system has been designed and installed in accordance with the safety requirements of ANSI Standard A119.2 and the National Electric Code. Any changes, additions and/or modifications that you make may develop
a hazardous condition. Be sure to consult your local authorized dealer for advice concerning changes or additions.
IMPORTANT NOTICE: Anyone making a change, an addition and/or a modification to the electrical system is assuming the full responsibly of any consequences.
Do not alter; make changes, additions and/or modifications to the electrical systems. Doing this could lead to a hazardous condition resulting in you or someone being seriously injured or killed.
ELECTRICAL SYSTEM BASICS To provide your motorhome with electrical power for both camping and traveling there are three different electrical systems. There is 12-volt DC (direct current) Automotive System, a 12-volt DC (direct current) Coach System and a 120-VAC (alternating current) Coach System. The 120-VAC system requires use of an external source 120-VAC outlet, a generator, or inverter. This section focuses on the Coach Electrical System.
12-VOLT DC AUTOMOTIVE SYSTEM The battery(s) provided by the chassis manufacturer supplies the starting power to the engine and power for the automotive lights, etc. Review the chassis manufacturer’s manual for operation, care, and maintenance. Never switch the 12-volt deep cycle coach battery with an automotive battery.
12-VOLT DC SYSTEM An on-board deep cycle marine type battery(s) supplies the power for your accessories while you are traveling, camping, or when a 120-VAC hook-up is not available. This system provides power for most of the coach lights, the water pump, furnace, radios, vent fans, and sometimes the refrigerator. Never switch the automotive battery with the deep cycle coach battery.
120-VAC SYSTEM To use this system, you need a 120-VAC power source or an inverter. A shoreline (extension cord) can be used to plug into a properly rated outlet at the campsite or home or if available on-board electrical generator. When you provide a 120-VAC power source, the electrical system will work the same way as it does in your home. You will be able to run the items such as your toaster, microwave, televisions, sweeper, roof air conditioner, some lighting and other items that require the 120-VAC power to operate.
INVERTER An inverter converts12-volt DC from the batteries to 120-VAC to run a limited number of items that need 120-VAC. It also controls the 12-volt power for recharging batteries when 110 is present from shore power or from the generator. Some units are inverter only and the battery charge will come from a separate converter charger. The chassis alternator does not run current through the inverter when charging house batteries.
WARNING

27
SHORELINE/POWER CORD Depending on your unit you will have either a heavy-duty 30 power supply cord to supply the power from an external power, 120-VAC connection, such as the camp- site power source, generally referred to as the Shore Power.
GENERATOR The generator is a self-contained power plant providing the 120-VAC alternating current (120-VAC). It is used to power the roof air conditioners, microwaves, Televisions, vacuum, etc. The unit can be activated while you are traveling to provide power to the major appliances.
12-VOLT DC SYSTEM The batteries are the heart of the 12-volt DC system and must be maintained. The automotive battery supplies the starting power of the vehicle and supplies the power for the headlights, taillights, other automotive lights, and a backup power source for starting the Generator. The RV Deep-Cycle battery supplies the power for the 12-volt RV appliances such as the furnace, refrigerator, interior lights, etc. If you keep the RV batteries properly charged you could use most everything, except for the microwave, roof air conditioner, electrical outlets, and the refrigerator in the electric mode. With your inverter turned on you can also use a limited number 110V systems for a limited period.
Unlike an automotive battery that is generally charged through the alternator when the vehicle is running, the RV Deep-Cycle and automotive batteries are charged through the alternator and through your inverter when the external 120-VAC power source is attached. When you are using the 12-volt system without the additional help of the 120-VAC system your power consumption or usage will be determined on individual needs and usage of the 12-volt appliances.
The automotive battery and the Deep-Cycle RV batteries can never be switched. The automotive battery is designed to provide a burst of energy to start the vehicle while the RV battery is designed to give the power in small increments over a longer period-of-time.
BATTERY MAINTENANCE It is very important that you read the manufacturer’s instructions for operating, maintaining, and charging
each of the batteries.
BATTERY TERMINALS Check battery terminals, monthly, for dirt and corrosion (green powder foam). Corrosion can alter the performance and destroy the battery. Most corrosion can be removed by using a bristle brush soaked
in baking soda, rinse with water or as directed in the battery manual.
BATTERY CHARGE Check batteries for charge, as per the manufacturer’s instructions. Before charging any battery, inspect the battery connections for loose or damaged connectors and the battery terminals for frayed conductors. Make sure they are both clean and securely fastened to the battery post.
REPLACING Replace batteries with the same type, size, and voltage. Read more information concerning the batteries in the winterizing and storing section.
NOTICE

28
Before performing any maintenance or working near the battery area, protect yourself from harm by disconnecting the cables using the procedure explained in your battery manual.
12-VOLT MAIN DISCONNECT
Chassis Battery Disconnect Coach Battery Disconnect
(See Mercedes Owner’s Manual for location)
BATTERY DISCONNECTING The battery disconnects provide a simple and safe way to disconnect the coach or chassis batteries and to prevent unwanted drainage during storage or when you are checking your 12-volt electrical system. The coach battery disconnect is just inside the entry door. Mercedes provides a separate chassis battery disconnect.
The 12-volt battery system plays a vital role in the use and enjoyment of your RV, the battery disconnects can give you peace-of-mind by preventing unwanted discharging of the batteries during extended period of storage. It is recommended that you leave the 12VDC system power on while traveling. Some slide mechanisms require power to the motors to maintain the closed position of the slides.
NOTE: If you plan to leave your RV plugged into 120-VAC at your home or campsite, it is advisable to check your batteries monthly. If you are going to disconnect the batteries during storage, make sure they are fully charged before disconnecting.
See the winterizing and storing section for more information concerning batteries.
It is important that you read the manufacturer’s instructions for operation and maintenance of the battery
disconnect.
WARNING
Figure 1

29
IF SOMETHING GOES WRONG PROBLEM Pressing the 12V main connect switch does not engage
12V system.
Generator will not start.
RV engine will not start, or chassis accessories will not operate.
120-VAC SYSTEM
WHAT TO DO Batteries may be fully discharged. Recharge batteries or
jump with battery direct connections. Check that both
12V main switches are engaged.
Check that chassis battery is switched to the on
position.
House battery may be fully discharged. Press and
hold the emergency generator start button and the
generator start button at the same time. Check
12VDC disconnect is not turned off.
Check that chassis battery is switched to the on
position.
To use the 120-VAC system you must have an external 120-VAC power source. These sources are the generator, shoreline/ power cord plugged into 120-VAC outlet, or an inverter. Your motorhome will use a 30 AMP 120-VAC service. Much like the service in your home this service has several circuits that are protected by breakers (or fuses). All general-purpose receptacles are protected by a GFCI breaker.
30 AMP SERVICE This is a 120-VAC service that is limited to a total draw of 30 AMPS. This system uses a heavy duty water-resistant 3 prong power cord. This is not a 240-VAC system. Ensure that you do not plug your unit into a 240-VAC outlet.
The use of an adapter is not recommended, and it would be better to use the on-board generator or inverter/charger if available.
30-amp shore cord receptacle
Extension cords are not recommended. By using extension cords to go beyond the
length that was originally supplied with your motorhome you could be creating a
dangerous situation and/ or a potential fire hazard.
WARNING

30
COMMON APPLIANCES AND AVERAGE AMPERAGE Below is a list of the most common appliances used and the average amps used when operating. Update the information if the amperage of your appliance is different than listed.
APPLIANCE Air Conditioner Refrigerator Water Heater Microwave Oven Coffee Pot Toaster Electric Fry Pan Food Processor Crock Pot 10 Volt Lamp TV DVD PLAYER Small Vacuum Iron Washer/Dryer Heating Pad Hair Dryer
AVERAGE AMPS 15 -17 (Each AC unit)
3.5 to 5.7 12 .5 12.8
9 10 10 6
1 .5 1
1 to 2 0.5 10 10
6 to 11 10 to 12
2 to 3
YOUR AMPERAGE __________ __________ __________ __________ __________ __________ __________ __________ __________ __________ __________ __________ __________ __________ __________ __________ __________
CIRCUIT BREAKERS AND FUSES Like your home, the 120-VAC circuits in the RV are protected by circuit breakers and fuses.
These are the same as circuit breakers used in your house electrical system. The circuits are listed on the inside of the fuse panel door. If a short circuit or an overload happens on the circuit, the circuit breaker will trip and interrupt the current flow.
If a fuse blows, first turn off the affected appliance or appliances check the fuse panel to see which fuse was affected and replace it. Be sure use you replace the blown fuse with one of the same amperage rating. If the fuse continues to blow, contact your dealer or a service facility for an
inspection.
Never replace a fuse with circuit breakers or fuses with a higher amperage than
originally installed. Over-fusing may cause the circuit wires to get hot and start a fire.
WARNING

31
POWER INVERTER/CHARGER The inverter/charger is a dual function device. The inverter portion of this device converts 12VDC to 120-VAC. The inverter draws power from your RV 12-volt DC coach batteries and electronically converts the DC current into standard 120-VAC AC current. This allows you to use electricity to run certain 120- VAC electrical appliances while not plugged into shore power or from the generator. You need to monitor the battery when dry camping, or have the Automatic Generator Start enabled. You should not let the battery be drawn down more than 11.4 volts before plugging the shore cord in or starting the generator.
The charger portion of this device will recharge the RV 12-volt DC coach batteries when you are using your generator or shore power. The length of time it takes to take to recharge the batteries will depend on how much it has been depleted, and by the ambient temperature. Cold temperatures will require longer charge time than in warmer temperature. When running the generator or being plugged into shore power, this will not become a concern because batteries will be continuously charged. All chargers have smart charge technology and will sense the battery condition and step current flow up or down as needed.
NOTE: See the specifications section for exact location (where applicable).
It is important that you read the manufacturer’s instructions for operation and maintenance of the power inverter/charger.
GROUND FAULT INTERRUPTER/BREAKER (GFCI) The GFCI function is to protect against severe electrical shock. You will find all general-purpose receptacles on a GFCI breaker. It is a highly sensitive circuit breaker that senses a problem or fault with the current flowing to through the plug and to an appliance such as a hair dryer, electrical skillet, etc. and breaks the path to the receptacle.
If the GFCI blows or trips, turn off the appliances involved and follow the GFCI manufacturer’s instructions on resetting. If the GFCI continues to blow or trip contact your dealer or service center for inspection and repair.
It is very important that you read the manufacturer’s instructions for operation testing and the maintenance of the ground fault interrupter/breaker.
The GFCI is a device that protects against severe shocks due to faulty currents. It is not made to protect against over current. Do not add breakers or fuses that are over the amperage that was originally installed.
To ensure your safety, test the GFCI often. A GFCI that is continually tripping is an indication of a problem in the electrical system. Have your system checked by a certified service technician.
MAINTENANCE Test GFCI before you leave on a trip, weekly when camping or, at least every 30 days. To test the circuits press the test button which will turn off the power to the outlet. Press the reset button, if the button comes back out then it appears to be working properly. If it does not pop back out, have it checked by a certified technician.

32
POWER AND SUPPLY SOURCE
APPLIANCE
Air Conditioner Lights Microwave Oven Range/Oven Refrigerator Vent hood Wall electrical outlets Water pressure Water supply Battery recharge Drainage -toilet
SELF- CONTAINED/REMOTE OPERATION
Generator 12V battery converter/Generator
12V battery Generator Generator Generator 12V battery 12V battery Generator
Tank/Generator 12V battery
CITY HOOK UP (RV PARK)
120-VAC 12V converter
Converter/120-VAC Converter/120-VAC Converter/120-VAC
120-VAC 120-VAC
120-VAC line Pressure system/120-VAC
City/Park Hook-Up 12V converter/120-VAC
GENERATOR (IF APPLICABLE) The generator is a self-contained power plant providing the 120-VAC alternating currents, this is equivalent to the power in any home. It is normally powered by diesel fuel from your chassis fuel tank, with an optional LP powered version. The generator will not run if the fuel level in the chassis tank drops below a quarter of a tank. The generator also allows you to enjoy many AC appliances such as your roof air conditioners, microwaves, TV’s, vacuum, etc. while dry camping. You will also be able to use it while you are traveling to provide power to the major appliances.
It is very important that you read the manufacturer’s instructions for operation and maintenance of the generator.
The generator engine can discharge carbon monoxide gas, a colorless odorless gas, which can cause death if inhaled.
When operating the generator:
Do not open roof vents, windows or doors which could draw fumes into the interior.
Do not operate the generator where an object such as a building or vegetation may deflect fumes to the inside of your unit.
Do no operate the generator where accumulated exhaust gas could seep inside another occupied vehicle, tent or building.
Make sure your CO detector is working before starting the generator.
WARNING

33
MAINTENANCE Check for cleanliness of the generating set, as it affects efficiency.
Check the oil and air filter often and service regularly as per your manufacturer’s owner’s manual.
Have the AC voltage and hertz checked for proper settings?
Keep the governor and choke linkage clean.
Check the generator starting battery for clean connections and proper state of charge.
Remember the generator runs out of fuel when the tank is below 1/4.
Keep the generator compartment clean do not use as a storage area.
Check the exhaust system often for leaks.
Check manufacturer’s owner’s manual for additional information and to ensure that proper maintenance has been performed.
IF SOMETHING GOES WRONG PROBLEM Generator will not start.
Generator has started but is not powering.
Makes a clinking noise when trying to start.
WHAT TO DO Check the fuel level. It must be 1/4 full before it will run
and should be filled at this level. If you have continually
tried to start it, it may be flooded. Wait a few minutes
before trying again. Check the oil level; it may not start if
the oil is too low.
Check the fuse on the generator - if blown replace with
same amps as originally installed. Check the main
breaker on the generator and reset if necessary.
Check the battery to see if it has a bad ground or
connection or if the battery is low. Check the position of
the battery disconnect; if not engaged, change.
Refer to your owner’s manual for more detailed troubleshooting information.
AGS setting in multiplex

34
AUTOMATIC GENERATOR START CONTROL SYSTEM (AGS) If you have this option, it is controlled through the multiplex. The AGS is a multifunction device that provides automatic on and off operations for your generator. This system monitors the coach battery and when low, it starts the generator and has a display to show that the generator is running, plus it will display if there is a problem with the generator (see AGS picture page 33) Read the manufacturer’s instruction manual for operation testing and the maintenance of the AGS.
LIGHTING, OTHER SYSTEM CONTROLS, AND MONITORING (MULTIPLEX SYSTEM) The multiplex system is designed to control and monitor almost all the systems in the coach from a main touch screen in the living area and from lesser function strategically place smaller push button panels throughout the coach. Climate, lights, generator start, slides, water pump, and many other functions are available with the touch on the screen or the push of a button. There is an app for android and apple devices to allow you operate most multiplex functions via your smart phones and tablets. Please take the time to familiarize yourself with the main panel and refer to the operator's manual for this system in your binder.
Many of the lights throughout your unit are controlled by a switch on the fixture itself. These include:
Reading lights for both sleeping positions in bedroom
Work light over the range (in range hood)
When available (dependent on the model and options) the following lights may be on the multiplex control
panel as you enter the unit:
Exterior lights (a yellow and clear lens on each side)
Aisle and indirect lights to provide low-level aisle lights through the living space, the bedroom, and bath. Step well
lighting (can be used as low-level night light)
Feature light in the outside grab handle at the entry door.
Dinette and kitchen overhead lights
Bathroom wall lights and the water pump may be available on
the multiplex remote panel located on the wall.
NOTE: In some models, for convenience, a switch for the water supply system is also on the multiplex panel.
As with other electrical usage in your motor coach, be aware of the battery drain caused by lights.
When lights are on for an extended period-of-time, whenever possible, use an outside power source, such as the coach generator, the vehicle’s alternator (with the engine running), or a land line.

35
TRANSFER SWITCH Your coach is equipped with an automatic 110-VAC input power transfer switch. This switch will automatically switch the input circuit as it is activated. NOTE the generator is the dominant power source and will remain as the AC supply source even with the shore cord plugged in.
CAMPGROUNDS AND SHORE POWER AMPERAGE As previously stated, most campgrounds will provide a 30-amp service hook-up. There are some older
campground state parks that only provide the 15-amp. Do not hook-up to the power source without talking with someone at the campground and finding out what type of service they provide.
If you hook up to a power source that is a lower voltage, you could damage your electrical system or its components. A polarity checker is available through your dealer. Checking before you hook up could save you in costly repairs.
SHORELINE/POWER CORD The detachable weather-resistant heavy-duty shoreline/power cord transfers the 120-VAC power from external power source to the inverter and some110VAC circuits wired directly from the transfer switch. inside the unit. The 30-amp system uses a cord with a 3-prong grounding plug and a 50-amp system (if equipped) uses a cord with a 4-prong grounding plug. To help reduce the load on your 12-volt DC battery you should use this system whenever possible.
When using the shoreline/power cord follow these steps to maximize the protection against creating a shock hazard.
Before you connect your power cord, make sure that your connections are clean and solid. Dirty contact or connections can result in low voltage.
For maximum protection against fire or an electrical shock, do not use an extension cord. Extension cords reduce the voltage to your system. If you do intend to use an extension cord, be sure to use one with a same current rating required for your system. The original shoreline/power cord provided is the correct length and amperage. When necessary, replace with the same type and specifications.
Do not use a cheater plug (adapter cord) or an extension cord with a current rating
less than the amperage of your motorhome requirements.
Always use the appropriate cord. Never mix the cord types or plug into a different
type receptacle by removing any of the prongs. You could be creating a potential fire
hazard.
Always disconnect the cord set from the power source before performing any maintenance.
Failure to disconnect the cord set could result in electrocution.
To reduce shock, follow the proper steps to connect and disconnect the shoreline power.
WARNING

36
SHORE CORD MAINTENANCE Before every use, check the ends of the cord set, the face on the inlet on the RV, and the receptacle on the shore cord. Discolorations are signs of overheating, replace if necessary.
If the cord set end is overheating, it might be the RV’s inlet or the shore-line receptacle that is causing the problem. Both mating parts should be replaced.
Check the neoprene covers on the in-limit switch and power switch to be sure they are free of cracks or fracture.
The plugs should be cleaned with a contact aerosol cleaner or some type of a nail file.
Prolong the life of the cord set by storing indoors or in the outside compartment when not in use .
PROBLEM Dirty or corroded plugs.
Bad power cord.
Bad power source from shore cord hook up.
Ground fault interrupt (GFCI) switch may be off
or tripped.
WHAT TO DO Clean plugs with aerosol cleaner.
Replace, as necessary.
Use a polarity checker or contact someone at the
campground to check the outlet.
Reset.
Always disconnect the cord set from the power source before performing any maintenance. Failure to disconnect the cord set could result in electrocution.
WARNING

37
Water and Plumbing Systems lumbing in your unit is divided into two sub-systems: You have a potable
freshwater system, which is your usable water for drinking, bathing, dishes etc.
and your wastewater system, which are the tanks that hold your drainage or
wastewater until you are ready to dump it.
The holding tanks are an important part of the water system, neglected or
mismanaged tanks can lead to having contaminated systems.
Neglecting or mismanaging both the fresh-water system and wastewater
systems could lead to water contamination and other health hazards or
environmental hazards.
Provide the proper care and follow the proper procedures for handling the water and the
components of both systems to avoid creating a hazard situation.
PLUMBING BASICS Several components work together to provide you with your freshwater and waste-water systems. Freshwater Tank An on-board freshwater storage tank that carries the freshwater (usable clean water). The tank is filled through an inlet in a storage compartment on the side of your RV and used to provide you with water when you are not in a location that has the city water hookup.
Electric Demand-type Pump Supplies the water pressure for the on-board freshwater tank.
City-Water Hookup Delivers pressurized water via a hose that is connected to a campground water supply and to an inlet on the side of the RV.
Monitoring (Multiplex Main Panel) Will display how much water is left in the freshwater tank, as well as how full the wastewater tanks are.
Waste Drainage System This system functions as it would in your home with lines running from kitchen sink, bath sink, tub/shower, washer/dryer, and toilet.
Gray Water Tank Holds drainage water that originates from sinks or the tub/shower until they are ready to be drained at a dump station.
Black Water Tank Holds the drainage from what is flushed down the toilet until it is ready to be drained at a dump station
(RM Models only, the kitchen sink and toilet drain into the black tank).
Fresh Water System To provide you with fresh water, you will use either the self-contained on-board fresh-water tank, where the water pressure is pumped through the lines by the water pump or use a city hook-up that provides the pressurized water directly into the lines. A city hook-up is provided by many of the campgrounds.
WARNING
P

38
38
CONSUMPTION WITH THE SELF-CONTAINED SYSTEM It is hard to realize just how much water we use every day in normal home use. Newcomers may discover that the water supply does not last long unless procedures for consumption are adjusted.
You can drastically reduce water used for showers by first wetting down and turning off the shower head, soaping yourself, and turning on the shower to rinse off.
Another tip is, when hand washing dishes, do not let the rinse water run while you wash one dish at a time and rinse. Wash several, turn the water on and rinse. Then turn it off and wash more. Once you put these types of practices into use you will find that there should be enough water to meet your need.
It is very important that you read the manufacturer’s instructions for operations, use and the maintenance of the fresh-water tank.
TO FILL THE FRESHWATER TANK Find the fluids control center in the outside compartment. You will find a ball valve located next to the words tank fill. Rotate the handle until it points to the words tank fill.
Find the loose hose end at the bottom of the fluids control plate. Remove the protective cap, connect your fill hose to the loose hose and begin filling your fresh-water tank.
NOTE: The fresh-water tank has an overflow pipe that will discharge excess water. If you see water running from the bottom of your coach shut the fill line off immediately, your tank is full.
If you have not used your water system for a while, you may have air in the plumbing lines which may need to be purged.
TO PURGE LINES Open all the faucets one at a time, both hot and cold, let the water flow until it flows without sputtering.
To help avoid contamination of the hoses used for your water source and to fill your fresh-water tank, hoses should be cleaned. Do not use hose for anything else. All fresh-water accessories should be kept away from grey and black water accessories.
DRAINING THE TANK We suggest you drain the fresh-water tank at the end of each camping trip, or anytime the tank is unused for more than a week, and before and after storage and/or winterizing.
It is important to make sure the lines and the water heater are also drained to prevent bacteria from growing.
TO DRAIN 1 Open the low point drain valve for the fresh-water tank and allow the water to drain. 2 When the water stops close the low point drain.
3 Open the drain valve for the fresh tank. • RM model the valve is in the bathroom vanity cabinet. • FW model the valve is under the bed.
WARNING

39
SANITIZING YOUR WATER TANK It is important that you keep your water fresh and clean and free of any potential contaminations. You should sanitize your system any time the tank has set empty, such as the first time it is used
or after storage, detected an odor, with continual use every 3 months and before storage/winterizing.
TO SANITIZE 1 Open drain valve to empty the tank.
2 Mix a solution of 3/4 cup (6 oz.) liquid household bleach to 3 gallons of water for every 15 gallons of tank capacity. Note When using bleach concentrate, use 3/8 cup (3 oz.) to 3 gallons of water. 3 Turn Anderson valve into winterize position, put hose down into bleach jug and turn on the pump. To pump the bleach
and water solution into the water tank. When the bleach solution jug is empty, turn off pump and put Anderson valve into the tank fill mode.
4 Fill the tank with fresh water, turn water pump on, open all faucets and water heater relief valve. 5 When water runs steady turn off the faucets and then turn pump switch off.
6 Let system sit at least 4 hours then drain system and flush with water.
If a chlorine taste remains, add 1 quart of vinegar into the tank that is partially filled with fresh water. Wait several days; let the vehicles motion agitate the solution (if possible). Drain system, and flush with fresh water.
FRESHWATER SYSTEM MAINTENANCE Before trips, be sure heavy items such as canned goods, tools, etc. are not in areas where they can contact water piping and cause damage due to road vibrations or shifting.
Each time you fill the water tank or are hooking up to the city water station, check the connections and fittings around the faucet areas to make sure they are not leaking due road vibrations.
When using the fresh water self-contained system check periodically inspect for any type of odor. If an odor is detected, follow the procedures above for sanitizing the system.
To avoid contamination or bacteria growth in the fresh-water tank or in the system be sure to provide the proper care and to follow the proper maintenance procedures.
WATER PUMP When you are using the self-contained freshwater tank, a water pump is used to pump the water through the lines. To avoid damage when you are using a city water hook-up, the pump must be off.
OPERATING It is very important that you read the manufacturer’s instructions for operation and the maintenance of the water pump. To winterize, refer to the winterizing and storage section for more information.
Check the tank level and if empty or low you must fill before using. After following the procedures in the owner’s manual, the pump should start whenever you turn the faucets on and stop when you turn them off.
IF SOMETHING GOES WRONG PROBLEM Pump cycles when nothing is turned on.
Pump will not start.
WHAT TO DO Check plumbing and fixtures for leak. Check to see if
air is trapped in the water heater outlet side or pump
head.
Check breaker, main switch, and ground connection.
Check motor and if the motor feels hot check the
thermal breaker. Check charging system for correct
voltage and good ground.
WARNING

40
It is noisy during operation.
Pump will not shut off.
Pump will not prime.
CITY-WATER HOOKUP
Check for loose plumbing and loose mounting feet.
Check for leaks inside and out including the toilet and
leaky valves.
Check the hose between the tank and the pump for
kinks. Check for water in the tank, check for proper
voltage.
City-water hookup allows pressurized water to flow from an outside hook-up into your RV without the use of the water pump.
1 Attach a clean, minimum, high pressure hose to the water inlet fitting.
2 Make sure water pump is turned off. (It is not needed when hooked up to this system). 3 Open the city water valve by turning the ball valve handle until it points at the words City Fixtures 4 Turn on the water and then all faucets until water is steadily running and then shut off the faucets.
NOTE: Depending on the campground city water the hookups may deliver high-pressure water. In this situation, we suggest you protect your plumbing system by installing a pressure reducer/regulator between the faucet and your hose. These can be obtained by contacting your dealer or RV supply outlet or hardware store.
WATER HEATER GAS/ELECTRIC Using the water with some discretion, as explained in the freshwater section, you will help ensure there will be an ample supply of hot water to meet your needs.
The water heater equipped in your unit can be operated on gas (LP) or electric.
Refer to the manufacturer’s instructions for operation, safety, and maintenance.
SEEPAGE OR ODORS If when turning on your faucets you detect a foul odor, DO NOT use the water. Sanitize the tank.
DRAINAGE SYSTEM All the water from the sinks, and the shower will drain into the grey holding tank. Water from the toilet will drain into the black holding tank. Each tank will be explained later in this section. NOTE: in the RM model the sink drains into the black holding tank
VENTS The roof vents are pipes that allow air into the drain system to dispel odor and equalize air pressure to permit rapid and smooth drainage and prevents the water in the P-traps from being siphoned off.
TRAPS The p-traps are installed to keep the holding tank odors from entering the vehicle. A foul odor from the tanks may be detected due to the water in the p-trap evaporating. This can occur if the unit has been in storage or anytime drains have not been used for a long period of time.

41
KITCHEN AND BATHROOM FIXTURES When the fresh water is flowing properly, the fixtures work and drain much like they would in your home. If you detect an odor coming from the drains add water to the sinks and the shower/tub area. This should eliminate the odor.
TOILET Refer to owner’s manual for proper operation and maintenance.
The toilet uses very little water. This helps to conserve water and holding tank space. You will need to follow the proper flushing and sanitizing instructions to keep the odors from entering your motorhome.
When using, push the handle or pedal halfway and hold to let water into the bowl, then fully depress to open the valve and complete the flush. To avoid the solid matter from building in the tank, do not release the handle until there is enough water in the bowl to carry the paper and wastes completely to the tank.
MAINTENANCE To prepare the toilet for use, add an odor chemical such as Pink Magic or Aqua-Chem. Use the required amount per the instructions on the bottle. Add to the toilet bowl, depress the toilet pedal to allow the bowl to fill with water, you would need approximately 1 gallon of water for proper mix, and then release the pedal so the mixture enters the wastewater tank.
Be careful with the toilet chemical, if spilled it can stain your floor or clothing.
Toilet tissue dissolves over time, but facial and/or other tissues will not. Do not discard any tissue, except toilet tissue into the stool.
Do not use detergent or bleach in the stool, they will remove lubricating oils and greases. Use only odor control type chemicals.
LEAKS OR ODORS Check black tank level and use odor control type chemicals when cleaning. If the toilet will not drain, check the level of the holding tank to ensure it is not full. If the tank is not full, check for any obstructions in the drain. If the valve has malfunctioned, or if debris is blocking the valve from seating correctly, then the valve may leak. Clean the debris from around the O-ring seat and check operation.
WASTEWATER SYSTEM The freshwater drainage system and the sewer system are individual self-contained systems. The system consists of a grey water tank, black water tank, and vents that equalize the air pressure and that carry out the odors. There is a monitor panel that indicates how full the wastewater tanks are, as well as how much water is left in the freshwater tank.
HOLDING TANK The grey water tank holds the drainage water that originates from the sinks, and shower / tub . This tank needs less attention than the black water tank, but it is possible for the gray water tank to get very stinky if it is not properly cared for.
NOTE: Grey water should never be emptied on the ground. Kitchen sink waste is considered black water due to the high concentration of solids.
NOTICE

42
BLACK WATER TANK Holds the drainage from what is flushed down the toilet (RM model also houses the sink water). This tank needs much
more attention than the Grey water tank. Your coach will have a black tank wash fitting on the liquids control board.
Connect a freshwater hose to this fitting and flush any loose debris remaining in the tank after the tank has been emptied
and the drain hose is still in the dump. This black tank wash is designed to spray most areas inside your tank. Although
the primary concern with the black water tank is controlling odor, you must also keep solid waste and toilet paper from
collecting and plugging the drain line and valve.
TANK WASH CONNECTION When using a sewer hookup at a campsite, do not leave the dump valves open. If you leave the valve open, it does not allow any fluid to be stored in the holding tanks, and a good supply of fluid is necessary to adequately flush the black water tank. It is best to wait until the black-water tank is around 3/4 full before dumping.
DUMPING THE WASTE-WATER TANKS Holding tanks are enclosed sewer systems and as such must be drained in an approved dump station.
Both toilet and gray water holding tanks must be drained and thoroughly rinsed regularly to prevent accumulation of harmful or toxic materials.
Capacity could vary on each trip due to the number of people using the system.
Under no circumstances should the contents of these tanks ever be emptied beside the roadway, in a river or stream, or directly upon the ground. It is illegal and is in violation of all sanitary practices.
It is up to the camper to make sure that his camping site is always left in a clean and sanitary condition. Each person should police his own area before leaving.
HOW TO DUMP Basically, both holding tanks empty the same way, through a single outlet located on the underside of your unit, but each tank is controlled by an individual slide drain valve. (Check your floor plan and specifications for location.)
1 Level the vehicle or slope toward the termination outlet.
2 Remove the sewage drain hose from its storage under the unit (see picture). 3 Check to make sure both dump valve slide handles are fully closed. 4 Remove termination outlet cap and connect the sewer hose. 5 Place the other end of the hose to the dump station inlet.
6 Pull the slide drain valve on the black water tank and drain until empty.
7 Pull the slide drain valve for the grey water tank and drain until empty. This allows the grey water to flush any leftover blank tank waste out of the drain line. 8 Close both dump valves when the tanks are empty.
9 Attach the freshwater hose to the black tank spray and allow it to spray for approximately 2 minutes. 10 Open black water tank valve again to flush and drain.
For storage and winterizing information, refer to the storing and winterizing section.
WARNING

43
HOLDING TANK TIPS Do clean the holding tank with approved cleaner.
Do add a special chemical additive to sanitize and improve tank action. Do
guard the tank against freeze up.
Do keep the dump valves closed to allow the tanks to get as full as conveniently possible to facilitate drainage
Do keep the dump valves closed and the drain cap in place to allow use of the system while traveling; only when the RV is stopped you should open them.
Do use a soft single-ply tissue.
Do open the bathroom vent to dispel condensation and odors.
Do not use the facilities while the vehicle is in motion as it is not safe to be out of your seat and without a seat belt.
Do not put facial tissues or paper sanitary napkins down the toilet to flush into the tank. Do not
put automotive type antifreeze or household cleaner in the toilet to flush into tank. Do not put
foreign objects into the system which could clog or damage it in any way.
Do not use automotive antifreeze or windshield washer fluid in your motorhome system. These can be harmful or fatal if swallowed.
TANK HEATER If you have this unit available, read the manufacturer’s owner’s manual for complete instructions on operations and maintenance.
The unit has a thermostat that will turn the heater on when the liquid in the holding tank reaches 44 degrees Fahrenheit and will turn off when it reaches 64 degrees, so the liquid will never get too warm. You should turn your heaters on when the temperature starts to approach freezing.
Refer to specifications for option information and location of switch.
BEFORE OPERATING Make sure there is liquid in the tank before turning the heater on.
If hooking to shore power or starting a generator, make sure the switch is in the off position.
To prevent damage to the thermostat on the heaters, make sure the tank heater switch is off when hooking up to shore power or when starting the generator, and make sure there is liquid in the tanks.
NOTICE

44
Appliances, Electronics, and Equipment Please read the owner’s manuals for proper operation of every appliance in your coach. These individual owner’s manuals can be found in your owner's manual binder.
APPLIANCES This is a listing of the many appliances available. Not all may be an option in your motorhome.
Air Conditioner Your roof mount air conditioners will operate only on 120/110 VAC. They are wired to the circuit breaker in the main distribution panel. In some cases, they will only operate from either shoreline or off the generator. Air conditioning compressors draw a sizable portion of current. On some models the front AC only is wired to run from the Inverter.
When the air conditioning is turned on, reduce the load as much as possible to avoid overload causing a breaker to trip.
Make sure the air conditioner is off before plugging your unit into the park receptacle or starting your auxiliary generator.
The ability of these air conditioners to maintain the desired inside temperature depends on the heat gain of the RV. During extremely high outdoor temperatures, the heat gain of the vehicle can be reduced by 1 Parking the RV in a shaded area. 2 Using window shades and blinds. 3 Keeping windows and doors shut or minimizing usage.
4 Avoiding the use of heat producing appliances.
OPERATING INSTRUCTIONS For instructions on the use, operation, safety, and care read your manufacturer's owner's manual for complete information.
Wait at least two minutes before restarting each air conditioner after shutting off with either the heat/off/cooling switch or the temperature set lever. This allows refrigerant pressure in the air conditioner to equalize and will allow the compressor to restart easily.
Failure to follow these steps may cause circuit breaker or fuses to trip or blow and can cause unsafe conditions.
To avoid damage, make sure the air conditioner is turned off before plugging into the shore cord or before starting the generator.
Do not run the air conditioner without a filter. Doing this could plug the evaporator cell and/or affect the performance.
The manufacturer will not be responsible for damage caused by condensed moisture on ceilings or other surfaces. When air enters the RV, condensing may occur. The air conditioner removes this moisture from the air during normal operation. Keep doors and windows closed during use to minimize condensed moisture on cold surfaces.
WARNING
NOTICE

45
MAINTENANCE Air Filters Periodically remove and clean the filter/grille assemblies located in the air box. To clean, remove the assemblies by placing fingers on the long portion of latches and with an over-and-downward pressure, unlatch the catches. After assemblies are removed, wash the filter/grille assemblies with soap and warm water. Let assemblies dry and then reinstall.
Air Box Housing Clean air box housing and control panel with a soft cloth dampened with a mild detergent. Never use furniture polish or abrasive cleaning materials.
IF SOMETHING GOES WRONG PROBLEM Nothing is working.
Not getting cold enough.
Compressor cycles often and the coil freezes.
CALLING FOR SERVICE
WHAT TO DO Make sure the unit is turned on. If the RV is connected to
power supply by a land line, check to be sure the line is
sized properly to run an air conditioner load and it is
plugged into power supply. If you are using the motor
generator, check the generator to be sure the motor
for the generator is running and producing power and
the breaker is on. Check the thermostat and make sure it
is set below the room temperature. Check your fuse or
circuit breaker to see if it is blown. Check breaker, main
switch, and ground connection. Check motor and if the
motor feels hot check the thermal breaker. Check
charging system for correct voltage and good ground.
Make sure there is no damage to the outside coil.
Make sure the AC current is adequate to run the air
conditioner. To help the system, you can avoid using
your appliances that produce a great amount of heat.
Try to control the outside air from entering the RV by
limiting the use of the entrance doors. Try to control the
direct sunlight from entering the RV. Use your
awnings to shade the area and keep the shades and
blinds closed.
Make sure the thermostat is not set too low. Check the
outside vents and open them for better air flow. Check and
clean filter if necessary.
If you have checked all the above, call your local service center for further help. This unit must be serviced by qualified service personnel only. Have the following information available before calling: 1 Air conditioner model and serial number found on rating place located on base pan of air conditioner bottom. Remove return air grille to observe this rating plate or check your serial number sheet. 2 Air Distribution box kit part and serial number found on rating plate located on ceiling template.
Roof Vents Read the manufacturer’s owner’s manual for operation instructions and maintenance.
Powered roof vent aid in ventilation when cooking and cooling when air conditioning is not desired.
All vent fans are 1 way not reversible. These vents are for moving inside air outward to provide improved

46
circulation. It functions only when the vent cover is open and turns off when the cover is closed. The vent switch is located on the wall.
Be sure to close vents in inclement weather. It is not necessary to close the vents all the way while the coach is in motion, however, remember the additional clearance they require.
Do not leave fan in active automatic mode while RV is stored or unattended for long periods. High winds and/or other unusual conditions or obstructions may prevent closing, resulting in leakage that could cause damage.
MAINTENANCE To clean, remove the eight (8) screws in the removable interior screen and wash with mild detergent and reinstall.
Multiplex Temperature Controls Read the manufacturer’s owner’s manual for operating instructions and maintenance.
The multiplex will operate the air-conditioning, the air-conditioning fan only, heat pump in the roof AC units, and the
furnace (see Climate Control Picture below)
Refrigerator Please closely read the refrigerator owner's operating manual located in your Renegade owner's manual binder that came with your coach.
The refrigerator operates on Gas (LP) or 110 VAC in the Villagio. The Vienna uses a 3 way refrigerator,
110 VAC, LP, and 12 Volt (NOTE: 110 VAC for 2022 Model Year). There is an exterior access door with two
twist locks. You will need a flathead screwdriver to turn these two locks, so the access door can be removed for
inspection.
An owner's manual has been included in your Renegade owner's manual binder for all appliances in your coach. Please read these manuals carefully before you take your coach on its very first trip.
NOTICE

47
ELECTRONICS
Due to the variety of electronics, models, and styles available, we are going to refer you to your individual
components manufacturer’s manual for the operating instructions, maintenance, troubleshooting, service,
and warranty information. These manuals will be found in your owner’s packet.
Under each category there may be additional information given and safety information. It is important that you read the safety information in the manufacturer’s owner’s manual for each component you may have.
Television and Remote Control Your TV and remote will work the same way they do in your home. The TV will need to be programmed for the area you are traveling in. The remote is made to work with your unit.
If you are having a problem with the reception, the problem could be with the antenna connections or the position of the antenna. Refer to both the TV and the antenna manuals to troubleshoot the problem. Refer to the manufacturer’s instructions for operating instructions, maintenance, safety, and warranty.
DVD Player Use your DVD player (if equipped) as you would in your home. For best results, the DVD should be clean and free of moisture. If moisture exists wipe dry before you put it into the DVD player.
Refer to the manufacturer’s instructions for operating instructions, maintenance, safety, and warranty.
Outdoor Entertainment Center (Vienna Only) This system, depending on the option, will allow to you listen to the stereo with headsets, and it may also have outside speakers or soundbar (depends on your units option package) for additional audio options. There is a phone line connection, and an antenna jack which allows you to hook to the roof antenna for an outside television or may be equipped with a DVD player, if optioned. It has a 110-V power outlet to plug in any accessories that you may need. This is a GFCI protected circuit for safety.
Normally the satellite signal for the outside entertainment center originates from the satellite receiver (if optioned) for the living room TV.
Bedroom entertainment center satellite reception is from a separate satellite receiver (if optioned).
Refer to the manufacturer’s instructions for operating instructions, maintenance instructions, and other functions such as service, and warranty information.
GPS and Navigational System Refer to the manufacturer’s instructions for operating instructions, maintenance instructions, and other functions
such as service, and warranty.
Monitor The front dash monitor displays functions for the GPS, back-up monitor and stereo.
Please read their individual owner’s manuals for instructions on their uses.
Antenna The roof-mounted antenna is connected by a coaxial cable to an amplified power booster inside your motorhome to improve the signal strength in outlying areas. Connection from the amplifier to the TV set is also through a coaxial cable. The 12 Volt Power Booster is located inside the cabinet with the other electronic equipment. To receive good reception, you need to make sure that the connections are tight, and the power supply switch is turned on.
Read the manufacturer’s owner’s manual for operating instructions, proper use, and maintenance.

48
Satellite Antenna Dish
The type of satellite dish, if optioned as the Villagio and Vienna come satellite prepped as standard, is called an “in-motion" dish that can be used while your coach is moving or parked. These types of satellite dishes are limited in reception of HD signals.
Satellite antennas are frequently referred to as dish antennas. The automatic in-motion roof mounted unit, if equipped, tracks the satellite signal while the vehicle is in motion and can provide TV or music.
The antenna or dish is connected to the satellite receiver through a coaxial cable for the TV signal and through a multi-conductor wire cable for directional control of the dish.
Read the manufacturer’s owner’s manual for operating instructions, proper use, and maintenance for all the different components of the satellite system.
Satellite Dish Subscriptions To use a satellite dish, you must subscribe to a satellite system before you will be able to fully operate. The antenna unit initialization and satellite acquisition are automatic and does not require any operator intervention. After turning on the television and applying power to the antenna, the unit will track the satellite.
Once you power up the system, the antenna will search for a TV satellite. Once it finds the satellite, it will use the IRD (Integrated Receiver Decoder) data to decode the system and the antenna locks onto and tracks the satellite. Passing through tunnels, under highway overpasses, and through dense urban areas can disrupt transmission by denying the antenna a line of sight to the satellite.
Satellite radio tuner Channels are broadcast from an earth station to a satellite that rebroadcasts the signal that covers the United States through the turner. You must subscribe to the Sirius Satellite Radio service.
Have your individual Electronic Serial Number (ESN) ready when you call to subscribe to the service.
Satellite digital receiver The dish is connected to the satellite receiver through a coaxial cable for the TV signal and through a multi-conductor wire cable for directional control of the dish in the case of automatic units. You must have your access card to be able to operate the receiver. MAINTENANCE Review owner’s manual for care and maintenance.
OTHER EQUIPMENT This is a listing of the many appliances available. Not all may be an option in your motorhome.
Awnings Patio and window awnings (if optioned) can provide you with extra living space and to shelter you from the sun. Window awnings can help keep your unit cool and protect furniture fading from direct sunlight. Providing proper care and maintenance will extend the life of the awnings.
OPERATING Read your manufacturer’s owner’s manual for operating instructions and care.
When opening, be sure that there are no obstructions such as tree and most importantly electrical wires. Always make sure the awning is extended high enough before opening the entry door.

49
TO AVOID DAMAGE Awnings are not designed to be used as a protection from rain or any other form of precipitation. These awnings will collapse, if left open, from the weight of the water that will accumulate between the arms of the awning. When closing, make sure the fabric is rolled around the roller tube from the bottom of the roller tube. If heavy wind conditions are expected or exist, retract awning and place in storage position! Leaving in the down position can cause damage to the RV and the awning. From time to time unusually strong gusts of wind may occur before the motion sensor on your awning has time to retract the arms. It is recommended that the awning be retracted if winds reach speeds of 7 to 10 MPH.
Repairs need to be made by a service repair technician. The roller tube is under extreme spring tension. Attempting to repair the awning could result in someone being injured.
WARNING

50
Passenger Side Entry Step Your unit is equipped with an electric step for entering the passenger entry. Controls are located at the door entry area. You must be careful when you extend the steps. Curbs or obstructions could cause the steps and or frames to bend.
Steps are extended when the door is open and retract when the door is closed.
A switch is located on the side wall at the entry way to allow you to keep the steps extended when the unit is parked, and the door is closed. An ignition override system is installed so the vehicle will not be driven with the step in the extended position. When you turn the ignition switch on, the override starts and will automatically retract the steps.
For maintenance and testing the steps, review the manufacturer’s owner’s manual.
Always look before you step out of the vehicle to ensure the steps have retracted out completely. A sensor will stop the unit if the steps are too close to a curb or obstruction. Wait until the steps have completed the extending cycle before you step on the steps.
If you step out when the steps are retracting or are not completely retracted, you could lose your balance and fall, causing severe injury.
Check that the steps have retracted properly before you pull away. Driving with the steps in the extended position could cause major damage to both the step and the vehicle.
Never step on the steps until they are fully extended, or you could damage the frame.
WARNING
NOTICE

51
Cleaning and Maintaining Your Unit By providing proper maintenance you will not only minimize downtime but assure that you will safely and comfortable enjoy your unit for many years to come.
INTERIOR CLEANING KITCHEN/BATH
Countertops
Solid Surface Due to its non-porous attribute, there is no wax or sealant required for any special care of the product. Normal
cleaning only requires soap and water or damp cloth with mild cleanser. Do avoid using strong acidic cleaners,
such as those designed for drains, toilets, and ovens. Some of these cleaners can cause whitening which can be
difficult to remove.
Corian Counters (if equipped) Corian was created for a lifetime of easy care. For cleaning most dirt and stains from countertops, use soapy
water or ammonia-based cleaner.
To avoid damage to the countertops:
Use hot pads or rubber footed trivet for hot pans, frying pans, crockpots etc. Avoid strong chemicals such as paint removers, oven cleaners, etc. If contact occurs quickly flush the surface with water.
Run cold water when pouring boiling liquids into sinks.
Heavy earthen ware and ceramic products with rough bottoms will cause deep scratches and excessive wear on the laminate surface.
Never use knives and other sharp implements on the counter. Never hammer or hit with hard objects, such as falling dishes, cans, utensils, especially near the edges, where it can result in chips and/or cracks in the laminate surface.
Cabinets/Cabinet Doors
Wipe down interior cabinets with a soft cloth using soapy water and rinse for dirt and grime. Clean wood cabinets
with a soft cloth and furniture polish to maintain the luster. If you scratch the surface, a high-quality furniture
polish can be used.
Sinks The sinks will be either acrylic, plastic, composite materials, or stainless steel (Kitchen) and must be cleaned with a
nonabrasive type of cleaner. Harsh cleaners will cause premature deterioration and discoloring. Using harsh brushes or pads
can scratch the sinks.
NOTICE

52
Faucets To clean and protect the finishes on your faucets and fixtures, use a damp cloth or sponge. Using abrasive
cleaner or materials will dull and damage the finish.
Before putting the vehicle in motion, check that the cutting board(s), kitchenware
and tableware, cookware and all other objects on the counters, tables, sinks, etc. are
properly stowed and secured. Keep cabinet doors locked.
If an accident occurred, objects could become airborne and injure or kill someone.
Do not use abrasive product on the counters, sinks, cabinets or faucets. These types of products can damage
the finish.
Flooring
Vinyl (Villagio) & Woven Vinyl (Vienna) Regularly sweep to keep any debris off the flooring. Damp-mop your floor at least once each week (more
frequently for heavy traffic areas) to decrease wear and abrasion from grit and soil.
If it is necessary to use mineral spirits use it with care. It is highly flammable.
Keep away from pilot lights or matches or anything that could cause it to ignite.
LIVING ROOM
Dinettes, Sofas, and Recliners Your unit and options will determine which dinette and sleeper you may have.
Seat belts are provided in the sofa sleeper to accommodate passengers while the coach is in motion. One seat belt
is provided in the recliner.
Never allow anyone to lie or sleep on the sofa, dinette, or bed while the coach is in
motion. All passengers must be secured with a seat belt. If there was an accident
anyone not wearing a seat belt has a much greater chance of being injured and or
killed.
WARNING
WARNING
NOTICE
WARNING

53
CLEANING FABRICS
Seating Fabrics Vacuum or brush off fabrics as often as needed. Cushions, recliners, sofas and/or dinettes may be labeled with the
voluntary industry clean-ability code. Because dyes or the backing on some upholstery fabrics will be affected by
water or solvents, the clean-ability code will indicate the cleaning method that is safe for your fabric.
The use of scotch-guard or a similar product could void fabric warranties.
The fabric code is symbolized by the following letters. If the furniture is not coded, test the fabric for
discoloration on an inconspicuous part of the furniture before spot-cleaning.
W Use only water-based cleaning agents or foam. Mix two tablespoons ammonia or detergent,
such as Ajax liquid, with a quart of water. Wipe the stain gently with a clean cloth dampened with the solution.
Continue wiping, turning the cloth so that you are always using a clean portion,
until the stain is removed. Be careful not to wet the fabric too much. Always wipe from the outer edge of the stain
toward the center.
S Use only mild, pure, water-free dry-cleaning solvents, such as Energine or Carbona.
Dampen a clean cloth with the solvent and follow the same procedure described under W.
WS Either of the above methods may be used.
X Clean fabric only by vacuuming or light brushing to remove soil. Do not use liquid cleaning agents of any kind.
TYPES OF STAINS AND CLEANING SUGGESTIONS
NOTE: The following information is provided only as a service and should not be interpreted as a warranty.
The list of cleaning agents does not constitute an endorsement of products; other similar products may be
equally effective.
Water-based Ketchup, soft drinks, milk, etc.
Remove using method W.
Oil-based Salad dressing, butter, greasy foods, etc.
Use method S, or for flat-woven fabrics, not velvet, apply Texize K2R Spot
Remover according to directions.
Combination Ice cream, gravy, etc. are both watery and oily. Use method S and follow with the W
method.
Mud Lift away what you can easily remove without forcing the mud into the fabric.
Allow the remaining mud to dry completely, then vacuum. If the stain remains.
Clean with method W.
NOTICE
54
Ultra-Leather Fabric A cleaner intended for use on fine leather or a water dampened cloth is recommended. Do not use chemicals
(such as Armor-All) that may dry the leather out and make it become cracked or have an aged appearance.
Chemical reactions to leather due to improper treatment or cleaning procedures are not covered under your
Renegade warranty.
Bedding and Curtains The bedspread, pillow sham and privacy curtains should be dry cleaned only. Washing may cause shrinking
and will void all warranties.
EXTERIOR CLEANING Clean and maintain your unit on a regular basis to keep it looking new and to extend the life of the body. Power
washing with mild soap and rinse is the recommended procedure making sure that medium pressure is used.
Fiberglass, Gel Coat Finish, and Molded Parts (plastic) Remove tree sap, seeds, gum resin, asphalt, etc., as soon as possible with washing. These environmental materials
will bake and harden in time and become difficult to remove without buffing. Power washing with mild soap and
power rinsing is the recommended procedure making sure that medium pressure
is used. If a power wash is not available wash regularly using a mild soap, cold or Lukewarm water and a clean
microfiber cloth. It is best to clean the unit in the shade or on a cloudy day when the exterior sidewalls and roof
are cool. Clean roof off first, wash, rinse and dry each section as you go to avoid streaking. Wax periodically to
extend the life of the paint finish. Waxing helps preserve the paint and allows for easier removal of dirt and road
tars.
IMPORTANT NOTICE: Do not wax your motorhome within 90 days of the production date to allow the paint to
cure.
Never use strong household detergents, gasoline, or strong solvents. You will damage the painted exterior.
Chrome Stainless Steel and Aluminum Parts Wash and clean each time you use the motorhome. Use only automotive approved nonabrasive cleaners and
polishers on exterior bright work.
Wheels Clean regularly with a nonabrasive cleaner recommended for aluminum wheels.
Windows, Door Glass, Windshield, Mirror Glass The windows are made of heat strengthened plate glass. Clean with window cleaner as needed.
NOTICE
NOTICE

55
MAINTENANCE At the beginning of the season, when storing, or at least every 6 months, check the following items.
Windows Check the sealant around the window to see if it has cracked or deteriorated, check for leaks.
Check the weep holes in the bottom on the windows to drain moisture from rain and to ensure they are clean
from debris. Vacuum if necessary.
Body and Roof Seals
IMPORTANT NOTICE: Reseal the seals yearly to maintain their integrity. Failure to maintain and reseal the seals
yearly will result in voiding the warranty coverage for these areas.
Check to be sure that seals are not cracked shrunk, and there are no voids or deteriorated areas from weather and
road vibration.
Check the sealant including around any of the appliance areas.
Chassis Underbody Inspect for rust and corrosion on chassis parts. Keep up with the standard maintenance program described in
your chassis owner’s manual which includes the frame bumpers and exhaust.

56
I
Reporting Safety Defects f you believe your vehicle has a defect which could cause a crash or could
cause injury or death, you should immediately inform the National Highway
Traffic Safety Administration (NHTSA) in addition to notifying Renegade.
If NHTSA received similar complaints, it may open an investigation. If it
finds that a safety defect exists in a group of vehicles, it may order a recall and
remedy campaign.
NHTSA cannot become involved in individual problems between
you, your dealer, or Renegade.
To contact NHTSA, you may either call the auto safety hotline toll free at 1-
888-327-4236 (TTY: 1-800- 424-9153) or visit the website https://one.nhtsa.gov/
About-NHTSA/NHTSA-Contact-Information for more contact information.
You can also obtain other information about motor vehicle safety from
the hotline or visit the NHTSA website http:// www.safercar.gov.
In addition to notifying NHTSA in a situation like this, we certainly hope
you will notify us. Please call us at 574-966-0193 or visit the website http://www.
renegaderv.com/contact to search for the right representative for your needs.

57