W M B F20/F30 Video...
21
BMW – F20/F30 Video Interface
Transcript of W M B F20/F30 Video...
BMW – F20/F30 Video Interface

Specification
1
About Interface
- Dimension
136mm * 83mm * 21mm
- External Appearance
* This can change under manufacturer’s circumstance
Specification
2
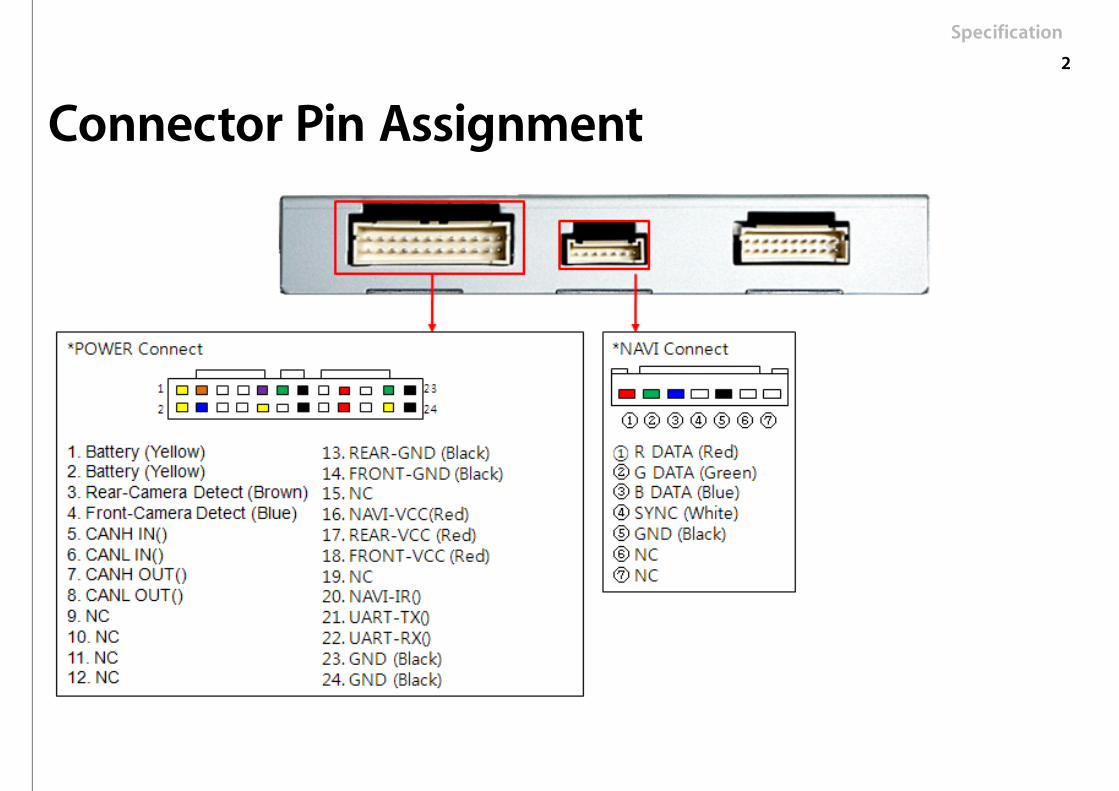
Connector Pin Assignment
Specification
3
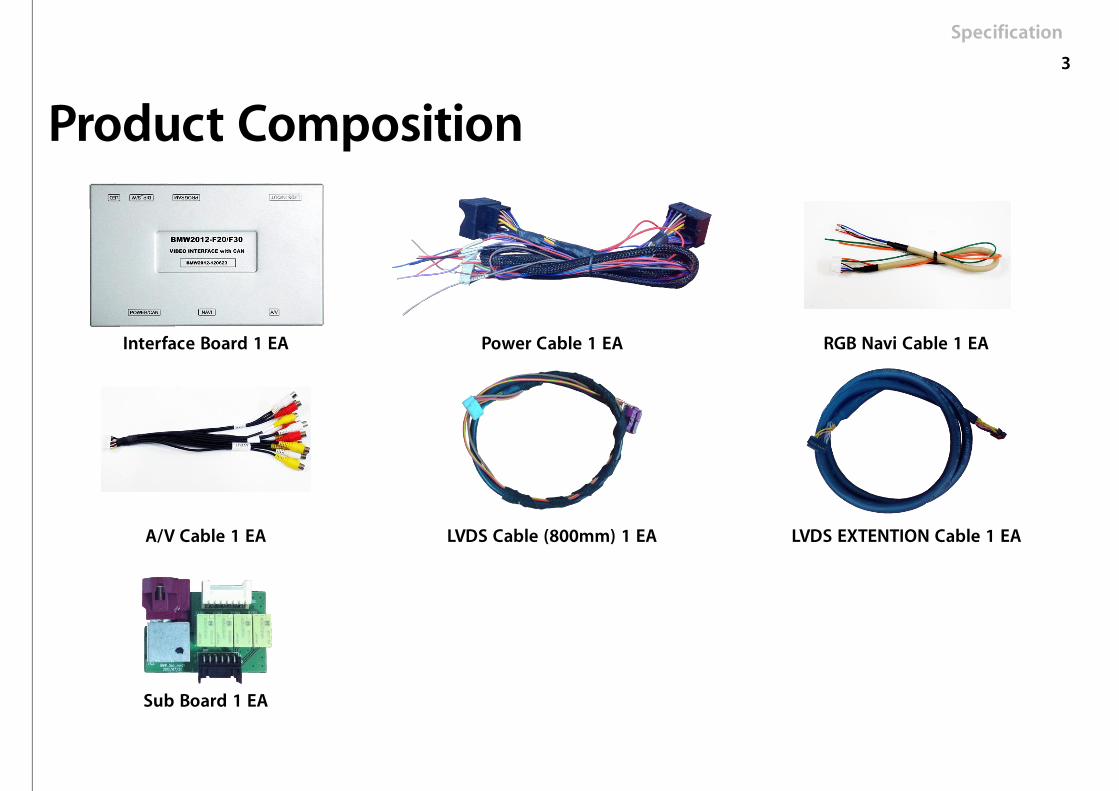
Product Composition
Interface Board 1 EA Power Cable 1 EA RGB Navi Cable 1 EA
A/V Cable 1 EA LVDS Cable (800mm) 1 EA LVDS EXTENTION Cable 1 EA
Sub Board 1 EA
Specification
4
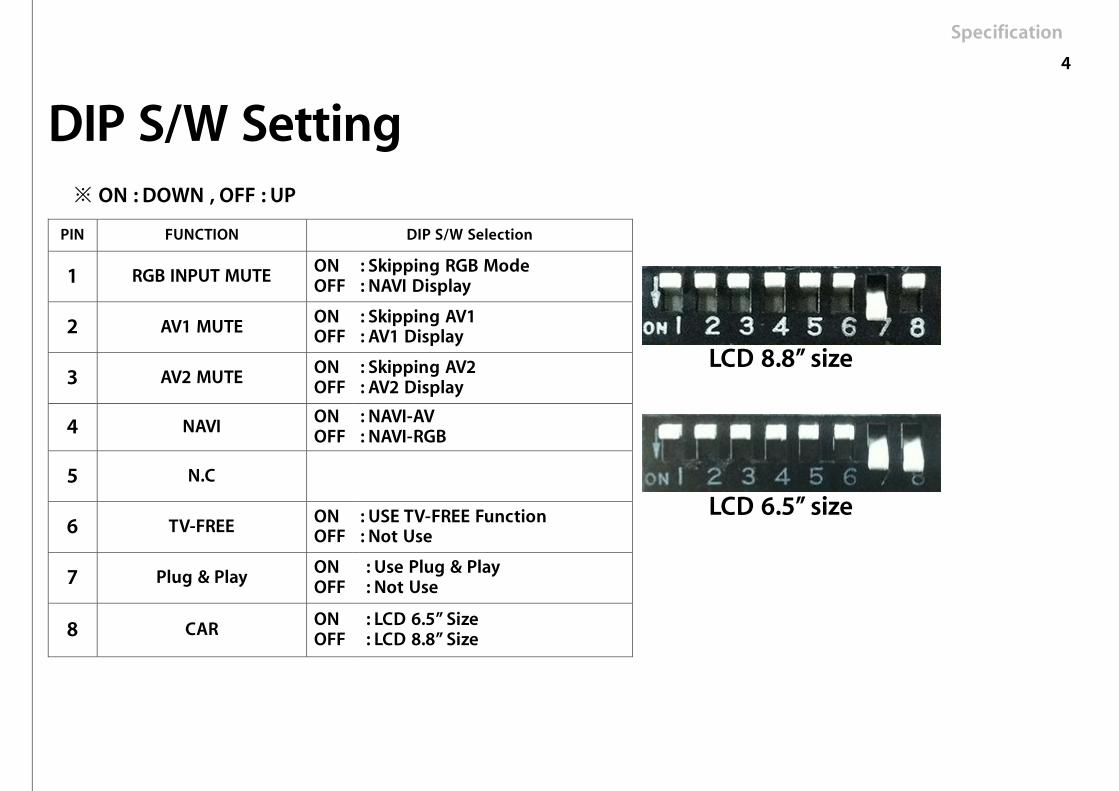
DIP S/W Setting
※ ON : DOWN , OFF : UP
PIN FUNCTION DIP S/W Selection
1 RGB INPUT MUTE ON OFF
: Skipping RGB Mode : NAVI Display
LCD 8.8’’ size
LCD 6.5’’ size
2 AV1 MUTE ON OFF
: Skipping AV1 : AV1 Display
3 AV2 MUTE ON OFF
: Skipping AV2 : AV2 Display
4 NAVI ON OFF
: NAVI-AV : NAVI-RGB
5 N.C
6 TV-FREE ON OFF
: USE TV-FREE Function : Not Use
7 Plug & Play ON OFF
: Use Plug & Play : Not Use
8 CAR ON OFF
: LCD 6.5’’ Size : LCD 8.8’’ Size

Specification
5
I-Drive Control Mode Change Control
`
Push Long : Change Mode
Push Short : Return to OEM
NAVI (GPS) AV1 AV2
(DTV Mode) Pull up Long : Scan Channel
Pull up Short : Channel Up
LCD 6.5’’ car Pull down Long: Change Screen Size (Only for LCD 8.8’’ car)
AV Mode : Pull down Short: Channel down.
Map Button : “OEM DTV “ installed car case:
“Menu” button cannot work, So, Use “Map” Button to change mode.

Specification
6
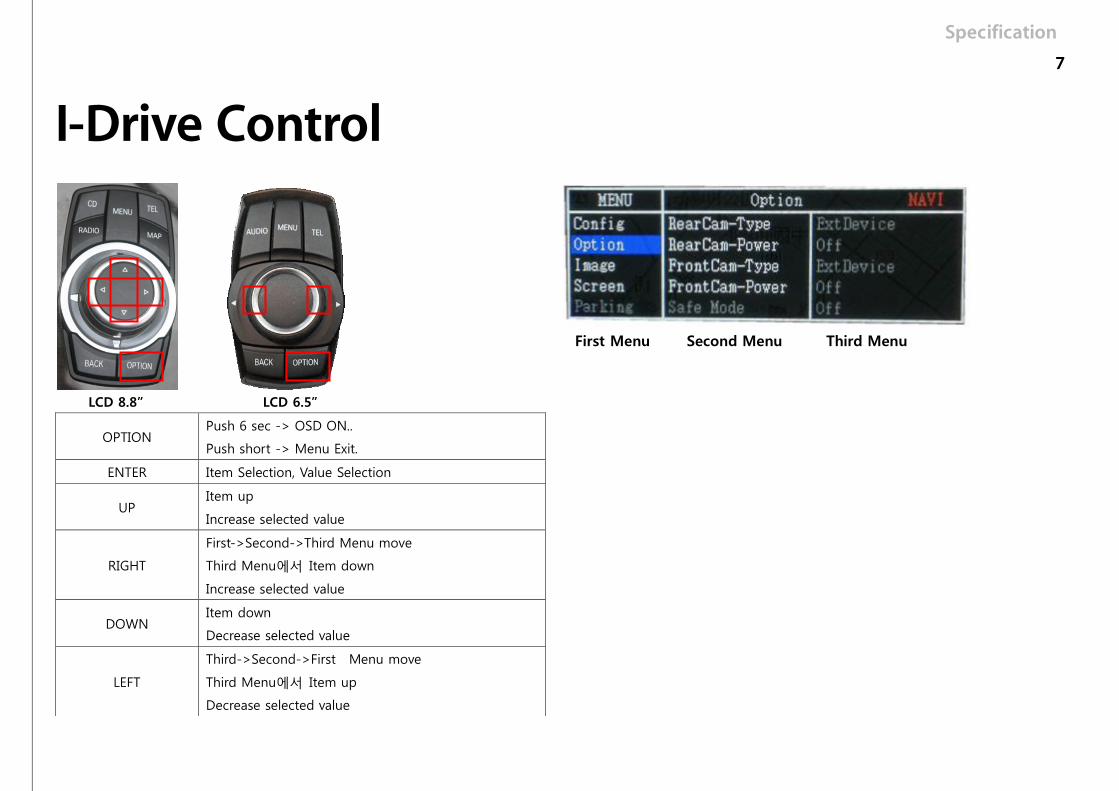
I-Drive Control
LCD 8.8’’
LCD 6.5’’
Icon image Move to right
Push Long : DVD UI ON, Push Short : Enter the Icon
Icon image Move to right
Icon image Move to right
Push Long : DVD UI ON, Push Short : Enter the Icon
Icon image Move to right
Specification
7
I-Drive Control
LCD 8.8’’ LCD 6.5’’
OPTION Push 6 sec -> OSD ON..
Push short -> Menu Exit.
ENTER Item Selection, Value Selection
UP Item up
Increase selected value
RIGHT
First->Second->Third Menu move
Third Menu에서 Item down
Increase selected value
DOWN Item down
Decrease selected value
LEFT
Third->Second->First Menu move
Third Menu에서 Item up
Decrease selected value
First Menu Second Menu Third Menu
Specification
8
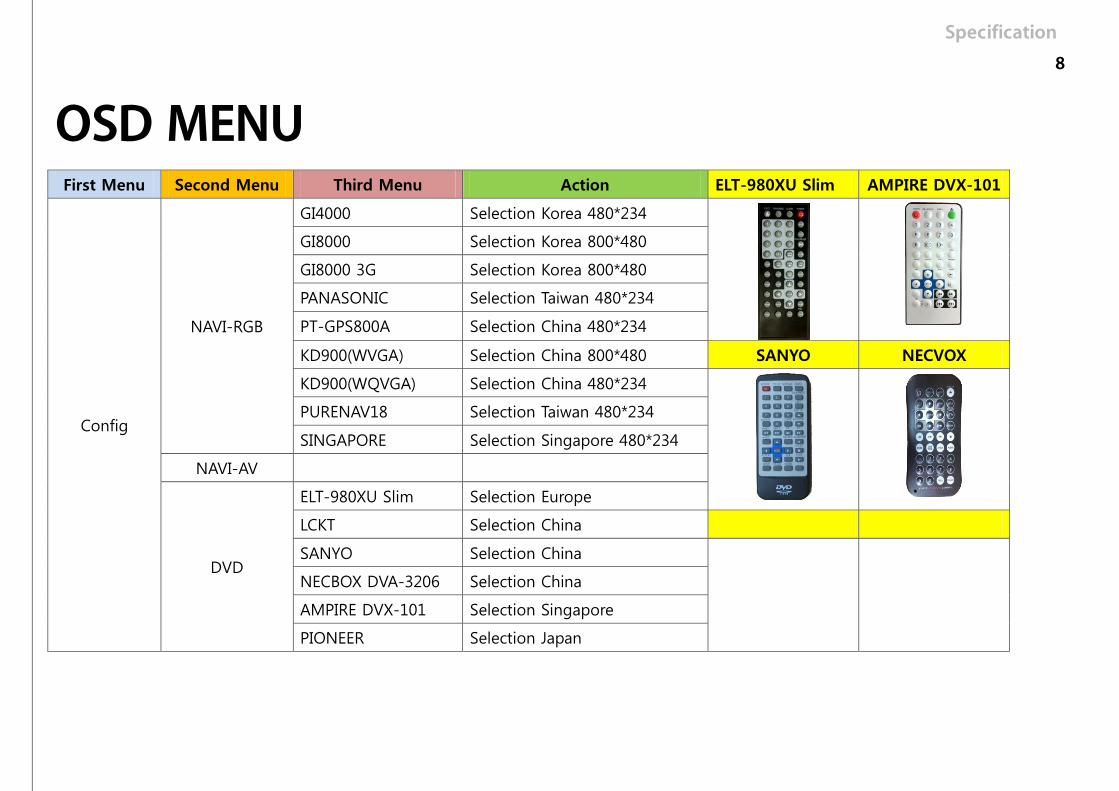
OSD MENU First Menu Second Menu Third Menu Action ELT-980XU Slim AMPIRE DVX-101
Config
NAVI-RGB
GI4000 Selection Korea 480*234
GI8000 Selection Korea 800*480
GI8000 3G Selection Korea 800*480
PANASONIC Selection Taiwan 480*234
PT-GPS800A Selection China 480*234
KD900(WVGA) Selection China 800*480 SANYO NECVOX
KD900(WQVGA) Selection China 480*234
PURENAV18 Selection Taiwan 480*234
SINGAPORE Selection Singapore 480*234
NAVI-AV
DVD
ELT-980XU Slim Selection Europe
LCKT Selection China
SANYO Selection China
NECBOX DVA-3206 Selection China
AMPIRE DVX-101 Selection Singapore
PIONEER Selection Japan

Specification
9
OSD MENU First Menu Second Menu Third Menu Action DVBT55HD Pioneer
Config DVB-T(DMB)
ELT-DVBT20 Selection Europe
NET-770 Selection Korea
MEDIALIFE Selection Korea
PANASONIC Selection Japan
PIONEER Selection Japan
GEX-DTV Selection Japan DVB-T2010HD
PORTUGAL Selection Europe
DVB-T20010HD Selection Europe
DVBT55-HD Selection Europe
CMMB-ZW Selection China
Reset EXCUTE Config Menu all Reset
LCKT PIONEER ELT-DVBT20 Portugal CMMB-ZW GEX-DTV GEX-DTV

Specification
10
OSD Menu First Menu Second Menu Third Menu Action
Option
RearCam – Type OEM Original Rear camera
ExtDevice Use aftermarket Rear camera
RearCam –Power
ON Rear camera get +12V consistently
AUTO Rear camera get +12V when reverse gear on.
OFF Shut out the power supply.
FrontCam –Type OEM Original Front camera
ExtDevice Use aftermarket Front camera
FrontCam –Power
ON Front camera get +12V consistently
AUTO Front camera get +12V when reverse gear on.
OFF Shut out the power supply.
RearCam-RcvOpt ON Show Frontcam 25sec after rear mode.
OFF Default
Reset Excute Option Menu all Reset

Specification
11
OSD Menu ▶ Navi-RGB Menu
First Menu Second Menu Third Menu Action
Image
Brightness Adjust the value of brightness
Contrast Adjust the value of contrast
Color – Red Adjust the value of RED
Color –Green Adjust the value of GREEN
Color –Blue Adjust the value of BLUE
Reset Excute Option Menu all Reset
▶ DVD,DVB-T(DTV),Navi – AV, Rear, Front Menu
First Menu Second Menu Third Menu Action
Image
Brightness Adjust the value of brightness
Contrast Adjust the value of contrast
Saturation Adjust the value of Saturation
Hue Adjust the value of Hue
Sharpness Adjust the value of Sharpness
Reset Excute Option Menu all Reset

Specification
12
OSD Menu ▶ OSD Setting – Parking Mode
- Display : Parking line display On/Off
- Horizontal : Parking line move Left/Right
- Vertical : Parking line move Up/Down
- TP : Parking line clarity
- AutoPower : Parking line ACC control
Horizontal
Vertical
On: Rear camera get a power supply when reverse gear on. But, Depend on camera Spec. sometimes noise image happen. Off: Rear camera get a power supply continuous.
Connect to back-light wire.
Connect to rear camera Acc and GND.

Specification
13
OSD Menu ▶ OSD Setting – Utility Mode
- Reset All : Initialization
- Info: Software version.
▶ OSD Setting – Utility Mode
- Horizontal
- Vertical
- Scaler X Up
- Scaler X Down
- Scaler Y Up
- Scaler Y Down
Install
14
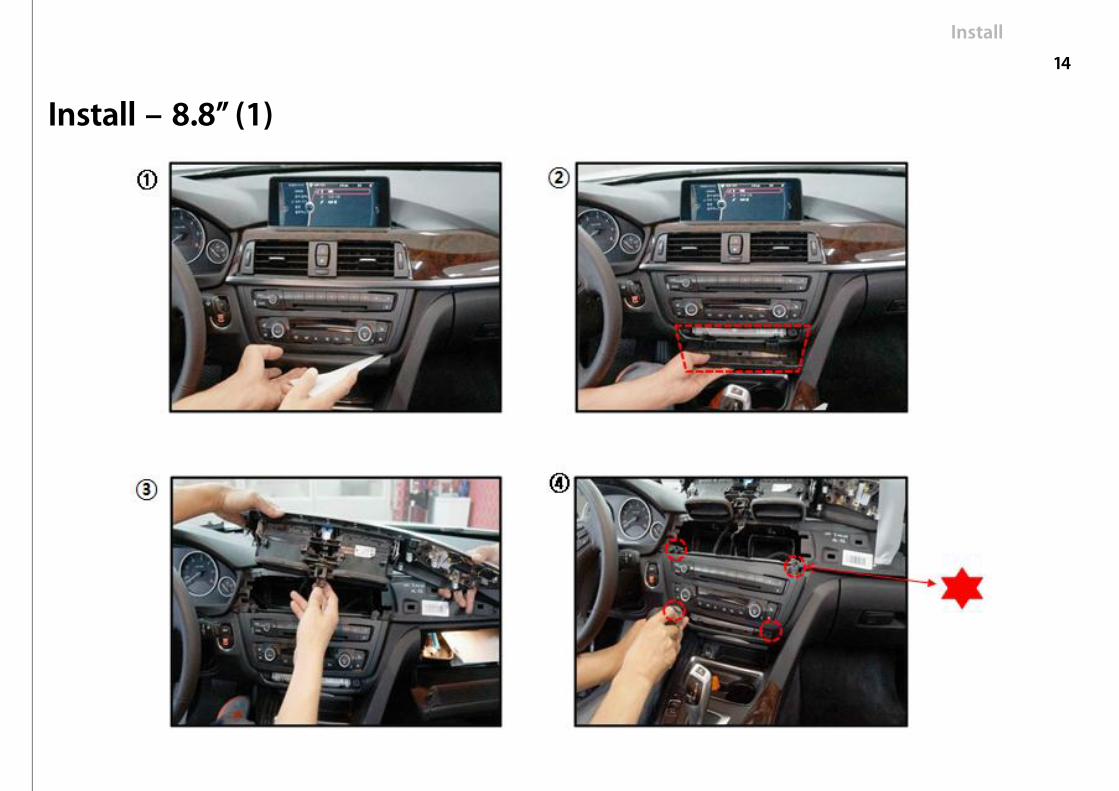
Install – 8.8’’ (1)
Install
15
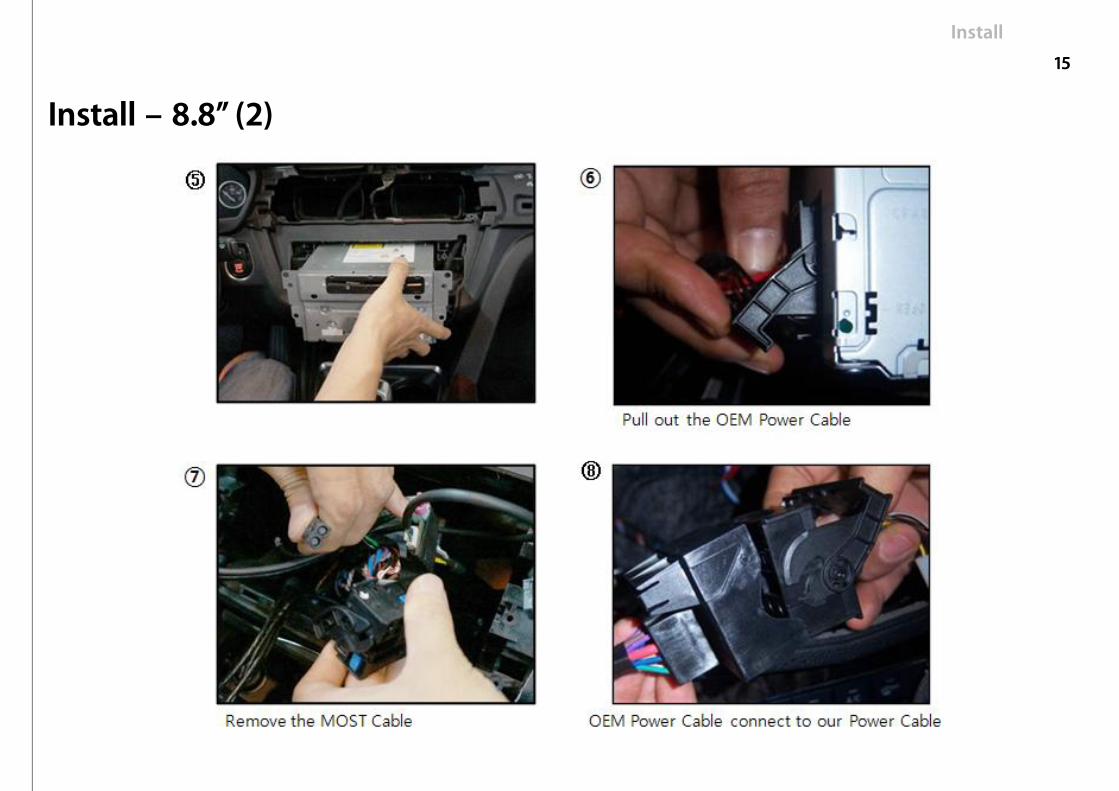
Install – 8.8’’ (2)
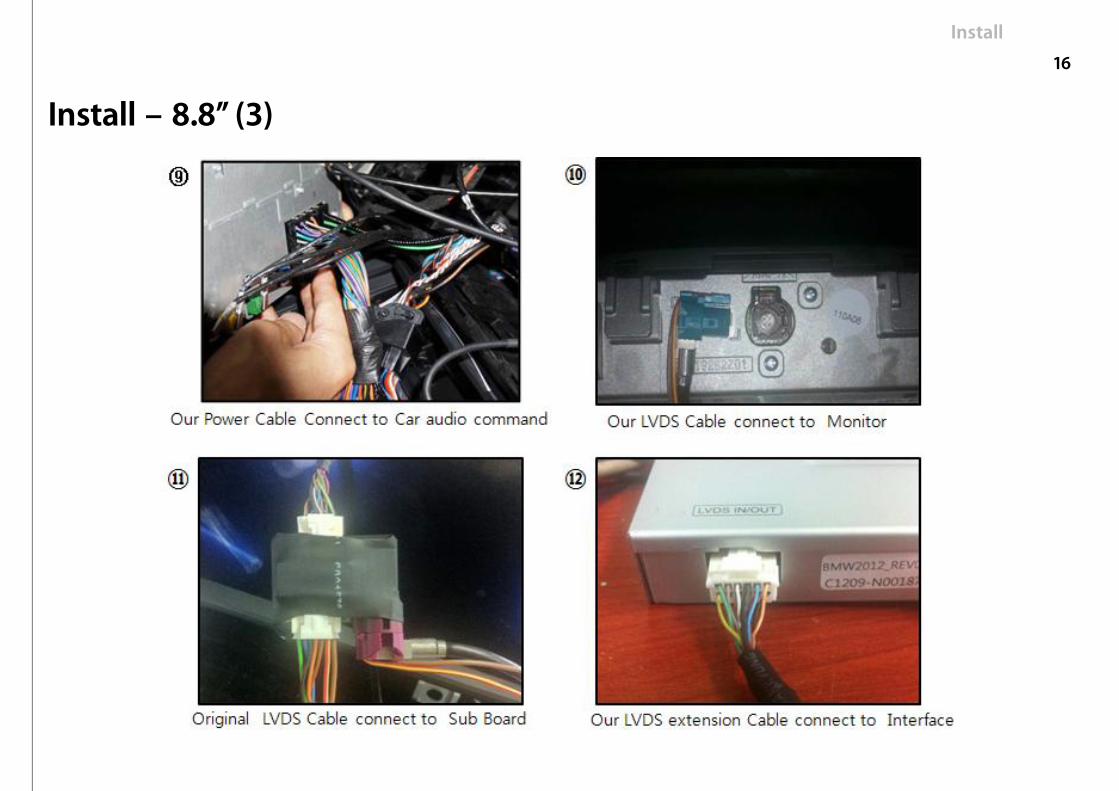
Install
16
Install – 8.8’’ (3)

Install
17
Install – 6.5’’ (1)

Install
18
Install – 6.5’’ (2)

Install
19
Install – 6.5’’ (3)
Install
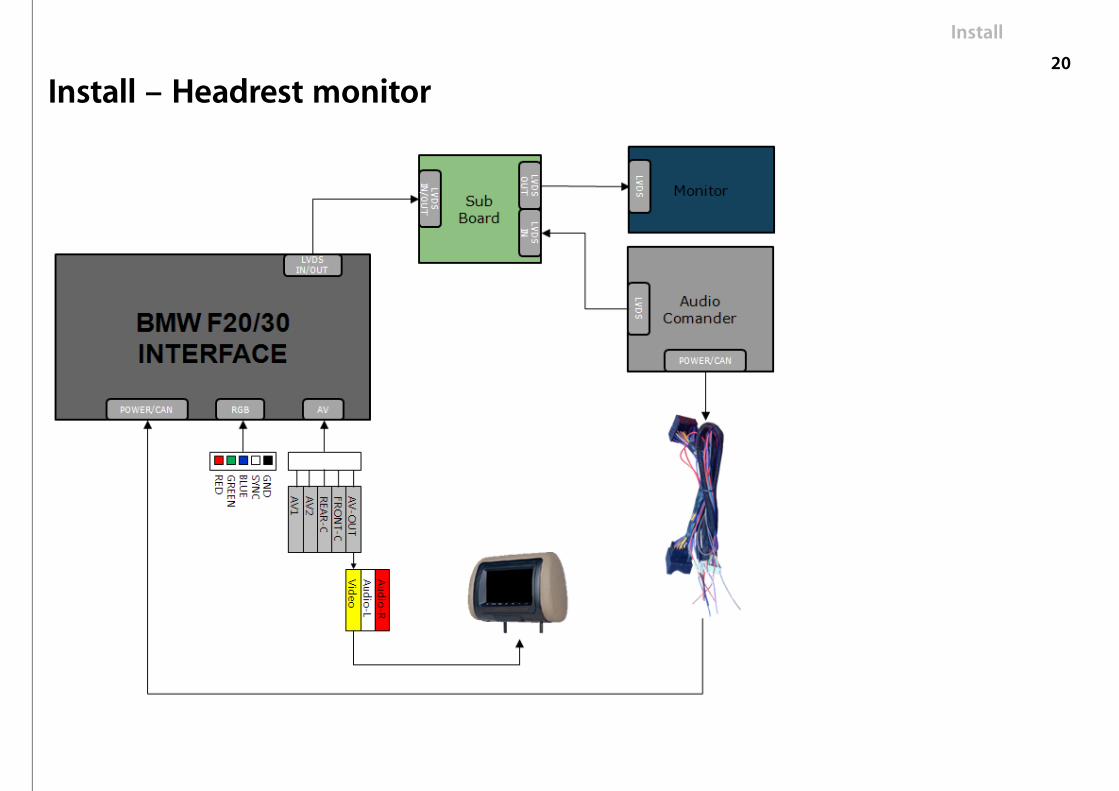
20
Install – Headrest monitor