BEAM PREPARATION IN INJECTORS AND BEAM CHARACTERISTICS K.Cornelis BE-OP-SPS.

W-BEAM GUARDRAIL REPAIR
ANDMAINTENAIQCE
A Guide for
Street and Highway Maintenance l?ersonnel
U.S.Departmentof Transportation
Federal MghwayAdministration
FHWA-RT-90-001
Prepared under the Rural Transportation
Assistance Progam Project ?0 by the
Technolo~ Transfer center>
Iowa State University,
hes, Iowa 50011
Thi$ document is disseminated under
the sponsorship ofthe Department ofTransportation in the interestofinformationexchange. The unitedstates Government assumes no
liability foritscontents or use thereof.
The contents Ofthis report reflect theviews ofthe authors, who are
responsible forthe factsand theaccuracy ofthe data presented he~ein.
The contents do not necessarily reflect
the o~fieial policy of the ~epa~tment of
~ranspor~ation.
This report does not constitute a
manual, handboolt, s~andard,
speci~~eation, or regulation.
The united states Government does
not endorse products or manufac-
turers. Trademarks or mannfaeturerqs
names appear herein only because
khey are considered essential ko the
object of this document.
TABLE OF CONTENTSpage
1. Guardrail Safety 1
Why Guardrail Repair and Maintenance are
Needed,, ..
1
Some Tips b IncreaseSafety 1
11. Site Review 3
Deciding What Needs b be Done 3
Removal of Damaged Materials and Cleanup 8
Placing Temporary Warnings and Marke]rs 9
III. Estimating Parts and Materials for Rail on
Wood Post 10
IV. Estimating Parts and Materials for Ra)il on
Steel Post 12
V. Equipment and Tools 14
Equipment and Function 14..
Tools for Use in Repair 15
VI. Manpower: Crew Size and Time Needed 20
Estimating Time Required for Repair 20
Estimating Crew Size 21
VII. Repair Sequence Guidelines 22
VIII. Traffic Control 28
Typical fia~c Control for Lane Closure 28
Typical Traffic Control for Shoulder Closl~re 30
IX. Records of Repairs 32
X. Maintenance Tips 33
1. GUARDRAIL SAFETY
Why Guardrail Repair and Maintenance is Needed
. Road was designed and constructed@ require ~ardrail.
The lomtion of posts, bridge piers, steep tiltch slopes, or some otherfeature of the road creates a hazard b drivers who get off their lane.When we have a road section Mat engineers have decided needs a@ardrail to make travel safe enough, it is im~rtant that wemaintain that ~ardrail. We must also repair that @ardrail so itcan pro~ct people who happen to run off the road. In most states wehave a duty, by law, to maintiin the road in a safe condition as theoriginal desi~ intended.
. Maintenance workers are closest b tie problem.
Maintenance workers are the front-line troops to keep the road safejust as much as any state trooper. They will likely he among thefirst persons to see any damage who understand the importance of a~ardrail in keeping a road sale. Their actions will be im~rtant inpreserving road sdety.
● Good maintenance reduces lawsuits against highwayagencies.
Keeping track of the damage to guardrails, making repairs quickly,and recording the repairs made will help limit lawsuits. The claimsmade will more likely be fair if good maintenance is done.
Some Tips to Increase Safety
*e●
*
e.0
*0
W-beam rail sections must not be badly bent out of shape.Bolts must be the right size and be tight.Wooden posts must not be loose, broken, or rotted.Steel posts must not be bent or pushed offline so badly that avehicle hitting the rail will slide off the road.Rail sections must be blocked out away from the posts.Road or shoulder surface under the rail needs to be free of holes anderoded ruts that a wheel can drop into.General line of the guardrail should be a smooth path.Guardrail needs b be at the correct height from tbe ground.

NOTES
2

11. SITE REVIEW
Deciding What Needs to be Done
e Define the extent (or severity) of damage.
3
Gurdrail hmage is so badtht it no longer fumtions andmay itself be a hzard tomotorists.
1.
2.
3.
The rail beam is pulledcompletely apart.
Three or more posts arebroken off or are nolonger attiched to rail.
Rail beam is bent orpushed more than 18inches out of line.
Guardrail is obuiouslyhmaged but may still work formost traffic cotiitions.
1.
2.
3.
Even though badly bentor crushed, rail beam isnot separated anywhere.
Two or fewer posts arebroken off or separatedfrom the rail beam.
Rail beam is bent orpushed out of line lessthan 12 inches.
Guardrail hmage is minor. Itwill continue to work.
1. Rail beam maybecrushed or flattened butis not cut.
2. No posts are broken offor separated from railbwam.
3. Rail beam is bent orpushed out of line lessthan six inches.

o Some exmples and cements.
Guardrail &mage is so bad tht it no longer functions
1
2,
3.
4
Several rail sections havetorn out. Three posts havebeen broken and severalare pushed more than 1.5feet off line. A vehiclehitting this spt now couldgo through the hole or bespeared on the end of theremaining rail.
One ~st is broken off. Twoother posts are badlypushed off line and the railbeam is torn loose. Asecond vehicle hitting thismight be rolled over by theposts and the mangled railor it might pass over therail and hit a morehazardous object.
Rail beam connection hasbroken. The rail beam issplit back to the nearestpost and the connection tothe end of the bridge isgone. This type of damagecan appear minor andunimportant, but it isserious for the vehiclecrashing into the beam.Such damage needs to befixed soon.
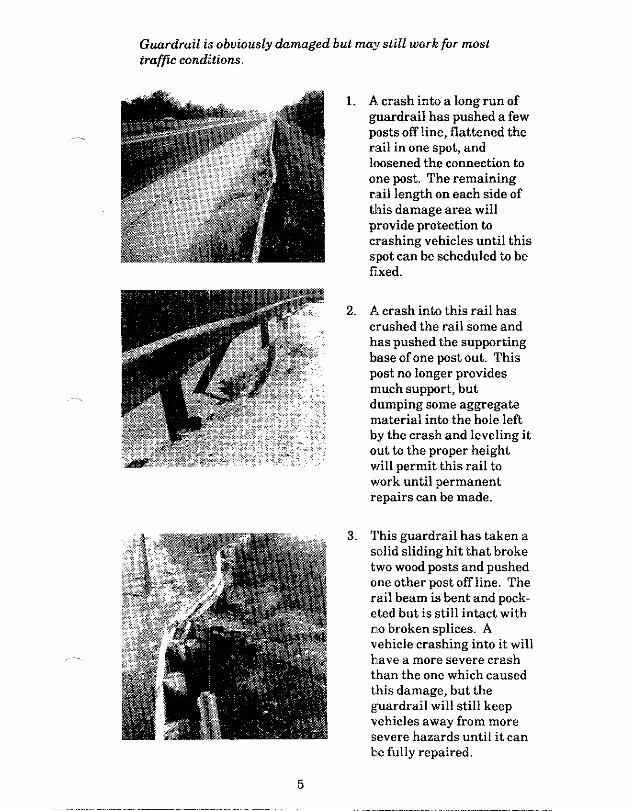
Gmrdrail is obviously hmaged but may still work for mosttraffic conditions.
2.
3.
A crash inti a long run of~ardrail has pushed a few~sts offline, flattened therail in one spt, andloosened the connection toonepst. The remainingrail length on each side ofthis damage area willprovide protection bcrashing vehicles until thissWt can be scheduled to befixed.
~. crash into this rail hascrushed the rail some andhas pushed the supWrtingbaseofone postout. Thispost no longer providesmuch sup~rt, butdumping some ag~egatematerial into the hole leftby the crash and leveling itout to the proper heightwill permit this rail towork until permanentrepairs can he made.
This ~ardrail has taken asolid sliding hit that broketwo wood posts and pushedoneother postoffline. Therail beam is bent and pock-eted but is still intact withno broken splices. Avehicle crashing into it willhave a more severe crashthan the one which &ausedthis damage, but theguardrail will still keepvehicles away from moresevere hazards until it canhe fully repaired.
5

Gwrd,ail &mage is minor. It will continue to wOrk
1. The guardrail beam hasbeen crushed down in thetop by a large farm machineor apiece of cOnstructiOnequipment and is badlycorroded. Even thOughiti$rustY and looks terrible, thebeam will still work to holda vehicle away from thehazard behind it.
2. The Wardrail has beendenied from a minorcollision. A~ardrail mayhave these ty~s of dings allalong its length and still bevery safeand useful. Itmaynot look pretty, but it stillworks.
3. Theguardrail basminOrcrush in the beam and hasbeen pushed off line a little.One or more of the Pstshave been pushed slightlyoffline. The guardrail maylook heat up, but it will Stillkeep a vehicle on tbe road inmOSLcrashes if it is stillconnected and if the top Ofthe rail is at least 24 inchesabove the ground.
6
_..__ .._,,—.—..._ —–-—.—.–——_—.- .—.
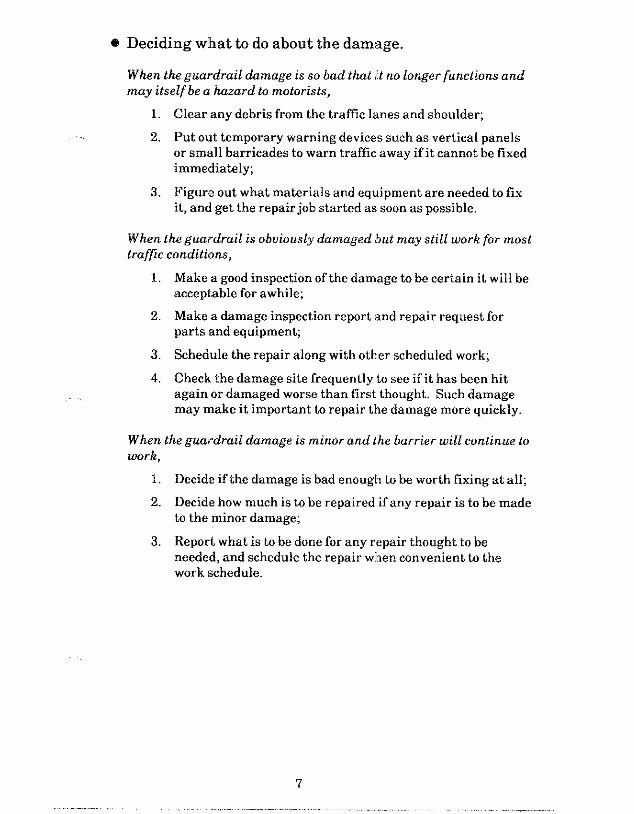
e Deciding what b do about the damage,
When the guardrail hmage is so bad t~t it no longer functiom andmay itself be a hzard to motorists,
1. Clear any debris from tbe traffic lanes and shoulder;
2. Put out temporary warning devices such as vertical panelsor small barricades to warn traffic away if it cannot be fixedimmediately;
3. Figure out what materials and equipment are needed to fixit, and get the repair job started as soon as ~ssible.
When the guardrail is obuiously &maged but may still work for mosttraffic conditions,
1. Make a good inspection of the damage to be certain it will beacceptable for awhile;
2. Make a damage inspection report and repair request forparts and equipment;
3. Schedule the repair along with other scheduled work;
4. Check the damage site frequently to see if it has been hitagain or damaged worse than first thought. Such damagemay make it imWrtant to repair the damage more quickly.
When the guardrail &mage is minor and Lhebarrier will continue towork,
1. Decide if the damage is bad enougk to be worth fixing at all;
2. Decide how much is to be repaired if any repair is to be madeto the minor damage;
3. Report what is to be done for any repair thought to beneeded, and schedule the repair when convenient to thework schedule.
7

Removal of Damaged Materials and Cleanup
. Clean debris from traveled lanes and shoulders.
Remove all broken ~ardrailand other loose parts that are onthe lanes or shoulders where a
prsOn might drive intO them.This includes all vehicle debrisleft from tbe collision. Iftbismaterial cannot be hauled away,then place it at least 5 feetbehind the remaining @ardrailfor collection later. Get this de-bris off the roadway. Leaving iton the road is dangerous.
. Remove guardrail parts that are still in place but arehazardous to traffic.
After a vehicle bits the~ardrail, a section of W-beamrail may still be attached toposts but twisted so it sticks out.It may snag or spear any vehiclethat hits it. Any damaged railsection Mat may spear a vehicleshould be cut out. Steel postsmay be still standing after a hitbut the rail section is strippedoff. These post stubs can be ahazard. If your equipment isable, pull such ~sts imme-diately or push them over farenough for a small car to rideover the post.
e Smooth out deep gouges in shoulder.
8

Placing Temporary Warnings and Markers
o IS the guardrail still functional? Is the dmage minor orwill the ~ardrail still work for most trafic conditions?
Yes Then temporary warning devices should not be needed.
No When the guardrail can no longerfunctionandmayitselfbea hazardtomotorists,thenplacetemprary warningsandmarkersuntilrepairsaremade.
Further checks when placing temporary warnings and markers:
a Is the shoulder narrow or the guardrail within 6 feet ofthe outside edge of tie traveled lane?
Yes Then vertical panels or some other small delineation deviceis suggested if there is room for trafic to pass by. Space maybe so limited that athching reflectors to the rail maybe allthat can be done to mark the area.
No Then safety barrels, Type II barricades, or vertical panelsmay be used to mark the danger and warn drivers awayfrom it.
o Will trafic be exposed@ the damage area over night orduring hours of darkness?
Yes Then consider using flashers on the warning devices andmarkers.
No Then flashers are not needed on the warning devices andmarkers.
9
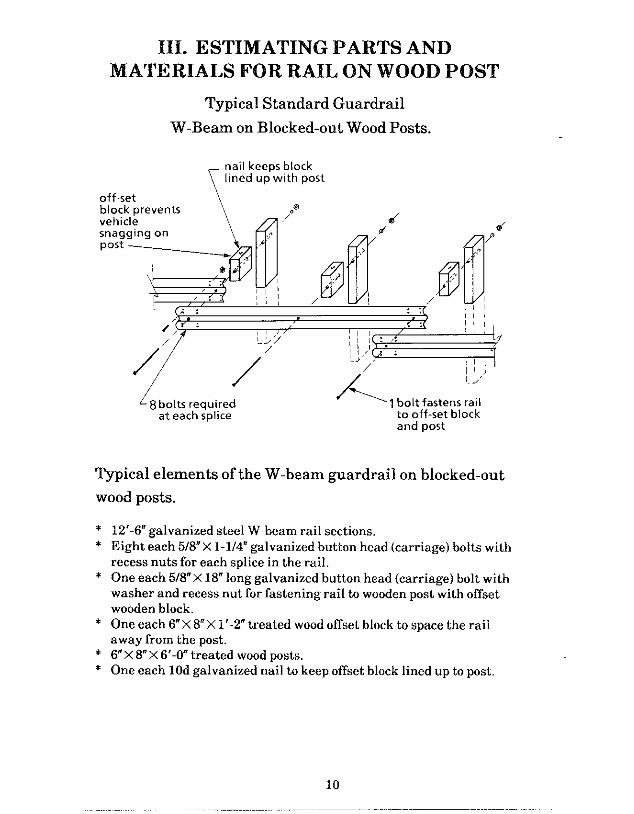
111. ESTIMATING PARTS ANDMATERIALS FOR RAIL ON WOOD POST
Typical Standard Guardrail
W-Bern on Blocked-out Wood Posts.
,: .,, ,,
/,; ‘ .:, !1,,,“,. !l, ,. l..
/
/’ /5’ -J;-A 1.Y
8boltsreq. ired 1 bolt fa$tens railat each splice to off-set block
and post
Typical elements of the W-beam guardrail on blocked-out
wood posts.
**
*
*
**
12’-6” galvanized steel W-beam rail sections.Eight each 5/8” X 1-1/4” galvanized button head (carriage) bolts withrecess nuts for each splice in the rail.One each 5/8” X 1W long galvanized button head (carriage) bolt withwasher and recess nut for fastening rail to wooden post with offsetwooden block.One wach 6“ X W X 1‘-2” treated wood offset block to space the railaway from the ~st.6“x 8“x 6’-0” treated wood Psts.One each 10d galvanized nail to keep offset block lined up to Wst.
10

W-Beam on Blocked-out Wood PostiCHECK LIST OF ~TEWLS FOR ~PMR
Item computeNumberneeded
W-Beam galvanized steel rail section Tally #of12,-& long punched @3,-1.& damaged
sections
5/& X lW long bolts with nuts for (# sections Xconnecting rail to Wst and block 2)+1
5/@ X 1.2W long bolts with nuts for (# sections Xrail splice connections 8)+8
&X8X 6,-W wood treated Wst (# sections X2)+1
&X&X 1’-% wood spacer block same as #vrood Psts
10d galvanized nails (one per spacer +~of spacerblock) blocks
OTHER NONSTANDARD ITEMS NEEDEDNote: Guardrail designs change over the years. When sections of
older guardrail are repaired they slhould be replaced in thesame way they were built originally. Parts and materialsmay be different from newer guardrail designs.
Item ComputeNumberneeded

IV. ESTIMATING PARTS ANDMATERIALS FOR RAIL ON STEEL POST
Typical Standard Guardrail
W-Besm on Blocked-out Steel Posts.
off-set block preventsvehicle wheel snagging on post
\
back-up plate providesdouble thickness, \
‘7’~~ ~,,~y.; ,,:8, :,!::: ;:~[.:/ :,>; ,
,
/
‘-J
,, ,,,.!.
,. .,
one bolt 8 bolts requiredconnects for each splicerai I to off-setblock
Typical elements of the W-beam guardrail on
blocked-out wood posts.
**
*
**
*
,
12’-6” steel W-beam rail sections.Eight each 5/W X 1-1/4” button bead (carriage) bolts with recess nutsfor each splice in the rail.One each 5/lW X 1-1/2” long galvanized hex bolt and nut forfastening W-beam to steel post offset block.One wach W X 9“galvanized steel post offset block for each post.Two each 5/W X 1-1/2” galvanized hex head bolts and nuts forfastening steel offset block to steel posts.One each 1~ X 1‘-1/4” galvanized W-beam backup plate atintermediate steel post locations for placing behind rail where norail splice occurs.
W6 X 9.0 X 6’-W steel post.
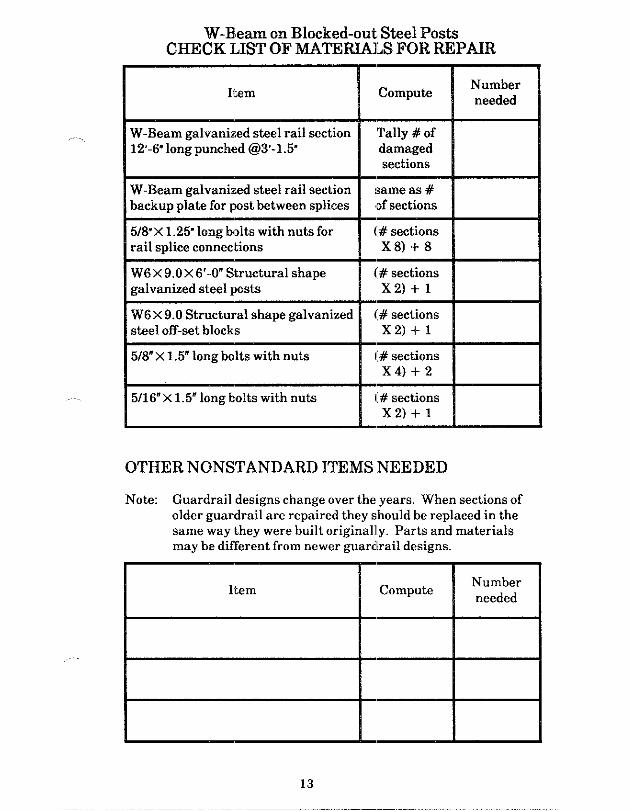
W-Rem on Blocked-out Stiel PostsC=CK LIST OF UTEUI.S FOR MP~
..
Item ComputeNumberneeded
W-Beam galvanized steel rail section Tally #of12,-P long punched @3’-l.& damaged
sections
W-Beam galvanized steel rail section same as #backup plate for post between splices ,Dfsections
5/9 X 1.2$ long bolts with nuts for (# sectionsrail splice connections X8)+8
W6 X 9.0 X 6’-W Structural shape (# sectionsgalvanized steel posts X2)+1
W6 X 9.0 Structural shape galvanized (# sectionsisteel off-set blocks X2)+1
5/8” X 1.5” long bolts with nuts (# sectionsX4)+2
5/16” X1.5” long bolts with nuts (# sectionsX2)+1
OTHER NONSTANDARD ITEMS NEEDED
Note: Guardraildesignschangeovertheyears. Whensectionsofolderguardrailarerepairedtheyshouldbereplacedin tbesamewaytheywerebuiltoriginally.Partsand materialsmay be different from newer guardrail designs.
Item
=
ComputeNumberneeded
13

V. EQUIPMENT AND TOOLS
Equipment and Function
e Light truck (2 l/2-tin nominal rating)
The truck should have a yellowrotating strobe light for warningtrfilc to stay clear of the workarea. Use the truck to haulrepair parts to the site, to haultools, and to haul damaged partsaway. A truck with a chain canoften be used to pull orstraighten steel posts. Use it tohaul traffic control devices andmarkers.
@ Front-end loader
A front-end loader can be usefulin reshaping the sh”ulder orforeslope area if rough spotsremain after the repair iscompleted. By using a chainwith the bucket, broken postscan be pulled.
0 Power post driver
A power post driver can speed upthe repair operation if a largenurnher of posts have to bereplaced (five or more). Safety totraffic and safety for workers isimproved when the repair workis done quickly.

Tools for Use in Repair
e Suggested minimum tools to take to repair site
Combination box-end and open.end wrench in 5/W and 5/l W
Orift pinsVise-grip pliersSledge hammerAdju~stiable(crescent)
wrench
Sho\,eIPosthole diggerStri]lg lineWood stakes or rebars6’-3” measuring stick or folding
wood ruler
IIeavy chainChisel and ha]nmerOxyacetylene torch(Maybe a pow[:r post driver ifa
large nunlber of posts are to bedriven)
A1.L I’ERSONNEL SHOULD HAVE L.EATHER GLOVES,HARl) HATS, AND SAFETY VESTS.
15

. Completi tiol list for a major repair job, tith specialtiol sets for ~drtil reptir
High Use Items:
One 0.5-inch electric impact wrenchOne 0.5-inch drive 1.25-inch deep
impact swketOne 0.5-inch drive impact swivelOne set of 0.5-inch drive sockets in
13/8-, 15/16-, 11/16-, and 7/8-inchsizes
One 15/8-inch end wrenchOne 1 l/4-inch end wrenchOne 12-inch adjustable (Cresent)
wrenchOne 0.5-inch drive rachetOne 0.5-inch X 3-inch drive extension
Two rolling head barsThree punches of various sizesOne blacksmith hammerOne ball peen hammer (2402.)
Onepairsnap-onpliers(vise~ips)Onepair channel-lock pliersTwo 12-inch C-clamps
One 12-fOOtsteel tipeOne 50-fmt steel bpeOne 6-foot stick rule graduated in
inches and 0.01 inchOne 100-fOOt string line
One claw hammer (16-0..)
one 4-foot carpenter’s level
Useful in removing bolts inrail splices in order toremove ~~ged railsectiom. Useful intightening hits to propersnug fitin~rt replme -ment.
Useful in making mimrshpe or fit adjwtments inrail sectiom to align splicesor bolt holes for fit.
Useful in holding railsectiom and other metalprts while bolting orjoining them.
For relocating posts adchecking the line andheight of the rail.
For driuing and pullingtoemils in woodenpostblackouts
Forplumbingposts
16

High Use Items (continual):
One 3/4-inch electric drillOne set drill bits including 9/16, 5/8,
3/4, and 1 inchOne l/2-inch electric hammer drill
.,. . One 3/4-inch wood bitTwo 3/8-inch wood bits
One 110-vOlt gasoline generatirOne 50-foot extension cordOne 25-foot extension cord
Two mebl files (mill bastard, 12inches)
One reamer tipered Oto 1.5 inches
One sand shovelOne tamperOne posthole diggerThree augers in sizes 12 inches, 18
inches, and 24 inches
One bolt puller
One gasoline powered chain saw
One knuckle boom
Five chains of various lengthsOne 8-pound sledge hammerThree 5/1 6-inch by 6-foot steel cables
Occasioml Use ItewLs:
‘rwo dtamond core drills 1 inch X 16inches
Two 9-inch core drill extensionsOne electric cutoff sawOne 3/4-inch concrete bitOne 1-inch concrete bit
For drilling hles in rail orposts as needed to fit railati posts together and tonaake rail splices.
To provide electric powerFor drills and other electrictools.
For smoott~ing cut edgesa!nddrilled holes.
(Jseful in resetting postsclnd reshping or diggingholes for posts.
For remouing stuck bolts.
l~or cutting wooden posts
l~or power assist in movingheauy items.
l~orpulling posts and otherparts with trucks and heauyequipment. For heauystraightening.
I?or drilling holes andattaching the rail beam toconcrete bi,idge abutmentsor bridge railing.
17
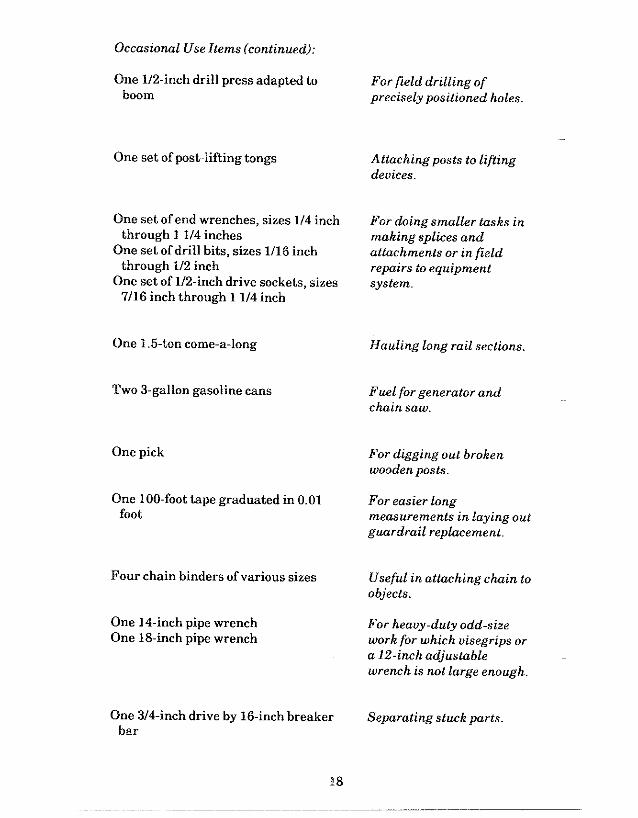
Occasiowl Use Items (continued):
One l/2-inch drill press adapted toboom
One set of~st-lifting tongs
One set of end wrenches, sties 1/4 inchthrough 1 1/4 inches
One set of drill bits, sizes 1/16 inchthrough 1/2 inch
One set of l/2-inch drive sockets, sizes7/1 6 inch through 1 1/4 inch
One 1.5-ton come-a-long
Two 3-gallon gasoline cans
One pick
One 100-foot tape graduated in 0.01foot
Four chain binders of various sizes
One 14-inch pipe wrenchOne 16-inch pipe wrench
One 3/4-inch drive by 16-inch breakerbar
18
For field drdling ofprecisely positioned holes.
Attaching posts to liftingdeuices.
For doing smaller tasks inmaking splices andattachments or in fieldre~irs to equipmentsystem.
Hauling long rail sections.
Fuel for generator andchin saw.
For digging out brokenwooden posts.
For easier longmeasurements in hying outguardrail replacement.
Useful in attaching ckin toobjects.
For heavy-duty odd-sizework for which uisegrips ora 12-inch adjustablewrewh is ~t large enough.
Separating stuck parts

Convenience Use Items:
. ..
One power tamper
One pneumatic hammer drill .Assist in o!rilling holes in,:oncrete cidvert or bridgewingwatls and other rail,zncho rages.
.Assist in setting posts andrestmping earth aroundrail line on large repirjobs.
Both of these items are time savers for big repair jobs
19

VI. MANPOWER: CREW SIZE AND TIMENEEDED
Estimating Time Required for Repair
e General Widelines
1.
2.
3.
4.
Include travel time to and from the repair site if this is amaintenance activity scheduled from a central garage.
Plan on it taking about 30 to 45 minutes to place the trtilccontrol devices. It will take shout the same time h gather thecontrol devices up titer the repair work is completed.
Allow 30 minutes for final inspection of the guardrail afterfinishing the repair and for recording the repair job.
The actual time needed to make ANY repair depends on theexperience and skill of the crew. The number of workers for thejob and the amount ofpower-assisted tools available will affect
@
the time required also.
Repairing “cosmetic” damage to guardrail installations
If your agency wants you to repair the very minor type of damagementioned earlier in this handbook, the actual repair (which mayonly he painting or minor straightening of a dented rail) should notrequire more than 30 minutes to one hour of time.
Repairing damage that still pemits the guardrail tofunction
When the inspection of the damage at the site indicates* only a couple of Wsts are broken* only a couple of posts are pushed badly off line* a rail is bent outofline less than 18 inches* only one rail splice is broken* only one rail section is torn out
or other conditions exist that permit routine scheduling of the repair(rather than emergency repair), the following time estimateguideline is suggested. Plan for one to two hours of repair time plustraffic control, inspection, and recording.
e Repairing major damage that requires prompt attention
When the guardrail damage is extensive, such as five or more postsare knocked out or several rail beam sections are broken, plan on al/2-daY time requirement including the traff]c control setup,inspection, and recording.
fF YOUR MAINTENANCE MANAGEMENT SYSTP;M GIVES AMORE I) ETAILED TIME BR&;AKDOWN, USE THA~ TOESTIMA~E TIME.
20

Estimating Crew Size
@ Traffic control crew needs
1. lf no person is to be assigned to flagging trtilc through therepair work zone, then no additional workers are needed. Thepersons repairing tbe rail can place andl gather up the trafficcontrol devices. There can be situations causing short-termencroachment on the road to move equipment or b make briefrepairs. Provide warning to traffic in st~chcases.
2. One worker is needed as a flagger when the traffic cones ortem~rary barricades around the repair site closes tbe road orstreet down b alternating one-way trafic IF ONE FLAGGERCAN CLEARLY SEE TRAFFIC APPROACHING THEREPAIR SITE FROM BOTH DIRECTIONS AND THEFLAGGER SIGNAL CAN BE SEEN BY DRIVERS WELL INADVANCE OF THE REQUIRED STOP POINT.
3. Two workers need b be assigned as flaggers for any other workzone conditions where the traffic cones or barricades createalternating one-way traff]c flow around the repair.
o workers needed b repair dsmage that has permitted the~ardrail b continue to function while the repair wasscheduled
Two workers and a ~rson in charge should be enough to makethe repairs. This assumes only a few psts or rail beam sectionsare involved.
. Workers needed for major repair
Whenfour,five,or morepostsare involvedor morethantworailbeamsectionshavetobe replaced,a crewof four isexpectedtobe needed.Ifa widerangeof powerassistedtoolsisavailablehthe crew, then a crew of three should be enough.
IF YOUR MAINTENANCE MANAGEMENT SYSTEM GIVESMORE DETAILED CREW SIZE BY WORK TASK FORGUARDRAIL REPAIR, USE THAT CREW SIZE ESTIMA~E.
VII. REPAIR SEQUENCE GUIDELINES
@ Setup traffic control
‘rakeenoughsignsandconesto thesite to properlymark therepair zone. If an arrow board andor a shadow truck are usedby your organkation, be certain to obtain enough equipmentand personnel to handle these items. All workers should wearsafety visibility vests.
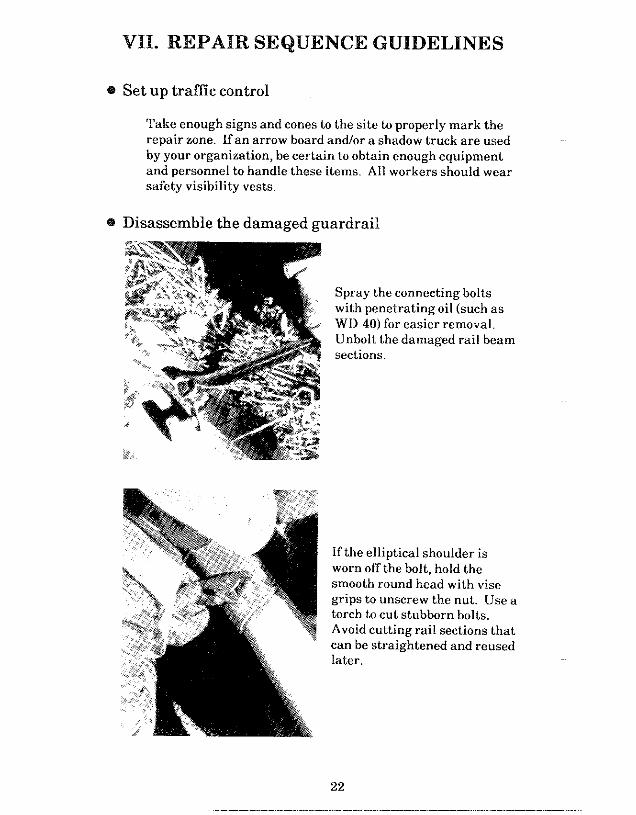
~ Disassemble the damaged guardrail
Spray tbe connecting boltswith penetrating oil (such asWI)-40) for easier removal.Unbolt the damaged rail beamsections.
If the elliptical shoulder isworn off the bolt, hold thesmooth round head with visegrips to unscrew tbe nut. Use atorch to cut stubborn bolts.Avoid cutting rail sections thatcan be straightened and reusedlater.
22
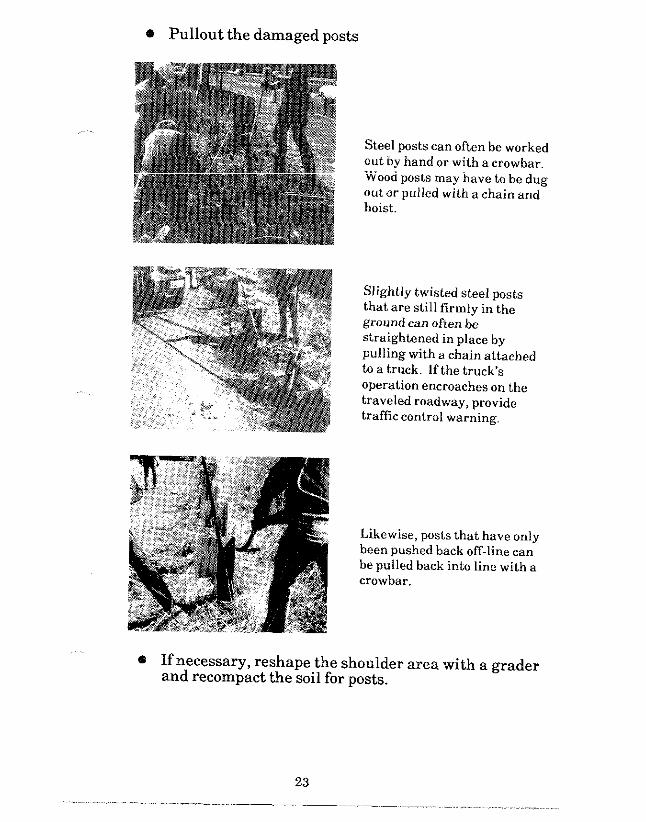
. Pullout the daaged posts
Steel posts van often be workedout by hand or with a crowbar.Wood posts may have to be dugOUtor pulled with a chain a“dhoist.
Slightly twisted steeI post$that are still firmly in theground can often bestraightened in place byPulling with a chain attichedtOa truck. If the truck’sOPeration encroaches on thetraveled roadway, providetraff]c control warning.
Likewise, posts that have onlybeen pushed back off-line ca”be pulled back into Ii”e with acrowbar.
. If necessary, reshape the shoulder area with a graderand recompact the soil for posts.
23
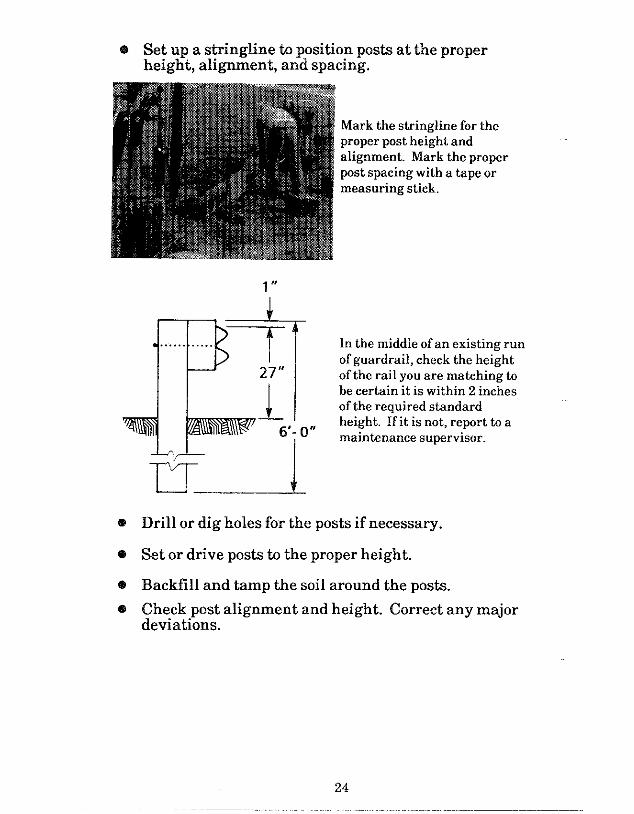
@ Setup a stiingline b position posts at the properheight, aliwent, and spacing.
Mark the stringline for theproper post height andali~ment. Msrk the properWst spacing with a tape ormeasuring stick.
1,,
PI..T In the middle of an existing runof guardrail, check the height
27” of therailyouare matching to
1be certsin it is within 2 inchesof the reauired standard
Y:.P ,>1 height. If it is not, report to a
6’- O“ maintenance supervisor.
DJDrill or dig holes for the posts if necessary.
Set or drive posts to the proper height.
Backfill and tamp the soil around the posts.
Check post alignment and height. Correct any majordeviations.
24

. Make a loose assembly of rail and blocks.
Attach new offset blocks toposts.
Starting downstream andworking backwards, hang newrail sections. Overlap the railthe same as the existing rail.Where steel posts are used, aback-up plate is needed at theintermediate posts (the postsbetween the rail splices).
Use a drift pinto lineup theholes for bolting.
e
o
Make sure all 8 bolts are in place in each spliceconnection.
Leave all connections finger tight to allow forlengthwise adjustment after all sections are in.
25

26
* Final assemb~y–when all the rail is hung, go back andtighten all the bolts snugly. There is no need toovertighten.
e Cleanup–smooth out the shoulder and slopeapproaching the guardrail so the next vehicle to runInto the guardrail has a smooth path.
Check after Repair is Completed
Have all the bolts been checked to see that eachone is tightened snug?
Was a blockout used on each post?
Was a nail driven in each wood blockout to toe-nail the block to the wood post?
Does each steel post in between the splices have aback-up plate behind the rail beam?
If hazard markers or delineators or reflectorswere installed, are they located properly on theguardrail?
Was the guardrail height checked to make sure itdid not shift up or down out of tolerance duringthe final assembly?
Date repair completed
Repair completion inspected by:
(signed)
27

VIII. TRAFFIC CONTROL
Typical Traffic Control Layout for Lane
Closure
NOTES:1. Oavtime ooe,ation a“d
shotirepai rd”rati o”.2. Usethislayo”twhe”
repair work is. ” o,within 2 feet of thetravelled wav (trafficlane). ‘
3. Flaggen should “seSTOP/SLOW paddlesinstead of red flags,
4. B“ffer zone may bered”<ed or extended
KEY:
28

Equipment Check Lis&Lane Closure
Work Zone Traffic Control Devices
1. ConesTaper, see table below for spacing of cones
(minimum of five)Buffer zone (minimum of five spaced at 2 times
speed in MPII)Work area (minimum of five spaced at 2 times
speed in MPH)End section 5
2.
3.
STOPISLOW paddles
SiWs:ONELANEROAD AHEADFLAGGER AHEAD, with distance plate
Suggested Taper Spacing
TOTAL
2
NOTES:
1.
2.
3.
22
You will need at least 20cones. Depending onwhere the work is, the kindof road, and otherconditions more devicesmight be needed. When indoubt, use more cones.YOUR SAFETY ISATSTAKE.
Any of several delineationdevices may be used:cones, type 1 or type 2barricades, drums, tubularmarkers, or verticalpanels. Check with yoursupervisor for local policy.
Maximum spacing betweendevices is approximatelyequal in feet to the speedlimit in MPII,
29
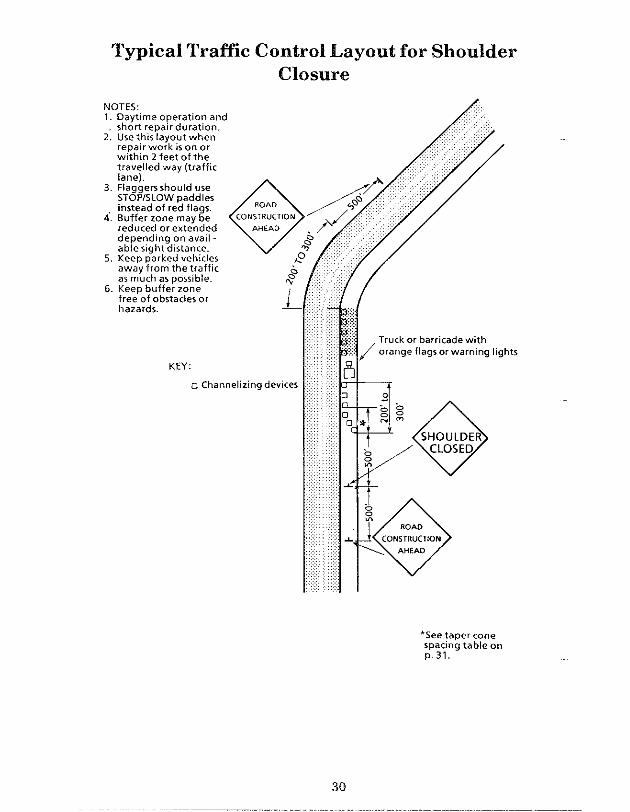
Typical Traffic Control Layout for Shoulder
Closure
,See taper cone;y3~:g table on
30

Equipment Check Lis&Shoulder Closure
Work Zone Traffic Control Devices
1. Cones:Taper, see table below for spacing of five cones 5Buffer zone (minimum of five spaced at 2 times
speed in MPFI)Work area (minimum of five spaced at 2 times
speed in MPH)
TOTAL
2. Signs:ROADCONSTRUCrlONAI{EADSHOU1.0E3fCLOSED
NOTES:
Spacing Guideline forSuggested 5-cone Shoulder
-
e30 15
35 20
40 30
45 45
E
1.
2.
3.
21
You will need al least 15cones. Depending onvihere tbe work is, the kindof road, and otherconditions more devicesmight be needed. When indoubt, use more cones.YOUR SAFRTYISATSTAKR
Any of several delineationdevices may be used:cones, type 1 or type 2barricades, dr[lms, tubularmarkers, or verticalpanels. Check with yoursupervisor for local policy.
Maximum spacing betweendevices is approximatelyequal in feet to the speedlimit in MI>Ii.
31
IX. RECORDS OF REPAIRS
All agencies should have work records of themaintenance performed. If your agency has an existingsystem for keeping track of maintenance work, then use itti record the work you did in repairing the guardrail,recording the parts you used, when you did it, and that thework was checked for correctness.
If your agency does not have a complete record system,the following suggestions are offered.
@ Use a copy of “Check after Repair is CompleteW as asimple record that the repair was inspected when it wasdone.
. Keep a copy of the “Checklist of Materials for Repair”worksheet filled in with the parts you actually used.Salvaged or reused parts can be written in by hand.Sign and date the materials checklist when the repair isdone.
e If an instant camera is available, take one or twoPolaroid pictures of the completed repair. Date thephotographs, and staple these items together to be filedin a completed Guardrail Repair file. Write on thesesheets the location of the repair.
32
——
X. MAINTENANCE TIPS
e On a re~lar schedule, check the bolts for tightuess onthe splices, on the connections to the posts, and at theanchors b any bridge. Once a year or once every twoyears would be a help. Record any inspection by dateand person doing it. This will help if there is ever alawsuit from a crash.
* When a Wardrail is hit and a large part of theguardrail at that location is damaged, check with asupervisor if the guardrail should be replaced orrepaired. Sometimes a policy may exist that will allowremoving the hazard from which the guardrail isprotecting vehicles instead of repairing it. It might alsobean older desi~ which can be upgraded to a morecurrent desi~ if enougk of the old design has beendamaged.
o Try to keep the weeds and grass away from a guardrail.It helps the driver see the line of the rail to aim awayfrom the hazard. It makes it easier to inspect theWardrail for needed repairs. It helps limit unevennessin the shoulder and approach to the Wardrail when avehicle is about to run into it.
@ Watch for buildup of material under a rail or erosion ofmaterial out from under a rail that changes the heightof the rail. It does not take long for this process in turfor aggregate shoulders to put a rail at the wrong height.
33

NOTES
34

-.
HHS-20/R5-96(3M)QE