VTech VCS754 User Guide - Nextiva · Before you can configure a static IP Address, you must disable...
18
nextiva.com/support VTech VCS754 User Guide
Transcript of VTech VCS754 User Guide - Nextiva · Before you can configure a static IP Address, you must disable...

1 | P a g e
nextiva.com/support
VTech VCS754 User Guide
1 | P a g e
© Nextiva, All Rights Reserved
Contents Installation ............................................................................................................................................................... 2
Components..................................................................................................................................................... 2 Desktop Setup – Base Unit .............................................................................................................................. 2
Location of Controls ................................................................................................................................................ 4 Front ............................................................................................................................................................ 4 Back ............................................................................................................................................................ 5 Status Indicators .............................................................................................................................................. 6
Provisioning Steps.................................................................................................................................................... 7 Assign the MAC address to a User. ................................................................................................................. 7 Configuring a Static IP Address ....................................................................................................................... 8 Enabling DHCP ................................................................................................................................................. 9 Checking the Firmware ................................................................................................................................... 9 Configuring the Provisioning Server ............................................................................................................. 10 Finding the IP Address ................................................................................................................................... 10 Entering the Server URL ................................................................................................................................ 10 Rebooting the Phone ..................................................................................................................................... 11
Additional Setup Options ...................................................................................................................................... 12 Correcting the Time ....................................................................................................................................... 12 Line Mirroring ................................................................................................................................................ 12 Busy Lamp Field (BLF) .................................................................................................................................... 12 Directories ...................................................................................................................................................... 12 Speed Dials ..................................................................................................................................................... 12 Automatic Call Distribution (ACD) States ..................................................................................................... 14
Usage .................................................................................................................................................................... 15 Making a Call .................................................................................................................................................. 15 Making a Second Call ..................................................................................................................................... 15 Accepting a Call .............................................................................................................................................. 15 Using the Wireless Microphone ................................................................................................................... 15 Terminating a Call .......................................................................................................................................... 15 Transferring a Call .......................................................................................................................................... 15 Conference Calls ............................................................................................................................................ 16 Check Voicemail ............................................................................................................................................. 16 Do Not Disturb ............................................................................................................................................... 16 Through the Phone’s Menu .......................................................................................................................... 16 Using Feature Access Codes .......................................................................................................................... 17
Factory Reset ......................................................................................................................................................... 17 Through the Phone’s Menu .......................................................................................................................... 17 Through the WebUI ....................................................................................................................................... 17
2 | P a g e
© Nextiva, All Rights Reserved
Installation Components
• Base Unit • Wireless Mic x 4 • Battery x 4 • Battery Door x 4 • Power Adapter • AC Power Cord • DC Power cable • Ethernet Cable • USB Cable
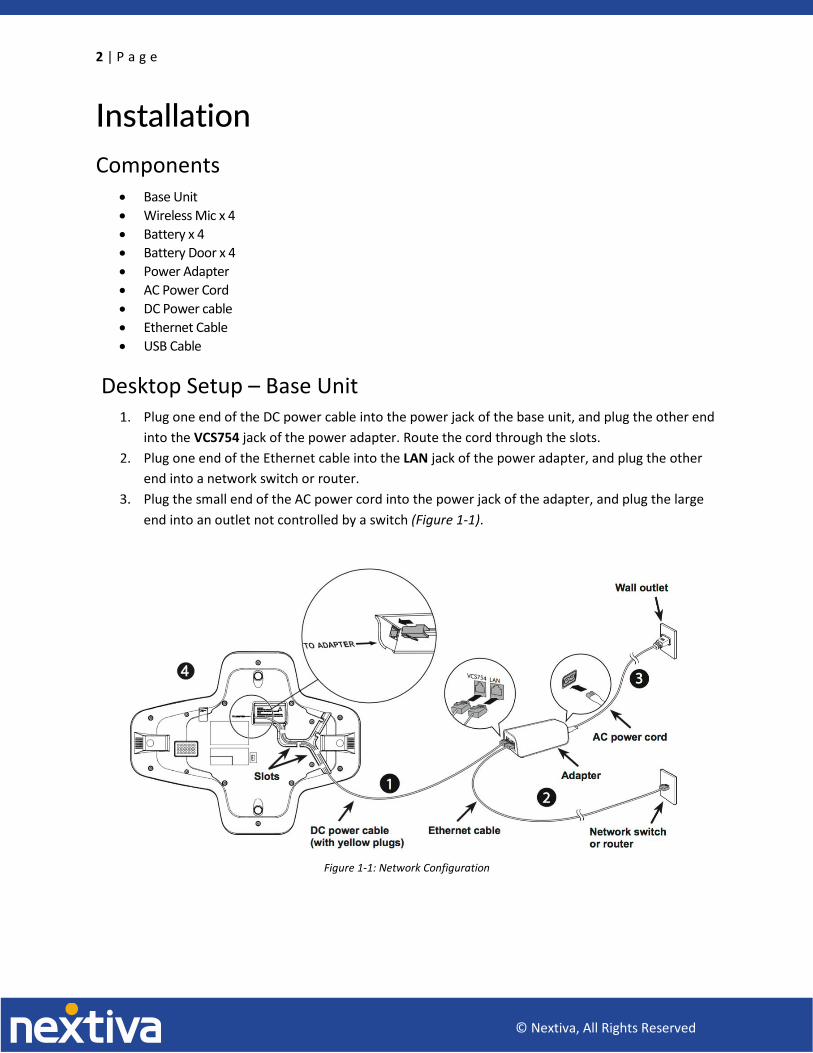
Desktop Setup – Base Unit Plug one end of the DC power cable into the power jack of the base unit, and plug the other end
into the VCS754 jack of the power adapter. Route the cord through the slots. Plug one end of the Ethernet cable into the LAN jack of the power adapter, and plug the other
end into a network switch or router. Plug the small end of the AC power cord into the power jack of the adapter, and plug the large
end into an outlet not controlled by a switch (Figure 1-1).
Figure 1-1: Network Configuration

3 | P a g e
© Nextiva, All Rights Reserved
Desktop Setup – Wireless Microphones Place the battery (with the label THIS SIDE UP facing up) into the battery compartment. Slide the battery door until it clicks into place (Figure 1-2).
Figure 1-2: Assembling the Wireless Microphone
Place the wireless mic onto the charging cradle until it is flush (Figure 1-3).
Figure 1-3: Docking the Wireless Microphone

© Nextiva, All Rights Reserved
4 | P a g e
Location of Controls Front The images below show the standard button configurations of the VTech VCS754 (Figure 2-1 & Figure 2-2), and the integrated wireless microphone (Figure 2-3).
Figure 2-1: Front Feature Map
Speaker LCD Screen System Status Indicator Menu/Select Navigation Keys Talk/Off Dial Pad Keys
Front Microphone MUTE ALL
Volume adjust Softkeys Wireless Mic Charging Contacts Hold/Cancel
5 | P a g e
© Nextiva, All Rights Reserved
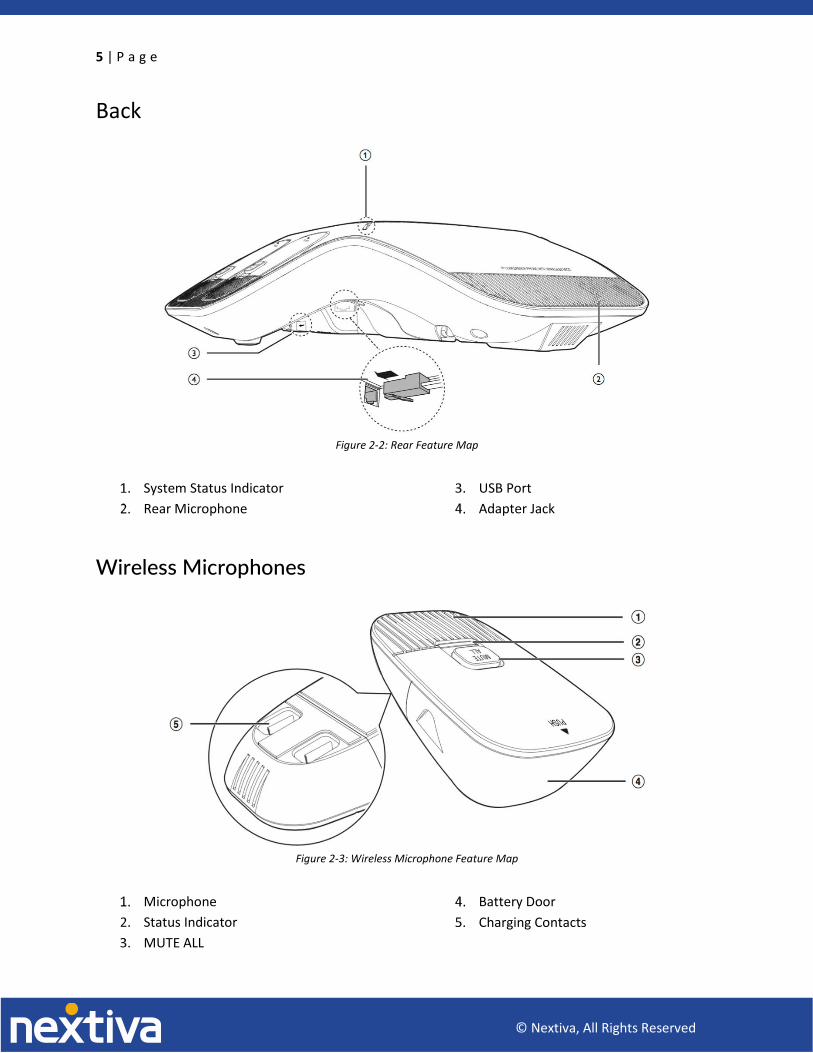
Back
Figure 2-2: Rear Feature Map
System Status Indicator Rear Microphone
USB Port Adapter Jack
Wireless Microphones
Figure 2-3: Wireless Microphone Feature Map
Microphone Status Indicator MUTE ALL
Battery Door Charging Contacts
6 | P a g e
© Nextiva, All Rights Reserved
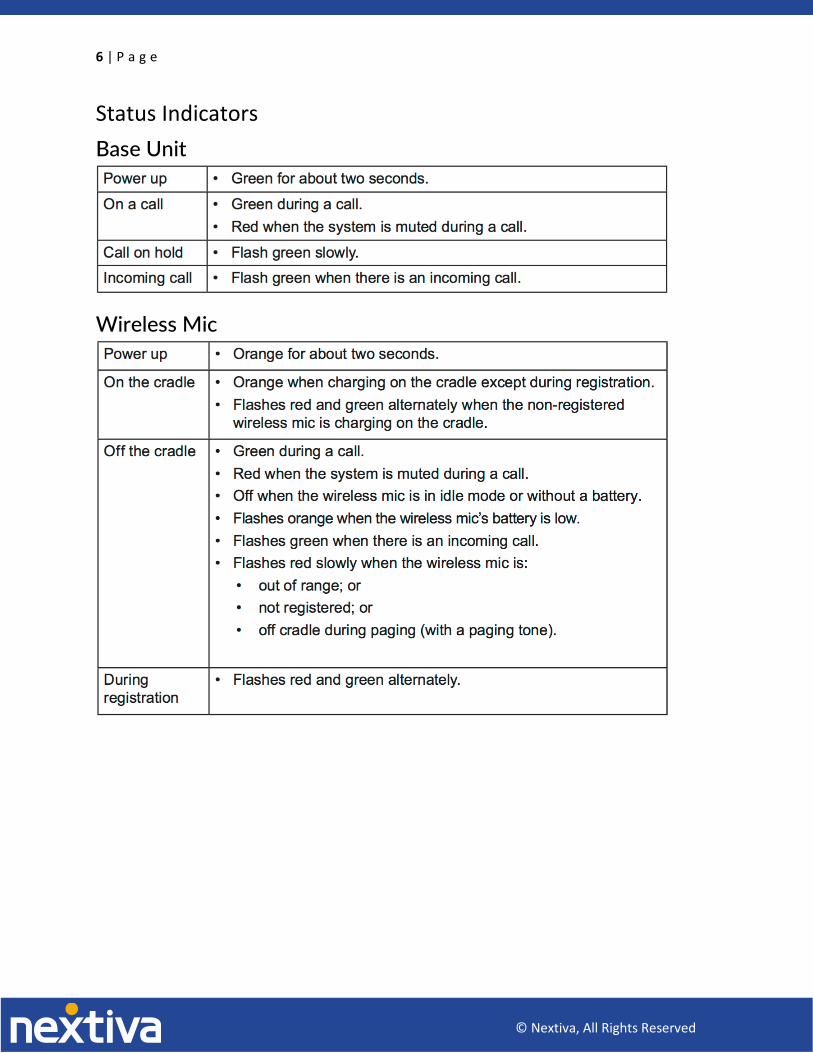
Status Indicators Base Unit
Wireless Mic

7 | P a g e
© Nextiva, All Rights Reserved
Provisioning Steps Assign the MAC Address to a User
For Administrators, log in to the NextOS 3.0 admin portal by visiting www.nextiva.com and clicking on the customer Login found at the top right. Log in to the NextOS 3.0 admin portal with your login credentials. Click Manage in the Users tile. Hover your cursor over the user you want to assign the phone to, and click the pencil icon that appears to the right. Click the Device section. Select Own Device. Select Nextiva VTech VCS754 from the Own Device drop-down list. Enter the MAC address of the phone in the MAC Address text box. Click Generate under the Authentication Name text box. Select the Change Password checkbox, and then click Generate under the Change Password
text box (Figure 3-1).
Figure 3-1: Assign Device to User
Click Save.
8 | P a g e
© Nextiva, All Rights Reserved
Configuring a Static IP Address Before you can configure a static IP Address, you must disable DHCP in the Admin settings.
Disabling DHCP:
Press the MENU button. Scroll down and select Admin settings.
NOTE: To select a menu option, press the SELECT button.
Press the 123 softkey to switch to letters, and then enter admin as the password. Press the Enter softkey. Select Network setting. Select DHCP. Press the right navigation button to change the DHCP status to Disabled. Press the Save softkey.
After disabling DHCP, the home screen will display “Line(s) unregistered”, and programmable key 1 will blink orange until either the phone is configured with a static IP or DHCP is re-enabled.
Configuring a Static IP Address:
Press the MENU button. Scroll down and select Admin settings. Press the 123 softkey to switch to letters, then enter admin as the password. Press the Enter softkey. Select Network setting. Select Set static IP. Using the dial pad, enter the desired static IP Address for the phone.
NOTE: To enter a period between the octets in the IP Address, press the Add dot softkey.
Press the down navigation key to highlight the Subnet mask field, and then enter the subnet mask for the network your phones will be on. If you do not know this information, contact your network administrator.
Press the down navigation key to highlight the Gateway field, and then enter the default gateway IP Address for the network your phones will be on. If you do not know this information, contact your network administrator.
Press the Save softkey.
After the static IP Address has been configured, you need to configure the primary and secondary DNS servers.

9 | P a g e
© Nextiva, All Rights Reserved
Configuring the DNS Servers:
Press the MENU button. Scroll down and select Admin settings. Press the 123 softkey to switch to letters, and then enter admin as the password. Press the Enter softkey. Select Network setting. Select Others. Enter the IP address of the primary DNS server in the DNS 1 field; 8.8.4.4 is recommended.
NOTE: To enter a period between the octets in the IP address, press the Add dot softkey.
Press the down navigation key to highlight the DNS 2 field, then enter the IP address of the secondary DNS server; 8.8.8.8 is recommended.
Press the Save softkey.
Enabling DHCP If the phone displays an incorrect time and date (00:00 and 01/01/14), it may be caused by the phone being configured with an incorrect static IP Address.
Press the MENU button. Scroll down and select Admin settings.
NOTE: To select a menu option, press the SELECT button.
Press the 123 softkey to switch to letters, and then enter admin as the password. Press the Enter softkey. Select Network setting. Select DHCP. Press the right navigation button to change the DHCP status to Enabled. Press the Save softkey. Reboot the phone by disconnecting the power supply from the back of the phone, and then
reconnecting it.
Checking the Firmware The phone should be on firmware 1.1.1.1, and should automatically download the proper firmware after it is provisioned.

10 | P a g e
© Nextiva, All Rights Reserved
Configuring the Provisioning Server If you purchased the device from a third party, or if you had previously provisioned this device, you need to factory reset it before it will accept the new settings in the configuration file. See the Factory Reset section for instructions.
Finding the IP Address Before you can enter the provisioning URL through the WebUI, you must know the IP Address of the phone.
Press the Menu button. Scroll down and select Status.
NOTE: To select a menu option press the Select button.
Select Network. The IP Address of the phone displays on the screen. Document the IP Address for future reference.
Entering the Server URLOnce you have the IP Address, you can access the WebUI from any computer on the same network as the phone.
1. Navigate to the phone’s IP Address using your web browser.2. Log in with admin for the username and admin for the password. The System Status screen
displays.
NOTE: If the phone does not except admin as the password, the password prompt appearsagain. At this point you will need to perform a factory reset (see Factory Reset for instructions).
Click SERVICING at the top-left.Click Provisioning on the far-left side of the screen.Remove the contents of the Server URL text box, and thenenter http://dm.nextiva.com:80/dms/Nextiva_Service_Provider/VTech_VCS754Scroll down and click Save.
After the server URL has been entered, you need to reboot the phone.

11 | P a g e
© Nextiva, All Rights Reserved
Rebooting the Phone
1. While still logged in to the phone on your web browser and on the Provisioning screen, click Reboot on the far-left side of the screen.
2. Click the blue Reboot button in the middle of the screen. The phone reboots, provisions, and registers to Nextiva’s network.
NOTE: If your network is configured to associate phones to a specific VLAN, you will lose your connection to the phone after the provisioning process is complete.
TROUBLESHOOTING: If the phone displays “Firmware update failed” during reboot, and “Line(s) unregistered” after reboot, check that the server URL entered is correct. If the server URL is correct, reset the authentication password in the NextOS 3.0 portal to ensure there are no special characters.
© Nextiva, All Rights Reserved
12 | P a g e
Additional Setup Options Correcting the Time If the VTech VCS754 does not display the correct time, first check that the time zone in the NextOS 3.0 portal is correct for the user the phone is assigned to before proceeding.
The VTech VCS754 cannot have its time changed on the local phone. Please call Nextiva Support to ensure your phone’s configuration file reflects the proper time zone.
Line Mirroring Line Mirroring is not supported on the VTech VCS754
Busy Lamp Field (BLF) Busy Lamp Field (BLF) is not supported on the VTech VCS754
Directories Remote Directories are not supported on the VTech VCS754
Speed Dials Speed Dial 100
1. Go off-hook.
NOTE: In this guide off-hook is used to describe when a phone is in use, or has a dial tone beforea call is made. On-hook describes when a phone is idle.
2. Dial *75 on the dial pad.3. Press the Dial softkey.4. After the phone beeps, enter the two-digit number you want to use for the speed dial, then the
phone number, followed by #. You hear a message saying “Speed Dial 100 programmingsuccessful. Thank you.”
Example: To set 05 as a speed dial to 4805551234, enter: 054805551234#
5. Go on-hook.
From the NextOS 3.0 Portal: 1. For Administrators, log in to the NextOS 3.0 portal by visiting www.nextiva.com and clicking on
the customer Login found in the upper right corner.2. Log in to the NextOS admin portal with your login credentials.
13 | P a g e
© Nextiva, All Rights Reserved
3. From the main dashboard, click Manage in the Users tile. 4. Hover your cursor over the user you want to set up speed dials for, and click the pencil icon to
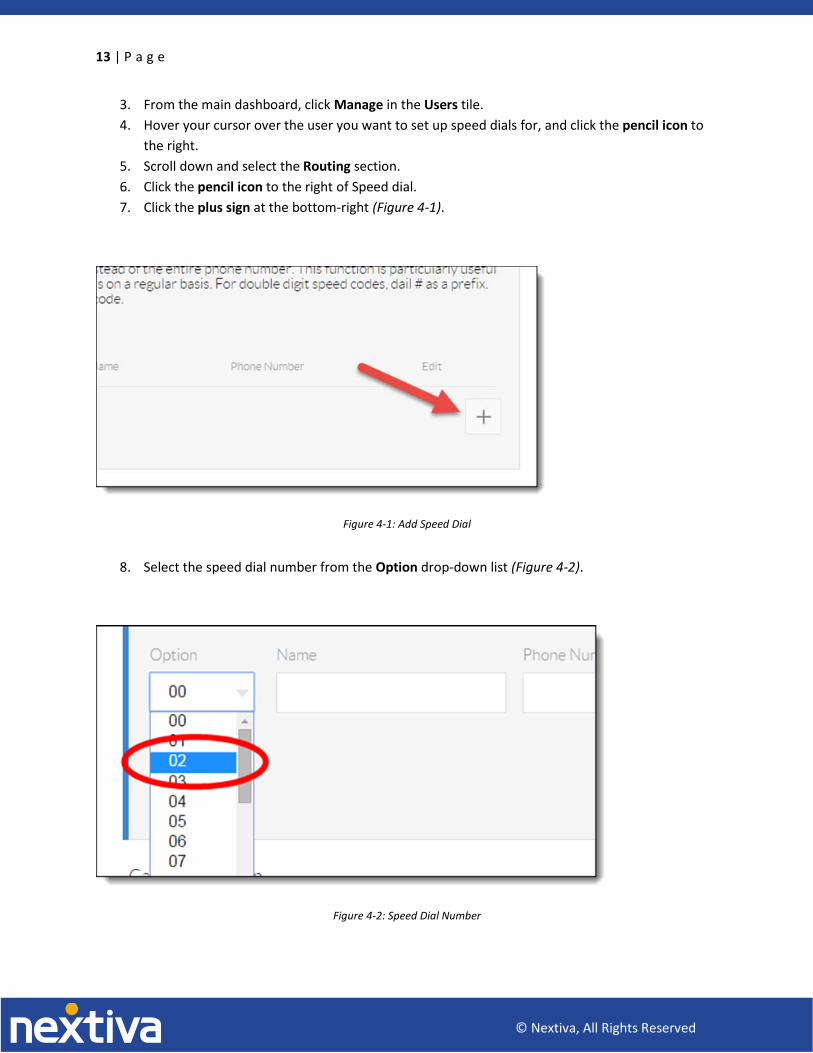
the right. 5. Scroll down and select the Routing section. 6. Click the pencil icon to the right of Speed dial. 7. Click the plus sign at the bottom-right (Figure 4-1).
Figure 4-1: Add Speed Dial
8. Select the speed dial number from the Option drop-down list (Figure 4-2).
Figure 4-2: Speed Dial Number

14 | P a g e
© Nextiva, All Rights Reserved
9. Enter a descriptive name for the speed dial in the Name text box, and then enter the phonenumber or extension in the Phone Number text box. Please note that special characters orspaces are not supported for the speed dial descriptive name (Figure 4-3).
Figure 4-3: Description and Phone Number
10. Click the green Save button at the bottom-right of the Speed dial menu. A pop-up messageappears stating that the speed dial 100 settings have been saved successfully.
Automatic Call Distribution (ACD)
States ACD States are not supported on the VTech VCS754.

15 | P a g e
© Nextiva, All Rights Reserved
Usage Making a Call
1. Dial the 10-digit number of the party you want to call. 2. Press Talk. 3. When finished speaking, press Talk to end the call.
Making a Second Call 1. While on a call, press “New”. 2. Dial the extension or 10-digit number you want to call.
NOTE: After you are connected, you can switch between the two calls by placing one party on hold, and then using the directional keys to select the active call.
Accepting a Call 1. While the phone is ringing, press Talk. 2. When finished speaking, press Talk to end the call.
Using the Wireless Microphone 1. During a call, lift a wireless microphone from the base unit charging cradle. 2. The status indicator on the wireless mic turns green. 3. Speak towards the microphone on the wireless mic.
• For best performance, speak to the microphone on the wireless mic at a distance of no more than 3 feet.
• Always return the wireless mics to the charging cradles after use.
Terminating a Call While on a call, press the End softkey at the bottom of the screen.
Transferring a Call Note: This phone only supports warm transfers, there is no blind transfer option.
1. While on a call, press the Transfer softkey. The party you were speaking to is placed on hold, and you hear a dial tone.
2. Dial the extension or 10-digit number of the party you want to transfer the call to, and then press the Dial softkey. Wait for the party to answer.
3. When the party is ready to accept the transfer, press the Transfer softkey.

16 | P a g e
© Nextiva, All Rights Reserved
Conference Calls 1. While on a call, press the Conf softkey. The party you were speaking to is placed on hold, and
you hear a dial tone. 2. Dial the extension or 10-digit number of the party you want to conference in, and then press the
Dial softkey.
NOTE: To cancel the conference call, press the Cancel softkey, and then press the Resume softkey to return to the original party.
3. When ready to bring the original party back in, press the Conf softkey again. The party that was on hold is conferenced in, and you are speaking to both parties.
Check Voicemail The phone displays a New Message alert on the LCD screen when there is a voicemail in the system.
1. On the New Message screen, press View. 2. Using the arrow keys, select Mailbox.
3. Enter your password when prompted. The default password is 0000#. 4. If this is your first time checking your voicemail, follow the prompts to change your password
and record your name. 5. Press 1 to access your voice mailbox. 6. Press 1 to listen to your messages. 7. When finished listening to your voicemails, press the End softkey to terminate the call.
Do Not Disturb The phone does not have a DND button. Follow the steps below to enable DND through the phone’s menu and using feature access codes:
Through the Phone’s Menu 1. Press the MENU button. 2. Select Call. 3. Select Do Not Disturb. 4. Press the right navigation button to change Off to On for Line 1.
NOTE: If you are enabling Do Not Disturb for another line besides line 1, scroll down to find the line, and then press the right navigation button.
5. Press the Save softkey. Do Not Disturb is activated, and a busy symbol appears in the upper-right corner of the screen.
6. To disable Do Not Disturb, repeat steps 1 through 5, selecting Off instead of On for step 4.

17 | P a g e
© Nextiva, All Rights Reserved
Using Feature Access Codes 1. Go off-hook, or press the SPEAKER or HEADSET button. 2. Dial *78, and then press the Dial softkey. You hear a message saying “Your Do Not Disturb
service has been activated successfully”, and then the call is disconnected. A busy symbol appears in the upper-right corner of the screen.
3. To turn DND off, dial *79. You will hear a message saying “Your Do Not Disturb service has been deactivated successfully”, and then the call is disconnected.
Factory Reset Through the Phone’s Menu
1. Press the MENU button. 2. Scroll down and select Admin settings.
NOTE: To select a menu option, press the SELECT button.
3. Press the 123 softkey to switch to letters, and then enter admin as the password. 4. Press the Enter softkey. 5. Select Reset to default. 6. Press the Yes softkey to confirm you want to factory reset the phone.
Through the WebUI 1. Navigate to the phone’s IP Address using your web browser. 2. Log in with admin for the username and admin for the password. The System Status screen
displays. 3. Click SERVICING at the top-left. 4. Click Provisioning on the far-left side of the screen. 5. Scroll down, and then click Reset at the bottom of the screen. 6. Click OK when the pop-up message appears asking if you want to reset the phone to defaults. 7. Click Save.