vSRX Deployment Guide for AWS - Juniper Networks · Created Date: 20190205055746Z
98
vSRX Deployment Guide for AWS Modified: 2019-02-04 Copyright © 2019, Juniper Networks, Inc.
Transcript of vSRX Deployment Guide for AWS - Juniper Networks · Created Date: 20190205055746Z
vSRX Deployment Guide for AWS
Modified: 2019-02-04
Copyright © 2019, Juniper Networks, Inc.
Juniper Networks, Inc.1133 InnovationWaySunnyvale, California 94089USA408-745-2000www.juniper.net
Juniper Networks, the Juniper Networks logo, Juniper, and Junos are registered trademarks of Juniper Networks, Inc. in the United Statesand other countries. All other trademarks, service marks, registeredmarks, or registered service marks are the property of their respectiveowners.
Juniper Networks assumes no responsibility for any inaccuracies in this document. Juniper Networks reserves the right to change, modify,transfer, or otherwise revise this publication without notice.
vSRX Deployment Guide for AWSCopyright © 2019 Juniper Networks, Inc. All rights reserved.
The information in this document is current as of the date on the title page.
YEAR 2000 NOTICE
Juniper Networks hardware and software products are Year 2000 compliant. Junos OS has no known time-related limitations through theyear 2038. However, the NTP application is known to have some difficulty in the year 2036.
ENDUSER LICENSE AGREEMENT
The Juniper Networks product that is the subject of this technical documentation consists of (or is intended for use with) Juniper Networkssoftware. Use of such software is subject to the terms and conditions of the End User License Agreement (“EULA”) posted athttps://support.juniper.net/support/eula/. By downloading, installing or using such software, you agree to the terms and conditions ofthat EULA.
Copyright © 2019, Juniper Networks, Inc.ii
Table of Contents
About the Documentation . . . . . . . . . . . . . . . . . . . . . . . . . . . . . . . . . . . . . . . . . . . . xi
Documentation and Release Notes . . . . . . . . . . . . . . . . . . . . . . . . . . . . . . . . . . xi
Documentation Conventions . . . . . . . . . . . . . . . . . . . . . . . . . . . . . . . . . . . . . . . xi
Documentation Feedback . . . . . . . . . . . . . . . . . . . . . . . . . . . . . . . . . . . . . . . . xiii
Requesting Technical Support . . . . . . . . . . . . . . . . . . . . . . . . . . . . . . . . . . . . . xiv
Self-Help Online Tools and Resources . . . . . . . . . . . . . . . . . . . . . . . . . . . xiv
Creating a Service Request with JTAC . . . . . . . . . . . . . . . . . . . . . . . . . . . . xv
Chapter 1 Overview . . . . . . . . . . . . . . . . . . . . . . . . . . . . . . . . . . . . . . . . . . . . . . . . . . . . . . . . . 17
Understanding vSRX with AWS . . . . . . . . . . . . . . . . . . . . . . . . . . . . . . . . . . . . . . . . 17
vSRX Overview . . . . . . . . . . . . . . . . . . . . . . . . . . . . . . . . . . . . . . . . . . . . . . . . . . 17
vSRX Benefits and Use Cases . . . . . . . . . . . . . . . . . . . . . . . . . . . . . . . . . . . . . . 19
vSRX with AWS . . . . . . . . . . . . . . . . . . . . . . . . . . . . . . . . . . . . . . . . . . . . . . . . . 20
AWS Glossary . . . . . . . . . . . . . . . . . . . . . . . . . . . . . . . . . . . . . . . . . . . . . . . . . . 22
Requirements for vSRX on AWS . . . . . . . . . . . . . . . . . . . . . . . . . . . . . . . . . . . . . . . 24
System Requirements for AWS . . . . . . . . . . . . . . . . . . . . . . . . . . . . . . . . . . . . 24
Interface Mapping for vSRX on AWS . . . . . . . . . . . . . . . . . . . . . . . . . . . . . . . . 25
vSRX Default Settings on AWS . . . . . . . . . . . . . . . . . . . . . . . . . . . . . . . . . . . . 26
Best Practices for Improving vSRX Performance . . . . . . . . . . . . . . . . . . . . . . 26
Junos OS Features Supported on vSRX . . . . . . . . . . . . . . . . . . . . . . . . . . . . . . . . . 26
SRX Series Features Supported on vSRX . . . . . . . . . . . . . . . . . . . . . . . . . . . . . 27
SRX Series Features Not Supported on vSRX . . . . . . . . . . . . . . . . . . . . . . . . . 28
Chapter 2 Installing vSRX in AWS . . . . . . . . . . . . . . . . . . . . . . . . . . . . . . . . . . . . . . . . . . . . 35
Configuring an Amazon Virtual Private Cloud for vSRX . . . . . . . . . . . . . . . . . . . . . 35
Step 1: Creating an Amazon VPC and Internet Gateway . . . . . . . . . . . . . . . . . 36
Step 2: Adding Subnets for vSRX . . . . . . . . . . . . . . . . . . . . . . . . . . . . . . . . . . . 38
Step 3: Adding Route Tables for vSRX . . . . . . . . . . . . . . . . . . . . . . . . . . . . . . . 39
Step 4: Adding Security Groups for vSRX . . . . . . . . . . . . . . . . . . . . . . . . . . . . . 41
Launching a vSRX Instance on an Amazon Virtual Private Cloud . . . . . . . . . . . . . 43
Step 1: Creating an SSH Key Pair . . . . . . . . . . . . . . . . . . . . . . . . . . . . . . . . . . . 43
Step 2: Launching a vSRX Instance . . . . . . . . . . . . . . . . . . . . . . . . . . . . . . . . . 45
Step 3: Viewing the AWS System Logs . . . . . . . . . . . . . . . . . . . . . . . . . . . . . . . 47
Step 4: Adding Network Interfaces for vSRX . . . . . . . . . . . . . . . . . . . . . . . . . . 47
Step 5: Allocating Elastic IP Addresses . . . . . . . . . . . . . . . . . . . . . . . . . . . . . . 49
Step 6: Adding the vSRX Private Interfaces to the Route Tables . . . . . . . . . . 50
Step 7: Rebooting the vSRX Instance . . . . . . . . . . . . . . . . . . . . . . . . . . . . . . . 50
Step 8: Logging in to a vSRX Instance . . . . . . . . . . . . . . . . . . . . . . . . . . . . . . . 51
Using Cloud-Init to Automate the Initialization of vSRX Instances in AWS . . . . . . 52
iiiCopyright © 2019, Juniper Networks, Inc.

Upgrading Junos OS Software on a vSRX Instance . . . . . . . . . . . . . . . . . . . . . . . . 54
Upgrading the Junos OS for vSRX Software Release . . . . . . . . . . . . . . . . . . . 54
Replacing the vSRX Instance on AWS . . . . . . . . . . . . . . . . . . . . . . . . . . . . . . . 54
Removing a vSRX Instance on AWS . . . . . . . . . . . . . . . . . . . . . . . . . . . . . . . . . . . . 56
Chapter 3 Configuring and Managing vSRX . . . . . . . . . . . . . . . . . . . . . . . . . . . . . . . . . . . . 57
vSRX Configuration and Management Tools . . . . . . . . . . . . . . . . . . . . . . . . . . . . . 57
Understanding the Junos OS CLI and Junos Scripts . . . . . . . . . . . . . . . . . . . . 57
Understanding the J-Web Interface . . . . . . . . . . . . . . . . . . . . . . . . . . . . . . . . . 57
Understanding Junos Space Security Director . . . . . . . . . . . . . . . . . . . . . . . . 58
Configuring vSRX Using the CLI . . . . . . . . . . . . . . . . . . . . . . . . . . . . . . . . . . . . . . . 58
Understanding vSRX on AWS Preconfiguration and Factory Defaults . . . . . . 58
Adding a Basic vSRX Configuration . . . . . . . . . . . . . . . . . . . . . . . . . . . . . . . . . 59
Adding DNS Servers . . . . . . . . . . . . . . . . . . . . . . . . . . . . . . . . . . . . . . . . . . . . . 61
Adding vSRX Feature Licenses . . . . . . . . . . . . . . . . . . . . . . . . . . . . . . . . . . . . . 61
Configuring vSRX Using the J-Web Interface . . . . . . . . . . . . . . . . . . . . . . . . . . . . . 62
Accessing the J-Web Interface and Configuring vSRX . . . . . . . . . . . . . . . . . . 62
Applying the Configuration . . . . . . . . . . . . . . . . . . . . . . . . . . . . . . . . . . . . . . . . 64
Adding vSRX Feature Licenses . . . . . . . . . . . . . . . . . . . . . . . . . . . . . . . . . . . . . 64
Managing Security Policies for Virtual Machines Using Junos Space Security
Director . . . . . . . . . . . . . . . . . . . . . . . . . . . . . . . . . . . . . . . . . . . . . . . . . . . . . . . 65
AWS Elastic Load Balancing and Elastic Network Adapter . . . . . . . . . . . . . . . . . . 65
AWS Elastic Load Balancing . . . . . . . . . . . . . . . . . . . . . . . . . . . . . . . . . . . . . . 65
Section . . . . . . . . . . . . . . . . . . . . . . . . . . . . . . . . . . . . . . . . . . . . . . . . . . . . . ?
Benefits of AWS Elastic Load Balancing . . . . . . . . . . . . . . . . . . . . . . . . . 66
Overview of AWS Elastic Load Balancing . . . . . . . . . . . . . . . . . . . . . . . . . 66
Overview of Application Load Balancer . . . . . . . . . . . . . . . . . . . . . . . . . . . . . . 67
Deployment of AWS Application Load Balancer . . . . . . . . . . . . . . . . . . . . . . 68
vSRX Behind AWS ELB Application Load Balancer Deployment . . . . . . 68
Overview of AWS Elastic Network Adapter (ENA) for vSRX Instances . . . . . . 71
Chapter 4 vSRX in AWS Use Cases . . . . . . . . . . . . . . . . . . . . . . . . . . . . . . . . . . . . . . . . . . . . 73
Example: Configuring NAT for vSRX . . . . . . . . . . . . . . . . . . . . . . . . . . . . . . . . . . . . 73
Example: Configuring VPN on vSRX Between Amazon VPCs . . . . . . . . . . . . . . . . 75
Chapter 5 vSRX Licensing . . . . . . . . . . . . . . . . . . . . . . . . . . . . . . . . . . . . . . . . . . . . . . . . . . . 79
vSRX Feature Licenses Overview . . . . . . . . . . . . . . . . . . . . . . . . . . . . . . . . . . . . . . 79
vSRX License Procurement and Renewal . . . . . . . . . . . . . . . . . . . . . . . . . . . . 79
vSRX Evaluation License . . . . . . . . . . . . . . . . . . . . . . . . . . . . . . . . . . . . . . . . . 80
Product Evaluation License . . . . . . . . . . . . . . . . . . . . . . . . . . . . . . . . . . . . 81
Advanced Security Features Evaluation License . . . . . . . . . . . . . . . . . . . . 81
License Types . . . . . . . . . . . . . . . . . . . . . . . . . . . . . . . . . . . . . . . . . . . . . . . . . . 82
Throughput . . . . . . . . . . . . . . . . . . . . . . . . . . . . . . . . . . . . . . . . . . . . . . . . . . . . 83
License Duration . . . . . . . . . . . . . . . . . . . . . . . . . . . . . . . . . . . . . . . . . . . . . . . . 83
Individual (á la carte) Feature Licenses . . . . . . . . . . . . . . . . . . . . . . . . . . . . . . 84
Bundled Licenses . . . . . . . . . . . . . . . . . . . . . . . . . . . . . . . . . . . . . . . . . . . . . . . 84
Stacking Licenses . . . . . . . . . . . . . . . . . . . . . . . . . . . . . . . . . . . . . . . . . . . . . . . 84
vSRX License Keys Components . . . . . . . . . . . . . . . . . . . . . . . . . . . . . . . . . . . 84
Copyright © 2019, Juniper Networks, Inc.iv
vSRX Deployment Guide for AWS
License Management Fields Summary . . . . . . . . . . . . . . . . . . . . . . . . . . . . . . 85
Managing Licenses for vSRX . . . . . . . . . . . . . . . . . . . . . . . . . . . . . . . . . . . . . . . . . . 87
vSRX Evaluation License Installation Process . . . . . . . . . . . . . . . . . . . . . . . . . 87
Adding a New License Key with J-Web . . . . . . . . . . . . . . . . . . . . . . . . . . . . . . 88
Adding a New License Key from the CLI . . . . . . . . . . . . . . . . . . . . . . . . . . . . . 89
Updating vSRX Licenses . . . . . . . . . . . . . . . . . . . . . . . . . . . . . . . . . . . . . . . . . 90
Deleting a License with J-Web . . . . . . . . . . . . . . . . . . . . . . . . . . . . . . . . . . . . . 91
Deleting a License with the CLI . . . . . . . . . . . . . . . . . . . . . . . . . . . . . . . . . . . . 92
License Warning Messages . . . . . . . . . . . . . . . . . . . . . . . . . . . . . . . . . . . . . . . 93
vSRX License Model Numbers . . . . . . . . . . . . . . . . . . . . . . . . . . . . . . . . . . . . . . . . 94
Chapter 6 Troubleshooting . . . . . . . . . . . . . . . . . . . . . . . . . . . . . . . . . . . . . . . . . . . . . . . . . . 97
Finding the Software Serial Number for vSRX . . . . . . . . . . . . . . . . . . . . . . . . . . . . 97
vCopyright © 2019, Juniper Networks, Inc.
Table of Contents

Copyright © 2019, Juniper Networks, Inc.vi
vSRX Deployment Guide for AWS
List of Figures
Chapter 1 Overview . . . . . . . . . . . . . . . . . . . . . . . . . . . . . . . . . . . . . . . . . . . . . . . . . . . . . . . . . 17
Figure 1: vSRX Architecture . . . . . . . . . . . . . . . . . . . . . . . . . . . . . . . . . . . . . . . . . . . . 18
Figure 2: vSRX 3.0 Software Architecture . . . . . . . . . . . . . . . . . . . . . . . . . . . . . . . . 19
Figure 3: vSRX in AWS Deployment . . . . . . . . . . . . . . . . . . . . . . . . . . . . . . . . . . . . . 21
Chapter 2 Installing vSRX in AWS . . . . . . . . . . . . . . . . . . . . . . . . . . . . . . . . . . . . . . . . . . . . 35
Figure 4: Example of vSRX in AWS Deployment . . . . . . . . . . . . . . . . . . . . . . . . . . . 36
Figure 5: Verify Region . . . . . . . . . . . . . . . . . . . . . . . . . . . . . . . . . . . . . . . . . . . . . . . 44
Figure 6: Disable Source/Dest. Check . . . . . . . . . . . . . . . . . . . . . . . . . . . . . . . . . . . 49
Chapter 3 Configuring and Managing vSRX . . . . . . . . . . . . . . . . . . . . . . . . . . . . . . . . . . . . 57
Figure 7: vSRX Behind AWS ELB Application Load Balancer Deployment . . . . . . 69
Figure 8: Sandwich Deployment of AWS ELB Application Load Balancer . . . . . . 70
Chapter 5 vSRX Licensing . . . . . . . . . . . . . . . . . . . . . . . . . . . . . . . . . . . . . . . . . . . . . . . . . . . 79
Figure 9: Sample vSRX License SKU . . . . . . . . . . . . . . . . . . . . . . . . . . . . . . . . . . . . 83
Figure 10: J-Web Licenses Window Showing Installed Licenses . . . . . . . . . . . . . . 85
Figure 11: J-Web Licenses Window . . . . . . . . . . . . . . . . . . . . . . . . . . . . . . . . . . . . . 88
Figure 12: Add License Window . . . . . . . . . . . . . . . . . . . . . . . . . . . . . . . . . . . . . . . . 89
Figure 13: License Details Window . . . . . . . . . . . . . . . . . . . . . . . . . . . . . . . . . . . . . 89
Figure 14: Deleting a License . . . . . . . . . . . . . . . . . . . . . . . . . . . . . . . . . . . . . . . . . . 92
Figure 15: Delete Licenses Window . . . . . . . . . . . . . . . . . . . . . . . . . . . . . . . . . . . . . 92
Figure 16: J-Web Dashboard for License Expiry Warning . . . . . . . . . . . . . . . . . . . . 93
viiCopyright © 2019, Juniper Networks, Inc.

Copyright © 2019, Juniper Networks, Inc.viii
vSRX Deployment Guide for AWS
List of Tables
About the Documentation . . . . . . . . . . . . . . . . . . . . . . . . . . . . . . . . . . . . . . . . . . xi
Table 1: Notice Icons . . . . . . . . . . . . . . . . . . . . . . . . . . . . . . . . . . . . . . . . . . . . . . . . . xii
Table 2: Text and Syntax Conventions . . . . . . . . . . . . . . . . . . . . . . . . . . . . . . . . . . . xii
Chapter 1 Overview . . . . . . . . . . . . . . . . . . . . . . . . . . . . . . . . . . . . . . . . . . . . . . . . . . . . . . . . . 17
Table 3: Amazon VPC Related Terminology . . . . . . . . . . . . . . . . . . . . . . . . . . . . . . 22
Table 4: Amazon EC2 Related Terminology . . . . . . . . . . . . . . . . . . . . . . . . . . . . . . . 23
Table 5: System Requirements for vSRX . . . . . . . . . . . . . . . . . . . . . . . . . . . . . . . . . 24
Table 6: vSRX and AWS Interface Names . . . . . . . . . . . . . . . . . . . . . . . . . . . . . . . . 25
Table 7: Factory-Default Settings for Security Policies . . . . . . . . . . . . . . . . . . . . . . 26
Table 8: vSRX Feature Considerations . . . . . . . . . . . . . . . . . . . . . . . . . . . . . . . . . . . 27
Table 9: SRX Series Features Not Supported on vSRX . . . . . . . . . . . . . . . . . . . . . 28
Chapter 2 Installing vSRX in AWS . . . . . . . . . . . . . . . . . . . . . . . . . . . . . . . . . . . . . . . . . . . . 35
Table 10: Supported AWS Instance Types for vSRX . . . . . . . . . . . . . . . . . . . . . . . . 45
Table 11: AWS Instance Details . . . . . . . . . . . . . . . . . . . . . . . . . . . . . . . . . . . . . . . . 46
Table 12: Network Interface Settings . . . . . . . . . . . . . . . . . . . . . . . . . . . . . . . . . . . . 48
Table 13: Elastic IP Settings . . . . . . . . . . . . . . . . . . . . . . . . . . . . . . . . . . . . . . . . . . . 50
Table 14: Private Route Settings . . . . . . . . . . . . . . . . . . . . . . . . . . . . . . . . . . . . . . . 50
Chapter 3 Configuring and Managing vSRX . . . . . . . . . . . . . . . . . . . . . . . . . . . . . . . . . . . . 57
Table 15: Device Name and User Account Information . . . . . . . . . . . . . . . . . . . . . . 63
Table 16: System Time Options . . . . . . . . . . . . . . . . . . . . . . . . . . . . . . . . . . . . . . . . 63
Chapter 5 vSRX Licensing . . . . . . . . . . . . . . . . . . . . . . . . . . . . . . . . . . . . . . . . . . . . . . . . . . . 79
Table 17: vSRX Evaluation License Type . . . . . . . . . . . . . . . . . . . . . . . . . . . . . . . . . . 81
Table 18: Summary of License Management Fields . . . . . . . . . . . . . . . . . . . . . . . . 86
Table 19: vSRX Licensing Package Types . . . . . . . . . . . . . . . . . . . . . . . . . . . . . . . . 94
ixCopyright © 2019, Juniper Networks, Inc.

Copyright © 2019, Juniper Networks, Inc.x
vSRX Deployment Guide for AWS
About the Documentation
• Documentation and Release Notes on page xi
• Documentation Conventions on page xi
• Documentation Feedback on page xiii
• Requesting Technical Support on page xiv
Documentation and Release Notes
To obtain the most current version of all Juniper Networks®technical documentation,
see the product documentation page on the Juniper Networks website at
https://www.juniper.net/documentation/.
If the information in the latest release notes differs from the information in the
documentation, follow the product Release Notes.
Juniper Networks Books publishes books by Juniper Networks engineers and subject
matter experts. These books go beyond the technical documentation to explore the
nuances of network architecture, deployment, and administration. The current list can
be viewed at https://www.juniper.net/books.
Documentation Conventions
Table 1 on page xii defines notice icons used in this guide.
xiCopyright © 2019, Juniper Networks, Inc.
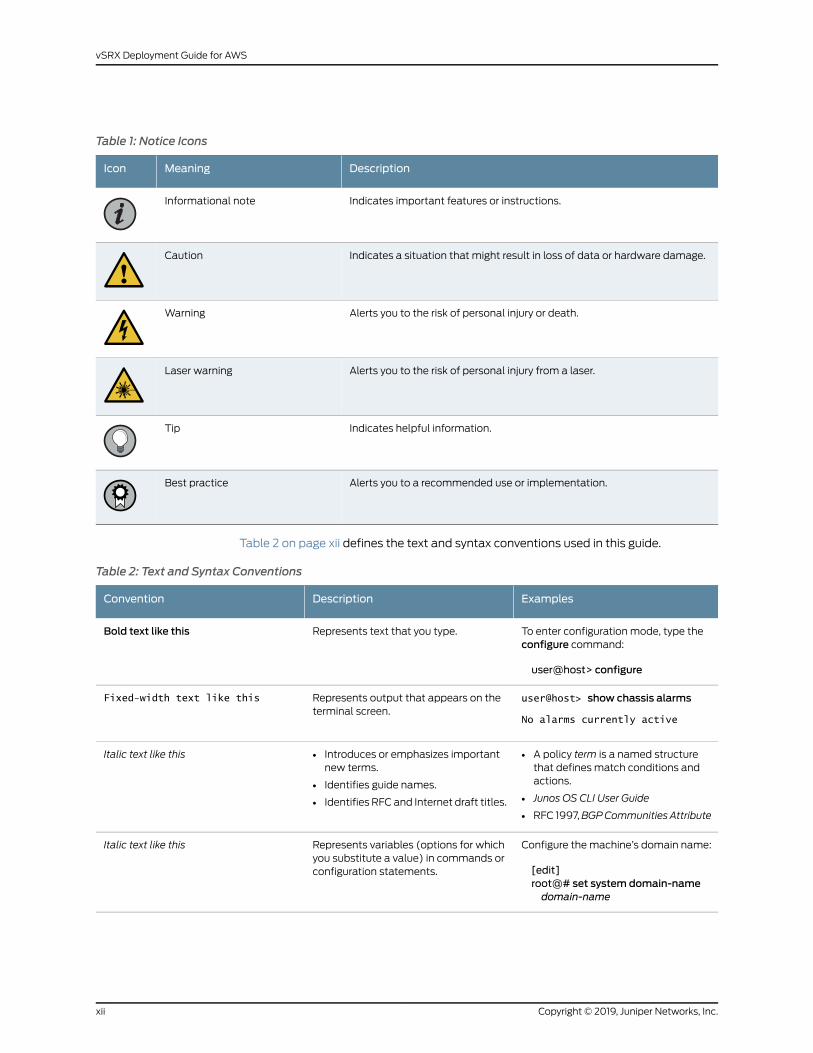
Table 1: Notice Icons
DescriptionMeaningIcon
Indicates important features or instructions.Informational note
Indicates a situation that might result in loss of data or hardware damage.Caution
Alerts you to the risk of personal injury or death.Warning
Alerts you to the risk of personal injury from a laser.Laser warning
Indicates helpful information.Tip
Alerts you to a recommended use or implementation.Best practice
Table 2 on page xii defines the text and syntax conventions used in this guide.
Table 2: Text and Syntax Conventions
ExamplesDescriptionConvention
To enter configuration mode, type theconfigure command:
user@host> configure
Represents text that you type.Bold text like this
user@host> show chassis alarms
No alarms currently active
Represents output that appears on theterminal screen.
Fixed-width text like this
• A policy term is a named structurethat defines match conditions andactions.
• Junos OS CLI User Guide
• RFC 1997,BGPCommunities Attribute
• Introduces or emphasizes importantnew terms.
• Identifies guide names.
• Identifies RFC and Internet draft titles.
Italic text like this
Configure themachine’s domain name:
[edit]root@# set system domain-namedomain-name
Represents variables (options for whichyou substitute a value) in commands orconfiguration statements.
Italic text like this
Copyright © 2019, Juniper Networks, Inc.xii
vSRX Deployment Guide for AWS
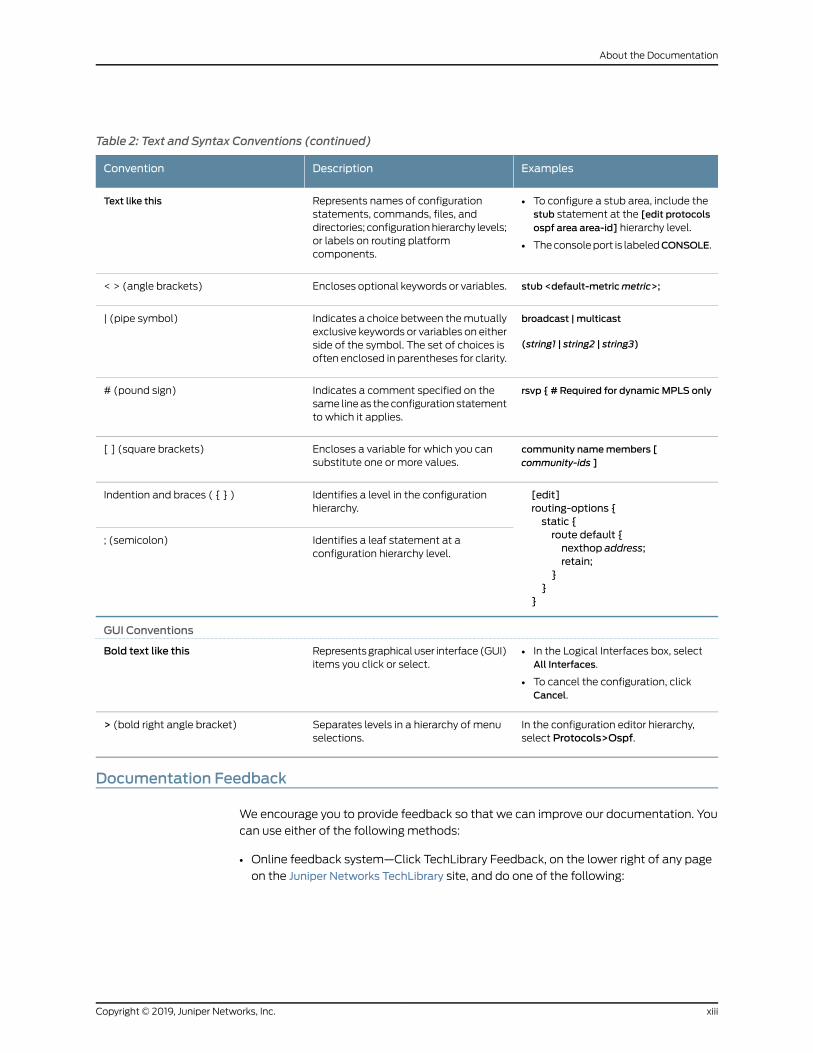
Table 2: Text and Syntax Conventions (continued)
ExamplesDescriptionConvention
• To configure a stub area, include thestub statement at the [edit protocolsospf area area-id] hierarchy level.
• Theconsoleport is labeledCONSOLE.
Represents names of configurationstatements, commands, files, anddirectories; configurationhierarchy levels;or labels on routing platformcomponents.
Text like this
stub <default-metricmetric>;Encloses optional keywords or variables.< > (angle brackets)
broadcast | multicast
(string1 | string2 | string3)
Indicates a choice between themutuallyexclusive keywords or variables on eitherside of the symbol. The set of choices isoften enclosed in parentheses for clarity.
| (pipe symbol)
rsvp { # Required for dynamicMPLS onlyIndicates a comment specified on thesame lineas theconfiguration statementto which it applies.
# (pound sign)
community namemembers [community-ids ]
Encloses a variable for which you cansubstitute one or more values.
[ ] (square brackets)
[edit]routing-options {static {route default {nexthop address;retain;
}}
}
Identifies a level in the configurationhierarchy.
Indention and braces ( { } )
Identifies a leaf statement at aconfiguration hierarchy level.
; (semicolon)
GUI Conventions
• In the Logical Interfaces box, selectAll Interfaces.
• To cancel the configuration, clickCancel.
Representsgraphicaluser interface(GUI)items you click or select.
Bold text like this
In the configuration editor hierarchy,select Protocols>Ospf.
Separates levels in a hierarchy of menuselections.
> (bold right angle bracket)
Documentation Feedback
We encourage you to provide feedback so that we can improve our documentation. You
can use either of the following methods:
• Online feedback system—Click TechLibrary Feedback, on the lower right of any page
on the Juniper Networks TechLibrary site, and do one of the following:
xiiiCopyright © 2019, Juniper Networks, Inc.
About the Documentation
• Click the thumbs-up icon if the information on the page was helpful to you.
• Click the thumbs-down icon if the information on the page was not helpful to you
or if you have suggestions for improvement, and use the pop-up form to provide
feedback.
• E-mail—Sendyourcommentsto [email protected]. Includethedocument
or topic name, URL or page number, and software version (if applicable).
Requesting Technical Support
Technical product support is available through the JuniperNetworksTechnicalAssistance
Center (JTAC). If you are a customer with an active J-Care or Partner Support Service
support contract, or are covered under warranty, and need post-sales technical support,
you can access our tools and resources online or open a case with JTAC.
• JTAC policies—For a complete understanding of our JTAC procedures and policies,
review the JTAC User Guide located at
https://www.juniper.net/us/en/local/pdf/resource-guides/7100059-en.pdf.
• Product warranties—For product warranty information, visit
https://www.juniper.net/support/warranty/.
• JTAC hours of operation—The JTAC centers have resources available 24 hours a day,
7 days a week, 365 days a year.
Self-Help Online Tools and Resources
For quick and easy problem resolution, Juniper Networks has designed an online
self-service portal called the Customer Support Center (CSC) that provides youwith the
following features:
• Find CSC offerings: https://www.juniper.net/customers/support/
• Search for known bugs: https://prsearch.juniper.net/
• Find product documentation: https://www.juniper.net/documentation/
• Find solutions and answer questions using our Knowledge Base: https://kb.juniper.net/
• Download the latest versions of software and review release notes:
https://www.juniper.net/customers/csc/software/
• Search technical bulletins for relevant hardware and software notifications:
https://kb.juniper.net/InfoCenter/
Copyright © 2019, Juniper Networks, Inc.xiv
vSRX Deployment Guide for AWS
• Join and participate in the Juniper Networks Community Forum:
https://www.juniper.net/company/communities/
• Create a service request online: https://myjuniper.juniper.net
Toverify serviceentitlementbyproduct serial number, useourSerialNumberEntitlement
(SNE) Tool: https://entitlementsearch.juniper.net/entitlementsearch/
Creating a Service Request with JTAC
You can create a service request with JTAC on theWeb or by telephone.
• Visit https://myjuniper.juniper.net.
• Call 1-888-314-JTAC (1-888-314-5822 toll-free in the USA, Canada, and Mexico).
For international or direct-dial options in countries without toll-free numbers, see
https://support.juniper.net/support/requesting-support/.
xvCopyright © 2019, Juniper Networks, Inc.
About the Documentation

Copyright © 2019, Juniper Networks, Inc.xvi
vSRX Deployment Guide for AWS
CHAPTER 1
Overview
• Understanding vSRX with AWS on page 17
• Requirements for vSRX on AWS on page 24
• Junos OS Features Supported on vSRX on page 26
Understanding vSRXwith AWS
This section presents an overview of vSRX on AmazonWeb Services (AWS).
• vSRX Overview on page 17
• vSRX Benefits and Use Cases on page 19
• vSRX with AWS on page 20
• AWSGlossary on page 22
vSRXOverview
vSRX is a virtual security appliance that provides security and networking services at the
perimeter or edge in virtualized private or public cloud environments. vSRX runs as a
virtual machine (VM) on a standard x86 server. vSRX is built on the Junos operating
system(JunosOS)anddeliversnetworkingandsecurity features similar to thoseavailable
on the software releases for the SRX Series Services Gateways.
The vSRX provides you with a complete Next Generation Firewall (NGFW) solution,
including core firewall, VPN, NAT, advanced Layer 4 through Layer 7 security services
such asApplication Security, intrusion detection andprevention (IPS), andUTM features
including EnhancedWeb Filtering and Anti-Virus. Combined with Sky ATP, the vSRX
offers a cloud-based advanced anti-malware service with dynamic analysis to protect
against sophisticatedmalware, andprovidesbuilt-inmachine learning to improve verdict
efficacy and decrease time to remediation.
Junos OS Release 18.4R1 supports two software architectures. Figure 1 on page 18 shows
the high-level vSRX software architecture.
17Copyright © 2019, Juniper Networks, Inc.
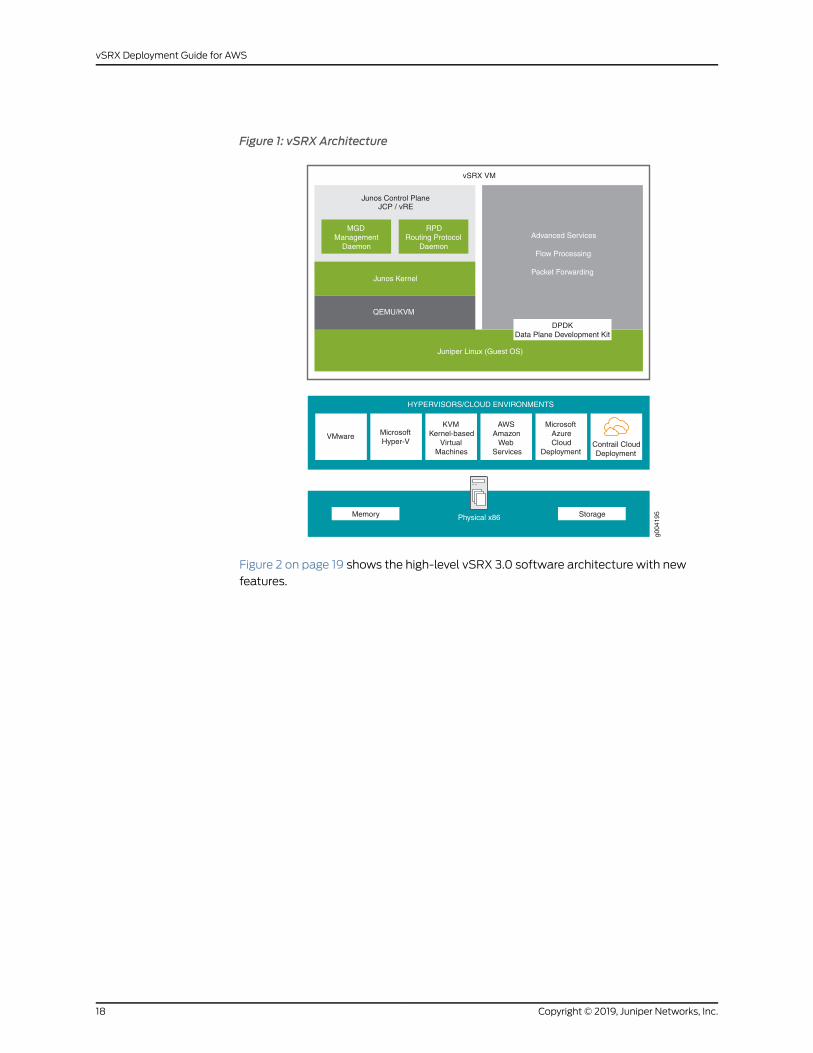
Figure 1: vSRX Architecture
HYPERVISORS/CLOUD ENVIRONMENTS
Physical x86
g004
195
vSRX VM
StorageMemory
Junos Control PlaneJCP / vRE
RPDRouting Protocol
Daemon
MGDManagement
Daemon
Junos Kernel
QEMU/KVM
Juniper Linux (Guest OS)
Advanced Services
Flow Processing
Packet Forwarding
DPDKData Plane Development Kit
MicrosoftHyper-V
VMware
KVMKernel-based
VirtualMachines
AWSAmazon
WebServices
MicrosoftAzureCloud
DeploymentContrail CloudDeployment
Figure 2 on page 19 shows the high-level vSRX 3.0 software architecture with new
features.
Copyright © 2019, Juniper Networks, Inc.18
vSRX Deployment Guide for AWS
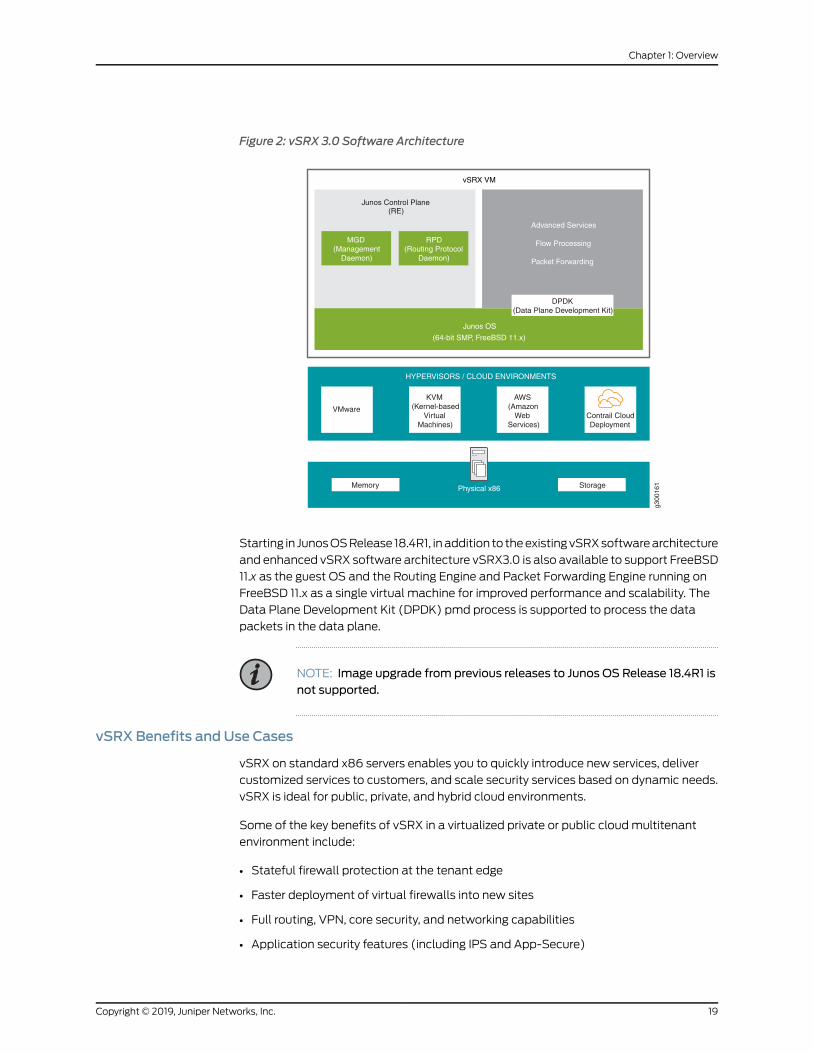
Figure 2: vSRX 3.0 Software Architecture
g300
161
HYPERVISORS / CLOUD ENVIRONMENTS
Physical x86
vSRX VM
StorageMemory
Junos Control Plane(RE)
RPD(Routing Protocol
Daemon)
MGD(Management
Daemon)
Junos OS
(64-bit SMP, FreeBSD 11.x)
Advanced Services
Flow Processing
Packet Forwarding
DPDK(Data Plane Development Kit)
KVM(Kernel-based
VirtualMachines)
AWS(Amazon
WebServices)
VMwareContrail CloudDeployment
Starting in JunosOSRelease 18.4R1, inaddition to theexistingvSRXsoftwarearchitecture
and enhanced vSRX software architecture vSRX3.0 is also available to support FreeBSD
11.x as the guest OS and the Routing Engine and Packet Forwarding Engine running on
FreeBSD 11.x as a single virtual machine for improved performance and scalability. The
Data Plane Development Kit (DPDK) pmd process is supported to process the data
packets in the data plane.
NOTE: Image upgrade from previous releases to Junos OS Release 18.4R1 isnot supported.
vSRX Benefits and Use Cases
vSRX on standard x86 servers enables you to quickly introduce new services, deliver
customized services to customers, and scale security services based on dynamic needs.
vSRX is ideal for public, private, and hybrid cloud environments.
Some of the key benefits of vSRX in a virtualized private or public cloudmultitenant
environment include:
• Stateful firewall protection at the tenant edge
• Faster deployment of virtual firewalls into new sites
• Full routing, VPN, core security, and networking capabilities
• Application security features (including IPS and App-Secure)
19Copyright © 2019, Juniper Networks, Inc.
Chapter 1: Overview
• Content security features (including antivirus, Web filtering, antispam, and content
filtering)
• Centralizedmanagement with Junos Space Security Director and local management
with J-Web Interface
• Juniper Networks Sky Advanced Threat Prevention (Sky ATP) integration
vSRXwith AWS
AWS provides on-demand services in the cloud. Services range from Infrastructure as a
Service (IaaS) and Platform as a Service (SaaS), to Application and Database as a
Service. AWS is a highly flexible, scalable, and reliable cloud platform. In AWS, you can
host servers and services on the cloud as a pay-as-you-go (PAYG) or
bring-your-own-license (BYOL) service.
NOTE: vSRX PAYG images do not require any Juniper Networks licenses.
vSRX can be deployed in a virtual private cloud (VPC) in the AmazonWeb Services
(AWS) cloud. You can launch vSRXasanAmazonElastic ComputeCloud (EC2) instance
in an Amazon VPC dedicated to a specific user account. The vSRX Amazon Machine
Image (AMI) uses hardware virtual machine (HVM) virtualization.
Figure 3 on page 21 shows an example of deploying a vSRX instance to provide security
for applications running in a private subnet of an Amazon VPC.
In the Amazon VPC, public subnets have access to the Internet gateway, but private
subnets do not. vSRX requires two public subnets and one or more private subnets for
each individual instance group. The public subnets consist of one for the management
interface (fxp0) and one for a revenue (data) interface. The private subnets, connected
to the other vSRX interfaces, ensure that all traffic between applications on the private
subnets and the Internet must pass through the vSRX instance.
Copyright © 2019, Juniper Networks, Inc.20
vSRX Deployment Guide for AWS
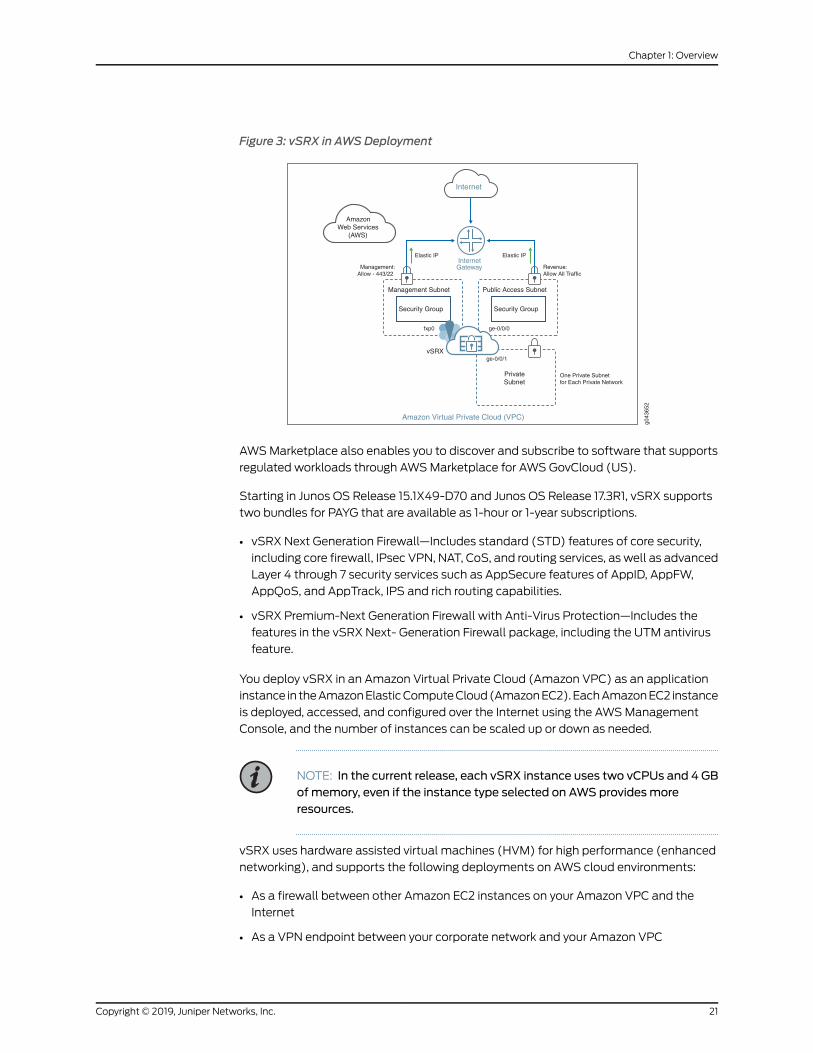
Figure 3: vSRX in AWSDeployment
Security Group
Management Subnet
fxp0
Security Group
Public Access Subnet
ge-0/0/0
Internet
Amazon Virtual Private Cloud (VPC)
InternetGateway
PrivateSubnet
vSRXge-0/0/1
Elastic IPElastic IP
Management:Allow - 443/22
Revenue:Allow All Traffic
AmazonWeb Services
(AWS)
One Private Subnetfor Each Private Network
g043
652
AWSMarketplace also enables you to discover and subscribe to software that supports
regulated workloads through AWSMarketplace for AWS GovCloud (US).
Starting in Junos OS Release 15.1X49-D70 and Junos OS Release 17.3R1, vSRX supports
two bundles for PAYG that are available as 1-hour or 1-year subscriptions.
• vSRX Next Generation Firewall—Includes standard (STD) features of core security,
including core firewall, IPsec VPN, NAT, CoS, and routing services, as well as advanced
Layer 4 through 7 security services such as AppSecure features of AppID, AppFW,
AppQoS, and AppTrack, IPS and rich routing capabilities.
• vSRX Premium-Next Generation Firewall with Anti-Virus Protection—Includes the
features in the vSRX Next- Generation Firewall package, including the UTM antivirus
feature.
You deploy vSRX in an Amazon Virtual Private Cloud (Amazon VPC) as an application
instance in theAmazonElasticComputeCloud(AmazonEC2).EachAmazonEC2 instance
is deployed, accessed, and configured over the Internet using the AWSManagement
Console, and the number of instances can be scaled up or down as needed.
NOTE: In the current release, each vSRX instance uses two vCPUs and 4 GBofmemory, even if the instance type selected on AWS providesmoreresources.
vSRX uses hardware assisted virtual machines (HVM) for high performance (enhanced
networking), and supports the following deployments on AWS cloud environments:
• As a firewall between other Amazon EC2 instances on your Amazon VPC and the
Internet
• As a VPN endpoint between your corporate network and your Amazon VPC
21Copyright © 2019, Juniper Networks, Inc.
Chapter 1: Overview
• As a firewall between Amazon EC2 instances on different subnets
Release History Table DescriptionRelease
Starting in Junos OS Release 15.1X49-D70 and Junos OS Release 17.3R1,vSRX supports two bundles for PAYG that are available as 1-hour or1-year subscriptions.
15.1X49-D70
RelatedDocumentation
AWS Tutorials•
• Getting Started with AWS
AWSGlossary
This section defines some common terms used in an AWS configuration.
Table 3 on page 22 defines common terms used for Amazon Virtual Private Cloud
(Amazon VPC) and Table 4 on page 23 defines common terms for Amazon Elastic
Compute Cloud (Amazon EC2) services.
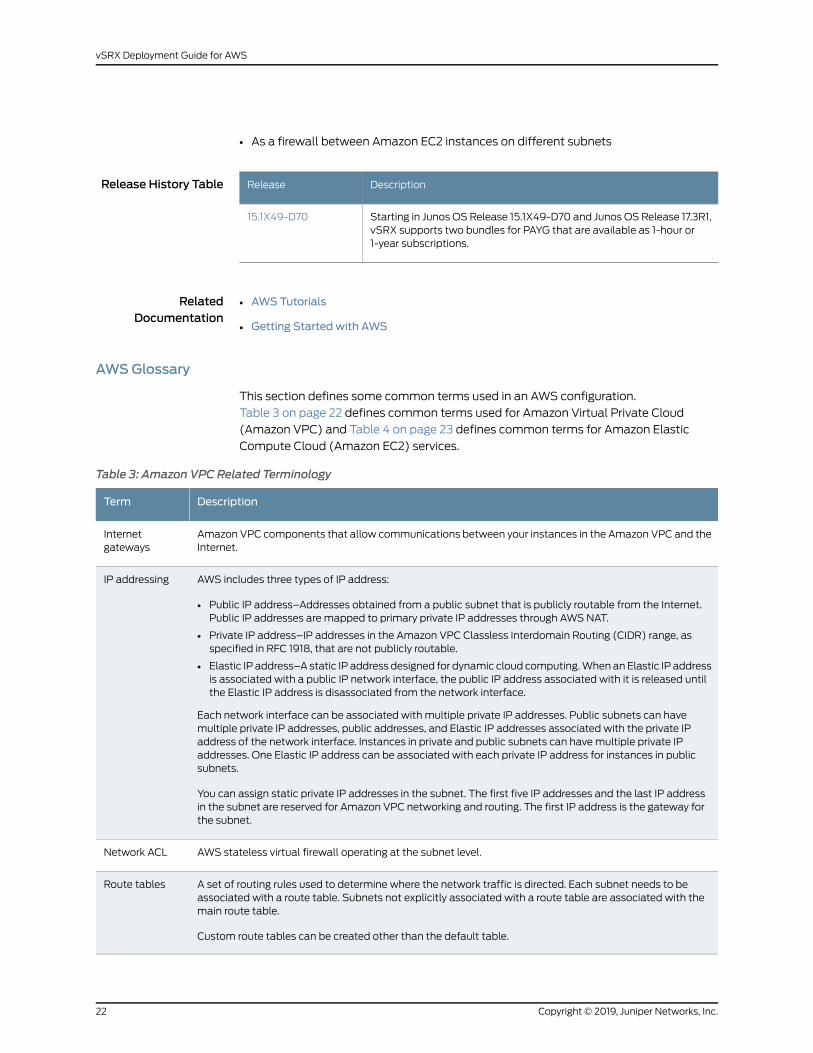
Table 3: Amazon VPC Related Terminology
DescriptionTerm
Amazon VPC components that allow communications between your instances in the Amazon VPC and theInternet.
Internetgateways
AWS includes three types of IP address:
• Public IP address–Addresses obtained from a public subnet that is publicly routable from the Internet.Public IP addresses are mapped to primary private IP addresses through AWSNAT.
• Private IP address–IP addresses in the Amazon VPC Classless Interdomain Routing (CIDR) range, asspecified in RFC 1918, that are not publicly routable.
• Elastic IP address–A static IP address designed for dynamic cloud computing.When an Elastic IP addressis associated with a public IP network interface, the public IP address associated with it is released untilthe Elastic IP address is disassociated from the network interface.
Each network interface can be associated with multiple private IP addresses. Public subnets can havemultiple private IP addresses, public addresses, and Elastic IP addresses associated with the private IPaddress of the network interface. Instances in private and public subnets can havemultiple private IPaddresses. One Elastic IP address can be associated with each private IP address for instances in publicsubnets.
You can assign static private IP addresses in the subnet. The first five IP addresses and the last IP addressin the subnet are reserved for Amazon VPC networking and routing. The first IP address is the gateway forthe subnet.
IP addressing
AWS stateless virtual firewall operating at the subnet level.Network ACL
A set of routing rules used to determine where the network traffic is directed. Each subnet needs to beassociated with a route table. Subnets not explicitly associated with a route table are associated with themain route table.
Custom route tables can be created other than the default table.
Route tables
Copyright © 2019, Juniper Networks, Inc.22
vSRX Deployment Guide for AWS

Table 3: Amazon VPC Related Terminology (continued)
DescriptionTerm
A virtual addressing space in the Amazon VPC CIDR block. The IP addresses for the Amazon EC2 instancesare allocated from the subnet pool of IP addresses.
You can create two types of subnets in the Amazon VPC:
• Public subnets–Subnets that have traffic connections to the Internet gateway.
• Private subnets–Subnets that do not have connections to the Internet gateway
NOTE: With vSRX Network Address Translation (NAT) , you can launch all customer instances in privatesubnets and connect vSRX interfaces to the Internet. This protects customer instances from being directlyexposed to Internet traffic.
Subnet
Virtual private cloud.VPC
Table 4: Amazon EC2 Related Terminology
DescriptionTerm
Persistent block storage that can be attached to anAmazon EC2 instance. Block storage volumescanbeformattedandmountedonan instance.AmazonEBSoptimized instancesprovidededicatedthroughput between Amazon EC2 and Amazon EBS.
AmazonElasticBlockStore(EBS)
AmazonWebservice thatenables launchandmanagementofelastic virtual serversor computersthat run on the Amazon infrastructure.
Amazon Elastic ComputeCloud (EC2)
Amazon image format that contains the information, suchas the template for root volume, launchpermissions, and block device mapping, that is required to launch an Amazon EC2 instance.
Amazon Machine Image(AMI)
A static IP designed for dynamic cloud computing. The public IP is mapped to the privet subnetIP using NAT.
Elastic IP
Provides high packet per second performance, low latency, higher I/O performance, and lowerCPU utilization compared to traditional implementations. vSRX leverages this networking withhardware virtualizedmachine (HVM) Amazon Machine Images (AMIs).
Enhanced networking
A virtualmachine or server onAmazonEC2 that usesXENor, XEN-HVMhypervisor types. AmazonEC2 provides a selection of instances optimized for different use cases.
Instance
Public key cryptography used by AWS to encrypt and decrypt login information. Create these keypairs using AWS-EC2 or import your own key pairs.
NOTE: AWS does not accept DSA. Limit the public key access permissions to 400.
Key pairs
Virtual network interfaces that you can attach to an instance in the Amazon VPC. An ElasticNetwork Interface (ENI) can have a primary private IP address, multiple secondary IP addresses,one Elastic IP address per private IP address, one public IP address, one or more security groups,one MAC address, and a source/destination check flag.
NOTE: For vSRX instances, disable the source/destination check for all interfaces.
Network interfaces
23Copyright © 2019, Juniper Networks, Inc.
Chapter 1: Overview
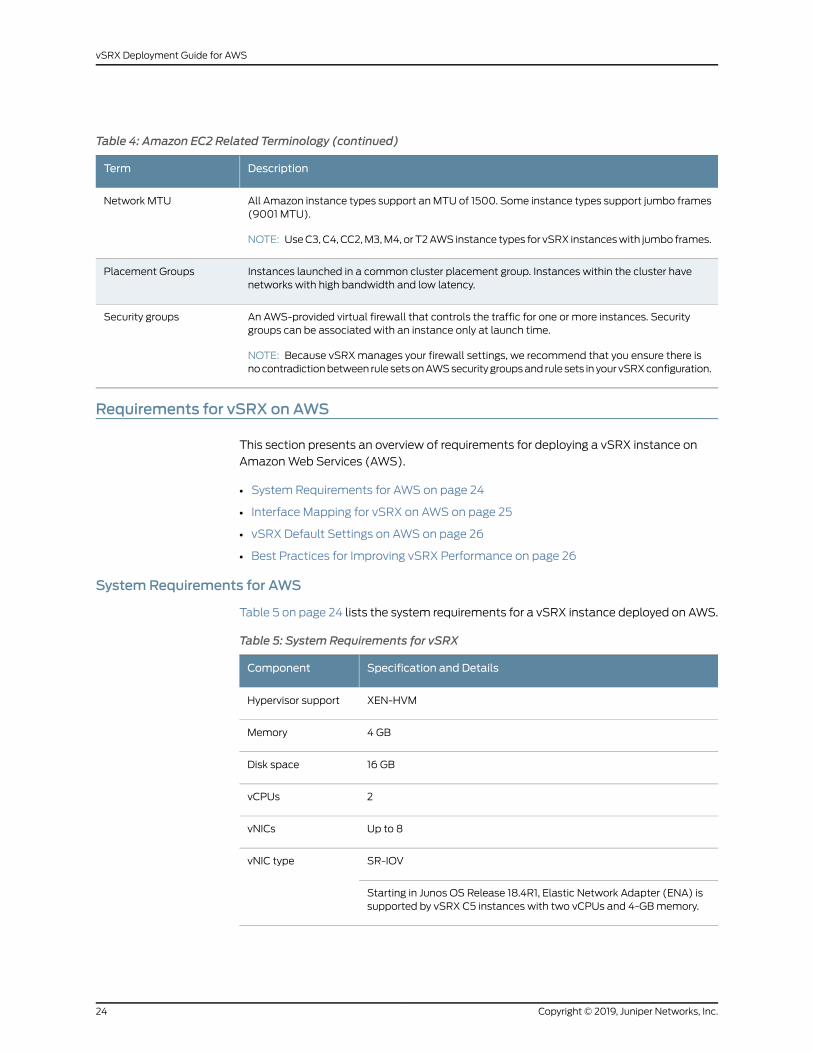
Table 4: Amazon EC2 Related Terminology (continued)
DescriptionTerm
All Amazon instance types support anMTU of 1500. Some instance types support jumbo frames(9001 MTU).
NOTE: UseC3, C4, CC2,M3,M4, or T2AWS instance types for vSRX instanceswith jumbo frames.
Network MTU
Instances launched in a common cluster placement group. Instances within the cluster havenetworks with high bandwidth and low latency.
Placement Groups
An AWS-provided virtual firewall that controls the traffic for one or more instances. Securitygroups can be associated with an instance only at launch time.
NOTE: Because vSRXmanages your firewall settings, we recommend that you ensure there isnocontradictionbetween rule setsonAWSsecuritygroupsand rule sets in your vSRXconfiguration.
Security groups
Requirements for vSRX on AWS
This section presents an overview of requirements for deploying a vSRX instance on
AmazonWeb Services (AWS).
• System Requirements for AWS on page 24
• Interface Mapping for vSRX on AWS on page 25
• vSRX Default Settings on AWS on page 26
• Best Practices for Improving vSRX Performance on page 26
SystemRequirements for AWS
Table 5 on page 24 lists the system requirements for a vSRX instance deployed on AWS.
Table 5: System Requirements for vSRX
Specification and DetailsComponent
XEN-HVMHypervisor support
4 GBMemory
16 GBDisk space
2vCPUs
Up to 8vNICs
SR-IOVvNIC type
Starting in Junos OS Release 18.4R1, Elastic Network Adapter (ENA) issupported by vSRX C5 instances with two vCPUs and 4-GBmemory.
Copyright © 2019, Juniper Networks, Inc.24
vSRX Deployment Guide for AWS
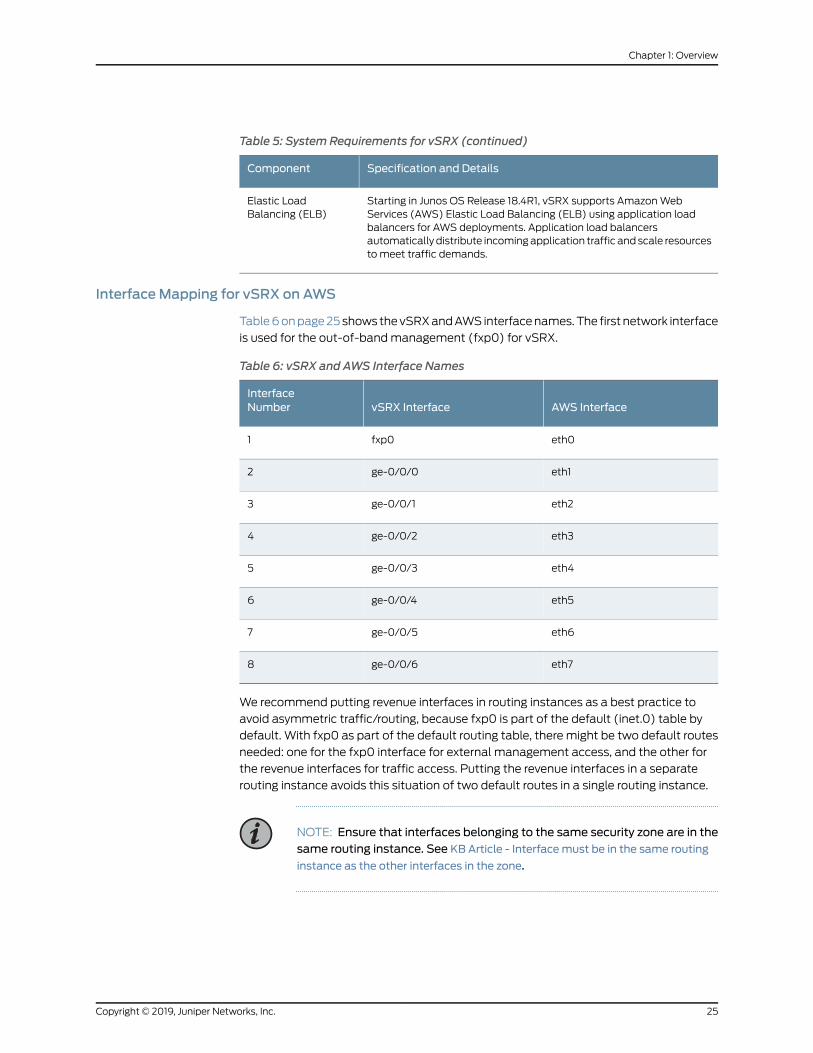
Table 5: System Requirements for vSRX (continued)
Specification and DetailsComponent
Starting in Junos OS Release 18.4R1, vSRX supports AmazonWebServices (AWS) Elastic Load Balancing (ELB) using application loadbalancers for AWS deployments. Application load balancersautomatically distribute incomingapplication traffic andscale resourcesto meet traffic demands.
Elastic LoadBalancing (ELB)
InterfaceMapping for vSRX on AWS
Table6onpage25shows thevSRXandAWS interfacenames.The first network interface
is used for the out-of-bandmanagement (fxp0) for vSRX.
Table 6: vSRX and AWS Interface Names
AWS InterfacevSRX InterfaceInterfaceNumber
eth0fxp01
eth1ge-0/0/02
eth2ge-0/0/13
eth3ge-0/0/24
eth4ge-0/0/35
eth5ge-0/0/46
eth6ge-0/0/57
eth7ge-0/0/68
We recommend putting revenue interfaces in routing instances as a best practice to
avoid asymmetric traffic/routing, because fxp0 is part of the default (inet.0) table by
default. With fxp0 as part of the default routing table, there might be two default routes
needed: one for the fxp0 interface for external management access, and the other for
the revenue interfaces for traffic access. Putting the revenue interfaces in a separate
routing instance avoids this situation of two default routes in a single routing instance.
NOTE: Ensure that interfaces belonging to the same security zone are in thesame routing instance. See KB Article - Interfacemust be in the same routing
instance as the other interfaces in the zone.
25Copyright © 2019, Juniper Networks, Inc.
Chapter 1: Overview
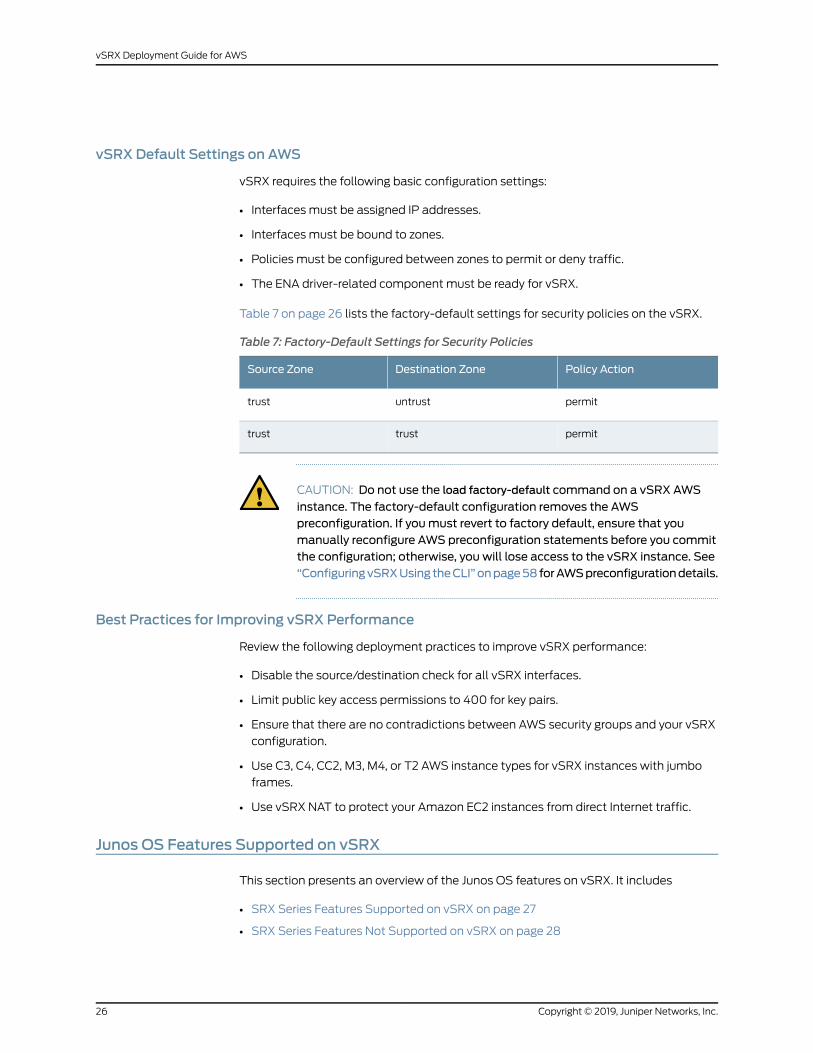
vSRX Default Settings on AWS
vSRX requires the following basic configuration settings:
• Interfaces must be assigned IP addresses.
• Interfaces must be bound to zones.
• Policies must be configured between zones to permit or deny traffic.
• The ENA driver-related component must be ready for vSRX.
Table 7 on page 26 lists the factory-default settings for security policies on the vSRX.
Table 7: Factory-Default Settings for Security Policies
Policy ActionDestination ZoneSource Zone
permituntrusttrust
permittrusttrust
CAUTION: Do not use the load factory-default command on a vSRX AWS
instance. The factory-default configuration removes the AWSpreconfiguration. If youmust revert to factory default, ensure that youmanually reconfigure AWS preconfiguration statements before you committhe configuration; otherwise, you will lose access to the vSRX instance. See“ConfiguringvSRXUsing theCLI”onpage58forAWSpreconfigurationdetails.
Best Practices for Improving vSRX Performance
Review the following deployment practices to improve vSRX performance:
• Disable the source/destination check for all vSRX interfaces.
• Limit public key access permissions to 400 for key pairs.
• Ensure that there are no contradictions between AWS security groups and your vSRX
configuration.
• Use C3, C4, CC2, M3, M4, or T2 AWS instance types for vSRX instances with jumbo
frames.
• Use vSRX NAT to protect your Amazon EC2 instances from direct Internet traffic.
Junos OS Features Supported on vSRX
This section presents an overview of the Junos OS features on vSRX. It includes
• SRX Series Features Supported on vSRX on page 27
• SRX Series Features Not Supported on vSRX on page 28
Copyright © 2019, Juniper Networks, Inc.26
vSRX Deployment Guide for AWS
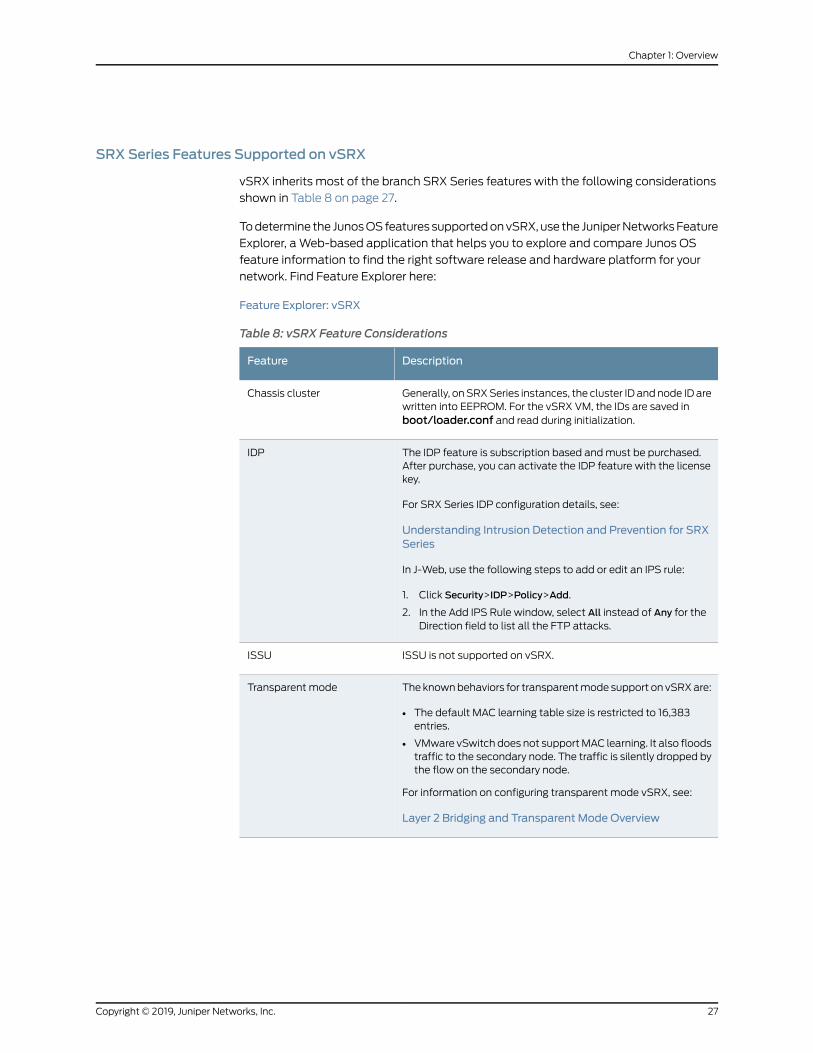
SRX Series Features Supported on vSRX
vSRX inherits most of the branch SRX Series features with the following considerations
shown in Table 8 on page 27.
Todetermine the JunosOS features supportedonvSRX, use the JuniperNetworksFeature
Explorer, a Web-based application that helps you to explore and compare Junos OS
feature information to find the right software release and hardware platform for your
network. Find Feature Explorer here:
Feature Explorer: vSRX
Table 8: vSRX Feature Considerations
DescriptionFeature
Generally, onSRXSeries instances, the cluster ID andnode ID arewritten into EEPROM. For the vSRX VM, the IDs are saved inboot/loader.conf and read during initialization.
Chassis cluster
The IDP feature is subscription based andmust be purchased.After purchase, you can activate the IDP feature with the licensekey.
For SRX Series IDP configuration details, see:
Understanding Intrusion Detection and Prevention for SRXSeries
In J-Web, use the following steps to add or edit an IPS rule:
1. Click Security>IDP>Policy>Add.
2. In the Add IPS Rule window, select All instead of Any for theDirection field to list all the FTP attacks.
IDP
ISSU is not supported on vSRX.ISSU
The knownbehaviors for transparentmode support on vSRXare:
• The default MAC learning table size is restricted to 16,383entries.
• VMware vSwitch does not supportMAC learning. It also floodstraffic to the secondary node. The traffic is silently dropped bythe flow on the secondary node.
For information on configuring transparent mode vSRX, see:
Layer 2 Bridging and Transparent Mode Overview
Transparent mode
27Copyright © 2019, Juniper Networks, Inc.
Chapter 1: Overview
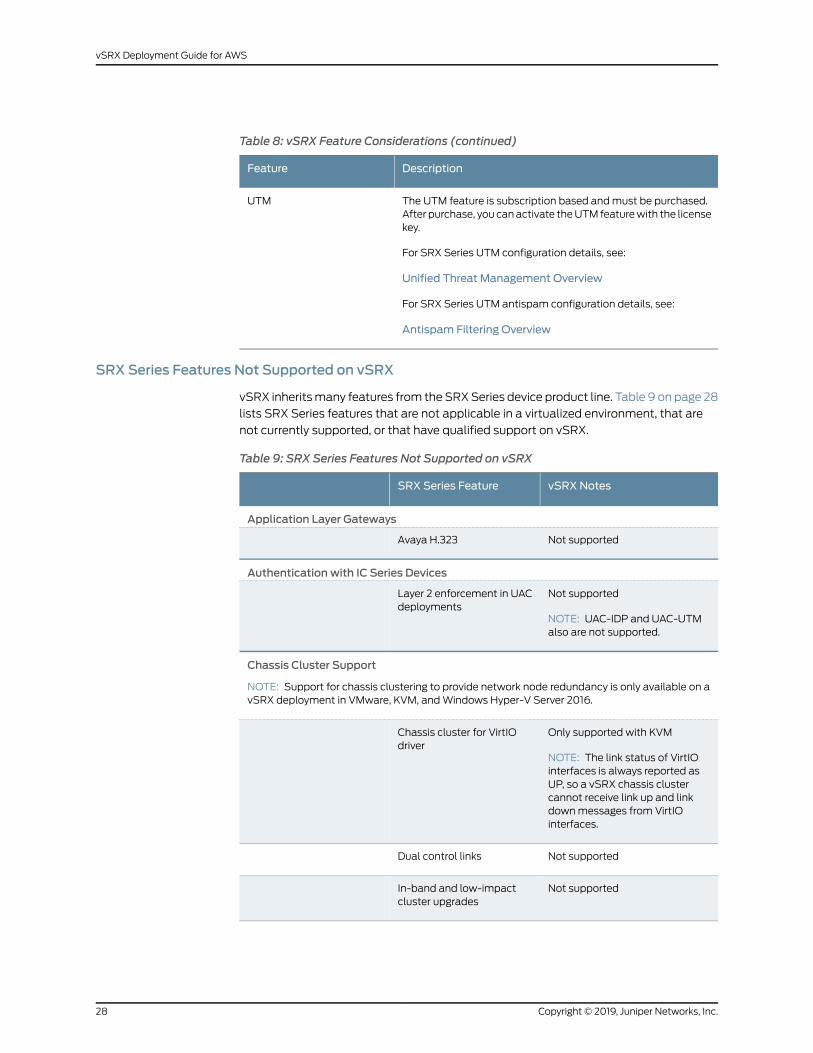
Table 8: vSRX Feature Considerations (continued)
DescriptionFeature
The UTM feature is subscription based andmust be purchased.After purchase, you canactivate theUTM featurewith the licensekey.
For SRX Series UTM configuration details, see:
Unified Threat Management Overview
For SRX Series UTM antispam configuration details, see:
Antispam Filtering Overview
UTM
SRX Series Features Not Supported on vSRX
vSRX inheritsmany features from the SRXSeries device product line. Table 9 on page 28
lists SRX Series features that are not applicable in a virtualized environment, that are
not currently supported, or that have qualified support on vSRX.
Table 9: SRX Series Features Not Supported on vSRX
vSRX NotesSRX Series Feature
Application Layer Gateways
Not supportedAvaya H.323
Authentication with IC Series Devices
Not supported
NOTE: UAC-IDP and UAC-UTMalso are not supported.
Layer 2 enforcement in UACdeployments
Chassis Cluster Support
NOTE: Support for chassis clustering to provide network node redundancy is only available on avSRX deployment in VMware, KVM, andWindows Hyper-V Server 2016.
Only supported with KVM
NOTE: The link status of VirtIOinterfaces is always reported asUP, so a vSRX chassis clustercannot receive link up and linkdownmessages from VirtIOinterfaces.
Chassis cluster for VirtIOdriver
Not supportedDual control links
Not supportedIn-band and low-impactcluster upgrades
Copyright © 2019, Juniper Networks, Inc.28
vSRX Deployment Guide for AWS
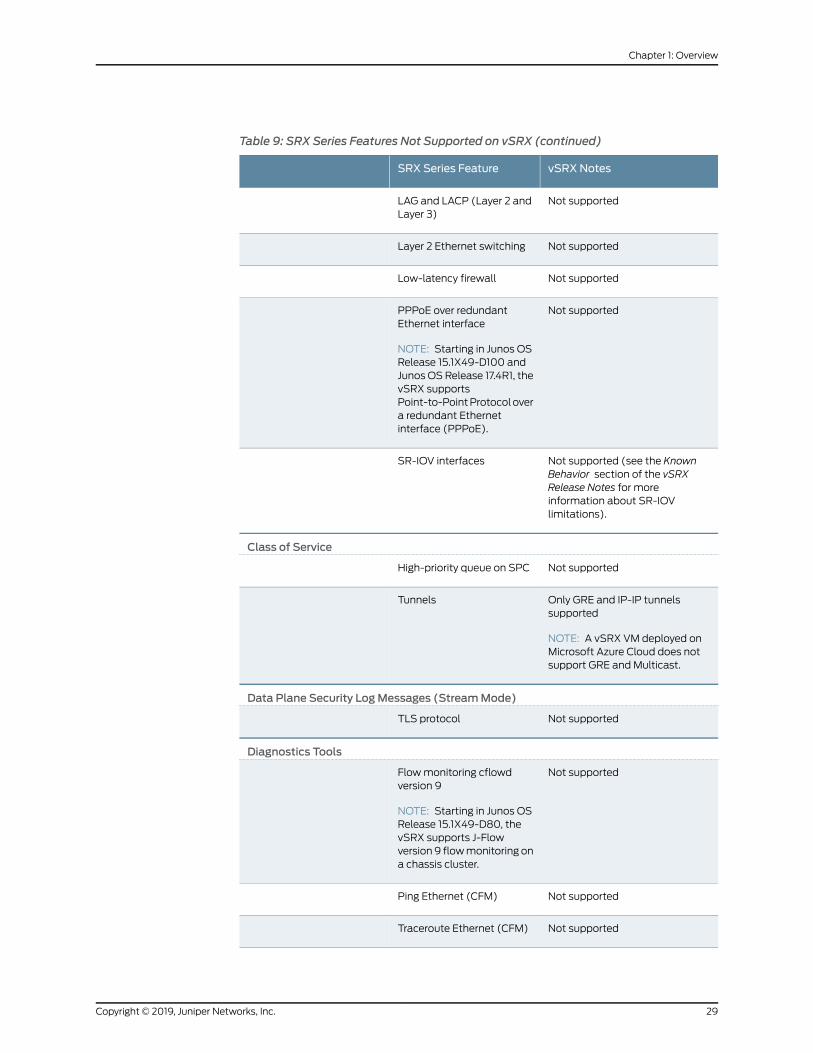
Table 9: SRX Series Features Not Supported on vSRX (continued)
vSRX NotesSRX Series Feature
Not supportedLAG and LACP (Layer 2 andLayer 3)
Not supportedLayer 2 Ethernet switching
Not supportedLow-latency firewall
Not supportedPPPoE over redundantEthernet interface
NOTE: Starting in Junos OSRelease 15.1X49-D100 andJunos OSRelease 17.4R1, thevSRX supportsPoint-to-PointProtocolovera redundant Ethernetinterface (PPPoE).
Not supported (see the KnownBehavior section of the vSRXRelease Notes for moreinformation about SR-IOVlimitations).
SR-IOV interfaces
Class of Service
Not supportedHigh-priority queue on SPC
Only GRE and IP-IP tunnelssupported
NOTE: A vSRX VM deployed onMicrosoft Azure Cloud does notsupport GRE and Multicast.
Tunnels
Data Plane Security LogMessages (StreamMode)
Not supportedTLS protocol
Diagnostics Tools
Not supportedFlowmonitoring cflowdversion 9
NOTE: Starting in Junos OSRelease 15.1X49-D80, thevSRX supports J-Flowversion9 flowmonitoring ona chassis cluster.
Not supportedPing Ethernet (CFM)
Not supportedTraceroute Ethernet (CFM)
29Copyright © 2019, Juniper Networks, Inc.
Chapter 1: Overview
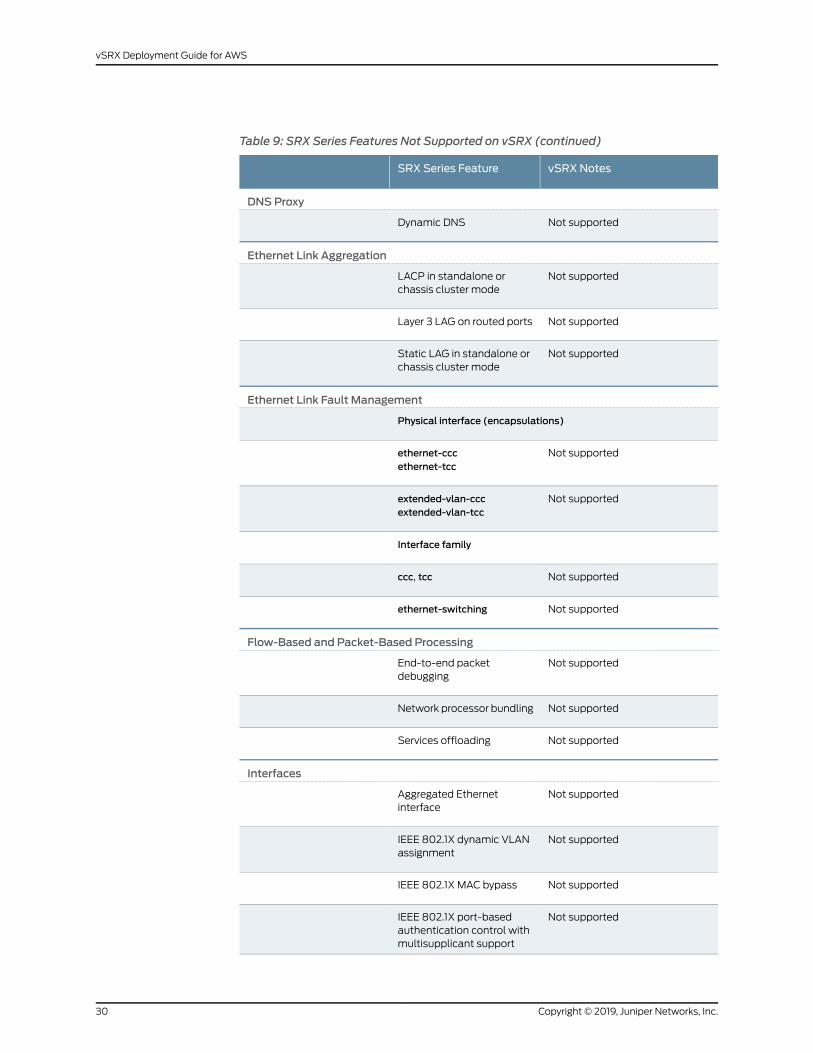
Table 9: SRX Series Features Not Supported on vSRX (continued)
vSRX NotesSRX Series Feature
DNS Proxy
Not supportedDynamic DNS
Ethernet Link Aggregation
Not supportedLACP in standalone orchassis cluster mode
Not supportedLayer 3 LAG on routed ports
Not supportedStatic LAG in standalone orchassis cluster mode
Ethernet Link Fault Management
Physical interface (encapsulations)
Not supportedethernet-cccethernet-tcc
Not supportedextended-vlan-cccextended-vlan-tcc
Interface family
Not supportedccc, tcc
Not supportedethernet-switching
Flow-Based and Packet-Based Processing
Not supportedEnd-to-end packetdebugging
Not supportedNetwork processor bundling
Not supportedServices offloading
Interfaces
Not supportedAggregated Ethernetinterface
Not supportedIEEE 802.1X dynamic VLANassignment
Not supportedIEEE 802.1X MAC bypass
Not supportedIEEE 802.1X port-basedauthentication control withmultisupplicant support
Copyright © 2019, Juniper Networks, Inc.30
vSRX Deployment Guide for AWS
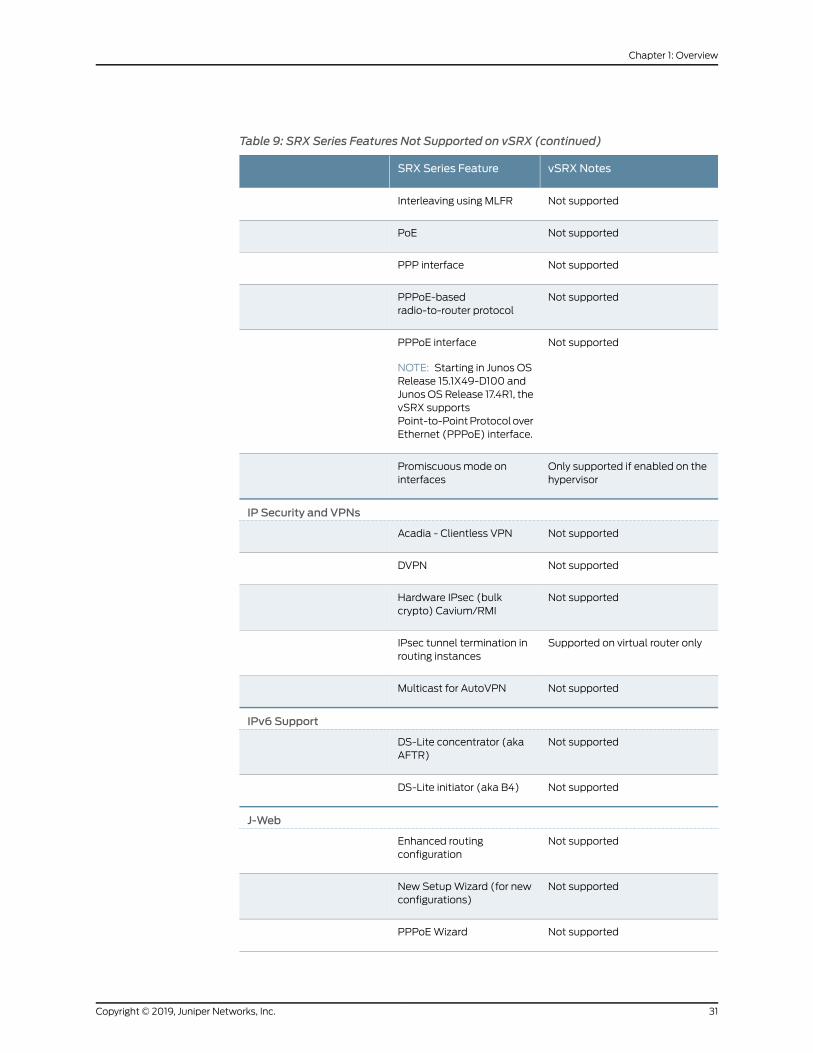
Table 9: SRX Series Features Not Supported on vSRX (continued)
vSRX NotesSRX Series Feature
Not supportedInterleaving using MLFR
Not supportedPoE
Not supportedPPP interface
Not supportedPPPoE-basedradio-to-router protocol
Not supportedPPPoE interface
NOTE: Starting in Junos OSRelease 15.1X49-D100 andJunos OSRelease 17.4R1, thevSRX supportsPoint-to-PointProtocoloverEthernet (PPPoE) interface.
Only supported if enabled on thehypervisor
Promiscuous mode oninterfaces
IP Security and VPNs
Not supportedAcadia - Clientless VPN
Not supportedDVPN
Not supportedHardware IPsec (bulkcrypto) Cavium/RMI
Supported on virtual router onlyIPsec tunnel termination inrouting instances
Not supportedMulticast for AutoVPN
IPv6 Support
Not supportedDS-Lite concentrator (akaAFTR)
Not supportedDS-Lite initiator (aka B4)
J-Web
Not supportedEnhanced routingconfiguration
Not supportedNew SetupWizard (for newconfigurations)
Not supportedPPPoEWizard
31Copyright © 2019, Juniper Networks, Inc.
Chapter 1: Overview
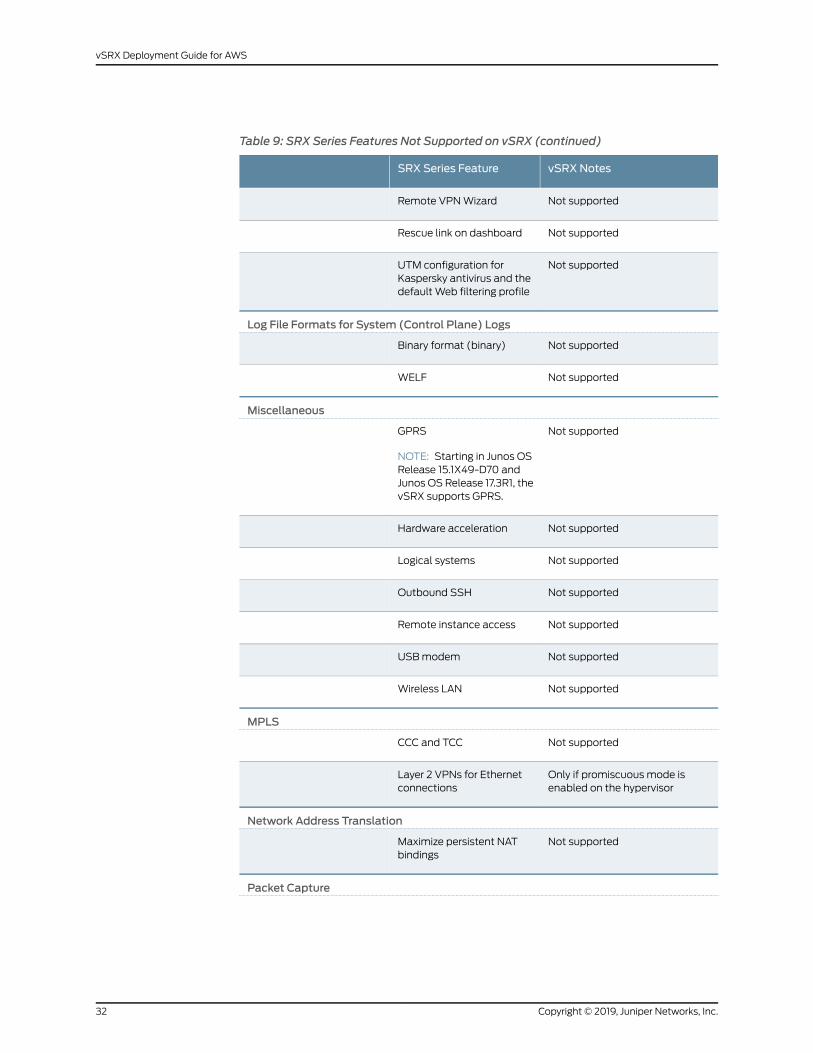
Table 9: SRX Series Features Not Supported on vSRX (continued)
vSRX NotesSRX Series Feature
Not supportedRemote VPNWizard
Not supportedRescue link on dashboard
Not supportedUTM configuration forKaspersky antivirus and thedefault Web filtering profile
Log File Formats for System (Control Plane) Logs
Not supportedBinary format (binary)
Not supportedWELF
Miscellaneous
Not supportedGPRS
NOTE: Starting in Junos OSRelease 15.1X49-D70 andJunos OS Release 17.3R1, thevSRX supports GPRS.
Not supportedHardware acceleration
Not supportedLogical systems
Not supportedOutbound SSH
Not supportedRemote instance access
Not supportedUSBmodem
Not supportedWireless LAN
MPLS
Not supportedCCC and TCC
Only if promiscuous mode isenabled on the hypervisor
Layer 2 VPNs for Ethernetconnections
Network Address Translation
Not supportedMaximize persistent NATbindings
Packet Capture
Copyright © 2019, Juniper Networks, Inc.32
vSRX Deployment Guide for AWS
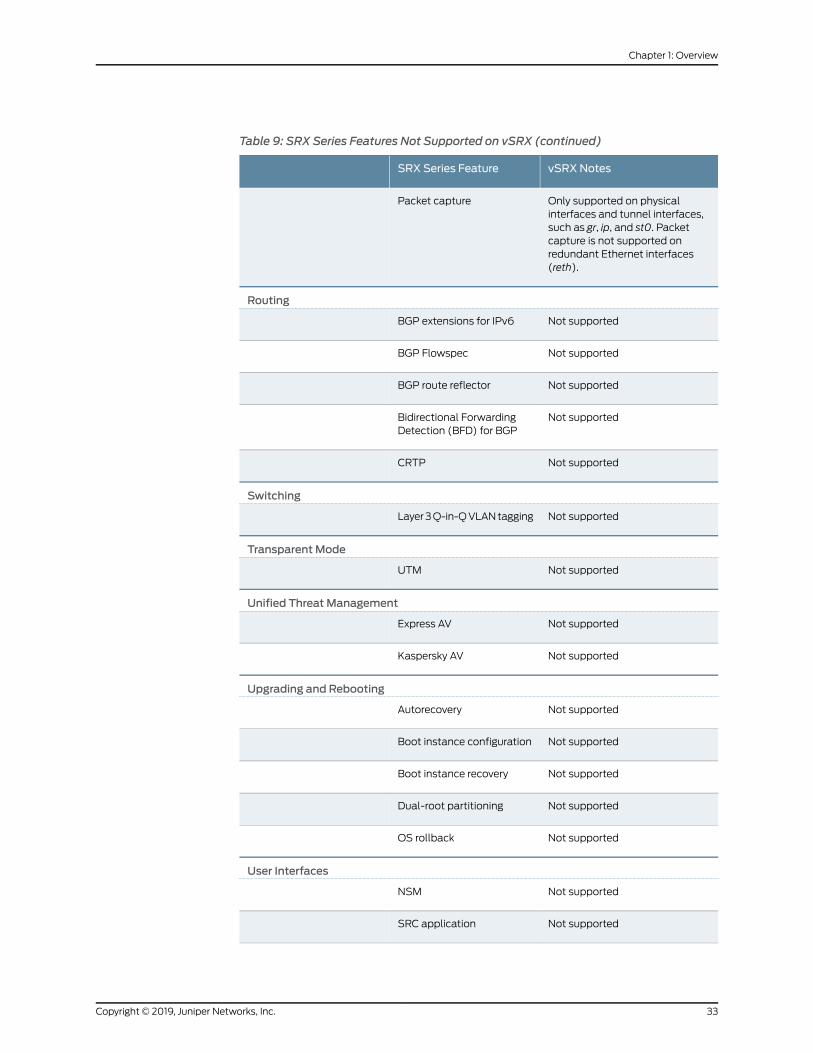
Table 9: SRX Series Features Not Supported on vSRX (continued)
vSRX NotesSRX Series Feature
Only supported on physicalinterfaces and tunnel interfaces,such as gr, ip, and st0. Packetcapture is not supported onredundant Ethernet interfaces(reth).
Packet capture
Routing
Not supportedBGP extensions for IPv6
Not supportedBGP Flowspec
Not supportedBGP route reflector
Not supportedBidirectional ForwardingDetection (BFD) for BGP
Not supportedCRTP
Switching
Not supportedLayer3Q-in-QVLANtagging
Transparent Mode
Not supportedUTM
Unified Threat Management
Not supportedExpress AV
Not supportedKaspersky AV
Upgrading and Rebooting
Not supportedAutorecovery
Not supportedBoot instance configuration
Not supportedBoot instance recovery
Not supportedDual-root partitioning
Not supportedOS rollback
User Interfaces
Not supportedNSM
Not supportedSRC application
33Copyright © 2019, Juniper Networks, Inc.
Chapter 1: Overview
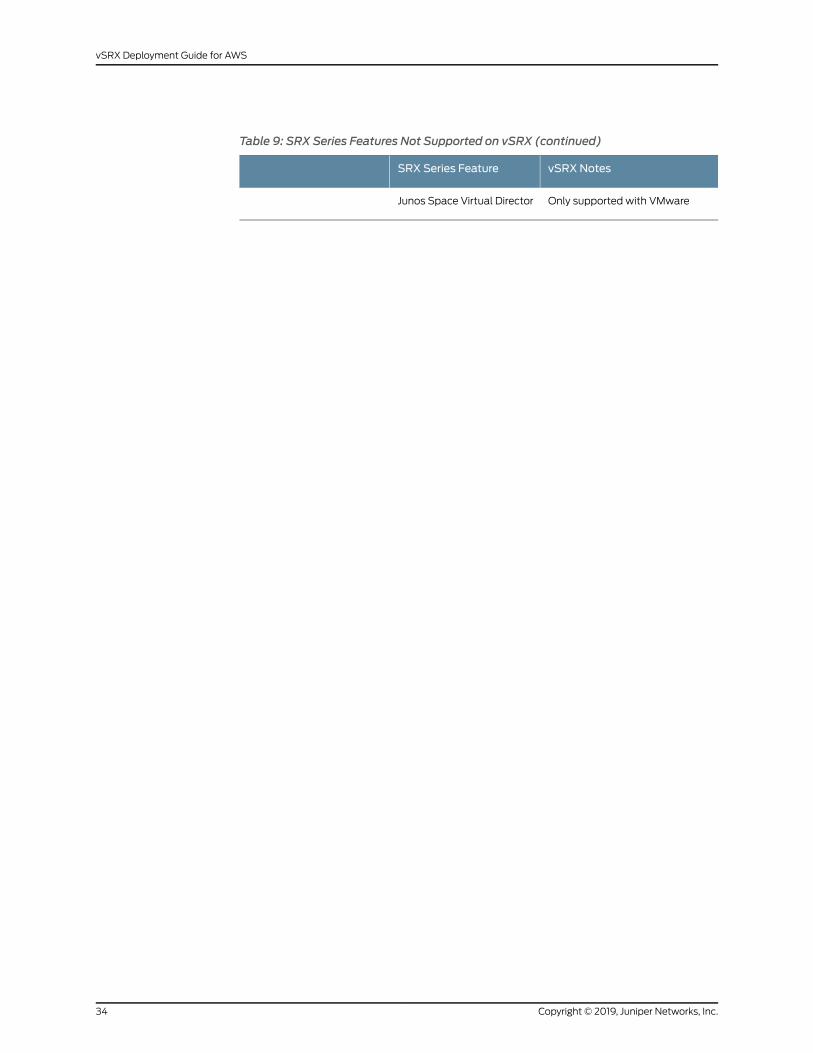
Table 9: SRX Series Features Not Supported on vSRX (continued)
vSRX NotesSRX Series Feature
Only supported with VMwareJunos Space Virtual Director
Copyright © 2019, Juniper Networks, Inc.34
vSRX Deployment Guide for AWS
CHAPTER 2
Installing vSRX in AWS
• Configuring an Amazon Virtual Private Cloud for vSRX on page 35
• Launching a vSRX Instance on an Amazon Virtual Private Cloud on page 43
• Using Cloud-Init to Automate the Initialization of vSRX Instances in AWS on page 52
• Upgrading Junos OS Software on a vSRX Instance on page 54
• Removing a vSRX Instance on AWS on page 56
Configuring an Amazon Virtual Private Cloud for vSRX
Before you begin, you need an AmazonWeb Services (AWS) account and an Identity
and Access Management (IAM) role, with all required permissions to access, create,
modify, and delete Amazon Elastic Compute Cloud (Amazon EC2), Amazon Simple
Storage Service (S3), and Amazon Virtual Private Cloud (Amazon VPC) objects. You
should also create access keys and corresponding secret access keys, X.509 certificates,
and account identifiers. For better understanding of AWS terminologies and their use in
vSRX AWS deployments, see “Understanding vSRX with AWS” on page 17.
Figure 3 on page 21 shows an example of how you can deploy vSRX to provide security
for applications running in a private subnet of an Amazon VPC.
35Copyright © 2019, Juniper Networks, Inc.
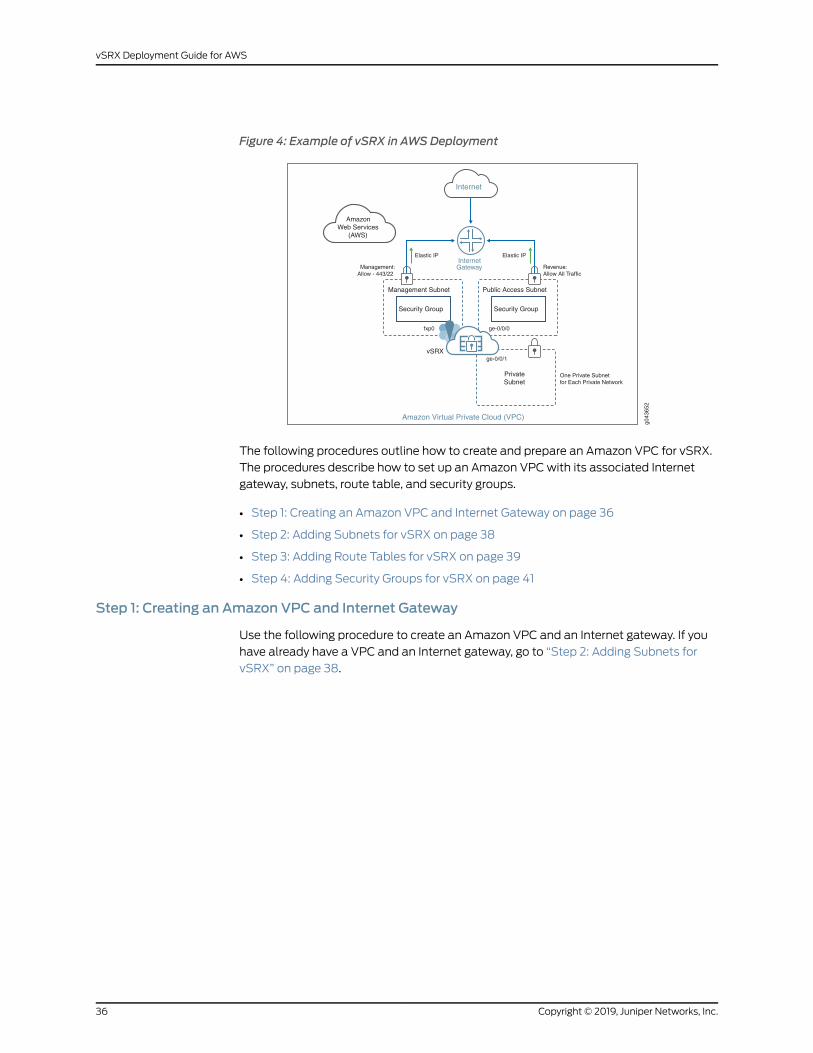
Figure 4: Example of vSRX in AWSDeployment
Security Group
Management Subnet
fxp0
Security Group
Public Access Subnet
ge-0/0/0
Internet
Amazon Virtual Private Cloud (VPC)
InternetGateway
PrivateSubnet
vSRXge-0/0/1
Elastic IPElastic IP
Management:Allow - 443/22
Revenue:Allow All Traffic
AmazonWeb Services
(AWS)
One Private Subnetfor Each Private Network
g043
652
The following procedures outline how to create and prepare an Amazon VPC for vSRX.
The procedures describe how to set up an Amazon VPCwith its associated Internet
gateway, subnets, route table, and security groups.
• Step 1: Creating an Amazon VPC and Internet Gateway on page 36
• Step 2: Adding Subnets for vSRX on page 38
• Step 3: Adding Route Tables for vSRX on page 39
• Step 4: Adding Security Groups for vSRX on page 41
Step 1: Creating an Amazon VPC and Internet Gateway
Use the following procedure to create an Amazon VPC and an Internet gateway. If you
have already have a VPC and an Internet gateway, go to “Step 2: Adding Subnets for
vSRX” on page 38.
Copyright © 2019, Juniper Networks, Inc.36
vSRX Deployment Guide for AWS
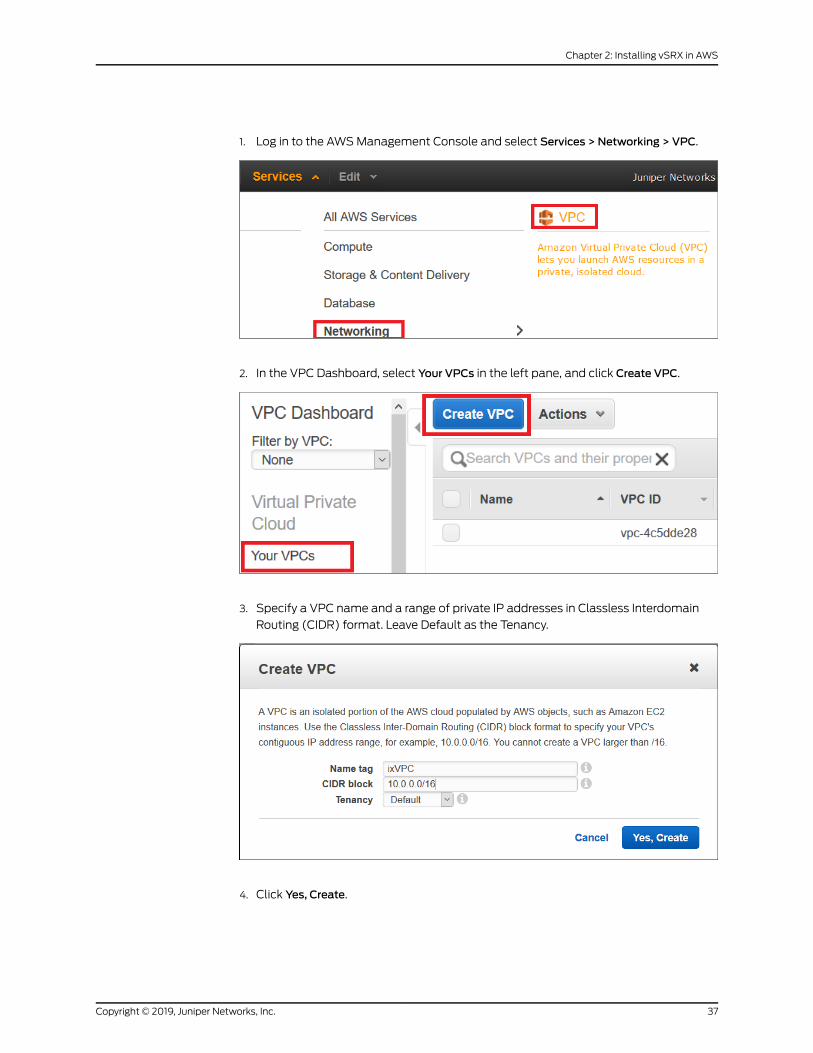
1. Log in to the AWSManagement Console and select Services > Networking > VPC.
2. In the VPC Dashboard, select Your VPCs in the left pane, and click Create VPC.
3. Specify a VPC name and a range of private IP addresses in Classless Interdomain
Routing (CIDR) format. Leave Default as the Tenancy.
4. Click Yes, Create.
37Copyright © 2019, Juniper Networks, Inc.
Chapter 2: Installing vSRX in AWS
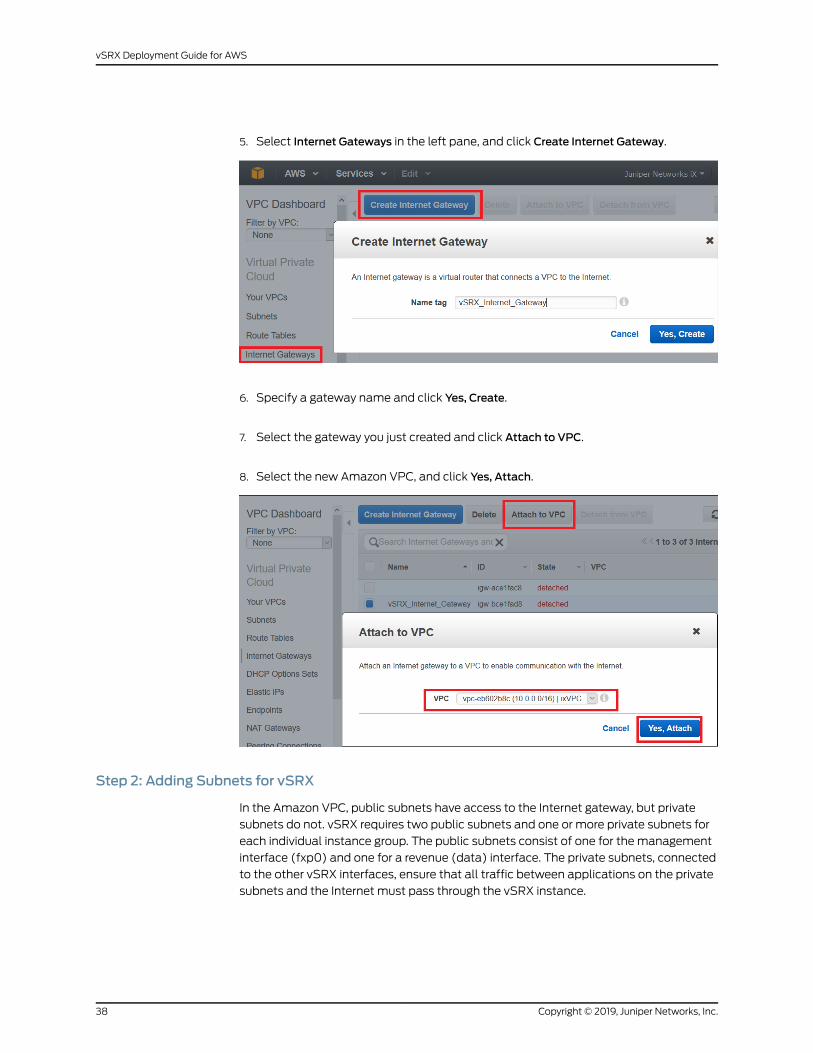
5. Select Internet Gateways in the left pane, and click Create Internet Gateway.
6. Specify a gateway name and click Yes, Create.
7. Select the gateway you just created and click Attach to VPC.
8. Select the new Amazon VPC, and click Yes, Attach.
Step 2: Adding Subnets for vSRX
In the Amazon VPC, public subnets have access to the Internet gateway, but private
subnets do not. vSRX requires two public subnets and one or more private subnets for
each individual instance group. The public subnets consist of one for the management
interface (fxp0) and one for a revenue (data) interface. The private subnets, connected
to the other vSRX interfaces, ensure that all traffic between applications on the private
subnets and the Internet must pass through the vSRX instance.
Copyright © 2019, Juniper Networks, Inc.38
vSRX Deployment Guide for AWS
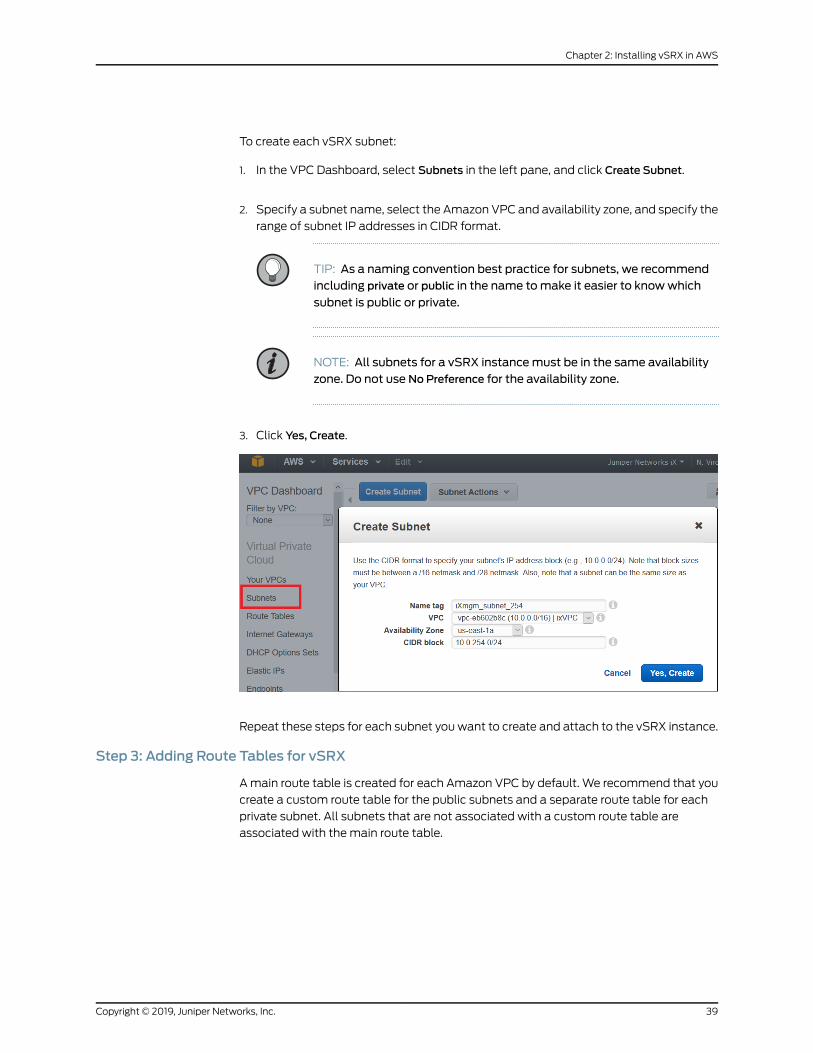
To create each vSRX subnet:
1. In the VPC Dashboard, select Subnets in the left pane, and click Create Subnet.
2. Specify a subnet name, select the Amazon VPC and availability zone, and specify the
range of subnet IP addresses in CIDR format.
TIP: As a naming convention best practice for subnets, we recommendincluding private or public in the name tomake it easier to knowwhich
subnet is public or private.
NOTE: All subnets for a vSRX instancemust be in the same availabilityzone. Do not use No Preference for the availability zone.
3. Click Yes, Create.
Repeat these steps for each subnet youwant to create and attach to the vSRX instance.
Step 3: Adding Route Tables for vSRX
Amain route table is created for each Amazon VPC by default. We recommend that you
create a custom route table for the public subnets and a separate route table for each
private subnet. All subnets that are not associated with a custom route table are
associated with the main route table.
39Copyright © 2019, Juniper Networks, Inc.
Chapter 2: Installing vSRX in AWS
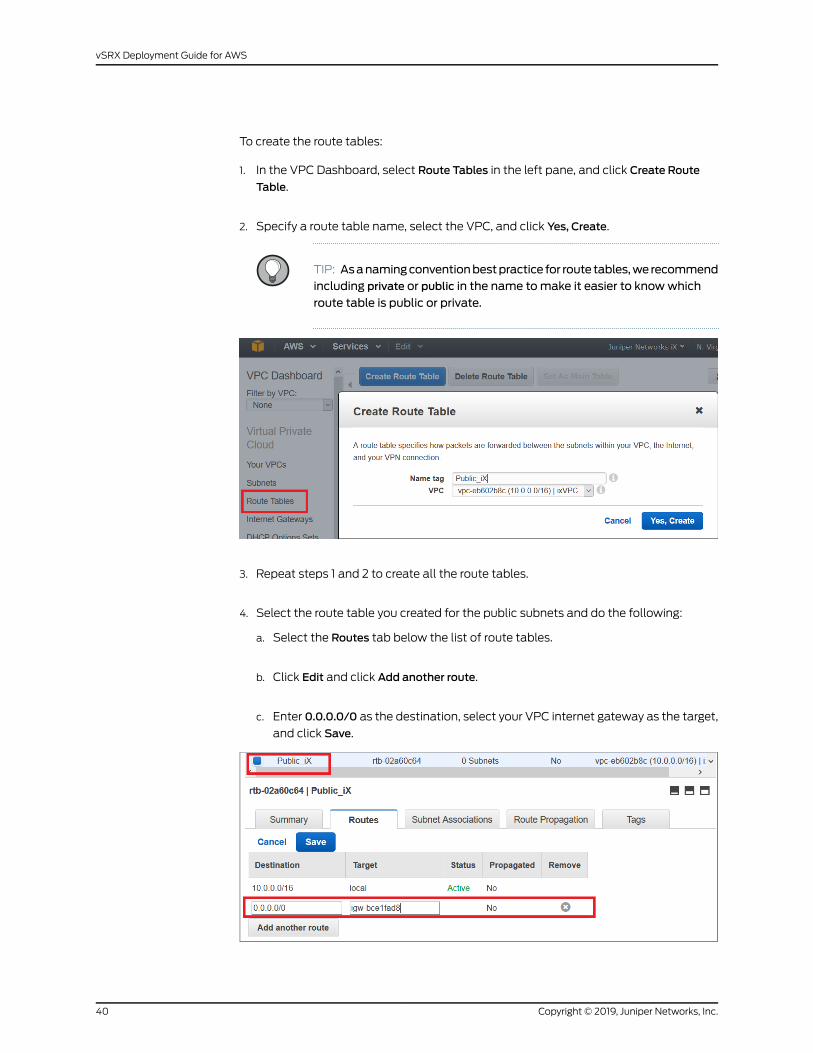
To create the route tables:
1. In the VPC Dashboard, select Route Tables in the left pane, and click Create Route
Table.
2. Specify a route table name, select the VPC, and click Yes, Create.
TIP: Asanamingconventionbestpractice for route tables,we recommendincluding private or public in the name tomake it easier to knowwhich
route table is public or private.
3. Repeat steps 1 and 2 to create all the route tables.
4. Select the route table you created for the public subnets and do the following:
a. Select the Routes tab below the list of route tables.
b. Click Edit and click Add another route.
c. Enter 0.0.0.0/0 as the destination, select your VPC internet gateway as the target,
and click Save.
Copyright © 2019, Juniper Networks, Inc.40
vSRX Deployment Guide for AWS
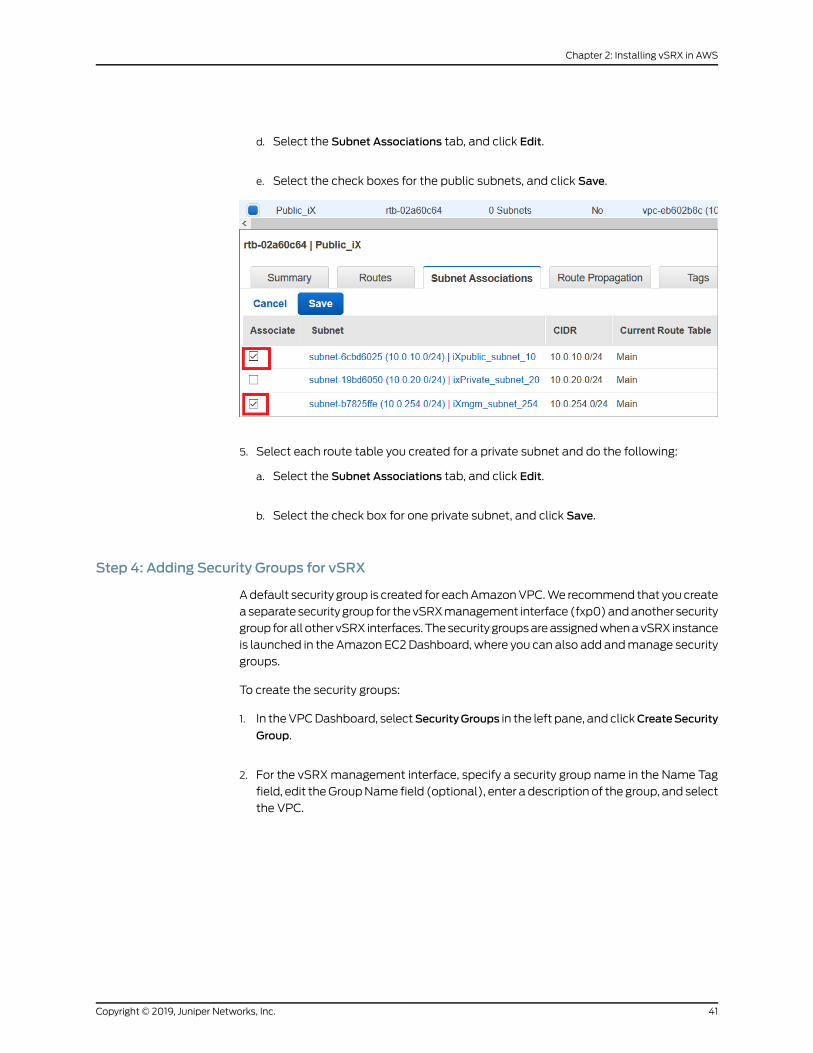
d. Select the Subnet Associations tab, and click Edit.
e. Select the check boxes for the public subnets, and click Save.
5. Select each route table you created for a private subnet and do the following:
a. Select the Subnet Associations tab, and click Edit.
b. Select the check box for one private subnet, and click Save.
Step 4: Adding Security Groups for vSRX
Adefault security group is created for eachAmazonVPC.We recommend that you create
aseparate security group for thevSRXmanagement interface (fxp0)andanother security
group forall other vSRX interfaces.ThesecuritygroupsareassignedwhenavSRX instance
is launched in the Amazon EC2Dashboard, where you can also add andmanage security
groups.
To create the security groups:
1. In theVPCDashboard, selectSecurityGroups in the left pane, and clickCreateSecurity
Group.
2. For the vSRXmanagement interface, specify a security group name in the Name Tag
field, edit theGroupName field (optional), enter a description of the group, and select
the VPC.
41Copyright © 2019, Juniper Networks, Inc.
Chapter 2: Installing vSRX in AWS
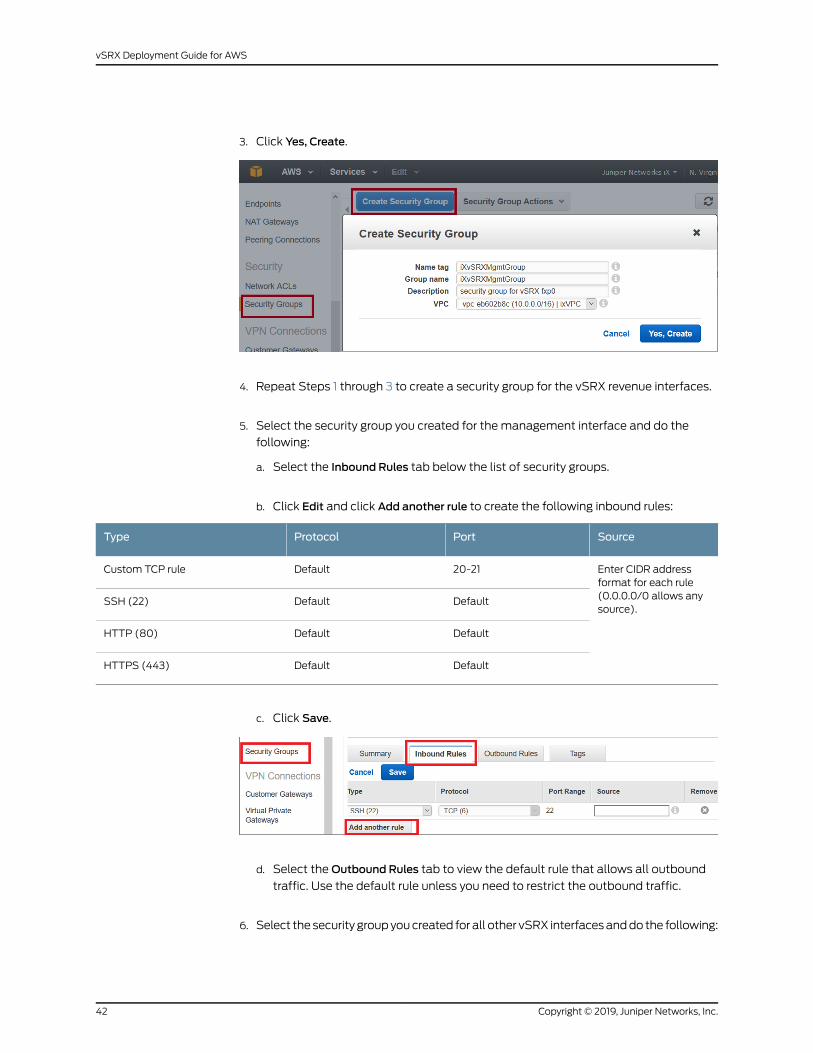
3. Click Yes, Create.
4. Repeat Steps 1 through 3 to create a security group for the vSRX revenue interfaces.
5. Select the security group you created for the management interface and do the
following:
a. Select the Inbound Rules tab below the list of security groups.
b. Click Edit and click Add another rule to create the following inbound rules:
SourcePortProtocolType
Enter CIDR addressformat for each rule(0.0.0.0/0 allows anysource).
20-21DefaultCustom TCP rule
DefaultDefaultSSH (22)
DefaultDefaultHTTP (80)
DefaultDefaultHTTPS (443)
c. Click Save.
d. Select theOutbound Rules tab to view the default rule that allows all outbound
traffic. Use the default rule unless you need to restrict the outbound traffic.
6. Select the security groupyoucreated for all other vSRX interfacesanddo the following:
Copyright © 2019, Juniper Networks, Inc.42
vSRX Deployment Guide for AWS
NOTE: The inbound and outbound rules should allow all traffic to avoidconflicts with the security settings on vSRX.
a. Select the Inbound Rules tab below the list of security groups.
b. Click Edit and create the following inbound rule:
SourcePortProtocolType
• For webservers, enter 0.0.0.0/0
• For VPNs, enter a range of IPv4 addresses in the form of a ClasslessInter-Domain Routing (CIDR) block (for example, 10.0.0.0/16).
AllAllAll Traffic
c. Click Save.
d. Keep thedefault rule in theOutboundRules tab.Thedefault ruleallowsall outbound
traffic.
RelatedDocumentation
Day One: AmazonWeb Services with vSRX Cookbook•
• IAM Roles for Amazon EC2
Launching a vSRX Instance on an Amazon Virtual Private Cloud
The following procedures describe how to launch and configure a vSRX instance in the
Amazon Virtual Private Cloud (Amazon VPC):
• Step 1: Creating an SSH Key Pair on page 43
• Step 2: Launching a vSRX Instance on page 45
• Step 3: Viewing the AWS System Logs on page 47
• Step 4: Adding Network Interfaces for vSRX on page 47
• Step 5: Allocating Elastic IP Addresses on page 49
• Step 6: Adding the vSRX Private Interfaces to the Route Tables on page 50
• Step 7: Rebooting the vSRX Instance on page 50
• Step 8: Logging in to a vSRX Instance on page 51
Step 1: Creating an SSH Key Pair
An SSH key pair is required to remotely access a vSRX instance on AWS. You can create
a new key pair in the Amazon EC2 Dashboard or import a key pair created by another
tool.
43Copyright © 2019, Juniper Networks, Inc.
Chapter 2: Installing vSRX in AWS
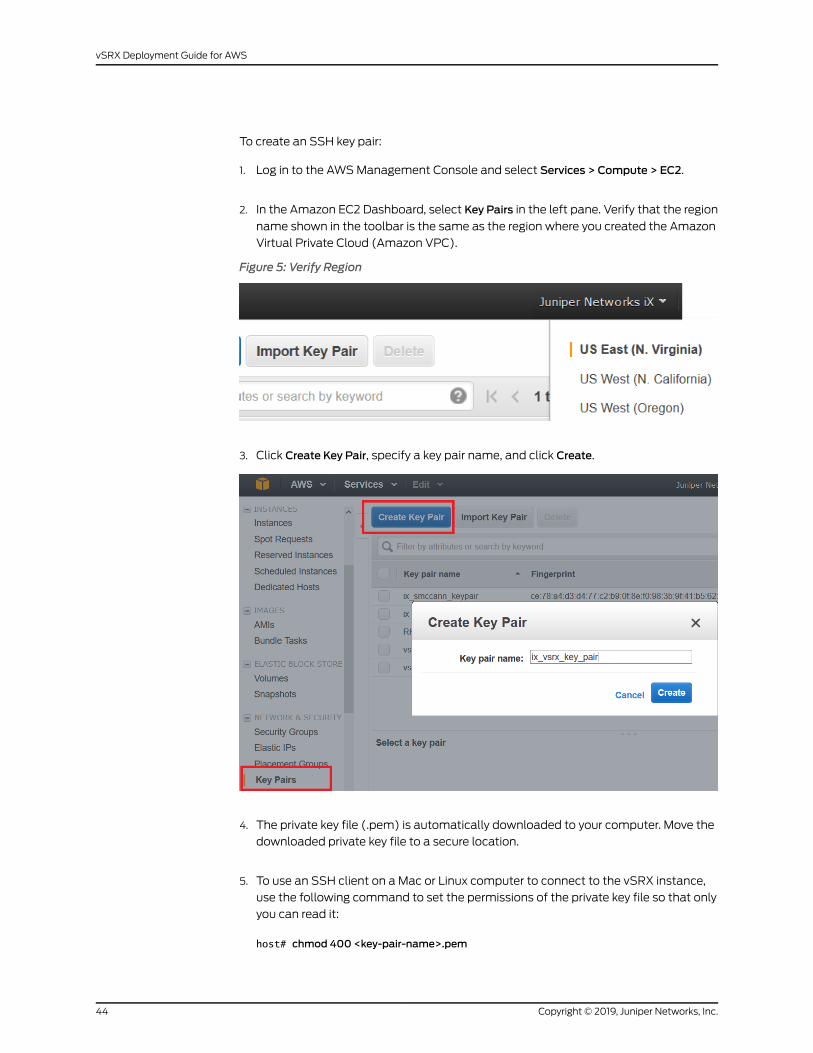
To create an SSH key pair:
1. Log in to the AWSManagement Console and select Services > Compute > EC2.
2. In the Amazon EC2 Dashboard, select Key Pairs in the left pane. Verify that the region
name shown in the toolbar is the same as the region where you created the Amazon
Virtual Private Cloud (Amazon VPC).
Figure 5: Verify Region
3. Click Create Key Pair, specify a key pair name, and click Create.
4. The private key file (.pem) is automatically downloaded to your computer. Move the
downloaded private key file to a secure location.
5. To use an SSH client on a Mac or Linux computer to connect to the vSRX instance,
use the following command to set the permissions of the private key file so that only
you can read it:
host# chmod 400 <key-pair-name>.pem
Copyright © 2019, Juniper Networks, Inc.44
vSRX Deployment Guide for AWS
NOTE: Alternately, use Import Key Pair to import a different key pair you
generated with a third-party tool.
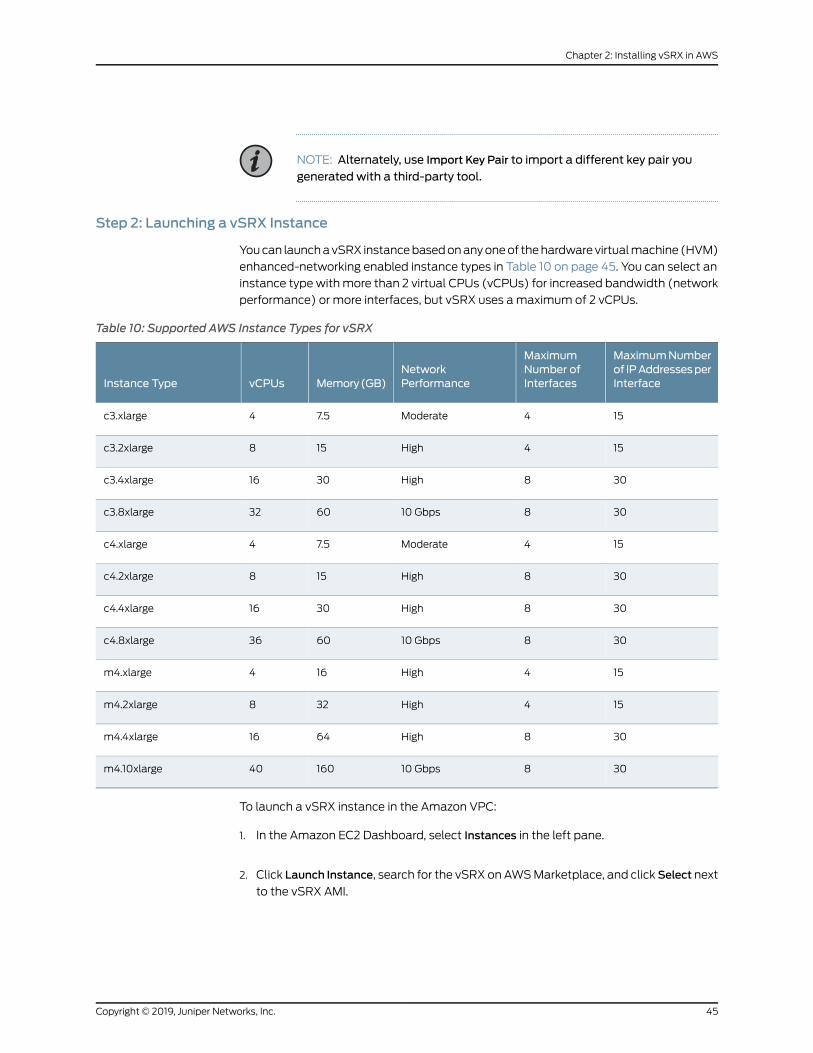
Step 2: Launching a vSRX Instance
Youcan launchavSRX instancebasedonanyoneof thehardwarevirtualmachine (HVM)
enhanced-networking enabled instance types in Table 10 on page 45. You can select an
instance type withmore than 2 virtual CPUs (vCPUs) for increased bandwidth (network
performance) or more interfaces, but vSRX uses amaximum of 2 vCPUs.
Table 10: Supported AWS Instance Types for vSRX
MaximumNumberof IPAddressesperInterface
MaximumNumber ofInterfaces
NetworkPerformanceMemory(GB)vCPUsInstance Type
154Moderate7.54c3.xlarge
154High158c3.2xlarge
308High3016c3.4xlarge
30810 Gbps6032c3.8xlarge
154Moderate7.54c4.xlarge
308High158c4.2xlarge
308High3016c4.4xlarge
30810 Gbps6036c4.8xlarge
154High164m4.xlarge
154High328m4.2xlarge
308High6416m4.4xlarge
30810 Gbps16040m4.10xlarge
To launch a vSRX instance in the Amazon VPC:
1. In the Amazon EC2 Dashboard, select Instances in the left pane.
2. Click Launch Instance, search for the vSRX onAWSMarketplace, and clickSelect next
to the vSRX AMI.
45Copyright © 2019, Juniper Networks, Inc.
Chapter 2: Installing vSRX in AWS
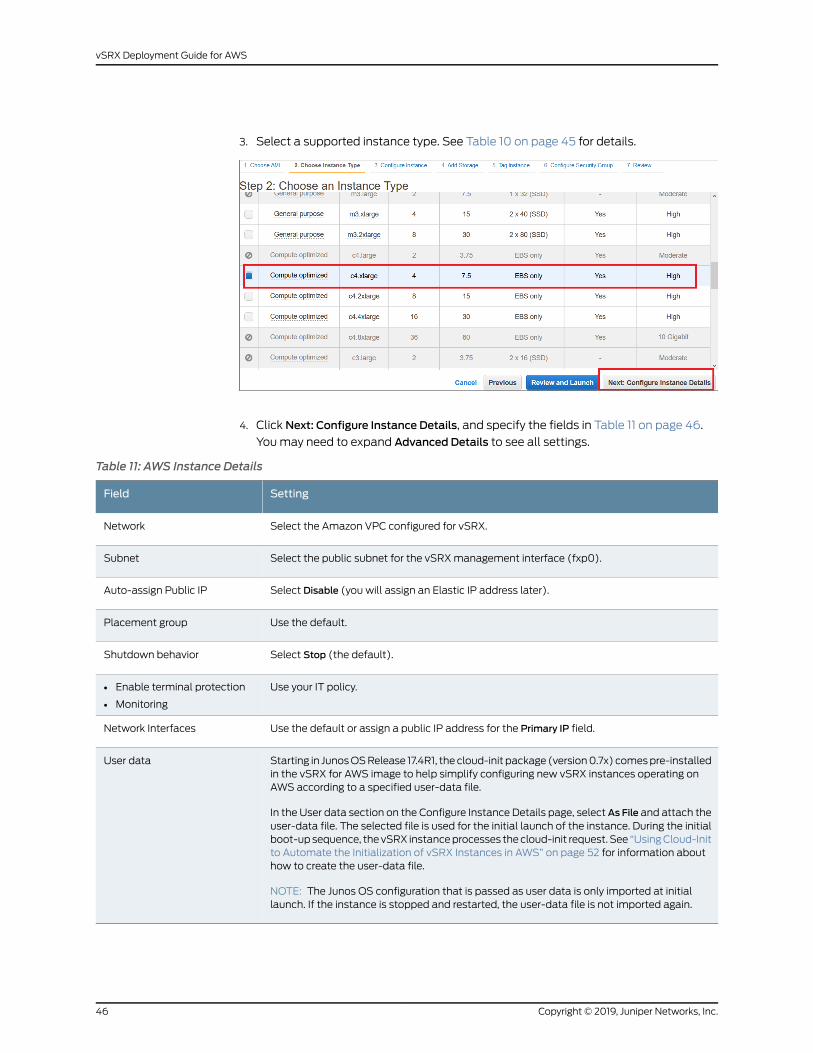
3. Select a supported instance type. See Table 10 on page 45 for details.
4. Click Next: Configure Instance Details, and specify the fields in Table 11 on page 46.
Youmay need to expand Advanced Details to see all settings.
Table 11: AWS Instance Details
SettingField
Select the Amazon VPC configured for vSRX.Network
Select the public subnet for the vSRXmanagement interface (fxp0).Subnet
Select Disable (you will assign an Elastic IP address later).Auto-assign Public IP
Use the default.Placement group
Select Stop (the default).Shutdown behavior
Use your IT policy.• Enable terminal protection
• Monitoring
Use the default or assign a public IP address for the Primary IP field.Network Interfaces
Starting in JunosOSRelease 17.4R1, the cloud-init package (version0.7x) comespre-installedin the vSRX for AWS image to help simplify configuring new vSRX instances operating onAWS according to a specified user-data file.
In the User data section on the Configure Instance Details page, select As File and attach theuser-data file. The selected file is used for the initial launch of the instance. During the initialboot-upsequence, thevSRX instanceprocesses thecloud-init request. See “UsingCloud-Initto Automate the Initialization of vSRX Instances in AWS” on page 52 for information abouthow to create the user-data file.
NOTE: The Junos OS configuration that is passed as user data is only imported at initiallaunch. If the instance is stopped and restarted, the user-data file is not imported again.
User data
Copyright © 2019, Juniper Networks, Inc.46
vSRX Deployment Guide for AWS
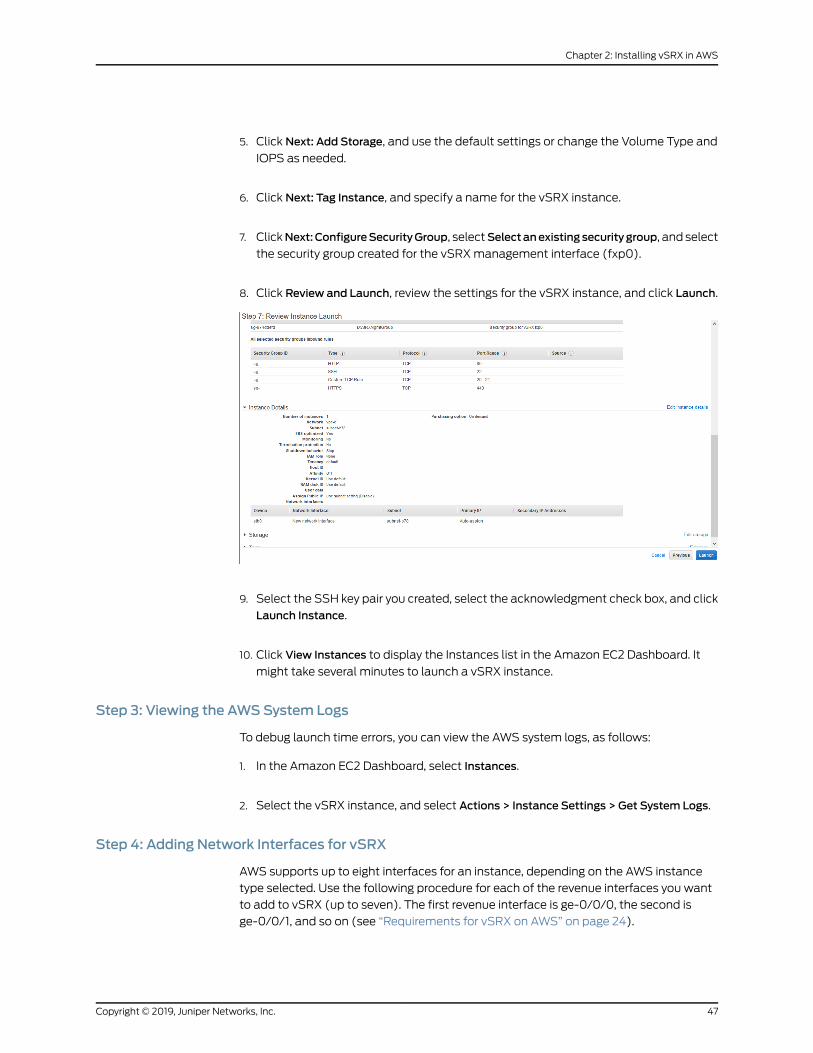
5. Click Next: Add Storage, and use the default settings or change the Volume Type and
IOPS as needed.
6. Click Next: Tag Instance, and specify a name for the vSRX instance.
7. ClickNext:ConfigureSecurityGroup, selectSelectanexistingsecuritygroup, and select
the security group created for the vSRXmanagement interface (fxp0).
8. Click Review and Launch, review the settings for the vSRX instance, and click Launch.
9. Select the SSH key pair you created, select the acknowledgment check box, and click
Launch Instance.
10. Click View Instances to display the Instances list in the Amazon EC2 Dashboard. It
might take several minutes to launch a vSRX instance.
Step 3: Viewing the AWSSystem Logs
To debug launch time errors, you can view the AWS system logs, as follows:
1. In the Amazon EC2 Dashboard, select Instances.
2. Select the vSRX instance, and select Actions > Instance Settings > Get System Logs.
Step 4: Adding Network Interfaces for vSRX
AWS supports up to eight interfaces for an instance, depending on the AWS instance
type selected. Use the following procedure for each of the revenue interfaces you want
to add to vSRX (up to seven). The first revenue interface is ge-0/0/0, the second is
ge-0/0/1, and so on (see “Requirements for vSRX on AWS” on page 24).
47Copyright © 2019, Juniper Networks, Inc.
Chapter 2: Installing vSRX in AWS
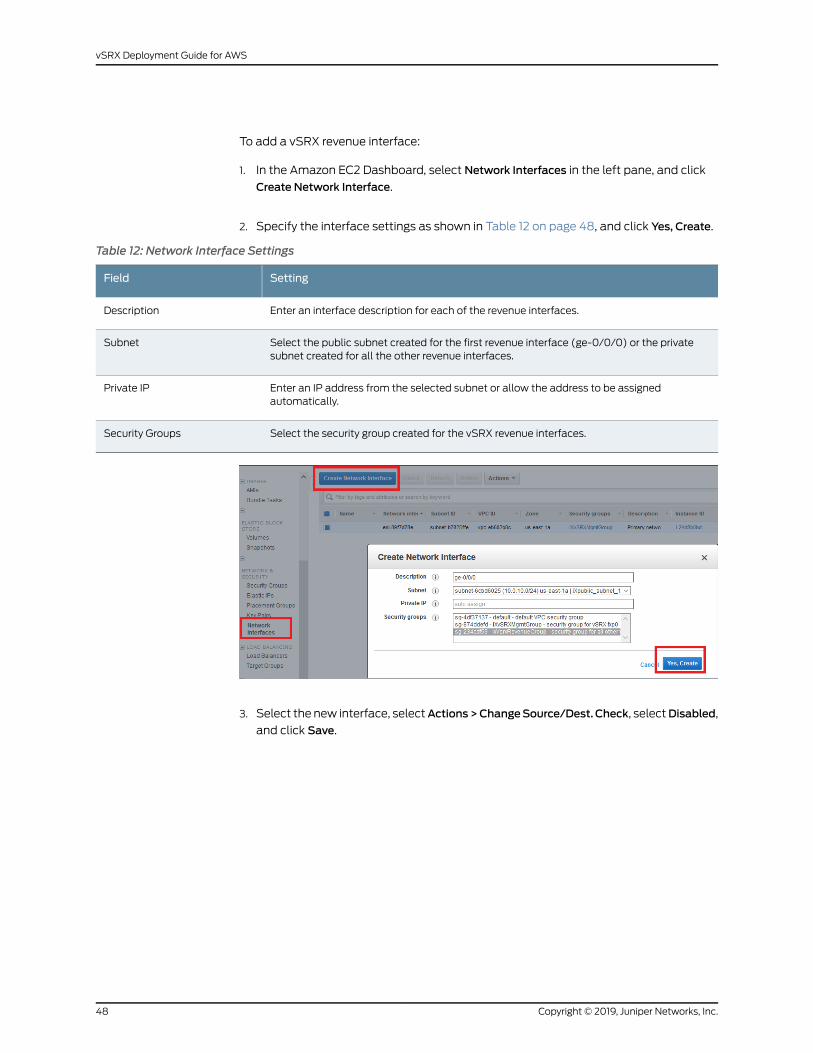
To add a vSRX revenue interface:
1. In the Amazon EC2 Dashboard, select Network Interfaces in the left pane, and click
Create Network Interface.
2. Specify the interface settings as shown in Table 12 on page 48, and click Yes, Create.
Table 12: Network Interface Settings
SettingField
Enter an interface description for each of the revenue interfaces.Description
Select the public subnet created for the first revenue interface (ge-0/0/0) or the privatesubnet created for all the other revenue interfaces.
Subnet
Enter an IP address from the selected subnet or allow the address to be assignedautomatically.
Private IP
Select the security group created for the vSRX revenue interfaces.Security Groups
3. Select the new interface, selectActions>ChangeSource/Dest. Check, selectDisabled,
and click Save.
Copyright © 2019, Juniper Networks, Inc.48
vSRX Deployment Guide for AWS
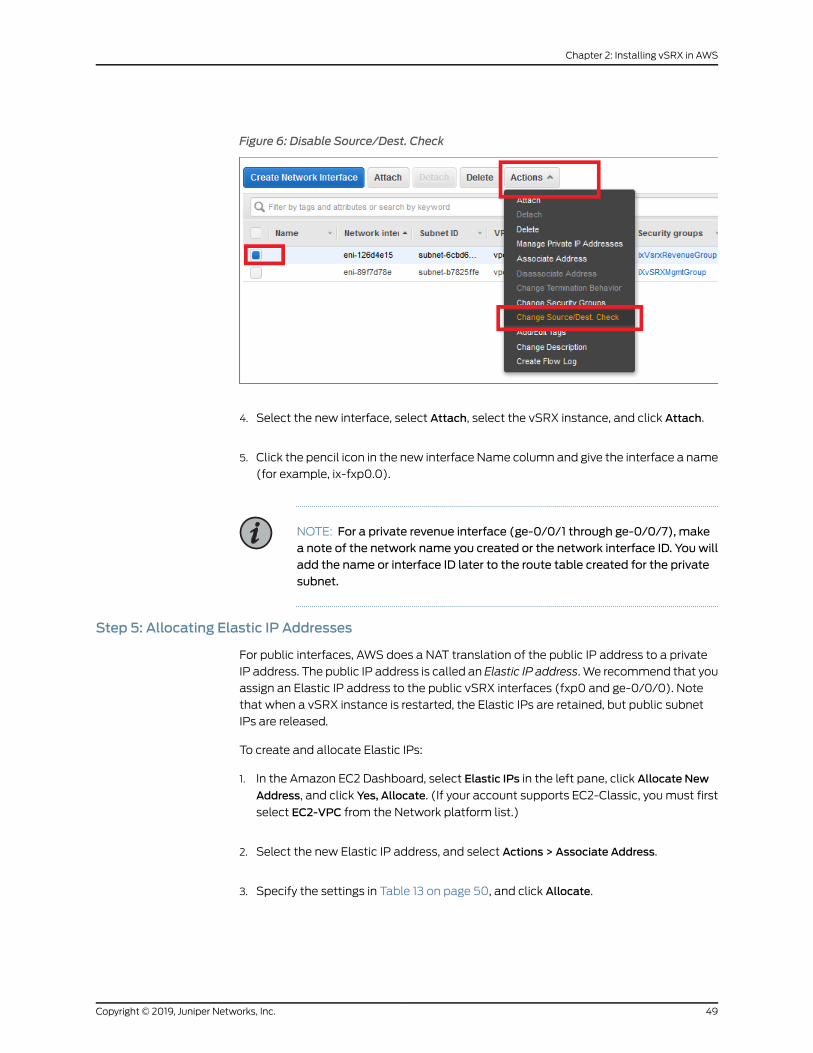
Figure 6: Disable Source/Dest. Check
4. Select the new interface, select Attach, select the vSRX instance, and click Attach.
5. Click the pencil icon in the new interface Name column and give the interface a name
(for example, ix-fxp0.0).
NOTE: For a private revenue interface (ge-0/0/1 through ge-0/0/7), makea note of the network name you created or the network interface ID. You willadd the name or interface ID later to the route table created for the privatesubnet.
Step 5: Allocating Elastic IP Addresses
For public interfaces, AWS does a NAT translation of the public IP address to a private
IP address. The public IP address is called an Elastic IP address. We recommend that you
assign an Elastic IP address to the public vSRX interfaces (fxp0 and ge-0/0/0). Note
that when a vSRX instance is restarted, the Elastic IPs are retained, but public subnet
IPs are released.
To create and allocate Elastic IPs:
1. In the Amazon EC2 Dashboard, select Elastic IPs in the left pane, click Allocate New
Address, and click Yes, Allocate. (If your account supports EC2-Classic, youmust first
select EC2-VPC from the Network platform list.)
2. Select the new Elastic IP address, and select Actions > Associate Address.
3. Specify the settings in Table 13 on page 50, and click Allocate.
49Copyright © 2019, Juniper Networks, Inc.
Chapter 2: Installing vSRX in AWS
Table 13: Elastic IP Settings
SettingField
Select the vSRXmanagement interface (fxp0) or the first revenue interface(ge-0/0/0).
Network Interface
Enter the private IP address to be associated with the Elastic IP address.Private IP Address
Step 6: Adding the vSRX Private Interfaces to the Route Tables
For each private revenue interface you created for vSRX, youmust add the interface ID
to the route table you created for the associated private subnet.
To add a private interface ID to a route table:
1. In the VPC Dashboard, select Route Tables in the left pane.
2. Select the route table you created for the private subnet.
3. Select the Routes tab below the list of route tables.
4. Click Edit and click Add another route.
5. Specify the settings in Table 14 on page 50, and click Save.
Table 14: Private Route Settings
SettingField
Enter 0.0.0.0/0 for Internet traffic.Destination
Type the network nameor the network interface ID for the associated private subnet. The networkinterface must be in the private subnet shown in the Subnet Associations tab.
NOTE: Do not select the Internet gateway (igw-nnnnnnnn).
Target
Repeat this procedure for each private network interface. Youmust reboot the vSRX
instance to complete this configuration.
Step 7: Rebooting the vSRX Instance
To incorporate the interface changes and complete the Amazon EC2 configuration, you
must reboot the vSRX instance. Interfaces attached while the vSRX instance is running
do not take effect until the instance is rebooted.
NOTE: Always use AWS to reboot the vSRX instance. Do not use the vSRXCLI to reboot.
Copyright © 2019, Juniper Networks, Inc.50
vSRX Deployment Guide for AWS
To reboot a vSRX instance:
1. In the Amazon EC2 Dashboard, select Instances in the left pane.
2. Select the vSRX instance, and select Actions > Instance State > Reboot.
It might take several minutes to reboot a vSRX instance.
Step 8: Logging in to a vSRX Instance
Use an SSH client to log in to a vSRX instance for the first time. To log in, specify the
location where you saved the SSH key pair .pem file for the user account, and the Elastic
IP address assigned to the vSRXmanagement interface (fxp0).
NOTE: Starting in Junos OS Release 17.4R1, the default user name haschanged from root@ to ec2-user@.
ssh -i <path>/<ssh-key-pair-name>.pem ec2-user@<fxpo-elastic-IP-address>
NOTE: Root login using a Junos OS password is disabled by default. You canconfigure other users after the initial Junos OS setup phase.
If you do not have the key pair filename and Elastic IP address, use these steps to view
the key pair name and Elastic IP for a vSRX instance:
1. In the Amazon EC2 Dashboard, select Instances.
2. Select the vSRX instance, and select eth0 in the Description tab to view the Elastic
IP address for the fxp0management interface.
3. Click Connect above the list of instances to view the SSH key pair filename.
To configure the basic settings for the vSRX instance, see “Configuring vSRX Using the
CLI” on page 58.
NOTE: vSRX pay-as-you-go images do not require any separate licenses.
51Copyright © 2019, Juniper Networks, Inc.
Chapter 2: Installing vSRX in AWS

Release History Table DescriptionRelease
Starting in Junos OS Release 17.4R1, the cloud-init package (version 0.7x)comes pre-installed in the vSRX for AWS image to help simplify configuringnew vSRX instances operating onAWSaccording to a specified user-data file.
17.4R1
RelatedDocumentation
Day One: AmazonWeb Services with vSRX Cookbook•
Using Cloud-Init to Automate the Initialization of vSRX Instances in AWS
Starting in Junos OS Release 17.4R1, the cloud-init package (version 0.7x) comes
pre-installed in the vSRX for AWS image to help simplify configuring newvSRX instances
operating on AWS according to a specified user-data file. Cloud-init is performed during
the first-time boot of a vSRX instance.
Cloud-init is anopensourceapplication forautomating the initializationofacloud instance
at boot-up. Cloud-init is designed to supportmultiple different cloud environments, such
as Amazon EC2, so that the same virtual machine (VM) image can be directly used in
multiple cloud instances without any modification. Cloud-init support in a VM instance
runs at boot time (first-time boot) and initializes the VM instance according to the
specified user-data file.
A user-data file is a special key in the metadata service that contains a file that
cloud-aware applications in the VM instance can access upon a first-time boot. In this
case, it is the validated Junos OS configuration file that you intend to upload to a vSRX
instance as the active configuration. This file uses the standard Junos OS command
syntax to define configuration details, such as root password, management IP address,
default gateway, and other configuration statements.
When you create a vSRX instance, you can use cloud-init services on AWS to pass a valid
Junos OS configuration file as user data to initialize new vSRX instances. The user-data
file uses the standard Junos OS syntax to define all the configuration details for your
vSRX instance. The default Junos OS configuration is replaced during the vSRX instance
launchwith a validated JunosOSconfiguration that you supply in the formof a user-data
file.
NOTE: The user-data file cannot exceed 16 KB. If your user-data file exceedsthis limit, youmust compress the file using gzip and use the compressed file.For example, the gzip junos.conf command results in the junos.conf.gz file.
The configurationmust be validated and include details for the fxp0 interface, login, and
authentication. Itmust alsohaveadefault route for traffic on fxp0. This informationmust
match the details of the AWSVPC and subnet intowhich the instance is launched. If any
of this information ismissingor incorrect, the instance is inaccessibleandyoumust launch
a new one.
Copyright © 2019, Juniper Networks, Inc.52
vSRX Deployment Guide for AWS
WARNING: Ensure that the user-data configuration file is not configured toperform autoinstallation on interfaces using Dynamic Host ConfigurationProtocol (DHCP) to assign an IP address to the vSRX. Autoinstallation withDHCPwill result in a "commit fail" for the user-data configuration file.
To initiate the automatic setup of a vSRX instance from AWS:
1. If youhavenotdonesoalready, createaconfiguration filewith the JunosOScommand
syntax and save the file. The configuration file can be plain text or MIME file type
text/plain.
The user-data configuration file must contain the full vSRX configuration that is to
beusedas theactiveconfigurationoneachvSRX instance, and thestring#junos-config
must be the first line of the user-data configuration file before the Junos OS
configuration.
NOTE: The#junos-configstring ismandatory in theuser-dataconfiguration
file; if it is not included, the configuration will not be applied to the vSRXinstance as the active configuration.
2. Copy the Junos OS configuration file to an accessible location fromwhere it can be
retrieved to launch the vSRX instance.
3. To specify the user-data file for configuring the vSRX instance, select As File in the
User data section on the Configure Instance Details page and attach the file (as
described in “Launching a vSRX Instance on an Amazon Virtual Private Cloud” on
page 43). The selected configuration file is used for the initial launch of the vSRX
instance. During the initial boot-up sequence, the vSRX instance processes the
cloud-init request.
NOTE: The boot time for the vSRX instancemight increase with the useof the cloud-init package. This additional time in the initial boot sequenceis due to the operations performed by the cloud-init package. During thisoperation, the cloud-init package halts the boot sequence and performsa lookup for the configuration data in each data source identified in thecloud.cfg. The time required to look up and populate the cloud data isdirectlyproportional to thenumberofdatasourcesdefined. In theabsenceofadatasource, the lookupprocesscontinuesuntil it reachesapredefinedtimeout of 30 seconds for each data source.
4. When the initial boot-up sequence resumes, the user-data file replaces the original
factory-default Junos OS configuration loaded on the vSRX instance. If the commit
succeeds, the factory-default configuration will be permanently replaced. If the
53Copyright © 2019, Juniper Networks, Inc.
Chapter 2: Installing vSRX in AWS
configuration is not supported or cannot be applied to the vSRX instance, the vSRX
will boot using the default Junos OS configuration.
Release History Table DescriptionRelease
Starting in JunosOSRelease 17.4R1, the cloud-init package (version0.7x) comespre-installed in the vSRX for AWS image to help simplify configuring new vSRXinstances operating on AWS according to a specified user-data file. Cloud-initis performed during the first-time boot of a vSRX instance.
17.4R1
RelatedDocumentation
Cloud-Init Documentation•
• cloud-init
• Launching an Instance
Upgrading Junos OS Software on a vSRX Instance
This section outlines how to upgrade Junos OS software on your vSRX instance to a
newer release. Depending upon your preference, you can replace the vSRX software in
one of two ways:
• Upgrading the Junos OS for vSRX Software Release on page 54
• Replacing the vSRX Instance on AWS on page 54
Upgrading the Junos OS for vSRX Software Release
You can directly upgrade the Junos OS for vSRX software using the CLI. Upgrading or
downgrading Junos OS can take several hours, depending on the size and configuration
of the network. You download the desired Junos OS Release for vSRX .tgz file from the
Juniper Networks website.
Youalsocanupgradeusing J-Web(see J-Web)or the JunosSpaceNetworkManagement
Platform (see Junos Space).
For the procedure on upgrading a specific Junos OS for vSRX software release, see the
Migration,Upgrade, andDowngrade Instructions topic in the release-specific vSRXRelease
Notes available on the vSRX TechLibrary.
Replacing the vSRX Instance on AWS
To replace a vSRX instance on AWSwith a different software release:
1. Log in to the vSRX instance using SSH and start the CLI.
NOTE: Starting in Junos OS Release 17.4R1, the default user name haschanged from root@ to ec2-user@.
Copyright © 2019, Juniper Networks, Inc.54
vSRX Deployment Guide for AWS
ec2-user@% cliec2-user@>
2. Enter configuration mode.
ec2-user@> configure[edit]ec2-user@#
3. Copy the existing Junos OS configuration from the vSRX. The contents of the current
level of the statement hierarchy (and below) are saved, along with the statement
hierarchy containing it.
NOTE: Bydefault, theconfiguration is savedtoa file inyourhomedirectory.
• See Saving a Configuration File for additional background information
on saving a Junos OS configuration file.
• See file copy for information on how to copy files from one location to
another location on the local device or to a location on a remote devicethat is reachable by the local device.
ec2-user@#save <filename>[edit]ec2-user@#
4. Remove the vSRX instance on AWS as described in “Removing a vSRX Instance on
AWS” on page 56.
5. Once the vSRX instance on AWS has been successfully removed, define the specifics
of a vSRX instance prior to launching it. See “Configuring an Amazon Virtual Private
Cloud for vSRX” on page 35.
6. Launch the vSRX image using the desired software version available from AWS
Marketplaceasdescribed in “LaunchingavSRX InstanceonanAmazonVirtualPrivate
Cloud” on page 43
7. Load the previously copied Junos OS configuration file onto your new (upgraded)
vSRX instance as described in Loading a Configuration File.
55Copyright © 2019, Juniper Networks, Inc.
Chapter 2: Installing vSRX in AWS
Removing a vSRX Instance on AWS
To remove a vSRX instance on AWS:
1. Log in to the AWSManagement Console and select Services > Compute > EC2 >
Instances.
2. Select the vSRX instance and select Actions > Instance State > Terminate to remove
the instance.
3. In the dialog box, expand the section and select Release associated Elastic IP.
4. Click Yes, Terminate.
NOTE: See Deleting Your VPC to remove any unused VPCs from AWS.
Copyright © 2019, Juniper Networks, Inc.56
vSRX Deployment Guide for AWS
CHAPTER 3
Configuring and Managing vSRX
• vSRX Configuration and Management Tools on page 57
• Configuring vSRX Using the CLI on page 58
• Configuring vSRX Using the J-Web Interface on page 62
• Managing Security Policies for Virtual Machines Using Junos Space Security
Director on page 65
• AWS Elastic Load Balancing and Elastic Network Adapter on page 65
vSRX Configuration andManagement Tools
This chapter is an overview on the various tools available to configure andmanage a
vSRX VM once it has been successfully deployed.
• Understanding the Junos OS CLI and Junos Scripts on page 57
• Understanding the J-Web Interface on page 57
• Understanding Junos Space Security Director on page 58
Understanding the Junos OS CLI and Junos Scripts
The Junosoperating systemcommand-line interface (JunosOSCLI) is a JuniperNetworks
specific command shell that runs on top of a UNIX-based operating system kernel.
Built into Junos OS, Junos script automation is an onboard toolset available on all Junos
OS platforms, including routers, switches, and security devices running Junos OS (such
as a vSRX instance).
You can use Junos OS CLI and the Junos OS scripts to configure, manage, administer,
and troubleshoot vSRX.
Understanding the J-Web Interface
The J-Web interface allows you to monitor, configure, troubleshoot, andmanage vSRX
instances by means of aWeb browser. J-Web provides access to all the configuration
statements supported by the vSRX instance.
You can use J-Web to configure, manage, administer, and troubleshoot vSRX.
57Copyright © 2019, Juniper Networks, Inc.
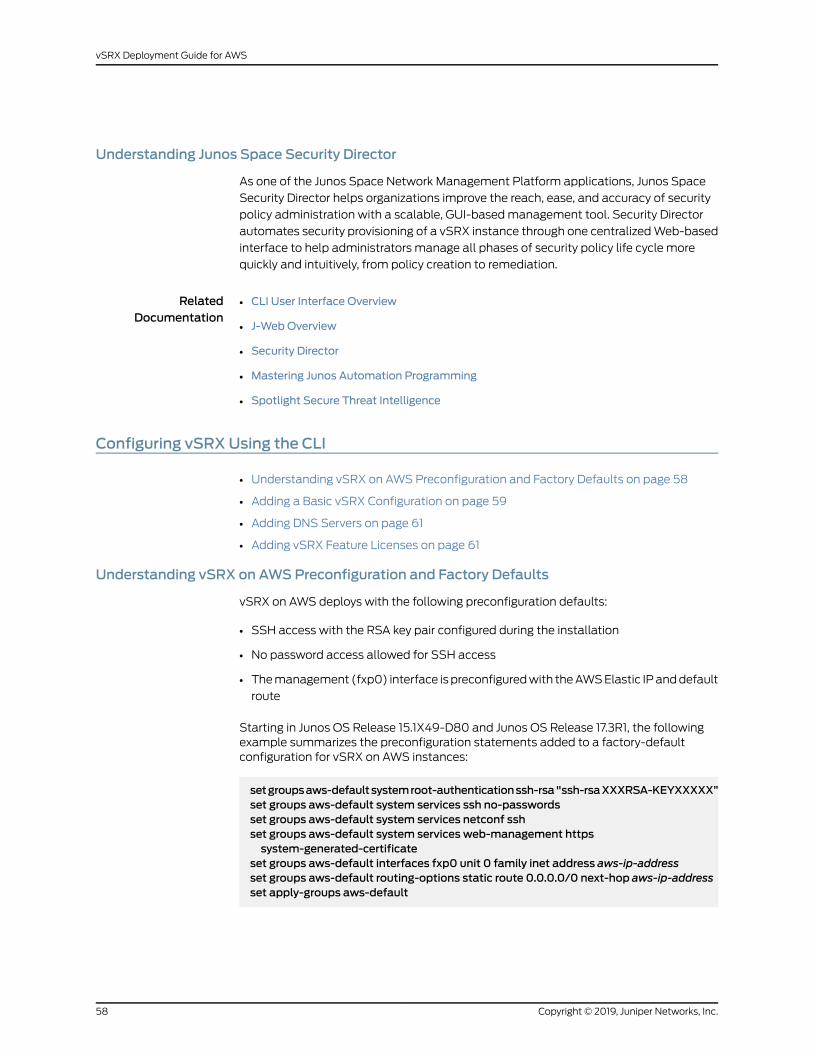
Understanding Junos Space Security Director
As one of the Junos Space Network Management Platform applications, Junos Space
Security Director helps organizations improve the reach, ease, and accuracy of security
policy administration with a scalable, GUI-basedmanagement tool. Security Director
automates security provisioning of a vSRX instance through one centralizedWeb-based
interface to help administrators manage all phases of security policy life cycle more
quickly and intuitively, from policy creation to remediation.
RelatedDocumentation
CLI User Interface Overview•
• J-Web Overview
• Security Director
• Mastering Junos Automation Programming
• Spotlight Secure Threat Intelligence
Configuring vSRXUsing the CLI
• Understanding vSRX on AWS Preconfiguration and Factory Defaults on page 58
• Adding a Basic vSRX Configuration on page 59
• Adding DNS Servers on page 61
• Adding vSRX Feature Licenses on page 61
Understanding vSRX on AWSPreconfiguration and Factory Defaults
vSRX on AWS deploys with the following preconfiguration defaults:
• SSH access with the RSA key pair configured during the installation
• No password access allowed for SSH access
• Themanagement (fxp0) interface ispreconfiguredwith theAWSElastic IPanddefault
route
Starting in Junos OS Release 15.1X49-D80 and Junos OS Release 17.3R1, the followingexample summarizes the preconfiguration statements added to a factory-defaultconfiguration for vSRX on AWS instances:
setgroupsaws-defaultsystemroot-authenticationssh-rsa"ssh-rsaXXXRSA-KEYXXXXX”set groups aws-default system services ssh no-passwordsset groups aws-default system services netconf sshset groups aws-default system services web-management httpssystem-generated-certificate
set groups aws-default interfaces fxp0 unit 0 family inet address aws-ip-addressset groups aws-default routing-options static route 0.0.0.0/0 next-hop aws-ip-addressset apply-groups aws-default
Copyright © 2019, Juniper Networks, Inc.58
vSRX Deployment Guide for AWS
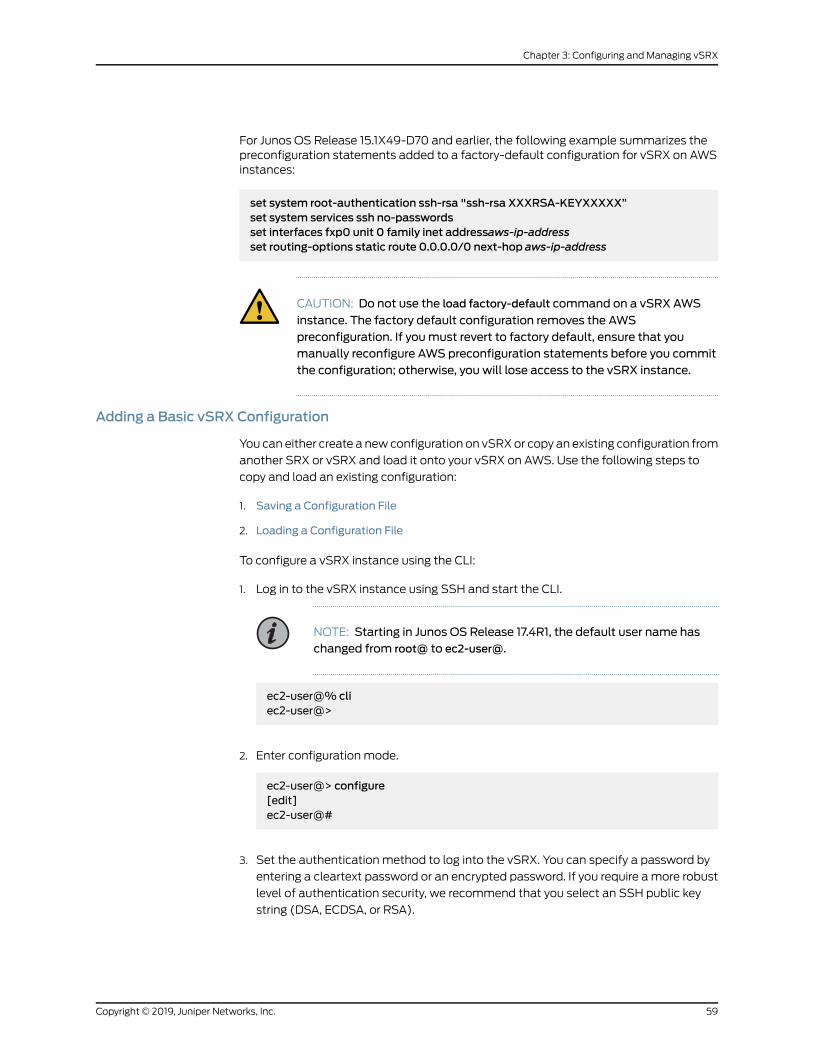
For Junos OS Release 15.1X49-D70 and earlier, the following example summarizes thepreconfiguration statements added to a factory-default configuration for vSRX on AWSinstances:
set system root-authentication ssh-rsa "ssh-rsa XXXRSA-KEYXXXXX”set system services ssh no-passwordsset interfaces fxp0 unit 0 family inet addressaws-ip-addressset routing-options static route 0.0.0.0/0 next-hop aws-ip-address
CAUTION: Do not use the load factory-default command on a vSRX AWS
instance. The factory default configuration removes the AWSpreconfiguration. If youmust revert to factory default, ensure that youmanually reconfigure AWS preconfiguration statements before you committhe configuration; otherwise, you will lose access to the vSRX instance.
Adding a Basic vSRX Configuration
You can either create a newconfiguration on vSRXor copy an existing configuration from
another SRX or vSRX and load it onto your vSRX on AWS. Use the following steps to
copy and load an existing configuration:
1. Saving a Configuration File
2. Loading a Configuration File
To configure a vSRX instance using the CLI:
1. Log in to the vSRX instance using SSH and start the CLI.
NOTE: Starting in Junos OS Release 17.4R1, the default user name haschanged from root@ to ec2-user@.
ec2-user@% cliec2-user@>
2. Enter configuration mode.
ec2-user@> configure[edit]ec2-user@#
3. Set the authentication method to log into the vSRX. You can specify a password by
entering a cleartext password or an encrypted password. If you require amore robust
level of authentication security, we recommend that you select an SSH public key
string (DSA, ECDSA, or RSA).
59Copyright © 2019, Juniper Networks, Inc.
Chapter 3: Configuring and Managing vSRX
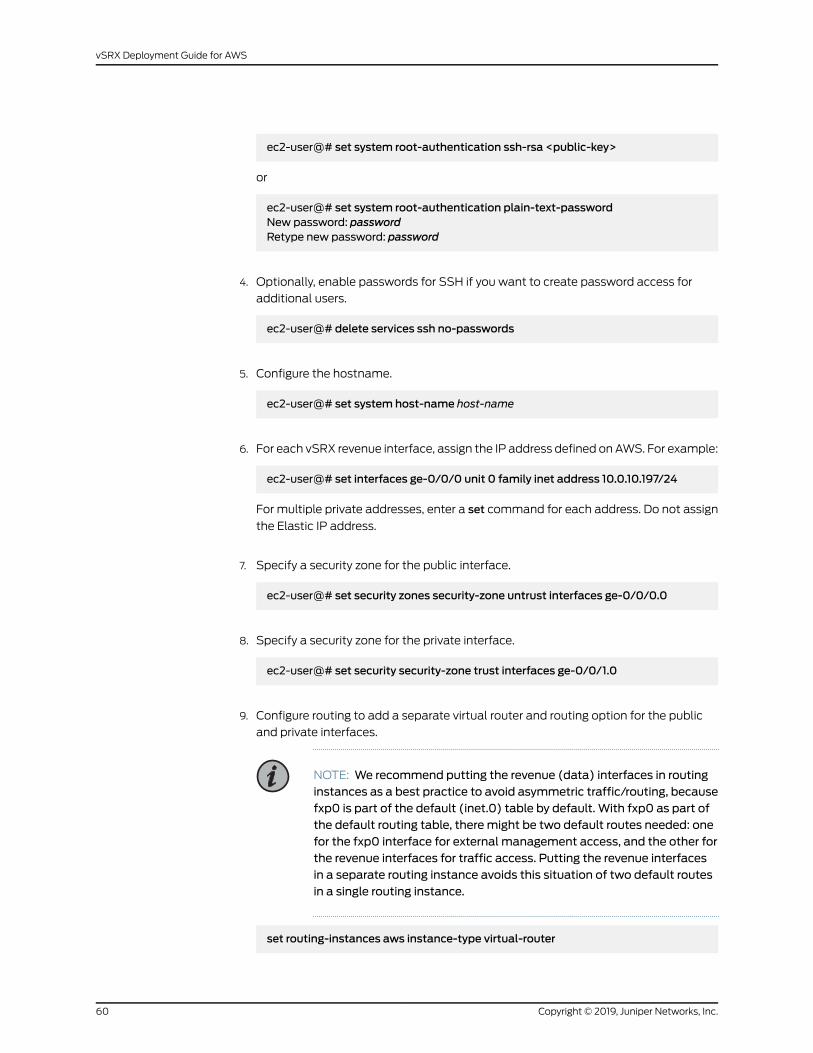
ec2-user@# set system root-authentication ssh-rsa <public-key>
or
ec2-user@# set system root-authentication plain-text-passwordNew password: passwordRetype new password: password
4. Optionally, enable passwords for SSH if you want to create password access for
additional users.
ec2-user@# delete services ssh no-passwords
5. Configure the hostname.
ec2-user@# set system host-name host-name
6. For each vSRX revenue interface, assign the IP address defined onAWS. For example:
ec2-user@# set interfaces ge-0/0/0 unit 0 family inet address 10.0.10.197/24
For multiple private addresses, enter a set command for each address. Do not assign
the Elastic IP address.
7. Specify a security zone for the public interface.
ec2-user@# set security zones security-zone untrust interfaces ge-0/0/0.0
8. Specify a security zone for the private interface.
ec2-user@# set security security-zone trust interfaces ge-0/0/1.0
9. Configure routing to add a separate virtual router and routing option for the public
and private interfaces.
NOTE: We recommend putting the revenue (data) interfaces in routinginstances as a best practice to avoid asymmetric traffic/routing, becausefxp0 is part of the default (inet.0) table by default. With fxp0 as part ofthe default routing table, theremight be two default routes needed: onefor the fxp0 interface for external management access, and the other forthe revenue interfaces for traffic access. Putting the revenue interfacesin a separate routing instance avoids this situation of two default routesin a single routing instance.
set routing-instances aws instance-type virtual-router
Copyright © 2019, Juniper Networks, Inc.60
vSRX Deployment Guide for AWS
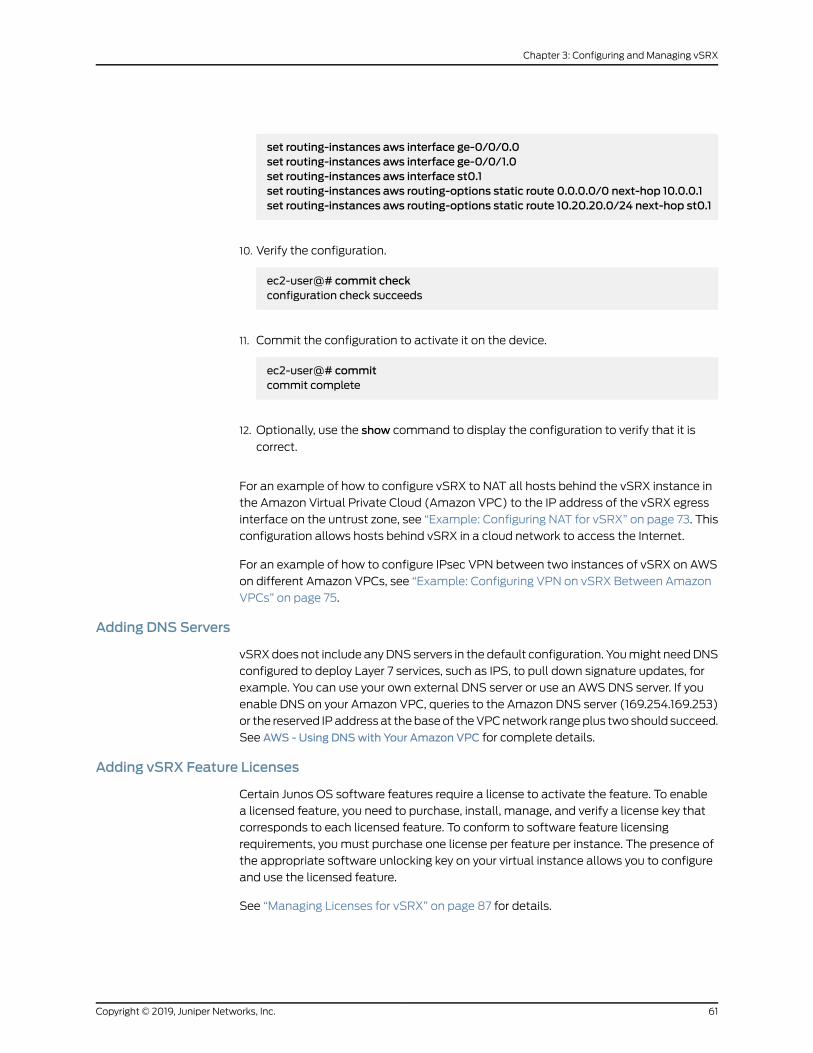
set routing-instances aws interface ge-0/0/0.0set routing-instances aws interface ge-0/0/1.0set routing-instances aws interface st0.1set routing-instances aws routing-options static route 0.0.0.0/0 next-hop 10.0.0.1set routing-instances aws routing-options static route 10.20.20.0/24 next-hop st0.1
10. Verify the configuration.
ec2-user@# commit checkconfiguration check succeeds
11. Commit the configuration to activate it on the device.
ec2-user@# commitcommit complete
12. Optionally, use the show command to display the configuration to verify that it is
correct.
For an example of how to configure vSRX to NAT all hosts behind the vSRX instance in
the Amazon Virtual Private Cloud (Amazon VPC) to the IP address of the vSRX egress
interface on the untrust zone, see “Example: Configuring NAT for vSRX” on page 73. This
configuration allows hosts behind vSRX in a cloud network to access the Internet.
For an example of how to configure IPsec VPN between two instances of vSRX on AWS
on different Amazon VPCs, see “Example: Configuring VPN on vSRX Between Amazon
VPCs” on page 75.
Adding DNS Servers
vSRXdoes not include anyDNS servers in the default configuration. Youmight needDNS
configured to deploy Layer 7 services, such as IPS, to pull down signature updates, for
example. You can use your own external DNS server or use an AWS DNS server. If you
enable DNS on your Amazon VPC, queries to the Amazon DNS server (169.254.169.253)
or the reserved IPaddress at thebaseof theVPCnetwork rangeplus twoshould succeed.
See AWS - Using DNSwith Your Amazon VPC for complete details.
Adding vSRX Feature Licenses
Certain Junos OS software features require a license to activate the feature. To enable
a licensed feature, you need to purchase, install, manage, and verify a license key that
corresponds to each licensed feature. To conform to software feature licensing
requirements, youmust purchase one license per feature per instance. The presence of
the appropriate software unlocking key on your virtual instance allows you to configure
and use the licensed feature.
See “Managing Licenses for vSRX” on page 87 for details.
61Copyright © 2019, Juniper Networks, Inc.
Chapter 3: Configuring and Managing vSRX
RelatedDocumentation
CLI User Guide•
• AWS - Using DNSwith Your VPC
Configuring vSRXUsing the J-Web Interface
• Accessing the J-Web Interface and Configuring vSRX on page 62
• Applying the Configuration on page 64
• Adding vSRX Feature Licenses on page 64
Accessing the J-Web Interface and Configuring vSRX
To configure vSRX using the J-Web Interface:
1. Enter the AWS Elastic IP address of the eth0 interface in the browser Address box.
2. Specify the username and password.
3. Click Log In, and select the ConfigurationWizards tab from the left navigation panel.
The J-Web SetupWizard page opens.
4. Click Setup.
You can use the Setup wizard to configure a device or edit an existing configuration.
• Select Edit Existing Configuration if you have already configured the wizard using
the factory mode.
• Select Create NewConfiguration to configure a device using the wizard.
The following configuration options are available in the guided setup:
• Basic
Copyright © 2019, Juniper Networks, Inc.62
vSRX Deployment Guide for AWS

Selectbasic to configure thedevicenameanduser account informationas shown
in Table 15 on page 63.
• Device name and user account information
Table 15: Device Name and User Account Information
DescriptionField
Type the name of the device. For example: vSRX.Device name
Create a default root user password.Root password
Verify the default root user password.Verify password
Add an optional administrative account in addition to the root account.
User role options include:
Operator
• Superuser: This user has full system administration rights and can add,modify, and delete settings and users.
• Operator: This user can perform system operations such as a systemreset but cannot change the configuration or add or modify users.
• Read only: This user can only access the system and view theconfiguration.
• Disabled: This user cannot access the system.
• Select either Time Server orManual. Table 16 on page 63 lists the system time
options.
Table 16: System Time Options
DescriptionField
Time Server
Type the hostname of the time server. For example:ntp.example.com.
Host Name
Type the IP address of the time server in the IP address entryfield. For example: 192.168.1.254.
IP
NOTE: You can enter either the hostname or the IP address.
Manual
Click the current date in the calendar.Date
Set the hour, minute, and seconds. Choose AM or PM.Time
Time Zone (mandatory)
Select the time zone from the list. For example: GMT GreenwichMean Time GMT.
Time Zone
63Copyright © 2019, Juniper Networks, Inc.
Chapter 3: Configuring and Managing vSRX
• Expert
Select Expert to configure the basic options as well as the following advanced
options:
• Four or more internal zones
• Internal zone services
• Application of security policies between internal zones
Click Need Help for detailed configuration information.
You see a success message after the basic configuration is complete.
Applying the Configuration
To apply the configuration settings for vSRX:
1. Review and ensure that the configuration settings are correct, and click Next. The
Commit Configuration page appears.
2. Click Apply Settings to apply the configuration changes to vSRX.
3. Check the connectivity to vSRX, because youmight lose connectivity if you have
changed themanagement zone IP. Click theURL for reconnection instructionsonhow
to reconnect to the device.
4. Click Done to complete the setup.
After successful completion of the setup, you are redirected to the J-Web interface.
CAUTION: After youcomplete the initial setup, youcan relaunchthe J-WebSetup wizard by clicking Configuration>Setup. You can either edit an
existing configuration or create a new configuration. If you create a newconfiguration, the current configuration in vSRXwill be deleted.
Adding vSRX Feature Licenses
Certain Junos OS software features require a license to activate the feature. To enable
a licensed feature, you need to purchase, install, manage, and verify a license key that
corresponds to each licensed feature. To conform to software feature licensing
requirements, youmust purchase one license per feature per instance. The presence of
the appropriate software unlocking key on your virtual instance allows you to configure
and use the licensed feature.
See “Managing Licenses for vSRX” on page 87 for details.
Copyright © 2019, Juniper Networks, Inc.64
vSRX Deployment Guide for AWS
Managing Security Policies for Virtual Machines Using Junos Space Security Director
Security Director is a Junos Spacemanagement application designed to enable quick,
consistent, and accurate creation, maintenance, and application of network security
policies for your security devices, including vSRX instances. With Security Director, you
canconfigure security-relatedpolicymanagement including IPsecVPNs, firewall policies,
NAT policies, IPS policies, andUTMpolicies. and push the configurations to your security
devices. These configurations use objects such as addresses, services, NAT pools,
application signatures, policy profiles, VPN profiles, template definitions, and templates.
These objects can be shared acrossmultiple security configurations; shared objects can
be created and used across many security policies and devices. You can create these
objects prior to creating security configurations.
When you finish creating and verifying your security configurations fromSecurityDirector,
you can publish these configurations and keep them ready to be pushed to all security
devices, including vSRX instances, from a single interface.
The Configure tab is the workspace where all of the security configuration happens. You
can configure firewall, IPS, NAT, and UTM policies, assign policies to devices, create and
apply policy schedules, create andmanage VPNs, and create andmanage all of the
shared objects needed for managing your network security.
RelatedDocumentation
Security Director•
AWS Elastic Load Balancing and Elastic Network Adapter
This section provides information about AWS Elastic Load Balancing (ELB) and Elastic
Network Adapter (ENA) support.
• AWS Elastic Load Balancing on page 65
• Overview of Application Load Balancer on page 67
• Deployment of AWS Application Load Balancer on page 68
• Overview of AWS Elastic Network Adapter (ENA) for vSRX Instances on page 71
AWS Elastic Load Balancing
This section provides information about AWS ELB.
• Section on page ?
• Benefits of AWS Elastic Load Balancing on page 66
• Overview of AWS Elastic Load Balancing on page 66
65Copyright © 2019, Juniper Networks, Inc.
Chapter 3: Configuring and Managing vSRX
Benefits of AWS Elastic Load Balancing
• Ensures high availability by automatically distributing the incoming traffic across
multiple targets in multiple availability zones (AZs) so that only the healthy targets
receive traffic.
• Provides flexibility to virtualize your application targets by allowing you to host more
applications on the same instance and to centrally manage Transport Layer Security
(TLS) settings and offload CPU-intensive workloads from your applications.
• Provides robust security features such as integrated certificate management, user
authentication, and SSL/TLS decryption.
• Supports auto scaling a sufficient number of applications to meet varying levels of
application load without requiring manual intervention.
• Allowsyou tomonitor yourapplicationsand their performance in real timewithAmazon
CloudWatchmetrics, logging, and request tracing.
• Offers load balancing across AWS and on-premises resources using the same load
balancer.
Overview of AWS Elastic Load Balancing
Elastic LoadBalancing (ELB) is a load-balancing service forAmazonWebServices (AWS)
deployments.
ELB distributes incoming application or network traffic across multiple targets, such as
Amazon EC2 instances, containers, and IP addresses, in multiple availability zones. ELB
scales your load balancer as traffic to your application changes over time, and can scale
to the vast majority of workloads automatically.
AWS ELB using application load balancers enables automation by using certain AWS
services:
• Amazon Simple Notification Service—For more information, see
https://docs.aws.amazon.com/sns/latest/dg/welcome.html.
• AWS Lambda—For more information, see
https://docs.aws.amazon.com/lambda/latest/dg/welcome.html.
• AWSAuto Scale Group—For more information, see
https://docs.aws.amazon.com/autoscaling/ec2/userguide/AutoScalingGroup.html.
AWS Elastic Load Balancing Components
AWS Elastic Load Balancing (ELB) components include:
• Load balancers—A load balancer serves as the single point of contact for clients. The
load balancer distributes incoming application traffic across multiple targets, such as
EC2 instances, in multiple availability zones (AZs), thereby increasing the availability
of your application. You add one or more listeners to your load balancer.
• Listeners or vSRX instances—A listener is a process for checking connection requests,
using the protocol and port that you configure. vSRX instances as listeners check for
Copyright © 2019, Juniper Networks, Inc.66
vSRX Deployment Guide for AWS
connection requests from clients, using the protocol and port that you configure, and
forward requests to one or more target groups, based on the rules that you define.
Each rule specifies a target group, condition, and priority. When the condition is met,
the traffic is forwarded to the target group. Youmust define a default rule for each
vSRX instance, and you can add rules that specify different target groups based on
the content of the request (also known as content-based routing).
• TargetgroupsorvSRXapplicationworkloads—EachvSRXapplicationas targetgroup
is used to route requests to oneormore registered targets.When you create each vSRX
instance as a listener rule, you specify a vSRX application and conditions. When a rule
condition is met, traffic is forwarded to the corresponding vSRX application. You can
create different vSRX applications for different types of requests. For example, create
one vSRX application for general requests and other vSRX applications for requests
to the microservices for your application.
AWS ELB supports three types of load balancers, application load balancers, network
load balancers, and classic load balancers. You can select a load balancer based on your
application needs. For more information about the types of AWS ELB load balancers,
see AWS Elastic Load Balancing.
Overview of Application Load Balancer
Startingwith JunosOSRelease 18.4R1, Elastic LoadBalancing (ELB)using theapplication
load balancer is supported to provide scalable security to the Internet facing traffic using
native AWS services. An application load balancer automatically distributes incoming
application traffic and scales resources to meet traffic demands.
You can also configure health checks, which are used to monitor the health of the
registered targets so that the loadbalancer can send requests only to the healthy targets.
The key features of an application load balancer are:
• Layer-7 load balancing
• HTTPS support
• High availability
• Security features
• Containerized application support
• HTTP/2 support
• WebSockets support
• Native IPv6 support
• Sticky sessions
• Health checks with operational monitoring, logging, request tracing
• Web Application Firewall (WAF)
When the application load balancer receives a request, it evaluates the rules of the vSRX
instance in order of priority to determine which rule to apply, and then selects a target
67Copyright © 2019, Juniper Networks, Inc.
Chapter 3: Configuring and Managing vSRX
from the vSRX application for the rule action. You can configure a vSRX instance rule to
route requests to different target groups based on the content of the application traffic.
Routing isperformed independently for each target group, evenwhena target is registered
with multiple target groups.
You can add and remove targets from your load balancer as your needs change, without
disrupting the overall flow of requests to your application. ELB scales your load balancer
as traffic to your application changes over time. ELB can scale majority of workloads
automatically.
The application load balancer launch sequence and current screen can be viewed using
the vSRX instance properties. When running vSRX as an AWS instance, logging in to the
instance through SSH starts a session on Junos OS. Standard Junos OS CLI can be used
to monitor health and statistics of the vSRX instance. If the #load_balancer=true tag is
sent inuserdata, thenboot-upmessagesmention that thevSRX interfacesareconfigured
for ELB and auto scaling support. Interfaces eth0 and eth1 are then swapped.
If an unsupported Junos OS configuration is sent to the vSRX instance in user data, then
the vSRX instance reverts to its factory-default configuration. If the If the
#load_balancer=true tag is missing, then interfaces are not swapped.
Deployment of AWSApplication Load Balancer
AWS ELB application load balancer can be deployed in two ways:
• vSRX behind AWS ELB application load balancer
• ELB sandwich
vSRX Behind AWS ELB Application Load Balancer Deployment
In this type of deployment, the vSRX instances are attached to the application load
balancer, in one or more availability zones (AZs), and the application workloads are
behind thevSRX instances. Theapplication loadbalancer sends traffic only to theprimary
interface of the instance. For a vSRX instance, the primary interface is the management
interface fxp0.
To enable ELB in this deployment, you have to swap themanagement and the first
revenue interface.
Figure 7 on page 69 illustrates the vSRX behind AWS ELB application load balancer
deployment.
Copyright © 2019, Juniper Networks, Inc.68
vSRX Deployment Guide for AWS
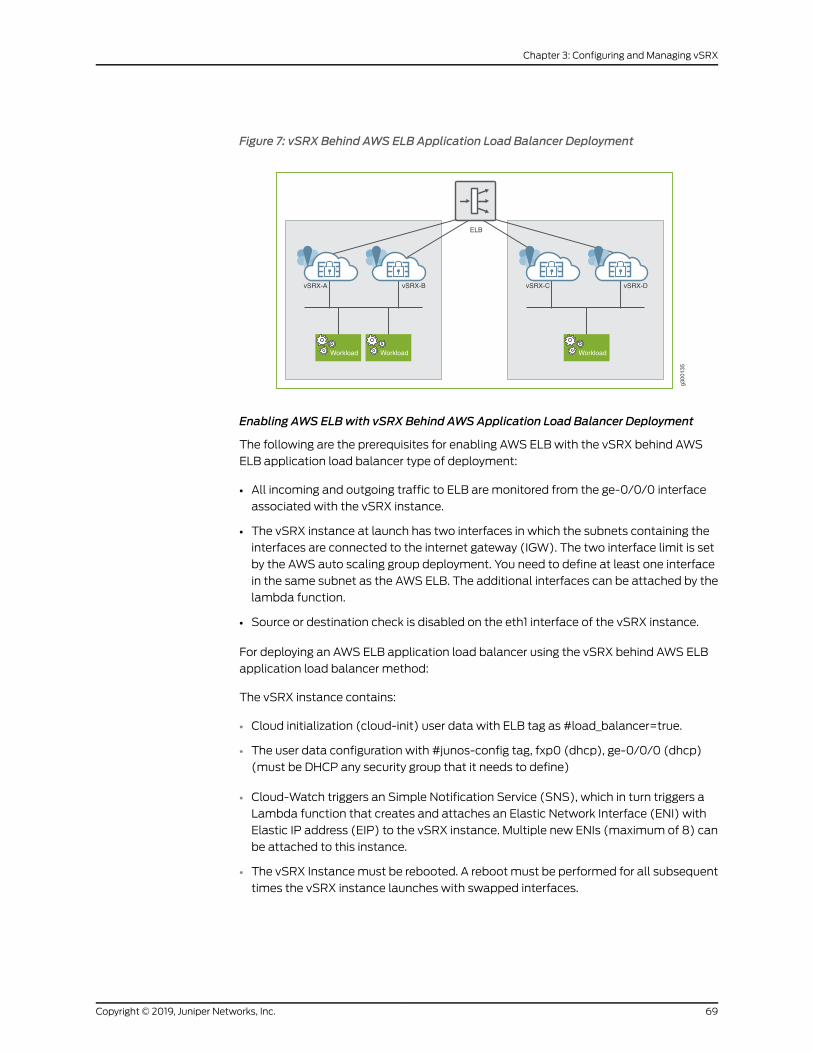
Figure 7: vSRX Behind AWS ELB Application Load Balancer Deployment
g300
135
vSRX-BvSRX-A vSRX-DvSRX-C
ELB
WorkloadWorkload Workload
Enabling AWS ELBwith vSRX Behind AWSApplication Load Balancer Deployment
The following are the prerequisites for enabling AWS ELB with the vSRX behind AWS
ELB application load balancer type of deployment:
• All incoming and outgoing traffic to ELB are monitored from the ge-0/0/0 interface
associated with the vSRX instance.
• The vSRX instance at launch has two interfaces in which the subnets containing the
interfaces are connected to the internet gateway (IGW). The two interface limit is set
by the AWS auto scaling group deployment. You need to define at least one interface
in the same subnet as the AWS ELB. The additional interfaces can be attached by the
lambda function.
• Source or destination check is disabled on the eth1 interface of the vSRX instance.
For deploying an AWS ELB application load balancer using the vSRX behind AWS ELB
application load balancer method:
The vSRX instance contains:
• Cloud initialization (cloud-init) user data with ELB tag as #load_balancer=true.
• The user data configuration with #junos-config tag, fxp0 (dhcp), ge-0/0/0 (dhcp)
(must be DHCP any security group that it needs to define)
• Cloud-Watch triggers an Simple Notification Service (SNS), which in turn triggers a
Lambda function that creates and attaches an Elastic Network Interface (ENI) with
Elastic IP address (EIP) to the vSRX instance. Multiple new ENIs (maximum of 8) can
be attached to this instance.
• The vSRX Instancemust be rebooted. A rebootmust be performed for all subsequent
times the vSRX instance launches with swapped interfaces.
69Copyright © 2019, Juniper Networks, Inc.
Chapter 3: Configuring and Managing vSRX
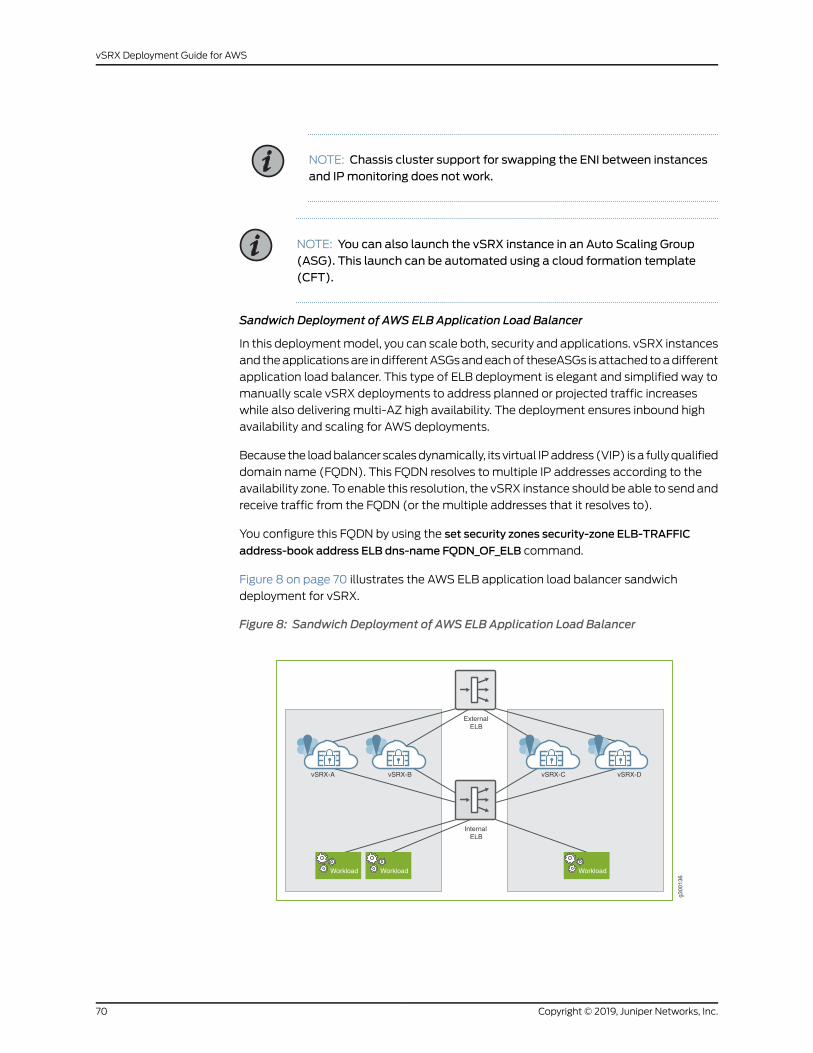
NOTE: Chassis cluster support for swapping the ENI between instancesand IPmonitoring does not work.
NOTE: You can also launch the vSRX instance in an Auto Scaling Group(ASG). This launch can be automated using a cloud formation template(CFT).
Sandwich Deployment of AWS ELB Application Load Balancer
In this deploymentmodel, you can scale both, security and applications. vSRX instances
and theapplicationsare indifferentASGsandeachof theseASGs isattached toadifferent
application load balancer. This type of ELB deployment is elegant and simplified way to
manually scale vSRX deployments to address planned or projected traffic increases
while also delivering multi-AZ high availability. The deployment ensures inbound high
availability and scaling for AWS deployments.
Because the loadbalancer scalesdynamically, its virtual IPaddress (VIP) isa fullyqualified
domain name (FQDN). This FQDN resolves to multiple IP addresses according to the
availability zone. To enable this resolution, the vSRX instance should be able to send and
receive traffic from the FQDN (or the multiple addresses that it resolves to).
You configure this FQDN by using the set security zones security-zone ELB-TRAFFIC
address-book address ELB dns-name FQDN_OF_ELB command.
Figure 8 on page 70 illustrates the AWS ELB application load balancer sandwich
deployment for vSRX.
Figure 8: Sandwich Deployment of AWS ELB Application Load Balancer
g300
136
vSRX-BvSRX-A vSRX-DvSRX-C
ExternalELB
InternalELB
Workload Workload Workload
Copyright © 2019, Juniper Networks, Inc.70
vSRX Deployment Guide for AWS
Enabling Sandwich Deployment of AWSApplication Load Balancer for vSRX
For AWS ELB application load balancer sandwich deployment for vSRX:
• vSRX receives the #load_balancer=true tag in cloud-init user data.
• In Junos OS, the initial boot process scans the mounted disk for the presence of the
flag file in the setup_vsrx file. If the file is present, it indicates that the two interfaces
with DHCP in two different virtual references must be configured. This scan and
configuration update is performed in the default configuration and on top of the user
data if the flag file is present.
NOTE: If user data is present then the boot time after the second or thethird mgd process commit increases.
• Youmust reboot the vSRX instance. Perform reboot for all the subsequent times the
vSRX instance is launched with swapped interfaces.
NOTE: Chassis cluster support for swapping theElasticNetwork Interfaces(ENIs) between instances and IPmonitoring does not work.
NOTE: You can also launch vSRX instance in an ASG and automate thedeployment using a cloud formation template (CFT).
Overview of AWS Elastic Network Adapter (ENA) for vSRX Instances
Amazon Elastic Compute Cloud (EC2) provides the Elastic Network Adapter (ENA), the
next generation network interface and accompanying drivers that provide enhanced
networking on EC2 vSRX instances.
Amazon EC2 provides enhanced networking capabilities through the Elastic Network
Adapter (ENA).
Benefits of AWS Elastic Network Adapter (ENA) Support for vSRX Instances
• Supports multi-queue device interfaces. ENAmakes uses of multiple transmit and
receive queues to reduce internal overhead and to increase scalability. The presence
of multiple queues simplifies and accelerates the process of mapping incoming and
outgoing packets to a particular vCPU.
• The ENAdriver supports industry-standard TCP/IP offload features such as checksum
offload and TCP transmit segmentation offload (TSO).
• Supports receive-sidescaling (RSS)networkdriver technology thatenables theefficient
distribution of network receive processing across multiple CPUs in multiprocessor
systems, formulticore scaling. Someof theENAdevices support aworkingmodecalled
low-latency queue (LLQ), which saves several microseconds.
71Copyright © 2019, Juniper Networks, Inc.
Chapter 3: Configuring and Managing vSRX
Enhanced networking uses single-root I/O virtualization (SR-IOV) to provide
high-performance networking capabilities on supported instance types. SR-IOV is a
method of device virtualization that provides higher I/O performance and lower CPU
utilization when compared to traditional virtualized network interfaces. Enhanced
networking provides higher bandwidth, higher packet per second (pps) performance,
and consistently lower inter-instance latencies. There is no additional charge for using
enhanced networking.
ENA is a custom network interface optimized to deliver high throughput and packet per
second (pps) performance, and consistently low latencies on EC2 vSRX instances. Using
ENA for vSRX C5 instances (with (two VCPUs and 4-GBmemory), you can utilize up to
20Gbps of network bandwidth. ENA-based enhanced networking is supported on vSRX
instances.
The ENA driver exposes a lightweight management interface with aminimal set of
memory-mapped registers and an extendable command set through an admin queue.
The driver supports awide range of ENAadapters, is link-speed independent (that is, the
same driver is used for 10 Gbps, 25 Gbps, 40 Gbps, and so on), and negotiates and
supports various features. The ENA enables high-speed and low-overhead Ethernet
traffic processing by providing a dedicated Tx/Rx queue pair per CPU core.
The DPDK drivers for ENA are available at
https://github.com/amzn/amzn-drivers/tree/master/userspace/dpdk.
NOTE: When AWS ELB application load balancers are used, the eth0 (first)and eth1 (second) interfaces are swapped for the vSRX instance. The AWSENA detects and rebinds the interface with its corresponding kernel driver.
Copyright © 2019, Juniper Networks, Inc.72
vSRX Deployment Guide for AWS
CHAPTER 4
vSRX in AWS Use Cases
• Example: Configuring NAT for vSRX on page 73
• Example: Configuring VPN on vSRX Between Amazon VPCs on page 75
Example: Configuring NAT for vSRX
This example shows how to configure vSRX to NAT all hosts behind the vSRX instance
in the Amazon Virtual Private Cloud (Amazon VPC) to the IP address of the vSRX egress
interface on the untrust zone. This configuration allows hosts behind vSRX in a cloud
network to access the Internet.
• Before You Begin on page 73
• Overview on page 73
• Configuration on page 73
• Configuring NAT on page 73
Before You Begin
Ensure that you have installed and launched a vSRX instance in an Amazon VPC.
Overview
A common cloud configuration includes hosts that you want to grant access to the
Internet, but you do notwant anyone fromoutside your cloud to get access to your hosts.
You can use vSRX in an Amazon VPC to NAT traffic inside the Amazon VPC from the
public Internet.
Configuration
Configuring NAT
Step-by-StepProcedure
To configure NAT on the vSRX instance:
1. Log in to the vSRXconsole in configuration editmode (See “Configuring vSRXUsing
the CLI” on page 58.
2. Set the IP addresses for vSRX revenue interfaces.
73Copyright © 2019, Juniper Networks, Inc.
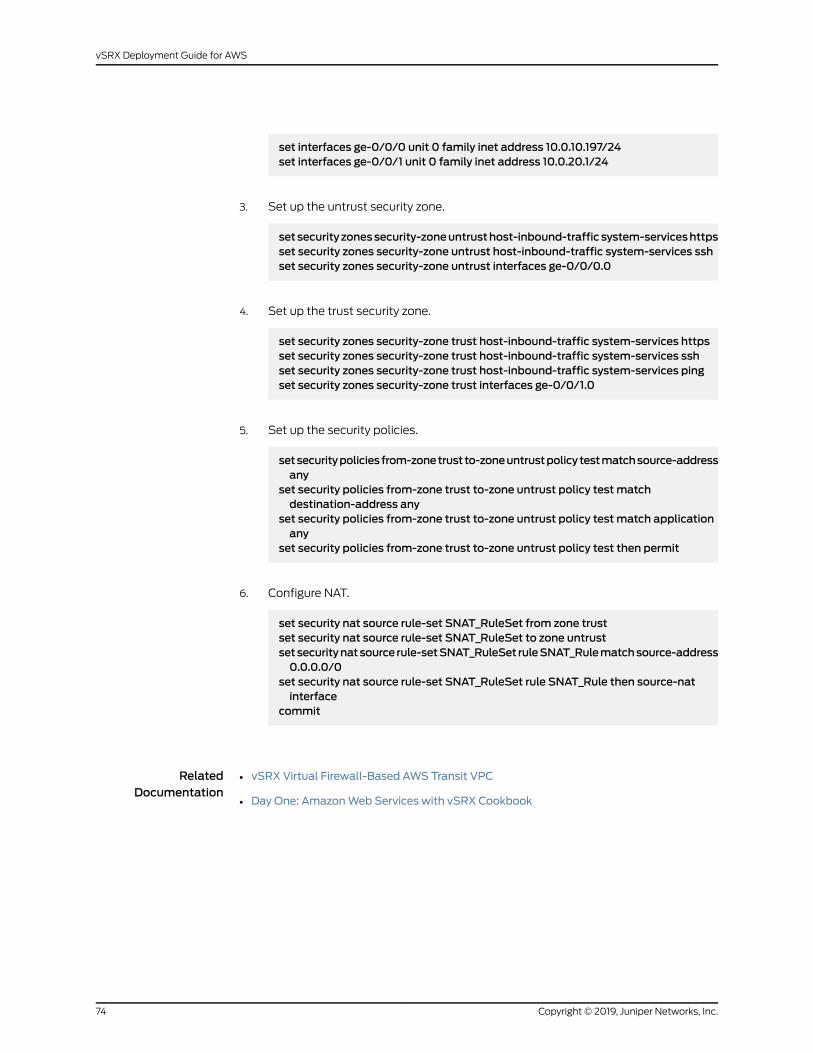
set interfaces ge-0/0/0 unit 0 family inet address 10.0.10.197/24set interfaces ge-0/0/1 unit 0 family inet address 10.0.20.1/24
3. Set up the untrust security zone.
setsecurity zonessecurity-zoneuntrusthost-inbound-traffic system-serviceshttpsset security zones security-zone untrust host-inbound-traffic system-services sshset security zones security-zone untrust interfaces ge-0/0/0.0
4. Set up the trust security zone.
set security zones security-zone trust host-inbound-traffic system-services httpsset security zones security-zone trust host-inbound-traffic system-services sshset security zones security-zone trust host-inbound-traffic system-services pingset security zones security-zone trust interfaces ge-0/0/1.0
5. Set up the security policies.
setsecuritypoliciesfrom-zonetrust to-zoneuntrustpolicytestmatchsource-addressany
set security policies from-zone trust to-zone untrust policy test matchdestination-address any
set security policies from-zone trust to-zone untrust policy test match applicationany
set security policies from-zone trust to-zone untrust policy test then permit
6. Configure NAT.
set security nat source rule-set SNAT_RuleSet from zone trustset security nat source rule-set SNAT_RuleSet to zone untrustsetsecuritynatsource rule-setSNAT_RuleSet ruleSNAT_Rulematchsource-address0.0.0.0/0
set security nat source rule-set SNAT_RuleSet rule SNAT_Rule then source-natinterface
commit
RelatedDocumentation
vSRX Virtual Firewall-Based AWS Transit VPC•
• Day One: AmazonWeb Services with vSRX Cookbook
Copyright © 2019, Juniper Networks, Inc.74
vSRX Deployment Guide for AWS
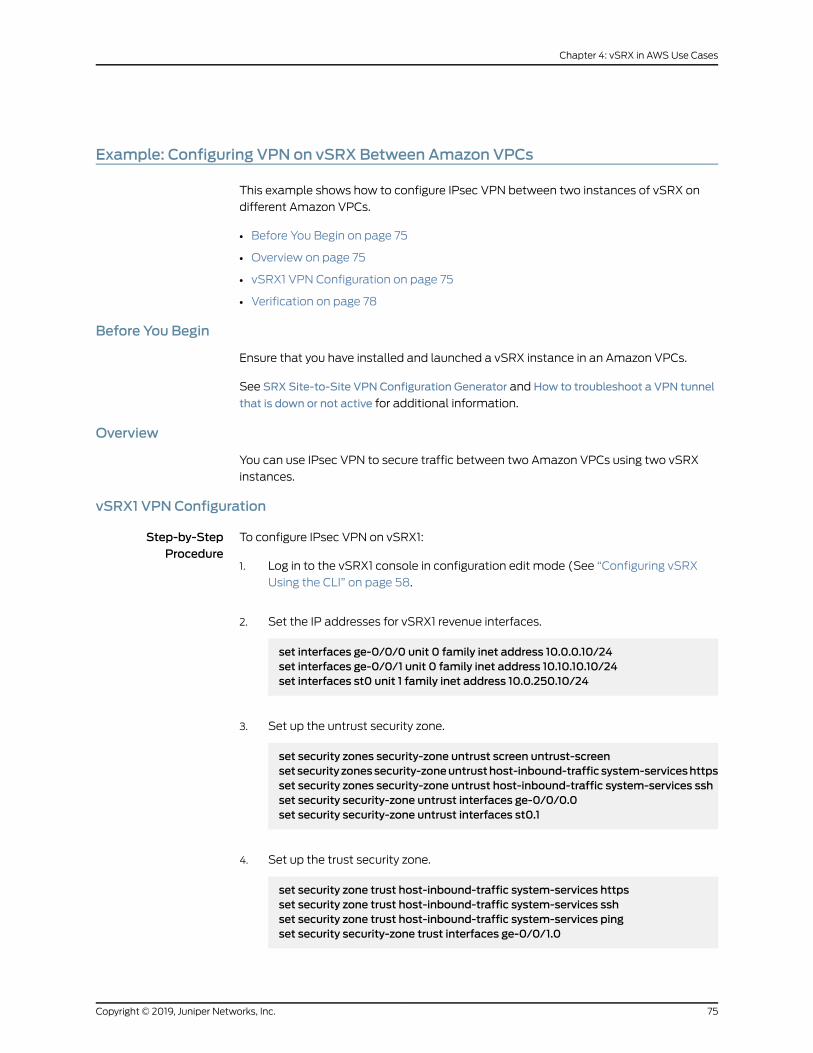
Example: Configuring VPN on vSRX Between Amazon VPCs
This example shows how to configure IPsec VPN between two instances of vSRX on
different Amazon VPCs.
• Before You Begin on page 75
• Overview on page 75
• vSRX1 VPN Configuration on page 75
• Verification on page 78
Before You Begin
Ensure that you have installed and launched a vSRX instance in an Amazon VPCs.
See SRX Site-to-Site VPN Configuration Generator and How to troubleshoot a VPN tunnel
that is down or not active for additional information.
Overview
You can use IPsec VPN to secure traffic between two Amazon VPCs using two vSRX
instances.
vSRX1 VPN Configuration
Step-by-StepProcedure
To configure IPsec VPN on vSRX1:
1. Log in to the vSRX1 console in configuration edit mode (See “Configuring vSRX
Using the CLI” on page 58.
2. Set the IP addresses for vSRX1 revenue interfaces.
set interfaces ge-0/0/0 unit 0 family inet address 10.0.0.10/24set interfaces ge-0/0/1 unit 0 family inet address 10.10.10.10/24set interfaces st0 unit 1 family inet address 10.0.250.10/24
3. Set up the untrust security zone.
set security zones security-zone untrust screen untrust-screensetsecurity zonessecurity-zoneuntrusthost-inbound-traffic system-serviceshttpsset security zones security-zone untrust host-inbound-traffic system-services sshset security security-zone untrust interfaces ge-0/0/0.0set security security-zone untrust interfaces st0.1
4. Set up the trust security zone.
set security zone trust host-inbound-traffic system-services httpsset security zone trust host-inbound-traffic system-services sshset security zone trust host-inbound-traffic system-services pingset security security-zone trust interfaces ge-0/0/1.0
75Copyright © 2019, Juniper Networks, Inc.
Chapter 4: vSRX in AWS Use Cases
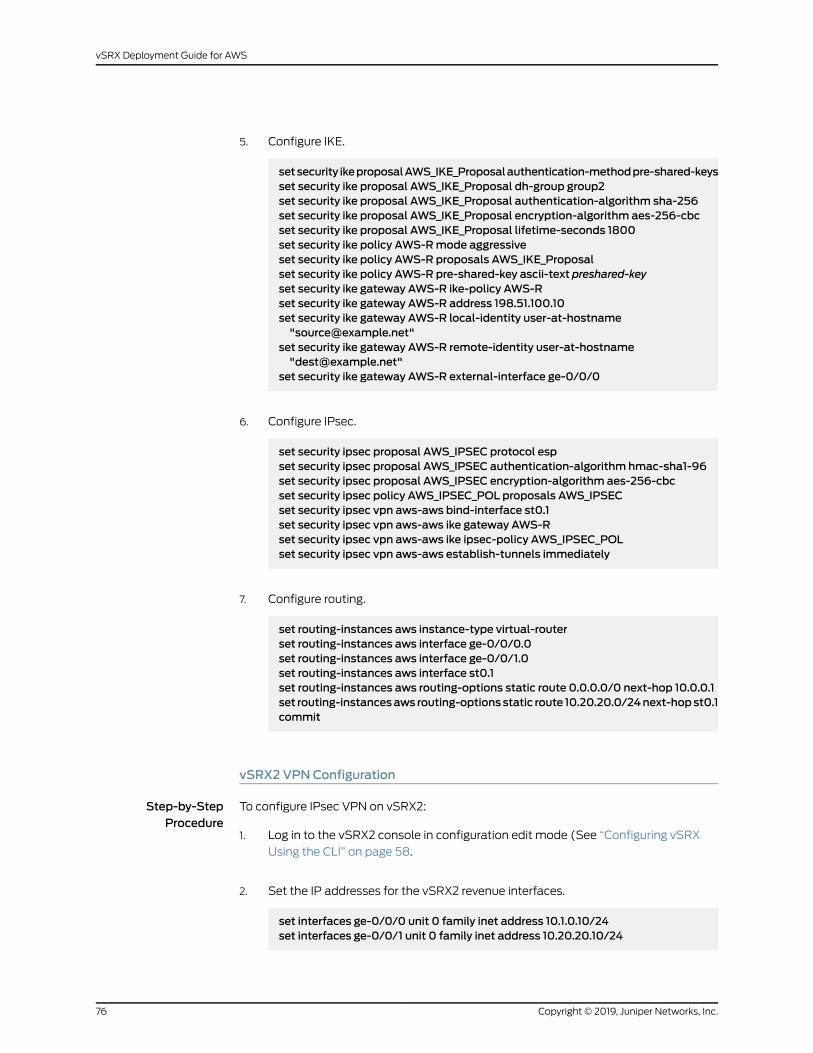
5. Configure IKE.
setsecurity ikeproposalAWS_IKE_Proposalauthentication-methodpre-shared-keysset security ike proposal AWS_IKE_Proposal dh-group group2set security ike proposal AWS_IKE_Proposal authentication-algorithm sha-256set security ike proposal AWS_IKE_Proposal encryption-algorithm aes-256-cbcset security ike proposal AWS_IKE_Proposal lifetime-seconds 1800set security ike policy AWS-Rmode aggressiveset security ike policy AWS-R proposals AWS_IKE_Proposalset security ike policy AWS-R pre-shared-key ascii-text preshared-keyset security ike gateway AWS-R ike-policy AWS-Rset security ike gateway AWS-R address 198.51.100.10set security ike gateway AWS-R local-identity user-at-hostname"[email protected]"
set security ike gateway AWS-R remote-identity user-at-hostname"[email protected]"
set security ike gateway AWS-R external-interface ge-0/0/0
6. Configure IPsec.
set security ipsec proposal AWS_IPSEC protocol espset security ipsec proposal AWS_IPSEC authentication-algorithm hmac-sha1-96set security ipsec proposal AWS_IPSEC encryption-algorithm aes-256-cbcset security ipsec policy AWS_IPSEC_POL proposals AWS_IPSECset security ipsec vpn aws-aws bind-interface st0.1set security ipsec vpn aws-aws ike gateway AWS-Rset security ipsec vpn aws-aws ike ipsec-policy AWS_IPSEC_POLset security ipsec vpn aws-aws establish-tunnels immediately
7. Configure routing.
set routing-instances aws instance-type virtual-routerset routing-instances aws interface ge-0/0/0.0set routing-instances aws interface ge-0/0/1.0set routing-instances aws interface st0.1set routing-instances aws routing-options static route 0.0.0.0/0 next-hop 10.0.0.1set routing-instancesaws routing-optionsstatic route 10.20.20.0/24next-hopst0.1commit
vSRX2 VPNConfiguration
Step-by-StepProcedure
To configure IPsec VPN on vSRX2:
1. Log in to the vSRX2 console in configuration edit mode (See “Configuring vSRX
Using the CLI” on page 58.
2. Set the IP addresses for the vSRX2 revenue interfaces.
set interfaces ge-0/0/0 unit 0 family inet address 10.1.0.10/24set interfaces ge-0/0/1 unit 0 family inet address 10.20.20.10/24
Copyright © 2019, Juniper Networks, Inc.76
vSRX Deployment Guide for AWS
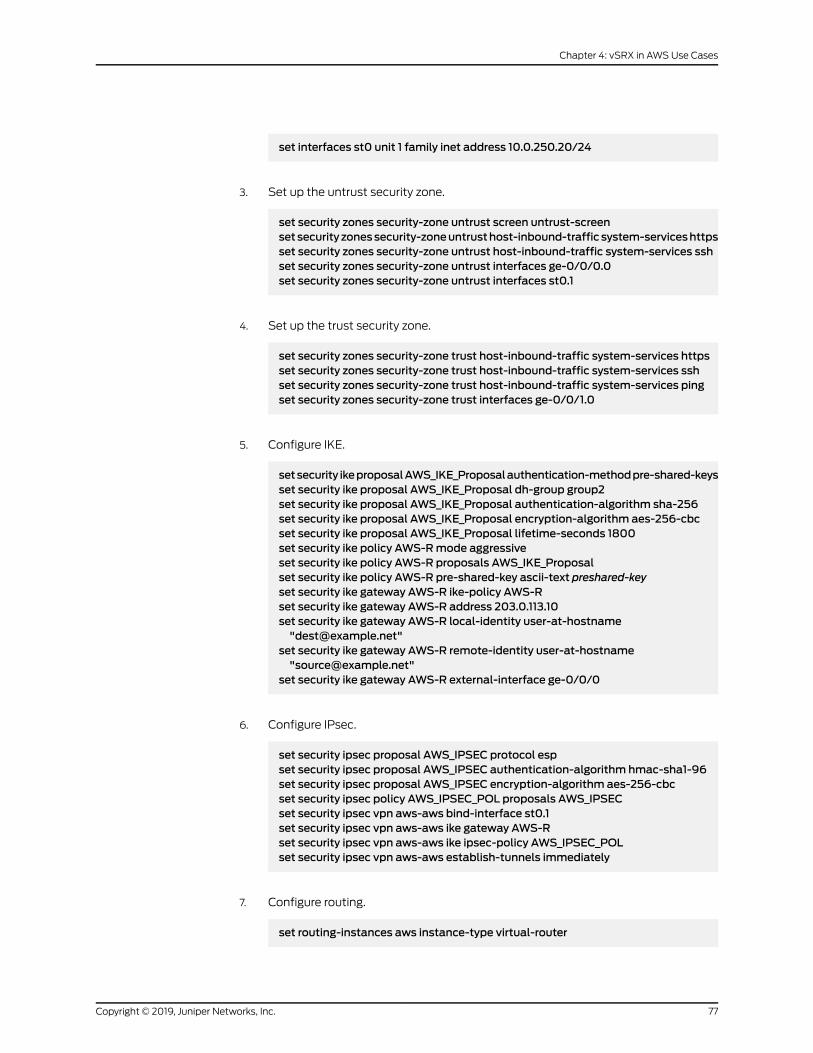
set interfaces st0 unit 1 family inet address 10.0.250.20/24
3. Set up the untrust security zone.
set security zones security-zone untrust screen untrust-screensetsecurity zonessecurity-zoneuntrusthost-inbound-traffic system-serviceshttpsset security zones security-zone untrust host-inbound-traffic system-services sshset security zones security-zone untrust interfaces ge-0/0/0.0set security zones security-zone untrust interfaces st0.1
4. Set up the trust security zone.
set security zones security-zone trust host-inbound-traffic system-services httpsset security zones security-zone trust host-inbound-traffic system-services sshset security zones security-zone trust host-inbound-traffic system-services pingset security zones security-zone trust interfaces ge-0/0/1.0
5. Configure IKE.
setsecurity ikeproposalAWS_IKE_Proposalauthentication-methodpre-shared-keysset security ike proposal AWS_IKE_Proposal dh-group group2set security ike proposal AWS_IKE_Proposal authentication-algorithm sha-256set security ike proposal AWS_IKE_Proposal encryption-algorithm aes-256-cbcset security ike proposal AWS_IKE_Proposal lifetime-seconds 1800set security ike policy AWS-Rmode aggressiveset security ike policy AWS-R proposals AWS_IKE_Proposalset security ike policy AWS-R pre-shared-key ascii-text preshared-keyset security ike gateway AWS-R ike-policy AWS-Rset security ike gateway AWS-R address 203.0.113.10set security ike gateway AWS-R local-identity user-at-hostname"[email protected]"
set security ike gateway AWS-R remote-identity user-at-hostname"[email protected]"
set security ike gateway AWS-R external-interface ge-0/0/0
6. Configure IPsec.
set security ipsec proposal AWS_IPSEC protocol espset security ipsec proposal AWS_IPSEC authentication-algorithm hmac-sha1-96set security ipsec proposal AWS_IPSEC encryption-algorithm aes-256-cbcset security ipsec policy AWS_IPSEC_POL proposals AWS_IPSECset security ipsec vpn aws-aws bind-interface st0.1set security ipsec vpn aws-aws ike gateway AWS-Rset security ipsec vpn aws-aws ike ipsec-policy AWS_IPSEC_POLset security ipsec vpn aws-aws establish-tunnels immediately
7. Configure routing.
set routing-instances aws instance-type virtual-router
77Copyright © 2019, Juniper Networks, Inc.
Chapter 4: vSRX in AWS Use Cases
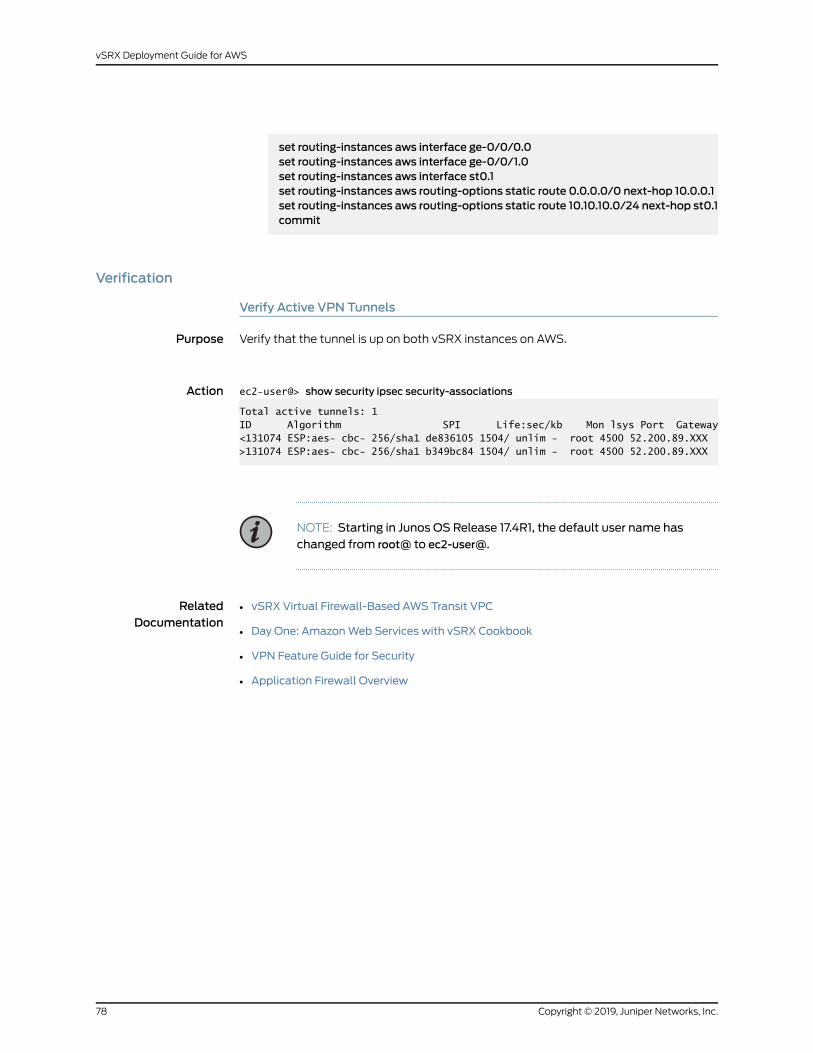
set routing-instances aws interface ge-0/0/0.0set routing-instances aws interface ge-0/0/1.0set routing-instances aws interface st0.1set routing-instances aws routing-options static route 0.0.0.0/0 next-hop 10.0.0.1set routing-instances aws routing-options static route 10.10.10.0/24 next-hop st0.1commit
Verification
Verify Active VPN Tunnels
Purpose Verify that the tunnel is up on both vSRX instances on AWS.
Action ec2-user@> show security ipsec security-associations
Total active tunnels: 1ID Algorithm SPI Life:sec/kb Mon lsys Port Gateway<131074 ESP:aes- cbc- 256/sha1 de836105 1504/ unlim - root 4500 52.200.89.XXX>131074 ESP:aes- cbc- 256/sha1 b349bc84 1504/ unlim - root 4500 52.200.89.XXX
NOTE: Starting in Junos OS Release 17.4R1, the default user name haschanged from root@ to ec2-user@.
RelatedDocumentation
• vSRX Virtual Firewall-Based AWS Transit VPC
• Day One: AmazonWeb Services with vSRX Cookbook
• VPN Feature Guide for Security
• Application Firewall Overview
Copyright © 2019, Juniper Networks, Inc.78
vSRX Deployment Guide for AWS
CHAPTER 5
vSRX Licensing
• vSRX Feature Licenses Overview on page 79
• Managing Licenses for vSRX on page 87
• vSRX License Model Numbers on page 94
vSRX Feature Licenses Overview
Some Junos OS software features require a license to activate the feature.
To enable a licensed feature, you need to purchase, install, manage, and verify a license
key that corresponds to each licensed feature. To conform to software feature licensing
requirements, youmust purchase one license per feature per instance. The presence of
the appropriate software unlocking key on your virtual instance allows you to configure
and use the licensed feature.
NOTE: If applicable for your vSRXdeployment, vSRXpay-as-you-go imagesdo not require any separate licenses.
• vSRX License Procurement and Renewal on page 79
• vSRX Evaluation License on page 80
• License Types on page 82
• Throughput on page 83
• License Duration on page 83
• Individual (á la carte) Feature Licenses on page 84
• Bundled Licenses on page 84
• Stacking Licenses on page 84
• vSRX License Keys Components on page 84
• License Management Fields Summary on page 85
vSRX License Procurement and Renewal
Licenses are usually ordered when the software application is purchased, and this
information isbound toacustomer ID. If youdidnotorder the licenseswhenyoupurchased
79Copyright © 2019, Juniper Networks, Inc.
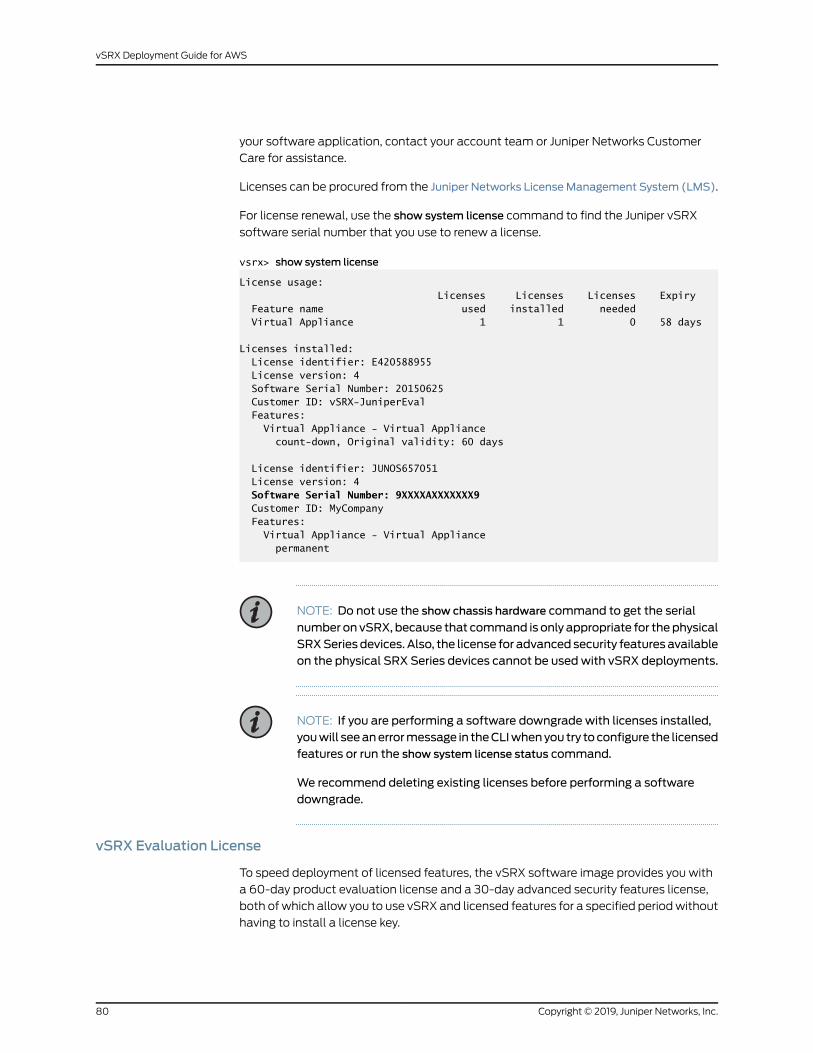
your software application, contact your account team or Juniper Networks Customer
Care for assistance.
Licenses can be procured from the Juniper Networks LicenseManagement System (LMS).
For license renewal, use the show system license command to find the Juniper vSRX
software serial number that you use to renew a license.
vsrx> show system license
License usage: Licenses Licenses Licenses Expiry Feature name used installed needed Virtual Appliance 1 1 0 58 days
Licenses installed: License identifier: E420588955 License version: 4 Software Serial Number: 20150625 Customer ID: vSRX-JuniperEval Features: Virtual Appliance - Virtual Appliance count-down, Original validity: 60 days
License identifier: JUNOS657051 License version: 4 Software Serial Number: 9XXXXAXXXXXXX9 Customer ID: MyCompany Features: Virtual Appliance - Virtual Appliance permanent
NOTE: Do not use the show chassis hardware command to get the serial
number on vSRX, because that command is only appropriate for thephysicalSRXSeries devices. Also, the license for advanced security features availableon the physical SRX Series devices cannot be usedwith vSRX deployments.
NOTE: If you are performing a software downgrade with licenses installed,youwill seeanerrormessage in theCLIwhenyou try toconfigure the licensedfeatures or run the show system license status command.
We recommend deleting existing licenses before performing a softwaredowngrade.
vSRX Evaluation License
To speed deployment of licensed features, the vSRX software image provides you with
a 60-day product evaluation license and a 30-day advanced security features license,
both of which allow you to use vSRX and licensed features for a specified periodwithout
having to install a license key.
Copyright © 2019, Juniper Networks, Inc.80
vSRX Deployment Guide for AWS
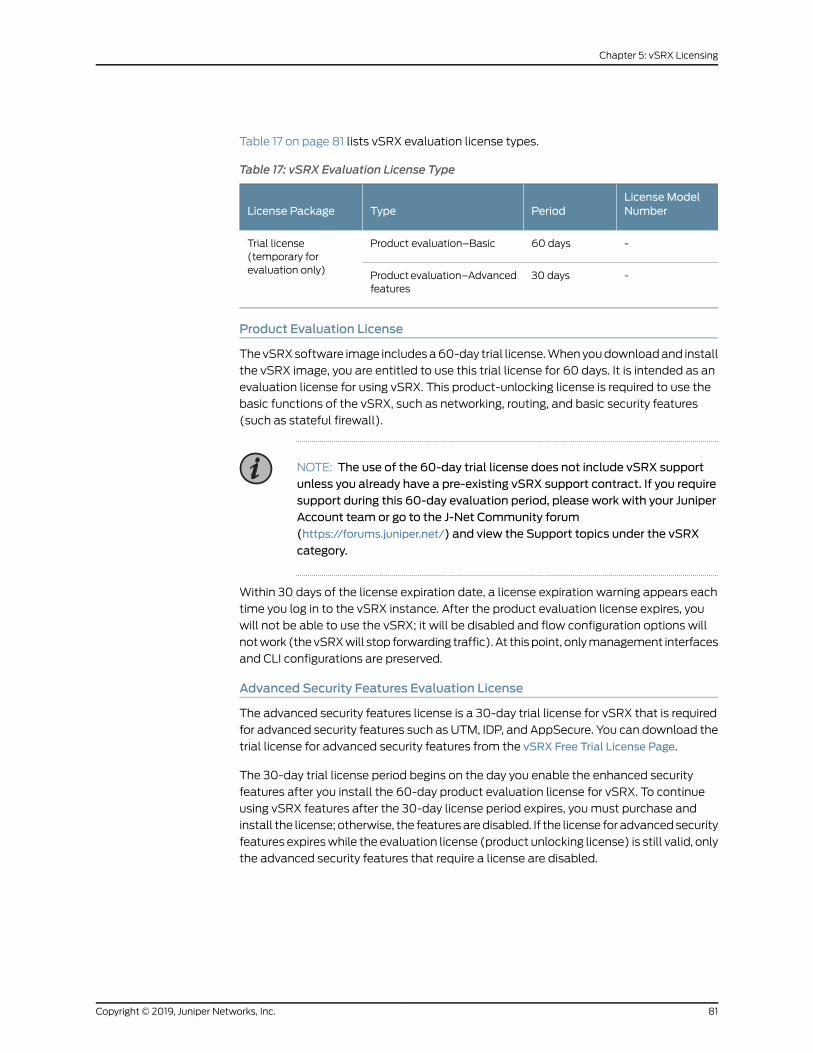
Table 17 on page 81 lists vSRX evaluation license types.
Table 17: vSRX Evaluation License Type
License ModelNumberPeriodTypeLicense Package
-60 daysProduct evaluation–BasicTrial license(temporary forevaluation only) -30 daysProductevaluation–Advanced
features
Product Evaluation License
ThevSRXsoftware image includesa60-day trial license.Whenyoudownloadand install
the vSRX image, you are entitled to use this trial license for 60 days. It is intended as an
evaluation license for using vSRX. This product-unlocking license is required to use the
basic functions of the vSRX, such as networking, routing, and basic security features
(such as stateful firewall).
NOTE: The use of the 60-day trial license does not include vSRX supportunless you already have a pre-existing vSRX support contract. If you requiresupport during this 60-day evaluation period, please work with your JuniperAccount team or go to the J-Net Community forum(https://forums.juniper.net/) and view the Support topics under the vSRX
category.
Within 30 days of the license expiration date, a license expiration warning appears each
time you log in to the vSRX instance. After the product evaluation license expires, you
will not be able to use the vSRX; it will be disabled and flow configuration options will
notwork (thevSRXwill stop forwarding traffic). At thispoint, onlymanagement interfaces
and CLI configurations are preserved.
Advanced Security Features Evaluation License
The advanced security features license is a 30-day trial license for vSRX that is required
for advanced security features such as UTM, IDP, and AppSecure. You can download the
trial license for advanced security features from the vSRX Free Trial License Page.
The 30-day trial license period begins on the day you enable the enhanced security
features after you install the 60-day product evaluation license for vSRX. To continue
using vSRX features after the 30-day license period expires, youmust purchase and
install the license; otherwise, the featuresaredisabled. If the license for advancedsecurity
features expireswhile the evaluation license (product unlocking license) is still valid, only
the advanced security features that require a license are disabled.
81Copyright © 2019, Juniper Networks, Inc.
Chapter 5: vSRX Licensing
NOTE: The UTM advanced features have a slightly different trial licensestrategy. UTM does not requires 30-day trial license but only a 30-day graceperiod. Once the 30-day advanced security features trial license expires,Juniper Networks supports a 30-day grace period for you to continue usingUTM features. The 30-day grace period goes into effect after the 30-triallicense expires.
There is also a 30-day trial license available for Juniper Sky Advanced Threat Prevention
(ATP). This is a second license that you can apply for a 30-day period in addition to the
advanced security features license for vSRX to enable the Sky ATP features. You can
download the Sky ATP trial license from the vSRX Free Trial License Page.
License Types
Juniper Networks provides a variety of licenses for both basic firewall features and
advanced security features for different throughputs and durations.
If you want to use vSRX to provide basic firewall features, you can use standard (basic)
licenses. However, to use some of the more advanced security features, such as
AppSecure, IDP, and UTM, youmight need to purchase advanced features licenses.
The high-level categories for licenses are:
• Throughput–All licenses have an associated throughput. Throughput rates include 1
Gbps, 2 Gbps, and 4 Gbps onmost platforms.
• Features–Licenses are available for different combinations of feature sets, from
standard (STD) through Content Security Bundle (CS-B).
• Individual or bundled–Licenses can be individual (á la carte) licenses for a set of
features, or can be bundled together to provide a broad range of features in one easy
license to maintain.
• Duration–All licenseshaveanassociated timeduration.Youcanpurchasebasic licenses
as perpetual (never expire) or subscription based (1-year or 3-year duration). All vSRX
licenses are subscription based.
• New or renewal–All subscription licenses are either new (first-time purchase) or
renewals (extending the license duration when the initial new subscription license is
about to expire).
Figure 9 on page 83 shows a sample license SKU and identifies how each field maps to
these categories.
Copyright © 2019, Juniper Networks, Inc.82
vSRX Deployment Guide for AWS

Figure 9: Sample vSRX License SKU
g043
428
VSRX-100M-ASECB-3-RProduct
Throughput
DurationFeature set
New orrenewal
Bundled orindividual
These categories of licenses can also be combined, or stacked, to providemore flexibility
for your vSRX use cases.
Throughput
Bandwidth or throughput license types allow you to use a single instance of the software
for up to the maximum throughput specified in the license entitlement. Throughput can
be combined on a single instance of the software so that the maximum throughput for
that instance is the aggregate of all the throughput licenses assigned to that instance.
A throughput license cannot be split across multiple instances. Throughput is identified
in the license entitlement inmegabits per second (Mbps), or gigabits per second (Gbps).
For example, if youwant3Gbpsof throughput for a vSRX instanceusing theSTD features,
youwould purchase a 1G STD license and a 2GSTD license and install both on the vSRX.
If you wanted 2 Gbps of throughput on two vSRX instances acting as a chassis cluster,
you could not use the same 2 Gbps license on both vSRX instances. You would need to
purchase one set of licenses for each vSRX instance in the cluster.
License Duration
All licenses can be perpetual or subscription based.
• Perpetual license–A perpetual license allows you to use the licensed software
indefinitely. Perpetual licenses do not require renewals. Perpetual licenses do not
includemaintenance and upgrade support. Youmust purchase that separately, vSRX
software releases such as vSRX for AWS do not support perpetual licenses.
• Subscription license–A subscription license is an annual license that allows you to use
the licensed software feature for the matching duration. Subscriptions might involve
periodic downloads of content (such as for IDP threat signature files). Subscription
licenses start when you retrieve the license key or 30 days after purchase if you have
not retrieved the license key. At the end of the license period, you need to renew the
license to continue using it.
NOTE: All subscription licenses are renewable. To renew a subscriptionlicense, purchase a new subscription of the same license. For moreinformation, see Subscription - Register and Install.
83Copyright © 2019, Juniper Networks, Inc.
Chapter 5: vSRX Licensing
Individual (á la carte) Feature Licenses
Every vSRX instance requires at least one standard license to support the desired
throughput rate. Beyond that, you can select from a range of individual feature licenses
thatprovideadditional security feature sets. The feature licensemustmatch the standard
license rate.
NOTE: AWS does not support individual licenses.
Forexample, if youneedAppSecureandSophosantivirus featuresat 1Gbpsof throughput
for a year, you could purchase the following individual licenses:
• VSRX-STD-1G-1—Provides the standard feature set and 1 Gbps of throughput.
• VSRX-CS-1G-1—Provides the advanced features.
Bundled Licenses
Bundled licenses simplify the licensemanagement by combining one or more individual
licenses into a single bundled license. Instead of installing andmanaging a standard
throughput licenseandoneormore individualadvanced feature licenses, youcanpurchase
one of the bundle license options andmanage one license instead.
For example, if youneedAppSecureandSophosantivirus featuresat 1Gbpsof throughput
forayear, youcouldpurchase thesinglebundledVSRX-CS-B-1G-1 license,which includes
the STD throughput license. This means you only need to manage one license instead
of two individual licenses.
Stacking Licenses
You can combine individual or bundled licenses to combine features or build up the
overall supplied throughput for the vSRX instance.
For example, you can combine a 1-Gbps license and a 2-Gbps license to have 3 Gbps of
throughput for the vSRX instance. You can also combine individual licenses, such as
Sophos antivirus (SAV) andWebsense EnhancedWeb Filtering (EWF) to get both sets
of security features.
NOTE: Individual licenses require a STD license with the same throughputrate.
vSRX License Keys Components
A license key consists of two parts:
• License ID—Alphanumeric string thatuniquely identifies the licensekey.Whena license
is generated, it is given a license ID.
• License data—Block of binary data that defines and stores all license key objects.
Copyright © 2019, Juniper Networks, Inc.84
vSRX Deployment Guide for AWS
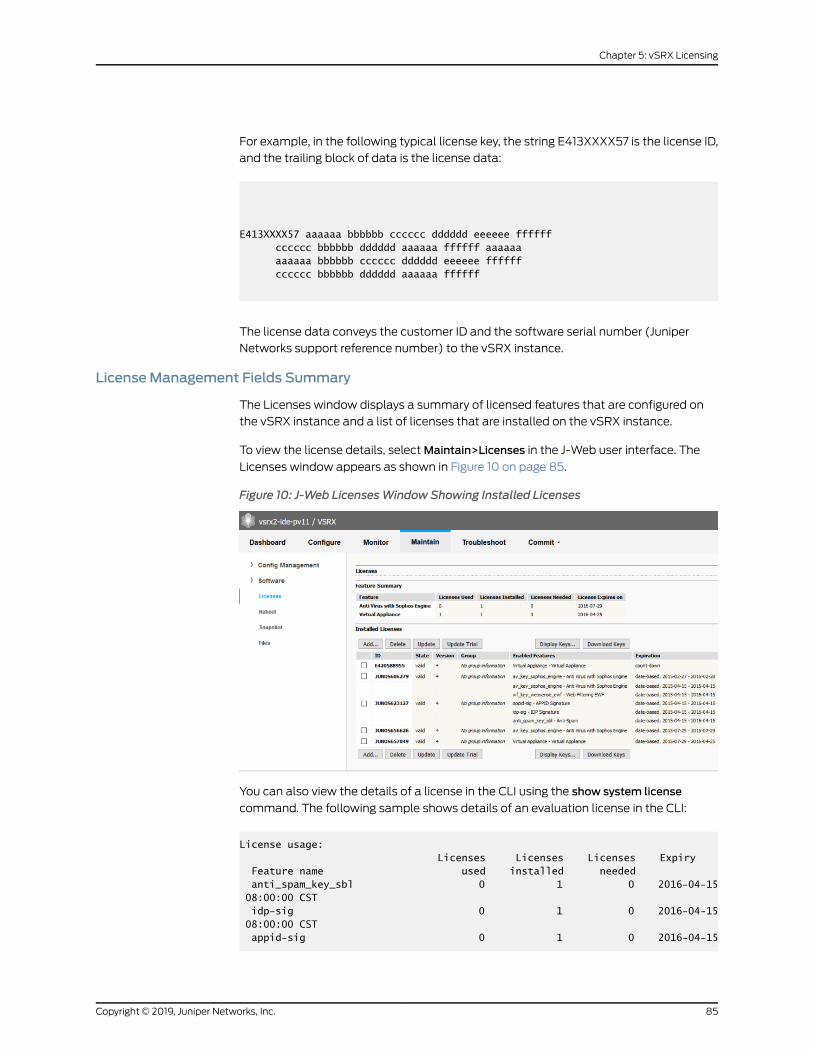
For example, in the following typical license key, the string E413XXXX57 is the license ID,
and the trailing block of data is the license data:
E413XXXX57 aaaaaa bbbbbb cccccc dddddd eeeeee ffffff cccccc bbbbbb dddddd aaaaaa ffffff aaaaaa aaaaaa bbbbbb cccccc dddddd eeeeee ffffff cccccc bbbbbb dddddd aaaaaa ffffff
The license data conveys the customer ID and the software serial number (Juniper
Networks support reference number) to the vSRX instance.
LicenseManagement Fields Summary
The Licenses window displays a summary of licensed features that are configured on
the vSRX instance and a list of licenses that are installed on the vSRX instance.
To view the license details, selectMaintain>Licenses in the J-Web user interface. The
Licenses window appears as shown in Figure 10 on page 85.
Figure 10: J-Web LicensesWindow Showing Installed Licenses
You can also view the details of a license in the CLI using the show system license
command. The following sample shows details of an evaluation license in the CLI:
License usage: Licenses Licenses Licenses Expiry Feature name used installed needed anti_spam_key_sbl 0 1 0 2016-04-15 08:00:00 CST idp-sig 0 1 0 2016-04-15 08:00:00 CST appid-sig 0 1 0 2016-04-15
85Copyright © 2019, Juniper Networks, Inc.
Chapter 5: vSRX Licensing
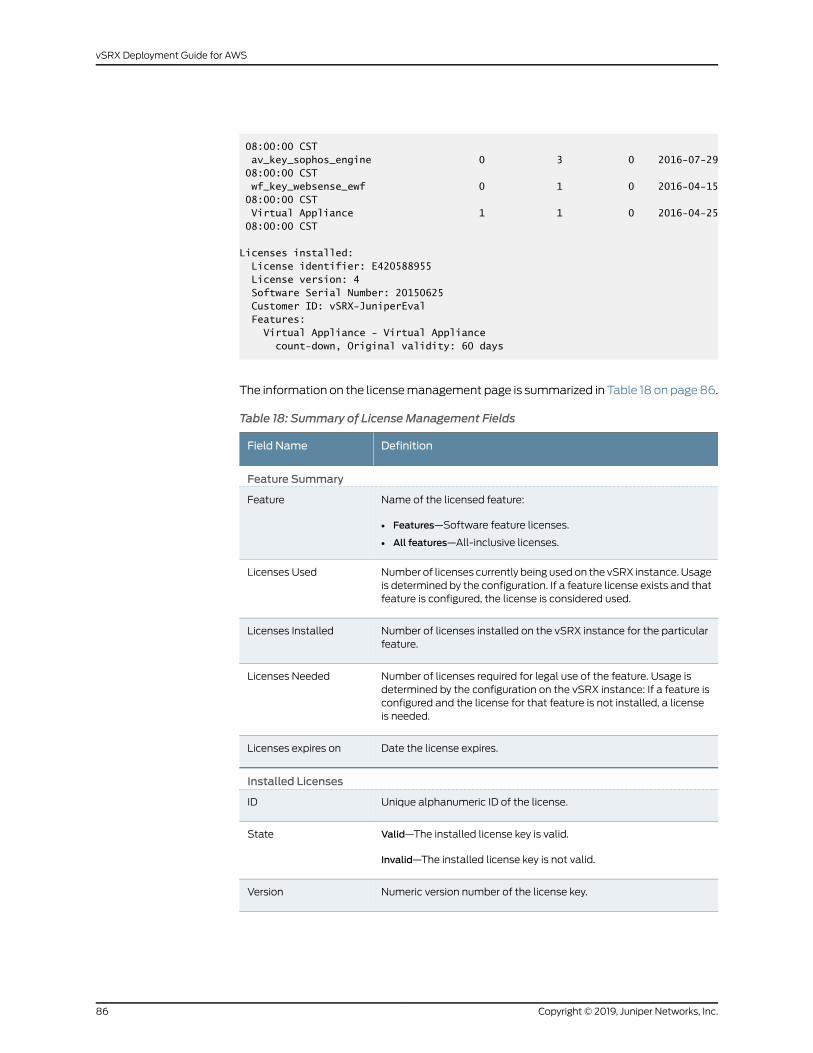
08:00:00 CST av_key_sophos_engine 0 3 0 2016-07-29 08:00:00 CST wf_key_websense_ewf 0 1 0 2016-04-15 08:00:00 CST Virtual Appliance 1 1 0 2016-04-25 08:00:00 CST
Licenses installed: License identifier: E420588955 License version: 4 Software Serial Number: 20150625 Customer ID: vSRX-JuniperEval Features: Virtual Appliance - Virtual Appliance count-down, Original validity: 60 days
The information on the licensemanagement page is summarized in Table 18 on page 86.
Table 18: Summary of License Management Fields
DefinitionField Name
Feature Summary
Name of the licensed feature:
• Features—Software feature licenses.
• All features—All-inclusive licenses.
Feature
Number of licenses currently being used on the vSRX instance. Usageis determined by the configuration. If a feature license exists and thatfeature is configured, the license is considered used.
Licenses Used
Number of licenses installed on the vSRX instance for the particularfeature.
Licenses Installed
Number of licenses required for legal use of the feature. Usage isdetermined by the configuration on the vSRX instance: If a feature isconfigured and the license for that feature is not installed, a licenseis needed.
Licenses Needed
Date the license expires.Licenses expires on
Installed Licenses
Unique alphanumeric ID of the license.ID
Valid—The installed license key is valid.
Invalid—The installed license key is not valid.
State
Numeric version number of the license key.Version
Copyright © 2019, Juniper Networks, Inc.86
vSRX Deployment Guide for AWS
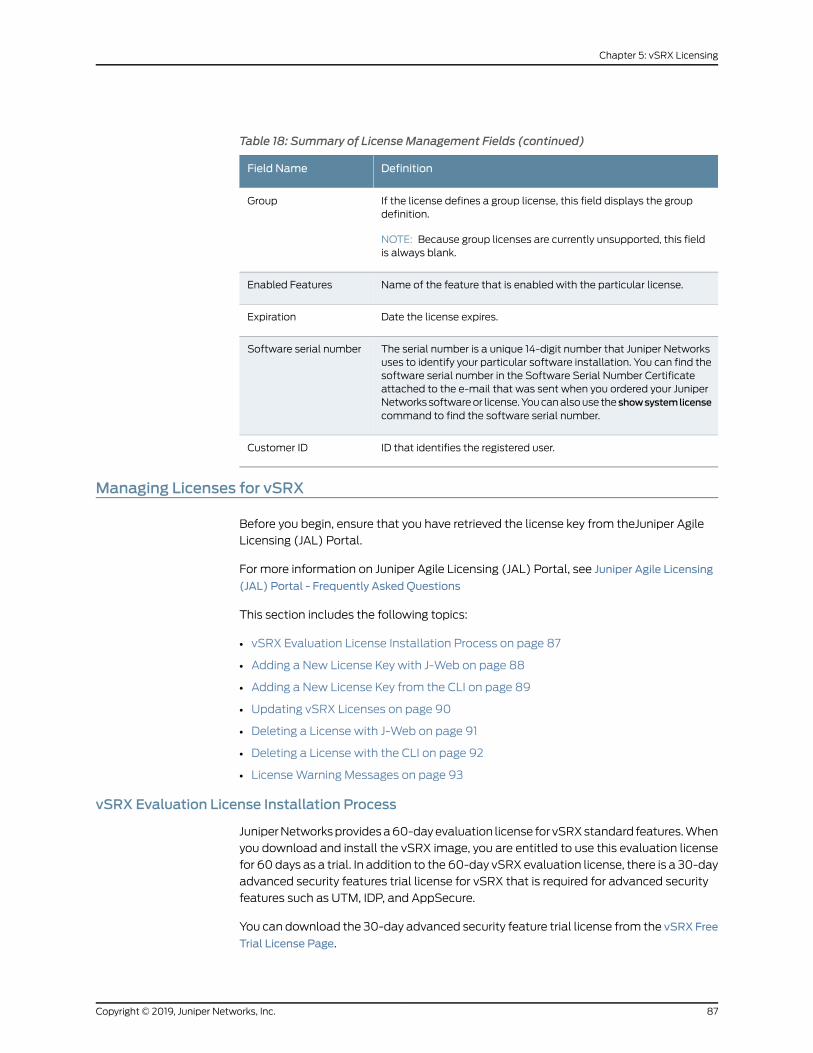
Table 18: Summary of License Management Fields (continued)
DefinitionField Name
If the license defines a group license, this field displays the groupdefinition.
NOTE: Because group licenses are currently unsupported, this fieldis always blank.
Group
Name of the feature that is enabled with the particular license.Enabled Features
Date the license expires.Expiration
The serial number is a unique 14-digit number that Juniper Networksuses to identify your particular software installation. You can find thesoftware serial number in the Software Serial Number Certificateattached to the e-mail that was sent when you ordered your JuniperNetworks softwareor license.Youcanalsouse the showsystemlicensecommand to find the software serial number.
Software serial number
ID that identifies the registered user.Customer ID
Managing Licenses for vSRX
Before you begin, ensure that you have retrieved the license key from theJuniper Agile
Licensing (JAL) Portal.
For more information on Juniper Agile Licensing (JAL) Portal, see Juniper Agile Licensing
(JAL) Portal - Frequently Asked Questions
This section includes the following topics:
• vSRX Evaluation License Installation Process on page 87
• Adding a New License Key with J-Web on page 88
• Adding a New License Key from the CLI on page 89
• Updating vSRX Licenses on page 90
• Deleting a License with J-Web on page 91
• Deleting a License with the CLI on page 92
• LicenseWarning Messages on page 93
vSRX Evaluation License Installation Process
JuniperNetworksprovidesa60-dayevaluation license for vSRXstandard features.When
you download and install the vSRX image, you are entitled to use this evaluation license
for 60 days as a trial. In addition to the 60-day vSRX evaluation license, there is a 30-day
advanced security features trial license for vSRX that is required for advanced security
features such as UTM, IDP, and AppSecure.
You can download the 30-day advanced security feature trial license from the vSRX Free
Trial License Page.
87Copyright © 2019, Juniper Networks, Inc.
Chapter 5: vSRX Licensing
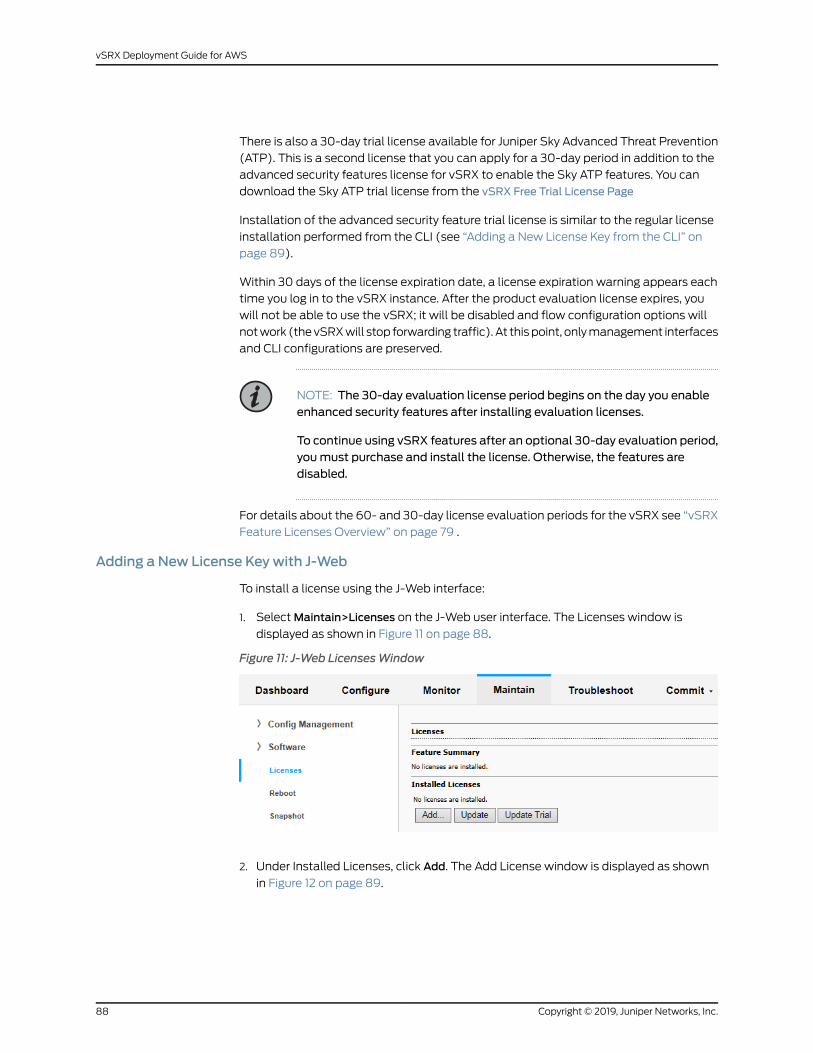
There is also a 30-day trial license available for Juniper Sky Advanced Threat Prevention
(ATP). This is a second license that you can apply for a 30-day period in addition to the
advanced security features license for vSRX to enable the Sky ATP features. You can
download the Sky ATP trial license from the vSRX Free Trial License Page
Installation of the advanced security feature trial license is similar to the regular license
installation performed from the CLI (see “Adding a New License Key from the CLI” on
page 89).
Within 30 days of the license expiration date, a license expiration warning appears each
time you log in to the vSRX instance. After the product evaluation license expires, you
will not be able to use the vSRX; it will be disabled and flow configuration options will
notwork (thevSRXwill stop forwarding traffic). At thispoint, onlymanagement interfaces
and CLI configurations are preserved.
NOTE: The 30-day evaluation license period begins on the day you enableenhanced security features after installing evaluation licenses.
To continue using vSRX features after an optional 30-day evaluation period,youmust purchase and install the license. Otherwise, the features aredisabled.
For details about the 60- and 30-day license evaluation periods for the vSRX see “vSRX
Feature Licenses Overview” on page 79 .
Adding a New License Key with J-Web
To install a license using the J-Web interface:
1. SelectMaintain>Licenses on the J-Web user interface. The Licenses window is
displayed as shown in Figure 11 on page 88.
Figure 11: J-Web LicensesWindow
2. Under Installed Licenses, click Add. The Add License window is displayed as shown
in Figure 12 on page 89.
Copyright © 2019, Juniper Networks, Inc.88
vSRX Deployment Guide for AWS
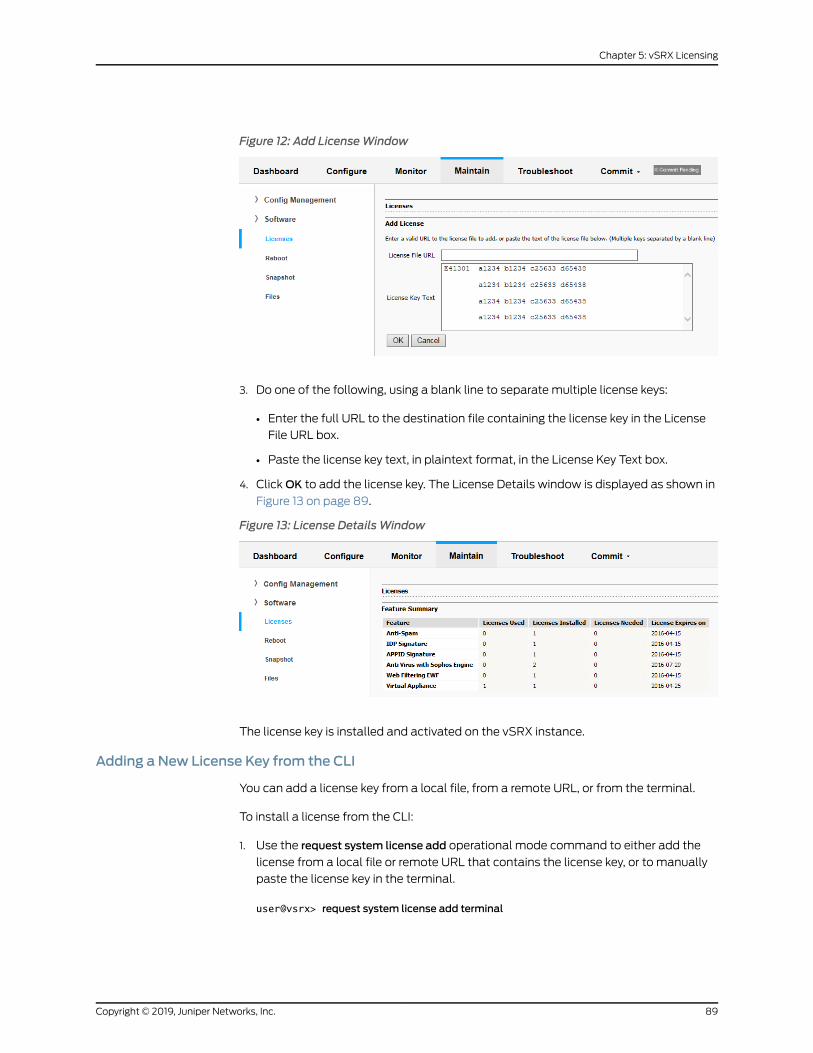
Figure 12: Add LicenseWindow
3. Do one of the following, using a blank line to separate multiple license keys:
• Enter the full URL to the destination file containing the license key in the License
File URL box.
• Paste the license key text, in plaintext format, in the License Key Text box.
4. ClickOK to add the license key. The License Details window is displayed as shown in
Figure 13 on page 89.
Figure 13: License DetailsWindow
The license key is installed and activated on the vSRX instance.
Adding a New License Key from the CLI
You can add a license key from a local file, from a remote URL, or from the terminal.
To install a license from the CLI:
1. Use the request system license add operational mode command to either add the
license from a local file or remote URL that contains the license key, or to manually
paste the license key in the terminal.
user@vsrx> request system license add terminal
89Copyright © 2019, Juniper Networks, Inc.
Chapter 5: vSRX Licensing

[Type ^D at a new line to end input, enter blank line between each license key]
E413XXXX57 aaaaaa bbbbbb cccccc dddddd eeeeee ffffff cccccc bbbbbb dddddd aaaaaa ffffff aaaaaa aaaaaa bbbbbb cccccc dddddd eeeeee ffffff cccccc bbbbbb dddddd aaaaaa ffffff
E413XXXX57: successfully added add license complete (no errors)
NOTE: You can save the license key to a file and upload the file to thevSRX file system through FTP or Secure Copy (SCP), and then use therequest system license add file-name command to install the license.
2. Optionally, use the show system license command to view details of the licenses.
root@host> show system license
License usage: Licenses Licenses Licenses Expiry Feature name used installed neededwf key websense ewf 1 0 1 invalid
Licenses installed: none
The license key is installed and activated on the vSRX instance.
Updating vSRX Licenses
You can update the vSRX licenses using either of the following twomethods:
• Automatic license update using the CLI
• Manual license update using the CLI
As a prerequisite, youmust install at least one valid license key on your vSRX instance
for required features. Automatic license updates as well as manual license updates are
performed based on a valid software serial number and customer ID embedded in the
license key.
To enable automatic license updates from the CLI:
1. Contact your account team or Juniper Networks Customer Care to extend the validity
period of existing license keys and obtain the URL for a valid update server.
2. Once you have successfully extended your license key and received the update server
URL, configure the auto-update parameter:
user@host# set system license autoupdate url https://ae1.juniper.net/
Copyright © 2019, Juniper Networks, Inc.90
vSRX Deployment Guide for AWS
3. Configure renew options (if required). The following sample allows vSRX to contact
the license server 30 days before the current license expires and sends an automatic
update request every 6 hours.
user@host> set system license renew before-expiration 30user@host> set system license renew interval 6
Tomanually update the licenses from the CLI:
1. Use the following command to update the license keys manually:
user@host> request system license update <url.of.license.server>
This command sends a license update request to the license server immediately.
NOTE: The request system license update commandwill always use the
default Juniper license server: https://ae1.juniper.net
2. Check the status of the license by entering the show system license command.
Deleting a License with J-Web
To delete a license using the J-Web interface:
1. SelectMaintain>Licenses.
2. Select the check box of the license or licenses you want to delete as shown in
Figure 14 on page 92.
91Copyright © 2019, Juniper Networks, Inc.
Chapter 5: vSRX Licensing
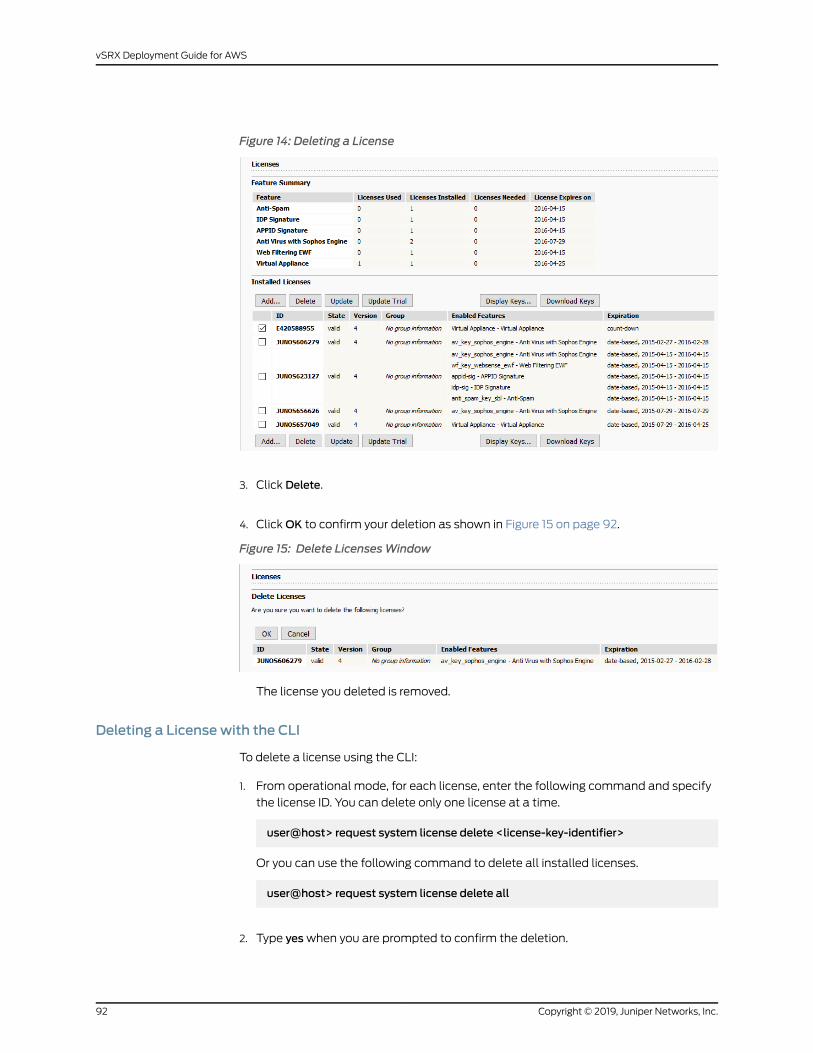
Figure 14: Deleting a License
3. Click Delete.
4. ClickOK to confirm your deletion as shown in Figure 15 on page 92.
Figure 15: Delete LicensesWindow
The license you deleted is removed.
Deleting a License with the CLI
To delete a license using the CLI:
1. From operational mode, for each license, enter the following command and specify
the license ID. You can delete only one license at a time.
user@host> request system license delete <license-key-identifier>
Or you can use the following command to delete all installed licenses.
user@host> request system license delete all
2. Type yeswhen you are prompted to confirm the deletion.
Copyright © 2019, Juniper Networks, Inc.92
vSRX Deployment Guide for AWS
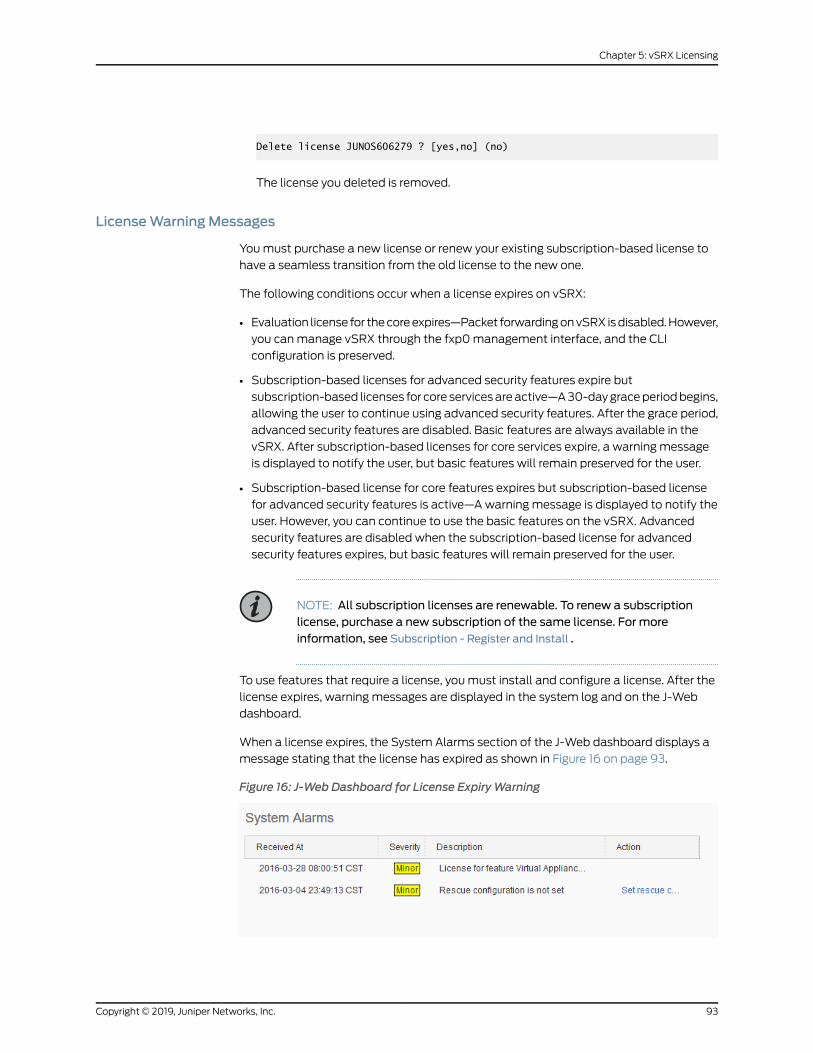
Delete license JUNOS606279 ? [yes,no] (no)
The license you deleted is removed.
LicenseWarningMessages
Youmust purchase a new license or renew your existing subscription-based license to
have a seamless transition from the old license to the new one.
The following conditions occur when a license expires on vSRX:
• Evaluation license for thecoreexpires—Packet forwardingonvSRX isdisabled.However,
you canmanage vSRX through the fxp0management interface, and the CLI
configuration is preserved.
• Subscription-based licenses for advanced security features expire but
subscription-based licenses for core servicesareactive—A30-daygraceperiodbegins,
allowing the user to continue using advanced security features. After the grace period,
advanced security features are disabled. Basic features are always available in the
vSRX. After subscription-based licenses for core services expire, a warning message
is displayed to notify the user, but basic features will remain preserved for the user.
• Subscription-based license for core features expires but subscription-based license
for advanced security features is active—Awarning message is displayed to notify the
user. However, you can continue to use the basic features on the vSRX. Advanced
security features are disabled when the subscription-based license for advanced
security features expires, but basic features will remain preserved for the user.
NOTE: All subscription licenses are renewable. To renew a subscriptionlicense, purchase a new subscription of the same license. For moreinformation, see Subscription - Register and Install .
To use features that require a license, youmust install and configure a license. After the
license expires, warning messages are displayed in the system log and on the J-Web
dashboard.
When a license expires, the System Alarms section of the J-Web dashboard displays a
message stating that the license has expired as shown in Figure 16 on page 93.
Figure 16: J-Web Dashboard for License ExpiryWarning
93Copyright © 2019, Juniper Networks, Inc.
Chapter 5: vSRX Licensing
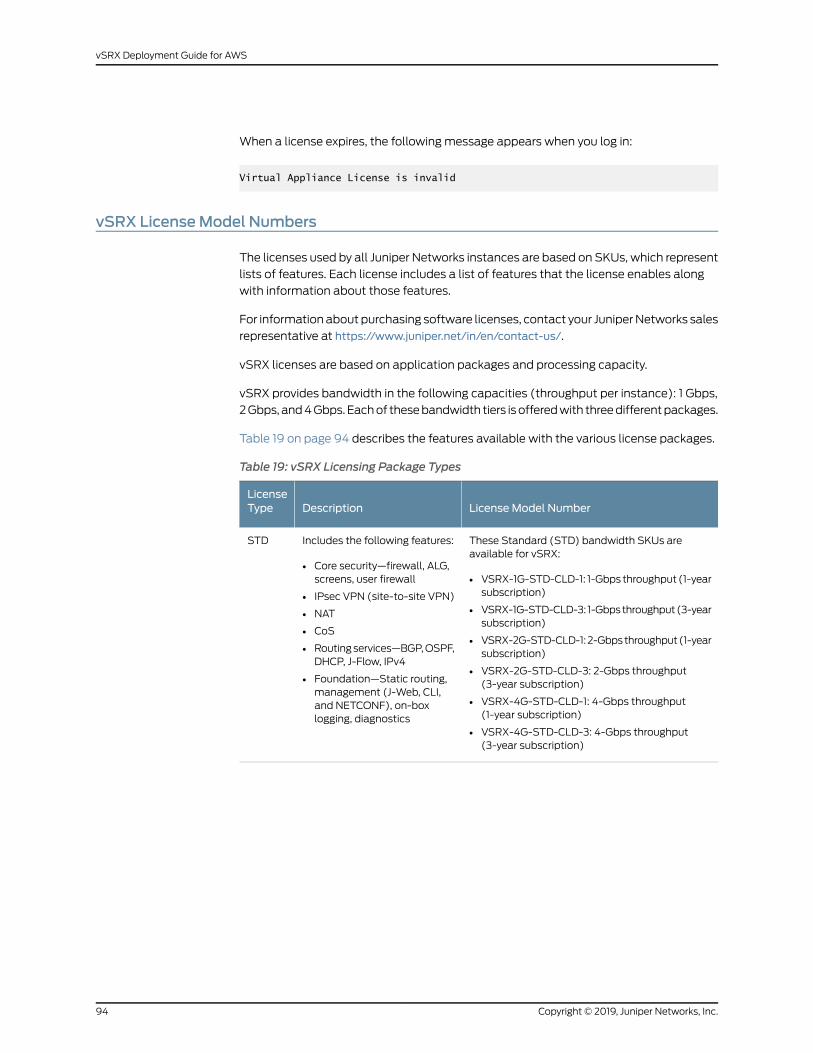
When a license expires, the following message appears when you log in:
Virtual Appliance License is invalid
vSRX LicenseModel Numbers
The licenses used by all Juniper Networks instances are based on SKUs, which represent
lists of features. Each license includes a list of features that the license enables along
with information about those features.
For information about purchasing software licenses, contact your JuniperNetworks sales
representative at https://www.juniper.net/in/en/contact-us/.
vSRX licenses are based on application packages and processing capacity.
vSRX provides bandwidth in the following capacities (throughput per instance): 1 Gbps,
2Gbps, and4Gbps. Eachof thesebandwidth tiers isofferedwith threedifferentpackages.
Table 19 on page 94 describes the features available with the various license packages.
Table 19: vSRX Licensing Package Types
License Model NumberDescriptionLicenseType
These Standard (STD) bandwidth SKUs areavailable for vSRX:
• VSRX-1G-STD-CLD-1: 1-Gbps throughput (1-yearsubscription)
• VSRX-1G-STD-CLD-3: 1-Gbpsthroughput(3-yearsubscription)
• VSRX-2G-STD-CLD-1:2-Gbpsthroughput(1-yearsubscription)
• VSRX-2G-STD-CLD-3: 2-Gbps throughput(3-year subscription)
• VSRX-4G-STD-CLD-1: 4-Gbps throughput(1-year subscription)
• VSRX-4G-STD-CLD-3: 4-Gbps throughput(3-year subscription)
Includes the following features:
• Core security—firewall, ALG,screens, user firewall
• IPsec VPN (site-to-site VPN)
• NAT
• CoS
• Routingservices—BGP,OSPF,DHCP, J-Flow, IPv4
• Foundation—Static routing,management (J-Web, CLI,and NETCONF), on-boxlogging, diagnostics
STD
Copyright © 2019, Juniper Networks, Inc.94
vSRX Deployment Guide for AWS
Table 19: vSRX Licensing Package Types (continued)
License Model NumberDescriptionLicenseType
TheseAppSecurityBundled(ASB)bandwidthSKUsare available for vSRX:
• VSRX-1G-ASB-CLD-1: 1-Gbps throughput (1-yearsubscription)
• VSRX-1G-ASB-CLD-3: 1-Gbpsthroughput(3-yearsubscription)
• VSRX-2G-ASB-CLD-1:2-Gbpsthroughput(1-yearsubscription)
• VSRX-2G-ASB-CLD-3: 2-Gbps throughput(3-year subscription)
• VSRX-4G-ASB-CLD-1: 4-Gbps throughput(1-year subscription)
• VSRX-4G-ASB-CLD-3: 4-Gbps throughput(3-year subscription)
Includes all STD featuresbundledwith IPSandAppsecuresignatures, along with thefollowing features:
• AppID
• AppFW
• AppQoS
• AppTrack
ASCB
These Content Security bundled (CSB) bandwidthSKUs are available for vSRX:
• VSRX-1G-CSB-CLD-1: 1-Gbps throughput (1-yearsubscription)
• VSRX-1G-CSB-CLD-3: 1-Gbpsthroughput(3-yearsubscription)
• VSRX-2G-CSB-CLD-1:2-Gbpsthroughput(1-yearsubscription)
• VSRX-2G-CSB-CLD-3: 2-Gbps throughput(3-year subscription)
• VSRX-4G-CSB-CLD-1: 4-Gbps throughput(1-year subscription)
• VSRX-4G-CSB-CLD-3: 4-Gbps throughput(3-year subscription)
Includes all STD features, alongwith the features bundled withASCB, including the addition ofthe following UTM features:
• Antivirus
• Content filtering
• Web filtering
CSB
NOTE: License stacking is allowed. So, for example, to license 3 Gbps ofthroughput for the standard (STD) feature set for 1 year, use aVSRX-1G-STD-CLD-1 license and a VSRX-2G-STD-CLD-1.
95Copyright © 2019, Juniper Networks, Inc.
Chapter 5: vSRX Licensing

Copyright © 2019, Juniper Networks, Inc.96
vSRX Deployment Guide for AWS
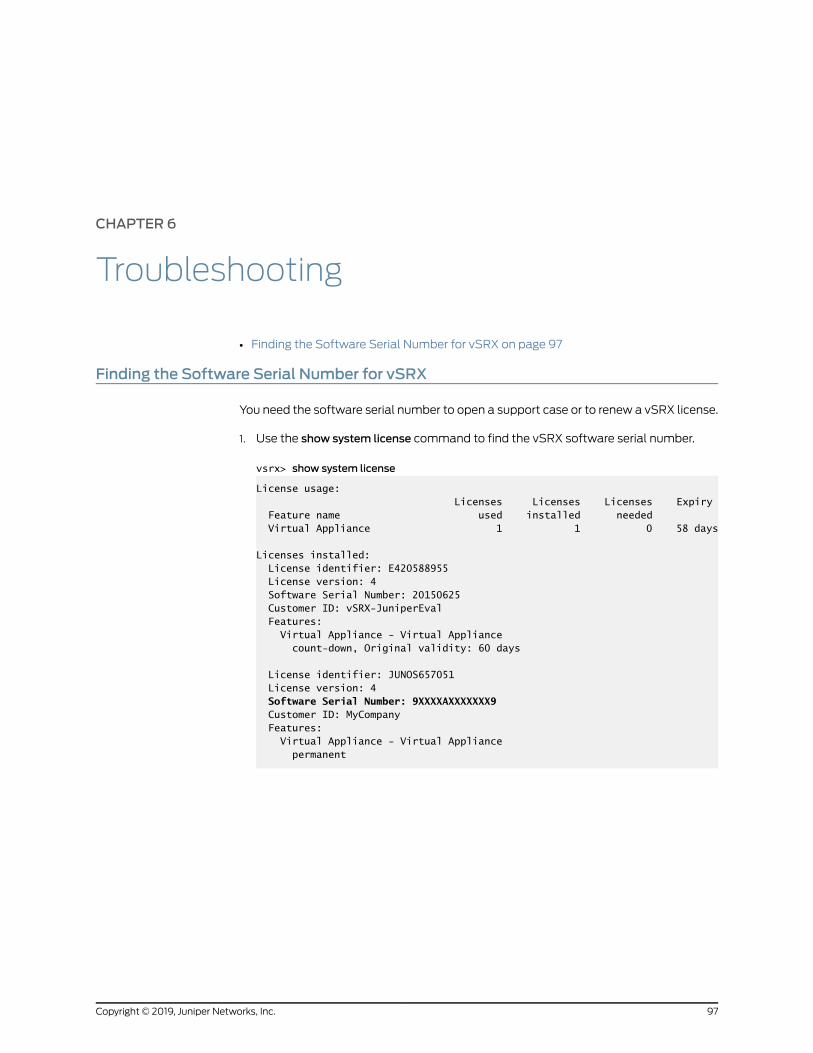
CHAPTER 6
Troubleshooting
• Finding the Software Serial Number for vSRX on page 97
Finding the Software Serial Number for vSRX
You need the software serial number to open a support case or to renew a vSRX license.
1. Use the show system license command to find the vSRX software serial number.
vsrx> show system license
License usage: Licenses Licenses Licenses Expiry Feature name used installed needed Virtual Appliance 1 1 0 58 days
Licenses installed: License identifier: E420588955 License version: 4 Software Serial Number: 20150625 Customer ID: vSRX-JuniperEval Features: Virtual Appliance - Virtual Appliance count-down, Original validity: 60 days
License identifier: JUNOS657051 License version: 4 Software Serial Number: 9XXXXAXXXXXXX9 Customer ID: MyCompany Features: Virtual Appliance - Virtual Appliance permanent
97Copyright © 2019, Juniper Networks, Inc.

Copyright © 2019, Juniper Networks, Inc.98
vSRX Deployment Guide for AWS