Volunteer Connectons User Manual - charemunitedway.org · Web viewto select the waiver to upload....
56
Volunteer Connections Agency User Manual A digital copy of this manual is available at www.CharEmUnitedWay.org/VCManual CEUW Volunteer Connection Website:
Transcript of Volunteer Connectons User Manual - charemunitedway.org · Web viewto select the waiver to upload....

Volunteer Connections Agency User Manual
A digital copy of this manual is available at www.CharEmUnitedWay.org/VCManual
CEUW Volunteer Connection Website:www.CharEmUnitedWay.org/Volunteer

Table of ContentsQuick Reference..............................................................................................2
Login Link......................................................................................................2Create a need...............................................................................................2Clone a Need................................................................................................2Add an Event................................................................................................3
Need Field Directory........................................................................................3Login................................................................................................................5New Agencies..................................................................................................5
Registering....................................................................................................5Your Agency's Profile Page...........................................................................6
The Agency Manager View.............................................................................18Opening Agency Manager View..................................................................18
Events............................................................................................................19Adding, Cloning and Deleting Events:.........................................................19Event RSVPs and Event Capacity................................................................20Linking Your Event and Volunteer Needs together.....................................21
Creating Needs..............................................................................................22Opportunity Scheduling: Posting Needs with Shifts.......................................26
Custom Shifts..............................................................................................26Recurring Shifts..........................................................................................29A Note About Removing Shifts....................................................................31
Managing Volunteer.......................................................................................31Volunteer Check-in.....................................................................................32Schedule Tab..............................................................................................37
Viewing Agency Statistics..............................................................................38Agency Engagement: Spread the Word!........................................................39Your Agency Manager Digest Email...............................................................42Help Resources..............................................................................................42
Quick ReferenceImportant Links

Login Link: https://charemunitedway.galaxydigital.com/user/login/
Link to Complete Manual:
http://www.charemunitedway.org/VCManual
Create a need:Manage Agency (top right side of screen in black bar) > Click Needs (picture 1) > click Add Need button (picture 2)
Photo 1: The Managers toolbar Photo 2: How to add a new need
Clone a NeedLogin > Manage Agency > Needs tab > Needs Title > Clone Need (bottom of page) > update any changes to the need
Add an EventLogin > Manage Agency > Events tab > Add New Event button (top of the list of your events, on the right side).To clone the event, use the same process as with cloning a need, only select the event, scroll to the bottom of the page and select Clone Event.
Need Field DirectoryRed indicated required fields; underline indicates a link to more information
in the complete guide.Field Description

TitleEnter a need title.
Tip: Avoid generic titles such as "Volunteers Needed"; try to be specific and engaging with your
titles.
DescriptionEnter a need description. If training or a background check is required, you can include that information
here.
Initiative
Select the initiative, if applicable, with which to associate the need.
*Initiatives are created by Char-Em United Way only, and will mainly be used to designate Season of
Caring projects.
Duration
Select a duration. Options are Ongoing, Runs Until, Happens On, Custom Shifts, and Recurring Shifts. For needs associated with a particular date,
users can search by date, and also by "soonest first." Creating and using shifts are detailed in the Duration
section of this manual.Note: Please do NOT select “Ongoing”. If it is a consistent need, please choose “Runs Until” and make the date one year from when you create the
need. Please see the Duration section for more information.
Capacity If applicable, enter the number of volunteers slots available for this need.
Allow Team Registration?
Indicate whether or not you want to allow team registrations. When searching needs, users can filter needs by which opportunities accept (or don't accept)
team registrations.
Minimum AgeSelect the minimum volunteer age accepted for this need. Once you've entered an age range (starting
with this field), volunteers can search for the needs best suited to their age group.
Maximum AgeSelect the maximum volunteer age accepted for this
need. Once you've entered an age range (starting with the previous field), volunteers can search for the
needs best suited to their age group.
Family Friendly?Indicate whether the need work-environment is family-friendly; meaning parents can bring their
children to help. Volunteers can search specifically for family-friendly needs.
Outdoors? If you select Yes to indicate an outdoor need, you will have the opportunity to provide inclement weather
plans. Volunteers viewing this need will see this

information in the Details area at the bottom of the need-information page. They will also be able to
search all needs on your site by which ones are (or are not) outdoors.
Wheelchair Accessible?
Indicate whether the need will be wheelchair-accessible. Volunteers viewing this need will see this information in the Details area at the bottom of the
need-information page. They will also be able to search all needs on your site by which ones are (or
are not) wheelchair-accessible.
Attributes
If you want additional details to stand out from the description above, include them here. Each detail
(attribute) must be 200 characters or fewer. This can be “wear closed-toe shoes” or “lunch provided.”
Attributes appear in the Details section at the bottom of the need-information page.
Address Enter the address of the opportunity.Zip Code Enter the zip code associated with the opportunity.
Users can search needs by ZIP codes.
Interests & Abilities
Select interests related to the need. Your selections will help the site to match up this need with potential volunteers. Users can also search needs by interest.
See the Interests section for more information. This is NOT referring to your type of agency- that is
“causes” listed under your organization description.
Clusters
Select which pertain to this NEED only (and not the entire organization). Select from a drop-down list: animals, youth, elderly (is the opportunity to work directly with animals/youth/elderly?), weekly shifts
needed (are there regularly weekly shifts needed for this opportunity, such as, needing someone to work
every Wednesday from 2-4pm)?
Additional Notification Recipients
If you wish to have certain people copied on all responses to this need, toggle this option On and
type each email address on a separate line. It is best to leave any default email addresses populated in
this field.
Waiver
If a waiver is added, a volunteer must indicate that he or she agrees to it before they can complete their
need response. Click Choose File to select the waiver to upload. Acceptable file formats
are .doc, .docx, and .pdf.

Using the Schedule and Check-In Tabs:On your Manage Agency page, under the large red box, you’ll find tabs for both the schedule and check-in.
ScheduleA calendar view that shows who is scheduled for each day. This displays people who have registered for shifts or “happens on” needs (it does not display “runs until” need responses).
Hold your cursor over a volunteer's name (don't click) to see the details of the need response.
Click on the volunteer's name to be taken to the need information page.
A similar calendar is available to volunteers so that they can see their personal volunteer schedules. That calendar is available in the user profile.
Check-InThis tab allows the agency to set up a centralized check-in place for volunteers. By utilizing the check-in feature, hours are automatically approved and assigned to that user. Volunteer Users do not have to have a VC account to use the check-in feature, and will just be asked to provide their name during the sign-in process.
Click on the check-in tab > select the need that people are signing in for > select individuals button -- Now users will be able to easily sign in and out of volunteer opportunities and will not have to track their hours. Additionally, if a need is associated with a length of time, for instance, if someone signs up for a 3 hour shift, they actually only need to sign in OR out, and the program will automatically assign the hours to that volunteer.
If the agency would like to sign people in and out “in bulk” they would select the List view under the need, and can check people in from a list of all registered volunteers.
This is a great way to easily track volunteer hours for both the individual and the agency!

LoginVisit
www.CharEmUnitedWay.com/Volunteer Click the Login button located in the top
right-hand corner of the page.Enter your credentials, and you will be taken to your Agency Dashboard
page.
New AgenciesRegistering
Visit www.CharEmUnitedWay.com/VolunteerTo register, under the search
bar, you'll see the question, "Do you represent an agency?"
Click the “Learn what Volunteer Connections can do for you.”
link.
OR click the Sign Up or Login button located in the top right-hand corner of the page.

Under the Create an Account heading, click the link for signing up an agency.
Both of these registration methods will take you to the fields needed for signing up an agency. Once you've completed these fields, click Request
Account.Note: The email address you provide is will be associated with the primary
agency manager unless otherwise specified.Note: Clicking Request Account indicates that you have read and agree to
the site's terms and conditions, if applicable.You should be taken directly to your agency manager page. If you aren't, just
click the Manage Agency button at the top of your screen.You are now ready to create your agency's profile.
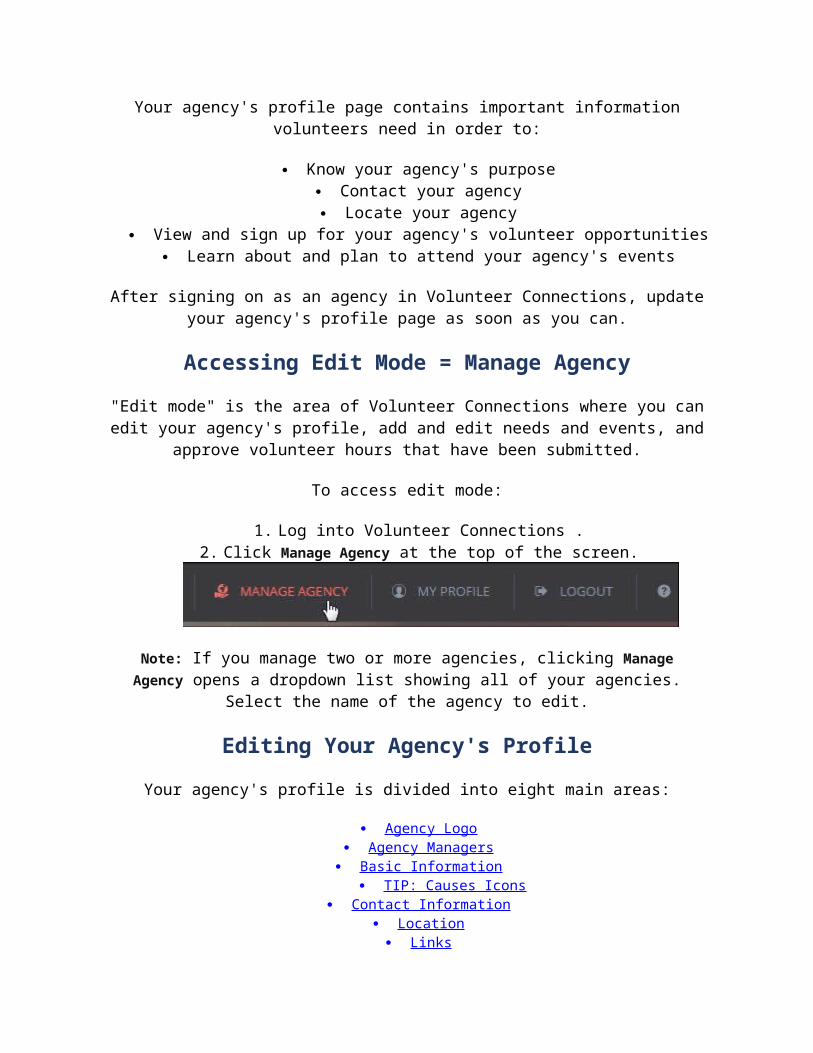
Your Agency's Profile PageYour agency's profile page contains important information volunteers need in
order to:
Know your agency's purpose Contact your agency Locate your agency
View and sign up for your agency's volunteer opportunities Learn about and plan to attend your agency's events
After signing on as an agency in Volunteer Connections, update your agency's profile page as soon as you can.
Accessing Edit Mode = Manage Agency"Edit mode" is the area of Volunteer Connections where you can edit your agency's profile, add and edit needs and events, and approve volunteer
hours that have been submitted.

To access edit mode:
1. Log into Volunteer Connections .2. Click Manage Agency at the top of the screen.
Note: If you manage two or more agencies, clicking Manage Agency opens a dropdown list showing all of your agencies. Select the name of the agency to
edit.
Editing Your Agency's ProfileYour agency's profile is divided into eight main areas:
Agency Logo Agency Managers Basic Information
TIP: Causes Icons Contact Information
Location Links
Descriptions Photos
Note: Be sure to click Update Agency Info button to save all of the information in your profile--regardless of what areas have been edited since
the last update.
Agency LogoYour agency logo is an important part of your agency profile; it appears in agency listings, as well as on the main page of every need and event you
post. It shows up as follows in grid view:
If you don't upload a logo, then the first letter of your agency's name will be displayed in a colored box in place of a logo:
Note: The color of the box changes with each new view.
Uploading Your Agency's Logo
To upload your agency's logo to Volunteer Connections:
1. Go to Manage Agency -> Edit

2. Under the "Agency Logo" heading, click Upload Logo.
3. Browse to the logo, select it, and click Open.
Note: The image should be at least 540 pixels by 540 pixels. You'll be able to resize it in the next step.
4. (as needed) Click and drag the borders to resize the image.5. Click Save Agency Logo.
Note: To remove a logo, click Remove under the Upload your logo heading. To replace an existing logo, first remove it and then upload a new one.
Making Your Logo Appear Larger
Some logos may appear larger than others in the agency card. Here are a couple of tips for making your logo appear as large as possible in the space
provide:
Use a logo that is roughly as wide as it is tall. Perfect squares and circles are best.
Use the cropping tool to crop out as much surrounding white space as you can, or crop the photo before uploading it.Creating Agency Managers
In Volunteer Connections, an agency manager is someone who can access edit mode for a particular agency. This individual can edit the agency's profile,
post needs, post events, and approve hours on behalf of the agency.

Each Volunteer Connections agency must have at least one manager. For agencies with multiple managers, one person serves as the primary agency
manager while all others are secondary.
Primary and Secondary Managers
To register an agency with Volunteer Connections, you must submit an email address. The system associates this email address with primary agency
manager. A primary agency manager can add and delete secondary managers.
Secondary agency managers can be added to an agency once it's been created in Volunteer Connections. They have all of the agency manager capabilities mentioned above but cannot add or delete other managers of their agency.
Note: Volunteer Connections allows up to 12 managers per agency.
Adding a Secondary Manager to an Agency
To add additional managers to an agency:
1. Go to edit mode for your agency. Under the "Managers" heading, you'll see the name of the primary manager (and any other managers).
2. Begin typing the email of the individual to be added. If that email is registered with Volunteer Connections, it will show up and you can
select it.

Note: If the person's email address is not displayed, the person is probably does not have a Volunteer Connections account. If you're certain that they
do have an account, check the spelling or consult your records to make sure you have the correct address.
It is not necessary to click an Update Agency Info button; the manager information is saved automatically.
Deleting a Secondary Manager
Only a primary manager (or an admin) can delete a secondary manager from an agency. The instructions below pertain specifically to agency managers
who are the primary managers for their agencies.
To delete a secondary manager:
1. Go to edit mode for your agency. Under the "Managers" heading, you'll see the name of the primary manager (and any other managers).
In the image above, note that the Annabelle Admin has a solid star next to her name, indicating that she is the primary manager. Meriwether Manager has a clear star, indicating that he is the
secondary manager.2. Click the X next to the secondary manager's name to delete it, and
then click Yes to confirm the deletion.Making a Secondary Agency Manager Primary
The primary agency manager has the ability to make someone else the primary manager for their agency.
Important: Each agency has only one primary manager. If, as the primary manager, you make someone else the primary manager, you will
automatically become a secondary agency manager and will no longer be able to make changes to the other managers listed.

To change a secondary agency manager to a primary one:
1. Go to edit mode for your agency. Under the "Managers" heading, you'll see the name of the primary manager (and any other managers).
Note that the primary manager (Annabelle Admin) has a solid star next to her name. This solid star indicates primary manager status, while the outline of a star (such as the one next to Meriwether Manager's
name) indicates secondary manager status.2. Click on the secondary manager's star outline, and then click Yes to
confirm that you want to make that individual the primary manager.
Once you have given someone else primary manager status, you will no longer see the X that allows you to delete another manager. You'll also see
only the solid star that indicates the primary manager. In the example below, we are still logged into Annabelle Admin's account, but she is no longer the
primary agency manager.
Basic InformationThe "Basic Information" section of the profile contains the fields described
below.
Agency Name
The name of your agency; completed automatically based on your entry when signing the agency up.
Direct Link
Your agency's direct link consists of this site's web address and a brief, unique label that you control. Use this field to

enter that unique label. It should be your agency's name or an abbreviated version of it.
In the example above, Community Paws Pet Therapy's profile page will consist of the site's URL for agencies (for example, anytownvolunteercenter.org/agency/detail), plus that direct
link.
Hours of Operatio
nBecause this is a free-text field, you do not have to use any
special format to enter days and times.
CausesUse this field to identify your agency’s type. Your selections will be used to match volunteers with agencies that interest
them. See CAUSES section below for more information.
Agency Video
Once you've uploaded your agency video to YouTube or Vimeo, enter your video's YouTube or Vimeo URL here.

Causes and Related Icons
Details about Causes and Icons
When registering your agency, you'll want to associate your agency with one or more causes. Your Connect site uses these causes to match your agency up with like-minded volunteers. Each cause is associated with an icon, as
listed below. VERIFY ICONS WE USE.
Icon Cause Types of Agencies

Arts and Culture
art centers; music, theatre, and other performance groups; arts education; museums; science centers; historical
centers
Basic Needs shelters; food banks; clothing donations; nonprofit thrift shops
Community cultural awareness; assistance for vision- or hearing-impaired; scouting; animal shelter and adoption
Crime & Safety law enforcement; community watch
Crisis domestic violence; drug treatment; hotlines
Disaster Response Red Cross; disaster and relief services
Education after-school services; tutoring; awareness; training; scouting
Employment job training; job placement; professional development
Environmentenvironmental awareness; conservation and recycling;
hiking and other outdoor clubs; animal welfare; scouting; animal shelter and adoption
Equality human rights; marriage equality; racial equality; women's rights
Family children's services; adoption; scouting; animal shelter and adoption

Health medical services; nutrition; special-needs camps; addiction services; therapeutic centers; health awareness
Housing housing assistance; shelters; home-building
Income income tax assistance; financial planning and management
Mental Wellness
support groups; addiction and recovery; therapeutic centers; survivor groups; hotlines
Veterans veterans' societies; health services; support groups
Contact InformationThe "Contact Information" section of the profile consists of fields described
below. This information is displayed publicly on your site.
Email Enter the email address your agency uses for general inquiries.
Phone, Fax Enter your agency's phone and fax (if applicable) numbers.
Contact Person Enter the name of the agency's primary contact.
Contact Title Enter the primary contact's title.
Additional Contact Email Addresses
Enter the emails you would like to have copied (cc'ed) on all need
responses and RSVPs sent to the agency managers.

Note: A person does not have to have a Volunteer Connections user account in order to be listed as a primary contact or additional agency contact
Important: The email address entered here is for viewers who wish to contact your agency by email. It is not used for automated notifications. Only the agency managers and additional contacts receive automated Volunteer
Connections notifications.
LocationThe address you enter here will be shown on the map on your profile page. Note: If you don't want your address to be public or shown on a map, you
can enter a P.O. Box instead of a street address.
The Additional Location Information field can be used for the following types of information:
Parking instructions if needed Landmarks to help people find you
Instructions for getting to a suite or other office within a larger building Information about multiple locations
LinksUse this section to provide your website URL, along with your Facebook and Twitter pages.
DescriptionsThe "Descriptions" area of your profile consists of two sections:
Who We Are - Your agency's history, mission, and vision What We Do - Your agency's programs; the various efforts your agency
take to realize its vision

Because the descriptions are so important, they appear at the top of your agency profile page, next to the logo.
Tip: For easier viewing, try to limit your descriptions to just a couple of paragraphs.
PhotosYou can add up to 12 agency photos. Photos are displayed in slideshow
format at the bottom of the page. Photos must be image files (jpg/jpeg, png, or gif) in order to load properly.
To add a photo:
1. In the "Photos" section of your profile editing page, click Add New Photo.
2. Browse to the photos you want to add and select them.3. Either click Open or simply drag and drop the photos into the Add New
Photos box. This action adds the pictures to your page.4. Click Okay, or click Refresh Now to view the pictures on your profile
editing page.
To see the slideshow of your photos, scroll to the top of the page and click View.

The photos are automatically displayed as a slide show, but a user can also manually scroll through them by clicking the arrows in the bottom left-hand
corner of the picture.
The Agency Manager ViewAgency manger view is the area of Volunteer Connections where agency managers can perform all of their agency manager tasks, which will be
discussed in future sections. This section is to orient you to the Manager View.
Opening Agency Manager ViewTo access your agency manager view, click the My Agency button at the top
right of your screen. Your screen should look similar to this:
Agency Manger’s Toolbox: this is where you can find all of these resources online, as well as videos and live trainings.
Tabs (if underlined, click to go to that section of this manual for more information):
View View your agency's profile page as a visitor to the site would see

it.Edit Edit your agency's profile page; add agency managers; add
photos.Needs Post a new need and manage existing ones. You can also select to
view inactive needs.Events Post a new event and manage existing ones. You can also select
to view inactive events.
StatsView statistical information that Volunteer Connections stores for
your site. This tab shows profile views, agency fans, need responses, and hours submitted for the past month. You can
change the date range as needed.Schedul
eView the individuals who are scheduled to volunteer for your agency in a selected month. See Managing Your Volunteer >
Schedule for more information about this tab.Time
TrackingApprove (or deny) submitted volunteer hours; submit volunteer
hours on behalf of volunteers. Click the Link to go to the Volunteer Connection training pages for more information.
Check-in Set up the volunteer check-in tool for volunteer sign-in.
EventsUse the Events feature to invite the public to one of your events to attend as a guest not necessarily as a volunteer. To link your volunteer needs and events, please see the corresponding section to provide links within each
posting.
This portion of the site to is open to anyone, and we encourage everyone to post their community events here. If the nonprofit community uses this
calendar, then we will have one unified location to help everyone plan and organize events that do not conflict. This is a great opportunity for our users.
This calendar is the calendar used on the Char-Em United Way website, so any of your events will be featured on the United Way site for free.
Once a year, nonprofit organizations may request an email blast to all of the Volunteer Connect users to promote their event.
Adding, Cloning and Deleting Events:Login > Manage Agency > Events tab > Add New Event button (top of
the list of your events, on the right side).
To clone or delete the event:

Use the same process as with cloning/deleting a need:Manage Agency > Events tab > Select event title > scroll to bottom of the
page for the Clone and Delete buttons
Important: When offering the same (or a similar) event multiple times, always opt to use the cloning feature to create a brand-new event (rather than simply updating the old information). Merely updating an event does not cancel the RSVPs from the original event--which can result in the new
event "filling up" when it isn't really full. Cloning also allows you to create a new event ID for your records, as well as not copying the RSVPs over and
generating a new “created on” date.
Event Fields ListField NotesTitle The title for the event.
Enable RSVPs?Toggle ON to require RSVPs from those signing up for the event through Volunteer Connections. (See Event RSVPs
and Event Capacity for more information.)
RSVP Capacity
If RSVPs are enabled, you may enter the maximum capacity for the event. Otherwise, keep it at zero.
(See Event RSVPs and Event Capacity for more information.)
Note: This field is not visible unless you have selected the RSVP option.
DescriptionEnter a description of the event.
Note: You can download an image of the event flyer into this box.
All Day EventToggle ON to indicate an all-day event.
Note: For an all-day event, you are required to enter a start time but not an end time.
Start and End Date/Time
Select the date from the calendar, and use the slider to select the event's start and end times.
Note: The date/time you enter should refer to the date and time of the event, not the date and time you want it
to be publicized on Volunteer Connections.Event Contact Enter the contact person’s name.Contact Email Enter the contact person’s email address.Contact Phone Enter the contact person's phone number.Event Location Type the name of the place where the event will be held.
Address Enter the full address of the event location.

Event RSVPs and Event CapacityVolunteer Connection’s RSVP feature allows a user to respond easily to an event. If a user indicates that they will attend, two email notifications are
sent out:
An email to the user, confirming the event information An email to the agency manager, informing them of the RSVP
When you opt to enable RSVPs, the Event Capacity text box appears.
While this box is good to use for events that have a limited capacity, it’s a good idea to use it for other events as well. If capacity is unlimited, enter 0
(zero) or leave the field blank.
When the RSVP capacity has already been met and someone tries to sign up for your event, they will get a message that the event is full. Their RSVP will be changed to “Maybe,” and an email will be sent to the agency manager,
informing them of the individual’s interest in the event.
Linking Your Event and Volunteer Needs together
Volunteer Connection recognizes how closely related needs and events can be, and we've made it easy to reflect this in your postings. Specifically, you
can have your need postings link to the event, and to have your event

posting link to the related needs, as shown in the event post below:
Linking Needs and EventsFirst create all of your needs for this event (see the next section for details on creating needs). Then contact Char-Em United Way to request a unique tag for your event. Char-Em United Way will create a unique tag for your
event, and will tag them all in the backend. CEUW will then provide you with a link you can post to your Events listing that will direct the user to a page with all of the needs listed together. This way you can include one link that shows all of the tickets sales shifts needs, the shifts needed to put up the
signs a few days before the event, and the need for someone to sweep after the event all together.
You can create the Event listing at any point. You can then copy the event URL and then paste that URL on your need pages in the description area.
Creating NeedsNotes:
- For information on managing need responses, please see the Managing Volunteers section of the manual.
- Need and Opportunity are used interchangeably. See the Needs Fields Directory for help with filling out this section.
How to Post a NeedTo post a need on Volunteer Connections site (see Quick Reference Guide):
1. Log in and go to your agency management area by clicking the My Agency button at the top of your screen. If you manage more than
one agency, click My Agencies and select from the list provided. - By default, you will be taken to the Edit tab of the agency manager
view.2. Click Needs tab towards the middle of the page.
3. Click Add New Need to open the Create Need form.

4. Complete the fields in the form. Fields are described in the next section.
5. Click Create Need.
A Note on Duration
Do Not Select Ongoing NeedsFor Char-Em United Way, please do not select Ongoing. If it is a consistent need, then please select Runs Until and set the date one year from when you create the need. After one year, you will be reminded of your expiring
need and can clone the event. This keeps the website updated and is easier for volunteers to find your needs. If Ongoing is selected, Char-Em United
Way will edit your need to be displayed for one year.Runs Until and Happens On
If you indicate that a need will be something other than Ongoing, you'll be shown fields for entering more information.
The additional fields (Capacity, Hours, and Registration Closed Date) are optional.
If you are accepting a limited number of volunteers, enter the number of volunteers needed in the Capacity field. The number of available
volunteers will be displayed on the public site; as each volunteer responds, the number of available volunteers displayed will decrease.
In this example, there are 20 volunteer spots remaining.
Once the capacity has been met, the need will be displayed as "full," and volunteers will no longer be able to see or respond to it. Those who
have responded to the need will still be able to access it via their profile or a saved link.
If the need is going to take place at a certain time of day, you can enter the time(s) in the Hours field. This information is shown on the
need information page.
If you want to indicate a cut-off date for registration (after which volunteers can no longer respond), indicate that date in the
Registration Closed Date field. Users will still be able to access the need information, but they will not be able to respond once the
"registration closed" date occurs. The need itself will be displayed as "Closed."
Custom Shifts and Recurring ShiftsPlease see the “Opportunity Scheduling” for a detailed explanation of using
and managing shifts.

How to Edit a NeedTo edit an existing need:
1. In the agency manager view, click Needs. All of your agency's existing needs are displayed in a table under Manage Needs.
Note: Expired needs are shown in faded text. To sort needs by ID, title, date, date type, date added, date updated, or status, click on a
column heading.2. Click on a need to edit it (or click the Edit link beneath the need title.)
3. After making your changes, click Update Need.
Clone a NeedOnce you've created a need, you can clone it as many times as necessary.
This is useful to update an expired need. (If you just update the original need, the “created on” date does not change and it will filter lower in search
results).
To clone a need:
1. Open the need you wish to clone. From the agency page, select the Needs tab (under the large Managers Toolbox red box), then select
the need you wish to clone by clicking on the underlined title (expired needs are greyed out but you can still select them).
2. Click Clone Need (located at the bottom of the screen), and then click Yes to confirm.
Volunteer Connections displays the cloned need.

3. This need is identical to the base need, with one difference: The title includes the word "copy" in parentheses. Update the title by removing
the word "copy."4. Update the need details as required.
5. Click Update Need to save the cloned need.
To clone another need, simply click Clone Need again and repeat the process described above.
How to Deactivate a NeedWhen a need is deactivated, it is no longer displayed on your site, and
volunteers can no longer respond to it.To deactivate a need:
1. In the agency manager view, click Needs. All of your agency's existing needs are displayed in a table under Manage Needs. (See image
above)2. Check the box to the left of each need(s) you want to delete.
3. Click on the "trash can" icon in the Actions row above the table.4. Click Yes to confirm that you are deactivating the need.
Note: To view an inactive need, click the Show Inactive button (shown in the image above). To reactivate an inactive need, click on it and
select Active from the Status dropdown.
Interest and Related IconsWhen posting a need in Volunteer Connections, you'll be asked to associate the need with one or more categories, or interests. Volunteer Connections
uses these categories to match opportunities up with interested volunteers.Each interest is associated with an icon, as listed below.
Icon Interest Typical Opportunities/Needs
Administrative/ Clerical
customer service, office duties; grant writing
Advocacy
outreach coordinators; speakers; letter-writing; organizing; education;
research; rallies; voter education; lobbying; legal; attending public
meetings; community forums; phone bank
<Hands with heart> Assistance/Aid
providing assistance to the elderly, providing help to a professional, in-
home care

Board Service advisory board; executive board; committee service
Court-Mandated This need/opportunity would work for court-mandated volunteer work
Education, Teaching, Mentoring, Coaching
tutoring; Bigs; coaching; arts instruction; homework help; training;
reading/literacy; STEM; mentoring
<Hands with Leaf> Environmental
Trail cleanup, working for conservation agency, water study
help<balloon> Event Help event preparations; ticket sales; day-
of
Food Prep or Service meal preparation; serving food; food pantry work; hunger relief
In-Kind monetary; clothing; canned and non-perishable foods
Laborconstruction; painting; home repairs;
electrician; cleaning; carpentry; maintenance; garden work
Marketing/ ITsocial networking; phone calls;
managing/implementing technology; developing/disseminating flyers,
brochures, and other marketing tools
Medical first-aid classes; healthcare/hospice

Nonprofit Professional internships; finance; development; AmeriCorps; clerical; program;
contract; executiveProfessional Services Legal, financial, nursing, or business
professionals needed
Social client interaction; time to interact with other volunteers
Opportunity Scheduling: Posting Needs with Shifts
Click here to view a video on opportunity scheduling.
Custom ShiftsCustom shifts are those that don't occur at the same time each day. Here are
some examples of needs that would fit into the "Custom Shifts" category:
Multiple shifts within a single day, such as serving shifts at a soup kitchen
Shifts that occur at different times on different days Shift that may occur at the same time but require a different number
of volunteers each timeAssigning Custom Shifts to a Need
The instructions below assume that you are already on the Create Need page, which you can access by going to your agency manager view,
clicking Needs and then clicking Add New Need.
To assign custom shifts to a need:

1. Select Custom Shifts from the Duration dropdown.
2. Complete the three Shift fields that appear. These fields are described below.
Field Description
Shift Date/Time
Click inside this field to view the date/time picker. Choose the date of the shift from the
calendar. Choose the time by adjusting the slider below the calendar.
Shift Hours
Indicate how long, in hours, the shift will last. Decimals (such as 2.5) are allowed.
Note: Type the number only; do not include the word "hours" or any other text.
Shift Capacity Type the number of volunteers that are needed per shift. For example, if you are posting three shifts
that require two volunteers each, you would type 2 (not 6).
Note: In the volunteer view, the total number of volunteer spots will be shown. Using the above
example, volunteers will see that the need has six

volunteer spots. After clicking to learn more, the volunteer will see that two spots per shift are
needed.3. Click Add Shift.
Once you have added a shift, two things happen: The shift is displayed right below the Add Shift button (shown below) and the Shift
Date/Time, Shift Hours, and Shift Capacity fields are cleared.
4. Complete steps 2 and 3 for all additional shifts for this need. Each time you add a new shift, it will be added to the listing.
Note: To remove a shift, click the X to the left of it, shown in the previous image. Existing shifts cannot be edited once the need is saved.
5. Complete all other required and applicable fields for the need (Allow Team Registration, Address, Interests & Abilities, etc.) See the “Creating Needs” section for instructions on completing this section.
6. Click Create Need.
Note: Once you have clicked Create Need for a Custom or Recurring Shift need, you cannot change the duration type.
Once the need has been created, Need Shifts table is displayed at the bottom of the Create Need page.

As volunteers respond to the shifts, the numbers under the Responses heading will be updated.
Note: To edit a shift, click the Edit (pencil) icon for the shift. You can edit the start date, start time, end date, end time, and capacity. Once you have saved the new information, you must refresh your screen to see the change reflected in the Need Shifts table. You will also be prompted to reach out to
anyone who has already responded to the edit shift, to inform them of the change.
Recurring ShiftsThe "Recurring Shifts" option is for repeating shifts of needs. Here are some
examples:
An agency serves food seven days a week and needs volunteers to work dinner shifts, 5 p.m. to 7 p.m.
A thrift store needs volunteers to sort donated clothes on the first Saturday of every month.
A nonprofit needs volunteers to tutor students after school on Wednesdays
The Recurring Shifts designation is for shifts that occur at the same time of day. If your shifts occur at different times, whether within the same day or
on different days, you should use the Custom Shifts designation instead.
Assigning Recurring Shifts to a NeedThe instructions below assume that you are already on the Create Need
page, which you can access by going to your agency manager view, clicking Needs and then clicking Add New Need.
To assign recurring (repeating) shifts to a need:
1. Select Recurring Shifts from the Duration dropdown. You will see two new required fields: an Occurs dropdown and a Capacity field.

2. From the Occurs dropdown, select the repeating time interval: Daily, Weekly, or Monthly.
3. If you select Monthly, you'll need to specify if the need should occur by Date (e.g., the 15th of every month) or by Day of the Week (e.g.,
the first Saturday of every month).4. Complete the additional fields that are displayed.
5. In the Capacity field, type the number of volunteers needed for each shift (not for all shifts combined). For example, if you are posting three
shifts that require two volunteers each, you would type 2 (not 6) for each shift.
Note: In the volunteer view, the total number of volunteer spots will be shown. Using the above example, volunteers will see that the need has six volunteer spots. After clicking to learn more, the volunteer will see that two
spots per shift are needed.
6. Fill out any other required and applicable fields.7. Click Create Need.
Note: Once you have clicked Create Need, you cannot change the duration type for Custom Shift and Recurring Shift needs.
Once you've clicked Create Need, a Need Shifts table is displayed at the bottom of the Create Need page, as depicted above with the custom
shifts.
Recurring Shifts: Additional FieldsDepending on whether you select Daily, Weekly, or Monthly for recurring
shifts, you'll be given some additional fields to complete.
Once you select Daily, Weekly from the Occurs dropdown, you'll see these additional fields as listed below, depending on your selection.

When you select Monthly from the Occurs dropdown, you'll have the option of choosing by Date (for example, the 15th of every month) or by Day of
the Week (for example, the first Monday of every month). After making your selection, you'll see these additional fields:
Additional Field Description
Repeat Every ... day(s)/week(s)/mon
th(s)
Indicate how often the shift repeats. A selection of 1 indicates that the shift occurs every day/week/month,
while a selection of 2 indicates every other day/week/month.
Note: If a need occurs on Tuesdays and Thursdays only, create two needs with weekly shifts: one for
Tuesday, and one for Thursday.
Date RangeClick inside these fields to view the date/time pickers. Select the start and end dates that the need should
be available for volunteer sign-up.
Repeats On
Select the day(s) on which the need occurs each week. In the example below, the need occurs on
Tuesdays and Thursdays only.
Start TimeIndicate the shift's start time.
Note: If shifts occur at different times each day, you should use the Custom Shifts duration.
Hours
Indicate how long, in hours, the shift will last. Decimals (such as 2.5) are allowed.
Note: Type the number only; do not include the word "hours" or any other text.
Note: If you selected to have the need recur monthly by Day of the Week, the system will use your Start Date selection and schedule the shift
accordingly. For example, if you select March 2, which happens to be the first Thursday of the month, the need will be scheduled for the first Thursday of every month thereafter, ending with the first Thursday of the month that
occurs before the end date.
A Note About Removing Shifts

As mentioned above, it's easy to remove an instance of a recurring shift after it has been created. If you remove a shift that already has responses, an email notification will be sent to those volunteers, letting them know that
they have been unregistered from the shift.
Managing VolunteerVolunteer Connections has many opportunities to assist with managing your
volunteers. This section will discuss Set up the Volunteer Check-in tool
Schedule -from managers tab
Please visit the website for more information on the following Volunteer Connection features:
Approve or reject submitted volunteer hours Log hours on behalf of volunteers
Message individual volunteers Time Tracking – from managers tab
Managing Volunteer responses
Volunteer Check-inVolunteer Check-in is available to agency managers. With Volunteer Check-
in:
Volunteers can electronically "check in" when they arrive at the site of a volunteer opportunity.
Agency managers can electronically check volunteers in as needed. When a volunteer "checks out" of the opportunity, Volunteer
Connections automatically assigns and approves the volunteer hours to that volunteer.
If the volunteer forgets to "check out," Volunteer Connections still assigns and approves volunteer hours based on the number of hours
specified previously by the agency manager.
Note: With Volunteer Check-in, there is no need for the volunteer to manually log their hours, and no need for the agency manager to later
approve them. It's all done automatically!
Rather watch the movie? Check out this video on Volunteer Check-in.

Accessing Volunteer Check-in1. Log into Volunteer Connections and click My Agency to open your
agency management area.2. Click Check-in.
3. If you manage more than one agency, select the applicable agency from the options provided.
Selecting A NeedOnce you have opened Volunteer Check-in and selected an agency (if
applicable), you will see all of the active needs
posted by your agency. They will show up in two formats, depending on
whether you have entered a duration for the
need.
Needs with a duration - If the Duration field has been completed in the posted need, the need is ready for check-in. You can
click Individual to allow volunteers to sign themselves in, or List to sign volunteers in yourself.
Needs with no duration - If no duration has been entered for a need, you must provide one. Type the number of hours of the need and
click Add. The screen will update to display the Individual and List options for the need.
Notes:- A duration is required for automatic logging of volunteer hours.
- If you will be using Volunteer Check-in for multiple needs at the same time, you can right-click the Individual or List button as applicable to open the
sign-in pages in new tabs.
Volunteer Check-in: Volunteer PerspectiveTo set your computer or mobile device up for volunteer check-ins, click
the Individual option below the need title. This opens the check-in page for volunteers.

Note: Because volunteers will be using this page, your utility bar, navigation menu, and other Volunteer Connections features are not visible on this page.
Checking In To a Volunteer Opportunity
To check in, the volunteer should type the email associated with their account into the Email field and then click Find My Account.
If the volunteer already has an account, the system lets them know that it has identified their account. They will need to click the Found
You! button to complete their check-in
Note: If the volunteer did not previously respond to the need, the system creates a need response for them at the time of check-in.
If the volunteer does not already have an account, they will be asked to provide their first and last name before checking in.

Once they've clicked to register, Volunteer Connections creates an account for them and sends an email welcoming them to Volunteer
Connections and inviting them to return to the site to complete a user profile.
Checking Out of a Volunteer Opportunity
Checking out of a volunteer opportunity is just as simple as checking in! The volunteer should repeat the process of entering their email address into the Email field, just as they did to check in. Once the system finds their
email address, it provides a button that the volunteer can click to check out.
Once the volunteer checks out, volunteer hours are automatically submitted for them. For more information on how volunteer hours are calculated at this
time, see Volunteer Check-in: Volunteer Hours.

Checking In: Agency Manager PerspectiveAs an agency manager, you can check volunteers in as they arrive to the
volunteer opportunity. To do this, click the List option for the need.
Volunteer Connections displays a list of all users who have responded to the need.
The list shows the users' names (in alphabetical order
by last name), email addresses, associated teams
(as applicable), and an indication of whether or not
they have already checked in.
Note that there is a check box to the left of each volunteer who has not checked in.
To check in volunteers, mark the boxes to the left of their names and click the Check In Users button. Once the volunteers have been checked in, the
check box will disappear and "No" will be changed to "Yes" under the Checked In column.
Note: Agency managers can only check in those volunteers who have already responded to the need. If the volunteer has not responded
previously, they must check themselves in. This applies whether or not the volunteer is already a registered user on the site.

Volunteer Check-in: Volunteer HoursVolunteer Connections automatically logs volunteer hours for volunteers who
have checked in to an opportunity using the Volunteer Check-in feature.
When the volunteer checks out of the opportunity, Volunteer Connections calculates the time volunteered and applies it to their
volunteer hours. If the volunteer does not check out of the opportunity within 24 hours,
Volunteer Connections credits the user with hours equal to the need duration. For example, if the duration is three hours, three volunteer
hours are added to the volunteer's record.
Note: Using the example of a need with a three-hour duration, a volunteer who checks out early will not get credit for the full three hours. A volunteer
who checks out after three hours (but within 24 hours) will get credit for more than three hours.
Hours are automatically approved; the agency manager does not have to review or manually approve them.
Shifts and Volunteer Check-inIf you use the Volunteer Check-in feature, your volunteers' hours will be
automatically calculated based on one of two things:
If the volunteer checks in but never checks out, the system attributes the number of hours you entered when posting the need.
If the volunteer checks out, the system attributes the number of hours between check-in and check-out.
If you plan to use Volunteer Check-in, keep this in mind when entering the number of hours that the volunteer opportunity is expected to last.
How Shift Needs Look to Volunteers
Shift needs, like all other needs, appear as "cards" on your site.
For shift needs, a volunteer will see "Multiple Shifts Available" on the
need card.

Once they click to view details, they will see a list of all available shifts.
If they click Respond on your own to respond individually, they'll be taken to the Need Response page, where they can provide any additional
information and complete their response.
If they click to respond as a team, they'll be taken to an area where they can name their team and add members.
If they click Respond to Multiple, they will be taken to another list of shifts, where they can mark the boxes of the shifts they wish to fill.
Note: The Respond to Multiple option is not available for team sign-ups.
Schedule TabFrom the Agency page, you can view a schedule of volunteers by clicking on
the Schedule tab from your Agency Manager Dashboard.
As an agency manager, you can view a calendar that lists the volunteers who are scheduled to show up for your agency's volunteer opportunities on a

given day. The calendar shows needs that are associated with a particular date--in other words, needs that have a duration of custom shifts, recurring shifts, or happens on. The calendar does not show responses to runs until
and ongoing needs.
By default, the calendar reflects the current month. To view a different month, select it from the Month dropdown. You can also filter responses to needs that occur in a certain area or contain a specific keyword or phrase.
Hold your cursor over a volunteer's name (don't click) to see the details of the need response.
Click on the volunteer's name to be taken to the need information page.
Each date on the calendar displays a maximum of five responses by default. If there are more than five responses, you'll see a View More button. Click
this button to view a new page that lists all of the need responses.
A similar calendar is available to volunteers so that they can see their personal volunteer schedules. That calendar is available in the user profile.
Viewing Agency StatisticsAs an agency manager, you can use your Stats area to get a sense of
volunteers' engagement with your agency's profile page and posted needs and events. This article explains how to access and export agency data. It
also explains what information you'll find in the exports.Accessing and Viewing Agency Data
To view agency statistics:

1. Click the My Agency button in your utility bar to access your agency-management area.
2. Click Stats.Your Stats area has four main sections:
Fields/button to specify a date range: Default is the past month. Total fans and views: Totals shown are for the date range specified.
Views include both logged-in users and visitors, and repeat views count as separate views.
Active Need Responses: All responses that have been submitted during the specified date range. Data include response ID; need ID,
name, and date; and volunteer name and email. Active Need Hours: All approved volunteer hours for the selected
date range.Note: Use the table filter to change which columns are shown on your
screen.
Exporting Agency DataThe Stats area includes buttons for exporting need responses and hours.
These exports include data not shown in the table on your screen. Columns for each export are provided below.
Need Responses ExportThis export includes:
Response ID Response date
Need name Shift ID, start date and time, and duration (if the need is a shift need) Volunteer first name, last name, email, phone, company, and address
Any notes provided by the volunteer when responding to the need Team name and team leader (if the volunteer is part of a team
response) Answers to any additional questions added by the site manager
Note: The site manager can add custom questions for all needs on the site and for all needs within a certain initiative.
Hours ExportThis export includes:
Date of the volunteer work (not the date the hours were submitted) Need title
Hours volunteered Miles traveled (if submitted)
Answers to any hours-submission questions added by the site manager

A description of the hours (if submitted) The source of the hours, if not manually entered by the volunteer (e.g.,
if the hours were exported or applied automatically through volunteer check-in)
The status of the hours (Approved, Denied, etc.) The volunteer's first name, last name, and email address
The volunteer's team, if they signed up with a teamNote: If the team leader entered default a team member's hours on their
behalf, this will be specified in the Description column.
Agency Engagement: Spread the Word!
This article is for Volunteer Connections agency managers who want to tell the world who they are, what they do, and how volunteers can help them
reach their goals!With Volunteer Connections , you can now share your agency, its needs, and its events more effectively than ever. Volunteer Connections is now mobile-friendly, which means that people using their smartphone, tablets, etc., will
easily be able to view your agency's profile page, respond to needs, and RSVP to events with just a few taps.
Ready to spread the word about your agency? Read on!Ways to Spread the Word
You have a couple of tools for spreading the word: links to your profile page and your volunteer opportunities; and convenient options for sharing
information on social media. In addition, you can encourage your volunteers to share your agency's opportunities with their friends and acquaintances.
LinksClick a link, and you're there! Here's where you can access links to specific
agency pages when you're logged in as an agency manager. Copy the link to your clipboard and paste it into an email, newsletter, or social media post!
Agency Profile Page - While in agency manager view, click the Edit tab and scroll to the Basic Information section of your agency's
profile. The link to your profile page is provided just under

the Customize Link field.
List of Your Agency's Needs - While in edit mode, click the Needs tab and scroll down to the Needs Links section. The first link shown will take users to a page that lists only your agency's posted needs. Link for RSS Feeds - Also in the Needs Links section under
the Needs tab is a link for anyone who wants to add your posted needs to their RSS feed.
Tip: Use this link to display a running list of volunteer opportunities on your agency's main website!
Social MediaFor many people, social media is the primary source for news, information,
and communication. Why not let it be their primarily source for volunteerism as well? Volunteer Connections 's mobile-friendly platform for
potential volunteers to learn about your agency, respond to your posted needs, and even RSVP to your events!
To share information on Facebook, Twitter, or Google+, click the applicable "arrow" icon. Here's an example for sharing a posted need:

Note: You do not have to be signed in as an agency manager to share your agency's information on social media.
The arrow icon is available for every need, event, and agency posted on Volunteer Connections.Your Volunteers
Don't forget about one of your most important resources: your volunteers! Encourage your volunteers to share links to your profile and to post
information about needs and events to their Facebook, Twitter, and Google+ accounts. When they visit Volunteer Connections, they can use the social
media sharing tool to let their friends and acquaintances know how they can help support your cause.
Best Practices and Other TipsHere are a few suggestions for communicating your agency information
effectively in Volunteer Connections: Use Clear Titles. Keep in mind that people may be scrolling quickly
through Volunteer Connections's list of needs and and events. Avoid generic titles (such as "Volunteers Needed"); be specific!
Include Related Links. If you need volunteers to help with an event, include a link to the event in your needs posting, and vice-versa. Click
here to learn how to do this. Keep Paragraphs Short. Try to limit paragraphs to 2 - 3 sentences to
ensure easy reading on a mobile device (or any device!). Use Formatting. Volunteer Connections's Text Editor has options for
bold text, headings, bullet points, numbered lists, and more! Take advantage of these features. Clear and well-executed formatting can
make your posts easier to read and respond to. Use Graphics. The ability to upload graphics into a post is another
feature of the Text Editor. You can include event flyers, photos, and other images in your need and event postings.

Your Agency Manager Digest Email
This section is geared toward agency managers. If you are a site manager, check out this article on managing the agency manager digest email.
Starting in July, you'll receive a Connect update on your agency's weekly activity every Wednesday morning. This email will inform you and your fellow
agency managers of the following information: Agency stats (views, fans, need responses, and hours posted) for the
week Needs that are set to expire within the next seven days
Ongoing needs that may need to be updatedIn addition, the digest includes links to the following portions of your agency
management area: Stats (to see page-view and fan data)
Time Tracking (to approve pending hours) Needs (to view or update needs)
Your site manager may choose to replace older notifications with this one, lowering the amount of Connect site emails you receive each week.
Help ResourcesListed below are the help resources you can access from your agency
manager view: Agency Manager's Toolbox - Click this banner to access useful articles for agency managers, sign up for agency trainings, and reach
out to your site manager. Help Center Link - This link is available as a question mark in the top
right-hand corner of your screen. Click it to access the agency-manager area of our Help Center. Once there, you can search dozens of articles that on managing your agency in Volunteer Connections.
Field-specific Help - If you have a question on a particular form field in the agency manager view, hover your cursor over the question mark

adjacent to the field.
.If you cannot find the information you need, please reach out to Char-Em
United Way and they will assist you with your Volunteer Connection needs.