Vodapay Max Operating Manual - Vodacom Business
87
Vodapay Max Operating Manual
Transcript of Vodapay Max Operating Manual - Vodacom Business

Vodapay MaxOperating Manual

1.2.3.4.5.6.7.8.9.
10.11.12.13.14.15.16.
1-45-67-1011-1314-1718-2122-3233-3738-4445-5455-6263-7071-7778-828384
Hardware InstructionsHardware Trouble Shooting GuideDevice Boot up StepsShift Change Steps - MANDATORYManager PIN setSupervisor PIN setCashier ManagementTip FunctionalitySale ProcessSale Process – tip & cashier functionalityQR Payment processReversal ProcessView & Print TransactionsChange SIM Card ConnectionSilent Mode IconContact Centre Details
VodaPay Max Operations Instructions
Welcome to Vodacom Financial Services | Payment Solutions
Installing and operating the VodaPay Max payment device
• Always read and follow all of the instructions and cautions in the manual before starting the installation.
• For the payment device to work effectively, ensure that it is plugged into a suitable power adaptor.
• Before inserting the AC socket, check that the power supply socket complies with the device’s set voltage.
• Keep the device away from any form of liquid. Do not allow water to enter into the device.
• Do not insert any foreign materials into the device since serious damage can occur.
• If the device is faulty and needs repairing, please have it serviced by a professional POS maintainer.
• When printing receipts, please use standard printer paper that has no folds, wrinkles, tears or holes at the edges of the print area, to avoid a paper jam.
• This device is flammable. Keep away from fire.• Users are forbidden to use this device illegally. Offenders
will face serious legal repercussions.
1. HARDWARE INSTRUCTIONS

Printer CoverContactless Area
Screen
Camera
Battery Cover
Audio JackMicro USB
Sound
Power On/Off
SD Card Slot
1. HARDWARE INSTRUCTIONS continued
OPERATING MANUAL | 01

Power ChargeRemove the battery cover, insert the rechargeable lithiumbattery, and replace the battery cover. Connect theadapter, mobile power or PC and terminal using a USBline. Plug the adapter into a power outlet. Power on theterminal. The terminal screen will display chargingprogress. After the terminal is fully charged “ ” willdisplay. See graphic below.
Install Paper Roll1. Open the paper cabinet cover in the direction shown above.2. Peel open the paper-roll and insert it into paper holder in the direction shown above, leaving a small portion of paper above the paper cutter.3. Close the paper holder cover in the direction shown above.
Inserting the paper-roll in the wrong direction will resultin printer malfunction.
USB
移移 源源
1. HARDWARE INSTRUCTIONS continued
OPERATING MANUAL | 02

Instructions
Power On/OffPower on: press “ ” key for 2-3 seconds to power on terminalPower off: press “ ” key until it shows menu “power off;Restart; flight mode; silence mode”, select “power off” to enter menu; your POS terminal will turn off; “cancel” “ok”’, press ok to confirm.
Magnetic CardSwipe card in magstripe card slot as demonstrated below insteady motion, and make sure the magstripe faces the device.Note: Any damage to the magstripe or incorrect swiping maylead to transaction failures.
1. HARDWARE INSTRUCTIONS continued
OPERATING MANUAL | 03

Contact IC CardThe IC Card Slot is on the right side of the main unit.To insert a card, hold the opposite side of the IC chipwith the chip facing up, insert the IC card into the slot.During the transaction process, the IC card shouldremain in the slot. See graphic below.
If the contact point of the IC chip is damaged or oxidized,the transaction may fail.
Contactless IC CardWhen tapping a card, hold the IC card close to the top ofprinter cover and hold for around 1 second until you heara “beep” sound signaling a successfully completedtransaction. The card can now be removed.
1. HARDWARE INSTRUCTIONS continued
OPERATING MANUAL | 04

Cate-gory
Fault Reason Solution
ON/OFF Issue
Unable topower onterminal
1. Ran out of battery;2. Battery installation is incorrect;3. AC power connect is incorrect;4. Battery failure
1. Connect with AC power supply;2. Confirm the battery is installed properly;3. Confirm the AC power supply is plugged in properly;4. Replace battery.
PIN PadIssue
No response Terminal crash Unplug power supplyand battery, turn offterminal and restart.
Communi-cationFault
Display reads: Commu-nication Timeout
1. Weak wireless signal is poor;2. SIM card
connection 3. Terminal
software issue;
1. Relocate the terminal to a window or open area;2. Reinsert the SIM card;3. Restart the terminal.
Display reads:“Please Insert SIM Card” afterSIM card isinserted
1. SIM card is damaged;2. SIM card was inserted improperly.
1. Check if the SIM card is functioning,
if the chip surface is oxidized or not, wipe with a soft cloth;2. Reinsert SIM card.
Printer Issue
Blank printouts
Thermal printerpaper is incor-rectlyinstalled.
Reinstall thermalprinter paper following“Install Paper Roll”guidelines above.
Printing islight/difficultto read
Poor quality printerpaper used.
Replace with goodquality printer paper.
2. HARDWARE TROUBLE SHOOTING GUIDE
OPERATING MANUAL | 05

Cate-gory
Fault Reason Solution
CardReadError
Display reads:“Swipe CardError, PleaseSwipe Again”
1. Reader is dirty;2. Card is
demagnetised;3. Card swiped
in incorrect direction.
1. Clean the card reader by inserting amoderately stiff piece of paper into the card slot anddragging the paper horizontally andvertically severaltimes, removing anyparticles or dirt in the reader.
2. Wipe any particles or dirt off of the magnetic strip on the card with asoft cloth; if the card is demagnetized, a replacement card may be needed from issuing bank;
3. Please note thedirection when swiping the card; the speedshould be contin-uous.
ChargingError
Displaysred batteryicon afterbattery isinstalledand poweradapter isconnected
Li-battery was instorage too long,causing the batteryto discharge below charging voltage; it can recover after reactivating.
If the battery icondisplays red, pleasecontinue charging for 15 minutes; when thebattery icon turns green, this indicates that the battery was successfullyreactivated; it shouldperform normally after a complete recharge.
2. HARDWARE TROUBLE SHOOTING GUIDE continued
OPERATING MANUAL | 06
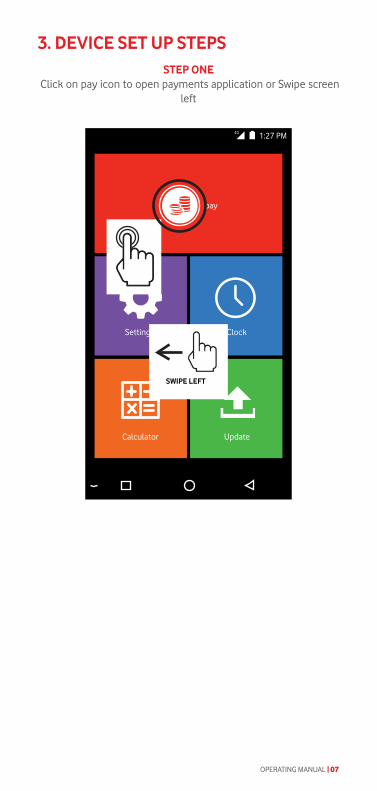
3. DEVICE SET UP STEPSSTEP ONE
Click on pay icon to open payments application or Swipe screen left
1:27 PM4G
Settings Clock
Calculator Update
pay
SWIPE LEFT
OPERATING MANUAL | 07
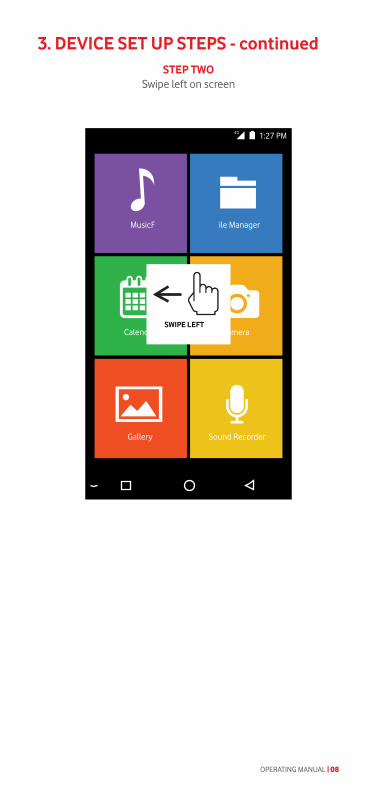
3. DEVICE SET UP STEPS - continuedSTEP TWO
Swipe left on screen
1:27 PM4G
MusicF ile Manager
CalendarC amera
Gallery Sound Recorder
SWIPE LEFT
OPERATING MANUAL | 08

STEP THREEClick on VodaPay Max Icon
1:27 PM4G
Helper Vodapay Max
DownloadsS IM Toolkit
Apiv3Demo
3. DEVICE SET UP STEPS - continued
OPERATING MANUAL | 09

STEP FOURThe Vodacom Payments home page will open
MORE
SALE
1:27 PM4G
3. DEVICE SET UP STEPS - continued
OPERATING MANUAL | 10

4. SHIFT MANAGEMENT
1. The SHIFT MANAGEMENT may be ON by default.2. Before transacting on the terminal, please ensure that the SHIFT MANAGEMENT is switched ON otherwise the TERMINAL WON’T WORK:
STEP ONEClick on the MENU icon, on the top right of the home screen
MORE
SALE
1:27 PM4G
OPERATING MANUAL | 11
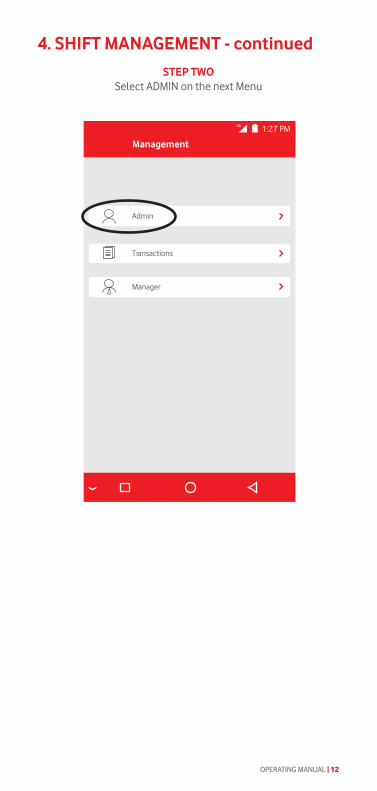
4. SHIFT MANAGEMENT - continuedSTEP TWO
Select ADMIN on the next Menu
Manager
Transactions
Admin
Management
1:27 PM4G
OPERATING MANUAL | 12
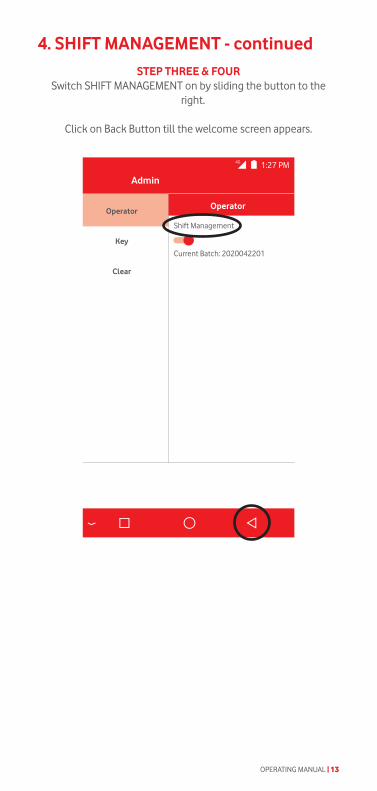
STEP THREE & FOURSwitch SHIFT MANAGEMENT on by sliding the button to the
right.
Click on Back Button till the welcome screen appears.
Operator
Key
Clear
Shift Management
Current Batch: 2020042201
Operator
Admin
1:27 PM4G
4. SHIFT MANAGEMENT - continued
OPERATING MANUAL | 13

5. MANAGER SCREENS CHANGE MANAGER PIN
STEP ONEClick on the MENU icon, on the top right of the home screen
MORE
SALE
1:27 PM4G
OPERATING MANUAL | 14
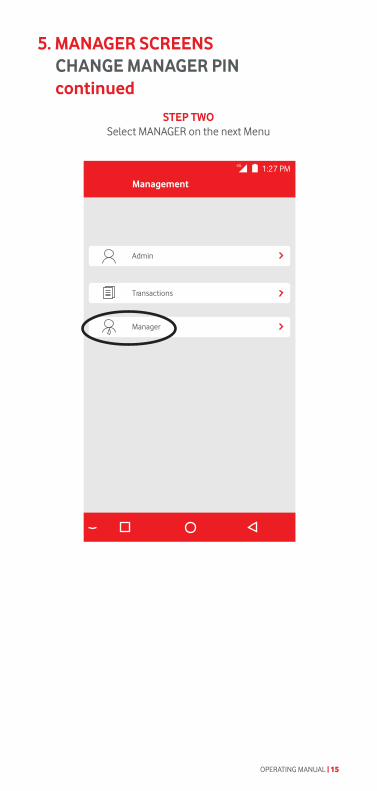
STEP TWOSelect MANAGER on the next Menu
Manager
Transactions
Admin
Management
1:27 PM4G
5. MANAGER SCREENS CHANGE MANAGER PIN continued
OPERATING MANUAL | 15
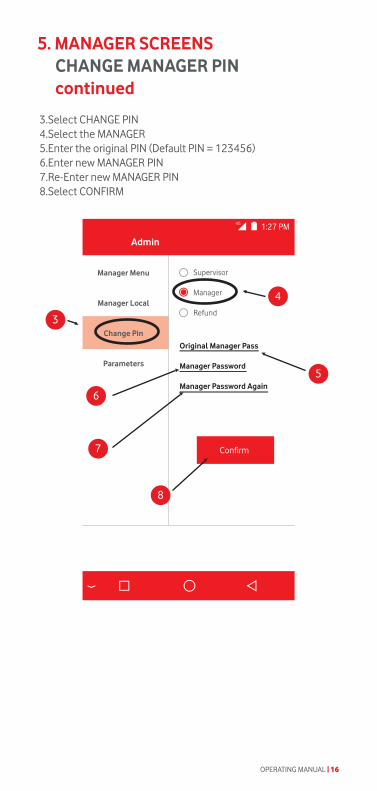
3.Select CHANGE PIN4.Select the MANAGER5.Enter the original PIN (Default PIN = 123456)6.Enter new MANAGER PIN7.Re-Enter new MANAGER PIN8.Select CONFIRM
Manager Menu
Manager Local
Change Pin
Parameters
Supervisor
Manager
Refund
Original Manager Pass
Manager Password
Manager Password Again
Admin
1:27 PM4G
4
5
8
7
3
6
5. MANAGER SCREENS CHANGE MANAGER PIN continued
OPERATING MANUAL | 16

5
5. MANAGER SCREENS CHANGE MANAGER PIN continued
OPERATING MANUAL | 17
6. SUPERVISOR SCREENS CHANGE SUPERVISOR PIN
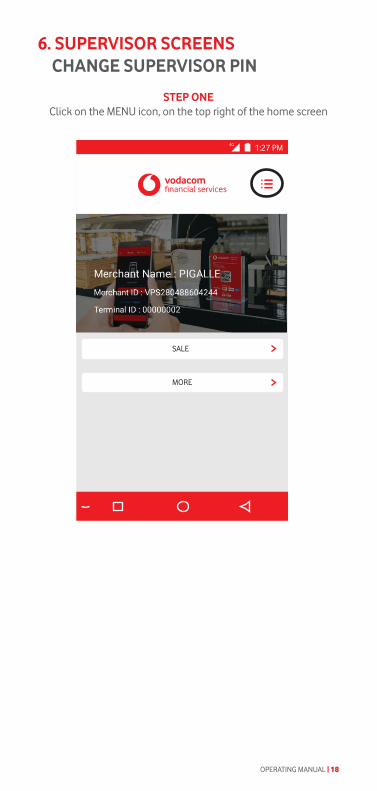
STEP ONEClick on the MENU icon, on the top right of the home screen
MORE
SALE
1:27 PM4G
OPERATING MANUAL | 18
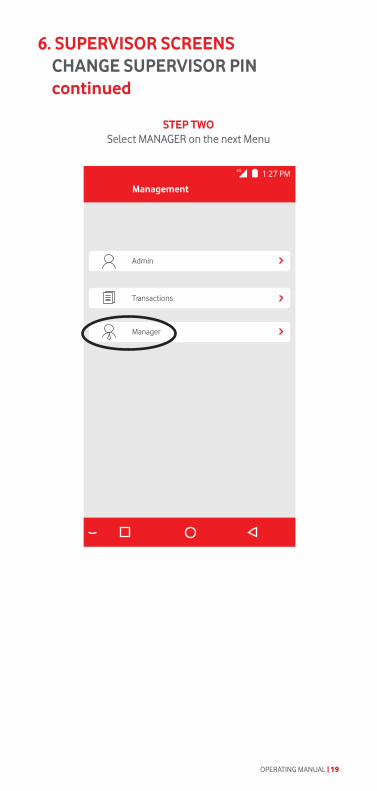
STEP TWOSelect MANAGER on the next Menu
Manager
Transactions
Admin
Management
1:27 PM4G
6. SUPERVISOR SCREENS CHANGE SUPERVISOR PIN continued
OPERATING MANUAL | 19
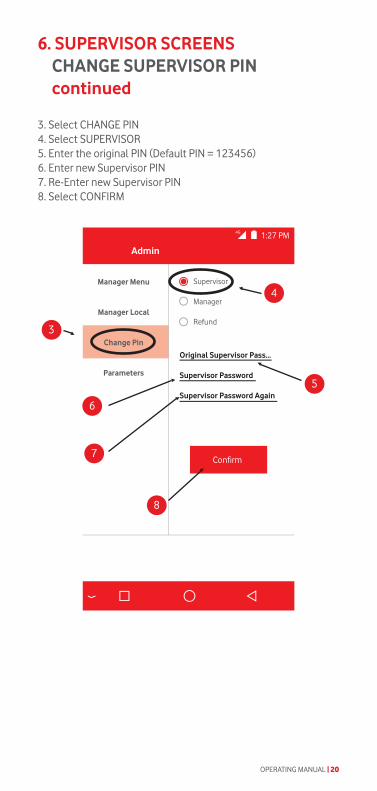
3. Select CHANGE PIN4. Select SUPERVISOR5. Enter the original PIN (Default PIN = 123456)6. Enter new Supervisor PIN7. Re-Enter new Supervisor PIN8. Select CONFIRM
Manager Menu
Manager Local
Change Pin
Parameters
Supervisor
Manager
Refund
Original Supervisor Pass...
Supervisor Password
Supervisor Password Again
Admin
1:27 PM4G
4
5
8
7
3
6
6. SUPERVISOR SCREENS CHANGE SUPERVISOR PIN continued
OPERATING MANUAL | 20

5
6. SUPERVISOR SCREENS CHANGE SUPERVISOR PIN continued
OPERATING MANUAL | 21

7. CASHIER MANAGEMENT
STEP ONEClick on the MENU icon, on the top right of the home screen
MORE
SALE
1:27 PM4G
OPERATING MANUAL | 22

Manager
Transactions
Admin
Management
1:27 PM4G
STEP TWOSelect MANAGER on the next Menu
7. CASHIER MANAGEMENT - continued
OPERATING MANUAL | 23

STEP THREEManager enters PIN. (Default PIN 123456). Clink on Enter Key
to proceed.
7. CASHIER MANAGEMENT - continued
OPERATING MANUAL | 24

STEP FOURSelect Manager Cashier
Manager Menu
Manager Local
Change Pin
Parameters
Support
Manager Cashier
Tips Report
Batch Upload
Admin
1:27 PM4G
7. CASHIER MANAGEMENT - continued
OPERATING MANUAL | 25

7. CASHIER MANAGEMENT - continued
STEP FIVEClick on the + sign top right of screen to add cashiers
1:27 PM4G
Cashier Management
01
OPERATING MANUAL | 26
7. CASHIER MANAGEMENT - continued
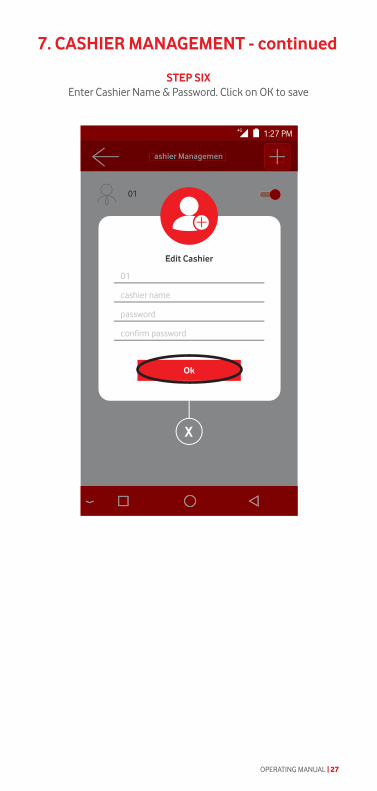
STEP SIXEnter Cashier Name & Password. Click on OK to save
Cashier Management
Cashier Managemen
t
1:27 PM4G
01
X
Edit Cashier
Ok
01
cashier name
password
confirm password
OPERATING MANUAL | 27
7. CASHIER MANAGEMENT - continued
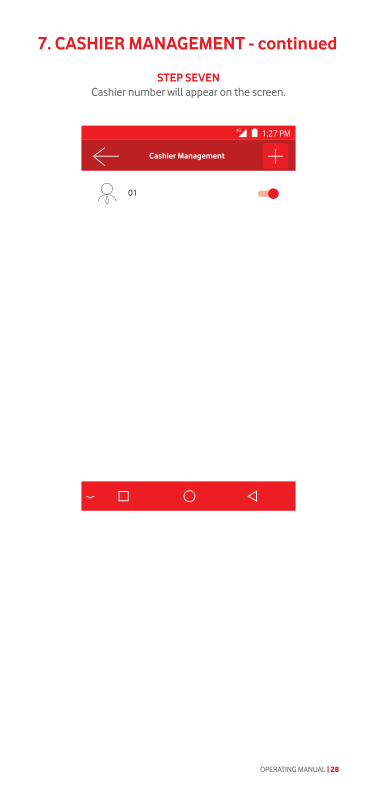
STEP SEVENCashier number will appear on the screen.
1:27 PM4G
Cashier Management
01
OPERATING MANUAL | 28

7. CASHIER MANAGEMENT - continued
STEP EIGHTPress on the cashier you want to edit/change.
1:27 PM4G
Cashier Management
01
OPERATING MANUAL | 29

7. CASHIER MANAGEMENT - continued
STEP NINEClick on the fields to update them and click on OK to Save.
Cashier Management
Cashier Managemen
t
1:27 PM4G
01
X
Edit Cashier
Ok
01
cashier name
password
confirm password
OPERATING MANUAL | 30

STEP TENSwipe left on the cashier you want to delete.
SWIPE LEFT
1:27 PM4G
Cashier Management
01
7. CASHIER MANAGEMENT - continued
OPERATING MANUAL | 31
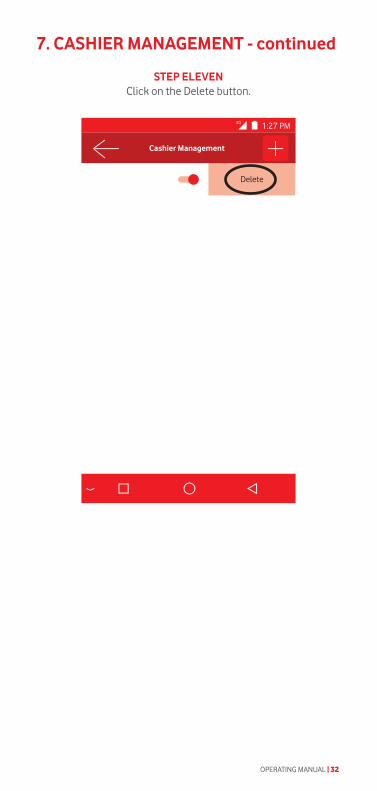
STEP ELEVENClick on the Delete button.
1:27 PM4G
Cashier Management
Delete
7. CASHIER MANAGEMENT - continued
OPERATING MANUAL | 32
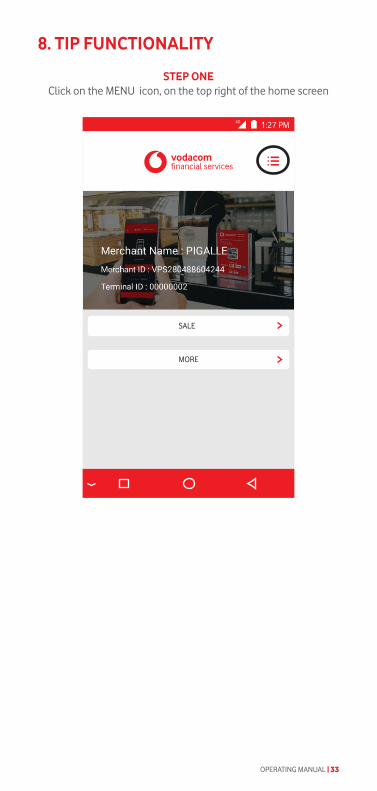
8. TIP FUNCTIONALITY
STEP ONEClick on the MENU icon, on the top right of the home screen
MORE
SALE
1:27 PM4G
OPERATING MANUAL | 33

8. TIP FUNCTIONALITY - continued
STEP TWOSelect MANAGER on the next Menu
Manager
Transactions
Admin
Management
1:27 PM4G
OPERATING MANUAL | 34

STEP THREEEnter Supervisor Pin (Default 123456)
8. TIP FUNCTIONALITY - continued
OPERATING MANUAL | 35
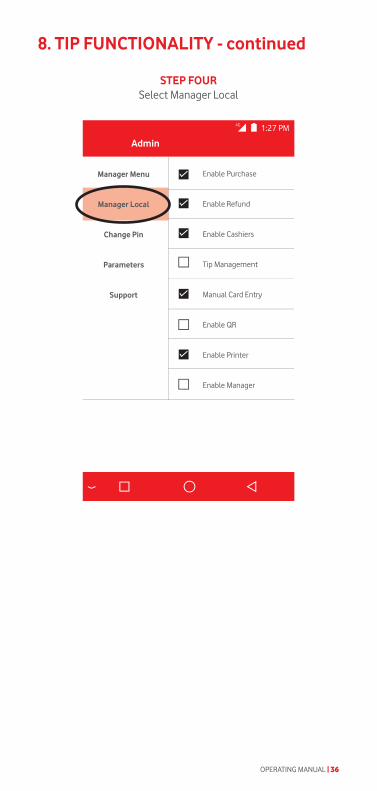
STEP FOURSelect Manager Local
Manager Menu
Manager Local
Change Pin
Parameters
Support
Enable Purchase
Enable Refund
Enable Cashiers
Tip Management
Manual Card Entry
Enable QR
Enable Printer
Enable Manager
Admin
1:27 PM4G
8. TIP FUNCTIONALITY - continued
OPERATING MANUAL | 36

STEP FIVE & SIXSelect Tip Management
Click on back button until you land on the main menu screen.
8. TIP FUNCTIONALITY - continued
Manager Menu
Manager Local
Change Pin
Parameters
Support
Enable Purchase
Enable Refund
Enable Cashiers
Tip Management
Manual Card Entry
Enable QR
Enable Printer
Enable Manager
Admin
1:27 PM4G
OPERATING MANUAL | 37

9. SALE PROCESS
STEP ONEClick on the SALE option
1. TAP Function: Hold card over the Tap Icon for 5 sec otherwise error Z21 might occur, if too quick.2. If TAP function fails then insert the card (card may not be tap enabled or tap limit exceeded)3. If Insert function does not work, then swipe the card
MORE
SALE
1:27 PM4G
OPERATING MANUAL | 38
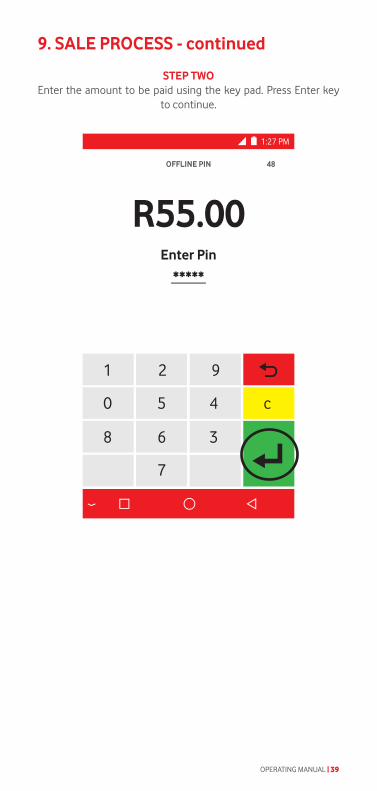
STEP TWOEnter the amount to be paid using the key pad. Press Enter key
to continue.
9. SALE PROCESS - continued
OPERATING MANUAL | 39
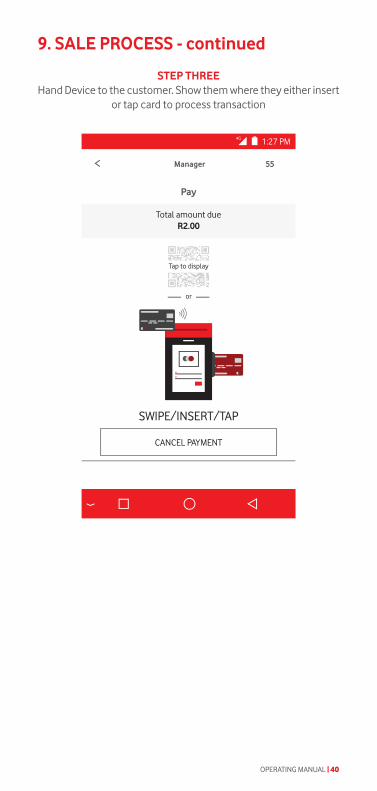
9. SALE PROCESS - continued
STEP THREEHand Device to the customer. Show them where they either insert
or tap card to process transaction
OPERATING MANUAL | 40

STEP FOURCustomer must enter PIN if prompted to. Press green enter Key
to proceed.
9. SALE PROCESS - continued
OPERATING MANUAL | 41
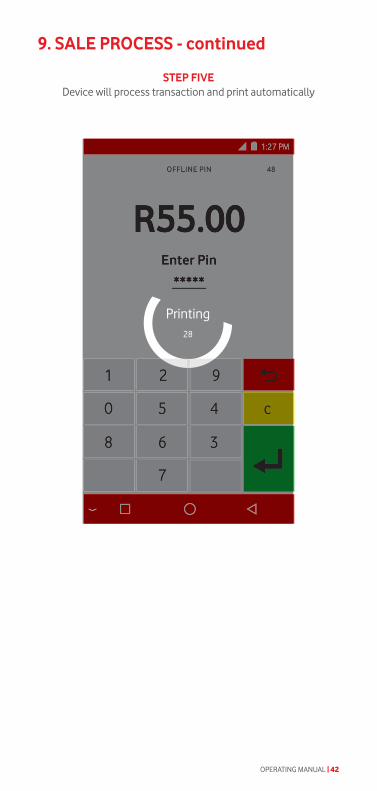
STEP FIVEDevice will process transaction and print automatically
9. SALE PROCESS - continued
Printing28
OPERATING MANUAL | 42

STEP SIXSuccessful transaction. Press home button to proceed.
9. SALE PROCESS - continued
Approved
1:27 PM4G
Home58
OPERATING MANUAL | 43

Home45
H
o
m
e45
1:27 PM4G
Please Remove Card
OK
9. SALE PROCESS - continued
STEP SEVENRemove customer’s card, tear off 2nd slip and hand them to the
customer. Press OK.
OPERATING MANUAL | 44
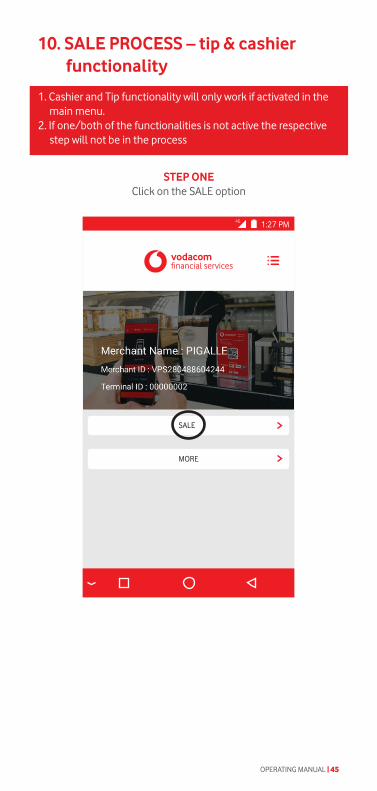
10. SALE PROCESS – tip & cashier functionality
STEP ONEClick on the SALE option
1. Cashier and Tip functionality will only work if activated in the main menu. 2. If one/both of the functionalities is not active the respective step will not be in the process
MORE
SALE
1:27 PM4G
OPERATING MANUAL | 45

STEP TWOEnter the amount to be paid using the key pad. Press
Enter key to continue.
10. SALE PROCESS – Tip & Cashier activated continued
OPERATING MANUAL | 46
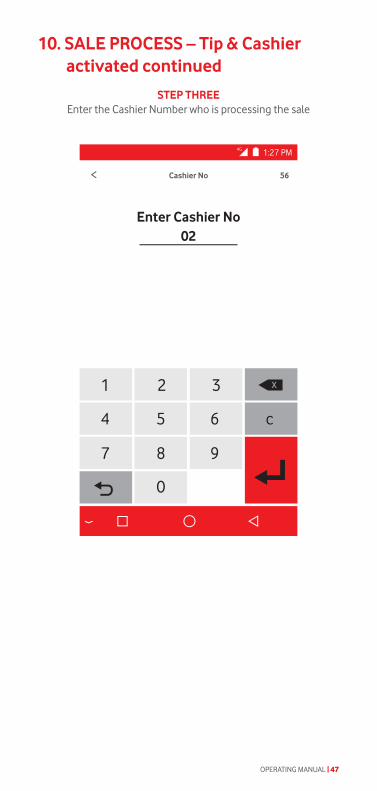
STEP THREEEnter the Cashier Number who is processing the sale
10. SALE PROCESS – Tip & Cashier activated continued
OPERATING MANUAL | 47
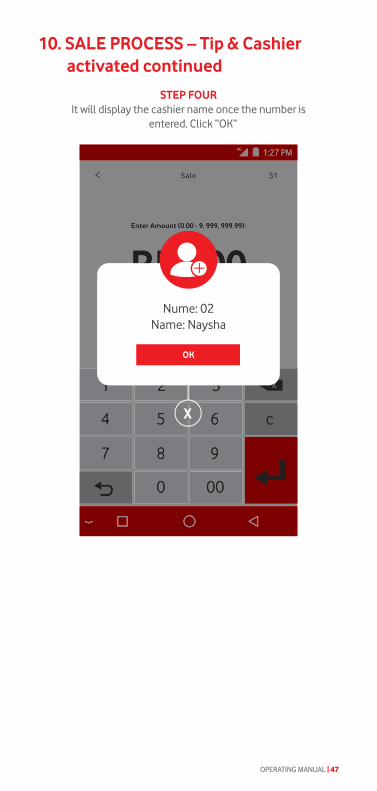
STEP FOURIt will display the cashier name once the number is
entered. Click “OK”
10. SALE PROCESS – Tip & Cashier activated continued
OPERATING MANUAL | 47
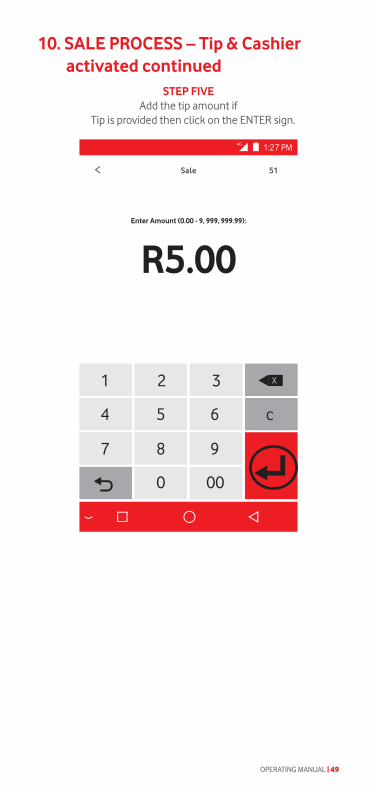
10. SALE PROCESS – Tip & Cashier activated continued
STEP FIVEAdd the tip amount if
Tip is provided then click on the ENTER sign.
OPERATING MANUAL | 49
10. SALE PROCESS – Tip & Cashier activated continued
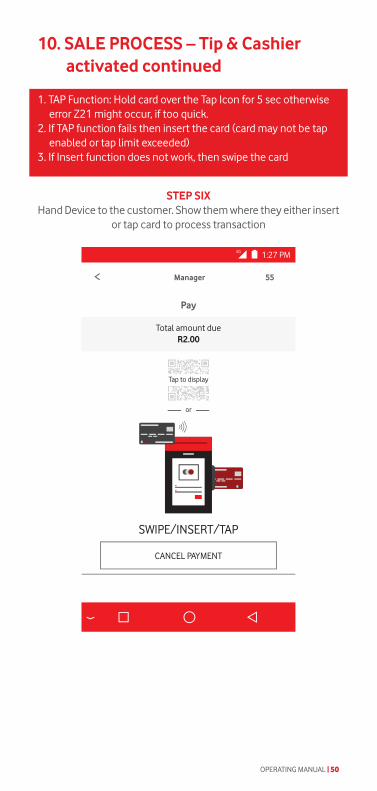
STEP SIXHand Device to the customer. Show them where they either insert
or tap card to process transaction
1. TAP Function: Hold card over the Tap Icon for 5 sec otherwise error Z21 might occur, if too quick.2. If TAP function fails then insert the card (card may not be tap enabled or tap limit exceeded)3. If Insert function does not work, then swipe the card
OPERATING MANUAL | 50

STEP SEVENCustomer must enter PIN if prompted to. Press green enter Key
to proceed.
10. SALE PROCESS – Tip & Cashier activated continued
OPERATING MANUAL | 51
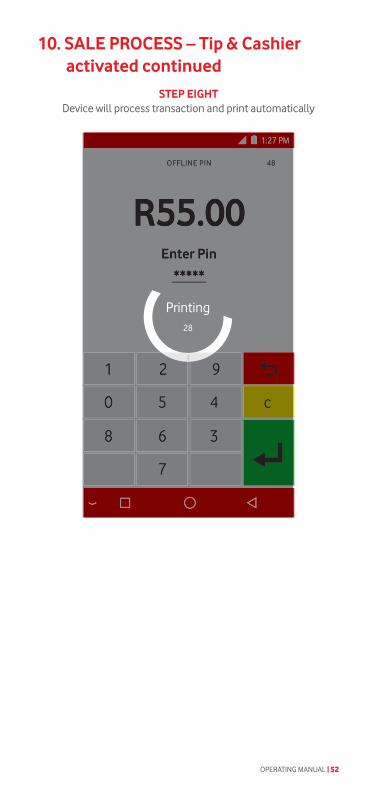
10. SALE PROCESS – Tip & Cashier activated continued
Printing28
STEP EIGHTDevice will process transaction and print automatically
OPERATING MANUAL | 52
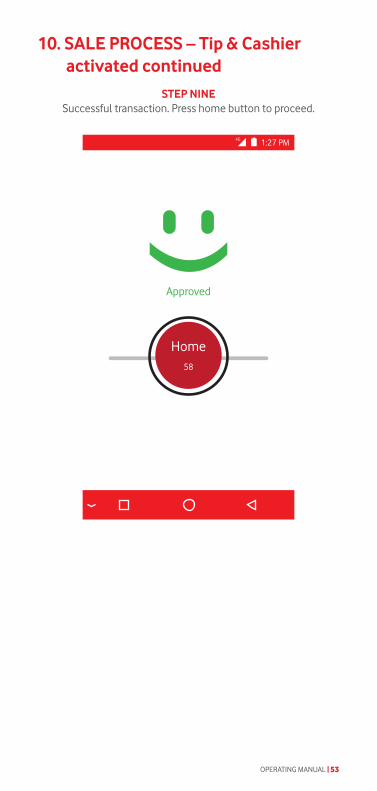
STEP NINESuccessful transaction. Press home button to proceed.
10. SALE PROCESS – Tip & Cashier activated continued
Approved
1:27 PM4G
Home58
OPERATING MANUAL | 53
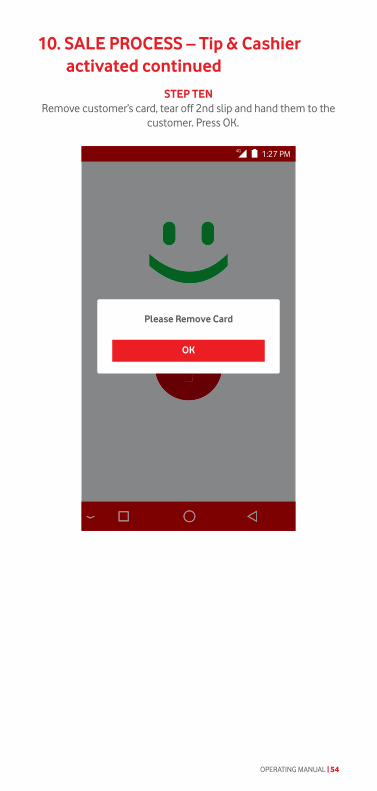
STEP TENRemove customer’s card, tear off 2nd slip and hand them to the
customer. Press OK.
10. SALE PROCESS – Tip & Cashier activated continued
Home45
H
o
m
e45
1:27 PM4G
Please Remove Card
OK
OPERATING MANUAL | 54

11. QR Payment process
OPERATING MANUAL | 55
A QR Code payment transaction enables consumers to make purchases by scanning a merchant generated QR Code using a compatible mobile app.
This mobile app may be an existing mobile banking app offered by the Issuer or a third party.
MORE
SALE
1:27 PM4G
STEP ONEClick on the SALE option

11. QR Payment process - continued
OPERATING MANUAL | 56
MORE
SALE
1:27 PM4G
STEP TWOClick on the SALE option

11. QR Payment process - continued
OPERATING MANUAL | 57
STEP THREEEnter the amount to be paid using the key pad. Press Enter key
to continue.

STEP FOUREnter cashier number.
11. QR Payment process - continued
OPERATING MANUAL | 58
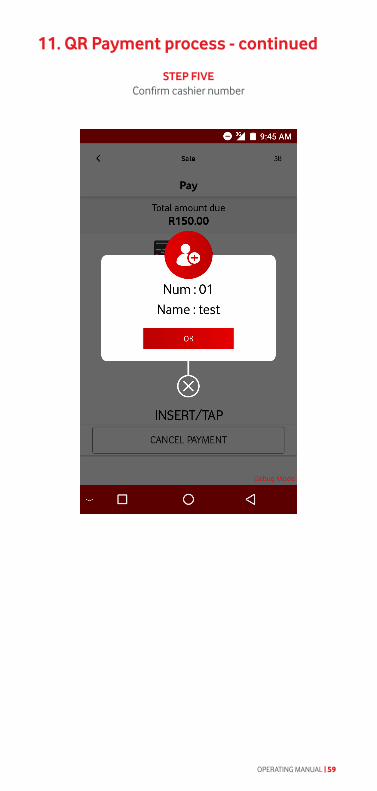
11. QR Payment process - continued
OPERATING MANUAL | 59
STEP FIVEConfirm cashier number
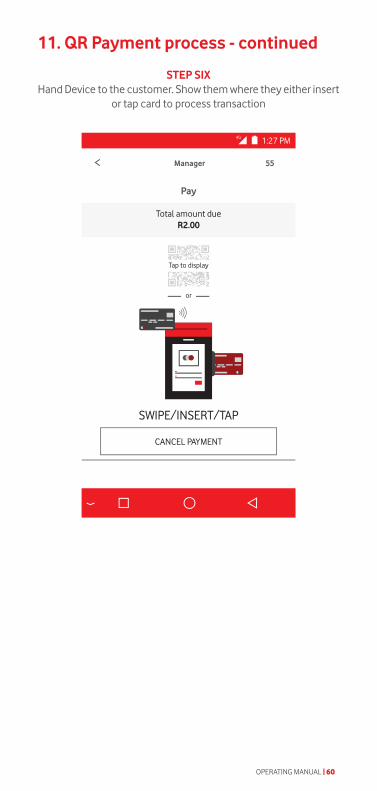
STEP SIXHand Device to the customer. Show them where they either insert
or tap card to process transaction
11. QR Payment process - continued
OPERATING MANUAL | 60

STEP SEVENSCAN QR code and continue with payment
11. QR Payment process - continued
OPERATING MANUAL | 61
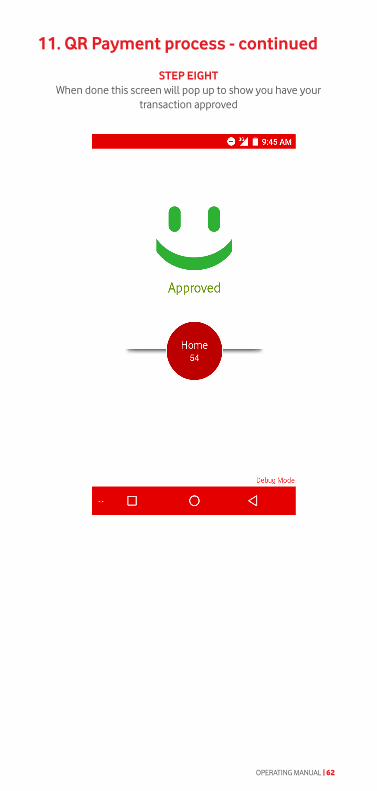
STEP EIGHTWhen done this screen will pop up to show you have your
transaction approved
11. QR Payment process - continued
OPERATING MANUAL | 62

12. REVERSAL PROCESS (to be performed by Supervisor)
STEP ONEClick on MORE option
A reversal is when an error is made on a transaction that needs to be reversed. The reversal must be performed on the same day of the transaction before clearing cut off time (23:59). It can be performed for one or more of the transactions done on the card in question.
MORE
SALE
1:27 PM4G
OPERATING MANUAL | 63
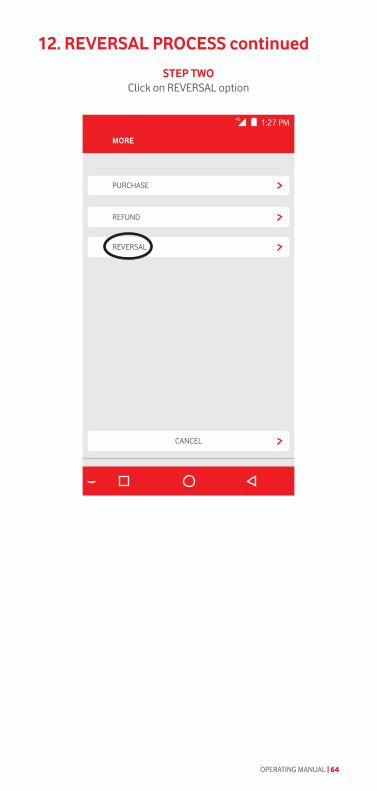
STEP TWOClick on REVERSAL option
12. REVERSAL PROCESS continued
MORE
REFUND
REVERSAL
CANCEL
PURCHASE
1:27 PM4G
OPERATING MANUAL | 64
12. REVERSAL PROCESS continued
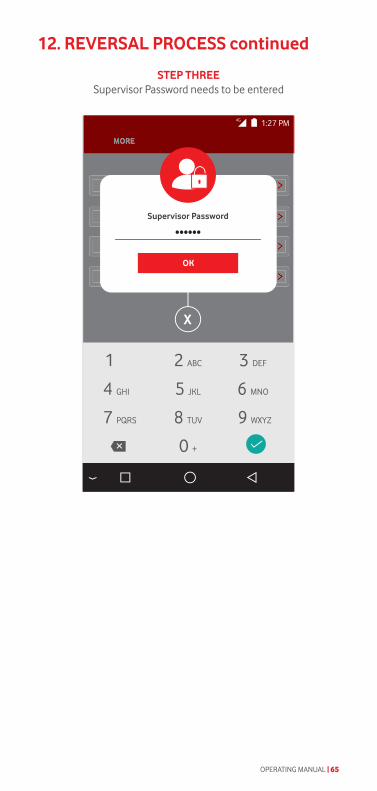
STEP THREESupervisor Password needs to be entered
OPERATING MANUAL | 65

12. REVERSAL PROCESS continued
STEP FOURSwipe/Insert same card that the sale was processed on.
OPERATING MANUAL | 66

12. REVERSAL PROCESS continued
STEP FIVEDevice will automatically identify transaction to be reversed, if only one transaction. If more than one transaction it will list
them.
OPERATING MANUAL | 67

12. REVERSAL PROCESS continued
STEP SIXSelect CONFIRM if the correct transaction. Or select the
transaction from the list and select confirm.
OPERATING MANUAL | 68

12. REVERSAL PROCESS continued
STEP SEVENSuccessful reversal. Press on Home button to proceed.
Success
1:27 PM4G
Home58
OPERATING MANUAL | 69

12. REVERSAL PROCESS continued
STEP EIGHTRemove Customers card and hand back to them with the slip.
Press on OK to proceed
Home45
H
o
m
e45
1:27 PM4G
Please Remove Card
OK
OPERATING MANUAL | 70

Transactions can also be viewed on the merchant portalhttps://merchantportal.vfs.africa/merchantportal/home/
Login
13. VIEW & PRINT TRANSACTIONS
STEP ONEClick on the MENU icon, on the top right of the home screen
MORE
SALE
1:27 PM4G
OPERATING MANUAL | 71

STEP TWOSelect TRANSACTIONS on the next Menu
13. VIEW & PRINT TRANSACTIONS continued
Manager
Transactions
Admin
Management
1:27 PM4G
OPERATING MANUAL | 72

STEP THREEAll transactions processed will then be displayed.
13. VIEW & PRINT TRANSACTIONS continued
OPERATING MANUAL | 73

13. VIEW & PRINT TRANSACTIONS continued
STEP FOURTo view & print the transactions summary for the day, click on the
VIEW TRANSACTIONS TOTAL in the top right of the screen
OPERATING MANUAL | 74
13. VIEW & PRINT TRANSACTIONS continued
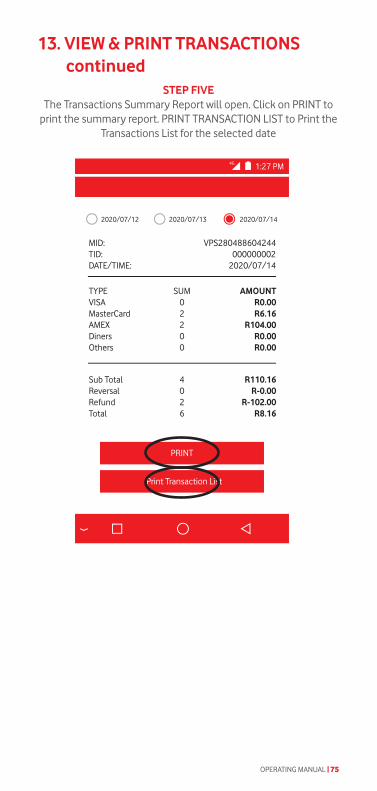
STEP FIVEThe Transactions Summary Report will open. Click on PRINT to
print the summary report. PRINT TRANSACTION LIST to Print the Transactions List for the selected date
OPERATING MANUAL | 75
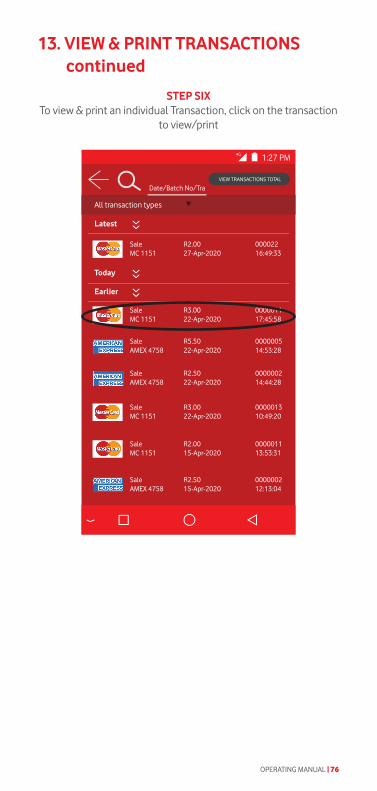
13. VIEW & PRINT TRANSACTIONS continued
STEP SIXTo view & print an individual Transaction, click on the transaction
to view/print
OPERATING MANUAL | 76

13. VIEW & PRINT TRANSACTIONS continued
STEP SEVENThe transaction details will open and click on PRINT to print the
transaction on the slip
OPERATING MANUAL | 77

14. CHANGE SIM CARD CONNECTION
Sim card 1 Signal Strength.
It states 4G this means it’s the card being used for
connectivity
Sim card 2 signal Strength.
It does not state the type of connectivity, therefore, is
not the active sim
When connectivity signal is weak follow these steps to swap sim cards.
STEP ONENavigate back to the home menu and Click on Settings
1:27 PM4G
Settings Clock
Calculator Update
pay
OPERATING MANUAL | 78
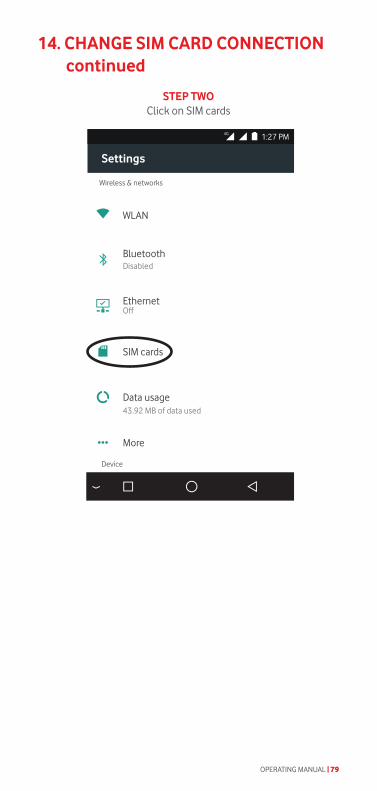
STEP TWOClick on SIM cards
14. CHANGE SIM CARD CONNECTION continued
OPERATING MANUAL | 79
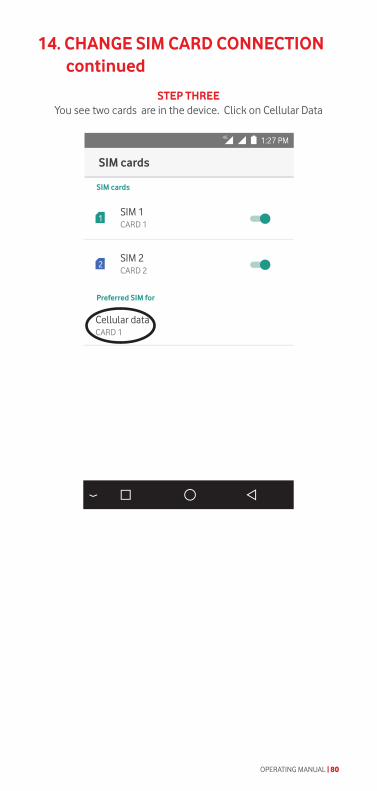
14. CHANGE SIM CARD CONNECTION continued
STEP THREEYou see two cards are in the device. Click on Cellular Data
OPERATING MANUAL | 80

14. CHANGE SIM CARD CONNECTION continued
STEP FOURThe green sim is the active sim. Click on the Blue Sim Card 2 to
activate it.
OPERATING MANUAL | 81
9:47 PM3G
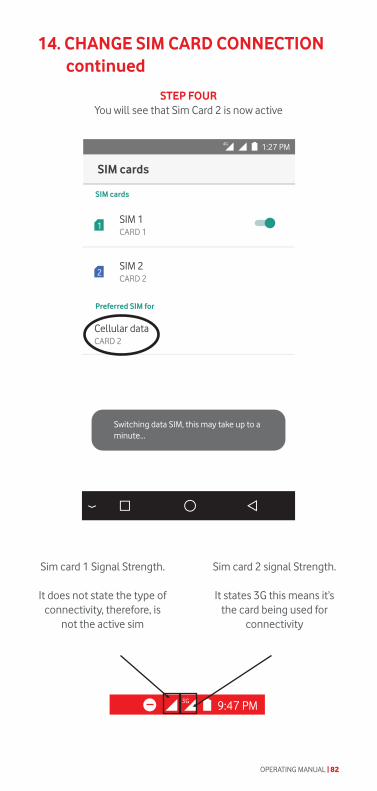
STEP FOURYou will see that Sim Card 2 is now active
Sim card 1 Signal Strength.
It does not state the type of connectivity, therefore, is
not the active sim
Sim card 2 signal Strength.
It states 3G this means it’s the card being used for
connectivity
14. CHANGE SIM CARD CONNECTION continued
OPERATING MANUAL | 82

15. SILENT MODE ICON continued
STEP ONEThis Minus sign means the device is in silent mode i.e. volume
and alerts is off. It does NOT mean their us no connectivity
MORE
SALE
1:27 PM4G
STEP TWOAdjust the volume on the device using the button on the left side
of the device
STEP THREEThe minus sign will disappear. Notice the connectivity icon is still
visible
OPERATING MANUAL | 83

Contact us
Phone: 0800 000 654Email: [email protected]
Web: http://voda.com/accept-payments
Call centre operating hours: Monday to Sunday 7am to 7pm with after-hours support for
emergencies.
Vodacom South Africa
Alternatively, scan the QR code below for more


![Vodacom Contract, Products & Services - The Vodacom Academy [C2] [Version: 010 1 7 th March 2014 Vodacom Contract, Products & Services.](https://static.fdocuments.us/doc/165x107/56649e425503460f94b355ee/vodacom-contract-products-services-the-vodacom-academy-c2-version.jpg)