VirtualSAN: HA and Hyper-Converged iSCSI SAN for Citrix ... · Type a target name in the Target...
58
VirtualSAN: HA and Hyper-Converged iSCSI SAN for Citrix XenServer Wednesday, Dec 7, 2016 KernSafe Technologies, Inc. www.kernsafe.com Copyright © KernSafe Technologies 2006-2017. All right reserved.
Transcript of VirtualSAN: HA and Hyper-Converged iSCSI SAN for Citrix ... · Type a target name in the Target...

VirtualSAN: HA and Hyper-Converged iSCSI SAN
for Citrix XenServer
Wednesday, Dec 7, 2016
KernSafe Technologies, Inc.
www.kernsafe.com
Copyright © KernSafe Technologies 2006-2017. All right reserved.

Table of Contents
Overview ....................................................................................................................................................... 3
Install XenServer ........................................................................................................................................... 3
Install Virtual Native SAN .......................................................................................................................... 4
Configuring on Management Node .............................................................................................................. 5
Create Target on Node1 ............................................................................................................................ 6
Create Target on Node2 .......................................................................................................................... 12
Creating Application on Node1 ............................................................................................................... 18
Creating Application on Node2 ............................................................................................................... 23
Configuring XenServer ................................................................................................................................ 28
Log On to XenServer ............................................................................................................................... 28
Add iSCSI storage device into XenServer ................................................................................................ 33
Create Pool in XenServers ....................................................................................................................... 41
Create a virtual machine ......................................................................................................................... 46
Install Operating system ......................................................................................................................... 52
Contact ........................................................................................................................................................ 58

Overview
The Virtual SAN is native version of KernSafe iSCSI SAN cross-platform which can work in the VMWare
cSphere (ESX, ESXi) and Citrix XenServer host machine. It quickly brings the benefits are:
1. Build Hyper-Converged Infrastructure or high availability visualization server with only two servers
(two nodes high availability).
2. Convert VMWare vSphere and Citrix XenServer into hyper converged servers, allows it can provide
both compute and storage service.
Citrix Xen Server™ is the only enterprise-class, cloud-proven virtualization platform that delivers the
critical features of live migration and centralized multi-server management at no cost. Xen Server is an
open and powerful server virtualization solution that radically reduces datacenter costs by transforming
static and complex datacenter environments into more dynamic, easy to manage IT service delivery
centers.
High availability is the implementation of technology so that if a component fails, another can take over
for it. By using highly available platforms, the downtime for a system can be reduced, and, in many cases,
it can be reduced to a short enough time that the users of the system do not see the failure.
Now, assume you have two servers want to run XenServer, have IP address as follows:
Name IP Address OS Usage
Manage Node Any Windows Management
Node1 192.168.0.231 Bare or Linux Compute and storage
Node2 192.168.0.232 Bare or Linux Compute and storage
Install XenServer
You need two servers which running XenServer. XenServer must first be installed on to a suitable
machine that will be used to create the virtual environment. For how to obtain or install Citrix Xen
Server, please contact the Citrix supplier.
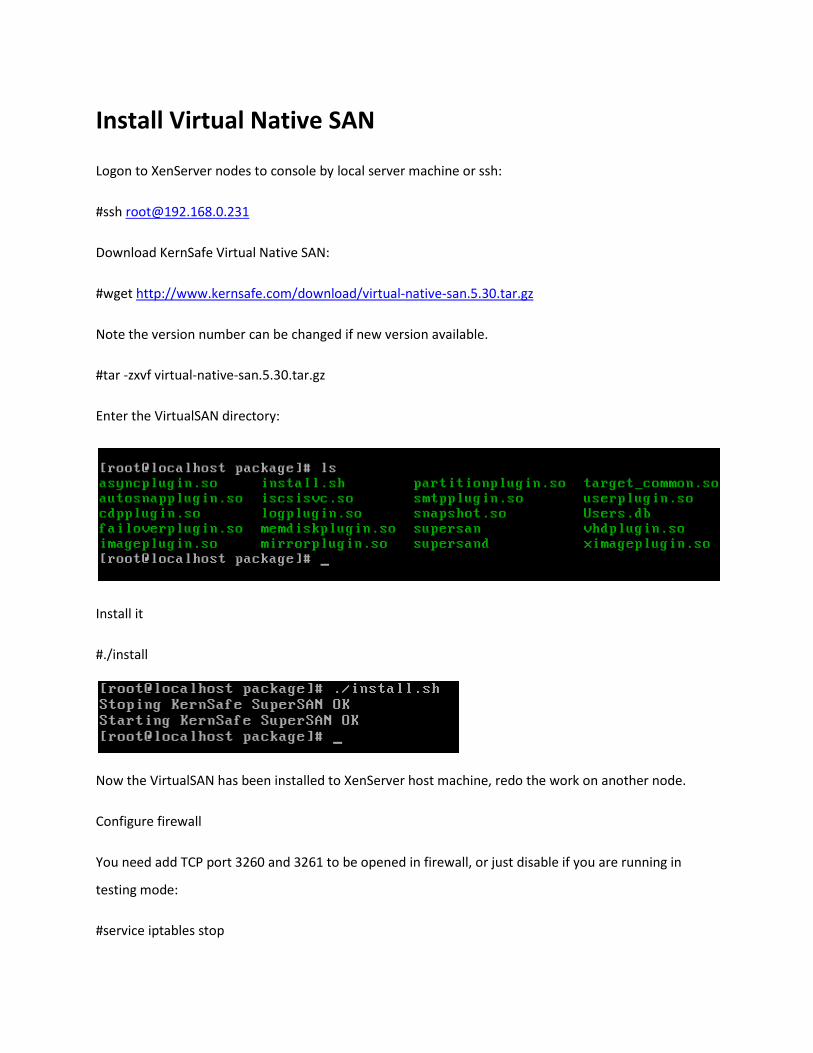
Install Virtual Native SAN
Logon to XenServer nodes to console by local server machine or ssh:
#ssh [email protected]
Download KernSafe Virtual Native SAN:
#wget http://www.kernsafe.com/download/virtual-native-san.5.30.tar.gz
Note the version number can be changed if new version available.
#tar -zxvf virtual-native-san.5.30.tar.gz
Enter the VirtualSAN directory:
Install it
#./install
Now the VirtualSAN has been installed to XenServer host machine, redo the work on another node.
Configure firewall
You need add TCP port 3260 and 3261 to be opened in firewall, or just disable if you are running in
testing mode:
#service iptables stop

Configuring on Management Node
The same as XenServer, VirtualSAN does also need Windows based machine as management node, in
Windows:
Launch KernSafe iSCSI SAN Management Console.
Click Server->Add another server menu item, the Add Server dialog shows.
Fulfill the dialog with the credential of remote KernSafe VirtualSAN server, then click the OK button to
add.
Do the same way with the second server.
Note: if you are running trial mode, you need click the “Start” button to manually start iSCSI service.

Create Target on Node1
Launch the iStorage Server Management Console, press the Create button on the toolbar of iStorage
Server management console, the Create Device Wizard is shown.
Select a device type

Choose Hard Disk.
Press the Next button to continue.
Select a medium type.

Choose Image File in iSCSI Medium Type window.
Then press Next button to continue.
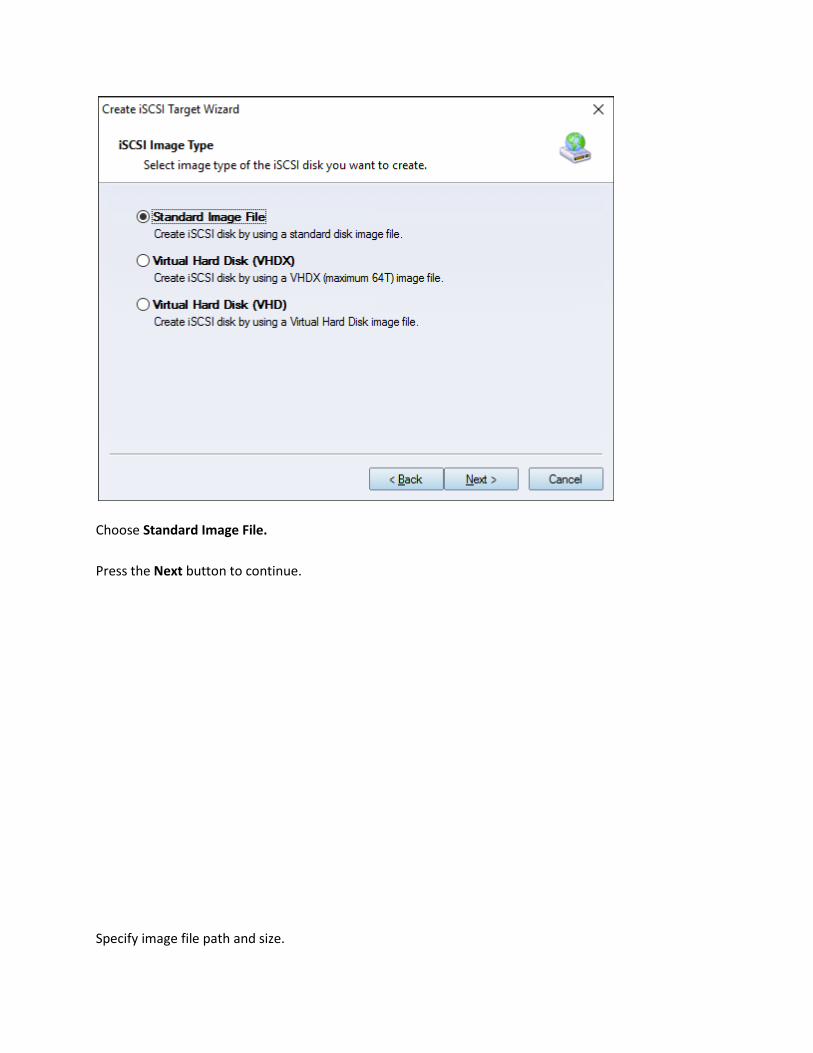
Select an Image type.

Choose Standard Image File.
Press the Next button to continue.
Specify image file path and size.

Specify the image file.
Specify the device size.
Press the Next button to continue.
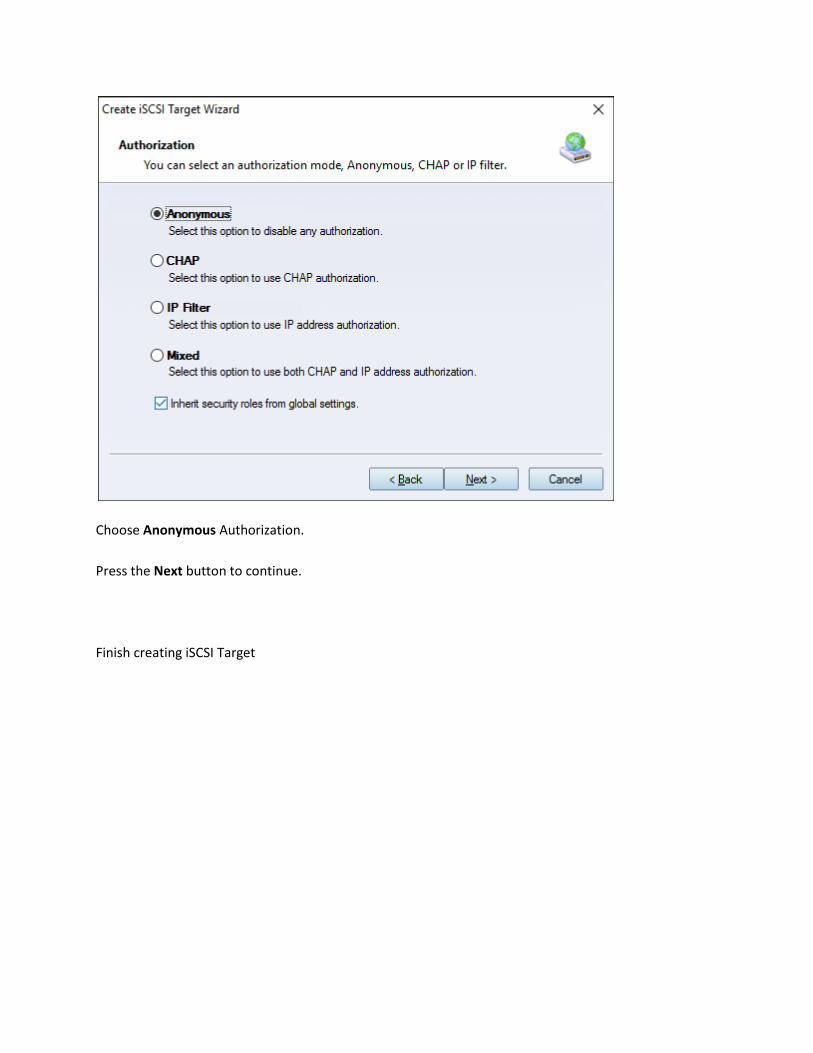
Set authorization mode.

Choose Anonymous authorization.
Press the Next button to continue.
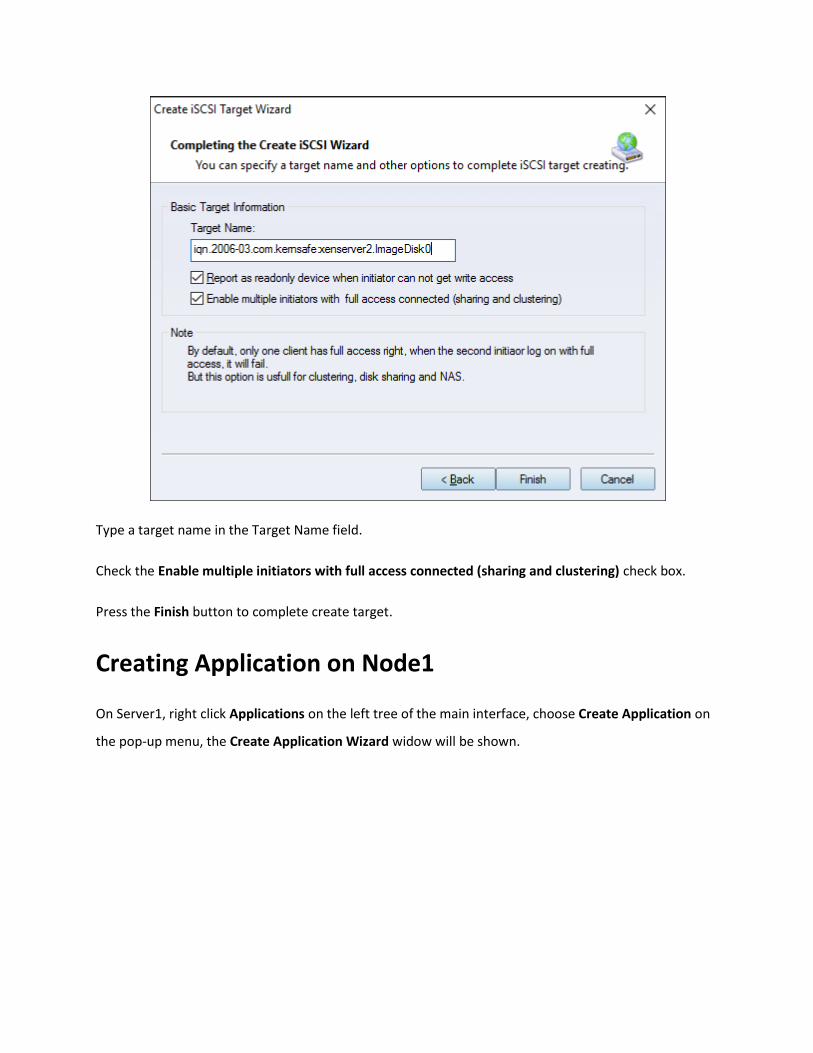
Finish creating iSCSI Target

Type a target name in the Target Name field, we use iqn.2006-03.com.kernsafe:xenserver1.ImageDisk0
as an example.
Check the Enable multiple initiators with full access connected (sharing and clustering) check box.
Press the Finish button to complete create target.
Create Target on Node2
Launch the iStorage Server management consolle, press the Create button on the toolbar of iStorage
Server management console, the Create Device Wizard is shown.
Select a device type

Choose Hard Disk.
Press the Next button to continue.
Select a medium type.

Choose Image File in iSCSI Medium Type window.
Then press Next button to continue.
Select an Image type.
Choose Standard Image File.
Press the Next button to continue.
Specify image file path and size.

Specify the image file.
Specify the device size.
Press the Next button to continue.
Set authorization mode.
Choose Anonymous Authorization.
Press the Next button to continue.
Finish creating iSCSI Target
Type a target name in the Target Name field.
Check the Enable multiple initiators with full access connected (sharing and clustering) check box.
Press the Finish button to complete create target.
Creating Application on Node1
On Server1, right click Applications on the left tree of the main interface, choose Create Application on
the pop-up menu, the Create Application Wizard widow will be shown.

Choose High Availability Node.
Then press Next to continue.

Check the iqn…xenserver1.ImageDisk0 storage and click Edit to find the mirror target.

Input the IP and port of server2 in iSCSI Source tab, and then click Discovery on the bottom of the
window to find the mirror target, choose the iqn…xenserver2.ImageDisk0 in the down-list.
Press OK button to continue.
Note: If the target needs CHAP authorization, you should provide User name and secret to logon.
The mirror target will be added to the window, then click Next button to continue.
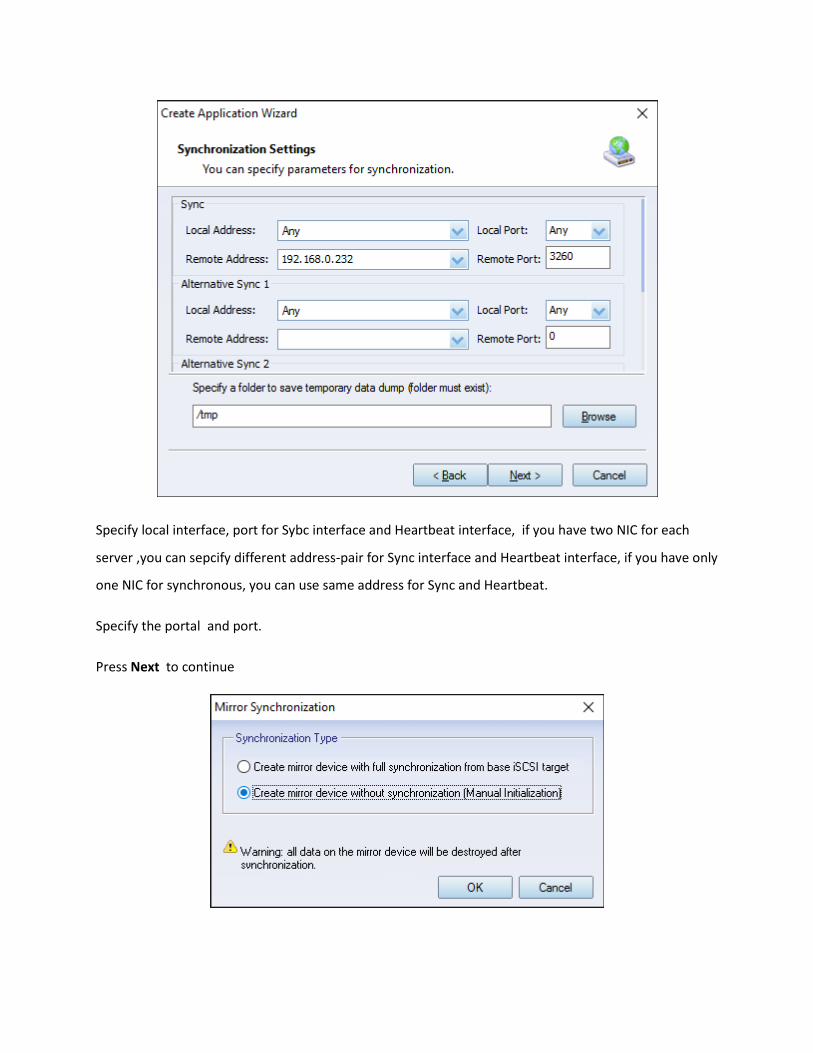
Specify local interface, port for Sybc interface and Heartbeat interface, if you have two NIC for each
server ,you can sepcify different address-pair for Sync interface and Heartbeat interface, if you have only
one NIC for synchronous, you can use same address for Sync and Heartbeat.
Specify the portal and port.
Press Next to continue

Now, the mirror target should be synchronized to the base target, if the two targets are both the new
one and do not be initialized, we can choose Create mirror device without synchronization (Manual
Initialization), otherwise, we must choose Create mirror device with full synchronization from base
iSCSI target.
Press OK button to continue.
Click Finish button to complete the application creation.
Creating Application on Node2
On server node2, right click Applications on the left tree of the main interface, choose Create
Application on the pop-up menu, the Create Application Wizard widow will be shown.

Choose High Availability Node.
Then press Next to continue.
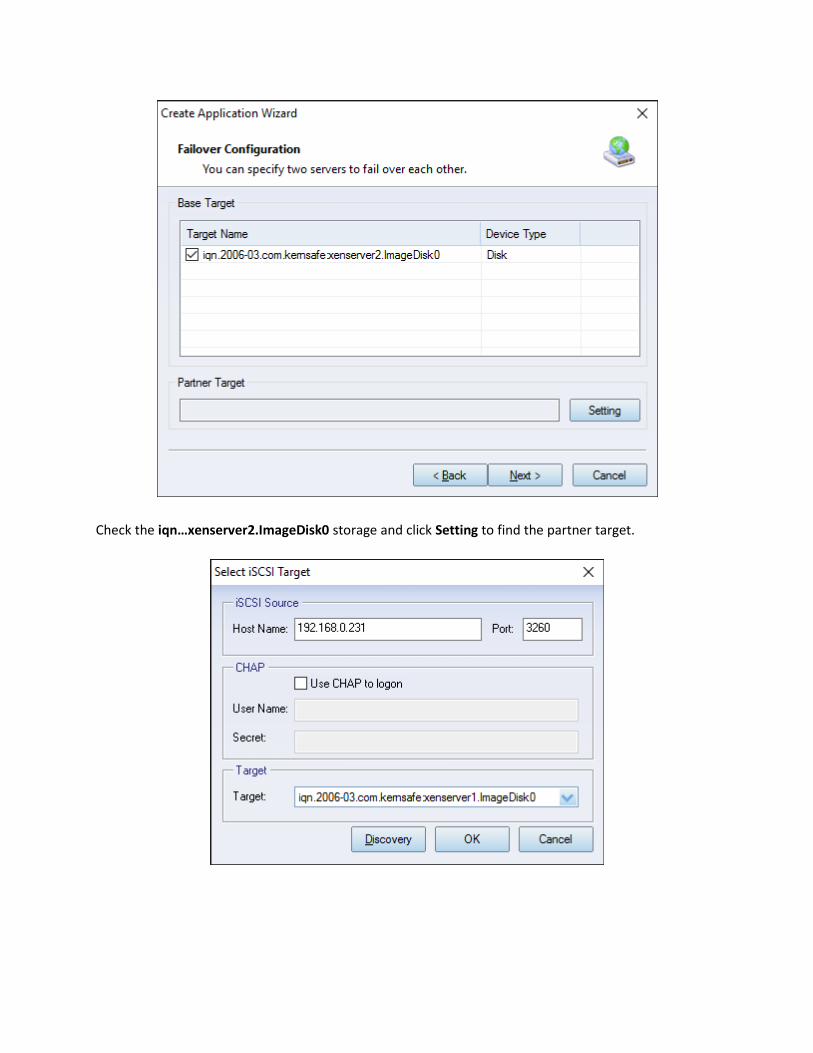
Check the iqn…xenserver2.ImageDisk0 storage and click Setting to find the partner target.

Input the IP and port of server1 in iSCSI Source tab, and then click Discovery on the bottom of the
window to find the mirror target, choose the iqn…xenserver2.ImageDisk0 in the down-list.
Press OK button to continue.
Note: If the target needs CHAP authorization, you should provide User name and secret to logon.
The mirror target will be added to the window, then click Next button to continue.

Specify Sync and Heartbeat interface.
Press the Next button to continue.
Now, the mirror target should be synchronized to the base target, if the two targets are both the new
one and do not be initialized, we can choose Create mirror device without synchronization (Manual
Initialization), otherwise, we must choose Create mirror device with full synchronization from base
iSCSI target.

Press OK button to continue.
Click Finish button to complete the application creation.
Configuring XenServer
Log On to XenServer
Open XenCenter.
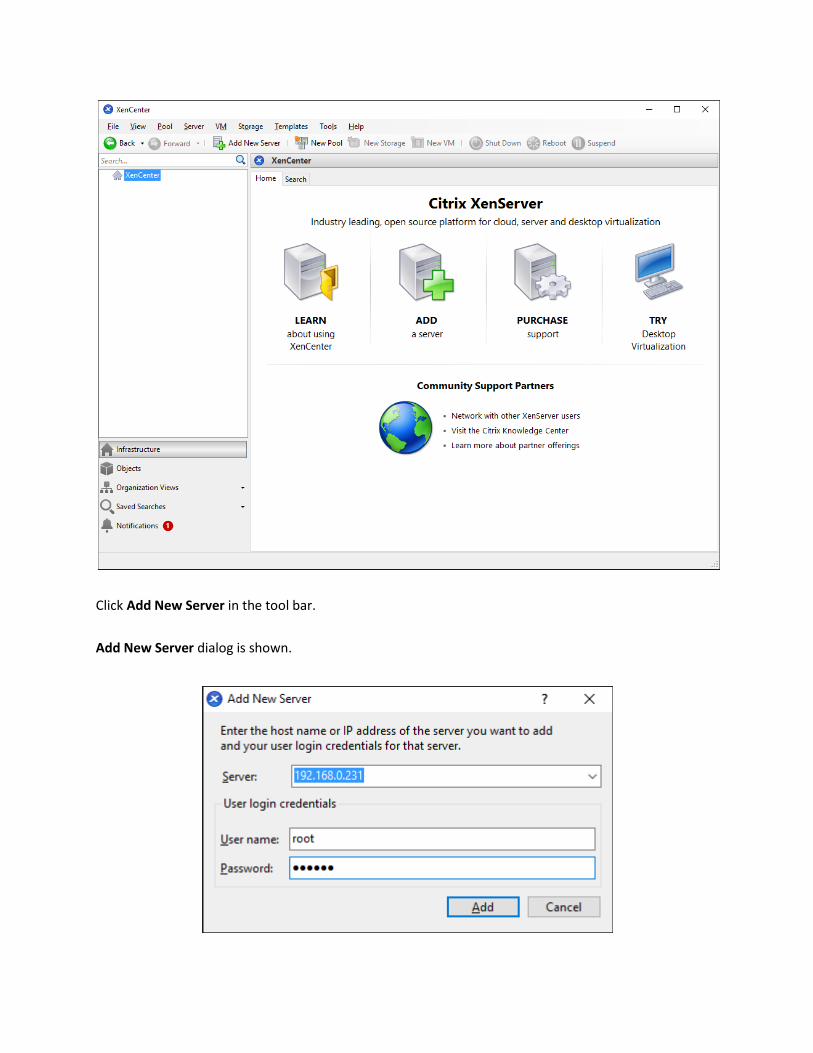
Click Add New Server in the tool bar.
Add New Server dialog is shown.

Input IP address / Name with which running Xen Server, User name and password.
Press the Add button to continue.
Repeat the steps to add another server.
The XenCenter which is connected by XenServers is shown as follows.

Enable Multipathing
Before to add storage, we must ensure that the Xen Server have enabled multipathing, we should to this
by entering maintenance mode and change this property, click Server->Enter Maintenance mode, the
following window is shown.

Click Enter Maintenance button, the server will enter maintenance mode.
Click Server->properties, click Multipathing on the left panel of the pop-up window, the following
window is shown.
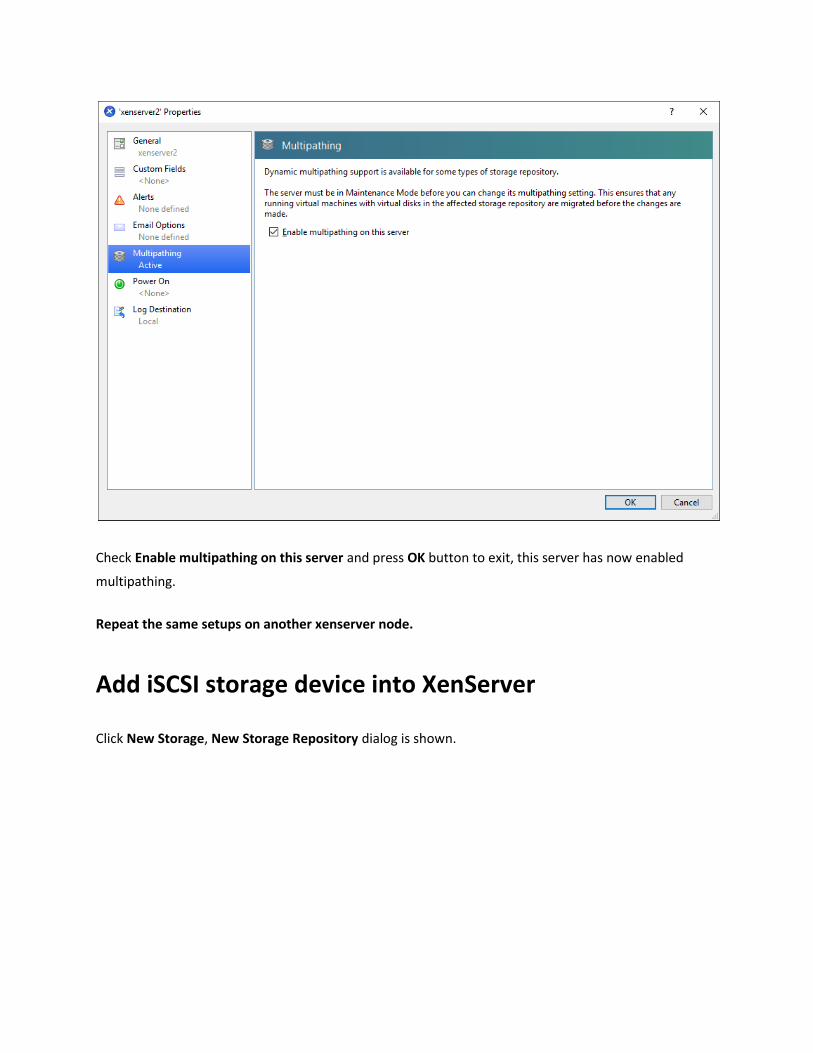
Check Enable multipathing on this server and press OK button to exit, this server has now enabled
multipathing.
Repeat the same setups on another xenserver node.
Add iSCSI storage device into XenServer
Click New Storage, New Storage Repository dialog is shown.
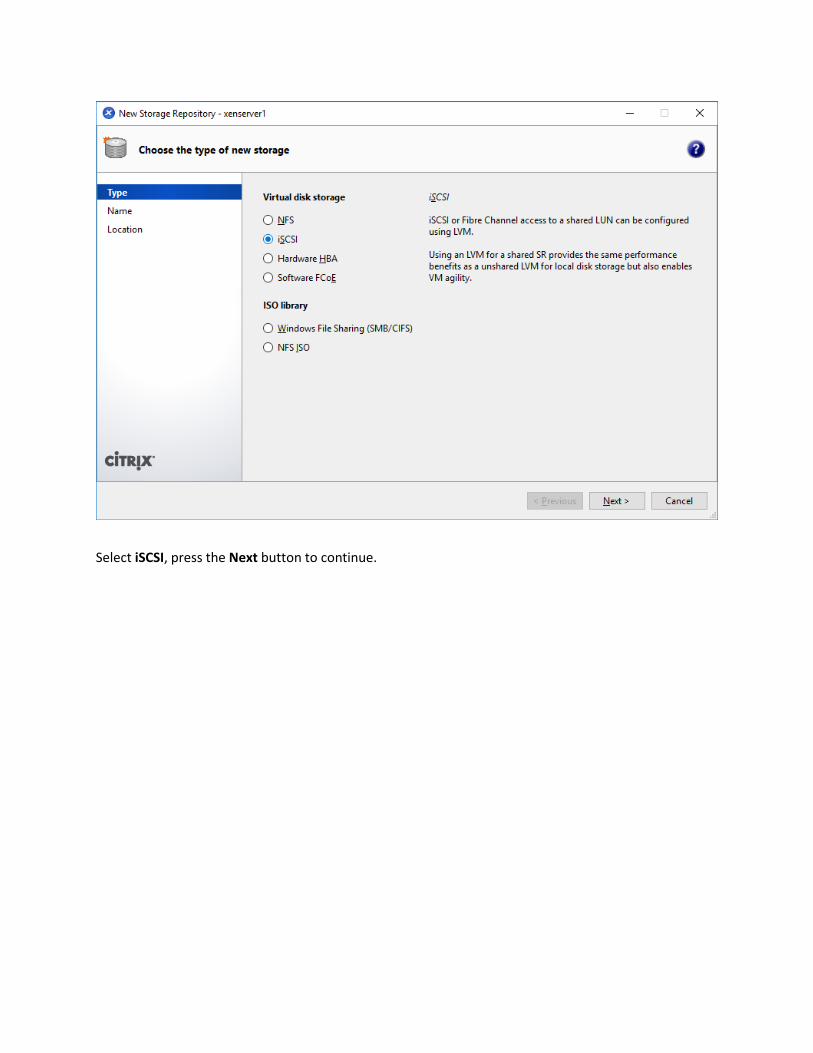
Select iSCSI, press the Next button to continue.

Type storage Name and press the Next button to continue.
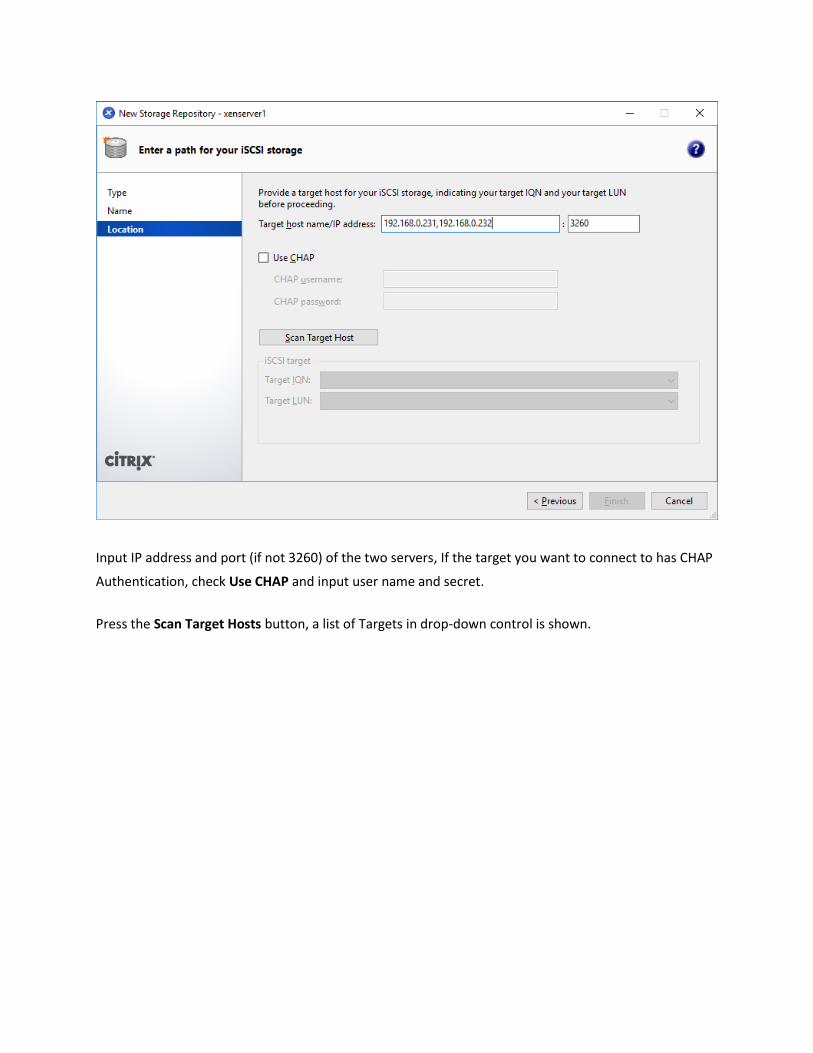
Input IP address and port (if not 3260) of the two servers, If the target you want to connect to has CHAP
Authentication, check Use CHAP and input user name and secret.
Press the Scan Target Hosts button, a list of Targets in drop-down control is shown.

Select *(192.168.0.231, 192.168.0.232:3260) and LUN 0: … Target LUN in the list.
Press the Finish button to continue.
The following dialog is shown, press the Yes button to proceed.
Now Xen Server is carrying on a series of operations, such as Creating SR, to create data structures
required by data repositories.

Sorted! You now see an iSCSI storage device successfully added into Xen Server.
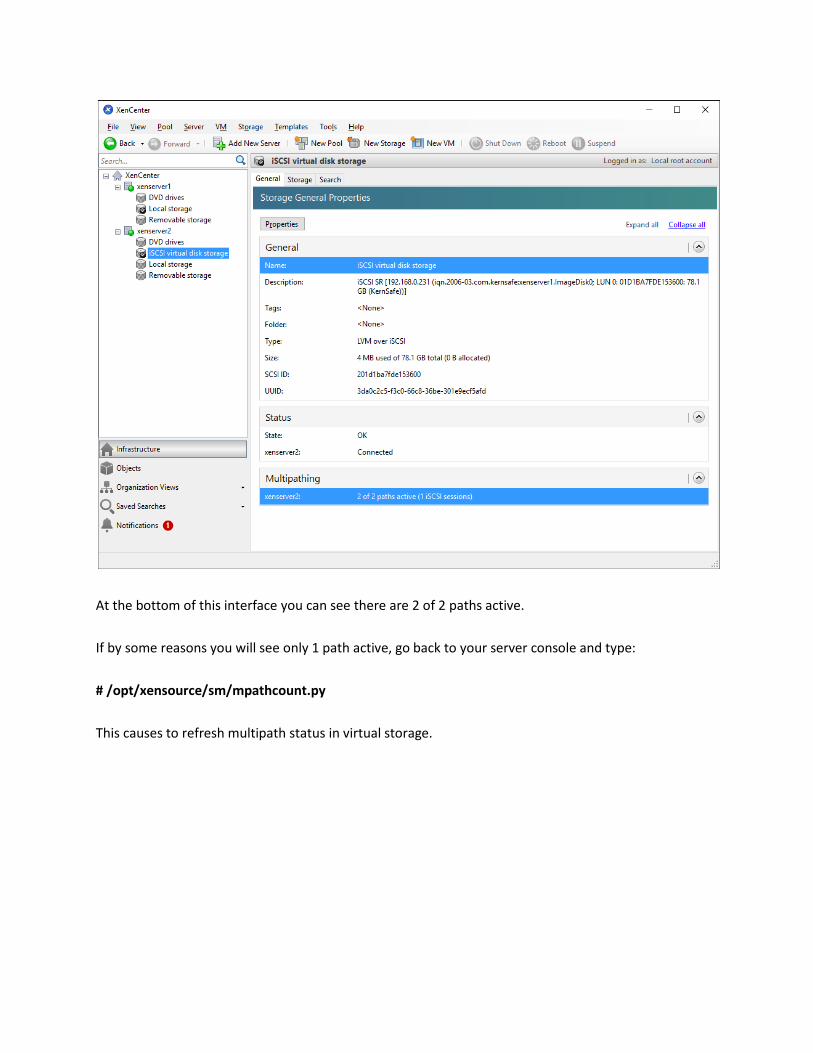
At the bottom of this interface you can see there are 2 of 2 paths active.
If by some reasons you will see only 1 path active, go back to your server console and type:
# /opt/xensource/sm/mpathcount.py
This causes to refresh multipath status in virtual storage.
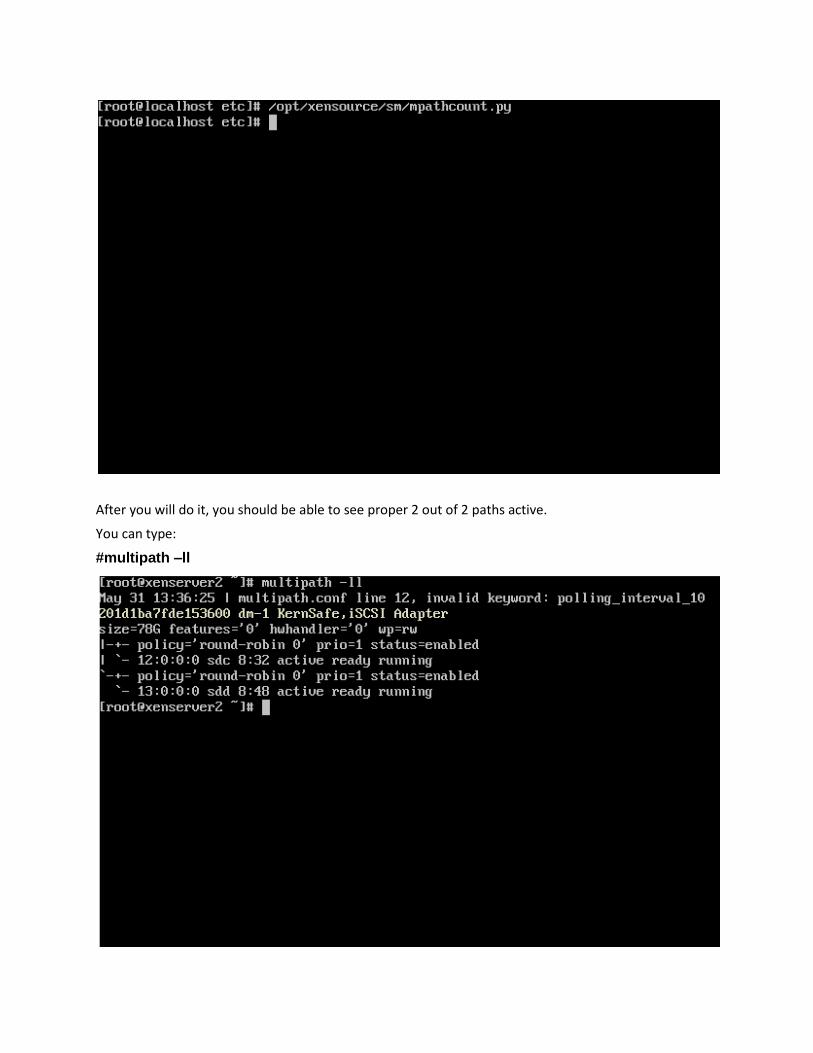
After you will do it, you should be able to see proper 2 out of 2 paths active.
You can type:
#multipath –ll

Create Pool in XenServers
Click on the Pool->New Pool… menu item then Create New Pool dialog shows.
Type Name and Description and select the both server, then click the Create Pool button to
create pool.

Press the Next button to continue.
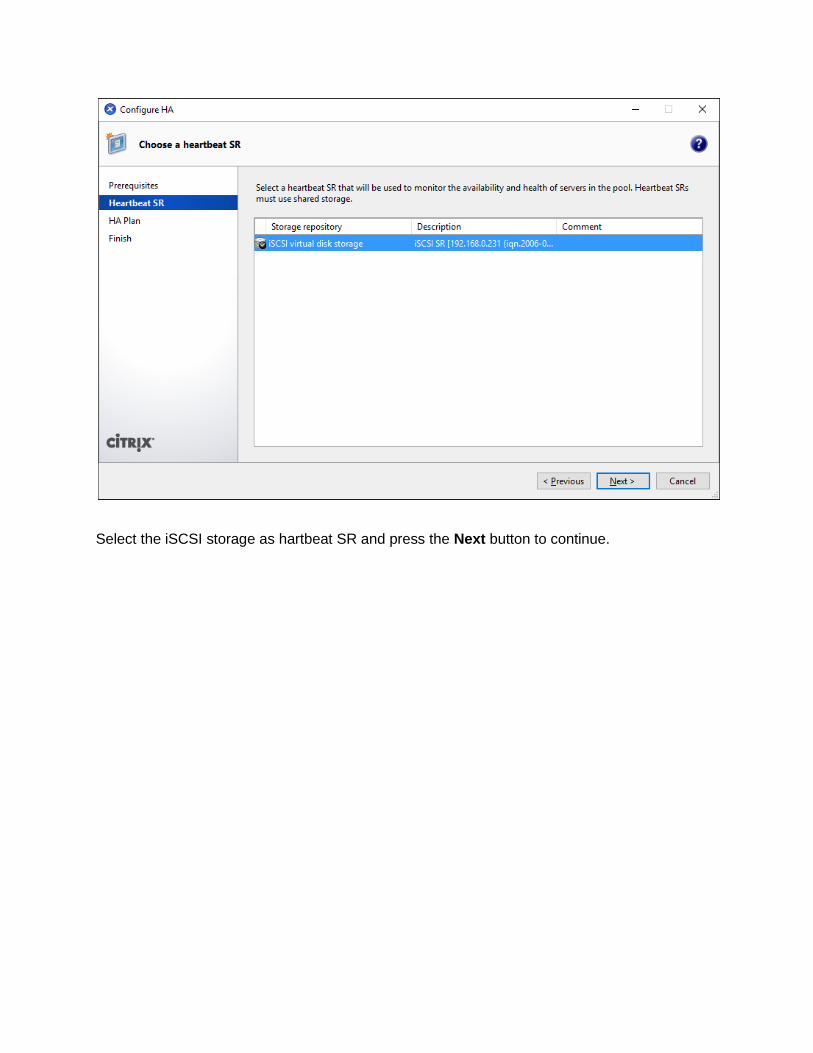
Select the iSCSI storage as hartbeat SR and press the Next button to continue.
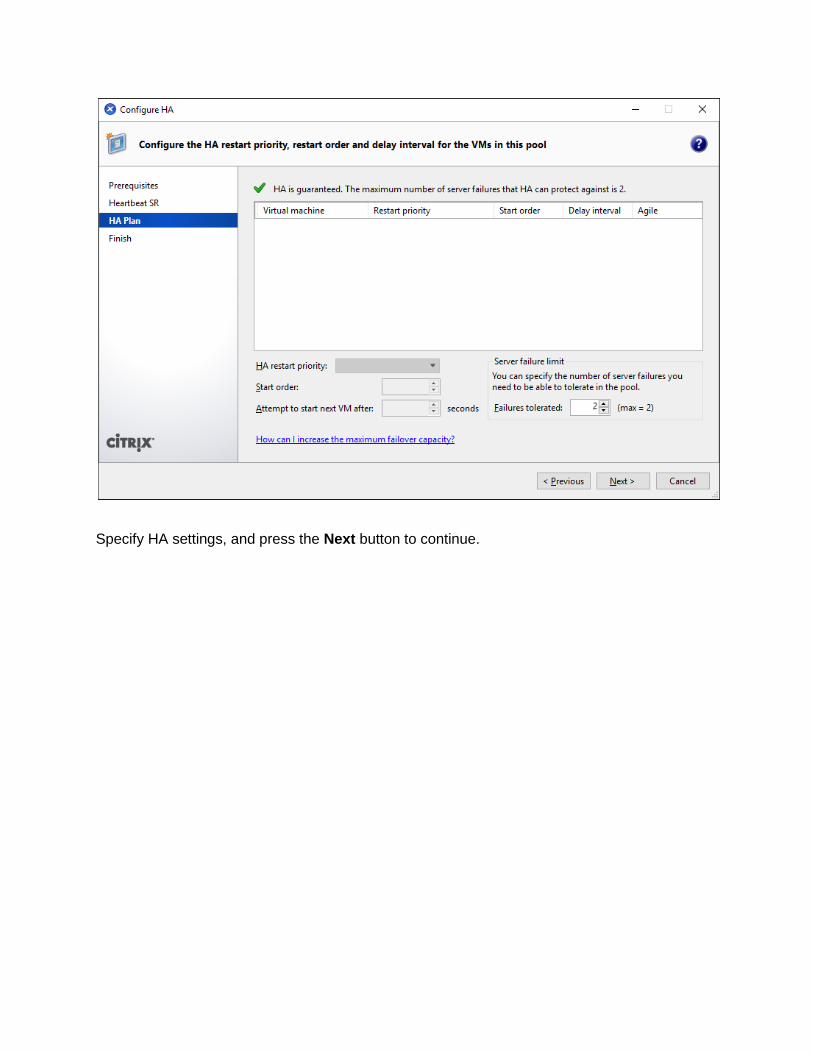
Specify HA settings, and press the Next button to continue.

Press the Finish button to finish creating pool.
Create a virtual machine
Click New VM on Xen Server console.
Select Windows 7 x64 in the following wizard.

Input the desired name and description.

Press the Next to continue.
Select installation media for operating system.

Choose physical DVD Drive on XenServer.
Press the Next button to continue.
Specify the number of CPUs and memory size.

Select number of vCPUs.
Specify initial memory size.
Press the Next button to continue.
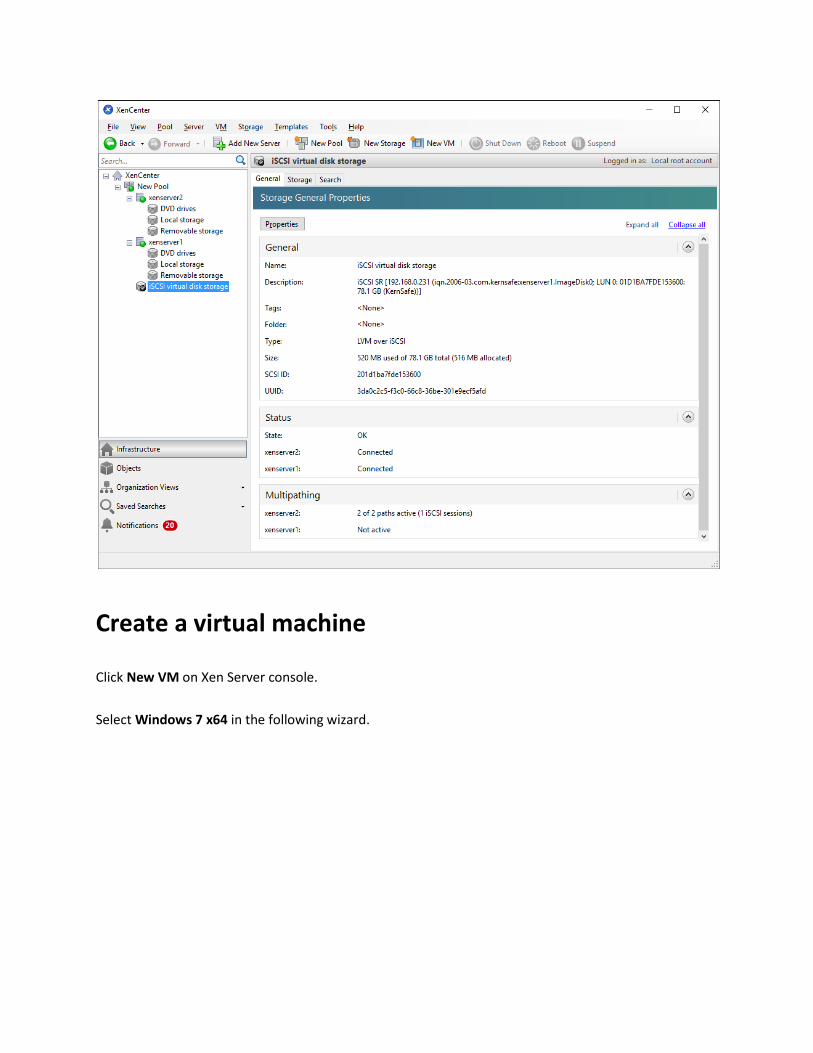
Select storage device.

First you see an iSCSI Virtual disk storage device, which is previously create. It is Xen Server’s default
storage device. If you want to add other virtual disk, press the Add button.
Select iSCSI virtual disk storage… and then press the Next button, the Disk Settings dialog is shown.

Specify the size of the new virtual disk.
Press the OK button to finish the wizard.
A virtual machine is built.
Note that before Version6.5 in the Storage labels of your virtual machine, you need to exchange the
position of iSCSI Virtual Storage and Local Storage (make sure iSCSI Virtual Storage at position 0) so that
the operating system can be installed on this iSCSI device.
Install Operating system
Run the virtual machine and set up the operating system.
The process is just like that on real machine.
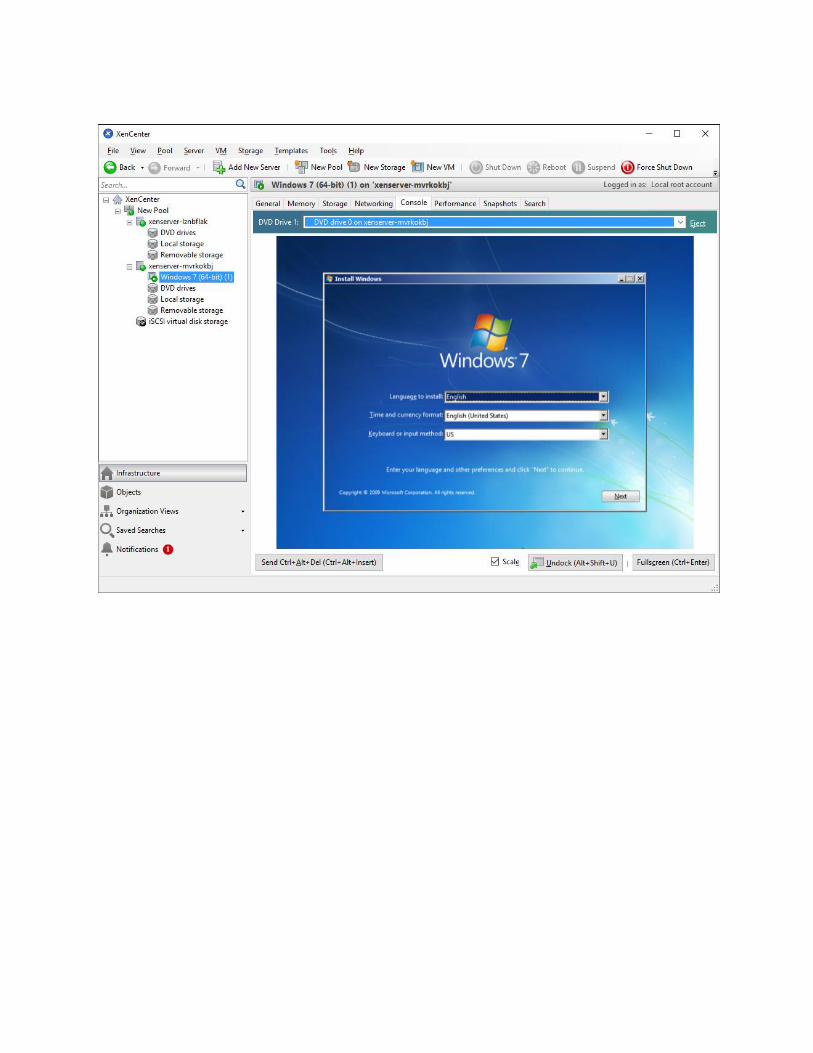

Press the Install Now button to install OS.
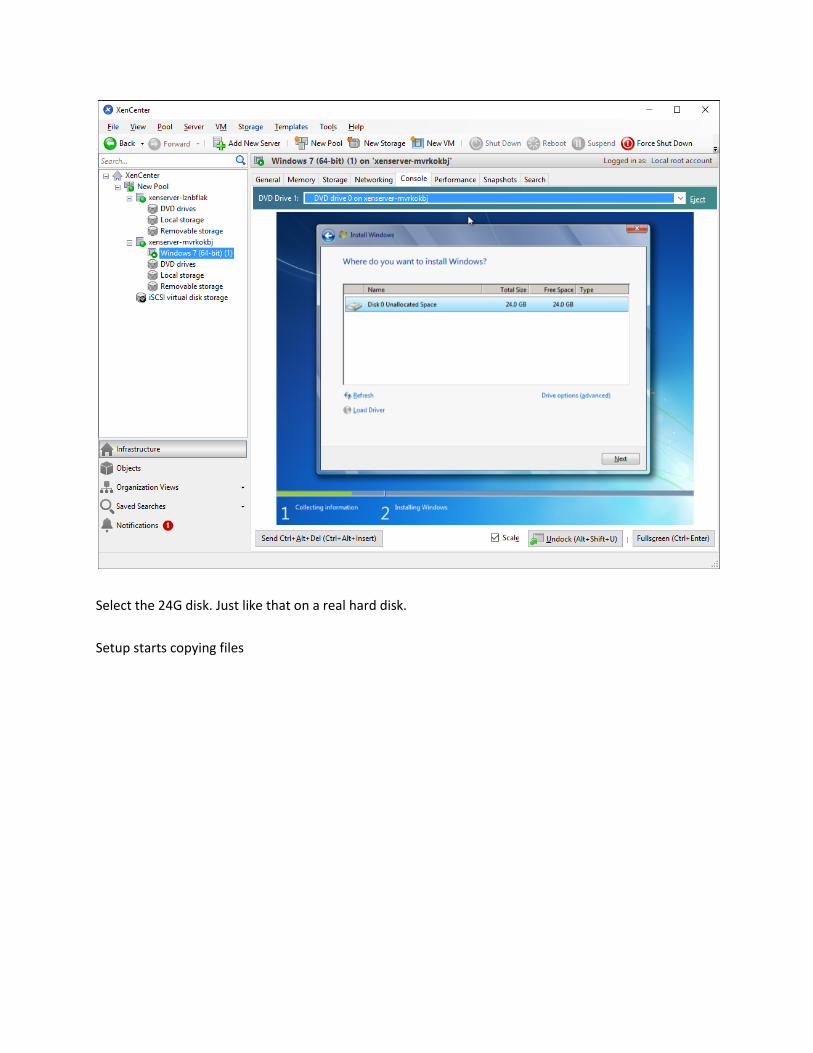
Select the 24G disk. Just like that on a real hard disk.
Setup starts copying files

Last, with all work done, we’ll see iSCSI virtual storage device in the virtual operating system.
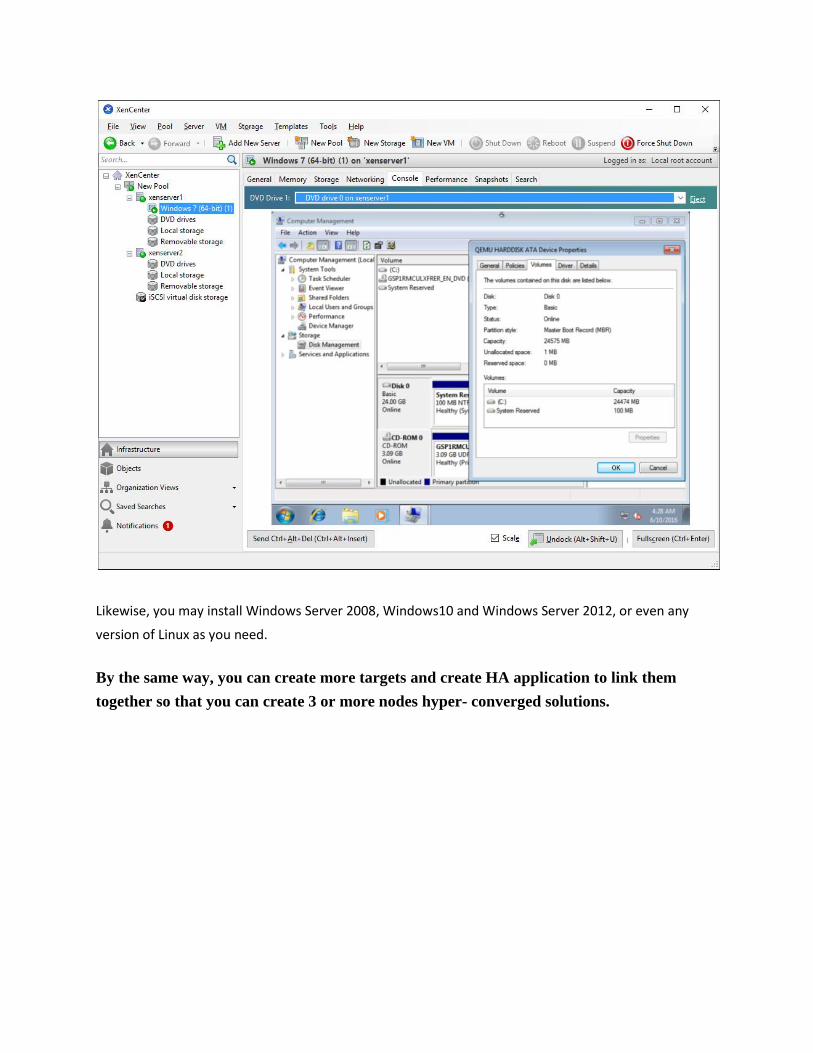
Likewise, you may install Windows Server 2008, Windows10 and Windows Server 2012, or even any
version of Linux as you need.
By the same way, you can create more targets and create HA application to link them
together so that you can create 3 or more nodes hyper- converged solutions.

Contact
Support: [email protected]
Sales:
Marketing:
Home Page: http://www.kernsafe.com
Product Page: http://www.kernsafe.com/product/free-virtual-native-san.aspx
Licenses http://www.kernsafe.com/product/virtual-native-iscsi-san/license-
compares.aspx
Forum: http://www.kernsafe.com/forum
KernSafe Technologies, Inc.
www.kernsafe.com
Copyright © KernSafe Technologies 2006-2017. All right reserved.