Virtual Box Build Guide May 2018 Doc Version 2 · Doc Version 2.0 . 2 TABLE OF CONTENTS 1 Authors...
41
1 Virtual Box Build Guide May 2018 Doc Version 2.0
Transcript of Virtual Box Build Guide May 2018 Doc Version 2 · Doc Version 2.0 . 2 TABLE OF CONTENTS 1 Authors...

1
Virtual Box Build Guide May 2018
Doc Version 2.0
2
TABLE OF CONTENTS
1 Authors Preface ......................................................................... 3
2 Introduction ............................................................................... 4
3 Build Installation Architecture Overview ................................... 5
4 V3 Happy Snap Features ............................................................ 6
5 Configuration Builder Package ................................................. 14
5.1 Vbox Creation Overview ........................................................ 15
5.2 Build VMs ............................................................................ 15
5.3 Generating Your Installer Files – Windows ............................... 19
5.4 Generating Installer Files – MAC ............................................ 20
6 Installation .............................................................................. 21
6.1 VirtualBox ............................................................................ 21
6.2 Rancher ............................................................................... 22
6.3 Rancher SSL Termination ...................................................... 25
6.4 Stack Deployment ................................................................ 27
7 Web Application Setup ............................................................. 31
8 User Setup................................................................................ 33
8.1 User Roles ........................................................................... 33
9 Site Administration .................................................................. 36
9.1 Site Email ............................................................................ 36
9.2 LDAP Settings ...................................................................... 36
10 Operational Overview .............................................................. 37
10.1 Log View ............................................................................. 37
10.2 Shell Interaction ................................................................... 38
11 Skedler Licensing ..................................................................... 39

3
1 AUTHORS PREFACE
In 2015, one of our corporate clients told us of their frustrations with the exorbitant licensing costs of commercial Security Information and Events Management (SIEM) products. The customer light heartedly asked whether we could build them an open source SIEM to get rid of these annual license fees. We thought that was a great idea and set out so to develop a SIEM product for Managed Security Service Providers (MSSP’s) and Security Professionals. This product is called SIEMonster.
SIEMonster Version 1 was released in late April of 2016 and a commercial release in November 2016. The release has been an astounding success without over 100,000 downloads of the product. We have assisted individuals and companies integrate SIEMonster into small medium and extra-large companies all around the world. SIEMonster with the help of the community and a team of developers have been working hard since the Version1 release incorporating what the community wanted to see in a SIEM as well as things we wanted to see in the next release.
Along the way we have signed up MSSP’s from around the world who have contributed to the rollout of SIEMonster and in return they have assisted us with rollout scripts, ideas and things we hadn’t even considered.
We are now proud to release the latest Version 3.0 Final. We have added the following features to this release
• ELK Stack updated to version 6.2
• Built in Searchguard open source RBAC & encrypted node to node transport with GUI for
user & role management
• Wazuh HIDS system with Kibana plugin and OpenSCAP options & simplified agent
registration process
• Simplified installation process for both Rancher Docker orchestration & SIEMonster web
application
• All new dashboard with options for 2fa, site administration with user role based access
and faster load times
• Built in parsers for most proprietary devices
• Preloaded Minemeld threat intel feeds integrated with log ingest out of the box.
• COREOS with NFS support
We have also automated correlation with Palo Alto MineMeld Open Source Threat Intelligence and added two factor authentication and easier rollouts.
The transition has now been completed to a full containerize all aspects of the SIEMonster application pool using the popular Docker system. This allows us to run on any hardware, cloud or operating system. It also provides the architecture for docker containers to be moved to other servers during downtime without affecting the SIEM.
We welcome you to try out our fully functional SIEM product, and if you wish to upgrade to our Premium version with Advanced Correlation, Reporting, Auditing and support please contact [email protected].

4
2 INTRODUCTION
SIEMonster Version 3 is built on the best open source components and custom develop from a wish list from the SIEMonster community. This document will cover the architecture, the features and the open source components that make up SIEMonster, so that all security professionals can run a SIEM in their organisations with no budget. If you would like more information about the architecture please see our High-Level Design.
SIEMonster is built on CoreOS, Docker with Rancher, Kubernetes orchestration. The product comes in Vbox, VMware, Bare-metal or Cloud install on AWS/Azure. SIEMonster can scale horizontally and vertically to support any enterprise client.
Some of these features include.
• OSINT from PaloAlto Minemeld.
• OSSEC Wazuh fork. Full integration with OSSEC Wazuh fork for Host Intrusion Detection and PCIDSS ruleset incorporated into Elastic.
• 411 demonstrated at DEFCON. Instant Incident Alerting via email or SMS or Console view via a secure portal and integration with “Slack”/”PagerDuty”/”Jira” using 411 Streams.
• Open Source AuditIT by Opmantek.
• Open Source Incident Response. Alerts maybe escalated as tickets to other operators or a whiteboard to show night shift analysts current issues.
• Elastalert & Event Monitor Alerting
• Data Correlation Index, community rulesets and dashboards, community and open source free plugins that make the SIEM.
• Incorporate your existing Vulnerability Scans into the Dashboard, (OpenVAS, Qualys, Nessus etc.)
• We have also developed and built in LDAP integration, advanced correlation and two factor authentication.

5
3 BUILD INSTALLATION ARCHITECTURE OVERVIEW
SIEMonster V3 cloud deployment is a modular Docker container system which will run on all operating systems supporting Docker. Architecturally this was chosen for portability across platforms, supporting not only most container platforms such as AWS ECS, Azure etc. but also VMWare, VirtualBox and bare metal installs used by our corporate customers. This will provide simplified upgrade paths and scaling potential as well as high availability. Flexible deployment solutions include most cloud container platforms such as AWS, Azure, Digital Ocean etc. Also, options are available for VMware ESX and bare metal installs. For AWS deployment, the platform chosen is the open source container management system provided by Rancher Labs. Rancher supplies the entire software stack needed to manage containers in production. Rancher software consists of four major components:
1. INFRASTRUCTURE ORCHESTRATION
Rancher takes in raw computing resources from any public or private cloud in the form of Linux hosts. Each Linux host can be a VM or physical machine. Rancher does not expect more from each host than CPU, memory, local disk storage, and network connectivity. From Rancher’s perspective, a VM instance from a cloud provider and a bare metal server are indistinguishable. Rancher implements a portable layer of infrastructure services designed specifically to power containerized applications. Rancher infrastructure services include networking, storage, load balancer, DNS, and security. Rancher infrastructure services are typically deployed as containers themselves, so that the same Rancher infrastructure service can run on any Linux hosts from any cloud.
2. CONTAINER ORCHESTRATION AND SCHEDULING
Many users choose to run containerized applications using a container orchestration and scheduling framework. Rancher includes a distribution of all popular container orchestration and scheduling frameworks today, including Docker Swarm, Kubernetes, and Mesos. The same user can create multiple Swarm or Kubernetes clusters. They can then use the native Swarm or Kubernetes tools to manage their applications. In addition to Swarm, Kubernetes, and Mesos, Rancher supports its own container orchestration and scheduling framework called Cattle. Cattle was originally designed as an extension to Docker Swarm. As Docker Swarm continues to develop, Cattle and Swarm started to diverge. Rancher will therefore support Cattle and Swarm as separate frameworks going forward. Cattle is used extensively by Rancher itself to orchestrate infrastructure services as well as setting up, managing, and upgrading Swarm, Kubernetes, and Mesos clusters.
3. APPLICATION CATALOG
Rancher users can deploy an entire multi-container clustered application from the application catalog with one click of a button. Users can manage the deployed applications and perform fully automated upgrades when new versions of the application become available. Rancher maintains a public catalog consisting of popular applications contributed by the Rancher community. Rancher users can create their own private catalogs. With this deployment, custom Rancher catalog applications have been created for the SIEMonster stack. Using the Rancher network overlay, the SIEMonster container application loads have been evenly balanced across four nodes.
4. ENTERPRISE-GRADE CONTROL
Rancher supports flexible user authentication plugins and comes with pre-built user authentication integration with Active Directory, LDAP, and GitHub. Rancher supports Role-Based Access Control (RBAC) at the level of environments, allowing users and groups to share or deny access to, for example, development and production environments.
6
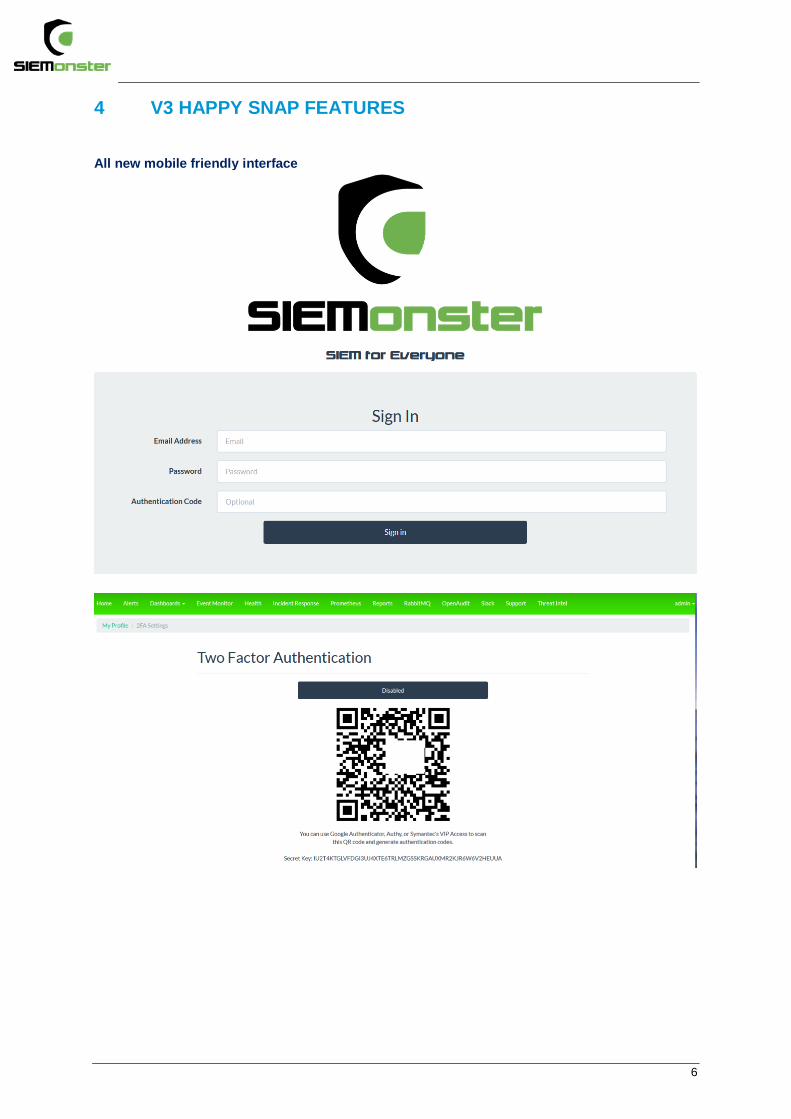
4 V3 HAPPY SNAP FEATURES
All new mobile friendly interface

7
Updated fast loading dashboard
Pre-Configured Dashboards

8
Role based access control with LDAP integration
9
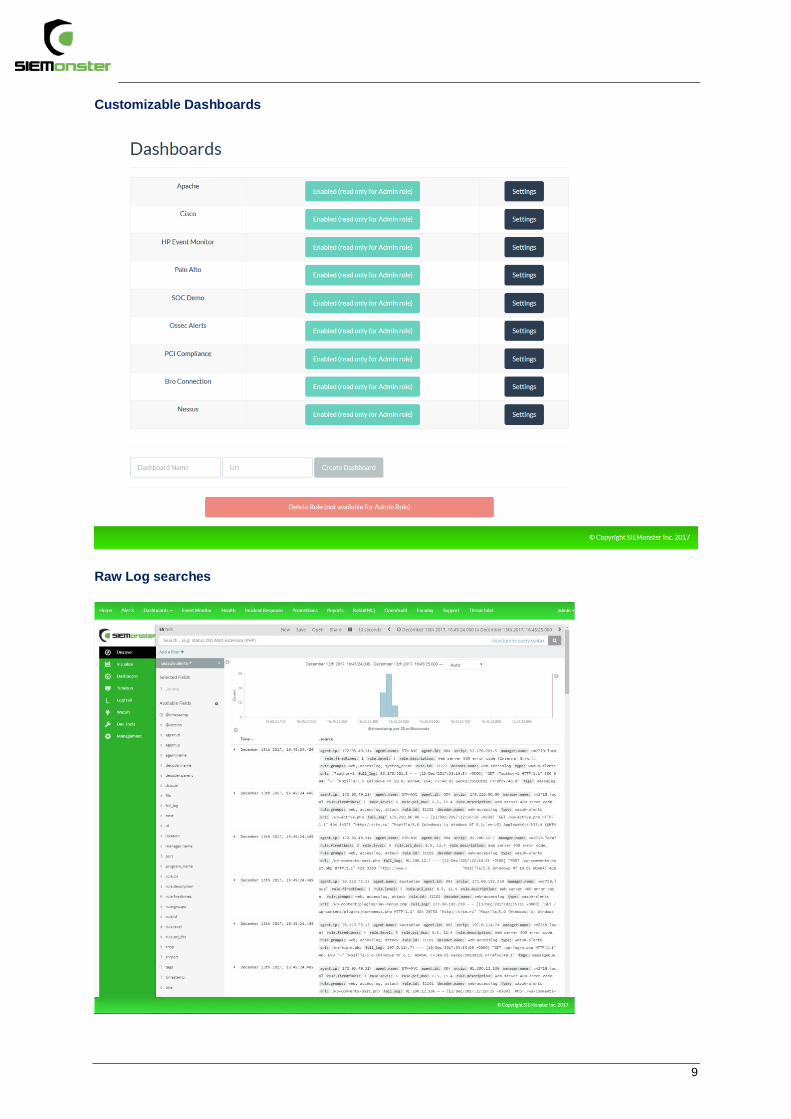
Customizable Dashboards
Raw Log searches
10
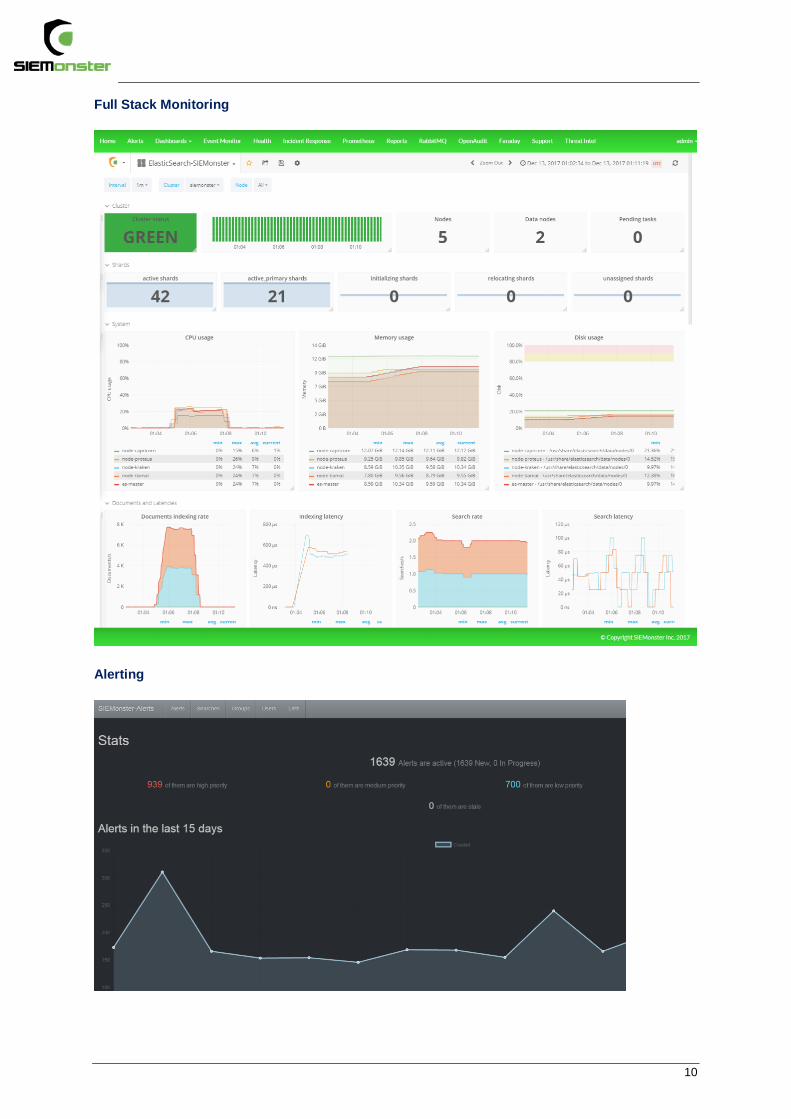
Full Stack Monitoring
Alerting

11
Wazuh HIDS Integration
Threat Intel
Vulnerability Management
12
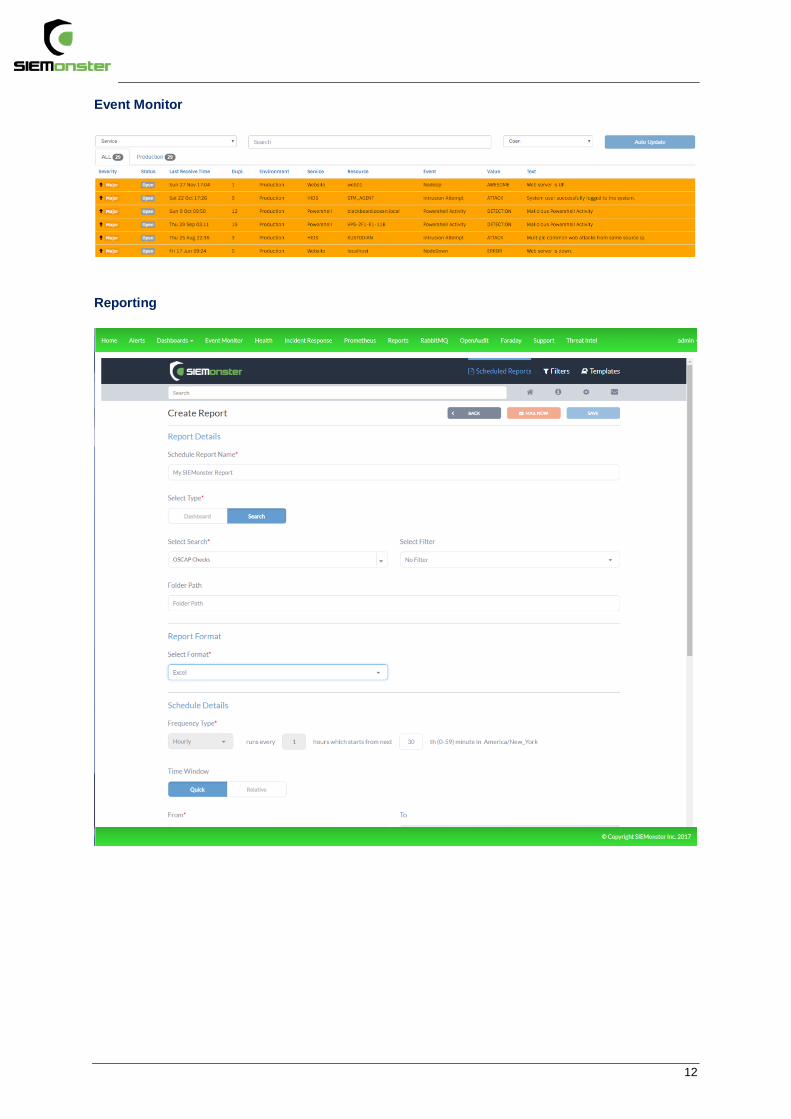
Event Monitor
Reporting
13
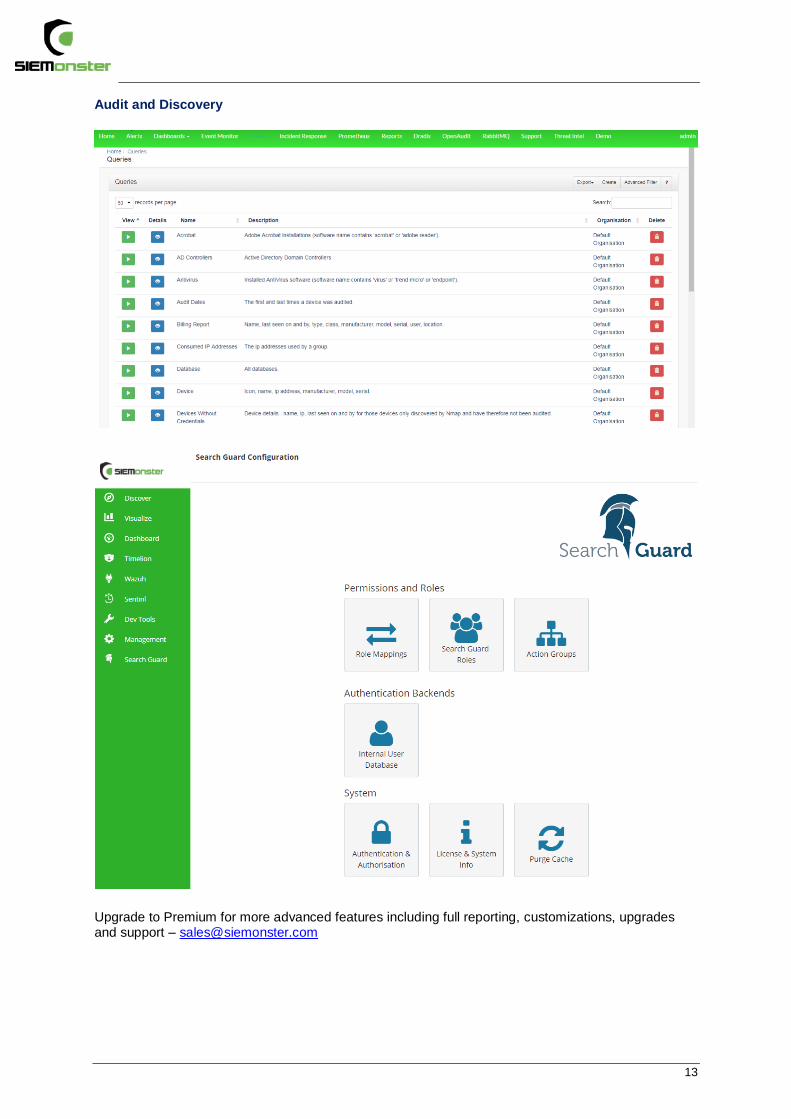
Audit and Discovery
Upgrade to Premium for more advanced features including full reporting, customizations, upgrades and support – [email protected]

14
5 CONFIGURATION BUILDER PACKAGE
The SIEMonster team have put together a package to allow for a fully customizable DIY VM installation.
The DIY option allows you to build your own VM and install CoreOS with a customized configuration. This will allow you to hard set IP addresses, proxies, disk size before you build. This is a good option for most corporate environments.
The SIEMonster custom configuration provides the means to quickly rollout a cluster using VirtualBox comprising the base build for all 5 servers required.
The five servers are comprised of
• Proteus (Application Server/Ingestion Server)
• Capricorn (Application Server)
• Kraken (Elasticsearch)
• Tiamat (Elasticsearch)
• Makara (Rancher / Orchestration Server / Ingestion Server)
System requirements should allow for 8GB RAM for each instance and minimum 250GB free disk space, (50GB per instance). Supported platforms:
• Mac OS X
• Debian
• Windows
• CentOS
Supported platform is Oracle VirtualBox 5.2

15
5.1 VBOX CREATION OVERVIEW
The high-level overview of the VM creation process is set out below.
• Download the latest CoreOS Production ISO
• Create a new VM to suit and then clone X4
• Download the package from the website using the Configuration Builder link
• Install prerequisites
• Edit the configuration file for static IP range, Gateway, DNS, Proxy & SSH credentials
• Run the configuration builder script to create the custom installer files for each host.
• Start each VM and then copy over the relevant installer files
• Install customized CoreOS to disk
• Access the Rancher Server & add SIEMonster Catalog entry, NFS and required access
control plus SSL certificates for the load balancer
• Add Rancher hosts from the Rancher UI
The goal of this project is to create custom installed VMs, through which a user can deploy a 5-node Rancher SIEMonster cluster. This can be achieved by creating ‘cloud-config’ installer templates for each node. Customizations:
• Static IP Range Assignment
• Proxy
• Gateway
• DNS
• SSH Password
5.2 BUILD VMS
• Download the latest stable CoreOS Production ISO -
https://coreos.com/os/docs/latest/booting-with-iso.html
• For VirtualBox, create a new custom VM using the following options:
Attach CoreOS ISO as the CD/DVD Disc Image
Use Linux – Other Linux 64-bit as Guest OS
Name the first VM ‘siem-01-makara’
Minimum processors – 2 Minimum cores- 1
Memory 8192MB minimum
Use bridged networking
Create a new virtual disk – 50GB or greater
See following screen shots for examples.

16
.

17
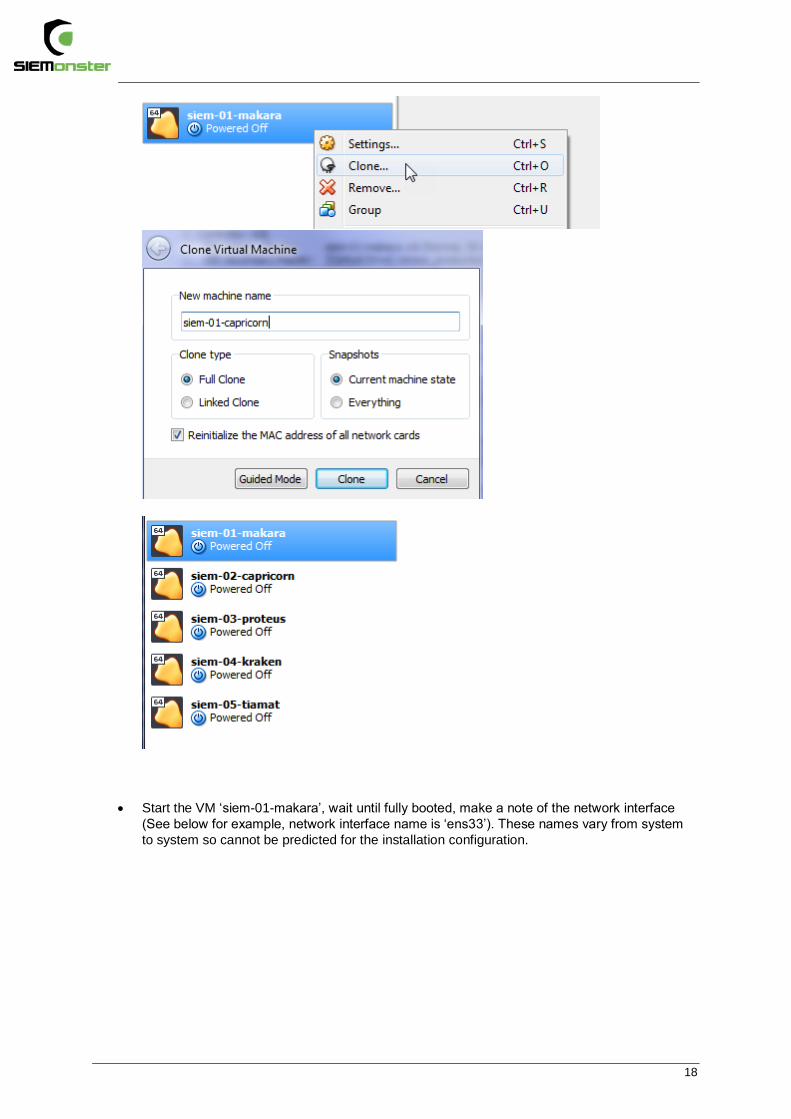
• Using the Clone option for this VM, create 4 full clones naming each as follows (reinitialize
MAC Addresses):
siem-02-capricorn
siem-03-proteus
siem-04-kraken
siem-05-tiamat
18
• Start the VM ‘siem-01-makara’, wait until fully booted, make a note of the network interface
(See below for example, network interface name is ‘ens33’). These names vary from system
to system so cannot be predicted for the installation configuration.

19
5.3 GENERATING YOUR INSTALLER FILES – WINDOWS
1. Click on Download on the SIEMonster website, register and Download the latest SIEMonster
Configuration Builder file.
SHA256 c1a30dd85eb03eea21aed149bac39285d4a37faa3f03cc48b75e5584dc1c14a2
2. Prepare the installation on a Linux machine, e.g. you can use an Ubuntu Live VM.
Prerequisites:
sudo apt install python-pip
pip install j2cli
pip install cot
SSH server accessible from VM instances
Configure:
Edit ova_params.sh – see example below
chmod +x *.sh
Build:
./build_iso.sh
3. An output folder will be created, containing the custom cloud-config installer files for each
host.
4. You now have the required installer files and can proceed to Chapter 6 Installation

20
Ensure ‘STATIC_IF’ value matches the network interface name.
5.4 GENERATING INSTALLER FILES – MAC
1. Click on Download on the SIEMonster website, register and Download the latest SIEMonster
Configuration Builder file.
SHA256 c1a30dd85eb03eea21aed149bac39285d4a37faa3f03cc48b75e5584dc1c14a2
2. Prerequisites:
pip install j2cli
pip install cot
SSH server accessible from VM instances
Configure:
Edit ova_params.sh (see above for example).
chmod +x *.sh
3. Build:
./build_ova.sh
4. An output folder will be created, containing the custom cloud-config installer files for each
host.
5. You now have the required installer files and can proceed to Chapter 6 Installation
21
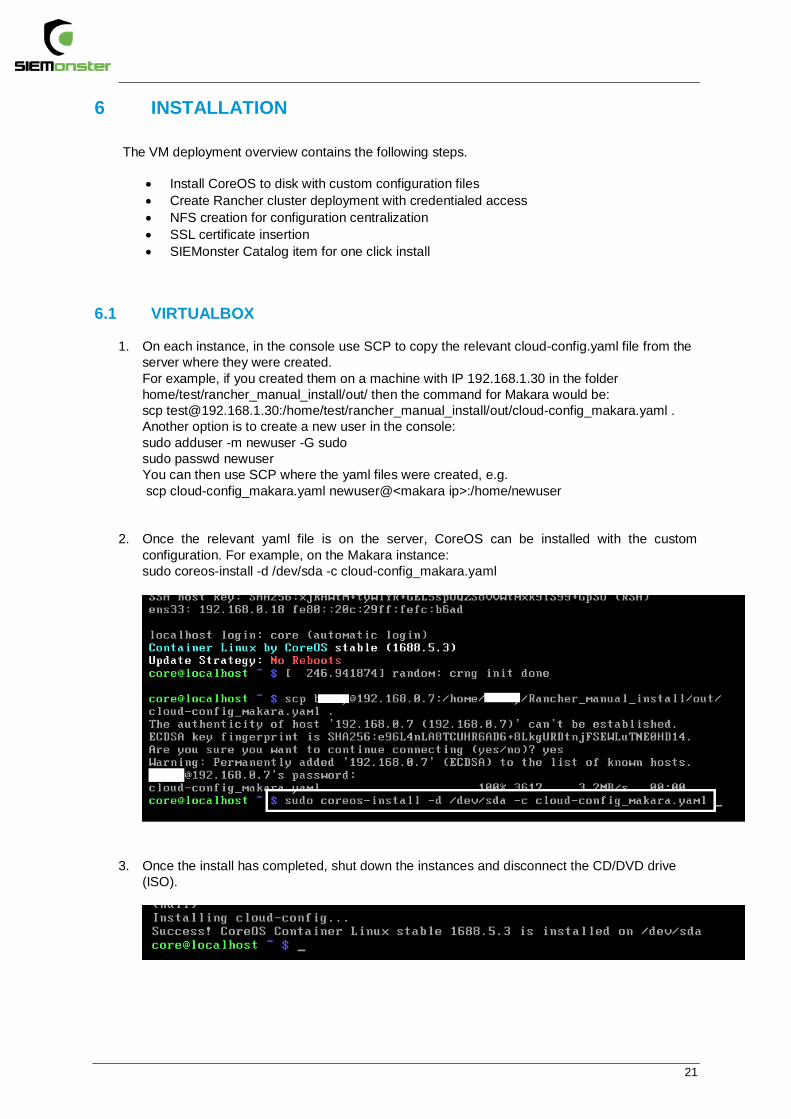
6 INSTALLATION
The VM deployment overview contains the following steps.
• Install CoreOS to disk with custom configuration files
• Create Rancher cluster deployment with credentialed access
• NFS creation for configuration centralization
• SSL certificate insertion
• SIEMonster Catalog item for one click install
6.1 VIRTUALBOX
1. On each instance, in the console use SCP to copy the relevant cloud-config.yaml file from the
server where they were created.
For example, if you created them on a machine with IP 192.168.1.30 in the folder
home/test/rancher_manual_install/out/ then the command for Makara would be:
scp [email protected]:/home/test/rancher_manual_install/out/cloud-config_makara.yaml .
Another option is to create a new user in the console:
sudo adduser -m newuser -G sudo
sudo passwd newuser
You can then use SCP where the yaml files were created, e.g.
scp cloud-config_makara.yaml newuser@<makara ip>:/home/newuser
2. Once the relevant yaml file is on the server, CoreOS can be installed with the custom
configuration. For example, on the Makara instance:
sudo coreos-install -d /dev/sda -c cloud-config_makara.yaml
3. Once the install has completed, shut down the instances and disconnect the CD/DVD drive
(ISO).

22
4. Power on each machine and when booted to login prompt, establish an SSH session to each
instance using the credentials set in sections 5.3/5.4 (default credentials (rancher/
s13M0nSterV3), if they were not changed.)
5. The Rancher Server container on Makara will start automatically, allow a few minutes for this
process and then access the URL https://<makara ip address>:8080
6.2 RANCHER
1. First setup access control – Admin – Access Control
Add username & password and Enable Local Auth
2. Install Rancher NFS from public catalog item.

23
Two settings are required, use the Makara IP address as the NFS Server and /nfs as the
Export Base Directory
3. Install agents – Go to Infrastructure – Hosts

24
Initially add a label makara = 1 and use the copy button in step 5 and paste into the SSH
session for Makara
Then change the label to capricorn = 1 and paste to Capricorn SSH session.
Repeat for the remaining hosts – proteus, kraken, tiamat
Within a few minutes all the hosts should appear under Infrastructure – Hosts
Wait until the hosts are stabilized in the Green state. Verify under Stacks – Infrastructure

25
6.3 RANCHER SSL TERMINATION
1. As the access to the web application is via SSL only, certificates are required to be generated
for the chosen local domain. A sample template, ‘openssl.cnf’ and script (generate_certs.sh)
to generate certificates can be found at https://github.com/siemonster/misc. If using Windows,
copy these files to a Linux/Mac virtual or physical machine to proceed.
2. Modify the openssl.cnf template to match the required local domain. For example, if the
chosen domain is ‘VMware.portal.siemonster.com’ (Must be a domain with 4 names) then
make the changes as follows:
3. Next make the script ‘generate_certs.sh’ executable ( chmod +x generate_certs.sh), and run
to produce the certificates and .p12 keystore.

26
4. In the Rancher UI, navigate to Infrastructure – Certificates, edit the existing siemportal
certificate, updating the private key and certificate.
5. Copy and paste the contents of the server.key and server.crt, or upload to the Private Key and
Certificate fields and save:
6. The ‘Name’ field must be set to ‘siemportal’ this is mandatory for the Load Balancer.
7. As the SIEMonster application uses multiple subdomains, it is necessary to import the
keyStore.p12 cert into the local trusted certificate authorities for clean SSL sessions. This is so
your browser doesn’t keep popping up do you trust this connection. To do this follow the
operating system below.
For Windows: Administrators is the minimum group membership required to complete this procedure. To add certificates to the Trusted Root Certification Authorities store for a local computer
• Click Start, click Start Search, type mmc, and then press ENTER.
• On the File menu, click Add/Remove Snap-in.
• Under Available snap-ins, click Certificates,and then click Add.
• Under This snap-in will always manage certificates for, click Computer account, and then click
Next.
• Click Local computer, and click Finish.
• If you have no more snap-ins to add to the console, click OK.
• In the console tree, double-click Certificates.
• Right-click the Trusted Root Certification Authorities store.
• Click Import to import the keystore.p12 certificate and follow the steps in the Certificate Import
Wizard.
For Mac OS X
• To open Keychain Access, start by clicking on Go in the Finder menu and the select Utilities.
• When the Utilities window opens up, look for and click on the icon named Keychain Access.

27
• Note: Alternatively, you can open the Keychain Access by typing “Keychain Access” in the
Spotlight search field at the top.
• Within the Keychain Access menu select File > click Import Items
• Browse to the .p12 or .pfx file that you want to import and open it.
• In the Add Certificates window select System in the Keychain drop-down and click Add
• Enter your admin password to authorize the changes and click Modify Keychain
• Leave the password field blank and click ‘OK’.
For Linux using Firefox
• Open Firefox. Click Edit > Preferences.
• Privacy & Security – scroll to bottom, View Certificates
• Your Certificates – Import keystore.p12
• Leave the password field blank and click ‘OK’.
6.4 STACK DEPLOYMENT
1. Add the SIEMonster V3 Catalog URL under Admin – Settings
https://github.com/siemonster/v3-final
2. Navigate to the SIEMonster catalog and click ‘View Details’ for the SIEMonster V3 App.
3. Under ‘New Stack’, substitute projectname for the required application name. This name will be used for your site domain in the next step.
Example:
siemonster-project-VMware change this to siemportal
siemonster-project-siemportal

28
4. Under Configuration Options, substitute projectname for the name chosen
For example
Name:
siemonster-project-siemportal will become
Site domain name:
siemportal.corp.clientname.com (domain name must have 4 names)
Before
After
5. Set the Elasticsearch JAVA HEAP SIZE per the machine specifications. For Elasticsearch Data Nodes, this should be set to a value half of the available system RAM. For the Master & Client nodes, the heap sizes can be left as default as these can be modified to suit at any time post install. The presets can be left at default for 8GB RAM systems

29
6. Set the administrator email address for the SIEMonster Web interface. This will be the same email that will be used in Chapter 7 – Web Application Setup.
7. The remaining application passwords should be changed from the defaults, see Appendix A for change management table. Aside from the CertAuth, Truststore & KeyStore passwords, all passwords can be changed post-install if required.
8. The SITE_ID option should be left at default, as initially the Logstash Heap Size
9. If Gmail alert relaying is required set the appropriate values. It is recommended to setup a Gmail account specifically for this purpose.
10. Finally, click on ‘Launch’.
11. The stack will take around 15 - 60 minutes to build, depending on internet connection speed. The status can be viewed under Stacks – User
On completion, the status will turn to green for all items:

30
If using a local DNS entry for example a hosts file. You will need to add your entries to a host file.
Local DNS Settings
The Makara server is the endpoint used by the load balancer. This will be the IP address used for the Rancher Server. Using a local DNS server, zone entries are required for site.dname.com and *.site.dname.com, e.g. siemportal.corp.clientname.com *. siemportal.corp.clientname.com Where there is no DNS server, the following entries can simply be added to the local hosts file using the Makara IP address 192.168.0.29 vmware.portal.siemonster.com 192.168.0.29 prometheus.vmware.portal.siemonster.com 192.168.0.29 alertmanager.vmware.portal.siemonster.com 192.168.0.29 dradis.vmware.portal.siemonster.com 192.168.0.29 ir.vmware.portal.siemonster.com 192.168.0.29 411.vmware.portal.siemonster.com 192.168.0.29 reporting.vmware.portal.siemonster.com 192.168.0.29 minemeld.vmware.portal.siemonster.com 192.168.0.29 health.vmware.portal.siemonster.com 192.168.0.29 sm-kibana.vmware.portal.siemonster.com 192.168.0.29 openaudit.vmware.portal.siemonster.com 192.168.0.29 rabbitmq.vmware.portal.siemonster.com 192.168.0.29 alerta.vmware.portal.siemonster.com
Leave a few minutes for the DNS to propagate if using a DNS server and the system health checks to complete before opening the web application URL, e.g. https://siemportal.corp.clientname.com from the example shown previously.
31
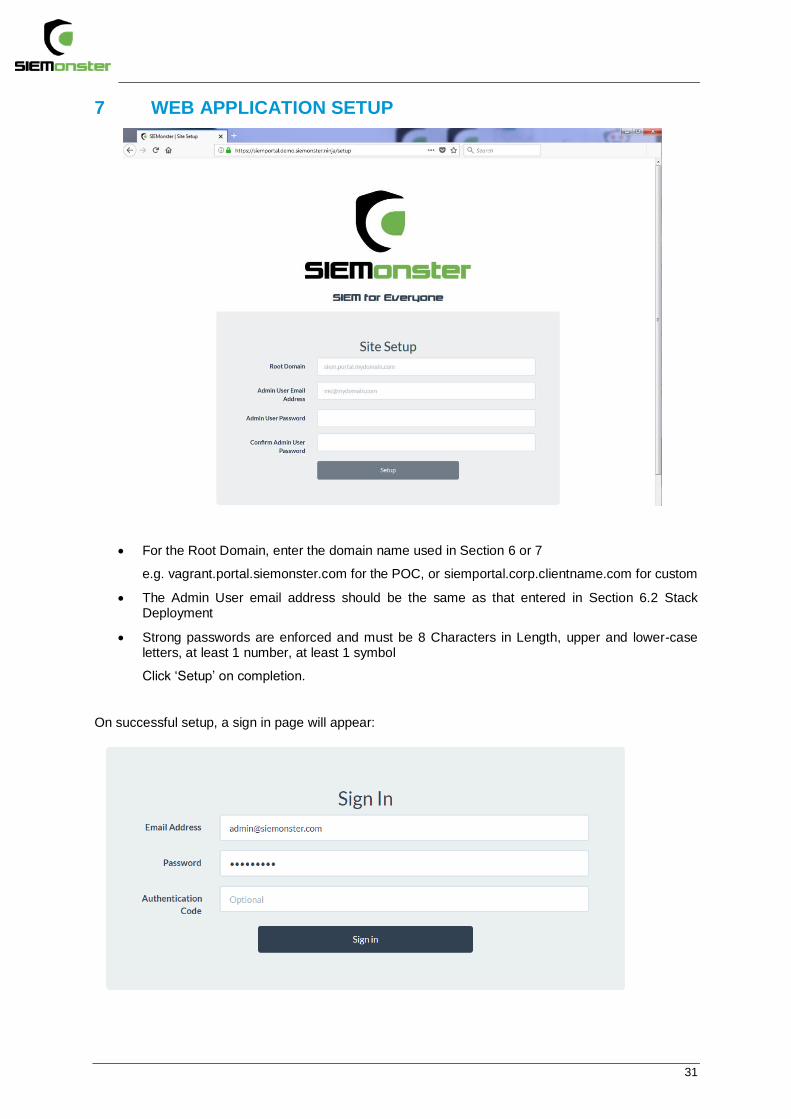
7 WEB APPLICATION SETUP
• For the Root Domain, enter the domain name used in Section 6 or 7
e.g. vagrant.portal.siemonster.com for the POC, or siemportal.corp.clientname.com for custom
• The Admin User email address should be the same as that entered in Section 6.2 Stack Deployment
• Strong passwords are enforced and must be 8 Characters in Length, upper and lower-case letters, at least 1 number, at least 1 symbol
Click ‘Setup’ on completion.
On successful setup, a sign in page will appear:

32
Sign in with the credentials entered during the above Setup phase. Note that the Authentication Code for 2FA if required, can be setup after initial login.
33
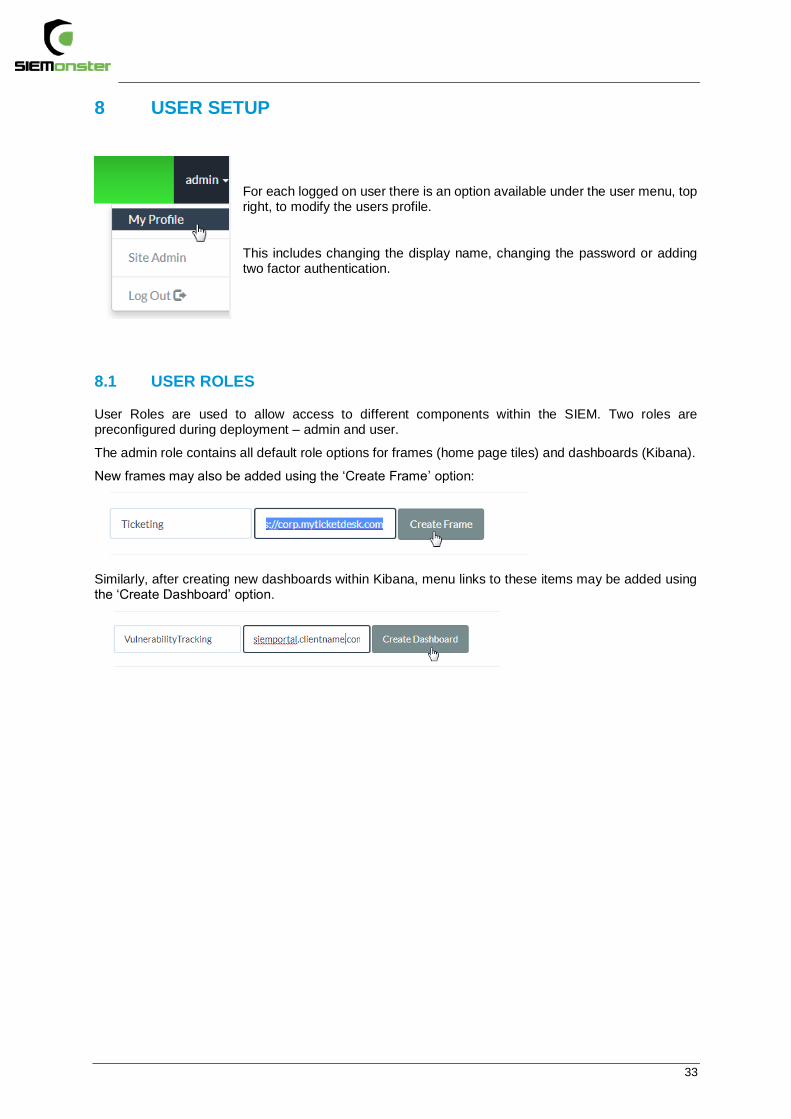
8 USER SETUP
For each logged on user there is an option available under the user menu, top right, to modify the users profile.
This includes changing the display name, changing the password or adding two factor authentication.
8.1 USER ROLES
User Roles are used to allow access to different components within the SIEM. Two roles are preconfigured during deployment – admin and user.
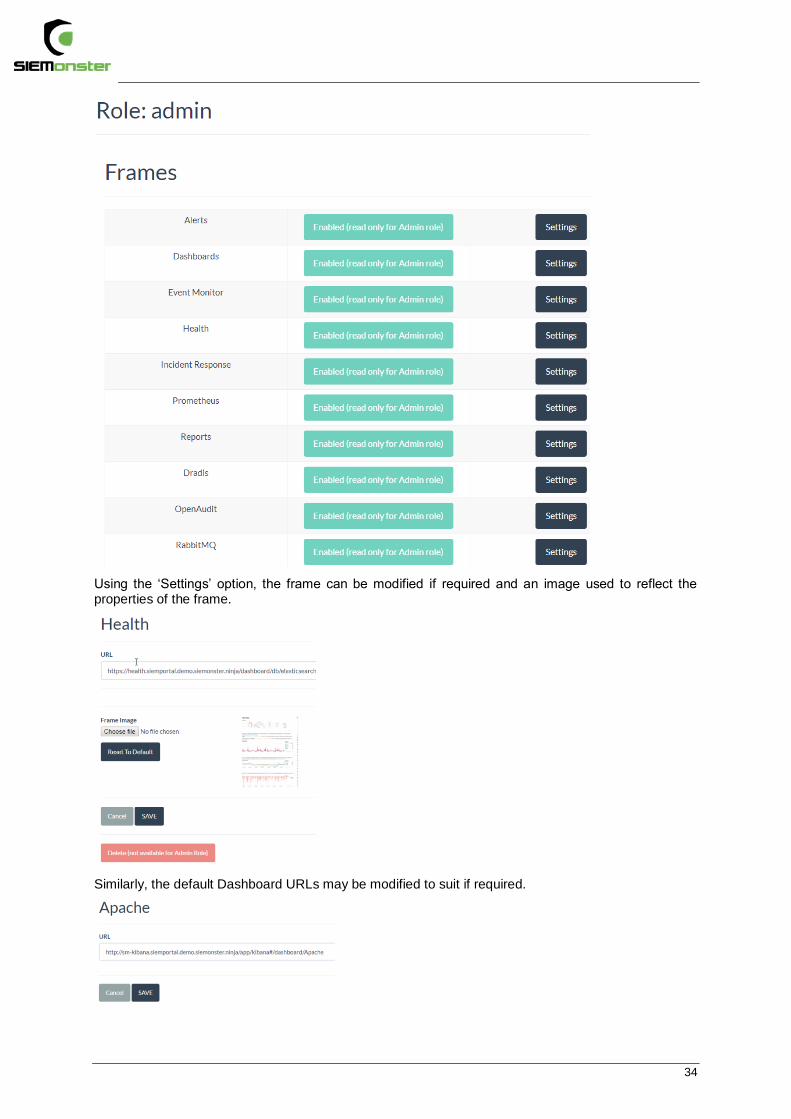
The admin role contains all default role options for frames (home page tiles) and dashboards (Kibana).
New frames may also be added using the ‘Create Frame’ option:
Similarly, after creating new dashboards within Kibana, menu links to these items may be added using the ‘Create Dashboard’ option.
34
Using the ‘Settings’ option, the frame can be modified if required and an image used to reflect the properties of the frame.
Similarly, the default Dashboard URLs may be modified to suit if required.

35
The ‘users’ role is designed for new users who have been allocated login credentials without a specific role. This is useful when allocating members of an LDAP group. A single support access tile is provided.
New roles may be added using the ‘Create Role’ option.
Access to relevant frames can be enabled and settings modified if required.
If the Dashboards frame is enabled, a Dashboard settings section will appear, providing options to enable or disable dashboards specific to the role.
.

36
9 SITE ADMINISTRATION
Under the Profile option is the Site Administration option.
This is used to setup site email settings, new local or LDAP users, roles and custom dashboard setup for each user.
9.1 SITE EMAIL
Email settings are configured to use Mailgun, for which a free account can be setup at https://www.mailgun.com/ This mail account is for the web application only, which will send out notifications when a user logs on to the SIEM.
9.2 LDAP SETTINGS
LDAP settings can be used to setup Active Directory users. It is recommended to create a group within the AD and then add users to this group who will require access.
Once completed, click on ‘Save LDAP Settings’. The entered details will first be confirmed correct before being saved.
LDAP users in the chosen group will now be able to login using their corporate email address and active directory password.

37
10 OPERATIONAL OVERVIEW
10.1 LOG VIEW
The logs for each container can be viewed within the Rancher Server UI as follows:
First click on a container
Next click on the menu to the right and choose View Logs:
This is useful for diagnostics and maintenance, the logs for any container can be viewed in this manner.

38
10.2 SHELL INTERACTION
Following the above steps and choosing the ‘Execute Shell’ option, a terminal may be opened to each container if any maintenance is required. For access to the configuration files, rules, etc. see the following section – VPN access.
If any changes have been made, the container can be restarted on the main screen:
39
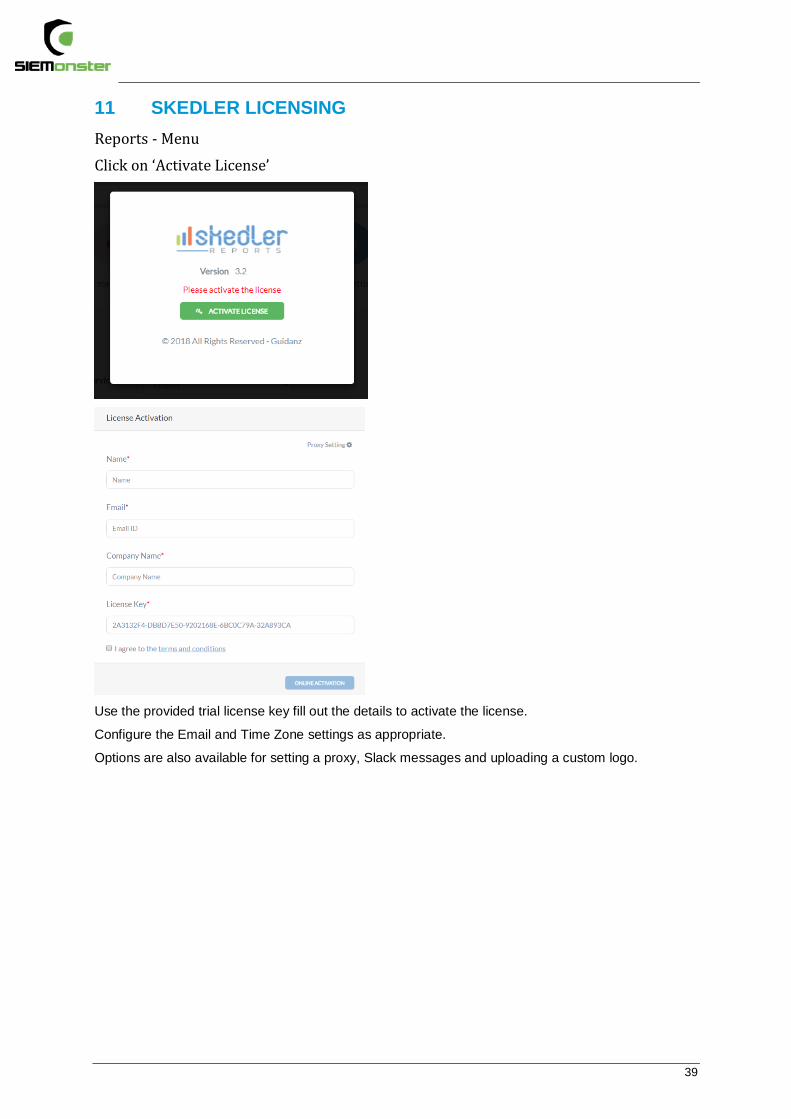
11 SKEDLER LICENSING
Reports - Menu
Click on ‘Activate License’
Use the provided trial license key fill out the details to activate the license.
Configure the Email and Time Zone settings as appropriate.
Options are also available for setting a proxy, Slack messages and uploading a custom logo.

40
41
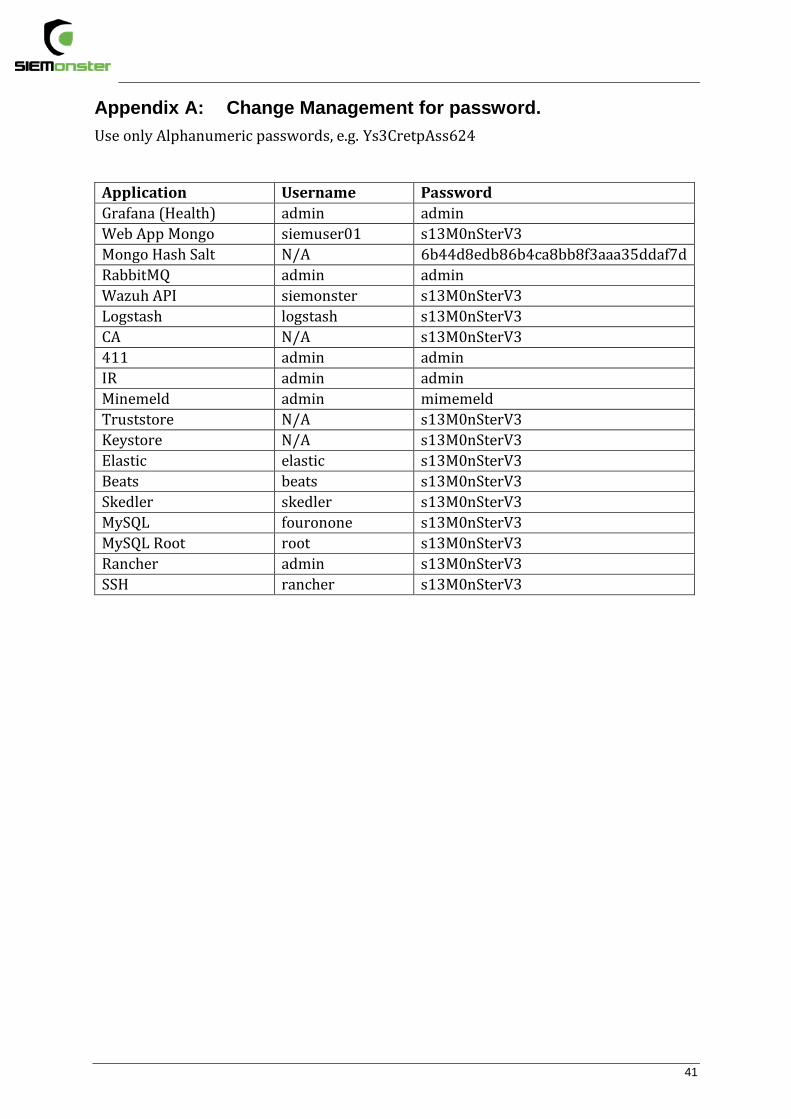
Appendix A: Change Management for password.
Use only Alphanumeric passwords, e.g. Ys3CretpAss624
Application Username Password
Grafana (Health) admin admin
Web App Mongo siemuser01 s13M0nSterV3
Mongo Hash Salt N/A 6b44d8edb86b4ca8bb8f3aaa35ddaf7d
RabbitMQ admin admin
Wazuh API siemonster s13M0nSterV3
Logstash logstash s13M0nSterV3
CA N/A s13M0nSterV3
411 admin admin
IR admin admin
Minemeld admin mimemeld
Truststore N/A s13M0nSterV3
Keystore N/A s13M0nSterV3
Elastic elastic s13M0nSterV3
Beats beats s13M0nSterV3
Skedler skedler s13M0nSterV3
MySQL fouronone s13M0nSterV3
MySQL Root root s13M0nSterV3
Rancher admin s13M0nSterV3
SSH rancher s13M0nSterV3