tutorials.render-test.comtutorials.render-test.com/worddocs/Fire... · Web viewSet your Diffuse...
29
Fire - Intermediate Skill Level In this tutorial we will create fire using a Blizzard Particle System, Instanced Geometry, and some Particle Age Textures. Open a new Max file, and start by going to the Create Tab. On the Geometry menu, click the dropdown at the top and find 'Particle Systems'. ---> -------> ----------> ------------> = Click on the Blizzard button to create the particle system, and drag out an icon in your viewport.
Transcript of tutorials.render-test.comtutorials.render-test.com/worddocs/Fire... · Web viewSet your Diffuse...

Fire - Intermediate Skill LevelIn this tutorial we will create fire using a Blizzard Particle System, Instanced Geometry, and some Particle Age Textures.
Open a new Max file, and start by going to the Create Tab. On the Geometry menu, click the dropdown at the top and find 'Particle Systems'.
--->
------->
---------->
------------> =
Click on the Blizzard button to create the particle system, and drag out an icon in your viewport.

Once you have it where you want it, click on the modify tab to set the blizzard's settings.
<--- I set the Display Icon values to 45 width and height for this example. Size always matters here, due to
the number of particles and the size we will make them later on. It is always a good idea to keep things closer to real world size for particles, textures, and lighting.
<--- The Viewport Display settings should be 'Mesh' and the Percentage of Particles to 100%. We want to
see all of them in the viewport.
<--- Next, Click on the Particle Generation rollout menu.

<--- In Particle Quantity change the Use Rate number to 3. This will give us a percentage of particles per second
instead of a total allowed number like with Use Total.
<--- Particle Motion, set the speed to 2 (change this based on how fast you want youer particles to fly out
from the blizzard icon. Variation can be 0%, or whatever you'd like the particles to differ in speed.
<--- Particle Timing should be a negative number so that it starts emitting particles before your scene
begins.
Emit Stop at the end of your scene, in this case I have 250 frames in my scene. Display for the same.
Life, I have this set at about 36, give or take based on your needs. I have set the Variation at 26 to
differ how long the particles last.
<--- Particle Size, I have set the size to 2.25, variation of 2.5% to differ to some degree. Grow For 5
frames to make them start small and get big quickly. and Fade for 34 frames, to make them shrink for awhile at the end of their life.
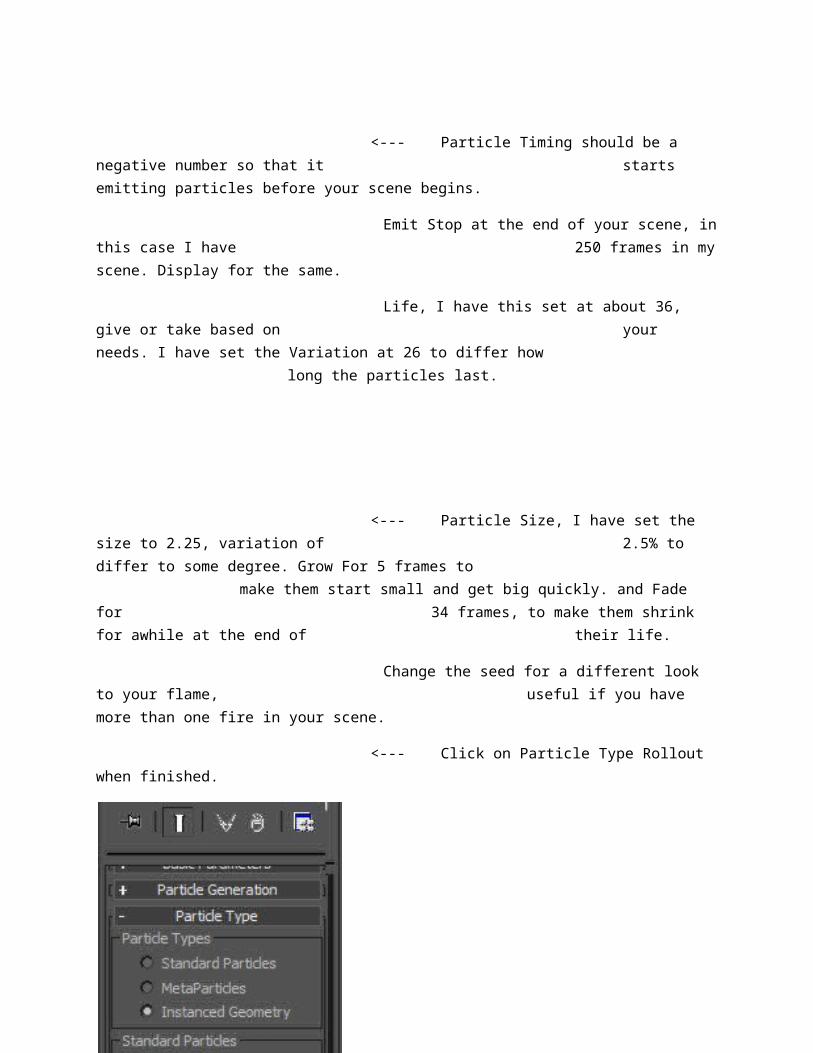
Change the seed for a different look to your flame, useful if you have more than one fire in your
scene.
<--- Click on Particle Type Rollout when finished.
<--- In Particle Type, click Instanced Gemoety. This lets us choose what we want our particles to look like.
<--- Here is where we must diverge from settings for a few minutes. We will need to create the "sparks"
from our flame out of a sphere. When we finish creating it, this will be where we click the Pick Object button and then click the spark we make in our scene to add it to the particle system.
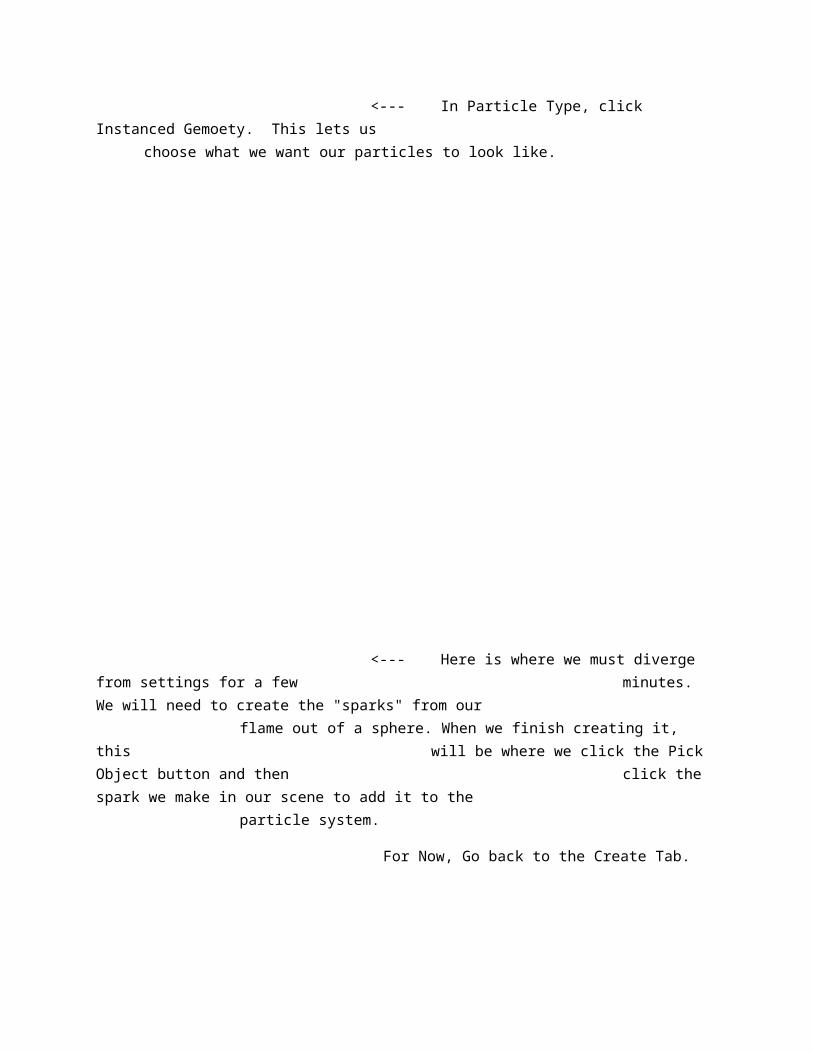
For Now, Go back to the Create Tab.
On the Create Tab, change your drop down menu in geometry back to Standard Primities.
--->
---->
----->
Click the sphere button and drag out a sphere in your viewport.

From here, keep your sphere selected and go to your Modifier Tab.
<--- I used a Radius of 3.5 and Segments of 32 to make my sphere have plenty of segments for what we do
next.

When finished with the sphere's settings, click the Modifier list Drop Down Menu.

<--- Scroll down and Choose Noise from the List.
<--- The Noise Modifier stacks on top of our sphere and gives us some new settings below.
<--- I have set the scale to 5. How big the noise is.
Make sure the Fractal box is Checked.

<--- The Strength settings tell us how much in each direction the noise will affect our sphere via how many
segments it has. I have set the X value to -3, the Y to 6, and Z to 12
This can changed based on your needs, just be sure to check your viewport and see what has
happened to your sphere.
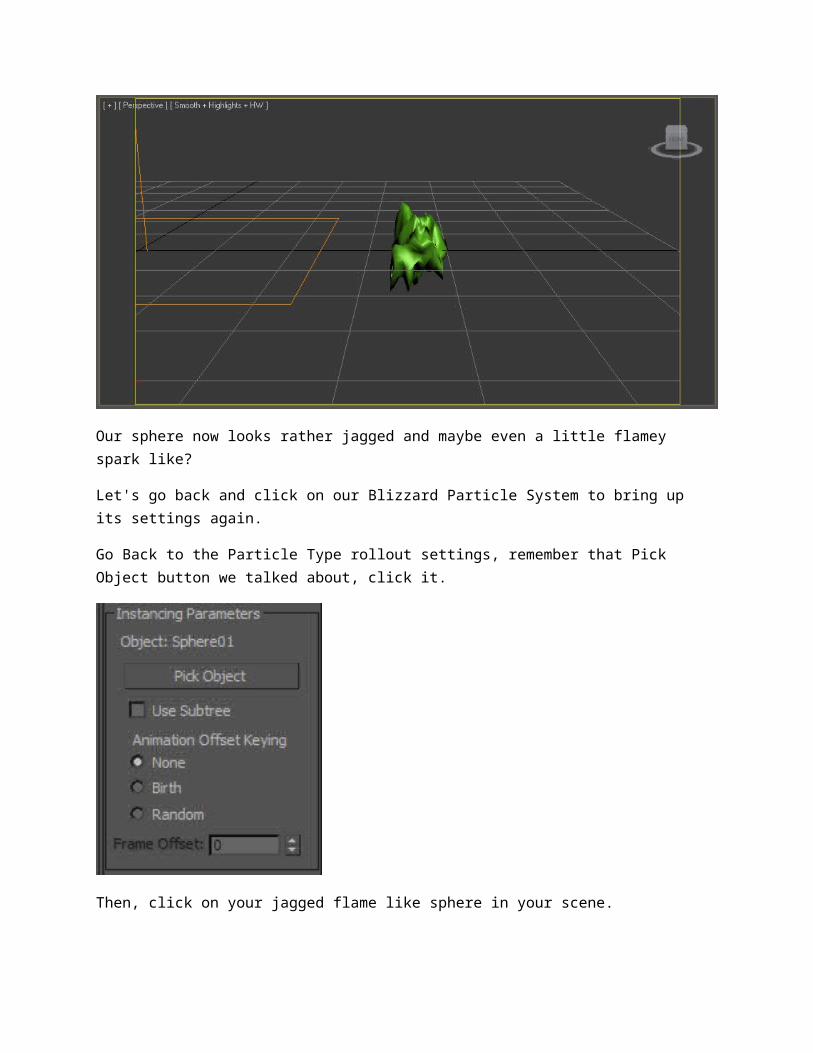
Our sphere now looks rather jagged and maybe even a little flamey spark like?
Let's go back and click on our Blizzard Particle System to bring up its settings again.
Go Back to the Particle Type rollout settings, remember that Pick Object button we talked about, click it.

Then, click on your jagged flame like sphere in your scene.
Your Particle System should be emitting your jagged spheres out now as the particles.
Go down below the Particle Type Rollout now, to Rotation and Collision and open it up.
<--- Spin Speed Controls, set your spin time to 30.
Everything else should stay at 0.
Good Job, your blizzard settings are complete, test your animation.
It should resemble this.
It doesn't look quite right does it? First, you can click the sphere we made to use as our particles. In my screen it's the little green one next to our fire.

Now, don't delete it, we need it to stick around so the particle system has something to reference.
Instead, select the sphere we made, then right click on the sphere we made, and in the right click menu click on Hide Selection.
Now we come to the most important part of the fictitious fire. The Texture.
Hit M on the keyboard to bring up the material editor and select an empty materials slot (click one of the grey spheres).

Set your Diffuse colors and click on Self Illumination checkbox next to Color and set that color as below.

Next we'll create the individual maps for our flame. Scroll down and open the Maps rollout menu.

Click on the 'None' button next to Diffuse Color, and from the resulting list find and select Particle Age.

It will then take you into the Particle Age Material. Set the resulting Colors to whatever you'd like the fire to be. In my case, fire colors of red and yellow orange was my choice. See below.
Once your colors are set, look at the Age# below each color. This tells the texture to be red at the beginning of its life and go through 20% of each particles life cycle.
It then gradually changes to a yellow orange color until it is fully yellow orange at 50% of the particles life cycle.
Leave the last color White and the last number 100%.

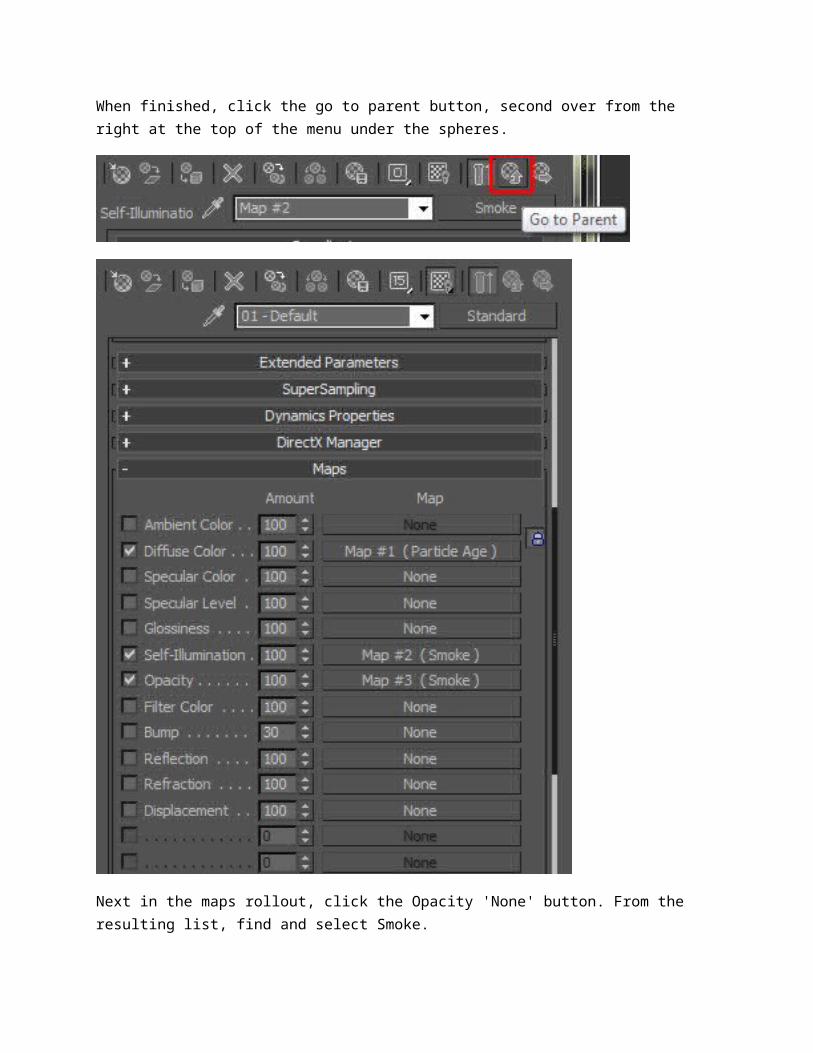
When finished, click the go to parent button, second over from the right at the top of the menu under the spheres.
Next in the maps rollout, click the Opacity 'None' button. From the resulting list, find and select Smoke.

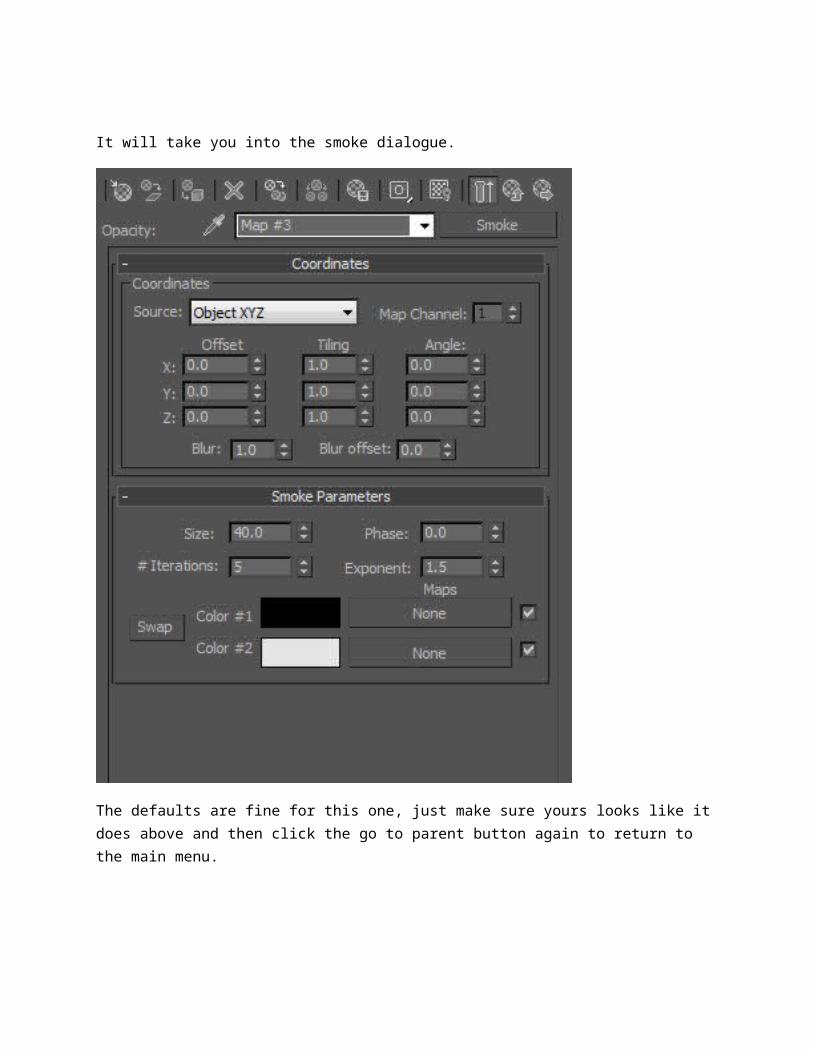
It will take you into the smoke dialogue.
The defaults are fine for this one, just make sure yours looks like it does above and then click the go to parent button again to return to the main menu.
in the Maps rollout, drag the texture up one to the Self Illumination 'Non' button.
The Opacity None button should now says Map#? (Smoke) now.
If you drag and drop it to the None button for Self-Illumination, hit copy (not instance) and then click on the Map#? (Smoke) button next to Self-Illumination.
<-- Drag the Opacity texture to
here and then click on it.
In the Smoke dialogue it should be an exact copy of the one we put into the opacity channel now.
The only things we are going to change is the color boxes.
The self illumination is going to make our fire emit light.
It will glow, as fires tend to do.

Select the colors you want the fire to glow with, in my case I chose a light orange color for #1 and a yellow color for #2.
That completes our texture, hit the go to parent button again to return to the main texture window.
and up at the top your texture should resemble this

Simply apply it to your Blizzard particle system, by dragging it over to the fire in your viewport, or hitting the assign to selection button in the material editor.
You finalized fire in the viewport should now look something like this.

Now all you have to do is set up your render settings and render it!
Mine for the scene are as follows.
On the common tab, be sure to have Mental Ray as your renderer. The Default Scanline Sucks!

On the Renderer Tab, I have made mine Mitchell with Samples per Pixel at Minimum 1, and Max 64.
If your render time becomes outrageous, reduce these numbers or leave them at their default 1/4 to 4.

On the Indirect Illumination Tab. Make sure your Enable Final Gather box is checked.
I have 300 Rays per FG Point.
35 in the Interpolate Over Num. FG Points:
and Diffuse Bounces at 1.
If your fire is going to be in a room and lighting it up at all, these settings are a must to experiment with. More Diffuse bounces gives the light more chances to bounce around and light up a scene.
The Multiplier number at the time, multiplies the amount of FG light and can also help light up your scene using your fire texture as a light.

The resulting render is: