komensf.orgkomensf.org/wp-content/uploads/2012/08/GeMS-Applicant... · Web viewHelpful Hints 22...
29
San Francisco Bay Area Affiliate of Susan G. Komen® Grants eManagement System (GeMS) Applicant User Guide Version 2.0
Transcript of komensf.orgkomensf.org/wp-content/uploads/2012/08/GeMS-Applicant... · Web viewHelpful Hints 22...

San Francisco Bay Area Affiliate of Susan G. Komen®
Grants eManagement System (GeMS)
Applicant User GuideVersion 2.0
Susan G. Komen San Francisco Bay Area GeMS Applicant User Guide Grant Year 2015-2016
Table of Contents
GeMS Login and Registration.................................................................................................................3
Accessing GeMS......................................................................................................................................4
GeMS User Roles.................................................................................................................................4
Creating a New Account......................................................................................................................5
Validating Users....................................................................................................................................8
User Homepage....................................................................................................................................8
User Tabs..............................................................................................................................................9
Automatic E-Mail Notifications..........................................................................................................10
System Messages...........................................................................................................................10
Initiating an Application..........................................................................................................................11
The CG Application Menu..................................................................................................................12
View, Edit and Complete Forms...................................................................................................13
Change the Status..........................................................................................................................14
Access Management Tools...........................................................................................................14
Examine Related Items (Progress Reports)................................................................................15
Application Completion..........................................................................................................................16
Forms Navigation................................................................................................................................16
Forms Completion..............................................................................................................................17
Automatic Calculations...................................................................................................................18
Error Messages...............................................................................................................................19
Uploads & Attachments..................................................................................................................19
PDF Version....................................................................................................................................19
Copy and Paste...............................................................................................................................20
Text Limits........................................................................................................................................20
Application Submission..........................................................................................................................20
Helpful Hints........................................................................................................................................22
Updated 8/12/2014 2

Susan G. Komen San Francisco Bay Area GeMS Applicant User Guide Grant Year 2015-2016
Updated 8/12/2014 3
Susan G. Komen San Francisco Bay Area GeMS Applicant User Guide Grant Year 2015-2016
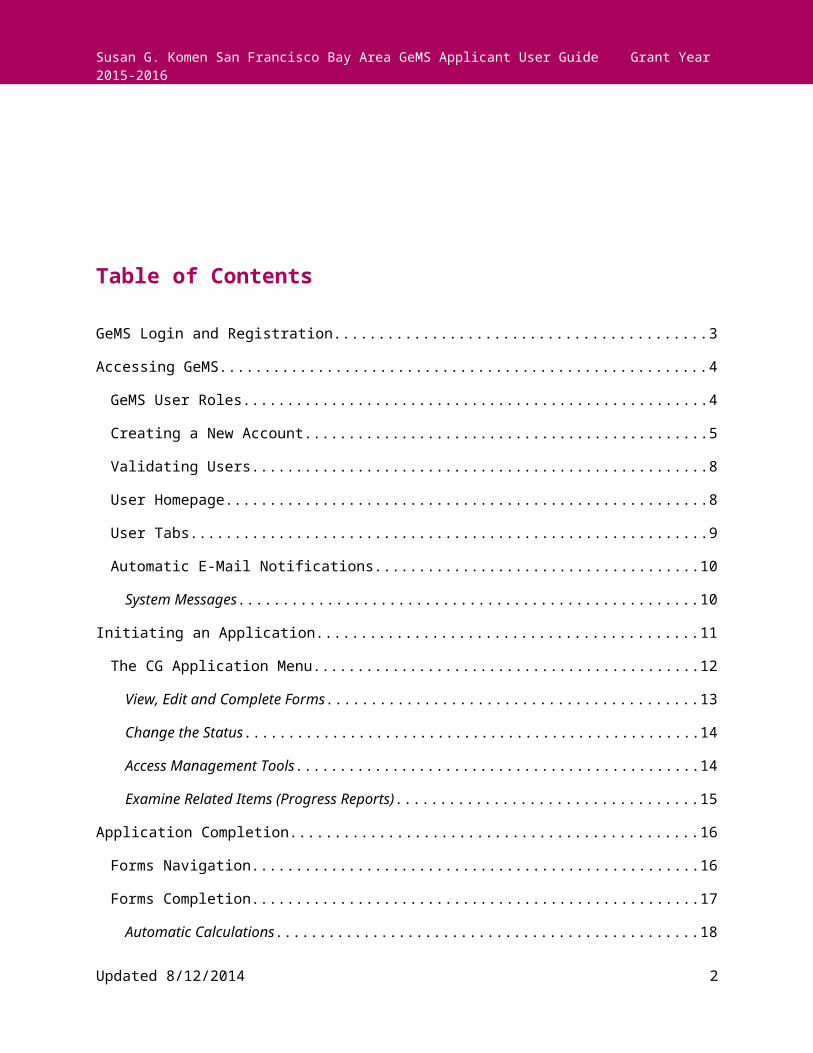
GeMS Login and Registration
To access Susan G. Komen’s Grants eManagement System (GeMS), type “https://affiliategrants.komen.org” into the address bar of your web browser and hit “Enter.” The page you see should look like the image shown below.
Updated 8/12/2014 4
Susan G. Komen San Francisco Bay Area GeMS Applicant User Guide Grant Year 2015-2016
Accessing GeMS
Welcome to GeMS! In order to use the system you must first be granted access to it. There is one basic way to get access to GeMS – through registering and creating an account. Prior to doing so, we recommend you take some time to think through what system roles are appropriate for the individuals in your organization. There is also an order in which registration should occur so users at your organization should plan this step first.
GeMS User Roles
Project Director:The role of Project Director should be assigned to the individual at your organization that will serve as the project’s lead contact. This individual is responsible for validating all new users when they register for the system under their organization. This individual will have the highest level of access in the system and will be responsible for overseeing all administrative functions available, such as application creation and completion.
Authorized Signer:The role of Authorized Signer should be assigned to the individual at your organization that has the authority to sign legal documents on behalf of the organization. This individual is responsible for electronically signing the application before submission and the grant contract if the organization is awarded funds.
Updated 8/12/2014 5
ATTENTION INTERNET EXPLORER USERS!
By default Internet Explorer 10 in Windows 8 does not run in compatibility mode. This is easily tested by logging into GeMS. If the compatibility mode is not enabled, the progress wheel in GeMS will simply spin without ever completing an action.
To enable the compatibility mode for Internet Explorer 10, follow these steps:
Windows 7 users start at step 2.
1. Windows 8 only - From the Windows 8 start screen select the Desktop.2. From the Desktop launch Internet Explorer 10.
3. Press the Alt key on your keyboard to bring up the top menu.
4. Go to Tools | Compatibility View settings
5. Either
Add https://affiliategrants.komen.org/ to the Compatibility View websitesor
Select Display all websites in Compatibility View
Susan G. Komen San Francisco Bay Area GeMS Applicant User Guide Grant Year 2015-2016
Viewer:The role of viewer should be assigned to any individual at your organization who needs access to view the organization’s information, but does not need the functionality to save, add, edit, or change anything within the organization’s information.
Writer:The role of writer should be assigned to any individual who needs access to an organization’s application process to help complete the application but does not have the authority to complete the submission process. This individual cannot change the status of an application and will not have administrative function availability.
Creating a New Account
1) From the Susan G. Komen GeMS homepage, click the “register now” link located towards the bottom of the homepage.
Updated 8/12/2014 6
Helpful Hint:
The Project Director must be the first individual at your organization to register. The Authorized Signer must register and be validated/approved prior to the creation of the
organizations first application.

Susan G. Komen San Francisco Bay Area GeMS Applicant User Guide Grant Year 2015-2016
2) Complete the user form in its entirety. Once any user has created a user account and gained access to the system, they will never have to request access again. There is no need for multiple accounts within GeMS.
a) If a question has a pink “GO” button next to it when completing a question, you MUST select the “GO” button and wait approximately 5 seconds before advancing to the next question.
b) Always select either “applicant” or “grantee” in the “What is your position at your Affiliate” question.
c) Fill in all information as required. All items marked with an ‘*’ are required to create your account.
d) The “Username” field must consist of all letters and numbers, minimum length 5 characters, maximum length 20 characters
e) The “Password” field must consist of all letters and numbers, minimum length 7 characters, maximum length 20 characters
f) The fields “Password” and “Confirm Password” must be the same.
3) If your organization already exists within GeMS, please select your organization from the Organization field drop down list. If your organization does not exist, please choose “other” in the Organization drop down list. If you choose “other,” you will be required to complete the Organization Registration section during your registration.
Updated 8/12/2014 7
Helpful Hint:
To guarantee a Project Director can locate your user request in the system, make sure your organization information matches theirs exactly.

Susan G. Komen San Francisco Bay Area GeMS Applicant User Guide Grant Year 2015-2016
4) Click “Save” in the upper right hand corner to save the data.
Having saved your contact information, your account must then be approved before you can access the system. If you attempt to access the system prior to getting approved/validated, you will receive the following message:
You will receive an email notification when your registration has been submitted for approval and, when access has been granted, you will receive an email message confirming your account has been validated.
Project Directors will be approved/validated by an Affiliate representative and all other users will be approved/validated by the organization’s Project Director.
In order for all users within an organization to be validated/approved, the Project Director must follow the steps listed below the screen image.
Updated 8/12/2014 8

Susan G. Komen San Francisco Bay Area GeMS Applicant User Guide Grant Year 2015-2016
Validating Users
1) The Project Director will receive an email when a user within their organization has registered and needs to be validated.
2) The Project Director logs in to GeMS and will select the “My Administration” tab at the top of the User Homepage.
3) Select the “User Approval for Project Directors” link within the My Administration section.
4) Once on the Komen Project Director User Approval Page (above), enter the new registrants name in the search criteria. You could also search the system for “new users” in the User Type field to perform a broader search.
5) Select the pink “Search” button.
6) Select the checkbox next to the users name in the Search Results section.
7) Select “Approval Type” to Approve User or Deny.
8) Assign the person’s organization to the exact same organization listed as the Project Director’s.
9) Select a role for the user – Authorized Signer, Writer, or Viewer.
10) The current date will appear in the “Active Date” field. You do not have to enter anything into the “Inactive Date” field unless you know the date you would like the user’s access to be inactivated.
11) Select the “Approve Selected User” button to complete the user’s validation/approval.
12) The new user will receive an email notification when they have been approved and can now access GeMS.
User Homepage
When a user logs into GeMS, they will land on the User Homepage. The content of the page and links across the top of the screen are described below.
Updated 8/12/2014 9

Susan G. Komen San Francisco Bay Area GeMS Applicant User Guide Grant Year 2015-2016
User Tabs My Home: Brings the user back to their homepage My CG Applications: Access to all community grant applications already in progress My SG Applications: Access to all small grant applications already in progress My CG Reports: Access to all community grant progress and final reports already in
progress My SG Reports: Access to all small grant final reports already in progress My Administration: Administrator functions, user approval; this tab will only appear for
authorized users My Organization: Current information about your organization (this information can be
updated at any time by authorized users) My Profile: Individual user information (this information can be updated at any time) Logout: Logout of the system View Available Proposals: Initiate a new grant application offered by the Affiliate My Inbox: System notifications regarding system users and application status My Tasks: List of current tasks you must complete
Updated 8/12/2014 10

Susan G. Komen San Francisco Bay Area GeMS Applicant User Guide Grant Year 2015-2016
Automatic E-Mail Notifications
Automatic email notifications may be sent to you periodically throughout the grant year. These messages will be sent by the system according to an automatic process or as the result of a user triggered event. These messages might be triggered by the submission of an application, an application being sent for modifications, or when a pending due-date is approaching. These messages are intended to help you know what is occurring in the system that pertains to you or your Organization. These messages may also be sent by Komen GeMS Affiliate personnel. These messages are designed to help keep you up to date with the progress of your application while also serving as reminders when action is required on your part. In order to receive these messages it is important you include an active, frequently used email address when creating your profile in the system. If you provide an incorrect email address or an address to an account that is either inactive or full, you will not be able to receive these important messages.
System Messages
In addition to the automatic email notifications, there is an area referred to as System Messages that manages messages sent to you, either from the system itself or from Komen GeMS Affiliate personnel. You can view or edit your System Messages by following these steps:
1) Click the “Open My Inbox” button under the “View My Inbox” section on the main menu. You will now see any unread system messages. You may filter system messages by choosing an option from the drop down labeled “Sort my inbox messages by.”
Updated 8/12/2014 11
Helpful Hint:
To view/edit/complete applications that are already in progress, go to your “My CG Applications” tab. To initiate a new or additional application, click on the “View Available Proposals” button.

Susan G. Komen San Francisco Bay Area GeMS Applicant User Guide Grant Year 2015-2016
2) Clicking the Subject of a message will take you to the message itself. You can read the message from that screen and may then perform any of the following actions: Click the “Reply” button to reply to the system message Click the “Close” button to close the system message Click the name of the sender to send an email to the sender of the message
Initiating an Application
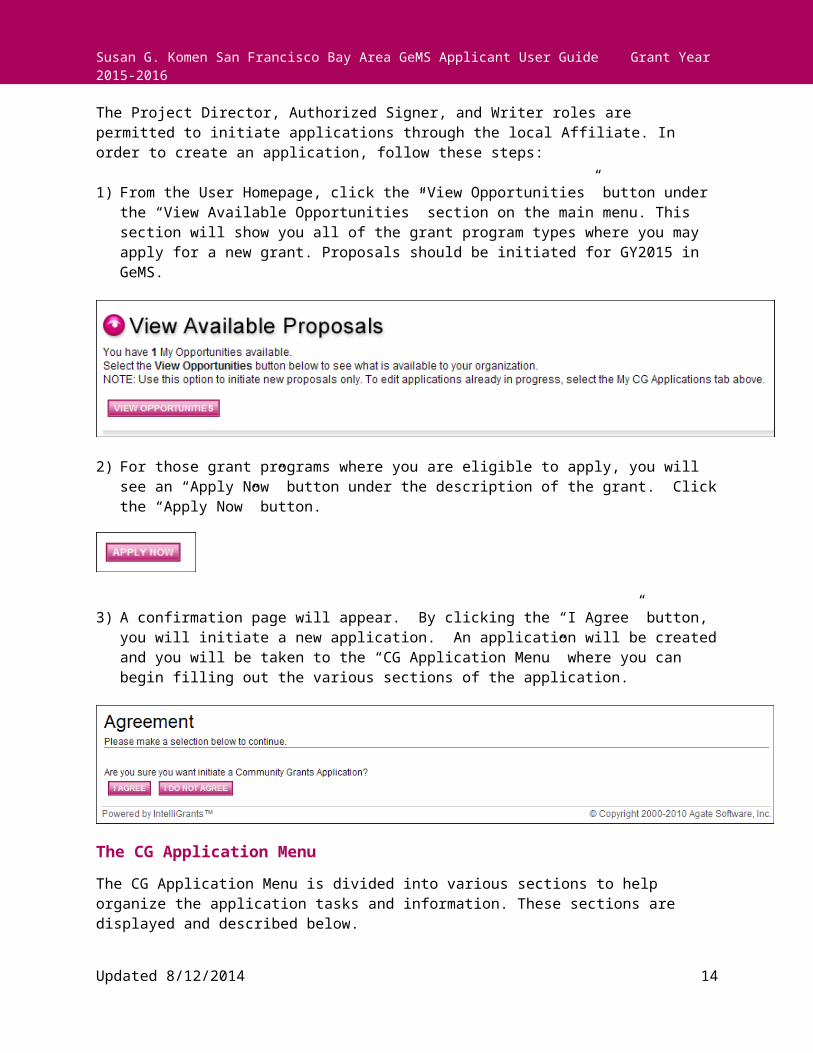
The Project Director, Authorized Signer, and Writer roles are permitted to initiate applications through the local Affiliate. In order to create an application, follow these steps:
1) From the User Homepage, click the “View Opportunities” button under the “View Available Opportunities” section on the main menu. This section will show you all of the grant program types where you may apply for a new grant. Proposals should be initiated for GY2015 in GeMS.
2) For those grant programs where you are eligible to apply, you will see an “Apply Now” button under the description of the grant. Click the “Apply Now” button.
3) A confirmation page will appear. By clicking the “I Agree” button, you will initiate a new application. An application will be created and you will be taken to the “CG Application Menu” where you can begin filling out the various sections of the application.
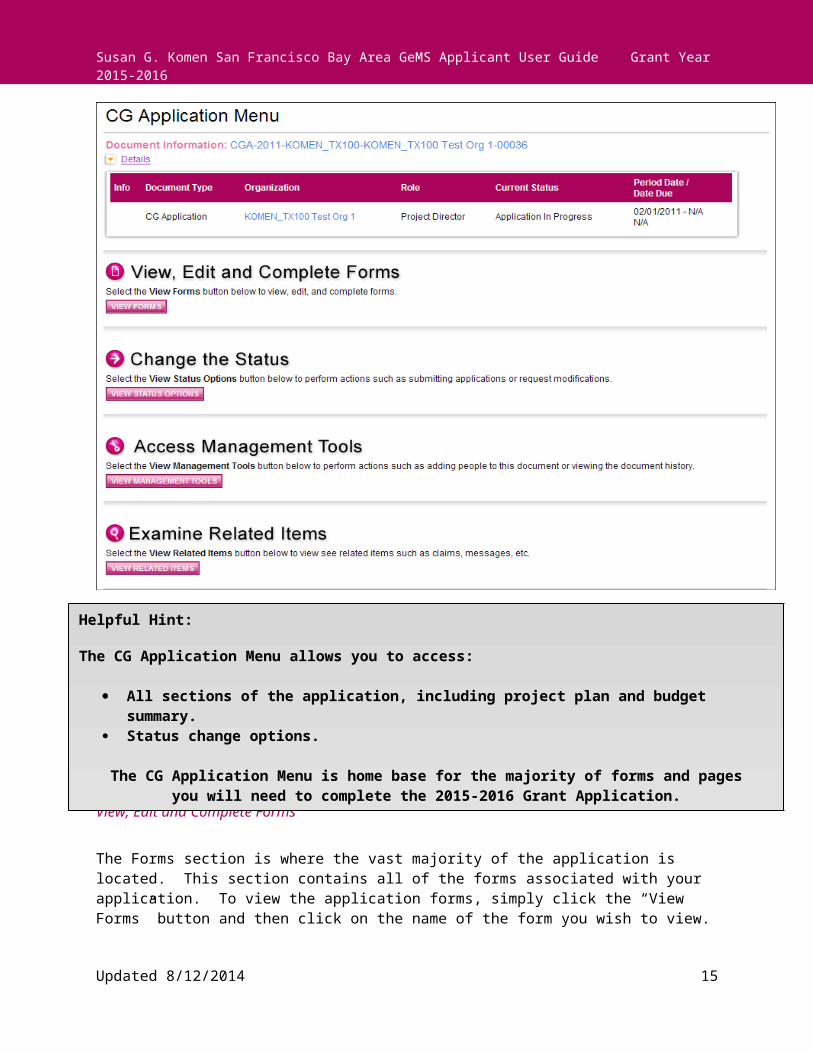
The CG Application MenuThe CG Application Menu is divided into various sections to help organize the application tasks and information. These sections are displayed and described below.
Updated 8/12/2014 12

Susan G. Komen San Francisco Bay Area GeMS Applicant User Guide Grant Year 2015-2016
View, Edit and Complete Forms
The Forms section is where the vast majority of the application is located. This section contains all of the forms associated with your application. To view the application forms, simply click the “View Forms” button and then click on the name of the form you wish to view.
Updated 8/12/2014 13
Helpful Hint:
The CG Application Menu allows you to access:
All sections of the application, including project plan and budget summary. Status change options.
The CG Application Menu is home base for the majority of forms and pages you will need to complete the 2015-2016 Grant Application.
Susan G. Komen San Francisco Bay Area GeMS Applicant User Guide Grant Year 2015-2016
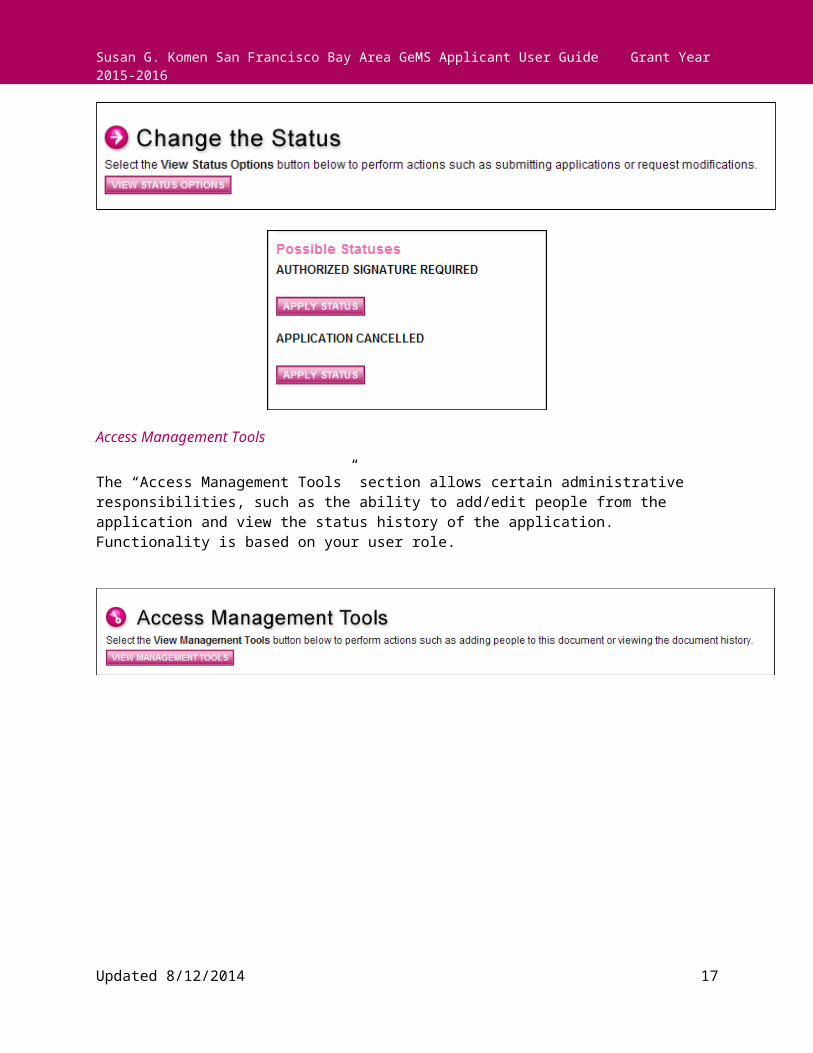
Change the Status
The “Change the Status” section allows the Project Director and Authorized Signer to change the status of an application or report. Status options are dependent on the current status of the document and the role of the user. Click the “View Status Options” button to see what status “push” options you currently have available.
Updated 8/12/2014 14
Susan G. Komen San Francisco Bay Area GeMS Applicant User Guide Grant Year 2015-2016
Access Management Tools
The “Access Management Tools” section allows certain administrative responsibilities, such as the ability to add/edit people from the application and view the status history of the application. Functionality is based on your user role.
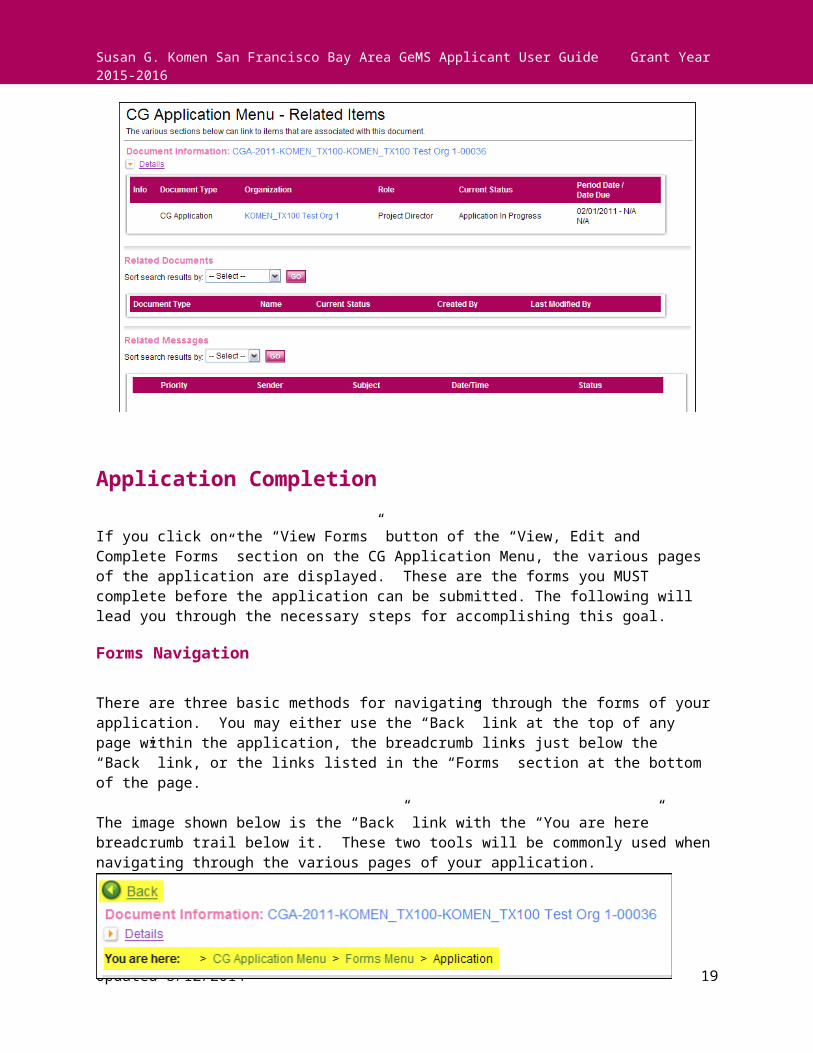
Examine Related Items (Progress Reports)
The “Examine Related Items” section is where you will find items related to an application or grant. An example of a related item would be a Progress Report.
Updated 8/12/2014 15

Susan G. Komen San Francisco Bay Area GeMS Applicant User Guide Grant Year 2015-2016
Application Completion
If you click on the “View Forms” button of the “View, Edit and Complete Forms” section on the CG Application Menu, the various pages of the application are displayed. These are the forms you MUST complete before the application can be submitted. The following will lead you through the necessary steps for accomplishing this goal.
Forms Navigation
There are three basic methods for navigating through the forms of your application. You may either use the “Back” link at the top of any page within the application, the breadcrumb links just below the “Back” link, or the links listed in the “Forms” section at the bottom of the page. The image shown below is the “Back” link with the “You are here” breadcrumb trail below it. These two tools will be commonly used when navigating through the various pages of your application.
Updated 8/12/2014 16
Susan G. Komen San Francisco Bay Area GeMS Applicant User Guide Grant Year 2015-2016
By clicking the “Back” button, you will be taken back to the Forms Menu and you can click on the next page you wish to complete. You do not have to complete the pages of the application in any particular order. Note that the “Back” button in the system is different than your internet browser back button. Be sure you are using the system button and not your browsers.
The “Forms” navigation tool can be found at the bottom of the page. To access the form, simply click on the page name.
Forms Completion
When filling out an application form, it is suggested you first complete all of those fields for which you have information. Not everyone in each organization will have all of the information necessary to complete each form. Complete as much of it as you can and then click the “Save” button. Fields followed by red asterisks are required fields.
In the creation of some forms, the “Add” button is used to create additional fields so the applicant can list each item that falls under a particular category. Project Work Plan - Goals, for example, will typically consist of more than one item. Any form that has an “Add” button allows you to have multiple instances of that particular form. The following picture shows the available “Add” button on a page where multiple pages can be created.
Updated 8/12/2014 17
Helpful Hint:
Please refer to the 2015-2016 Request for Applications (RFA) for specific information related to the various forms and required information associated with the 2015-2016 Grant Application.

Susan G. Komen San Francisco Bay Area GeMS Applicant User Guide Grant Year 2015-2016
When multiple pages have been created for a particular form, you can choose between them. A dropdown menu will appear on the far right of the button toolbar. Select the Item and hit the “Go” button and it will take you to that item’s page.
When additional pages have been created, a number in parentheses will appear after the form name to indicate the number of pages connected with the particular link. MultiPage forms will not display a Created By or Last Modified By name/date.
Automatic CalculationsWhen possible, GeMS will automatically calculate totals for you. Click the “Save” button to perform calculations – calculations will not occur until the “Save” button is selected.
Updated 8/12/2014 18
Susan G. Komen San Francisco Bay Area GeMS Applicant User Guide Grant Year 2015-2016
The “Budget Summary” page is another example of automatic calculations. When the Budget Summary is opened, the system will take the values you have entered in the Budget pages and display the information in the Budget Summary.
Error MessagesIf any required field is not completed within an application form or there are business rules violated, an error message will be displayed in red across the top of the page immediately after the “Save” button is clicked. During form completion it is not necessary to correct errors right away. You may return to the form at a later time and fix errors. If for some reason any errors remain when you attempt to submit the application, you will receive an error message. The Komen GeMS system will require the errors be fixed before the application submission can be completed. See the example below.
Updated 8/12/2014 19

Susan G. Komen San Francisco Bay Area GeMS Applicant User Guide Grant Year 2015-2016
Uploads & AttachmentsFor some pages, form fields are not enough to capture the type of information that may be required. In those situations, a file upload field may be provided to allow you to upload a file instead. Files of the following types are allowed as uploads: bmp, doc, docx, gif, jpg, pdf, png, ppt, tif, txt, wpd, xls and xlsx. To upload a file, click the “Browse” button. Uploads should be 4 mgs or less.
Browse to the folder that contains the file you would like to upload and either double-click the file or click the file and then click the “Open” button.
After the page reloads, you must then click the page “Save” button to save the uploaded file.
PDF VersionIn many pages, once the page is saved, a “Print Version” button will be available that will automatically create a PDF for you with the data you provided for each form. These dynamic PDF’s can be printed or saved to your computer for reference.
Copy and PasteApplicants should be cautious when utilizing copy and paste. We suggest you copy to NotePad first, then to GeMS. Copying to NotePad will remove all formatting.
Updated 8/12/2014 20

Susan G. Komen San Francisco Bay Area GeMS Applicant User Guide Grant Year 2015-2016
Text LimitsApplicants must also be aware of the character limits of each text box, as attempting to copy and paste text larger than the allotted amount of space will yield an error. The character limit may be found at the bottom left of each text box.
Note: If you exceed the allowed length, do not exit the document until you have edited it down to the allowed text limit; otherwise your text will be lost.
Application Submission
The Project Director must change the status of the application to “Authorized Signature Required” to begin the application submission process. After the Project Director has changed the Application status, the Authorized Signer must finalize the submission by changing the status to “Application Submitted”.
Once an application is submitted it will enter into a read-only status and cannot be changed!
1) Project Director logs in and clicks “Open My Tasks.”
Updated 8/12/2014 21

Susan G. Komen San Francisco Bay Area GeMS Applicant User Guide Grant Year 2015-2016
Updated 8/12/2014 22

Susan G. Komen San Francisco Bay Area GeMS Applicant User Guide Grant Year 2015-2016
2) Select the grant you would like to submit in your task list.
3) Click “View Status Options” to see the possible statuses.
4) Click “Apply Status” under the appropriate status.
If any errors exist on any of the application’s forms when the Project Director attempts to change the status to Authorized Signature Required or the Authorized Signer attempts to submit, they will receive an error message directing them to the form(s) with errors. All errors must be fixed before GeMS will allow an application to be submitted. If no errors exist, the grantee will be prompted to confirm his or her submission. You can check for errors at any time using the Global Errors link.
Updated 8/12/2014 23

Susan G. Komen San Francisco Bay Area GeMS Applicant User Guide Grant Year 2015-2016
5) Authorized Signer logs in to GeMS and clicks “Open My Tasks.”
6) Select the grant you would like to submit in your task list.
7) Click “View Status Options” to see the possible statuses.
8) Click “Apply Status” for “Application Submitted.”
Helpful Hints
When completing the application within GeMS, please review the Request for Applications and additional support tools provided by the local Affiliate for details on each application page and submission requirements.
Always hit “Save” to save your data. If you do not hit “Save” and you navigate away from the screen, your data will be lost.
If you scroll over the first aid kits, help content will be available for that specific question.
The system will log out after 45 minutes with no activity. If the system logs out automatically, the last data entered will not be saved if the save button was not selected prior to the log out.
If you copy and paste text from Word, you must hit the backspace button within the text field for the character count to be shown.
The Project Work Plan Summary is a report of all of the goals and objectives entered on the Project Work Plan pages.
Print versions of the blank application and completed application are available within the “Access Management Tools” section of the application menu.
Always use the “Back” button within the system when trying to return to a previous page.
When in doubt, contact the GeMS Affiliate staff – Cindy Je, Program Manager, [email protected] or (415) 397-0110. Affiliate staff is available for:
o Registration and log-in troubleshooting o General system troubleshootingo Further explanation of application requirements
Updated 8/12/2014 24