Version 4.0 Administration Workbooklexisnexis.com.au/products/practice-management/downloads/lal...
442
Lexis Affinity Version 4.0 Administration Workbook October 2012
Transcript of Version 4.0 Administration Workbooklexisnexis.com.au/products/practice-management/downloads/lal...

Lexis Affinity
Version 4.0
Administration Workbook
October 2012

Copyright Statement © 2012 Reed International Books Australia Pty Ltd trading as LexisNexis. LexisNexis and the Knowledge
Burst logo are registered trademarks of Reed Elsevier Properties Inc. and used under license ABN 70 001 002 357. All rights reserved.
This document is commercial in confidence. It is provided for use within the law firm named in this document or the LexisNexis order form. This document and the information in it is not to be copied or given to any person that is not a permanent employee of the firm without LexisNexis’ written permission.
The title and copyright in LexisNexis software, documentation, manuals and methods vests in LexisNexis. Reproduction in any form or by any means is not permitted (except as may be agreed in a System Specification signed by LexisNexis and the client) nor shall it be sold, lent, hired out or made available in any way to other persons. The user undertakes to prevent copying or use by third parties and the observance of the above.
All LexisNexis systems, software and services are supplied only under licence in accordance with the terms and conditions set out in published LexisCare Service Arrangements. Copies are available on request.
LexisNexis Helpline Tel: 1800 999 906 Int Tel: +61 2 9422 8755 Fax: 02 9422 2405 Email: [email protected]
SYDNEY Tower 2, 475-495 Victoria Avenue Chatswood NSW 2067 Locked Bag 2222 Chatswood Delivery Centre Chatswood NSW 2067 DX 29590 Chatswood NSW Tel: 02 9422 2222 Fax: 02 9422 2444
MELBOURNE Level 10, 461 Bourke Street Melbourne VIC 3000 GPO Box 4503 Melbourne VIC 3001 Tel: 03 9602 6300 Fax: 03 9600 2125
BRISBANE South Tower Level 3 527 Gregory Terrace Fortitude Valley QLD 4006 Tel: 1800 772 772 Fax: 07 3335 0001
ADELAIDE Suites 22 & 23 Level 30, Westpac House 91 King William Street Adelaide SA 5000 Tel: 1800 772 772
PERTH Suite 25, Level 5, Ashton Chambers 189 St George's Terrace Perth WA 6000 Tel: 08 6213 2100 Fax: 08 6213 2130
LexisNexis InfoLine Tel: 1800 772 772 Fax: 02 9422 2405 Email: [email protected]
LexisNexis Helpline New Zealand Tel: 0800 222 338 Email: [email protected]
AUCKLAND Level 12, 57-59 Fort Street Auckland Central, Auckland 1010 New Zealand PO Box 2399 Auckland 1140 New Zealand Tel: +64 9 368 1700 Fax: +64 9 368 9500
WELLINGTON Level 1, 138 The Terrace Wellington Central, Wellington 6011 New Zealand PO Box 472 Wellington 6140 New Zealand Tel: +64 4 385 1479 Fax: +64 4 385 1598
MALAYSIA LexisNexis Malaysia Sdn Bhd T1-6, Jaya 33 3 Jalan Semangat, Seksyen 13 46100 Petaling Jaya Selangor Darul Ehsan Malaysia Tel: +603 7882 3500 Fax: +603 7882 3501
SINGAPORE LexisNexis Asia 3 Killiney Rd #08-08 Winsland House 1 Singapore 239519 Tel: +65 6733 1380 Fax: +65 6733 1719

© 2012 Reed International Books Australia Pty Ltd trading as LexisNexis Page 1
Table of Contents 1. Lexis® Affinity Library Administrator ................................................................................. 11
2. The Structure of Lexis Affinity Library ............................................................................... 13
3. Lexis Affinity Library Desktop ............................................................................................ 17
3.1 Sign into Lexis Affinity Library .............................................................................................. 17
3.2 My Favourites ....................................................................................................................... 20
3.3 Deleting Programs from My Favourites ............................................................................... 21
3.4 Automatically run programs after Sign-In ............................................................................ 22
3.5 Using Quick Access codes to open Programs ....................................................................... 22
3.6 Create Snapshots ................................................................................................................. 24
3.7 Lock and Unlock Lexis Affinity Library .................................................................................. 25
3.8 Lexis Affinity Library Help ..................................................................................................... 26
3.9 Using Lexis Affinity Help Programs....................................................................................... 27
3.10 Accessing Recently Used Records ........................................................................................ 30
3.11 Grid Displays ......................................................................................................................... 31
3.11.1 Selecting Columns ................................................................................................. 32
3.12 Quick Access Codes .............................................................................................................. 33
3.12.1 Alphabetical List of codes to access Affinity programs......................................... 33
3.12.2 Quick Access Codes by Program Group ................................................................ 36
3.13 Full Text Searching ............................................................................................................... 39
4. Toolbars and Keyboard Shortcuts ..................................................................................... 41
5. QuickCodes ........................................................................................................................ 43
5.1 Create a QuickCode .............................................................................................................. 43
5.2 Print QuickCodes .................................................................................................................. 44
5.2.1 Using QuickCodes ................................................................................................. 44
6. Entities ............................................................................................................................... 45
6.1 Ledgers for Automatic Posting ............................................................................................. 51
6.1.1 “Creation” Tab ...................................................................................................... 52
6.1.2 “Billing” Tab .......................................................................................................... 54
6.1.3 “Receipting” tab .................................................................................................... 55

Administration Workbook
Page 2 © 2012 Reed International Books Australia Pty Ltd trading as LexisNexis
6.1.4 “Write Off” tab ..................................................................................................... 55
6.1.5 “Other” tab ........................................................................................................... 55
6.1.6 “Legacy” tab ......................................................................................................... 56
6.1.7 “Trust” tab ............................................................................................................ 56
6.1.8 Code Rules ............................................................................................................ 57
7. System ................................................................................................................................ 59
7.1 “General” tab ....................................................................................................................... 60
7.2 Licences ............................................................................................................................... 63
7.2.1 Programs Available When Certificate Expires ...................................................... 63
7.2.2 Requesting a New Certificate ............................................................................... 64
7.2.3 Updating the System with New Certificate .......................................................... 65
7.3 “Archiving” tab .................................................................................................................... 66
7.4 “Backup” tab ........................................................................................................................ 68
7.5 “Diary” tab ........................................................................................................................... 69
7.6 “Documents” tab ................................................................................................................. 71
7.6.1 Affinity .................................................................................................................. 71
7.6.2 Document Management ...................................................................................... 72
7.6.3 Product Integration .............................................................................................. 75
7.6.4 Full Text Search .................................................................................................... 80
7.6.5 E-Billing / e-Collection .......................................................................................... 83
7.7 “Email” tab ........................................................................................................................... 84
7.7.1 Options ................................................................................................................. 84
7.7.2 Email Save ............................................................................................................ 84
7.8 “emPower” tab .................................................................................................................... 85
7.9 “Espreon” tab ...................................................................................................................... 86
7.9.1 Setup .................................................................................................................... 86
7.9.2 Action Setup ......................................................................................................... 90
7.10 “Exchange Server” tab ......................................................................................................... 92
7.11 “Fee Sheet” tab ................................................................................................................... 93
7.12 “Foreign Currency” tab ........................................................................................................ 96
7.13 “HotDocs” tab ...................................................................................................................... 97
7.13.1 Setup .................................................................................................................... 97
7.14 “GFI FaxMaker” tab ........................................................................................................... 100
7.15 “Investment” tab ............................................................................................................... 101

Lexis® Affinity Library
© 2011 Reed International Books Australia Pty Ltd trading as LexisNexis Page 3
7.16 “Macquarie Bank” tab ........................................................................................................ 102
7.17 “Management Reports” tab ............................................................................................... 103
7.18 “Matters and Clients” tab .................................................................................................. 104
7.19 “Miscellaneous” tab ........................................................................................................... 107
7.19.1 “Field Mapping” tab ............................................................................................ 107
7.19.2 Libraries” tab ....................................................................................................... 107
7.19.3 “User Statements” tab ........................................................................................ 107
7.20 “PhoneBook” tab ................................................................................................................ 107
7.21 “Posting” tab ...................................................................................................................... 108
7.21.1 Client & Matter Alerts ......................................................................................... 108
7.21.2 Cheques, Anticipated Disbursements and Receipts ........................................... 110
7.21.3 Fees, Billing & Allocating ..................................................................................... 112
7.22 “Research” tab ................................................................................................................... 116
7.23 “Safe Custody” tab ............................................................................................................. 118
7.24 “Session” tab ...................................................................................................................... 118
7.25 “Softdocs” tab .................................................................................................................... 119
7.26 “Sundry Interface” tab ....................................................................................................... 120
7.27 “Tasks” tab ......................................................................................................................... 123
7.28 “Trust Statement” tab ........................................................................................................ 124
7.29 “WordLink” tab .................................................................................................................. 125
8. System Administration .................................................................................................... 127
8.1 Encrypted Passsword in Affinity.ini .................................................................................... 127
9. Options ............................................................................................................................ 129
9.1 “Matter Labels” tab ............................................................................................................ 130
9.1.1 “Logo” settings .................................................................................................... 131
9.2 “Matter Display” tab .......................................................................................................... 132
9.3 “Diary” tab .......................................................................................................................... 133
9.4 “Espreon” tab ..................................................................................................................... 135
9.5 "Email" tab ......................................................................................................................... 136
9.6 “Exchange Server” tab........................................................................................................ 137
9.7 “Precedents” tab ................................................................................................................ 138
9.8 “Tasks” tab ......................................................................................................................... 139
9.9 “Spell Checking” tab ........................................................................................................... 140
Administration Workbook
Page 4 © 2012 Reed International Books Australia Pty Ltd trading as LexisNexis
9.10 “Research” tab ................................................................................................................... 141
9.11 “Other” tab ........................................................................................................................ 143
10. Matter Types ....................................................................................................................145
11. Code Rules........................................................................................................................151
11.1 Client Code Rules ............................................................................................................... 151
11.2 Creditor Code Rules ........................................................................................................... 153
11.3 Matter Code Rules ............................................................................................................. 154
11.4 Safe Custody Code Rules ................................................................................................... 157
11.5 Archive Code Rules ............................................................................................................ 159
12. Setting up the PhoneBook Prompts.................................................................................161
12.1 Name Labels ...................................................................................................................... 161
12.2 PhoneBook Groups ............................................................................................................ 167
12.3 Matter Party Roles ............................................................................................................. 169
12.4 PhoneBook Relationship Dictionary .................................................................................. 171
12.5 Print the PhoneBook Relationships ................................................................................... 172
13. Client Groups ...................................................................................................................173
13.1 Create a New Client Group ................................................................................................ 173
13.2 Transfer Group Members .................................................................................................. 174
14. Client Business Sources ....................................................................................................175
14.1 Create a New Business Sources ......................................................................................... 175
14.2 Print Client Business Sources ............................................................................................. 175
15. Client Industry Classifications ..........................................................................................176
15.1 Create a New Industry Classification ................................................................................. 176
15.2 Print Client Industry Classifications ................................................................................... 176
16. Conflict Checker ...............................................................................................................177
16.1 Setup .................................................................................................................................. 178
16.1.1 Grant Employee Launch Clearance .................................................................... 178
16.1.2 PhoneBook Groups ............................................................................................ 179
16.1.3 Matters ............................................................................................................... 180
16.1.4 DataForms .......................................................................................................... 181

Lexis® Affinity Library
© 2011 Reed International Books Australia Pty Ltd trading as LexisNexis Page 5
16.1.5 Document Types ................................................................................................. 181
16.2 Conflict Checker System ..................................................................................................... 182
16.2.1 “Search Options” tab .......................................................................................... 182
16.2.2 “Invalid Search Texts” tab ................................................................................... 182
16.2.3 “DataForms” tab ................................................................................................. 183
16.2.4 “PhoneBook Groups” tab .................................................................................... 183
16.3 Conflict Checker Maintenance ........................................................................................... 184
16.3.1 “Types” tab ......................................................................................................... 184
16.3.2 “General” tab ...................................................................................................... 186
16.3.3 “Wordlink” tab .................................................................................................... 186
16.4 Conflict Checker Maintenance Menu and Ribbon ............................................................. 187
16.4.1 Menu ................................................................................................................... 187
16.4.2 Ribbon ................................................................................................................. 187
16.5 Conflict Checker Audit ........................................................................................................ 188
16.5.1 “Audit Trail” tab .................................................................................................. 189
16.5.2 “Filter” tab .......................................................................................................... 190
16.6 Conflict of Interest Checker................................................................................................ 191
16.6.1 Search Criteria ..................................................................................................... 193
16.6.2 Execute Search .................................................................................................... 195
16.7 Conflict Checker Results ..................................................................................................... 196
16.7.1 DataForm Results ................................................................................................ 197
16.7.2 Printing Audit Trail Results ................................................................................. 197
16.8 Appendices ......................................................................................................................... 198
16.8.1 Appendix A Sample Conflict Checker Quick Report Results .............................. 198
16.8.2 Appendix B Sample Conflict Checker Standard Template Report Results ......... 199
16.8.3 Appendix C Sample Template: Wordlink_Conflict_Checker_Audit.dot ............. 200
16.8.4 Appendix D Conflict Checker Wordlink Merge fields ......................................... 201
17. Postcodes......................................................................................................................... 203
17.1 Download the Postcodes ................................................................................................... 203
18. Accounting Options ......................................................................................................... 207
18.1 Accounting Options ............................................................................................................ 208
19. Tax Types ......................................................................................................................... 211
Administration Workbook
Page 6 © 2012 Reed International Books Australia Pty Ltd trading as LexisNexis
20. Bank Accounts ..................................................................................................................215
20.1 Trust Bank Account ............................................................................................................ 215
20.2 Create a New General or Company Bank Account ............................................................ 225
20.3 Special Requirements for Macquarie Bank Limited .......................................................... 226
20.3.1 Bank Account Ribbon ......................................................................................... 227
21. Calendars .........................................................................................................................229
21.1 Calendar Registration ........................................................................................................ 229
21.2 Create a new Calendar based on an existing one ............................................................. 231
22. States................................................................................................................................235
23. Fees ..................................................................................................................................239
23.1 Fee Templates ................................................................................................................... 242
23.1.1 Fixed Fee – recording Scale Cost and Time Cost separately .............................. 242
23.1.2 Fixed Charge – Not recording Scale Cost and Time Cost separately .................. 243
23.1.3 Rate per Unit - recording Scale Cost and Time Cost separately......................... 244
23.1.4 Rate per Unit – not recording Scale Cost and Time Cost separately ................. 245
23.1.5 Fee Template Filter ............................................................................................ 246
23.1.6 Map Singular / Plural Unit Type ......................................................................... 248
23.2 Fee Type ............................................................................................................................ 249
23.2.1 Fee Type Groups ................................................................................................ 251
23.2.2 Fee Type Field Descriptions ............................................................................... 252
23.3 Fee Rate Code .................................................................................................................... 253
23.4 Hourly Rate on Matter ....................................................................................................... 255
23.5 Employee Rate ................................................................................................................... 256
23.6 Importing Fee Entries from an External File ...................................................................... 257
24. Sundry Types ....................................................................................................................259
24.1 Set up Sundry Type for Matters ........................................................................................ 259
24.2 Expense Type Groups ........................................................................................................ 261
24.3 Adding an existing Sundry Expense to a Group ................................................................. 262
24.4 Set up Sundry Type for Creditors ...................................................................................... 263
25. Bill Templates and Credit Note Types ..............................................................................267
25.1 Bill Templates .................................................................................................................... 267

Lexis® Affinity Library
© 2011 Reed International Books Australia Pty Ltd trading as LexisNexis Page 7
25.2 Bill Credit Note Types ......................................................................................................... 273
25.2.1 Print / View Bill Credit Note Types ..................................................................... 273
26. Billing Plans ...................................................................................................................... 275
27. Debtors Letters Templates .............................................................................................. 277
28. Collection Plans ............................................................................................................... 281
28.1 Collection Plan Registration ............................................................................................... 282
28.2 Setting up Emails ................................................................................................................ 287
29. Payment Plans ................................................................................................................. 289
29.1 Payment Plan Templates .................................................................................................... 289
29.1.1 Setting up a Payment Plan Email ........................................................................ 292
30. Diary Setup ...................................................................................................................... 295
30.1 Diary Events, Locations & Jurisdictions .............................................................................. 295
30.2 Diary Groups and Filters ..................................................................................................... 297
30.2.1 Diary Groups ....................................................................................................... 297
30.2.2 Diary Filters ......................................................................................................... 300
30.3 Resources ........................................................................................................................... 302
30.3.1 Resource Types ................................................................................................... 302
31. Safe Custody .................................................................................................................... 305
31.1 Safe Custody Item Types .................................................................................................... 305
31.2 Safe Custody Relationships ................................................................................................ 306
32. Employee Transfer Batch ................................................................................................ 307
32.1 Client and Matter Filters .................................................................................................... 315
33. Employees ....................................................................................................................... 317
33.1 Create a PhoneBook record for an Employee .................................................................... 317
33.2 Create the Employee record .............................................................................................. 319
33.3 Employee Charts & Rates ................................................................................................... 321
33.4 Employee Budgets and Costs ............................................................................................. 323
33.5 Export / Import Employee Budgets into Excel ................................................................... 324
33.5.1 Export .................................................................................................................. 324

Administration Workbook
Page 8 © 2012 Reed International Books Australia Pty Ltd trading as LexisNexis
33.5.2 Import ................................................................................................................ 329
33.6 Employee Password ........................................................................................................... 337
33.7 Creating the Lexis Affinity Desktop ................................................................................... 338
33.8 Employee Types ................................................................................................................. 340
33.8.1 Print Employee Types ......................................................................................... 342
33.9 Departments ...................................................................................................................... 343
33.9.1 Print Departments .............................................................................................. 344
34. Auto Sign In ......................................................................................................................345
35. Team Security ..................................................................................................................347
35.1 To implement Team Security............................................................................................. 347
35.1.1 System Variables ................................................................................................ 347
35.1.2 Employees .......................................................................................................... 348
35.1.3 Maintaining several employees ......................................................................... 349
35.1.4 Matters ............................................................................................................... 352
35.1.5 Matter Team Batch Update ............................................................................... 355
35.1.6 Reports ............................................................................................................... 360
36. Security Options ...............................................................................................................363
36.1 Altering Security Options ................................................................................................... 363
36.2 Security Options ................................................................................................................ 366
36.2.1 Archive options .................................................................................................. 367
36.2.2 Archive Requisition ............................................................................................ 368
36.2.3 Bank .................................................................................................................... 369
36.2.4 Bill ....................................................................................................................... 370
36.2.5 Cheque Requisition Options............................................................................... 372
36.2.6 Cheque options .................................................................................................. 374
36.2.7 Client Options ..................................................................................................... 375
36.2.8 Creditor Options ................................................................................................. 377
36.2.9 Diary Options ..................................................................................................... 378
36.2.10 Document ........................................................................................................... 379
36.2.11 Employee Options .............................................................................................. 380
36.2.12 emPower Options............................................................................................... 381
36.2.13 Entity Options..................................................................................................... 382
36.2.14 Fee Options ........................................................................................................ 382

Lexis® Affinity Library
© 2011 Reed International Books Australia Pty Ltd trading as LexisNexis Page 9
36.2.15 Fee Rate Codes ................................................................................................... 383
36.2.16 Foreign Currency Rates ....................................................................................... 383
36.2.17 Investment Options ............................................................................................ 384
36.2.18 Invoice Options ................................................................................................... 385
36.2.19 Ledger Options .................................................................................................... 386
36.2.20 Licence ................................................................................................................ 386
36.2.21 Matter Options ................................................................................................... 387
36.2.22 PhoneBook Options ............................................................................................ 393
36.2.23 Postcode Options ................................................................................................ 396
36.2.24 Posting Options ................................................................................................... 397
36.2.25 Precedent Options .............................................................................................. 399
36.2.26 Receipt Options................................................................................................... 400
36.2.27 Report Options .................................................................................................... 402
36.2.28 Safe Custody Options .......................................................................................... 402
36.2.29 State Options ...................................................................................................... 403
36.2.30 Sundry Options ................................................................................................... 403
36.2.31 System ................................................................................................................. 404
36.2.32 Transit Register ................................................................................................... 404
36.2.33 Workflow ............................................................................................................ 405
37. General Ledger ................................................................................................................ 407
37.1 Classifying General Ledger Accounts ................................................................................. 407
37.1.1 General Ledger Types ......................................................................................... 407
37.1.2 General Ledger Sub-Types .................................................................................. 408
37.2 Create General Ledger Account ......................................................................................... 409
37.3 Create Sub Accounts .......................................................................................................... 415
37.4 Export / Import General Ledger Budgets into Excel........................................................... 417
37.4.1 Export .................................................................................................................. 417
37.4.2 Import ................................................................................................................. 421
37.5 Display General Ledger Transactions ................................................................................. 424
37.6 Change Proportional Drivers on Existing Transactions ...................................................... 425
37.7 General Ledger Menu & Ribbon......................................................................................... 431
37.7.1 Functions on Menu Toolbar ................................................................................ 431
37.7.2 General Ledger Ribbon ....................................................................................... 432
37.8 General Ledger Filters ........................................................................................................ 434

Administration Workbook
Page 10 © 2012 Reed International Books Australia Pty Ltd trading as LexisNexis
37.9 Printing .............................................................................................................................. 438
38. Year End Procedure .........................................................................................................439

Lexis® Affinity Library
© 2012 Reed International Books Australia Pty Ltd trading as LexisNexis Page 11
1. Lexis® Affinity Library Administrator
This course is designed for system administrators, and office managers of the firm who want to be able to learn what Lexis Affinity Library can do for their firm.
The Administration course introduces the attendee to the fundamental set-up of Lexis Affinity Library.
Topics covered in this course include:
The concepts of Lexis Affinity Library
PhoneBook fields
Employees & access levels
Bank accounts
General ledger
System variables
Matter types
Fees
Sundry types

Administration Workbook
Page 12 © 2012 Reed International Books Australia Pty Ltd trading as LexisNexis
Notes

Lexis® Affinity Library
© 2012 Reed International Books Australia Pty Ltd trading as LexisNexis Page 13
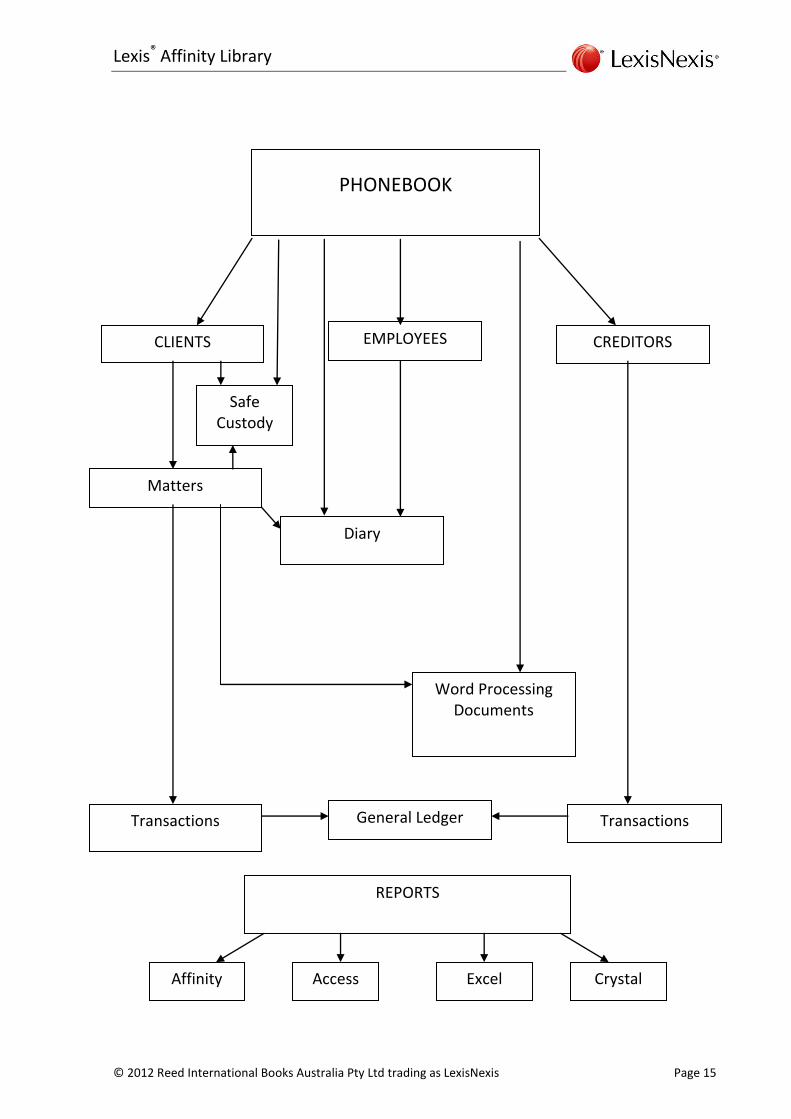
2. The Structure of Lexis Affinity Library
Lexis Affinity Library offers a complete and integrated approach to Law Office Management.
The Lexis Affinity Library system uses a set of related tables to maintain a complete picture of your practice. These tables are just like a set of card files in which information is recorded in an orderly fashion. Understanding the tables behind Lexis Affinity Library
will help you use the system in a more powerful way to accomplish your goals.
PhoneBook
This is the core of Lexis Affinity Library. The PhoneBook should contain the names and addresses of all the people or companies with whom your firm deals. This includes Clients, Employees, Prospects, Debtors and other parties such as; Other Solicitors, Real Estate agents, Barristers, Doctors, and Creditors. The integrity of the data in the PhoneBook is vital to your practice. The PhoneBook also allows you to record relationships between people or companies in the PhoneBook, such as associated companies, employee relationships and Directorships.
The PhoneBook is also your marketing database and therefore can include potential clients or anyone who you want included in your marketing mail outs. The PhoneBook includes the ability to create mail merge documents for all or selected contacts in the PhoneBook.
Clients
Clients are a sub-set of the PhoneBook. Client information is stored in two places (referred to as Tables) in Lexis Affinity Library. Client names and addresses are stored in the PhoneBook and client account balances are stored in the Client record. Although all of the client information can actually be entered in the Client record (so that it is easy to create a new client entry in one place), the name and address details are stored in, and can be accessed through, the central PhoneBook.
This makes it easy for staff to look up any name and address in the PhoneBook, regardless of whether they are looking for a client’s telephone number or that of another party.
Matters
Once a client has been created in the system, you are able to create matters for the client. Attributes of the matter, such as the Partner, the Controller and the Author and the matter type are all defined in separate files (or tables).
The matter file records information such as matter number, description of the matter and links to other parties. Other party details are kept in the PhoneBook with all other names and addresses. In addition, the matter file records the various ledger balances such as Fees, Debtors, Billed Fees and Trust.
Other associated variables can be recorded for matters of a particular type. For example - the exchange date for a conveyancing matter or the date of marriage for a family law matter.

Administration Workbook
Page 14 © 2012 Reed International Books Australia Pty Ltd trading as LexisNexis
SafeCustody
Details of Packets held and the contents of those packets (Packet Items) are recorded and can be accessed by Client or Matter. Lexis Affinity Library also records details of the Date Lodged, Location, Borrower, Date Borrowed and date due for Return, Returned Date, Review Date, and Release to details.
Transactions
Transactions include fee entries, cheques, receipts, bills and journals. They are posted to matters and General Ledger Accounts immediately. Matter, Client and GL Account balances are automatically updated and are therefore always up to date.
Diary
Diary includes the details of appointments, reminders and telephone messages..
Documents
Details of documents recorded against this matter.
Reporting
Lexis Affinity Library comes with an extensive range of reports. Prior to Version 3, reports were available in QuickReport format. From Version 3 onwards, some Lexis Affinity reports are available in DevExpress format, which allows users to copy and modify Lexis Affinity reports and to create their own reports (subject to a licence agreement). You can also create your own reports by using third party products such as Excel, Access and Crystal Reports.
The general structure of Lexis Affinity Library is shown in the following diagram.
Lexis® Affinity Library
© 2012 Reed International Books Australia Pty Ltd trading as LexisNexis Page 15
PHONEBOOK
EMPLOYEES
Diary
Word Processing Documents
CLIENTS CREDITORS
Matters
Transactions Transactions General Ledger
REPORTS
Affinity Access Excel Crystal
Safe Custody

Administration Workbook
Page 16 © 2012 Reed International Books Australia Pty Ltd trading as LexisNexis
Notes

Lexis® Affinity Library
© 2012 Reed International Books Australia Pty Ltd trading as LexisNexis Page 17
3. Lexis Affinity Library Desktop
Access to Lexis Affinity Library is by double-clicking on the Lexis Affinity Library icon on your Windows Desktop and signing in as a User.
The Lexis Affinity Library Desktop will display and you can select individual applications by double clicking on the relevant icon.
The icons that appear on the Desktop will vary from User to User. This reduces the number of icons that appear on most Desktops and makes Lexis Affinity Library easy to navigate.
The applications available to a User are determined by the Lexis Affinity Library Administrator.
3.1 Sign into Lexis Affinity Library
Hands on
In this exercise you will sign into Lexis Affinity Library as YSR (Password is YSR). YSR has the highest level of Security and access to all applications, to ensure all relevant aspects of Lexis Affinity Library can be used during the training. In your office, there is usually only one person (the Lexis Affinity Library Administrator) who has access to every application.
1. Double Click the Lexis Affinity Library icon
The Lexis Affinity Library Sign-In screen will display:
2. User ID YSR
3. Password YSR (The password is not case sensitive.)
4. Database Select the appropriate Database
5. Click on [OK] OR Press <ENTER>
The Lexis Affinity Library Desktop appears.

Administration Workbook
Page 18 © 2012 Reed International Books Australia Pty Ltd trading as LexisNexis
Menu Toolbar This group of programs is common to all Lexis Affinity Library users. File Select Exit, Lock, Set Date, or Check for Task Reminders. Utilities Select User Options, Password Change, Postcode Search or QuickCodes. Help Select Help to go to Lexis Affinity Help, the LexisCare Home Page, emPower Precedent Update Site, run a System Check (if enabled), log a Helpline Call, display the Version & Build number, the number of licensed users and the number of used licences and the oracle version details.
Application Toolbar This gives direct access to PhoneBook, Clients & Matters and Safe Custody and Research (if licensed).
Global Navigation Toolbar These are the main headings of the various groups of programs of Lexis Affinity Library. Each group opens to display further sub groups. Individual programs can be accessed by a double click or by pressing the F9 key to access the shortcuts for each program.
My Favourites This is user definable to allow quick access to the most often used programs.

Lexis® Affinity Library
© 2012 Reed International Books Australia Pty Ltd trading as LexisNexis Page 19
Help Details The details displayed here are either the standard LexisNexis Helpline details or can be customised for your individual firm. (Select System | General.)
Snapshots pane This is a user definable area. Users can “snapshot” a particular PhoneBook entry, Client, Matter or Report. They are accessed by a double click.
Quick Access Code search Users can quickly access the Affinity programs by entering the code for the program.
Search Users can search the database, documents and programs.

Administration Workbook
Page 20 © 2012 Reed International Books Australia Pty Ltd trading as LexisNexis
3.2 My Favourites
When you first sign into Lexis Affinity, the “My Favourites” pane displays. You can add frequently used programs to this pane so that they are easily accessible and you do not need to remember which group they belong to. Once a program is in “My Favourites”, you can select to “Run after Sign in” and that program will automatically open when you log in.
Hands on
In this exercise you will add three programs to My Favourites.
1. Open Transactions | Cheques
2. Right click on the Cheque Requisitions icon and select Add to My Favourites
3. Repeat this for Fees & Billing | Fees | Fee Sheet and Fee List The selected icons will now be in My Favourites.
4. Open My Favourites to display the icons
Open Programs from My Favourites
Hands on
In this exercise you will open each application. You can have more than one program open and minimised at the same time.
1. Open each application and minimize each one
The application names will display on the Taskbar at the bottom of the screen.
Switching between programs
You can switch between open programs on the Affinity desktop by pressing Ctrl+Tab to move forward or Ctrl+Shift+Tab to move backward.
When you press Ctrl+Tab, the dialog box shown below appears with the icons for each open program. As each program is selected the caption displays the name of the program.

Lexis® Affinity Library
© 2012 Reed International Books Australia Pty Ltd trading as LexisNexis Page 21
Butterfly
This represents the Affinity desktop. When you select this icon, all the currently opened programs within Affinity are minimised and the Affinity desktop is displayed.
2. Select each program and maximize it
Close Programs
Hands on
In this exercise you will close each application.
3. When each application is maximized, close each one
There are several ways to close a screen:
Click on the X in the top right hand corner
<ALT + F4>
Click on the icon in the top left hand corner and click on Close
Some screens have a “File” option on the Menu Bar. In this case, you can:
File | Exit
<ALT +F> X
3.3 Deleting Programs from My Favourites
Hands on
1. Open My Favourites
2. Right click on the Cheque Requisitions icon and select Delete
The icon will then be removed from My Favourites.

Administration Workbook
Page 22 © 2012 Reed International Books Australia Pty Ltd trading as LexisNexis
3.4 Automatically run programs after Sign-In
It is possible to have certain programs automatically open when you sign into Lexis Affinity Library.
Hands on
In this exercise you will flag the Fee Sheet to be opened after signing in.
1. Right click Fee Sheet in My Favourites
2. Select Run after Sign-In
3. Sign out of Lexis Affinity Library
4. Sign into Lexis Affinity Library using the same User and Password as before
You will see the Fee Sheet has opened.
5. Close the Fee Sheet
To remove programs from “Run after Sign-In”
6. Right click the Fee Sheet icon and remove the tick against Run after Sign-In
3.5 Using Quick Access codes to open Programs
A quick way to open programs within Lexis Affinity is to use the Quick Access codes. This is particularly useful to users who prefer to use the keyboard rather than the mouse.
Each program has the shortcut code included in brackets after the Tool Tip. A complete list is provided by clicking here.
For example – the Shortcut for the Fee Sheet is FEES.
You can press F9 from the Lexis Affinity desktop or any non-modal program. (Non-modal programs are those that let you continue to work elsewhere in the application while the original program is displayed.)

Lexis® Affinity Library
© 2012 Reed International Books Australia Pty Ltd trading as LexisNexis Page 23
Hands On
In this exercise you will open the Fee Sheet, using the Quick Access code.
1. On the Lexis Affinity Desktop, press the F9 key
A dialog screen will open:
The default location for this dialog screen is the very top right hand side of the desktop screen. You can click and drag it to another location and it will stay there until you move it again.
2. Enter the code – FEES - in the text box.
As you type the code, the first code that matches the text you entered will be selected automatically.
3. Once Fee Sheet is selected, press Enter
The Fee Sheet will display.
TIP: To hide the Quick Access code dialog box Press Esc or click anywhere within Lexis Affinity, outside of the dialog box.
To view the list of Codes
Press F9 and click on the drop down list to view all the Quick Access codes.
The drop-down list displays all the available codes, including their description, in alphabetical order.
The complete list of codes is available at the end of this chapter. There is an Alphabetical List and a list by Program group.

Administration Workbook
Page 24 © 2012 Reed International Books Australia Pty Ltd trading as LexisNexis
3.6 Create Snapshots
Direct links to PhoneBook entries, particular clients and matters, and reports, can be placed on the Snapshots pane.
Hands on
In this exercise you will create a snapshot for a Matter.
1. Select Matters from the Applications Toolbar to display the Matter Selection screen.
2. Double-click on the first matter to display the details for that matter.
3. Click on the Snapshot button. OR Press F10
The selected matter will now be in the Snapshots pane.
4. Close the Matter screen
In this case you can use File | Exit or <ALT + F> X
NOTE: To remove a Snapshot item, select it, right click and select Delete.

Lexis® Affinity Library
© 2012 Reed International Books Australia Pty Ltd trading as LexisNexis Page 25
3.7 Lock and Unlock Lexis Affinity Library
You can lock Lexis Affinity Library if you need to leave your desk and do not want to close the program that you currently are working in. This will hep to prevent unauthorised suers accessing Affinity.
Lock Lexis Affinity Library
Hands on
1. Open Matters from the Application toolbar
2. Open any matter
3. On the Menu Toolbar, select File | Lock
This will minimize any open programs and lock the Lexis Affinity Library application.
4. Unlock Lexis Affinity Library by entering the Password and click on [Unlock] (The same as when you signed in)
5. Maximise the Matter screen by clicking on the matter icon on the Taskbar (at the bottom of the screen)
6. Close the Matter screen
NOTE: Clicking on [Exit] will close Affinity.

Administration Workbook
Page 26 © 2012 Reed International Books Australia Pty Ltd trading as LexisNexis
3.8 Lexis Affinity Library Help
The Help button on the Menu Toolbar gives you access to the following:
Lexis Affinity Help Launches the Help programs for Lexis Affinity. This provides access to a summary page of “What’s New”, the Enhancement Notice for the current version of Lexis Affinity and access to the Essentials, Operations and Administrator Workbooks. The “User Reference” selection provides access to DataForms and Precedents, Workflow, Scripting,, Investments and Safe Custody Reference material and End of Financial Year Instructions.
LexisCare Home Page Launches the LexisCare Service Centre web site. http://service.locus.com.au/Helpline/jsp/Client/Login.jsp
emPower Precedent Update Site Launches the Lexis emPower UpdateSite. http://service.locus.com.au/UpdateSite/jsp/Client/Login.jsp
System Check Launches the System Check program.
Log a Helpline call Launches the LexisCare Service Centre web site. http://service.locus.com.au/Helpline/jsp/Client/Login.jsp
About Displays information about: The Version and Build number of the software. The Current users - ie the number of users in the system. Concurrent user licences – ie the maximum number of users allowed in the system at any one time. The Oracle versions.
Lexis® Affinity Library
© 2012 Reed International Books Australia Pty Ltd trading as LexisNexis Page 27
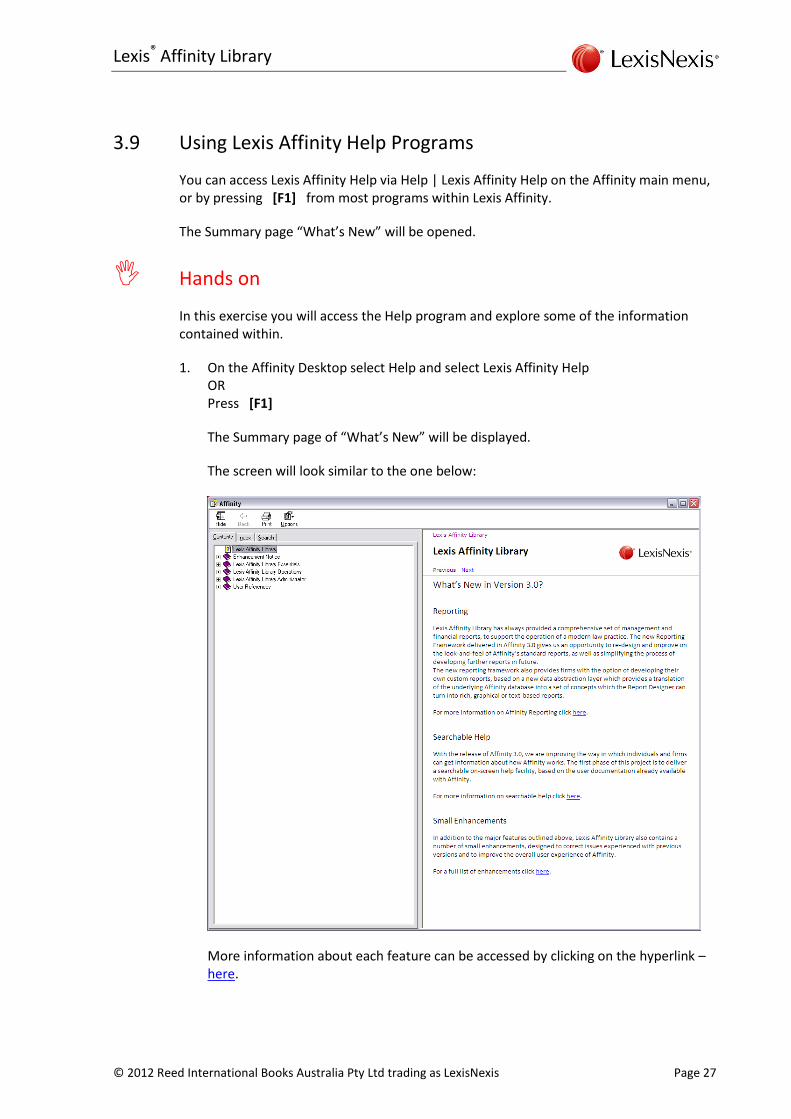
3.9 Using Lexis Affinity Help Programs
You can access Lexis Affinity Help via Help | Lexis Affinity Help on the Affinity main menu, or by pressing [F1] from most programs within Lexis Affinity.
The Summary page “What’s New” will be opened.
Hands on
In this exercise you will access the Help program and explore some of the information contained within.
1. On the Affinity Desktop select Help and select Lexis Affinity Help OR Press [F1]
The Summary page of “What’s New” will be displayed.
The screen will look similar to the one below:
More information about each feature can be accessed by clicking on the hyperlink – here.
Administration Workbook
Page 28 © 2012 Reed International Books Australia Pty Ltd trading as LexisNexis
Another menu displays providing access to information on the new reporting features.
2. Click on [Back] at the top left of the screen
“Contents” tab
From here you can open each section- for example the Enhancement Notice for the current Version of software. You can click on to open each Chapter heading and see the topics included in each chapter.
“Index” tab
This will display all the “headings” from the source documents.
“Search” tab
This tab provides access to the search capabilities in Lexis Affinity help.

Lexis® Affinity Library
© 2012 Reed International Books Australia Pty Ltd trading as LexisNexis Page 29
Searching within Help
Hands on
In this exercise you will use the Search programs to locate various pieces of information.
1. Select the “Search” tab
2. In the “Search” field type ‘Fee’ and click on [List Topics] or press [Enter]
The left hand side of the screen will now contain a list of the topic titles where the word “Fee” is used.
3. Click on [Display]
The right hand side of the screen now displays the selected page of information and the word ‘Fee’ will be highlighted. You can refine the search options to reduce the list of results.
Example Result
fee Will return all topics containing the word “fee”.
fee sheet Will return all topics containing either of the words “fee” and “sheet”.
“fee sheet” Will return topics containing the phrase “fee sheet”. ie Use quotes around the search text to search for phrases.
fee* Will return all topics containing the word “fee” and words that start with “fee” (for example: feeling, feeble etc). You can also use wildcards at the beginning of the search text.
fee OR sheet Will return all topics containing the words “fee” or “sheet”.
fee NOT list Will return topics which contain the word “fee” but not the word “list”.
fee NEAR sheet “NEAR” is used to find words which aren’t necessarily together but are near each other.
NOTE: searching Help files is not case sensitive. (you do not need to type ‘or’, ’not’ or ‘near’ in upper case.)
Search Options
Search previous results Refines your search by only searching the topics returned by your previous search.
Match similar words This finds all occurrences of the given word with common suffixes. For example, “run” will return “running” and “runner” but not “runtime”.
Search titles only This searches only the topic titles and not the text within each topic.

Administration Workbook
Page 30 © 2012 Reed International Books Australia Pty Ltd trading as LexisNexis
3.10 Accessing Recently Used Records
The down arrows beside PhoneBook, Clients, Matters and Safe Custody on the Application Toolbar gives you a quick way to access the last PhoneBook, Client, Matter or Safe Custody Packet opened. The number of entries that appear in this list is set in the Employee record.
Hands on
1. Click on the PhoneBook down arrow to see the latest PhoneBook entries accessed.
2. Click on one of the PhoneBook entries in the drop-down list to open the PhoneBook with that record displayed
3. Close the PhoneBook screen

Lexis® Affinity Library
© 2012 Reed International Books Australia Pty Ltd trading as LexisNexis Page 31
3.11 Grid Displays
The Grids in Lexis Affinity can be customized to suit your preferences.
Hands On
In this exercise you will open the PhoneBook listing to review how to change the grid displays. Many of these features are available throughout Lexis Affinity.
1. Open the PhoneBook listing by clicking on the PhoneBook icon on the Application toolbar
The PhoneBook Selection screen displays similar to the one shown below:
Features of the Grids
Checkboxes You can select one or multiple entries by clicking in the column. A tick indicates that the item is selected. Where a right click menu is available, right clicking will automatically place a tick in the checkbox. On the right click menu or drop down menus, such as for the Word icon– ‘Current’ is any entry that is highlighted. ‘Selected’ is any item/s that are ticked. ‘All” is all items displayed.
Column Width Lexis Affinity has preset column widths. You can change the width of all columns by clicking on the separator and dragging it to the right or left. This change will be retained until you change it.

Administration Workbook
Page 32 © 2012 Reed International Books Australia Pty Ltd trading as LexisNexis
Columns displayed Lexis Affinity has preset columns that are displayed. You can change the columns that are displayed on the “Columns” tab. This change will be retained until you change it.
Order of the data You can change the order of the data that is displayed, by clicking in the header of the column. The first click will sort in ascending order and display a small arrow head pointing up. A second click will reverse the order and display a small arrow head pointing down. You can sub-sort by clicking one column and then holding the CTRL key and clicking again in a second column. This change will be retained until you change it.
3.11.1 Selecting Columns
Many programs within Lexis Affinity use a standard Column Selection window. An example is shown below:
The “Hidden” column displays the list of available columns for the program. You can select additional columns to be displayed by highlighting them in the “Hidden” column and clicking on [Display]. Clicking on [All >] will move every column to the “Displayed” column.
The “Displayed” column displays the columns that have been selected and the order in which they will be displayed. You can remove columns from the display by highlighting them and clicking on [Hide] or remove them all by clicking on [< All]. Note that you cannot display a grid with no columns selected – Lexis Affinity will revert to the default columns if you do not select any.
[Restore Defaults] reverts the column display to the default Affinity selection.

Lexis® Affinity Library
© 2012 Reed International Books Australia Pty Ltd trading as LexisNexis Page 33
3.12 Quick Access Codes
3.12.1 Alphabetical List of codes to access Affinity programs
Program Code Program Code
Accounting Options ACC Client Creation CLC
All Matters Search ALLMT Client Groups CLG
Archival ARC Client Industry Class’ns CLIC
Archive Batch ARCB Clients CL
Archive Requests ARCR Code Rules CODE
Archive Retrieval Req’s ARCRR Collection Plans COLL
Archived Matters ARCM Conflict Checker Audit CCA
Auto Billing AB Conflict Checker Maintenance
CCM
AutoGen AUTOGEN Conflict Checker System CCS
Bank Deposit Query DEPQ Conflict of Interest Checker CCI
Bank Deposits DEP Countries COUNT
Bank EFT EFT Creditor Creation CREDC
Bank EFT Query EFTQ Creditor Groups CREDG
Bank Reconciliation BREC Creditor Payment Run CREDPAY
Banks BANK Creditors CRED
Bill Credit Note Types BCNT Crimson Logic CRIM
Bill Credit Notes BCN DataForm Collections DFC
Bill Discount Rate BDR DataForm Fields DFF
Bill Journal BJRNL DataForms DF
Bill Templates BTEMP Debtors Letter Templates DRLET
Billing Plan BPLAN Diary DRY
Bills BILL Diary Entry DRYENT
Branches BRNCH Diary Events DRYE
Budget and Cost Dist. BCD Diary Jurisdictions DRYJ
Calendar CAL Diary Locations DRYL
Calendar Registration CALR Document Management DM
Cheque Creation CHQC Document Mgt Admin DMA
Cheque Present CHQP Document Types DOCT
Cheque Requests (List) CHQR Employee Transfer Batch EMPTB
Cheque Requisitions CHQRC Employees EMP
Cheques CHQ emPower System EPOW
Program Code Program Code

Administration Workbook
Page 34 © 2012 Reed International Books Australia Pty Ltd trading as LexisNexis
Program Code Program Code
Entities ENT Matter Journals MTJNL
Explorer EXP Matter Party Role MTPR
Fee Batch Entry FEEB Matter Team Role MTROL
Fee Creation FEEC Matter Types MTYP
Fee List FEEL Matters MT
Fee Rate Codes FEERC Monitor Import MON
Fee Revaluation FEEREV Name Labels NAME
Fee Sheet FEES On-Line Search SRCH
Fee Templates FEETE Petty Cash Disbursement Journal
PCASH
Fee Types FEETY PhoneBook PB
Foreign Currencies FC PhoneBook Creation PBC
Foreign Currency Exchange Rates
FCEX PhoneBook Groups PBG
Foreign Currency Re-valuation Journals
FCRJ PhoneBook Relationship Dictionary
PBR
Foreign Currency Translation Journals
FCTJ Postcodes POSTC
Future Budgets FUTBDGT Precedent Categories PRECC
General Ledger GL Precedents PREC
Import Investment Interest
INVINT Procedures PROC
Institution Creation INSTC Receipt Creation RECC
Institutions INST Receipts REC
Investment Commission Plan
INVCOM Reports REPT
Investment Journals INVJNL Resource Booking RESB
Investment Receipt Creation
INVRC Resource Registration RESR
Investment Receipts INVR Safe Custody Item Types SCIT
Investment Register Types INVRT Safe Custody Letter Template SCLT
Investment Terms INVT Safe Custody Relationships SCR
Investments INV Safe Custody Search SC
Journals JRNL Scripts SCPT
Lawpoint Interface LAWP Service Tax Payment STAXP
Lock Dates for Entities LOCK Settlement Adjuster SETT
Matter & Client Import Listener
IMPLST Softlog Import SOFT

Lexis® Affinity Library
© 2012 Reed International Books Australia Pty Ltd trading as LexisNexis Page 35
Program Code Program Code
Sounds SNDS Team Registration TEAMR
States STAT Transfer Fees Disbs and Sundries
TFRFDS
Sundry Batch Entry SUNDB Transit Register TRANR
Sundry Creation SUNDC Trust Journals TRSTJ
Sundry Import Errors SUNDIE Withholding Tax Rates TAXW
Sundry Interface SUNDI WordLink Field Builder WLFB
Sundry Invoice Interface SUNDINV Workflow Area WFLOW
Sundry List SUND Write Off Disbursements WOD
Sundry Types SUNDTY Write Off Trust WOT
System SYS Write Off Trust Disbursements WOTD
System Check SCHK Write Off Unbilled Fees, Disbursements & Sundries
WOUB
Task List TASK Write Offs WO
Tax Types TAXT Year End YEAR
Team TEAM

Administration Workbook
Page 36 © 2012 Reed International Books Australia Pty Ltd trading as LexisNexis
3.12.2 Quick Access Codes by Program Group
Program Code Program Code
Transactions
AutoGen AUTOGEN Matter Journals MTJNL
Cheque Creation CHQC Monitor Import MON
Cheque Requests (List) CHQR Petty Cash Disbursement Journal
PCASH
Cheque Requisitions (Create)
CHQRC Receipt Creation RECC
Cheques CHQ Receipts REC
Creditor Creation CREDC Service Tax Payment STAXP
Creditor Groups CREDG Softlog Import SOFT
Creditor Payment Run CREDPAY Sundry Batch Entry SUNDB
Creditors CRED Sundry Creation SUNDC
Crimson Logic CRIM Sundry Import Errors SUNDIE
Import Investment Interest
INVINT Sundry Interface SUNDI
Institution Creation INSTC Sundry Invoice Interface SUNDINV
Institutions INST Sundry List SUND
Investment Commission Plan
INVCOM Sundry Types SUNDTY
Investment Journals INVJNL Transfer Fees Disbs and Sundries
TFRFDS
Investment Receipt Creation
INVRC Transit Register TRANR
Investment Receipts INVR Trust Journals TRSTJ
Investment Register Types INVRT Write Off Disbursements WOD
Investments INV Write Offs WO
Investment Terms INVT Write Off Trust WOT
Journals JRNL Write Off Trust Disbursements WOTD
Lawpoint Interface LAWP Write Off Unbilled Fees, Disbursements & Sundries
WOUB

Lexis® Affinity Library
© 2012 Reed International Books Australia Pty Ltd trading as LexisNexis Page 37
Program Code Program Code
Case Management
Diary DRY Precedent Categories PRECC
Diary Events DRYE Precedents PREC
Diary Entry DRYENT Procedures PROC
Diary Jurisdictions DRYJ Resource Booking RESB
Diary Locations DRYL Resource Registration RESR
Document Mgt DM Scripts SCPT
Document Mgt Admin DMA Settlement Adjuster SETT
Document Types DOCT Task List TASK
emPower System EPOW WordLink Field Builder WLFB
On-Line Search SRCH Workflow Area WFLOW
Fees & Billing
Auto Billing AB Fee Batch Entry FEEB
Bill Credit Notes BCN Fee Creation FEEC
Bill Credit Note Types BCNT Fee List FEEL
Bill Discount Rate BDR Fee Rate Codes FEERC
Billing Plan BPLAN Fee Revaluation FEEREV
Bill Journal BJRNL Fee Sheet FEES
Bills BILL Fee Templates FEETE
Bill Templates BTEMP Fee Types FEETY
Collection Plans COLL Payment Plan Templates PPLAN
Debtors Letter Templates
DRLET
Financial Maintenance
Accounting Options ACC Foreign Currency Re-val Jnls FCRJ
Bank Deposit Query DEPQ Foreign Currency Trans Jnls FCTJ
Bank Deposits DEP Future Budgets FUTBDGT
Bank EFT EFT General Ledger GL
Bank EFT Query EFTQ Lock Dates for Entities LOCK
Bank Reconciliation BREC Reports REPT
Banks BANK System Check SCHK
Budget and Cost Distn BCD Tax Types TAXT
Cheque Present CHQP Withholding Tax Rates TAXW
Foreign Currencies FC Year End YEAR
Foreign Currency Rates FCEX

Administration Workbook
Page 38 © 2012 Reed International Books Australia Pty Ltd trading as LexisNexis
Program Code Program Code
Database
All Matters Search ALLMT Employees EMP
Archival ARC Employee Transfer Batch EMPTB
Archive Batch ARCB Explorer EXP
Archived Matters ARCM Matter & Client Import Listener
IMPLST
Archive Requests ARCR Matter Party Role MTPR
Archive Retrieval Requisitions
ARCRR Matters MT
Client Business Sources CLBS Matter Team Role MTROL
Client Creation CLC Matter Types MTYP
Client Groups CLG PhoneBook PB
Client Industry Classifications
CLIC PhoneBook Creation PBC
Clients CL PhoneBook Groups PBG
Conflict Checker Audit CCA PhoneBook Relationship Dictionary
PBR
Conflict Checker Maintenance
CCM Safe Custody Item Types SCIT
Conflict Checker System CCS Safe Custody Letter Template SCLT
Conflict of Interest Checker
CCI Safe Custody Relationships SCR
DataForm Collections DFC Safe Custody Search SC
DataForm Fields DFF Team TEAM
DataForms DF Team Registration TEAMR
System Settings
Branches BRNCH Name Labels NAME
Calendar CAL Postcodes POSTC
Calendar Registration CALR Sounds SNDS
Code Rules CODE States STAT
Countries COUNT System SYS
Entities ENT

Lexis® Affinity Library
© 2012 Reed International Books Australia Pty Ltd trading as LexisNexis Page 39
3.13 Full Text Searching
The Search option on the Affinity Desktop allows you to search for a string of text in the database or in the program names.
You can search on one or all of the following options:
The following table details what fields are searched for each option:
PhoneBook Matters / Archived Matters
Name File ID
Search Short Description
Given Name Long Description
Middle Name
Family Name Clients
Long Name Search Name
Short Name
Email DataForms
Email2 Text Value
Email3
Address/PostalAddress/DX/RegisteredAddress Safe Custody
Suburb/PostalSuburb/DXLoc/RegisteredSuburb Item Description
State/PostalState/DXState/RegisteredState
PostCode/PostalPostCode/RegisteredPostCode Programs
Program name
Documents Program description
Name
Description
Contents of documents (if Full Text Search is enabled)

Administration Workbook
Page 40 © 2012 Reed International Books Australia Pty Ltd trading as LexisNexis
Notes

Lexis® Affinity Library
© 2012 Reed International Books Australia Pty Ltd trading as LexisNexis Page 41
4. Toolbars and Keyboard Shortcuts
A number of Toolbar options are standard across the system. Some of these are shown below and are referred to throughout this workbook. Keyboard Shortcuts are also provided for some of the most common functions.
F4 New Creates a new entry, such as a new PhoneBook record or a Cheque,
F2 Edit Allows you to edit the record currently displayed.
F7 Reverse Allows you to reverse the selected entry.
F8 Delete Allows you to deletes the selected entry.
Create a Merge File for Word Processing Links to Microsoft Word to create or edit a document based on a selected document or precedent. If WordPerfect is used then the WordPerfect icon appears where links to word processing is enabled.
F3 Search Displays a list of records from which a particular record can be selected.
F10 Snapshot Creates a Snapshot for a particular Client, Matter, Report etc on the Desktop.
Ctrl+P Print Print a report, the current record or a list. Most reports will be displayed on the screen first and can then be printed or saved to a file.
F5 Refresh Immediately refreshes the data on the screen.
F12 Clear Clears the filter and refreshes the screen.
Administration Workbook
Page 42 © 2012 Reed International Books Australia Pty Ltd trading as LexisNexis
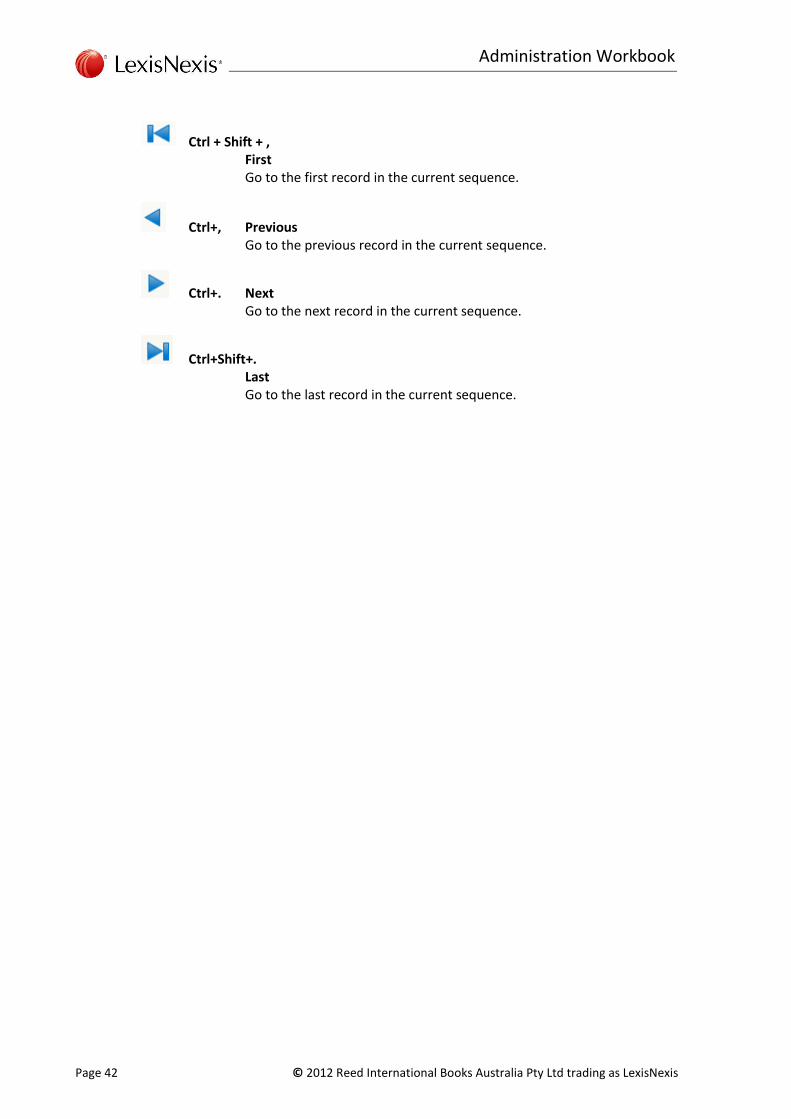
Ctrl + Shift + , First Go to the first record in the current sequence.
Ctrl+, Previous Go to the previous record in the current sequence.
Ctrl+. Next Go to the next record in the current sequence.
Ctrl+Shift+. Last Go to the last record in the current sequence.

Lexis® Affinity Library
© 2012 Reed International Books Australia Pty Ltd trading as LexisNexis Page 43
5. QuickCodes
QuickCodes enable the user to enter text in to Lexis Affinity Library with minimal effort. For example, one of the most common reasons for issuing a Trust Receipt is “On account of costs & disbursements”. Rather than type this description every time, Lexis Affinity Library QuickCodes allows the text to be entered once and used many times over. This not only saves typing but also standardises the way text is typed.
Once a QuickCode has been created it can be used in most Lexis Affinity Library applications – for example when creating cheques, receipts, fees, journals etc. More than one QuickCode can be used to insert the detailed description for an entry if multiple lines are required.
5.1 Create a QuickCode
Hands On
In this exercise you will create a new QuickCode. The example given is that of SM (Settlement Money), however you may choose to create your name using your initials as the Code.
1. Open QuickCodes (Utilities | QuickCodes)
2. Click on to create a new code. The screen is displayed below:
3. Code SM
A QuickCode can have a maximum of 5 characters.
4. Expands To Settlement Money
5. Click on to update.

Administration Workbook
Page 44 © 2012 Reed International Books Australia Pty Ltd trading as LexisNexis
QuickCode Field Descriptions
Code the code that is typed to insert the text. This is a maximum of five characters.
Expands To This is the description that Lexis Affinity Library will insert when the code is entered into a field. 240 characters
5.2 Print QuickCodes
You can print the QuickCodes for ease of reference.
Hands on
In this exercise you will print the QuickCodes.
1. Click on to see the list of QuickCodes.
A sample list of QuickCodes is shown below:
2. Close the Print Preview
3. Close QuickCodes
5.2.1 Using QuickCodes
To use QuickCodes throughout Lexis Affinity Library type the Code, preceded by a backward slash and followed by a space, for example, \dnr∆ to insert “Department of Natural Resources”.
Look Up List for QuickCodes
QuickCodes can be displayed on the screen (where QuickCodes are available) by typing \?.

Lexis® Affinity Library
© 2012 Reed International Books Australia Pty Ltd trading as LexisNexis Page 45
6. Entities
The Entities option allows you to record information relating to the separate entities that exist on your system. For example, the Partnership files and the Service Company files. Some firms may have other entities – such as old partnerships that are being wound down.
Prior to or during the installation your LexisNexis Accounts Consultant will enter many of these details. Generally, the decisions in this area have been made during the specialisation phase of your installation in conjunction with your LexisNexis Accounts Consultant and your senior accounting staff and should not be changed without extensive consultation with that person and your LexisNexis Consultant.
Procedure
1. Open Entities (System Settings | Setup)
The following screen displays:

Administration Workbook
Page 46 © 2012 Reed International Books Australia Pty Ltd trading as LexisNexis
Firm Information
Code The Code assigned to the Entity. Maximum 4 characters.
Started The date and time the Entity was created.
Name This confirms that you are displaying the correct entity. Multiple entities can be set up to cater for other companies including service companies.
A.C.N. Your firm’s registered A.C.N.
A.B.N. Your firm’s registered A.B.N.
If your Entity is located in New Zealand, ACN and ABN are replaced with: Company # Your firm’s Company Number.
GST # Your firm’s GST number.
Default Bank When drawing cheques and receipts this will be the Bank Account that is automatically selected and displayed on the screen. You should set this to be the account used most often by your firm.
Last Bill This sets and records the last Bill number. To assist with identification it is recommended that you include a “B” prefix in the bill number reference.
Last Credit Note This sets and records the last credit note number. To assist with identification it is recommended that you include a “CN” prefix in this reference.
Last Write Off This sets and records the last Write off number. To assist with identification it is recommended that you include a “W” prefix in this reference to indicate a Write off entry.
Last Interest This is the number of the last Interest Journal that was processed. This is not applicable in Combined Ledger Systems.
Fin Year End Once the Year End process is run, this date is automatically updated. This date displays the Entity’s current End of Financial Year Date (ie the period in which current transactions are being posted).
Cash or Accrued Profit This indicates if the Entity reports their “Profit” on an Accrued or Cash basis. You cannot change this setting.

Lexis® Affinity Library
© 2012 Reed International Books Australia Pty Ltd trading as LexisNexis Page 47
Entity in Takeup For a new installation where financials have not been converted, this flag will be set to “Yes” while PhoneBook, Client, Matter and General Ledger information is being entered, or taken up. Upon completion of take-up, when your reports and system balance back to your previous system, you will be taken out of take-up to commence processing live transactions.
Entity Type This is recorded at the time of creating the Entity.
Options are: General Matter and General Ledger Transactions Company General Ledger Transactions only.
WP Directory Records the directory where the templates are kept. (For example Bills & Matter Label formats.)
Next Notice # This has been used for Pre LPA Controlled Money accounts. If registering this type of Controlled Money accounts and sending Notices, enter the number of the last advice. If using LPA Controlled Money accounts, this is an optional field.
This is not applicable in Combined Ledger Systems.
Billing and Collection Defaults
“Collection Plan” tab Override Matter Type Collection Plan with If this is ticked, the Collection Plan selected here will override any Collection Plan that has been attached to a Matter Type.
“Billing Plan” tab Billing Plan This is the default Billing Plan that will be set on all new matters. Each matter can be altered when created. Billing Trigger If the default Billing Plan is based on Values, then this field must be completed with the trigger value.
“Sundry / Discounts” tab Apply Sundry at Time of Billing This is the default Sundry Type to be applied to all Bills. This default setting will then flow through to existing and new Clients and to existing and new Matters. The default can be overridden at the Client Matter or Bill level. If most bills will have the same Sundry added, this should be recorded here. Otherwise you can select it at the time of Billing.

Administration Workbook
Page 48 © 2012 Reed International Books Australia Pty Ltd trading as LexisNexis
Apply Discount Rate to WIP at Time of Billing This is the default Bill Discount Rate to be applied to all Bills. This default setting will then flow through to existing and new Clients and to existing and new Matters. The default can be overridden at the Client Matter or Bill level. If most bills will have the same Discount rate applied, this should be recorded here. Otherwise you can select it at the time of Billing.
If Foreign Currency is enabled:
Enable printing of Bills in alternate currency If ticked, a separate icon displays for merging a Bill to a precedent that is suitable for billing in a Foreign Currency.
Enable printing of Tax in alternate currency If ticked, Tax reports can be printed in an alternate currency.
If Foreign Currency is not enabled, leave these options unticked.
Allocate Tax separately when Receipting Bills? If ticked, when a partial receipt is processed, a screen will display allowing you to allocate the amount between net and tax amounts. This applies to receipts, trust to office transfers, bill payment journals and adjustments. Generally, this option would not be enabled, however this option is relevant to Malaysian service tax sites.
Tax Rules for Entity No user input is required here. Four options are available: Goods and Services Tax (Tax on Bills and Purchases) Business / Sales Tax (Tax inclusive on Bills only) No Tax on Bills or Purchases Malaysian Service Tax. The setting appropriate to the Country of the Entity is selected when the dataset is created. Additional Entities for the same Country will have the same settings.
If Combined Ledger System is enabled:
Combined Ledger No user input is required here. This setting indicates that the Entity is operating as a Combined Ledger System.

Lexis® Affinity Library
© 2012 Reed International Books Australia Pty Ltd trading as LexisNexis Page 49
Include Tax on Sundry Tax Journal If ticked – the Tax component for a Sundry will be taken from the matter’s T balance when the Sundry is charged to the matter. This does not include “Anticipated Sundries” processed at the time of billing. If unticked – the Tax component for a Sundry will NOT be taken from the matter’s balance when the Sundry is charged to the matter.
Trust loan sweep facility This setting determines when the Firm will advance funds to a matter that is overdrawn. Select from:
Not Used – no advances are made when the matter is overdrawn.
Matter – If the matter is overdrawn, funds will be advanced from the Firm Float even though the client has funds on other matters.
Client – If the matter is overdrawn, funds will be advanced from the Firm Float only if there are no trust funds available on other client’s matters.
GST Report Summary for Select the required format for the Summary Page of the Tax (GST) Report.

Administration Workbook
Page 50 © 2012 Reed International Books Australia Pty Ltd trading as LexisNexis
Entities Ribbon
New Create a new Entity - this would usually be done with assistance from your LexisNexis Accounts Consultant.
Colour Set or change the colour of the selected Entity. This colour is displayed when posting Petty Cash, General Journals and Accounts Payable invoices. (Colours relating to cheques and receipts are set through Banks).
First Go to the first Entity in the sequence.
Previous Go to the previous Entity in the sequence.
Next Go to the next Entity in the sequence.
Last Go to the last Entity in the sequence.
Edit Code Rules Opens the Edit Code Rules dialog box.
Print Print an Entity summary report to screen, listing details of all registered Entities.
Refresh Refreshes the data displayed on the screen.

Lexis® Affinity Library
© 2012 Reed International Books Australia Pty Ltd trading as LexisNexis Page 51
6.1 Ledgers for Automatic Posting
The right-hand side of the “Entities” dialog box nominates accounts for automatic postings.
The examples provided here are to be used as a guide only. These settings should be decided in consultation with your LexisNexis Accounts Consultant and your senior accounting staff, including external accountants where applicable. You should not change these codes without first contacting your LexisNexis Consultant or the Helpline for assistance.
The tabs available are; - Creation, Billing, Receipting, Write Offs, Other and Legacy.
Each tab is explained on the following pages.

Administration Workbook
Page 52 © 2012 Reed International Books Australia Pty Ltd trading as LexisNexis
6.1.1 “Creation” Tab
This section allows you to record the GL Account numbers that will be used to record the debit and credit postings when certain types of entries are processed. Note that postings to these control accounts always exclude the Tax component.
Fee Fees are unbilled time entries. If the value of unbilled Fee entries is to be included in the General Ledger Accounts, when time is recorded, you will need to nominate a debit and credit account here. The debit entry could be to an Asset Account (such as WIP) and the credit to an Income Account (such as Unbilled WIP). If you do not want to include the value of unbilled Fee entries at this stage, leave these fields blank.
Sundry Expenses Sundry Expenses include non-cash disbursements such as Photocopying, Facsimiles etc. If you want the value of Unbilled Sundry Expenses to be included in the General Ledger Accounts, when the entry is recorded, you will need to nominate debit and credit accounts here. If you do not want to include the value of Sundry Expenses at this stage, leave these fields blank.
Disbursements Disbursements are payments made for matters by Office Cheque. The debit entry would usually be to an Asset Account (such as Disbursement Control Account). The credit entry would be to the Bank Account. This cannot be altered.
Anticipated Disbursements Anticipated Disbursements are Cheque Requisitions that are processed on a matter, where the Anticipated Disbursement flag is ticked. Most firms would include the value of Anticipated Disbursements in the General Ledger Accounts. The debit would be posted to an Asset Account (such as Anticipated Disbursements Control Account) and the credit would be posted to a Liability Account (such as Creditors).
Agent’s Disbursements Agents Disbursements are invoices where the client will claim the input tax. Most firms would include the value of Agents Disbursements in the General Ledger Accounts. The debit would be posted to an Asset Account (such as Agents Disbursements and the credit would be posted to a Liability Account (such as Creditors – Agents Disbursements).

Lexis® Affinity Library
© 2012 Reed International Books Australia Pty Ltd trading as LexisNexis Page 53
If Combined Ledger System is enabled:
The Combined Ledger System recognises Disbursements, Anticipated Disbursements and Agents Disbursements differently to the non Combined Ledger System. The following is recommended:
Disbursements The Debit Chart must be the same as the Disbursement Debit Chart recorded on the “Trust” tab.
Anticipated Disbursements / Agent Disbursements The debit entry would be an Asset Account (Unbilled Anticipated Disbursements). The credit entry would be a Liability Account (Anticipated Disbursements)

Administration Workbook
Page 54 © 2012 Reed International Books Australia Pty Ltd trading as LexisNexis
6.1.2 “Billing” Tab
This section allows you to record the GL Account numbers that will be used to record the debit and credit postings when certain types of entries are billed. Generally the debit of a Billing entry would be posted to a Debtors Control Account. You may choose to have separate accounts for each type of Debtor (the Balance Sheet can be printed with only the total of all Debtors Accounts). This also applies to Income Accounts – you can choose to have separate Income Accounts for each type of Fee shown on this tab – for example – Write Ups and Discounts.
Fee The debit entry would normally be posted to an Asset account (such as Debtors Control) and the credit entry to an Income Account (such as Fees Billed). If accounts are nominated for debit and credit postings on the Creation tab, the program will automatically credit and debit those accounts to negate the ‘creation’ postings.
Fee – Over Recovery The debit entry would normally be posted to the Debtors Control Account and the credit entry would be to an Income Account. If you prefer you may create a separate Income Account for Write Ups and nominate that account here, otherwise use the same Income Account as for Fees.
Fee Discount A Fee Discount is a reduction in Fees and therefore the debits and credits are reversed. The debit entry would normally be posted to an Income Account and the credit entry would be to the Debtors Control Account. If you prefer you may create a separate income account for Fee Discounts and nominate that account here, otherwise use the same Income Account as for Fees.
Sundry Expense The debit entry would normally be posted to an Asset account (such as Debtors Control) and the credit entry to an Income Account (such as Sundries Billed). If accounts are nominated for debit and credit postings on the Creation tab, the program will automatically credit and debit those accounts to negate the ‘creation’ postings.
Disbursement The debit entry would normally be posted to an asset account (such as Debtors Control Account) and the credit entry would be to the account that was nominated on the “Creation” tab.
Anticipated Disbursements The debit entry would normally be posted to an asset account (such as Debtors Control Account) and the credit entry would be to the account nominated for the debit postings on the “Creation” tab.

Lexis® Affinity Library
© 2012 Reed International Books Australia Pty Ltd trading as LexisNexis Page 55
6.1.3 “Receipting” tab
This section allows you to record the GL Account numbers that will be used to record the debit and credit postings when certain types of entries are receipted. The debit postings will be to the Cash at Bank Account and cannot be changed. The credit entries will be to the Control Accounts that were nominated on the “Billing” tab.
6.1.4 “Write Off” tab
This section allows you to record the GL Account numbers that will be used to record the debit and credit postings when certain types of entries are written off. The debit entries would normally be to Expense Accounts – you may choose to have one write off account for all write offs, or individual accounts. The credit entries would be to the Control Accounts setup in the Creation or Billing tab.
If Combined Ledger System is enabled Disbursement – Unbilled control account Debit will record Trust disbursement written off – Debit would be expense and the credit would be the control account setup in the Creation tab The Debit control account for Disbursement billed and Anticipated billed need to be exactly the same and the Credit for both need to be the same accounts that were setup on the Billing tab (Debtor Control account). Overdrawn Trust Balances can be written off in a CLS dataset and the write off account must also be recorded.
6.1.5 “Other” tab
This tab allows you to record the GL Account numbers to be used for miscellaneous items.
Creditor Control This GL Account is the total of all the Creditors Accounts.
Profit Appropriation This GL Account will be used by the program at the end of the financial year to receive the net profit or loss for the year.
Output Tax This GL Account will be used to record the Tax component of sales.
Input Tax This GL Account will be used to record the Tax component of purchases.
Withholding Tax This GL Account will be used to record the Tax that is withheld from payments made (when the Tax Rate of WHOLD is used). Note this is NOT for any amount deducted for Withholding tax on Investments.

Administration Workbook
Page 56 © 2012 Reed International Books Australia Pty Ltd trading as LexisNexis
Ant. Disbs Input Tax Holding This GL Account will be used to record the GST on Anticipated Disbursement entries processed where the “Invoice Received” flag has not been ticked. (Also refer to the setting in System | Posting. If “Always post Ant Disb Tax to Holding Account” s ticked, this setting is ignored.)
If Combined Ledger System is enabled: This is not required.
Trust to Office Transfer This GL Account will be used as a holding account for Trust to Office transfers that are processed by journal.
If Combined Ledger System is enabled: This is generally referred to as the FirmFloat Account.
TrToOff Tfr Loan Account This account will be used for recording Trust to Office transfer amounts, where branches have different Bank Accounts.
6.1.6 “Legacy” tab
Take-up Imbalance This GL Account will be used to hold any imbalances that exist in the accounting system that you used prior to Lexis Affinity Library. It will also be used to hold any take-up transactions that are reversed when the system is no longer in take-up mode.
In / Out Transfer Disbursement Account This account is used to record where Disbursements are transferred from one matter to another with different branch and / or department.
6.1.7 “Trust” tab
This tab records the special Trust Accounts that are used in a Combined Ledger System. Note that postings to these control accounts will be tax inclusive if the setting "Include Tax on Sundry Trust Journal?" is ticked.
Disbursement The debit entry would normally be posted to an asset account, and the credit to a liability account. The Debit control figure is made up of Unbilled Trust Disbursements. The Credit control figure is made up of Unbilled Trust Disbursements.

Lexis® Affinity Library
© 2012 Reed International Books Australia Pty Ltd trading as LexisNexis Page 57
Trust Sundry The debit entry is to the Firm Float Control Account (Trust to Office Transfer account). The credit entry would normally be posted to a liability account (Unbilled Sundries). This control figure is the total of sundries taken from trust, which are yet to be billed.
Billing The debit entry is to the Firm Float Control Account (Trust to Office Transfer Account). The credit entry would normally be posted to a liability account. This control figure is the total of bills outstanding (excluding Billed Anticipateds). Any Debtor Adjustments (additional amount requested) will also be included in this control account.
Billing Debtors Adjustment The debit entry is sub account of the Debtors Control (Asset) This control account records all “Debt Adjustments “ (Amount Requested).
6.1.8 Code Rules
You can also access Code Rules from Entities by clicking on .
Code rules allows you to set the rules for determining codes for PhoneBook entries, Clients, Matters, Creditors and Safe Custody Packet and Item Numbers.
Refer to the Chapter on Code Rules for information on this.

Administration Workbook
Page 58 © 2012 Reed International Books Australia Pty Ltd trading as LexisNexis
Notes

Lexis® Affinity Library
© 2012 Reed International Books Australia Pty Ltd trading as LexisNexis Page 59
7. System
This section controls the System Variables for the firm as a whole. Some of these variables are ‘global’ (ie they apply to each user, unless that variable is altered in Options).
Many of these details will be entered by your Lexis Affinity Consultant (Accounts and Workflow) prior to or during the installation phase. Some of the decisions will have already been made by your Lexis Affinity Library Administrator.
Hands on
1. Open System (System Settings | Setup)
The screen is displayed below:

Administration Workbook
Page 60 © 2012 Reed International Books Australia Pty Ltd trading as LexisNexis
7.1 “General” tab
This tab records the particulars of your firm.
Company The name displayed is the name of the entity that the software is licensed to.
Address The address of your firm.
Minutes per Unit This specifies the number of minutes per unit to be used when entering time or recording Fees. For example, you may choose to enter time as 6 minutes per unit, therefore 10 units = one hour (60 minutes).
Word Processor Nominate the word processing system used by your firm. This determines the WP icon that will display in the Toolbars and ensures Lexis Affinity Library automatically launches the correct word processing application. Lexis Affinity Library supports Microsoft Word 97 and above and also WordPerfect 8.
Draft Bill Reference The text entered here will appear on draft bills and is used to easily identify Draft Bills from Final / Dispatched Bills in the Bill Lists.
Calendar This is the calendar that applies to the firm as a whole. Additional Calendars may be created and used for different Authors and Bank Accounts.
Stacked (MultiLine) Tabs Tick this to have the tabs on the Phone Book, Clients, Matters and Archived Matters screens stacked (or visible) on 2 or more lines.
Is this a Multi-State Practice? Tick this if your practice operates in more than one state of Australia.
Default Employees print security to full If ticked, a new Employee will have this flag this ticked by default. This setting controls the Employee’s ability to print or merge a complete list of PhoneBook entries, Clients, Matters or Archived Matters
Use Microsoft Format for DataForm Field Format LexisNexis recommends that this field is ticked, therefore using the Windows standard (ie Microsoft) formatting for DataForm fields.

Lexis® Affinity Library
© 2012 Reed International Books Australia Pty Ltd trading as LexisNexis Page 61
Registry Password Access If the password in the Affinity.ini file is encrypted and third party applications need to access that password, this setting must be ticked. If the Affinity.ini password is not encrypted, this setting should be left unticked.
Database Notice The text entered here will display on the main Lexis Affinity Library screen. If you have more than one dataset, (for example a live set of files and a training set of files) it can be useful to name each Database, to ensure each user can distinguish between the two sets.
Licences Each firm is issued with a Licence for a specified number of concurrent users. Refer to the separate chapter on “Licences” for more information on this topic.
Speller Select this icon to set up Spell Check for the firm. You can set options such as “Ignore words in UPPERCASE” and select the Dictionaries to be used.
Customise Help Details Select this icon to display or hide Help information on the desktop. Select Enabled to display information and CUSTOM to record your own details.
The options show as displayed below:
The following screen will show where each line of information is displayed.
Automatic Select this to use the default Helpline information.

Administration Workbook
Page 62 © 2012 Reed International Books Australia Pty Ltd trading as LexisNexis
Custom Select this record your personalized details.
Australia Select this to automatically insert the Helpline details for Australia.
New Zealand Select this to automatically inert the Helpline details for NZ.
Time Recording Reminders Minimum Hours / Units per day This is the default minimum number of hours or units that time recording staff members should record each day. The minimum should be either hours or units for the whole firm. Grace Days This is the default number of days that you allow the staff to get their time entries submitted. Remind for past days This is the default number of days the system should review to locate missing time entries. NOTE: The Time Recording Reminders are defaults and can be set individually for each Employee (in Employee). They are used to generate the Time Recording Reminders (from Reports).

Lexis® Affinity Library
© 2012 Reed International Books Australia Pty Ltd trading as LexisNexis Page 63
7.2 Licences
In order to use Lexis Affinity Library, a license file (certificate) must exist on the firm’s Lexis Affinity server. The certificate shows how many users the firm is licensed for as well as the expiry date of the license. The certificate can be either perpetual or an annual license.
For each user that logs into the system, the certificate expiry is checked and will display the following messages if the following scenarios are encountered.
Certificate About to Expire
Certificate Expired
7.2.1 Programs Available When Certificate Expires
If the licence has expired, the following options are still available:(subject to the Employee Security Settings):
Transactions | AutoGen
Financial Maintenance | Bank Reconciliation
Financial Maintenance | Foreign Currency Translation Journals
Financial Maintenance | Foreign Currency Re-valuation Journals
Financial Maintenance | Reports
Financial Maintenance | Year End
Database | Clients
Database | Employees
Database | Matters
Database | Phonebook
System Settings | System

Administration Workbook
Page 64 © 2012 Reed International Books Australia Pty Ltd trading as LexisNexis
7.2.2 Requesting a New Certificate
A new certificate can be requested by following the steps below.
Procedure
1. Open Lexis Affinity
2. Open System (System Settings)
3. Select the “General” tab and click on [Licences]
The following screen displays:
4. Click on [Email]
A new email message will be created with the email recipient address, subject, and email body auto-populated.
Review the email and add additional information as required.
5. Send the email
The email will be sent to the LexisNexis Helpline Team for processing.

Lexis® Affinity Library
© 2012 Reed International Books Australia Pty Ltd trading as LexisNexis Page 65
7.2.3 Updating the System with New Certificate
When you receive the new certificate, save the Certificate file follow the instructions below to update your dataset.
Procedure
1. Open System (System Settings)
2. Select the “General” tab and click on [Licences]
3. Click on [+ Add…]
4. Locate the <Firm Code>_AFFINITY_master.pem file provided with your upgrade DVD.
5. Click [Open].
A message will display advising that a master certificate already exists.
6. Click on [Yes] to proceed.
7. Verify that the Expiry Date has changed.
For annual license certificates, the expiry will be the last day of the current month in 12 months time. For perpetual certificates, this will be 31/12/2099.
8. Click on [Close]
9. Close Lexis Affinity.
10. Re open Lexis Affinity
11. Verify that the certificate expiration message does not appear anymore.

Administration Workbook
Page 66 © 2012 Reed International Books Australia Pty Ltd trading as LexisNexis
7.3 “Archiving” tab
This option allows you to select the required treatment for Archived Matters and Retrieval Requests and to nominate which system defaults, if any, you would like disabled.
Archive Matter Disable auto set “Off Site Date” field, if location is set to “off site” if this option is left unchecked, when an Archived file location is changed to “Off Site” the “Stored off site” date will be automatically updated with the current system date.
Disable auto set Archive status, if Archive Request is deleted if this option is left unchecked, when an Archive request has been made and subsequently deleted the file Status returns to “Stored”.
Disable auto set Archive status, if a Location is changed if this option is left unchecked, when the location of an Archived Matter is changed the status is also changed accordingly. For example, if the Location is “Destroyed” the status is also “Destroyed”, if the Location is “Office” the status is “Completed”, if the Location is “Missing” the status is also “Missing”.
Disable auto set Archive status, if Archive Request is exists if this option is left unchecked, when an Archive request is made file status changes to “Requested”.

Lexis® Affinity Library
© 2012 Reed International Books Australia Pty Ltd trading as LexisNexis Page 67
After Archiving a Matter Default Archive Status (New) When a matter is first archived, Lexis Affinity Library will assign a status. You can select a default prompt for this field. Select from:
No Status set Stored
Completed Ready for Destruction
Requested Destroyed
Dispatched Missing
Returned
Default Archive Status (Return) This applies when you reopen a matter (ie unarchive it) and then archive it again. The usual default is Returned. Select from:
No Status set Stored
Completed Ready for Destruction
Requested Destroyed
Dispatched Missing
Returned
Default Archive Location When a matter is archived Lexis Affinity Library will store a location of the file. You can select a default location for this field. Select from:
Location not set Off site Storage
Office Destroyed
Compactus Missing
Ad month for Review date Enter the number of months to be added to the Completion Date to calculate the Review Date.
Ad month for Destruction date Enter the number of months to be added to the Completion Date to calculate the Destruction Date.
To Close and Archive a Matter Allow Archival of unclosed Matters If ticked, you will be able to archive matters that have zero accounting balances and have not been flagged as “Completed”. It is recommended that this option is unticked.

Administration Workbook
Page 68 © 2012 Reed International Books Australia Pty Ltd trading as LexisNexis
Disallow matter closure if outstanding accounting If ticked, only matters with zero balances can be completed. It is recommended that this option is ticked.
Warn on no fees allocated when closing matters If ticked, Lexis Affinity Library will warn if a matter is being completed where no fees have been billed.
Allow matter closure and archival with unpresented cheques If ticked, Lexis Affinity Library will allow matters with unpresented cheques to be completed.
NOTE: Completed matters retain full transaction history and can be reopened at any time.
Safe Custody – Test for Safe Custody Packet Items Tick this to give a warning if Safe Custody Packet Items exist when completing a matter.
Print on Matter Closure Tick the items you want Lexis Affinity to automatically print when closing a matter.
7.4 “Backup” tab
Logical Backup Export Folder If ticked, the system will check that a dump file has been generated within the last seven days.
Folder Location Use [Find] to locate the backup folder. This folder is usually at the same level as the Affinity folder – for example if Affinity is installed at Y: (ie Y:\Affinity), the backup folder is usually at Y:\AffinityExport.
Clear Backup Failure Error Messages Use this to clear the message that advises that the latest backup was not successful.
Clear Date Test Error Message Use this to clear the message that advises that no backup has been made in the last seven days.

Lexis® Affinity Library
© 2012 Reed International Books Australia Pty Ltd trading as LexisNexis Page 69
7.5 “Diary” tab
This tab allows you to set the parameters for linking Lexis Affinity Library Diary and Microsoft Outlook or GroupWise. Note that this is a one way integration and only entries made in the Lexis Affinity Library Diary will be updated into Outlook or GroupWise. Entries made directly in Outlook or GroupWise will NOT update the users Lexis Affinity Library Diary.
In addition to the options available in “Diary”, it is also possible to enable Exchange Integration. When this is enabled, the Outlook options on this screen become disabled.
You can also create various Diary Groups and Diary Filters.
The screen below is displayed:
You can select from the following options:
Outlook or GroupWise Link Select the appropriate integration.
Keep User Settings This allows each Employee to choose to link their Diary to Outlook by setting their individual preferences in “Options | Diary”.
Unlink All Users’ Diaries from Outlook This will not integrate the Lexis Affinity Library Diary entries with Outlook.
Link All Users Diaries to Outlook Each user’s diary will be integrated with Outlook. If this option is chosen you can then set the Refresh Time and the number of days backward and forward that Lexis Affinity Library entries will be inserted into Outlook.
Disabled if Exchange Integration is enables
Disabled if Exchange Integration is enables
Disabled if Exchange Integration is enabled

Administration Workbook
Page 70 © 2012 Reed International Books Australia Pty Ltd trading as LexisNexis
Alert Priority The Alert priority field determines how diary alerts (reminders) will be handled. There are three options: Outlook This is the default option. The alert (reminder) setting for a diary appointment will be transferred to the appointment in Outlook on creation of the appointment. When the alert is acted upon by the user (eg. dismiss, snooze), the status selected will remain on the Outlook appointment. When Lexis Affinity synchronises the Diary with the Outlook Calendar, the alert status will not be updated in Outlook. The only time the alert status will be updated is if the appointment date and/or time changes on the appointment in Lexis Affinity. No Alerts in Outlook The alert flag will not transfer over to the appointment in the Outlook Calendar. This means the user will be relying on Lexis Affinity to provide reminders for appointments that originated in the Lexis Affinity diary. Affinity The alert flag on appointments in the Lexis Affinity diary will always update the appointment in the Outlook Calendar. The result of this may be that if an alert is acted upon by the user in Outlook (eg. dismiss), the alert may return after synchronisation between the two diaries has taken place.
Maintenance Diary Group Maintenance
You can create Groups for use within Diary. Examples of Groups could be;
the Administration Staff (based on Employee Type),
the Litigation Department (based on Department)
or a combination of these – ie the Administration staff in Litigation.
You can also have groups of various Employees by individually selecting each Employee.
Diary Groups can be Public – ie available to all users, or Private – ie only available to the logged in User who created it. Diary Groups can also be created within the Diary function.
Diary Filter Maintenance You can create Filters for use within Diary. Examples of Filters could be Meetings scheduled in “our Offie” Diary Filters can be Public – ie available to all users, or Private – ie only available to the logged in User who created it.
Diary Filters can also be created within the Diary function.
NOTE: Further information about Diary Filters is contained in the Diary Setup chapter.

Lexis® Affinity Library
© 2012 Reed International Books Australia Pty Ltd trading as LexisNexis Page 71
7.6 “Documents” tab
7.6.1 Affinity
This tab is used for setting up the paths, display and save behaviour of Precedents, Bills and other files that are registered in Lexis Affinity.
Base Folders Enter the Base Folder for each option. This means that the location of the folder only needs to be recorded in one place and if this location is altered, only one change for each type of template is required.
Auto-save Document Type The Auto-save feature is used with Lexis Affinity Document Management. It causes certain documents to be saved to the Affinity database automatically, without the need for user intervention (ie. the Save As dialog box will not display). This can only occur if data is available for all mandatory save fields. The checkboxes are used to flag which types of documents are to use the auto-save feature. If you are using E-Billing and Affinity Document Management, you must select this option for Bills. If you are using E-Collection and Affinity Document Management, you must select this option for Debtors Letters.

Administration Workbook
Page 72 © 2012 Reed International Books Australia Pty Ltd trading as LexisNexis
Top Level Precedent Category will show all items in Sub Categories If this option is ticked, when a parent Precedent Category is selected (at say, the matter level) it will display all precedents in all Sub Categories. If you do not select this item, you will only see precedents listed when you select the Sub Category that they belong to.
Remember Precedent Categories If selected, the system will remember the previous state of the Precedent Explorer as to whether the categories were expanded or collapsed when the user reopens Precedent Explorer.
7.6.2 Document Management
This tab is used for setting up parameters relating to Lexis Affinity Document Management.
Saving DM information in Affinity Don’t save at time of document generation
This is a legacy option and should always remain ticked.

Lexis® Affinity Library
© 2012 Reed International Books Australia Pty Ltd trading as LexisNexis Page 73
Use the Document Management folder structure when adding new documents
Select this option to allow users to move or copy files to the Document Management folder structure when they are adding files from the Documents tab on various windows in Lexis Affinity. When this options is activated, radio buttons for move, copy or neither will become available on the Add Document dialog box.
Use Sent / Received Date as created date when saving Emails Select this option to use the sent date (for sent emails) and the received date (for received emails) as the created date in the Document Management table.
If this option is not selected, the created date for email items will be the date the email message was saved to the database.
Append Email Descr to end of file name when attaching documents to emails
When files are attached to emails sent from within Lexis Affinity, the Email Description field is used as the file name. Select the "Append Email Descr…." option to append the Email Description field to the original file name when emailing files from Lexis Affinity.
(Note that if the Email Description field is blank, Lexis Affinity will use the original name alone when attaching the file to an email.)

Administration Workbook
Page 74 © 2012 Reed International Books Australia Pty Ltd trading as LexisNexis
Compulsory Fields This allows you to set which fields are mandatory when completing the Save Document dialog box. Select from: Matter PhoneBook/Client Author Operator Description
File Storage Options These options control where files saved through the Lexis Document Toolbar and Lexis Email Toolbar will be saved. Note that in previous versions of Lexis Affinity, these settings were controlled by the Lexis Document Toolbar (in MS Word).
Details entered here will take priority over settings in the Lexis Document Toolbar. If documents are being added to the Affinity database from an external source, via the Affinity API, these fields must be completed.
Directory Storage Structure determines the folders structure that will be used when files are saved using the Lexis Document Toolbar and Lexis Email Toolbar.
File Location is the base folder location for creation of the folders and files.
This information is stored in the Current User area of the Windows registry. When a user opens Lexis Affinity, the relevant registry keys will be updated with the information stored in these two fields.

Lexis® Affinity Library
© 2012 Reed International Books Australia Pty Ltd trading as LexisNexis Page 75
7.6.3 Product Integration
This tab allows you to activate integration between Lexis Affinity and other products. This includes setting up integration with Lexis Settlement Adjuster, Lexis Information Manager and other external document management systems.
For information regarding integration with external document management systems including Redmap, Worldox, Information Manager, iManage, CaseFlow, WorkSite and IdealDocs, please speak to your Lexis Workflow Consultant.
PDF Integration Enable Native MS Office PDF Support Users of MS Office 2007 and 2010 may select this checkbox to use the Microsoft PDF plug-in with Lexis Affinity. Once activated, PDF functionality within Lexis Affinity will use this plug-in rather than PDFCreator. The Lexis Document Toolbar also has a Native PDF setting which must be activated in order to use the PDF plug-in when saving via the ribbon in Word. Please refer to the Document Management Administration Reference in Help for further details. Note that this feature is an add-on for MS Office 2007 which can be downloaded from Microsoft's website.

Administration Workbook
Page 76 © 2012 Reed International Books Australia Pty Ltd trading as LexisNexis
Field Protection Enable Client Code If ticked, users cannot change the Client Code on the Client Edit screen. (Note that this can be unticked for an Employee Type in Security Options – Document | Override Client Code.)
Lexis Settlement Adjuster
Follows these steps to integrate with Lexis Settlement Adjuster 2.7.2.
1. Ensure you have the correct version of Settlement Adjuster installed. For Lexis Affinity 4.0 you must be using Settlement Adjuster 2.7.2.
2. Open Lexis Settlement Adjuster and turn on integration with Lexis Affinity Library Conveyancing, and Lexis Affinity Document Management (if applicable) and emPower (if applicable). Go to Tools, Options, Integration:

Lexis® Affinity Library
© 2012 Reed International Books Australia Pty Ltd trading as LexisNexis Page 77
3. In Lexis Affinity Library, activate the integration under System |Documents | Product Integration. Integrate with Settlement Adjuster Tick this checkbox.
4. Click on the button.
The Settlement Adjuster Field Mapping dialog box will display. When you open this dialog, the fields will be blank. The sample shown below is after mapping the fields.
This dialog box is used to map the fields between Lexis Affinity and Lexis Settlement Adjuster. You can map fields from the standard Lexis Affinity Library database tables (eg. PhoneBook, Client, Matter) and also DataForm Fields and matter party details.
As Settlement Adjuster supports three different jurisdictions, there is a tab to set up the integration for each jurisdiction.
NOTE: This step is not required if you are directly mapping emPower fields to Settlement Adjuster.

Administration Workbook
Page 78 © 2012 Reed International Books Australia Pty Ltd trading as LexisNexis
5. Select the Setup tab to enter the path to the Settlement Adjuster program file.
The first field is the path that Affinity expects to find Settlement Adjuster installed in. If it has been moved, or is on a network path, or simply cannot be located by Lexis Affinity, you can manually insert the path to adjuster.exe in the Always use this location: field.
6. Click [OK] to save your changes.
7. Close System Variables.
8. Open Matter Types (Database | Matters)
9. Locate the Matter Type to be modified.
10. Select the “Lexis Settlement Adjuster” tab.

Lexis® Affinity Library
© 2012 Reed International Books Australia Pty Ltd trading as LexisNexis Page 79
11. Click on the “Enabled?” checkbox.
12. Select the jurisdiction you want Settlement Adjuster to open in for this matter type.
13. Select who you act for on this matter type.
14. Click on to save your changes.
15. Modify all Matter Types required
16. Close Matter Types
After enabling Settlement Adjuster on a matter type, the Settlement Adjuster icon will display on the matter screen toolbar.
This completes setting up the integration with Lexis Settlement Adjuster.

Administration Workbook
Page 80 © 2012 Reed International Books Australia Pty Ltd trading as LexisNexis
7.6.4 Full Text Search
This tab controls the settings for Document Full Text Searching and Global Searching.
To use either of these features, your Lexis Affinity server must have Oracle 11g R2 or above installed. In addition, for Document Full Text Searching, the Oracle System user account must be given permission to access the documents folder on your network.
Full Text Search This feature is used to search documents and can be accessed from Document Management or Document Management Admin (from Case Management) or from the Documents tab on PhoneBook, Client or Matter records. You can search for text in either the description field of the saved document or within the document itself.
Global Searching This feature extends the functionality of Full Text Search and can search the database (PhoneBook, Client, Current and Archived Matters, Safe Custody and DataForm records) and Affinity programs. This feature can be accessed from the Affinity desktop.
Enable Full Text Search Tick this to enable Full Text Search for documents stored within the Lexis Affinity Document Management system. Integrity Server Tick this option if your Lexis Affinity database is running on an Integrity Server.
Index All Documents Click on this to button to index all documents or to refresh the index.

Lexis® Affinity Library
© 2012 Reed International Books Australia Pty Ltd trading as LexisNexis Page 81
Index Modified Documents Click on this button to index new modified documents. If a document is modified and the Lexis Document Toolbar is used to re-save the document, the document will be automatically re-indexed. However, if you use other methods for saving modifications to documents (eg. the Word save icon in MS Word) you will need to manually re-index your documents. We recommend re-indexing at least once a day.
Global Searching Tick this to enable Global Searching within the additional areas of Lexis Affinity.
NOTE: It is not necessary to refresh or rebuild the indexes when you first enable Global Searching.
Refresh Indexes The global searching indexes refresh automatically. However, a manual refresh of the global searching indexes may be required from time to time if you are experiencing problems.
Rebuild Indexes The global searching indexes can be rebuilt if required. This should only be necessary if troubleshooting a global search issue. You should always attempt to refresh the indexes before doing a rebuild as a rebuild can be a lengthy process.
The following table gives examples of how to use the search features. Note that searching is NOT case sensitive.
Example Result
black Will return results where the text ‘black’ in any of the searchable fields. This will include “Blackwell”, “Blacktown”, or any word that includes the string “black”.
black day Will return results where both words are in a searchable field – though not necessarily together. This will include “Black Day Publishing” and instances of “the sky was black and gloomy”
“black day” Will return results where the two words are used together in a searchable field. This will include “Black Day Publishing”.
black OR day Will return results where either of these words exist in a searchable field. This will include “Blackwell Scientific Publishing”, “Black day Publishing”, “it was a day of black and gloomy clouds” and “it was a dull day”.
black NOT day Will return results containing the word “black” unless it also contains the word “day”. This will include “Blackwell Scientific Publishing“ but not “Black Day publishing”.
(black AND limited) or blessington
Will return results the words “black” and limited are used together – or the word “blessington” is used in a searchable field.

Administration Workbook
Page 82 © 2012 Reed International Books Australia Pty Ltd trading as LexisNexis
Fields searched on:
PhoneBook Matters / Archived Matters
Name File ID
Search Short Description
Given Name Long Description
Middle Name
Family Name Clients
Long Name Search Name
Short Name
Email DataForms
Email2 Text Value
Email3
Address/PostalAddress/DX/RegisteredAddress Safe Custody
Suburb/PostalSuburb/DXLoc/RegisteredSuburb Item Description
State/PostalState/DXState/RegisteredState
PostCode/PostalPostCode/RegisteredPostCode Programs
Program name
Documents Program description
Name
Description
Contents of documents (if Full Text Search is enabled)

Lexis® Affinity Library
© 2012 Reed International Books Australia Pty Ltd trading as LexisNexis Page 83
7.6.5 E-Billing / e-Collection
Use this tab to record how documents generated by the e-Billing and e-Collection processes are stored.
If you have Affinity Document Management installed, the system will save the pdf version of the document using the same settings as for saving word documents.
If you do not use Affinity Document Management, you can set the path. The path name supports Wordlink fields.
Use Affinity Document Management Settings Tick this option if you have Affinity Document Management installed. In this case, the system will save the pdf version of the documents using the same settings as for saving word documents.
Save Documents in following location If Affinity Document Management is not installed, record the details of the location where you want the documents generated in e-Billing and e-Collection processes to be stored.

Administration Workbook
Page 84 © 2012 Reed International Books Australia Pty Ltd trading as LexisNexis
7.7 “Email” tab
Use this tab to record the settings for your Email system.
7.7.1 Options
These are general options for integration with Outlook. Your Lexis Affinity Consultant will make these settings for you.
7.7.2 Email Save
These options control the settings for creating emails from Lexis Affinity and for saving emails from Outlook back to Lexis Affinity Document Management.
Email Format: Specifies the default format of emails generated from Affinity. Auto uses the default setting in Outlook.
Auto-Save Options: Specifies the areas within Affinity where emails can be generated from which will insert auto-profiling information into the subject line of the email.

Lexis® Affinity Library
© 2012 Reed International Books Australia Pty Ltd trading as LexisNexis Page 85
Subject Metadata: Specifies the details which will be inserted into the subject line of the email for the purposes of auto-profiling
Named Properties: Inserts "hidden" properties storing the matter/phonebook details to which the email relates. This option should be left on.
NOTE: For more information on Email Auto-Profiling, please refer to the Lexis Affinity Document Management Administrator Reference, which is available in Help.
7.8 “emPower” tab
Please refer to the emPower Administrator Reference, available in Help.

Administration Workbook
Page 86 © 2012 Reed International Books Australia Pty Ltd trading as LexisNexis
7.9 “Espreon” tab
7.9.1 Setup
This section outlines how to configure Espreon system settings. To make Espreon available to users you will also need to activate it under Matter Types and Employee Security.
"Web Service" tab
Enabled: Tick this box to enable Espreon access from within Lexis Affinity Library.
Access Code: This will be provided to you by Espreon.
Access Token: This will be provided to you by Espreon.
URL: This is the URL to access Espreon's B2B Gateway. This will be provided to you by Espreon.
The "Test" button is a simple way to check you have a successful connection with the Espreon B2B Gateway.
Refresh Interval: This is the interval (in minutes) that Lexis Affinity will synchronise with the Espreon B2B Gateway. (NB. Not all Espreon searches are returned immediately. Each time a "refresh" or "sync" is executed, Lexis Affinity will try to update details from Espreon.)

Lexis® Affinity Library
© 2012 Reed International Books Australia Pty Ltd trading as LexisNexis Page 87
This button nominates which Lexis Affinity users (ie. employees) will run the timed synchronisation as per the refresh interval. At least one logged in user must be nominated to perform the timed synchronisation. More than one user may be selected but the more users that are selected, the greater the overhead that is placed on the system and this will affect performance.
Note that a manual synchronisation can be performed at any time by any user. This is done by opening a matter, displaying the Espreon tab and then
clicking on the button.
Show Confirmation Dialog? If this option is ticked, when the timed synchronisation occurs, the nominated user(s) will be prompted with the following dialog box:
If this option is not ticked, the synchronisation will occur in the background.
"Web Site" tab
The settings on this tab allow access to the Espreon's web page from within Lexis Affinity Library. Login credentials may also be provided for individual users via the User Options dialog box.

Administration Workbook
Page 88 © 2012 Reed International Books Australia Pty Ltd trading as LexisNexis
Enabled: Tick this box to enable access to the Espreon web site from within Lexis Affinity Library.
Account: This will be provided to you by Espreon.
User Name: This will be provided to you by Espreon.
Password: This will be provided to you by Espreon.
URL: This is the URL to the Espreon web page. This will be provided to you by Espreon.
Web Browser Settings Select the boxes beside the buttons to be displayed on the Affinity toolbar inside the Espreon web site window.
"Search Order" tab
Method: Choose an action to perform when you create a new Espreon order. Choose between Web Service or Web Site. Note that if you choose Web Site, you are effectively disabling the B2B web service functionality.
Export Files to Folder: Browse to a folder name for the storage of Espreon search documents. It is recommended that you provide a path, otherwise, by default, files will be saved in the TEMP folder of each user's profile. A network path is recommended.
Enable DocMan: Check this box to use Lexis Affinity's Document Management system to store and record results (ie. PDF or HTML files). The document will be saved in the default folder for the matter, as set up under Document Management, and an entry will display under the "Documents" tab on the matter. Note that if you use this option, you must still nominate a valid export folder in the "Export Files to Folder". This is used as a temporary

Lexis® Affinity Library
© 2012 Reed International Books Australia Pty Ltd trading as LexisNexis Page 89
storage location for the downloaded files, before they are transferred to the matter folder.
On New Order Script: Insert the name of a valid Lexis Affinity script if you wish to run this script when every search order is executed.
"Disbursement Recovery" tab
Enabled: Check this box to turn on automatic disbursement recovery. When a search is requested, the system will journal the cost between the client and the Creditor account. This can be further fine-tuned at the individual search type level, but must be activated here if you want any disbursements captured.
Creditor: Select the Creditor for these disbursement entries (ie. SAI Global).
Espreon should already be set up as a Creditor; select it from the list of Creditors. Use the binoculars to search the Creditors list.
Alternatively, if you selected the option to post the disbursements as Sundries, then you will not need to enter a Creditor account as Sundries are posted between the matter and the General Ledger.
Replacement Chart for Errors: Use the binoculars list to search the list of General Ledger accounts.
If the matter number you entered when you requested a search cannot be used for the debit side of the journal, Lexis Affinity will post to an alternate account, in the General Ledger (eg. Irrecoverable Disbursements, Bad Debts). Nominate here the General Ledger account that will be used in these circumstances.

Administration Workbook
Page 90 © 2012 Reed International Books Australia Pty Ltd trading as LexisNexis
Note that a matter cannot be posted to if the Client or the Matter is on Hold for Disbursements. In this case the On-Line Search Admin screen shows the matter with a status of "Hold". If you leave this blank then no recovery takes place.
Retry completed search orders: In certain circumstances automatically posting disbursements on a matter will fail (such as when the matter is on hold). Tick this option to automatically retry posting the disbursement. This option is unticked by default.
7.9.2 Action Setup
Your Lexis Affinity Workflow Consultant will assist you to set up this area but you should be aware of how the setup of each search type will affect its operation in Lexis Affinity.
When you click on the Action Setup button, the setup screen for the first search in the list (alphabetically) will be displayed.
Code: Each search has a unique code. You cannot change this field.
Description: This is the description of the search. This can be modified if required, although keeping the standard description is recommended, to assist with support.

Lexis® Affinity Library
© 2012 Reed International Books Australia Pty Ltd trading as LexisNexis Page 91
Enabled: This box must be ticked if the search is to be available in Lexis Affinity. If you untick this box, this search will not be visible at the matter level. Some searches have not been enabled as they are not yet implemented in Lexis Affinity. You should not enable a search that is not yet implemented.
On New Order Script: Nominate a Lexis Affinity script that will run when executing this search.
Help Text: Allows you to display customised help text at the top of the search order screen, providing any addition information about the search to the users.
Order Request: This area controls what data will be returned to Lexis Affinity. You should retain the default settings although some searches (eg. title searches) will return both a PDF document and an HTML document. You can choose the format you prefer. The default selection is PDF document.
PDF Document: Tick this box to return a PDF document, where available.
HTML Document: Tick this box to return an HTML document, where available.
Text Document: This box will be ticked where data is available to be returned to an Affinity dialog box. You should not change the default setting.
Result Limit: Leave this set to 0.
Disbursement Recovery:
Status The options are: Automatic Disbursement Recovery - where the system will automatically journal the Espreon cost between the matter and the creditor or the General Ledger recovery account as soon as the status of a search goes to "Completed".
Hold Disbursement Recovery - where no recovery takes place automatically and each matter must be updated manually (by clicking the button 'Disbursement Recovery' from the On-Line Search Admin screen to update the cost onto the matter).
None - where no Disbursement Recovery takes place at all.
Reason The text that will be written on to the matter ledger as the reason for the expense.
Tax Type The tax type used to post this expense.
Expense Type If you nominate an expense type here then it is easy, at the time of billing,

Administration Workbook
Page 92 © 2012 Reed International Books Australia Pty Ltd trading as LexisNexis
to locate expenses of the same tax type and accumulate them into 1 entry on a bill.
Post Entry as Options are:
DISB - where the system will post the entry as a Disbursement, and the journal will be made between the matter and the Creditor Account;
SUNDRY - where the system will post the entry as a Sundry, and the journal will be made between the matter and the usual General Ledger Sundry recovery account.
Document Management, Show Dialog: Check this box to display the Document Management "Save Document" dialog box when a search document is saved. This is only necessary if you want to allow users to add further information into the document profile before saving.
7.10 “Exchange Server” tab
Your Lexis Affinity Workflow Consultant will assist you to set up integration between Lexis Affinity and your Exchange Server.

Lexis® Affinity Library
© 2012 Reed International Books Australia Pty Ltd trading as LexisNexis Page 93
7.11 “Fee Sheet” tab
The screen is shown below:
When Submitting Entries - Unit / Minute Options Don't Round Units
No rounding occurs on any entries. If an entry is recorded as a part of a unit either by the timer or by the user, that amount is posted to the matter ledger, to 2 decimal places. For example a Fee entry of 3.45 units will be posted to the matter as recorded.
Round to Nearest Unit (but never to zero) Fractions of units are rounded to the nearest whole unit at the time of submitting. The rounding follows the usual mathematical convention of rounding either up or down depending on how close the fraction is to .5. Under this option entries of less than half a unit (3 minutes) would be recorded with 1 unit. Once submitted the rounded amount is displayed on the Fee sheet.
Always Round Units up The fraction is ALWAYS rounded UP to the nearest whole unit. The entry is rounded up when submitted and displayed on the timesheet as the rounded amount.
Use minutes to recalculate value and units When a fee entry is submitted the unit and amount value of the entry will be changed to reflect the actual number of minutes that the fee entry shows.

Administration Workbook
Page 94 © 2012 Reed International Books Australia Pty Ltd trading as LexisNexis
Examples of each option::
Unit Don’t Round Nearest Unit Units Up Use Minutes
Units Minutes Units Minutes Units Minutes
Units Minutes
1.25 1.25 8 1.0 6 2.0 12 1.33 8
1.3 1.3 8 1.0 6 2.0 12 1.33 8
1.33 1.33 8 1.0 6 2.0 12 1.33 8
1.34 1.34 8 1.0 6 2.0 12 1.33 8
1.4 1.4 8 1.0 6 2.0 12 1.33 8
1.41 1.41 8 1.0 6 2.0 12 1.33 8
1.42 1.42 9 1.0 6 2.0 12 1.5 9
1.5 1.5 9 2.0 12 2.0 12 1.5 9
Allow User to Override Check this option to give all users of the Fee sheet the ability to override the System variable settings for Unit rounding at the individual user level.
When Closing Fee Sheet Prompt User to Submit If ticked, when the user closes a Fee Sheet containing unsubmitted entries, a prompt will display to remind the user to submit the entries. Submit entries made by other users Select from: Always Entries made by other users will be submitted Never Entries made by other users will not be automatically submitted Prompt A prompt will display. Allow User to Override If ticked, the user will be able to turn this prompt off in the “Options” tab on the Fee Sheet.
Options Display Fee Sheet in Windows Taskbar
If enabled, the Fee Sheet icon will be displayed on the Windows taskbar when the Fee Sheet is opened.
Multi User Editing / Allow multiple users entering Fee Sheet for same Employee This allows more than one user to enter time for the same employee concurrently.

Lexis® Affinity Library
© 2012 Reed International Books Australia Pty Ltd trading as LexisNexis Page 95
Entries to Display All fee entries for selected Author Check this to display all entries for the elected Author regardless of who entered the fee. Only fee entries made by logged in user Check this to display only fee entries for the selected Author, entered by the logged in user. Allow User to Override If ticked, the user will be able to change this setting in the “Options” tab on the Fee Sheet.
Summary Panel – Budgeted Billable Time Use Chargeable Units from Employee Budget Select this where a Chargeable Units Budget has been entered for each employee who enters time. Use Minimum Hours/Units from Employee Record Select this where budgets have not been recorded. Minimum time specified in … If the “Use Minimum Hours/Units . . “ is checked, you can use this option to select whether the time is shown in Hours or Units.

Administration Workbook
Page 96 © 2012 Reed International Books Australia Pty Ltd trading as LexisNexis
7.12 “Foreign Currency” tab
This tab allows you to select whether or not your files will be activated for Foreign Currency transactions.
Does this firm deal with foreign currencies?
Y Transactions can be recorded in multiple currencies. (Another screen will display as shown below.)
N All transactions are recorded in the local currency.
NOTE: Once a set of files has had Foreign Currency implemented, it cannot be turned off.
Foreign Currency Options Is this firm a multi-country practice?
Y Different Countries and their associated Currency can be registered.
N Countries are not required to be set up.
Country Select the Country of the main Entity.
Currency Select the currency of the main Entity. (This is the Base Currency).
Translation Reserve Select the General Ledger Account that is to be used as the Translation Reserve Account. This account will hold the balance of the Foreign Currency Translation Journals when balances are converted from one currency to another.
Default Currency to Local Currency in Filters? If ticked, the transaction filters will default to the Local Currency. Transaction filters include; Cheques, Receipts, Journals, Bank Deposits, Investment Journals, Investment Receipts, Trust Journals and Bank EFT Query.

Lexis® Affinity Library
© 2012 Reed International Books Australia Pty Ltd trading as LexisNexis Page 97
7.13 “HotDocs” tab
This tab allows you to set up the integration with HotDocs.
7.13.1 Setup
"Integration" tab
Matter: Check this box to enable a "HotDocs" tab in the matter filter screen.
Matter Party: Check this box to enable a "HotDocs" tab in the matter party filter screen (for "Event" matters only).
PhoneBook: Check this box to enable a "HotDocs" tab in the PhoneBook filter screen.
Enable Docman: Enables the Document Management Save As dialog box inside the HotDocs filler (used when generating HPT files).
Import Script: Nominate a Lexis Affinity script to run on the completion of a HotDocs merge.
Preload template fields into Affinity Script (debug purpose only): Leave this field unchecked. You may be requested by the Lexis Helpline to temporarily turn this on for troubleshooting purposes.

Administration Workbook
Page 98 © 2012 Reed International Books Australia Pty Ltd trading as LexisNexis
"Application" tab
Visible: This field should always remain unticked unless you are otherwise advised by your Lexis Affinity Workflow Consultant.
"Assembly" tab
Queue Add Method: Leave this set to the default option of UseAddToQueue method.
Queue Visible: Check this box to display the HotDocs assembly queue dialog box.
Copy Answer File data to Affinity on Assembly Complete: Check this box to save the Answer File data into a table in the Lexis Affinity database as soon as the HotDocs assembly is finished.
Copy Answer File data to Affinity on File Save: Check this box to save the Answer File data into a table in the Lexis Affinity database as soon as the Answer File is saved (recommended).
Field Filter: Use the field filter to nominate specific fields to write back to the Lexis Affinity database, rather than all fields. For the Field Filter to work, you must select one of the Copy Answer File options to write data back to Affinity.

Lexis® Affinity Library
© 2012 Reed International Books Australia Pty Ltd trading as LexisNexis Page 99
"Answer File" tab
Save Path: Nominate a shared network path for HotDocs answer files generated from Lexis Affinity. (NB. This should be the path you copied the existing answer files to as this will become the new answer file folder.) If left bank, it will default to MyDocuments\HotDocs\Answer Files\Affinity. (This is not recommended if answer files are to be shared between users, and included in backups.)
Use this button to insert the answer file path from the HotDocs application into the Save Path field, in hard-coded format.
Use this button to insert the code %ANSWERFILESPATH% into the Save Path field. This means Affinity will use the answer file path nominated in the HotDocs application. If it changes in HotDocs, Affinity will automatically pick up the new path rather than a hard-coded path name.
Add prefix to filename for matter precedents: Tick this box to apply the standard prefix (PREC_MATTER_) to answer file names. If this box is not ticked, the answer file name will be the matter number alone.
Add prefix to filename for matterparty precedents: Tick this box to apply the standard prefix (PREC_MATTERPARTY_) to answer file names. It is highly recommended that this box is ticked.
Add prefix to filename for phonebook precedents: Tick this box to apply the standard prefix (PREC_PHONEBOOK_) to answer file names. It is highly recommended that this box is ticked.

Administration Workbook
Page 100 © 2012 Reed International Books Australia Pty Ltd trading as LexisNexis
7.14 “GFI FaxMaker” tab
This tab allows you to set up integration with GFI FaxMaker.
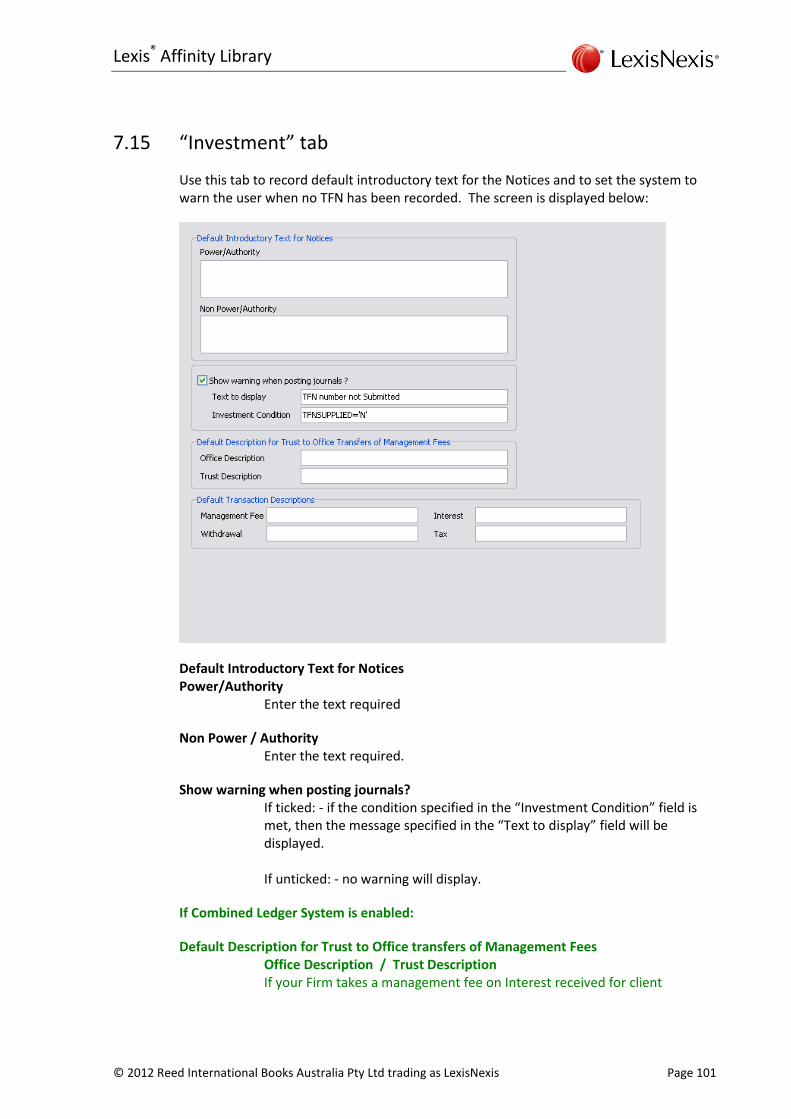
Lexis® Affinity Library
© 2012 Reed International Books Australia Pty Ltd trading as LexisNexis Page 101
7.15 “Investment” tab
Use this tab to record default introductory text for the Notices and to set the system to warn the user when no TFN has been recorded. The screen is displayed below:
Default Introductory Text for Notices Power/Authority
Enter the text required
Non Power / Authority Enter the text required.
Show warning when posting journals? If ticked: - if the condition specified in the “Investment Condition” field is met, then the message specified in the “Text to display” field will be displayed. If unticked: - no warning will display.
If Combined Ledger System is enabled:
Default Description for Trust to Office transfers of Management Fees Office Description / Trust Description If your Firm takes a management fee on Interest received for client

Administration Workbook
Page 102 © 2012 Reed International Books Australia Pty Ltd trading as LexisNexis
investments, enter the default text. This description will be used on Trust Ledgers.
Default Transactions Descriptions Management Fee / Withdrawal / Interest / Tax If your Firm processes interest for investments via Trust Receipts, enter the default text required for each option. This description will be used on the Trust Ledgers.
7.16 “Macquarie Bank” tab
This tab allows you to enable Macquarie Bank DEFT Payment integration.
Enable Macquarie Bank Integration Tick this to enable the functionality.
DEFT Payment Centres Each Payment Centre has a predefined Name & Address which have been supplied by Macquarie Bank. These addresses are used in the DEFT Payment Slip which must be included in Bills and Debtors Letters and are tied to the mailing address of the “Bill to Contact”.

Lexis® Affinity Library
© 2012 Reed International Books Australia Pty Ltd trading as LexisNexis Page 103
7.17 “Management Reports” tab
Enable employee security level If ticked, the reports are controlled by either the Employee Security Level or the access given to individual reports.
If unticked, all reports are available to all users regardless of their security level. The security level is found on the main screen of the Employee screen. NOTE: If a report is created at level 4 then only users with a security level of 0, 1, 2, or 3 can access it.)
Default Branch in Bank Filters / Reports Leave unticked so that Bank Filters and Reports do not display a Branch.

Administration Workbook
Page 104 © 2012 Reed International Books Australia Pty Ltd trading as LexisNexis
7.18 “Matters and Clients” tab
This tab records settings regarding Matters and Clients.
The screen is displayed below:
Matter Registration Alert – Enabled A warning will be displayed to inform the user that a new matter has been created for a client that does not currently have an active matter. The wording of the message and the criteria for determining whether or not the message is displayed are set below.
Calculation based on date You can select from Date Completed or Date Opened.
Warn if date is more than This is the length of time since the last matter was opened or closed, depending on the above setting. Select from Days, Weeks, Months or Years
Message Enter the text of the message to be displayed. An example is “Confirm Address and Contact Details”.

Lexis® Affinity Library
© 2012 Reed International Books Australia Pty Ltd trading as LexisNexis Page 105
Matter Search – Completed / Closed Colour Select a colour to be used for completed matters when they are included in a Matter List.
Printing Ledgers Default Expanded Format when printing Matter Combo Ledger If ticked, the “Expanded Format” option will be ticked when printing the Matter Combo Ledger from the “Balances” tab.
Use preferred mail address for Combo, Investment Ledger and Investment Register, Trust Ledger reports? If ticked, the address flagged as the Mail Address in the PhoneBook or Client record, will print on the Combo Ledger (when printed in Expanded Format), Trust Ledger, Trust Statement, Investment Register and Investment Ledger. If not ticked, the Street Address will be used.
Suppress extended details for Combo, Trust Ledger reports? If ticked, the default on the Combo and Trust Ledger screens for ‘Suppress extended details’ will be ticked. Extended details include information about the Cheque Details / Clearance Date and Receipted By.
If Combined Ledger System is enabled
Suppress zero value commission bills on Trust Ledger reports? If ticked, commission bills with a nil effect will not be included on Trust Ledgers.
Suppress movement between protected/unprotected trust? If ticked, the entries detailing the transfer of funds between protected and unprotected will not be included.
New Client Defaults Default new clients to permanent If ticked, a new Client will have the “Permanent Client” flag ticked. The Client Filter allows you to select Active and Permanent Clients, so that they can be included for marketing purposes, even if there are no open matters
Default Scale Costed Fees on Bill for New Clients If ticked, a new Client will have this flag ticked by default.
Matter / Client / PhoneBook Security Enable Matter Team Security Tick this to enable Matter team Security, so that access to PhoneBook, Clients & Matters is restricted to only those members of the Matter team.
Administration Workbook
Page 106 © 2012 Reed International Books Australia Pty Ltd trading as LexisNexis
Matter Label Template Maintenance If you prefer to design your own format for matter labels, you need to attach them using this feature. Some consulting from a Lexis Affinity Consultant will be required.
Matter Contact Options Allow duplication of “contact name” The system will allow duplicate entries. Do not add an entry where “contact name” already exists The system will not allow duplicate contact names to be attached to the matter. Do not add an entry where “contact name and type” already exists The system will not allow duplicate contact names to be attached to the matter if the contact name AND the type attached to the name already exist.
Matter client role required? If ticked, the Client Role field (on the “Miscellaneous” tab) is mandatory when a matter is created.
Delete button will de-activate Matter Party / Contact? (for Softdocs Integration)? Tick this to de-activate matter contacts rather than have them deleted. This option can also be applied at the matter type level, which is the recommended method. This is because Softdocs may not be available on all matters.

Lexis® Affinity Library
© 2012 Reed International Books Australia Pty Ltd trading as LexisNexis Page 107
7.19 “Miscellaneous” tab
7.19.1 “Field Mapping” tab
This screen provides for fields from another table to be mapped to fields in Lexis Affinity Library.
You will be assisted in recording these details if necessary by your Lexis Affinity Workflow Consultant.
7.19.2 Libraries” tab
This feature is no longer used.
7.19.3 “User Statements” tab
This is only required if you are using WordPerfect word processing software and will be set up by your Lexis Affinity Workflow Consultant if required, at installation.*
7.20 “PhoneBook” tab
New PhoneBook Entries Default Suburb / State / Postcode / Country If ticked, the Suburb, State, Postcode and/or Country details from the Firm details stored in System Settings | System | General will be prompted when creating a new PhoneBook entry. Default Street as Mailing Address Tick this to have Lexis Affinity Library flag the Street Address as the Postal Address.
Default Bank Account Format Select the format that applies to your region. This will affect the Bank Account format selected on the “Bank” tab for new PhoneBook entries.
Default type for new Linked Business Contact entries Select the default Type (Name Label) to be used for creating new records that will be linked to PhoneBook entries. Generally this would be Business Contact.

Administration Workbook
Page 108 © 2012 Reed International Books Australia Pty Ltd trading as LexisNexis
7.21 “Posting” tab
This tab allows you to nominate default settings for Clients and Matters, default descriptions for some types of transactions and
7.21.1 Client & Matter Alerts
The screen is displayed below:
Alert User when Client Balance exceeds:
Unbilled Disbursements Limit Ticked: - a warning will be displayed when the Total Unbilled Disbursements on the Client’s matters exceeds the Unbilled Disbursement Limit. When processing transactions a warning message will display advising that the “Unbilled Disbursement Limit” has been exceeded and recommending that the “Client Exposure Limit Report” be run for full details. This does not prevent the user finalizing the transaction.
Unbilled Fees Limit If ticked: - a warning will be displayed when the Total Unbilled Fees (excluding Tax) on the Client’s matters exceeds the Unbilled Fees Limit. The warning also advises that the “Client Exposure Limit Report” be run for full details. This does not prevent the user finalizing the transaction.

Lexis® Affinity Library
© 2012 Reed International Books Australia Pty Ltd trading as LexisNexis Page 109
Total Exposure Limit If ticked: - a warning will be displayed when the total of WIP, Unbilled Disbursements, Debtors less Trust exceeds 100% of the Total Exposure Limit. The warning also advises that the “Client Exposure Limit Report” be run for full details. This does not prevent the user finalising the transaction.
Alert User when Matter Balance exceeds: Disbursements Budget
If ticked: - a warning will be displayed when the Total Disbursements (billed and unbilled including anticipated disbursements & sundries – excluding tax) exceeds the Disbursement Budget. The warning also advises that the “Matter Credit Limit” Report be run for full details. This does not prevent the user finalising the transaction.
Fees Budget If ticked: - a warning will be displayed when the Total Fees (excluding Tax) exceeds 80% of the Fee Budget. The warning also advises that the “Matter Credit Limit” Report be run for full details. This does not prevent the user finalising the transaction. Test within $ or % of Budget Complete these fields to restrict the warning messages w=to when the fees Budget is within this range.
Total Budget If ticked: - a warning will be displayed when the total of Fees and Disbursements exceeds the Total Budget. The warning also advises that the “Matter Credit Limit” Report be run for full details. This does not prevent the user finalising the transaction.
e-Collection Options Email Debtor Letters Tick this to set the default e-Collection setting for new PhoneBook records. Save Only PDF Versions of Debtor Letters in Document Management If ticked, only the PDF version of debtor letters will be saved. If not ticked, both the Word and PDF versions will be saved.

Administration Workbook
Page 110 © 2012 Reed International Books Australia Pty Ltd trading as LexisNexis
7.21.2 Cheques, Anticipated Disbursements and Receipts
The screen is displayed below:
Default Description for Automatic Creditor Cheques Enter the default wording for Automatic Creditor Cheques For example – Payment of current account.
Default Description for Automatic Matter Receipts Enter the default wording for Matter Receipts For example – Payment of bill.
Always post Anticipated Disbursement Tax to Holding If ticked: - the GST amount of a Cheque Requisition which is marked as an Anticipated Disbursement will be posted to the GST Input Tax Holding Account. When the Cheque Requisition is converted to a Cheque, the GST will be transferred to the GST Input Tax Account. If unticked: and a GST Holding Account has been recorded in Entities | Other, the GST on Anticipated Disbursements will be posted to the GST Holding Account if the Invoice has not been received. When this flag is ticked, the GST will be transferred to the GST Input Account.
Include Amount in Words when printing Receipt This only applies if you use “Standard” format Cheques. If ticked – the amount of the receipt will be printed in words as well as in figures.
Wrap Address Lines to fit If ticked, address details (when included on Cheques, Receipts, Creditor Remittance Advices, Draft Bills and reports) will be word wrapped, if necessary, to print on 3 lines.
Address Formatting Rules
If the address in the PhoneBook record contains one line then the format is:
Address Line Suburb, State, Postcode Country

Lexis® Affinity Library
© 2012 Reed International Books Australia Pty Ltd trading as LexisNexis Page 111
If the address in the PhoneBook contains two lines then the format is:
Address Line 1 Address Line 2 Suburb, State, Postcode, Country
If the address in the PhoneBook contains three lines then the format is:
Address Line 1, Address Line 2 Address Line 3 Suburb, State, Postcode, Country
If the address box in the PhoneBook contains more than three lines then the format is:
Address Line 1, Address Line 2 Address Line 3…Address Line n Suburb, State, Postcode, Country
Set Receipts as cleared when Posting Bank Deposit if the Clearance Date is Due If ticked: - any receipts that have been processed with a Clearance Date of the same date as the Bank Deposit, will be cleared when the Bank Deposit is posted. For example a Bank or Financial Institution Cheque is often processed with today’s date as the Clearance Date and the funds will become ‘cleared’ when the Bank Deposit for that item is posted. If this is not ticked, then receipts that are processed with a Clearance Date of today will not be ‘cleared’ until tomorrow.

Administration Workbook
Page 112 © 2012 Reed International Books Australia Pty Ltd trading as LexisNexis
7.21.3 Fees, Billing & Allocating
The screen is displayed below:
Default Tax Status on Bill for New Clients Enter the Tax Status that applies to most Clients. This is the default Tax Status for new clients. Select from Taxable Bill: Tax will be added where required and the Bill will be included in the “Matter Taxable Bills” section of the GST/Tax reports. Export Bill: This is for bills that comply with the tax rulings regarding “export” requirements and no Tax is charged. The bill will be included in the ”Matter Export Bills” section of the GST/Tax reports. Other Tax-free Bill: This is for other types of Tax free bills. The bill will be included in the “Matter Other GST/Tax Free Bills” section of the GST/Tax reports.
Default to Employee’s Department in Fee Creation If ticked: - this field will be ticked when creating a new Employee. Refer to the chapter on Employees for more information on this.
Default to Employee’s Branch in Fee Creation If ticked: - this field will be ticked when creating a new Employee Refer to the chapter on Employees for more information on this.

Lexis® Affinity Library
© 2012 Reed International Books Australia Pty Ltd trading as LexisNexis Page 113
For all users NOT using Combined Ledger System:
Default Office Description for Trust to Office Transfer Enter the default description for the Office entry in a Trust to Office journal.
Default Trust Description for Trust to Office Transfer Enter the default description for the Trust entry in a Trust to Office journal.
If Combined Ledger System is enabled:
Default Office / Trust Description for Trust to Office Transfers In a Combined Ledger System, the text entered in these fields is used for the default narration for the Bill Payment Journals that are initiated from the Matter | Bill tab, from the Bills List, or the automatic journals that occur when posting a credit Debtors Adjustment in billing. These fields accept the %REFNO% convention to insert the bill number into the narration.
Default Description for Writing Off Bills Enter the default description for writing off bills.
For all users NOT using Combined Ledger System
Exclude Anticipated Debtors when allocating Debtors If ticked: - when a user processes an Office Receipt for a bill that includes Anticipated Disbursements, they will only be able to receipt the Fees, Disbursements and Sundries components of the bill. The expectation is that you receipt the full amount into the Firm’s Trust account, pay the Anticipated Disbursement amount from Trust and the balance is then transferred to Office via the Trust to Office transfer journal, or that you do a ‘split banking’.
If Combined Ledger System is enabled:
Default Trust Description when posting Bill Enter a description to be used on the Trust Ledger when funds are debited to pay an account. For example: - Payment of Account.
Default Credit (or Debit) Debtors Adjustment Narration This is the default description that will be used where for a Credit (or Debit) Debtors Adjustment is made.
NOTE: These fields accept the %REFNO% convention to insert the bill number into the narration.
Default note on bill to matter short description If ticked: - the Short Description of the Matter will be automatically inserted on the “Note” tab on the Billing creation screen. Use «B_INV_NOTE» in the Bill template to include this in the printed bill.

Administration Workbook
Page 114 © 2012 Reed International Books Australia Pty Ltd trading as LexisNexis
AutoDescription for Bill receipts/ Journals Ticked The text entered in the “Reason” field at the top of the screen will NOT automatically populate the “Reason” field in the Allocation table with the same text. Instead the default text “Payment of Bnnn” will be inserted.
Unticked The text entered in the “Reason” field at the top of the screen will automatically populate the “Reason” field in the Allocation table with the same text.
NOTE: This does not apply to receipts posted from the “Bills” tab on the matter.
Include bill note in description when allocating bill If ticked: - the text recorded on the “Note” tab within the bill creation will be inserted on the ledger when the bill is posted or receipted.
NOTE: The combination of these setting allows users to effectively alter the “Re” of the matter for a particular Bill. The text on the “Note” tab will be used on the Ledgers and can be included in the printed bill.
Show alternative Timekeeper bill summary If ticked – the Timekeeper Bill Summary in a draft Bill will display the Fees information separated into this bill and all previously dispatched bills.
Allow WIP write off on Matter Completion up to a limit of Enter the maximum balance of WIP that will prompt the system to allow an automatic write off of WIP when completing a matter.
When generating / editing a Bill re-calculate tax for Fees, Disbursements, Anticipated Disbursements and Sundries Ticked: The “Override Current Tax Rate?” flag on the Bill screen Tax will be automatically ticked and tax will be recalculated when a Bill is generated or edited. Tax is re-calculated based on the total of Fees (or Disbursements or Anticipated Disbursements or Sundries) multiplied by the current Tax Rate. This has two effects – (1) Rounding errors; if the total of the individual amounts of Tax do not equal the sum of the items multiplied by the Tax Rate, the Tax will be re-calculated and (2) If the Tax Rate HAS changed, the Tax will be calculated as the sum of the items multiplied by the Tax Rate. In this case there is no need to check the “Override Current Tax Rate?” flag on the Bill screen. An exception to this rule is in the case of bills generated in Auto Billing. In that case, if the “Override Current Tax Rate?” flag is checked, this overrides the settings in System. Unticked : Users will need to manually check the “Override Current Tax Rate?” flag on the Bill screen to re-calculate tax.

Lexis® Affinity Library
© 2012 Reed International Books Australia Pty Ltd trading as LexisNexis Page 115
Posting Bills Select the option that will be prompted when you post a bill. The options are: Post Only Post to the Debtors ledger. Post / Merge When the bill is posted, the word document is to be created and automatically saved (if auto-saving of Bills has been specified in System | Documents | Auto-save Document Types) Post / Merge / PDF as above. After the Word document is saved, create the PDF version and save. Post / Merge / PDF / Email as above. After the PDF document is saved, the Email will be created with the pdf version of the bill attached.
Enforce “Draft Finalised” flag for e-Billing If ticked, it is necessary to tick the Draft Finalised flag on a Bill before it can be sent by email. If unticked, the Draft Finalised flag has no impact on posting and sending bills by email.

Administration Workbook
Page 116 © 2012 Reed International Books Australia Pty Ltd trading as LexisNexis
7.22 “Research” tab
Use this tab to record the settings for automatic access to LexisNexis AU or LexisNexis NZ Research Services.
Activate LexisNexis Research Tick this to activate LexisNexis Research from inside Lexis Affinity Library. When Research has been enabled, further options will display as described below.
Select Country Chose from Australia or New Zealand.
Default URL This will be completed automatically when the Country is selected.
User Settings General Research General Research is when the research is launched form the Application toolbar. Matter Research Matter Research is when the research is launched from a matter. Automatically Start Timer Ticking this will automatically start a Fee Sheet entry with the Timer started. Default Matter Select a Matter Number if most time spent on research is charged to one matter. Otherwise leave blank, so that a matter can be selected on the Fee Sheet entry.

Lexis® Affinity Library
© 2012 Reed International Books Australia Pty Ltd trading as LexisNexis Page 117
Suppress Web Browser Script Error Messages Tick this box to turn off display of script error messages in your web browser.
Keep User Settings Check this to allow individual user settings to override these settings.
Apply to all Users Check this to apply these settings to all users.

Administration Workbook
Page 118 © 2012 Reed International Books Australia Pty Ltd trading as LexisNexis
7.23 “Safe Custody” tab
This section allows you to nominate default settings for the maintenance and registration of Client’s Safe Custody packets and specify the location of the template documents automatically generated on lodgement and release of documents.
The screen is displayed below:
Packet ID / Enable automatic generated Packet ID If ticked, Lexis Affinity Library will assign the next available packet number when registering a new Safe Custody Packet.
Packet ID / Make Packet ID read Only If ticked, users are prevented from overriding the automatically allocated number at the time of Registration.
Packet Item ID (Envelope) / Enable automatic generated Packet Item ID? If ticked, Lexis Affinity Library will assign the Packet Item ID or Number. This can be overwritten at the time of entering the Packet Item.
Packet Item ID (Envelope) / Make Packet Item ID read only? If ticked, users are prevented from overriding the automatically allocated Packet Item ID.
Auto Print Acknowledgement Receipt If ticked: - an Acknowledgement Receipt will print after a new item is registered in a Safe Custody packet.
7.24 “Session” tab
The “Session” tab will show you all users logged into the Lexis Affinity Library system.
There are no settings to be recorded here.

Lexis® Affinity Library
© 2012 Reed International Books Australia Pty Ltd trading as LexisNexis Page 119
7.25 “Softdocs” tab
This section is used to set up integration between Lexis Affinity and Softdocs precedents. This area will be set up by your Lexis Workflow Consultant.
If you have not purchased a licence for Softdocs integration, this will be inactive.

Administration Workbook
Page 120 © 2012 Reed International Books Australia Pty Ltd trading as LexisNexis
7.26 “Sundry Interface” tab
This section allows you to create multiple Sundry Interface formats and for each one to nominate default values and positions of data when you import an external file that contains Sundry Disbursement entries.
The settings on the System | Sundry Interface screen form the STANDARD Sundry Interface type.
Additional Sundry Interface settings can be recorded by clicking on [Edit Extra Sundry Interface].
The following screen displays:
Type Code Enter a name for the Sundry Interface Type. This could be the name of the system used or the type of entries the file contains.
Start Position Enter the numbered position where each field of information starts.
Length (in Char) Enter the number of characters in this field.
File ID The Matter Number or reference.
Description Text that is entered when recording the charge in the external system.
Unit The number of units if in the external file.

Lexis® Affinity Library
© 2012 Reed International Books Australia Pty Ltd trading as LexisNexis Page 121
Type The type of entry. For example; if the file contains more than one type of charge, each one would be identified with a code such as COP for Photocopying.
Amount The charge for this entry.
Import from File The path and file name of the file that is created by the external system.
You can click on to locate the file if it already exists.
Delete file after successful import? If ticked, the file will be deleted if the import is successful. (ie that it is imported, not necessarily that all entries were valid). If the system that you are importing from generates a file with the same name each time – it is recommended that this is ticked, or a procedure is put in place to rename the file each time, so that the next export will be successful.
Update Matters with Final Bill flag set? If ticked, matters that have been flagged as having a Final Bill sent, will not be updated automatically. Entries for these matters will be reported in the Sundry Import Errors listing.
Default Sundry Type Select a Sundry Type to be used if the external file does not contain a Type Code in the defined position.
Instant Matters The path and file name of the file that contains details of new maters as they are created in Lexis Affinity.
You can click on to locate the file if it already exists.
Current Matters The path and file name of the file that contains details of all maters created in Lexis Affinity.
You can click on to locate the file if it already exists. Export Click on this to export all the matter details to the export file. A sample of a line from the exported file is shown below:
"010002","Recovery Debt from Kelly","Blackwell Scientific
Publications"
Where 010002 is the File ID (Matter Number) Recovery Debt from Kelly is the Short Description Blackwell Scientific Publications is the Title (as defined in Name Labels)

Administration Workbook
Page 122 © 2012 Reed International Books Australia Pty Ltd trading as LexisNexis
Export SQL Enter the field names to be included in the export file.
Field Delimiter Enter the character that separates the field names. Click on [Test SQL] to verify the Export SQL settings. A message similar to the following will display if the contents are valid.
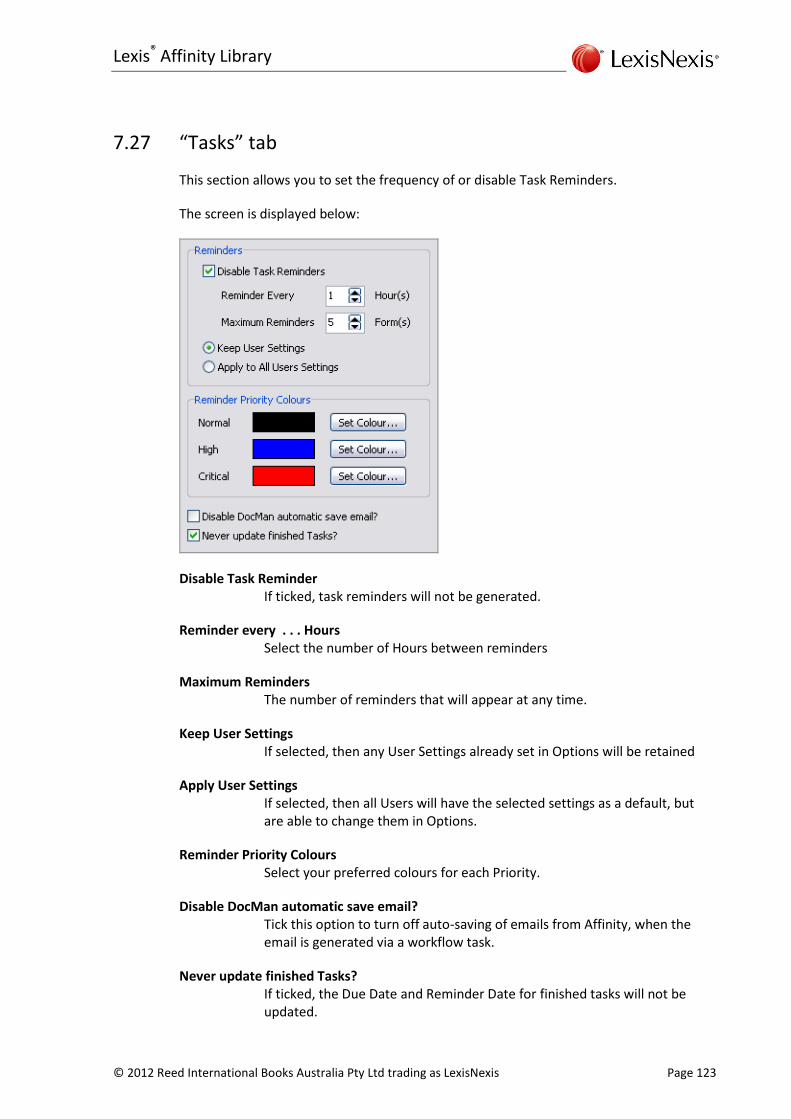
Lexis® Affinity Library
© 2012 Reed International Books Australia Pty Ltd trading as LexisNexis Page 123
7.27 “Tasks” tab
This section allows you to set the frequency of or disable Task Reminders.
The screen is displayed below:
Disable Task Reminder If ticked, task reminders will not be generated.
Reminder every . . . Hours Select the number of Hours between reminders
Maximum Reminders The number of reminders that will appear at any time.
Keep User Settings If selected, then any User Settings already set in Options will be retained
Apply User Settings If selected, then all Users will have the selected settings as a default, but are able to change them in Options.
Reminder Priority Colours Select your preferred colours for each Priority.
Disable DocMan automatic save email? Tick this option to turn off auto-saving of emails from Affinity, when the email is generated via a workflow task.
Never update finished Tasks? If ticked, the Due Date and Reminder Date for finished tasks will not be updated.

Administration Workbook
Page 124 © 2012 Reed International Books Australia Pty Ltd trading as LexisNexis
7.28 “Trust Statement” tab
Use this tab to record the text that will be printed at the end of a Trust Statement and to set the defaults for the Trust Statement generating screen.
Clause for Trust Statements Enter text that should appear at the end of a Trust Statement.
Default Settings: Select the items which should be ticked by default: Skip Transit Entries? Suppress investment deposit/withdrawal transactions if net trust is zero Suppress movement between protected/unprotected trust Suppress Reversals Suppress extended details Extended details include; the Received Date and Receipted By details. Suppress zero value trust entry for commission bills? Include Investment Statements If Investment Statements are included select the options from the list that are to be ticked by default. Controlled Money / Estates / Investment Money / NZ Investments / Powers

Lexis® Affinity Library
© 2012 Reed International Books Australia Pty Ltd trading as LexisNexis Page 125
7.29 “WordLink” tab
This tab allows you to set the WordLink options.
Go to bookmark StartHere after document merge? Ticking this option will cause the cursor to move to a bookmark in the merged document named "StartHere". Note that you must create this bookmark in your precedent documents if you wish to use this feature.
Update Form Fields after document merge? Ticking this option ensures all fields are updated after the document is "merged". This is the equivalent of performing a field update using the <F9> key in Microsoft Word.
Update Merge Fields before document merge? Ticking this option performs a check on the merge fields in a document. This check attempts to fix corrupted merge fields in the document prior to merging. (Corrupted fields can result in the wrong field values being set after the merge.) This option is un-ticked by default.
Use Document Management SaveAs dialog after document merge? If this option is ticked, the Document Management “Save As” dialog box will display immediately after the document has merged. If left un-ticked, the user will need to click on the “Save As” button on the Document Management toolbar in Word.

Administration Workbook
Page 126 © 2012 Reed International Books Australia Pty Ltd trading as LexisNexis
Show the merge progress dialog? The Merge Progress dialog box displays during the merge process and indicates what stage of the merge is currently being performed. This is very useful during the precedent development and testing phase but may slow down the merge process. It is recommended that this option be un-ticked after the development phase is complete, to optimise speed.
Merge Fields By? This field sets the method for merging precedents. The default is “WordLink” and this is the standard precedent processing method used by Lexis Affinity. The other methods should only be selected after advice from your LexisNexis consultant.
Use Alternative Merge Process? An alternative merge process is available where precedents are being used that have a large number of form fields. Do not select this option unless advised to do so by your LexisNexis consultant.
Delete empty lines? Select this option to delete lines which have been left empty by the merge process due to fields not containing any data. (This is replicating the behaviour of Microsoft Word after a mail merge and is recommended.)
Include in Table? Deletes empty lines within tables. By default empty lines are not removed within tables.
Enforce Font Style? Select this option to force the font of the original text in the precedent to be applied to the output document. This is generally only necessary where a complex combination of nested Word merge fields are being used. Leave this option unticked if you are not experiencing issues as it will slow down the merge process.
Launch Microsoft Word Method There are two methods available for launching Microsoft Word when merging from Lexis Affinity. The default is the Standard method. The Direct (Shell Execute) method is an alternative way of launching Word and should be used if issues are experienced using the Standard method.
Map Singular Plural Words Allows you to record the singular and plural forms of words that are used in Fee templates. For example unit:units, Folio:Folios.
Defaults for new precedents: Record Selection Option Enable Matter Party automatic selection if there is only one entry? If ticked, you will not be prompted to select from a list of one.

Lexis® Affinity Library
© 2012 Reed International Books Australia Pty Ltd trading as LexisNexis Page 127
8. System Administration
8.1 Encrypted Passsword in Affinity.ini
It is possible to use an encrypted password in the Affiniyt.ini file to assist in preventing any unauthorised access to the database name and passwords.
If your current database password is known to people who should not have access to the database, then nit is recommended that you change the database password before encrypting it.
To encrypt the password
1. From explorer, open the Affinity\Utilities folder
2. Double click INIBuilder.exe to open INIBuilder.
3. Select the “Databases” tab
4. Select the database from the list displayed.
5. Tick the Use Encrypted Password check box
6. Click on [Update]
7. Click on [OK] to save the change
The Affinity.ini file will be updated and will now not show the password to the database.
A sample is shown below:

Administration Workbook
Page 128 © 2012 Reed International Books Australia Pty Ltd trading as LexisNexis
To decrypt the password in the Affinity.ini file
1. Repeat the steps above and remove the tick from Use Encrypted Password
2. Click on [Update]
You will be prompted to enter the database password
1. Re-enter the correct password
2. Click on [OK]
3. Open the Affinity.ini file to view the change.
NOTE: If the password in the Affinity.ini file is encrypted and third party applications need to access that password, the setting in System | General - Registry Password Access - must be ticked.

Lexis® Affinity Library
© 2012 Reed International Books Australia Pty Ltd trading as LexisNexis Page 129
9. Options
This area controls the system variables for the individual user. These options are discussed with the Lexis Affinity Library Administrator during the planning and installation phases.
Some of these settings will be recorded by your Lexis Affinity representative on your system.
Hands on
1. Open Options (Utilities | User Options)
The screen is displayed below:

Administration Workbook
Page 130 © 2012 Reed International Books Australia Pty Ltd trading as LexisNexis
9.1 “Matter Labels” tab
This section controls the default printer for Matter Labels, the default number of copies of current and archived matter labels and the default Matter Label Style.
Default Label Printer Select the printer that most matter labels will be printed on.
Matter Copies Select the number of copies of matter labels that you usually require.
Archive Copies Select the number of copies of archived matter labels that you usually require.
Template Select the required Template from the drop down list.
Logo Click on this to record settings for the placement of a logo (if used), and some details of the label printing. See “Logo” settings below.
Options – Use as default setting
If this is ticked, then there is no choice when printing matter labels about the number of copies or the printer they are sent to.
Collate labels (Archive Only)
If ticked, labels generated by Archiving will be collected (spooled) into a single file for printing. This works in conjunction with the Batch Archiving application.
Auto print on matter creation
If ticked, matter labels will print immediately after finalizing the creation of a matter.
Show dialog on print If ticked, the Matter Label Print Options screen will display before printing, thereby allowing the user to select different styles of labels, additional copies and printer.
If un-ticked, the label will be printed immediately using the default system settings.
Save current selected matter label template as system default
If ticked, this label style will apply to the whole firm. If un-ticked, different label types may be selected.
Page Margins Set the top / left / right and bottom margins for the selected label style. You will need to update each Style individually.

Lexis® Affinity Library
© 2012 Reed International Books Australia Pty Ltd trading as LexisNexis Page 131
9.1.1 “Logo” settings
The details of the logo (if used) - can be modified by selecting [Logo].
Top Position (pt) This determines how far down the page the logo will print.
Left Position (pt) This determines how far to the right the logo will print.
Transparent If ticked, the logo will have a clear / transparent background.
Display Author Field If ticked, the word “Author” will print next to the Authors’ initials.
Enlarge File ID Field Value If ticked, the File ID (Matter Number) will be printed in a larger font.
When the settings are:
The label prints as shown below:

Administration Workbook
Page 132 © 2012 Reed International Books Australia Pty Ltd trading as LexisNexis
9.2 “Matter Display” tab
This section allows you to change the information automatically populated in the Description field in the Allocation table when processing entries to a matter.
For example – if in Options the settings are:
On a processing screen, in the Allocation Table, you will see:
If this field is left blank, Lexis Affinity Library will insert the default which is: ”Client, Short Description, FileID”.
TIP: This is a setting for each User – you can change this from time to time, if required. For example on the receipt screen if you are receipting for bills, it may be more convenient to display the matter number first.

Lexis® Affinity Library
© 2012 Reed International Books Australia Pty Ltd trading as LexisNexis Page 133
9.3 “Diary” tab
This section is used to set an individual’s Diary defaults (eg. default author, default notify settings and Outlook or GroupWise link).
The firm wide setting for linking Diary to Outlook or GroupWise can be found under System Settings | System | Diary.
NOTE: If Exchange Integration is enabled, the “Outlook Link” area will be disabled.
The screen is displayed below:
Default Author The User is the person logged into Lexis Affinity Library. Partner, Controller and Author are Employees who can be in control of Clients or Matters. When creating a new diary entry, Lexis Affinity Library will assume the diary entry is for the Default Author selected here. For example, if the Default Author is User, new Diary Entry screen will prompt with the logged in User.
Default Print Event Description
Tick this selection if a printed copy of a diary entry is to include the description. If left blank, there is an option to print at the time of creating a diary entry.

Administration Workbook
Page 134 © 2012 Reed International Books Australia Pty Ltd trading as LexisNexis
Notify Tick this box if you would like a default “Notify” option enabled for each new diary entry made. Specify the length of time in minutes before the appointment time that you would like to be notified with a reminder of the appointment.
Outlook Link - Link with Microsoft Outlook
Tick this box if the users Diary is to link to Microsoft Outlook Calendar.
GroupWise Link - Link with Novell GroupWise
Tick this box if the users Diary is to link to Novell GroupWise.
Log into …as Enter the correct User name.
Test As the Employee name in Lexis Affinity Library may not be exactly the same as the registered Email name, you can click on the Test button. If they are not exactly the same, the Email registered name will be displayed and you will be given the opportunity to use that name.
Refresh & Include Specify the frequency with which to refresh entries and how far forward/back the entries should be synchronised.
Alert Priority The Alert priority field determines how diary alerts (reminders) will be handled. There are three options: Outlook This is the default option. The alert (reminder) setting for a diary appointment will be transferred to the appointment in Outlook on creation of the appointment. When the alert is acted upon by the user (eg. dismiss, snooze), the status selected will remain on the Outlook appointment. When Lexis Affinity synchronises the Diary with the Outlook Calendar, the alert status will not be updated in Outlook. The only time the alert status will be updated is if the appointment date and/or time changes on the appointment in Lexis Affinity. No Alerts in Outlook The alert flag will not transfer over to the appointment in the Outlook Calendar. This means the user will be relying on Lexis Affinity to provide reminders for appointments that originated in the Lexis Affinity diary. Affinity The alert flag on appointments in the Lexis Affinity diary

Lexis® Affinity Library
© 2012 Reed International Books Australia Pty Ltd trading as LexisNexis Page 135
will always update the appointment in the Outlook Calendar. The result of this may be that if an alert is acted upon by the user in Outlook (eg. dismiss), the alert may return after synchronisation between the two diaries has taken place.
Default With When new Diary entries are made for Matters, the “With” field will default to the Client. This can be changed at the time of making the entry if the appointment is with another party. It is also possible to add in an SQL to automatically select another party for the Diary entry.
9.4 “Espreon” tab
The Espreon web site can be opened via the matter window from the Espreon tab. When the [Web Site] button is clicked, the Espreon web page will be launched and the user may perform the searches required.
Espreon web site account details for individual users can be set in this tab.
Account This refers to the firm’s account code with Espreon.
User Name This is the user’s login name to the Espreon web site.
Password This is the user’s login password.
Retype Password This is to confirm the user’s login password. User will be prompted to re-enter if the Password and Retype Password fields do not match.

Administration Workbook
Page 136 © 2012 Reed International Books Australia Pty Ltd trading as LexisNexis
9.5 "Email" tab
This section enables you to specify options relating to generating and auto-profiling emails from Affinity.
Email Format Specifies the default format of emails generated from Affinity. Options are Auto, Plain Text, HTML and Rich Text.
If Auto is selected, the default format in Outlook is used.
Auto-Save This specifies which emails, when generated from Affinity, will contain auto-profiling information within the subject line.
Prompt for file name when attaching document
Select this option to display the Attachments dialog box prior to generation of an email. This dialog box will list the attachments for the email and allow the user to modify the name to be used for the each attachment.
Disable document attachment pop-up window when Emailing from Matter contacts or PhoneBook
Select this option to suppress display of the prompts to attach documents when emailing from the PhoneBook or the Matter contacts tab.
NOTE: For more information on Email Auto-profiling, please refer to the Lexis Affinity Document Management Administrator Reference, available in Help.

Lexis® Affinity Library
© 2012 Reed International Books Australia Pty Ltd trading as LexisNexis Page 137
9.6 “Exchange Server” tab
This option is relevant only for firms using the Exchange Integration feature.
Synchronisation of Diary and Task for each individual user can be switched on or off through the options in this tab.
Emailbox for Exchange Integration This is read from the Employee record. If none has been set, EMPTY displays.
Folders to Synchronize Tick the items to be synchronized.

Administration Workbook
Page 138 © 2012 Reed International Books Australia Pty Ltd trading as LexisNexis
9.7 “Precedents” tab
This section can be used to control how dates will appear in WordPerfect documents.
The screen is displayed below:
Date Format Several formats are available. If required your Lexis Affinity Workflow Consultant will record this for you.
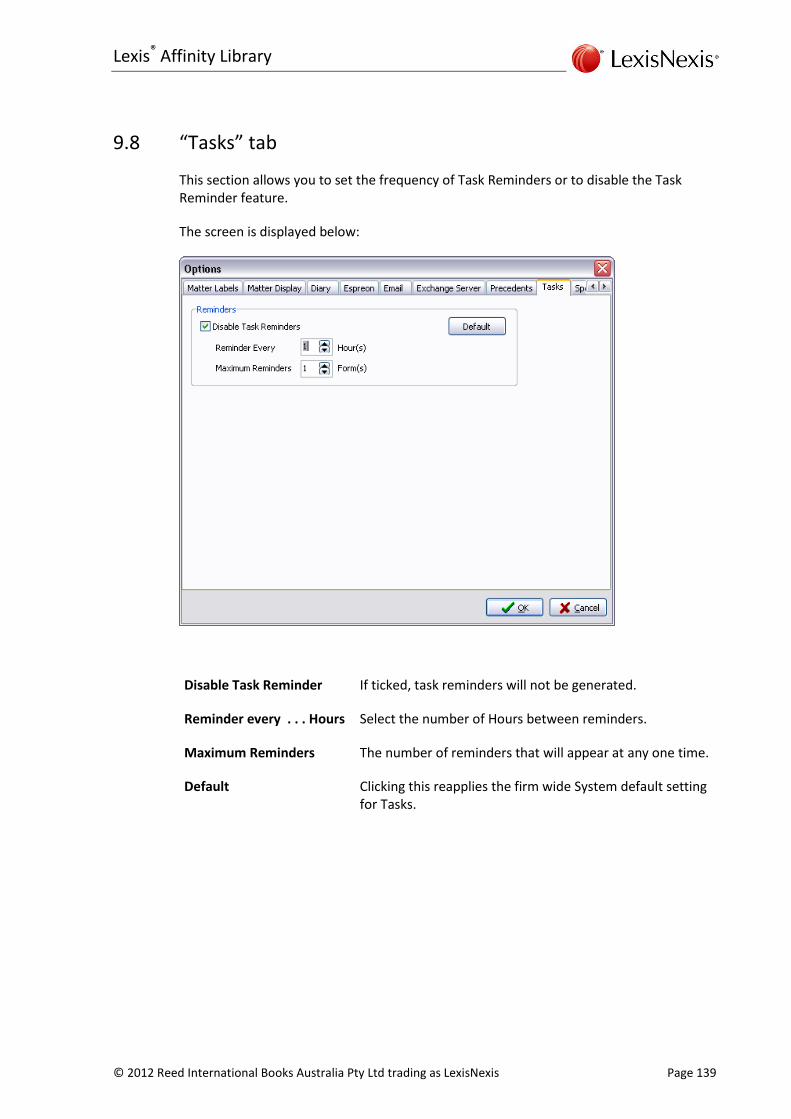
Lexis® Affinity Library
© 2012 Reed International Books Australia Pty Ltd trading as LexisNexis Page 139
9.8 “Tasks” tab
This section allows you to set the frequency of Task Reminders or to disable the Task Reminder feature.
The screen is displayed below:
Disable Task Reminder If ticked, task reminders will not be generated.
Reminder every . . . Hours Select the number of Hours between reminders.
Maximum Reminders The number of reminders that will appear at any one time.
Default Clicking this reapplies the firm wide System default setting for Tasks.

Administration Workbook
Page 140 © 2012 Reed International Books Australia Pty Ltd trading as LexisNexis
9.9 “Spell Checking” tab
This section allows you to set the functions where Spell Checking will be enabled.
The screen is displayed below:
Ticking this checkbox will automatically tick all the listed functions where spell checking can be applied.
Click on this icon to set the options for Spell Check.
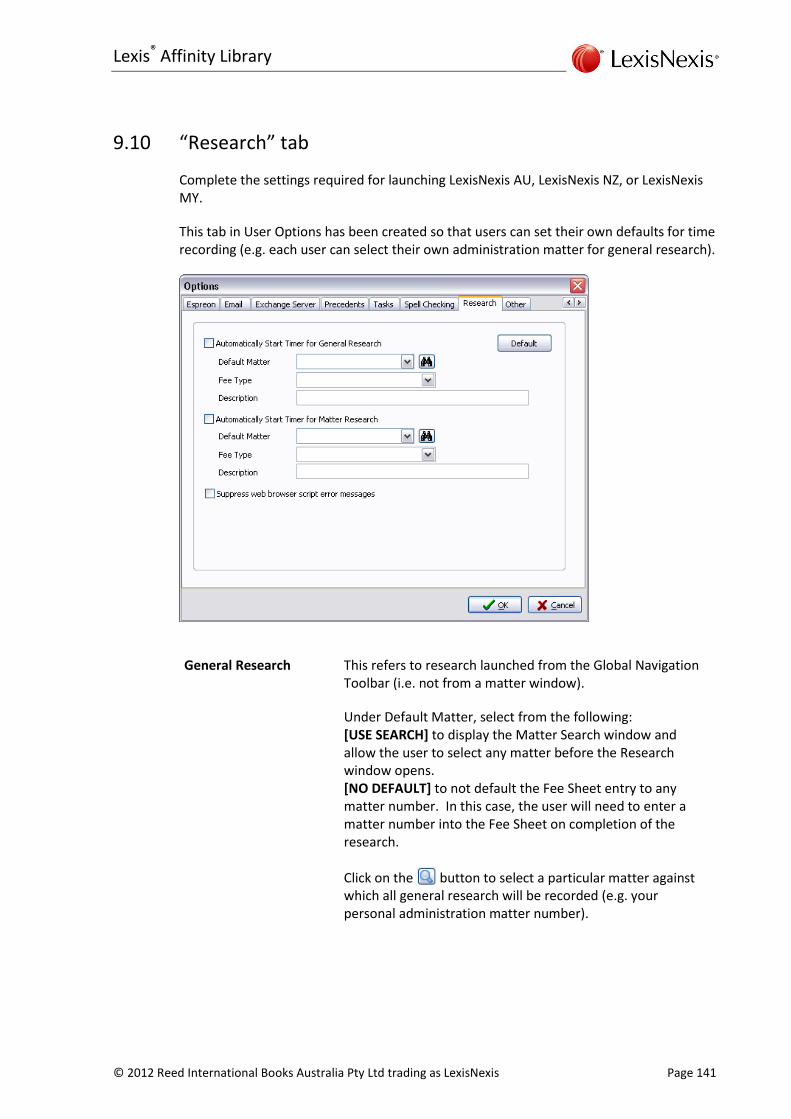
Lexis® Affinity Library
© 2012 Reed International Books Australia Pty Ltd trading as LexisNexis Page 141
9.10 “Research” tab
Complete the settings required for launching LexisNexis AU, LexisNexis NZ, or LexisNexis MY.
This tab in User Options has been created so that users can set their own defaults for time recording (e.g. each user can select their own administration matter for general research).
General Research This refers to research launched from the Global Navigation Toolbar (i.e. not from a matter window).
Under Default Matter, select from the following: [USE SEARCH] to display the Matter Search window and allow the user to select any matter before the Research window opens. [NO DEFAULT] to not default the Fee Sheet entry to any matter number. In this case, the user will need to enter a matter number into the Fee Sheet on completion of the research.
Click on the button to select a particular matter against which all general research will be recorded (e.g. your personal administration matter number).

Administration Workbook
Page 142 © 2012 Reed International Books Australia Pty Ltd trading as LexisNexis
Matter Research Under Default Matter, select [MATTER] to always use the current matter (i.e. matter from which research was launched).
Click on the button to select a particular matter against which all matter research will be recorded.
NOTE: Matter and fee type selected may cause a chargeable fee sheet entry to be created for a matter, and this will become a Fee on the matter when submitted. Choose matter numbers and fee types carefully if you do not wish fees for research to be included in bills.

Lexis® Affinity Library
© 2012 Reed International Books Australia Pty Ltd trading as LexisNexis Page 143
9.11 “Other” tab
This section provides for the automatic printing of file notes when a fee entry is recorded and for setting the default Bank Account for the receipt of Bills.
The screen is displayed below:
Auto print File note on Fee creation
If ticked, Lexis Affinity Library will automatically print a file note every time a fee is created.
Bank for Receipting Bills If there is more than one General Account, you can specify which General Bank Account should be used for the majority of receipts. If only one General Account exists, the system will default to that bank account and no settings need to be made.

Administration Workbook
Page 144 © 2012 Reed International Books Australia Pty Ltd trading as LexisNexis
Notes

Lexis® Affinity Library
© 2012 Reed International Books Australia Pty Ltd trading as LexisNexis Page 145
10. Matter Types
Matters can be categorised by the type of work or field of law. This is referred to as Matter Types. Furthermore, Matter Types can be collated into Groups. For example you may have many different Litigation Matter Types and a Group called Litigation.
NOTE: If you attempt to delete a Matter Type that has records attached, you will be required to assign those records to another Matter Type.
Matter Types is found in Database | Matters
The Matter Type of CP in the Lewisham Reid training dataset is shown below:
Code A maximum of 5 characters.
Description A maximum of 40 characters to describe this Matter Type.
Group Select a Group OR
Click on to create a new Group.

Administration Workbook
Page 146 © 2012 Reed International Books Australia Pty Ltd trading as LexisNexis
“General” tab
DataForm A DataForm is used to record additional details about a matter – for example in a Conveyance – Purchaser matter, you could also record information about the property being purchased, the mortgage, the vendor’s solicitors etc. This DataForm will open after the matter is registered.
Matter Label Select the required Label Style from the drop down list. The default label style will be used when printing labels from the Matter screen. The label style will need to be selected when printing labels for a range of matters.
Workflow Area The Workflow Area contains the standard steps on how this matter should be conducted and could be used to generate the Cost Agreement letter upon matter registration.
Base Folder This option sets the folder where variable paragraphs are stored for the selected matter type. Setting a path here makes it simpler to use the InsertDoc command in your precedent or script as you will not need to specify the full path name to the document.
Script If you have created a script for this document in the Lexis Affinity Scripts program, attach the script here. Scripts are used to enhance the functionality of your precedents (eg. prompt users for input of text, insert variable clauses)
“DataForm Group” tab
This is used to associate a specific group of DataForms to a Matter Type. If left blank, all DataForms are visible on the Matter Data Tab.
“emPower” tab (if enabled)
Use this tab to attach an emPower precedent module to matters of this Matter Type.

Lexis® Affinity Library
© 2012 Reed International Books Australia Pty Ltd trading as LexisNexis Page 147
“Fees + Bills” tab
Fee Rate Code Fee Rate Codes can be set for specific clients or matters.
Fee Template Group Select a Fee Template Group that could apply to matters of this type.
Bill Template Select the Bill Template to be used for most matters of this type.
Collection Plan Select the default Collection Plan that will be prompted when a matter of this type is registered.
Default Scale Costed Fees on Bill for New Matters? Tick this if most matters of this type are billed on a Scale Cost basis.
“Lexis Settlement Adjuster” tab
Enabled Tick this if your Firm uses Lexis Settlement Adjuster, and you would like to launch it from Matters inside Lexis Affinity Library. You will require Lexis Settlement Adjuster version 2.7.2 to use this feature.
Jurisdiction* Select the correct Jurisdiction for the Matter Type (QLD, NSW or VIC). This will ensure Lexis Settlement Adjuster launches with the correct jurisdiction selected.
Acting for?* Select the party for whom you are acting. Select between Purchaser/Seller or Vendor/Buyer. This will cause Lexis Settlement Adjuster to automatically select the party you are acting for in the header area of the statement.
* These settings only work when Settlement Adjuster is used in conjunction with Lexis Affinity dataforms. When integrating with emPower Precedents, these fields are ignored and the corresponding options in Settlement Adjuster are used.

Administration Workbook
Page 148 © 2012 Reed International Books Australia Pty Ltd trading as LexisNexis
“Matter Party / Role” tab
Use this tab to define a list of valid Matter Party Types (PhoneBook Groups) for the selected Matter Type. If no Types are selected here, all Types will display in the selection list when a contact is added to a matter.
The “Matter Party / Role” tab for the Conveyancing – Purchaser Matter Type is shown below:
NOTE: You can add a Role to an allowed Matter Party Type by right-clicking on the Type in the right-hand panel and selecting Add Role. This will limit the Roles that can be assigned against to this Matter Party Type.
This tab shows that when adding a Contact (Matter Party) to a Conveyance – Purchaser matter, the list of available Types is restricted according to the list set up under that Matter Type.
This is shown below:

Lexis® Affinity Library
© 2012 Reed International Books Australia Pty Ltd trading as LexisNexis Page 149
If the Type selected is Solicitor – the only Role that is possible is Vendor.
Default Role for Matter Client Select a default Role for the Matter Client when matters of this type are created. This can be changed by the user, if required, when creating the matter or later by editing the Matter.
Delete button will de-activate Matter Party / Contact? (for Softdocs Integration) This option is used for integration with Softdocs precedents only. You should leave this unchecked, unless advised by your Lexis Affinity Workflow Consultant.
“Other Party Captions” tab
You can nominate appropriate prompts for the 3 Static Other Party Contacts that can be stored on matters of this type.
“Precedent Category Group” tab
This allows one or more Precedent Categories to be attached to the Matter Type. The precedents that then display on a matter will be only those belonging to the categories nominated here.
Filter Precedents by the attached Workflow This option is related to how precedent documents are displayed on a matter. If ticked, the precedents on a matter will be filtered according to the workflow that is attached to the matter. If unticked, the precedents on a matter will be filtered by Precedent Category Group.
“Rates” tab
Entity Select the Entity to which the rates apply, if there is more than one Entity.

Administration Workbook
Page 150 © 2012 Reed International Books Australia Pty Ltd trading as LexisNexis
Fee Rate This is a standard hourly rate that will be charged irrespective of the Employee Rate. The Fee Rate can also be a percentage of the Employee Rate; for example: 90% is entered as 0.90, 110% is entered as 1.10.
Expected Value This is the value that you estimate will be billed on matters of this type.
Commence / Expire Enter the Commencement and Expiry date (if relevant) for the rate.
“Key Dates”
Key Date 1 / 2 / 3 The captions of each date field can be set by the user for each Matter Type. Dates can be set as: [Normal] can be completed or left blank Non Blank must be completed Not Used the field will not be visible on the matter screen
The dates can be viewed on Matter | Matter Details | Overview and can be edited on the “Analysis” tab .
“Research” tab
Use this tab to select research sources for this matter type. This is an optional selection; if you do not select individual sources, a search will be performed across all available sources.
“Document Folders” tab
This tab is used to select the System Folders that are to be displayed for this Matter Type. If no System Folders are selected here, all System Folders will display.

Lexis® Affinity Library
© 2012 Reed International Books Australia Pty Ltd trading as LexisNexis Page 151
11. Code Rules
This section determines how Lexis Affinity Library will create codes for Clients, Matters, Creditors and Safe Custody Packet and Item numbers.
NOTE: Although Lexis Affinity Library will accept most symbols as part of a Code (for example Matter Numbers), it is recommended that you do not use the following symbols: \ / : * ? “ < > | These symbols are prohibited when saving documents in Word. If these symbols are used as part of a Matter Number and you are integrating with Lexis Document Management or a 3rd Party Product, the characters will need to be transformed.
11.1 Client Code Rules
Hands on
In this exercise you will review the settings for Code Rules.
1. Open Code Rules (System Settings | Register Codes)
2. Select the “Client” tab
The screen is displayed below:
Lexis Affinity Library offers two basic options for creating Client IDs.
Client Number Selecting this will result in an all-numeric Client Code. The length of the field is determined by the value entered in “Number Padding” The maximum is 9. This would produce Client Codes of 000000001, 000000002.

Administration Workbook
Page 152 © 2012 Reed International Books Australia Pty Ltd trading as LexisNexis
Partial Name Selecting this will result in an Alpha/Numeric Client Code. The Number of Characters determines the number of alpha characters. The Number Padding determines the number of numeric characters. The maximum number of characters in total is 10. For example; If the Client is Amberware Pty Ltd, the Number of Characters is 4 and Number Padding is 4, the Client Code will be AMBE0001.
Create Acronym ticked If this is ticked (and the Number of Characters is 4 and Number Padding is 4), the Client Code will be AMPL0001, or the next available number. However, if Number of Characters is set to 7, and Number Padding is set to 3 - the Client Code will be AMBERPL001. (Lexis Affinity Library will use the first letter of each word in the Name up to the Number of Characters and then use extra letters from the first Name up to the number of characters specified in Number of Characters.)
Create Acronym not ticked If the Number of characters is set to 7 and the Number Padding is set to 3, the Client Code will be AMBERWA001.
Space Substitution Character Enter a symbol to be automatically substituted for a blank character that may occur in a Client Code.
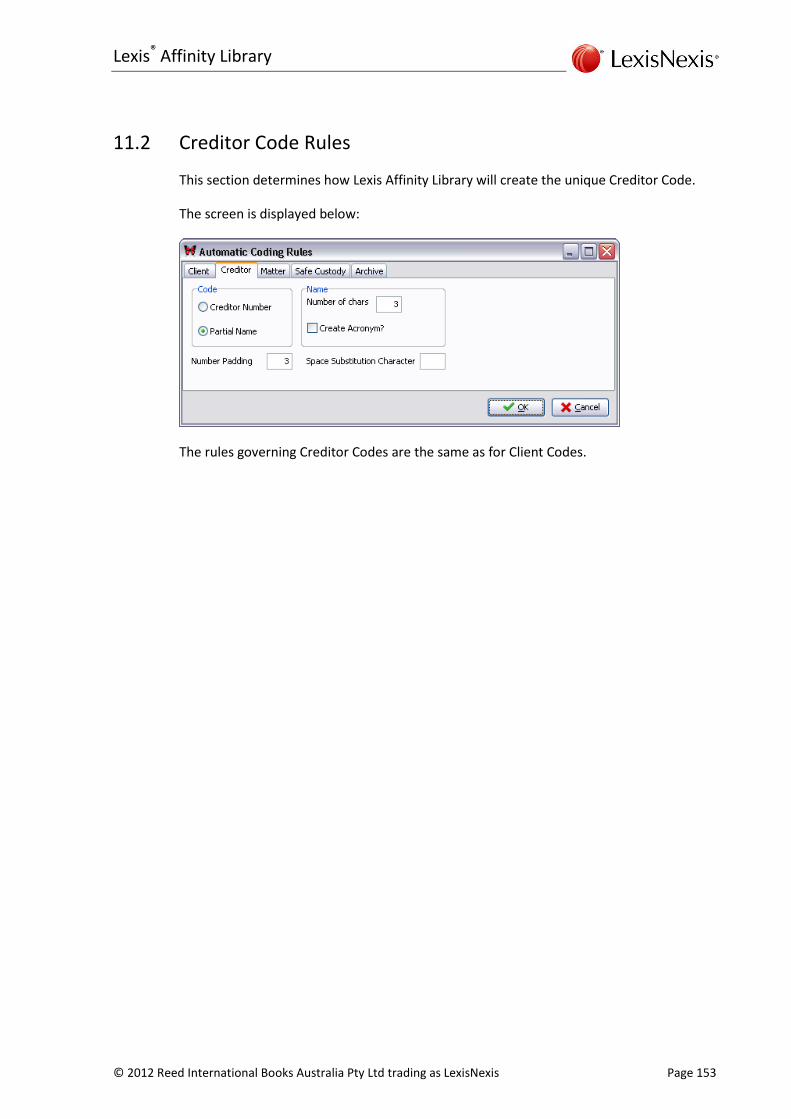
Lexis® Affinity Library
© 2012 Reed International Books Australia Pty Ltd trading as LexisNexis Page 153
11.2 Creditor Code Rules
This section determines how Lexis Affinity Library will create the unique Creditor Code.
The screen is displayed below:
The rules governing Creditor Codes are the same as for Client Codes.
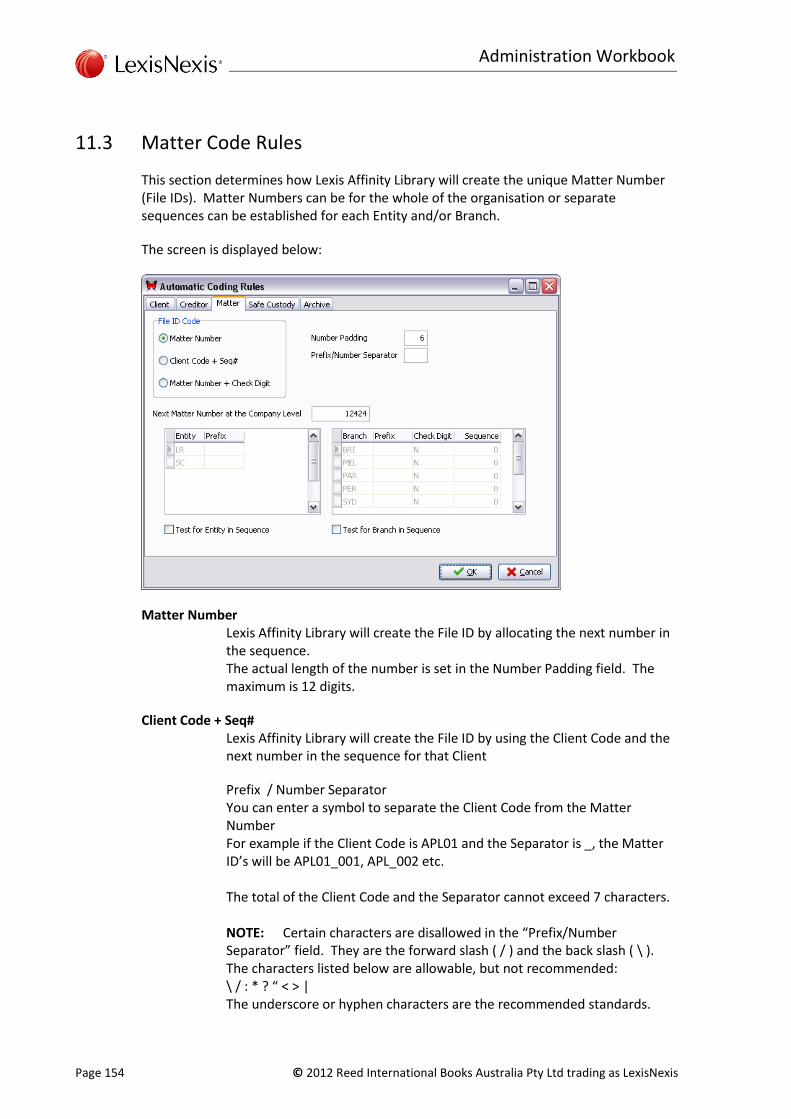
Administration Workbook
Page 154 © 2012 Reed International Books Australia Pty Ltd trading as LexisNexis
11.3 Matter Code Rules
This section determines how Lexis Affinity Library will create the unique Matter Number (File IDs). Matter Numbers can be for the whole of the organisation or separate sequences can be established for each Entity and/or Branch.
The screen is displayed below:
Matter Number Lexis Affinity Library will create the File ID by allocating the next number in the sequence. The actual length of the number is set in the Number Padding field. The maximum is 12 digits.
Client Code + Seq# Lexis Affinity Library will create the File ID by using the Client Code and the next number in the sequence for that Client
Prefix / Number Separator You can enter a symbol to separate the Client Code from the Matter Number For example if the Client Code is APL01 and the Separator is _, the Matter ID’s will be APL01_001, APL_002 etc. The total of the Client Code and the Separator cannot exceed 7 characters. NOTE: Certain characters are disallowed in the “Prefix/Number Separator” field. They are the forward slash ( / ) and the back slash ( \ ). The characters listed below are allowable, but not recommended: \ / : * ? “ < > | The underscore or hyphen characters are the recommended standards.

Lexis® Affinity Library
© 2012 Reed International Books Australia Pty Ltd trading as LexisNexis Page 155
Matter Number + Check digit Lexis Affinity Library will create a File ID and add a check digit as the last number. For example 0124119, 0124122 (where the numbers are 012411, 012412 and 9 and 2 are the check digits).
Next Matter Number at the Company Level This indicates the next matter that will be used, if you are not using different sequences for Entities or Branches.
Test for Entity in Sequence Tick this to activate the Entity table.
If only one Entity exists, the prompt to Test for Entity will not be displayed.
Entity The Entities registered in your system will be displayed on the left hand side. Prefix Enter a prefix for each Entity – for example Lewisham Reid – LR.
Check Digit Y to include a Check digit as the last digit of the Matter Number N No Check digit will be used.
Sequence Enter the next number to be used. For example – 100
If the “Number Padding” at the top of the screen is 6, the Entity prefix is LR, Check digit is N and Sequence is 100, the next number in sequence for Lewisham Reid will be LR0100. This will be displayed at the bottom of the screen. If Number Padding is 6, Entity Prefix is LR, Check digit is Y and Sequence is 100, the next number will be LR1000 (where the last 0 is the check digit).
Test for Branch in Sequence Tick this to activate the Branch table on the right hand side. If only one Branch exists, the prompt to Test for Branch will not be displayed.
Branch The Branches registered in your system will be displayed.
Prefix Enter a prefix for each Branch. For example Auckland – AK Check Digit Y to include a Check Digit as the last digit of the Matter Number N No Check Digit will be used.
Administration Workbook
Page 156 © 2012 Reed International Books Australia Pty Ltd trading as LexisNexis
Sequence Enter the next number to be used. For example – 100. If the “Number Padding” at the top of the screen is 6, the Entity prefix is LR, Branch Prefix is AKI, Check Digit is N and Sequence is 100, the next number in sequence for Lewisham Reid, Auckland Branch will be LRAK100. This will be displayed at the bottom of the screen. If Number Padding is 6, Entity Prefix is LR, Branch Prefix is BRI, Check Digit is Y and Sequence is 100, the next number will be LRAK1000 (where the last 0 is the check digit).

Lexis® Affinity Library
© 2012 Reed International Books Australia Pty Ltd trading as LexisNexis Page 157
11.4 Safe Custody Code Rules
This section determines how Lexis Affinity Library will create numbers for Packet IDs and Items. Safe Custody Packet and Item IDs can be for the whole of the organisation or separate sequences can be established for each Entity and/or Branch.
The screen is displayed below:
Packet ID – Number Padding Enter the number of digits for the Packet ID number. Maximum 15.
Packet Item ID (Envelope) Enter the number of digits for the Packet Item ID. Maximum 6.
Next Packet Number at the Company Level This indicates the next packet number that will be used, if you are not using different sequences for Entities or Branches.
Test for Entity in Sequence Tick this to activate the Entity table.
Entity The Entities registered in your system will be displayed on the left hand side. Prefix Enter a prefix for each Entity – for example Lewisham Reid – LR.

Administration Workbook
Page 158 © 2012 Reed International Books Australia Pty Ltd trading as LexisNexis
Sequence Enter the next number to be used. For example – 100
If the Packet ID “Number Padding” at the top of the screen is 6, the Entity prefix is LR and Sequence is 100, the next Packet ID number in sequence for Lewisham Reid will be LR0100. This will be displayed at the bottom of the screen. If the Packet ID “Number Padding” is 6, Entity Prefix is LR and Sequence is 100, the next Packet ID number will be LR1000 (where the last 0 is the check digit).
Test for Branch in Sequence Tick this to activate the Branch table on the right hand side.
Branch The Branches registered in your system will be displayed.
Prefix Enter a prefix for each Branch. For example Auckland - AKI Sequence Enter the next number to be used. For example – 100. If the Packet ID “Number Padding” at the top of the screen is 6, the Entity prefix is LR, Branch Prefix is AK and Sequence is 100, the next Packet ID number in sequence for Lewisham Reid, Auckland Branch will be LRAK100. This will be displayed at the bottom of the screen.

Lexis® Affinity Library
© 2012 Reed International Books Australia Pty Ltd trading as LexisNexis Page 159
11.5 Archive Code Rules
This section determines how Lexis Affinity Library will create numbers for Archive IDs. Archive IDs can be for the whole of the organisation or separate sequences can be established for each Entity and/or Branch.
The screen is displayed below:
Next Archived Matter at the Company Level This indicates the next archive matter number that will be used, if you are not using different sequences for Entities or Branches.
Number Padding if used with Prefixes Number Padding determines the number of numeric characters You do not need to complete this if archived matters should only have a numeric ID.
Test for Entity in Sequence Tick this to activate the Entity table.
Entity The Entities registered in your system will be displayed on the left hand side. Prefix Enter a numeric prefix for each Entity – for example Lewisham Reid – 01.
Sequence Enter the next number to be used. For example – 100
If the “Number Padding” at the top of the screen is 6, the Entity prefix is 01, and Sequence is 100, the next number in sequence for Lewisham Reid will be 010100. This will be displayed at the bottom of the screen.

Administration Workbook
Page 160 © 2012 Reed International Books Australia Pty Ltd trading as LexisNexis
Test for Branch in Sequence Tick this to activate the Branch table on the right hand side.
Branch The Branches registered in your system will be displayed.
Prefix Enter a numeric prefix for each Branch. Sequence Enter the next number to be used. For example – 100. If the “Number Padding” at the top of the screen is 6, the Entity prefix is 01, Branch Prefix is 04 and Sequence is 100, the next number in sequence for Lewisham Reid, Auckland Branch will be 0104100. This will be displayed at the bottom of the screen.

Lexis® Affinity Library
© 2012 Reed International Books Australia Pty Ltd trading as LexisNexis Page 161
12. Setting up the PhoneBook Prompts
The PhoneBook is the core of Lexis Affinity Library. The PhoneBook should contain the names and addresses of all the people or companies with whom your firm deals. This includes Clients, Employees, Prospects, Other Solicitors, Real Estate agents, Barristers, Doctors, and Creditors. The integrity of the data in the PhoneBook is vital to your practice. The PhoneBook also allows you to record relationships between people or companies in the PhoneBook, such as associated companies, employee relationships and Directorships.
The PhoneBook is also your marketing database and therefore can include potential clients or anyone who you want included in your marketing mail outs. PhoneBook entries can be attached to one or more groups for reporting purposes. The PhoneBook includes the ability to create mail merge documents for all or selected contacts in the PhoneBook.
Before creating PhoneBook entries it is important to understand Name Labels, Groups and Relationships.
12.1 Name Labels
When you register PhoneBook entries, you need to select a Type of PhoneBook Entry. The standard Types are; Barrister, Business, Court, Business Contact, Our Firm, Individual, Joint Party and Staff. You may register additional types to suit your firm’s requirements. It is recommended that you speak with your Lexis Affinity Library Solution Support Representative before doing this. Each Type of entry can have its own set of prompts (Name Labels) that will appear on the screen to make it easier to enter the correct Name and Contact details in the appropriate fields. For example, if you are registering a Business, it is more logical for the prompts to read Business Name / Contact Name, whereas if you are registering an Individual, the prompts should read Surname / Given Names.

Administration Workbook
Page 162 © 2012 Reed International Books Australia Pty Ltd trading as LexisNexis
Standard Lexis Affinity Library Name Labels
Barrister This is for creating Barristers.
Business This is for all commercial entities that are registered in the PhoneBook such as Companies, Trusts, Partnerships, Associations, and Government Institutions.
Court This is for creating Courts.
Business Contact This is for creating the contacts at each organisation with which you deal.
Our Firm This is used for the PhoneBook entry/ies that record/s details of your firm.
Individual This is for any single person. Although a married couple may be jointly purchasing a property, their details need to be recorded separately as Individuals in the PhoneBook. The married couple is then recorded as a Joint party and this is used as the Client record.
Joint Party This is for a combination of two or more Businesses or Individuals for the purpose of registering a client.
Staff This is for creating the Firm’s employees.
The table that follows shows the standard Name Labels.

Lexis® Affinity Library
© 2012 Reed International Books Australia Pty Ltd trading as LexisNexis Page 163
"PhoneBook" Tab
Sta
ff
S
Init
ials
JAE
Nam
e
Jacq
uelin
e
Eas
ton
No
t U
sed
Po
siti
on
Sec
reta
ry
Fu
ll N
ame
Jacq
uelin
e
Ann
Eas
ton
No
t U
sed
No
t U
sed
No
t U
sed
No
t U
sed
.
Join
t P
arty
J
Sea
rch
Nam
e
God
frey
, Mic
hael
& A
nne
Co
rres
po
nd
ence
Nam
e
Mr
& M
rs M
S
God
frey
No
t U
sed
No
t U
sed
Nam
es in
Fu
ll
Mic
hael
Sim
on
God
frey
and
Ann
e G
odfr
ey
No
t U
sed
No
t U
sed
A.B
.N.
T.F
.N.
Ind
ivid
ual
I
Sea
rch
Nam
e
God
frey
,
Mic
hael
Sim
on
Co
rres
po
nd
e
nce
Nam
e
Mr
Mic
hael
S
God
frey
No
t U
sed
Occ
up
atio
n
Plu
mbe
r
Det
aile
d
Nam
e
Mic
hael
Sim
on
God
frey
No
t U
sed
A.C
.N.
A.B
.N.
T.F
.N.
Ou
r F
irm
F
Sea
rch
Nam
e
Lew
isha
m R
eid
Co
rres
po
nd
ence
Nam
e
Lew
isha
m R
eid
Mai
n C
on
tact
Ms
Y R
oger
s
No
t U
sed
Fu
ll T
rad
ing
Nam
e
Lew
isha
m R
eid
No
t U
sed
A.C
.N.
A.B
.N.
T.F
.N.
Bu
sin
ess
Co
nta
ct
E
Su
rnam
e_
Bu
s. N
ame
Ada
ms_
Bla
ckw
ell
Co
mp
any
Nam
e
Bla
ckw
ell S
cien
tific
Pub
licat
ions
Co
rres
po
nd
ence
Nam
e
Mr
John
W E
dwar
ds
Po
siti
on
Fu
ll C
om
pan
y N
ame
Bla
ckw
ell S
cien
tific
Pub
licat
ions
Dep
t/D
ivis
ion
Ser
vice
s D
epar
tmen
t
No
t U
sed
A.B
.N.
T.F
.N.
Co
urt
C
Sea
rch
Nam
e
Dis
tric
t,
Par
ram
atta
Co
urt
Nam
e
Dis
tric
t Cou
rt
Reg
istr
y
Par
ram
atta
Div
isio
n
Civ
il C
laim
s
Nam
e fo
r
Ch
equ
es
Dis
tric
t Cou
rt o
f
Par
ram
atta
Sta
te in
Fu
ll
New
Sou
th
Wal
es
No
t U
sed
A.B
.N.
T.F
.N.
Bu
sin
ess
B
Sea
rch
Nam
e
Bla
ckw
ell S
cien
tific
Pub
licat
ions
Co
rres
po
nd
ence
Nam
e
Bla
ckw
ell S
cien
tific
Pub
licat
ions
Fro
m B
us_
Co
nta
ct
Mr
J A
dam
s
Fro
m B
us_
Co
nta
ct
Mr
J A
dam
s
Fu
ll T
rad
ing
Nam
e
Bla
ckw
ell S
cien
tific
Pub
licat
ions
No
t U
sed
A.C
.N.
A.B
.N.
T.F
.N.
Bar
rist
er
A
Sea
rch
Nam
e
Edw
ards
, Joh
n
Will
iam
Ch
amb
er N
ame
Sel
wyn
Cha
mbe
rs
Co
rres
po
nd
ence
Nam
e
John
W E
dwar
ds,
QC
Bar
rist
er’s
Cle
rk
Bar
riste
rs C
lerk
ing
Ser
vice
s
Nam
e fo
r C
heq
ues
John
Will
iam
Edw
ards
No
t U
sed
No
t U
sed
A.B
.N.
T.F
.N.
PH
ON
EB
OO
K
TA
B
Co
de
Sea
rch
Nam
e
Tit
le
Occ
up
atio
n
Lo
ng
Nam
e
Sh
ort
Nam
e
A.C
.N.
A.B
.N.
T.F
.N.

Administration Workbook
Page 164 © 2012 Reed International Books Australia Pty Ltd trading as LexisNexis
"Personal" Tab
Sta
ff
Per
son
al
Det
ails
Ap
pel
Ms
Giv
en N
ame
Jacq
uelin
e
Mid
dle
Nam
e
Ann
Fam
ily N
ame
Eas
ton
gen
der
No
t U
sed
Ban
k D
etai
ls
Join
t P
arty
No
t U
sed
Ban
k D
etai
ls
Ind
ivid
ual
Per
son
al
Det
ails
Ap
pel
)
Mr
Giv
en N
ame
Mic
hael
Mid
dle
Nam
e
Sim
on
Fam
ily N
ame
God
frey
Gen
der
Dat
e o
f B
irth
21/0
6/19
62
Ban
k D
etai
ls
Ou
r F
irm
Do
cum
ent
Det
ails
No
t U
sed
No
t U
sed
No
t U
sed
Nam
e o
n
Do
cum
ents
Lew
isha
m R
eid
No
t u
sed
No
t U
sed
Ban
k D
etai
ls
Bu
sin
ess
Co
nta
ct
Ad
dit
ion
al
Det
ails
Ap
pel
Mr
Giv
en N
ame
John
Mid
dle
Nam
e
Fam
ily N
ame
Edw
ards
Gen
der
Bec
om
e a
Co
nta
ct
21/0
6/20
06
Ban
k D
etai
ls
Co
urt
UP
PE
R C
AS
E
No
t U
sed
CO
UR
T N
AM
E
DIS
TR
ICT
CO
UR
T
SU
BU
RB
PA
RR
AM
AT
TA
ST
AT
E
NS
W
No
t U
sed
No
t U
sed
Ban
k D
etai
ls
Bu
sin
ess
Do
cum
ent
Det
ails
No
t U
sed
No
t U
sed
No
t U
sed
Nam
e o
n
Do
cum
ents
Bla
ckw
ell S
cien
tific
Pub
licat
ions
No
t U
sed
No
t U
sed
Ban
k D
etai
ls
Bar
rist
er
Per
son
al
Det
ails
Ap
pel
Mr
Giv
en n
ame
John
Mid
dle
Nam
e
Will
iam
Fam
ily
Nam
e
Edw
ards
Gen
der
No
t U
sed
Ban
k D
etai
ls
PE
RS
ON
AL
TA
B
Per
son
al T
ab
Ap
pel
Giv
en N
ame
Mid
dle
Nam
e
Fam
ily N
ame
Gen
der
Dat
e o
f B
irth
Ban
k T
ab

Lexis® Affinity Library
© 2012 Reed International Books Australia Pty Ltd trading as LexisNexis Page 165
"Client" and "Creditor" Tabs
Sta
ff
Nam
e
Jacq
uelin
e E
asto
n
Co
nta
ct (
Op
tio
nal
)
Wit
hh
old
ing
Tax
Rat
e
NO
TE:
If W
ith
ho
ldin
g Ta
x R
ate
s ar
e n
ot
app
licab
le t
o y
ou
r d
atas
et,
se
lect
No
t U
sed
.
Sta
ff
Nam
e
Jacq
uelin
e E
asto
n
Co
nta
ct (
Op
tio
nal
)
Join
t P
arty
Nam
es
Mr
Mic
hael
& M
rs
Ann
e G
odfr
ey
Co
nta
ct (
Op
tio
nal
)
Wit
hh
old
ing
Tax
Rat
e
Join
t P
arty
Nam
es
N/A
Co
nta
ct (
Op
tio
nal
)
N/A
Ind
ivid
ual
Nam
e
Mr
Mic
hael
Sim
on
God
frey
Co
nta
ct (
Op
tio
nal
)
Wit
hh
old
ing
Tax
Rat
e
Ind
ivid
ual
Nam
e
Mr
Mic
hael
Sim
on
God
frey
Co
nta
ct (
Op
tio
nal
)
Mic
hael
God
frey
Bu
sin
ess
Co
nta
ct
No
t U
sed
No
tt U
sed
Wit
hh
old
ing
Tax
Rat
e Bu
sin
ess
Co
nta
ct
No
t U
sed
No
tt U
sed
Co
urt
No
t U
sed
No
t U
sed
Wit
hh
old
ing
Tax
Rat
e
Co
urt
Cre
dit
or
Nam
e
Dis
tric
t Cou
rt o
f
Par
ram
atta
Cre
dit
or
Co
nta
ct
Bu
sin
ess
Bu
sin
ess
Nam
e
Bla
ckw
ell S
cien
tific
Pub
licat
ions
Co
nta
ct
Mr
J A
dam
s
Wit
hh
old
ing
Tax
Rat
e
Bu
sin
ess
Bu
sin
ess
Nam
e
Bla
ckw
ell S
cien
tific
Pub
licat
ions
Co
nta
ct
Mr
J A
dam
s
Bar
rist
er
Nam
e
John
Will
iam
Edw
ards
Co
nta
ct
(Op
tio
nal
)
Wit
hh
old
ing
Tax
Rat
e
Bar
rist
er
Nam
e
John
Will
iam
Edw
ards
Co
nta
ct
(Op
tio
nal
)
CL
IEN
T
TA
B
Clie
nt
Nam
e
Clie
nt
Co
nta
ct
Wit
hh
old
ing
Tax
Rat
e CR
ED
ITO
R
TA
B
Cre
dit
or
Nam
e
Clie
nt
Co
nta
ct
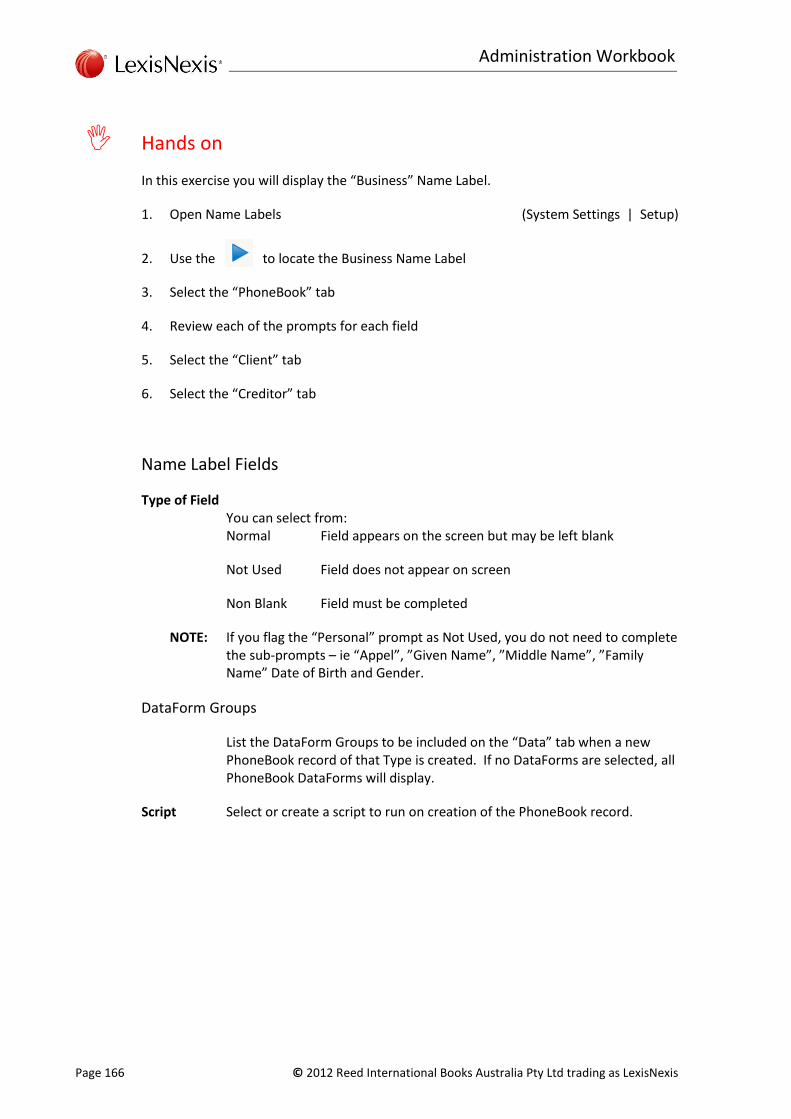
Administration Workbook
Page 166 © 2012 Reed International Books Australia Pty Ltd trading as LexisNexis
Hands on
In this exercise you will display the “Business” Name Label.
1. Open Name Labels (System Settings | Setup)
2. Use the to locate the Business Name Label
3. Select the “PhoneBook” tab
4. Review each of the prompts for each field
5. Select the “Client” tab
6. Select the “Creditor” tab
Name Label Fields
Type of Field You can select from: Normal Field appears on the screen but may be left blank
Not Used Field does not appear on screen
Non Blank Field must be completed
NOTE: If you flag the “Personal” prompt as Not Used, you do not need to complete the sub-prompts – ie “Appel”, ”Given Name”, ”Middle Name”, ”Family Name” Date of Birth and Gender.
DataForm Groups
List the DataForm Groups to be included on the “Data” tab when a new PhoneBook record of that Type is created. If no DataForms are selected, all PhoneBook DataForms will display.
Script Select or create a script to run on creation of the PhoneBook record.

Lexis® Affinity Library
© 2012 Reed International Books Australia Pty Ltd trading as LexisNexis Page 167
12.2 PhoneBook Groups
Lexis Affinity Library provides for PhoneBook entries to be grouped – generally for marketing purposes. PhoneBook Groups can be used to filter the PhoneBook entries so that only selected records are exported to word processing for merging.
It is recommended that the ability to create new PhoneBook Groups not be given to everyone, to avoid accidental duplication of groups.
NOTE: It is possible to add PhoneBook Groups from the “Groups” tab in a PhoneBook entry however the method described below is the recommended one.
Hands on
In this exercise you will create a new PhoneBook Group for Expert Witnesses. The Expert Witnesses will need to be able to be attached to matters.
1. Open PhoneBook Groups (Database | PhoneBook)
2. Click on to create a new PhoneBook Group
The screen is displayed below:
3. Category Expert Witnesses
4. Include in Conflict Checker Reporting Tick this
When this field is checked, the PhoneBook Group name will be output in the Conflict of Interest search results where a PhoneBook search matches the criteria entered.

Administration Workbook
Page 168 © 2012 Reed International Books Australia Pty Ltd trading as LexisNexis
5. Matter/Other Party Tick this
You must tick this if you want to be able to attach members of this PhoneBook Group to matters as Matter Contacts.
Generally the following prompts do not apply to current releases of software.
6. Acting For? / DataForm Field Link Leave blank
7. Colour Select a colour to display this PhoneBook Group in
8. Select the “Matter Party Type DataForm Group” tab
This tab allows you to select DataForms that will display for contacts of this type when they are added to matters.
9. Click on to save the PhoneBook Group

Lexis® Affinity Library
© 2012 Reed International Books Australia Pty Ltd trading as LexisNexis Page 169
12.3 Matter Party Roles
PhoneBook records are used in a number of different areas in Lexis Affinity Library. For example, they are used to add Contacts to a matter and to populate emPower DataForms (where emPower is installed).
When selecting a PhoneBook record to add as a Contact, the PhoneBook Type and the PhoneBook Role can be specified. The PhoneBook Type is the group the PhoneBook record belongs to (eg. solicitors, doctors, real estate agents). The PhoneBook Role is the role the selected person or entity has in relation to the matter.
For example:
A solicitor firm could be Type: “Solicitors” and Role: “First Defendant’s Solicitor”.
A doctor could be Type: “Doctor” and Role: “Expert Witness”.
A doctor could be Type: “Doctor” and Role “Respondent 1”.
The Roles required are set up by the Lexis Affinity Library Administrator in your firm.
Creating New Matter Party Roles
Hands on
1. Open Matter Party Role (Database | Matters)
2. Click on to create a new Matter Party Role
The screen is displayed below:
3. Code DEF_1_SOLICITOR
Codes cannot contain spaces but may contain characters.
4. Label Solicitor for Defendant 1
5. Click on to save the new Matter Party Role

Administration Workbook
Page 170 © 2012 Reed International Books Australia Pty Ltd trading as LexisNexis
To display the Roles already created
1. Click on
The following screen will display:
2. Click on [Cancel] to close the dialog box.
Print Matter Party Roles
1. Click on
The listing will display on the screen. This listing also shows the date the Role was created.

Lexis® Affinity Library
© 2012 Reed International Books Australia Pty Ltd trading as LexisNexis Page 171
12.4 PhoneBook Relationship Dictionary
When you create PhoneBook entries, you can record relationships between that and other PhoneBook entries. The types of relationships available in the PhoneBook Entries are created in the PhoneBook Relationship Dictionary. You can create both backward and forward relationships.
Discussion
Examine an existing relationship.
1. Open PhoneBook Relationship Dictionary (Database | PhoneBook) OR Select the “Relationships” tab in a PhoneBook entry
2. Locate “is a debtor contact for”
The screen is displayed below:
3. Forward is a debtor contact for
4. Backward has as a debtor contact
5. Default System Role for new records – Forward Debtor Contact
6. Backward Debtor
This is automatically inserted when Debtor Contact is selected in Forward
7. Select to update if any changes are made

Administration Workbook
Page 172 © 2012 Reed International Books Australia Pty Ltd trading as LexisNexis
12.5 Print the PhoneBook Relationships
1. Click on or Ctrl+P to see a list of existing Relationships:
A sample list of Relationships is shown below:

Lexis® Affinity Library
© 2012 Reed International Books Australia Pty Ltd trading as LexisNexis Page 173
13. Client Groups
The program offers the ability to group clients. These Client Groups are separate to the PhoneBook Groups.
Client Groups are used to collate the individual entities or individuals that are part of the same organisation. For example Black Day Publishing Pty Ltd and Blackwell Scientific Publications are subsidiaries of the Black Publishing Group and both companies are flagged as belonging to the Black Publishing Group. Similarly, you may have separate client records for Peter Binet, Heather Binet, Binet Homes Pty Ltd and Binet Designs Pty Ltd. Peter and Helen are married and are the directors of the 2 companies, so it is useful to attach all these clients into a group which could be called “Binet”.
Client Master Groups are used to collate two or more Client Groups.
Client and Master Client Groups are used for searching, filtering and reporting.
13.1 Create a New Client Group
Hands on
In this exercise you will create a new Client Group for Local Government Departments.
1. Open Client Groups (Database | Clients)
The screen is displayed below:
2. New Local Government Departments
3. Click on [Add]
Local Government Departments will now appear on the list displayed.

Administration Workbook
Page 174 © 2012 Reed International Books Australia Pty Ltd trading as LexisNexis
To create a Master Group
You could create a Master Group called “Government Departments” if you had several groups to cover various areas of government, such as Local, State, Interstate.
4. Select the “Master Groups” tab
5. New Government Departments
6. Click on [Add]
Government Departments will now appear in the list displayed.
To Add Members to a Master Group
7. Select the “Master Group Members” tab
8. Master Group Select Government Departments from the drop down list
A list of Client Groups will be displayed.
9. Tick Local Government Departments
10. Close Client Groups
13.2 Transfer Group Members
You can use this facility to quickly transfer all members of one Client Group to another Client Group.
Procedure
1. Select the “Groups” tab
2. Highlight the Group to be transferred
3. Click on [Transfer Members]
4. Select the group to be transferred to (this is the Target Group)
5. Click on [OK]
A message will display asking you to confirm the transfer
6. Select [Yes]
A message will display advising the number of transfers.

Lexis® Affinity Library
© 2012 Reed International Books Australia Pty Ltd trading as LexisNexis Page 175
14. Client Business Sources
Lexis Affinity offers the ability to record the source of new Clients. Business Sources can be a type of referral – eg Existing Client Referral, or from various marketing and advertising activities – eg Internal Tax Seminar, Web Page advertising Recording this information can assist in the planning of marketing activities for the firm.
14.1 Create a New Business Sources
Hands on
In this exercise you will create a new Business Source of NAB Referral.
1. Open Client Business Sources (Database | Clients)
2. Click on to create a new Business Source
The screen is displayed below:
3. Category National Bank Referral
4. Click on to update.
14.2 Print Client Business Sources
1. Click on or press Ctrl+P to see a list of existing Client Business Sources
A sample list of Client Business Sources is shown below:

Administration Workbook
Page 176 © 2012 Reed International Books Australia Pty Ltd trading as LexisNexis
15. Client Industry Classifications
The program offers the ability to record the Industry Classification of each Client. Recording this information can assist in the planning of marketing activities for the firm.
15.1 Create a New Industry Classification
Hands on
In this exercise you will create a new Industry Classification of Mining.
1. Open Client Industry Classifications (Database | Clients)
2. Click on to create a new Industry Classification
The screen is displayed below:
3. Category Mining
4. Click on to update.
15.2 Print Client Industry Classifications
1. Click on to see a list of existing Client Industry Classifications
A sample list of Client Industry Classifications is shown below:

Lexis® Affinity Library
© 2012 Reed International Books Australia Pty Ltd trading as LexisNexis Page 177
16. Conflict Checker
Conflict Checking allows users to run a check within key areas of the database for potential conflicts that may exist.
The Conflict of Interest Checker functionality is comprised of four separate programs which sit within the Database Menu, under the sub-group heading Conflict Checker:-
Conflict Checker Audit - this function allows users to search, view and/or print previous Conflict of Interest Checker search results
Conflict Checker Maintenance – enables users to register Conflict Checker MSWord templates, Conflict Checker types and define standard user parameter settings with an optional override function
Conflict Checker System - enables users to define global parameter settings, search options and include invalid search texts.
Conflict of Interest Checker – enables users to interrogate various areas of the database to check for areas of potential conflict within the current database
The Conflict of Interest Checker program will interrogate the PhoneBook, Client, Matter, DataForm, Archived, Hot Docs and emPower records within the database. It will search for data that matches the search words or phrase input as the search criteria, and output the results found in either the standard quick report or via registered MSWord templates.
Using MSWord Templates provides users with greater reporting flexibility as well as the added option to save the merged word document via Document Manager.

Administration Workbook
Page 178 © 2012 Reed International Books Australia Pty Ltd trading as LexisNexis
16.1 Setup
16.1.1 Grant Employee Launch Clearance
Ensure that users have access to the Conflict Checker programs as required.
TIP: Changes to Launchable programs are not visible until the user has signed out and signed in again.

Lexis® Affinity Library
© 2012 Reed International Books Australia Pty Ltd trading as LexisNexis Page 179
16.1.2 PhoneBook Groups
A checkbox is available in PhoneBook Groups named “Include in Conflict Checker Reporting.”
Ticked When this field is ticked, the PhoneBook Group name will be included in the Conflict of Interest search results where a PhoneBook search matches the criteria entered.
Unticked When this field is not ticked, the Conflict of Interest Checker will search for records that match the search criteria entered but will not include the PhoneBook Group Name in the search results.

Administration Workbook
Page 180 © 2012 Reed International Books Australia Pty Ltd trading as LexisNexis
16.1.3 Matters
A checkbox is available in the Matter record on the “Miscellaneous” tab.
Ticked When this field is ticked, the Matter Description will be included in the Conflict of Interest search results where a Matter search matches the criteria entered.
Unticked When this field is not ticked, the Conflict of Interest Checker will search for records that match the search criteria entered and will include the matter reference (ie Matter Number) but will not include the Matter Description in the search results.
IMPORTANT
This does not suppress the Matter description detail from being accessible to all Users within Lexis Affinity; it will only suppress the detail from reporting within the Conflict Checker results.

Lexis® Affinity Library
© 2012 Reed International Books Australia Pty Ltd trading as LexisNexis Page 181
16.1.4 DataForms
A checkbox is available in the DataForm record, on the “DataForm Options” tab.
Ticked When this field is checked, the Conflict of Interest Checker will search the DataForm for details that match the search words or phrase criteria entered, and output any matches found in the search results.
Unticked Details contained in DataForm fields are not searched.
16.1.5 Document Types
If your firm uses Affinity Document Management and will use MSWord Conflict Checker Templates It is recommended that you create a new Document Type called Conflict Checker Results (or similar).
When saving the merged word documents, the results can then be saved against this document type.
TIP: Document Types is located in Case Management | Document Management.

Administration Workbook
Page 182 © 2012 Reed International Books Australia Pty Ltd trading as LexisNexis
16.2 Conflict Checker System
This program allows the user to define global parameter settings regarding DataForms and PhoneBook Groups, Search options and Invalid Search Texts for the Conflict of Interest Checker.
16.2.1 “Search Options” tab
This tab enables the following criteria to be set.
Minimum Characters Set the minimum number of characters which a Conflict of Interest Check will search. Enter zero to disable the feature.
Matter suppress detail description The text entered in this field will be included alongside the Matter Reference Id, if the matter has been flagged to “Suppress Detail in Conflict Search”.
16.2.2 “Invalid Search Texts” tab
This tab has two options, Add and Delete:-
Add Enables the User to create invalid search text records ie: “the” Every new invalid search text created will then be shown in table form within this function. To remove a “Search Text” entry, highlight the entry and click on [Delete]..
Delete Enables the User to delete invalid search text records that have been created.

Lexis® Affinity Library
© 2012 Reed International Books Australia Pty Ltd trading as LexisNexis Page 183
16.2.3 “DataForms” tab
Administrators can either manually select their chosen DataForms for inclusion in the Conflict of Interest Checker search via Database > DataForms, or can opt to flag to “Include all” as per the Conflict Checker System options below. Within this tab there are three options available:-
Keep current DataForms Conflict Checker Settings If individual DataForms have been flagged to be included in Conflict Checker reporting then this would be the standard setting.
Remove all DataForms from Conflict Checker If this option is checked, then all current DataForms which have been flagged to be included in Conflict Checker reporting will be automatically unchecked.
Include all DataForms in Conflict Checker If this option is checked, then ALL registered DataForms will be marked for inclusion in the Conflict Checker reporting.
16.2.4 “PhoneBook Groups” tab
Administrators can either manually select their chosen PhoneBook Groups via Database > PhoneBook Groups for inclusion in the Conflict of Interest Checker search, or to utilise the Conflict Checker System options as per below.
Within this tab there are three options available:-
Keep current PhoneBook Groups Conflict Checker Settings If individual PhoneBook Groups have been flagged to be included in Conflict Checker reporting then this would be the standard setting.
Remove all PhoneBook Groups from Conflict Checker If this option is checked, then all current PhoneBook Groups which have been flagged to be included in Conflict Checker reporting will be automatically unchecked.
Include all PhoneBook Groups in Conflict Checker If this option is checked, then ALL registered PhoneBook Groups will have the checkbox ticked stating that all PhoneBook Groups will be marked for inclusion in the Conflict Checker reporting
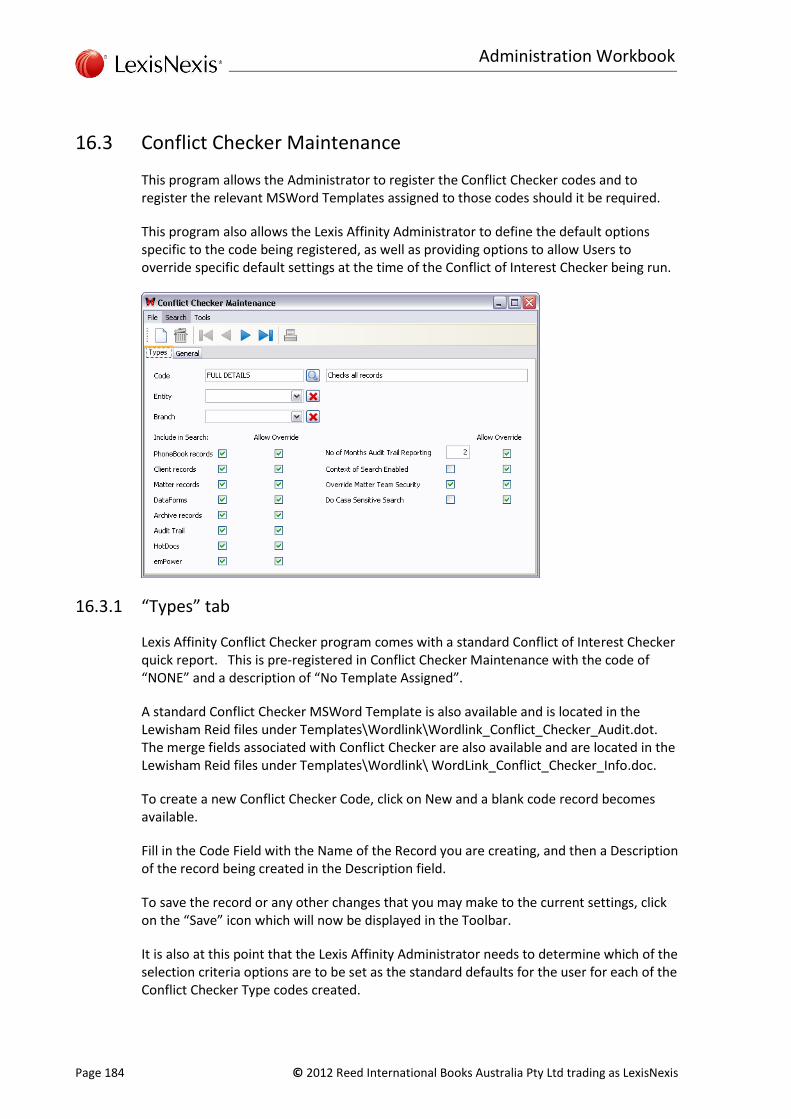
Administration Workbook
Page 184 © 2012 Reed International Books Australia Pty Ltd trading as LexisNexis
16.3 Conflict Checker Maintenance
This program allows the Administrator to register the Conflict Checker codes and to register the relevant MSWord Templates assigned to those codes should it be required.
This program also allows the Lexis Affinity Administrator to define the default options specific to the code being registered, as well as providing options to allow Users to override specific default settings at the time of the Conflict of Interest Checker being run.
16.3.1 “Types” tab
Lexis Affinity Conflict Checker program comes with a standard Conflict of Interest Checker quick report. This is pre-registered in Conflict Checker Maintenance with the code of “NONE” and a description of “No Template Assigned”.
A standard Conflict Checker MSWord Template is also available and is located in the Lewisham Reid files under Templates\Wordlink\Wordlink_Conflict_Checker_Audit.dot. The merge fields associated with Conflict Checker are also available and are located in the Lewisham Reid files under Templates\Wordlink\ WordLink_Conflict_Checker_Info.doc.
To create a new Conflict Checker Code, click on New and a blank code record becomes available.
Fill in the Code Field with the Name of the Record you are creating, and then a Description of the record being created in the Description field.
To save the record or any other changes that you may make to the current settings, click on the “Save” icon which will now be displayed in the Toolbar.
It is also at this point that the Lexis Affinity Administrator needs to determine which of the selection criteria options are to be set as the standard defaults for the user for each of the Conflict Checker Type codes created.

Lexis® Affinity Library
© 2012 Reed International Books Australia Pty Ltd trading as LexisNexis Page 185
Code Short Name Code for the Conflict Checker Type created.
Description Description associated with the Conflict Checker record created.
Entity Select the default Entity or leave blank to include All Entities
Branch Select the default Branch or leave blank to include All Branches
Include in Search Each main record type within Lexis Affinity ie: PhoneBook records, can be flagged as a default to be included in the Conflict of Interest Checker search.
Options include PhoneBook, Client, Matter, DataForms, Archive Records (Matters), the Audit trail, HotDocs (see below) and emPower.
HotDocs Select this option and the Conflict of Interest Checker will search any data that has been copied from HotDocs answer files into the Lexis Affinity database. Note that the HotDocs answer files are not directly interrogated. The data must exist in the Lexis Affinity database.
emPower Select this option and the Conflict of Interest Checker will search the emPower fields that have been nominated by your System Administrator to be included in conflict checks.
No of Months Audit Trail Reporting As a standard default this will be set to 2 months. When the Conflict of Interest Checker is run, the report will output instances where a search criteria match is found within the Audit Trail table for the last two months.
Context of Search Enabled When this field is checked, a new field is enabled in the Conflict of Interest Checker program.
This field becomes mandatory in the Conflict of Interest Checker if the override option is disabled.
Override Matter Team Security If Matter Team Security is used Firm-wide within Lexis Affinity, and this option is disabled, then the Operator running the Conflict of Interest Checker will only see those matters for which they have Team access.
Do Case Sensitive Search When checked the Conflict of Interest Checker will run a Case Sensitive search. This may considerably reduce the potential conflict check search results.
Allow Override If any of these items are flagged it indicates that these defaults can be overridden by the Operator at the time that they run the Conflict of Interest Checker.

Administration Workbook
Page 186 © 2012 Reed International Books Australia Pty Ltd trading as LexisNexis
16.3.2 “General” tab
The “output” reference has two options:-
Internal If using the standard quick report option, then no changes are required here as the report reads the internal setting.
MSWord Select this if you are using MSWord Templates to generate your Conflict Check Report. Additional fields are then displayed.
Direct merge by Wordlink / Mail Merge The checkbox should be ticked to enable the Wordlink mail merge functionality.
Use System Path As the Conflict Checker does not use the standard System template paths this field will remain unchecked.
Path To register the Conflict Checker MSWord template in Affinity, need to set the path location of the template here. When the Conflict of Interest Checker is run it reads the path location as defined here.
Should there be multiple Conflict Checker Codes registered, it will be necessary to assign the correct template, and the relevant template path for each of the codes created.
Before / After Macro Enter the name of a macro to run before or after generation of the document. For example, you may have a macro that performs additional formatting on the document or performs calculations on table fields
16.3.3 “Wordlink” tab
When MSWord is selected as the option within the “General” tab, a new Wordlink tab will be enabled.
This allows the Operator to set the Wordlink optimisation settings for the template document merge.

Lexis® Affinity Library
© 2012 Reed International Books Australia Pty Ltd trading as LexisNexis Page 187
16.4 Conflict Checker Maintenance Menu and Ribbon
16.4.1 Menu
The Conflict Checker Maintenance Menu options follow the standard Lexis Affinity menu options with the exception of the Tools menu option, which allows the Operator to immediately access the Conflict Checker System function.
16.4.2 Ribbon
The Conflict Checker Maintenance ribbon follows the standard Lexis Affinity icons
Administration Workbook
Page 188 © 2012 Reed International Books Australia Pty Ltd trading as LexisNexis
16.5 Conflict Checker Audit
This program allows the User to search for, view and/or print previously generated Conflict of Interest Checker results.
When a Conflict of Interest Check has been run with the Audit Trail option having been selected, the Audit Trail list will be populated with the details applicable to the search that has been conducted.
The ribbon options include:-
Merge Template with Conflict Checker Search results Will only be enabled if the original search was executed using a Conflict Checker MSWord Template and enables the Operator to re print the results

Lexis® Affinity Library
© 2012 Reed International Books Australia Pty Ltd trading as LexisNexis Page 189
16.5.1 “Audit Trail” tab
A sample Audit trail is displayed below:
The Audit Trail list contains the following information:-
Created The date the Conflict of Interest Checker search was run.
Author The registered code of the Employee who ran the Conflict Check search.
Context Search Details of the Context of Search record if used.
Description The detail of the Search Words/Phrase text string searched.
Entity The Entity Code selected with this search; if this record is unchecked, All Entities were selected in the search.
Branch The Branch Code selected with this search; if this record is unchecked, All Branches were selected in the search.
Archive If ticked indicates that Archive records were included in the search criteria.
Audit Trail If ticked indicates that Audit Trail was selected in the search criteria.
Audit Trail from Indicates the date from which the Audit Trail search commenced.
Case Sensitive If ticked indicates that a Case Sensitive search was executed.
Client If ticked indicates that Client records were included in the search criteria.
DataForm If ticked indicates that DataForm records were included in the search criteria.
Matter If ticked indicates that Matter records were included in the search criteria.
PhoneBook If ticked indicates that PhoneBook records were included in the search criteria.
Override Matter Team Security If ticked indicates that Override Matter Team Security was enabled in the search criteria.

Administration Workbook
Page 190 © 2012 Reed International Books Australia Pty Ltd trading as LexisNexis
16.5.2 “Filter” tab
Filtering options are similar to those that exist within other Affinity programs, and Operators should be familiar with the standard settings.
Where the “Context of Search” field has been utilised the Operator has the option to select from existing PhoneBook records by use of the Binoculars in order to populate this field.
Once a filtered search has been executed and the Operator has finished reviewing the list of filtered results, can then clear the filtered results to show the full Audit Trail list by clicking on the “Clear Filter” button in the toolbar.
The Audit Trail Filter options include:-
Select Equal to Entity This allows you to search the audit results for a selected entity code. Branch This allows you to search the audit results for a selected branch code.
Created Since and Before Allows you to search for Audit Trail records created since a particular date or before a particular date, or between two dates.
Select to where criteria – Contains Search the Audit Trail for records that contain the search text you enter into the nominated field.
Select to where criteria – Starts with Search the Audit Trail for records that start with the search text entered into the nominated field.
Do Case Sensitive Search Opt to run a Case Sensitive search of the Audit Trail for case sensitive matches of the search text entered in the nominated field.
Context Search Search the Audit Trail for records which have been run in the context of or on behalf of an existing PhoneBook record.
Description Key in the relevant search text to find the records associated with the Context Search detail.
Search Criteria Enter the search text to locate those Audit Trail records that match the criteria selected.
Clear All Click on this button to clear all Filter settings.
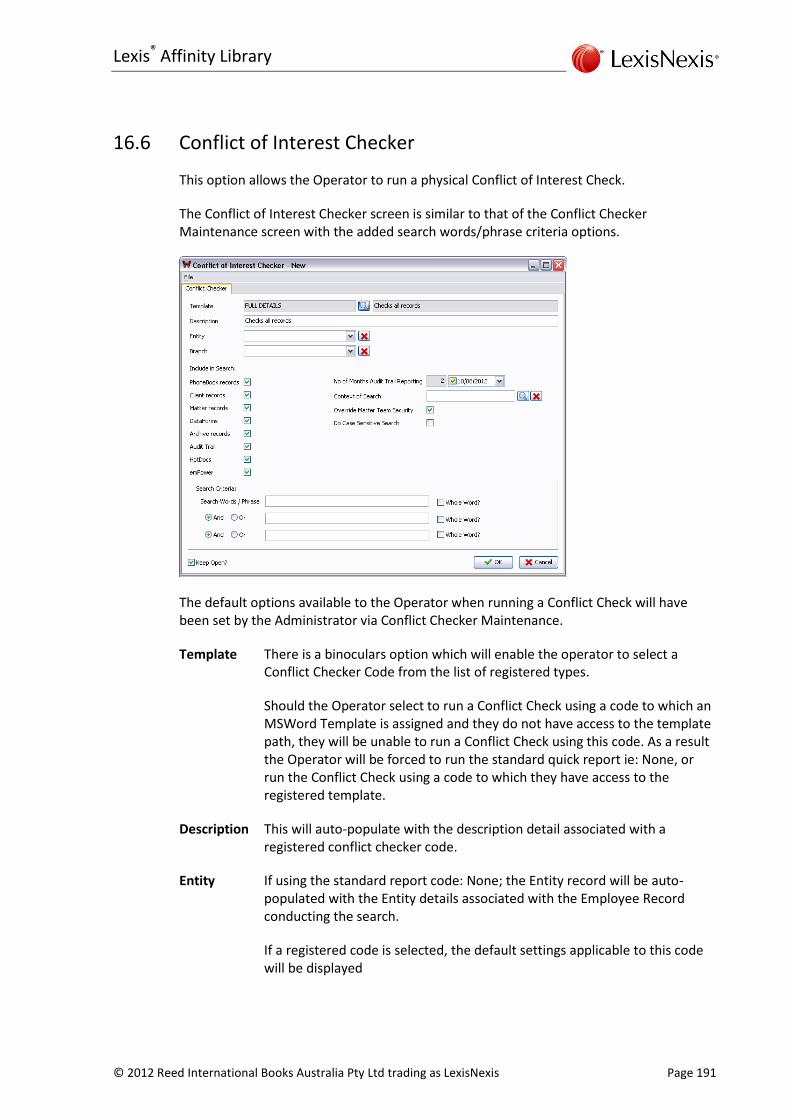
Lexis® Affinity Library
© 2012 Reed International Books Australia Pty Ltd trading as LexisNexis Page 191
16.6 Conflict of Interest Checker
This option allows the Operator to run a physical Conflict of Interest Check.
The Conflict of Interest Checker screen is similar to that of the Conflict Checker Maintenance screen with the added search words/phrase criteria options.
The default options available to the Operator when running a Conflict Check will have been set by the Administrator via Conflict Checker Maintenance.
Template There is a binoculars option which will enable the operator to select a Conflict Checker Code from the list of registered types.
Should the Operator select to run a Conflict Check using a code to which an MSWord Template is assigned and they do not have access to the template path, they will be unable to run a Conflict Check using this code. As a result the Operator will be forced to run the standard quick report ie: None, or run the Conflict Check using a code to which they have access to the registered template.
Description This will auto-populate with the description detail associated with a registered conflict checker code.
Entity If using the standard report code: None; the Entity record will be auto-populated with the Entity details associated with the Employee Record conducting the search.
If a registered code is selected, the default settings applicable to this code will be displayed

Administration Workbook
Page 192 © 2012 Reed International Books Australia Pty Ltd trading as LexisNexis
Branch If using the standard report code: None; the Branch record will be auto-populated with the Branch details associated with the Employee Record conducting the search. If a registered code is selected, the default settings applicable to this code will be displayed.
Include in Search If the options to override the default settings have been enabled in Conflict Checker Maintenance, then the Operator can choose which options they wish to include or exclude from the available default settings.
The available Search options are the PhoneBook, Client, Matter, DataForms, Archive (Matters), Audit Trail, HotDocs and emPower.
Data from HotDocs answer files can also be included, provided the data has been written back to the Lexis Affinity database. Note that the HotDocs answer files are not directly interrogated. The data must exist in the Lexis Affinity database.
No of Months Audit Trail Reporting When the date field is enabled, the Operator can amend the date record to a date of their choice for the Conflict Checker to report on results found that match in the audit trail.
Context of Search If the “Context of Search” field is enabled, and the override option disabled, then this field is mandatory for completion and the following error message will display if the field is not completed:-
The Operator will not be able to execute a Conflict of Interest Checker search until this field is completed. If a PhoneBook record exists the Operator can choose the Binoculars to run a standard PhoneBook search, or enter in Free Text.
Override Matter Team Security It is unlikely that this option be enabled for Operators to have the choice in the Conflict of Interest Checker program; however should the record be enabled, it provides Operators when running the Conflict of Interest Checker report to ignore the Matter Team Security settings set against the Matter record where an Employee is only able to see those records to which they are assigned as a Team Member.

Lexis® Affinity Library
© 2012 Reed International Books Australia Pty Ltd trading as LexisNexis Page 193
Case Sensitive Search If the option is unchecked, and the Operator selects to search the word ‘ace’ then all instances where the search finds a match will be included in the results ie: ‘Grace’, ‘Pace’, ‘Lace’, ‘Ace Holdings Pty Ltd’.
If the Operator selects to run a case sensitive search on the word ‘Ace’, then the search will only output those records where the search finds a match ie: ‘Ace Holdings Pty Ltd’, and ignore those records as per above ‘Grace’, ‘Pace’, and ‘Lace’.
Utilising the Case Sensitive search option, will help reduce the number of possible matches output in the search results.
Keep Open If this check box is ticked the screen will remain open at the end of a Conflict of Interest Search, enabling the Operator to run multiple searches using the same Search profile or should they wish too, select a new search profile.
16.6.1 Search Criteria
The search criteria entered here formulates the basis of the Conflict Checker search results. Further more, what is actually entered in each of the available fields, will impact on the end results when the Conflict of Interest Search has been run.
Search Words/Phrase If the Context of Search field is enabled and the Operator uses the PhoneBook field to populate this field then the Search Words/Phrase will be auto-populated with that PhoneBook record detail.
Should additional search criteria need to be met, the Operator can fill in further search words or phrases in the applicable fields.
Whole Word? At the end of each search word/phrase there is a “Whole Word?” checkbox;
this allows the Operator to qualify the search they are entering in order to further reduce the number of potential matches of the searched word/phrase found within the database.
If this option is checked, then only a single word made up of those
characters and/or digits entered will be recognised as the valid search criteria.
ie: should the search/phrase entered be ‘Leader’s’ with the Whole Word?
option checked, then the search results will output only those records where an exact match for ‘Leader’s’ has been found.

Administration Workbook
Page 194 © 2012 Reed International Books Australia Pty Ltd trading as LexisNexis
Should the Whole Word? option be unchecked, and a search executed with
the criteria ‘Leader’ the following results would be output, as the search executed is looking for ALL instances in the database where the criteria entered has been met.
And If use “And” in the search criteria, the Conflict of Interest Checker will search for instances of the search criteria entered found to be in the same text string.
ie: in the Lewisham Reid database key in search words/phrase criteria “Fauldings” and in the “and” field type “Debt Recovery”, will receive the following results
Or If use the “Or” in the search criteria, the Conflict of Interest Search will look for each individual instance of the search criteria entered within the database.
ie: search words/phrase criteria enter “Fauldings” and in the “or” field type “Debt Recovery” and the results found include multiple instances of the search criteria where records are found that match both search records entered

Lexis® Affinity Library
© 2012 Reed International Books Australia Pty Ltd trading as LexisNexis Page 195
16.6.2 Execute Search
Once all relevant search criteria have been entered, the Operator now selects OK in order to proceed with the search.
Invalid Text Should an Operator key in a word which has been recorded as an “Invalid Text” in Conflict Checker System Settings the following error message will be displayed
If Operator clicks on OK, the invalid search text record will be highlighted.
Minimum Characters Should an Operator enter a search record that does not meet the
minimum characters registered in Conflict Checker System Settings the following error message will now be displayed
Operator should now click on OK and re key their preferred search criteria.

Administration Workbook
Page 196 © 2012 Reed International Books Australia Pty Ltd trading as LexisNexis
16.7 Conflict Checker Results
The results generated will be dependent on the report or template code chosen and the search options selected
Should the Code: None have been selected then the quick report will output the Conflict Checker Results
Should an MSWord template be selected then the results will be output using the WordLink mail merge facility and the end results can then be saved into Lexis Affinity Document Manager.

Lexis® Affinity Library
© 2012 Reed International Books Australia Pty Ltd trading as LexisNexis Page 197
16.7.1 DataForm Results
If an Operator selects to search records where the search word/phrase exists in DataForms only it will search all the DataForm records where they have been marked up for inclusion in Conflict Checker Reporting.
If all record types are included in the Search options then the same applies as per above.
If however, the Operator should then choose to run a Conflict of Interest Check and opt to include PhoneBook and DataForms as the only search options, the search results will output only those PhoneBook and PhoneBook DataForm details where matches are found.
The same applies when running a Conflict of Interest Check and choose to include only Matter and DataForms as the search options; the search results will output only those Matter and Matter DataForm details where matches are found.
16.7.2 Printing Audit Trail Results
If Audit Trail is selected as part of the criteria, this will output the audit records found in both the quick report and the template options.
Should an Operator wish to produce a list of the Audit Trail records that match their selected search criteria, then this can be done by running an Audit Trail only Conflict of Interest Check.
This may also be managed by the creation of a new Conflict Checker Type in Conflict Checker Maintenance where Audit Trail only is checked in the “Include in Search” options.

Administration Workbook
Page 198 © 2012 Reed International Books Australia Pty Ltd trading as LexisNexis
16.8 Appendices
16.8.1 Appendix A Sample Conflict Checker Quick Report Results

Lexis® Affinity Library
© 2012 Reed International Books Australia Pty Ltd trading as LexisNexis Page 199
16.8.2 Appendix B Sample Conflict Checker Standard Template Report Results

Administration Workbook
Page 200 © 2012 Reed International Books Australia Pty Ltd trading as LexisNexis
16.8.3 Appendix C Sample Template: Wordlink_Conflict_Checker_Audit.dot
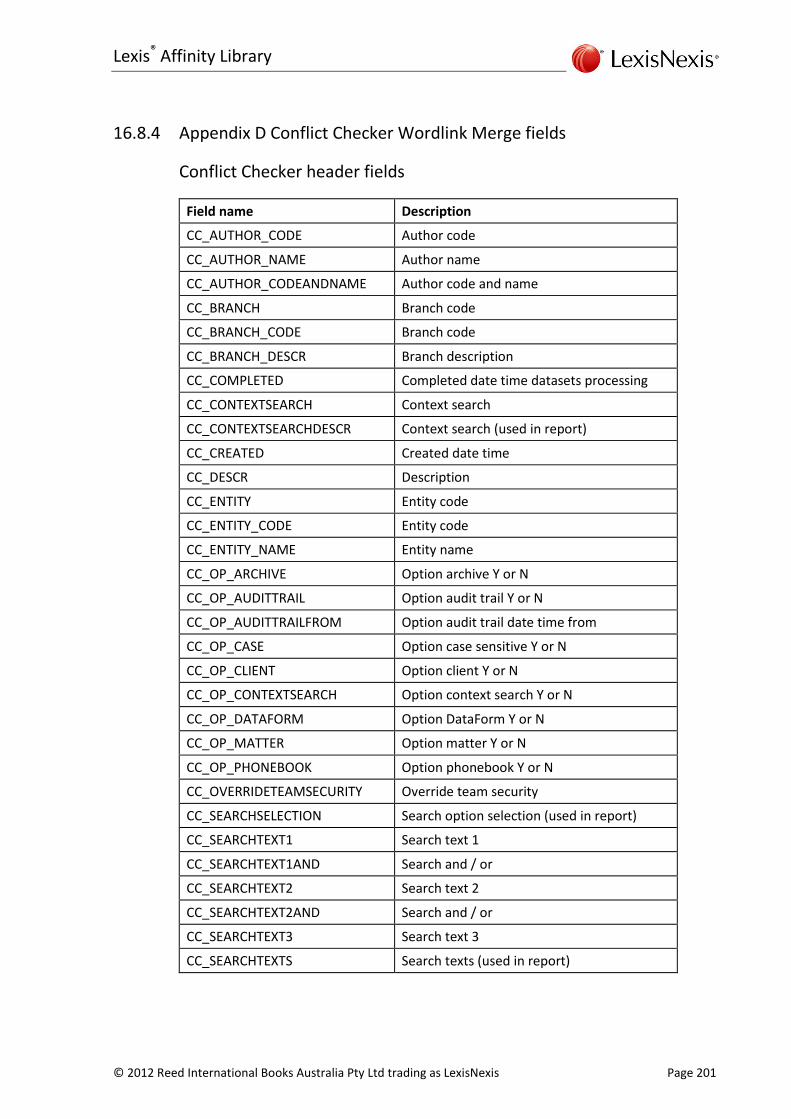
Lexis® Affinity Library
© 2012 Reed International Books Australia Pty Ltd trading as LexisNexis Page 201
16.8.4 Appendix D Conflict Checker Wordlink Merge fields
Conflict Checker header fields
Field name Description
CC_AUTHOR_CODE Author code
CC_AUTHOR_NAME Author name
CC_AUTHOR_CODEANDNAME Author code and name
CC_BRANCH Branch code
CC_BRANCH_CODE Branch code
CC_BRANCH_DESCR Branch description
CC_COMPLETED Completed date time datasets processing
CC_CONTEXTSEARCH Context search
CC_CONTEXTSEARCHDESCR Context search (used in report)
CC_CREATED Created date time
CC_DESCR Description
CC_ENTITY Entity code
CC_ENTITY_CODE Entity code
CC_ENTITY_NAME Entity name
CC_OP_ARCHIVE Option archive Y or N
CC_OP_AUDITTRAIL Option audit trail Y or N
CC_OP_AUDITTRAILFROM Option audit trail date time from
CC_OP_CASE Option case sensitive Y or N
CC_OP_CLIENT Option client Y or N
CC_OP_CONTEXTSEARCH Option context search Y or N
CC_OP_DATAFORM Option DataForm Y or N
CC_OP_MATTER Option matter Y or N
CC_OP_PHONEBOOK Option phonebook Y or N
CC_OVERRIDETEAMSECURITY Override team security
CC_SEARCHSELECTION Search option selection (used in report)
CC_SEARCHTEXT1 Search text 1
CC_SEARCHTEXT1AND Search and / or
CC_SEARCHTEXT2 Search text 2
CC_SEARCHTEXT2AND Search and / or
CC_SEARCHTEXT3 Search text 3
CC_SEARCHTEXTS Search texts (used in report)

Administration Workbook
Page 202 © 2012 Reed International Books Australia Pty Ltd trading as LexisNexis
Notes

Lexis® Affinity Library
© 2012 Reed International Books Australia Pty Ltd trading as LexisNexis Page 203
17. Postcodes
The Lexis Affinity Library data files include a set of Australian Postcode, however, you may find it necessary to update this from time to time.
For Australia, the list of official Australian postcodes is available to be downloaded from the Australia Post website at: www1.auspost.com.au/postcodes/
The import function allows your firm to overwrite the complete list of postcodes currently held, or to update postcodes that meet nominated criteria (i.e. nominated state or country). This information is provided to cover importing Australian Postcodes.
17.1 Download the Postcodes
Procedure
These instructions are provided as a guide only. Lexis Affinity users must take full responsibility for downloading and importing Postcodes.
1. Access the web site
2. Select to download the Postcode Data File
3. Select the file to download
The file is downloaded as a zip file.
4. Unzip the file and save to a convenient location – for example the Affinity folder
5. Open the file
If it is a csv file, Microsoft Excel will open.
6. Examine the file and make a note of the following:
Format of the file (generally csv)
Is there a Header row? (Generally Yes)
Column numbers for Postcode, Suburb, Category and State (generally 2,3,1,10)
NOTE: The file does not include the leading zeroes in Postcodes for the Northern Territory. (For example Darwin is 800, not 0800). This will need to be corrected – either in the csv file or in Affinity itself. This will not stop the import.
7. Save the file after you have made any modifications

Administration Workbook
Page 204 © 2012 Reed International Books Australia Pty Ltd trading as LexisNexis
Procedure
1. Open Postcodes (System Settings | Register Codes)
2. Click on to import Postcodes
The following screen displays:
3. Import File Enter the name of the file or click on to locate the file
4. File Format Select the correct format
5. Layout - Suburb / State / Postcode / Category Columns Enter the column numbers
6. Value for Country from Column or Set to Enter the details
The Australia Post file does not contain a Country column. If you prefer to include the Country in your addresses, you can enter AUSTRALIA in “Set to”

Lexis® Affinity Library
© 2012 Reed International Books Australia Pty Ltd trading as LexisNexis Page 205
7. Postcodes to remove prior to import Select All or Postcodes matching Criteria
This allows you to remove only those Postcodes that have either a nominated country and/or state, or those postcodes that have a blank country description and/or a nominated state.
8. Click on [Next]
A screen similar to the following displays
9. Click on [Import]
The import will commence. Lexis Affinity Library will display a screen similar to the following indicating progress of the import.

Administration Workbook
Page 206 © 2012 Reed International Books Australia Pty Ltd trading as LexisNexis
When the import has completed, a confirmation message will be displayed to the user, similar to the sample below.
10. Click on [OK] to finalise the import.
NOTE: Postcodes can be imported to replace the entire list of postcodes currently existing within the Lexis Affinity Library database, or they can be imported to add to or replace existing postcodes that meet nominated criteria – for example, those that have a particular state or country attached to them.

Lexis® Affinity Library
© 2012 Reed International Books Australia Pty Ltd trading as LexisNexis Page 207
18. Accounting Options
The Master Accounting concept accommodates firms requirements to produce reports, both Matter based (for example the Fee or Bill List) and General Ledger reports (Profit & Loss and Balance sheet), classified according to the analysis category assigned to a team, group, department or other reporting structure. The levels of reporting implemented have been named Entity, Branch, Department, Matter Type and Author.
Accounting Options enable firms to specify the level of reporting that is required for all transactions. Depending on the firms requirements, these settings will determine mandatory fields with respect to Solicitor Analysis fields, Matter Billing/Analysis fields and general ledger transactions.
When a transaction originates from a matter, for example a fee entry, bill, cheque or receipt, the Analysis fields default to those found on the matter itself under the Billing / Analysis tab and the Matter Type assigned to the file.
When a transaction originates from the General Ledger, for example Accounts Payable invoices, general ledger cheques or journals, the Analysis fields default to those found attached in the form of a general ledger "Driver". For example, cheques drawn in payment of Rent may be automatically allocated to each Department.
Each Firm will determine at what level the Analysis fields will be mandatory. For example, a fee entry (and ultimately the bill and income) is assigned an Author, Matter type, Branch and Department according to the matter used when the time is recorded. Depending on the firm’s reporting requirements, the firm must decide to what level this same type of analysis is required to be applied for ALL transactions.
Whilst it is quite a common requirement for a Profit and Loss report to be produced analysing the profitability of a particular Branch, or Department, or even a particular Author or Matter type it is less common to have this same level of reporting requirement to produce a Balance Sheet to the same level of analysis.

Administration Workbook
Page 208 © 2012 Reed International Books Australia Pty Ltd trading as LexisNexis
18.1 Accounting Options
Hands on
In this exercise you will view the Accounting Analysis Table and discuss the various options.
1. Open Accounting Options (Financial Maintenance | Accounts Setup)
The following screen will display:
Analysis Table - Required for P&L / Required for All Sections
Entity This is a compulsory setting that is required for all transactions. For example every fee entry, bill, matter, Employee, journal, cheque and receipt must belong to an Entity.
Branch Check the appropriate box to indicate if a Branch flag is required for Profit and Loss (income and expense) transactions only or if the Branch flag will be mandatory for all transactions (including Balance sheet items). Traditionally a Branch has been a physical location, for example Melbourne, or Sydney, however if a firm has a reporting requirement to analyse transactions on another criteria other than just physical location, the use of Branch may be considered. Employees may also be setup with security settings that restrict access to matters and transactions belonging only to their designated Branch. If Branch is checked, at either level, when a new Employee is registered and a new Matter is created, it MUST be assigned a Branch.

Lexis® Affinity Library
© 2012 Reed International Books Australia Pty Ltd trading as LexisNexis Page 209
Department Check the appropriate box to indicate if a Department flag is required for Profit and Loss (income and expense) transactions only or if the Department flag will be mandatory for all transactions (including Balance sheet items). Traditionally a Department has been defined as a Practice group, for example Conveyancing, Family Law and Admin, however if a firm has a reporting requirement to analyse transactions on another criteria other than just Practice groups, the use of Department could be considered. If Department is checked, at either level, when a new Employee is registered and a new Matter is created it MUST be assigned a Department.
Matter Type Check the appropriate box to indicate if a Matter Type flag is required for Profit and Loss (income and expense) transactions only or if the Matter Type flag will be mandatory for all transactions (including Balance sheet items). Although possible, it is quite unlikely for this flag to be required for Balance sheet items. Attaching the Matter Type flag to Profit & Loss transactions allows a firm to easily print a report allowing the assessment of the profitability, or otherwise, of work in a particular field of law.

Administration Workbook
Page 210 © 2012 Reed International Books Australia Pty Ltd trading as LexisNexis
Notes:

Lexis® Affinity Library
© 2012 Reed International Books Australia Pty Ltd trading as LexisNexis Page 211
19. Tax Types
The Tax Types section of Lexis Affinity Library controls the GST and other Tax Types that need to be registered to correctly record the Tax portion of transactions. The Tax Types will be registered in your system at installation. There is no need to add additional Tax Types. However, you may be required to alter the rate from time to time in accordance with government regulations.
Discussion
1. Open Tax Types (Financial Maintenance | Accounts Setup)
2. Locate TAXIN
The screen is displayed below:
3. Default Purchases
This indicates that purchase transactions – for example Cheques, Cheque Requisitions etc will default to the Tax Type TAXIN, unless other settings override this – for example an Expense Type.
Other options are unticked for TAXIN.
4. Locate TAX
Fees and Sundries are ticked for TAX, so that Tax is added to the value when billed.

Administration Workbook
Page 212 © 2012 Reed International Books Australia Pty Ltd trading as LexisNexis
5. Click on [Print] to view the existing Tax Rates
6. Close Tax Types

Lexis® Affinity Library
© 2012 Reed International Books Australia Pty Ltd trading as LexisNexis Page 213
Tax Type Field Descriptions
Code The Code used by Lexis Affinity Library for each Tax Type.
Description The description of the Tax Type.
Default Purchases If the Tax Type displayed on the screen is the one normally used for purchases, tick this box. Purchases are usually Tax inclusive amount so this should be ticked.
Default Fees and Sundry If the GST Tax Type displayed on the screen is the one normally used for Fees and Sundries, tick this box, Fees and Sundries usually have Tax added at the time of billing, so this should be ticked.
Withholding Tax Tick this if this is the Rate for Withholding Tax.
Tax Rates
An explanation of each of the 7 standard Tax rates follows;
ADTAX Used with matter disbursements or anticipated disbursements. When entering the transaction, tax is calculated but not included as part of the total purchase. Tax is only added when the disbursement is billed.
AGENT Used for posting disbursement where the client claims the Input Tax credit. These disbursements can be separated on the balance sheet, if required.
EXCL Used for posting disbursements or other payments that should be “Excluded from TAX” reporting and have “No TAX effect”.
TAX Standard Tax rate used for adding Tax to Fees and Sundry amounts entered and Tax added at the time of billing.
TAXIN Standard Tax rate used for entering Tax inclusive amounts, for example purchases in the form of cheque requisitions, cheques and Creditor invoices.
NOTAX Rate used for posting any entries where no Tax is to be applied, either at the time of entry or at the time of billing. These entries will still appear on Tax reports but with a zero value for Tax.
WHOLD Withholding tax is deducted from the Purchase amount entered.

Administration Workbook
Page 214 © 2012 Reed International Books Australia Pty Ltd trading as LexisNexis
Notes

Lexis® Affinity Library
© 2012 Reed International Books Australia Pty Ltd trading as LexisNexis Page 215
20. Bank Accounts
You may create any number of Bank Accounts. The Type of Bank account available is determined by the Entity selected. For example a Trust Bank account may only be registered in an Entity created as General - Trust/Office transactions.
20.1 Trust Bank Account
If you have more than one Trust Bank Account, it is recommended that you register separate matters for the Statutory Deposit Account, Bank Adjustments and Trust to Office Transfer Accounts for each Bank Account.
Discussion
In this exercise you will review the Trust Bank Account for Lewisham Reid (TA).
7. Open Banks (Financial Maintenance | Banking)
8. Locate TA Bank Account
A sample screen is shown below:

Administration Workbook
Page 216 © 2012 Reed International Books Australia Pty Ltd trading as LexisNexis
Bank Account Field Descriptions
Entity This will display which Entity the Bank Account belongs to.
Account Code This is the code used to identify this account. (4 characters)
Type Bank accounts can be Trust, General or Company. Trust: only matter transactions in the main Partnership entity. General: both matter and general ledger transactions. Company: only general ledger transactions in a Service entity.
Bank Accounts for the main partnership will be either General or Trust. For any other entity (for example a Service Company) select Company.
Account Format Select from: Australia International New Zealand
Account Name The Bank Account Name – text stored here appears on the Bank Deposit Slip. (80 characters)
Bank Name The name of the bank.
Abbreviation An abbreviated form of the Bank name (4 characters)
Branch Name of branch or BSB.
Bank Address / Suburb / Postcode Address of bank.
State The State field refers to the States or Localities that have been registered in the data files. For example a “State” can be registered for Singapore or New Zealand even though these are not states in the normal meaning of that word.
Each “State” has a set of restrictions that are applied to the Trust Bank Accounts.

Lexis® Affinity Library
© 2012 Reed International Books Australia Pty Ltd trading as LexisNexis Page 217
The Options are:
Check for unpresented cheques when posting a receipt
Overdraw Trust Balance on Matter
Overdraw Investment Balance on Matter
Overdraw Bank Account balance
Overdraw Trust Balance on Firm Control Matter
Print Cheque if Total Firm Trust Overdrawn
If any of these options are enabled, it is also possible to set a password. More information on these options is included in the chapter on States.
Account Number Number of Bank Account. You can include the BSB as part of the number.
Swift Code The Swift Code for international Bank Accounts.
Default Branch in Bank Deposit / EFT Tick this to have the Branch of the logged in user default as the Branch in Bank Deposits and Bank EFT Payments. If unticked, the Branch field will be blank.
Active An inactive Bank Account must have a zero closing balance and is not available for selection on processing screens.
Macquarie Bank / MBL Account? Tick this if this Bank Account is held at the Macquarie Bank. Default DEFT Account Tick this if this is the main account used for receiving DEFT payments from Clients.
Posting Fields
“Defaults” tab
Clearance Time (Days) This is the number of days required by your bank to clear funds. This is calculated by adding the number of days to today’s date using the working days available in the calendar specified below.
Calendar A Calendar can be created for the firm, which would exclude weekends and public holidays. This calendar is used to calculate the Clearance Date of the receipt.

Administration Workbook
Page 218 © 2012 Reed International Books Australia Pty Ltd trading as LexisNexis
“Matter” tab
An additional field is required if this bank account is held at the Macquarie Bank and you will receive payments via a DEFT payments file.
DEFT Payments This matter will be used if there are transactions in the payments file where the matter number is invalid or missing.
Statutory Deposit This is the Matter File ID for the Trust Account Statutory Deposit.
Adjustment Matter This is a separate Matter that can be used for posting Bank Statement errors where entries have been made affecting the balance of the Trust Bank account in anticipation of those entries being corrected by the Bank.
Trust to Office This is a separate Matter that can be used as a suspense account for the transfer of funds by journal entry from Trust to Office
Trust to Office Trust Balance must be Zero before finalising Cashbook? If ticked, the balance of this matter must be zero before you can finalise the Cashbook. This is a statutory requirement in some regions.

Lexis® Affinity Library
© 2012 Reed International Books Australia Pty Ltd trading as LexisNexis Page 219
Minimum balance of Trust To Office at day end Enter the amount that can be left in the Trust to Office Transfer Matter at the end of the day.
“General Ledger” tab
Trust to Office Transfer This is the General Ledger Chart for the Trust to Office Transfer Account.
Cheque and Receipt numbering and printing
Series Indicate the number of the series.
Last Number in Order This is the number of the last Cheque or Receipt you have in stock.
Last Cheque This is the number of the last Cheque or Receipt used.
Warning Level Indicate the number of forms that should be left when you are reminded to re order.
Program A number of formats are available: Cheques Enter “STANDARD” (Case sensitive) to print cheques that can be printed on LexisNexis Cheque stationery.
Leave blank if no printed cheque is required. (ie the “Print” option is not visible on the Cheque entry screen.)
Receipts Enter “STANDARD” (Case sensitive) to print receipts that can be printed on LexisNexis Receipt stationery. Enter “LOGOSTANDARD” to print receipt son blank paper and to include a Firm Logo at the top of the Office Copy and the Receipt. Leave blank if no printed receipt is required. (ie the “Print” option is not visible on the Receipt entry screen.)

Administration Workbook
Page 220 © 2012 Reed International Books Australia Pty Ltd trading as LexisNexis
For New Zealand Users only: Enter NZSTANDARD” (Case sensitive) to print cheques to conform to NZ requirements. Complete the Company Logo and the Trust Logo to include the additional details.
Printer Select the default printer for cheques and receipts.
Tray Enter the default tray for printing cheques and receipts.
Margins Set the margins so that cheques and receipt print correctly.
Receipts only
Hide Receipted By Tick this to exclude the “Receipted By” field on the printed receipt.
Company Logo Path Enter the path and file name of the file containing the Company logo to be used. You will also need to set the position and size of the logo.
Trust Logo Path (For NZ Users) Enter the path and file name of the file containing the Trust logo to be used. You will also need to set the position and size of the logo.
Direct Debits - Details
Last Direct Debit Enter the last Direct Debit Number used.
Direct Debit Fields Select from: Normal This makes the fields optional. Non Blank This makes the fields compulsory. Not Used The fields will not be displayed.
Account Name Enter the EFT name of the Account. (32 characters)
BSB Number Enter the BSB Number.
Account Number Enter the Bank Account Number. (9 characters) This field is limited to 9 characters to comply with bank requirements for aba files. If the Bank Account Format is New Zealand, only the Account Number is required.

Lexis® Affinity Library
© 2012 Reed International Books Australia Pty Ltd trading as LexisNexis Page 221
File Settings
Export Format Select the appropriate format for the export file you are creating. If the Bank Account Format is Australian or International, chose the aba format. If the Bank Account format is New Zealand, chose the format for the bank you are using.
Export File The name of the file that will be created when processing payments for transfer by the Bank.
Name of User / Originator This is the Employee who is authorised to transfer this information to the bank.
User ID Number This number is issued by the Bank.
Include Balancing Entry Tick this if your Bank requires a balancing entry to be included in the file to be sent to the bank.
Export Settings
Description of Entries This description should explain the type of entries that will be included in this file. This text is used in the header row of the aba file. You can use it to describe the type of setting you have defined – for example different settings may apply for Creditors Payments and general office payments.
Firm Ref This text is used in the balancing entry. This is for your reference.
Payee Ref Format Choose from:
Custom text Free format text using the contents of Custom Payee Ref.
CODE + CHQ NO Creditors Code + The Cheque Number allocated.
CODE + EFTREF Creditors Code + the EFT Ref.
This is the information that will appear on the Payee’s Bank Statement.

Administration Workbook
Page 222 © 2012 Reed International Books Australia Pty Ltd trading as LexisNexis
Custom Payee Ref If you have selected Custom Text in the previous column, enter text here to describe the entries - eg Payment of account.
Default Cred Pay Run If ticked, this setting (for the aba file) will be prompted when the export file is generated directly from the Creditor Payment Run option.
Default Export? If ticked, this setting (for the aba file) will be prompted when the export file s generated from the Bank EFT function.
NOTE: If no default is set the system will prompt the user to nominate which setting to use when the file is created.

Lexis® Affinity Library
© 2012 Reed International Books Australia Pty Ltd trading as LexisNexis Page 223
Authority Levels and Authorised Employees for Cheque Requests
The program allows for the on-line authorisation of Cheque Requests. You can set limits of the value of the cheques, how many authorities are required and if a primary authority is required.
“Authority Levels” tab
Cheque Amount Limit This sets the upper limit of the Cheque Requests that can be authorised electronically.
Num Authorities Required This sets the number of authorisers required for each cheque request.
“Authorised Employees” tab
Cheque Amount Limit This sets the upper limit of the Cheque Requests that can be authorised electronically by the employee.
Employee The ID of the Employee who can authorize Cheque Requisitions automatically.
Primary Authoriser A tick indicates that this Employee is a Primary Authoriser.
Reminder A tick indicates that a reminder will be issued when there are Cheque Requisitions to be authorised by use when logging in.
NOTE: If another Bank Account has similar authority levels already created you can click on [Copy From] to copy the settings.

Administration Workbook
Page 224 © 2012 Reed International Books Australia Pty Ltd trading as LexisNexis
Setting up a Bank Account for Branches
As this Bank Account is to be operated from two different locations, there will be two separate series of Cheque and Receipts. It may also be useful to have different colours for each branch.
1. Click on to open the Bank Series screen
The Bank Account details will be displayed.
2. Branch Select the first Branch
3. Click on to access the Colour screen
4. Select a colour to be used for this branch
5. Click on [OK] to update the colour selection
6. Complete the Cheque and Receipt details with your own information
7. Click on [OK] to update the branch details
8. Click on to open the Bank Series screen
9. Branch Select the second branch
10. Click on to access the Colour screen
11. Select a colour to be used for this branch
12. Click on [OK] to update the colour selection
13. Complete the Cheque and Receipt details with your own information
14. Click on [OK] to update the branch details
15. Click on to update the Bank Account

Lexis® Affinity Library
© 2012 Reed International Books Australia Pty Ltd trading as LexisNexis Page 225
20.2 Create a New General or Company Bank Account
General or Company Bank Accounts are created in the same way as Trust Bank Accounts apart from the Posting Fields
Posting Fields
If you are creating a General or Company Bank Account, you will be required to complete the following:
Cash at Bank This is the Bank Control Account that is used to report the Cash at Bank amount on the Balance Sheet for the entity to which this account belongs. Normally each Bank Account would have a separate Control Account, although these would be totalled on the Balance Sheet.
Loan Account This is a GL Account that is used for the automatic "behind the scenes" transactions when an inter-entity or inter-branch cheque or receipt is processed. An example of this type of transaction may be a cheque drawn on the Service Company Bank Account in payment of a Creditor invoice containing Service entity AND Partnership amounts.
Note re Bank Account Colours
Bank Accounts can be colour co-ordinated with your cheques/receipts stationery. A different colour may be selected for each Bank Account.
While Desktop colours are set for individual users, Bank Account, Branch and Entity colours are universal (ie all workstations / users are affected by the colour selected). Selecting different colours provides an easy method of quickly identifying which account, branch or entity has been selected when processing Receipt and Cheque transactions. This should help minimize transactions being posted to the wrong bank account, branch or entity.
Macquarie Bank Settings
If you have flagged this account as a Macquarie Bank account, you will need to select a General ledger Chart as the DEFT Payments account. This GL Chart will be used if there are entries in the imported file that cannot be allocated to matters. (This could be either an invalid or missing matter number.)

Administration Workbook
Page 226 © 2012 Reed International Books Australia Pty Ltd trading as LexisNexis
20.3 Special Requirements for Macquarie Bank Limited
If your firm banks with the Macquarie Bank, there are some additional requirements when creating the Bank Accounts, so that you are able to generate invoices with DEFT payment options, import a DEFT Payment File and import Bank Statement entries.
Before creating your Bank Accounts for the Macquarie Bank Limited, you will need to review the settings as mentioned below:
System
Activate Macquarie Bank DEFT Integration in System Settings | System | Macquarie Bank. The details of the Payment Centres are already included. Users are responsible for maintaining these if there are any changes made by Macquarie Bank Limited.
Launch Clearance for Employees
Employees who will need to process payments or import files need to be given Launch Clearance.
Security Options
Review the Security Option “Receipt | General | ForbidMatter. Generally, this should be crossed so that transactions where the payment amount is more than the outstanding amount can be processed. Refer to the Administrator Workbook, Chapter “Security Options” for additional information.
Bill Templates
Bill Templates. Including Accounts Rendered Statements need to be amended to include the DEFT Payment slip. Further information is included in the Administrator Workbook, Chapter “Bill Templates”.

Lexis® Affinity Library
© 2012 Reed International Books Australia Pty Ltd trading as LexisNexis Page 227
20.3.1 Bank Account Ribbon
F4 New Create a New Bank Account.
F8 Delete Delete this Bank Account.
Screen Colour Change the screen colour for this Bank Account.
Bank Series Attach a new, alter or display existing Bank Series details attached to this Bank Account. You can change the colour or Cheque and Receipt numbering series for each Branch of the selected bank account.
Ctrl + Shift +,
First Go to the first Bank Account in the sequence
Ctrl+, Previous Go to the previous Bank Account in the sequence
Ctrl+. Next Go to the next Bank Account in the sequence
Ctrl + Shift + . Last Go to the last Bank Account in the sequence.
Ctrl+P Print Print a Bank Account summary report to screen, listing details of all registered Bank Accounts, including balances.
F5 Refresh Immediately refreshes the data on the screen.

Administration Workbook
Page 228 © 2012 Reed International Books Australia Pty Ltd trading as LexisNexis
Notes

Lexis® Affinity Library
© 2012 Reed International Books Australia Pty Ltd trading as LexisNexis Page 229
21. Calendars
Calendars can be used in Lexis Affinity to determine dates that an Employee is available to work (these affect Workflow Tasks and Roll Call reports) and for Clearance Dates for Trust Receipts.
A Calendar can be created for a particular Employee or group of Employees, and for a Bank Account. Each Calendar can be created to take into account such things as part time workers, public holidays and weekends etc. If you operate in more than one state, you may require different calendars for each state.
21.1 Calendar Registration
Hands on
In this exercise you will register a new Calendar for Working Days in Melbourne. This Calendar will be based on a five day working week, but with the first Tuesday in November marked as a Public Holiday.
1. Open Calendar Registration (System Settings | Setup)
2. Click on to register a new Calendar
The following screen displays:
3. Code MELBOURNE
4. Description Working Days with Melbourne Public Holidays
5. Click on to save
6. Close Calendar Registration and open Calendars
7. Open MELBOURNE
At this stage the new calendar is the same as the default Calendar – ie Working days from Monday to Friday and no Public Holidays noted.
A screen displays showing a full years Calendar with Saturday and Sunday highlighted.

Administration Workbook
Page 230 © 2012 Reed International Books Australia Pty Ltd trading as LexisNexis
8. Click on the first Tuesday in November
This date will be highlighted.
NOTE: You can click and drag over a period to mark a group of dates. To unmark a particular day on the calendar click on the required day
9. Click on to save the Calendar
Calendar for Next Year
10. Click on to move forward a year
11. Mark the first Tuesday in November
12. Click on to save the Calendar

Lexis® Affinity Library
© 2012 Reed International Books Australia Pty Ltd trading as LexisNexis Page 231
21.2 Create a new Calendar based on an existing one
Hands on
In this exercise you will create a new Calendar for a part time worker who does not work Fridays. This Calendar can be based on MELBOURNE.
1. Click on
The following screen displays:
2. New Code MELB-4 DAYS
3. Description Part Time – Melbourne – No Fridays
4. Click on [OK]
A new Calendar displays with the new name, and the same dates as the original Calendar.
5. Select the “Options” tab
The following screen displays:
6. Place a tick in the check box for Friday
Note that you can start the Calendar on Monday, Sunday or Saturday
7. Select the “Calendar” tab again
The Calendar now displays with Fridays and the first Tuesday in November marked off.

Administration Workbook
Page 232 © 2012 Reed International Books Australia Pty Ltd trading as LexisNexis
Calendar Registration Ribbon
Save allows the user to save the Calendar Settings.
Save As allows the user to save the Calendar Settings under a different name.
allows the user to move either forward to backwards within the calendar.
Export allows the user to export the calendar to a text file to be saved to a nominated location within the network. By default the system will save an exported calendar as a ‘txt’ text file.
Import allows the user to import a calendar from a previous saved file.
will clear the calendar of amendments.

Lexis® Affinity Library
© 2012 Reed International Books Australia Pty Ltd trading as LexisNexis Page 233
Calendars Ribbon
F4 New alllows user to create a new Calendar.
F2 Edit allows user to open a Calendar and make edits.
F8 Delete will delete a calendar previously established in the database.
Ctrl + Shift + , First Go to the first record in the current sequence.
Ctrl+, Previous Go to the previous record in the current sequence.
Ctrl+. Next Go to the next record in the current sequence.
Ctrl+Shift+. Last Go to the last record in the current sequence.
Ctrl+P Print Print a list of Calendars.

Administration Workbook
Page 234 © 2012 Reed International Books Australia Pty Ltd trading as LexisNexis
Notes

Lexis® Affinity Library
© 2012 Reed International Books Australia Pty Ltd trading as LexisNexis Page 235
22. States
The “States” function in Lexis Affinity determines what restrictions apply to various procedures that may be affected by local regulations.
Generally, the States will be created in your dataset, however you should check the settings to confirm that they meet your requirements.
Determining what State Setting Applies
If the setting in System indicates that the firm is not a multi-state practice, then the State setting that is applied is the same as the State recorded as part of the Address in System.
If the firm is a multi-state practice then Trust Banks must be attached to a state and that State setting determines the trust overdrawing tests etc when posting to a particular trust bank.
Branches can also be attached to a state and in this case, that State setting determines the overdrawing investments test for matters that belong to that Branch.

Administration Workbook
Page 236 © 2012 Reed International Books Australia Pty Ltd trading as LexisNexis
The “State” of NSW is shown below:
Check for unpresented cheques when posting a receipt If ticked, a warning will display if a receipt for a bill is posted and there is an unpresented general cheque included in the bill. Note this is a warning only and does not stop the user processing the receipt. This option can be changed if required and does not require a Password to be entered to post the receipts affected by this setting.
The following settings would not normally be altered after installation, although the Passwords (if applicable) should be changed from time to time.
Overdraw Trust Balance on Matter If ticked, the Matter balance can be overdrawn. If this is ticked, a password must be set.
Overdraw Investment Balance on Matter If ticked, the Investment balance on a matter can be overdrawn. If this is ticked, a password must be set.
Overdraw Bank Account Balance If ticked, the Bank Account can be overdrawn. If this is ticked, a password must be set.
Overdraw Trust Balance on Firm Control Matter If ticked, the Trust balance of the Firm Control Account can be overdrawn. If this is ticked, a password must be set. Additionally, if this is ticked, the “Print Cheque if Total Firm Trust Overdrawn” can be ticked.

Lexis® Affinity Library
© 2012 Reed International Books Australia Pty Ltd trading as LexisNexis Page 237
Passwords
If an option is ticked, a Password must be set.
The Password screen is displayed below:
1. Old Password Enter the Password previously registered
If this is a new set of files, the Passwords will be blank.
2. New Password / Confirm Enter the new password in each field
3. Overdraw Trust Balance on Matter?
Tick this to enable the restriction.
4. Click on [OK] to update the passwords

Administration Workbook
Page 238 © 2012 Reed International Books Australia Pty Ltd trading as LexisNexis
Notes

Lexis® Affinity Library
© 2012 Reed International Books Australia Pty Ltd trading as LexisNexis Page 239
23. Fees
The term “Fees” is used for time entries.
Lexis Affinity Library offers a variety of options for recording fees against a matter. Primarily fees may be based on either a fee for service (scale costing) or time recorded.
There are several ways of setting the method of recording fee entries on Matters. These are;
Fee Templates
Fee Types
Fee Rate Codes
Matter Rates
Matter Type Fee Rates
Employee Rates
If more than one option applies to a matter, the following order is applied:
Matter Rate
Matter Fee Rate Code for the Employee
Matter Fee Rate Code for the Employee Type
Matter Type Rate
Matter Type Fee Rate Code for the Employee
Matter Type Fee Rate Code for the Employee Type
Employee Rate
In all cases a Fee Template or Fee Type (with a rate attached) will override any other recorded rate.

Administration Workbook
Page 240 © 2012 Reed International Books Australia Pty Ltd trading as LexisNexis
Fee Templates
A Fee Template is used to record a particular fee for a specific piece of work. Fee Templates are grouped into Fee Template Groups, usually based on the type of work – for example Family Law Court Scale. A number of different Fee Templates are created in each Fee Template Group. Examples of Fee Templates include; short letter; long letter; telephone attendance. Fee Templates may be a fixed fee (eg $50.00) or a charge per unit (eg $10 per page). Fee Templates that are likely to be used on any matter are generally left ungrouped and are referred to as Global Templates.
This is also called Item Costing or Scale Costing.
Fee Types
A Fee Type can be used on any matter, by any author and is used to record time for a particular type of work.
There are two types of Fee Types.
Those used to record actual time taken for a particular type of work – for example a telephone call, attendance on a client. In this case there is no rate set on the Fee Type and the Employee Rate is applied to the number of units recorded.
Those used to record a fee for a particular task – for example delivery of documents, court filing of documents. In this case the Fee Type has a rate set, so that one unit of each Delivery of Documents entry is recorded at the same amount, regardless of the Author of the Fee Entry.
In both types, the description of the Fee Type is automatically inserted in the Fee Description on the Fee entry.
Fee Types can be billable or non-billable. Non Billable Fee Types do not have a rate set and include work such as Administration and Leave Days.
Fee Rate Codes
A Fee Rate Code allows you to assign a rate for each Employee or Employee Type. You can attach Fee Rate Codes to Clients, Matters or Matter Types.
Matter Rates
A rate on a Matter means that all fees recorded for that matter are recorded at the same dollar value. If the Hourly rate is set at $300.00 then Partners and Articled Clerks will be costed at the same rate.

Lexis® Affinity Library
© 2012 Reed International Books Australia Pty Ltd trading as LexisNexis Page 241
Matter Type Fee Rates
If a Rate is set for a Matter Type, new matters of that type will use that rate, unless it is altered on the matter. If a Matter is altered from one type to another it will not change the rate on the matter. The Rate may be a dollar value or a percentage rate (as explained below). If a rate is attached to a Matter Type, it is used as a default when creating a new matter of that Matter Type.
This rate may be written up or down by a percentage for a particular matter. (This would usually be set on the matter record). For example – if the Rate on the matter is $1.10, fee entries will be recorded as 110% of the Employees Hourly Rate. If the Hourly rate on the matter is $0.90, fee entries will be recorded as 90% of the Employee Hourly Rate. Any value up to, but not including, $5.00 will be applied as a percentage.
Employee Rates
The Hourly Rate is set on each Employee record. The number of units recorded is multiplied by the Employee Rate.
This rate may be written up or down by a percentage for a particular matter. (This is set on the matter record). For example – if the Hourly Rate on the matter is $1.10, fee entries will be recorded as 110% of the Employees Hourly Rate. If the Hourly rate on the matter is $0.90, fee entries will be recorded as 90% of the Employee Hourly Rate.
Non-Billable WIP
A matter can be flagged as Non-Billable and from that point on all Fees recorded for the matter will be Non-Billable. If the fees recorded later become Billable – options are available to automatically convert the entries. This can be done in either a draft bill or from Fees & Billing | Fees | Fee Revaluation.

Administration Workbook
Page 242 © 2012 Reed International Books Australia Pty Ltd trading as LexisNexis
23.1 Fee Templates
Fee Templates are used to record a Fee for Service or Scale Costing. A Fee Template can be either a fixed fee for a specific piece of work or a rate per item. The entries recorded on the WIP ledger when using Fee Templates can be either; both the Fee Template value (Standard Cost) and the Time Value (Record Separate Scale Costs to Fee is ticked) OR the length of time taken and the value of the Fee Template (Standard Cost) (Record Separate Scale Costs to Fee is not ticked).
23.1.1 Fixed Fee – recording Scale Cost and Time Cost separately
Hands on
In this exercise you will create a Fee Template for an Initial Meeting. This is a fixed fee for this meeting and the WIP ledger should show both the Fee Template value (Standard Cost) as well as the value of the time entries. Attach this template to the Debt Group.
1. Open Fee Templates (Fees & Billing | Fees)
2. Click on [New]
3. Code C5
4. Template Group Select DR
5. Fee Description Initial meeting
6. Other Notes Leave blank for this exercise (This can be used to describe when this Fee Template should be used.)
7. Record Separate Scale Cost to Fee Tick this
8. Unit Description Leave blank
9. Tax Rate TAX
10. Select the “Add Rate” tab
11. If Standard Cost 125.00
12. If cost per item Leave blank
13. Item takes default Leave blank as this Fee Template is for an item with a fixed fee.
14. Commence Accept Today’s date Expire Can be left blank
15. Click on [Add]
16. Select the “Rates” tab to check and click on [OK] to update

Lexis® Affinity Library
© 2012 Reed International Books Australia Pty Ltd trading as LexisNexis Page 243
23.1.2 Fixed Charge – Not recording Scale Cost and Time Cost separately
Hands on
In this exercise you will create a Fee Template for a Review Meeting. This is a fixed fee for this meeting, however in this case the WIP ledger should show the amount of time recorded, but show the value of that time as the Fee Template value (Standard Cost).
1. Click on [New]
2. Code C6
3. Template Group Select DR
4. Fee Description Review meeting
5. Other Notes Leave blank for this exercise
6. Record Separate Scale Cost to Fee Leave unticked
7. Unit Description Leave blank
8. Tax Rate TAX
9. Select the “Add Rate” tab
10. If Standard Cost 125.00
11. If cost per item Leave blank
12. Item takes default Leave blank as this Fee Template is for an item with a fixed fee.
13. Commence Accept Today’s date
14. Expire This can be left blank
If a new rate is added in the future, the Expire date will be updated.
15. Click on [Add]
16. Select the “Rates” tab to check
17. Click on [OK] to update

Administration Workbook
Page 244 © 2012 Reed International Books Australia Pty Ltd trading as LexisNexis
23.1.3 Rate per Unit - recording Scale Cost and Time Cost separately
hands on
In this exercise you will create a Fee Template for Attendance at Court. This template is based on a rate per item of work and the WIP ledger should show both the Fee Template value (Cost per Item x number of units) as well as the value of the time entries.
1. Click on [New]
2. Code C7
3. Template Group Select DR
4. Fee Description Attendance at Court
5. Other Notes Leave blank for this exercise
6. Record Separate Scale Cost to Fee Tick this
7. Unit Description hour
8. Tax Rate TAX
9. Select the “Add Rate” tab
10. If Standard Cost Leave blank
11. If cost per item 150.00
12. Item takes default Leave blank.
13. Commence Accept Today’s date
14. Click on [Add]
15. Select the “Rates” tab to check
16. Click on [OK] to update
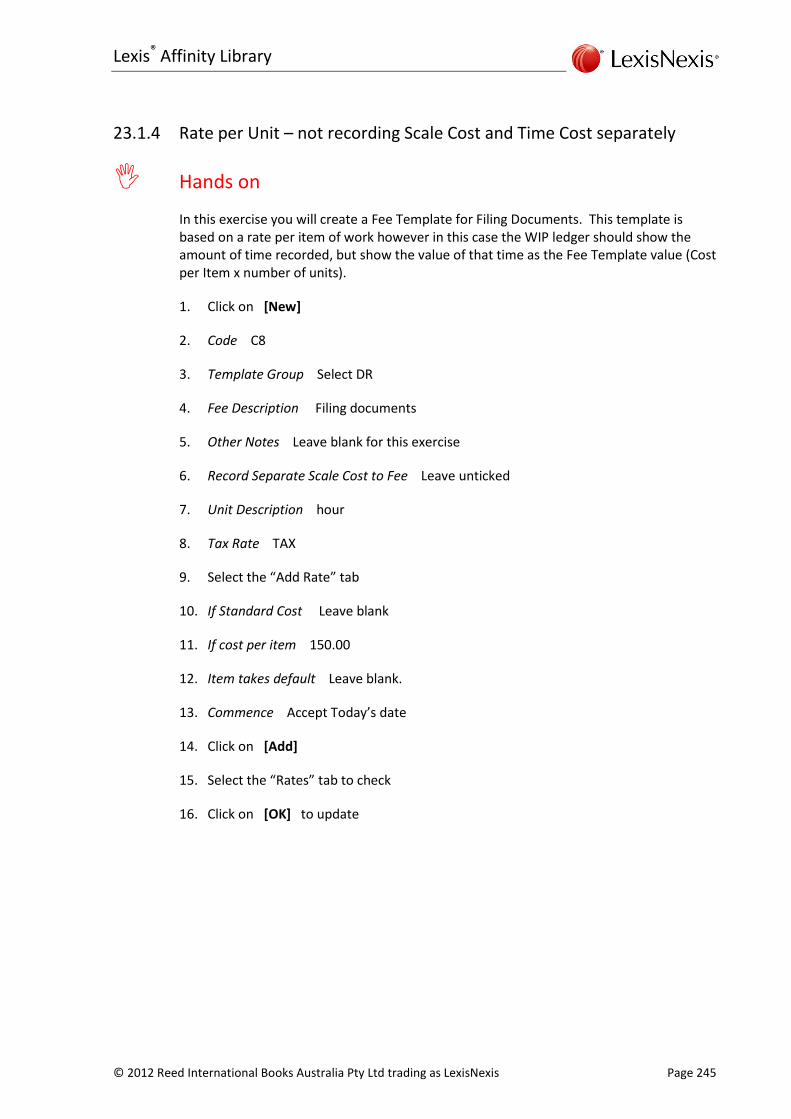
Lexis® Affinity Library
© 2012 Reed International Books Australia Pty Ltd trading as LexisNexis Page 245
23.1.4 Rate per Unit – not recording Scale Cost and Time Cost separately
Hands on
In this exercise you will create a Fee Template for Filing Documents. This template is based on a rate per item of work however in this case the WIP ledger should show the amount of time recorded, but show the value of that time as the Fee Template value (Cost per Item x number of units).
1. Click on [New]
2. Code C8
3. Template Group Select DR
4. Fee Description Filing documents
5. Other Notes Leave blank for this exercise
6. Record Separate Scale Cost to Fee Leave unticked
7. Unit Description hour
8. Tax Rate TAX
9. Select the “Add Rate” tab
10. If Standard Cost Leave blank
11. If cost per item 150.00
12. Item takes default Leave blank.
13. Commence Accept Today’s date
14. Click on [Add]
15. Select the “Rates” tab to check
16. Click on [OK] to update

Administration Workbook
Page 246 © 2012 Reed International Books Australia Pty Ltd trading as LexisNexis
23.1.5 Fee Template Filter
Fee Template Filters can be used to limit the display of Fee Templates.
Hands on
In this exercise you will list the Fee Templates for DR
1. Select the “Filter” tab
2. Rates As At Leave blank for this exercise to include all Templates
3. Group Select DR
4. Select the “Fee Templates” tab
Only the Fee Templates that belong to the DEBT Group are displayed.
5. Select the “Filter” tab again and tick Include Global Templates
6. Select the “Fee Templates” tab
Now both Fee Templates that belong to the DEBT Group and those that do not belong to a group are displayed.

Lexis® Affinity Library
© 2012 Reed International Books Australia Pty Ltd trading as LexisNexis Page 247
Fee Template Field Descriptions
Code The Fee Template Code.
Template Group Select a Group to which this Fee Template belongs.
Fee Description The standard description to appear on the ledger and the bill.
Other Notes This is a free format field. It could be used to describe when this item is to be used.
Tax Rate Select the Tax Type to be applied to this Fee Template. If the cost entered includes Tax then select TAXIN, if the cost is before the application of Tax, then select TAX and Tax will be added a the time of billing.
Record separate Scale Cost to Fees? If ticked, both time units and scale costs will be recorded on a matter.
Unit Description Enter the type of unit – For example page, hour, folio, minute.
“Rates”
If Standard Cost Enter an amount if this item attracts a flat fee.
If Cost per Item Enter a rate per item
Item Takes Default Enter a unit figure only if there is a standard time for performing this task.
Commence / Expire Enter a Start Date. Alternately Lexis Affinity Library will insert Today’s Date. ”Expire” Date is optional. It is recommended that you complete the Expiry date of a previous rate when you commence another.
“Filter” tab
Rates As At Enter a date to limit the display to Fee Templates that apply as at that date.
Group Select a Group to limit the display to only those Fee Templates that are members of that group.
Include Global Templates Tick this to include any Fee Templates that are not assigned to a Fee Template Group.

Administration Workbook
Page 248 © 2012 Reed International Books Australia Pty Ltd trading as LexisNexis
23.1.6 Map Singular / Plural Unit Type
You can access Map Singular Plural Words from within Fee Templates. This allows you to record the singular and plural forms of words that are used in Wordlink style Bill Templates. This option is also accessible from System | Document.
Procedure
1. Click on to open Map Singular / Plural Words
The following screen displays:
2. Click on [New] to create a new item
3. Singular Enter the singular form – eg copy
4. Plural Enter the plural form – eg copies
5. Default Fee Template Leave unticked
6. Click on [OK] to save
Default Fee Template
It is recommended that you register one generic term such as Unit / Units and tick this as the “Default Fee Template”. If a Fee Template code is used in a Wordlink Bill Template and the singular/plural form has not been defined, Lexis Affinity will use this term.
To alter the Default Fee Template Status
1. Select Unit/Units
2. Click on
3. Default Fee Template Tick this
4. Follow the same procedure to untick Minute / Minutes

Lexis® Affinity Library
© 2012 Reed International Books Australia Pty Ltd trading as LexisNexis Page 249
23.2 Fee Type
Fee Types are used to record time for certain tasks.
NOTE: If you attempt to delete a Fee Type that has records attached, you will be required to reassign it to another Fee Type.
Hands on
In this exercise you will register a new Fee Type for Service of Documents, which is to be charged at a flat rate of $37.50.
1. Open Fee Types (Fees & Billing | Fees)
2. Select to create a new Fee Types
The screen is displayed below:
3. Code SD
4. Description Service of Documents
5. Billable ? Tick this
6. Category Select Chargeable / Billable from the drop down list
7. Group Leave blank for this exercise
8. Print date range on Bill Template? Leave unticked for this exercise

Administration Workbook
Page 250 © 2012 Reed International Books Australia Pty Ltd trading as LexisNexis
9. Print dates separately on Bill Template? Leave unticked for this exercise
10. Tax Rate Select TAX
11. Select the “Add Rate” tab
12. Rate 37.50
13. Click on [Add]
14. Click to save and update.
15. Close Fee Types
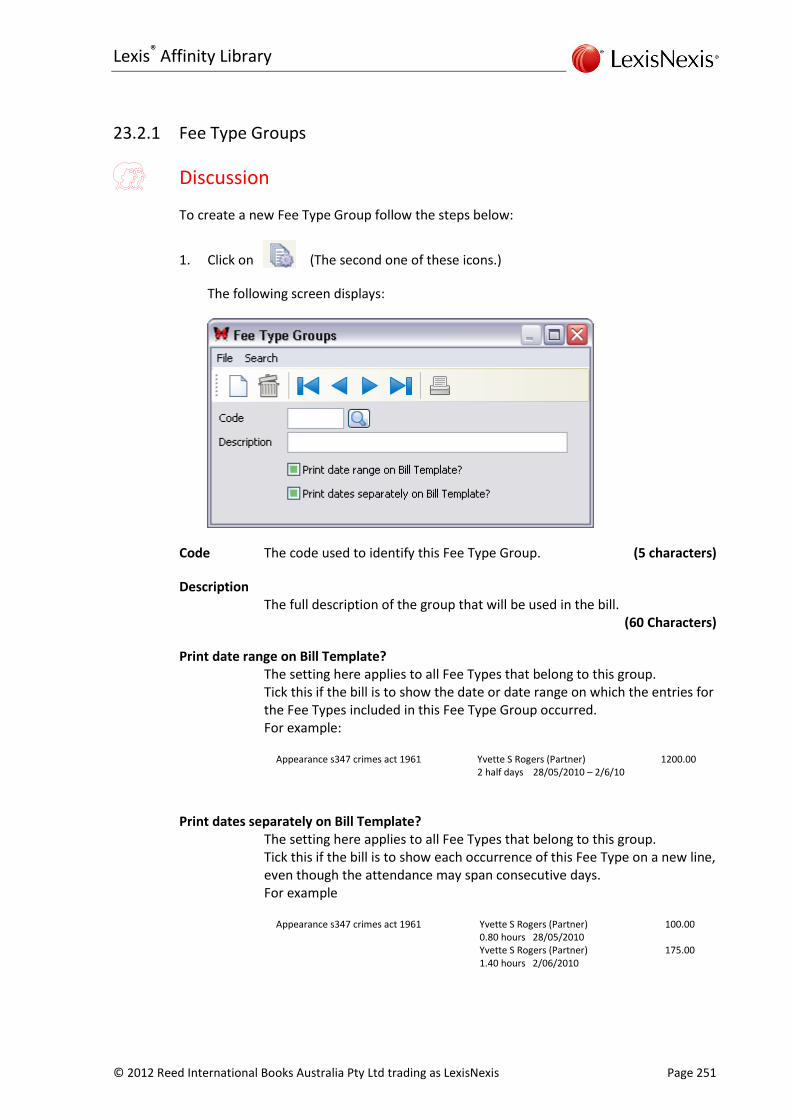
Lexis® Affinity Library
© 2012 Reed International Books Australia Pty Ltd trading as LexisNexis Page 251
23.2.1 Fee Type Groups
Discussion
To create a new Fee Type Group follow the steps below:
1. Click on (The second one of these icons.)
The following screen displays:
Code The code used to identify this Fee Type Group. (5 characters)
Description The full description of the group that will be used in the bill. (60 Characters)
Print date range on Bill Template? The setting here applies to all Fee Types that belong to this group. Tick this if the bill is to show the date or date range on which the entries for the Fee Types included in this Fee Type Group occurred. For example:
Appearance s347 crimes act 1961 Yvette S Rogers (Partner) 2 half days 28/05/2010 – 2/6/10
1200.00
Print dates separately on Bill Template? The setting here applies to all Fee Types that belong to this group. Tick this if the bill is to show each occurrence of this Fee Type on a new line, even though the attendance may span consecutive days. For example
Appearance s347 crimes act 1961 Yvette S Rogers (Partner) 0.80 hours 28/05/2010
100.00
Yvette S Rogers (Partner) 1.40 hours 2/06/2010
175.00

Administration Workbook
Page 252 © 2012 Reed International Books Australia Pty Ltd trading as LexisNexis
23.2.2 Fee Type Field Descriptions
Billable A Billable Fee Type can have a rate set for the work done. A Fee Type that is not Billable does not have a rate set and is therefore used for administration or leave.
Category Four categories have been created: Chargeable/Billable For chargeable work on Clients’ Matters. Productive Non Chargeable For non chargeable work on Clients’ Matters. Non Productive Non Chargeable For administration work including Leave time. Lost Time Time not at work, excluding Leave Time
NOTE: The following options have been included in Lexis Affinity Library to cater for a specific requirement to show all work of a similar nature grouped together with dates and / or date ranges and a specific format for the number of hours or parts of a day. These settings require special scripting within your Bill Template. Please ask your Lexis Affinity Consultant for more information on this, if you think it may suit your requirements.
Group Groups can be created to make it easier to collate fee entries of varying types together. For example, you may have two different Fee Types for travel – one for domestic and one for overseas, however you want all travel activities to be shown together. In this case you would create a Group called ‘Travel’ and add both Fee Types to that Group. In the Bill Template, it is then possible to show all the fee entries that belong to a Group together, using the description of the Group.
Print date range on Bill Template? Tick this if the bill is to show the date or date range on which the fee type occurred.
Print dates separately on Bill Template? Tick this if the bill is to show each occurrence of this Fee Type on a new line, even though the attendance may span consecutive days.

Lexis® Affinity Library
© 2012 Reed International Books Australia Pty Ltd trading as LexisNexis Page 253
23.3 Fee Rate Code
Fee Rate Codes allow for different Hourly Rates for each Employee or Employee Type. Fee Template Groups can also be attached to Fee Rate Codes. These Fee Rate Codes can then be attached to Matter Types, Clients or Matters. If a Fee Rate Code is attached to a matter, this rate will override any Employee Rates.
Hands on
In this exercise you will register a new Fee Rate Code. This Fee Rate Code will be used for the Retainer Matter for Ares Military Research Pty Ltd.
1. Select Fee Rate Codes (Fees & Billing | Fees)
2. Select to create a new Fee Rate Code
The following screen will display:
3. Code ARES_RET
4. Description Ares Military Research Retainer Rates
5. Click to save and update.
The following screen will display:

Administration Workbook
Page 254 © 2012 Reed International Books Australia Pty Ltd trading as LexisNexis
6. Date Effective Click on and select Today’s Date as the From Date
Two new Tabs will display
7. Select the “Employee Types” tab
8. Use the table below to record the Rates and Budget for the nominated Employee Types
Code Description Rate Budget (Hours)
AC Articled Clerk 96.00 10
ASC Associate 220.00 20
CON Consultant 310.00 5
LC Law Clerk 95.00 10
PAR Partner 480.00 15
SEC Secretary 50.00 40
SOL Employed Solicitor 195.00 60
SP Senior Partner 520.00 10
9. Click to save and update.
10. Close Fee Rate Codes
NOTE: Not all Employees or Employee Types need to have a rate set. If the rate is blank, the Hourly rate for the Employee is used. Budget hours are optional.
Fee Rate Code Column Descriptions
Code The Employee Type code
Description The description of the Employee Type
Rate The Hourly Rate for the Employee Type for the Fee Rate Code.
Budget Hours The estimate of how many hours each Employee Type should spend on the matter/s attached to this Fee Rate Code. A Report can be produced that will show hours spent by each Employee Type against Budget.

Lexis® Affinity Library
© 2012 Reed International Books Australia Pty Ltd trading as LexisNexis Page 255
23.4 Hourly Rate on Matter
If a matter is to be charged at a flat hourly rate for all Employees, this is set on the matter record.
Hands on
In this exercise you will edit a matter and enter an Hourly Rate.
1. Open Matter 990143
2. Select Edit Matter
3. Select the “Rates” tab
4. Select the “Add Rates” tab
5. Rate 200
6. Click on [Add]
7. Click [OK] to save and update.
8. Close the Matter

Administration Workbook
Page 256 © 2012 Reed International Books Australia Pty Ltd trading as LexisNexis
23.5 Employee Rate
When creating Employees, you can record an Hourly rate.
Hands on
In this exercise you will display Employee YSR and view the Hourly Rate for her.
1. Open Employees (Database | Employees)
The following screen will display:
2. Click on [Employee Charts and Rates]
3. Select the “Rates” tab
Note the Hourly rate of $480.00.
4. Notional Cost Leave blank for this exercise
This is used to record the cost of employing this person.
5. Close the Employee screen

Lexis® Affinity Library
© 2012 Reed International Books Australia Pty Ltd trading as LexisNexis Page 257
23.6 Importing Fee Entries from an External File
Lexis Affinity Library provides for the import of a tab separated text file into the database.
This file must conform to certain requirements to be successfully imported. These requirements are detailed below.
Attributes
The file must be a tab separated (delimited) file.
The file to import must have column headings. They can be in any order and it is not necessary to use all columns, however no additional columns can exist.
Column headings The headings must include the full names of the columns being used. It is not necessary to include all columns. Not all columns must contain data – for example you can complete Duration and leave Units blank. The column headings are not case sensitive. The available columns are: Date, Matter, Type, Duration, Units, Description, Note and Label.
Dates Separators within the date can be either a slash (/), a dash (-) or a period (.) : Examples of date formats are: dd/mm/yy dd/mm/yyyy
Type The text entered in the “Text” column must agree with the Fee Types registered in Lexis Affinity Library.
Duration Duration should be expressed as hours:minutes. For example 2 hours and 30 minutes would be expressed as 2:30.
NOTE: If you complete both Duration and Units, the Duration column will be used.
Units Units can be entered as either whole units or up to 2 decimal places.
Label column The Label Column can be used for extra detail (i.e. a memo) to assist the user when the entry has been imported into the system. For example if a particular Fee Rate Code should be used, text relating to that fact could be included in the Label field. Or, another example could be if the Matter number is not known, the name of the Matter could be recorded in the Label field.

Administration Workbook
Page 258 © 2012 Reed International Books Australia Pty Ltd trading as LexisNexis
Notes re Importing
Please note the following points about the import routine:
If an error is encountered when trying to import the fee entries, the system will display the error/s and no entries will be imported.
Entries imported from a file to a Fee Sheet are not automatically submitted. They need to be submitted in the same manner as if they had been entered direct to the Affinity system. Imported entries will be allocated to the user who’s Fee Sheet is open and the import function is being activated from.
The system has no method of determining if the entries have been imported on a previous occasion. If the entries are imported in error, it is necessary to delete them from the Fee Sheet before submitting them.
If using a spreadsheet to generate the tab separated text file, the spreadsheet program may drop leading zeros on the matter numbers. If the matter numbers in your firm do have leading zeros, ensure they are visible in the text file prior to attempting to import the entries. In Microsoft Excel, using the ‘ character in front of a matter number which starts with a leading zero should retain the zero when saving the file as a tab separated text file.

Lexis® Affinity Library
© 2012 Reed International Books Australia Pty Ltd trading as LexisNexis Page 259
24. Sundry Types
Sundries can be used to record internal non cash disbursements or can be additional Fee entries on a bill.
Generally users record internal disbursements such as photocopying, facsimile charges, postage, telephone etc. as Sundries. Some firms also treat courier fees as a sundry, that is, they pay the courier out of general expenses and then charge the client in the same way as photocopying.
Fee Entry Sundries can be used to add an amount to the Fee section of a bill. The sundry can either be a % of fees to an amount.
The settings in Entities determine how the values of Sundries are treated in the Profit & Loss or Balance Sheet. Sundries may be recorded as Income when they are billed, or when they are recorded.
Sundries can be recorded either directly from the matter, from Sundry Creation, from Sundry Batch Entry, imported from a file or in a bill.
Sundry Types can also be used in conjunction with a setting in Creditors to automatically default invoice posting to a nominated Expense Account.
24.1 Set up Sundry Type for Matters
Hands on
In this exercise you will create a new Sundry Expense Code for File Retrieval Fee.
1. Open Sundry Types (Transactions | Sundries)
2. Click on to create a new Sundry Expense
The screen is displayed below:

Administration Workbook
Page 260 © 2012 Reed International Books Australia Pty Ltd trading as LexisNexis
3. Code FRF
4. Description File Retrie val Fee
5. Ledger Leave blank
If the Income for this type of Sundry Expense will be posted to the Account nominated in Entities | Postings, you do not need to complete this field. If the Income is to be posted separately, complete this field with the GL Account Number.
6. Group Leave blank for now
You can collate individual Sundry Expenses into Groups for reporting and billing. (This is explained in the next exercise.)
7. Include in Fees Section? Leave unticked for this exercise
If ticked, the entries flagged as FRF will be included at the end of the Fees section of the Word copy of the bill. For recording purposes, this amount will still be treated as disbursements. These items are referred to as “Fee Like Sundries”. If this flag is ticked the following prompt becomes active:
8. Mark as Private for Billing? (Enabled if included in Fees section)
Generally this is not ticked. Bill formats can be tailored so that this feature can be used to include or exclude particular entries.
9. Print as a Separate Item?
Tick this if you prefer the entries of this Sundry Type to be printed separately.
10. Apply as a % of fees Billed? (Enabled if included in Fees section)
You can use this to have Lexis Affinity calculate the amount of the Sundry based on the fees billed. This can be used for the inclusion of “Care & Consideration” surcharges.
11. Tax Rate TAX – Standard Tax
This will add Tax at the time of Billing.
12. Select the “Add Rate” tab
13. Rate 15
This is the $ amount per entry – for example a charge per page. If the charge varies – for example taxi fares, leave this blank.
14. Click on [Add]

Lexis® Affinity Library
© 2012 Reed International Books Australia Pty Ltd trading as LexisNexis Page 261
24.2 Expense Type Groups
Sundry Expenses can be classified into Groups. For example you can group File Retrieval Fees and File Management Fees into a group called File Management. In this case all File Management Fees and File Retrieval Fees will be accumulated into one total on a bill or ledger.
Hands on (Continuation)
In this part of the exercise you will create a new Group of Sundries called File Management.
1. Click on (Expense Type Group)
2. Click on to create a new Expense Type Group
The following screen displays:
3. Code FILE
4. Description File Management
5. Click on
6. Close the Expense Type Group screen
7. Group Select FILE
8. Click on to save the new Sundry Expense Type

Administration Workbook
Page 262 © 2012 Reed International Books Australia Pty Ltd trading as LexisNexis
24.3 Adding an existing Sundry Expense to a Group
Hands on
In this exercise you will add the existing FM (File Management) Sundry Expense to the new Group (FILE).
1. Scroll through the Expense Types to FM OR
Click on to locate it
2. Group Select FILE
3. Click on to update
4. Close the Expense Types screen

Lexis® Affinity Library
© 2012 Reed International Books Australia Pty Ltd trading as LexisNexis Page 263
24.4 Set up Sundry Type for Creditors
When processing an Invoice for a Creditor, you can set the system so that Lexis Affinity knows the default Expense Account to post the invoice to. To do this, you need to register a Sundry Type for the type of expense and attach it to the Creditor.
Hands on
In this exercise you will create a new Sundry Expense Code for Stationery
1. Open Sundry Types (Transactions | Sundries)
2. Click on to create a new Sundry Expense
3. Code STAT
4. Description Stationery
5. Ledger 2506
This is the Expense Chart Stationery in the Lewisham Reid Training dataset.
6. Group Leave blank for this type of Sundry
7. Tax Rate TAXIN
This should be the tax rate that applies to the majority of the invoices that will be processed for this type of entry. (This Tax rate will prompt on the Invoice entry screen.)
No other settings apply this Sundry Types that are created for using with Creditors.
8. Click on to update

Administration Workbook
Page 264 © 2012 Reed International Books Australia Pty Ltd trading as LexisNexis
On the Creditor
Discussion
Follow these instructions to record a Sundry Type on a Creditor.
1. Open Creditors (Transactions | Creditors)
2. Open Officeworks
3. Click on [Edit Creditor]
4. Select the “Financial” tab
5. Default Sundry Type Select Stationery
6. Click on [OK] to save the change
When you process an invoice for Officeworks, the Refno will be automatically populated if the Type is Ledger. The Tax Rate will default to the Tax Rate on the Sundry Type.

Lexis® Affinity Library
© 2012 Reed International Books Australia Pty Ltd trading as LexisNexis Page 265
Sundry Expense Field Descriptions
Code This is a five-character field and can be alpha, numeric or alpha/numeric.
Description This is the description that will appear on the matter ledger
Ledger If Income from this type of Sundry Charge is to be recorded in the Recoveries Account that is recorded in Entities | Postings, then leave this blank. If you want separate Income Accounts for any Sundry Charges, you will need to record an Income Account here.
Group Group this Expense Type with other like sundry expenses for billing.
Include in Fees Section Tick this to include the Sundry Expenses in a sub section following Fee entries.
Mark as Private in Billing? Tick this if the expenses are to be included in the total of the bill, but not itemised.
Print as a separate item? Tick this to print this Sundry Type separately.
Apply as % of fees Billed Tick this if this sundry is to be calculated as a % of fees on a bill.
Tax Rate Nominate the TAX category. This will usually be either TAX or TAXIN.
Rates Enter the Start date and Rate.

Administration Workbook
Page 266 © 2012 Reed International Books Australia Pty Ltd trading as LexisNexis
Notes

Lexis® Affinity Library
© 2012 Reed International Books Australia Pty Ltd trading as LexisNexis Page 267
25. Bill Templates and Credit Note Types
25.1 Bill Templates
Bills are created using Bill Templates. Different Bill Templates can be created to meet the specific requirements of your firm. Your LexisNexis Affinity Accounts Consultant will load your templates onto your server. These templates are in the form of Word Templates – ie “.dot” files.
When the word templates are loaded onto your server, they must then be attached to Bill Templates. A Bill Template can then be attached to a Matter Type, Client or Matter. The “Documents” tab in System allows you to record the base folder for Bill Templates (and other templates). It is recommended that this is completed so that the Bill template can point to the actual document – rather than the full path. If the folder is changed at a later date, you will only need to alter the System | Documents information, not every single template.
Discussion
In this example you will review the DETAILED Bill Template that is included in the Lewisham Reid files.
1. Open Bill Templates (Fees & Billing | Billing)
2. Select DETAILED
The following screen displays:

Administration Workbook
Page 268 © 2012 Reed International Books Australia Pty Ltd trading as LexisNexis
Code Code for this Bill template. (20 characters)
Word Processor Select SYSTEM, unless using Word Perfect in which case, select WORDPERFECT8. Other options are available under the advice of a LexisNexis Consultant.
Default Tick this if this Bill template is to be the default template for all bills where a Billing Template has not been specified on the Client or Matter record. One template must be selected as the Default.
Default credit note template Tick this if this Template is the default template for Credit Notes.
Consolidated Do not tick this. This is used for VBA style bills, which are no longer used,
Direct merge by WordLink / Mail Merge Tick this option to have the bill generated using the program’s WordLink method.
Use System Path Tick this if you have recorded the base folder for Bill Templates in System | Documents. If this field is grey or disabled, this indicates that the path has not been recorded in System.
Allow Bill to be Sent via Email Tick this if bills based on this template will be sent via Email.
Edit Covering Email This option is enabled for Bill Templates that are flagged to be sent via Email. Refer to the section “Covering Emails” which follows.
Description A short description of the type of Bill Template. 80 characters
File Location Either type the full path and name where the template is located, or click
on to navigate to the location It is recommended that templates are stored in a separate folder. The File location could be similar to Y:\Affinity\Lewisham Reid\Templates\.
Before / After Macro Enter the name of a macro to run before or after generation of the letter. For example, you may have a macro that performs additional formatting on the document or performs calculations on table fields.

Lexis® Affinity Library
© 2012 Reed International Books Australia Pty Ltd trading as LexisNexis Page 269
Save File Path (Bulk Billing) This is valid for “TEXTFILE” selection under Word Processor. Enter the output path and file name of the textfile to be generated.
Maximum Line Width This is valid for “TEXTFILE” selection under Word Processor. Enter the maximum number of characters in each line of the output file.
Script If you have created a script for this document in the Scripts program, attach the script here. Scripts are used to enhance the functionality of your precedents (eg. prompt users for input of text, insert variable clauses).
“WordLink” tab
This tab allows you to set processing options.
Disable Processing of Form Fields This option stops the program processing form fields (i.e. formtext, checkbox etc). By default this option should be ticked. Failing to select this option on a document which contains many form fields will greatly increase the time it takes to merge the document.
Disable Processing of InsertDoc Directive This option forces the merge engine not to look for INSERTDOC commands.
Disable Processing of Headers This option forces the merge engine not to look inside headers for fields, formatting codes or INSERTDOC commands.
Disable Processing of Footers This option forces the merge engine not to look inside footers for fields, formatting codes or INSERTDOC.

Administration Workbook
Page 270 © 2012 Reed International Books Australia Pty Ltd trading as LexisNexis
Disable Processing of Formatting Directives Selecting this option prevents the processing of formatting codes (such as <b></b>). If your Billing Template does not contain these codes, tick this option.
Disable Processing of Table Data Merge Functions Enable this option if your document does not contain any table functions such as DELETEROW, DELETETABLE etc.
Disable Processing of Invalid Merge Fields This option disables replacing invalid merge fields with error text ##MERGEFIELD INVALID##. If this option is unticked and the Billing Template contains merge fields which contain invalid WordLink commands or fields which are not handled within the script, these fields will remain in the document. This option should be unticked during testing however once the document is working correctly this should be ticked.
“Preamble” tab
3. Select the “Preamble” tab
This tab allows you to enter standard text that can be included in the bill.

Lexis® Affinity Library
© 2012 Reed International Books Australia Pty Ltd trading as LexisNexis Page 271
Covering Emails
Where a bill is to be sent by Email, this is done by creating a pdf version of the bill and emailing it as an attachment. The “Covering Email” option is used to record the recipients of the email, the Subject Line. Message and Signature.
Wordlink fields can be inserted in the Subject, Message and Signature fields. This will allow you to include information such as Matter Numbers, Authors and Bill Numbers.
Discussion
1. Click on
The Email screen is shown below:
2. To: You can click on and select from the listed fields These are:
CLIENT, CONTACT, BILL TO, DEBTOR, BILLTO_CONTACT, DEBTOR_CONTACT, PARTY 1, 2 and 3, AUTHOR, PARTNER, CONTROLLER or CLIENT;CONTACT;BILLTO;PARTY1;PARTY2;PARTY3;AUTHOR;PARTNER;CONTROLLER as a group.

Administration Workbook
Page 272 © 2012 Reed International Books Australia Pty Ltd trading as LexisNexis
You can select one or more individually, or select the group and remove individual entries if they are not required.
NOTE: If you are selecting any of these fields, you must also make sure that: (1) the Employees are linked to their PhoneBook record (2) that you have entered Email addresses for the relevant entries in the PhoneBook.
OR you can type separate Email addresses, separated by a semi colon (;).
3. CC: Enter email addresses manually if you require a copy of the email to go a particular person/s.
4. BCC Enter email addresses manually if you require a blind copy of the email to go a particular person/s.
5. Subject Enter the text required for the subject line of the Email (300 characters)
Wordlink fields can be used here.
6. Message Enter the text of the message
Wordlink fields can be used here.
7. Signature | HTML Enter the email Signature that should be used to sign off the emails.
The Signature field supports HTML formatting and Wordlink commands.
You can copy your Email Signature and paste it in this field. You can then make edits to it if required – for example you may prefer to send emails about overdue accounts from the “Accounts Department”.
Wordlink fields can also be used here.
8. Click on [OK] to update the Email
WordLink
To complete the Bill Template
9. Click on to update the Bill Template
10. Close the Bill Templates screen

Lexis® Affinity Library
© 2012 Reed International Books Australia Pty Ltd trading as LexisNexis Page 273
25.2 Bill Credit Note Types
Different types of credit notes can be created, to enable reporting of credit notes by different types (For example; Discounted fees, Bad debt).
Procedure
To attach a new Credit Note Type
1. Open Bill Credit Note Types (Fees & Billing | Billing)
2. Click on to create a new Bill Credit Note Type
3. Code TAXED
4. Description Bill Taxed by Court
5. Click on to update.
25.2.1 Print / View Bill Credit Note Types
You can select the printer icon to list the Bill Credit Note types recorded on your files.
A sample of the Bill Credit Note Types is shown below:
6. Close the print display
7. Close the Bill Credit Note Types screen

Administration Workbook
Page 274 © 2012 Reed International Books Australia Pty Ltd trading as LexisNexis
Notes

Lexis® Affinity Library
© 2012 Reed International Books Australia Pty Ltd trading as LexisNexis Page 275
26. Billing Plans
A Billing Plan can be used in Auto Billing to automatically generate drafts for matters that meet the criteria specified in the Billing Plans.
You can set a default Billing Plan (and Billing Trigger if TRG Billing Plan is selected) in Entities. This will set a default which will apply to all new matters.
There are nine (9) Billing Plans created automatically for you.
These are:
MON Monthly YR Yearly
BIM BiMonthly COM Completion
QRT Quarterly TRU Value of Unprotected Trust
4MT Four Monthly TRG Value of Billing Trigger
6MT Six Monthly
These can be altered or deleted as required, however at least one Billing Plan must remain. Each matter must have a Billing Plan.
Billing Plans
Code a 3 character alpha numeric code.
Description a 40 character description.
Classification
None No testing criteria will be applied when processing Auto Bills.
Value Will test the total value of the bill to be generated.
If a “Value” classification has been selected, you must specify the Trigger Value:
Trigger – Choose from:
Cap Value of Bill to Unprotected Trust balance
The total value of the Bill (incl tax) will not exceed the balance in Unprotected Trust.
Billing Trigger A bill will be generated when the total of the amounts to be billed (excl Tax) is equal to or exceeds the Billing Trigger Value.
Period Will test the length of time since the Last Bill or Date Instructed if there is no previous bill.
If a “Period” classification has been selected, you must specify the period. Choose from:
Unit Type Choose from Month or Year.
No of Units Specify the number of months or years.

Administration Workbook
Page 276 © 2012 Reed International Books Australia Pty Ltd trading as LexisNexis
Note re AutoBilling
Automated Bills can be generated based on Billing Plans.
The generating screen is shown below:
To generate bills on matters that are due for billing every month, tick “Test Trigger Condition”” and MON and click on [Next].

Lexis® Affinity Library
© 2012 Reed International Books Australia Pty Ltd trading as LexisNexis Page 277
27. Debtors Letters Templates
Each letter or statement template that will be used within Collection Plans and Payment Plans must be identified in the system.
These documents must be loaded onto your system before registering the Debtors Letters Templates. It is recommended that all templates are stored in a common location.
Discussion
In this example you will review one of the Debtors Letter Templates (B_REM1) that is included in the Lewisham Reid files.
1. Open Debtors Letter Templates (Fees & Billing | Collections)
2. Open B_REM1
The screen is shown below:
Code This is the Code for the template that will display in the Collection Plan. (20 characters)
Direct Merge by WordLink/Mail Merge Tick this option to have the Debtor Letter generated using Lexis Affinity Library's WordLink method.
Use System Path Tick this if you have recorded the base folder for Collection Letters in System | Documents. If this field is grey or disabled, this indicates that the path has not been recorded in System.
Administration Workbook
Page 278 © 2012 Reed International Books Australia Pty Ltd trading as LexisNexis
Description This is a detailed description of the letter. (50 characters)
Location If Use System Path has been ticked, enter the name of the document to be used for this Debtors Letter. If Use System Path has not been ticked, enter the full path and name of the template document.
Letter Type Select from Debtors Letter / Trust Funds up Front Letter / Accounts Rendered Statement / Payment Plan Letter.
The category that you select will determine which templates are displayed when locating templates for the different parts of the Collection Plan.
Before / After Macro Enter the name of a macro to run before or after generation of the letter. For example, you may have a macro that performs additional formatting on the document or performs calculations on table fields.
Script If you have created a script for this document in the Lexis Affinity Library Scripts program, attach the script here. Scripts are used to enhance the functionality of your precedents (eg. prompt users for input of text, insert variable clauses).
“Wordlink” tab
This tab allows you to set processing options.
Disable Processing of Form Fields This option stops Lexis Affinity Library processing form fields (i.e. formtext, checkbox etc). By default this option should be ticked.
Failing to select this option on a document which contains many form fields will greatly increase the time it takes to merge the document.
Disable Processing of InsertDoc Directive This option forces the merge engine not to look for INSERTDOC commands.
Disable Processing of Headers This option forces the merge engine not to look inside headers for fields, formatting codes or INSERTDOC commands.
Disable Processing of Footers This option forces the merge engine not to look inside footers for fields, formatting codes or INSERTDOC.
Disable Processing of Formatting Directives Selecting this option prevents the processing of formatting codes (such as <b></b>). If your Billing Template does not contain these codes, tick this option.

Lexis® Affinity Library
© 2012 Reed International Books Australia Pty Ltd trading as LexisNexis Page 279
Disable Processing of Table Data Merge Functions Enable this option if your document does not contain any table functions such as DELETEROW, DELETETABLE etc.
Disable Processing of Invalid Merge Fields This option disables replacing invalid merge fields with error text ##MERGEFIELD INVALID##. If this option is unticked and the Billing Template contains merge fields which contain invalid WordLink commands or fields which are not handled within the script, these fields will remain in the document. This option should be unticked during testing however once the document is working correctly this should be ticked.
3. Click on to update the Debtors Letter Template
4. Close the Debtor Letter Templates screen

Administration Workbook
Page 280 © 2012 Reed International Books Australia Pty Ltd trading as LexisNexis
Notes

Lexis® Affinity Library
© 2012 Reed International Books Australia Pty Ltd trading as LexisNexis Page 281
28. Collection Plans
Collection Plans are a way for your practice to implement a number of different plans or cycles to follow up the collection of outstanding bills.
There is no limit to the number of different plans; however a STANDARD plan is included in your files as the default. This plan cannot be deleted but can be modified to suit your requirements.
Collection Plans can be attached to PhoneBook entries, Clients, Matters, Single Bills and Matter Types.
There are a number of major elements that make up the Collection Plan system:
Debtor Letters Templates
Collection Plan registration
Attach the collection plan to the relevant record
Debt Collection notes
Generating Collection Letters and Account Rendered Statements
This section covers setting up the Collection Plan.

Administration Workbook
Page 282 © 2012 Reed International Books Australia Pty Ltd trading as LexisNexis
28.1 Collection Plan Registration
Each Collection Plan must be registered in Lexis Affinity Library.
You may need several Collection Plans. One plan may be based on a 30 day cycle; another may be a 14 day cycle with different wording of the letters. You may prefer to send Statements to some clients and letters to others, one client may need a very specific format and different departments may prefer a different format to other departments. Each variation needs a separate plan.
Each Collection Plan is made for either a single matter, a single bill or for a debtor.
Once the basic attributes of a Collection Plan have been established, you can copy the details of the original plan to a new plan and alter the new plan.
Discussion
In this example you will review the Standard Collection Plan that is included as part of your files and in the Lewisham Reid data files. You can modify this plan to suit your own requirements and use it as a basis for additional Collection Plans.
1. Open Collection Plans (Fees & Billing | Collections)
2. Select the STANDARD Collection Plan and select the “Debtors Letter” tab
The following screen displays:

Lexis® Affinity Library
© 2012 Reed International Books Australia Pty Ltd trading as LexisNexis Page 283
Code This is the Code for the Plan. You cannot change the STANDARD plan. (20 characters)
Description This is a brief description of the Plan. (50 characters)
Expected Days to Payment / Days / Day of the Following Month Due dates can be set to be a number of days after the Bill is issued, or a set date in the following month. If set as 30 Days The payment will be due 30 days from the date of the Bill. If set as 25 day of the Following Month The Payment will be due on the 25th of the following month. (These settings can be overridden at the time of generating the bill).
Charge Interest on Outstanding Bills? Tick this to add interest to an account. If ticked, another tab displays – “Interest Recovery”.
Require Part Payment Letters? Ticked If a part payment is made a letter will be sent. This letter would acknowledge the payment made and request further payment. Unticked No letters will be sent after a part payment.
Group Bills in Debtors Letter by You can select from:
Single Bill Only one bill per letter.
Matter The total balance outstanding for the matter.
Debtor The total amount outstanding for all matters for which the debtor has been identified as the ‘Bill To’ entity or person will be grouped together and included in the debtor collection letters.
“Trust Funds Up Front Letter” tab
Entity Each Entity can have different default values.
Default Value for New Matter This is the default amount of the “Up Front” request. This can be altered for each matter.
Template This is the template for the letter that can be sent requesting Up Front funds from the Debtor. The template link is maintained in Debtor Letter Templates.

Administration Workbook
Page 284 © 2012 Reed International Books Australia Pty Ltd trading as LexisNexis
“Trust Funds Follow Up Letters” tab
This tab displays the letter/s that will be sent if the client does not pay the requested amount after the initial letter. This tab also details the days between the initial letter and the follow up letter, whether an Email needs to be sent, and if this item should be recorded as a task.
To add another letter, press on the keyboard, or press <TAB>
Code Each letter that is registered is assigned a Code.
Description A notation to describe the letter.
Template The Bill Template that will be used when this type of letter is sent.
Days To Letter This is the number of days between the previous letter and when the next letter is due.
Email Y indicates that an email will be sent at the same time as the letter is generated. You can customise the email by clicking on . N indicates that no email will be generated.
Task Y indicates that a task will be generated when the letter is generated. N indicates that no task will be created.
Repeat Last Letter? Tick this to repeat the last letter sent until the funds are received.
“Debtors Letters” tab
This tab displays which letters will be sent to follow up overdue accounts, the days between each letter, whether or not an Email is required and if this is to be recorded as a task.
To add another letter, press on the keyboard, or press <TAB>.
Code Each letter that is registered is assigned a Code.
Description A notation to describe the letter.
Template The Bill Template that will be used when this type of letter is sent.
Days To Letter This is the number of days between the previous letter and when the next letter is due.

Lexis® Affinity Library
© 2012 Reed International Books Australia Pty Ltd trading as LexisNexis Page 285
Notification Email The Notification Email is generally sent to internal staff members. Y indicates that an email will be sent at the same time as the letter is generated. You can customise the email by clicking on . N indicates that no email will be generated.
Covering Email The Covering Email is generally sent to external parties such as the Debtor/Debtor Contact. Y indicates that an email will be sent at the same time as the letter is generated. You can customise the email by clicking on . N indicates that no email will be generated.
Task Y indicates that a task will be generated when the letter is generated. N indicates that no task will be created.
Repeat Last Letter? Tick this to repeat the last letter sent until the funds are received.
“Part Payment Letter” tab
Part Payment Trigger This is the percentage of the outstanding bill that constitutes a part payment.
Days to Letter If there is no further payment within 1 day of the part payment, another letter will be issued as designated below.
Template This is the template that will be used to print the letter acknowledging receipt of the part payment.
Follow Up Letter This is the code of the letter that will be sent if there are no further funds received after the part payment. The code of 2 refers to the list of letters shown on the “Debtors Letters” tab below. Letter 2 is the Account Still Outstanding letter, and this letter will be sent 14 days after the last letter.
Send Notification Email The Notification Email is generally sent to internal staff members. Tick this to generate emails when a Part Payment Letter is generated. You can customise the email by clicking on [Edit Notification Email].
Send Letter as PDF with Covering Email Tick this if you prefer to send Part Payment Letters as PDFs by email. You can customise the email by clicking on [Edit Covering Email].

Administration Workbook
Page 286 © 2012 Reed International Books Australia Pty Ltd trading as LexisNexis
“Interest Recovery” tab
This tab only displays if the Collection Plan has been flagged to charge interest.
Start applying Interest from Letter Enter the Code number of the letter which starts the Interest period. (Refer to the “Debtors Letters” tab for the Code Numbers.
Grace Days to Charge Interest Enter the number of days grace allowed. The “Grace” period is the length of time after which the Bill is due, you allow clients to be late in paying.
Sundry Type Select a Sundry Type to be used when the Interest charge is recorded. (Optional).
Charge Interest on Fees? / Fees Tax? / Disbursements? / Disbursements Tax? / Sundries / Sundries Tax?
Tick the items that are to be included in the Interest calculation.
Interest Rates Use the “Add Interest Rate” tab to record the Commencement Date and Interest Rate.
“A/C Rendered Statement” tab
Template This is the template that is used for the Statement.
Allow minimum Days between printing Statements This indicates the frequency of Statements.
Send Notification Email The Notification Email is generally sent to internal staff members. Tick this to generate emails when an Account Rendered Statement is generated. You can customise the email by clicking on [Edit Notification Email].
Send Statement as PDF with Covering Email Tick this if you prefer to send Account Rendered Statements as PDFs by email. You can customise the email by clicking on [Edit Covering Email].

Lexis® Affinity Library
© 2012 Reed International Books Australia Pty Ltd trading as LexisNexis Page 287
28.2 Setting up Emails
Both Notification and Covering emails use the same procedures.
Emails are available in Trust Funds Follow Up Letters, Debtors Letters, Part Payment Letters and Account Rendered Statements.
Discussion
1. Open the Collection Plan Email dialog box by firstly clicking in the Email column and then on
The Email screen is shown below:
2. To: You can click on and select from the listed fields These are:
CLIENT, CONTACT, BILL TO, DEBTOR, BILLTO_CONTACT, DEBTOR_CONTACT, PARTY 1, 2 and 3, AUTHOR, PARTNER, CONTROLLER or CLIENT;CONTACT;BILLTO;PARTY1;PARTY2;PARTY3;AUTHOR;PARTNER;CONTROLLER as a group. You can select one or more individually, or select the group and remove individual entries if they are not required.

Administration Workbook
Page 288 © 2012 Reed International Books Australia Pty Ltd trading as LexisNexis
NOTE: If you are selecting any of these fields, you must also make sure that: (1) the Employees are linked to their PhoneBook record (2) that you have entered Email addresses for the relevant entries in the PhoneBook.
OR you can type separate Email addresses, separated by a semi colon (;).
3. CC: Enter email addresses manually if you require a copy of the email to go a particular person/s.
4. BCC Enter email addresses manually if you require a blind copy of the email to go a particular person/s.
5. Subject Enter the text required for the subject line of the Email (300 characters)
For example: Outstanding account for %TITLE%
Wordlink fields can be used here.
6. Message Enter the text of the message
Wordlink fields can be used here.
7. Signature | HTML Enter the email Signature that should be used to sign off the emails.
The Signature field supports HTML formatting and Wordlink commands.
You can copy your Email Signature and paste it in this field. You can then make edits to it if required – for example you may prefer to send emails about overdue accounts from the “Accounts Department”.
Wordlink fields can also be used here.
8. Click on [OK] to update the Email

Lexis® Affinity Library
© 2012 Reed International Books Australia Pty Ltd trading as LexisNexis Page 289
29. Payment Plans
Payment Plans are a way for your practice to implement a number of different plans or cycles that can be used to follow up Debtors who are paying their accounts by instalments.
One Payment plan is included in your data files. This is the STANDARD Payment Plan and can be copied and modified to suit the individual firm’s requirements.
There are two elements to establishing a Payment Plan system:
Debtor Letter Templates
Payment Plan Templates
When the Payment Plans have been created, you can attach a Payment Plan to a Matter or when processing a Bill.
29.1 Payment Plan Templates
A Payment Plan is a way that you agree with your debtors as to how they will pay you for their outstanding accounts. An example of a Payment Plan is;- a proportional instalment each month with a follow-up letter 7 days after the initial expected payment date if no payment has been received, and a further reminder letter another 7 days later, and so on, culminating with the debt reverting to the Collection Plan cycle for recovery of the outstanding debt.
There may be different time structures of payment plan for different debtors, different letters for different debtors or different departments, different number of letters. Each significant variation will require a separate Payment Plan Template to be registered. There is no limit to the number of Payment Plan Templates that may be established on your system.
Once the basic attributes of a Payment Plan have been established, it is possible to create additional plans based on this original plan, by copying the details of the original plan to a new plan and adjusting the new plan.
Discussion
In this example you will review the STANDARD Payment Plan Template which is included in the Lewisham Reid files.
1. Open Payment Plan Templates (Fees & Billing | Collections)
2. Select STANDARD
The following screen displays:

Administration Workbook
Page 290 © 2012 Reed International Books Australia Pty Ltd trading as LexisNexis
Code Code for this Payment Plan. (20 characters)
When creating a new template you can copy from an existing one.
Description A short description of the type of Payment Plan Template. (50 characters)
Perpetual Payment Plan Tick this to indicate that this is a Perpetual Payment Plan. A Perpetual Payment Plan allows for the client to make regular instalment payments to clear the outstanding debt. Perpetual Payment Plans are attached to matters and cover all outstanding accounts for that matter. Some of the fields explained below are not required for Perpetual Payment Plans.
Payment Letter Template Select the Letter template to use in this Payment Plan, by clicking on
to view the list of all the Payment Plan Templates. These are letters registered in Debtor Letter Templates and marked as Payment Plan Letters.
Require Email with Letter? If ticked - the Email dialog box will display. You can select to whom the Email should be addressed – eg Partner, Author Credit Controller, the Subject Line of the Email and the message. The message may include Lexis Affinity Library field such as Client name and Matter Number. Instructions for creating Emails follow this section.

Lexis® Affinity Library
© 2012 Reed International Books Australia Pty Ltd trading as LexisNexis Page 291
Require Task with Letter? If ticked – the Task dialog box will display. You can enter the details of the task to be carried out and by whom. Instructions for creating and editing tasks are included in the Workflow training.
Defaults for New Payment Plans – Frequency Set the number of and frequency of instalments. Select from Days, Weeks, Months or Years
Number of Instalments Enter the number of instalments that the Debtor is required to pay. For example if the Debtor is paying off an account over 12 months, the Frequency should be set at Months and the Number of Instalments should be 12.
Maximum Deferred Instalments before invoking Warning Letters Enter the number of payments that can be late before Warning Letters are produced.
Require Full Payment of Instalment? Tick this if each Instalment must be paid in full without generating Warning Letters. Leave this unchecked if partial payments of an instalment are acceptable.
Grace Days for Instalment Payment Enter the number of days grace allowed before Warning Letters are produced.
“Warning Letters” tab
Complete this section with each letter that will be used in the Payment Plan cycle.
In the Template column, click on to list the Letters available to use in Payment Plans. Indicate if an Email needs to be sent in relation to the Warning Letter, or a Task set.
Revert to Collection Plan on Last Letter Tick this if you want the last letter in the plan to be followed by letters generated by the Collection Plan.
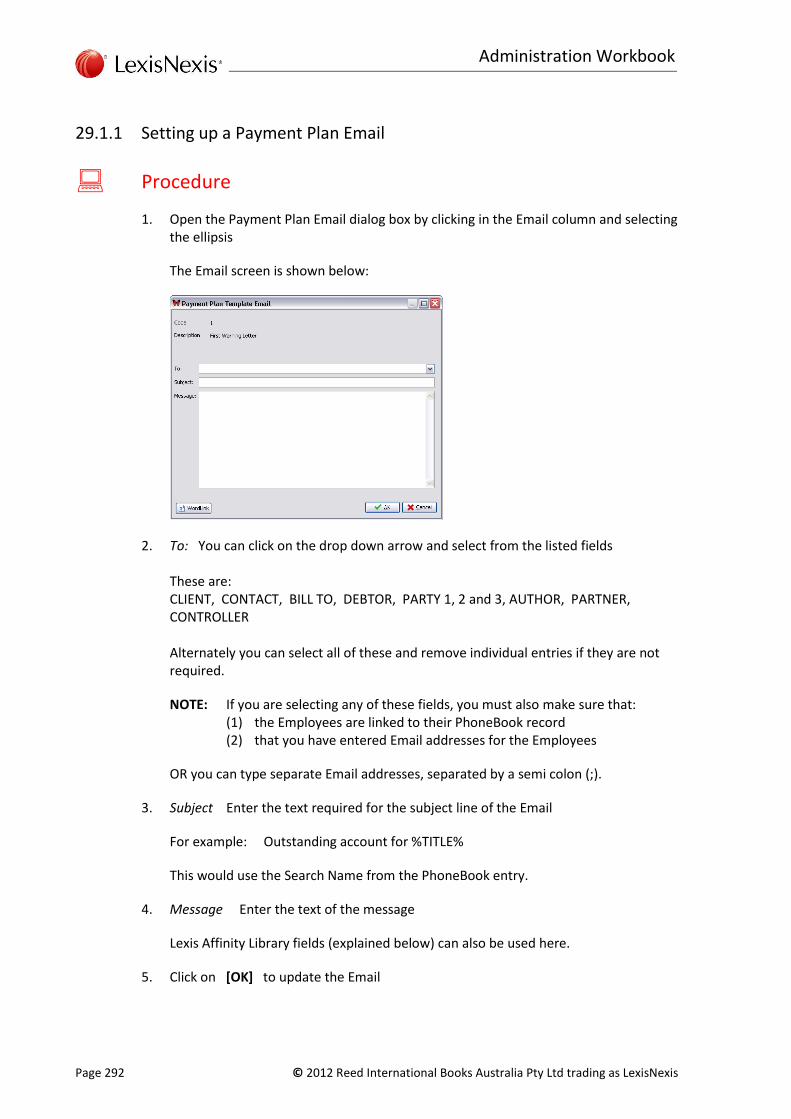
Administration Workbook
Page 292 © 2012 Reed International Books Australia Pty Ltd trading as LexisNexis
29.1.1 Setting up a Payment Plan Email
Procedure
1. Open the Payment Plan Email dialog box by clicking in the Email column and selecting the ellipsis
The Email screen is shown below:
2. To: You can click on the drop down arrow and select from the listed fields These are: CLIENT, CONTACT, BILL TO, DEBTOR, PARTY 1, 2 and 3, AUTHOR, PARTNER, CONTROLLER Alternately you can select all of these and remove individual entries if they are not required.
NOTE: If you are selecting any of these fields, you must also make sure that: (1) the Employees are linked to their PhoneBook record (2) that you have entered Email addresses for the Employees
OR you can type separate Email addresses, separated by a semi colon (;).
3. Subject Enter the text required for the subject line of the Email
For example: Outstanding account for %TITLE%
This would use the Search Name from the PhoneBook entry.
4. Message Enter the text of the message
Lexis Affinity Library fields (explained below) can also be used here.
5. Click on [OK] to update the Email

Lexis® Affinity Library
© 2012 Reed International Books Australia Pty Ltd trading as LexisNexis Page 293
Fields available for use in Emails
Matter Table fields can be used in Emails if they are prefixed and suffixed by the “%”sign. For example; - to use the Long Description of the matter you would use the code - %LONGDESCR%.
Listed below are fields that you would typically use in a debtors letters.
AmountReq The amount requested from the Client or Debtor.
BILLREF The reference number of the outstanding Bill.
BILLDATE The date of the outstanding Bill.
In addition, any field from the Matter Table can be used. Some of these are listed below. To obtain a full list of the Matter table fields, Select Reports, Select the Database Glossary Report and select Matter Table.
FILEID Matter Number or identifier.
PARTNER EMPLOYEE.CODE for the partner of the matter.
CONTROLLER EMPLOYEE.CODE for the controller (matter manager).
AUTHOR EMPLOYEE.CODE for the author (person doing most work).
SHORTDESCR Short description of the matter.
LONGDESCR Long description of the matte.
OPENED Date that this matter was opened. .(uses windows format for dates)
EXP_COMPLETION Expected completion date for this matter.
COMPLETED Date legal work on this matter was finished.
OFFICE Which branch office BRANCH.CODE this matter belongs.
ARCHIVED Date it was archived.
CONTACT Matter contact - free form or PHONEBOOK.SEARCH.
BILL_TO Debtor for matter.

Administration Workbook
Page 294 © 2012 Reed International Books Australia Pty Ltd trading as LexisNexis
Notes

Lexis® Affinity Library
© 2012 Reed International Books Australia Pty Ltd trading as LexisNexis Page 295
30. Diary Setup
Before Diary can be used you should create the Diary Events, Diary Locations, Diary Jurisdiction and resources
30.1 Diary Events, Locations & Jurisdictions
Diary events are the things that you need to do – either in relation to specific matters, PhoneBook entries or general administration duties.
Diary Locations are the places that you go to for a Diary Event.
You can further classify Diary Events by Jurisdiction. For example you may create all the suburban Magistrates Courts as Locations and also create a Jurisdiction for all Magistrates Courts.
Hands on
In this exercise you will create a new Diary Event, Diary Place and view the Diary Jurisdictions.
Diary Events
1. Open Diary Events (Case Management | Diary)
2. Click on [New]
The following screen will display:
3. Event Visit Client
4. Click on to update.
5. Click on or press CTrl+P to print the list of Diary Events
6. Close Diary Events

Administration Workbook
Page 296 © 2012 Reed International Books Australia Pty Ltd trading as LexisNexis
Diary Locations
1. Open Diary Locations (Case Management | Diary)
2. Click on [New]
The following screen will display:
3. Location Clients Office
4. Click on to update.
5. Close Diary Locations
Diary Jurisdictions
6. Open Diary Jurisdictions (Case Management | Diary)
The following screen will display:
7. Close Diary Jurisdictions

Lexis® Affinity Library
© 2012 Reed International Books Australia Pty Ltd trading as LexisNexis Page 297
30.2 Diary Groups and Filters
Diary Groups and Filters can be created and saved for use again by other users – if saved as a Public Groups or Filters . Private Groups and Filters can also be created and these are only available to the user who created them.
Diary Groups and Filters can be created in System, selecting the “Diary” tab or in Diary.
30.2.1 Diary Groups
From System
Hands on
In this exercise you will create a Diary Group for the Office Junior and Secretary Employee Types and Georgina Gray. This Group should be called “Non Professional Staff”.
1. Open System (System Settings | Setup)
2. Select the “Diary” tab
3. Click on [Diary Group Maintenance]
The following screen displays:
If any Diary Groups already exist, they will be listed here.
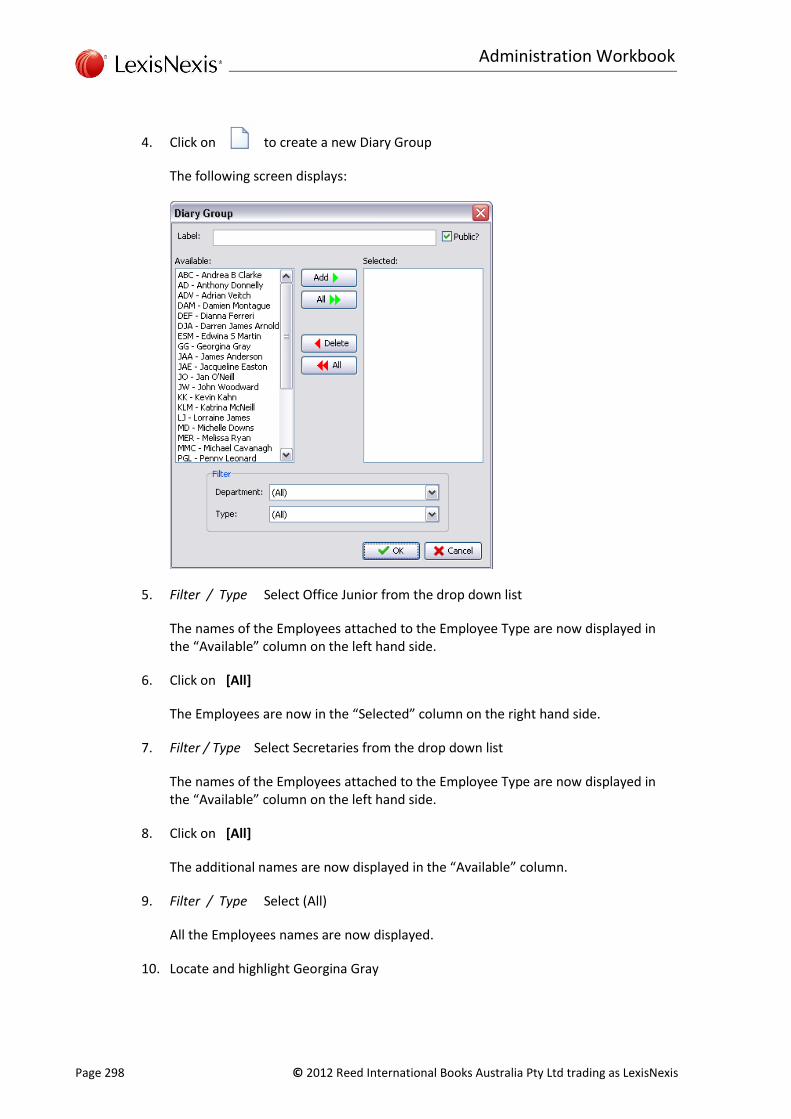
Administration Workbook
Page 298 © 2012 Reed International Books Australia Pty Ltd trading as LexisNexis
4. Click on to create a new Diary Group
The following screen displays:
5. Filter / Type Select Office Junior from the drop down list
The names of the Employees attached to the Employee Type are now displayed in the “Available” column on the left hand side.
6. Click on [All]
The Employees are now in the “Selected” column on the right hand side.
7. Filter / Type Select Secretaries from the drop down list
The names of the Employees attached to the Employee Type are now displayed in the “Available” column on the left hand side.
8. Click on [All]
The additional names are now displayed in the “Available” column.
9. Filter / Type Select (All)
All the Employees names are now displayed.
10. Locate and highlight Georgina Gray

Lexis® Affinity Library
© 2012 Reed International Books Australia Pty Ltd trading as LexisNexis Page 299
11. Click on [Add]
All the required Employees should now be listed in the “available” column.
12. Label Non Professional Staff
13. Public Tick this
This indicates that this Diary Group will be available to all users.
14. Click on [OK]
The new Diary Group will now appear as shown below:
The Author of the Diary Group is the user who created the Group. Groups created via the System option will have the Author of ‘sys’.
From this screen you can edit or delete an existing Group, copy a group to a new group with a different name and print either a list of groups or the names of the Employees in the groups.
Diary Group Filter
The Diary Group Filter allows you to select Groups created by a particular Employee.
15. Close Diary Groups

Administration Workbook
Page 300 © 2012 Reed International Books Australia Pty Ltd trading as LexisNexis
30.2.2 Diary Filters
The Diary Filters can be used to locate certain Events, Places or Jurisdictions in conjunction with other Diary settings such as the “With” details or Matter settings such as Partner.
From System
Hands on
In this exercise you will create a Diary Filter to locate Diary Entries for Meetings that are to be held in “Our Office”.
1. Open System (System Settings | Setup)
2. Select the “Diary” tab
3. Click on [Diary Filter Maintenance]
The following screen displays:
If any Diary Filters already exist, they will be listed here.

Lexis® Affinity Library
© 2012 Reed International Books Australia Pty Ltd trading as LexisNexis Page 301
4. Click on to create a new Diary Filter
The following screen displays:
5. Event Select Meeting
6. Click on
7. Location Select Our Office
8. Click on
9. Label Meetings in Office
10. Public Tick this
11. Click on [OK]

Administration Workbook
Page 302 © 2012 Reed International Books Australia Pty Ltd trading as LexisNexis
30.3 Resources
Resources can be used to itemise the equipment that is available. You can group various types of resources into Resource Types.
30.3.1 Resource Types
Hands on
In this exercise you will register a new Resource Type and add two resources.
1. Open Resource Registration (Case Management | Diary)
The following screen displays:
2. Type Click on [Types]
The following screen displays:
3. Click on [Add]
4. Enter the text “Equipment”
You can continue to click on [Add] and enter the name of the next Resource Type.
5. Close the Resource Types screen
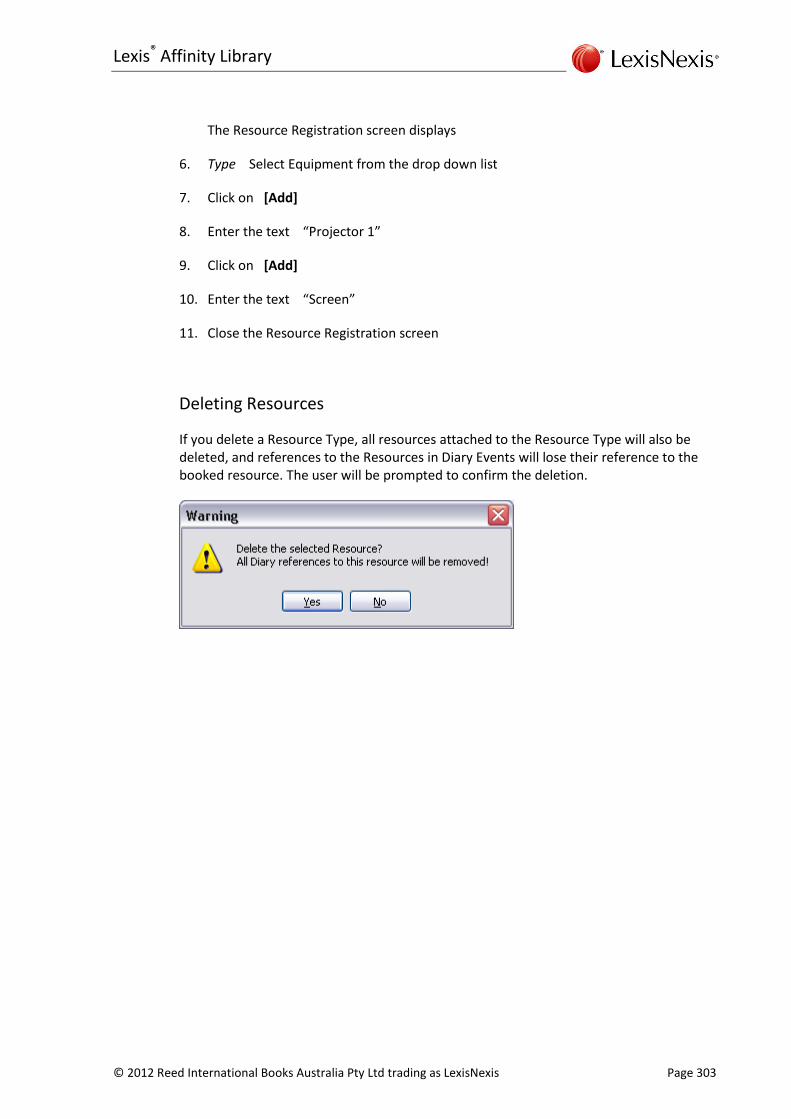
Lexis® Affinity Library
© 2012 Reed International Books Australia Pty Ltd trading as LexisNexis Page 303
The Resource Registration screen displays
6. Type Select Equipment from the drop down list
7. Click on [Add]
8. Enter the text “Projector 1”
9. Click on [Add]
10. Enter the text “Screen”
11. Close the Resource Registration screen
Deleting Resources
If you delete a Resource Type, all resources attached to the Resource Type will also be deleted, and references to the Resources in Diary Events will lose their reference to the booked resource. The user will be prompted to confirm the deletion.

Administration Workbook
Page 304 © 2012 Reed International Books Australia Pty Ltd trading as LexisNexis
Notes

Lexis® Affinity Library
© 2012 Reed International Books Australia Pty Ltd trading as LexisNexis Page 305
31. Safe Custody
Lexis Affinity Library Safe Custody provides a means of recording and tracking documents or other items clients give to the firm for safekeeping.
31.1 Safe Custody Item Types
You will need to create the various Item Types before you start to register packets and documents.
Procedure
1. Open Safe Custody Item Types (Database | Safe Custody)
2. Click on to print a list of existing Item Types
3. Click on to create a new Item Type
The following screen displays:
4. Type Enter a name for the type of Item
5. Description Enter a full description of each Item Type OR This field can be used as a prompt for the user to enter the critical details:
6. Click on [Save] to update
When you have finished creating all the Item Types, you may prefer to print a new list.

Administration Workbook
Page 306 © 2012 Reed International Books Australia Pty Ltd trading as LexisNexis
31.2 Safe Custody Relationships
Safe Custody Relationships allow you to categorise the Contacts for a Safe Custody Item. Examples include: Executor, Trustee, Joint Holder.
To create, edit or delete Safe Custody Relationships
Procedure
Follow the steps below to create a new Safe Custody Relationship.
1. Open Safe Custody Relationships (Database | Safe Custody)
2. Click on [New]
The following screen displays:
Code Enter the code for the relationship. (32 characters)
Description Enter the description (50 characters)
3. Click on [Save] to update the relationship

Lexis® Affinity Library
© 2012 Reed International Books Australia Pty Ltd trading as LexisNexis Page 307
32. Employee Transfer Batch
Employee Transfer Batch allows you to transfer various Lexis Affinity Library records from one Employee to another. This would usually be used where an Employee has left and another Employee is taking over some or all of the responsibilities of that Employee.
The Batch Transfer is run as a wizard and the operator can select which records are to be altered.
Records that can be altered include:
Matters – Partner, Controller and Author
Matter Tasks
Matter Teams
Employee Teams
Client Partner
Client Introducer
Diary Entry Reminders
Diary Entry Meeting Invitees
Email Recipients for Workflow and Collection Plan Emails
Document Authors
Document Operators
Safe Custody Borrowers
Cheque Requisition Requestors
The routine can be run for all clients and / or matters, or a filtered list of clients or matters.

Administration Workbook
Page 308 © 2012 Reed International Books Australia Pty Ltd trading as LexisNexis
Hands on
In this exercise you will transfer all the Client and Matter records for DJA to AD.
1. Open Employee Transfer Batch (Database | Employees)
The following screen displays:
This screen allows you to choose the default Employees to be transferred “from” and “to”.
Each step of the wizard will allow you to alter this selection – this screen simply sets the defaults or prompts.
Note that if the default Employee does not have a current record, no default will display.
2. From – Current employee assigned Select Darren James Arnold
3. To – New employee to be assigned Select Anthony Donnelly
NOTE: You can tick “Show Employee Code” to have this screen displayed with only the Employees Code (ie initials).
Click on this to clear the Employees selected in the “transfer from” and “transfer to” columns.
Click on this to select specific clients or matters to be transferred.
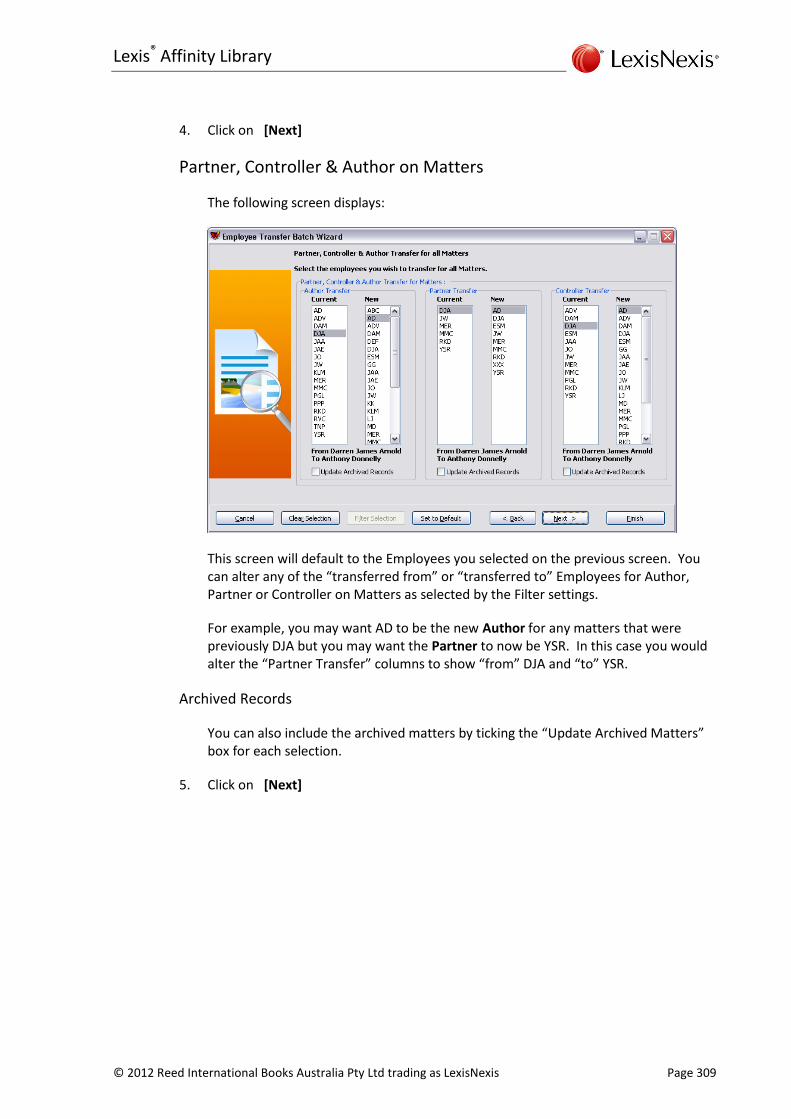
Lexis® Affinity Library
© 2012 Reed International Books Australia Pty Ltd trading as LexisNexis Page 309
4. Click on [Next]
Partner, Controller & Author on Matters
The following screen displays:
This screen will default to the Employees you selected on the previous screen. You can alter any of the “transferred from” or “transferred to” Employees for Author, Partner or Controller on Matters as selected by the Filter settings.
For example, you may want AD to be the new Author for any matters that were previously DJA but you may want the Partner to now be YSR. In this case you would alter the “Partner Transfer” columns to show “from” DJA and “to” YSR.
Archived Records
You can also include the archived matters by ticking the “Update Archived Matters” box for each selection.
5. Click on [Next]

Administration Workbook
Page 310 © 2012 Reed International Books Australia Pty Ltd trading as LexisNexis
Tasks
The following screen displays:
This screen allows you to choose the “transfer from “ and “transfer to” Employees for Tasks.
You can also alter any Archived Matters which have outstanding tasks attached.
6. Click on [Next]
Matter Teams
This screen allows you to choose the “transfer from “ and “transfer to” Employees for Matter Teams (ie where you have added Employees to a Team in a Matter screen).
This means that where DJA has been a member of a Team – AV will now be in the Team with the role that DJA had previously.
7. Click on [Next]
Employee Teams
This screen allows you to choose the “transfer from“ and “transfer to” Employees for where the “transfer from “ Employee is a member of a Team.
8. Click on [Next]

Lexis® Affinity Library
© 2012 Reed International Books Australia Pty Ltd trading as LexisNexis Page 311
Partner on Clients
This screen allows you to choose the “transfer from “ and “transfer to” Employees for the Partner on the Client records.
The Clients selected are those that were chosen on the first screen of the transfer wizard.
9. Click on [Next]
Introducer on Clients
This screen allows you to choose the “transfer from “ and “transfer to” Employees for the Introducer on the Client records.
The Clients selected are those that were chosen on the first screen of the transfer wizard.
Click on [Clear Selection] to leave the ‘transfer from” Employee as is.
10. Click on [Next]
Diary Entries
This screen allows you to choose the “transfer from “ and “transfer to” Employees where the “transfer from” Employee is the “Reminder for” field on Diary entries.
Note that any Diary entries that are for the “transfer from” Employee where the Due Date is prior to today will not be updated.
11. Click on [Next]
Diary Appointment Invitees
This screen allows you to choose the “transfer from “ and “transfer to” Employees where the ‘transfer from” employee has been invited to any future meetings.
12. Click on [Next]
Workflow & Collection Plan Email Recipients
This screen allows you to choose the “transfer from “ and “transfer to” Employees where the ‘transfer from” employee has been included in an Email that is attached to a Workflow or Collection Plan
13. Click on [Next]

Administration Workbook
Page 312 © 2012 Reed International Books Australia Pty Ltd trading as LexisNexis
Matter & Client Document Author
This screen allows you to choose the “transfer from “ and “transfer to” Employees where the ‘transfer from” employee is the author of Matter or PhoneBook documents
14. Click on [Next]
Matter & Client Document Operator
This screen allows you to choose the “transfer from “ and “transfer to” Employees where the ‘transfer from” employee is the Operator of Matter or PhoneBook documents.
15. Click on [Next]
Safe Custody Document Borrower
This screen allows you to choose the “transfer from “ and “transfer to” Employees where the ‘transfer from” employee is a borrower of Safe Custody documents.
16. Click on [Next]
Author of Cheque Requests
This screen allows you to choose the “transfer from “ and “transfer to” Employees where the ‘transfer from” employee is selected in the “Requested by” field of a Cheque Requisition.
17. Click on [Finish]

Lexis® Affinity Library
© 2012 Reed International Books Australia Pty Ltd trading as LexisNexis Page 313
A screen similar to the one below will be displayed showing the details of the Filters selected and whether or not Archived matters are included:
18. Click on [Yes] to proceed
Another screen will display detailing which Employees will be transferred and to whom.
You should review this screen very carefully before proceeding.

Administration Workbook
Page 314 © 2012 Reed International Books Australia Pty Ltd trading as LexisNexis
TIP: You could print this screen, so that you have a record of the transfers about to be made.. <ALT + Print Screen) and then paste into a Word Document.
19. Click on [Yes] to proceed
When the transfer has been completed Lexis Affinity Library will display a screen showing the number of records affected.
A sample is shown below:
20. Click on [OK]
Another screen will display asking if you want to process any more transfers.
21. Click on [No]
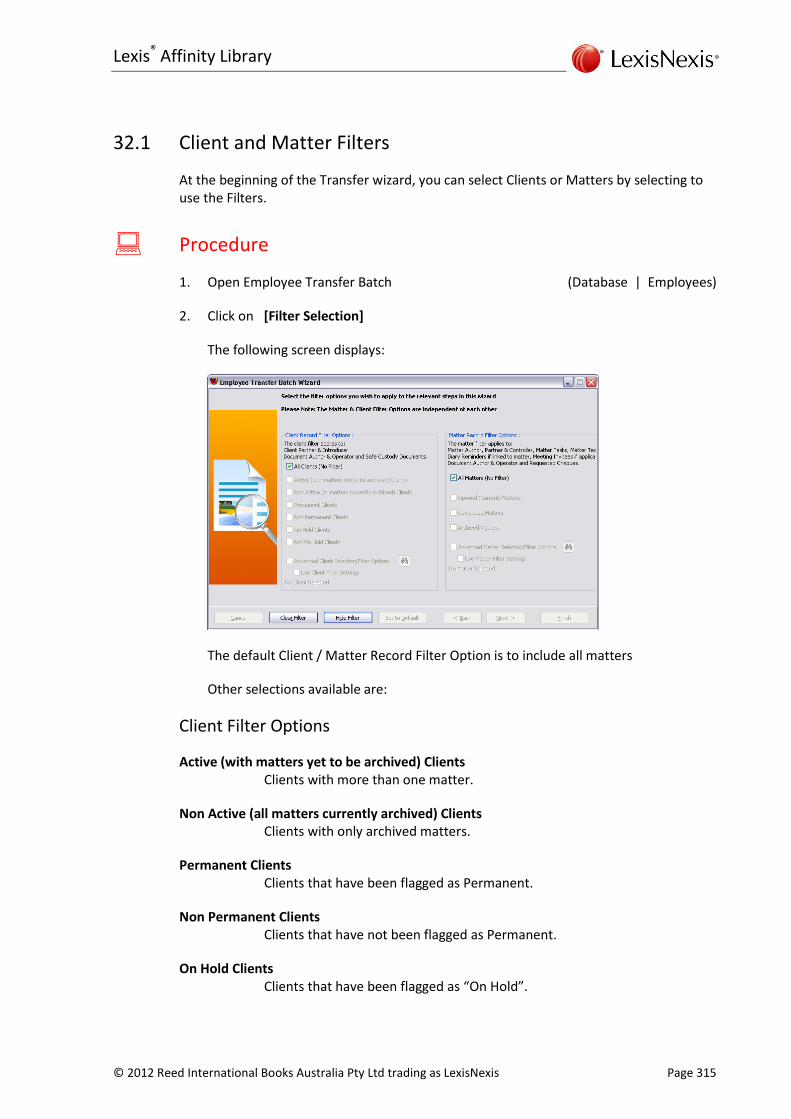
Lexis® Affinity Library
© 2012 Reed International Books Australia Pty Ltd trading as LexisNexis Page 315
32.1 Client and Matter Filters
At the beginning of the Transfer wizard, you can select Clients or Matters by selecting to use the Filters.
Procedure
1. Open Employee Transfer Batch (Database | Employees)
2. Click on [Filter Selection]
The following screen displays:
The default Client / Matter Record Filter Option is to include all matters
Other selections available are:
Client Filter Options
Active (with matters yet to be archived) Clients Clients with more than one matter.
Non Active (all matters currently archived) Clients Clients with only archived matters.
Permanent Clients Clients that have been flagged as Permanent.
Non Permanent Clients Clients that have not been flagged as Permanent.
On Hold Clients Clients that have been flagged as “On Hold”.

Administration Workbook
Page 316 © 2012 Reed International Books Australia Pty Ltd trading as LexisNexis
Not on Hold Clients Clients that have not been flagged as “On Hold”.
Advanced Client Selection / Filter Options
Tick this and click on to open the Client list and use the “Filter” tab to specifically select one or more Clients For example you may wish to only select the Clients that belong to a Client Group – such as Black Publishing Group. If you have used the “Filter” tab to select Clients, you must also tick “Use Client Filter Settings”
Matter Record Filter Options
Opened (Current) Matters Matters that are not Completed.
Completed Matters Matters that are flagged as Completed.
Archived Matters Matters that have been archived.
Advanced Matter Selection / Filter Options
Tick this and click on to open the Matter list and use the “Filter” tab to specifically select one or more Matters. If you have used the “Filter” tab to select Matters, you must also tick “Use Matter Filter Settings”

Lexis® Affinity Library
© 2012 Reed International Books Australia Pty Ltd trading as LexisNexis Page 317
33. Employees
“Employee” is the term used to include all the people who work for your firm. Employees are categorised into Types and usually belong to a Department and may also belong to a Branch. The Employee record includes information about security levels and access rights granted to an Employee. Each Employee is granted access to individual functions in Lexis Affinity. Security Options determine whether or not an Employee Type can or can’t perform certain functions within each application.
It is recommended that all Employees are recorded in the PhoneBook before creating them as Employees. The PhoneBook entry stores information such as the e-mail address which is used in the Workflow / Document production area.
NOTE: If you attempt to delete an Employee that has records attached, you will be required to reassign it to another Employee.
33.1 Create a PhoneBook record for an Employee
Hands on
In this exercise you will register yourself as an Employee of Lewisham Reid.
1. Open PhoneBook from the Applications Toolbar
2. Locate and open one of the Lewisham Reid PhoneBook records
3. Select the “Linked Records” tab
4. Click on [Create]
5. Type Select Staff from the drop down List
The Type of entry that you select determines the prompts that are displayed on the screen – these are called the Name Labels.
6. Initials Enter your initials
7. Code Leave blank
8. Name Alter this to read your name.
9. Full Name Alter this to include any other names if necessary.
10. Position Enter your occupation or position in the firm
11. Salutation Enter the name that should be used in correspondence or Emails to you
12. Default Ref Leave blank

Administration Workbook
Page 318 © 2012 Reed International Books Australia Pty Ltd trading as LexisNexis
13. Select the “Personal Details” tab
Complete the details.
14. Click on [OK] to save this entry
15. Open PhoneBook screen for editing on exit Tick this
The PhoneBook editing screen displays.
16. Enter Mobile / Home / Direct Phone Numbers if required
NOTE: It is also possible to enter the TFN number on the “Security” tab, HOWEVER, this information may then become available to staff members who should not see it. (The “Security” tab can be disabled in Employee Security).
Attaching the Employee to a PhoneBook Group
1. Select the “Groups” tab
2. Tick “Our Staff”
Establish the Relationship
3. Select the “Relationships” tab
4. Click on [New]
5. Relationship Select “is an employee of”
6. Relate to Click on
7. Locate and select the Lewisham Reid PhoneBook record
8. Click on [OK]
Email Address
9. Select the “Addresses” tab
10. Email Alter the Firm’s Email Address to that of the staff member
11. Save and close the PhoneBook entry

Lexis® Affinity Library
© 2012 Reed International Books Australia Pty Ltd trading as LexisNexis Page 319
33.2 Create the Employee record
1. Open Employees (Database | Employees)
2. Click on to create a new Employee.
The following screen displays:
3. Code Enter your initials as recorded in the PhoneBook
4. Tick Active and Author
5. Name Click on and locate yourself as a staff member in the PhoneBook listing
Lexis Affinity Library will insert the name of the Employee.
6. Network ID Leave blank if using Lewisham Reid for the training exercise. Alternately enter your own Network ID
7. Phone Enter your (work) phone number / direct line number
8. Birth Date Enter your Birth Date (optional field)
9. Experience 5 years

Administration Workbook
Page 320 © 2012 Reed International Books Australia Pty Ltd trading as LexisNexis
10. Calendar Select WORK
11. Security Level 5
12. Limit Ability to Print Records Leave unticked
13. Limit Non-Reporting Matter Filters to Employees Department Leave unticked
14. Limit Non-Reporting Matter Filters to Employees Branch Leave unticked
15. Reopen List Length 10
16. Refresh Time 60
17. Default Notify 15 minutes before appointment
18. Default to Employee's Department in Fee Creation Tick this
19. Default to Employee's Branch in Fee Creation Tick this
20. Analysis / Employee Type Select a suitable Employee Type
21. Department Select a suitable Department drop down list
22. Branch Select a suitable Branch from the drop down list
23. Entity Select Lewisham Reid from the drop down list
24. Mailbox for Exchange Integration Enter the users Email address to be used for Exchange Integration
25. Time Recording Reminders – Minimum Hours/Units per day 7.5
26. Grace Days 1
27. Remind for past days 7
28. Click on to save

Lexis® Affinity Library
© 2012 Reed International Books Australia Pty Ltd trading as LexisNexis Page 321
33.3 Employee Charts & Rates
This option allows you to attach an Employee to an Entity, permit or restrict access to posting transactions in that Entity, nominate an Income Account for the employee, record an Hourly Rate and Nominal Cost.
Hands on
1. Click on [Employee Charts and Rates]
The screen is displayed below:
2. Entity Select the required Entity
3. Posting Allowed in this Entity? Leave ticked
4. Fees Billed Chart Leave blank for this exercise
This is the GL Account that will record the Fees Billed amounts for this Employee. This only required if separate accounts are necessary for each Employee.
5. Select the “Add Rate” tab
6. Rate 250
This is the normal hourly rate for this employee.
7. Notional Cost 125
8. Commence / Expire Accept today’s date as the starting date. Leave the Expire Date blank
9. Click on [Add] to save the rates
10. Select the “Rates” tab to show the new rate
11. Keep Employee Chart Form open after posting Untick this
12. Click on [OK]

Administration Workbook
Page 322 © 2012 Reed International Books Australia Pty Ltd trading as LexisNexis
Employee Charts & Rates
Entity Select the Entity to which this Employee belongs
Posting Allowed in this Entity Tick this if the Employee has rights to process transactions in the Entity selected.
Fees Billed Chart Enter the Income Account Number for this Employee.
“Rates” tab
Rate default hourly rate used for recording fees, if not overridden by another fee arrangement.
Notional Cost The Notional Cost is a calculation of the cost of employing that particular Employee. The cost would normally include items such as salary, a proportion of overhead and non-salary components, for example professional indemnity or workers compensation insurance costs.

Lexis® Affinity Library
© 2012 Reed International Books Australia Pty Ltd trading as LexisNexis Page 323
33.4 Employee Budgets and Costs
Lexis Affinity allows you to record both budgets and costs for each employee. These budgets and costs for employees are used in various reports.
1. Click on to enter the budgets for this employee.
2. Employee Code Select yourself
3. Enter Budgets for Year Accept the default date
4. Fees Billed / Yearly Budget in Employee Budgets 120000
5. Calculate Months ? Tick
You will now see the monthly amounts.
6. Complete the other budgets using the table below:
Fees Received 120000
Chargeable Units 1008
Non-Chargeable Units 572
Timekeeper Fees Recorded 120000
7. Keep Employee Budget form open after posting? Untick this
8. Click on [OK] to update the budgets
Note that in the Employee Costs tab you can enter the yearly costs for Direct Costs, Indirect Costs and Total Employee Costs.

Administration Workbook
Page 324 © 2012 Reed International Books Australia Pty Ltd trading as LexisNexis
33.5 Export / Import Employee Budgets into Excel
It is possible to export and import Employee budgets into and from Excel. This is controlled by the Security Option Employee | Budget.
33.5.1 Export
Procedure
The Export option exports budgets that already exist in the Employee table. It may be necessary for you to use Future Budgets (under Financial Management) to create budgets for the years you require, by using either the 'Copy Budget of Year x' or 'Copy Actual YTD balance' option.
When you are ready to export your budgets, open the Employee application.
1. Click on [Import/Export Employee Budgets]
The following dialog opens:
Export to Excel File
Entity Choose the entity whose budgets you want to export. Only that Entity's budgets will be exported.
Export Budgets for Year Choose the year whose budgets you want to export.
Include Inactive Employees Tick this to include Employees who are marked as Inactive.
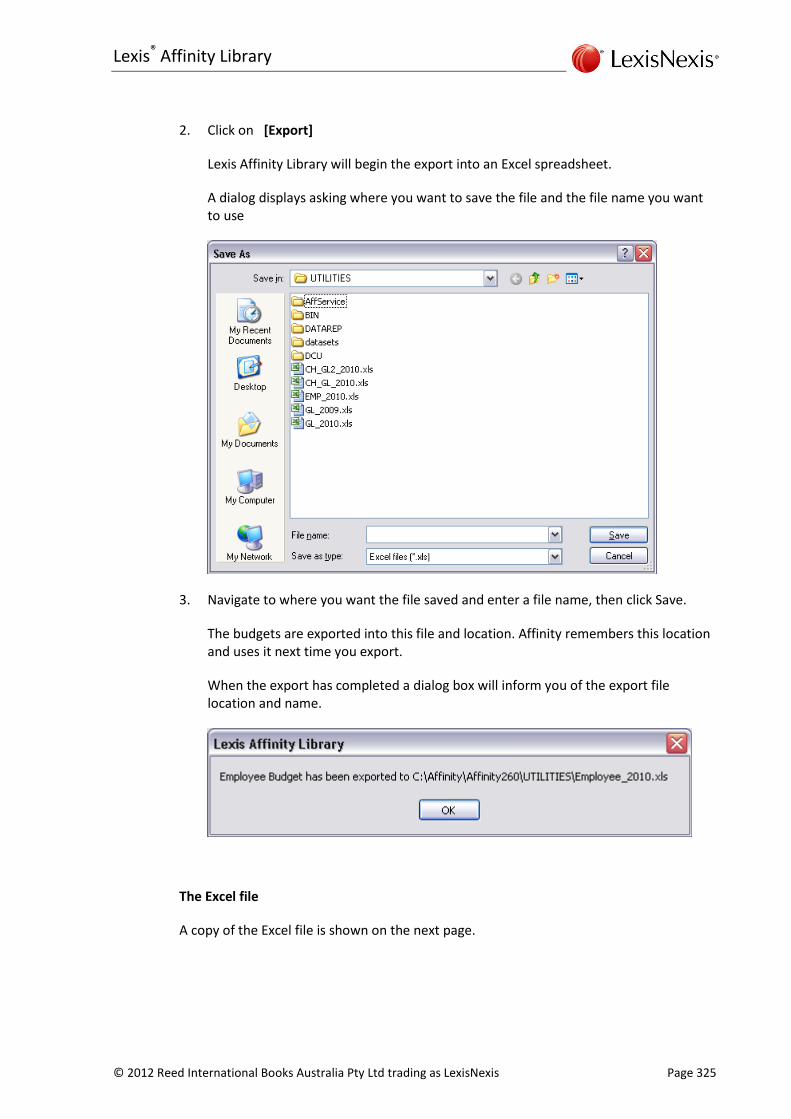
Lexis® Affinity Library
© 2012 Reed International Books Australia Pty Ltd trading as LexisNexis Page 325
2. Click on [Export]
Lexis Affinity Library will begin the export into an Excel spreadsheet.
A dialog displays asking where you want to save the file and the file name you want to use
3. Navigate to where you want the file saved and enter a file name, then click Save.
The budgets are exported into this file and location. Affinity remembers this location and uses it next time you export.
When the export has completed a dialog box will inform you of the export file location and name.
The Excel file
A copy of the Excel file is shown on the next page.

Administration Workbook
Page 326 © 2012 Reed International Books Australia Pty Ltd trading as LexisNexis
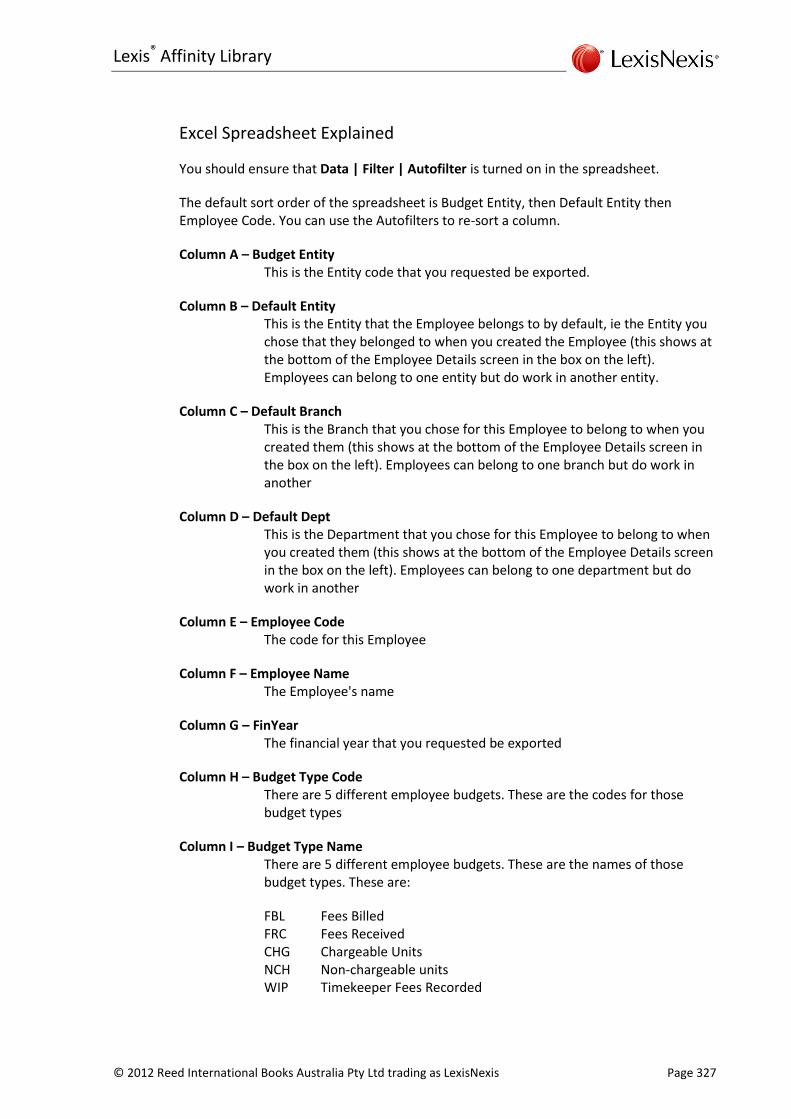
Lexis® Affinity Library
© 2012 Reed International Books Australia Pty Ltd trading as LexisNexis Page 327
Excel Spreadsheet Explained
You should ensure that Data | Filter | Autofilter is turned on in the spreadsheet.
The default sort order of the spreadsheet is Budget Entity, then Default Entity then Employee Code. You can use the Autofilters to re-sort a column.
Column A – Budget Entity This is the Entity code that you requested be exported.
Column B – Default Entity This is the Entity that the Employee belongs to by default, ie the Entity you chose that they belonged to when you created the Employee (this shows at the bottom of the Employee Details screen in the box on the left). Employees can belong to one entity but do work in another entity.
Column C – Default Branch This is the Branch that you chose for this Employee to belong to when you created them (this shows at the bottom of the Employee Details screen in the box on the left). Employees can belong to one branch but do work in another
Column D – Default Dept This is the Department that you chose for this Employee to belong to when you created them (this shows at the bottom of the Employee Details screen in the box on the left). Employees can belong to one department but do work in another
Column E – Employee Code The code for this Employee
Column F – Employee Name The Employee's name
Column G – FinYear The financial year that you requested be exported
Column H – Budget Type Code There are 5 different employee budgets. These are the codes for those budget types
Column I – Budget Type Name There are 5 different employee budgets. These are the names of those budget types. These are:
FBL Fees Billed FRC Fees Received CHG Chargeable Units NCH Non-chargeable units WIP Timekeeper Fees Recorded

Administration Workbook
Page 328 © 2012 Reed International Books Australia Pty Ltd trading as LexisNexis
Column J – Yearly Total Note: Contains a formula. This is the total of the columns K<nn> to V<nnn>. Don't enter anything into this total column as when you alter the month budgets the total column updates to reflect the addition of the columns.
Columns K to V – Months Month1-Jul this means that the first month in your Financial Year is July.. The month following Month1 or Month2 etc will depend on your own Financial Year end month.

Lexis® Affinity Library
© 2012 Reed International Books Australia Pty Ltd trading as LexisNexis Page 329
33.5.2 Import
When you have made any changes you want to the budgets, you are ready to import the Excel spreadsheet back into Lexis Affinity Library.
IMPORTANT
If you want to add formulas and move figures etc, it is recommended that you copy the exported spreadsheet to another one, or a second worksheet, and do it there. When importing, Lexis Affinity Library will check to see that the columns are in the order defined above, and if they are not the import will fail. The order of the data is not important, but the columns must be in the same order as in the originally exported spreadsheet.
Procedure
1. Click on [Import/Export Employee Budgets]
The dialog box opens.
2. Click on [Import]
A dialog will open on the last used export/import directory for you to choose a file to import
3. Choose the file to import.
A new dialog will open asking you to choose the worksheet from the file that you want to import.

Administration Workbook
Page 330 © 2012 Reed International Books Australia Pty Ltd trading as LexisNexis
4. Select the worksheet you want to import
If there is more then 1 worksheet for the same entity then only the last one will be saved into Lexis Affinity Library (it overwrites the first one). If you are importing worksheets for different entities then all the selected ones are imported, unless there is more than 1 for the same entity, in which case only the last will be saved.
When the import has finished a dialog will tell you how many records were imported
Errors when Importing
If the columns in the Excel file have changed, or there are errors in the data fields, you may get an error when importing:

Lexis® Affinity Library
© 2012 Reed International Books Australia Pty Ltd trading as LexisNexis Page 331
You should choose Yes.
A dialog will ask where you want to save the log file. Choose a location and a file name. Once it has been saved it will automatically open so you can view the errors:
In this case the name of the employee was changed.
The error file will tell you the column and line number of the error location. Correct the errors in the Excel file and try the import again.

Administration Workbook
Page 332 © 2012 Reed International Books Australia Pty Ltd trading as LexisNexis
Employee Field Descriptions
Code is a 4-character unique reference for each employee. It can be alpha, numeric, or alpha-numeric. The Find icon next to Code invokes a searchable list of employees.
Active specifies that an employee is currently working. Inactive employees cannot sign in and cannot be selected for fees, matters etc. Inactive employees can be included in fee reports etc.
Partner
enables this employee to be selected for fields requiring a Partner. A partner can own files, is a matter manager for the client, and can also be a Controller. When a Client is registered a Service Partner is assigned.
Author enables this employee to be selected for fields requiring an Author. An author can own their own files. An employee needs to be an author in order to be able to record a fee (time) entry.
Controller enables this employee to be selected as a Matter Controller. A Controller can be the Partner responsible for the overall running of a particular matter, not necessarily the Service Partner responsible for maintaining the Client relationship.
Credit Controller enables this employee to be selected as the Credit Controller in Collection Plans. – ie an email or task can be assigned to this person.
Equity Partner
enables this employee to be selected as an equity partner. An employee can be selected as an Equity Partner if they are also a Partner.
Name is the employee name as it should appear in correspondence. The Find icon here connects the employee to the PhoneBook table so that additional information such as address, telephone number and email details can be referenced in reports and in precedents.
Network ID This is an optional feature that allows a user to automatically sign into Lexis Affinity Library. See the Chapter “Auto Sign In” following this Chapter.
Phone can be a private phone number that is not in the PhoneBook (eg. home phone number).
Birth Date This is an optional field.
Experience is the number of year’s experience an employee has. It is used in some bill formats for taxation purposes. This field has a 20-character maximum. This is an optional field.

Lexis® Affinity Library
© 2012 Reed International Books Australia Pty Ltd trading as LexisNexis Page 333
Calendar select the calendar that applies to the working days of the Employee.
Security Level is an additional security mechanism to control permissions to particular reports and activities. Examples of access are shown below.
You need: To be able to:
Level 0 States Change the password for overdrawing trust under the States option without knowing original password. Safe Custody Change the Packet ID in Safe Custody
Level 1 Archive Requests Can delete records with status of Requested or Dispatched. Bill Reverse Can reverse a bill with transactions posted to Take Up Account Cheque Reverse Can reverse a cheque with transactions posted to Take Up Account Invoice Reverse (Accounts Payable ) Can reverse an invoice with transactions posted to Take Up Account Receipt Reverse Can reverse a receipt with transactions posted to Take Up Account Journal Reverse Can reverse a Journal with transactions posted to Take Up Account Reports Can Add/Edit/Delete reports
Level 5 Fee List Can select Author and Author Type in Filter. Fee Sheet Can select other employees.
These access levels have been set by the Lexis Affinity Library Administrator.
NOTE: Reports access is controlled by the nominated security level of each report.
Limit Ability to Print Records If ticked, indicates that this Employee will not be able to either print or merge to Word processing a full list of PhoneBook entries, Clients, Matters or Archived Matters. (This setting also applies to the All Matters Search function).
Limit Non Reporting Matter Filters to Employee’s Department / Branch If ticked, the Employee will only be able to display the matters where the Department / Branch of the matter is the same as the Employee.
Administration Workbook
Page 334 © 2012 Reed International Books Australia Pty Ltd trading as LexisNexis
Limit Standard and Dashboard Reports Filters to Employee Employees with this setting can only view reports for themselves. (For example, can access their own Fee Earner Profile) Employee Branch Employees with this setting can only view reports for the Branch to which they belong. Employee Department Employees with this setting can only view reports for the Department to which they belong. Unrestricted Employees with this setting can only view any report at any level.
NOTE: The Firm Profile report is not affected by these settings and is shipped with a Security Level of 1.
Reopen List Length specifies the maximum number of Clients, Matters, PhoneBook entries etc to appear in the lists of records last used.
Refresh time specifies how frequently open Client, Matter, PhoneBook etc screens are refreshed, i.e. changed data is updated. It is recommended that this be set at 60 seconds.
Default Notify specifies the default number of minutes before the start of an appointment that a notification will display.
Default to Employee's Department in Fee Creation If ticked the Department of the fee entry will default to that of the Employee. If not ticked, the Department will default to the Department of the matter selected when the fee entry is being recorded.
Default to Employee's Branch in Fee Creation If ticked the Branch of the fee entry will default to that of the Employee. If not ticked the Branch will default to the Branch of the matter selected when the fee entry is being recorded.
Employee Type This is a user-definable list of Employee Types – examples of these would be - partner, associate, solicitor, clerk, accounts, secretary etc. These fields are used for reporting. Security permissions are set by Employee Type.
Department This is a user-definable list of departments that are used for reporting. Examples are - Family Law, Commercial, Administration etc. It is possible for each employee to work in a number of Departments. When entering fees, another department may be selected.

Lexis® Affinity Library
© 2012 Reed International Books Australia Pty Ltd trading as LexisNexis Page 335
Branch This is a user-definable list of branches that are used for reporting. Examples are – Brisbane, Melbourne, Sydney and Warrnambool.
Entity Every Employee must belong to an Entity, usually the Partnership. You may have an administrative user registered in the Service Entity.
Time Recording Reminders The defaults are recorded in System | General. Minimum Hours/Units per day This is the minimum hours or Units a day that should be recorded by the Employee. Grace Days This is the number of days that the Employee is allowed to be late submitting their time. Remind for past days This is the default number of days the system should review to locate missing time entries.
These settings are used to generate the Time Recording Reminders (from Reports).

Administration Workbook
Page 336 © 2012 Reed International Books Australia Pty Ltd trading as LexisNexis
Budget Field Descriptions
Entity Different Budgets can be recorded for each Entity that the Employee works for.
Enter Budgets for Year Select the closing date for the financial year required.
Yearly Budget Enter the annual budget for each Budget Type
Calculate Months If ticked, Lexis Affinity Library will divide the annual budget equally over the 12 months.
Fees Billed This is the $ value of fees this employee is expected to bill per year.
Fees Received This is the $ value of fees this employee is expected to receive per year.
Chargeable Units This is the number of units of time this employee is expected to record per year.
Non-Chargeable Units This is the number of units of non-chargeable time this employee is expected to record per year.
Time-Keeper Fees Recorded This is the $ value of the chargeable units this employee is expected to record per year.
Keep Employee Budget screen open after posting? Tick this option to enter the budgets for another employee.

Lexis® Affinity Library
© 2012 Reed International Books Australia Pty Ltd trading as LexisNexis Page 337
33.6 Employee Password
You can use the Employees application to change the password for an Employee. Passwords can also be changed from the Password Change icon in Launch.
When a new Employee is registered, Lexis Affinity Library will assign a password – this will be the same as the Employee Code. It is recommended that all Employees are assigned a new password, to prevent unauthorized access to information.
If you do not want users to change their password, you can disable this in Security Options for the Employee type, or you can remove the Password Change application in the User’s Launch Pad.
Hands on
In this exercise you will alter the password for yourself.
1. Locate and open the Employee record for yourself
2. Click on
The Change Password screen similar to the one below is displayed below:
3. Old Password Enter your initials
4. Override Leave unticked
5. New Password chicken (or your choice of password)
6. Confirm (chicken or your choice of password)
7. Click on [OK]

Administration Workbook
Page 338 © 2012 Reed International Books Australia Pty Ltd trading as LexisNexis
33.7 Creating the Lexis Affinity Desktop
Once an Employee has been registered, you will need to create the Lexis Affinity Desktop. This determines what applications or functions the user will have access to.
It is usually easiest to copy the Launchable Programs from another Employee of the same Type and then make any necessary alterations for that particular Employee.
Hands on
In this exercise, you will determine which application icons will be available to this Employee.
1. Click on on the Employee screen
2. Click on
3. Select DAM
4. Click on [OK] to copy
The Applications that DAM has access to are now shown in the “Clearance given for these” column on the right hand side
Add another Application
If there are other applications that this Employee should have access to, you can add them here. For example:
1. Select Postcode Search
2. Click on [Select]
3. Click on [OK]
This Employee now has access to a limited range of applications.
4. Log out of Affinity
5. Sign in again as yourself (with your new password)
6. Open Transactions
Note only a limited number of applications are available.
7. Log out of Lexis Affinity Library
8. Sign in again as YSR (Password: ysr)

Lexis® Affinity Library
© 2012 Reed International Books Australia Pty Ltd trading as LexisNexis Page 339
Employee Ribbon
F4 New Create a new employee. (The data entry screen remains the same whether you are creating, displaying or editing.) Once you have clicked on this button to create a new employee, or when changes are made to an existing employee, this button changes function to the “Apply” button.
Apply Saves the changes made to an employee record.
F8 Delete The Employee record currently displayed will be deleted. NOTE: It is recommended that you uncheck Active instead of deleting Employees that are no longer employed.
Cancel The changes made to the Employee record will be cancelled.
Change Password: Allows the password to be changed for the selected employee.
Employee Types: Used to create and list employee types.
Departments: Used to create and list Department Types.
Associate with Contacts Used to associate PhoneBook entries with Employees.
Employee Charts and Rates Used to control posting in each Entity, Hourly Charge Out Rate, Notional Cost and General ledger Income Account.
Budget Used to record and alter Budgets for each Employee.
Programs this Employee may launch Used to maintain the list of applications this employee may launch.

Administration Workbook
Page 340 © 2012 Reed International Books Australia Pty Ltd trading as LexisNexis
33.8 Employee Types
You can add Employee Types when you are creating an Employee. You can print a list of Employee Types and set or alter the Security Options for each Employee Type.
Hands on
In this exercise you will add a new Employee Type.
1. Ensure an Employee screen is open
2. Click on Employee Types
3. Click on to create a new Employee Type
The following screen will display:
4. Code FC
5. Description Financial Controller
6. Report Group 9
7. Seniority Leave as 0
8. Click on to save and update

Lexis® Affinity Library
© 2012 Reed International Books Australia Pty Ltd trading as LexisNexis Page 341
Employee Type Field Descriptions
Code Enter a 3-character code.
Description Enter a description for the employee type.
Report Group The Report Group determines the order in which Employees are listed and grouped in some reports. The following table shows how to set the Report Groups in order to have a Report which lists employees in the order of partners, then associates, then solicitors and conveyancers together.
Type Code Report Group
PAR 1
ASS 2
SOL 3
CON 3
Notice that both Solicitors and Conveyancers are grouped as 3 in this sequence, so that they can be grouped together.
Seniority This feature is used for specific customised Bill Templates and generally should be left at 0. The number here defines the order of seniority when printing fee earners with the same fee types in a bill. Please ask your Lexis Affinity Consultant for more information if you feel you need to use this feature.
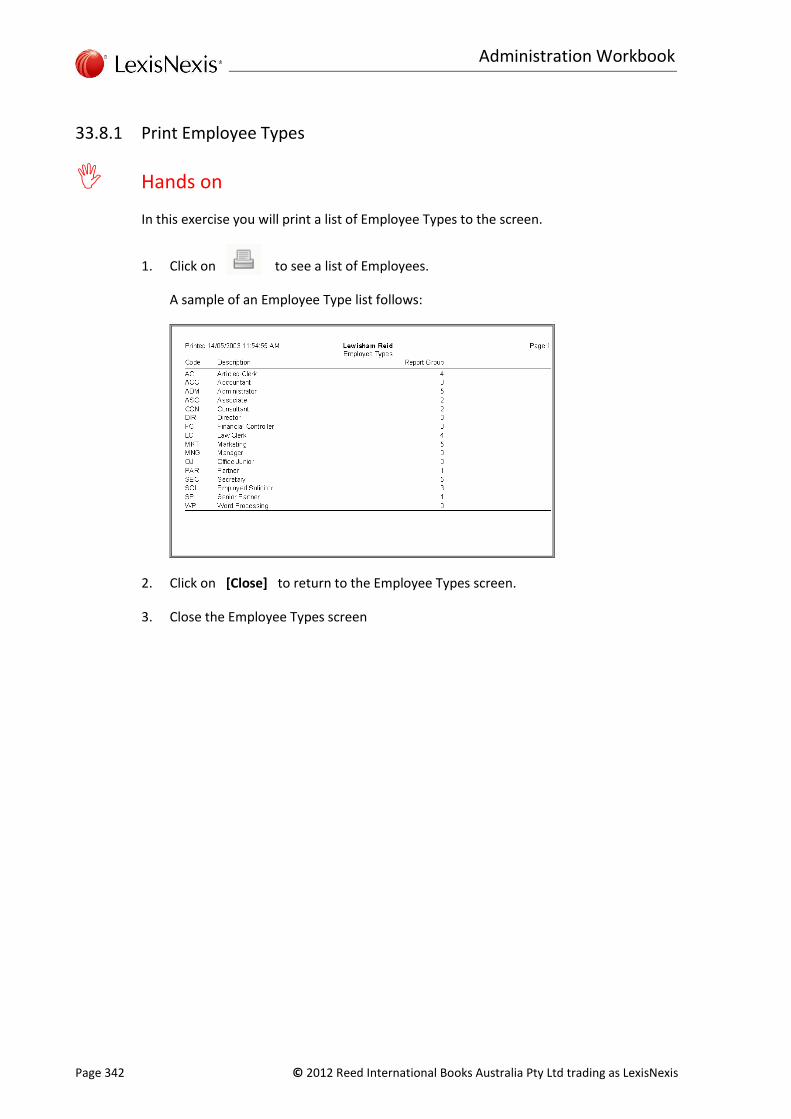
Administration Workbook
Page 342 © 2012 Reed International Books Australia Pty Ltd trading as LexisNexis
33.8.1 Print Employee Types
Hands on
In this exercise you will print a list of Employee Types to the screen.
1. Click on to see a list of Employees.
A sample of an Employee Type list follows:
2. Click on [Close] to return to the Employee Types screen.
3. Close the Employee Types screen

Lexis® Affinity Library
© 2012 Reed International Books Australia Pty Ltd trading as LexisNexis Page 343
33.9 Departments
Use the Employee application to create Departments. You can also print a list of Departments from this application. Employees may be assigned to a department if they mainly work for one department. Alternately the Department may be left blank, if that Employee always works in many different Departments. The Department may then be nominated at the time of recording fees.
If the details of each department vary – for example - telephone numbers, addresses etc, it is recommended that each Department be created as a PhoneBook entry. This will enable the user to link the Department to the PhoneBook record and these fields of information can be brought into various documents.
Procedure
Follow this procedure to create a new Department for Tourism & Hospitality.
1. Click on to open the Employee Departments
2. Click on to create a new Department
The following screen will display
3. Code TH
4. Description Tourism & Hospitality
If Departments are in the PhoneBook:
5. Click on to open the PhoneBook list
6. Locate and select the PhoneBook record for the Department
7. Click on to save and update

Administration Workbook
Page 344 © 2012 Reed International Books Australia Pty Ltd trading as LexisNexis
33.9.1 Print Departments
1. Click on to print a list of Departments
A sample Department List appears below:

Lexis® Affinity Library
© 2012 Reed International Books Australia Pty Ltd trading as LexisNexis Page 345
34. Auto Sign In
The system allows for automatic access to Lexis Affinity Library without having to login from the workstation. A link has been enabled between the NDS password and the Affinity logon. Note that if this feature is implemented, the user will not be able to access any other Oracle Database, such as Trial Conversion files or Lewisham Reid Training files.
Procedure
There are 2 steps to this procedure
Amend the Affinity Icon
1. Right click on the Affinity icon and select Properties
2. Target Add the suffix -nl to the command line
An example of this is shown below:
Note that the drive letter and folder path will differ depending on where Lexis Affinity Library has been installed on your system.
3. Click on [OK]
Amend the Employee record
The network login for the employee must be recorded on the Employee.
1. Open Employees (Database | Employees)
2. Locate and select the Employee to be altered
3. Network ID enter the Login name – for example yvetter
NOTE: The content of the Network ID field is not case sensitive.

Administration Workbook
Page 346 © 2012 Reed International Books Australia Pty Ltd trading as LexisNexis
Notes
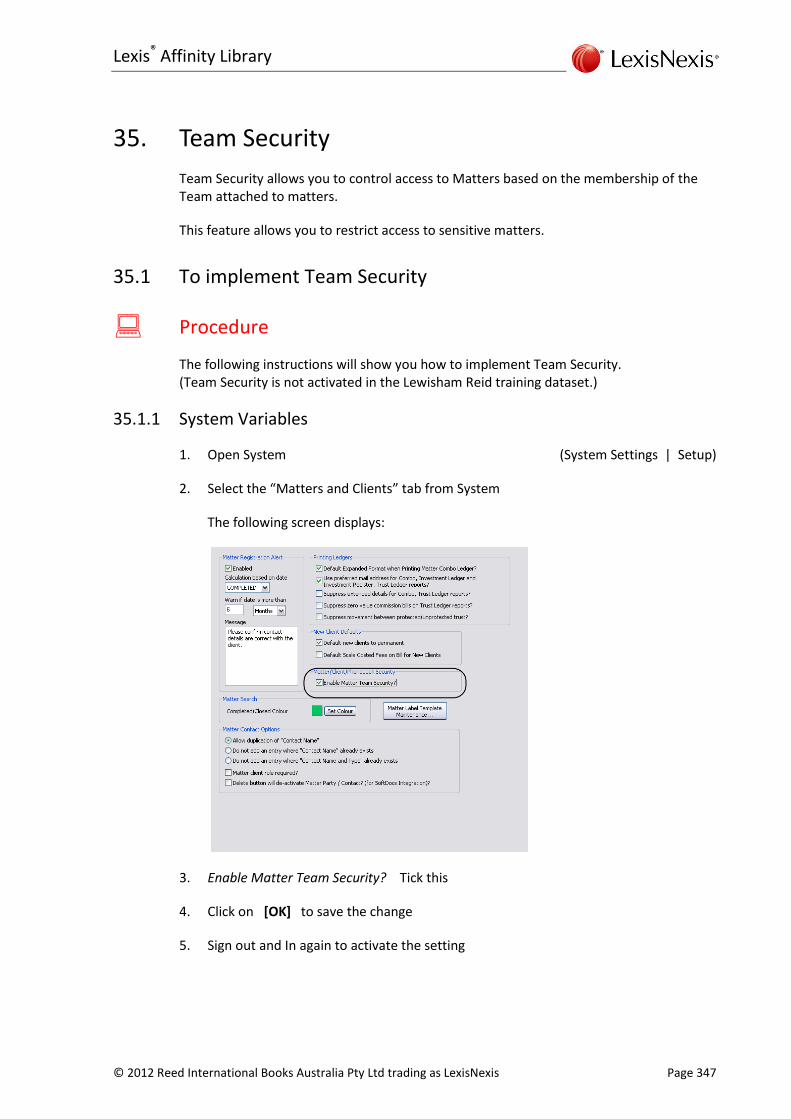
Lexis® Affinity Library
© 2012 Reed International Books Australia Pty Ltd trading as LexisNexis Page 347
35. Team Security
Team Security allows you to control access to Matters based on the membership of the Team attached to matters.
This feature allows you to restrict access to sensitive matters.
35.1 To implement Team Security
Procedure
The following instructions will show you how to implement Team Security. (Team Security is not activated in the Lewisham Reid training dataset.)
35.1.1 System Variables
1. Open System (System Settings | Setup)
2. Select the “Matters and Clients” tab from System
The following screen displays:
3. Enable Matter Team Security? Tick this
4. Click on [OK] to save the change
5. Sign out and In again to activate the setting

Administration Workbook
Page 348 © 2012 Reed International Books Australia Pty Ltd trading as LexisNexis
35.1.2 Employees
Each Employee record needs to be reviewed to check the access that they have to matters.
1. Open Employees (Database | Employees)
2. Open the Employee record
3. Tick the options that are to apply to this Employee
Limit Visibility to Matter Team Membership If ticked,
Matters are available in matter lists only if the user is a member of the Matter Team.
Clients are available in Client lists only if the user is a member of a Matter Team for at least one matter for that Client.
The matter list retrieved for reports is filtered by whether the logged in user is a member of the Matter Team.

Lexis® Affinity Library
© 2012 Reed International Books Australia Pty Ltd trading as LexisNexis Page 349
Override Matter Team Membership If ticked:
All Team Security Settings are overridden including the setting on the Matter record – “Restrict visibility to team members”.
If you are using Team Security to control access to matters, this setting would normally only be ticked for the most senior Employees.
4. Tick “Limit Visibility to Matter Team Membership” to follow this procedure
5. Click on [Apply] to save the changes
35.1.3 Maintaining several employees
If Team Security is enabled, it is possible to set the Printing, Visibility and Fee entry options for multiple Employees, using a grid system.
1. Open an Employee screen
2. Double click on next to the Employee ID
A grid displays as shown below:
The options available on this grid include the Team Security Settings but also allow you to change settings for other options.
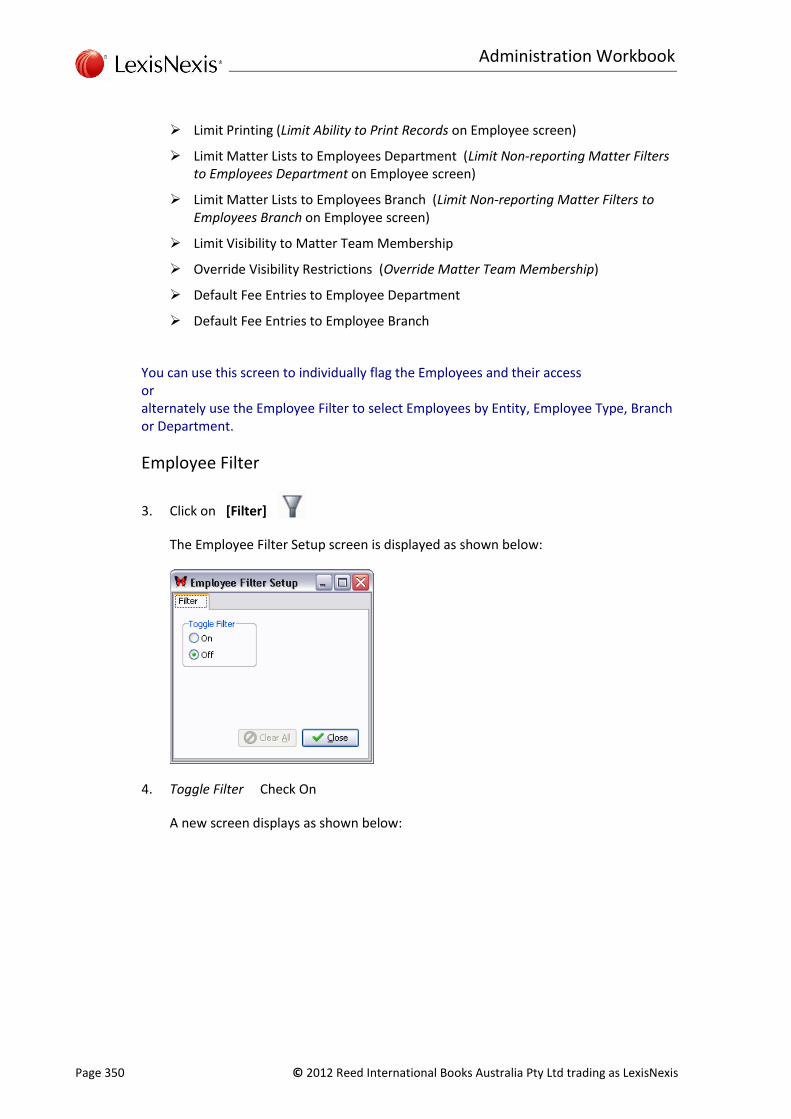
Administration Workbook
Page 350 © 2012 Reed International Books Australia Pty Ltd trading as LexisNexis
Limit Printing (Limit Ability to Print Records on Employee screen)
Limit Matter Lists to Employees Department (Limit Non-reporting Matter Filters to Employees Department on Employee screen)
Limit Matter Lists to Employees Branch (Limit Non-reporting Matter Filters to Employees Branch on Employee screen)
Limit Visibility to Matter Team Membership
Override Visibility Restrictions (Override Matter Team Membership)
Default Fee Entries to Employee Department
Default Fee Entries to Employee Branch
You can use this screen to individually flag the Employees and their access or alternately use the Employee Filter to select Employees by Entity, Employee Type, Branch or Department.
Employee Filter
3. Click on [Filter]
The Employee Filter Setup screen is displayed as shown below:
4. Toggle Filter Check On
A new screen displays as shown below:

Lexis® Affinity Library
© 2012 Reed International Books Australia Pty Ltd trading as LexisNexis Page 351
5. Click on the down arrow for the option required
For example – select Employee Type
6. Make your selection – for example Partner (PAR)
7. Click on [Close]
The Employee Selection Screen will display again listing only those Employees of the Type selected.
8. Check the options required for each listed Employee
9. Click on [OK] to save the changes

Administration Workbook
Page 352 © 2012 Reed International Books Australia Pty Ltd trading as LexisNexis
35.1.4 Matters
Each Matter that is to have restricted access must be flagged as such on the Matter | Teams tab as shown in this section. This can be done individually on each matter or in a batch.
Procedure
Follow these instructions to restrict viewing matter 010015 to Team Members
1. Open Matter 010015
2. Select the “Workflow” tab
3. Select Team
4. Click on
The screen displays as shown below:
5. Restrict visibility to team members? Tick this
NOTE: This will allow members of the team to view this matter. The Team is made up of the Partner on the Matter (YSR) the Controller of the Matter (MMC) the Author of the Matter (JW) and the Client Introducer (YSR – not displayed on the Matter screen)
All other Employees will be restricted, unless they have “Override Matter Team Membership” turned on.

Lexis® Affinity Library
© 2012 Reed International Books Australia Pty Ltd trading as LexisNexis Page 353
Add a Team Member
6. Click in the Employee Name column and click on the down arrow
7. Select DD (David Drew) from the list
8. Click in the Role column and click on the down arrow
9. Select Junior Solicitor
10. Click on [OK] to save this change
At this stage:
YSR can access Matter 010015, however matters where YSR is not a team member are unavailable.
If you select a matter Number from the drop down list on Matters and the logged in user does to have access to that matter a message similar to the one below will display:
(In the standard Lewisham Reid training dataset, you can use Matter 012402 to try this.)
If you open the Matter List and search for a matter that is not accessible to the logged in user, a message similar to the one below will display:
(Again you can use Matter 012402.)
YSR can only view matters where YSR is either specifically in the Team, or is a Partner, Controller or Author of the Matter or the Introducer of the Client.

Administration Workbook
Page 354 © 2012 Reed International Books Australia Pty Ltd trading as LexisNexis
In Summary:
When Team Security is enabled then:
All matters are only visible to Employees who are members of the Matter Team. The Team members are those listed on the “Team” tab and the Partner, Author and Controller of the matter, or the Introducer if the Client.
The matter only displays in a matter list if the logged in user is a member of the Matter Team.
The matter list retrieved for reports is filtered by whether the logged in user is a member of the Matter Team.
The Security options can be summarised as follows:
If the logged in User is:
And the Matter is restricted And the Matter is not restricted
A restricted employee
The matter is visible if the user is a team member
The matter is visible if the user is a team member
Unrestricted employee
The matter is visible if the user is a team member The matter is visible if “Override Matter Team Restrictions” is On
The matter is visible
Override Enabled
The matter is visible The matter is visible

Lexis® Affinity Library
© 2012 Reed International Books Australia Pty Ltd trading as LexisNexis Page 355
35.1.5 Matter Team Batch Update
It is possible to add or remove a Team to multiple matters using a batch facility.
These options are not available if the System | Matter and Clients | Enable Matter Team Security is enabled and “Override Matter Team Membership” is not enabled in Employees.
Procedure
To illustrate this feature, you will need to alter System and the Employee record.
1. Open System | System Settings | Matters and Clients
2. Enable Matter Team Security Untick this
3. Open Employees (YSR should display)
4. Limit Visibility to Matter team membership Untick this
5. Override Matter Team Membership Tick this
6. Click on [Apply] to save the change
7. Sign Out and In again to refresh the System setting
To Append Teams or Individuals to Matters in a batch
These steps will illustrate how to append the ADMIN team and KLM to all the Commercial matters
8. Open any matter
It is not important which matter you open to start the procedure as you will use the Matter Filter options to select matters.
9. Select the “Workflow” tab and select Team
A screen similar to the one below will display:

Administration Workbook
Page 356 © 2012 Reed International Books Australia Pty Ltd trading as LexisNexis
10. Click on [Batch Update Matter Teams]
A screen similar to the one below will display:
11. Click on [Filter]
The Matter Selection screen displays
12. Use the filter options to select the matters to be altered
In this example you will be altering all the matters with a matter Type of COMM

Lexis® Affinity Library
© 2012 Reed International Books Australia Pty Ltd trading as LexisNexis Page 357
13. Select the Matters tab to view the matters to be altered
14. Click on [OK]
The matters are inserted in the grid
15. Append Teams Tick ADMIN
You can include any number of teams to be added.
The IDs and names of the team members display in the “Append Members” box
16. Append Members Click on [+ Add]

Administration Workbook
Page 358 © 2012 Reed International Books Australia Pty Ltd trading as LexisNexis
17. In the new line that displays, click in the Employee name column and click on the drop down arrow
18. Select KLM
19. click in the Role column and click on the drop down arrow
20. Select Junior Solicitor
You can use the [+ Add] and [- Remove] to add additional members or to remove members.
21. Action Select Append teams and members to matters
22. Click on [OK] to update
A message will display advising the number of matters that have been updated.

Lexis® Affinity Library
© 2012 Reed International Books Australia Pty Ltd trading as LexisNexis Page 359
Team Registration
Matter Team Batch Update can also be accessed from Team Registration (found in Database | Employees).
IMPORTANT
If the user does not have “Override Team Matter Membership” ticked, they cannot access Team (from Database | Employees). The following message will display:

Administration Workbook
Page 360 © 2012 Reed International Books Australia Pty Ltd trading as LexisNexis
35.1.6 Reports
Override Matter Team Membership is Enabled
Classic Matter and Client based reports will include an additional option – “Print Report for”’. This allows the logged in user to print reports for other employees as if they were that employee.
Print report for Select the user for whom the report is to be produced. The list box contains the code for each employee marked as Active in the Employee table.
If the report is generated for another user, the heading on the report includes the wording ‘Includes Restricted Clients only’. This indicates that the logged in user has override permission and has chosen to print the report for another user.
A sample is shown below:

Lexis® Affinity Library
© 2012 Reed International Books Australia Pty Ltd trading as LexisNexis Page 361
Limit Visibility to Matter Team Membership is enabled
There is no prompt on the report screen and the list of matters/clients includes only those matters where the user is a matter team member.
The heading includes the wording ‘Includes Restricted Clients only’.
No Team Security for the Employee but some matters are restricted.
If the logged in user does not have either option ticked, the list of matters retrieved for reports is all matters except matters with the Restricted flag set to Y, unless that user is a member of that matter team.

Administration Workbook
Page 362 © 2012 Reed International Books Australia Pty Ltd trading as LexisNexis
Notes

Lexis® Affinity Library
© 2012 Reed International Books Australia Pty Ltd trading as LexisNexis Page 363
36. Security Options
Access to the various applications or functions in Lexis Affinity Library is controlled by the Security Options set for the Employee Type to which the user belongs. Each Employee Type must be granted access to or denied access to each Application in Lexis Affinity Library. Changes to the security settings will only take effect the next time the user signs in.
36.1 Altering Security Options
Hands on
In this exercise you will give the Financial Controller Employee Type access to the same functions as the partners. A new Employee Type will have no access to any function and it is often easier to copy from an established Employee Type and modify the new one, rather than start with everything disabled.
1. Select Employees (Database | Employees)
2. Select Employee Type icon
3. Use the button to locate PAR or
Click on and locate PAR from the displayed list
4. Click on to open Employee Type Security.
These options will be covered in detail in this section.
5. Close the Employee Type Security
6. Click on
This will allow you to export Security Settings to a file or to import a file already created.
The following screen will display:

Administration Workbook
Page 364 © 2012 Reed International Books Australia Pty Ltd trading as LexisNexis
7. Export / Employee Type Select PAR
8. Save to File Enter the path and name of the file to be created For example: Partner_Security.txt
9. Click on [Export]
A message will display to advise that the export is complete.
10. Import / Employee Type Select FC
11. File Name Click on
12. Locate and select the file you previously exported
13. Click on [Import]
A message will display advising that the import has been completed.
14. Close the Export / Import function

Lexis® Affinity Library
© 2012 Reed International Books Australia Pty Ltd trading as LexisNexis Page 365
Review the Security Settings for the Financial Controller
Alter a Setting
15. Double-click on ”Employee”
This will expand it and change all the options to a tick.
16. Highlight “Client” and press <SPACE BAR>
This will change the option to a cross.
17. Click on to expand “Client”
Each option within “Client” is now also ticked.
18. Click to close the Employee Type Security window.
The following message will display:
19. Click on [Yes] and close the Employee Types screen

Administration Workbook
Page 366 © 2012 Reed International Books Australia Pty Ltd trading as LexisNexis
36.2 Security Options
This section covers all the Security Options in Lexis Affinity Library and explains what each option means.
Normally there is only one Employee Type that has access to all areas. Usually, this has been discussed with the Partners, System Administrator and / or Accounts Administrator during the installation phase.
Hands on
In this exercise you will review all the Security settings for YSR.
1. Click on to locate YSR
2. Click on to open Employee Types
3. Click on the Security icon.
The screen is displayed below:
Security options can be set against each of the items for each employee type. Details of each item are set out on the following pages. In the following explanations a tick indicates that permission is granted for that item. Generally a User with full access would have mainly ticks, however there are some items where the recommended selection is a cross.

Lexis® Affinity Library
© 2012 Reed International Books Australia Pty Ltd trading as LexisNexis Page 367
36.2.1 Archive options
Access Enables users to access archived matters.
Box Management - Access Enables users to access archived matters by Box Number.
Box Management – Edit Enables user to edit the Box Number.
Delete Enables users to delete a box number from an archived matter.
Edit Enables users to edit archived matter details.
Reopen Enables users to reopen or reinstate an Archived matter back to a Current matter.

Administration Workbook
Page 368 © 2012 Reed International Books Australia Pty Ltd trading as LexisNexis
36.2.2 Archive Requisition
Location Create Enables users to record the archived file location
Location Delete Enables users to delete the archived file location
Retrieval Create Enables users to initiate an archived file retrieval request.
Retrieval Delete Enables users to delete a request.
Retrieval StatusChange Enables users to change the status of the retrieval request.
Retrieval List Create Enables users to generate an Archived file retrieval list.
Retrieval List Delete Enables users to delete the listing.

Lexis® Affinity Library
© 2012 Reed International Books Australia Pty Ltd trading as LexisNexis Page 369
36.2.3 Bank
Activate If ticked, the “Active” field displays on Bank Accounts and the user is able to flag a Bank Account is “Active” or not.
Tabs – Authorised Employees If ticked, the “Authorise” tab will be visible on Cheque Requests. If the Employee is to be able to authorise Cheques, this must be ticked.
Tabs – Authority Levels If ticked, the Employee will be able to set the Cheque Amount Limits, Number of Employees required to authorise Cheque Requests and whether or not a Primary Authoriser is required.

Administration Workbook
Page 370 © 2012 Reed International Books Australia Pty Ltd trading as LexisNexis
36.2.4 Bill
The screen is displayed below:
AddGST Enables users to flag a disbursement to have GST added at the time of Billing. If a transaction should have GST added when billed, but was not processed as ADGST, users can select an individual transaction on the Draft Bill and mark it to have GST added.
Allow Write Offs Enables users to process write offs.
Bulk Billing Enables users to generate a text file containing more than one previously generated invoice.

Lexis® Affinity Library
© 2012 Reed International Books Australia Pty Ltd trading as LexisNexis Page 371
ConfirmCreate When you click on the bill creation button, you are asked to confirm this action.
Create Enables users to create bills.
Edit Enables users to edit bills.
Insert New: - Anticipated Disbursement / Fee / Sundry Ticked – Users can insert new entries of the specified type in a draft bill, without exiting the bill program.
LockAmounts: - Collection Plan / Disbs / Fees / Foreign Currency / Payment Plan / Revalue/Realign / Sundries / Tax Exempt Status / Transfer Fees / Trust Reserve Amount / Trust Transfer Amount / Unconverted Anticipated Adjustments Ticked - Users cannot alter the amounts or access the option named. They can only generate bills that are equal to the total of the underlying transactions. Crossed - Users can alter the amounts to be billed.
Revalue/Realign option includes access to Fee Revaluations and changing Non-Billable WIP to Billable and vice versa.) Sundries option: If this option is ticked, users cannot insert a sundry write up in a bill. Trust Reserve Amount option: If crossed, users can reserve funds against existing unpaid bills (draft bills or posted bills). Clicking on the [Reserve] button will populate the field with either the full amount of the bill, or the available amount in trust. If ticked, (ie Locked) users can alter the amount of funds to be transferred on draft bills only. (ie not on posted bills.) Trust Transfer Amount option: This option applies only to Firms using VBA Bill Templates. Most Firms now use WordLink Bill templates and this option therefore does not apply. This option should be the same as the Trust Reserve Amount setting.
Multi Party Enables users to post Multi Party Bills.
Post Enables users to post bills.
Reverse Enables users to reverse bills.
Trust Statement If ticked, changes can be made to the Trust Statement on the Bill.
Edit Description Enables user to edit the descriptions of Trust entries.
Insert Transaction Enables user to insert a new transaction.

Administration Workbook
Page 372 © 2012 Reed International Books Australia Pty Ltd trading as LexisNexis
Order / Accumulate Enables user to change the order of entries and accumulate entries.
Rebuild Enables user to use the rebuild function to restore the entries to the original. If any edit options are enabled this should also be enabled.
Remove Transaction Enables user to remove a transaction.
Set Private Flag Enables user to set or unset the “Private” flag on an entry.
36.2.5 Cheque Requisition Options
Allow Office Banks Enables users to select an Office / General Bank Account in Cheque Requisitions.
Anticipated Enables users to flag a Cheque Requisition as an Anticipated Disbursement.
Anticipated - Checked If ticked, the Anticipated Disbursement checkbox is ticked by default.
Anticipated – Creditor Checked If ticked, the Attach to Creditor checkbox is ticked by default, if the Anticipated Disbursement checkbox is ticked. It is recommended that this is ticked, so that all Anticipated Disbursement entries are recorded in a Creditors Account.
Anticipated – Replace Anticipated This option is applicable to users of the Combined Ledger System Enables users to match Trust Disbursement Cheques with Billed Anticipated Cheque Requests.

Lexis® Affinity Library
© 2012 Reed International Books Australia Pty Ltd trading as LexisNexis Page 373
Anticipated – SplitBilled Enables users to part pay a billed Anticipated Disbursement.
Convert Enables users to convert Cheque Requisitions into actual Cheque payments.
Create Enables users to create Cheque Requisitions.
Delete Enables users to delete unbilled Cheque Requisitions. This is recommended for the Accounts Department Supervisor only.
Edit Enables users to edit limited fields on Cheque Requisitions. This is recommended for the Accounts Department Supervisor.
HoldStatus Enables users to change the “Hold” status of a Cheque Requisition to allow payments to proceed, or change the status back to “Held”.
Ledger Enables users of this type to enter cheque requisitions against general ledger accounts. (ie cheques that are to be drawn for non-matter expenses).
Print Ticked - the Print option in Cheque Requisition is ticked by default. Crossed - the Print option in Cheque Creation is crossed by default. In either case all users (with access to this screen) can alter this option at the time of creating a cheque requisition.

Administration Workbook
Page 374 © 2012 Reed International Books Australia Pty Ltd trading as LexisNexis
36.2.6 Cheque options
The screen is displayed below:
Cheque Options are divided into General and Trust. The following options apply to both.
Create Enables users to create cheques.
Default Amount Allocation If ticked, the amount entered on the top part of the Cheque Entry screen will be prompted when the user <TAB>s or clicks into the top line of the Amount column in the Allocation table.
ForceTally Forces users to ensure that the total of the individual amounts of a cheque equal the total of the Cheque entered in the Amount Field. It is recommended that ForceTally is ticked.
Print Enables users to print cheques.
Reverse Enables users to reverse cheques.
The following option applies to General Accounts only.
Profit Distribution This is a customised setting and should be left crossed.
The following option applies to Trust Accounts only.
Allow Investment Enables users to process an Investment Cheque entry from the Trust Cheque screen.
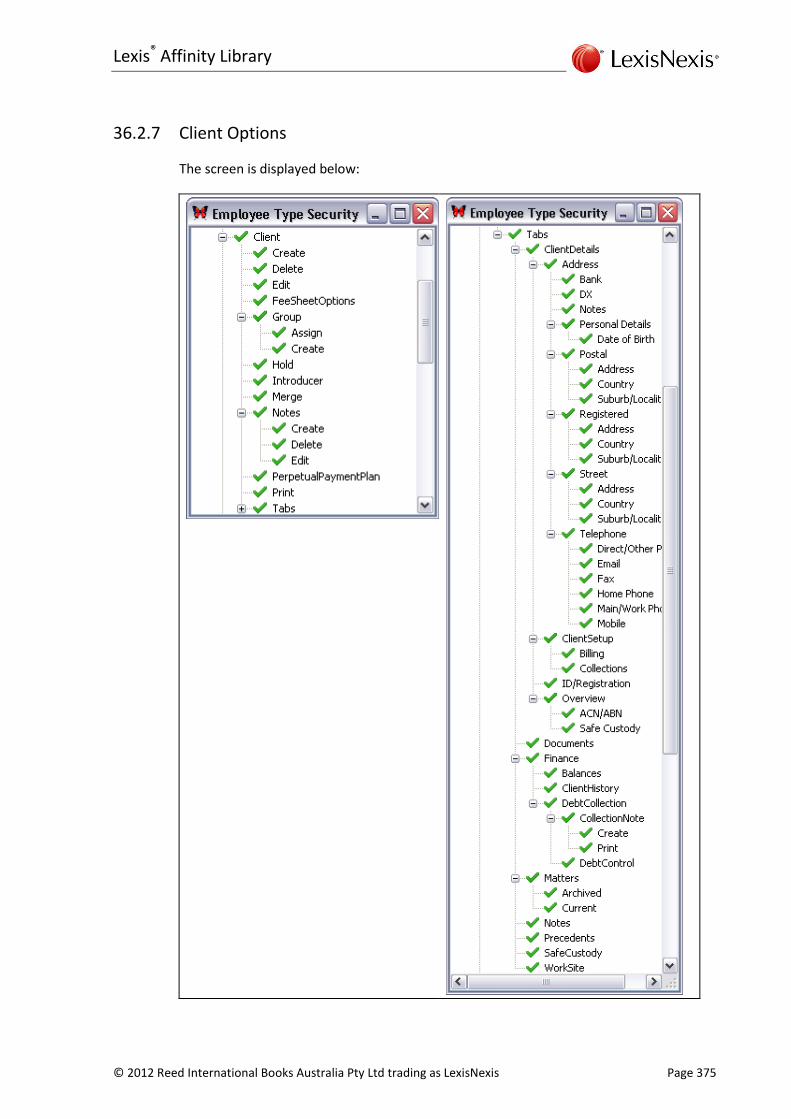
Lexis® Affinity Library
© 2012 Reed International Books Australia Pty Ltd trading as LexisNexis Page 375
36.2.7 Client Options
The screen is displayed below:

Administration Workbook
Page 376 © 2012 Reed International Books Australia Pty Ltd trading as LexisNexis
Create Enables users to create clients.
Delete Enables users to delete clients - most users would NOT have access to this function.
Edit Enables users to edit Clients.
Fee Sheet Options Enables users to alter the Fee Sheet settings regarding rounding up of time units, when submitting the Fee entries.
Group – Assign Enables users to assign a client to a client group.
Group – Create Enables users to create new groups to which clients may be assigned. To control the creation of new Client groups, most users would NOT have access to this function.
Hold Enables an icon that allows the user to hold or unhold all work on all the client’s matters (Receipts and Bills are still permitted).
Introducer Enables the user to select or alter the Introducer on a Client.
Merge Enables users to create a merge file.
Notes - Create Enables users to create notes for clients.
Notes – Delete Enables users to delete notes for clients.
Notes – Edit Enables users to edit notes for clients.
Perpetual Payment Plan This feature is not yet activated.
Print Enables users to print Client information
Tabs Several sub groups are contained in “Tabs”. These are grouped as they display on the Client screen. A tick indicates that the information is visible. A cross indicates that the information is hidden. In particular, note the following: Collection Note – Create Enables the user to enter a Collection Note. (ie a note detailing collection activity – such as promises to pay, extra follow up required).
Collection Note – Print Enables users to print the Collection Notes.

Lexis® Affinity Library
© 2012 Reed International Books Australia Pty Ltd trading as LexisNexis Page 377
36.2.8 Creditor Options
The screen is displayed below;
Create Enables users to create new creditors.
Creditors GL Journal Enables user to process a journal entry directly to the Creditors Control Account. This should be crossed and only ticked on the advice of LexisNexis staff.
Delete Enables users to delete creditors.
Edit Enables users to edit existing creditors.

Administration Workbook
Page 378 © 2012 Reed International Books Australia Pty Ltd trading as LexisNexis
36.2.9 Diary Options
The screen is displayed below:
Create Enables users to create diary entries for clients and matters.
Delete Enables users to delete diary entries for clients and matters.
Drag Enables users to drag a diary entry from one date to another when viewing diary through the weekly or monthly options.
Edit Enables users to edit a diary entry.
Event - AutoSave Enables users to type in a new Event at the time of creating a diary entry and have it saved as an Event for future use.
Event - Force Choice Users must choose from the existing list of Events, or leave the field blank. No free format text is allowed.
Jurisdiction - AutoSave Enables users to type in a new Jurisdiction at the time of creating a diary entry and have it saved as a Jurisdiction for future use.
Jurisdiction - Force Choice Users must choose from the existing list of Jurisdictions, or leave the field blank. No free format text is allowed.
Location - AutoSave Enables users to type in a new Location at the time of creating a diary entry and have it saved as a Location.
Location - Force Choice Users must choose from the existing list of Locations, or leave the field blank. No free format text is allowed.

Lexis® Affinity Library
© 2012 Reed International Books Australia Pty Ltd trading as LexisNexis Page 379
36.2.10 Document
The screen is displayed below and applies to the “Documents” tab on the Matter, PhoneBook and Client screens.
Add Enables users to Add a new document.
Custom Folders Create Enables users to create a custom folder on individual matters, clients or PhoneBook records to categorise documents. Delete Enables users to delete custom folders on individual matters, clients or PhoneBook records. Rename Enables users to delete custom folders on individual matters, clients or PhoneBook records.
Delete Enables users to delete a document. Delete Versions Enables users to delete a document that contains versions.
Edit Enables users to edit a document.
Open File Enables users to open a document.
Override Client Code If the setting in System | Documents | Product Integration – “Field Protection – Enable Client Code” is ticked, users are not able to alter the Client Code in the edit Client screen. If the System setting is ticked and this option is ticked, users will be able to alter the Client Code. If crossed, the System setting applies.

Administration Workbook
Page 380 © 2012 Reed International Books Australia Pty Ltd trading as LexisNexis
36.2.11 Employee Options
The screen is displayed below:
Budget Enables users to set Budgets for Fees recorded and billed for themselves and other employees.
Create Enables users to create Employees.
Delete Enables users to delete Employees.
Department Enables users to add a new Department.
Edit Enables users to edit Employees.
Employee Cost Enables users to record costs in the Employee Budget and Costs program.
Fees Billed Chart Enables users to see the Fees Billed Chart on Employee | Chart & Rates.
Fees Billed Chart – Edit Enables users to change the Fees Billed Chart on Employee | Chart & Rates.
Password – Change Enables users to alter their Password.
Password – Override Enables users to alter the Password for other users.
Rates Enables users to record or change the rates used for fee entries.
Security Enables user to edit the Employee Type Security options.
Type – Security Not yet implemented.

Lexis® Affinity Library
© 2012 Reed International Books Australia Pty Ltd trading as LexisNexis Page 381
36.2.12 emPower Options
The screen is displayed below:
Document Properties – Edit Enables users to edit the precedent information.
Option – Change Module Enables users to change the module attached to a matter from the “emPower | Options” tab on a matter.
Power Pack – Create Enables users to create an emPower Power Pack
Power Pack – Delete Enables users to delete an emPower Power Pack
Power Pack – Edit Enables users to edit an emPower Power Pack
Power Pack – Matter Admin Enables users to create and make changes to Power Packs from the Matter screen.
Power Pack – Rename Enables users to rename an emPower Power Pack

Administration Workbook
Page 382 © 2012 Reed International Books Australia Pty Ltd trading as LexisNexis
36.2.13 Entity Options
The screen is displayed below:
Edit Ledger Table Enables users to edit the Posting Table in Entities. It is recommended that this is crossed.
36.2.14 Fee Options
These options apply to entries on the Fee List and to submitted fee entries on a Fee Sheet.
Change Author in Fee Sheet Enables users who have Security Level 6 or lower to change the Author in the Fee Sheet.
Create Enables users to create fees entries from the Fee List. This setting does not affect creating new fee entries from the Fee Sheet.
Delete Enables users to delete or reverse unbilled fees from the Fee List and submitted entries from the Fee Sheet. (This is usually crossed.)
DescrOnly Enables users to edit the Date, Matter and Description of a submitted fee entry, from either the Fee List or Fee Sheet if Edit is crossed.
Edit Enables users to edit all details of submitted fee entries.
Fee Templates – Create Enables users to create new Fee Templates

Lexis® Affinity Library
© 2012 Reed International Books Australia Pty Ltd trading as LexisNexis Page 383
Fee Templates – Delete Enables users to delete Fee Templates
Fee Templates – Edit Enables users to edit Fee Templates.
Override Taxcode Ticked – Users can select the Tax Code from the list of Tax Codes. Crossed – Users cannot alter the Tax Code.
36.2.15 Fee Rate Codes
BackDating Enables users to enter Fee Rate Codes for prior dates.
36.2.16 Foreign Currency Rates
Backdating Enables users to enter a Foreign Currency Exchange Rate for prior dates.

Administration Workbook
Page 384 © 2012 Reed International Books Australia Pty Ltd trading as LexisNexis
36.2.17 Investment Options
The screen is displayed below:
Create Enables users to create Investments.
Delete Enables users to delete Investments.
Edit Enables users to edit Investments.
Post Enables users to post transactions to Investments.
Post Commission Enables users to post Commission entries.
Receipt If ticked, receipts can be processed from an Investment.
Reverse Journal Enables uses to reverse a journal entry.
Reverse Receipt Enables uses to reverse a receipt entry

Lexis® Affinity Library
© 2012 Reed International Books Australia Pty Ltd trading as LexisNexis Page 385
36.2.18 Invoice Options
The screen is displayed below:
Create Enables users to create creditor invoices
Credit Note Enables users to process Credit Notes.
ForceTally Forces users to ensure that the total of the individual amounts of an invoice equal the total of the Invoice entered in the Amount Field. It is recommended that ForceTally is ticked.
Reverse Enables users to reverse a Credit Note.

Administration Workbook
Page 386 © 2012 Reed International Books Australia Pty Ltd trading as LexisNexis
36.2.19 Ledger Options
These options apply to the General Ledger. Generally, for most users, access to these functions would be disabled (crossed).
The screen is displayed below:
Budget Enables users to create budgets for General Ledger Accounts
Create Enables users to create General Ledger Accounts.
Delete Enables users to delete GL Accounts.
Driver Maintenance Enables users to create and edit General Ledger drivers
Edit Enables users to edit GL Accounts.
Journal Enables users to post journals to the General Ledger, regardless of whether the user has access to General Ledger from the desktop.
Reverse Journal Enables users to reverse journals to the General Ledger.
View Balance Enables users to view the balance of the General Ledger account when processing to that account.
36.2.20 Licence
Update Enables user to update the Licence Certificate issued.

Lexis® Affinity Library
© 2012 Reed International Books Australia Pty Ltd trading as LexisNexis Page 387
36.2.21 Matter Options
The screen is displayed below:

Administration Workbook
Page 388 © 2012 Reed International Books Australia Pty Ltd trading as LexisNexis
AllowAdjustments Enables users to adjust unallocated Receipts using the Adjustments function from the Matter / Bills tab.
AllowGeneralCredit Enables users to post transactions that will cause the matter debtors ledger balances to go into credit. It is recommended that this option be disabled.
Allow Hold Collection Cycle Enables users to place a Hold on the production of Collection letters in the Collection Letter production process.
Allow Trust to Office Enables users to process a Trust to Office transfer from within the Matter record.
Archive – Archived Search / Merge / Print Enables users to archive matters, search for archived matters, create a merge file of archived matter records and print the archived matters.
Associate Enables users to associate matters with other matters.
Close Enables users to close matters.
Copy – DataForm Activates the [Copy] icon on the “Data” tab of a matter and allows the user to copy the DataForm or DataForm fields from another matter.
Copy – Mater Create Activates the [Copy] icon on the “Matter Creation” screen and allows the user to copy the Matter Information from another matter.
Copy – Matter Edit Activates the [Copy] icon on the “Matter Edit” screen and allows the user to copy the Matter Information from another matter.
Delete Enables users to delete a matter from the table that has been registered and has no transactions, for example, a matter registered in error.
Descr Only Enables users to edit only the Short and Long Description fields and the Your Reference field of a matter if Edit is crossed.
Diary Enables users to access the diary function and make new diary entries from the matter screen.
DisbDebt Journal Enables users to post journal entries between Disbursement and Debtors transactions, for example move Receipt entries from the Disbursement ledger to the Debtors ledger in payment of bills.

Lexis® Affinity Library
© 2012 Reed International Books Australia Pty Ltd trading as LexisNexis Page 389
Edit Enables users to edit all matter details, excluding the File ID (matter number. If this option is crossed, the Edit Matter icon on the Matter Toolbar will not be visible to those employees.
FeeAnalysis Enables user to produce a Fee Analysis report on matters. This Fee Analysis is based on formulas designed by David Maester from Harvard University.
Fee Sheet Options Enables users to alter the Fee Sheet settings regarding rounding up of time units, when submitting the Fee entries.
Fields- Long Description Enables user to view the Long Description of matters.
Fields – Short Description Enables user to view the Short Description of matters.
HideStatic OP Enables users to see the details of Other Parties attached to a matter.
Merge Enables users to create a merge file of matter details.
Multi Party Enables user to flag a matter as having Multi Party Bills.
New – Create Enables users to create new matters.
New – Edit Hold Prohibits users altering the status of matters from Registration Hold. The “Hold” area of Matter maintenance is disabled.
New – Payment Plan Enables users to attach a Payment Plan to a matter.
New – Registration Hold Ticked – New Matters created by the user will be automatically placed on Registration Hold and that user cannot remove the “Registration Hold” flag. Crossed – New Matters are not automatically placed on Registration Hold, although the user can select “Registration Hold” (on “Miscellaneous tab”).
Petty CashJournal Enables users to post Petty Cash journal entries from the matter.
Print Enables users to print details of matters.
Split or Change Cheque Type Enables the [Split or Change Cheque] to display on the Matter | Cheques tab. This process changes the Type of a Trust Cheque, or allows the user to split a cheque between these two types.

Administration Workbook
Page 390 © 2012 Reed International Books Australia Pty Ltd trading as LexisNexis
Tabs Several sub groups are contained in “Tabs”. These are grouped as they display on the Client screen. A tick indicates that the information is visible. A cross indicates that the information is hidden
Contacts Enables users to view other PhoneBook contacts attached to this matter – for example – Doctors, Barristers. Create / Delete / Edit Enables users to create new contacts, delete existing contacts or change contacts from the “Contacts” tab on a matter.
Data Enables users to view the variable data entered on the matter.
Documents Enables users to view the precedents available and all documents generated for the matter.
Finance Enables users to view the financial balances and transactions. Balances Enables users to view the net balances of the matter, the tax to be added, any amounts that have been written off and the Fees, Disbursement and Overall Budget. Bills Enables users to view all bills, both draft and final, on the matter, and access the Adjustment to allocation of funds function. Cheques Enables users to view the Cheques that have been drawn for the matter. A filter option allows users to list only Unpresented Cheques and/or reversed Cheques. Debt Collection Collection Note - Create Enables users to record a Collection Note for a matter. Collection Note – Print Enables users to print the Collection Notes for a matter. Debt Control Enables user to view the status of outstanding bills and what action has been taken on each one. Debtors History Enables users to view the Debtors Letters that have been sent on the matter. Tabs – Trust Letter History Enables users to view the letters that have been produced requesting Trust funds.

Lexis® Affinity Library
© 2012 Reed International Books Australia Pty Ltd trading as LexisNexis Page 391
Finance Setup Billing Enables users to view the Billing controls Collection Enables users to view the Collection settings Multi Party Bills Enables users to post Multi Party Bills. Graphs Enables users to view the breakdown of time and fees by authors on the matter. Investments Enables users to view the Investments for this matter. They can also create, edit and process Investment transactions Rates Enables users to view the rates that have been attached to the matter. Receipts Enables users to view all receipts on the matter. Trust Loans This option is applicable to users of the Combined Ledger System Enables users to view the details of Trust Loans.
Matter Details Archive History Enables users to display the Archive history including previous movement of a matter in and out of Archives. Comments Enables users to view comments and enter a new comment. Matter Setup Enables users to view some of the details initially recorded about the matter, such as Workflow area, Alpha ID and the type of work (eg: Agency, Speculation, Gratis etc). Overview Enables users to view some of the details initially recorded about the matter, such as Date Instructed or Completed, Partner, Controller, Author, Matter Type.

Administration Workbook
Page 392 © 2012 Reed International Books Australia Pty Ltd trading as LexisNexis
Notes Enables users to view the matter File Notes. Create Enables the user to create a File Note on a matter. Delete Enables the user to delete File Notes. Edit Enables the user to edit File Notes Edit Note By Others Enables the user to edit or delete File Notes made by other users.
Precedents Enables users to view the letters generated for matters.
Research Enables users to access the Research functions linked to LNAU or LNNZ.
Safe Custody Enables users to access the Safe Custody information for the matter.
WorkSite Enables users to view this tab.
Workflow Diary Enables users to view the diary entries on matter. Users can also delete, edit or create a new diary entry from this tab. Tasks Enables users to view, open and start the tasks associated with the matter. TeamMembers Enables users to view the users making up the Team for this matter.

Lexis® Affinity Library
© 2012 Reed International Books Australia Pty Ltd trading as LexisNexis Page 393
36.2.22 PhoneBook Options
The screen is displayed below:

Administration Workbook
Page 394 © 2012 Reed International Books Australia Pty Ltd trading as LexisNexis
Allow Hold Collection Cycle Enables users to place a Hold on the production of Collection letters in the Collection Letter production process.
Create Enables users to create PhoneBook entries
Delete Enables users to delete PhoneBook entries
Edit Enables users to edit PhoneBook entries
Group – Assign Enables users to assign a PhoneBook entry to a PhoneBook group.
Group – Create Enables users to create new Groups within PhoneBook.
Link Enables users to link one PhoneBook entry to another.
Merge Enables users to create a merge file of PhoneBook data.
Print Enables users to print details of PhoneBook records.
Transfer Debtor Contact Activates the Transfer Debtor Contact icon in Connections Relationships.
Tabs Several sub groups are contained in “Tabs”. These are grouped as they display on the PhoneBook screen. A tick indicates that the information is visible. A cross indicates that the information is hidden
Connections Associated Staff Groups Linked Records Relationships
Contact Details ID/Registration This includes ACN, ABN etc. Miscellaneous Overview - Addresses DX Postal (Address, Country, Suburb/Locality) Registered (Address, Country, Suburb/Locality) Street (Address, Country, Suburb/Locality) Direct/Other Phone Email Fax Home Phone Main/Work Phone Mobile Personal - Date of Birth

Lexis® Affinity Library
© 2012 Reed International Books Australia Pty Ltd trading as LexisNexis Page 395
Data Enables users to select the tab and display all the relevant details.
Diary Enables users to select the tab, display Diary entries, or create new ones.
Documents Enables users to access documents for the PhoneBook record. Users can add new documents, edit existing documents, delete documents or view documents.
Finance Balances Bank Debt Collection Collection Note – Create Enables users to record a Collection Note for a PhoneBook entry. Collection Note – Print Enables users to print the Collection Notes for a PhoneBook entry Debt Control Setup
Notes Enables users to display existing notes or add to them.
Precedents Enables users to display the Precedents available for the PhoneBook record.
Safe Custody Enables users to select the tab and access Safe Custody Packets and Items. Users can create new Packets or Items, Edit existing records, print details or labels and delete Safe Custody packets or Items.
WorkSite Enables users to select the tab and access information for the PhoneBook record

Administration Workbook
Page 396 © 2012 Reed International Books Australia Pty Ltd trading as LexisNexis
36.2.23 Postcode Options
The screen is displayed below:
Create Enables users to create PostCodes
Delete Enables users to delete PostCodes
Search - Create Enables users to create new Postcodes from the Postcode Search icon.
Search – Delete Enables users to delete Postcodes from the Postcode Search icon.
Search – Edit Enables users to alter Postcodes from the Postcode Search icon.

Lexis® Affinity Library
© 2012 Reed International Books Australia Pty Ltd trading as LexisNexis Page 397
36.2.24 Posting Options
The screen is displayed below:
General Allow Allocate Anticipated Drs
Ticked - users can post a receipt for the anticipated portion of a Debtors balance. Crossed - a user can only post an Office Receipt for the value of Debtors less Anticipated, and would then need to post a Trust Receipt for the remainder – ie a split banking. If split bankings are not allowed, you will need to process a Trust Receipt for the full amount.
Allow Loan Account Where inter-entity or inter-branch cheque or receipt entries are made a loan account is used to automatically post off-setting journal entries. Ticked - users are able to post inter-entity or inter-branch transactions. Crossed - users cannot post inter-entity or inter-branch transactions and cheques and receipts must be restricted to the originating entity or branch of the transaction or matter.
Allow Reverse Billed Disbs Enables users to reverse a disbursement entry even though it has been billed.
Allow Trust To Office Enables users to process Trust to Office Transfers from within the Bills List.

Administration Workbook
Page 398 © 2012 Reed International Books Australia Pty Ltd trading as LexisNexis
Disallow Posting to Control Accounts Control Accounts include Debtor, Creditor or Cash at Bank control General Ledger accounts. Ticked - users will be able to post directly to these Control Accounts, although a Warning is given. Crossed - users cannot post to these accounts. This is the recommended selection.
Override Bank Reconciliation Ticked – users can present cheques from the Cheques option, present a deposit in Bank Deposit Query, remove entries from Bank Reconciliation, change the opening balance and enter entries in the Bank Reconciliation that fall outside the current statement period. (The current Statement period is the period between the last reconciled Bank Statement and Today.) Performing these functions incorrectly can cause the Bank Reconciliation to go out of balance. Crossed – users cannot perform these functions. (This is the recommended option).
Override Branch Enables users to post entries outside the Branch to which they belong. (The Brach is set on the Employee Record).
Override GST Enables users to override the amount of GST automatically calculated determined by the GST flag selected. Usually this is crossed.
OverrideJournal Lock Date Enables users to post Journal transactions prior to the Entity Lock date without first having to unlock the system. Usually this is crossed.
Override Write Off Charts Enables users to select another GL Chart when processing Write Off entries.
Post Service Company When creating a new Employee, the default for the flag “Posting Allowed in this Entity” is set according to this setting.
Trust Create Trust Journals
Enables users to process Trust Journals.
Draw Uncleared Enables users to draw Trust cheques against uncleared funds. Usually this is crossed.

Lexis® Affinity Library
© 2012 Reed International Books Australia Pty Ltd trading as LexisNexis Page 399
Override Bank Reconciliation Ticked – users can present cheques from the Cheques option, present a deposit in Bank Deposit Query, remove entries from Bank Reconciliation, change the opening balance and enter entries in the Bank Reconciliation that fall outside the current statement period. (The current Statement period is the period between the last reconciled Bank Statement and Today.) Performing these functions incorrectly can cause the Bank Reconciliation to go out of balance. Crossed – users cannot perform these functions. (This is the recommended option).
Override Reserved Trust Enables users to draw on the Reserved Trust amount.
Print Journal Enables users to print Trust Journals as they are processed.
Reverse Trust Journal Enables users to reverse a Trust Journal entry.
36.2.25 Precedent Options
The screen is displayed below:
Create Enables users to create Precedents in Precedents Explorer
Delete Enables users to delete Precedents in Precedents Explorer
Edit Enables users to edit Precedents in Precedents Explorer.
Merge Enables users to merge a list to a Precedent.
Open File Enables users to open the precedent document in MS Word to edit it.

Administration Workbook
Page 400 © 2012 Reed International Books Australia Pty Ltd trading as LexisNexis
36.2.26 Receipt Options
The screen is displayed below:
Receipt Options are divided into General and Trust. The following options apply to both.
Clear Enables users to clear Trust Funds.
Create Enables users to process Receipts.
Default Amount Allocation If ticked, the amount entered on the top part of the Receipt Entry screen will be prompted when the user <TAB>s or clicks into the top line of the Amount column in the Allocation table.
ForceTally Forces users to ensure that the total of the individual amounts of a receipt equal the total of the Receipt entered in the Amount Field. It is recommended that ForceTally is ticked.
Print The print option will default to ticked.
Reverse Enables users to reverse receipts.

Lexis® Affinity Library
© 2012 Reed International Books Australia Pty Ltd trading as LexisNexis Page 401
The following options apply only to General:
ForbidDisbursements Prohibits users from allocating receipts directly to matter disbursements balances. It is recommended that this option be enabled (ie. ticked).
ForbidMatter Prohibits users from posting receipts directly to a matter without a bill. If ticked, all receipts must be posted to a bill on a matter. Generally, it is recommended that this option be enabled (ie. ticked). However, if Macquarie Bank DEFT Payments is enabled, this setting can be disabled to cater for the situation where a Debtor may pay more than the outstanding balance. Used together, both ForbidMatter & ForbidDisbursements effectively force matter receipts to be allocated only to Bills. This ensures that Fee, Disbursement and Sundry Ledgers are properly posted (as per the original components of the Bill) and maintains the integrity of Lexis Affinity Library reports, especially reports relating to bills and GST.
Write Off Enables users to write off Debtors balances when processing receipts.
The following options apply only to Trust:
Allow Immediate Clearance on Cheques Enables users to process Trust Receipts of the type IC. NOTE: IC Receipts are immediately cleared and can be drawn against immediately. Before allowing this feature to be used, you should check that this is allowable under your Law Society regulations.
Allow Investment Enables users to process Investment transactions directly from a Trust Receipt.

Administration Workbook
Page 402 © 2012 Reed International Books Australia Pty Ltd trading as LexisNexis
36.2.27 Report Options
The screen is displayed below:
Maintenance controls the visibility of the following items on the Action menu: Reports Update Report Schema Maintenance Report Design Maintenance Dashboard Design Maintenance
Modify controls the visibility of the following items on the Action menu: Add Edit Delete
Settings controls the visibility of Report Settings Maintenance.
36.2.28 Safe Custody Options
The screen is displayed below:
Create Enables users to create Safe Custody packets
Delete Enables users to delete Safe Custody packets
Edit Enables users to edit Safe Custody packets.
PacketID Enables users to view the Safe Custody Packet ID
Packet Location Enables users to view the Safe Custody Packet location

Lexis® Affinity Library
© 2012 Reed International Books Australia Pty Ltd trading as LexisNexis Page 403
36.2.29 State Options
Test Unpresented Cheques If ticked, the prompt “Check for unpresented Cheques when posting a receipt” is activated on the States option.
36.2.30 Sundry Options
The screen is displayed below:
If Combined Ledger System enabled:
Anticipated Convert Enables users to convert an Anticipated Sundry entry to a real Sundry entry.
Create Enables users to create an Anticipated Sundry in Billing
Replace Anticipated Sundry Enables users to replace an Anticipated Sundry with a real Sundry.
Split Billed Enables users to split a Billed Anticipated Sundry so that it can be matched with a real Sundry.
For all Datasets
Create Enables users to create Sundry entries.
Delete Enables users to reverse Sundry entries.
Edit Enables users to edit Sundry entries.
Override Taxcode Ticked – User can alter the Taxcode. Crossed – User cannot alter the Taxcode.

Administration Workbook
Page 404 © 2012 Reed International Books Australia Pty Ltd trading as LexisNexis
36.2.31 System
The screen is displayed below:
System Check Enables users to run the System Check application.
36.2.32 Transit Register
The screen is displayed below:
Create Enables users to create a Transit Register Receipt (ie a receipt of a Third Party Cheque).
Payment Enables users to update the Transit Register when the cheque is forwarded to the Third Party.
Reverse Enables users to reverse a Transit Register Receipt.

Lexis® Affinity Library
© 2012 Reed International Books Australia Pty Ltd trading as LexisNexis Page 405
36.2.33 Workflow
The screen is displayed below:
Create Enables users to create a new Workflow Area.
Delete Enables users to delete an existing Workflow Area. Usually this is crossed.
Edit Enables users to edit an existing Workflow Area.
Procedure – Create Enables users to create steps in the Procedure for a Workflow Area.
Procedure – Delete Enables users to delete steps in the Procedure for an existing Workflow Area. Usually this is crossed.
Procedure – Edit Enables users to edit the steps in the Procedure for an existing Workflow Area.
Procedure – Stop Enables users to stop a workflow procedure on a matter.
Task – Change Critical Due dates Enables users to alter Due Dates that are flagged as Critical.
Task – Create Enables users to create an ad hoc or task on a matter.
Task – Delete Enables users to delete an ad hoc task, or a task inserted via a Workflow procedure on a matter.
Task – Skip Enables users to skip tasks.
Task – Unfinish Enables users to ‘Unfinish” a task that has been flagged as “Finished”.

Administration Workbook
Page 406 © 2012 Reed International Books Australia Pty Ltd trading as LexisNexis
Notes

Lexis® Affinity Library
© 2012 Reed International Books Australia Pty Ltd trading as LexisNexis Page 407
37. General Ledger
The General Ledger icon allows you to; create new general ledger accounts, display general ledger account transactions and balances and post transactions. This workshop covers creating and displaying General Ledger Accounts only.
37.1 Classifying General Ledger Accounts
Each General Ledger Account must belong to a Type.
The General Ledger Types have already been created for you.
37.1.1 General Ledger Types
Hands on
In this exercise you will view the General Ledger Types.
1. Open General Ledger (Financial Maintenance | Accounts Setup)
2. Select Ledger Type Maintenance
3. Select the Print icon
A sample ‘General Ledger Types’ list is displayed below:
4. Close the Print Screen

Administration Workbook
Page 408 © 2012 Reed International Books Australia Pty Ltd trading as LexisNexis
37.1.2 General Ledger Sub-Types
Each Ledger Type can be sub-categorised into Sub-Types. For example, Asset and Liability Accounts can be split into Current and Non-Current Accounts. This is used when printing the Balance Sheet section of the Financial Management Report. These sub-types are already created for you.
You can also create Sub-Types for categorising Income and expenses, for example, you may wish to group expenses according to their type, such as Occupancy, Communication or Professional Costs, or you may wish to group Income into Professional Income (fees) and Other Income.
Hands on
In this exercise you will create a Sub Type for Professional Costs.
1. Click on on the Ledger Types screen
2. Click on [New]
The following screen displays:
3. Type Code PCOST
4. Description Professional Costs
This is the wording that will print on the Financial Management Reports (Profit & Loss and/or Balance Sheet).
5. Chart Type Select E (Expense)
6. Sequence 1
This indicates that this Sub Group will be printed first in the Expense section of the report.
7. Click on to save the Sub Type
8. Close the Ledger Sub-Types screen
9. Close the Ledger Types screen

Lexis® Affinity Library
© 2012 Reed International Books Australia Pty Ltd trading as LexisNexis Page 409
37.2 Create General Ledger Account
Hands on
In this exercise you will create a new General Ledger Account for Professional Indemnity Insurance number 237.
1. Click on [New]
The following screen displays:
2. Ledger Code 237
3. Type select Expense from the Drop Down List
4. Description Professional Indemnity Insurance
5. Report Description Professional Indemnity Insurance
This is the description that appears on reports including the Financial Management Report. It can be different to the name of the account if required.

Administration Workbook
Page 410 © 2012 Reed International Books Australia Pty Ltd trading as LexisNexis
6. Tax Type Select Not a Tax Account
Select from: Not a Tax Account Use for most Accounts Output Account Reserved for GST Output Account Input Account Reserved for GST Input Account Exclude from GST Reporting Use for Salaries etc
7. Report Sub-Type Select PCOST from the drop down list
8. Default Driver Select STAFF
Drivers are created so that expenses can be automatically allocated between Branches, Departments or Matter Types within an Entity. Drivers are optional and will have been created by the Lexis Affinity Library Accounts Administrator.
Transactions can be allocated to an Entity, Author, Branch, Department or Matter Type when posted.
9. Suppress printing on the Fin Mgt Report Leave unticked
10. Expense Analysis Report Column Leave blank
Columns can be used to group different types of Expenses. The Expense Analysis report can be used to report on these types.
11. Classification of Asset This does not apply to this exercise
If Foreign Currency is enabled: and the Account is an Asset or Liability:
Select the appropriate classification:
Non Monetary Account using Historical Cost rate This will apply the Foreign Currency Exchange Rate that applied at the date of the transaction. This would generally apply to GL Accounts such as Fixed Assets – Buildings, Equipment etc.
Monetary Account using Current Rate This will apply the rate that applies today. This would generally apply to Current Assets & Liabilities such as Cash at Bank, Debtors & Disbursements.
Petty Cash Monetary Account using Current Rate This will apply the rate that applies today.
12. Click on [Save] to update and save the new GL Account
13. Select to refresh the data

Lexis® Affinity Library
© 2012 Reed International Books Australia Pty Ltd trading as LexisNexis Page 411
General Ledger Budgets
If you are not using Department, Branch or Matter Type analysis, you can allocate a budget to a General Ledger Account without using the Budget Proportional Driver.
14. Highlight 237 and click on to open the Budget screen
The following screen will display
15. Enter Budgets for Year Accept the prompted date
Lexis Affinity Library will default to the end of the current financial year.
16. Yearly Budget 30000
17. Calculate Months Tick this
The Monthly Budgets will be inserted.
18. Keep Ledger Budget form open after posting? Untick this
NOTE: If you are not using Department, Branch or Matter Type reporting, you can now click on [OK].

Administration Workbook
Page 412 © 2012 Reed International Books Australia Pty Ltd trading as LexisNexis
Budget Proportional Drivers
If you are apportioning expenses to Departments, Branches or Matter Types using Proportional Drivers, then you also need to allocate budgets in the same manner.
Budget Proportional Drivers are used to allocate the total budget entered over the various Branches, Departments and Matter Types.
Budget Proportional Drivers are usually created by the Lexis Affinity Library Accounts Administrator.
Attach an existing Budget Proportional Driver
Hands on
In this exercise you will attach the BUDGET – STAFF Proportional Driver to the expense account for Professional Indemnity Insurance.
1. Driver Select BUDGET- STAFF
If you do not need to review the Budgets you can simply click on [OK]
To view the allocations that will be made:
2. Click on [Edit Proportional Driver]
The following screen will display:

Lexis® Affinity Library
© 2012 Reed International Books Australia Pty Ltd trading as LexisNexis Page 413
3. Driver The name of the driver will display
4. Entity Accept the prompted Entity
5. Driver Date Change this date to the beginning of the Financial Year
This is the start date for the Driver.
6. Copy or Select Driver details from available List below Tick this
This allows you to create a new driver based on an existing driver – either Actual or Budget.
7. Current Drivers Accept the prompted driver
8. Existing Dates Ensure the most recent date is highlighted
Because you have elected to copy an existing driver, the details of the Driver for BUDGET – STAFF for the selected date will be inserted into the driver you are creating now.
9. Click on [Next]
The Branch Allocation screen displays.
This screen allows you to enter percentages for each Branch.
To alter an existing percentage overtype it.
To remove a Branch – right click and select Remove.

Administration Workbook
Page 414 © 2012 Reed International Books Australia Pty Ltd trading as LexisNexis
Departments within Branches
If you need to allocate each Branch between Departments (differently to the overall allocation between Departments which is on the next screen) – right click and select Edit Department Driver for Selected Branch.
When all allocations are made:
10. Click on [Next] to accept this allocation
The Department Allocation screen displays.
11. Allocate the Departments as you require
Note that you can also allocate Matter Type proportions within each Department.
12. Click on [Next]
The Matter Type Allocation screen displays.
13. Allocate the Matter Types if required
14. Click on [Next]
15. Click on [Update] to save
16. Close the Budget screen
NOTE: You can enter Budgets for General Ledger Accounts for future years by opening Future Budgets (Financial Maintenance | Accounts Setup).

Lexis® Affinity Library
© 2012 Reed International Books Australia Pty Ltd trading as LexisNexis Page 415
37.3 Create Sub Accounts
Sub Accounts can be used to differentiate different sub types of expenses (or income). An example of this would be to have a Travel as a Header Account and separate sub-accounts for Local, Interstate and Overseas Travel.
Hands on
In this exercise you will create a new sub-account for Travel – Interstate. Travel is already created as GL Account 240 and one sub account already exists – 240.1
1. Highlight GL Account 240 and click on to create a new GL Account
The following message displays:
2. Click on [Yes] to proceed
The following screen will display:
This screen advises you that the Header Account is 240 (Travel) and defaults to the same details as the header account.

Administration Workbook
Page 416 © 2012 Reed International Books Australia Pty Ltd trading as LexisNexis
3. Ledger Code 240.2
4. Description Travel – Interstate
5. Report Description Travel – Interstate
6. Tax Type Select Not a Tax Account
7. Report Sub-Type Leave blank
8. Default Driver Leave blank for this exercise
If the Header Account already has a driver attached Lexis Affinity Library will prompt with the same driver.
9. Suppress printing on the Fin Mgt Report Leave unticked
10. Expenses Analysis Report Column Leave blank
11. Click on [Save] to update and save the new GL Account
12. Select to refresh the data

Lexis® Affinity Library
© 2012 Reed International Books Australia Pty Ltd trading as LexisNexis Page 417
37.4 Export / Import General Ledger Budgets into Excel
It is possible to export and import General Ledger (GL) budgets into and from Excel. This option is controlled by the security setting Ledger | Budget.
Note that the Proportional Drivers are ignored: they are not included in the export, nor can they can imported.
37.4.1 Export
Hands On
The Export option exports budgets that already exist in the GL. It may be necessary for you to use Future Budgets (under Financial Management) to create budgets for the years you require, by using either the 'Copy Budget of Year x' or 'Copy Actual YTD balance' options.
When you are ready to export your budgets, open the General Ledger application.
1. Click on [Import/Export Budget]
The screen displays as shown below:
Export to Excel File
Entity Choose the entity whose budgets you want to export. Only that Entity's budgets will be exported.
Export Budgets for Year Choose the year whose budgets you want to export.

Administration Workbook
Page 418 © 2012 Reed International Books Australia Pty Ltd trading as LexisNexis
Translation Currency (If Foreign Currency is enabled) This is the translation currency for the budget for these accounts. Only accounts that have a budget with this currency as the translation currency are exported, not the complete set of entity budgets.
Include Header Account Tick this to include the Header Account as well as the sub-accounts. If not ticked, only actual posting accounts are exported. If ticked, the header row shows shaded grey in the Excel worksheet.
2. Click on [Export]
A dialogue pops up asking where you want to save the file and the file name you want to use.
3. Navigate to where you want the file saved and enter a file name, then click on [Save]
The budgets are exported into this file and location. Affinity remembers this location and uses it next time you export.
When the export has completed a dialogue box will inform you of the export file location and name.
The Excel file
A copy of the Excel file is shown on the next page.

Lexis® Affinity Library
© 2012 Reed International Books Australia Pty Ltd trading as LexisNexis Page 419

Administration Workbook
Page 420 © 2012 Reed International Books Australia Pty Ltd trading as LexisNexis
Excel Spreadsheet Explained
You should ensure that Data | Filter | Autofilter is turned on in the spreadsheet.
Column A – Entity This is the Entity code that you requested be exported.
Column B – Chart The number of the Chart in the GL chart of accounts. Where Header Accounts exist this column contains the chart number of the header account for each of its sub-accounts.
Column C – SubAcct The sub account of this header ledger.
Column D – Budget Type Income, Expenses, Assets, Liabilities, Equity – the main divisions of the Chart of Accounts.
Column E – Report Description The description you entered in the section labeled 'Report Description' when you created the account.
Column F – FinYear The financial year that you requested be exported.
Column G – Currency The currency of the accounts that were exported. This will be the entity currency, or the Translation Currency where Foreign Currency is enabled and Translation Budgets are being exported.
Column H – Yearly Total Note: Contains a formula. This is the total of the columns I<nn> to T<nnn>. Don't enter anything into this total column as when you alter the month budgets the total column updates to reflect the addition of the columns.
Columns I to T – Months Month1-Jul this means that the first month in your Financial Year is July. The month following Month1 or Month2 etc will depend on your own Financial Year end month.
Shaded Row This indicates a header row, a non-posting account.
Autofilter Each column has an autofilter attached. This is a filter that Lexis Affinity Library has applied to each column depending on the data contained. For example, you can filter the Budget Type column so that only Income accounts are displayed. The columns with figures allow you to filter based on values.

Lexis® Affinity Library
© 2012 Reed International Books Australia Pty Ltd trading as LexisNexis Page 421
37.4.2 Import
When you have made any changes you want to the budgets, you are ready to import the Excel spreadsheet back into Lexis Affinity.
IMPORTANT
If you want to add formulas and move figures etc we would recommend that you copy the exported spreadsheet to another one, or a second worksheet, and do it there. When importing, Lexis Affinity Library will check to see that the columns are in the order defined above, and if they are not the import will fail. The order of the data is not important, but the columns must be in the same order as in the originally exported spreadsheet.
Hands On
1. Click on .
The dialogue box opens.
2. Click on [Import]
A dialogue will open on the last used export/import directory for you to choose a file to import.

Administration Workbook
Page 422 © 2012 Reed International Books Australia Pty Ltd trading as LexisNexis
3. Choose the file to import.
A new dialogue will open asking you to choose the worksheet from the file that you want to import.
4. Select the worksheet you want to import
If there is more then 1 worksheet for the same entity then only the last one will be saved into Lexis Affinity Library (it overwrites the first one). If you are importing worksheets for different entities then all the selected ones are imported, unless there is more than 1 for the same entity, in which case only the last will be saved.
When the import has finished a dialogue will tell you how many records were imported

Lexis® Affinity Library
© 2012 Reed International Books Australia Pty Ltd trading as LexisNexis Page 423
Errors when Importing
If the columns in the Excel file have changed, or there are errors in the data fields, you may get an error when importing:
You should choose Yes.
A dialogue will ask where you want to save the log file. Choose a location and a file name. Once it has been saved it will automatically open so you can view the errors:
In this case the Financial Year column is missing, therefore the other columns are now in the wrong position, thus there are many errors.
The error file will tell you the column and line number of the error location. Correct the errors in the Excel file and try the import again.

Administration Workbook
Page 424 © 2012 Reed International Books Australia Pty Ltd trading as LexisNexis
37.5 Display General Ledger Transactions
The transactions in a GL Account are displayed in the lower half of the screen.
Hands on
In this exercise you will display the transactions for Professional Fees Invoiced for this month.
The Lewisham Reid files that are using for training may not have any current transactions, so in this exercise you are told to select a date rage from 1/6/2008 to 30/6/2009.
1. Select the “Filter” tab
2. Click on Clear All
3. Enter the date range as 1/6/2008 to 30/6/2009
4. Select the “Ledger” tab
5. Highlight Professional Fees Invoiced
6. Click on [Show Transactions]
The transactions will be displayed as shown below:
NOTE: You can rest the mouse over the Description field to display the name of the Payee. Similarly you can rest the mouse on Entity, Author, Branch or Department to show the full name.
7. Order by most recent to oldest? Tick this
The most recent transactions will now display at the beginning of the list.

Lexis® Affinity Library
© 2012 Reed International Books Australia Pty Ltd trading as LexisNexis Page 425
37.6 Change Proportional Drivers on Existing Transactions
This option is available on transactions that have already been processed using a non permanent driver.
One use of this is where a transaction is processed for an expense that needs to be allocated to various branches or departments based on information that is not available at the time of processing (such as revenue figures). In this case the expense could all be allocated to the main branch or administration department at the time of processing and then altered after the end of the month when revenue figures are available.
Hands on
In this exercise you will alter the allocation of a transaction on GL 2505 dated 6/4/2008. Previously this transaction was posted using the Driver of STAFF. However this transaction now needs to be altered.
1. Open General Ledger (Financial Maintenance | Accounts Setup)
2. Select the “Filter” tab
3. Click on [Clear All]
4. Ledger Code from 2505
5. Transactions – Date from 6/4/2008
6. Select the “Ledger” tab
The top part of the screen will display details of the Chart and the driver attached to it.
7. Click on [Show transactions]
The transactions for the ledger will display.
8. Locate the transactions for 06/04/2008 JNL90
There are four separate entries as shown below:
You will see that this entry has been allocated to the Brisbane branch and 4 separate departments.

Administration Workbook
Page 426 © 2012 Reed International Books Australia Pty Ltd trading as LexisNexis
9. Click on
The following screen displays:
10. Driver Select STAFF
11. Chart Select 2505
12. Entity Accept LR
13. Transaction Date from / to 06/04/2010 to 06/04/2010
This will limit the number of transactions displayed.
14. Only include Transactions where Current Driver Date is less than Accept the prompted date
15. Change Permanent Flag to Yes for New Driver? Leave unticked for this exercise
Tick this If these changes are to be permanent. Any further changes would then have to be made by reversing the journal and reprocessing it.
16. Click on [Refresh Chart Transactions]
The following screen displays:

Lexis® Affinity Library
© 2012 Reed International Books Australia Pty Ltd trading as LexisNexis Page 427
17. Highlight the entry and right click
18. Select Display Proportional Driver
The following screen displays:
19. Click on [Cancel]
20. Click on [Edit New Proportional Driver]
The following screen displays:

Administration Workbook
Page 428 © 2012 Reed International Books Australia Pty Ltd trading as LexisNexis
21. Copy or Select Driver from available List below Leave unticked
This is unticked, as you are not copying a driver.
22. Click on [Next]
A blank Proportional Driver screen displays as shown below:
In the following steps you will apportion the expense to Brisbane branch (100%) and 50% to ADM Department and 50% to DD Department
23. Branch click in the field, click on the drop down arrow and select BRI
24. Percent Allocated 100
25. Right click on the line
26. Select Edit Department Driver for Selected Branch
27. Department Select ADM
28. Percent Allocated 50 <TAB>
29. Department Select DD
30. Percent Allocated 50
31. Click on [OK]
The Branch section of the Driver displays.
You do not need to alter this screen as these allocations are for all Branches.

Lexis® Affinity Library
© 2012 Reed International Books Australia Pty Ltd trading as LexisNexis Page 429
32. Click on [Next]
The Matter Type section of the Driver displays.
33. Click on [Next]
34. Click on [Close]
35. Click on [Go]
In this exercise you have altered a transaction that is in a previous financial year. The following message will display:
36. Click on [Yes]
The GL screen will display.
37. Click on
38. Click on [Show Transactions]
The transactions will now be listed as displayed below:
The original entries are now shown in green – with “Y” in the Adjust column. The reversing entries are shown in red – with “Y” in the Adjust column. The new (and correct) entries are shown in black

Administration Workbook
Page 430 © 2012 Reed International Books Australia Pty Ltd trading as LexisNexis
General Ledger Transaction Fields
Date This is the date of the transaction
Type This is the type of transaction – for example; Balance Bought Forward (BBF), Bill (BLL) , Cheque (CHQ), Receipt (RCP), Journal (JNL), Creditor Invoice (INV)
Refno This is the reference number of the transaction - for example; Matter number for Bills, Cheque number, receipt number, Journal number
Description This is the Bill Number or description entered when the transaction is processed.
Entity This is the Entity attached to the transaction
Creditor If the transaction was also posted to a Creditor Account Number, this account number displays.
Author This is the Author ID attached to the transaction
Branch This is the Branch attached to the transaction
Department This is the Department attached to the transaction
Matter Type This is the Matter type (field of law) attached to the transaction
Adjustment Any adjustments that have been processed
Debit / Credit This is the amount of the transaction and whether it was a debit or credit posting.

Lexis® Affinity Library
© 2012 Reed International Books Australia Pty Ltd trading as LexisNexis Page 431
37.7 General Ledger Menu & Ribbon
Performing different functions in the General Ledger can be achieved by either selecting the icon or by selecting the relevant function from the Menu.
37.7.1 Functions on Menu Toolbar
There are two options on the Menu Toolbar – File and Help
File
New Create a new General Ledger Account
Edit Edit or alter an existing General Ledger Account
Delete Delete the selected General Ledger Account - this is only available for account registered in error, i.e. with no transactions posted.
Journal Opens the Journal Entry Posting screen
Print Chart of Accounts Prints a list of all the General Ledger Accounts displayed.
Print Ledger Allocations Prints the transactions for each General Ledger Account displayed in the list.
Print Chart Budgets Prints the Budget for the selected GL Account.

Administration Workbook
Page 432 © 2012 Reed International Books Australia Pty Ltd trading as LexisNexis
37.7.2 General Ledger Ribbon
F4 New Create a new General Ledger account.
F2 Edit Edit the selected General Ledger account.
F8 Delete Delete the selected General ledger account.
F5 Refresh This will refresh or update the list displayed.
Ledger Maintenance Access functions to change General Ledger account numbering, convert existing sub-account structures into Master accounts and consolidate multiple ledgers into a single account.
Proportional Driver Maintenance Establish and maintain the Entity, Branch and department proportional drivers used when posting non-matter based transactions.
Change Proportional Drivers on existing Transactions This allows you to change the Ledger Driver Allocation on transactions that were posted with a non-permanent driver, without having to reverse the transactions and re entering them.
Journal Opens the Journal Entry Posting screen
Budget Create and edit General Ledger budgets for the current and previous years.
Import / Export Budget Allows user to export the General Ledger budgets, or import them from a csv file.

Lexis® Affinity Library
© 2012 Reed International Books Australia Pty Ltd trading as LexisNexis Page 433
Ledger Type Maintenance Access, maintain and list the required General Ledger Types for all Accounts and Ledger Sub-types for Balance sheet accounts.
Print – Chart of Account Prints a list of the Charts displayed in the Ledger list.
Ctrl+P Print – Ledger Allocations Prints the transactions for each Chart displayed in the Ledger list.
Print – Chart Budgets Prints the Budgets for the Charts included in the Ledger list, grouped by the criteria selected.

Administration Workbook
Page 434 © 2012 Reed International Books Australia Pty Ltd trading as LexisNexis
37.8 General Ledger Filters
General Ledger accounts can be filtered via various options.
Procedure
The General Ledger Filter is shown below.
1. Open the General Ledger list
2. Select the “Filter” tab
3. Click on [Clear All]
The following screen will display:
4. Make your selections as required

Lexis® Affinity Library
© 2012 Reed International Books Australia Pty Ltd trading as LexisNexis Page 435
General Ledger Filter Fields
“Ledger and Transaction Options” tab
Types Leave blank to include all GL Types OR Select one GL Type from the drop down list OR Enter the letters corresponding to the GL Types for more than one Type– for example; IE for Income and Expenses Accounts only.
Ledger Code from / to You can select a range of Account Numbers – for example – 100 TO 199.
Description includes You can enter part of the name of the Account – for example – Stationery.
Column This allows for accounts to be grouped from 0 – 8 for analysis. For example Overheads, Staff Costs etc. can have different Column numbers and can then be reported separately on the Expense Analysis Report.
Default Driver Includes You can select a driver from the drop down list.
Budget Driver Includes You can select a driver from the drop down list.
Exclude Non-Printing Charts Tick this to exclude GL Charts that have “Suppress Printing on the Fin Mgt Report ?” ticked.
Transactions - Date From / Date To / Today / This Week etc This allows you to list transactions for the selected period. You can enter a Date range or select a period such as This Month. If the dates are unchecked, all transactions will be listed. You can disable the dates by unticking the check boxes beside the date or by clicking on [Clear All]. (Note that Clear All clears all other filter settings as well).
Transactions - Amount more than / less than Allows you to select only transactions that are greater than or less than the amount specified.
Transaction – Description includes Allows you to search for transactions in a selected GL Account, that include the entered text in the description – for example – you can select Marketing – Melbourne and search for the word “invitations”
Exclude Adjustments and Reversals Allows you to exclude adjustment entries and reversals from the transactions reported.

Administration Workbook
Page 436 © 2012 Reed International Books Australia Pty Ltd trading as LexisNexis
Include only Movement for Date Period Tick this to include only transactions in the period selected – with no opening or brought forward balances.
Entity Display transactions belonging to a single entity or clear this field to display all transactions.
Author Display transactions belonging to a single Author or clear this field to display all transactions.
Branch Display transactions belonging to a single Branch or clear this field to display all transactions.
Department Display transactions belonging to a single Department or clear this field to display all transactions.
Matter Type Display transactions assigned to a single Matter type or clear this field to display all transactions.
“Report Options” tab
This tab allows you to print one or more GL Charts (or Accounts) sorted by selected criteria, such as branch or department. You can also select to print the Budgets for selected Charts.
Printing Grouped Ledger Allocation Report Select the criteria for sorting the entries included in the report. The transactions will be listed in date order by the criteria selected for the Charts included in the Ledger listing. To print the Grouped Ledger Allocation report, either select the Print icon or File and Print Grouped Ledger Allocations.
Printing Transactions Report – Page Break between Charts / First Group If you have selected more than one account to print, you can tick this to force a Page Break between each Account or each Groups as selected above..
Printing Transactions Report – Print Individual Sub-accounts If ticked – each Ledger will print separately If unticked – a combined ledger for all sub-accounts will print.
Summarise Control Account Transactions If ticked, only the movement for the month will be included in the printed report. This assists users where they are required to print ledgers for the Debtors Control Account.

Lexis® Affinity Library
© 2012 Reed International Books Australia Pty Ltd trading as LexisNexis Page 437
Printing Chart Budgets Select the criteria for sorting the Charts included. ”Chart” must be included to be able to print this report. To print the Chart Budgets, either select the Print icon or File and Print Chart Budgets.
For Year Select the Financial Year to be included in the report.
Include Charts without a Budget Tick this to include all Charts listed.
Only show whole dollar amounts Tick this to print Budgets in whole dollars.

Administration Workbook
Page 438 © 2012 Reed International Books Australia Pty Ltd trading as LexisNexis
37.9 Printing
You can print one or more GL Accounts. You can use the Filters tab to select which accounts to print and for what date ranges.
Hands on
In this exercise you will print the ledger transactions for Professional Fees for a financial year.
1. Open the General Ledger list
2. Select the “Filter” tab
3. Select the “Ledger and Transaction Options” tab
4. Click on [Clear All]
5. Ledger Code From I00
6. Transactions / Date From / To 0107008 - 300609
7. Select the “Ledger” tab
8. Click on the drop down arrow on the Print icon
9. Select Print Ledger Allocations
Transactions for the period selected will be displayed for each Income Account.
10. Scroll through the report and review the transactions
11. Select Close when finished
12. Close the General Ledger screen

Lexis® Affinity Library
© 2012 Reed International Books Australia Pty Ltd trading as LexisNexis Page 439
38. Year End Procedure
Procedure
To run the Year End procedure:
1. Open Year End (Financial Maintenance | Reporting)
The following screen displays:
2. Update Year End as at Select the financial year of the transaction
3. Profit Appropriation Ledger Accept the prompted Chart or select another one
4. Tick the Select column to run the procedure for that entity
5. Click on [OK]

Administration Workbook
Page 440 © 2012 Reed International Books Australia Pty Ltd trading as LexisNexis
Notes