Version: 2 - EUSSO Technologies, Inc.8)_series-Manual-V2.6.pdfLaunch your browser and open the VoIP...
101
4/8 FXO/FXS VoIP Router Series Web UI User’s Manual Version: 2.6 1
Transcript of Version: 2 - EUSSO Technologies, Inc.8)_series-Manual-V2.6.pdfLaunch your browser and open the VoIP...

48 FXOFXS VoIP Router Series
Web UI Userrsquos Manual
Version 26
1
Table of contents Chapter 1 Web UI Management4
11 Access to Web UI4 12 Web UI Management5
121 Web UI Management Overview5 1221 VoIP Setup Port Status7 1222 VoIPLine Configure Line Setting9 1223 Line configure Tone Setting 11 1224 Line configure Line Feature 13 1225 Line configure Line Polarity 16 1226 Routing Setup VoIP Call Out Setting 17 1227 VoIP Call In Routing Table Setting 27 1228 VoIP Call In IVR Setting 34 1229 VoIP Routing Profile Setting37 12210 VoIP Forwarding Profile Setting40 12211 VoIP Authorization Setting43
123 Register Server Setting 44 1231 Register Status 44 1232 Setup the Register ServermdashSIP Protocol 45 1234 Setup the Register ServermdashH323 Protocol 47
124 Auto Provision function49 125 Advance Setup 51
1251 NAT Traversal51 1252 Listen Port52 1253 VoIP Package 53 1254 RTP Packet Summary 55 1255 Flash amp Call waiting56 1256 Gain57 1257 QoS 59 1258 CDR 60 1259 FoIP 61 12510 Prompt VoiceampBeep 62
126 Application 64 1261 Ping test64 1262 Telnet amp SNMP65
127 System 66 1271 System Status66 1272 System Settings 70 1273 Date amp Time 71
2
3
1274 Administrator Setting 72 1275 System Log 73
128 Route Function(System Setup) 75 1281 Setting WAN connection System SetupConnection 751282 LAN Settings 80 1283 NAT 83 1284 Firewall88 1285 Routing93 1286 UPnP Settings 95 1287 DDNS 97
129 BackupRestore 98 1291 Configuration 98 1292 VoIP Module 99
1210 Save Modification 101
Chapter 1 Web UI Management
11 Access to Web UI
The VoIP router provide user friendly Web interface to let you configure your router
function
The default setting of DHCP Server inside VoIP Router is turn ON So please set up your
PC TCPIP network as ldquoGet IP Automaticallyrdquo from DHCP to get internal IP from G3000C
By default The Router will become the network gateway and default IP is 192168221
and will assign your PC IP as 19216822X
Please go to ldquoControl PanelrdquorarrrdquoNetworkrdquo In the ldquoConfigurerdquo page choose the TCPIP of
LAN card and press ldquoPropertiesrdquo please choose ldquoObtain IP Address Automaticallyrdquo
Launch your browser and open the VoIP Router Internal UI WAP page as
http192168221
The default User name is voip
The default Password is 1234
4
12 Web UI Management
The VoIP router provide user friendly Web interface to let you configure your router
function and VoIP function There are a help on line content within each setting page
Please press Help hyperlink to view the on line help There are 3 main functions for
web VoIP System Setup(Router) amp System maintenance Each function is setup by
the function below
121 Web UI Management Overview
Route function
Connection (Setting WAN connecting)
LAN Setting
Firewall Basic setup
Networks System Status Display
Dynamic DNS Setting
DHCP Server Setting
Static Routing Setting
Local Server Setting
DMZ Setting
VoIP function
Port Status Display
Line Configure Setting
Line Setting
Tone Setting
VoIP Call Out Routing Table Setting
VoIP Call In Routing Table Setting
VoIP Call In IVR
VoIP Routing Profile Setting
VoIP Forwarding Profile Setting
Authorization
Register Status
5
System Maintenance function
Configurations BackupRestore
VoIP Module BackupRestore
Reboot System
Save Modification
Gateway Manual overview
6
122 VoIP Function 1221 VoIP Setup Port Status
This page will display the current and last time VoIP call status amp result
a The PC time will show the date amp time that your connected PC now
b The VoIP Router time will show the date amp time on this VoIP router the
dateamp time may get from SNTP server or setting from your PC You may set
the SNTP server from System SetupAdministratorDate amp Time
A Ports Message
a Port display the port number eg 1 or 2
b Type Telephone interface type
FXO (DAA interface) for connect to telephone line or PBX extension
line
FXS (SLIC interface) for connect to regulate phone set
c Display Name display the remote party name of this VoIP call
d Status Current status of this port
Idle Standby for make a phone call
Signal Waiting for DTMF press or VoIP protocol connecting
In There is a phone call made from phone port and call out to Network
by VoIP
Out There is a phone call made from Network VoIP and pick up by
phone set
e Connected IP The remotely party IP of this VoIP call
f Caller ID Caller ID received from telephone line port
g Start Time Date amp time of this VoIP call begin on this port
h End Time Date amp Time of last VoIP call End on this port 7
i Talking Sec Total talked seconds of last VoIP call on this port
j Dialed number
On the VoIP call out (line status display ldquoInrdquo) This will display the real
dial out number for VoIP call
On the VoIP call in (line status display ldquoOutrdquo) This will display the
number will dial out to phone line
Release by This will display the reason of this call termination
BError Message
For some reason(ex All lines of this VoIP Router are busy) here will display the
failure information about the last failure VoIP Call
8
1222 VoIPLine Configure Line Setting
VoIP SetupLine ConfigureLine Setting
This page will setup the phone line information each port
a Port display the port number eg 1 or 2
b Interface Telephone interface type
FXO for connect to telephone line or PBX extension line
FXS for connect to regulate phone set
a Name Line name for this port This will send and display on the remote
side during VoIP call
b Line number Telephone number assigned to this line
c TxGain Transmitter Gain This will adjust the speaker volume of local
phone set The adjust range is from +3 to -13dB Higher value will cause
louder sound come from local phone set
d RxGain Receiver Gain This will adjust the microphone volume of local
phone set The adjust range is from -3 to +13dB Higher value will increase
amplifier the sound get from local phone set
e Inbound Enable or disable the VoIP call to Internet Disable the inbound
option will not allow any call made from phone set to Internet
f Outbound Enable or disable the VoIP call from Internet Disable the
Outbound option will not allow any call made from Internet to phone set
g Hotline When Enable it will allow you to make a VoIP call without Press
any number That mean it will direct call out by VoIP when you off hook the
phone of this line
For example if you want line 1 to become a hot line for VoIP call every time
when you off hook the phone connected to the line 1 it will directly call to
another VoIP gateway location at 168560922 and dial 601 You can enable the
line 1 as hot line and add a routing rule on the routing table on VoIP
SetupRouting SetupVoIP Call Out to assign the AREA CODE to hl1 to 9
10
handle the router rule for hot line function And please also remember to Strip
3 digits to stripe the ldquohl1rdquo symbol and remember add real phone number you
want to dial on Prefix In this case the setting example on call out routing
(VoIP SetupRouting SetupVoIP Call Out) for hot line application is as
below
Index Remark Area Code IP Address Strip Prefix Profile Delete
1 Hot_Line_Call Hl1 10111 3 601 Delete
1223 Line configure Tone Setting
VoIP SetupLine Configure Tone Setting
ACall Progress Tone
This page defines the tones generated to the phone connected to the phone port
The cadence of CPT is been defined here also All lines use same tone
parameters After modify the tone parameters you must save modify then
Reboot to let the modified parameters work
Detect Voice Busy Cycle Use the parameters to automatic detect cadence
busy tone When detected a voice cadence repeat over the number setting
in sequence the VoIP Router will treat it like busy tone and disconnect
automatically Please do not set this parameter less than 5 to avoid
unexpected erroneous disconnect
BTone define Table
You can set up to 15 tones set for generation For the generation the first entry
will be used The call progress tones ranging from 300 Hz to 2000 Hz Tone
Maximum 15 tones can be defined
a Type
Dial Define the generated dial tone 11
Busy Define the busy tone for generate
Ring Define the ring back tone for generate
b Low freq Lower frequency for defined tone
c High freq Higher frequency for defined tone Each tone can define two
frequencies if only one frequency needed please leave High Frequency to
0
d T_ON_1 T_OFF_1 T_ON_2 T_OFF_2
The cadence pattern of up to four intervals for each dual-frequency
Minimum Cadence value is 30msec
12
1224 Line configure Line Feature
VoIP SetupLine Configure Line Feature
This page defines the feature on the phone port of the VoIP router
A Dial Pause signal length(as )[100~3000] ms Define the pause time (ms) of the ldquordquo on the Routing SettingVoIP Call Out This pause time is usually for time delay when connect to PBX and used for seize the CO line The default pause time is 1000ms The input range is between 100 to 3000 ms User can use more then one ldquordquo to get longer delay time
B Loop Current Drop amp Polarity Reversal Generate
Define the signal generated on local side when remote side disconnects Disable Disable the Loop current Drop and Polarity Reversal
Generate signal only generate busy tone Polarity Reversal-gt Enable Enable FXS interface to generate the
Polarity Reversal Signal Current Drop-gt 1 S Enable FXS interface to generate one second
Current Drop signal Current Drop-gt 2 S Enable FXS interface to generate two seconds
Current Drop signal 13
14
Current Drop-gt 3 S Enable FXS interface to generate three seconds Current Drop signal
C Called Number Relay on FXS
Define when use the FXS interface to outbound call resend or Drop out the dialed number
Drop out Do not send the dialed number When use the FXS port direct connect to phone set for outbound call please enable the ldquoDrop outrdquo function to avoid hear the unnecessary dialed number when answer the phone call
Resend Resend the dialed number When use the FXS port to connect to PBX line for outbound call please enable the ldquoResendrdquo function to redial the destination number by DTMF this will cause the PBX transfer to the call to the final user
D Caller ID Generate type
Define the Caller ID (CID) signal generate format Disable Disable do not send CID signal DTMF Send CID signal by DTMF format FSK Bell Send CID signal by FSK Bell format FSK ETSI Send CID signal by FSK ETSI format
E Caller ID Detect Mode
Define the CID detect format of FXO interface Disable Disable Do not detect any CID signal DTMF Enable detect CID signal by DTMF format FSK Bell Enable detect CID signal by FSK Bell format FSK ETSI Enable detect CID signal by FSK ETSI format
F When VoIP call out send ANI by
Define when VoIP call out use the below number as the Caller ID (ANI) Register Number Use the gateway register number as ANI
Line Number Use the line number setting on the VoIP
SetupLine ConfigureLine Setting as ANI PSTN CID Use the received Caller ID number from PSTN line as
ANI G FXS Ring Method
Define how the FXS interface to ring the phone line when VoIP call in Free Random Any unused available line
15
Line number Priority The 1st line has high priority it will always ring the 1st line if it is available When 1st line is busy it will try to ring 2nd line if it is free
Rotation 1st line ring first then 2nd line ring next time when the latest line ring this time it will come back to ring 1st line next time
All Ring all phone lines if it is available Sequence Ring all the available phone line one by one the ring
period for ring each phone is definable Period (sec) define the ring period (seconds) when select
ldquoSequencerdquo ring
1225 Line configure Line Polarity
VoIP SetupLine Configure Line Polarity
This page defines the Polarity on the phone port of the VoIP router
If use the normal phone set to connect gateway please select ldquoNormalrdquo If use PBX or special PSTN line (support polarity invert) then please select ldquoInvertrdquo
Please remember to press the Modify button to take it effect For store back to flash
memory please press Save Modification (Syetem MaintenanceSave
Modification)
16
1226 Routing Setup VoIP Call Out Setting
VoIP SetupRouting SetupVoIP Call Out
This page let you define the routing rule for Call out to VoIP (User press the
phone number through phone set dial pad then VoIP Router translate the phone
number by the routing table setting here to destination IP amp dial out number
then Call out via network protocol)Here can define some special keyword like
IPIVR PSTN as destination for some special function also
Each time when you off hook the phone connected to this VoIP Router you will
hear a dial tone or prompt voice to remind you to press the phone number after
you input the number you called if digits of the number of you called is not
exceed the Max Digits please remember to press the key for ending the input
if you do not press key for enter gateway will automatically call out the
number after timeout of define on OtherDigitTime
A Time amp Digits wait for dial out
The VoIP Router wait user input the number digits amp time parameters as below
Time amp Digits wait for user Press
a MaxDigits Define the maximum digits wait for user press for all VoIP Call
Out if user press digits match the number defined here It will go to
translate for call out rule without needed to press key 17
b FirstDigitTime Define the waiting time (seconds) for user press phone
number first digit User need to press first digits before the setting time
(seconds) defined here if VoIP Router wait for the defined seconds and
there is no any digits press the VoIP Router will stop to wait and feedback
the user busy tone
c OtherDigitTime Define the waiting time (seconds) for user press phone
number secondary amp the rest digits User need to press the rest digits
before the seconds defined here if VoIP Router wait for the defined
seconds and there is no any digits press it will go to translate for call out
rule without needed to press key
d Timeout for Re-entry route When one of the rules on the VoIP call out
rules is matched and be execute the device will wait the time( seconds)
defined here for successful connection but if time out defined there still
failure connection it will trying to reroute by another call rule setting by the
ldquovrdquo+ the number prefix
For example as below when the user try to call the destination number
12345678 it will try to call the gateway location at 168112233 but if wait
10 seconds and still can not successful connection the gateway will abort
the call and try call out by the PSTN line
Timeout for Re-entry route 10
second
Index Remark Area Code
Min Digits
Max Digits
Destination Strip Prefix Profile Delete
1 Normal rule
8 8 8 168112233 Delete
2 Backup rule
v8 PSTN Delete
ltThe example that use ldquovrdquo prefixes for reroute the call outgt
When user enable the hot line function on VoIP SetupLine ConfigureLine
Setting menu it will over ride the above parameters and direct call out by hot
line call out rule
BVoIP call out Routing Table
a Remark Remark for this routing rule Please use UNDERLINE to replace
18
19
the SPACE due to HTTP protocol limitation
b Area Code Define the Prefix number fit this rule any phone number prefix
digits matched with the rule will call out by this rule define Please Notify
there is a compare order rule on this routing table That mean the VoIP
Router will check the rule list from top to bottom one by one any rule item
matched with the prefix digits that user press will go to call out directly no
regard to the rest rules below For Example if a rule item for area code
8862 is on Index 5 another rule item for area code 886 on Index 6 below
that will be ignored
By setting the hln (hl1 for hot line one hl2 for hot line two) on the area code
field and enable hot line function (VoIP SetupLine ConfigureLine
Setting) the VoIP Router can service the hot line direct call
c Min Digits define the minimum digits wait for user press for number fit
this rule if user press digits less the number defined here It will keep
waiting for input until exceed the FirstDigitTime defined time If user
press digits more then Min Digits here the VoIP Router will wait time
defined on OtherDigitTime then go to translate for call out rule without
needed to press key
d Max Digits define the maximum digits wait for user press for number fit
this rule if user press digits match the number defined here It will go to
translate for call out rule without needed to press key
e Destination Define the destination IP for call out number fit this rule user
can input below format
IP address for example 16856922
1 for sip please add sip before ip address for example sip16856922
2 for h323 please add h323 before ip address for example
h32316856922
URL route via URL For example sipfwdcom This VoIP Router can
setup to register to DDNS service (System
SetupAdvancedDynamic DNS) to let user call out to another VoIP
Router with dynamic IP by URL
gkn route via gatekeeper it will get the destination IP by gatekeeper
setting (VoIP SetupGatekeeper) in advance For example gk1
for gatekeeper 1 gk2 for gatekeeper 2 gk for all the gatekeepers
20
available ( search sequence gk1 gt gk2 gt gk3 gt gk4) Gk3_2_1 will try
gk3 first then gk2 then gk1
All the setting above can be added by port number for examples
168569228495 will call to 8495 port
srn rsn same as gkn basically it is used for SIP register server
PSTN route this call via PSTN line interface This is usually used
for for the backup route for the rule setting on Routing setup
VoIP Call out with ldquovrdquo prefix
ipivr Enter the Network parameter voice interactive setting mode User can use this function to enter all the WAN network parameters without PC ( Please refer the application note ldquo IP IVR produce ldquo for more detail procedure )
ldcfg Restore all parameters to the default values User can
assign a password to use this function to restore all the parameters to the default values
rect Enter to voice record procedure User can assign a function
code for enter the voice record procedure when press this code to enter the voice record procedure the device will record 30 seconds voice file and keep on sound wave file ( G711 uLaw) User can download the recorded wave file on VoIP
SetupAdvance settingPrompt Voice and used this file to upload for customization voice file or used for busy tone analysis
agent agent code setting When a VoIP call in made by this
device it will ring the assigned phone set If the user want to use the different phone set (connected to same device but did not ring) to answer the call just off hook and enter this agent code to redirect the call to this phone you used for talk
lo assign the route to local loop back The destination IP of this
call will be the local host ie127001
f Strip the number of digits will be ignored by user input For example if
user press the number is 886212345678 and the STRIP field is setting to
21
4 the first 4 digits 8862 will be truncated and actually call out number will
be 12345678
g Prefix The numbers will be added on the prefix of the user press number
For examples if user press the number is 12345678 and the PREFIX field
is setting to 0028862 the actually call out number will be
002886212345678 Another example if user press the number is 90
STRIP field is setting to 2 and the PREFIX field is setting to 012345678
the actually call out number will be 012345678 ( ldquordquo mean delay 1 second)
This example is especially useful for speed dial function
h Profile Define the optional special call out parameters on this destination
Please input the name you defined on the profile (VoIP SetupRouting
SetupRouting Profile) list
i Delete Delete this rule item on routing table
To add new rule item on routing table please assign the item number you want
to insert before input AREA CODE and IP address then press ADD button to add
it on the list Then modify the necessary information on the routing table list
Please remember to press the modify button to take it effect For store back to
flash memory please press Syetem MaintenanceSave Modification
CSetting Examples
Here is some VoIP call out routing table setting examples below
a Define wait time and digits for destination phone number
MaxDigits FirstDigitTime(Sec) 30
OtherDigitTime(Sec) 5
10
In this case when user picks up the phone the VoIP router will generate 30
seconds (defined on FirstDigitTime) dial tone for user press DTMF for
destination phone number After user press first digit DTMF from phone set (for
example 0 the VoIP router will wait 5 seconds (defined on OtherDigitTime) to
press the rest phone number digits if user did not press any key within first 30
seconds the VoIP Router will generate the busy tone to terminate the call After
user press first digit and did not key any key within 5 seconds for example like
601 it will call out 601 after 5 seconds but if user press 601 it will direct call
out 601 immediately without waiting rest key
In this case the Max Digits is setting to 10 so if user dial 0212345678 10 digits
phone number it will call out immediately without wait 5 seconds or key that
mean it will not accept phone number more than 10 digits like 02123456781 if
user press that phone number it still call out the number to 0212345678
because maximum digits for phone number is 10
b VoIP call out by IP
Index Remark Area Code Min Digits Max Digits IP Address Strip Prefix Profile Delete
1 NY_office 6 1721671 Delete
In this case we assume that we have another VoIP router locate at New York
office and the IP is 1721671 when we press any phone number prefix is 6 will
call to that VoIP router for example if we dial 601 the VoIP will Call out 601 to
another VoIP router locate at IP 1721671 you can check the real call out IP
and phone number at the VoIP Setup Port Status
22
Port Message
Port Type Display
name Status Connected IP Caller ID Start Time End Time
Talking
Sec Dialed number Release by
1 FXS Idle 1721671 20040219
135510
20040219
135543 28 601 (146)onHangup
2 FXS Idle
c Call by Domain name
Index Remark Area Code Min Digits Max Digits IP Address Strip Prefix Profile Delete
2 JackSH 8621 4 4 Voiprouterdyndnsorg 4 01390244027
2 Delete
3 China 86 2 5 Chinaproxycom
In this case by route rule 2 we set up a short cut number 8021 for dial out
number 013902440272 to another VoIP router user just press 8021 will cause
cut 4 digits (8621) define on Strip and add the number defined on Strip
(013902440272) then call to that gateway(voiprouterdyndnsorg) and
number(013902440272)
In this case by route rule 3 we assume we have another VoIP Router locate at
chinaezvoncom URL and we use prefix 86 to call out for this gateway the
minimum digits for phone is 2 digits and the maximum phone number digits is
5 any phone number contain over 5 digits will be truncated to 5 digits like
862013 will be truncated to 86201 for call out
Caution
There is order rule on this routing table the VoIP router will check the route
table items by index order one by one That mean in above case if user put
the area code item 86(index 1) above 8621(index 2) then the route item
8621 will never been used
23
Index Remark Area Code Min Digits Max Digits IP Address Strip Prefix Profile Delete
1 Take_All 86 10111
2 Never_Used 8621 20111
never
d Strip and Prefix
User is easy to combine using Strip and Prefix define to modify the phone
number from phone to real call out phone number for example if the VoIP
router is installed on Taipei and use another Gatekeeper to service global
service When user just dial 10 digits Taipei phone number like 02-12345678(do
not need to press key because Max Digits setting is 10) and the VoIP router
will stripe the 02 ( 2 digits defined on Strip) add the country code 8862 (defined
on Prefix) then send 8862-12345678 out for VoIP call see below example
Index Remark Area Code Min Digits Max Digits IP Address Strip Prefix Profile Delete
1 Taipei 02 10 Gk 2 8862 Delete
By above setting When you dial 0212345678 you can check the real call out IP
and phone number will change to 886212345678 at the VoIP Setup Port
Status
Port Message
Port Type Display
name Status Connected IP Caller ID Start Time End Time
Talking
Sec Dialed number Release by
1 FXS Idle 1721671 20040219
135510
20040219
135543 28 886212345678 (146)onHangup
2 FXS Idle
e Call via Gatekeeper SIP Register server
This VoIP router can register up to 4 servers for example
Index Remark Area
Code
Min
Digits
Max
Digits IP Address Strip Prefix Profile Delete
1 Via_GK2 1 gk2 Delete
24
25
2 GK2_3_1
2 gk2_3_1 Delete
3 GK_ALL 3 gk Delete
By Index 1 if user input any phone number with prefix code is 1 The VoIP
Router will call out via Gatekeeper 2
By Index 2 if user input any phone number with prefix code is 2 The VoIP
Router will try to call out by Gatekeeper 2 ( if register to Gatekeeper 2 is
successful) if Gatekeeper 2 is not available it will check Gatekeeper 3 then
check Gatekeeper 1That mean if register to gk2 is failure and register to gk3 amp
gk1 is successful the VoIP router will call out via gk3
You can check the Gatekeeper register status on VoIP SetupRegister
ServerRegister Status
f Call to different IP port
The default IP port used by VoIP router is 1720 for H323 and 5060 for SIP if
work with remote side of VoIP Router or gateway is change another port
number for VoIP please assign another port number after destination IP or URL
Please make sure both side use same port number for VoIP call otherwise it can
not make call You can change the VoIP router default listen port on
Index Remark Area Code Min Digits Max Digits IP Address Strip Prefix Profile Delete
1 Port_1719 1 101111719 Delete
2 Port_8495 2 Chinaproxycom8495 Delete
g Profile
Define the optional special VoIP parameters when calling to the destination
Please input the name you defined on the profile (VoIP SetupRouting
SetupRouting Profile) list
Example if user set the VoIP Call Out amp Routing Profile like below
Index Remark Area Code Min Digits Max Digits IP Address Strip Prefix Profile Delete
1 UsePF1 1 gk1 PF1 Delete
2 UsePF2 2 10112 PF2 Delete
26
3 UseDefaultPF 3 Gateproxycom Delete
Index Name VAD CODEC H245
Tunneling
DTMF
Relay
T38
FAX Relay
Package
Frame
Q931
Fast
Start
ID1 AS ID2 AS ID3 AS ID4 AS Delete
1 PF1 ON G7231 ON Out band ON 3 ON
00001 H323 1001 E164 Delete
2 PF2 ON G7231 ON In band ON 3 OFF
00002 H323 1002 E164 Delete
When VoIP call out number with prefix 1 will use the Profile named PF1 (H323
ID1 = 0001 E164 ID=1001 DTMF Relay=Out band Q931 Fast Start=ON) to
Call out VoIP
When VoIP call out number with prefix 2 will use the Profile named PF2 (H323
ID1 = 0002 E164 ID=1002 DTMF Relay=In band Q931 Fast Start=OFF) to
Call out VoIP
When VoIP call out number with prefix 3 because there is no Profile assigned it
will use the default value for VoIP out
h Delete Delete this rule item on routing table
To add new rule item on routing table please assign the item number you want
to insert before input AREA CODE then press ADD button to add it on the list
Then modify the necessary information on the routing table list
Please remember to press the modify button to take it effect For store back to
flash memory please press Syetem MaintenanceSave Modification
1227 VoIP Call In Routing Table Setting
VoIP SetupRouting SetupVoIP Call In
This page let you define the routing rule for Call in from VoIP (VoIP Router got
a VoIP call required form Network and then translates the phone number
passed from remote side VoIP Router to the real dial out number amp line base on
this VoIP Call In routing table) Each time when the VoIP Router received a VoIP
call from Network it will check with Area Code to see which rule matched to
service if no rule matched it will refuse to call out and will bound back the call
When the VoIP Router received a VoIP called from network it will check below
rules fields then decide line and number to dial out
a Area Code Define the Prefix number this rule service any VoIP called
from network dialed number prefix digits matched with the rule will call out
to phone by this rule define Please Notify there is a compare order rule on
this routing table That mean the VoIP Router will check the rule list from
top to bottom one by one any rule item matched with the prefix digits that
user press will go to call out directly no regard to the rest rules below For
Example if a rule item for area code 8862 is on Index 1 another rule below
that like index 2 for area code 886 will be ignored
Index Area Code Strip Prefix Maximum Minimum From To LineNo Gatekeeper Alert Profile Forward Delete
1 886 Delete
2 8862 Delete
Be ignored
b AuthAuthorization IP check enable Enable IP range authorization
function When Enable the gateway will check the remote caller IP 27
28
range setting on VoIP SetupRouting SetupAuthorization if it is within the authorization the gateway will allow the call out but if the remote callerrsquos IP is not in the range it will refuse to call out and terminate this call
IndexArea
Code
AuthStrip Prefix MaximumMinimumFrom To LineNo RS Verify
CallWaitingAlert Profile Forward Delete
1 8862 4 Delete
c Strip Number of digits will be ignored by user input For example if
received VoIP call number is 886212345678 and the STRIP field is setting to
4 the first 4 digits 8862 will be truncated and actually call out number will
be 12345678
Index Area Code Strip Prefix Maximum Minimum From To LineNo Gatekeeper Alert Profile Forward Delete
1 8862 4 Delete
Ex VoIP Call in number is 886212345678 and real dial out number is
12345678 by strip 4 digits
d Prefix The numbers will be added on the prefix of received VoIP call
number For examples if received VoIP call number is 12345678 and the
PREFIX field is setting to 0028862 the actually call out number will be
002886212345678
Index Area Code Strip Prefix Maximum Minimum From To LineNo Gatekeeper Alert Profile Forward Delete
1 0028862 Delete
Ex VoIP Call in number is 12345678 and real dial out number is
0028862-12345678 by add 0028862 prefix
Another example if user VoIP router received a call number 90 STRIP field
is setting to 2 and the PREFIX field is setting to 012345678 the actually
call out number will be 012345678 ( mean wait 1 second for PBX get line
for dial out to PSTN the wait time for one can be set on VoIP SetupLine
ConfigureLine Feature) This example is especially for speed dial
function
29
Index Area Code Strip Prefix Maximum Minimum From To LineNo Gatekeeper Alert Profile Forward Delete
1 90 2 012345678 Delete
Ex VoIP Call in number is 90 and real dial out number is 012345678 by
stripe 2 digits and add 012345678 prefix so the real dial out number is
012345678
e Maximum Define the maximum digits of call number allow to dial If the
length of dial number after pervious STRIP amp PREFIX process is more than
the setting it will deny dialing out For example you can set the Maximum
dial out digits is 8 for call to local area phone only any VoIP call in attempt
to dial 0712345678 out of 8 digits for call out long distance will been deny
to call out
IndexArea Code Strip Prefix Maximum Minimum From To LineNo Gatekeeper Alert Profile Forward Delete
1 8 Delete
Ex VoIP Call in number is 0712345678 and Maximum setting to 8 the VoIP
router will deny to call out
f Minimum Define the minimum digits of call number allow to dial If the
length of dial number after pervious STRIP amp PREFIX process is less than
the setting it will deny dialing out For example if set Minimum to 4 any
VoIP call in attempt to dial number less than 4 digits like 110 911 will been
deny to call out
Index Area Code Strip Prefix Maximum Minimum From To LineNo Gatekeeper Alert Profile Forward Delete
1 4 Delete
Ex VoIP Call in number is 911 and Minimum setting to 4 the VoIP router will
deny to call out
g From Define the beginning line number for service this area code VoIP call
For example if user assigned FROM 1 TO 1 for AREA CODE 601 in this
routing table then any VoIP call for call in number 601 will ring the line 1
only
h To Define the ending line number for service this area code VoIP call
30
Index Area Code Strip Prefix Maximum Minimum From To LineNo Gatekeeper Alert Profile Forward Delete
1 601 1 1 Delete
2 602 2 2 Delete
3 Delete
Ex Any VoIP Call in number with prefix 601 will ring the line 1 and Any VoIP
Call in number with prefix Call in number 602 will ring the line 2 any other
numbers will ring any available (not busy) lines
i Line No Click to enable if you want to force compare with the line number
setting on LINE CONFIGURE menu (VoIP SetupLine ConfigureLine
Setting) If the dial number after pervious STRIP amp PREFIX process is
matched with the line number setting the VoIP call will ring the dedicate
phone line that assigned with matched number
j RS Verify Assign which proxy to authorize this incoming VoIP call before
call out For example if the dial number should be checked by server 1
setting on the server menu (VoIP SetupRegister Server) please
input rs1 for server 1 You can input rs2 for server 2rs for all the servers
available ( search sequence rs1 gt rs2 gt rs3 gt rs4) rs3_2_1 will try rs3
first then rs2 then rs1
Index Area Code Strip Prefix Maximum Minimum From To LineNo Gatekeeper Alert Profile Forward Delete
1 1 Rs1 Delete
2 2 Rs Delete
3 3 rs3_2_1 Delete
The called and the caller have to register on the same rs When the caller
dial the number It can obtain a authorized number from rs and the called
has got the call after the rs confirmed that the caller had gotten
authorization otherwise it will send busy tone
This confirmation only can apply in through rs to make a dial moreover
both sides have register the same rs If the dialing-rule is IP point-to-point
mutually dials and because has no authorization by rs this connection will
be unable to put through
k Call WaitingEnable or Disable the call waiting function
Enable During Talk you can answer another phone call and
31
hold the original conversation When some one call in when you are busy on another phone call you will hear a du-du call waiting signal please use flash key on your phone to hold the original call and answer the incoming call press again flask key will switch back the original call party
Disable Disalbe the Call waiting function The gateway will reply the busy to remote side when the line is on used
Index Area Code Auth Strip Prefix Maximum Minimum From To LineNo RS Verify CallWaiting Alert Profile Forward Delete
1 1 Rs1 Enable Delete
2 2 Rs Delete
3 3 rs3_2_1 Delete
l Alert Control the Ring Back tone generate timing
Mode 0 When this VoIP Router get ring back tone from phone line it
will send the ring Alert signal to remote VoIP Router for generate ring
back tone
Mode 1 Before this VoIP Router dial to phone line it will send the ring
Alert signal to remote VoIP Router for generate ring back tone
Mode 2 After this VoIP Router finish dial out number to phone line it
will send Connect OK signal to remote VoIP Router
Mode 3 Before this VoIP Router dial to phone line it will send the ring
Alert signal to remote VoIP Router for generate ring back tone after
this VoIP Router finish dial out number to phone line it will send
Connect OK signal to remote VoIP Router
m Profile Define the optional special VoIP parameters when received on this
destination Please input the name you defined on the profile list (VoIP
SetupRouting SetupRouting Profile)
Example if user set the VoIP Call in amp Routing Profile like below
Index Area Code Strip Prefix Maximum Minimum From To LineNo Gatekeeper Alert Profile Forward Delete
1 1 PF1 Delete
2 2 PF2 Delete
3 3 Delete
Index Name VAD CODEC H245
Tunneling
DTMF
Relay
T38
FAX Relay
Package
Frame
Q931
Fast
Start
ID1 AS ID2 AS ID3 AS ID4 AS Delete
32
1 PF1 ON G7231 ON Out band ON 3 ON
00001 H323 1001 E164 Delete
2 PF2 ON G7231 ON In band ON 3 OFF
00002 H323 1002 E164 Delete
When VoIP call in number with prefix 1 will use the Profile named PF1
( H323 ID1 = 0001 E164 ID=1001 DTMF Relay=Out band Q931 Fast
Start=ON) to answer the VoIP Call in
When VoIP call in number with prefix 2 will use the Profile named PF2
( H323 ID1 = 0002 E164 ID=1002 DTMF Relay=In band Q931 Fast
Start=OFF) to answer the VoIP Call in
When VoIP call in number with prefix 3 because there is no Profile assigned
it will use the default value for VoIP Call Out
n Forward Define the profile name for forward the unanswerable VoIP call
on this Call In rule Please input the name you defined on the Voip SetupRouting Setup Forwarding
Example if user set the VoIP Call in amp Forward Profile like below
Index Area Code Strip Prefix Maximum Minimum From To LineNo Gatekeeper Alert Profile Forward Delete
1 601 1 1 CF1 Delete
2 602 2 2 CF2 Delete
Other 10111104
No Name Always OnBusy No Answer No Answer Sec Delete
1 CF1 hkbigcom301 Delete
2 CF2 assistbigcom assistbigcom610 30 Delete
In this case when the VoIP router received a VoIP call in number with prefix
501 ( not 601 or 602 prefix defined on Call In Routing table) it will forward
this call to the IP amp number defined on Other filed(in this case
10111104 it mean it will forward this call to IP 10111 and calling
33
number will change to 104)
When the line 1 user is going to have a tour to another location with same
VoIP router equipment user setup the called prefix number 601 forward to
profile name CF1 and in CF1 profile the Always field is set to
hkbigcom301 that mean any call number with prefix 601 will always be
forward to another VoIP Router locate at hkbigcom and dial out number is
301
When the line 2 is busy and another VoIP with prefix 602 Call in it will
forward it to the assistbigcom with same number (defined on OnBusy)
When VoIP Call In number with prefix 602 it will ring the line 2 for 30
seconds (defined on No Answer Sec) if no one answer line 2 within 30
seconds it will forward the call to another VoIP Router located at
assistbigcom and dial out number is 610 (defined on No Answer)
o Delete Delete this rule item on routing table
To add new rule item on routing table please assign the item number you
want to insert before input AREA CODE then press ADD button to add it on
the list Then modify the necessary information on the routing table list
Please remember to press the modify button to take it effect For store back
to flash memory please press Save Modification (Syetem
MaintenanceSave Modification)
1228 VoIP Call In IVR Setting
VoIP SetupRouting SetupVoIP Call In IVR
When Enable the [Prompt Voice for VoIP Call In function on VoIP
SetupAdvance SetupPrompt Voice all the remote party of VoIP caller will hear the customization upload voice file and need press the destination number All the input number will be checked the number length and be stripadd prefix defined on this page When a matched area code be processed it will use this number to check on the VoIP SetupRouting
SetupVoIP Call In to decide the final route path If no match area code rule defined on the table the gateway will response busy tone and connect failure User can use this function as the password authorization on the outbound gateway For example if we upload the voice file content on Prompt voice
for VoIP call in of VoIP SetupAdvance SetupPrompt Voice is ldquoPlease input the password and destination numberrdquo and we set a compare rule as below
Index Remark Area Code
Min Digits
Max Digits Strip Prefix Delete
1 Password check
8495 7 12 4 02 Delete
When a remote VoIP call in and want this gateway to outbound call the remote side user will hear voice prompt like ldquoPlease input the password and destination numberrdquo because there is only a compare authorization rule all the none 8495 prefix phone number will not accept to dial out and will be disconnect ( that mean we use 8495 as the outbound call authorization password) and the digits of user input phone number should between 7 to 12 (include 4 digits come from 8495)the number user input will strip the first 4 digits (8495) and add 02 prefix Then this number will be checked by VoIP SetupRouting SetupVoIP Call In For Example if user input the number is849512345678 it will strip 4 digits and add 02 prefix code the use 0212345678 to find a call out rule
34
A Time amp Digits wait for user
The VoIP Router wait user input the number digits amp time parameters as below
Time amp Digits wait for user Press
e MaxDigits Define the maximum digits wait for user press for all VoIP Call
Out if user press digits match the number defined here It will go to
translate for call out rule without needed to press key
f FirstDigitTime Define the waiting time (seconds) for user press phone
number first digit User need to press first digits before the setting time
(seconds) defined here if VoIP Router wait for the defined seconds and
there is no any digits press the VoIP Router will stop to wait and feedback
the user busy tone
g OtherDigitTime Define the waiting time (seconds) for user press phone
number secondary amp the rest digits User need to press the rest digits
before the seconds defined here if VoIP Router wait for the defined
seconds and there is no any digits press it will go to translate for call out
rule without needed to press key
BVoIP Call In IVR Routing Table
a Remark Remark for this routing rule Please use UNDERLINE to replace
the SPACE due to HTTP protocol limitation
b Area Code Define the Prefix number fit this rule any phone number prefix
digits matched with the rule will call out by this rule define Please Notify
there is a compare order rule on this routing table That mean the VoIP
Router will check the rule list from top to bottom one by one any rule item
matched with the prefix digits that user press will go to call out directly no
regard to the rest rules below For Example if a number 84951xxxxxx is
fit the rule item 1amp2 it will be processed by rule 1 and never be processed
by rule 2 that mean that rule 2 is never been used
Index Remark Area Code
Min Digits
Max Digits Strip Prefix Delete
1 Password+number 8495 7 12 4 02 Delete
2 No used rule 84951
c Min Digits define the minimum digits wait for user press for number fit
35
36
this rule if user press digits less the number defined here It will keep
waiting for input until exceed the FirstDigitTime defined time If user
press digits more then Min Digits here the VoIP Router will wait time
defined on OtherDigitTime then go to translate for call out rule without
needed to press key
d Max Digits define the maximum digits wait for user press for number fit
this rule if user press digits match the number defined here It will go to
translate for call out rule without needed to press key
j Strip the number of digits will be ignored by user input For example if
user press the number is 886212345678 and the STRIP field is setting to
4 the first 4 digits 8862 will be truncated and actually call out number will
be 12345678
k Prefix The numbers will be added on the prefix of the user press number
For examples if user press the number is 12345678 and the PREFIX field
is setting to 0028862 the actually call out number will be
002886212345678
l Delete Delete this rule item on routing table
To add new rule item on routing table please assign the item number you want
to insert before input AREA CODE and IP address then press ADD button to add
it on the list Then modify the necessary information on the routing table list
Please remember to press the modify button to take it effect For store back to
flash memory please press Syetem MaintenanceSave Modification
1229 VoIP Routing Profile Setting
VoIP SetupRouting SetupRouting Profile
This page defines the optional special VoIP parameters when makingreceived a
VoIP call For define some special parameters for different VoIP equipment or
authorize purpose please add a profile at VoIP SetupRouting Setup
Routing Profile and use the same name as the profile on the Call in Routing
Table (VoIP SetupRouting SetupVoIP Call In) or Call out Routing table
(VoIP SetupRouting SetupVoIP Call Out)
a Name Specify a profile name Please use UNDERLINE to replace the
SPACE due to HTTP protocol limitation
b VAD
ON turn on the VAD(Voice Active Detection) function
OFF turn off the VAD function please select ON for save the bandwidth
c CODEC Select different voice CODEC for VoIP communication The bit rate
of G7231 is 53k63k G729 is 8k uLaw and aLaw is 64k per second The
G7231 is default CODEC
d H245 tunneling
ON for enable H245 tunneling
OFF for disable H245 tunneling
37
38
e DTMF Relay
When select In band to transfer the DTMF during VoIP the user pressed
DTMF tone will be treat as general voice and been compressed then
transmit to remote side to decompress play back it maybe cause some
problem on duplicate or missing DTMF receive
When select Out band to transfer the DTMF during VoIP the user
pressed DTMF tone will be decode by local VoIP Router then transmit as
signal after received on received remote VoIP Router it will be
regenerate by remote VoIP Router The default value is Out band
f T38 FAX Relay
ON FAX will be transmitted by using T38 FAX over IP protocol
OFF FAX over IP is disabled
g Package Frame Select the number of voice payload frames on each UDP
package VoIP transmit More frames into one package mean save more
bandwidth The default frames on each package is 3
h Q931 Fast Start
ON Enable Fast Start capability during Q931 handshaking
OFF Disable Fast Start capability during Q931 handshaking
i ID1 User defines ID 1 during this VoIP call
j As
E164 Parameter on ID1 field is the E164 during this VoIP call
H323 ID Parameter on ID1 field is the H323 ID during this VoIP call
Calling Parameter on ID1 field is DID number during this VoIP call If
this optional is setting it will override the LINE NUMBER on line setting menu
Password Parameter on ID1 field is the password for VoIP call
Parameter defined here will used as MD5 during H235 and will not
display on the Web UI
k ID2ID3ID4 there are 4 fields for user define the ID parameters please
reference the ID1 setting above
l Delete Delete this rule item on routing table
To add new profile item on routing table please assign the number you want to
insert before input profile NAME then press ADD button to add it on the list
39
Then modify the necessary information on the routing table list
Please remember to press the modify button to take it effect For store back to
flash memory please press Save Modification (Syetem MaintenanceSave
Modification)
Here is VoIP Routing Profile setting examples below
Index Name VAD CODEC H245
Tunneling
DTMF
Relay
T38
FAX Relay
Package
Frame
Q931
Fast
Start
ID1 AS ID2 AS ID3 AS ID4 AS Delete
1 PF1 ON G7231 ON Out band ON 3 ON
00001 H323 1001 E164 Delete
2 PF2 ON G7231 ON In band ON 2 OFF
00002 H323 1002 E164 Password Delete
When using profile PF1 the parameters will be used for H323 ID1 = 0001
E164 ID=1001 DTMF Relay=Out band Q931 Fast Start=ON) to call answer
the VoIP
When using profile PF2 the parameters will be used for H323 ID1 = 0002
E164 ID=1002 DTMF Relay=In band Q931 Fast Start=OFF Password=1234
but be hidden ) to call answer the VoIP
12210 VoIP Forwarding Profile Setting
VoIP SetupRouting SetupForwarding
This page defines the forwarding behavior include
get an unmatched prefix number for VoIP call in
Line busy
No answer
Please add a profile at VoIP SetupRouting SetupRouting Profile and
put the name of profile on the Call out Routing table (VoIP SetupRouting
SetupVoIP Call Out)
a Other Define the forward IP and forward phone number when there is no
match rule setting on VoIP Call Out Routing table The format is IPphone
number or URLphone number ie all the phone number can not match a
prefix rule will be forward to the IPamp phone number define on here
b Name Specify a profile name Please use UNDERLINE to replace the
SPACE due to HTTP protocol limitation
c Always Always redirect forward to this IP(or URL)phone number All
incoming call will be forward to IP assigned here
d On Busy Redirect forward to this IP(or URL)phone number when busy an
incoming VoIP call will forward to IP assigned here when this line is busy
e No Answer Redirect forward to this IP(or URL)phone number when no
answer over the time No Answer Sec an incoming VoIP call will forward
to IP assigned here when ring time over the defined on No Answer Sec
40
41
f No Answer Sec Defined the wait seconds for redirect forward to another
IP(or URL)
g Delete Delete this rule item on routing table
h To add new rule item on routing table please assign the item number you
want to insert before input AREA CODE then press ADD button to add it on
the list Then modify the necessary information on the routing table list
Please remember to press the modify button to take it effect For store back to
flash memory please press Save Modification (System MaintenanceSave
Modification)
Example if user set the VoIP Call in amp Routing Profile like below
Index Area Code Strip Prefix Maximum Minimum From To LineNo Gatekeeper Alert Profile Forward Delete
1 601 1 1 CF1 Delete
2 602 2 2 CF2 Delete
Other 10111104
No Name Always OnBusy No Answer No Answer Sec Delete
1 CF1 hkbigcom301 Delete
2 CF2 assistbigcom assistbigcom610 30 Delete
In this case when the VoIP router received a VoIP call in number with prefix 501
( not 601 or 602 prefix defined on Call In Routing table) it will forward this call
to the IPamp number defined on Other filed(in this case 10111104 it mean it
will forward this call to IP 10111 and calling number will change to 104)
When the line 1 user is going to have a tour to another location with same VoIP
router equipment user setup the called prefix number 601 forward to profile
name CF1 and in CF1 profile the Always field is set to hkbigcom301 that
mean any call number with prefix 601 will always be forward to another VoIP
42
Router locate at hkbigcom and dial out number is 301
When the line 2 is busy and another VoIP with prefix 602 Call in it will forward
it to the assistbigcom with same number (defined on OnBusy)
When VoIP Call In number with prefix 602 it will ring the line 2 for 30 seconds
(defined on No Answer Sec) if no one answer line 2 within 30 seconds it will
forward the call to another VoIP Router located at assistbigcom and dial out
number is 610 (defined on No Answer)
12211 VoIP Authorization Setting
VoIP SetupRouting SetupAuthorization
When this gateway has been used for outbound call it can enable to check the
remote caller gatewayrsquos IP to decide accept or refuse the call If define the IP range
here and enable the [Auth] option on theVoIP SetupRouting SetupVoIP Call In only the IP in range will allow to call out by this gateway
43
123 Register Server Setting
1231 Register Status
VoIP SetupRegister ServerRegister Status
You Can check the register status of this gateway on this page
a MAC this gatewayrsquo MAC Address
b RS1-4 Indicate the status of 4 server register
SIPampH323 The protocol used for registering the server this gateway supports both H323 and SIP protocol
Green Indicator Successful to register server and the register phone number
Red Indicator Failure to register server and the failure reason Yellow Indicator Disable the register function
Example for Status display as above it indicates
1 The register to Server 1 function is disabled (SIP) 2 Use SIP protocol to register to register as RS2 the register method is
4 lines independent Each lines use different number to register 25618801 25618802 5618803 25618804 Line 2 and Line 4 are disabled to register Line 1 and Line 3 are successful to register
3 Use H323 protocol to register as RS3 all 4 lines share same register 102003
4 Use SIP protocol to register as RS4 each lines use different number as 102002 102003 77201111 You can see that line 2 and line 3 register failures The line 2 failure reason is ldquounauthorizedrdquo and Line 4 failure reason is ldquonot numberrdquo
Please setup each register parameters at VoIP SetupRegister StatusServer1~4 44
1232 Setup the Register ServermdashSIP Protocol
圖 112 VoIP SetupRegister ServerServer
If you need use this gateway to register to the H323 gatekeeper or SIP registerproxy server you can setup the account for register here This gateway can register up to four Servers simultaneously
a Protocol Select use SIP or H323 protocol to register to server by different protocol the gateway will adjust the page for different parameters for input
b Register Method
Global All the lines of the gateway share same account to register Independent Each lines can set differentsame account independently
for register c Enable SIP Proxy
Enable Register SIP Proxy server function Disable Register SIP Proxy server function
d SIP Proxy URL Please input the IPURL of the SIP proxy server e Port [1~65535] Port number used for register to server The SIP
protocol default is 5060 please make sure you have same port number setting on the gateway and server
45
46
f Thought Outbound Proxy
When your gateway is installed behind the firewall or NAT you maybe need use Proxy server to relay your call If so please input the Outbound proxy serverrsquos IP here
g Prot[1~65535] Port number used for register Outbound Proxy Server h TTL(Registration interval)[10-7200s] Some SIP Server need you
set the time interval (seconds) for send the expire signal to register server keep alive
i Domain Some SIP Server need you input the Domain for register
please input here j Proxy Require Some SIP Server (Nortel) need you input the more
information for proxy function please input here k Line Number index of lines l Type Interface type of the line
FXO Analog phone interface for connect to PSTN or PBX extension line FXS Analog phone interface for connect to phone set or PBX Co line
m Remark Remark for this routing rule Please use UNDERLINE to replace the
SPACE due to HTTP protocol limitation
n Number Register phone number Some SIP Server needs this to
parameters for register o Account Account for register to SIP server
p Password Password for register to SIP server q Conference ID Some SIP Server requires an ID to enable the
conference function please input the ID here to enable that r Enable Enable or disable independently each line for register
1234 Setup the Register ServermdashH323 Protocol
VoIP SetupRegister ServerServer
When Select use H323 to register gatekeeper please input the flow information for register
s Register Method
Global All the lines of the gateway share same account to register
Independent Each line can set differentsame account independently for register
a Enable H323 Gatekeeper
Enable Register H323 Gatekeeper function Disable Register H323 Gatekeeper function
b Gatekeeper URL Please input the IPURL of the Gatekeeper server
c Port[1~65535] Port number used for register to server The H323
protocol default is 1719 please make sure you have same port number setting on the gateway and ser
47
48
d GK ID Some Gatekeeper Server need you input an ID for register
please input here
e Proxy for NAT When your gateway is installed behind the firewall
or NAT you maybe need use Proxy server to relay your call If your gatekeeper supports this proxy function you can enable gateway function here to use that
f Line Line Number index of lines t Type Interface type of the line
FXO Analog phone interface for connect to PSTN or PBX extension line
FXS Analog phone interface for connect to phone set or PBX Co line
g Remark Remark for this routing rule Please use UNDERLINE to replace
the SPACE due to HTTP protocol limitation
h E164 phone number used for register to server
i H323 ID Account name used for register to gatekeeper
j Password Password used for register to gatekeeper
k Enable Enable or disable independently each line for register
Please remember to press the Modify button to take it effect For store back to
flash memory please press Save Modification (Syetem MaintenanceSave
Modification)
124 Auto Provision function
To use the auto provision function the system have to install a dedicate Auto Provision Server for keep all parameters for installed gateways When Enable the Auto Provision function the System administer can modify all the Parameters of each gateway on the local Provision Server and remote gateway will automatic download all the parameters from Provision Server The Gateways can link up to five provision servers simultaneously for
Redundancy backup the system
VoIP SetupProvision
a Provision SetEnable or Disable auto provision function on this
gateway When Enable all the function parameters will download from remote Provision server
b Provision Sever1~5 Provision server connection status 49
50
It will indicate the status of linking to each Provision Servers The gateway will link to one of the five setting Provision Server each time If successful link it will display green indicator If failure link it will display red indicator The yellow indicator means it is disable
c Last link time Display the Date amp Time for last successful link to Provision server on this gateway
d Numbers of successful linkDisplay the times of successful linking
from Provision Server to this gateway
e Numbers of successful updateDisplay the times of successful
linking and update the parameters from t Provision Server to this gateway
f Last link actionDisplay the latest action command for provision
function
g GatewayDisplay the Network router gateway IP address for used
on the Internet connection
h Provision Server IP User can manual add a new Provision Server by add its IP here and press Link Please remember enable auto provision function before you input the new Provision Server IP
For store back to flash memory please press Save Modification (Syetem
MaintenanceSave Modification)
125 Advance Setup
1251 NAT Traversal
VoIP SetupAdvance SetupNAT Traversal
If your VoIP gateway is installed behind NAT you may need a special configuration and server to establish the VoIP communication this gateway support several method for NAT Traversal as below
By Outbound Proxy User can appoint an Outbound Proxy Server to handle the NAT traversal on VoIP SetupRegister SeverServer
Declare NAT IP address Select to enable the input the NAT router IP of the network
Use STUN server
Enable STUN and input the STUN serverrsquos IP for handle the NAT traversal you can input 2 sets of STUN servers IP
The Gateway will display the system found NAT IP address
For store back to flash memory please press Save Modification (System
MaintenanceSave Modification)
51
1252 Listen Port
VoIP SetupAdvance SetupListen Port
In this page user can define the usage port for setup the VoIP communication Both side of gateways need use the same port for begin VoIP communication
a SIP Listen Port Define the listen port for SIP protocol the default port is 5060 input range from 1024 to 65535
b H323 Call Signal Port Define the Call signal port for H323
protocol the default port is 1720 input range from 1024 to 65535
c H323 Gatekeeper Listen Port Define the Gatekeeper listen port for H323 protocol the default port is 1719 input range from 1024 to 65535
d RTP Initial Port Define the RTP package initial port the input
range from 1024 to 65535 the gateway will display the used UDP ports due to multiple lines connection
After modify and press Modify system will save and reboot automatically to take it effective
52
1253 VoIP Package
VoIP SetupAdvance SetupVoIP Package
User can define the parameters relative about VoIP package on this page
Jitter Buffer(ms) Define the Jitter buffer size input range is from 20 to 200ms
VoIP DTMF Relay Mode Define the relay mode for DTMF signal
In band When local gateway detects a DTMF signal it will not decode it The DTMF signal will been compressdecompress as VoIP voice package
Out band When local gateway detects a DTMF signal it will decode it and relay it as a data package separately The remote gateway will regenerate the DTMF signal after receive the DTMF data package System default is relay DTMF by out band mode
VoIP DTMF Relay Mode (Out band) Define 2 methods to relay DTMF when select Out band relay mode
by SIPRFC2833 (SIP protocol) or H323H245 (H323 protocol) by SIP INFO (SIP protocol) or Q931 (H323 protocol)
RFC2833 Payload number for DTMF[96~127]
Define the DTMF token on RFC2833 input range form 96 to 127 53
54
Silence Detection Suppression Enable or disable the Silence DetectionVAD function When Enable if local gateway detect a silence situation ( no talk) it will send a VAD package rather than a full voice package for remote side to active CNG ( Comfort Noise Generation) to save the bandwidth The default is Enable to save the bandwidth
Prefer CODEC
In this table you can define the prefer CODEC The priority 1 selection is highest priority By different CODEC user can select different payload size per package as below
G711 uLaw 20304050607080ms G711 aLaw 20 304050607080ms G7231 306090ms G729a 20304050607080ms G726 20304050607080ms None none
The gateway will calculate and show approximately bandwidth for one VoIP call
1254 RTP Packet Summary
VoIP SetupAdvance SetupRTP Packet Summary
On this page user will know the RTP package summary about last VoIP call
Line number of line Using CODEC ex G7231 G729a Source IP Remote side IP Source Port Remote side port Packet Interval interval time between 2 packets(ms) Packet Send number of packets sent Packet Received number of packets received Packet Lost number of lost packets
55
1255 Flash amp Call waiting
VoIP SetupAdvance SetupFlash amp Call waiting
On this page user can define the parameters relative to the FLASH key and Call
Waiting function These functions usually work with PBX
Token for flash key on VoIP() Define the token for flash key during VoIP protocol ( use ldquo ldquo by default)
Flash Signal generate length
Define the pause time (ms) for one ldquordquo symbol at Routing SettingVoIP Call Out This pause till is useful for PBX seize the trunk line from extension line The default time is 1000ms Input range from 100 to 3000ms
Flash Signal Detect Threshold Define the threshold for valid FLASH signal Only the flash time length between setting between min to max is accept by the gateway
Call waiting from PSTN when VoIP talking
EnableDisable the Call Waiting function from PSTN line when talking by VoIP
Call waiting from VoIP when PSTN talking
EnableDisable the Call Waiting function from VoIP when talking by PSTN line
56
1256 Gain
VoIP SetupAdvance SetupGain
This page defines different function gain on the gateway
Gain when Dial tone phase
When phone off hook user will hear the dial tone generated from the gateway sser can adjust the playrecord gain during this phase for stable DTMF detection After connection the gains setting here is no use the gateway will adjust the gain setting on Line ConfigureLine setting
Play Transmit gain from network to line Adjust the speaker volume on the handset Higher value will louder the speaker on local side
Record Receive gain from line to network Adjust the microphone volume on the handset Larger value which will amplifier the MIC volume on local site
Incorrect value will cause the gateway can not receive the DTMF user pressed on phone set please use the default 0dB if no other issue
DTMF Generate DSP play Gain [-29~3]
Setting the internal gain used by DSP for generate the DTMF signal incorrect value will cause the DTMF can not accept by other telephone equipment Please use the default value if no other issue
Call progress Tone DSP play Gain[-31~0]
Setting the internal gain used by DSP for generate the CPT ( Call Progress Tone) Incorrect value will cause the DTMF can not accept by other telephone equipment Please use the default value if no other issue
Caller ID Detection record Gain [13~-3]
57
58
Setting the Caller ID Receiver gain Incorrect value will cause the Caller ID signal can not be receive please use the default value if no other issue
1257 QoS
VoIP SetupAdvance SetupQoS
User can define the ToS field on the VoIP packet for Quality of Service control The ToS field is included these 2 parameters
Precedence bit 012 DSCP(Diffserv Code Point) bit 3~7
User can select inptut either IP Precedence or DSCP value Or input the ToS
binary code directlly
59
1258 CDR
VoIP SetupAdvance SetupCDR
The Gateway can export all the CDR (Call detail Record) to external CDR server by HTTP protocol The gateway supports up to 2 CDR servers for keep the record
Export to CDR Server Please install and enable this function if you want to keep CDR of this gateway
CDR Server IP1 Please input the IP of first CDR server if installed CDR Server IP2 Please input the IP of second CDR server if installed
60
1259 FoIP
VoIP SetupAdvance SetupFoIP
User can define the parameters relative FAX Over IP function
Maximum FoIP Rate (bps) Appoint the maximum FAX transceiver rate during FoIP
Disable Only the VoIP function is supported on the gateway FoIP is disabled
Auto Gateway will negotiation the maximum speed for FoIP with FAX machine
Appoint the Maximum speed24004800960012000 14000
T38 Low Speed Redundancy [Enable|Disable] Enable or Disable to send the double packet function during low speed T38 FoIP
T38 High Speed Redundancy [Enable|Disable]
Enable or Disable to send the double packet function during high speed T38 FoIP
61
12510 Prompt VoiceampBeep
VoIP SetupAdvance SetupPrompt Voice amp Beep
This gateway can use voice or beep to prompt the user different situation User can downloadupload their own prompt voice wave files also For prompt beep enable function it can be enable by
VoIP Call out Beep When enable the gateway will generate a beep for call out for VoIP
VoIP Call out Failure twice Beep
When enable the gateway will generate twice beep if failure to call out for VoIP
No PSTN line warming twice Beep
When enable the gateway will generate twice beep if failure to call out for PSTN usually mean there is no trunk line connect to the PSTN line port
Can not register to server warming twice Beep
When enable the gateway will generate twice beep when end user off hook the phone if the gateway failure to register to Register Server
For prompt voice enable function it can be enable by 62
63
Prompt voice for replace dial tone Use a customize voice file to replace the dial tone
Warming Prompt after VoIP out failure Annunciate a customize voice file when VoIP call failure
No PSTN Line Connected Annunciate a customize voice file when there is no trunk connected to the PSTN port and failure to call via PSTN line
Can not register to server warming prompt Annunciate a customize voice file when the gateway failure to register to Register Server
Prompt voice for VoIP call in When Remote gateway call in the gateway if enable this function the gateway will annunciate a customize voice to remote gateway user to ask the destination number this function must work with the setting rule on VoIP SetupRouting SetupVoIP Call In IVR
For enable the prompt beep or voice annunciation function please select to enable the function and click Modify Caution If enable both prompt beep and Voice annunciation on the same
function only the voice annunciation will work and will not hear the beep sound Procedure to upload customize voice wave file 1Select the function index you want to modify 2press brows select the content voice file 3 Press Restore to upload and save 4To keep the voice file permanently press Save Flash to save it The gateway only accepts the G7231 or G711 format voice file and all the 5 files size totally can not exceed 384KB
126 Application
1261 Ping test
VoIP SetupApplicationPing Test
User can use the Ping Test function to test the network status or remote device Ping DestinationPing
Target device IP for ping test
Number of Ping[1-100]Ping次數
Number of ping test maximum is 100
Ping Packet Size[56-5600 bytes] Size of ping test packet input range is between 56 to 5600 bytes
64
1262 Telnet amp SNMP
VoIP SetupApplicationTelnet amp SNMP
User can enable and set the user account for the SNMP and Telnet function of this gateway on this page
a Enable telnet server Enable Enable telnet service function user can telnet this
gateway Disable Disable telnet service function
b Enable SNMP Server
Enable Enable SNMP service function user can use SNMP on the gateway
Disable Disable SNMP service function
c User NameSet a user name for Telnet amp SNM login d Login PasswordSet the password for Telnet amp SNMP login e Confirm PasswordCheck the password again
65
127 System
1271 System Status
This page reveals the status of the gateway including WAN LAN and some hardware information Internet
This sub-block shows the Internet information of your home gateway It depends on the WAN mode connecting to your ISP The different items correspond to each WAN mode will be revealed after the common part of the Internet status sub-block Common Part
Refresh Clicking this button the browser refreshes the Internet status page to get the most update information
66
67
CableDSL This field indicates the Internet connection status Its value is Connected Disconnected or Connecting WAN IP Connected to the Internet through Cable or ADSL modem the ISP will offer the home gateway a WAN IP address to communicate with other hosts in the Internet Subnet Mask This field indicates a mask used to determine what subnet the WAN IP address belongs to An IP address has two components the network address and the host address For example consider the IP address 192168168182 with subnet mask is 2552552550 the first three numbers (192168168) represent the Class C network address and the forth number (182) identifies a particular host on this network Gateway ldquoGatewayrdquo is a node on a network that serves as an entrance to another network For the home gateway The ldquoGatewayrdquo is the next device which routes the traffic to the Internet DNS Domain Name System (or Service or Server) is an Internet service that translates domain names into IP addresses Because the domain names are alphabetic they are easier to remember However the Internet is based on IP addresses Every time you use a domain name a DNS service must translate the name into the corresponding IP address For example the domain name wwwexamplecom might translate to 1981052324 The DNS system has its own network If one DNS server doesnt know how to translate a particular domain name it will ask its upper stream server and so on until the correct IP address is returned or timed-out Secondary DNS This is the secondary DNS to use when the primary DNS does not work Domain Name Domain name is a name which identifies one or more IP addresses This field represents the domain name obtained from your ISP Connection Type There are five ways to get the WAN IP address They are DHCP STATIC PPPoE PPTP and L2TP This field indicates the way to get the WAN IP address Through Figure 3-2 to 3-6 detail all specific items of each mode
68
Gateway IP Address This field is the LAN IP address of the home gateway
Subnet Mask This field is the subnet mask of the network in the LAN side
DHCP Server The home gateway supports DHCP service This field indicates the enabled status of the DHCP Server
NAT This field shows whether the NAT is enabled or not Firewall The gateway supports firewall service This field indicates firewall service is enabled or not
Information
System Up Time Shows the time in hhmmss format from when the home gateway was powered up to the web browser requests this page System Date Shows the data and time in mmddyear hhmmss when the web browser requests this page Connected Clients This field shows how many clients in the LAN clients connect to the home gateway Runtime Code Version Shows the version of runtime code
Boot Code Version Shows version of boot code
LAN MAC Address Short for Media Access Control address a hardware address that uniquely identifies each node of a network This field indicates gatewayrsquos LAN MAC address
WAN MAC Address This field indicates gatewayrsquos WAN MAC address
69
Hardware Version Tells the version of hardware of the gateway
Serial Number This field indicates serial number
1272 System Settings
This page is used to configure the names given by the ISP if any to represent the gateway and also to set the local time zone Host Name Some ISPs request the host name to represent the home gateway Fill the host name given by the ISP or you may not be able to access the Internet successfully The maximum length of the host name is 32 bytes Domain Name User configured domain name of the network maintained by gateway NTP Server Network Time Protocol is used to obtain the time from the Internet NTP server The home gateway will resolve the NTP server from the internal URL lists If you know a better NTP server you can enter it Domain name and IP address format are both acceptable Set Time Zone Choose the time zone of you current location Daylight Saving It is a way of getting more out of the summer days by advancing the clocks by one hour during the summer time Some time zone has daylight saving You have to check this item fill out the start time and the end daylight saving time if the current time zone has daylight saving
70
1273 Date amp Time
This page is used to setting the system time of VoIP gateway it can define the correct time by which ways
71
1274 Administrator Setting
This page allows you to change the user and administration password used to manage this router for security reasons
72
1275 System Log The system log page shows the gatewayrsquos activity logs such as the Internet connectivity hacker attack intrusion detection and the wireless association The log helps you to do fault analysis or regular statistics Download Save the log to a local file Clear Clear the log Refresh Retrieve the log from the gateway and show in the text area again System log The text area shows system activities
Security log The text area shows hacker attack or firewall logs
73
Remote Log Settings
Remote Log Check this file and the gateway will send the log message to the ldquoSend Log tordquo remote host
Send Log to Set the IP address to send log
Email Log When the log buffer is full the gateway will check whether this item is enabled If enabled the gateway will send all the log messages to the ldquoSend Email tordquo email address
SMTP Server Set the SMTP Server (email server) to send the email log to You can either specify the serverrsquos name or its IP address
74
128 Route Function(System Setup)
1281 Setting WAN connection System SetupConnection
System SetupWANConnected Type
Connection Type There are five ways to connect to the Internet They are Dynamic IP Static IP PPPoE PPTP and L2TP
The cable modem ISP usually requests you to obtain the WAN IP dynamically Some ISPs request you to fill the host name To do this please go to ldquoSystemSystem Settingsrdquo page to change the host name
A Dynamic IP Address
75
Request IP address You can specify the IP address you desired But the ISP has the right to neglect it and provides you a different one MTU (576-1500) You can specify the MTU (maximum transmission unit) of your home gateway The default value is 1500 bytes and in normal case you donrsquot have to change MAC Cloning Some ISPs will identify the MAC address registered by the user If not registered the ISP wonrsquot allow the traffic to pass Enable the MAC cloning function will change WAN MAC to the registered one MAC Address The MAC address will be cloned Clone MAC Address This button is use to detect the PC which is browsing this page and make its MAC address to be the MAC address to clone
B Static IP Address
IP address assigned by your ISP Set the IP address that assigned by the ISP
76
Subnet Mask Set the subnet mask of the network ISP Gateway Address Set the ISPrsquos gateway IP address This address routes packets to Internet
C PPPoE
This page is the PPPoE configuration page Most of the ISPs request the user to connect to central office (CO) side via PPPoE acronym of Point-to-Point Protocol over Ethernet which provides authentication authorization and accounting User Name Enter the user name provided by your ISP to identify the computer using PPPoE Password Enter the password provided by your ISP to identify the computer using PPPoE Please retype your password Retype the password to make sure type correct password
77
78
Service Name Some ISP provides the service name of this PPPoE connection If so enter this item or make it blank MTU (546-1492) Maximum Transmission Unit (MTU) is the largest physical packet size measured in bytes which a network can transmit Any messages larger than the MTU are divided into smaller packets before sent In ordinary that the user does not have to worry about the MTU size the gateway routing engine will handle the MTU differences between PPP and the LAN Ethernet side But for some old PPPoE server you have to make the MTU size of the PPPoE side smaller than the default value or some Web side is not able to access PPPoE MTU should be set between 546 and 1492
Maximum Idle Time (60-3600) Set a period of time to disconnect PPPoE connection when userrsquos idle time greater than it The Maximum Idle Time is only worked on the auto-connect mode It makes no effect on manual-on mode and keep-alive mode (see Connection Mode) Connection Mode Three connection modes are designed to fit different request They are keep-alive manual-on and auto-connect mode For the manual-on mode you have to dial-on and cut out the connection manually The keep-alive mode will make the connection always on If the line is dropped the modules will try to connect to the PPPoE server always The auto-connect mode is designed to save the communication cost for the user In the beginning of powered on the link will not be built Instead the gateway monitors the traffic from LAN side to the Internet The sooner routing traffic was issued the later PPPoE link is established The gateway continually watches the LAN to WAN traffic if there is no activity for more than the Maximum Idle Time the connection will be
dropped
D DNS
This page sets the primary and secondary DNS servers which were given by your ISP or known to you When a domain name request received the gateway tries to resolve to it from the Primary Domain Name Server Resolving failed the gateway tries the Secondary sever again Static DNS Server Check this item to make the primary and secondary DNS server at the next two rows active If this field is not enabled the statically configured DNS server will not take effect Domain Name Server (DNS) Address Set your primary DNS in this field Secondary DNS Address (optional) Set your secondary DNS to use when the primary DNS does not work
79
1282 LAN Settings
SSystem SetupLANLAN Settings
The home gateway is an IP sharing device which provides the home users share the same public IP address While in the LAN side each network device must have one private IP address to do network communication This page is to set the configuration of the LAN interface of the gateway IP Address Set this to be gatewayrsquos LAN interface IP address The LAN interface address is also aced as the default gateway address to the computers in you private network Subnet Mask This field indicates a mask used to determine what subnet the LAN IP address belongs to The Gateway acts as DHCP Server Check this item if the home gateway supports DHCP server service This is the normal case that can make you free from installing a DHCP server in your home network And you can connect to the Internet just as what you have done in your company environment IP Pool Starting Address The starting address provided by DHCP service
80
IP Pool Ending Address The ending address provided by DHCP sevice Lease Time Set the lease time of the IP address to renew Local Domain Name Set the gatewayrsquos local Domain Name DNS Proxy The home gateway acts as a DNS Proxy In this case the DHCP service will set LAN interface IP address as the DNS server address and inform the clients in the DHCP renew process
DHCP Client List
This page lists all the DHCP clients in the LAN side The DHCP server is capable of administering 253 clients
81
82
Host Name This column shows the host name of the DHCP clients IP Address This column shows the IP Address of the DHCP clients MAC Address This column shows the MAC Address of the DHCP clients Static Check this item to make the IP address static and every time the client connect to the home gateway it will get the same IP address all the way Refresh Click this button the browser request the DHCP client list from the home gateway and refresh the page again Static Clients You can add static clients using this block if those clients are not current connect to the home network Fill out the ldquoHost Name IP address and the MAC Address then click the ldquoAddrdquo button they will be add to the static list and show on the DHCP client list Uncheck the static box of that entry and click the ldquoOKrdquo button this static entry will be deleted
1283 NAT
Virtual Server
This is the virtual server page which set the rules translate the private IPprivate port pairs to the public ports Private IP Set the IP address of the virtual server Private Port Set the port of the virtual server to connect to Internet Type Set the protocol of the virtual server Valid options are TCP UDP and Both Public Port Set gatewayrsquos WAN port to connect to virtual server Comment Let you put some notes to describe this entry Enabled Enable this entry
83
Special Application
Trigger Port To define the TCPUDP port range to monitor when initiating from the home network the public ports configured in this entry will be activated Trigger Type Defines the protocol type TCP UDP or both of the trigger ports Public Port This column defines the public ports opened when the trigger ports were seen You can enter multiple ports delimited by comma or a range of port by dash White space will be neglect Public Type Defines the protocol type TCPUDPBoth of the public ports Comment Let you put some notes to describe this entry Enabled Enable this entry
84
Port Mapping
The Port Mapping page does a port range mapping
85
Server IP Set one of LAN clientrsquos IP address to do port mapping Mapping Ports Set the ports to mapping from WAN to LAN You can enter multiple ports delimited by comma or a range of port by dash White space will be neglect Public Type Defines the protocol type TCPUDPBoth of the public ports Comment Let you put some notes to describe this entry Enabled Enable this entry
ALG
Some applications have to do Application Level Gateway (ALG) to monitor the transaction or monitor the payload of the packet This page let you setup them We use mnemonic nouns to describe the specific ALGs The checked entries will be enabled by the ALG processing For the Non-Standard FTP Port you have to set the port number to let the ALG take it as an FTP session
DMZ
Check this item to enable DMZ service
86
87
DMZ table This table lets you configure the DMZ hosts If you have more than one public IP Addresses you can specify each one with an associated DMZ host Public IP MZ table Address Select among the WAN IP addresses of the home gateway IP Address of Virtual DMZ Host Fill the client in the LAN side as the associated DMZ host Add Add this entry to virtual DMZ host table Delete Delete this entry from virtual DMZ host table
1284 Firewall Firewall Options
Enable Hacker Attack Protect The hackers always try to break into you system or crack down your network The gateway provides hacker attack protect modules to protect your home network Discard PING from WAN side ldquoPingrdquo is the most widely used tool to diagnose the network Hackers use ldquopingrdquo to discover your gateway firstly and try to hack your home network later Discard ldquopingrdquo from WAN side prevent the hacker from discovering your home network by using ldquopingrdquo Disallow to PING the Gateway Check this item not only prevent ping from the WAN side but also prevent pinging the home gateway from the LAN side The side effect is to increase the difficulty to diagnose your home network Drop Port Scan Packets The most famous Internet hacking method is the port scan ldquoPort scanrdquo
88
scans all the TCPUDP port of a station to find out the opened ports After confirmed the hackers try to connect to the listened ports to attack your computer Check this option the home gateway will drop the port scan packets to protect your system Allow to Scan Security Port (113) Some Linux email servers will try to detect the security TCPUDP port (113) If you drop it the Linux email servers will not allow you to log into Allow it can solve such kind of problem Discard NetBios Packets The NetBios protocol is widely used by the MS Windows Network Place which should only be use in the home network and should not be used in the Internet environment Strongly suggest you to check this item for security consideration Accept Fragment Packets Accept packets that are fragmented Send ICMP packets when error Send ICMP packets when the error happens in connection Advance settings Click this button the detail hacker attack patterns will appear to let you decide which one should be enabled Figure 7-2 shows the hacker attack patterns to protect
89
Client Filtering
Enable Client Filter Check this box and all the entries below will take effect IP Block the IP addresses ranged to connect to Internet Port Set the port range within which is not allowed to connect to Internet Type Set which protocol TCPIPBoth of this entry to inhibit Block Time Two options are provided for this column the ldquoAlwaysrdquo and ldquoBlockrdquo If ldquoAlwaysrdquo is selected the next two items will be neglect Otherwise the client filter function schedule the block time base on the ldquoDayrdquo and ldquoTimerdquo settings Day Set which days to block Internet connection Time Set what time in each day to block the Internet access Comment Let you put you note why you want to block the Internet access Enable Check the item to enable this entry
90
URL Filtering
Enable URL Filter Check this box and all the entries below will take effect IP The IP addresses ranged will be the candidate to check the URL when they use web browser to access the Internet URL filter string The specific URL string to block Enable Check this item to enable this URL filter entry
91
MAC Control
MAC Control
MAC Address Control Check this item to enable MAC control service Filter out or only accept the following MAC address connect to Internet Select ldquoFilter outrdquo the MAC addresses list in the following table will be block out to access the Internet Or ldquoAcceptrdquo to allow them to connect to the Internet freely
Configure MAC Address
MAC Address List all the MAC address want to block then connect to Internet Comment Put your note why you set here Action You can select one of the MAC addresses recorded by the home gateway or enter the new entry manually Add Click this button a new entry will be added to the MAC Control table Delete Click this button to delete this entry if it is not necessary
92
1285 Routing
Routing Table
To set this
Destination LAN IP This field indicates the destination IP of this route entry Subnet Mask This field indicates the Subnet Mask of this route Gateway If a packetrsquos destination IP address do ldquobit andrdquo operation with the ldquoSubnet Maskrdquo equals to the ldquoDestination LAN IPrdquo the packet will send to the Gateway Interface This field indicates which network interface deal the connection Refresh Refresh the routing information from the home gateway again
93
Static Routing
Destination LAN IP This field indicates the destination IP of this route entry Subnet Mask This field indicates the Subnet Mask of this route Gateway If a packetrsquos destination IP address do ldquobit andrdquo operation with the ldquoSubnet Maskrdquo equals to the ldquoDestination LAN IPrdquo the packet will send to the Gateway Add Click this button to add this entry to routing table statically Delete Click this button to delete this static entry
94
1286 UPnP Settings UPnP
Enable UPnP Check this item to enable UPnP UPnP Port Number Set UPnP port number to announce to the UPnP control points The UPnP control points use this TCP port to send request to the home gateway Advertise Time (60-1800) Set the time interval after which the home gateway sends advertisement packets Subscribe Timeout (60-1800) The UPnP control point subscribes a request to the home gateway The home gateway keeps the request until the control point renew it unsubscribe it or after timed-out This item set the timeout value of the subscribe requests
95
Port Mapping
Remote Host This field lists remote host that connect to LAN client External Port This field lists the port of the remote host connect to LAN client Internal Client This field lists LAN client connect to the Internet Internal Port This field lists port of LAN client connect to the Internet Protocol This field lists the protocol TCPUDP of the connection Duration This field lists the duration of the connection Description This field lists the description of list port mapping The description gives you a brief note of what the entry is Refresh Refresh the UPnP port mapping from the home gateway again
96
1287 DDNS
Enabled Check this item to enable the DDNS settings Disabled Check this item to disable the DDNS settings Host Name Set your host name that need to do DDNS update DDNS Server Set the DDNS server that updates your IP address User Name The DDNS server requires you to supply a name and password to update your IP address You have to register the user name and password offline to the specific DDNS server Password The DDNS server requires you to supply a name and password to update your IP address You have to register the user name and password offline to the specific DDNS server DDNS Retry Time Set the time interval to update your IP address to ddns server
97
129 BackupRestore
1291 Configuration
Backup-RestoreConfigurations
This page let you backup Restore all of your configuration parameters on the
VoIP Router It is very good idea to back up all of your VoIP Router configuration
parameters after install
a To Backup press Download setting backup file and input the file name you
want and file location to save
b To Restore press the Browse button the select the backup configuration
parameters file to upload then press Restore After you upload the file
Press Saved modification to save your current configuration to Flash ROM
(Usually used to save currently WAN configuration)After save please
remember to Reboot the VoIP Router to let the restored parameters take
effective
Caution Never power off the VoIP Router when during Restore configure or
upgrade VoIP module or System it will cause permanent damage when power off
during writing Flash inside VoIP Router
98
1292 VoIP Module
System MaintenanceBackup-RestoreConfigurations
This page displays the current firmware module version and let you backup
Restore all of your VoIP firmware module on the VoIP Router Please use this
page to update the VoIP module firmware if necessary
a To Restore from local file press the Browse button the select the VoIP
module file to upload then press Restore After you upload the file Press
Saved modification to save your current configuration to Flash ROM
(Usually used to save currently WAN configuration)After save please
remember to Reboot the VoIP Router to let the restored parameters take
effective
b To Restore from Upgrade server please input the URL address of upgrade
server and press the APServer to link to upgrade server to get latest version
firmware and upgrade automatically
Caution Never power off the VoIP Router when during Restore configure or
upgrade VoIP module or System it will cause permanent damage when power off
during writing Flash inside VoIP Router
99
1293 Reboot System
Reboot System
Use the Reboot button on this page to reboot your VoIP Router before you
reboot please make sure you have to press the Saved modification to save your
current configuration to Flash ROM otherwise all the change will be disappear
after reboot
100
1210 Save Modification
Save Modification
Most of the VoIP Router parameters will take effective after you modify but it is
just temporary stored on RAM only it will disappear after your reboot or power
off the VoIP Router to save the parameters into Flash ROM and let it take
effective forever please remember to press the Save Modification button
after you modify the parameters
101
- 11 Access to Web UI
- 12 Web UI Management
-
- 121 Web UI Management Overview
- 123 Register Server Setting
- 124 Auto Provision function
- 125 Advance Setup
- 126 Application
- 127 System
- 128 Route Function(System Setup)
- 129 BackupRestore
- 1210 Save Modification
-
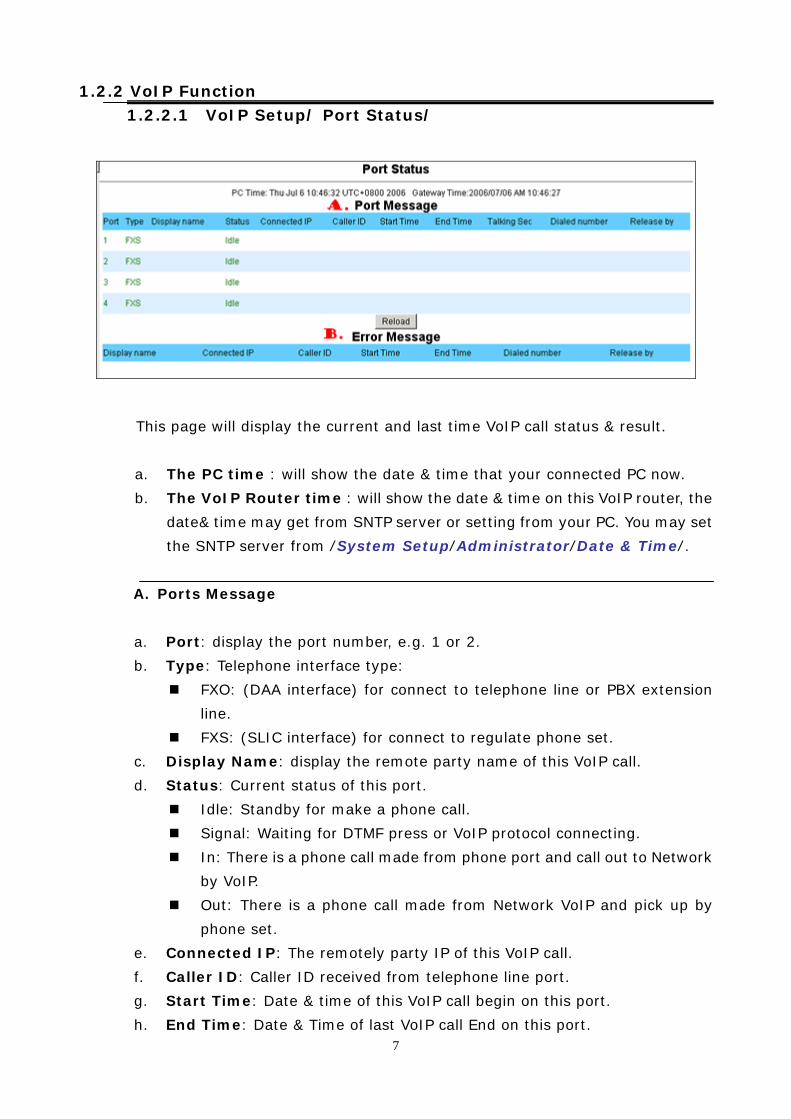

10
handle the router rule for hot line function And please also remember to Strip
3 digits to stripe the ldquohl1rdquo symbol and remember add real phone number you
want to dial on Prefix In this case the setting example on call out routing
(VoIP SetupRouting SetupVoIP Call Out) for hot line application is as
below
Index Remark Area Code IP Address Strip Prefix Profile Delete
1 Hot_Line_Call Hl1 10111 3 601 Delete
1223 Line configure Tone Setting
VoIP SetupLine Configure Tone Setting
ACall Progress Tone
This page defines the tones generated to the phone connected to the phone port
The cadence of CPT is been defined here also All lines use same tone
parameters After modify the tone parameters you must save modify then
Reboot to let the modified parameters work
Detect Voice Busy Cycle Use the parameters to automatic detect cadence
busy tone When detected a voice cadence repeat over the number setting
in sequence the VoIP Router will treat it like busy tone and disconnect
automatically Please do not set this parameter less than 5 to avoid
unexpected erroneous disconnect
BTone define Table
You can set up to 15 tones set for generation For the generation the first entry
will be used The call progress tones ranging from 300 Hz to 2000 Hz Tone
Maximum 15 tones can be defined
a Type
Dial Define the generated dial tone 11
Busy Define the busy tone for generate
Ring Define the ring back tone for generate
b Low freq Lower frequency for defined tone
c High freq Higher frequency for defined tone Each tone can define two
frequencies if only one frequency needed please leave High Frequency to
0
d T_ON_1 T_OFF_1 T_ON_2 T_OFF_2
The cadence pattern of up to four intervals for each dual-frequency
Minimum Cadence value is 30msec
12
1224 Line configure Line Feature
VoIP SetupLine Configure Line Feature
This page defines the feature on the phone port of the VoIP router
A Dial Pause signal length(as )[100~3000] ms Define the pause time (ms) of the ldquordquo on the Routing SettingVoIP Call Out This pause time is usually for time delay when connect to PBX and used for seize the CO line The default pause time is 1000ms The input range is between 100 to 3000 ms User can use more then one ldquordquo to get longer delay time
B Loop Current Drop amp Polarity Reversal Generate
Define the signal generated on local side when remote side disconnects Disable Disable the Loop current Drop and Polarity Reversal
Generate signal only generate busy tone Polarity Reversal-gt Enable Enable FXS interface to generate the
Polarity Reversal Signal Current Drop-gt 1 S Enable FXS interface to generate one second
Current Drop signal Current Drop-gt 2 S Enable FXS interface to generate two seconds
Current Drop signal 13
14
Current Drop-gt 3 S Enable FXS interface to generate three seconds Current Drop signal
C Called Number Relay on FXS
Define when use the FXS interface to outbound call resend or Drop out the dialed number
Drop out Do not send the dialed number When use the FXS port direct connect to phone set for outbound call please enable the ldquoDrop outrdquo function to avoid hear the unnecessary dialed number when answer the phone call
Resend Resend the dialed number When use the FXS port to connect to PBX line for outbound call please enable the ldquoResendrdquo function to redial the destination number by DTMF this will cause the PBX transfer to the call to the final user
D Caller ID Generate type
Define the Caller ID (CID) signal generate format Disable Disable do not send CID signal DTMF Send CID signal by DTMF format FSK Bell Send CID signal by FSK Bell format FSK ETSI Send CID signal by FSK ETSI format
E Caller ID Detect Mode
Define the CID detect format of FXO interface Disable Disable Do not detect any CID signal DTMF Enable detect CID signal by DTMF format FSK Bell Enable detect CID signal by FSK Bell format FSK ETSI Enable detect CID signal by FSK ETSI format
F When VoIP call out send ANI by
Define when VoIP call out use the below number as the Caller ID (ANI) Register Number Use the gateway register number as ANI
Line Number Use the line number setting on the VoIP
SetupLine ConfigureLine Setting as ANI PSTN CID Use the received Caller ID number from PSTN line as
ANI G FXS Ring Method
Define how the FXS interface to ring the phone line when VoIP call in Free Random Any unused available line
15
Line number Priority The 1st line has high priority it will always ring the 1st line if it is available When 1st line is busy it will try to ring 2nd line if it is free
Rotation 1st line ring first then 2nd line ring next time when the latest line ring this time it will come back to ring 1st line next time
All Ring all phone lines if it is available Sequence Ring all the available phone line one by one the ring
period for ring each phone is definable Period (sec) define the ring period (seconds) when select
ldquoSequencerdquo ring
1225 Line configure Line Polarity
VoIP SetupLine Configure Line Polarity
This page defines the Polarity on the phone port of the VoIP router
If use the normal phone set to connect gateway please select ldquoNormalrdquo If use PBX or special PSTN line (support polarity invert) then please select ldquoInvertrdquo
Please remember to press the Modify button to take it effect For store back to flash
memory please press Save Modification (Syetem MaintenanceSave
Modification)
16
1226 Routing Setup VoIP Call Out Setting
VoIP SetupRouting SetupVoIP Call Out
This page let you define the routing rule for Call out to VoIP (User press the
phone number through phone set dial pad then VoIP Router translate the phone
number by the routing table setting here to destination IP amp dial out number
then Call out via network protocol)Here can define some special keyword like
IPIVR PSTN as destination for some special function also
Each time when you off hook the phone connected to this VoIP Router you will
hear a dial tone or prompt voice to remind you to press the phone number after
you input the number you called if digits of the number of you called is not
exceed the Max Digits please remember to press the key for ending the input
if you do not press key for enter gateway will automatically call out the
number after timeout of define on OtherDigitTime
A Time amp Digits wait for dial out
The VoIP Router wait user input the number digits amp time parameters as below
Time amp Digits wait for user Press
a MaxDigits Define the maximum digits wait for user press for all VoIP Call
Out if user press digits match the number defined here It will go to
translate for call out rule without needed to press key 17
b FirstDigitTime Define the waiting time (seconds) for user press phone
number first digit User need to press first digits before the setting time
(seconds) defined here if VoIP Router wait for the defined seconds and
there is no any digits press the VoIP Router will stop to wait and feedback
the user busy tone
c OtherDigitTime Define the waiting time (seconds) for user press phone
number secondary amp the rest digits User need to press the rest digits
before the seconds defined here if VoIP Router wait for the defined
seconds and there is no any digits press it will go to translate for call out
rule without needed to press key
d Timeout for Re-entry route When one of the rules on the VoIP call out
rules is matched and be execute the device will wait the time( seconds)
defined here for successful connection but if time out defined there still
failure connection it will trying to reroute by another call rule setting by the
ldquovrdquo+ the number prefix
For example as below when the user try to call the destination number
12345678 it will try to call the gateway location at 168112233 but if wait
10 seconds and still can not successful connection the gateway will abort
the call and try call out by the PSTN line
Timeout for Re-entry route 10
second
Index Remark Area Code
Min Digits
Max Digits
Destination Strip Prefix Profile Delete
1 Normal rule
8 8 8 168112233 Delete
2 Backup rule
v8 PSTN Delete
ltThe example that use ldquovrdquo prefixes for reroute the call outgt
When user enable the hot line function on VoIP SetupLine ConfigureLine
Setting menu it will over ride the above parameters and direct call out by hot
line call out rule
BVoIP call out Routing Table
a Remark Remark for this routing rule Please use UNDERLINE to replace
18
19
the SPACE due to HTTP protocol limitation
b Area Code Define the Prefix number fit this rule any phone number prefix
digits matched with the rule will call out by this rule define Please Notify
there is a compare order rule on this routing table That mean the VoIP
Router will check the rule list from top to bottom one by one any rule item
matched with the prefix digits that user press will go to call out directly no
regard to the rest rules below For Example if a rule item for area code
8862 is on Index 5 another rule item for area code 886 on Index 6 below
that will be ignored
By setting the hln (hl1 for hot line one hl2 for hot line two) on the area code
field and enable hot line function (VoIP SetupLine ConfigureLine
Setting) the VoIP Router can service the hot line direct call
c Min Digits define the minimum digits wait for user press for number fit
this rule if user press digits less the number defined here It will keep
waiting for input until exceed the FirstDigitTime defined time If user
press digits more then Min Digits here the VoIP Router will wait time
defined on OtherDigitTime then go to translate for call out rule without
needed to press key
d Max Digits define the maximum digits wait for user press for number fit
this rule if user press digits match the number defined here It will go to
translate for call out rule without needed to press key
e Destination Define the destination IP for call out number fit this rule user
can input below format
IP address for example 16856922
1 for sip please add sip before ip address for example sip16856922
2 for h323 please add h323 before ip address for example
h32316856922
URL route via URL For example sipfwdcom This VoIP Router can
setup to register to DDNS service (System
SetupAdvancedDynamic DNS) to let user call out to another VoIP
Router with dynamic IP by URL
gkn route via gatekeeper it will get the destination IP by gatekeeper
setting (VoIP SetupGatekeeper) in advance For example gk1
for gatekeeper 1 gk2 for gatekeeper 2 gk for all the gatekeepers
20
available ( search sequence gk1 gt gk2 gt gk3 gt gk4) Gk3_2_1 will try
gk3 first then gk2 then gk1
All the setting above can be added by port number for examples
168569228495 will call to 8495 port
srn rsn same as gkn basically it is used for SIP register server
PSTN route this call via PSTN line interface This is usually used
for for the backup route for the rule setting on Routing setup
VoIP Call out with ldquovrdquo prefix
ipivr Enter the Network parameter voice interactive setting mode User can use this function to enter all the WAN network parameters without PC ( Please refer the application note ldquo IP IVR produce ldquo for more detail procedure )
ldcfg Restore all parameters to the default values User can
assign a password to use this function to restore all the parameters to the default values
rect Enter to voice record procedure User can assign a function
code for enter the voice record procedure when press this code to enter the voice record procedure the device will record 30 seconds voice file and keep on sound wave file ( G711 uLaw) User can download the recorded wave file on VoIP
SetupAdvance settingPrompt Voice and used this file to upload for customization voice file or used for busy tone analysis
agent agent code setting When a VoIP call in made by this
device it will ring the assigned phone set If the user want to use the different phone set (connected to same device but did not ring) to answer the call just off hook and enter this agent code to redirect the call to this phone you used for talk
lo assign the route to local loop back The destination IP of this
call will be the local host ie127001
f Strip the number of digits will be ignored by user input For example if
user press the number is 886212345678 and the STRIP field is setting to
21
4 the first 4 digits 8862 will be truncated and actually call out number will
be 12345678
g Prefix The numbers will be added on the prefix of the user press number
For examples if user press the number is 12345678 and the PREFIX field
is setting to 0028862 the actually call out number will be
002886212345678 Another example if user press the number is 90
STRIP field is setting to 2 and the PREFIX field is setting to 012345678
the actually call out number will be 012345678 ( ldquordquo mean delay 1 second)
This example is especially useful for speed dial function
h Profile Define the optional special call out parameters on this destination
Please input the name you defined on the profile (VoIP SetupRouting
SetupRouting Profile) list
i Delete Delete this rule item on routing table
To add new rule item on routing table please assign the item number you want
to insert before input AREA CODE and IP address then press ADD button to add
it on the list Then modify the necessary information on the routing table list
Please remember to press the modify button to take it effect For store back to
flash memory please press Syetem MaintenanceSave Modification
CSetting Examples
Here is some VoIP call out routing table setting examples below
a Define wait time and digits for destination phone number
MaxDigits FirstDigitTime(Sec) 30
OtherDigitTime(Sec) 5
10
In this case when user picks up the phone the VoIP router will generate 30
seconds (defined on FirstDigitTime) dial tone for user press DTMF for
destination phone number After user press first digit DTMF from phone set (for
example 0 the VoIP router will wait 5 seconds (defined on OtherDigitTime) to
press the rest phone number digits if user did not press any key within first 30
seconds the VoIP Router will generate the busy tone to terminate the call After
user press first digit and did not key any key within 5 seconds for example like
601 it will call out 601 after 5 seconds but if user press 601 it will direct call
out 601 immediately without waiting rest key
In this case the Max Digits is setting to 10 so if user dial 0212345678 10 digits
phone number it will call out immediately without wait 5 seconds or key that
mean it will not accept phone number more than 10 digits like 02123456781 if
user press that phone number it still call out the number to 0212345678
because maximum digits for phone number is 10
b VoIP call out by IP
Index Remark Area Code Min Digits Max Digits IP Address Strip Prefix Profile Delete
1 NY_office 6 1721671 Delete
In this case we assume that we have another VoIP router locate at New York
office and the IP is 1721671 when we press any phone number prefix is 6 will
call to that VoIP router for example if we dial 601 the VoIP will Call out 601 to
another VoIP router locate at IP 1721671 you can check the real call out IP
and phone number at the VoIP Setup Port Status
22
Port Message
Port Type Display
name Status Connected IP Caller ID Start Time End Time
Talking
Sec Dialed number Release by
1 FXS Idle 1721671 20040219
135510
20040219
135543 28 601 (146)onHangup
2 FXS Idle
c Call by Domain name
Index Remark Area Code Min Digits Max Digits IP Address Strip Prefix Profile Delete
2 JackSH 8621 4 4 Voiprouterdyndnsorg 4 01390244027
2 Delete
3 China 86 2 5 Chinaproxycom
In this case by route rule 2 we set up a short cut number 8021 for dial out
number 013902440272 to another VoIP router user just press 8021 will cause
cut 4 digits (8621) define on Strip and add the number defined on Strip
(013902440272) then call to that gateway(voiprouterdyndnsorg) and
number(013902440272)
In this case by route rule 3 we assume we have another VoIP Router locate at
chinaezvoncom URL and we use prefix 86 to call out for this gateway the
minimum digits for phone is 2 digits and the maximum phone number digits is
5 any phone number contain over 5 digits will be truncated to 5 digits like
862013 will be truncated to 86201 for call out
Caution
There is order rule on this routing table the VoIP router will check the route
table items by index order one by one That mean in above case if user put
the area code item 86(index 1) above 8621(index 2) then the route item
8621 will never been used
23
Index Remark Area Code Min Digits Max Digits IP Address Strip Prefix Profile Delete
1 Take_All 86 10111
2 Never_Used 8621 20111
never
d Strip and Prefix
User is easy to combine using Strip and Prefix define to modify the phone
number from phone to real call out phone number for example if the VoIP
router is installed on Taipei and use another Gatekeeper to service global
service When user just dial 10 digits Taipei phone number like 02-12345678(do
not need to press key because Max Digits setting is 10) and the VoIP router
will stripe the 02 ( 2 digits defined on Strip) add the country code 8862 (defined
on Prefix) then send 8862-12345678 out for VoIP call see below example
Index Remark Area Code Min Digits Max Digits IP Address Strip Prefix Profile Delete
1 Taipei 02 10 Gk 2 8862 Delete
By above setting When you dial 0212345678 you can check the real call out IP
and phone number will change to 886212345678 at the VoIP Setup Port
Status
Port Message
Port Type Display
name Status Connected IP Caller ID Start Time End Time
Talking
Sec Dialed number Release by
1 FXS Idle 1721671 20040219
135510
20040219
135543 28 886212345678 (146)onHangup
2 FXS Idle
e Call via Gatekeeper SIP Register server
This VoIP router can register up to 4 servers for example
Index Remark Area
Code
Min
Digits
Max
Digits IP Address Strip Prefix Profile Delete
1 Via_GK2 1 gk2 Delete
24
25
2 GK2_3_1
2 gk2_3_1 Delete
3 GK_ALL 3 gk Delete
By Index 1 if user input any phone number with prefix code is 1 The VoIP
Router will call out via Gatekeeper 2
By Index 2 if user input any phone number with prefix code is 2 The VoIP
Router will try to call out by Gatekeeper 2 ( if register to Gatekeeper 2 is
successful) if Gatekeeper 2 is not available it will check Gatekeeper 3 then
check Gatekeeper 1That mean if register to gk2 is failure and register to gk3 amp
gk1 is successful the VoIP router will call out via gk3
You can check the Gatekeeper register status on VoIP SetupRegister
ServerRegister Status
f Call to different IP port
The default IP port used by VoIP router is 1720 for H323 and 5060 for SIP if
work with remote side of VoIP Router or gateway is change another port
number for VoIP please assign another port number after destination IP or URL
Please make sure both side use same port number for VoIP call otherwise it can
not make call You can change the VoIP router default listen port on
Index Remark Area Code Min Digits Max Digits IP Address Strip Prefix Profile Delete
1 Port_1719 1 101111719 Delete
2 Port_8495 2 Chinaproxycom8495 Delete
g Profile
Define the optional special VoIP parameters when calling to the destination
Please input the name you defined on the profile (VoIP SetupRouting
SetupRouting Profile) list
Example if user set the VoIP Call Out amp Routing Profile like below
Index Remark Area Code Min Digits Max Digits IP Address Strip Prefix Profile Delete
1 UsePF1 1 gk1 PF1 Delete
2 UsePF2 2 10112 PF2 Delete
26
3 UseDefaultPF 3 Gateproxycom Delete
Index Name VAD CODEC H245
Tunneling
DTMF
Relay
T38
FAX Relay
Package
Frame
Q931
Fast
Start
ID1 AS ID2 AS ID3 AS ID4 AS Delete
1 PF1 ON G7231 ON Out band ON 3 ON
00001 H323 1001 E164 Delete
2 PF2 ON G7231 ON In band ON 3 OFF
00002 H323 1002 E164 Delete
When VoIP call out number with prefix 1 will use the Profile named PF1 (H323
ID1 = 0001 E164 ID=1001 DTMF Relay=Out band Q931 Fast Start=ON) to
Call out VoIP
When VoIP call out number with prefix 2 will use the Profile named PF2 (H323
ID1 = 0002 E164 ID=1002 DTMF Relay=In band Q931 Fast Start=OFF) to
Call out VoIP
When VoIP call out number with prefix 3 because there is no Profile assigned it
will use the default value for VoIP out
h Delete Delete this rule item on routing table
To add new rule item on routing table please assign the item number you want
to insert before input AREA CODE then press ADD button to add it on the list
Then modify the necessary information on the routing table list
Please remember to press the modify button to take it effect For store back to
flash memory please press Syetem MaintenanceSave Modification
1227 VoIP Call In Routing Table Setting
VoIP SetupRouting SetupVoIP Call In
This page let you define the routing rule for Call in from VoIP (VoIP Router got
a VoIP call required form Network and then translates the phone number
passed from remote side VoIP Router to the real dial out number amp line base on
this VoIP Call In routing table) Each time when the VoIP Router received a VoIP
call from Network it will check with Area Code to see which rule matched to
service if no rule matched it will refuse to call out and will bound back the call
When the VoIP Router received a VoIP called from network it will check below
rules fields then decide line and number to dial out
a Area Code Define the Prefix number this rule service any VoIP called
from network dialed number prefix digits matched with the rule will call out
to phone by this rule define Please Notify there is a compare order rule on
this routing table That mean the VoIP Router will check the rule list from
top to bottom one by one any rule item matched with the prefix digits that
user press will go to call out directly no regard to the rest rules below For
Example if a rule item for area code 8862 is on Index 1 another rule below
that like index 2 for area code 886 will be ignored
Index Area Code Strip Prefix Maximum Minimum From To LineNo Gatekeeper Alert Profile Forward Delete
1 886 Delete
2 8862 Delete
Be ignored
b AuthAuthorization IP check enable Enable IP range authorization
function When Enable the gateway will check the remote caller IP 27
28
range setting on VoIP SetupRouting SetupAuthorization if it is within the authorization the gateway will allow the call out but if the remote callerrsquos IP is not in the range it will refuse to call out and terminate this call
IndexArea
Code
AuthStrip Prefix MaximumMinimumFrom To LineNo RS Verify
CallWaitingAlert Profile Forward Delete
1 8862 4 Delete
c Strip Number of digits will be ignored by user input For example if
received VoIP call number is 886212345678 and the STRIP field is setting to
4 the first 4 digits 8862 will be truncated and actually call out number will
be 12345678
Index Area Code Strip Prefix Maximum Minimum From To LineNo Gatekeeper Alert Profile Forward Delete
1 8862 4 Delete
Ex VoIP Call in number is 886212345678 and real dial out number is
12345678 by strip 4 digits
d Prefix The numbers will be added on the prefix of received VoIP call
number For examples if received VoIP call number is 12345678 and the
PREFIX field is setting to 0028862 the actually call out number will be
002886212345678
Index Area Code Strip Prefix Maximum Minimum From To LineNo Gatekeeper Alert Profile Forward Delete
1 0028862 Delete
Ex VoIP Call in number is 12345678 and real dial out number is
0028862-12345678 by add 0028862 prefix
Another example if user VoIP router received a call number 90 STRIP field
is setting to 2 and the PREFIX field is setting to 012345678 the actually
call out number will be 012345678 ( mean wait 1 second for PBX get line
for dial out to PSTN the wait time for one can be set on VoIP SetupLine
ConfigureLine Feature) This example is especially for speed dial
function
29
Index Area Code Strip Prefix Maximum Minimum From To LineNo Gatekeeper Alert Profile Forward Delete
1 90 2 012345678 Delete
Ex VoIP Call in number is 90 and real dial out number is 012345678 by
stripe 2 digits and add 012345678 prefix so the real dial out number is
012345678
e Maximum Define the maximum digits of call number allow to dial If the
length of dial number after pervious STRIP amp PREFIX process is more than
the setting it will deny dialing out For example you can set the Maximum
dial out digits is 8 for call to local area phone only any VoIP call in attempt
to dial 0712345678 out of 8 digits for call out long distance will been deny
to call out
IndexArea Code Strip Prefix Maximum Minimum From To LineNo Gatekeeper Alert Profile Forward Delete
1 8 Delete
Ex VoIP Call in number is 0712345678 and Maximum setting to 8 the VoIP
router will deny to call out
f Minimum Define the minimum digits of call number allow to dial If the
length of dial number after pervious STRIP amp PREFIX process is less than
the setting it will deny dialing out For example if set Minimum to 4 any
VoIP call in attempt to dial number less than 4 digits like 110 911 will been
deny to call out
Index Area Code Strip Prefix Maximum Minimum From To LineNo Gatekeeper Alert Profile Forward Delete
1 4 Delete
Ex VoIP Call in number is 911 and Minimum setting to 4 the VoIP router will
deny to call out
g From Define the beginning line number for service this area code VoIP call
For example if user assigned FROM 1 TO 1 for AREA CODE 601 in this
routing table then any VoIP call for call in number 601 will ring the line 1
only
h To Define the ending line number for service this area code VoIP call
30
Index Area Code Strip Prefix Maximum Minimum From To LineNo Gatekeeper Alert Profile Forward Delete
1 601 1 1 Delete
2 602 2 2 Delete
3 Delete
Ex Any VoIP Call in number with prefix 601 will ring the line 1 and Any VoIP
Call in number with prefix Call in number 602 will ring the line 2 any other
numbers will ring any available (not busy) lines
i Line No Click to enable if you want to force compare with the line number
setting on LINE CONFIGURE menu (VoIP SetupLine ConfigureLine
Setting) If the dial number after pervious STRIP amp PREFIX process is
matched with the line number setting the VoIP call will ring the dedicate
phone line that assigned with matched number
j RS Verify Assign which proxy to authorize this incoming VoIP call before
call out For example if the dial number should be checked by server 1
setting on the server menu (VoIP SetupRegister Server) please
input rs1 for server 1 You can input rs2 for server 2rs for all the servers
available ( search sequence rs1 gt rs2 gt rs3 gt rs4) rs3_2_1 will try rs3
first then rs2 then rs1
Index Area Code Strip Prefix Maximum Minimum From To LineNo Gatekeeper Alert Profile Forward Delete
1 1 Rs1 Delete
2 2 Rs Delete
3 3 rs3_2_1 Delete
The called and the caller have to register on the same rs When the caller
dial the number It can obtain a authorized number from rs and the called
has got the call after the rs confirmed that the caller had gotten
authorization otherwise it will send busy tone
This confirmation only can apply in through rs to make a dial moreover
both sides have register the same rs If the dialing-rule is IP point-to-point
mutually dials and because has no authorization by rs this connection will
be unable to put through
k Call WaitingEnable or Disable the call waiting function
Enable During Talk you can answer another phone call and
31
hold the original conversation When some one call in when you are busy on another phone call you will hear a du-du call waiting signal please use flash key on your phone to hold the original call and answer the incoming call press again flask key will switch back the original call party
Disable Disalbe the Call waiting function The gateway will reply the busy to remote side when the line is on used
Index Area Code Auth Strip Prefix Maximum Minimum From To LineNo RS Verify CallWaiting Alert Profile Forward Delete
1 1 Rs1 Enable Delete
2 2 Rs Delete
3 3 rs3_2_1 Delete
l Alert Control the Ring Back tone generate timing
Mode 0 When this VoIP Router get ring back tone from phone line it
will send the ring Alert signal to remote VoIP Router for generate ring
back tone
Mode 1 Before this VoIP Router dial to phone line it will send the ring
Alert signal to remote VoIP Router for generate ring back tone
Mode 2 After this VoIP Router finish dial out number to phone line it
will send Connect OK signal to remote VoIP Router
Mode 3 Before this VoIP Router dial to phone line it will send the ring
Alert signal to remote VoIP Router for generate ring back tone after
this VoIP Router finish dial out number to phone line it will send
Connect OK signal to remote VoIP Router
m Profile Define the optional special VoIP parameters when received on this
destination Please input the name you defined on the profile list (VoIP
SetupRouting SetupRouting Profile)
Example if user set the VoIP Call in amp Routing Profile like below
Index Area Code Strip Prefix Maximum Minimum From To LineNo Gatekeeper Alert Profile Forward Delete
1 1 PF1 Delete
2 2 PF2 Delete
3 3 Delete
Index Name VAD CODEC H245
Tunneling
DTMF
Relay
T38
FAX Relay
Package
Frame
Q931
Fast
Start
ID1 AS ID2 AS ID3 AS ID4 AS Delete
32
1 PF1 ON G7231 ON Out band ON 3 ON
00001 H323 1001 E164 Delete
2 PF2 ON G7231 ON In band ON 3 OFF
00002 H323 1002 E164 Delete
When VoIP call in number with prefix 1 will use the Profile named PF1
( H323 ID1 = 0001 E164 ID=1001 DTMF Relay=Out band Q931 Fast
Start=ON) to answer the VoIP Call in
When VoIP call in number with prefix 2 will use the Profile named PF2
( H323 ID1 = 0002 E164 ID=1002 DTMF Relay=In band Q931 Fast
Start=OFF) to answer the VoIP Call in
When VoIP call in number with prefix 3 because there is no Profile assigned
it will use the default value for VoIP Call Out
n Forward Define the profile name for forward the unanswerable VoIP call
on this Call In rule Please input the name you defined on the Voip SetupRouting Setup Forwarding
Example if user set the VoIP Call in amp Forward Profile like below
Index Area Code Strip Prefix Maximum Minimum From To LineNo Gatekeeper Alert Profile Forward Delete
1 601 1 1 CF1 Delete
2 602 2 2 CF2 Delete
Other 10111104
No Name Always OnBusy No Answer No Answer Sec Delete
1 CF1 hkbigcom301 Delete
2 CF2 assistbigcom assistbigcom610 30 Delete
In this case when the VoIP router received a VoIP call in number with prefix
501 ( not 601 or 602 prefix defined on Call In Routing table) it will forward
this call to the IP amp number defined on Other filed(in this case
10111104 it mean it will forward this call to IP 10111 and calling
33
number will change to 104)
When the line 1 user is going to have a tour to another location with same
VoIP router equipment user setup the called prefix number 601 forward to
profile name CF1 and in CF1 profile the Always field is set to
hkbigcom301 that mean any call number with prefix 601 will always be
forward to another VoIP Router locate at hkbigcom and dial out number is
301
When the line 2 is busy and another VoIP with prefix 602 Call in it will
forward it to the assistbigcom with same number (defined on OnBusy)
When VoIP Call In number with prefix 602 it will ring the line 2 for 30
seconds (defined on No Answer Sec) if no one answer line 2 within 30
seconds it will forward the call to another VoIP Router located at
assistbigcom and dial out number is 610 (defined on No Answer)
o Delete Delete this rule item on routing table
To add new rule item on routing table please assign the item number you
want to insert before input AREA CODE then press ADD button to add it on
the list Then modify the necessary information on the routing table list
Please remember to press the modify button to take it effect For store back
to flash memory please press Save Modification (Syetem
MaintenanceSave Modification)
1228 VoIP Call In IVR Setting
VoIP SetupRouting SetupVoIP Call In IVR
When Enable the [Prompt Voice for VoIP Call In function on VoIP
SetupAdvance SetupPrompt Voice all the remote party of VoIP caller will hear the customization upload voice file and need press the destination number All the input number will be checked the number length and be stripadd prefix defined on this page When a matched area code be processed it will use this number to check on the VoIP SetupRouting
SetupVoIP Call In to decide the final route path If no match area code rule defined on the table the gateway will response busy tone and connect failure User can use this function as the password authorization on the outbound gateway For example if we upload the voice file content on Prompt voice
for VoIP call in of VoIP SetupAdvance SetupPrompt Voice is ldquoPlease input the password and destination numberrdquo and we set a compare rule as below
Index Remark Area Code
Min Digits
Max Digits Strip Prefix Delete
1 Password check
8495 7 12 4 02 Delete
When a remote VoIP call in and want this gateway to outbound call the remote side user will hear voice prompt like ldquoPlease input the password and destination numberrdquo because there is only a compare authorization rule all the none 8495 prefix phone number will not accept to dial out and will be disconnect ( that mean we use 8495 as the outbound call authorization password) and the digits of user input phone number should between 7 to 12 (include 4 digits come from 8495)the number user input will strip the first 4 digits (8495) and add 02 prefix Then this number will be checked by VoIP SetupRouting SetupVoIP Call In For Example if user input the number is849512345678 it will strip 4 digits and add 02 prefix code the use 0212345678 to find a call out rule
34
A Time amp Digits wait for user
The VoIP Router wait user input the number digits amp time parameters as below
Time amp Digits wait for user Press
e MaxDigits Define the maximum digits wait for user press for all VoIP Call
Out if user press digits match the number defined here It will go to
translate for call out rule without needed to press key
f FirstDigitTime Define the waiting time (seconds) for user press phone
number first digit User need to press first digits before the setting time
(seconds) defined here if VoIP Router wait for the defined seconds and
there is no any digits press the VoIP Router will stop to wait and feedback
the user busy tone
g OtherDigitTime Define the waiting time (seconds) for user press phone
number secondary amp the rest digits User need to press the rest digits
before the seconds defined here if VoIP Router wait for the defined
seconds and there is no any digits press it will go to translate for call out
rule without needed to press key
BVoIP Call In IVR Routing Table
a Remark Remark for this routing rule Please use UNDERLINE to replace
the SPACE due to HTTP protocol limitation
b Area Code Define the Prefix number fit this rule any phone number prefix
digits matched with the rule will call out by this rule define Please Notify
there is a compare order rule on this routing table That mean the VoIP
Router will check the rule list from top to bottom one by one any rule item
matched with the prefix digits that user press will go to call out directly no
regard to the rest rules below For Example if a number 84951xxxxxx is
fit the rule item 1amp2 it will be processed by rule 1 and never be processed
by rule 2 that mean that rule 2 is never been used
Index Remark Area Code
Min Digits
Max Digits Strip Prefix Delete
1 Password+number 8495 7 12 4 02 Delete
2 No used rule 84951
c Min Digits define the minimum digits wait for user press for number fit
35
36
this rule if user press digits less the number defined here It will keep
waiting for input until exceed the FirstDigitTime defined time If user
press digits more then Min Digits here the VoIP Router will wait time
defined on OtherDigitTime then go to translate for call out rule without
needed to press key
d Max Digits define the maximum digits wait for user press for number fit
this rule if user press digits match the number defined here It will go to
translate for call out rule without needed to press key
j Strip the number of digits will be ignored by user input For example if
user press the number is 886212345678 and the STRIP field is setting to
4 the first 4 digits 8862 will be truncated and actually call out number will
be 12345678
k Prefix The numbers will be added on the prefix of the user press number
For examples if user press the number is 12345678 and the PREFIX field
is setting to 0028862 the actually call out number will be
002886212345678
l Delete Delete this rule item on routing table
To add new rule item on routing table please assign the item number you want
to insert before input AREA CODE and IP address then press ADD button to add
it on the list Then modify the necessary information on the routing table list
Please remember to press the modify button to take it effect For store back to
flash memory please press Syetem MaintenanceSave Modification
1229 VoIP Routing Profile Setting
VoIP SetupRouting SetupRouting Profile
This page defines the optional special VoIP parameters when makingreceived a
VoIP call For define some special parameters for different VoIP equipment or
authorize purpose please add a profile at VoIP SetupRouting Setup
Routing Profile and use the same name as the profile on the Call in Routing
Table (VoIP SetupRouting SetupVoIP Call In) or Call out Routing table
(VoIP SetupRouting SetupVoIP Call Out)
a Name Specify a profile name Please use UNDERLINE to replace the
SPACE due to HTTP protocol limitation
b VAD
ON turn on the VAD(Voice Active Detection) function
OFF turn off the VAD function please select ON for save the bandwidth
c CODEC Select different voice CODEC for VoIP communication The bit rate
of G7231 is 53k63k G729 is 8k uLaw and aLaw is 64k per second The
G7231 is default CODEC
d H245 tunneling
ON for enable H245 tunneling
OFF for disable H245 tunneling
37
38
e DTMF Relay
When select In band to transfer the DTMF during VoIP the user pressed
DTMF tone will be treat as general voice and been compressed then
transmit to remote side to decompress play back it maybe cause some
problem on duplicate or missing DTMF receive
When select Out band to transfer the DTMF during VoIP the user
pressed DTMF tone will be decode by local VoIP Router then transmit as
signal after received on received remote VoIP Router it will be
regenerate by remote VoIP Router The default value is Out band
f T38 FAX Relay
ON FAX will be transmitted by using T38 FAX over IP protocol
OFF FAX over IP is disabled
g Package Frame Select the number of voice payload frames on each UDP
package VoIP transmit More frames into one package mean save more
bandwidth The default frames on each package is 3
h Q931 Fast Start
ON Enable Fast Start capability during Q931 handshaking
OFF Disable Fast Start capability during Q931 handshaking
i ID1 User defines ID 1 during this VoIP call
j As
E164 Parameter on ID1 field is the E164 during this VoIP call
H323 ID Parameter on ID1 field is the H323 ID during this VoIP call
Calling Parameter on ID1 field is DID number during this VoIP call If
this optional is setting it will override the LINE NUMBER on line setting menu
Password Parameter on ID1 field is the password for VoIP call
Parameter defined here will used as MD5 during H235 and will not
display on the Web UI
k ID2ID3ID4 there are 4 fields for user define the ID parameters please
reference the ID1 setting above
l Delete Delete this rule item on routing table
To add new profile item on routing table please assign the number you want to
insert before input profile NAME then press ADD button to add it on the list
39
Then modify the necessary information on the routing table list
Please remember to press the modify button to take it effect For store back to
flash memory please press Save Modification (Syetem MaintenanceSave
Modification)
Here is VoIP Routing Profile setting examples below
Index Name VAD CODEC H245
Tunneling
DTMF
Relay
T38
FAX Relay
Package
Frame
Q931
Fast
Start
ID1 AS ID2 AS ID3 AS ID4 AS Delete
1 PF1 ON G7231 ON Out band ON 3 ON
00001 H323 1001 E164 Delete
2 PF2 ON G7231 ON In band ON 2 OFF
00002 H323 1002 E164 Password Delete
When using profile PF1 the parameters will be used for H323 ID1 = 0001
E164 ID=1001 DTMF Relay=Out band Q931 Fast Start=ON) to call answer
the VoIP
When using profile PF2 the parameters will be used for H323 ID1 = 0002
E164 ID=1002 DTMF Relay=In band Q931 Fast Start=OFF Password=1234
but be hidden ) to call answer the VoIP
12210 VoIP Forwarding Profile Setting
VoIP SetupRouting SetupForwarding
This page defines the forwarding behavior include
get an unmatched prefix number for VoIP call in
Line busy
No answer
Please add a profile at VoIP SetupRouting SetupRouting Profile and
put the name of profile on the Call out Routing table (VoIP SetupRouting
SetupVoIP Call Out)
a Other Define the forward IP and forward phone number when there is no
match rule setting on VoIP Call Out Routing table The format is IPphone
number or URLphone number ie all the phone number can not match a
prefix rule will be forward to the IPamp phone number define on here
b Name Specify a profile name Please use UNDERLINE to replace the
SPACE due to HTTP protocol limitation
c Always Always redirect forward to this IP(or URL)phone number All
incoming call will be forward to IP assigned here
d On Busy Redirect forward to this IP(or URL)phone number when busy an
incoming VoIP call will forward to IP assigned here when this line is busy
e No Answer Redirect forward to this IP(or URL)phone number when no
answer over the time No Answer Sec an incoming VoIP call will forward
to IP assigned here when ring time over the defined on No Answer Sec
40
41
f No Answer Sec Defined the wait seconds for redirect forward to another
IP(or URL)
g Delete Delete this rule item on routing table
h To add new rule item on routing table please assign the item number you
want to insert before input AREA CODE then press ADD button to add it on
the list Then modify the necessary information on the routing table list
Please remember to press the modify button to take it effect For store back to
flash memory please press Save Modification (System MaintenanceSave
Modification)
Example if user set the VoIP Call in amp Routing Profile like below
Index Area Code Strip Prefix Maximum Minimum From To LineNo Gatekeeper Alert Profile Forward Delete
1 601 1 1 CF1 Delete
2 602 2 2 CF2 Delete
Other 10111104
No Name Always OnBusy No Answer No Answer Sec Delete
1 CF1 hkbigcom301 Delete
2 CF2 assistbigcom assistbigcom610 30 Delete
In this case when the VoIP router received a VoIP call in number with prefix 501
( not 601 or 602 prefix defined on Call In Routing table) it will forward this call
to the IPamp number defined on Other filed(in this case 10111104 it mean it
will forward this call to IP 10111 and calling number will change to 104)
When the line 1 user is going to have a tour to another location with same VoIP
router equipment user setup the called prefix number 601 forward to profile
name CF1 and in CF1 profile the Always field is set to hkbigcom301 that
mean any call number with prefix 601 will always be forward to another VoIP
42
Router locate at hkbigcom and dial out number is 301
When the line 2 is busy and another VoIP with prefix 602 Call in it will forward
it to the assistbigcom with same number (defined on OnBusy)
When VoIP Call In number with prefix 602 it will ring the line 2 for 30 seconds
(defined on No Answer Sec) if no one answer line 2 within 30 seconds it will
forward the call to another VoIP Router located at assistbigcom and dial out
number is 610 (defined on No Answer)
12211 VoIP Authorization Setting
VoIP SetupRouting SetupAuthorization
When this gateway has been used for outbound call it can enable to check the
remote caller gatewayrsquos IP to decide accept or refuse the call If define the IP range
here and enable the [Auth] option on theVoIP SetupRouting SetupVoIP Call In only the IP in range will allow to call out by this gateway
43
123 Register Server Setting
1231 Register Status
VoIP SetupRegister ServerRegister Status
You Can check the register status of this gateway on this page
a MAC this gatewayrsquo MAC Address
b RS1-4 Indicate the status of 4 server register
SIPampH323 The protocol used for registering the server this gateway supports both H323 and SIP protocol
Green Indicator Successful to register server and the register phone number
Red Indicator Failure to register server and the failure reason Yellow Indicator Disable the register function
Example for Status display as above it indicates
1 The register to Server 1 function is disabled (SIP) 2 Use SIP protocol to register to register as RS2 the register method is
4 lines independent Each lines use different number to register 25618801 25618802 5618803 25618804 Line 2 and Line 4 are disabled to register Line 1 and Line 3 are successful to register
3 Use H323 protocol to register as RS3 all 4 lines share same register 102003
4 Use SIP protocol to register as RS4 each lines use different number as 102002 102003 77201111 You can see that line 2 and line 3 register failures The line 2 failure reason is ldquounauthorizedrdquo and Line 4 failure reason is ldquonot numberrdquo
Please setup each register parameters at VoIP SetupRegister StatusServer1~4 44
1232 Setup the Register ServermdashSIP Protocol
圖 112 VoIP SetupRegister ServerServer
If you need use this gateway to register to the H323 gatekeeper or SIP registerproxy server you can setup the account for register here This gateway can register up to four Servers simultaneously
a Protocol Select use SIP or H323 protocol to register to server by different protocol the gateway will adjust the page for different parameters for input
b Register Method
Global All the lines of the gateway share same account to register Independent Each lines can set differentsame account independently
for register c Enable SIP Proxy
Enable Register SIP Proxy server function Disable Register SIP Proxy server function
d SIP Proxy URL Please input the IPURL of the SIP proxy server e Port [1~65535] Port number used for register to server The SIP
protocol default is 5060 please make sure you have same port number setting on the gateway and server
45
46
f Thought Outbound Proxy
When your gateway is installed behind the firewall or NAT you maybe need use Proxy server to relay your call If so please input the Outbound proxy serverrsquos IP here
g Prot[1~65535] Port number used for register Outbound Proxy Server h TTL(Registration interval)[10-7200s] Some SIP Server need you
set the time interval (seconds) for send the expire signal to register server keep alive
i Domain Some SIP Server need you input the Domain for register
please input here j Proxy Require Some SIP Server (Nortel) need you input the more
information for proxy function please input here k Line Number index of lines l Type Interface type of the line
FXO Analog phone interface for connect to PSTN or PBX extension line FXS Analog phone interface for connect to phone set or PBX Co line
m Remark Remark for this routing rule Please use UNDERLINE to replace the
SPACE due to HTTP protocol limitation
n Number Register phone number Some SIP Server needs this to
parameters for register o Account Account for register to SIP server
p Password Password for register to SIP server q Conference ID Some SIP Server requires an ID to enable the
conference function please input the ID here to enable that r Enable Enable or disable independently each line for register
1234 Setup the Register ServermdashH323 Protocol
VoIP SetupRegister ServerServer
When Select use H323 to register gatekeeper please input the flow information for register
s Register Method
Global All the lines of the gateway share same account to register
Independent Each line can set differentsame account independently for register
a Enable H323 Gatekeeper
Enable Register H323 Gatekeeper function Disable Register H323 Gatekeeper function
b Gatekeeper URL Please input the IPURL of the Gatekeeper server
c Port[1~65535] Port number used for register to server The H323
protocol default is 1719 please make sure you have same port number setting on the gateway and ser
47
48
d GK ID Some Gatekeeper Server need you input an ID for register
please input here
e Proxy for NAT When your gateway is installed behind the firewall
or NAT you maybe need use Proxy server to relay your call If your gatekeeper supports this proxy function you can enable gateway function here to use that
f Line Line Number index of lines t Type Interface type of the line
FXO Analog phone interface for connect to PSTN or PBX extension line
FXS Analog phone interface for connect to phone set or PBX Co line
g Remark Remark for this routing rule Please use UNDERLINE to replace
the SPACE due to HTTP protocol limitation
h E164 phone number used for register to server
i H323 ID Account name used for register to gatekeeper
j Password Password used for register to gatekeeper
k Enable Enable or disable independently each line for register
Please remember to press the Modify button to take it effect For store back to
flash memory please press Save Modification (Syetem MaintenanceSave
Modification)
124 Auto Provision function
To use the auto provision function the system have to install a dedicate Auto Provision Server for keep all parameters for installed gateways When Enable the Auto Provision function the System administer can modify all the Parameters of each gateway on the local Provision Server and remote gateway will automatic download all the parameters from Provision Server The Gateways can link up to five provision servers simultaneously for
Redundancy backup the system
VoIP SetupProvision
a Provision SetEnable or Disable auto provision function on this
gateway When Enable all the function parameters will download from remote Provision server
b Provision Sever1~5 Provision server connection status 49
50
It will indicate the status of linking to each Provision Servers The gateway will link to one of the five setting Provision Server each time If successful link it will display green indicator If failure link it will display red indicator The yellow indicator means it is disable
c Last link time Display the Date amp Time for last successful link to Provision server on this gateway
d Numbers of successful linkDisplay the times of successful linking
from Provision Server to this gateway
e Numbers of successful updateDisplay the times of successful
linking and update the parameters from t Provision Server to this gateway
f Last link actionDisplay the latest action command for provision
function
g GatewayDisplay the Network router gateway IP address for used
on the Internet connection
h Provision Server IP User can manual add a new Provision Server by add its IP here and press Link Please remember enable auto provision function before you input the new Provision Server IP
For store back to flash memory please press Save Modification (Syetem
MaintenanceSave Modification)
125 Advance Setup
1251 NAT Traversal
VoIP SetupAdvance SetupNAT Traversal
If your VoIP gateway is installed behind NAT you may need a special configuration and server to establish the VoIP communication this gateway support several method for NAT Traversal as below
By Outbound Proxy User can appoint an Outbound Proxy Server to handle the NAT traversal on VoIP SetupRegister SeverServer
Declare NAT IP address Select to enable the input the NAT router IP of the network
Use STUN server
Enable STUN and input the STUN serverrsquos IP for handle the NAT traversal you can input 2 sets of STUN servers IP
The Gateway will display the system found NAT IP address
For store back to flash memory please press Save Modification (System
MaintenanceSave Modification)
51
1252 Listen Port
VoIP SetupAdvance SetupListen Port
In this page user can define the usage port for setup the VoIP communication Both side of gateways need use the same port for begin VoIP communication
a SIP Listen Port Define the listen port for SIP protocol the default port is 5060 input range from 1024 to 65535
b H323 Call Signal Port Define the Call signal port for H323
protocol the default port is 1720 input range from 1024 to 65535
c H323 Gatekeeper Listen Port Define the Gatekeeper listen port for H323 protocol the default port is 1719 input range from 1024 to 65535
d RTP Initial Port Define the RTP package initial port the input
range from 1024 to 65535 the gateway will display the used UDP ports due to multiple lines connection
After modify and press Modify system will save and reboot automatically to take it effective
52
1253 VoIP Package
VoIP SetupAdvance SetupVoIP Package
User can define the parameters relative about VoIP package on this page
Jitter Buffer(ms) Define the Jitter buffer size input range is from 20 to 200ms
VoIP DTMF Relay Mode Define the relay mode for DTMF signal
In band When local gateway detects a DTMF signal it will not decode it The DTMF signal will been compressdecompress as VoIP voice package
Out band When local gateway detects a DTMF signal it will decode it and relay it as a data package separately The remote gateway will regenerate the DTMF signal after receive the DTMF data package System default is relay DTMF by out band mode
VoIP DTMF Relay Mode (Out band) Define 2 methods to relay DTMF when select Out band relay mode
by SIPRFC2833 (SIP protocol) or H323H245 (H323 protocol) by SIP INFO (SIP protocol) or Q931 (H323 protocol)
RFC2833 Payload number for DTMF[96~127]
Define the DTMF token on RFC2833 input range form 96 to 127 53
54
Silence Detection Suppression Enable or disable the Silence DetectionVAD function When Enable if local gateway detect a silence situation ( no talk) it will send a VAD package rather than a full voice package for remote side to active CNG ( Comfort Noise Generation) to save the bandwidth The default is Enable to save the bandwidth
Prefer CODEC
In this table you can define the prefer CODEC The priority 1 selection is highest priority By different CODEC user can select different payload size per package as below
G711 uLaw 20304050607080ms G711 aLaw 20 304050607080ms G7231 306090ms G729a 20304050607080ms G726 20304050607080ms None none
The gateway will calculate and show approximately bandwidth for one VoIP call
1254 RTP Packet Summary
VoIP SetupAdvance SetupRTP Packet Summary
On this page user will know the RTP package summary about last VoIP call
Line number of line Using CODEC ex G7231 G729a Source IP Remote side IP Source Port Remote side port Packet Interval interval time between 2 packets(ms) Packet Send number of packets sent Packet Received number of packets received Packet Lost number of lost packets
55
1255 Flash amp Call waiting
VoIP SetupAdvance SetupFlash amp Call waiting
On this page user can define the parameters relative to the FLASH key and Call
Waiting function These functions usually work with PBX
Token for flash key on VoIP() Define the token for flash key during VoIP protocol ( use ldquo ldquo by default)
Flash Signal generate length
Define the pause time (ms) for one ldquordquo symbol at Routing SettingVoIP Call Out This pause till is useful for PBX seize the trunk line from extension line The default time is 1000ms Input range from 100 to 3000ms
Flash Signal Detect Threshold Define the threshold for valid FLASH signal Only the flash time length between setting between min to max is accept by the gateway
Call waiting from PSTN when VoIP talking
EnableDisable the Call Waiting function from PSTN line when talking by VoIP
Call waiting from VoIP when PSTN talking
EnableDisable the Call Waiting function from VoIP when talking by PSTN line
56
1256 Gain
VoIP SetupAdvance SetupGain
This page defines different function gain on the gateway
Gain when Dial tone phase
When phone off hook user will hear the dial tone generated from the gateway sser can adjust the playrecord gain during this phase for stable DTMF detection After connection the gains setting here is no use the gateway will adjust the gain setting on Line ConfigureLine setting
Play Transmit gain from network to line Adjust the speaker volume on the handset Higher value will louder the speaker on local side
Record Receive gain from line to network Adjust the microphone volume on the handset Larger value which will amplifier the MIC volume on local site
Incorrect value will cause the gateway can not receive the DTMF user pressed on phone set please use the default 0dB if no other issue
DTMF Generate DSP play Gain [-29~3]
Setting the internal gain used by DSP for generate the DTMF signal incorrect value will cause the DTMF can not accept by other telephone equipment Please use the default value if no other issue
Call progress Tone DSP play Gain[-31~0]
Setting the internal gain used by DSP for generate the CPT ( Call Progress Tone) Incorrect value will cause the DTMF can not accept by other telephone equipment Please use the default value if no other issue
Caller ID Detection record Gain [13~-3]
57
58
Setting the Caller ID Receiver gain Incorrect value will cause the Caller ID signal can not be receive please use the default value if no other issue
1257 QoS
VoIP SetupAdvance SetupQoS
User can define the ToS field on the VoIP packet for Quality of Service control The ToS field is included these 2 parameters
Precedence bit 012 DSCP(Diffserv Code Point) bit 3~7
User can select inptut either IP Precedence or DSCP value Or input the ToS
binary code directlly
59
1258 CDR
VoIP SetupAdvance SetupCDR
The Gateway can export all the CDR (Call detail Record) to external CDR server by HTTP protocol The gateway supports up to 2 CDR servers for keep the record
Export to CDR Server Please install and enable this function if you want to keep CDR of this gateway
CDR Server IP1 Please input the IP of first CDR server if installed CDR Server IP2 Please input the IP of second CDR server if installed
60
1259 FoIP
VoIP SetupAdvance SetupFoIP
User can define the parameters relative FAX Over IP function
Maximum FoIP Rate (bps) Appoint the maximum FAX transceiver rate during FoIP
Disable Only the VoIP function is supported on the gateway FoIP is disabled
Auto Gateway will negotiation the maximum speed for FoIP with FAX machine
Appoint the Maximum speed24004800960012000 14000
T38 Low Speed Redundancy [Enable|Disable] Enable or Disable to send the double packet function during low speed T38 FoIP
T38 High Speed Redundancy [Enable|Disable]
Enable or Disable to send the double packet function during high speed T38 FoIP
61
12510 Prompt VoiceampBeep
VoIP SetupAdvance SetupPrompt Voice amp Beep
This gateway can use voice or beep to prompt the user different situation User can downloadupload their own prompt voice wave files also For prompt beep enable function it can be enable by
VoIP Call out Beep When enable the gateway will generate a beep for call out for VoIP
VoIP Call out Failure twice Beep
When enable the gateway will generate twice beep if failure to call out for VoIP
No PSTN line warming twice Beep
When enable the gateway will generate twice beep if failure to call out for PSTN usually mean there is no trunk line connect to the PSTN line port
Can not register to server warming twice Beep
When enable the gateway will generate twice beep when end user off hook the phone if the gateway failure to register to Register Server
For prompt voice enable function it can be enable by 62
63
Prompt voice for replace dial tone Use a customize voice file to replace the dial tone
Warming Prompt after VoIP out failure Annunciate a customize voice file when VoIP call failure
No PSTN Line Connected Annunciate a customize voice file when there is no trunk connected to the PSTN port and failure to call via PSTN line
Can not register to server warming prompt Annunciate a customize voice file when the gateway failure to register to Register Server
Prompt voice for VoIP call in When Remote gateway call in the gateway if enable this function the gateway will annunciate a customize voice to remote gateway user to ask the destination number this function must work with the setting rule on VoIP SetupRouting SetupVoIP Call In IVR
For enable the prompt beep or voice annunciation function please select to enable the function and click Modify Caution If enable both prompt beep and Voice annunciation on the same
function only the voice annunciation will work and will not hear the beep sound Procedure to upload customize voice wave file 1Select the function index you want to modify 2press brows select the content voice file 3 Press Restore to upload and save 4To keep the voice file permanently press Save Flash to save it The gateway only accepts the G7231 or G711 format voice file and all the 5 files size totally can not exceed 384KB
126 Application
1261 Ping test
VoIP SetupApplicationPing Test
User can use the Ping Test function to test the network status or remote device Ping DestinationPing
Target device IP for ping test
Number of Ping[1-100]Ping次數
Number of ping test maximum is 100
Ping Packet Size[56-5600 bytes] Size of ping test packet input range is between 56 to 5600 bytes
64
1262 Telnet amp SNMP
VoIP SetupApplicationTelnet amp SNMP
User can enable and set the user account for the SNMP and Telnet function of this gateway on this page
a Enable telnet server Enable Enable telnet service function user can telnet this
gateway Disable Disable telnet service function
b Enable SNMP Server
Enable Enable SNMP service function user can use SNMP on the gateway
Disable Disable SNMP service function
c User NameSet a user name for Telnet amp SNM login d Login PasswordSet the password for Telnet amp SNMP login e Confirm PasswordCheck the password again
65
127 System
1271 System Status
This page reveals the status of the gateway including WAN LAN and some hardware information Internet
This sub-block shows the Internet information of your home gateway It depends on the WAN mode connecting to your ISP The different items correspond to each WAN mode will be revealed after the common part of the Internet status sub-block Common Part
Refresh Clicking this button the browser refreshes the Internet status page to get the most update information
66
67
CableDSL This field indicates the Internet connection status Its value is Connected Disconnected or Connecting WAN IP Connected to the Internet through Cable or ADSL modem the ISP will offer the home gateway a WAN IP address to communicate with other hosts in the Internet Subnet Mask This field indicates a mask used to determine what subnet the WAN IP address belongs to An IP address has two components the network address and the host address For example consider the IP address 192168168182 with subnet mask is 2552552550 the first three numbers (192168168) represent the Class C network address and the forth number (182) identifies a particular host on this network Gateway ldquoGatewayrdquo is a node on a network that serves as an entrance to another network For the home gateway The ldquoGatewayrdquo is the next device which routes the traffic to the Internet DNS Domain Name System (or Service or Server) is an Internet service that translates domain names into IP addresses Because the domain names are alphabetic they are easier to remember However the Internet is based on IP addresses Every time you use a domain name a DNS service must translate the name into the corresponding IP address For example the domain name wwwexamplecom might translate to 1981052324 The DNS system has its own network If one DNS server doesnt know how to translate a particular domain name it will ask its upper stream server and so on until the correct IP address is returned or timed-out Secondary DNS This is the secondary DNS to use when the primary DNS does not work Domain Name Domain name is a name which identifies one or more IP addresses This field represents the domain name obtained from your ISP Connection Type There are five ways to get the WAN IP address They are DHCP STATIC PPPoE PPTP and L2TP This field indicates the way to get the WAN IP address Through Figure 3-2 to 3-6 detail all specific items of each mode
68
Gateway IP Address This field is the LAN IP address of the home gateway
Subnet Mask This field is the subnet mask of the network in the LAN side
DHCP Server The home gateway supports DHCP service This field indicates the enabled status of the DHCP Server
NAT This field shows whether the NAT is enabled or not Firewall The gateway supports firewall service This field indicates firewall service is enabled or not
Information
System Up Time Shows the time in hhmmss format from when the home gateway was powered up to the web browser requests this page System Date Shows the data and time in mmddyear hhmmss when the web browser requests this page Connected Clients This field shows how many clients in the LAN clients connect to the home gateway Runtime Code Version Shows the version of runtime code
Boot Code Version Shows version of boot code
LAN MAC Address Short for Media Access Control address a hardware address that uniquely identifies each node of a network This field indicates gatewayrsquos LAN MAC address
WAN MAC Address This field indicates gatewayrsquos WAN MAC address
69
Hardware Version Tells the version of hardware of the gateway
Serial Number This field indicates serial number
1272 System Settings
This page is used to configure the names given by the ISP if any to represent the gateway and also to set the local time zone Host Name Some ISPs request the host name to represent the home gateway Fill the host name given by the ISP or you may not be able to access the Internet successfully The maximum length of the host name is 32 bytes Domain Name User configured domain name of the network maintained by gateway NTP Server Network Time Protocol is used to obtain the time from the Internet NTP server The home gateway will resolve the NTP server from the internal URL lists If you know a better NTP server you can enter it Domain name and IP address format are both acceptable Set Time Zone Choose the time zone of you current location Daylight Saving It is a way of getting more out of the summer days by advancing the clocks by one hour during the summer time Some time zone has daylight saving You have to check this item fill out the start time and the end daylight saving time if the current time zone has daylight saving
70
1273 Date amp Time
This page is used to setting the system time of VoIP gateway it can define the correct time by which ways
71
1274 Administrator Setting
This page allows you to change the user and administration password used to manage this router for security reasons
72
1275 System Log The system log page shows the gatewayrsquos activity logs such as the Internet connectivity hacker attack intrusion detection and the wireless association The log helps you to do fault analysis or regular statistics Download Save the log to a local file Clear Clear the log Refresh Retrieve the log from the gateway and show in the text area again System log The text area shows system activities
Security log The text area shows hacker attack or firewall logs
73
Remote Log Settings
Remote Log Check this file and the gateway will send the log message to the ldquoSend Log tordquo remote host
Send Log to Set the IP address to send log
Email Log When the log buffer is full the gateway will check whether this item is enabled If enabled the gateway will send all the log messages to the ldquoSend Email tordquo email address
SMTP Server Set the SMTP Server (email server) to send the email log to You can either specify the serverrsquos name or its IP address
74
128 Route Function(System Setup)
1281 Setting WAN connection System SetupConnection
System SetupWANConnected Type
Connection Type There are five ways to connect to the Internet They are Dynamic IP Static IP PPPoE PPTP and L2TP
The cable modem ISP usually requests you to obtain the WAN IP dynamically Some ISPs request you to fill the host name To do this please go to ldquoSystemSystem Settingsrdquo page to change the host name
A Dynamic IP Address
75
Request IP address You can specify the IP address you desired But the ISP has the right to neglect it and provides you a different one MTU (576-1500) You can specify the MTU (maximum transmission unit) of your home gateway The default value is 1500 bytes and in normal case you donrsquot have to change MAC Cloning Some ISPs will identify the MAC address registered by the user If not registered the ISP wonrsquot allow the traffic to pass Enable the MAC cloning function will change WAN MAC to the registered one MAC Address The MAC address will be cloned Clone MAC Address This button is use to detect the PC which is browsing this page and make its MAC address to be the MAC address to clone
B Static IP Address
IP address assigned by your ISP Set the IP address that assigned by the ISP
76
Subnet Mask Set the subnet mask of the network ISP Gateway Address Set the ISPrsquos gateway IP address This address routes packets to Internet
C PPPoE
This page is the PPPoE configuration page Most of the ISPs request the user to connect to central office (CO) side via PPPoE acronym of Point-to-Point Protocol over Ethernet which provides authentication authorization and accounting User Name Enter the user name provided by your ISP to identify the computer using PPPoE Password Enter the password provided by your ISP to identify the computer using PPPoE Please retype your password Retype the password to make sure type correct password
77
78
Service Name Some ISP provides the service name of this PPPoE connection If so enter this item or make it blank MTU (546-1492) Maximum Transmission Unit (MTU) is the largest physical packet size measured in bytes which a network can transmit Any messages larger than the MTU are divided into smaller packets before sent In ordinary that the user does not have to worry about the MTU size the gateway routing engine will handle the MTU differences between PPP and the LAN Ethernet side But for some old PPPoE server you have to make the MTU size of the PPPoE side smaller than the default value or some Web side is not able to access PPPoE MTU should be set between 546 and 1492
Maximum Idle Time (60-3600) Set a period of time to disconnect PPPoE connection when userrsquos idle time greater than it The Maximum Idle Time is only worked on the auto-connect mode It makes no effect on manual-on mode and keep-alive mode (see Connection Mode) Connection Mode Three connection modes are designed to fit different request They are keep-alive manual-on and auto-connect mode For the manual-on mode you have to dial-on and cut out the connection manually The keep-alive mode will make the connection always on If the line is dropped the modules will try to connect to the PPPoE server always The auto-connect mode is designed to save the communication cost for the user In the beginning of powered on the link will not be built Instead the gateway monitors the traffic from LAN side to the Internet The sooner routing traffic was issued the later PPPoE link is established The gateway continually watches the LAN to WAN traffic if there is no activity for more than the Maximum Idle Time the connection will be
dropped
D DNS
This page sets the primary and secondary DNS servers which were given by your ISP or known to you When a domain name request received the gateway tries to resolve to it from the Primary Domain Name Server Resolving failed the gateway tries the Secondary sever again Static DNS Server Check this item to make the primary and secondary DNS server at the next two rows active If this field is not enabled the statically configured DNS server will not take effect Domain Name Server (DNS) Address Set your primary DNS in this field Secondary DNS Address (optional) Set your secondary DNS to use when the primary DNS does not work
79
1282 LAN Settings
SSystem SetupLANLAN Settings
The home gateway is an IP sharing device which provides the home users share the same public IP address While in the LAN side each network device must have one private IP address to do network communication This page is to set the configuration of the LAN interface of the gateway IP Address Set this to be gatewayrsquos LAN interface IP address The LAN interface address is also aced as the default gateway address to the computers in you private network Subnet Mask This field indicates a mask used to determine what subnet the LAN IP address belongs to The Gateway acts as DHCP Server Check this item if the home gateway supports DHCP server service This is the normal case that can make you free from installing a DHCP server in your home network And you can connect to the Internet just as what you have done in your company environment IP Pool Starting Address The starting address provided by DHCP service
80
IP Pool Ending Address The ending address provided by DHCP sevice Lease Time Set the lease time of the IP address to renew Local Domain Name Set the gatewayrsquos local Domain Name DNS Proxy The home gateway acts as a DNS Proxy In this case the DHCP service will set LAN interface IP address as the DNS server address and inform the clients in the DHCP renew process
DHCP Client List
This page lists all the DHCP clients in the LAN side The DHCP server is capable of administering 253 clients
81
82
Host Name This column shows the host name of the DHCP clients IP Address This column shows the IP Address of the DHCP clients MAC Address This column shows the MAC Address of the DHCP clients Static Check this item to make the IP address static and every time the client connect to the home gateway it will get the same IP address all the way Refresh Click this button the browser request the DHCP client list from the home gateway and refresh the page again Static Clients You can add static clients using this block if those clients are not current connect to the home network Fill out the ldquoHost Name IP address and the MAC Address then click the ldquoAddrdquo button they will be add to the static list and show on the DHCP client list Uncheck the static box of that entry and click the ldquoOKrdquo button this static entry will be deleted
1283 NAT
Virtual Server
This is the virtual server page which set the rules translate the private IPprivate port pairs to the public ports Private IP Set the IP address of the virtual server Private Port Set the port of the virtual server to connect to Internet Type Set the protocol of the virtual server Valid options are TCP UDP and Both Public Port Set gatewayrsquos WAN port to connect to virtual server Comment Let you put some notes to describe this entry Enabled Enable this entry
83
Special Application
Trigger Port To define the TCPUDP port range to monitor when initiating from the home network the public ports configured in this entry will be activated Trigger Type Defines the protocol type TCP UDP or both of the trigger ports Public Port This column defines the public ports opened when the trigger ports were seen You can enter multiple ports delimited by comma or a range of port by dash White space will be neglect Public Type Defines the protocol type TCPUDPBoth of the public ports Comment Let you put some notes to describe this entry Enabled Enable this entry
84
Port Mapping
The Port Mapping page does a port range mapping
85
Server IP Set one of LAN clientrsquos IP address to do port mapping Mapping Ports Set the ports to mapping from WAN to LAN You can enter multiple ports delimited by comma or a range of port by dash White space will be neglect Public Type Defines the protocol type TCPUDPBoth of the public ports Comment Let you put some notes to describe this entry Enabled Enable this entry
ALG
Some applications have to do Application Level Gateway (ALG) to monitor the transaction or monitor the payload of the packet This page let you setup them We use mnemonic nouns to describe the specific ALGs The checked entries will be enabled by the ALG processing For the Non-Standard FTP Port you have to set the port number to let the ALG take it as an FTP session
DMZ
Check this item to enable DMZ service
86
87
DMZ table This table lets you configure the DMZ hosts If you have more than one public IP Addresses you can specify each one with an associated DMZ host Public IP MZ table Address Select among the WAN IP addresses of the home gateway IP Address of Virtual DMZ Host Fill the client in the LAN side as the associated DMZ host Add Add this entry to virtual DMZ host table Delete Delete this entry from virtual DMZ host table
1284 Firewall Firewall Options
Enable Hacker Attack Protect The hackers always try to break into you system or crack down your network The gateway provides hacker attack protect modules to protect your home network Discard PING from WAN side ldquoPingrdquo is the most widely used tool to diagnose the network Hackers use ldquopingrdquo to discover your gateway firstly and try to hack your home network later Discard ldquopingrdquo from WAN side prevent the hacker from discovering your home network by using ldquopingrdquo Disallow to PING the Gateway Check this item not only prevent ping from the WAN side but also prevent pinging the home gateway from the LAN side The side effect is to increase the difficulty to diagnose your home network Drop Port Scan Packets The most famous Internet hacking method is the port scan ldquoPort scanrdquo
88
scans all the TCPUDP port of a station to find out the opened ports After confirmed the hackers try to connect to the listened ports to attack your computer Check this option the home gateway will drop the port scan packets to protect your system Allow to Scan Security Port (113) Some Linux email servers will try to detect the security TCPUDP port (113) If you drop it the Linux email servers will not allow you to log into Allow it can solve such kind of problem Discard NetBios Packets The NetBios protocol is widely used by the MS Windows Network Place which should only be use in the home network and should not be used in the Internet environment Strongly suggest you to check this item for security consideration Accept Fragment Packets Accept packets that are fragmented Send ICMP packets when error Send ICMP packets when the error happens in connection Advance settings Click this button the detail hacker attack patterns will appear to let you decide which one should be enabled Figure 7-2 shows the hacker attack patterns to protect
89
Client Filtering
Enable Client Filter Check this box and all the entries below will take effect IP Block the IP addresses ranged to connect to Internet Port Set the port range within which is not allowed to connect to Internet Type Set which protocol TCPIPBoth of this entry to inhibit Block Time Two options are provided for this column the ldquoAlwaysrdquo and ldquoBlockrdquo If ldquoAlwaysrdquo is selected the next two items will be neglect Otherwise the client filter function schedule the block time base on the ldquoDayrdquo and ldquoTimerdquo settings Day Set which days to block Internet connection Time Set what time in each day to block the Internet access Comment Let you put you note why you want to block the Internet access Enable Check the item to enable this entry
90
URL Filtering
Enable URL Filter Check this box and all the entries below will take effect IP The IP addresses ranged will be the candidate to check the URL when they use web browser to access the Internet URL filter string The specific URL string to block Enable Check this item to enable this URL filter entry
91
MAC Control
MAC Control
MAC Address Control Check this item to enable MAC control service Filter out or only accept the following MAC address connect to Internet Select ldquoFilter outrdquo the MAC addresses list in the following table will be block out to access the Internet Or ldquoAcceptrdquo to allow them to connect to the Internet freely
Configure MAC Address
MAC Address List all the MAC address want to block then connect to Internet Comment Put your note why you set here Action You can select one of the MAC addresses recorded by the home gateway or enter the new entry manually Add Click this button a new entry will be added to the MAC Control table Delete Click this button to delete this entry if it is not necessary
92
1285 Routing
Routing Table
To set this
Destination LAN IP This field indicates the destination IP of this route entry Subnet Mask This field indicates the Subnet Mask of this route Gateway If a packetrsquos destination IP address do ldquobit andrdquo operation with the ldquoSubnet Maskrdquo equals to the ldquoDestination LAN IPrdquo the packet will send to the Gateway Interface This field indicates which network interface deal the connection Refresh Refresh the routing information from the home gateway again
93
Static Routing
Destination LAN IP This field indicates the destination IP of this route entry Subnet Mask This field indicates the Subnet Mask of this route Gateway If a packetrsquos destination IP address do ldquobit andrdquo operation with the ldquoSubnet Maskrdquo equals to the ldquoDestination LAN IPrdquo the packet will send to the Gateway Add Click this button to add this entry to routing table statically Delete Click this button to delete this static entry
94
1286 UPnP Settings UPnP
Enable UPnP Check this item to enable UPnP UPnP Port Number Set UPnP port number to announce to the UPnP control points The UPnP control points use this TCP port to send request to the home gateway Advertise Time (60-1800) Set the time interval after which the home gateway sends advertisement packets Subscribe Timeout (60-1800) The UPnP control point subscribes a request to the home gateway The home gateway keeps the request until the control point renew it unsubscribe it or after timed-out This item set the timeout value of the subscribe requests
95
Port Mapping
Remote Host This field lists remote host that connect to LAN client External Port This field lists the port of the remote host connect to LAN client Internal Client This field lists LAN client connect to the Internet Internal Port This field lists port of LAN client connect to the Internet Protocol This field lists the protocol TCPUDP of the connection Duration This field lists the duration of the connection Description This field lists the description of list port mapping The description gives you a brief note of what the entry is Refresh Refresh the UPnP port mapping from the home gateway again
96
1287 DDNS
Enabled Check this item to enable the DDNS settings Disabled Check this item to disable the DDNS settings Host Name Set your host name that need to do DDNS update DDNS Server Set the DDNS server that updates your IP address User Name The DDNS server requires you to supply a name and password to update your IP address You have to register the user name and password offline to the specific DDNS server Password The DDNS server requires you to supply a name and password to update your IP address You have to register the user name and password offline to the specific DDNS server DDNS Retry Time Set the time interval to update your IP address to ddns server
97
129 BackupRestore
1291 Configuration
Backup-RestoreConfigurations
This page let you backup Restore all of your configuration parameters on the
VoIP Router It is very good idea to back up all of your VoIP Router configuration
parameters after install
a To Backup press Download setting backup file and input the file name you
want and file location to save
b To Restore press the Browse button the select the backup configuration
parameters file to upload then press Restore After you upload the file
Press Saved modification to save your current configuration to Flash ROM
(Usually used to save currently WAN configuration)After save please
remember to Reboot the VoIP Router to let the restored parameters take
effective
Caution Never power off the VoIP Router when during Restore configure or
upgrade VoIP module or System it will cause permanent damage when power off
during writing Flash inside VoIP Router
98
1292 VoIP Module
System MaintenanceBackup-RestoreConfigurations
This page displays the current firmware module version and let you backup
Restore all of your VoIP firmware module on the VoIP Router Please use this
page to update the VoIP module firmware if necessary
a To Restore from local file press the Browse button the select the VoIP
module file to upload then press Restore After you upload the file Press
Saved modification to save your current configuration to Flash ROM
(Usually used to save currently WAN configuration)After save please
remember to Reboot the VoIP Router to let the restored parameters take
effective
b To Restore from Upgrade server please input the URL address of upgrade
server and press the APServer to link to upgrade server to get latest version
firmware and upgrade automatically
Caution Never power off the VoIP Router when during Restore configure or
upgrade VoIP module or System it will cause permanent damage when power off
during writing Flash inside VoIP Router
99
1293 Reboot System
Reboot System
Use the Reboot button on this page to reboot your VoIP Router before you
reboot please make sure you have to press the Saved modification to save your
current configuration to Flash ROM otherwise all the change will be disappear
after reboot
100
1210 Save Modification
Save Modification
Most of the VoIP Router parameters will take effective after you modify but it is
just temporary stored on RAM only it will disappear after your reboot or power
off the VoIP Router to save the parameters into Flash ROM and let it take
effective forever please remember to press the Save Modification button
after you modify the parameters
101
- 11 Access to Web UI
- 12 Web UI Management
-
- 121 Web UI Management Overview
- 123 Register Server Setting
- 124 Auto Provision function
- 125 Advance Setup
- 126 Application
- 127 System
- 128 Route Function(System Setup)
- 129 BackupRestore
- 1210 Save Modification
-

Port Message
Port Type Display
name Status Connected IP Caller ID Start Time End Time
Talking
Sec Dialed number Release by
1 FXS Idle 1721671 20040219
135510
20040219
135543 28 601 (146)onHangup
2 FXS Idle
c Call by Domain name
Index Remark Area Code Min Digits Max Digits IP Address Strip Prefix Profile Delete
2 JackSH 8621 4 4 Voiprouterdyndnsorg 4 01390244027
2 Delete
3 China 86 2 5 Chinaproxycom
In this case by route rule 2 we set up a short cut number 8021 for dial out
number 013902440272 to another VoIP router user just press 8021 will cause
cut 4 digits (8621) define on Strip and add the number defined on Strip
(013902440272) then call to that gateway(voiprouterdyndnsorg) and
number(013902440272)
In this case by route rule 3 we assume we have another VoIP Router locate at
chinaezvoncom URL and we use prefix 86 to call out for this gateway the
minimum digits for phone is 2 digits and the maximum phone number digits is
5 any phone number contain over 5 digits will be truncated to 5 digits like
862013 will be truncated to 86201 for call out
Caution
There is order rule on this routing table the VoIP router will check the route
table items by index order one by one That mean in above case if user put
the area code item 86(index 1) above 8621(index 2) then the route item
8621 will never been used
23
Index Remark Area Code Min Digits Max Digits IP Address Strip Prefix Profile Delete
1 Take_All 86 10111
2 Never_Used 8621 20111
never
d Strip and Prefix
User is easy to combine using Strip and Prefix define to modify the phone
number from phone to real call out phone number for example if the VoIP
router is installed on Taipei and use another Gatekeeper to service global
service When user just dial 10 digits Taipei phone number like 02-12345678(do
not need to press key because Max Digits setting is 10) and the VoIP router
will stripe the 02 ( 2 digits defined on Strip) add the country code 8862 (defined
on Prefix) then send 8862-12345678 out for VoIP call see below example
Index Remark Area Code Min Digits Max Digits IP Address Strip Prefix Profile Delete
1 Taipei 02 10 Gk 2 8862 Delete
By above setting When you dial 0212345678 you can check the real call out IP
and phone number will change to 886212345678 at the VoIP Setup Port
Status
Port Message
Port Type Display
name Status Connected IP Caller ID Start Time End Time
Talking
Sec Dialed number Release by
1 FXS Idle 1721671 20040219
135510
20040219
135543 28 886212345678 (146)onHangup
2 FXS Idle
e Call via Gatekeeper SIP Register server
This VoIP router can register up to 4 servers for example
Index Remark Area
Code
Min
Digits
Max
Digits IP Address Strip Prefix Profile Delete
1 Via_GK2 1 gk2 Delete
24
25
2 GK2_3_1
2 gk2_3_1 Delete
3 GK_ALL 3 gk Delete
By Index 1 if user input any phone number with prefix code is 1 The VoIP
Router will call out via Gatekeeper 2
By Index 2 if user input any phone number with prefix code is 2 The VoIP
Router will try to call out by Gatekeeper 2 ( if register to Gatekeeper 2 is
successful) if Gatekeeper 2 is not available it will check Gatekeeper 3 then
check Gatekeeper 1That mean if register to gk2 is failure and register to gk3 amp
gk1 is successful the VoIP router will call out via gk3
You can check the Gatekeeper register status on VoIP SetupRegister
ServerRegister Status
f Call to different IP port
The default IP port used by VoIP router is 1720 for H323 and 5060 for SIP if
work with remote side of VoIP Router or gateway is change another port
number for VoIP please assign another port number after destination IP or URL
Please make sure both side use same port number for VoIP call otherwise it can
not make call You can change the VoIP router default listen port on
Index Remark Area Code Min Digits Max Digits IP Address Strip Prefix Profile Delete
1 Port_1719 1 101111719 Delete
2 Port_8495 2 Chinaproxycom8495 Delete
g Profile
Define the optional special VoIP parameters when calling to the destination
Please input the name you defined on the profile (VoIP SetupRouting
SetupRouting Profile) list
Example if user set the VoIP Call Out amp Routing Profile like below
Index Remark Area Code Min Digits Max Digits IP Address Strip Prefix Profile Delete
1 UsePF1 1 gk1 PF1 Delete
2 UsePF2 2 10112 PF2 Delete
26
3 UseDefaultPF 3 Gateproxycom Delete
Index Name VAD CODEC H245
Tunneling
DTMF
Relay
T38
FAX Relay
Package
Frame
Q931
Fast
Start
ID1 AS ID2 AS ID3 AS ID4 AS Delete
1 PF1 ON G7231 ON Out band ON 3 ON
00001 H323 1001 E164 Delete
2 PF2 ON G7231 ON In band ON 3 OFF
00002 H323 1002 E164 Delete
When VoIP call out number with prefix 1 will use the Profile named PF1 (H323
ID1 = 0001 E164 ID=1001 DTMF Relay=Out band Q931 Fast Start=ON) to
Call out VoIP
When VoIP call out number with prefix 2 will use the Profile named PF2 (H323
ID1 = 0002 E164 ID=1002 DTMF Relay=In band Q931 Fast Start=OFF) to
Call out VoIP
When VoIP call out number with prefix 3 because there is no Profile assigned it
will use the default value for VoIP out
h Delete Delete this rule item on routing table
To add new rule item on routing table please assign the item number you want
to insert before input AREA CODE then press ADD button to add it on the list
Then modify the necessary information on the routing table list
Please remember to press the modify button to take it effect For store back to
flash memory please press Syetem MaintenanceSave Modification
1227 VoIP Call In Routing Table Setting
VoIP SetupRouting SetupVoIP Call In
This page let you define the routing rule for Call in from VoIP (VoIP Router got
a VoIP call required form Network and then translates the phone number
passed from remote side VoIP Router to the real dial out number amp line base on
this VoIP Call In routing table) Each time when the VoIP Router received a VoIP
call from Network it will check with Area Code to see which rule matched to
service if no rule matched it will refuse to call out and will bound back the call
When the VoIP Router received a VoIP called from network it will check below
rules fields then decide line and number to dial out
a Area Code Define the Prefix number this rule service any VoIP called
from network dialed number prefix digits matched with the rule will call out
to phone by this rule define Please Notify there is a compare order rule on
this routing table That mean the VoIP Router will check the rule list from
top to bottom one by one any rule item matched with the prefix digits that
user press will go to call out directly no regard to the rest rules below For
Example if a rule item for area code 8862 is on Index 1 another rule below
that like index 2 for area code 886 will be ignored
Index Area Code Strip Prefix Maximum Minimum From To LineNo Gatekeeper Alert Profile Forward Delete
1 886 Delete
2 8862 Delete
Be ignored
b AuthAuthorization IP check enable Enable IP range authorization
function When Enable the gateway will check the remote caller IP 27
28
range setting on VoIP SetupRouting SetupAuthorization if it is within the authorization the gateway will allow the call out but if the remote callerrsquos IP is not in the range it will refuse to call out and terminate this call
IndexArea
Code
AuthStrip Prefix MaximumMinimumFrom To LineNo RS Verify
CallWaitingAlert Profile Forward Delete
1 8862 4 Delete
c Strip Number of digits will be ignored by user input For example if
received VoIP call number is 886212345678 and the STRIP field is setting to
4 the first 4 digits 8862 will be truncated and actually call out number will
be 12345678
Index Area Code Strip Prefix Maximum Minimum From To LineNo Gatekeeper Alert Profile Forward Delete
1 8862 4 Delete
Ex VoIP Call in number is 886212345678 and real dial out number is
12345678 by strip 4 digits
d Prefix The numbers will be added on the prefix of received VoIP call
number For examples if received VoIP call number is 12345678 and the
PREFIX field is setting to 0028862 the actually call out number will be
002886212345678
Index Area Code Strip Prefix Maximum Minimum From To LineNo Gatekeeper Alert Profile Forward Delete
1 0028862 Delete
Ex VoIP Call in number is 12345678 and real dial out number is
0028862-12345678 by add 0028862 prefix
Another example if user VoIP router received a call number 90 STRIP field
is setting to 2 and the PREFIX field is setting to 012345678 the actually
call out number will be 012345678 ( mean wait 1 second for PBX get line
for dial out to PSTN the wait time for one can be set on VoIP SetupLine
ConfigureLine Feature) This example is especially for speed dial
function
29
Index Area Code Strip Prefix Maximum Minimum From To LineNo Gatekeeper Alert Profile Forward Delete
1 90 2 012345678 Delete
Ex VoIP Call in number is 90 and real dial out number is 012345678 by
stripe 2 digits and add 012345678 prefix so the real dial out number is
012345678
e Maximum Define the maximum digits of call number allow to dial If the
length of dial number after pervious STRIP amp PREFIX process is more than
the setting it will deny dialing out For example you can set the Maximum
dial out digits is 8 for call to local area phone only any VoIP call in attempt
to dial 0712345678 out of 8 digits for call out long distance will been deny
to call out
IndexArea Code Strip Prefix Maximum Minimum From To LineNo Gatekeeper Alert Profile Forward Delete
1 8 Delete
Ex VoIP Call in number is 0712345678 and Maximum setting to 8 the VoIP
router will deny to call out
f Minimum Define the minimum digits of call number allow to dial If the
length of dial number after pervious STRIP amp PREFIX process is less than
the setting it will deny dialing out For example if set Minimum to 4 any
VoIP call in attempt to dial number less than 4 digits like 110 911 will been
deny to call out
Index Area Code Strip Prefix Maximum Minimum From To LineNo Gatekeeper Alert Profile Forward Delete
1 4 Delete
Ex VoIP Call in number is 911 and Minimum setting to 4 the VoIP router will
deny to call out
g From Define the beginning line number for service this area code VoIP call
For example if user assigned FROM 1 TO 1 for AREA CODE 601 in this
routing table then any VoIP call for call in number 601 will ring the line 1
only
h To Define the ending line number for service this area code VoIP call
30
Index Area Code Strip Prefix Maximum Minimum From To LineNo Gatekeeper Alert Profile Forward Delete
1 601 1 1 Delete
2 602 2 2 Delete
3 Delete
Ex Any VoIP Call in number with prefix 601 will ring the line 1 and Any VoIP
Call in number with prefix Call in number 602 will ring the line 2 any other
numbers will ring any available (not busy) lines
i Line No Click to enable if you want to force compare with the line number
setting on LINE CONFIGURE menu (VoIP SetupLine ConfigureLine
Setting) If the dial number after pervious STRIP amp PREFIX process is
matched with the line number setting the VoIP call will ring the dedicate
phone line that assigned with matched number
j RS Verify Assign which proxy to authorize this incoming VoIP call before
call out For example if the dial number should be checked by server 1
setting on the server menu (VoIP SetupRegister Server) please
input rs1 for server 1 You can input rs2 for server 2rs for all the servers
available ( search sequence rs1 gt rs2 gt rs3 gt rs4) rs3_2_1 will try rs3
first then rs2 then rs1
Index Area Code Strip Prefix Maximum Minimum From To LineNo Gatekeeper Alert Profile Forward Delete
1 1 Rs1 Delete
2 2 Rs Delete
3 3 rs3_2_1 Delete
The called and the caller have to register on the same rs When the caller
dial the number It can obtain a authorized number from rs and the called
has got the call after the rs confirmed that the caller had gotten
authorization otherwise it will send busy tone
This confirmation only can apply in through rs to make a dial moreover
both sides have register the same rs If the dialing-rule is IP point-to-point
mutually dials and because has no authorization by rs this connection will
be unable to put through
k Call WaitingEnable or Disable the call waiting function
Enable During Talk you can answer another phone call and
31
hold the original conversation When some one call in when you are busy on another phone call you will hear a du-du call waiting signal please use flash key on your phone to hold the original call and answer the incoming call press again flask key will switch back the original call party
Disable Disalbe the Call waiting function The gateway will reply the busy to remote side when the line is on used
Index Area Code Auth Strip Prefix Maximum Minimum From To LineNo RS Verify CallWaiting Alert Profile Forward Delete
1 1 Rs1 Enable Delete
2 2 Rs Delete
3 3 rs3_2_1 Delete
l Alert Control the Ring Back tone generate timing
Mode 0 When this VoIP Router get ring back tone from phone line it
will send the ring Alert signal to remote VoIP Router for generate ring
back tone
Mode 1 Before this VoIP Router dial to phone line it will send the ring
Alert signal to remote VoIP Router for generate ring back tone
Mode 2 After this VoIP Router finish dial out number to phone line it
will send Connect OK signal to remote VoIP Router
Mode 3 Before this VoIP Router dial to phone line it will send the ring
Alert signal to remote VoIP Router for generate ring back tone after
this VoIP Router finish dial out number to phone line it will send
Connect OK signal to remote VoIP Router
m Profile Define the optional special VoIP parameters when received on this
destination Please input the name you defined on the profile list (VoIP
SetupRouting SetupRouting Profile)
Example if user set the VoIP Call in amp Routing Profile like below
Index Area Code Strip Prefix Maximum Minimum From To LineNo Gatekeeper Alert Profile Forward Delete
1 1 PF1 Delete
2 2 PF2 Delete
3 3 Delete
Index Name VAD CODEC H245
Tunneling
DTMF
Relay
T38
FAX Relay
Package
Frame
Q931
Fast
Start
ID1 AS ID2 AS ID3 AS ID4 AS Delete
32
1 PF1 ON G7231 ON Out band ON 3 ON
00001 H323 1001 E164 Delete
2 PF2 ON G7231 ON In band ON 3 OFF
00002 H323 1002 E164 Delete
When VoIP call in number with prefix 1 will use the Profile named PF1
( H323 ID1 = 0001 E164 ID=1001 DTMF Relay=Out band Q931 Fast
Start=ON) to answer the VoIP Call in
When VoIP call in number with prefix 2 will use the Profile named PF2
( H323 ID1 = 0002 E164 ID=1002 DTMF Relay=In band Q931 Fast
Start=OFF) to answer the VoIP Call in
When VoIP call in number with prefix 3 because there is no Profile assigned
it will use the default value for VoIP Call Out
n Forward Define the profile name for forward the unanswerable VoIP call
on this Call In rule Please input the name you defined on the Voip SetupRouting Setup Forwarding
Example if user set the VoIP Call in amp Forward Profile like below
Index Area Code Strip Prefix Maximum Minimum From To LineNo Gatekeeper Alert Profile Forward Delete
1 601 1 1 CF1 Delete
2 602 2 2 CF2 Delete
Other 10111104
No Name Always OnBusy No Answer No Answer Sec Delete
1 CF1 hkbigcom301 Delete
2 CF2 assistbigcom assistbigcom610 30 Delete
In this case when the VoIP router received a VoIP call in number with prefix
501 ( not 601 or 602 prefix defined on Call In Routing table) it will forward
this call to the IP amp number defined on Other filed(in this case
10111104 it mean it will forward this call to IP 10111 and calling
33
number will change to 104)
When the line 1 user is going to have a tour to another location with same
VoIP router equipment user setup the called prefix number 601 forward to
profile name CF1 and in CF1 profile the Always field is set to
hkbigcom301 that mean any call number with prefix 601 will always be
forward to another VoIP Router locate at hkbigcom and dial out number is
301
When the line 2 is busy and another VoIP with prefix 602 Call in it will
forward it to the assistbigcom with same number (defined on OnBusy)
When VoIP Call In number with prefix 602 it will ring the line 2 for 30
seconds (defined on No Answer Sec) if no one answer line 2 within 30
seconds it will forward the call to another VoIP Router located at
assistbigcom and dial out number is 610 (defined on No Answer)
o Delete Delete this rule item on routing table
To add new rule item on routing table please assign the item number you
want to insert before input AREA CODE then press ADD button to add it on
the list Then modify the necessary information on the routing table list
Please remember to press the modify button to take it effect For store back
to flash memory please press Save Modification (Syetem
MaintenanceSave Modification)
1228 VoIP Call In IVR Setting
VoIP SetupRouting SetupVoIP Call In IVR
When Enable the [Prompt Voice for VoIP Call In function on VoIP
SetupAdvance SetupPrompt Voice all the remote party of VoIP caller will hear the customization upload voice file and need press the destination number All the input number will be checked the number length and be stripadd prefix defined on this page When a matched area code be processed it will use this number to check on the VoIP SetupRouting
SetupVoIP Call In to decide the final route path If no match area code rule defined on the table the gateway will response busy tone and connect failure User can use this function as the password authorization on the outbound gateway For example if we upload the voice file content on Prompt voice
for VoIP call in of VoIP SetupAdvance SetupPrompt Voice is ldquoPlease input the password and destination numberrdquo and we set a compare rule as below
Index Remark Area Code
Min Digits
Max Digits Strip Prefix Delete
1 Password check
8495 7 12 4 02 Delete
When a remote VoIP call in and want this gateway to outbound call the remote side user will hear voice prompt like ldquoPlease input the password and destination numberrdquo because there is only a compare authorization rule all the none 8495 prefix phone number will not accept to dial out and will be disconnect ( that mean we use 8495 as the outbound call authorization password) and the digits of user input phone number should between 7 to 12 (include 4 digits come from 8495)the number user input will strip the first 4 digits (8495) and add 02 prefix Then this number will be checked by VoIP SetupRouting SetupVoIP Call In For Example if user input the number is849512345678 it will strip 4 digits and add 02 prefix code the use 0212345678 to find a call out rule
34
A Time amp Digits wait for user
The VoIP Router wait user input the number digits amp time parameters as below
Time amp Digits wait for user Press
e MaxDigits Define the maximum digits wait for user press for all VoIP Call
Out if user press digits match the number defined here It will go to
translate for call out rule without needed to press key
f FirstDigitTime Define the waiting time (seconds) for user press phone
number first digit User need to press first digits before the setting time
(seconds) defined here if VoIP Router wait for the defined seconds and
there is no any digits press the VoIP Router will stop to wait and feedback
the user busy tone
g OtherDigitTime Define the waiting time (seconds) for user press phone
number secondary amp the rest digits User need to press the rest digits
before the seconds defined here if VoIP Router wait for the defined
seconds and there is no any digits press it will go to translate for call out
rule without needed to press key
BVoIP Call In IVR Routing Table
a Remark Remark for this routing rule Please use UNDERLINE to replace
the SPACE due to HTTP protocol limitation
b Area Code Define the Prefix number fit this rule any phone number prefix
digits matched with the rule will call out by this rule define Please Notify
there is a compare order rule on this routing table That mean the VoIP
Router will check the rule list from top to bottom one by one any rule item
matched with the prefix digits that user press will go to call out directly no
regard to the rest rules below For Example if a number 84951xxxxxx is
fit the rule item 1amp2 it will be processed by rule 1 and never be processed
by rule 2 that mean that rule 2 is never been used
Index Remark Area Code
Min Digits
Max Digits Strip Prefix Delete
1 Password+number 8495 7 12 4 02 Delete
2 No used rule 84951
c Min Digits define the minimum digits wait for user press for number fit
35
36
this rule if user press digits less the number defined here It will keep
waiting for input until exceed the FirstDigitTime defined time If user
press digits more then Min Digits here the VoIP Router will wait time
defined on OtherDigitTime then go to translate for call out rule without
needed to press key
d Max Digits define the maximum digits wait for user press for number fit
this rule if user press digits match the number defined here It will go to
translate for call out rule without needed to press key
j Strip the number of digits will be ignored by user input For example if
user press the number is 886212345678 and the STRIP field is setting to
4 the first 4 digits 8862 will be truncated and actually call out number will
be 12345678
k Prefix The numbers will be added on the prefix of the user press number
For examples if user press the number is 12345678 and the PREFIX field
is setting to 0028862 the actually call out number will be
002886212345678
l Delete Delete this rule item on routing table
To add new rule item on routing table please assign the item number you want
to insert before input AREA CODE and IP address then press ADD button to add
it on the list Then modify the necessary information on the routing table list
Please remember to press the modify button to take it effect For store back to
flash memory please press Syetem MaintenanceSave Modification
1229 VoIP Routing Profile Setting
VoIP SetupRouting SetupRouting Profile
This page defines the optional special VoIP parameters when makingreceived a
VoIP call For define some special parameters for different VoIP equipment or
authorize purpose please add a profile at VoIP SetupRouting Setup
Routing Profile and use the same name as the profile on the Call in Routing
Table (VoIP SetupRouting SetupVoIP Call In) or Call out Routing table
(VoIP SetupRouting SetupVoIP Call Out)
a Name Specify a profile name Please use UNDERLINE to replace the
SPACE due to HTTP protocol limitation
b VAD
ON turn on the VAD(Voice Active Detection) function
OFF turn off the VAD function please select ON for save the bandwidth
c CODEC Select different voice CODEC for VoIP communication The bit rate
of G7231 is 53k63k G729 is 8k uLaw and aLaw is 64k per second The
G7231 is default CODEC
d H245 tunneling
ON for enable H245 tunneling
OFF for disable H245 tunneling
37
38
e DTMF Relay
When select In band to transfer the DTMF during VoIP the user pressed
DTMF tone will be treat as general voice and been compressed then
transmit to remote side to decompress play back it maybe cause some
problem on duplicate or missing DTMF receive
When select Out band to transfer the DTMF during VoIP the user
pressed DTMF tone will be decode by local VoIP Router then transmit as
signal after received on received remote VoIP Router it will be
regenerate by remote VoIP Router The default value is Out band
f T38 FAX Relay
ON FAX will be transmitted by using T38 FAX over IP protocol
OFF FAX over IP is disabled
g Package Frame Select the number of voice payload frames on each UDP
package VoIP transmit More frames into one package mean save more
bandwidth The default frames on each package is 3
h Q931 Fast Start
ON Enable Fast Start capability during Q931 handshaking
OFF Disable Fast Start capability during Q931 handshaking
i ID1 User defines ID 1 during this VoIP call
j As
E164 Parameter on ID1 field is the E164 during this VoIP call
H323 ID Parameter on ID1 field is the H323 ID during this VoIP call
Calling Parameter on ID1 field is DID number during this VoIP call If
this optional is setting it will override the LINE NUMBER on line setting menu
Password Parameter on ID1 field is the password for VoIP call
Parameter defined here will used as MD5 during H235 and will not
display on the Web UI
k ID2ID3ID4 there are 4 fields for user define the ID parameters please
reference the ID1 setting above
l Delete Delete this rule item on routing table
To add new profile item on routing table please assign the number you want to
insert before input profile NAME then press ADD button to add it on the list
39
Then modify the necessary information on the routing table list
Please remember to press the modify button to take it effect For store back to
flash memory please press Save Modification (Syetem MaintenanceSave
Modification)
Here is VoIP Routing Profile setting examples below
Index Name VAD CODEC H245
Tunneling
DTMF
Relay
T38
FAX Relay
Package
Frame
Q931
Fast
Start
ID1 AS ID2 AS ID3 AS ID4 AS Delete
1 PF1 ON G7231 ON Out band ON 3 ON
00001 H323 1001 E164 Delete
2 PF2 ON G7231 ON In band ON 2 OFF
00002 H323 1002 E164 Password Delete
When using profile PF1 the parameters will be used for H323 ID1 = 0001
E164 ID=1001 DTMF Relay=Out band Q931 Fast Start=ON) to call answer
the VoIP
When using profile PF2 the parameters will be used for H323 ID1 = 0002
E164 ID=1002 DTMF Relay=In band Q931 Fast Start=OFF Password=1234
but be hidden ) to call answer the VoIP
12210 VoIP Forwarding Profile Setting
VoIP SetupRouting SetupForwarding
This page defines the forwarding behavior include
get an unmatched prefix number for VoIP call in
Line busy
No answer
Please add a profile at VoIP SetupRouting SetupRouting Profile and
put the name of profile on the Call out Routing table (VoIP SetupRouting
SetupVoIP Call Out)
a Other Define the forward IP and forward phone number when there is no
match rule setting on VoIP Call Out Routing table The format is IPphone
number or URLphone number ie all the phone number can not match a
prefix rule will be forward to the IPamp phone number define on here
b Name Specify a profile name Please use UNDERLINE to replace the
SPACE due to HTTP protocol limitation
c Always Always redirect forward to this IP(or URL)phone number All
incoming call will be forward to IP assigned here
d On Busy Redirect forward to this IP(or URL)phone number when busy an
incoming VoIP call will forward to IP assigned here when this line is busy
e No Answer Redirect forward to this IP(or URL)phone number when no
answer over the time No Answer Sec an incoming VoIP call will forward
to IP assigned here when ring time over the defined on No Answer Sec
40
41
f No Answer Sec Defined the wait seconds for redirect forward to another
IP(or URL)
g Delete Delete this rule item on routing table
h To add new rule item on routing table please assign the item number you
want to insert before input AREA CODE then press ADD button to add it on
the list Then modify the necessary information on the routing table list
Please remember to press the modify button to take it effect For store back to
flash memory please press Save Modification (System MaintenanceSave
Modification)
Example if user set the VoIP Call in amp Routing Profile like below
Index Area Code Strip Prefix Maximum Minimum From To LineNo Gatekeeper Alert Profile Forward Delete
1 601 1 1 CF1 Delete
2 602 2 2 CF2 Delete
Other 10111104
No Name Always OnBusy No Answer No Answer Sec Delete
1 CF1 hkbigcom301 Delete
2 CF2 assistbigcom assistbigcom610 30 Delete
In this case when the VoIP router received a VoIP call in number with prefix 501
( not 601 or 602 prefix defined on Call In Routing table) it will forward this call
to the IPamp number defined on Other filed(in this case 10111104 it mean it
will forward this call to IP 10111 and calling number will change to 104)
When the line 1 user is going to have a tour to another location with same VoIP
router equipment user setup the called prefix number 601 forward to profile
name CF1 and in CF1 profile the Always field is set to hkbigcom301 that
mean any call number with prefix 601 will always be forward to another VoIP
42
Router locate at hkbigcom and dial out number is 301
When the line 2 is busy and another VoIP with prefix 602 Call in it will forward
it to the assistbigcom with same number (defined on OnBusy)
When VoIP Call In number with prefix 602 it will ring the line 2 for 30 seconds
(defined on No Answer Sec) if no one answer line 2 within 30 seconds it will
forward the call to another VoIP Router located at assistbigcom and dial out
number is 610 (defined on No Answer)
12211 VoIP Authorization Setting
VoIP SetupRouting SetupAuthorization
When this gateway has been used for outbound call it can enable to check the
remote caller gatewayrsquos IP to decide accept or refuse the call If define the IP range
here and enable the [Auth] option on theVoIP SetupRouting SetupVoIP Call In only the IP in range will allow to call out by this gateway
43
123 Register Server Setting
1231 Register Status
VoIP SetupRegister ServerRegister Status
You Can check the register status of this gateway on this page
a MAC this gatewayrsquo MAC Address
b RS1-4 Indicate the status of 4 server register
SIPampH323 The protocol used for registering the server this gateway supports both H323 and SIP protocol
Green Indicator Successful to register server and the register phone number
Red Indicator Failure to register server and the failure reason Yellow Indicator Disable the register function
Example for Status display as above it indicates
1 The register to Server 1 function is disabled (SIP) 2 Use SIP protocol to register to register as RS2 the register method is
4 lines independent Each lines use different number to register 25618801 25618802 5618803 25618804 Line 2 and Line 4 are disabled to register Line 1 and Line 3 are successful to register
3 Use H323 protocol to register as RS3 all 4 lines share same register 102003
4 Use SIP protocol to register as RS4 each lines use different number as 102002 102003 77201111 You can see that line 2 and line 3 register failures The line 2 failure reason is ldquounauthorizedrdquo and Line 4 failure reason is ldquonot numberrdquo
Please setup each register parameters at VoIP SetupRegister StatusServer1~4 44
1232 Setup the Register ServermdashSIP Protocol
圖 112 VoIP SetupRegister ServerServer
If you need use this gateway to register to the H323 gatekeeper or SIP registerproxy server you can setup the account for register here This gateway can register up to four Servers simultaneously
a Protocol Select use SIP or H323 protocol to register to server by different protocol the gateway will adjust the page for different parameters for input
b Register Method
Global All the lines of the gateway share same account to register Independent Each lines can set differentsame account independently
for register c Enable SIP Proxy
Enable Register SIP Proxy server function Disable Register SIP Proxy server function
d SIP Proxy URL Please input the IPURL of the SIP proxy server e Port [1~65535] Port number used for register to server The SIP
protocol default is 5060 please make sure you have same port number setting on the gateway and server
45
46
f Thought Outbound Proxy
When your gateway is installed behind the firewall or NAT you maybe need use Proxy server to relay your call If so please input the Outbound proxy serverrsquos IP here
g Prot[1~65535] Port number used for register Outbound Proxy Server h TTL(Registration interval)[10-7200s] Some SIP Server need you
set the time interval (seconds) for send the expire signal to register server keep alive
i Domain Some SIP Server need you input the Domain for register
please input here j Proxy Require Some SIP Server (Nortel) need you input the more
information for proxy function please input here k Line Number index of lines l Type Interface type of the line
FXO Analog phone interface for connect to PSTN or PBX extension line FXS Analog phone interface for connect to phone set or PBX Co line
m Remark Remark for this routing rule Please use UNDERLINE to replace the
SPACE due to HTTP protocol limitation
n Number Register phone number Some SIP Server needs this to
parameters for register o Account Account for register to SIP server
p Password Password for register to SIP server q Conference ID Some SIP Server requires an ID to enable the
conference function please input the ID here to enable that r Enable Enable or disable independently each line for register
1234 Setup the Register ServermdashH323 Protocol
VoIP SetupRegister ServerServer
When Select use H323 to register gatekeeper please input the flow information for register
s Register Method
Global All the lines of the gateway share same account to register
Independent Each line can set differentsame account independently for register
a Enable H323 Gatekeeper
Enable Register H323 Gatekeeper function Disable Register H323 Gatekeeper function
b Gatekeeper URL Please input the IPURL of the Gatekeeper server
c Port[1~65535] Port number used for register to server The H323
protocol default is 1719 please make sure you have same port number setting on the gateway and ser
47
48
d GK ID Some Gatekeeper Server need you input an ID for register
please input here
e Proxy for NAT When your gateway is installed behind the firewall
or NAT you maybe need use Proxy server to relay your call If your gatekeeper supports this proxy function you can enable gateway function here to use that
f Line Line Number index of lines t Type Interface type of the line
FXO Analog phone interface for connect to PSTN or PBX extension line
FXS Analog phone interface for connect to phone set or PBX Co line
g Remark Remark for this routing rule Please use UNDERLINE to replace
the SPACE due to HTTP protocol limitation
h E164 phone number used for register to server
i H323 ID Account name used for register to gatekeeper
j Password Password used for register to gatekeeper
k Enable Enable or disable independently each line for register
Please remember to press the Modify button to take it effect For store back to
flash memory please press Save Modification (Syetem MaintenanceSave
Modification)
124 Auto Provision function
To use the auto provision function the system have to install a dedicate Auto Provision Server for keep all parameters for installed gateways When Enable the Auto Provision function the System administer can modify all the Parameters of each gateway on the local Provision Server and remote gateway will automatic download all the parameters from Provision Server The Gateways can link up to five provision servers simultaneously for
Redundancy backup the system
VoIP SetupProvision
a Provision SetEnable or Disable auto provision function on this
gateway When Enable all the function parameters will download from remote Provision server
b Provision Sever1~5 Provision server connection status 49
50
It will indicate the status of linking to each Provision Servers The gateway will link to one of the five setting Provision Server each time If successful link it will display green indicator If failure link it will display red indicator The yellow indicator means it is disable
c Last link time Display the Date amp Time for last successful link to Provision server on this gateway
d Numbers of successful linkDisplay the times of successful linking
from Provision Server to this gateway
e Numbers of successful updateDisplay the times of successful
linking and update the parameters from t Provision Server to this gateway
f Last link actionDisplay the latest action command for provision
function
g GatewayDisplay the Network router gateway IP address for used
on the Internet connection
h Provision Server IP User can manual add a new Provision Server by add its IP here and press Link Please remember enable auto provision function before you input the new Provision Server IP
For store back to flash memory please press Save Modification (Syetem
MaintenanceSave Modification)
125 Advance Setup
1251 NAT Traversal
VoIP SetupAdvance SetupNAT Traversal
If your VoIP gateway is installed behind NAT you may need a special configuration and server to establish the VoIP communication this gateway support several method for NAT Traversal as below
By Outbound Proxy User can appoint an Outbound Proxy Server to handle the NAT traversal on VoIP SetupRegister SeverServer
Declare NAT IP address Select to enable the input the NAT router IP of the network
Use STUN server
Enable STUN and input the STUN serverrsquos IP for handle the NAT traversal you can input 2 sets of STUN servers IP
The Gateway will display the system found NAT IP address
For store back to flash memory please press Save Modification (System
MaintenanceSave Modification)
51
1252 Listen Port
VoIP SetupAdvance SetupListen Port
In this page user can define the usage port for setup the VoIP communication Both side of gateways need use the same port for begin VoIP communication
a SIP Listen Port Define the listen port for SIP protocol the default port is 5060 input range from 1024 to 65535
b H323 Call Signal Port Define the Call signal port for H323
protocol the default port is 1720 input range from 1024 to 65535
c H323 Gatekeeper Listen Port Define the Gatekeeper listen port for H323 protocol the default port is 1719 input range from 1024 to 65535
d RTP Initial Port Define the RTP package initial port the input
range from 1024 to 65535 the gateway will display the used UDP ports due to multiple lines connection
After modify and press Modify system will save and reboot automatically to take it effective
52
1253 VoIP Package
VoIP SetupAdvance SetupVoIP Package
User can define the parameters relative about VoIP package on this page
Jitter Buffer(ms) Define the Jitter buffer size input range is from 20 to 200ms
VoIP DTMF Relay Mode Define the relay mode for DTMF signal
In band When local gateway detects a DTMF signal it will not decode it The DTMF signal will been compressdecompress as VoIP voice package
Out band When local gateway detects a DTMF signal it will decode it and relay it as a data package separately The remote gateway will regenerate the DTMF signal after receive the DTMF data package System default is relay DTMF by out band mode
VoIP DTMF Relay Mode (Out band) Define 2 methods to relay DTMF when select Out band relay mode
by SIPRFC2833 (SIP protocol) or H323H245 (H323 protocol) by SIP INFO (SIP protocol) or Q931 (H323 protocol)
RFC2833 Payload number for DTMF[96~127]
Define the DTMF token on RFC2833 input range form 96 to 127 53
54
Silence Detection Suppression Enable or disable the Silence DetectionVAD function When Enable if local gateway detect a silence situation ( no talk) it will send a VAD package rather than a full voice package for remote side to active CNG ( Comfort Noise Generation) to save the bandwidth The default is Enable to save the bandwidth
Prefer CODEC
In this table you can define the prefer CODEC The priority 1 selection is highest priority By different CODEC user can select different payload size per package as below
G711 uLaw 20304050607080ms G711 aLaw 20 304050607080ms G7231 306090ms G729a 20304050607080ms G726 20304050607080ms None none
The gateway will calculate and show approximately bandwidth for one VoIP call
1254 RTP Packet Summary
VoIP SetupAdvance SetupRTP Packet Summary
On this page user will know the RTP package summary about last VoIP call
Line number of line Using CODEC ex G7231 G729a Source IP Remote side IP Source Port Remote side port Packet Interval interval time between 2 packets(ms) Packet Send number of packets sent Packet Received number of packets received Packet Lost number of lost packets
55
1255 Flash amp Call waiting
VoIP SetupAdvance SetupFlash amp Call waiting
On this page user can define the parameters relative to the FLASH key and Call
Waiting function These functions usually work with PBX
Token for flash key on VoIP() Define the token for flash key during VoIP protocol ( use ldquo ldquo by default)
Flash Signal generate length
Define the pause time (ms) for one ldquordquo symbol at Routing SettingVoIP Call Out This pause till is useful for PBX seize the trunk line from extension line The default time is 1000ms Input range from 100 to 3000ms
Flash Signal Detect Threshold Define the threshold for valid FLASH signal Only the flash time length between setting between min to max is accept by the gateway
Call waiting from PSTN when VoIP talking
EnableDisable the Call Waiting function from PSTN line when talking by VoIP
Call waiting from VoIP when PSTN talking
EnableDisable the Call Waiting function from VoIP when talking by PSTN line
56
1256 Gain
VoIP SetupAdvance SetupGain
This page defines different function gain on the gateway
Gain when Dial tone phase
When phone off hook user will hear the dial tone generated from the gateway sser can adjust the playrecord gain during this phase for stable DTMF detection After connection the gains setting here is no use the gateway will adjust the gain setting on Line ConfigureLine setting
Play Transmit gain from network to line Adjust the speaker volume on the handset Higher value will louder the speaker on local side
Record Receive gain from line to network Adjust the microphone volume on the handset Larger value which will amplifier the MIC volume on local site
Incorrect value will cause the gateway can not receive the DTMF user pressed on phone set please use the default 0dB if no other issue
DTMF Generate DSP play Gain [-29~3]
Setting the internal gain used by DSP for generate the DTMF signal incorrect value will cause the DTMF can not accept by other telephone equipment Please use the default value if no other issue
Call progress Tone DSP play Gain[-31~0]
Setting the internal gain used by DSP for generate the CPT ( Call Progress Tone) Incorrect value will cause the DTMF can not accept by other telephone equipment Please use the default value if no other issue
Caller ID Detection record Gain [13~-3]
57
58
Setting the Caller ID Receiver gain Incorrect value will cause the Caller ID signal can not be receive please use the default value if no other issue
1257 QoS
VoIP SetupAdvance SetupQoS
User can define the ToS field on the VoIP packet for Quality of Service control The ToS field is included these 2 parameters
Precedence bit 012 DSCP(Diffserv Code Point) bit 3~7
User can select inptut either IP Precedence or DSCP value Or input the ToS
binary code directlly
59
1258 CDR
VoIP SetupAdvance SetupCDR
The Gateway can export all the CDR (Call detail Record) to external CDR server by HTTP protocol The gateway supports up to 2 CDR servers for keep the record
Export to CDR Server Please install and enable this function if you want to keep CDR of this gateway
CDR Server IP1 Please input the IP of first CDR server if installed CDR Server IP2 Please input the IP of second CDR server if installed
60
1259 FoIP
VoIP SetupAdvance SetupFoIP
User can define the parameters relative FAX Over IP function
Maximum FoIP Rate (bps) Appoint the maximum FAX transceiver rate during FoIP
Disable Only the VoIP function is supported on the gateway FoIP is disabled
Auto Gateway will negotiation the maximum speed for FoIP with FAX machine
Appoint the Maximum speed24004800960012000 14000
T38 Low Speed Redundancy [Enable|Disable] Enable or Disable to send the double packet function during low speed T38 FoIP
T38 High Speed Redundancy [Enable|Disable]
Enable or Disable to send the double packet function during high speed T38 FoIP
61
12510 Prompt VoiceampBeep
VoIP SetupAdvance SetupPrompt Voice amp Beep
This gateway can use voice or beep to prompt the user different situation User can downloadupload their own prompt voice wave files also For prompt beep enable function it can be enable by
VoIP Call out Beep When enable the gateway will generate a beep for call out for VoIP
VoIP Call out Failure twice Beep
When enable the gateway will generate twice beep if failure to call out for VoIP
No PSTN line warming twice Beep
When enable the gateway will generate twice beep if failure to call out for PSTN usually mean there is no trunk line connect to the PSTN line port
Can not register to server warming twice Beep
When enable the gateway will generate twice beep when end user off hook the phone if the gateway failure to register to Register Server
For prompt voice enable function it can be enable by 62
63
Prompt voice for replace dial tone Use a customize voice file to replace the dial tone
Warming Prompt after VoIP out failure Annunciate a customize voice file when VoIP call failure
No PSTN Line Connected Annunciate a customize voice file when there is no trunk connected to the PSTN port and failure to call via PSTN line
Can not register to server warming prompt Annunciate a customize voice file when the gateway failure to register to Register Server
Prompt voice for VoIP call in When Remote gateway call in the gateway if enable this function the gateway will annunciate a customize voice to remote gateway user to ask the destination number this function must work with the setting rule on VoIP SetupRouting SetupVoIP Call In IVR
For enable the prompt beep or voice annunciation function please select to enable the function and click Modify Caution If enable both prompt beep and Voice annunciation on the same
function only the voice annunciation will work and will not hear the beep sound Procedure to upload customize voice wave file 1Select the function index you want to modify 2press brows select the content voice file 3 Press Restore to upload and save 4To keep the voice file permanently press Save Flash to save it The gateway only accepts the G7231 or G711 format voice file and all the 5 files size totally can not exceed 384KB
126 Application
1261 Ping test
VoIP SetupApplicationPing Test
User can use the Ping Test function to test the network status or remote device Ping DestinationPing
Target device IP for ping test
Number of Ping[1-100]Ping次數
Number of ping test maximum is 100
Ping Packet Size[56-5600 bytes] Size of ping test packet input range is between 56 to 5600 bytes
64
1262 Telnet amp SNMP
VoIP SetupApplicationTelnet amp SNMP
User can enable and set the user account for the SNMP and Telnet function of this gateway on this page
a Enable telnet server Enable Enable telnet service function user can telnet this
gateway Disable Disable telnet service function
b Enable SNMP Server
Enable Enable SNMP service function user can use SNMP on the gateway
Disable Disable SNMP service function
c User NameSet a user name for Telnet amp SNM login d Login PasswordSet the password for Telnet amp SNMP login e Confirm PasswordCheck the password again
65
127 System
1271 System Status
This page reveals the status of the gateway including WAN LAN and some hardware information Internet
This sub-block shows the Internet information of your home gateway It depends on the WAN mode connecting to your ISP The different items correspond to each WAN mode will be revealed after the common part of the Internet status sub-block Common Part
Refresh Clicking this button the browser refreshes the Internet status page to get the most update information
66
67
CableDSL This field indicates the Internet connection status Its value is Connected Disconnected or Connecting WAN IP Connected to the Internet through Cable or ADSL modem the ISP will offer the home gateway a WAN IP address to communicate with other hosts in the Internet Subnet Mask This field indicates a mask used to determine what subnet the WAN IP address belongs to An IP address has two components the network address and the host address For example consider the IP address 192168168182 with subnet mask is 2552552550 the first three numbers (192168168) represent the Class C network address and the forth number (182) identifies a particular host on this network Gateway ldquoGatewayrdquo is a node on a network that serves as an entrance to another network For the home gateway The ldquoGatewayrdquo is the next device which routes the traffic to the Internet DNS Domain Name System (or Service or Server) is an Internet service that translates domain names into IP addresses Because the domain names are alphabetic they are easier to remember However the Internet is based on IP addresses Every time you use a domain name a DNS service must translate the name into the corresponding IP address For example the domain name wwwexamplecom might translate to 1981052324 The DNS system has its own network If one DNS server doesnt know how to translate a particular domain name it will ask its upper stream server and so on until the correct IP address is returned or timed-out Secondary DNS This is the secondary DNS to use when the primary DNS does not work Domain Name Domain name is a name which identifies one or more IP addresses This field represents the domain name obtained from your ISP Connection Type There are five ways to get the WAN IP address They are DHCP STATIC PPPoE PPTP and L2TP This field indicates the way to get the WAN IP address Through Figure 3-2 to 3-6 detail all specific items of each mode
68
Gateway IP Address This field is the LAN IP address of the home gateway
Subnet Mask This field is the subnet mask of the network in the LAN side
DHCP Server The home gateway supports DHCP service This field indicates the enabled status of the DHCP Server
NAT This field shows whether the NAT is enabled or not Firewall The gateway supports firewall service This field indicates firewall service is enabled or not
Information
System Up Time Shows the time in hhmmss format from when the home gateway was powered up to the web browser requests this page System Date Shows the data and time in mmddyear hhmmss when the web browser requests this page Connected Clients This field shows how many clients in the LAN clients connect to the home gateway Runtime Code Version Shows the version of runtime code
Boot Code Version Shows version of boot code
LAN MAC Address Short for Media Access Control address a hardware address that uniquely identifies each node of a network This field indicates gatewayrsquos LAN MAC address
WAN MAC Address This field indicates gatewayrsquos WAN MAC address
69
Hardware Version Tells the version of hardware of the gateway
Serial Number This field indicates serial number
1272 System Settings
This page is used to configure the names given by the ISP if any to represent the gateway and also to set the local time zone Host Name Some ISPs request the host name to represent the home gateway Fill the host name given by the ISP or you may not be able to access the Internet successfully The maximum length of the host name is 32 bytes Domain Name User configured domain name of the network maintained by gateway NTP Server Network Time Protocol is used to obtain the time from the Internet NTP server The home gateway will resolve the NTP server from the internal URL lists If you know a better NTP server you can enter it Domain name and IP address format are both acceptable Set Time Zone Choose the time zone of you current location Daylight Saving It is a way of getting more out of the summer days by advancing the clocks by one hour during the summer time Some time zone has daylight saving You have to check this item fill out the start time and the end daylight saving time if the current time zone has daylight saving
70
1273 Date amp Time
This page is used to setting the system time of VoIP gateway it can define the correct time by which ways
71
1274 Administrator Setting
This page allows you to change the user and administration password used to manage this router for security reasons
72
1275 System Log The system log page shows the gatewayrsquos activity logs such as the Internet connectivity hacker attack intrusion detection and the wireless association The log helps you to do fault analysis or regular statistics Download Save the log to a local file Clear Clear the log Refresh Retrieve the log from the gateway and show in the text area again System log The text area shows system activities
Security log The text area shows hacker attack or firewall logs
73
Remote Log Settings
Remote Log Check this file and the gateway will send the log message to the ldquoSend Log tordquo remote host
Send Log to Set the IP address to send log
Email Log When the log buffer is full the gateway will check whether this item is enabled If enabled the gateway will send all the log messages to the ldquoSend Email tordquo email address
SMTP Server Set the SMTP Server (email server) to send the email log to You can either specify the serverrsquos name or its IP address
74
128 Route Function(System Setup)
1281 Setting WAN connection System SetupConnection
System SetupWANConnected Type
Connection Type There are five ways to connect to the Internet They are Dynamic IP Static IP PPPoE PPTP and L2TP
The cable modem ISP usually requests you to obtain the WAN IP dynamically Some ISPs request you to fill the host name To do this please go to ldquoSystemSystem Settingsrdquo page to change the host name
A Dynamic IP Address
75
Request IP address You can specify the IP address you desired But the ISP has the right to neglect it and provides you a different one MTU (576-1500) You can specify the MTU (maximum transmission unit) of your home gateway The default value is 1500 bytes and in normal case you donrsquot have to change MAC Cloning Some ISPs will identify the MAC address registered by the user If not registered the ISP wonrsquot allow the traffic to pass Enable the MAC cloning function will change WAN MAC to the registered one MAC Address The MAC address will be cloned Clone MAC Address This button is use to detect the PC which is browsing this page and make its MAC address to be the MAC address to clone
B Static IP Address
IP address assigned by your ISP Set the IP address that assigned by the ISP
76
Subnet Mask Set the subnet mask of the network ISP Gateway Address Set the ISPrsquos gateway IP address This address routes packets to Internet
C PPPoE
This page is the PPPoE configuration page Most of the ISPs request the user to connect to central office (CO) side via PPPoE acronym of Point-to-Point Protocol over Ethernet which provides authentication authorization and accounting User Name Enter the user name provided by your ISP to identify the computer using PPPoE Password Enter the password provided by your ISP to identify the computer using PPPoE Please retype your password Retype the password to make sure type correct password
77
78
Service Name Some ISP provides the service name of this PPPoE connection If so enter this item or make it blank MTU (546-1492) Maximum Transmission Unit (MTU) is the largest physical packet size measured in bytes which a network can transmit Any messages larger than the MTU are divided into smaller packets before sent In ordinary that the user does not have to worry about the MTU size the gateway routing engine will handle the MTU differences between PPP and the LAN Ethernet side But for some old PPPoE server you have to make the MTU size of the PPPoE side smaller than the default value or some Web side is not able to access PPPoE MTU should be set between 546 and 1492
Maximum Idle Time (60-3600) Set a period of time to disconnect PPPoE connection when userrsquos idle time greater than it The Maximum Idle Time is only worked on the auto-connect mode It makes no effect on manual-on mode and keep-alive mode (see Connection Mode) Connection Mode Three connection modes are designed to fit different request They are keep-alive manual-on and auto-connect mode For the manual-on mode you have to dial-on and cut out the connection manually The keep-alive mode will make the connection always on If the line is dropped the modules will try to connect to the PPPoE server always The auto-connect mode is designed to save the communication cost for the user In the beginning of powered on the link will not be built Instead the gateway monitors the traffic from LAN side to the Internet The sooner routing traffic was issued the later PPPoE link is established The gateway continually watches the LAN to WAN traffic if there is no activity for more than the Maximum Idle Time the connection will be
dropped
D DNS
This page sets the primary and secondary DNS servers which were given by your ISP or known to you When a domain name request received the gateway tries to resolve to it from the Primary Domain Name Server Resolving failed the gateway tries the Secondary sever again Static DNS Server Check this item to make the primary and secondary DNS server at the next two rows active If this field is not enabled the statically configured DNS server will not take effect Domain Name Server (DNS) Address Set your primary DNS in this field Secondary DNS Address (optional) Set your secondary DNS to use when the primary DNS does not work
79
1282 LAN Settings
SSystem SetupLANLAN Settings
The home gateway is an IP sharing device which provides the home users share the same public IP address While in the LAN side each network device must have one private IP address to do network communication This page is to set the configuration of the LAN interface of the gateway IP Address Set this to be gatewayrsquos LAN interface IP address The LAN interface address is also aced as the default gateway address to the computers in you private network Subnet Mask This field indicates a mask used to determine what subnet the LAN IP address belongs to The Gateway acts as DHCP Server Check this item if the home gateway supports DHCP server service This is the normal case that can make you free from installing a DHCP server in your home network And you can connect to the Internet just as what you have done in your company environment IP Pool Starting Address The starting address provided by DHCP service
80
IP Pool Ending Address The ending address provided by DHCP sevice Lease Time Set the lease time of the IP address to renew Local Domain Name Set the gatewayrsquos local Domain Name DNS Proxy The home gateway acts as a DNS Proxy In this case the DHCP service will set LAN interface IP address as the DNS server address and inform the clients in the DHCP renew process
DHCP Client List
This page lists all the DHCP clients in the LAN side The DHCP server is capable of administering 253 clients
81
82
Host Name This column shows the host name of the DHCP clients IP Address This column shows the IP Address of the DHCP clients MAC Address This column shows the MAC Address of the DHCP clients Static Check this item to make the IP address static and every time the client connect to the home gateway it will get the same IP address all the way Refresh Click this button the browser request the DHCP client list from the home gateway and refresh the page again Static Clients You can add static clients using this block if those clients are not current connect to the home network Fill out the ldquoHost Name IP address and the MAC Address then click the ldquoAddrdquo button they will be add to the static list and show on the DHCP client list Uncheck the static box of that entry and click the ldquoOKrdquo button this static entry will be deleted
1283 NAT
Virtual Server
This is the virtual server page which set the rules translate the private IPprivate port pairs to the public ports Private IP Set the IP address of the virtual server Private Port Set the port of the virtual server to connect to Internet Type Set the protocol of the virtual server Valid options are TCP UDP and Both Public Port Set gatewayrsquos WAN port to connect to virtual server Comment Let you put some notes to describe this entry Enabled Enable this entry
83
Special Application
Trigger Port To define the TCPUDP port range to monitor when initiating from the home network the public ports configured in this entry will be activated Trigger Type Defines the protocol type TCP UDP or both of the trigger ports Public Port This column defines the public ports opened when the trigger ports were seen You can enter multiple ports delimited by comma or a range of port by dash White space will be neglect Public Type Defines the protocol type TCPUDPBoth of the public ports Comment Let you put some notes to describe this entry Enabled Enable this entry
84
Port Mapping
The Port Mapping page does a port range mapping
85
Server IP Set one of LAN clientrsquos IP address to do port mapping Mapping Ports Set the ports to mapping from WAN to LAN You can enter multiple ports delimited by comma or a range of port by dash White space will be neglect Public Type Defines the protocol type TCPUDPBoth of the public ports Comment Let you put some notes to describe this entry Enabled Enable this entry
ALG
Some applications have to do Application Level Gateway (ALG) to monitor the transaction or monitor the payload of the packet This page let you setup them We use mnemonic nouns to describe the specific ALGs The checked entries will be enabled by the ALG processing For the Non-Standard FTP Port you have to set the port number to let the ALG take it as an FTP session
DMZ
Check this item to enable DMZ service
86
87
DMZ table This table lets you configure the DMZ hosts If you have more than one public IP Addresses you can specify each one with an associated DMZ host Public IP MZ table Address Select among the WAN IP addresses of the home gateway IP Address of Virtual DMZ Host Fill the client in the LAN side as the associated DMZ host Add Add this entry to virtual DMZ host table Delete Delete this entry from virtual DMZ host table
1284 Firewall Firewall Options
Enable Hacker Attack Protect The hackers always try to break into you system or crack down your network The gateway provides hacker attack protect modules to protect your home network Discard PING from WAN side ldquoPingrdquo is the most widely used tool to diagnose the network Hackers use ldquopingrdquo to discover your gateway firstly and try to hack your home network later Discard ldquopingrdquo from WAN side prevent the hacker from discovering your home network by using ldquopingrdquo Disallow to PING the Gateway Check this item not only prevent ping from the WAN side but also prevent pinging the home gateway from the LAN side The side effect is to increase the difficulty to diagnose your home network Drop Port Scan Packets The most famous Internet hacking method is the port scan ldquoPort scanrdquo
88
scans all the TCPUDP port of a station to find out the opened ports After confirmed the hackers try to connect to the listened ports to attack your computer Check this option the home gateway will drop the port scan packets to protect your system Allow to Scan Security Port (113) Some Linux email servers will try to detect the security TCPUDP port (113) If you drop it the Linux email servers will not allow you to log into Allow it can solve such kind of problem Discard NetBios Packets The NetBios protocol is widely used by the MS Windows Network Place which should only be use in the home network and should not be used in the Internet environment Strongly suggest you to check this item for security consideration Accept Fragment Packets Accept packets that are fragmented Send ICMP packets when error Send ICMP packets when the error happens in connection Advance settings Click this button the detail hacker attack patterns will appear to let you decide which one should be enabled Figure 7-2 shows the hacker attack patterns to protect
89
Client Filtering
Enable Client Filter Check this box and all the entries below will take effect IP Block the IP addresses ranged to connect to Internet Port Set the port range within which is not allowed to connect to Internet Type Set which protocol TCPIPBoth of this entry to inhibit Block Time Two options are provided for this column the ldquoAlwaysrdquo and ldquoBlockrdquo If ldquoAlwaysrdquo is selected the next two items will be neglect Otherwise the client filter function schedule the block time base on the ldquoDayrdquo and ldquoTimerdquo settings Day Set which days to block Internet connection Time Set what time in each day to block the Internet access Comment Let you put you note why you want to block the Internet access Enable Check the item to enable this entry
90
URL Filtering
Enable URL Filter Check this box and all the entries below will take effect IP The IP addresses ranged will be the candidate to check the URL when they use web browser to access the Internet URL filter string The specific URL string to block Enable Check this item to enable this URL filter entry
91
MAC Control
MAC Control
MAC Address Control Check this item to enable MAC control service Filter out or only accept the following MAC address connect to Internet Select ldquoFilter outrdquo the MAC addresses list in the following table will be block out to access the Internet Or ldquoAcceptrdquo to allow them to connect to the Internet freely
Configure MAC Address
MAC Address List all the MAC address want to block then connect to Internet Comment Put your note why you set here Action You can select one of the MAC addresses recorded by the home gateway or enter the new entry manually Add Click this button a new entry will be added to the MAC Control table Delete Click this button to delete this entry if it is not necessary
92
1285 Routing
Routing Table
To set this
Destination LAN IP This field indicates the destination IP of this route entry Subnet Mask This field indicates the Subnet Mask of this route Gateway If a packetrsquos destination IP address do ldquobit andrdquo operation with the ldquoSubnet Maskrdquo equals to the ldquoDestination LAN IPrdquo the packet will send to the Gateway Interface This field indicates which network interface deal the connection Refresh Refresh the routing information from the home gateway again
93
Static Routing
Destination LAN IP This field indicates the destination IP of this route entry Subnet Mask This field indicates the Subnet Mask of this route Gateway If a packetrsquos destination IP address do ldquobit andrdquo operation with the ldquoSubnet Maskrdquo equals to the ldquoDestination LAN IPrdquo the packet will send to the Gateway Add Click this button to add this entry to routing table statically Delete Click this button to delete this static entry
94
1286 UPnP Settings UPnP
Enable UPnP Check this item to enable UPnP UPnP Port Number Set UPnP port number to announce to the UPnP control points The UPnP control points use this TCP port to send request to the home gateway Advertise Time (60-1800) Set the time interval after which the home gateway sends advertisement packets Subscribe Timeout (60-1800) The UPnP control point subscribes a request to the home gateway The home gateway keeps the request until the control point renew it unsubscribe it or after timed-out This item set the timeout value of the subscribe requests
95
Port Mapping
Remote Host This field lists remote host that connect to LAN client External Port This field lists the port of the remote host connect to LAN client Internal Client This field lists LAN client connect to the Internet Internal Port This field lists port of LAN client connect to the Internet Protocol This field lists the protocol TCPUDP of the connection Duration This field lists the duration of the connection Description This field lists the description of list port mapping The description gives you a brief note of what the entry is Refresh Refresh the UPnP port mapping from the home gateway again
96
1287 DDNS
Enabled Check this item to enable the DDNS settings Disabled Check this item to disable the DDNS settings Host Name Set your host name that need to do DDNS update DDNS Server Set the DDNS server that updates your IP address User Name The DDNS server requires you to supply a name and password to update your IP address You have to register the user name and password offline to the specific DDNS server Password The DDNS server requires you to supply a name and password to update your IP address You have to register the user name and password offline to the specific DDNS server DDNS Retry Time Set the time interval to update your IP address to ddns server
97
129 BackupRestore
1291 Configuration
Backup-RestoreConfigurations
This page let you backup Restore all of your configuration parameters on the
VoIP Router It is very good idea to back up all of your VoIP Router configuration
parameters after install
a To Backup press Download setting backup file and input the file name you
want and file location to save
b To Restore press the Browse button the select the backup configuration
parameters file to upload then press Restore After you upload the file
Press Saved modification to save your current configuration to Flash ROM
(Usually used to save currently WAN configuration)After save please
remember to Reboot the VoIP Router to let the restored parameters take
effective
Caution Never power off the VoIP Router when during Restore configure or
upgrade VoIP module or System it will cause permanent damage when power off
during writing Flash inside VoIP Router
98
1292 VoIP Module
System MaintenanceBackup-RestoreConfigurations
This page displays the current firmware module version and let you backup
Restore all of your VoIP firmware module on the VoIP Router Please use this
page to update the VoIP module firmware if necessary
a To Restore from local file press the Browse button the select the VoIP
module file to upload then press Restore After you upload the file Press
Saved modification to save your current configuration to Flash ROM
(Usually used to save currently WAN configuration)After save please
remember to Reboot the VoIP Router to let the restored parameters take
effective
b To Restore from Upgrade server please input the URL address of upgrade
server and press the APServer to link to upgrade server to get latest version
firmware and upgrade automatically
Caution Never power off the VoIP Router when during Restore configure or
upgrade VoIP module or System it will cause permanent damage when power off
during writing Flash inside VoIP Router
99
1293 Reboot System
Reboot System
Use the Reboot button on this page to reboot your VoIP Router before you
reboot please make sure you have to press the Saved modification to save your
current configuration to Flash ROM otherwise all the change will be disappear
after reboot
100
1210 Save Modification
Save Modification
Most of the VoIP Router parameters will take effective after you modify but it is
just temporary stored on RAM only it will disappear after your reboot or power
off the VoIP Router to save the parameters into Flash ROM and let it take
effective forever please remember to press the Save Modification button
after you modify the parameters
101
- 11 Access to Web UI
- 12 Web UI Management
-
- 121 Web UI Management Overview
- 123 Register Server Setting
- 124 Auto Provision function
- 125 Advance Setup
- 126 Application
- 127 System
- 128 Route Function(System Setup)
- 129 BackupRestore
- 1210 Save Modification
-

Index Remark Area Code Min Digits Max Digits IP Address Strip Prefix Profile Delete
1 Take_All 86 10111
2 Never_Used 8621 20111
never
d Strip and Prefix
User is easy to combine using Strip and Prefix define to modify the phone
number from phone to real call out phone number for example if the VoIP
router is installed on Taipei and use another Gatekeeper to service global
service When user just dial 10 digits Taipei phone number like 02-12345678(do
not need to press key because Max Digits setting is 10) and the VoIP router
will stripe the 02 ( 2 digits defined on Strip) add the country code 8862 (defined
on Prefix) then send 8862-12345678 out for VoIP call see below example
Index Remark Area Code Min Digits Max Digits IP Address Strip Prefix Profile Delete
1 Taipei 02 10 Gk 2 8862 Delete
By above setting When you dial 0212345678 you can check the real call out IP
and phone number will change to 886212345678 at the VoIP Setup Port
Status
Port Message
Port Type Display
name Status Connected IP Caller ID Start Time End Time
Talking
Sec Dialed number Release by
1 FXS Idle 1721671 20040219
135510
20040219
135543 28 886212345678 (146)onHangup
2 FXS Idle
e Call via Gatekeeper SIP Register server
This VoIP router can register up to 4 servers for example
Index Remark Area
Code
Min
Digits
Max
Digits IP Address Strip Prefix Profile Delete
1 Via_GK2 1 gk2 Delete
24
25
2 GK2_3_1
2 gk2_3_1 Delete
3 GK_ALL 3 gk Delete
By Index 1 if user input any phone number with prefix code is 1 The VoIP
Router will call out via Gatekeeper 2
By Index 2 if user input any phone number with prefix code is 2 The VoIP
Router will try to call out by Gatekeeper 2 ( if register to Gatekeeper 2 is
successful) if Gatekeeper 2 is not available it will check Gatekeeper 3 then
check Gatekeeper 1That mean if register to gk2 is failure and register to gk3 amp
gk1 is successful the VoIP router will call out via gk3
You can check the Gatekeeper register status on VoIP SetupRegister
ServerRegister Status
f Call to different IP port
The default IP port used by VoIP router is 1720 for H323 and 5060 for SIP if
work with remote side of VoIP Router or gateway is change another port
number for VoIP please assign another port number after destination IP or URL
Please make sure both side use same port number for VoIP call otherwise it can
not make call You can change the VoIP router default listen port on
Index Remark Area Code Min Digits Max Digits IP Address Strip Prefix Profile Delete
1 Port_1719 1 101111719 Delete
2 Port_8495 2 Chinaproxycom8495 Delete
g Profile
Define the optional special VoIP parameters when calling to the destination
Please input the name you defined on the profile (VoIP SetupRouting
SetupRouting Profile) list
Example if user set the VoIP Call Out amp Routing Profile like below
Index Remark Area Code Min Digits Max Digits IP Address Strip Prefix Profile Delete
1 UsePF1 1 gk1 PF1 Delete
2 UsePF2 2 10112 PF2 Delete
26
3 UseDefaultPF 3 Gateproxycom Delete
Index Name VAD CODEC H245
Tunneling
DTMF
Relay
T38
FAX Relay
Package
Frame
Q931
Fast
Start
ID1 AS ID2 AS ID3 AS ID4 AS Delete
1 PF1 ON G7231 ON Out band ON 3 ON
00001 H323 1001 E164 Delete
2 PF2 ON G7231 ON In band ON 3 OFF
00002 H323 1002 E164 Delete
When VoIP call out number with prefix 1 will use the Profile named PF1 (H323
ID1 = 0001 E164 ID=1001 DTMF Relay=Out band Q931 Fast Start=ON) to
Call out VoIP
When VoIP call out number with prefix 2 will use the Profile named PF2 (H323
ID1 = 0002 E164 ID=1002 DTMF Relay=In band Q931 Fast Start=OFF) to
Call out VoIP
When VoIP call out number with prefix 3 because there is no Profile assigned it
will use the default value for VoIP out
h Delete Delete this rule item on routing table
To add new rule item on routing table please assign the item number you want
to insert before input AREA CODE then press ADD button to add it on the list
Then modify the necessary information on the routing table list
Please remember to press the modify button to take it effect For store back to
flash memory please press Syetem MaintenanceSave Modification
1227 VoIP Call In Routing Table Setting
VoIP SetupRouting SetupVoIP Call In
This page let you define the routing rule for Call in from VoIP (VoIP Router got
a VoIP call required form Network and then translates the phone number
passed from remote side VoIP Router to the real dial out number amp line base on
this VoIP Call In routing table) Each time when the VoIP Router received a VoIP
call from Network it will check with Area Code to see which rule matched to
service if no rule matched it will refuse to call out and will bound back the call
When the VoIP Router received a VoIP called from network it will check below
rules fields then decide line and number to dial out
a Area Code Define the Prefix number this rule service any VoIP called
from network dialed number prefix digits matched with the rule will call out
to phone by this rule define Please Notify there is a compare order rule on
this routing table That mean the VoIP Router will check the rule list from
top to bottom one by one any rule item matched with the prefix digits that
user press will go to call out directly no regard to the rest rules below For
Example if a rule item for area code 8862 is on Index 1 another rule below
that like index 2 for area code 886 will be ignored
Index Area Code Strip Prefix Maximum Minimum From To LineNo Gatekeeper Alert Profile Forward Delete
1 886 Delete
2 8862 Delete
Be ignored
b AuthAuthorization IP check enable Enable IP range authorization
function When Enable the gateway will check the remote caller IP 27
28
range setting on VoIP SetupRouting SetupAuthorization if it is within the authorization the gateway will allow the call out but if the remote callerrsquos IP is not in the range it will refuse to call out and terminate this call
IndexArea
Code
AuthStrip Prefix MaximumMinimumFrom To LineNo RS Verify
CallWaitingAlert Profile Forward Delete
1 8862 4 Delete
c Strip Number of digits will be ignored by user input For example if
received VoIP call number is 886212345678 and the STRIP field is setting to
4 the first 4 digits 8862 will be truncated and actually call out number will
be 12345678
Index Area Code Strip Prefix Maximum Minimum From To LineNo Gatekeeper Alert Profile Forward Delete
1 8862 4 Delete
Ex VoIP Call in number is 886212345678 and real dial out number is
12345678 by strip 4 digits
d Prefix The numbers will be added on the prefix of received VoIP call
number For examples if received VoIP call number is 12345678 and the
PREFIX field is setting to 0028862 the actually call out number will be
002886212345678
Index Area Code Strip Prefix Maximum Minimum From To LineNo Gatekeeper Alert Profile Forward Delete
1 0028862 Delete
Ex VoIP Call in number is 12345678 and real dial out number is
0028862-12345678 by add 0028862 prefix
Another example if user VoIP router received a call number 90 STRIP field
is setting to 2 and the PREFIX field is setting to 012345678 the actually
call out number will be 012345678 ( mean wait 1 second for PBX get line
for dial out to PSTN the wait time for one can be set on VoIP SetupLine
ConfigureLine Feature) This example is especially for speed dial
function
29
Index Area Code Strip Prefix Maximum Minimum From To LineNo Gatekeeper Alert Profile Forward Delete
1 90 2 012345678 Delete
Ex VoIP Call in number is 90 and real dial out number is 012345678 by
stripe 2 digits and add 012345678 prefix so the real dial out number is
012345678
e Maximum Define the maximum digits of call number allow to dial If the
length of dial number after pervious STRIP amp PREFIX process is more than
the setting it will deny dialing out For example you can set the Maximum
dial out digits is 8 for call to local area phone only any VoIP call in attempt
to dial 0712345678 out of 8 digits for call out long distance will been deny
to call out
IndexArea Code Strip Prefix Maximum Minimum From To LineNo Gatekeeper Alert Profile Forward Delete
1 8 Delete
Ex VoIP Call in number is 0712345678 and Maximum setting to 8 the VoIP
router will deny to call out
f Minimum Define the minimum digits of call number allow to dial If the
length of dial number after pervious STRIP amp PREFIX process is less than
the setting it will deny dialing out For example if set Minimum to 4 any
VoIP call in attempt to dial number less than 4 digits like 110 911 will been
deny to call out
Index Area Code Strip Prefix Maximum Minimum From To LineNo Gatekeeper Alert Profile Forward Delete
1 4 Delete
Ex VoIP Call in number is 911 and Minimum setting to 4 the VoIP router will
deny to call out
g From Define the beginning line number for service this area code VoIP call
For example if user assigned FROM 1 TO 1 for AREA CODE 601 in this
routing table then any VoIP call for call in number 601 will ring the line 1
only
h To Define the ending line number for service this area code VoIP call
30
Index Area Code Strip Prefix Maximum Minimum From To LineNo Gatekeeper Alert Profile Forward Delete
1 601 1 1 Delete
2 602 2 2 Delete
3 Delete
Ex Any VoIP Call in number with prefix 601 will ring the line 1 and Any VoIP
Call in number with prefix Call in number 602 will ring the line 2 any other
numbers will ring any available (not busy) lines
i Line No Click to enable if you want to force compare with the line number
setting on LINE CONFIGURE menu (VoIP SetupLine ConfigureLine
Setting) If the dial number after pervious STRIP amp PREFIX process is
matched with the line number setting the VoIP call will ring the dedicate
phone line that assigned with matched number
j RS Verify Assign which proxy to authorize this incoming VoIP call before
call out For example if the dial number should be checked by server 1
setting on the server menu (VoIP SetupRegister Server) please
input rs1 for server 1 You can input rs2 for server 2rs for all the servers
available ( search sequence rs1 gt rs2 gt rs3 gt rs4) rs3_2_1 will try rs3
first then rs2 then rs1
Index Area Code Strip Prefix Maximum Minimum From To LineNo Gatekeeper Alert Profile Forward Delete
1 1 Rs1 Delete
2 2 Rs Delete
3 3 rs3_2_1 Delete
The called and the caller have to register on the same rs When the caller
dial the number It can obtain a authorized number from rs and the called
has got the call after the rs confirmed that the caller had gotten
authorization otherwise it will send busy tone
This confirmation only can apply in through rs to make a dial moreover
both sides have register the same rs If the dialing-rule is IP point-to-point
mutually dials and because has no authorization by rs this connection will
be unable to put through
k Call WaitingEnable or Disable the call waiting function
Enable During Talk you can answer another phone call and
31
hold the original conversation When some one call in when you are busy on another phone call you will hear a du-du call waiting signal please use flash key on your phone to hold the original call and answer the incoming call press again flask key will switch back the original call party
Disable Disalbe the Call waiting function The gateway will reply the busy to remote side when the line is on used
Index Area Code Auth Strip Prefix Maximum Minimum From To LineNo RS Verify CallWaiting Alert Profile Forward Delete
1 1 Rs1 Enable Delete
2 2 Rs Delete
3 3 rs3_2_1 Delete
l Alert Control the Ring Back tone generate timing
Mode 0 When this VoIP Router get ring back tone from phone line it
will send the ring Alert signal to remote VoIP Router for generate ring
back tone
Mode 1 Before this VoIP Router dial to phone line it will send the ring
Alert signal to remote VoIP Router for generate ring back tone
Mode 2 After this VoIP Router finish dial out number to phone line it
will send Connect OK signal to remote VoIP Router
Mode 3 Before this VoIP Router dial to phone line it will send the ring
Alert signal to remote VoIP Router for generate ring back tone after
this VoIP Router finish dial out number to phone line it will send
Connect OK signal to remote VoIP Router
m Profile Define the optional special VoIP parameters when received on this
destination Please input the name you defined on the profile list (VoIP
SetupRouting SetupRouting Profile)
Example if user set the VoIP Call in amp Routing Profile like below
Index Area Code Strip Prefix Maximum Minimum From To LineNo Gatekeeper Alert Profile Forward Delete
1 1 PF1 Delete
2 2 PF2 Delete
3 3 Delete
Index Name VAD CODEC H245
Tunneling
DTMF
Relay
T38
FAX Relay
Package
Frame
Q931
Fast
Start
ID1 AS ID2 AS ID3 AS ID4 AS Delete
32
1 PF1 ON G7231 ON Out band ON 3 ON
00001 H323 1001 E164 Delete
2 PF2 ON G7231 ON In band ON 3 OFF
00002 H323 1002 E164 Delete
When VoIP call in number with prefix 1 will use the Profile named PF1
( H323 ID1 = 0001 E164 ID=1001 DTMF Relay=Out band Q931 Fast
Start=ON) to answer the VoIP Call in
When VoIP call in number with prefix 2 will use the Profile named PF2
( H323 ID1 = 0002 E164 ID=1002 DTMF Relay=In band Q931 Fast
Start=OFF) to answer the VoIP Call in
When VoIP call in number with prefix 3 because there is no Profile assigned
it will use the default value for VoIP Call Out
n Forward Define the profile name for forward the unanswerable VoIP call
on this Call In rule Please input the name you defined on the Voip SetupRouting Setup Forwarding
Example if user set the VoIP Call in amp Forward Profile like below
Index Area Code Strip Prefix Maximum Minimum From To LineNo Gatekeeper Alert Profile Forward Delete
1 601 1 1 CF1 Delete
2 602 2 2 CF2 Delete
Other 10111104
No Name Always OnBusy No Answer No Answer Sec Delete
1 CF1 hkbigcom301 Delete
2 CF2 assistbigcom assistbigcom610 30 Delete
In this case when the VoIP router received a VoIP call in number with prefix
501 ( not 601 or 602 prefix defined on Call In Routing table) it will forward
this call to the IP amp number defined on Other filed(in this case
10111104 it mean it will forward this call to IP 10111 and calling
33
number will change to 104)
When the line 1 user is going to have a tour to another location with same
VoIP router equipment user setup the called prefix number 601 forward to
profile name CF1 and in CF1 profile the Always field is set to
hkbigcom301 that mean any call number with prefix 601 will always be
forward to another VoIP Router locate at hkbigcom and dial out number is
301
When the line 2 is busy and another VoIP with prefix 602 Call in it will
forward it to the assistbigcom with same number (defined on OnBusy)
When VoIP Call In number with prefix 602 it will ring the line 2 for 30
seconds (defined on No Answer Sec) if no one answer line 2 within 30
seconds it will forward the call to another VoIP Router located at
assistbigcom and dial out number is 610 (defined on No Answer)
o Delete Delete this rule item on routing table
To add new rule item on routing table please assign the item number you
want to insert before input AREA CODE then press ADD button to add it on
the list Then modify the necessary information on the routing table list
Please remember to press the modify button to take it effect For store back
to flash memory please press Save Modification (Syetem
MaintenanceSave Modification)
1228 VoIP Call In IVR Setting
VoIP SetupRouting SetupVoIP Call In IVR
When Enable the [Prompt Voice for VoIP Call In function on VoIP
SetupAdvance SetupPrompt Voice all the remote party of VoIP caller will hear the customization upload voice file and need press the destination number All the input number will be checked the number length and be stripadd prefix defined on this page When a matched area code be processed it will use this number to check on the VoIP SetupRouting
SetupVoIP Call In to decide the final route path If no match area code rule defined on the table the gateway will response busy tone and connect failure User can use this function as the password authorization on the outbound gateway For example if we upload the voice file content on Prompt voice
for VoIP call in of VoIP SetupAdvance SetupPrompt Voice is ldquoPlease input the password and destination numberrdquo and we set a compare rule as below
Index Remark Area Code
Min Digits
Max Digits Strip Prefix Delete
1 Password check
8495 7 12 4 02 Delete
When a remote VoIP call in and want this gateway to outbound call the remote side user will hear voice prompt like ldquoPlease input the password and destination numberrdquo because there is only a compare authorization rule all the none 8495 prefix phone number will not accept to dial out and will be disconnect ( that mean we use 8495 as the outbound call authorization password) and the digits of user input phone number should between 7 to 12 (include 4 digits come from 8495)the number user input will strip the first 4 digits (8495) and add 02 prefix Then this number will be checked by VoIP SetupRouting SetupVoIP Call In For Example if user input the number is849512345678 it will strip 4 digits and add 02 prefix code the use 0212345678 to find a call out rule
34
A Time amp Digits wait for user
The VoIP Router wait user input the number digits amp time parameters as below
Time amp Digits wait for user Press
e MaxDigits Define the maximum digits wait for user press for all VoIP Call
Out if user press digits match the number defined here It will go to
translate for call out rule without needed to press key
f FirstDigitTime Define the waiting time (seconds) for user press phone
number first digit User need to press first digits before the setting time
(seconds) defined here if VoIP Router wait for the defined seconds and
there is no any digits press the VoIP Router will stop to wait and feedback
the user busy tone
g OtherDigitTime Define the waiting time (seconds) for user press phone
number secondary amp the rest digits User need to press the rest digits
before the seconds defined here if VoIP Router wait for the defined
seconds and there is no any digits press it will go to translate for call out
rule without needed to press key
BVoIP Call In IVR Routing Table
a Remark Remark for this routing rule Please use UNDERLINE to replace
the SPACE due to HTTP protocol limitation
b Area Code Define the Prefix number fit this rule any phone number prefix
digits matched with the rule will call out by this rule define Please Notify
there is a compare order rule on this routing table That mean the VoIP
Router will check the rule list from top to bottom one by one any rule item
matched with the prefix digits that user press will go to call out directly no
regard to the rest rules below For Example if a number 84951xxxxxx is
fit the rule item 1amp2 it will be processed by rule 1 and never be processed
by rule 2 that mean that rule 2 is never been used
Index Remark Area Code
Min Digits
Max Digits Strip Prefix Delete
1 Password+number 8495 7 12 4 02 Delete
2 No used rule 84951
c Min Digits define the minimum digits wait for user press for number fit
35
36
this rule if user press digits less the number defined here It will keep
waiting for input until exceed the FirstDigitTime defined time If user
press digits more then Min Digits here the VoIP Router will wait time
defined on OtherDigitTime then go to translate for call out rule without
needed to press key
d Max Digits define the maximum digits wait for user press for number fit
this rule if user press digits match the number defined here It will go to
translate for call out rule without needed to press key
j Strip the number of digits will be ignored by user input For example if
user press the number is 886212345678 and the STRIP field is setting to
4 the first 4 digits 8862 will be truncated and actually call out number will
be 12345678
k Prefix The numbers will be added on the prefix of the user press number
For examples if user press the number is 12345678 and the PREFIX field
is setting to 0028862 the actually call out number will be
002886212345678
l Delete Delete this rule item on routing table
To add new rule item on routing table please assign the item number you want
to insert before input AREA CODE and IP address then press ADD button to add
it on the list Then modify the necessary information on the routing table list
Please remember to press the modify button to take it effect For store back to
flash memory please press Syetem MaintenanceSave Modification
1229 VoIP Routing Profile Setting
VoIP SetupRouting SetupRouting Profile
This page defines the optional special VoIP parameters when makingreceived a
VoIP call For define some special parameters for different VoIP equipment or
authorize purpose please add a profile at VoIP SetupRouting Setup
Routing Profile and use the same name as the profile on the Call in Routing
Table (VoIP SetupRouting SetupVoIP Call In) or Call out Routing table
(VoIP SetupRouting SetupVoIP Call Out)
a Name Specify a profile name Please use UNDERLINE to replace the
SPACE due to HTTP protocol limitation
b VAD
ON turn on the VAD(Voice Active Detection) function
OFF turn off the VAD function please select ON for save the bandwidth
c CODEC Select different voice CODEC for VoIP communication The bit rate
of G7231 is 53k63k G729 is 8k uLaw and aLaw is 64k per second The
G7231 is default CODEC
d H245 tunneling
ON for enable H245 tunneling
OFF for disable H245 tunneling
37
38
e DTMF Relay
When select In band to transfer the DTMF during VoIP the user pressed
DTMF tone will be treat as general voice and been compressed then
transmit to remote side to decompress play back it maybe cause some
problem on duplicate or missing DTMF receive
When select Out band to transfer the DTMF during VoIP the user
pressed DTMF tone will be decode by local VoIP Router then transmit as
signal after received on received remote VoIP Router it will be
regenerate by remote VoIP Router The default value is Out band
f T38 FAX Relay
ON FAX will be transmitted by using T38 FAX over IP protocol
OFF FAX over IP is disabled
g Package Frame Select the number of voice payload frames on each UDP
package VoIP transmit More frames into one package mean save more
bandwidth The default frames on each package is 3
h Q931 Fast Start
ON Enable Fast Start capability during Q931 handshaking
OFF Disable Fast Start capability during Q931 handshaking
i ID1 User defines ID 1 during this VoIP call
j As
E164 Parameter on ID1 field is the E164 during this VoIP call
H323 ID Parameter on ID1 field is the H323 ID during this VoIP call
Calling Parameter on ID1 field is DID number during this VoIP call If
this optional is setting it will override the LINE NUMBER on line setting menu
Password Parameter on ID1 field is the password for VoIP call
Parameter defined here will used as MD5 during H235 and will not
display on the Web UI
k ID2ID3ID4 there are 4 fields for user define the ID parameters please
reference the ID1 setting above
l Delete Delete this rule item on routing table
To add new profile item on routing table please assign the number you want to
insert before input profile NAME then press ADD button to add it on the list
39
Then modify the necessary information on the routing table list
Please remember to press the modify button to take it effect For store back to
flash memory please press Save Modification (Syetem MaintenanceSave
Modification)
Here is VoIP Routing Profile setting examples below
Index Name VAD CODEC H245
Tunneling
DTMF
Relay
T38
FAX Relay
Package
Frame
Q931
Fast
Start
ID1 AS ID2 AS ID3 AS ID4 AS Delete
1 PF1 ON G7231 ON Out band ON 3 ON
00001 H323 1001 E164 Delete
2 PF2 ON G7231 ON In band ON 2 OFF
00002 H323 1002 E164 Password Delete
When using profile PF1 the parameters will be used for H323 ID1 = 0001
E164 ID=1001 DTMF Relay=Out band Q931 Fast Start=ON) to call answer
the VoIP
When using profile PF2 the parameters will be used for H323 ID1 = 0002
E164 ID=1002 DTMF Relay=In band Q931 Fast Start=OFF Password=1234
but be hidden ) to call answer the VoIP
12210 VoIP Forwarding Profile Setting
VoIP SetupRouting SetupForwarding
This page defines the forwarding behavior include
get an unmatched prefix number for VoIP call in
Line busy
No answer
Please add a profile at VoIP SetupRouting SetupRouting Profile and
put the name of profile on the Call out Routing table (VoIP SetupRouting
SetupVoIP Call Out)
a Other Define the forward IP and forward phone number when there is no
match rule setting on VoIP Call Out Routing table The format is IPphone
number or URLphone number ie all the phone number can not match a
prefix rule will be forward to the IPamp phone number define on here
b Name Specify a profile name Please use UNDERLINE to replace the
SPACE due to HTTP protocol limitation
c Always Always redirect forward to this IP(or URL)phone number All
incoming call will be forward to IP assigned here
d On Busy Redirect forward to this IP(or URL)phone number when busy an
incoming VoIP call will forward to IP assigned here when this line is busy
e No Answer Redirect forward to this IP(or URL)phone number when no
answer over the time No Answer Sec an incoming VoIP call will forward
to IP assigned here when ring time over the defined on No Answer Sec
40
41
f No Answer Sec Defined the wait seconds for redirect forward to another
IP(or URL)
g Delete Delete this rule item on routing table
h To add new rule item on routing table please assign the item number you
want to insert before input AREA CODE then press ADD button to add it on
the list Then modify the necessary information on the routing table list
Please remember to press the modify button to take it effect For store back to
flash memory please press Save Modification (System MaintenanceSave
Modification)
Example if user set the VoIP Call in amp Routing Profile like below
Index Area Code Strip Prefix Maximum Minimum From To LineNo Gatekeeper Alert Profile Forward Delete
1 601 1 1 CF1 Delete
2 602 2 2 CF2 Delete
Other 10111104
No Name Always OnBusy No Answer No Answer Sec Delete
1 CF1 hkbigcom301 Delete
2 CF2 assistbigcom assistbigcom610 30 Delete
In this case when the VoIP router received a VoIP call in number with prefix 501
( not 601 or 602 prefix defined on Call In Routing table) it will forward this call
to the IPamp number defined on Other filed(in this case 10111104 it mean it
will forward this call to IP 10111 and calling number will change to 104)
When the line 1 user is going to have a tour to another location with same VoIP
router equipment user setup the called prefix number 601 forward to profile
name CF1 and in CF1 profile the Always field is set to hkbigcom301 that
mean any call number with prefix 601 will always be forward to another VoIP
42
Router locate at hkbigcom and dial out number is 301
When the line 2 is busy and another VoIP with prefix 602 Call in it will forward
it to the assistbigcom with same number (defined on OnBusy)
When VoIP Call In number with prefix 602 it will ring the line 2 for 30 seconds
(defined on No Answer Sec) if no one answer line 2 within 30 seconds it will
forward the call to another VoIP Router located at assistbigcom and dial out
number is 610 (defined on No Answer)
12211 VoIP Authorization Setting
VoIP SetupRouting SetupAuthorization
When this gateway has been used for outbound call it can enable to check the
remote caller gatewayrsquos IP to decide accept or refuse the call If define the IP range
here and enable the [Auth] option on theVoIP SetupRouting SetupVoIP Call In only the IP in range will allow to call out by this gateway
43
123 Register Server Setting
1231 Register Status
VoIP SetupRegister ServerRegister Status
You Can check the register status of this gateway on this page
a MAC this gatewayrsquo MAC Address
b RS1-4 Indicate the status of 4 server register
SIPampH323 The protocol used for registering the server this gateway supports both H323 and SIP protocol
Green Indicator Successful to register server and the register phone number
Red Indicator Failure to register server and the failure reason Yellow Indicator Disable the register function
Example for Status display as above it indicates
1 The register to Server 1 function is disabled (SIP) 2 Use SIP protocol to register to register as RS2 the register method is
4 lines independent Each lines use different number to register 25618801 25618802 5618803 25618804 Line 2 and Line 4 are disabled to register Line 1 and Line 3 are successful to register
3 Use H323 protocol to register as RS3 all 4 lines share same register 102003
4 Use SIP protocol to register as RS4 each lines use different number as 102002 102003 77201111 You can see that line 2 and line 3 register failures The line 2 failure reason is ldquounauthorizedrdquo and Line 4 failure reason is ldquonot numberrdquo
Please setup each register parameters at VoIP SetupRegister StatusServer1~4 44
1232 Setup the Register ServermdashSIP Protocol
圖 112 VoIP SetupRegister ServerServer
If you need use this gateway to register to the H323 gatekeeper or SIP registerproxy server you can setup the account for register here This gateway can register up to four Servers simultaneously
a Protocol Select use SIP or H323 protocol to register to server by different protocol the gateway will adjust the page for different parameters for input
b Register Method
Global All the lines of the gateway share same account to register Independent Each lines can set differentsame account independently
for register c Enable SIP Proxy
Enable Register SIP Proxy server function Disable Register SIP Proxy server function
d SIP Proxy URL Please input the IPURL of the SIP proxy server e Port [1~65535] Port number used for register to server The SIP
protocol default is 5060 please make sure you have same port number setting on the gateway and server
45
46
f Thought Outbound Proxy
When your gateway is installed behind the firewall or NAT you maybe need use Proxy server to relay your call If so please input the Outbound proxy serverrsquos IP here
g Prot[1~65535] Port number used for register Outbound Proxy Server h TTL(Registration interval)[10-7200s] Some SIP Server need you
set the time interval (seconds) for send the expire signal to register server keep alive
i Domain Some SIP Server need you input the Domain for register
please input here j Proxy Require Some SIP Server (Nortel) need you input the more
information for proxy function please input here k Line Number index of lines l Type Interface type of the line
FXO Analog phone interface for connect to PSTN or PBX extension line FXS Analog phone interface for connect to phone set or PBX Co line
m Remark Remark for this routing rule Please use UNDERLINE to replace the
SPACE due to HTTP protocol limitation
n Number Register phone number Some SIP Server needs this to
parameters for register o Account Account for register to SIP server
p Password Password for register to SIP server q Conference ID Some SIP Server requires an ID to enable the
conference function please input the ID here to enable that r Enable Enable or disable independently each line for register
1234 Setup the Register ServermdashH323 Protocol
VoIP SetupRegister ServerServer
When Select use H323 to register gatekeeper please input the flow information for register
s Register Method
Global All the lines of the gateway share same account to register
Independent Each line can set differentsame account independently for register
a Enable H323 Gatekeeper
Enable Register H323 Gatekeeper function Disable Register H323 Gatekeeper function
b Gatekeeper URL Please input the IPURL of the Gatekeeper server
c Port[1~65535] Port number used for register to server The H323
protocol default is 1719 please make sure you have same port number setting on the gateway and ser
47
48
d GK ID Some Gatekeeper Server need you input an ID for register
please input here
e Proxy for NAT When your gateway is installed behind the firewall
or NAT you maybe need use Proxy server to relay your call If your gatekeeper supports this proxy function you can enable gateway function here to use that
f Line Line Number index of lines t Type Interface type of the line
FXO Analog phone interface for connect to PSTN or PBX extension line
FXS Analog phone interface for connect to phone set or PBX Co line
g Remark Remark for this routing rule Please use UNDERLINE to replace
the SPACE due to HTTP protocol limitation
h E164 phone number used for register to server
i H323 ID Account name used for register to gatekeeper
j Password Password used for register to gatekeeper
k Enable Enable or disable independently each line for register
Please remember to press the Modify button to take it effect For store back to
flash memory please press Save Modification (Syetem MaintenanceSave
Modification)
124 Auto Provision function
To use the auto provision function the system have to install a dedicate Auto Provision Server for keep all parameters for installed gateways When Enable the Auto Provision function the System administer can modify all the Parameters of each gateway on the local Provision Server and remote gateway will automatic download all the parameters from Provision Server The Gateways can link up to five provision servers simultaneously for
Redundancy backup the system
VoIP SetupProvision
a Provision SetEnable or Disable auto provision function on this
gateway When Enable all the function parameters will download from remote Provision server
b Provision Sever1~5 Provision server connection status 49
50
It will indicate the status of linking to each Provision Servers The gateway will link to one of the five setting Provision Server each time If successful link it will display green indicator If failure link it will display red indicator The yellow indicator means it is disable
c Last link time Display the Date amp Time for last successful link to Provision server on this gateway
d Numbers of successful linkDisplay the times of successful linking
from Provision Server to this gateway
e Numbers of successful updateDisplay the times of successful
linking and update the parameters from t Provision Server to this gateway
f Last link actionDisplay the latest action command for provision
function
g GatewayDisplay the Network router gateway IP address for used
on the Internet connection
h Provision Server IP User can manual add a new Provision Server by add its IP here and press Link Please remember enable auto provision function before you input the new Provision Server IP
For store back to flash memory please press Save Modification (Syetem
MaintenanceSave Modification)
125 Advance Setup
1251 NAT Traversal
VoIP SetupAdvance SetupNAT Traversal
If your VoIP gateway is installed behind NAT you may need a special configuration and server to establish the VoIP communication this gateway support several method for NAT Traversal as below
By Outbound Proxy User can appoint an Outbound Proxy Server to handle the NAT traversal on VoIP SetupRegister SeverServer
Declare NAT IP address Select to enable the input the NAT router IP of the network
Use STUN server
Enable STUN and input the STUN serverrsquos IP for handle the NAT traversal you can input 2 sets of STUN servers IP
The Gateway will display the system found NAT IP address
For store back to flash memory please press Save Modification (System
MaintenanceSave Modification)
51
1252 Listen Port
VoIP SetupAdvance SetupListen Port
In this page user can define the usage port for setup the VoIP communication Both side of gateways need use the same port for begin VoIP communication
a SIP Listen Port Define the listen port for SIP protocol the default port is 5060 input range from 1024 to 65535
b H323 Call Signal Port Define the Call signal port for H323
protocol the default port is 1720 input range from 1024 to 65535
c H323 Gatekeeper Listen Port Define the Gatekeeper listen port for H323 protocol the default port is 1719 input range from 1024 to 65535
d RTP Initial Port Define the RTP package initial port the input
range from 1024 to 65535 the gateway will display the used UDP ports due to multiple lines connection
After modify and press Modify system will save and reboot automatically to take it effective
52
1253 VoIP Package
VoIP SetupAdvance SetupVoIP Package
User can define the parameters relative about VoIP package on this page
Jitter Buffer(ms) Define the Jitter buffer size input range is from 20 to 200ms
VoIP DTMF Relay Mode Define the relay mode for DTMF signal
In band When local gateway detects a DTMF signal it will not decode it The DTMF signal will been compressdecompress as VoIP voice package
Out band When local gateway detects a DTMF signal it will decode it and relay it as a data package separately The remote gateway will regenerate the DTMF signal after receive the DTMF data package System default is relay DTMF by out band mode
VoIP DTMF Relay Mode (Out band) Define 2 methods to relay DTMF when select Out band relay mode
by SIPRFC2833 (SIP protocol) or H323H245 (H323 protocol) by SIP INFO (SIP protocol) or Q931 (H323 protocol)
RFC2833 Payload number for DTMF[96~127]
Define the DTMF token on RFC2833 input range form 96 to 127 53
54
Silence Detection Suppression Enable or disable the Silence DetectionVAD function When Enable if local gateway detect a silence situation ( no talk) it will send a VAD package rather than a full voice package for remote side to active CNG ( Comfort Noise Generation) to save the bandwidth The default is Enable to save the bandwidth
Prefer CODEC
In this table you can define the prefer CODEC The priority 1 selection is highest priority By different CODEC user can select different payload size per package as below
G711 uLaw 20304050607080ms G711 aLaw 20 304050607080ms G7231 306090ms G729a 20304050607080ms G726 20304050607080ms None none
The gateway will calculate and show approximately bandwidth for one VoIP call
1254 RTP Packet Summary
VoIP SetupAdvance SetupRTP Packet Summary
On this page user will know the RTP package summary about last VoIP call
Line number of line Using CODEC ex G7231 G729a Source IP Remote side IP Source Port Remote side port Packet Interval interval time between 2 packets(ms) Packet Send number of packets sent Packet Received number of packets received Packet Lost number of lost packets
55
1255 Flash amp Call waiting
VoIP SetupAdvance SetupFlash amp Call waiting
On this page user can define the parameters relative to the FLASH key and Call
Waiting function These functions usually work with PBX
Token for flash key on VoIP() Define the token for flash key during VoIP protocol ( use ldquo ldquo by default)
Flash Signal generate length
Define the pause time (ms) for one ldquordquo symbol at Routing SettingVoIP Call Out This pause till is useful for PBX seize the trunk line from extension line The default time is 1000ms Input range from 100 to 3000ms
Flash Signal Detect Threshold Define the threshold for valid FLASH signal Only the flash time length between setting between min to max is accept by the gateway
Call waiting from PSTN when VoIP talking
EnableDisable the Call Waiting function from PSTN line when talking by VoIP
Call waiting from VoIP when PSTN talking
EnableDisable the Call Waiting function from VoIP when talking by PSTN line
56
1256 Gain
VoIP SetupAdvance SetupGain
This page defines different function gain on the gateway
Gain when Dial tone phase
When phone off hook user will hear the dial tone generated from the gateway sser can adjust the playrecord gain during this phase for stable DTMF detection After connection the gains setting here is no use the gateway will adjust the gain setting on Line ConfigureLine setting
Play Transmit gain from network to line Adjust the speaker volume on the handset Higher value will louder the speaker on local side
Record Receive gain from line to network Adjust the microphone volume on the handset Larger value which will amplifier the MIC volume on local site
Incorrect value will cause the gateway can not receive the DTMF user pressed on phone set please use the default 0dB if no other issue
DTMF Generate DSP play Gain [-29~3]
Setting the internal gain used by DSP for generate the DTMF signal incorrect value will cause the DTMF can not accept by other telephone equipment Please use the default value if no other issue
Call progress Tone DSP play Gain[-31~0]
Setting the internal gain used by DSP for generate the CPT ( Call Progress Tone) Incorrect value will cause the DTMF can not accept by other telephone equipment Please use the default value if no other issue
Caller ID Detection record Gain [13~-3]
57
58
Setting the Caller ID Receiver gain Incorrect value will cause the Caller ID signal can not be receive please use the default value if no other issue
1257 QoS
VoIP SetupAdvance SetupQoS
User can define the ToS field on the VoIP packet for Quality of Service control The ToS field is included these 2 parameters
Precedence bit 012 DSCP(Diffserv Code Point) bit 3~7
User can select inptut either IP Precedence or DSCP value Or input the ToS
binary code directlly
59
1258 CDR
VoIP SetupAdvance SetupCDR
The Gateway can export all the CDR (Call detail Record) to external CDR server by HTTP protocol The gateway supports up to 2 CDR servers for keep the record
Export to CDR Server Please install and enable this function if you want to keep CDR of this gateway
CDR Server IP1 Please input the IP of first CDR server if installed CDR Server IP2 Please input the IP of second CDR server if installed
60
1259 FoIP
VoIP SetupAdvance SetupFoIP
User can define the parameters relative FAX Over IP function
Maximum FoIP Rate (bps) Appoint the maximum FAX transceiver rate during FoIP
Disable Only the VoIP function is supported on the gateway FoIP is disabled
Auto Gateway will negotiation the maximum speed for FoIP with FAX machine
Appoint the Maximum speed24004800960012000 14000
T38 Low Speed Redundancy [Enable|Disable] Enable or Disable to send the double packet function during low speed T38 FoIP
T38 High Speed Redundancy [Enable|Disable]
Enable or Disable to send the double packet function during high speed T38 FoIP
61
12510 Prompt VoiceampBeep
VoIP SetupAdvance SetupPrompt Voice amp Beep
This gateway can use voice or beep to prompt the user different situation User can downloadupload their own prompt voice wave files also For prompt beep enable function it can be enable by
VoIP Call out Beep When enable the gateway will generate a beep for call out for VoIP
VoIP Call out Failure twice Beep
When enable the gateway will generate twice beep if failure to call out for VoIP
No PSTN line warming twice Beep
When enable the gateway will generate twice beep if failure to call out for PSTN usually mean there is no trunk line connect to the PSTN line port
Can not register to server warming twice Beep
When enable the gateway will generate twice beep when end user off hook the phone if the gateway failure to register to Register Server
For prompt voice enable function it can be enable by 62
63
Prompt voice for replace dial tone Use a customize voice file to replace the dial tone
Warming Prompt after VoIP out failure Annunciate a customize voice file when VoIP call failure
No PSTN Line Connected Annunciate a customize voice file when there is no trunk connected to the PSTN port and failure to call via PSTN line
Can not register to server warming prompt Annunciate a customize voice file when the gateway failure to register to Register Server
Prompt voice for VoIP call in When Remote gateway call in the gateway if enable this function the gateway will annunciate a customize voice to remote gateway user to ask the destination number this function must work with the setting rule on VoIP SetupRouting SetupVoIP Call In IVR
For enable the prompt beep or voice annunciation function please select to enable the function and click Modify Caution If enable both prompt beep and Voice annunciation on the same
function only the voice annunciation will work and will not hear the beep sound Procedure to upload customize voice wave file 1Select the function index you want to modify 2press brows select the content voice file 3 Press Restore to upload and save 4To keep the voice file permanently press Save Flash to save it The gateway only accepts the G7231 or G711 format voice file and all the 5 files size totally can not exceed 384KB
126 Application
1261 Ping test
VoIP SetupApplicationPing Test
User can use the Ping Test function to test the network status or remote device Ping DestinationPing
Target device IP for ping test
Number of Ping[1-100]Ping次數
Number of ping test maximum is 100
Ping Packet Size[56-5600 bytes] Size of ping test packet input range is between 56 to 5600 bytes
64
1262 Telnet amp SNMP
VoIP SetupApplicationTelnet amp SNMP
User can enable and set the user account for the SNMP and Telnet function of this gateway on this page
a Enable telnet server Enable Enable telnet service function user can telnet this
gateway Disable Disable telnet service function
b Enable SNMP Server
Enable Enable SNMP service function user can use SNMP on the gateway
Disable Disable SNMP service function
c User NameSet a user name for Telnet amp SNM login d Login PasswordSet the password for Telnet amp SNMP login e Confirm PasswordCheck the password again
65
127 System
1271 System Status
This page reveals the status of the gateway including WAN LAN and some hardware information Internet
This sub-block shows the Internet information of your home gateway It depends on the WAN mode connecting to your ISP The different items correspond to each WAN mode will be revealed after the common part of the Internet status sub-block Common Part
Refresh Clicking this button the browser refreshes the Internet status page to get the most update information
66
67
CableDSL This field indicates the Internet connection status Its value is Connected Disconnected or Connecting WAN IP Connected to the Internet through Cable or ADSL modem the ISP will offer the home gateway a WAN IP address to communicate with other hosts in the Internet Subnet Mask This field indicates a mask used to determine what subnet the WAN IP address belongs to An IP address has two components the network address and the host address For example consider the IP address 192168168182 with subnet mask is 2552552550 the first three numbers (192168168) represent the Class C network address and the forth number (182) identifies a particular host on this network Gateway ldquoGatewayrdquo is a node on a network that serves as an entrance to another network For the home gateway The ldquoGatewayrdquo is the next device which routes the traffic to the Internet DNS Domain Name System (or Service or Server) is an Internet service that translates domain names into IP addresses Because the domain names are alphabetic they are easier to remember However the Internet is based on IP addresses Every time you use a domain name a DNS service must translate the name into the corresponding IP address For example the domain name wwwexamplecom might translate to 1981052324 The DNS system has its own network If one DNS server doesnt know how to translate a particular domain name it will ask its upper stream server and so on until the correct IP address is returned or timed-out Secondary DNS This is the secondary DNS to use when the primary DNS does not work Domain Name Domain name is a name which identifies one or more IP addresses This field represents the domain name obtained from your ISP Connection Type There are five ways to get the WAN IP address They are DHCP STATIC PPPoE PPTP and L2TP This field indicates the way to get the WAN IP address Through Figure 3-2 to 3-6 detail all specific items of each mode
68
Gateway IP Address This field is the LAN IP address of the home gateway
Subnet Mask This field is the subnet mask of the network in the LAN side
DHCP Server The home gateway supports DHCP service This field indicates the enabled status of the DHCP Server
NAT This field shows whether the NAT is enabled or not Firewall The gateway supports firewall service This field indicates firewall service is enabled or not
Information
System Up Time Shows the time in hhmmss format from when the home gateway was powered up to the web browser requests this page System Date Shows the data and time in mmddyear hhmmss when the web browser requests this page Connected Clients This field shows how many clients in the LAN clients connect to the home gateway Runtime Code Version Shows the version of runtime code
Boot Code Version Shows version of boot code
LAN MAC Address Short for Media Access Control address a hardware address that uniquely identifies each node of a network This field indicates gatewayrsquos LAN MAC address
WAN MAC Address This field indicates gatewayrsquos WAN MAC address
69
Hardware Version Tells the version of hardware of the gateway
Serial Number This field indicates serial number
1272 System Settings
This page is used to configure the names given by the ISP if any to represent the gateway and also to set the local time zone Host Name Some ISPs request the host name to represent the home gateway Fill the host name given by the ISP or you may not be able to access the Internet successfully The maximum length of the host name is 32 bytes Domain Name User configured domain name of the network maintained by gateway NTP Server Network Time Protocol is used to obtain the time from the Internet NTP server The home gateway will resolve the NTP server from the internal URL lists If you know a better NTP server you can enter it Domain name and IP address format are both acceptable Set Time Zone Choose the time zone of you current location Daylight Saving It is a way of getting more out of the summer days by advancing the clocks by one hour during the summer time Some time zone has daylight saving You have to check this item fill out the start time and the end daylight saving time if the current time zone has daylight saving
70
1273 Date amp Time
This page is used to setting the system time of VoIP gateway it can define the correct time by which ways
71
1274 Administrator Setting
This page allows you to change the user and administration password used to manage this router for security reasons
72
1275 System Log The system log page shows the gatewayrsquos activity logs such as the Internet connectivity hacker attack intrusion detection and the wireless association The log helps you to do fault analysis or regular statistics Download Save the log to a local file Clear Clear the log Refresh Retrieve the log from the gateway and show in the text area again System log The text area shows system activities
Security log The text area shows hacker attack or firewall logs
73
Remote Log Settings
Remote Log Check this file and the gateway will send the log message to the ldquoSend Log tordquo remote host
Send Log to Set the IP address to send log
Email Log When the log buffer is full the gateway will check whether this item is enabled If enabled the gateway will send all the log messages to the ldquoSend Email tordquo email address
SMTP Server Set the SMTP Server (email server) to send the email log to You can either specify the serverrsquos name or its IP address
74
128 Route Function(System Setup)
1281 Setting WAN connection System SetupConnection
System SetupWANConnected Type
Connection Type There are five ways to connect to the Internet They are Dynamic IP Static IP PPPoE PPTP and L2TP
The cable modem ISP usually requests you to obtain the WAN IP dynamically Some ISPs request you to fill the host name To do this please go to ldquoSystemSystem Settingsrdquo page to change the host name
A Dynamic IP Address
75
Request IP address You can specify the IP address you desired But the ISP has the right to neglect it and provides you a different one MTU (576-1500) You can specify the MTU (maximum transmission unit) of your home gateway The default value is 1500 bytes and in normal case you donrsquot have to change MAC Cloning Some ISPs will identify the MAC address registered by the user If not registered the ISP wonrsquot allow the traffic to pass Enable the MAC cloning function will change WAN MAC to the registered one MAC Address The MAC address will be cloned Clone MAC Address This button is use to detect the PC which is browsing this page and make its MAC address to be the MAC address to clone
B Static IP Address
IP address assigned by your ISP Set the IP address that assigned by the ISP
76
Subnet Mask Set the subnet mask of the network ISP Gateway Address Set the ISPrsquos gateway IP address This address routes packets to Internet
C PPPoE
This page is the PPPoE configuration page Most of the ISPs request the user to connect to central office (CO) side via PPPoE acronym of Point-to-Point Protocol over Ethernet which provides authentication authorization and accounting User Name Enter the user name provided by your ISP to identify the computer using PPPoE Password Enter the password provided by your ISP to identify the computer using PPPoE Please retype your password Retype the password to make sure type correct password
77
78
Service Name Some ISP provides the service name of this PPPoE connection If so enter this item or make it blank MTU (546-1492) Maximum Transmission Unit (MTU) is the largest physical packet size measured in bytes which a network can transmit Any messages larger than the MTU are divided into smaller packets before sent In ordinary that the user does not have to worry about the MTU size the gateway routing engine will handle the MTU differences between PPP and the LAN Ethernet side But for some old PPPoE server you have to make the MTU size of the PPPoE side smaller than the default value or some Web side is not able to access PPPoE MTU should be set between 546 and 1492
Maximum Idle Time (60-3600) Set a period of time to disconnect PPPoE connection when userrsquos idle time greater than it The Maximum Idle Time is only worked on the auto-connect mode It makes no effect on manual-on mode and keep-alive mode (see Connection Mode) Connection Mode Three connection modes are designed to fit different request They are keep-alive manual-on and auto-connect mode For the manual-on mode you have to dial-on and cut out the connection manually The keep-alive mode will make the connection always on If the line is dropped the modules will try to connect to the PPPoE server always The auto-connect mode is designed to save the communication cost for the user In the beginning of powered on the link will not be built Instead the gateway monitors the traffic from LAN side to the Internet The sooner routing traffic was issued the later PPPoE link is established The gateway continually watches the LAN to WAN traffic if there is no activity for more than the Maximum Idle Time the connection will be
dropped
D DNS
This page sets the primary and secondary DNS servers which were given by your ISP or known to you When a domain name request received the gateway tries to resolve to it from the Primary Domain Name Server Resolving failed the gateway tries the Secondary sever again Static DNS Server Check this item to make the primary and secondary DNS server at the next two rows active If this field is not enabled the statically configured DNS server will not take effect Domain Name Server (DNS) Address Set your primary DNS in this field Secondary DNS Address (optional) Set your secondary DNS to use when the primary DNS does not work
79
1282 LAN Settings
SSystem SetupLANLAN Settings
The home gateway is an IP sharing device which provides the home users share the same public IP address While in the LAN side each network device must have one private IP address to do network communication This page is to set the configuration of the LAN interface of the gateway IP Address Set this to be gatewayrsquos LAN interface IP address The LAN interface address is also aced as the default gateway address to the computers in you private network Subnet Mask This field indicates a mask used to determine what subnet the LAN IP address belongs to The Gateway acts as DHCP Server Check this item if the home gateway supports DHCP server service This is the normal case that can make you free from installing a DHCP server in your home network And you can connect to the Internet just as what you have done in your company environment IP Pool Starting Address The starting address provided by DHCP service
80
IP Pool Ending Address The ending address provided by DHCP sevice Lease Time Set the lease time of the IP address to renew Local Domain Name Set the gatewayrsquos local Domain Name DNS Proxy The home gateway acts as a DNS Proxy In this case the DHCP service will set LAN interface IP address as the DNS server address and inform the clients in the DHCP renew process
DHCP Client List
This page lists all the DHCP clients in the LAN side The DHCP server is capable of administering 253 clients
81
82
Host Name This column shows the host name of the DHCP clients IP Address This column shows the IP Address of the DHCP clients MAC Address This column shows the MAC Address of the DHCP clients Static Check this item to make the IP address static and every time the client connect to the home gateway it will get the same IP address all the way Refresh Click this button the browser request the DHCP client list from the home gateway and refresh the page again Static Clients You can add static clients using this block if those clients are not current connect to the home network Fill out the ldquoHost Name IP address and the MAC Address then click the ldquoAddrdquo button they will be add to the static list and show on the DHCP client list Uncheck the static box of that entry and click the ldquoOKrdquo button this static entry will be deleted
1283 NAT
Virtual Server
This is the virtual server page which set the rules translate the private IPprivate port pairs to the public ports Private IP Set the IP address of the virtual server Private Port Set the port of the virtual server to connect to Internet Type Set the protocol of the virtual server Valid options are TCP UDP and Both Public Port Set gatewayrsquos WAN port to connect to virtual server Comment Let you put some notes to describe this entry Enabled Enable this entry
83
Special Application
Trigger Port To define the TCPUDP port range to monitor when initiating from the home network the public ports configured in this entry will be activated Trigger Type Defines the protocol type TCP UDP or both of the trigger ports Public Port This column defines the public ports opened when the trigger ports were seen You can enter multiple ports delimited by comma or a range of port by dash White space will be neglect Public Type Defines the protocol type TCPUDPBoth of the public ports Comment Let you put some notes to describe this entry Enabled Enable this entry
84
Port Mapping
The Port Mapping page does a port range mapping
85
Server IP Set one of LAN clientrsquos IP address to do port mapping Mapping Ports Set the ports to mapping from WAN to LAN You can enter multiple ports delimited by comma or a range of port by dash White space will be neglect Public Type Defines the protocol type TCPUDPBoth of the public ports Comment Let you put some notes to describe this entry Enabled Enable this entry
ALG
Some applications have to do Application Level Gateway (ALG) to monitor the transaction or monitor the payload of the packet This page let you setup them We use mnemonic nouns to describe the specific ALGs The checked entries will be enabled by the ALG processing For the Non-Standard FTP Port you have to set the port number to let the ALG take it as an FTP session
DMZ
Check this item to enable DMZ service
86
87
DMZ table This table lets you configure the DMZ hosts If you have more than one public IP Addresses you can specify each one with an associated DMZ host Public IP MZ table Address Select among the WAN IP addresses of the home gateway IP Address of Virtual DMZ Host Fill the client in the LAN side as the associated DMZ host Add Add this entry to virtual DMZ host table Delete Delete this entry from virtual DMZ host table
1284 Firewall Firewall Options
Enable Hacker Attack Protect The hackers always try to break into you system or crack down your network The gateway provides hacker attack protect modules to protect your home network Discard PING from WAN side ldquoPingrdquo is the most widely used tool to diagnose the network Hackers use ldquopingrdquo to discover your gateway firstly and try to hack your home network later Discard ldquopingrdquo from WAN side prevent the hacker from discovering your home network by using ldquopingrdquo Disallow to PING the Gateway Check this item not only prevent ping from the WAN side but also prevent pinging the home gateway from the LAN side The side effect is to increase the difficulty to diagnose your home network Drop Port Scan Packets The most famous Internet hacking method is the port scan ldquoPort scanrdquo
88
scans all the TCPUDP port of a station to find out the opened ports After confirmed the hackers try to connect to the listened ports to attack your computer Check this option the home gateway will drop the port scan packets to protect your system Allow to Scan Security Port (113) Some Linux email servers will try to detect the security TCPUDP port (113) If you drop it the Linux email servers will not allow you to log into Allow it can solve such kind of problem Discard NetBios Packets The NetBios protocol is widely used by the MS Windows Network Place which should only be use in the home network and should not be used in the Internet environment Strongly suggest you to check this item for security consideration Accept Fragment Packets Accept packets that are fragmented Send ICMP packets when error Send ICMP packets when the error happens in connection Advance settings Click this button the detail hacker attack patterns will appear to let you decide which one should be enabled Figure 7-2 shows the hacker attack patterns to protect
89
Client Filtering
Enable Client Filter Check this box and all the entries below will take effect IP Block the IP addresses ranged to connect to Internet Port Set the port range within which is not allowed to connect to Internet Type Set which protocol TCPIPBoth of this entry to inhibit Block Time Two options are provided for this column the ldquoAlwaysrdquo and ldquoBlockrdquo If ldquoAlwaysrdquo is selected the next two items will be neglect Otherwise the client filter function schedule the block time base on the ldquoDayrdquo and ldquoTimerdquo settings Day Set which days to block Internet connection Time Set what time in each day to block the Internet access Comment Let you put you note why you want to block the Internet access Enable Check the item to enable this entry
90
URL Filtering
Enable URL Filter Check this box and all the entries below will take effect IP The IP addresses ranged will be the candidate to check the URL when they use web browser to access the Internet URL filter string The specific URL string to block Enable Check this item to enable this URL filter entry
91
MAC Control
MAC Control
MAC Address Control Check this item to enable MAC control service Filter out or only accept the following MAC address connect to Internet Select ldquoFilter outrdquo the MAC addresses list in the following table will be block out to access the Internet Or ldquoAcceptrdquo to allow them to connect to the Internet freely
Configure MAC Address
MAC Address List all the MAC address want to block then connect to Internet Comment Put your note why you set here Action You can select one of the MAC addresses recorded by the home gateway or enter the new entry manually Add Click this button a new entry will be added to the MAC Control table Delete Click this button to delete this entry if it is not necessary
92
1285 Routing
Routing Table
To set this
Destination LAN IP This field indicates the destination IP of this route entry Subnet Mask This field indicates the Subnet Mask of this route Gateway If a packetrsquos destination IP address do ldquobit andrdquo operation with the ldquoSubnet Maskrdquo equals to the ldquoDestination LAN IPrdquo the packet will send to the Gateway Interface This field indicates which network interface deal the connection Refresh Refresh the routing information from the home gateway again
93
Static Routing
Destination LAN IP This field indicates the destination IP of this route entry Subnet Mask This field indicates the Subnet Mask of this route Gateway If a packetrsquos destination IP address do ldquobit andrdquo operation with the ldquoSubnet Maskrdquo equals to the ldquoDestination LAN IPrdquo the packet will send to the Gateway Add Click this button to add this entry to routing table statically Delete Click this button to delete this static entry
94
1286 UPnP Settings UPnP
Enable UPnP Check this item to enable UPnP UPnP Port Number Set UPnP port number to announce to the UPnP control points The UPnP control points use this TCP port to send request to the home gateway Advertise Time (60-1800) Set the time interval after which the home gateway sends advertisement packets Subscribe Timeout (60-1800) The UPnP control point subscribes a request to the home gateway The home gateway keeps the request until the control point renew it unsubscribe it or after timed-out This item set the timeout value of the subscribe requests
95
Port Mapping
Remote Host This field lists remote host that connect to LAN client External Port This field lists the port of the remote host connect to LAN client Internal Client This field lists LAN client connect to the Internet Internal Port This field lists port of LAN client connect to the Internet Protocol This field lists the protocol TCPUDP of the connection Duration This field lists the duration of the connection Description This field lists the description of list port mapping The description gives you a brief note of what the entry is Refresh Refresh the UPnP port mapping from the home gateway again
96
1287 DDNS
Enabled Check this item to enable the DDNS settings Disabled Check this item to disable the DDNS settings Host Name Set your host name that need to do DDNS update DDNS Server Set the DDNS server that updates your IP address User Name The DDNS server requires you to supply a name and password to update your IP address You have to register the user name and password offline to the specific DDNS server Password The DDNS server requires you to supply a name and password to update your IP address You have to register the user name and password offline to the specific DDNS server DDNS Retry Time Set the time interval to update your IP address to ddns server
97
129 BackupRestore
1291 Configuration
Backup-RestoreConfigurations
This page let you backup Restore all of your configuration parameters on the
VoIP Router It is very good idea to back up all of your VoIP Router configuration
parameters after install
a To Backup press Download setting backup file and input the file name you
want and file location to save
b To Restore press the Browse button the select the backup configuration
parameters file to upload then press Restore After you upload the file
Press Saved modification to save your current configuration to Flash ROM
(Usually used to save currently WAN configuration)After save please
remember to Reboot the VoIP Router to let the restored parameters take
effective
Caution Never power off the VoIP Router when during Restore configure or
upgrade VoIP module or System it will cause permanent damage when power off
during writing Flash inside VoIP Router
98
1292 VoIP Module
System MaintenanceBackup-RestoreConfigurations
This page displays the current firmware module version and let you backup
Restore all of your VoIP firmware module on the VoIP Router Please use this
page to update the VoIP module firmware if necessary
a To Restore from local file press the Browse button the select the VoIP
module file to upload then press Restore After you upload the file Press
Saved modification to save your current configuration to Flash ROM
(Usually used to save currently WAN configuration)After save please
remember to Reboot the VoIP Router to let the restored parameters take
effective
b To Restore from Upgrade server please input the URL address of upgrade
server and press the APServer to link to upgrade server to get latest version
firmware and upgrade automatically
Caution Never power off the VoIP Router when during Restore configure or
upgrade VoIP module or System it will cause permanent damage when power off
during writing Flash inside VoIP Router
99
1293 Reboot System
Reboot System
Use the Reboot button on this page to reboot your VoIP Router before you
reboot please make sure you have to press the Saved modification to save your
current configuration to Flash ROM otherwise all the change will be disappear
after reboot
100
1210 Save Modification
Save Modification
Most of the VoIP Router parameters will take effective after you modify but it is
just temporary stored on RAM only it will disappear after your reboot or power
off the VoIP Router to save the parameters into Flash ROM and let it take
effective forever please remember to press the Save Modification button
after you modify the parameters
101
- 11 Access to Web UI
- 12 Web UI Management
-
- 121 Web UI Management Overview
- 123 Register Server Setting
- 124 Auto Provision function
- 125 Advance Setup
- 126 Application
- 127 System
- 128 Route Function(System Setup)
- 129 BackupRestore
- 1210 Save Modification
-
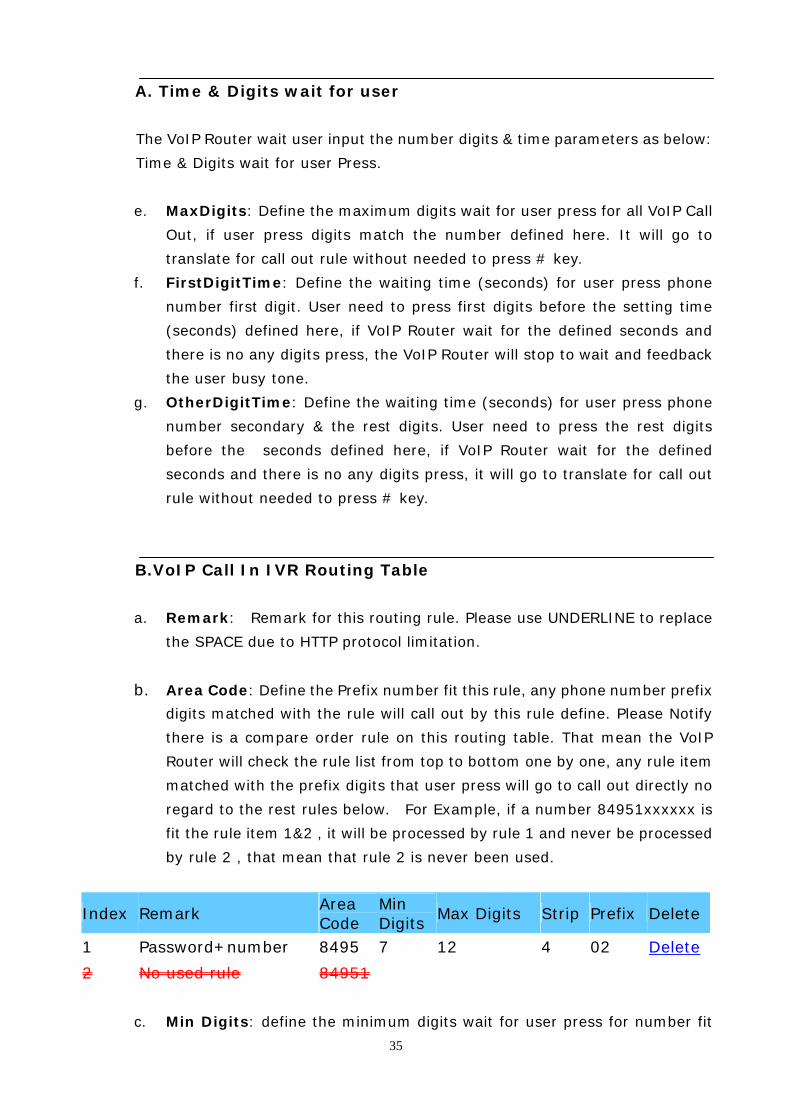
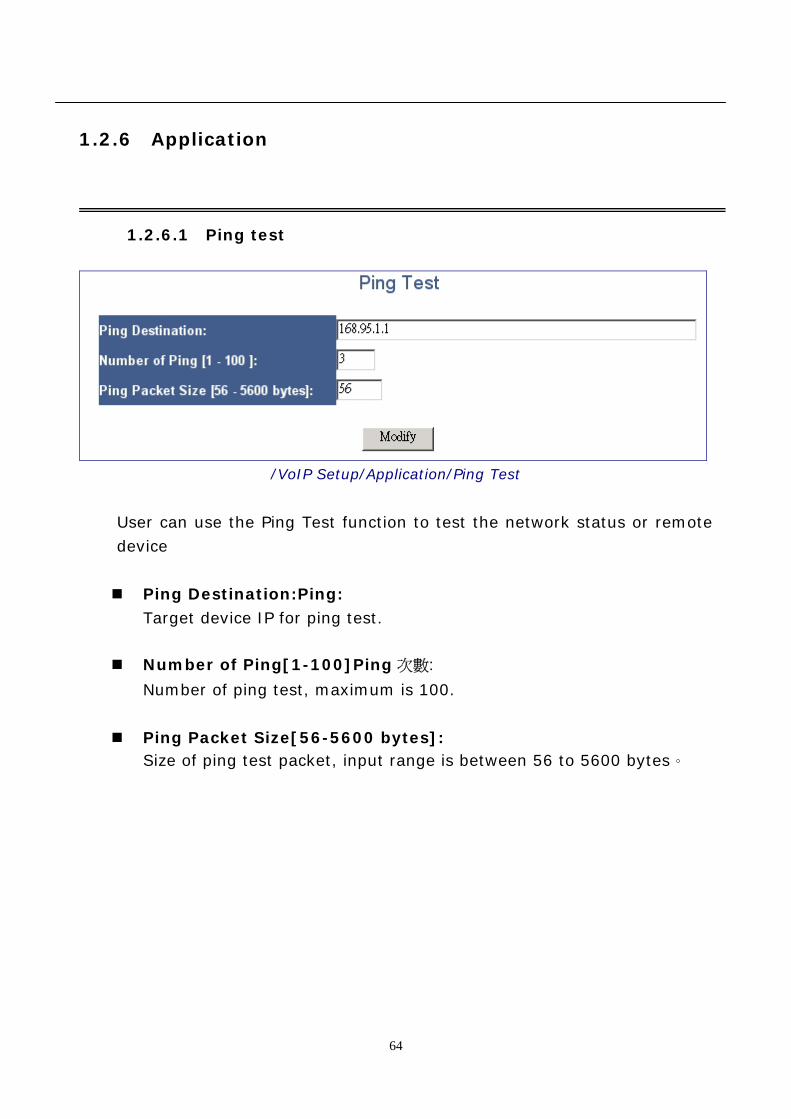
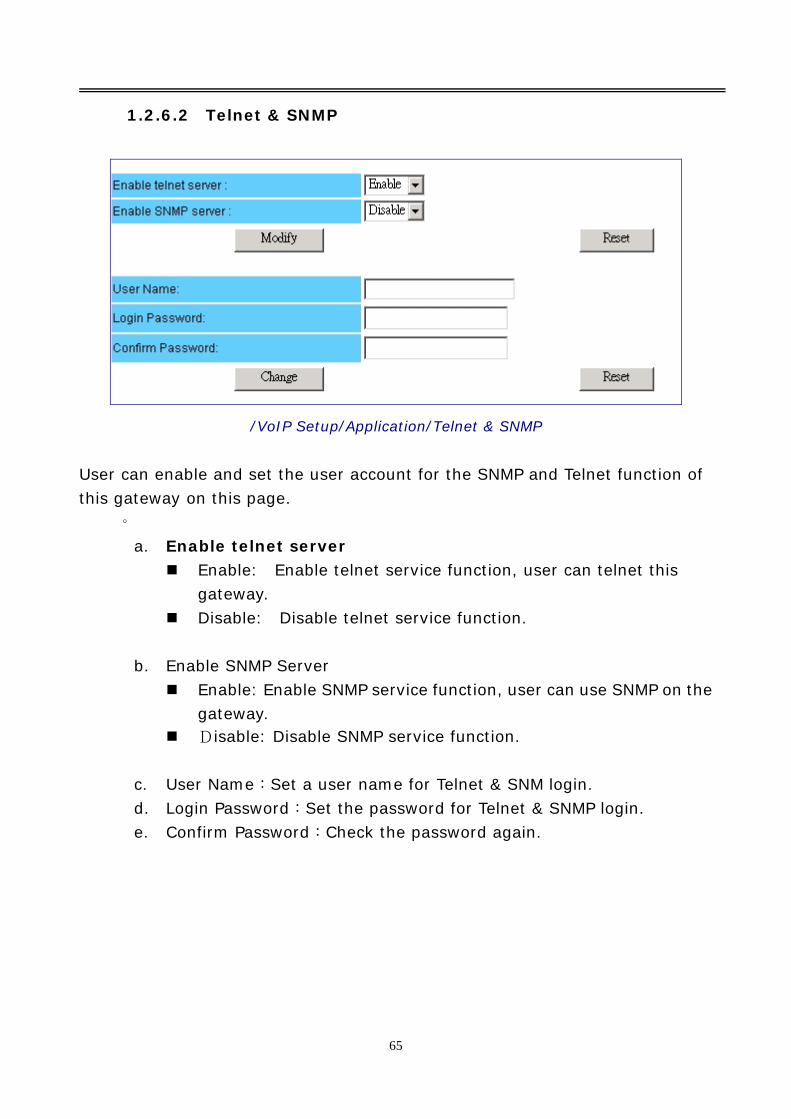
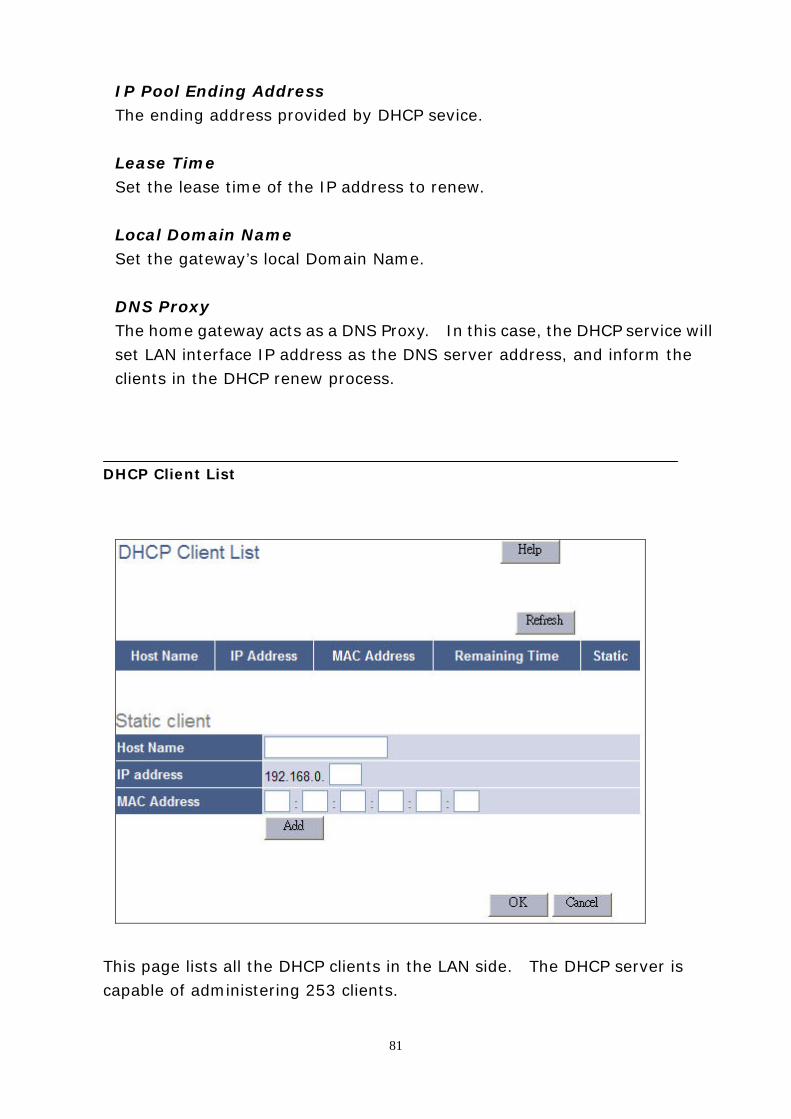
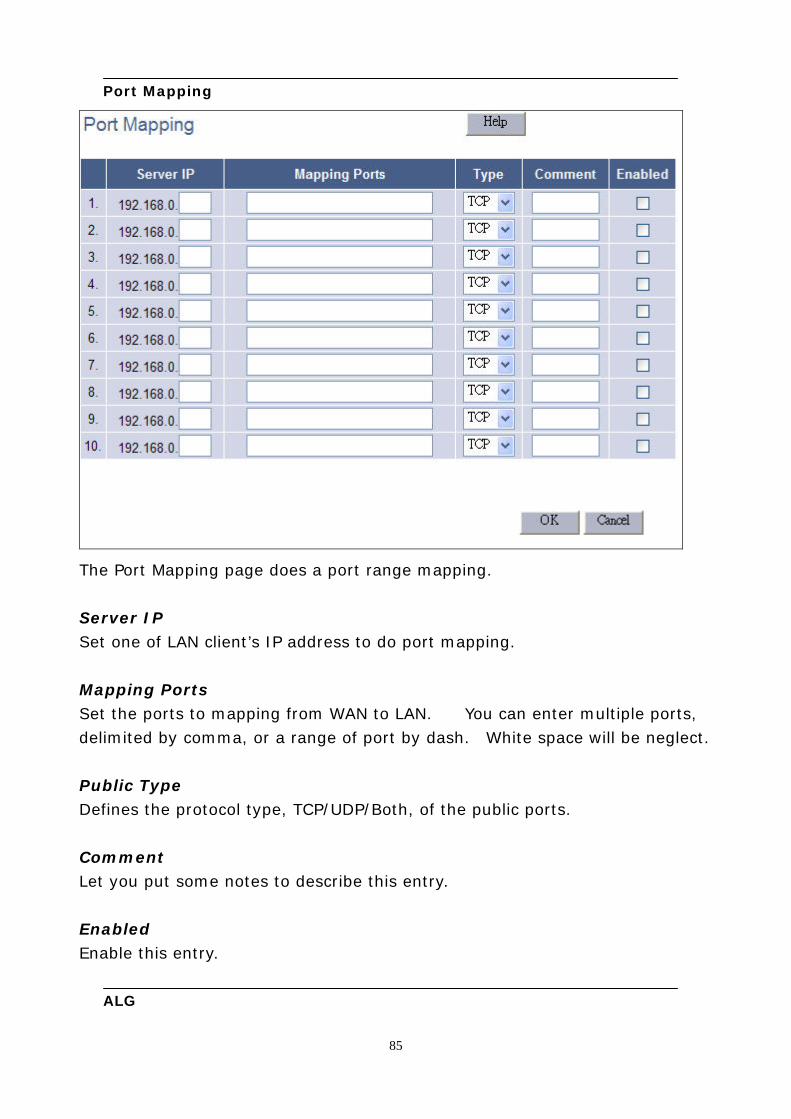
Port Mapping
The Port Mapping page does a port range mapping
85
Server IP Set one of LAN clientrsquos IP address to do port mapping Mapping Ports Set the ports to mapping from WAN to LAN You can enter multiple ports delimited by comma or a range of port by dash White space will be neglect Public Type Defines the protocol type TCPUDPBoth of the public ports Comment Let you put some notes to describe this entry Enabled Enable this entry
ALG
Some applications have to do Application Level Gateway (ALG) to monitor the transaction or monitor the payload of the packet This page let you setup them We use mnemonic nouns to describe the specific ALGs The checked entries will be enabled by the ALG processing For the Non-Standard FTP Port you have to set the port number to let the ALG take it as an FTP session
DMZ
Check this item to enable DMZ service
86
87
DMZ table This table lets you configure the DMZ hosts If you have more than one public IP Addresses you can specify each one with an associated DMZ host Public IP MZ table Address Select among the WAN IP addresses of the home gateway IP Address of Virtual DMZ Host Fill the client in the LAN side as the associated DMZ host Add Add this entry to virtual DMZ host table Delete Delete this entry from virtual DMZ host table
1284 Firewall Firewall Options
Enable Hacker Attack Protect The hackers always try to break into you system or crack down your network The gateway provides hacker attack protect modules to protect your home network Discard PING from WAN side ldquoPingrdquo is the most widely used tool to diagnose the network Hackers use ldquopingrdquo to discover your gateway firstly and try to hack your home network later Discard ldquopingrdquo from WAN side prevent the hacker from discovering your home network by using ldquopingrdquo Disallow to PING the Gateway Check this item not only prevent ping from the WAN side but also prevent pinging the home gateway from the LAN side The side effect is to increase the difficulty to diagnose your home network Drop Port Scan Packets The most famous Internet hacking method is the port scan ldquoPort scanrdquo
88
scans all the TCPUDP port of a station to find out the opened ports After confirmed the hackers try to connect to the listened ports to attack your computer Check this option the home gateway will drop the port scan packets to protect your system Allow to Scan Security Port (113) Some Linux email servers will try to detect the security TCPUDP port (113) If you drop it the Linux email servers will not allow you to log into Allow it can solve such kind of problem Discard NetBios Packets The NetBios protocol is widely used by the MS Windows Network Place which should only be use in the home network and should not be used in the Internet environment Strongly suggest you to check this item for security consideration Accept Fragment Packets Accept packets that are fragmented Send ICMP packets when error Send ICMP packets when the error happens in connection Advance settings Click this button the detail hacker attack patterns will appear to let you decide which one should be enabled Figure 7-2 shows the hacker attack patterns to protect
89
Client Filtering
Enable Client Filter Check this box and all the entries below will take effect IP Block the IP addresses ranged to connect to Internet Port Set the port range within which is not allowed to connect to Internet Type Set which protocol TCPIPBoth of this entry to inhibit Block Time Two options are provided for this column the ldquoAlwaysrdquo and ldquoBlockrdquo If ldquoAlwaysrdquo is selected the next two items will be neglect Otherwise the client filter function schedule the block time base on the ldquoDayrdquo and ldquoTimerdquo settings Day Set which days to block Internet connection Time Set what time in each day to block the Internet access Comment Let you put you note why you want to block the Internet access Enable Check the item to enable this entry
90
URL Filtering
Enable URL Filter Check this box and all the entries below will take effect IP The IP addresses ranged will be the candidate to check the URL when they use web browser to access the Internet URL filter string The specific URL string to block Enable Check this item to enable this URL filter entry
91
MAC Control
MAC Control
MAC Address Control Check this item to enable MAC control service Filter out or only accept the following MAC address connect to Internet Select ldquoFilter outrdquo the MAC addresses list in the following table will be block out to access the Internet Or ldquoAcceptrdquo to allow them to connect to the Internet freely
Configure MAC Address
MAC Address List all the MAC address want to block then connect to Internet Comment Put your note why you set here Action You can select one of the MAC addresses recorded by the home gateway or enter the new entry manually Add Click this button a new entry will be added to the MAC Control table Delete Click this button to delete this entry if it is not necessary
92
1285 Routing
Routing Table
To set this
Destination LAN IP This field indicates the destination IP of this route entry Subnet Mask This field indicates the Subnet Mask of this route Gateway If a packetrsquos destination IP address do ldquobit andrdquo operation with the ldquoSubnet Maskrdquo equals to the ldquoDestination LAN IPrdquo the packet will send to the Gateway Interface This field indicates which network interface deal the connection Refresh Refresh the routing information from the home gateway again
93
Static Routing
Destination LAN IP This field indicates the destination IP of this route entry Subnet Mask This field indicates the Subnet Mask of this route Gateway If a packetrsquos destination IP address do ldquobit andrdquo operation with the ldquoSubnet Maskrdquo equals to the ldquoDestination LAN IPrdquo the packet will send to the Gateway Add Click this button to add this entry to routing table statically Delete Click this button to delete this static entry
94
1286 UPnP Settings UPnP
Enable UPnP Check this item to enable UPnP UPnP Port Number Set UPnP port number to announce to the UPnP control points The UPnP control points use this TCP port to send request to the home gateway Advertise Time (60-1800) Set the time interval after which the home gateway sends advertisement packets Subscribe Timeout (60-1800) The UPnP control point subscribes a request to the home gateway The home gateway keeps the request until the control point renew it unsubscribe it or after timed-out This item set the timeout value of the subscribe requests
95
Port Mapping
Remote Host This field lists remote host that connect to LAN client External Port This field lists the port of the remote host connect to LAN client Internal Client This field lists LAN client connect to the Internet Internal Port This field lists port of LAN client connect to the Internet Protocol This field lists the protocol TCPUDP of the connection Duration This field lists the duration of the connection Description This field lists the description of list port mapping The description gives you a brief note of what the entry is Refresh Refresh the UPnP port mapping from the home gateway again
96
1287 DDNS
Enabled Check this item to enable the DDNS settings Disabled Check this item to disable the DDNS settings Host Name Set your host name that need to do DDNS update DDNS Server Set the DDNS server that updates your IP address User Name The DDNS server requires you to supply a name and password to update your IP address You have to register the user name and password offline to the specific DDNS server Password The DDNS server requires you to supply a name and password to update your IP address You have to register the user name and password offline to the specific DDNS server DDNS Retry Time Set the time interval to update your IP address to ddns server
97
129 BackupRestore
1291 Configuration
Backup-RestoreConfigurations
This page let you backup Restore all of your configuration parameters on the
VoIP Router It is very good idea to back up all of your VoIP Router configuration
parameters after install
a To Backup press Download setting backup file and input the file name you
want and file location to save
b To Restore press the Browse button the select the backup configuration
parameters file to upload then press Restore After you upload the file
Press Saved modification to save your current configuration to Flash ROM
(Usually used to save currently WAN configuration)After save please
remember to Reboot the VoIP Router to let the restored parameters take
effective
Caution Never power off the VoIP Router when during Restore configure or
upgrade VoIP module or System it will cause permanent damage when power off
during writing Flash inside VoIP Router
98
1292 VoIP Module
System MaintenanceBackup-RestoreConfigurations
This page displays the current firmware module version and let you backup
Restore all of your VoIP firmware module on the VoIP Router Please use this
page to update the VoIP module firmware if necessary
a To Restore from local file press the Browse button the select the VoIP
module file to upload then press Restore After you upload the file Press
Saved modification to save your current configuration to Flash ROM
(Usually used to save currently WAN configuration)After save please
remember to Reboot the VoIP Router to let the restored parameters take
effective
b To Restore from Upgrade server please input the URL address of upgrade
server and press the APServer to link to upgrade server to get latest version
firmware and upgrade automatically
Caution Never power off the VoIP Router when during Restore configure or
upgrade VoIP module or System it will cause permanent damage when power off
during writing Flash inside VoIP Router
99
1293 Reboot System
Reboot System
Use the Reboot button on this page to reboot your VoIP Router before you
reboot please make sure you have to press the Saved modification to save your
current configuration to Flash ROM otherwise all the change will be disappear
after reboot
100
1210 Save Modification
Save Modification
Most of the VoIP Router parameters will take effective after you modify but it is
just temporary stored on RAM only it will disappear after your reboot or power
off the VoIP Router to save the parameters into Flash ROM and let it take
effective forever please remember to press the Save Modification button
after you modify the parameters
101
- 11 Access to Web UI
- 12 Web UI Management
-
- 121 Web UI Management Overview
- 123 Register Server Setting
- 124 Auto Provision function
- 125 Advance Setup
- 126 Application
- 127 System
- 128 Route Function(System Setup)
- 129 BackupRestore
- 1210 Save Modification
-

MAC Control
MAC Control
MAC Address Control Check this item to enable MAC control service Filter out or only accept the following MAC address connect to Internet Select ldquoFilter outrdquo the MAC addresses list in the following table will be block out to access the Internet Or ldquoAcceptrdquo to allow them to connect to the Internet freely
Configure MAC Address
MAC Address List all the MAC address want to block then connect to Internet Comment Put your note why you set here Action You can select one of the MAC addresses recorded by the home gateway or enter the new entry manually Add Click this button a new entry will be added to the MAC Control table Delete Click this button to delete this entry if it is not necessary
92
1285 Routing
Routing Table
To set this
Destination LAN IP This field indicates the destination IP of this route entry Subnet Mask This field indicates the Subnet Mask of this route Gateway If a packetrsquos destination IP address do ldquobit andrdquo operation with the ldquoSubnet Maskrdquo equals to the ldquoDestination LAN IPrdquo the packet will send to the Gateway Interface This field indicates which network interface deal the connection Refresh Refresh the routing information from the home gateway again
93
Static Routing
Destination LAN IP This field indicates the destination IP of this route entry Subnet Mask This field indicates the Subnet Mask of this route Gateway If a packetrsquos destination IP address do ldquobit andrdquo operation with the ldquoSubnet Maskrdquo equals to the ldquoDestination LAN IPrdquo the packet will send to the Gateway Add Click this button to add this entry to routing table statically Delete Click this button to delete this static entry
94
1286 UPnP Settings UPnP
Enable UPnP Check this item to enable UPnP UPnP Port Number Set UPnP port number to announce to the UPnP control points The UPnP control points use this TCP port to send request to the home gateway Advertise Time (60-1800) Set the time interval after which the home gateway sends advertisement packets Subscribe Timeout (60-1800) The UPnP control point subscribes a request to the home gateway The home gateway keeps the request until the control point renew it unsubscribe it or after timed-out This item set the timeout value of the subscribe requests
95
Port Mapping
Remote Host This field lists remote host that connect to LAN client External Port This field lists the port of the remote host connect to LAN client Internal Client This field lists LAN client connect to the Internet Internal Port This field lists port of LAN client connect to the Internet Protocol This field lists the protocol TCPUDP of the connection Duration This field lists the duration of the connection Description This field lists the description of list port mapping The description gives you a brief note of what the entry is Refresh Refresh the UPnP port mapping from the home gateway again
96
1287 DDNS
Enabled Check this item to enable the DDNS settings Disabled Check this item to disable the DDNS settings Host Name Set your host name that need to do DDNS update DDNS Server Set the DDNS server that updates your IP address User Name The DDNS server requires you to supply a name and password to update your IP address You have to register the user name and password offline to the specific DDNS server Password The DDNS server requires you to supply a name and password to update your IP address You have to register the user name and password offline to the specific DDNS server DDNS Retry Time Set the time interval to update your IP address to ddns server
97
129 BackupRestore
1291 Configuration
Backup-RestoreConfigurations
This page let you backup Restore all of your configuration parameters on the
VoIP Router It is very good idea to back up all of your VoIP Router configuration
parameters after install
a To Backup press Download setting backup file and input the file name you
want and file location to save
b To Restore press the Browse button the select the backup configuration
parameters file to upload then press Restore After you upload the file
Press Saved modification to save your current configuration to Flash ROM
(Usually used to save currently WAN configuration)After save please
remember to Reboot the VoIP Router to let the restored parameters take
effective
Caution Never power off the VoIP Router when during Restore configure or
upgrade VoIP module or System it will cause permanent damage when power off
during writing Flash inside VoIP Router
98
1292 VoIP Module
System MaintenanceBackup-RestoreConfigurations
This page displays the current firmware module version and let you backup
Restore all of your VoIP firmware module on the VoIP Router Please use this
page to update the VoIP module firmware if necessary
a To Restore from local file press the Browse button the select the VoIP
module file to upload then press Restore After you upload the file Press
Saved modification to save your current configuration to Flash ROM
(Usually used to save currently WAN configuration)After save please
remember to Reboot the VoIP Router to let the restored parameters take
effective
b To Restore from Upgrade server please input the URL address of upgrade
server and press the APServer to link to upgrade server to get latest version
firmware and upgrade automatically
Caution Never power off the VoIP Router when during Restore configure or
upgrade VoIP module or System it will cause permanent damage when power off
during writing Flash inside VoIP Router
99
1293 Reboot System
Reboot System
Use the Reboot button on this page to reboot your VoIP Router before you
reboot please make sure you have to press the Saved modification to save your
current configuration to Flash ROM otherwise all the change will be disappear
after reboot
100
1210 Save Modification
Save Modification
Most of the VoIP Router parameters will take effective after you modify but it is
just temporary stored on RAM only it will disappear after your reboot or power
off the VoIP Router to save the parameters into Flash ROM and let it take
effective forever please remember to press the Save Modification button
after you modify the parameters
101
- 11 Access to Web UI
- 12 Web UI Management
-
- 121 Web UI Management Overview
- 123 Register Server Setting
- 124 Auto Provision function
- 125 Advance Setup
- 126 Application
- 127 System
- 128 Route Function(System Setup)
- 129 BackupRestore
- 1210 Save Modification
-

![IP Phone Solution [호환 모드]EMS Media Gateway Elementary Management System WAN Router IPNext 700 WAN Router E1/T1, FXO IP-PBX PBX VoIP Gateway E1/T1, FXO LAN VoIP Gateway AP-IP90](https://static.fdocuments.us/doc/165x107/6022f868893384315b76eed5/ip-phone-solution-eeoe-ems-media-gateway-elementary-management-system.jpg)