VENISON BIG GAME GUIDE 4 2016 V3 · You “eat with your eyes ... The term “plating” refers to...
26
For more information and recipes, go to: Building Strong and Vibrant New York Communities Cornell Cooperative Extension provides equal program and employment opportunities. VENISON Processing, Preparing, and Presenting Big Game
Transcript of VENISON BIG GAME GUIDE 4 2016 V3 · You “eat with your eyes ... The term “plating” refers to...

For more inform
ation and recipes, go to:
Building Strong and Vibrant N
ew York C
omm
unitiesCornell Cooperative Extension provides equal program
and employm
ent opportunities.
VEN
ISON
Processing, Preparing, and Presenting Big Gam
e

Acknow
ledgment: This w
ork was supported by the U
SDA
National Institute of Food and A
griculture, Multistate
Hatch and Sm
ith-Lever projects 2013-14-380: Returning Warriors II: A
Study of the Social-Ecological Benefi ts of C
oming H
ome to N
ature and 2011-12-221: Returning Warriors: A
Study of the Social-Ecological Benefi ts of Com
ing H
ome to N
ature.
This guide is produced by REWO
RRRS (Returning Warriors: O
utdoor Recreation, Restoration &
Resilience Study) in partnership with W
ild H
arvest Table, Seneca County C
ornell Cooperative Extension, W
ounded W
arriors in Action Foundation (W
WIA
) and Cornell U
niversity D
epartment of N
atural Resources.
Edited and Com
piled by: Moira Tidball, K
eith TidballG
raphic Design by: C
hristie Brewer
4/2016 v.347
Photo by Holly A
. Heyser
time to set a nice table and enjoy the m
eal! You can always be creative, but
a traditional way to set the table is forks on the left, knife and spoon on the
right, drink above the knife and spoon slightly to the right, and a napkin under the fork. Enjoy your feast w
ith family or friends or treat yourself to a
well-deserved gourm
et meal!

46
Presentation of Gam
eM
any people have a negative association with eating venison. Perhaps
they have had a bad experience eating venison that was overcooked, or
mishandled in som
e way to get labeled as “too gam
ey” or “tough as shoe leather”. O
ther people just cannot get past the idea of eating “Bambi”, so
don’t mention that w
hen presenting the food at the table ;-) The recipes and tips in this book should help even the toughest critics realize that venison m
eat is delicious, and don’t forget to mention that venison is also
highly nutritious. The fi nal step is presenting game nicely at the table.
You “eat with your eyes fi rst” is a true expression know
n by chefs and restaurants. If food looks appealing, people w
ant to eat it or are at least are w
illing to try it. If it looks nasty, well, you’ll have a harder tim
e convincing people that it tastes good.
The term “plating” refers to m
aking a dish look delicious by using a mix of
color, textures, layering, and placement of foods on the plate. You can use
the same techniques at hom
e by choosing colorful vegetable side dishes or garnishing the plate w
ith a bit of green parsley or a small section of
fruit. You may choose to serve m
eat on top of rice, potatoes, pasta, or salad greens w
ith a drizzle of sauce over the top when plating gam
e dishes. A
nother important consideration is the portions on the plate so that it
looks balanced and food is not spilling off the plate.
If you have taken the time to harvest an anim
al and cook it, then take the
The REWO
RRRS study, funded by the United States D
epartment of
Agriculture N
ational Institute of Food and Agriculture, explores the
importance of hum
an nature interactions in outdoor recreation and restoration activities am
ong returning war veterans, and how
these interactions relate to individual, com
munity, and social-ecological health
and resilience. The multitude of benefi ts provided by nature contact for
health and well-being are w
ell documented. A
potential added benefi t of outdoor recreation activities that involve nature contact through hunting and fi shing is bringing hom
e meat to eat! This booklet off ers practical
advice on preparing and consuming venison, including deer, elk, m
oose, and other ungulates, from
fi eld to table based on the Wild H
arvest Table program
and Cornell C
ooperative Extension research and outreach. The health and nutritional benefi ts of consum
ing venison are presented, along w
ith recipes and tips for delicious preparation and appealing presentation of venison. A
lways be sure to check your state’s hunting regulations for
seasons and bag limits as w
ell as guidance regarding game and habitat
studies.studies.

Table of Contents
How
and Why to U
se this Guide 1 - 3
Food Safety and Field Processing 4 - 6
Nutritional Benefi ts of V
enison 6
Venison C
uts and Cooking M
ethods 7
Recipes 8 - 36
Canning V
enison in a Pressure Canner 37 - 45
Presentation of Gam
e 46 - 47
45
Raw
Pack Preparation1. If desired put ½
teaspoon salt in pint jars, 1 teaspoon in quart jars.2. Pack raw
meat into hot jars, leaving 1-inch headspace.
3. Do not add liquid.
4. Wipe jar rim
. Place prepared lid on jar and adjust jar ring.
Process in a Dial G
auge Pressure Canner at 11 pounds pressure O
R in a
Weighted G
auge Pressure Canner at 10 pounds pressure
Pints75 m
inutesQ
uarts90 m
inutes
Altitude A
djustment
Adapted from
So Easy to Preserve, 5th Edition, Cooperative Extension U
niversity of Georgia.
Dial G
auge Pressure Canner
Altitude
Pounds of Pressure0 to 2,000 feet
112,001 to 4,000 feet
124,001 to 6,000 feet
136,001 to 8,000 feet
148,001 to 10,000 feet
15
Weighted G
auge Pressure Canner
Altitude
Pounds of Pressure1 to 1,000 feet
10A
bove 2,000 feet15

44
Canning M
eat Strips, C
ubes or C
hunks (Bear, Beef, Veal, Lam
b, Pork or Venison)
1. Choose high quality, chilled m
eat. Remove excess fat.
2. Strong-fl avored wild m
eats should be soaked for 1 hour in a brine made
from 1 tablespoon salt per quart of w
ater. Rinse meat.
3. Cut into 1-inch w
ide strips, cubes or chunks.
Hot Pack Preparation
1. Pre-cook meat to the rare stage by roasting, stew
ing or browning in a
small am
ount of fat.2. If desired put ½
teaspoon salt in pint jars, 1 teaspoon in quart jars.3. Pack m
eat loosely into hot jars, leaving 1-inch headspace.4. Fill jar to 1 inch from
the top with boiling m
eat juices, broth, water or
tomato juice (especially for w
ild game.)
5. Remove air bubbles. A
dd more liquid if necessary.
6. Wipe jar rim
. Place prepared lid on jar and hold in place with ring.
1
How
and Why to U
se this G
uideThis booklet is part of a series intended to equip the W
WIA
guide with the
basic information necessary to be able to successfully process, prepare, and
present wild fi sh and gam
e that is harvested during a WW
IA event. This
booklet provides skills and recipes needed to process and prepare venison. Venison can refer to w
hite-tailed deer, mule deer, elk, antelope, m
oose, caribou and all other popular deer-like big gam
e species. In a recent study undertaken w
ith WW
IA, veteran participants w
ere asked if including w
ild fi sh and game processing, preparation and presentation
skills in sponsored expeditions would increase their satisfaction w
ith those outings. 89%
(139/156) responded that it would increase their satisfaction,
with 70%
saying it would greatly increase satisfaction. 90%
agreed that “increasing m
y knowledge and skill in w
ild fi sh and game processing,
preparation, and presentation would increase m
y feelings of satisfaction about being an outdoors person.” There is a huge feeling of satisfaction that com
es from procuring one’s ow
n food from start to fi nish. There is
also an ethical responsibility to be a good steward of w
hat is harvested. As
a hunting guide you are an important part of this process.

2
Here are som
e things to think about well
ahead of the hunt.
1. Do you have the equipm
ent and know-how
to fi eld dress a deer or other big gam
e quarry? You will need at least a sharp knife to gut
the deer, plastic gloves, and a fi eld dressing guide (or knowledge).
Consider ice for the cavity if it w
ill take a few hours to pack the anim
al out, plus a plan for m
oving the animal from
the fi eld to a cooler and eventual processing location.
2. Have you considered non-lead am
munition for the hunt, especially if
deer meat w
ill be consumed by children or m
others to be? Research conducted by the M
innesota Departm
ent of Natural Resources show
ed that lead fragm
ents can spread well into the m
eat, even as far as a foot aw
ay from the w
ound channel! 3. D
o you have a butcher or system coordinated to properly process the
meat? O
nce the deer is fi eld dressed, is there a local processor that will
accept the deer? Often this can be donated to a W
WIA
hunt and frozen m
eat is shipped later.4. If taxiderm
y is desired, is this organized? If so, coordination to save the rack, head, and hide w
ill have to be linked with the butcher plans.
5. Have you considered state law
s about shipping meat and packaging
concerns? 6. D
o you have coolers and ice or a way to keep the deer m
eat below
45°F as quickly as possible? 7. If choice cuts of m
eat will be available right aw
ay, do you have a plan to incorporate this into part of a m
eal plan and/or a cooking dem
onstration? This is a great way to have a taste of the prize right
43
boil foods for 10 minutes before tasting or eating. A
dd an additional m
inute of boiling time for each additional 1,000 feet elevation.
3. All low
-acid foods canned according to the approved recomm
endations m
ay be eaten without boiling, w
hen you are sure of all the following:
• Food w
as processed in a pressure canner.•
The pressure canner gauge was accurate.
• U
p-to-date researched process times and pressures w
ere used for the size of jar, style of pack, and kind of food being canned.
• A
n approved recipe was used w
ith no changes made in ingredients
or proportions of ingredients.•
The time and pressure recom
mended for processing the food at the
canning location’s altitude were follow
ed.•
Jar lid is fi rmly sealed and concave.
• N
othing has leaked from the jar.
• N
o liquid spurts out when jar is opened.
• N
o unnatural or “off ” odors can be detected.•
Meat that is not fully subm
erged in liquid may discolor, but it is still
safe to eat.
References: USD
A’s C
omplete G
uide to Hom
e Canning, 2006. So Easy to Preserve, 5th Edition, C
ooperative Extension Service, The U
niversity of Georgia, 2006. N
ational Center for H
ome Food Preservation w
ebsite: htt p://nchfp.uga.edu/. C
ompiled by Judy Price &
Katherine H
umphries , C
ornell Cooperative Extension.

42
3. To reprocess, start by removing the lid. C
heck headspace of food and liquid. C
heck the jar rim for dam
age. If no chips or nicks are on the sealing rim
, the lid may not have been put on tightly enough or the lid
may not have been prepared properly. C
lean the sealing surface of the jar or replace the jar if dam
aged. Use a new
lid and process for the full raw
-pack time. A
fter reprocessing, the food will be safe, how
ever the quality w
ill be diminished.
Storage of Jars
1. Remove, w
ash, dry and store metal screw
bands in a dry place to retard rusting. W
ash jars and label each jar with contents, date processed and
lot number if m
ore than one canner load was processed on the date.
Writing the date and content directly on the lid w
ith a permanent
marker w
orks well and insures you w
on’t mistakenly use the lid again
next year (the metal rings can be reused, but the lids should only be
used once for canning). For best quality, store between 50°F and 70°F in
a dry place to prevent the lids from rusting and possibly breaking the
seal.
2. Before opening each jar, look for bulging lids, leaks and any unusual appearance of the food. A
fter opening, check for off -odor, mold, foam
or spurting liquid. N
ever taste questionable foods. Caution: To prevent the risk of botulism
, low-acid and tom
ato foods not canned according to 1994 or m
ore recent USD
A-endorsed recom
mendations should be boiled
even if you detect no signs of spoilage. At altitudes below
1,000 feet,
3
away and get som
e expert tips on venison preparation. It may be
helpful to have a vacuum sealer or freezer bags for m
eat to be frozen and available to go hom
e with hunters at the end of the hunting trip.
8. Do you have basic cooking equipm
ent and ingredients to cook up som
e wild gam
e? A cast iron skillet, D
utch oven (or pot with a lid),
sharp knife, olive oil, pads of butt er, salt & pepper, and tongs are the
basics needed to cook up some tasty back straps or a roast. A
clove of garlic and other seasoning m
ixes are also nice to have on hand. Don’t
forget hand sanitizer for both the cook and the eaters!
9. Has the hunter practiced shooting w
ith the gun or bow (and am
mo)
that will be used in the fi eld for the quick killing shot? A
lways
familiarize your hunter w
ith their fi rearm or bow
. Things don’t always
go perfectly, but a well shot deer w
ill be easier to clean and the meat
will be m
ore pristine. 10. D
o you have some resources for the hunters to cook their venison
when they get hom
e, such as this booklet or cookbook or website
suggestions?

4
Rem
ember Food Safety
Starts in the Field!Consider using non-lead bullets or slugs
Research has shown that sm
all, undetectable lead fragments rem
ain in the m
eat of animals shot w
ith lead amm
unition, especially in the ground meat.
Lead is a neurotoxin that can be particularly harmful to grow
ing children and developing fetuses (pregnant w
omen). If you choose to use lead
amm
unition, be sure to discard the meat around the w
ound channel.
Properly field dress the deer and cool the inner cavity as soon as possible
Bring a sharp knife for gutt ing your deer, plastic gloves, and some
sanitizing wipes to clean your blade. If you choose to rinse the inner
cavity of the deer after gutt ing, be sure to dry it w
ith a towel. Excessive
moisture can lead to
harmful bacteria grow
th. Prop the cavity open w
ith clean sticks to allow
the air to circulate, cooling dow
n the cavity. Penn State has a Field D
ressing Deer Pocket
Image from
ww
w.hunter-ed.com
41
on a rack, dry towel, w
ood board, or layers of newspaper to prevent the
jars from breaking from
contact with a cold surface. A
ny water on the
top of jars will evaporate, so do not tilt the jars to pour w
ater off as this can break the seal. Leave at least 1-inch of space betw
een jars. Keep hot
jars out of cold drafts.
16. Do not tighten rings. Jar lids should not be re-tightened after
processing. As jars cool, the contents in the jars contract, pulling the
self-sealing lid fi rmly against the jar to form
a high vacuum. M
ost two-
piece lids will seal w
ith a “pop” sound while they’re cooling.
17. Allow
jars to cool, untouched, for 12 to 24 hours.
Finishing the Canning Process
1. Testing for seal - When jars are com
pletely cool to the touch (about 12 hours), test each jar for a seal. Jars w
ith fl at, metal lids are sealed if:
• Lid has popped dow
n in center.•
Lid does not move w
hen pressed down w
ith a fi nger.•
Tapping the center of the lid with a spoon m
akes a clear ringing sound. A
dull thudding sound may indicate a w
eak seal or that food is touching the underside of the lid. To determ
ine which, hold the jar
up and look at it.
2. If a jar is not sealed, refrigerate and use it within 2 or 3 days. O
ther options are to freeze the contents (in a freezer container) or to reprocess the food w
ithin 24 hours of the initial processing.

40
12. Let the pressure in the canner drop to zero. This will take 30-45 m
inutes in a standard heavy-w
alled canner and nearly an hour in larger canners. N
ewer thin-w
alled canners depressurize more quickly. D
o not rush the cooling process by sett ing the canner in w
ater or running cold w
ater over it. Never lift the w
eight or open the vent to hasten the reduction of pressure. Proper depressurization is im
portant for the safety of the food.
13. When canner is depressurized, open the vent or rem
ove the weight.
Older canners are depressurized w
hen the gauge on a dial gauge canner registers zero, or w
hen a gentler nudge to the weight on a
weighted gauge canner does not produce steam
. New
er canners are equipped w
ith a safety lock. These canners are depressurized when
the safety lock releases. Sometim
es safety locks located in the handle of the canner w
ill stick. If a nudge to a canner weight indicates it is
depressurized then run a knife blade between the handles to release the
lock.
14. Wait 10 m
inutes, unfasten the lid and remove it carefully. Lift the lid
with the underside aw
ay from you so that the steam
coming out of the
canner does not burn your face. Do not leave the canner unopened to
completely cool. The food m
ay spoil, and it may be very diffi cult to
open the canner hours after it has cooled.
15. Use a jar lifter to carefully rem
ove the jars as soon as the processing tim
e and depressurization time is over. Place the hot jars right side up
5
Guide that is handy to have in your kit. There are m
any on-line resources for fi eld dressing deer. Just be sure the inform
ation is from a reliable,
research-based source, such as a State’s Cooperative Extension (.edu) or
Departm
ent of Environmental C
onservation (.gov).
Keep the deer below
40°F during agingO
nly age your deer for a few days to tenderize the m
eat if you have a place to store it below
40°F where pests cannot get it (i.e. canines, cats, or
rodents). The deer should be hung by its hind feet with the skin on during
aging. If the temperature is not cooperating, it is not necessary to age the
meat to achieve tender results. O
ther ways to tenderize m
eat are through m
echanical processes, such as pounding with a m
eat mallet or piercing
the meat; using acidic m
arinades, such as vinegar or wine to break dow
n the m
eat; brining the meat in salted w
ater to enhance juiciness; braising by searing or “brow
ning” the meat, then cooking it for a few
hours in liquid (think stew
or pot roast); and a fi nal tenderizing technique is to not overcook steaks or other tender cuts.
Have a plan for storing deer m
eat, such as freezing, canning, jerky m
akingO
ne cubic foot of freezer space holds about 30-35 pounds of cut and w
rapped meat, depending on the shape of the cuts. You can expect to get
about 50-60% yield of edible m
eat, so a 100 pound deer will yield about
50 to 60 pounds of meat for the freezer. A
lways freeze m
eat one layer at a tim
e. Filling a box with m
any packs of unfrozen meat w
ill lead to w
arm spots in the m
iddle of the box and portions of the meat m
ay not be thoroughly frozen, causing a food safety concern. M
eat can be condensed
6
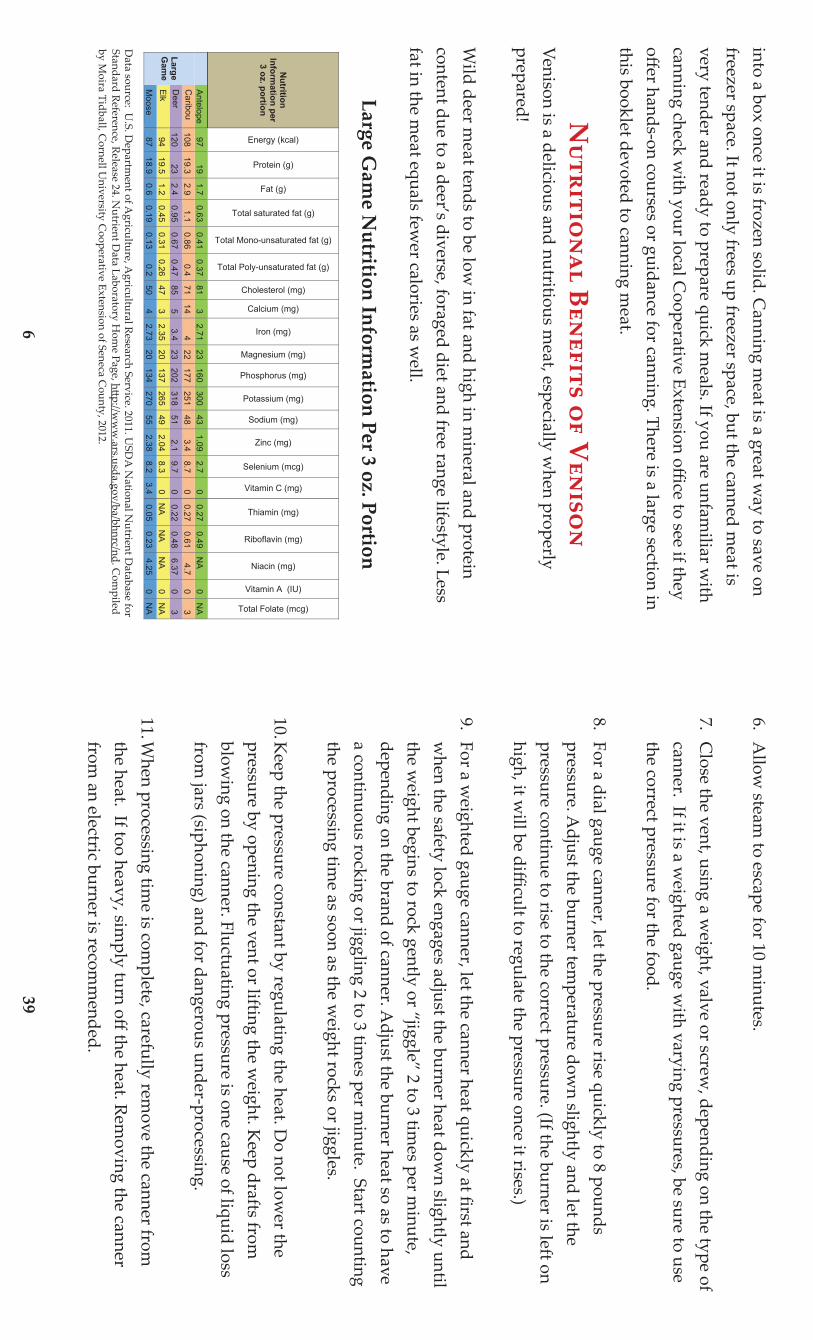
Data source: U
.S. Departm
ent of Agriculture, A
gricultural Research Service. 2011. USD
A N
ational Nutrient D
atabase for Standard Reference, Release 24. N
utrient Data Laboratory H
ome Page, htt p://w
ww
.ars.usda.gov/ba/bhnrc/nd. Com
piled by M
oira Tidball, Cornell U
niversity Cooperative Extension of Seneca C
ounty, 2012.
Nutrition
Information per
3 oz. portion
Energy (kcal)
Protein (g)
Fat (g)
Total saturated fat (g)
Total Mono-unsaturated fat (g)
Total Poly-unsaturated fat (g)
Cholesterol (mg)
Calcium (mg)
Iron (mg)
Magnesium (mg)
Phosphorus (mg)
Potassium (mg)
Sodium (mg)
Zinc (mg)
Selenium (mcg)
Vitamin C (mg)
Thiamin (mg)
Riboflavin (mg)
Niacin (mg)
Vitamin A (IU)
Total Folate (mcg)
Antelope 97
19 1.7
0.63 0.41
0.37 81
3 2.71
23 160
300 43
1.09 2.7
0 0.27
0.49 N
A 0
NA
Large G
ame
Caribou
108 19.3
2.9 1.1
0.86 0.4
71 14
4 22
177 251
48 3.4
8.7 0
0.27 0.61
4.7 0
3 D
eer 120
23 2.4
0.95 0.67
0.47 85
5 3.4
23 202
318 51
2.1 9.7
0 0.22
0.48 6.37
0 3
Elk 94
19.5 1.2
0.45 0.31
0.26 47
3 2.35
20 137
265 49
2.04 8.3
0 N
A N
A N
A 0
NA
Moose
87 18.9
0.6 0.19
0.13 0.2
50 4
2.73 20
134 270
55 2.38
8.2 3.4
0.05 0.23
4.25 0
NA
into a box once it is frozen solid. Canning m
eat is a great way to save on
freezer space. It not only frees up freezer space, but the canned meat is
very tender and ready to prepare quick meals. If you are unfam
iliar with
canning check with your local C
ooperative Extension offi ce to see if they off er hands-on courses or guidance for canning. There is a large section in this booklet devoted to canning m
eat.
Nutritional Benefits of V
enisonVenison is a delicious and nutritious m
eat, especially when properly
prepared!
Wild deer m
eat tends to be low in fat and high in m
ineral and protein content due to a deer’s diverse, foraged diet and free range lifestyle. Less fat in the m
eat equals fewer calories as w
ell.
Large Gam
e Nutrition Inform
ation Per 3 oz. Portion
39
6. Allow
steam to escape for 10 m
inutes.
7. Close the vent, using a w
eight, valve or screw, depending on the type of
canner. If it is a weighted gauge w
ith varying pressures, be sure to use the correct pressure for the food.
8. For a dial gauge canner, let the pressure rise quickly to 8 pounds pressure. A
djust the burner temperature dow
n slightly and let the pressure continue to rise to the correct pressure. (If the burner is left on high, it w
ill be diffi cult to regulate the pressure once it rises.)
9. For a weighted gauge canner, let the canner heat quickly at fi rst and
when the safety lock engages adjust the burner heat dow
n slightly until the w
eight begins to rock gently or “jiggle” 2 to 3 times per m
inute, depending on the brand of canner. A
djust the burner heat so as to have a continuous rocking or jiggling 2 to 3 tim
es per minute. Start counting
the processing time as soon as the w
eight rocks or jiggles.
10. Keep the pressure constant by regulating the heat. D
o not lower the
pressure by opening the vent or lifting the weight. K
eep drafts from
blowing on the canner. Fluctuating pressure is one cause of liquid loss
from jars (siphoning) and for dangerous under-processing.
11. When processing tim
e is complete, carefully rem
ove the canner from
the heat. If too heavy, simply turn off the heat. Rem
oving the canner from
an electric burner is recomm
ended.

38
The following are general instructions for
using a pressure canner (17 steps):
1. Place 2 to 3 inches hot water in the canner if you are canning raw
packed foods. For hot packed food, the w
ater may be gently boiling.
2. Set the jars of food on the rack in the canner so steam can fl ow
around each jar.
3. Fasten the canner lid so that no steam escapes around the seal.
4. Make sure the vent (petcock) is open.
5. Turn burner heat to high, and watch for steam
to escape in a funnel shape from
the open vent.
7
Venison Cuts and C
ooking Methods
htt p://extension.psu.edu/publications/agrs-112

8
Recipes
Hunter’s Pie Baked Potatoes 9
Venison Pot Roast 12Venison Backstrap w
ith Caram
elized Onions 14
Venison Nachos 16
Venison Summ
er Sausage with C
heese and Jalapeño Pepper 18Venison M
eatballs 20 G
rilled Venison Steaks 22G
randpa’s Venison Burgers 24Venison Stew
26Venison “Veal” C
utlets 28Venison Sw
iss Steaks 30Red, W
hite, and Blue – 4th of July Venison Burgers 32
Venison (or Goose) Jerky 34
The guiding culture started in the north woods, especially in the
northeastern states of Maine and N
ew York. These early guides knew
w
here to hunt and fi sh, how to navigate the w
ilderness, and how to
cook their quarry! True to this great guiding tradition, today’s guides should be experts in the four Ps (procurem
ent, processing, preparing, and presentation) of w
ild game m
eat that they help their fellows harvest. N
ot only is this im
portant to pay our respect to tradition, it is a fundamental
aspect of our ethical obligations as hunters and anglers today. What
follows are som
e delicious and simple recipes to help you partake in this
time-honored tradition.
37
Canning Venison in a Pressure C
annerC
anning is the process by which foods are placed in jars or cans and
heated to a temperature that destroys m
icroorganisms and inactivates
enzymes. This heating and later cooling form
s a vacuum seal. The vacuum
seal prevents other m
icroorganisms from
re-contaminating the food w
ithin the jar or can.
The pressure canner is used to process foods under pressure which creates
higher temperatures in the canner than can be achieved in a boiling w
ater bath canner. The pressure m
ost often used is 10 or 11 pounds, which
creates a temperature of 240°F.
Pressure canning is the only safe method for processing low
acid foods such as vegetables, m
eat, poultry, and fi sh. The pressure canner can supply enough heat to destroy the bacterial toxins that cause botulism
as well as
other types of spoilage. Failure to properly process low acid foods in a
pressure canner can result in botulism, w
hich is often fatal.
Read your manufacturer’s instructions concerning the operation of your
pressure canner; however, only use canning recipes and tim
etables that have been approved by U
SDA
and published after 1994.

36
Directions
1. Com
bine all of the marinade ingredients in a
shallow glass or ceram
ic (not metal) pan and
place meat in the pan, being sure to coat all of
the pieces with the m
arinade.2. C
over and refrigerate the marinating m
eat for 1-2 hours or overnight (the jerky w
ill taste saltier the longer it is m
arinated).3. Rem
ove the pan from the refrigerator and
place meat along w
ith the marinade in a skillet
or pan and place on the stove over medium
high heat and bring to a boil. Boil the m
ixture for 5 m
inutes (this will kill any bacteria by
reaching 160°F). Remove the strips of m
eat and place to drain on clean absorbent tow
els.4. A
rrange the meat strips on dehydrator trays
with the m
eat close together but not touching. If you are dehydrating in an oven, place the m
eat on metal racks that are placed on
cooking sheets to catch the drippings. Place the racks in a dehydrator or convection oven preheated to 140-145°F. Begin checking the m
eat after about 3 hours to see if it is dry. It should crack, but not break w
hen bent.
(continued) Venison (or Goose) Jerky Recipe
9
Ingredients•
1 ½ lb ground venison
• ½
red onion, minced
• 2 cloves garlic
• 2 carrots, fi nely diced
• 1 cup of peas
• 1 teaspoon m
inced thyme or oregano, ½
teaspoon if using ground
• ½
cup chopped parsley (optional)•
2 cups diced tomatoes (or a 14.5 oz can)
• a splash of w
ine, Guinness, or verm
outh to deglaze the pan (optional)
• 4 large baking potatoes, such as russet
• 4 tablespoons butt er
• ½
cup milk
• salt and pepper to taste
This is a fun twist on Shepard’s Pie. They can be m
ade ahead of time if
you are feeding a crowd.
Serves: 4
Hunter’s Pie
Baked Potatoes
VEN
ISON

10
Directions
1. Preheat oven to 375°F. Wash and dry the baking potatoes, pierce
potatoes on all sides with a fork and rub a bit of olive oil over the
potatoes. Place on oven rack and bake until tender, about 45 minutes-1
hour.
2. Meanw
hile brown ground venison in a skillet over m
edium heat on the
stove (you may need to add a bit of olive oil depending on your pan
and if the venison is sticking). Add the onion, carrots, peas, 1 clove of
minced garlic, thym
e, and a handful of chopped parsley. Sauté a few
minutes. A
dd about 2 Tbsp of wine, G
uinness, or vermouth to deglaze
the pan, scraping up any bits (optional). Add the tom
atoes and stir w
ell. Cook until the liquid is absorbed and the m
eat is cooked through. K
eep warm
until the potatoes are done.
3. When the potatoes are done cooking
and cool enough to handle, cut them
in half lengthwise. Scoop the inside
of the potato out into a bowl (a m
etal spoon or sm
all ice cream scoop w
orks w
ell for this) leaving the wall of the
potato intact. 4. Place the hollow
ed out potato skins on a baking sheet. Add butt er,
milk, and 1 clove of m
inced garlic to the insides of the potato and mash/
whip the potatoes. Season to taste w
ith salt and pepper. Place mashed/
whipped potatoes into a quart size plastic bag and cut the corner to
VEN
ISON
35
Preparing Venison or G
oose to Make Jerky
• Take about 2 pounds of m
eat out of the freezer, choosing a cut that will
slice well, such as steaks, chops or roasts.
• Place the m
eat in the refrigerator to defrost. Partially frozen meat is
easier to slice. Do not defrost the m
eat at room tem
perature because this w
ill allow bacteria to m
ultiply and potentially cause an unsafe product. •
Trim fat from
the meat and slice the m
eat into slices no thicker than ¼
-inch. Slice with the grain if a chew
y jerky is desired and across the grain if a m
ore britt le, tender jerky is preferred.
(directions continued on next page)
Photo by Holly A
. Heyser

34
Clean out the freezer of last year’s venison by m
aking some jerky to snack
on during this hunting season. Jerky is really quite easy to make, yet it
takes some tim
e. Reliable, science-based recipes must be follow
ed. Using
meat from
the freezer will help w
ith proper rotation of your freezer space and help em
pty it for defrosting before restocking it with this year’s
quarry. Plus, frozen meat w
orks well for this recipe and jerky tastes great!
Serves: 6
Venison (or Goose) Jerky
Marinade Ingredients
• ¼
cup soy sauce•
1 tablespoon Worcestershire sauce
• dash of pepper
• dash of garlic pow
der•
dash of onion powder
• 1 teaspoon hickory sm
oke fl avored salt (or regular salt)
11
make a pastry-type bag or use a pastry bag and tip if you have one.
Spoon the venison mixture into the potato skins and then pipe som
e of the w
hipped potatoes on top. (The potatoes can be placed in the fridge at this stage for a few
hours until ready to heat for dinner- this makes
them a fun, and easy thing to serve for a dinner party w
ith friends and fam
ily)
5. Put the potatoes back into the oven and cook about 10 minutes until
heated through.

12
Ingredients•
3 pound venison roast•
2 tablespoons fl our•
1 tablespoon olive oil•
1 medium
onion, diced•
2 cloves garlic, minced
• 3 big carrots, sliced
• 4 celery stalks, sliced
• 1 teaspoon thym
e•
1 teaspoon rosemary
• ½
teaspoon salt•
½ teaspoon pepper
• 1 ½
cups stock (beef, chicken, or wine)
This makes a delicious Sunday roast and the leftovers m
ake great sandw
iches. Happy hunting and bon appetite!
Serves: 10 - 12
Venison Pot Roast
VEN
ISON
33
Directions
1. Mix all ingredients and form
into 6 hamburger
patt ies. Grill patt ies until cooked through. You
can top patt ies with additional blue cheese and
chives. It is important to not over cook venison
or it will dry out due to its lack of fat, w
hich also m
akes it a healthy choice of meat!

32
Ingredients•
1 ½ pounds ground venison m
eat•
½ cup diced sw
eet onion, such as vidalia, red, or shallot•
½ cup diced sun-dried tom
atoes•
½ cup crum
bled blue cheese•
1-2 tablespoons olive oil•
1 egg or just egg white
• 1 tablespoon Italian seasoning (or 1 teaspoon thym
e, 1 teaspoon oregano, 1 teaspoon parsley fl akes)
• salt and pepper to taste
In celebration of the 4th of July or any patriotic celebration, try these “Red, W
hite, and Blue” burgers…sure to be a crow
d pleaser. The “red” is from
sun dried tomatoes, the “blue” is blue cheese and the “w
hite” is white
tailed deer. Recipe was developed by C
agey T.
Serves: 6
Red, W
hite, and Blue –
4th of July Venison Burgers
VEN
ISON
13
Directions
1. Lightly dust roast with fl our, salt and pepper.
2. Heat olive oil in dutch oven over m
edium to
medium
-high heat; sear roast on each side until brow
n (about 2 minutes each side).
3. Add onion, garlic, carrots, m
ushrooms, and
celery to pan. Sauté for 3-5 minutes.
4. Add thym
e, rosemary, salt, and pepper.
5. Pour in liquid, then scrape bott om of the pan
with a w
ooden spoon to loosen fl our and meat
drippings to incorporate into the sauce.6. C
over the pan and place in oven at 300°F for a few
hours until meat is very tender and falls
off the bone, making sure there is still liquid in
the pan.7. If using a crock pot, cook in crock pot for 8
hours on low.
8. To make a gravy, save the juice from
the pan by straining off the solids and then boiling the liquid on the stove until thickened. C
an be served over boiled potatoes.

14
Ingredients•
1-2 pounds venison backstrap•
2 tablespoons balsamic vinegar
• 3 tablespoons olive oil, divided
• 1 m
edium vidalia or yellow
onion, sliced•
2 cloves fresh garlic, minced
• 1 teaspoon fresh rosem
ary•
1 teaspoon fresh thyme (optional)
• ½
teaspoon brown sugar
• dash of cayenne pepper
• coarse salt
• freshly ground black pepper
The backstrap or tenderloins are the long tender strips of meat found along
either side of the spine. It is often considered the prize cut of meat from
a deer.
Serves: 4
Venison Backstrap with
Caram
elized Onions
VEN
ISON
31
Directions
1. Flour the venison steak and pound with a
meat m
allet until about ¼ - ½
-inch thickness.2. In a large braising pan or cast iron skillet
(properly seasoned, of course) heat the olive oil over m
edium high heat. A
dd the steaks and cook about 3 m
inutes until well brow
ned. Flip and brow
n the other side. 3. Rem
ove the meat and set aside on a plate.
4. Add the onion, carrot, pepper, m
ushroom,
garlic and 1 teaspoon herbs to the skillet. Sauté the veggies 3-5 m
inutes. Push the veggies aside, put the steaks back in the pan, and arrange veggies around and on top of the m
eat.5. M
ix the other teaspoon of herbs with the
tomatoes and pour on top of the m
eat and vegetables.
6. Cover pan and cook in a 325°F oven for 1 ½
hours.
7. Can be served over brow
n rice or whole grain
noodles with a side salad for a balanced,
nutritious meal.

30
Ingredients•
1 pound venison steak or boneless chops•
¼ cup fl our, seasoned w
ith salt and pepper•
1 tablespoon olive oil•
1 small onion (about ½
cup), chopped•
1 clove minced garlic (1-2 teaspoons)
• ½
cup chopped carrot•
½ cup chopped peppers
• ½
cup chopped mushroom
s•
1 pint diced tomatoes (fresh or canned)
• 2 teaspoons Italian seasoning or a m
ix of oregano, thyme, rosem
ary, basil, etc.
• salt and pepper to taste
Serves: 4
Here is a tried and true w
ay to make tender and fl avorful venison steaks!
Venison Swiss Steaks
VEN
ISON
15
Directions
1. Rinse venison and pat dry. Season with salt
and pepper. Add balsam
ic vinegar and 1 tablespoon of the olive oil. Rub into m
eat and let m
arinate for about 30 minutes to an hour.
2. Heat 1 tablespoon of the olive oil over
medium
high heat. Pan fry venison, turning to brow
n, until medium
rare, about four minutes
total for a two-inch thick backstrap. Rem
ove from
heat and tent with foil (it w
ill cook a bit m
ore under the foil).3. Turn dow
n heat to medium
and add rem
aining olive oil to pan. Add onions, garlic
and rosemary, dash of cayenne pepper and
other desired herbs. Sprinkle with brow
n sugar. Toss and cook until onions brow
n and are slightly caram
elized, about 2-5 minutes.
Remove from
heat. Slice venison at an angle and serve w
ith onion and garlic mixture.
16
Ingredients•
1 pound ground venison•
1 tablespoon olive oil•
1 medium
onion, diced•
2-3 cloves garlic, minced
• 2-3 tablespoons chili pow
der•
1 can (28 ounces) diced tomatoes (or 1 quart hom
e canned tomatoes)
• 1 can (15 ounces) red kidney beans or black beans (drained and rinsed)
• 1 cup shredded cheddar cheese
• ½
cup sour cream•
salt and pepper to taste•
tortilla chips•
optional: 1 tablespoon brown sugar, 1 teaspoon crushed oregano, and 1
teaspoon cumin
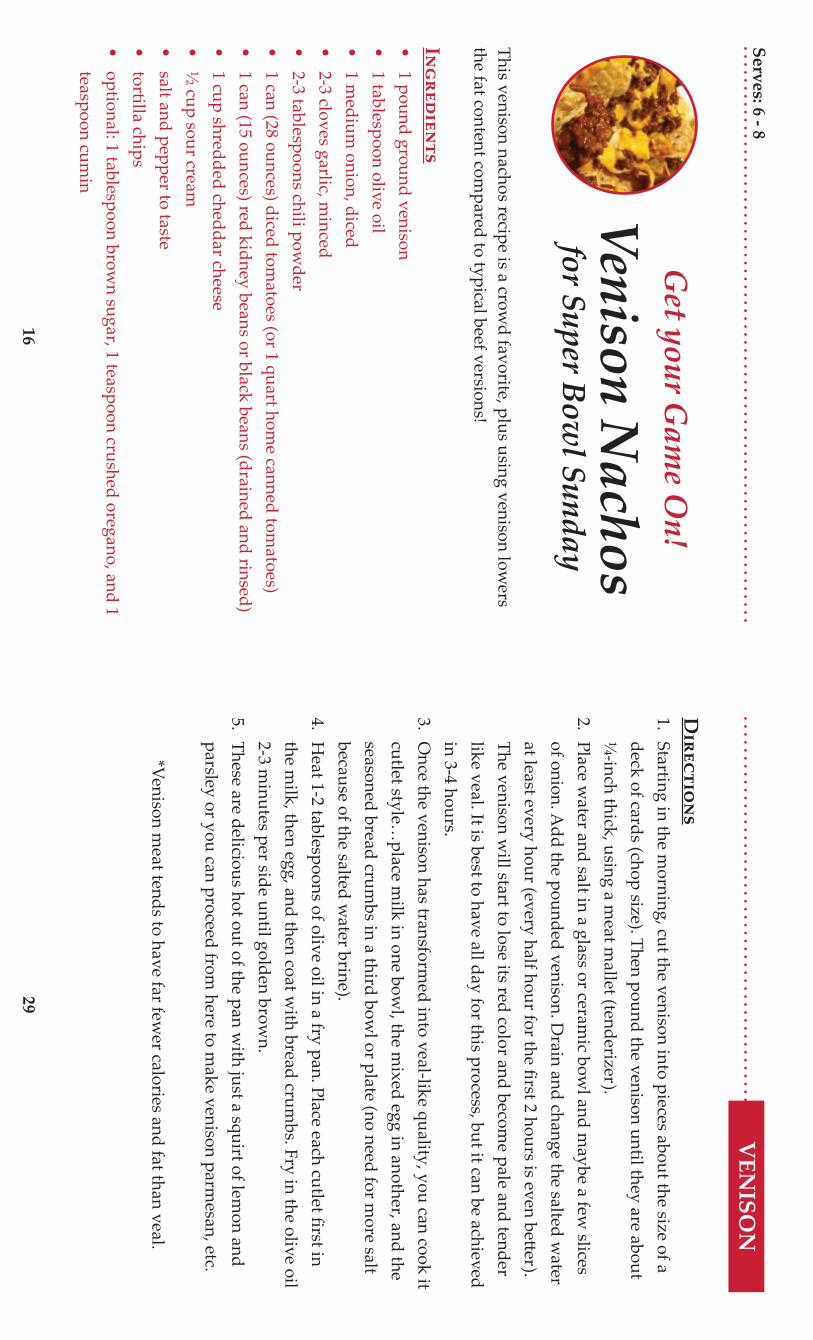
This venison nachos recipe is a crowd favorite, plus using venison low
ers the fat content com
pared to typical beef versions!
Serves: 6 - 8
Get your G
ame O
n!
Venison Nachos
for Super Bow
l Sunday
29
Directions
1. Starting in the morning, cut the venison into pieces about the size of a
deck of cards (chop size). Then pound the venison until they are about ¼
-inch thick, using a meat m
allet (tenderizer).2. Place w
ater and salt in a glass or ceramic bow
l and maybe a few
slices of onion. A
dd the pounded venison. Drain and change the salted w
ater at least every hour (every half hour for the fi rst 2 hours is even bett er). The venison w
ill start to lose its red color and become pale and tender
like veal. It is best to have all day for this process, but it can be achieved in 3-4 hours.
3. Once the venison has transform
ed into veal-like quality, you can cook it cutlet style…
place milk in one bow
l, the mixed egg in another, and the
seasoned bread crumbs in a third bow
l or plate (no need for more salt
because of the salted water brine).
4. Heat 1-2 tablespoons of olive oil in a fry pan. Place each cutlet fi rst in
the milk, then egg, and then coat w
ith bread crumbs. Fry in the olive oil
2-3 minutes per side until golden brow
n.5. These are delicious hot out of the pan w
ith just a squirt of lemon and
parsley or you can proceed from here to m
ake venison parmesan, etc.
*Venison meat tends to have far few
er calories and fat than veal.
VEN
ISON

28
Ingredients•
1 pound venison steak or chops•
½ cup onion, sliced
• ½
cup fresh herbs such as parsley, rosemary,
thyme or 2 tablespoons dried Italian seasoning
• 1 quart w
ater•
2-4 tablespoons salt•
1 egg, stirred•
½ cup m
ilk•
½ cup seasoned bread crum
bs•
1-2 tablespoons olive oil
These tender morsels can be eaten sim
ply or interchanged with any veal
recipe (e.g., venison veal parmesan, venison veal m
arsala, venison veal piccata).
Serves: 4
Venison “Veal” Cutlets
VEN
ISON
17
Directions
1. In a stock pot, add the olive oil and brown
the venison over medium
high heat. Add the
onion and cook 3-5 minutes longer until onion
is translucent. Add the garlic and spices and
cook another minute (don’t let the garlic get
brown). A
dd the tomatoes and scrape the
bott om of the pan w
ith a wooden spoon or
non-metal spatula.
2. Bring mixture to a gentle boil, then low
er heat and sim
mer the chili about half an hour
or more until it is thicker. A
dd the beans and cook until heated through and the consistency is thick. Season to taste.
3. Preheat oven to 400°F. In a 10-inch pie plate, layer the tortilla chips, then cover w
ith venison chili (leave som
e room along the edges to pick
up chips) and top with cheddar cheese. Bake
for about 8 minutes until the cheese is m
elted. D
ollop spoonfuls of sour cream on top and
serve.

18
Ingredients•
1 cup cold water
• 3 tablespoons Tender Q
uick Curing salt
• 1-2 teaspoons m
ustard seed•
1-2 teaspoons garlic powder
• 1 teaspoon m
arjoram (optional)
• 1 teaspoon ground black pepper
• 2 teaspoons liquid sm
oke fl avoring ( *omit this if sm
oking the sausage)•
3 pounds ground venison•
1 cup shredded or fi nely diced cheddar cheese•
2 jalapeño peppers, seeded and fi nely diced
Here is a recipe for a delicious sum
mer sausage you can m
ake at home. It
is a perfect appetizer to share with fam
ily or friends!
Serves: 6
Venison Summ
er Sausage w
ith Cheese and Jalapeño Pepper
27
Directions
1. Preheat oven to 300°F or turn on your crock pot. In a suitable braising pan (i.e. a deep pan w
ith an oven-proof lid, such as a dutch oven) heat the olive oil over m
edium heat.
2. Meanw
hile, lightly fl our the venison cubes. Brown the fl oured venison
cubes in the oil until nicely browned on all sides about 3-5 m
inutes.3. Rem
ove venison from the pan and set aside on a plate. A
dd the onion, garlic, carrot, celery and seasonings to the pan and gently brow
n your veggies for about 3 m
inutes. Add the w
ine, Worcestershire sauce and
vinegar to the pan and gently scrape up any bits on the bott om of the
pan with a w
ooden spoon.4. Turn off the burner. A
dd potatoes, tomatoes and venison m
eat back into the pan. G
ently stir all ingredients to combine and season w
ith salt and pepper (about 1 teaspoon salt and ½
teaspoon black pepper) and parsley (optional).
5. Cover the braising dish and place in oven for about 2 to 2½
hours until the m
eat is tender.6. If using a crock pot: fl our and brow
n the meat in the olive oil as
explained above. Place browned m
eat in a crock pot. Add the w
ine or beer to the pan that the m
eat was brow
ned in and scrape up any brow
ned bits on the bott om of the pan. A
dd this to the crock pot along w
ith the remaining ingredients and leave it to cook all day (4 -5 hours
on high sett ing or 8+ hours on low).
VEN
ISON

26
Ingredients•
1 ½ pounds cubed venison m
eat (you can use cube steak or roast if you do not have stew
meat packaged)
• 6 m
edium potatoes w
ashed and cut in half or quartered•
1 medium
onion, diced•
1 cup diced carrots (large chunks or can use “baby” carrots)•
1 cup diced celery•
3 cloves garlic, minced
• 3 tablespoons olive oil
• ¼
cup fl our (optional to season the fl our with
salt and pepper)•
1 tablespoon Italian seasoning•
salt and pepper to taste•
1 teaspoon Worcestershire sauce (optional)
• 1 tablespoon balsam
ic vinegar (optional)•
1 ½ cups dry red w
ine or 12 ounces of dark beer•
1 can (about 14 ½ ounces) canned tom
atoes (diced or w
hole)•
4 tablespoons fresh chopped parsley (optional)
This one pot meal is great on a cold w
inter night. You can even m
ake it in a crockpot so it is ready when
you get home.
Serves: 4 - 6
Venison StewV
ENISO
N
19
Directions
1. Preheat oven to 300°F.2. In a large bow
l, mix w
ater, curing salt, m
ustard, garlic, marjoram
, black pepper and liquid sm
oke until the salt is thoroughly dissolved. M
ix in the ground venison, cheese and jalapeño peppers until evenly blended (easiest to do this w
ith your hands, wearing
food gloves).3. D
ivide the mixture in half and roll each half
into 2 inch thick “logs.” Tightly wrap each
“log” with alum
inum foil and refrigerate for
24 hours.4. A
fter 24 hours, carefully remove the
aluminum
foil from the sausage logs and place
them on a baking sheet. Bake the sausage until
they reach an internal temperature of 170°F,
about 1 ½ - 2 hours. Let cool and slice thin to
serve.
*If smoking the sum
mer sausage, om
it the liquid sm
oke when m
ixing ingredients. Then instead of baking the unw
rapped sausage logs, cook them
in a smoker according to the m
anufacturer’s recom
mendations, m
aking sure the meat reaches
an internal temperature of 170°F.

20
Ingredients•
1 pound ground venison•
2 eggs, beaten•
6 tablespoons grated Parmesan cheese
• ½
cup breadcrumbs or quick oats
• 1-2 tablespoons olive oil
• ¼
cup chopped fresh parsley•
1 tablespoon Italian seasonings (thyme, oregano, basil)
• 1 clove m
inced garlic•
¼ cup m
inced onion (optional)•
½ teaspoon salt
• ½
teaspoon black pepper
Meatballs are a great w
ay to feed a crowd and use up ground venison.
They can be served with M
arinara sauce over spaghett i or as a sandwich,
and freeze well to be enjoyed later.
Serves: 4Venison Meatballs
VEN
ISON
25
Directions
1. Peel and dice half of the onion into ¼-inch
pieces. Wipe the m
ushrooms w
ith a damp
paper towel then dice into ¼
-inch pieces. If using jalapeño or poblano, rinse the pepper and dice to ¼
-inch pieces. (For less heat, rem
ove the seeds and sauté the peppers in oil before adding into the m
eat. For more heat,
add the seeds and uncooked peppers).2. Rem
ove sausage from casing if necessary. M
ix ground venison, sausage, onion, m
ushrooms,
peppers if using, and spices by hand. Divide
into 6 even portions, about 3 ounces each. Shape the patt ies into thick rounds w
ith a slight im
pression in the middle of each.
3. Grill patt ies on preheated fl att op griddle or
two sided grill. The patt ies w
ill be very lean so it is best not to cook them
on a grated grill as they m
ay fall apart. Cook until a therm
ometer
inserted into the center of a patt y reads at least 160°F.
4. Top with your favorite ham
burger toppings (suggested: lett uce, tom
ato, onion and barbecue sauce) and enjoy!

24
Ingredients•
1 pound ground venison•
2 Italian sausages•
1 small onion
• ½
cup mushroom
s•
1 teaspoon black pepper•
½ teaspoon cayenne pepper
• ½
teaspoon cumin
• ½
teaspoon dried thyme
• for extra heat, 1-2 tablespoons diced jalapeño or poblano pepper (about 1 w
hole jalapeño or 1/3 of a whole poblano)
• H
amburger buns “This is a new
spin on my grandpa’s recipe for venison
burgers. As an avid fi sher and hunter, he often served these delicious
burgers to my dad, aunt and uncle w
hen they were grow
ing up. Grandpa
uses the sausage to give the lean venison some extra fat to hold the patt ies
together on the grill. I’ve added the spices and peppers to give it a litt le extra heat!” – M
egan Moore, dietetic intern w
ith Seneca County C
ornell C
ooperative Extension.
Serves: 6
Grandpa’s
Venison Burgers
VEN
ISON
21
Directions
1. In a large bowl m
ix all ingredients and form
into 1 ½ inch m
eatballs.2. Lightly oil a large, heavy skillet or use a non-
stick sauté pan and cook the meatballs over
medium
heat until browned and cooked
through, turning frequently, for about 15 m
inutes.3. The m
eatballs can also be cooked in the oven at 375°F for about 25-30 m
inutes, until cooked through. Enjoy your m
eatballs with your
favorite sauce or in a sandwich.
4. To freeze any leftover meatballs, allow
them
to cool 15-30 minutes and freeze them
in an airtight container, such as tightly w
rapped in butcher paper or vacuum
sealed.

22
Ingredients•
1 ½ pounds of venison steak from
the loin or round •
3 tablespoons olive oil•
1 tablespoon lemon juice
• 1 tablespoon soy sauce
• 1 tablespoon W
orcestershire sauce•
1 clove minced garlic
• salt and pepper to taste
OR you can use ½
a cup of your favorite marinade
There are three tenderizing techniques used in this recipe to make the
end result tender and juicy- piercing the meat, m
arinating, and not over-cooking.
Serves: 4
Grilled Venison Steaks
VEN
ISON
23
Directions
1. Mix all ingredients except steak vigorously
together with a w
ire whip or shake in a jar.
2. Place meat in a ceram
ic or glass dish and pierce the steak all over w
ith a fork or Jaccard-type m
eat tenderizer. (Note: w
e are not prom
oting any particular brand of tenderizing equipm
ent and the image below
is just a representation. Forks w
ork just fi ne, too.) Pour the m
arinade over the meat, turning the m
eat to evenly distribute the m
arinade.3. C
over and place in the refrigerator for about 4 hours, turning the m
eat a few tim
es.4. G
rill the steaks over high heat (hott est part of grill) about 4 m
inutes a side, basting with any
remaining m
arinade or a bit of butt er. Venison steak is best if cooked no higher than m
edium,
or about 145°F. It’s that simple.