Vendor Account Management - New York City
56
Vendor Account Management Roles Involved: • Vendors Summary: Step-by-step instructions on how to manage your vendor account in PASSPort. Last Updated: March 10, 2020
Transcript of Vendor Account Management - New York City

Vendor Account Management
Roles Involved:
• Vendors
Summary:
Step-by-step instructions on how to manage
your vendor account in PASSPort.
Last Updated: March 10, 2020
2
Table of Contents
1. Vendor Account Management Overview ........................................................................................................................................................................................ 3
2. Creating and Submitting a Change Request ................................................................................................................................................................................. 4
3. Submitting a Certification of No Change ..................................................................................................................................................................................... 16
4. Commodity Enrollment .................................................................................................................................................................................................................. 18
5. Self-Declaring Minority-Owned/Woman-Owned Business Enterprise (M/WBE) Certifications ................................................................................................ 34
6. Updating Vendor Contact Information ......................................................................................................................................................................................... 41
7. Uploading Equal Employment Opportunity (EEO) and Doing Business As (DBA) Documentation ........................................................................................... 47
Accessing PASSPort
To access PASSPort and log in using your NYC.ID credentials, go to http://www.nyc.gov/passport
Note: While navigating PASSPort you are able to easily increase its font size and readability. To do this, click the “ctrl” and “+” keys simultaneously on your
keyboard. Each time you click these keys, your web browser will zoom in and PASSPort will resize accordingly. To reduce PASSPort’s font size,
simultaneously click the “ctrl” and “-“ keys.
3
1. Vendor Account Management Overview
This user manual provides you with step-by-step instructions for submitting both Change Requests and Certification of No Changes in PASSPort, as well as
step-by-step instructions for completing day-to-day account management activities, such as enrolling in commodities, self-declaring Minority-
Owned/Woman-Owned Business Enterprise (M/WBE) certifications, updating contact information, and uploading Equal Employment Opportunity (EEO)
and Doing Business As (DBA) documentation.
After the Vendor Enrollment process is completed, your organization’s enrollment information is valid for three years from when it is signed and submitted
in PASSPort; however, you are required to confirm your information is accurate and up-to-date with each new contract award. If any of your organization’s
enrollment information has changed since a prior filing, you must submit a Change Request. Once a Change Request has been submitted, it will follow the
same review process as the Vendor Enrollment process and you will receive automated notifications regarding any Change Requests they create. If no
information has changed since a prior filing, you may submit a Certification of No Change (a statement that the information on file is current). Both a
Change Request and Certification of No Change are submitted within PASSPort. Submitting a Change Request or Certification of No Change restarts the
three year clock for your organization’s enrollment package.
In addition to submitting a Change Request or a Certification of No Change, fully enrolled vendors are able to enroll in commodities, update their contact
information, and upload Equal Employment Opportunity (EEO) and Doing Business As (DBA) documentation in PASSPort to create a more complete vendor
profile.
4
2. Creating and Submitting a Change Request
If your organization needs to update their basic company information, related entities, vendor questionnaire, or principal questionnaires, you can start the
Change Request process in PASSPort. Once a Change Request has been submitted, it will follow the same review process as the Vendor Enrollment
process. You will receive automated notifications regarding any Change Requests you create and will be notified whenever action is taken on a Change
Request.
Follow the below steps to create and submit a Change Request in PASSPort.
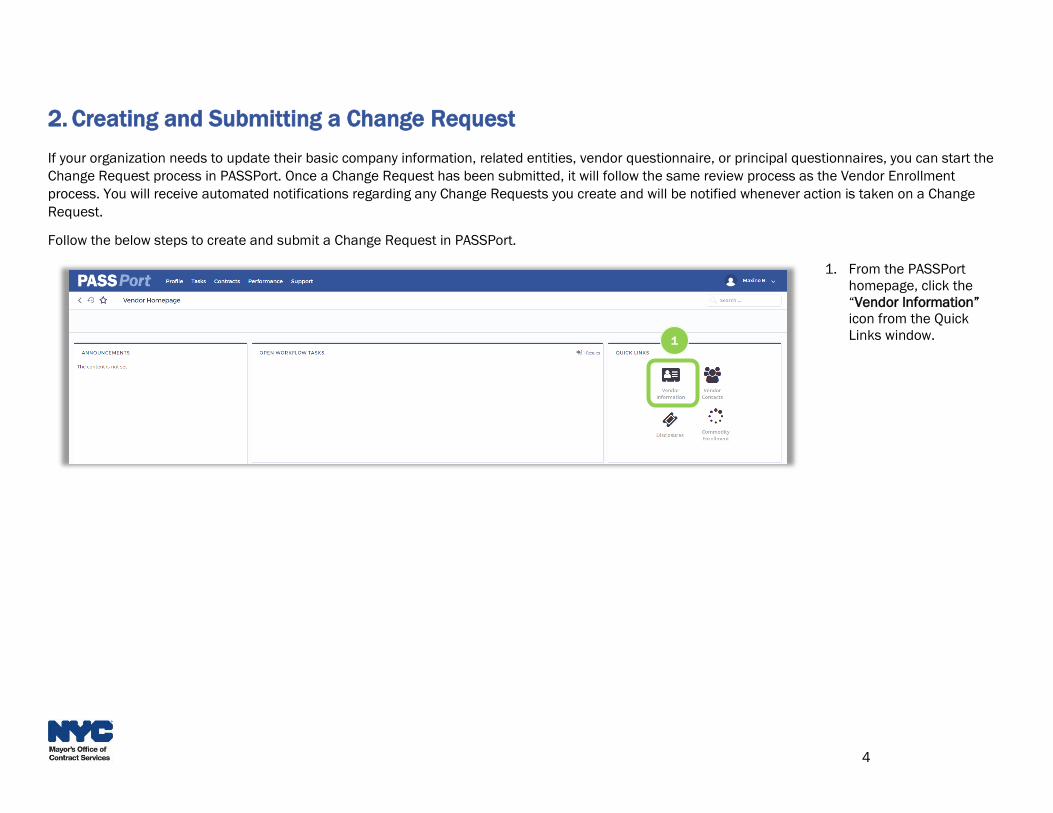
1. From the PASSPort
homepage, click the
“Vendor Information”
icon from the Quick
Links window.1
5
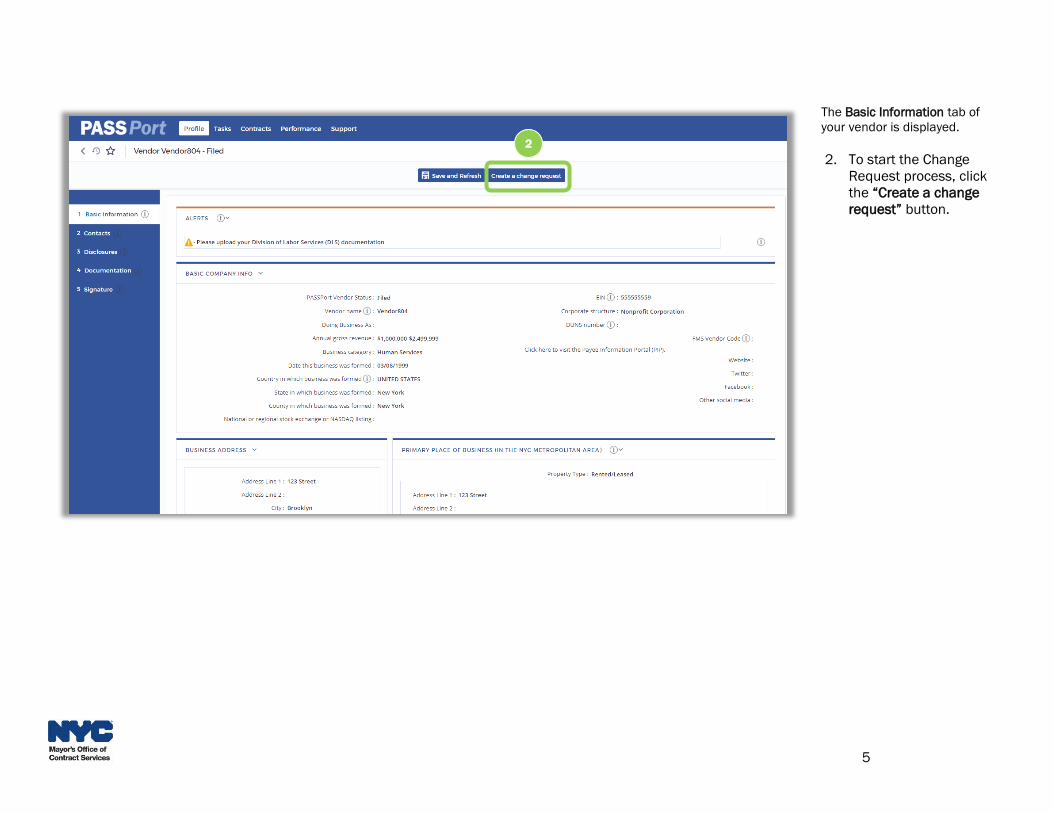
The Basic Information tab of
your vendor is displayed.
2. To start the Change
Request process, click
the “Create a change
request” button.
2

6
3. Scroll down on the page
and enter the reason
for the Change Request
in the “Change request
reason” field.
Note: You should enter a short
description of why the Change
Request is being created and
what information is being
updated as part of this Change
Request.
3

7
4. If necessary, make
changes to your “Basic
Company Info,”
“Business Address,”
and/or “Primary Place
of Business (in the NYC
Metropolitan Area).”
5. Click the “Save and
Refresh” button.
6. Navigate to the
Disclosures tab.
4
6
5
8
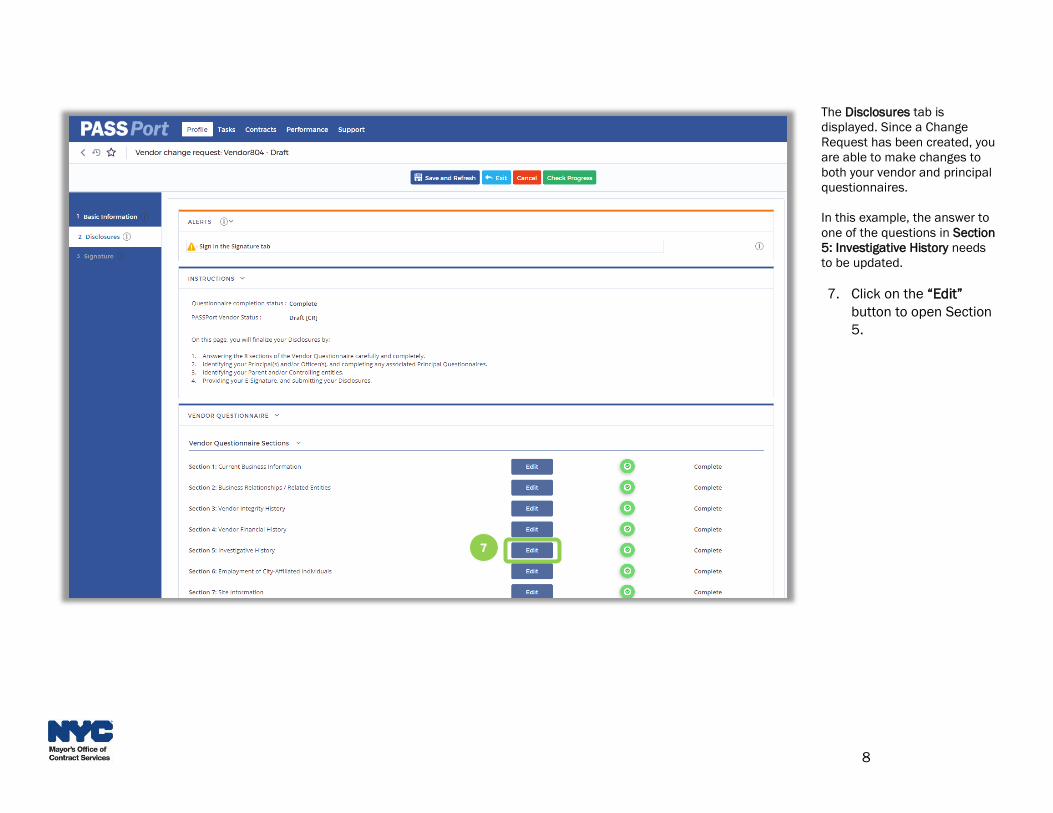
The Disclosures tab is
displayed. Since a Change
Request has been created, you
are able to make changes to
both your vendor and principal
questionnaires.
In this example, the answer to
one of the questions in Section
5: Investigative History needs
to be updated.
7. Click on the “Edit”
button to open Section
5.
7
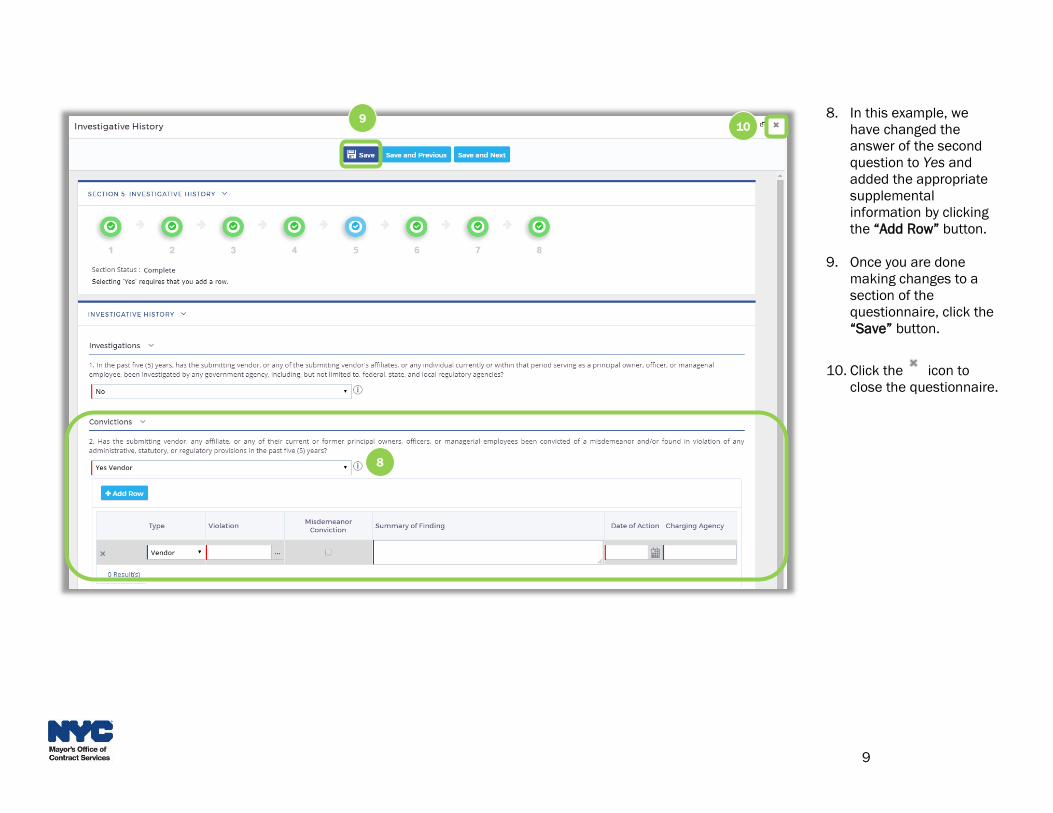
9
8. In this example, we
have changed the
answer of the second
question to Yes and
added the appropriate
supplemental
information by clicking
the “Add Row” button.
9. Once you are done
making changes to a
section of the
questionnaire, click the
“Save” button.
10. Click the icon to
close the questionnaire.
9
8
10
10
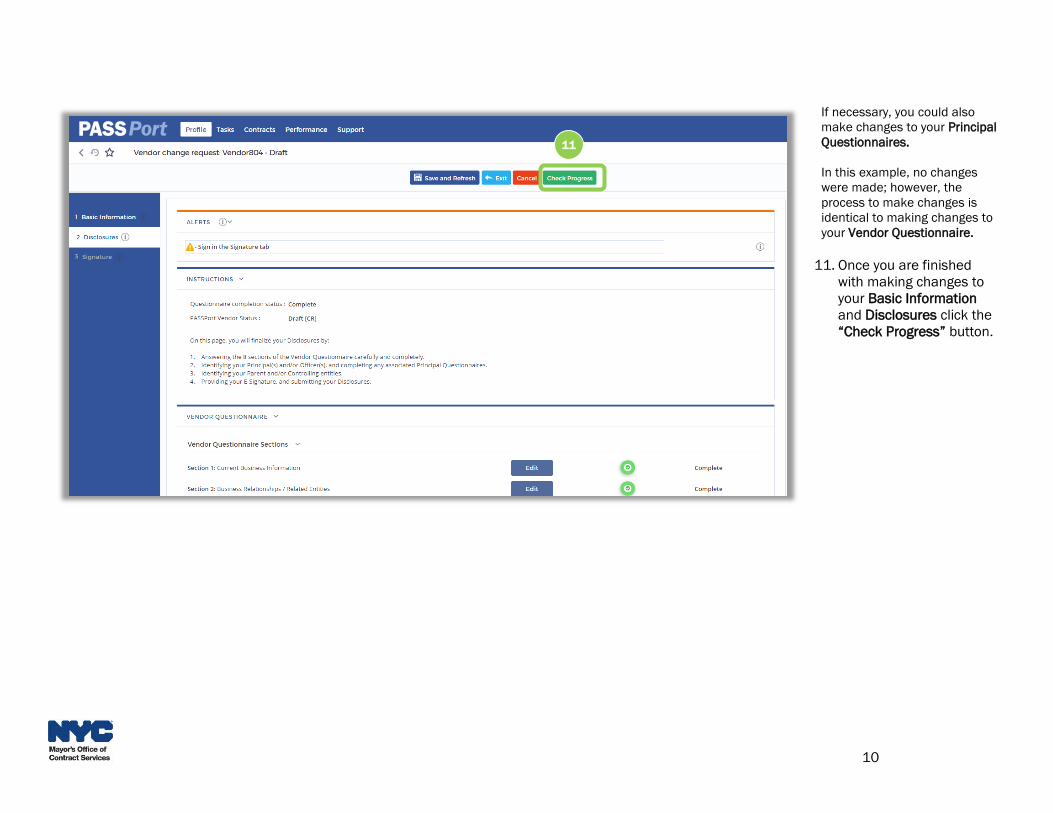
If necessary, you could also
make changes to your Principal
Questionnaires.
In this example, no changes
were made; however, the
process to make changes is
identical to making changes to
your Vendor Questionnaire.
11. Once you are finished
with making changes to
your Basic Information
and Disclosures click the
“Check Progress” button.
11
11
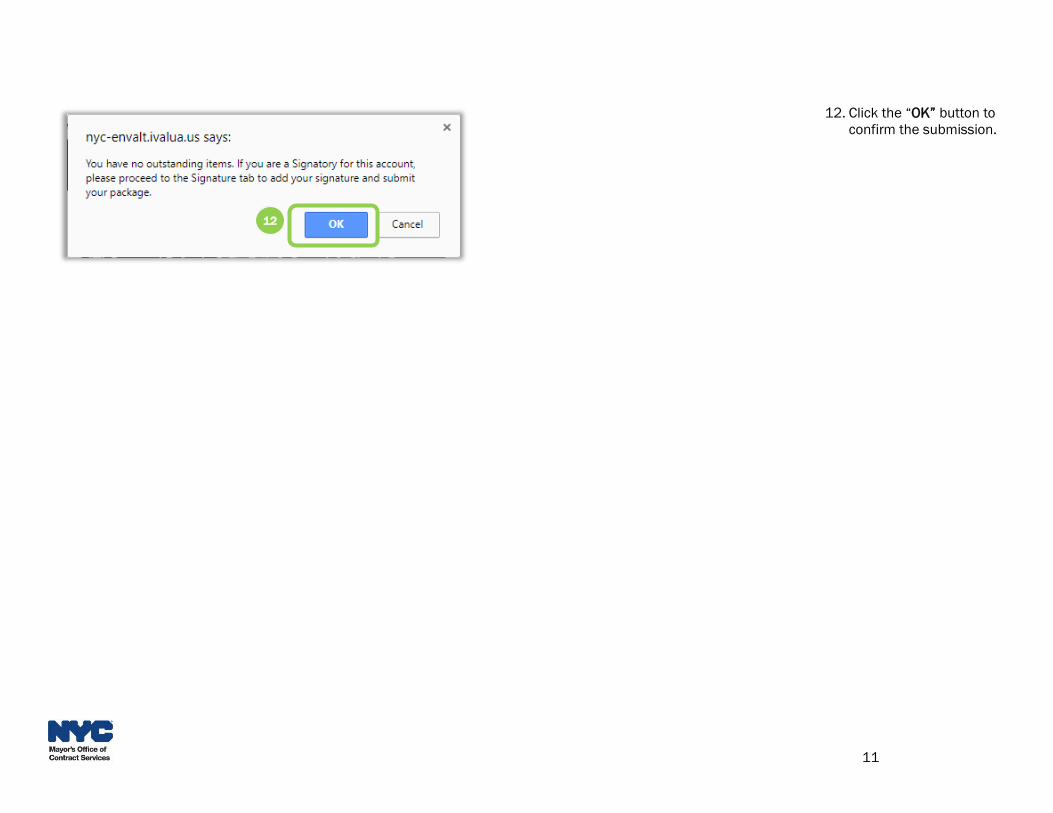
12. Click the “OK” button to
confirm the submission.
12
12
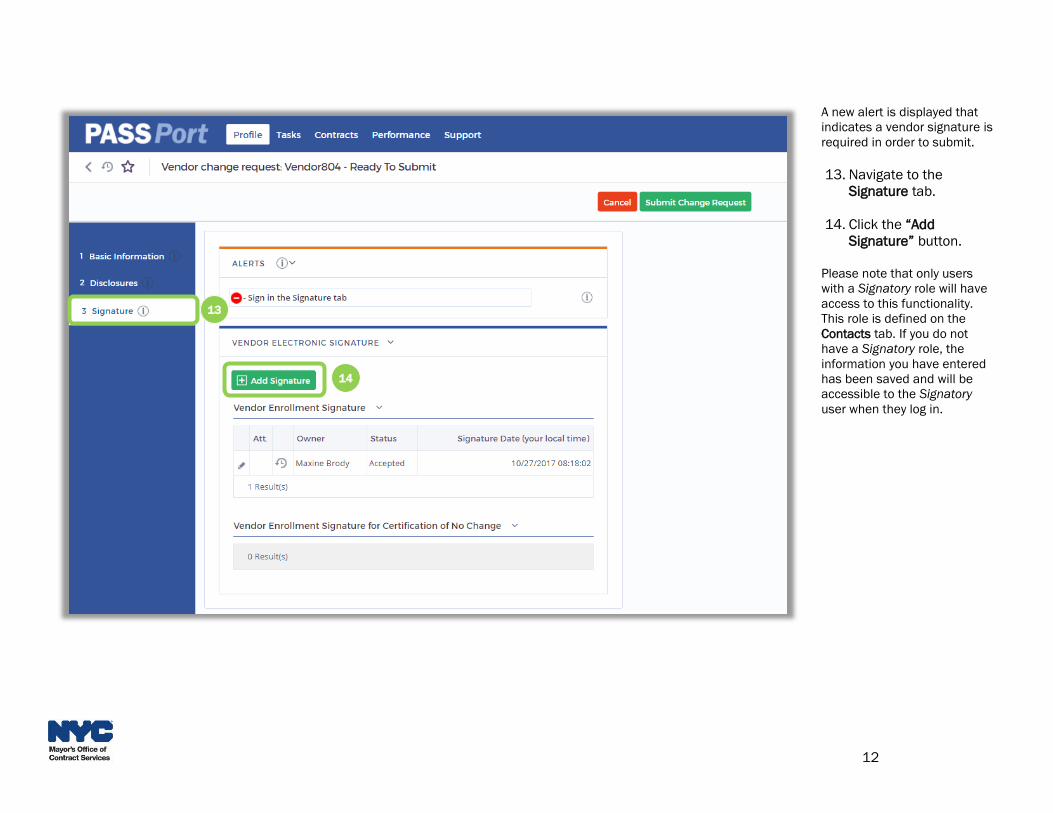
A new alert is displayed that
indicates a vendor signature is
required in order to submit.
13. Navigate to the
Signature tab.
14. Click the “Add
Signature” button.
Please note that only users
with a Signatory role will have
access to this functionality.
This role is defined on the
Contacts tab. If you do not
have a Signatory role, the
information you have entered
has been saved and will be
accessible to the Signatory
user when they log in.
14
13

13
15. Click the “Ready to
Sign” button.
15
14
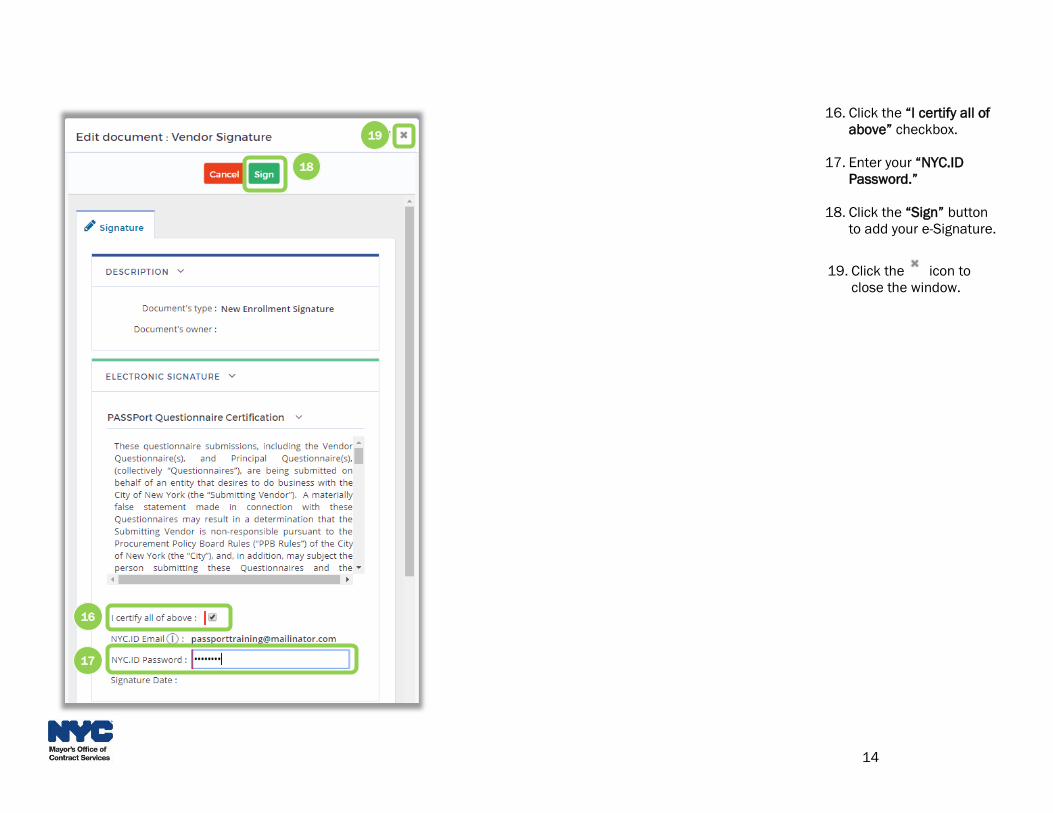
16. Click the “I certify all of
above” checkbox.
17. Enter your “NYC.ID
Password.”
18. Click the “Sign” button
to add your e-Signature.
19. Click the icon to
close the window.
17
16
18
19
15
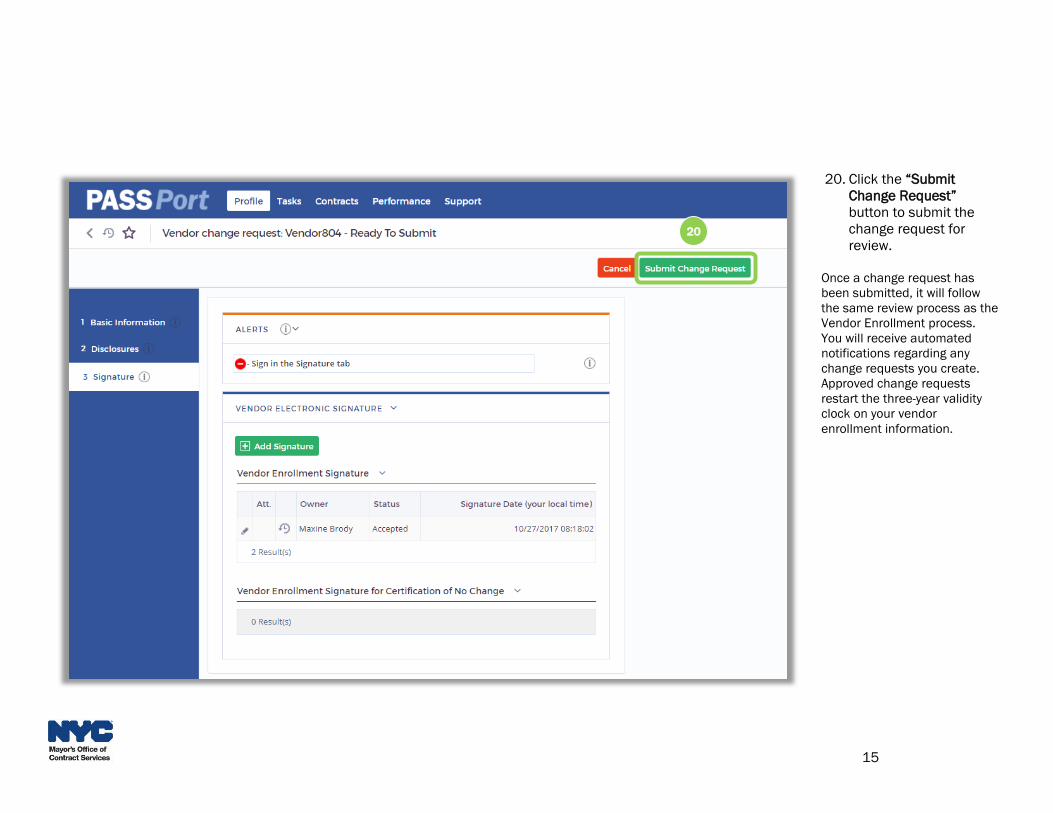
20. Click the “Submit
Change Request”
button to submit the
change request for
review.
Once a change request has
been submitted, it will follow
the same review process as the
Vendor Enrollment process.
You will receive automated
notifications regarding any
change requests you create.
Approved change requests
restart the three-year validity
clock on your vendor
enrollment information.
20
16
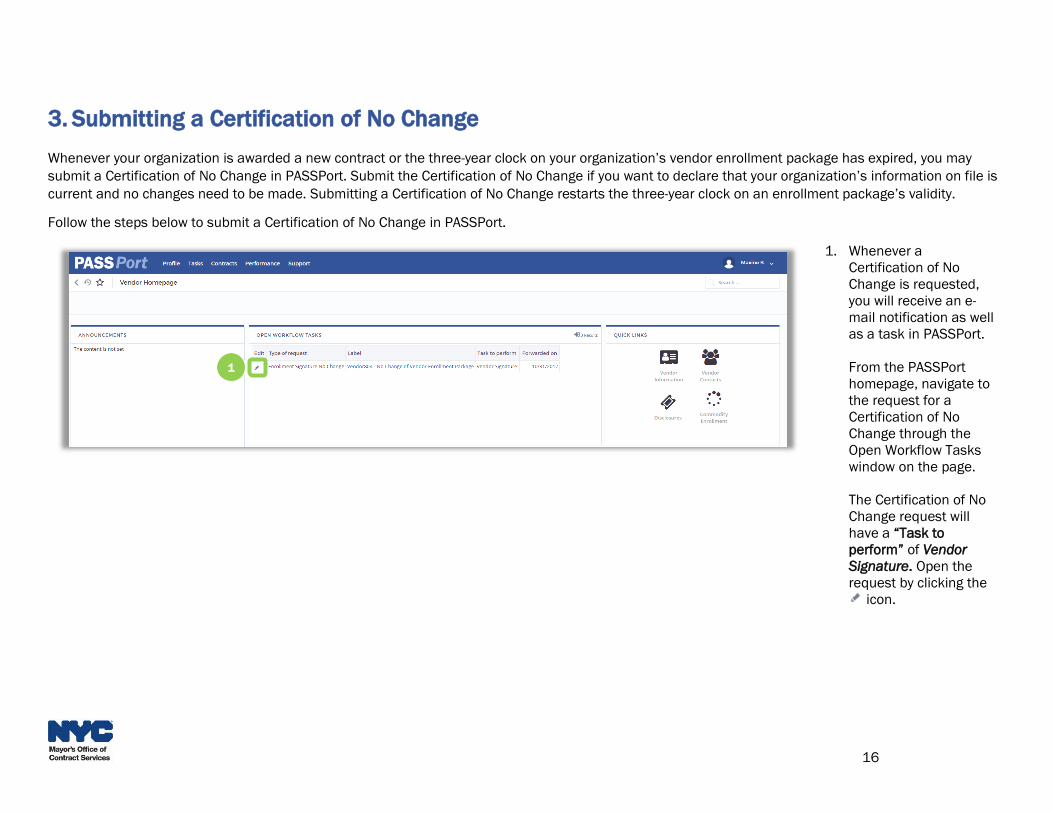
3. Submitting a Certification of No Change
Whenever your organization is awarded a new contract or the three-year clock on your organization’s vendor enrollment package has expired, you may
submit a Certification of No Change in PASSPort. Submit the Certification of No Change if you want to declare that your organization’s information on file is
current and no changes need to be made. Submitting a Certification of No Change restarts the three-year clock on an enrollment package’s validity.
Follow the steps below to submit a Certification of No Change in PASSPort.
1. Whenever a
Certification of No
Change is requested,
you will receive an e-
mail notification as well
as a task in PASSPort.
From the PASSPort
homepage, navigate to
the request for a
Certification of No
Change through the
Open Workflow Tasks
window on the page.
The Certification of No
Change request will
have a “Task to
perform” of Vendor
Signature. Open the
request by clicking the
icon.
1
Brian.Harrison
Typewritten Text

17
2. If your enrollment
information has not
changed since it was
last submitted, click the
“I certify all of above”
checkbox.
3. Enter your “NYC.ID
Password.”
4. Click the “Sign” button
to add your e-Signature
and submit the CNC.
5. Click the “Confirm”
button. Entering text is
not required.
Note: If any of your enrollment
information has changed and
needs to be updated, click the
“Change Request Needed”
button to start the Change
Request process.
2
3
4
5
Brian.Harrison
Typewritten Text
Brian.Harrison
Typewritten Text
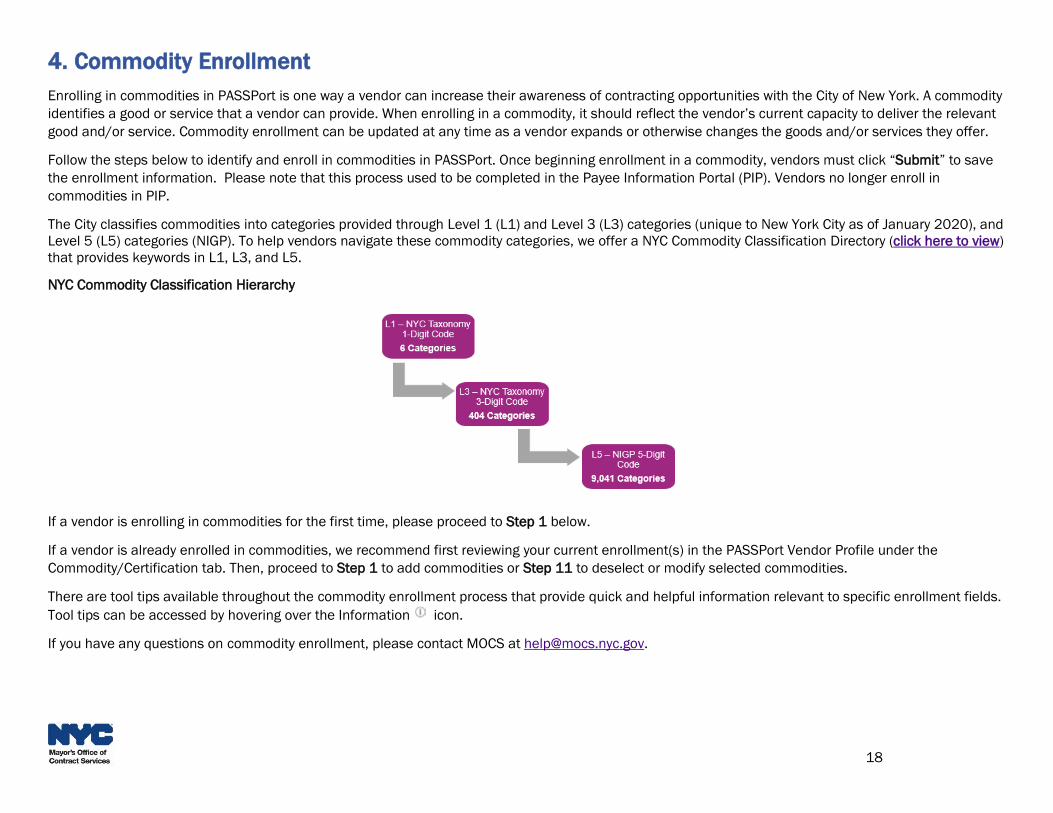
4. Commodity Enrollment
Enrolling in commodities in PASSPort is one way a vendor can increase their awareness of contracting opportunities with the City of New York. A commodity
identifies a good or service that a vendor can provide. When enrolling in a commodity, it should reflect the vendor’s current capacity to deliver the relevant
good and/or service. Commodity enrollment can be updated at any time as a vendor expands or otherwise changes the goods and/or services they offer.
Follow the steps below to identify and enroll in commodities in PASSPort. Once beginning enrollment in a commodity, vendors must click “Submit” to save
the enrollment information. Please note that this process used to be completed in the Payee Information Portal (PIP). Vendors no longer enroll in
commodities in PIP.
The City classifies commodities into categories provided through Level 1 (L1) and Level 3 (L3) categories (unique to New York City as of January 2020), and
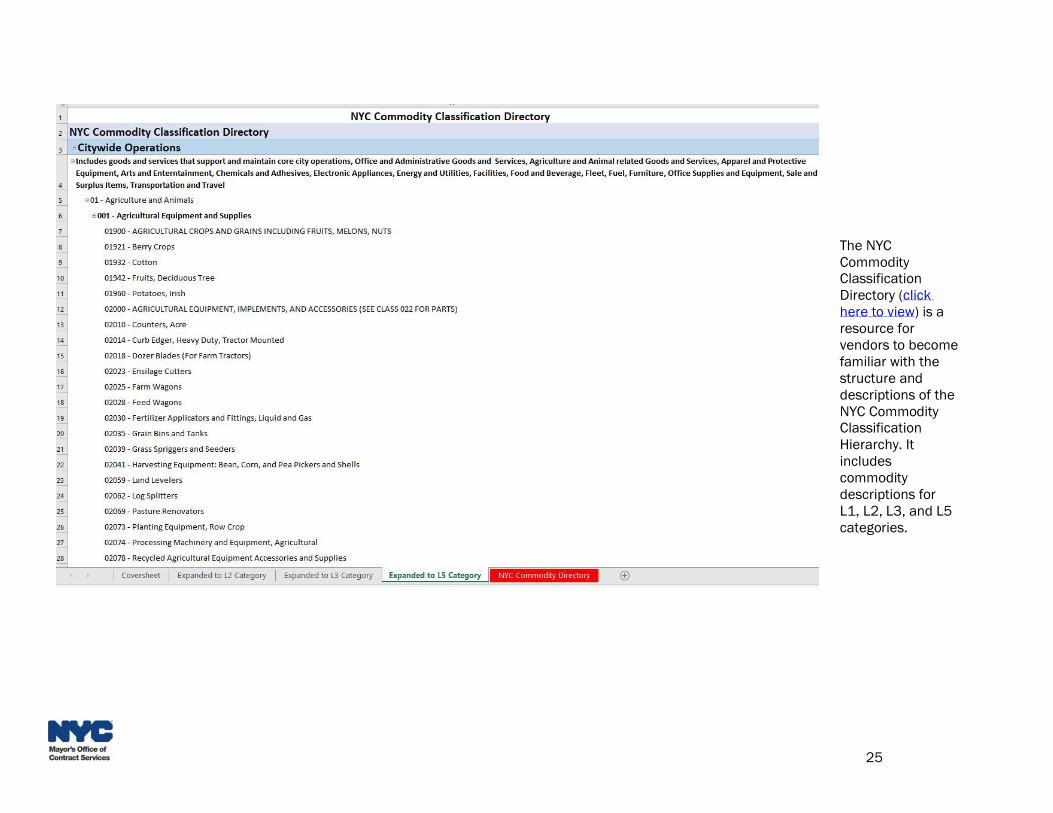
Level 5 (L5) categories (NIGP). To help vendors navigate these commodity categories, we offer a NYC Commodity Classification Directory (click here to view)
that provides keywords in L1, L3, and L5.
NYC Commodity Classification Hierarchy
If a vendor is enrolling in commodities for the first time, please proceed to Step 1 below.
If a vendor is already enrolled in commodities, we recommend first reviewing your current enrollment(s) in the PASSPort Vendor Profile under the
Commodity/Certification tab. Then, proceed to Step 1 to add commodities or Step 11 to deselect or modify selected commodities.
There are tool tips available throughout the commodity enrollment process that provide quick and helpful information relevant to specific enrollment fields.
Tool tips can be accessed by hovering over the Information icon.
If you have any questions on commodity enrollment, please contact MOCS at [email protected].
18
Brian.Harrison
Typewritten Text
Brian.Harrison
Typewritten Text
Brian.Harrison
Typewritten Text
19
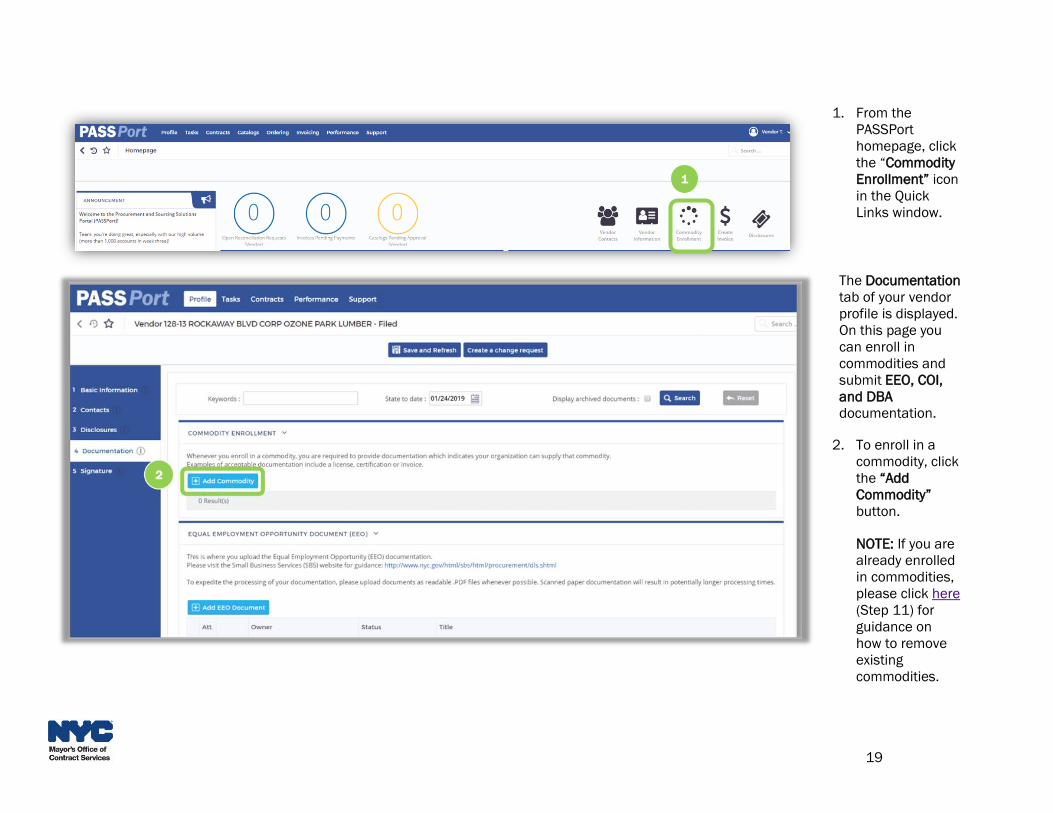
1. From the
PASSPort
homepage, click
the “Commodity
Enrollment” icon
in the Quick
Links window.
The Documentation
tab of your vendor
profile is displayed.
On this page you
can enroll in
commodities and
submit EEO, COI,
and DBA
documentation.
2. To enroll in a
commodity, click
the “Add
Commodity”
button.
NOTE: If you are
already enrolled
in commodities,
please click here
(Step 11) for
guidance on
how to remove
existing
commodities.
1

20
3. Click the
icon to begin
navigating
through L1, L3,
and L5
categories. Upon
clicking, all six
L1 categories
will appear.
3
21
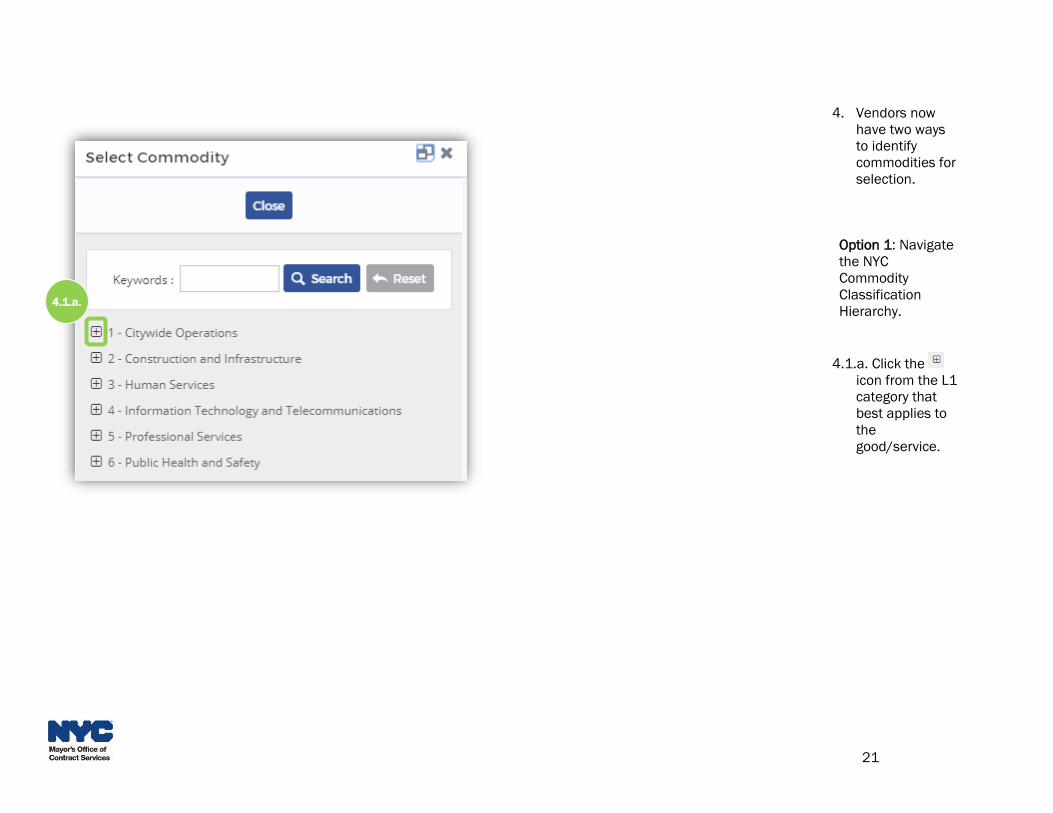
4. Vendors now
have two ways
to identify
commodities for
selection.
Option 1: Navigate
the NYC
Commodity
Classification
Hierarchy.
4.1.a. Click the
icon from the L1
category that
best applies to
the
good/service.
4.1.a.
22
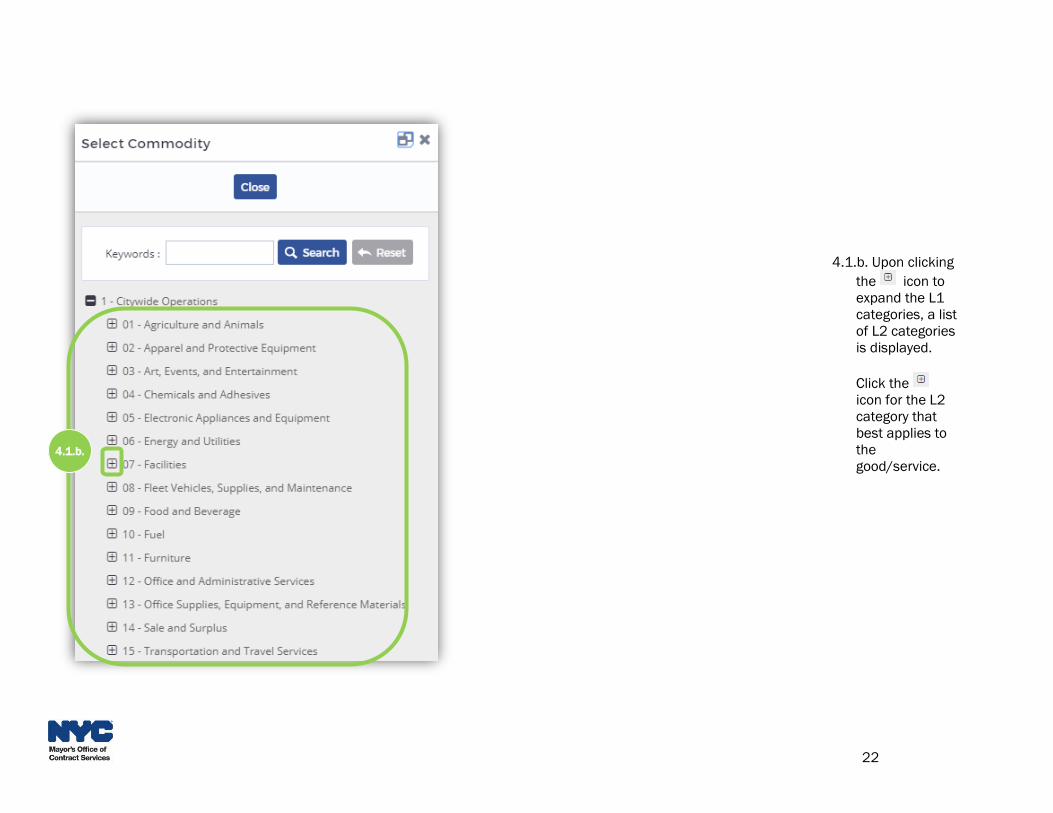
4.1.b. Upon clicking
the icon to
expand the L1
categories, a list
of L2 categories
is displayed.
Click the
icon for the L2
category that
best applies to
the
good/service. 4.1.b.

23
4.1.c. Upon clicking
the icon to
expand the L2
categories, a list
of L3 categories
is displayed.
Select the L3
category that
best applies to
the good/service
(Vendor will then
move to Step 5
below.)
NOTE: You may
only select one L3
category at a time.
If more than one
L3 category is
selected, the user
will receive an alert
and will not be able
to proceed.
4.1.c.
24
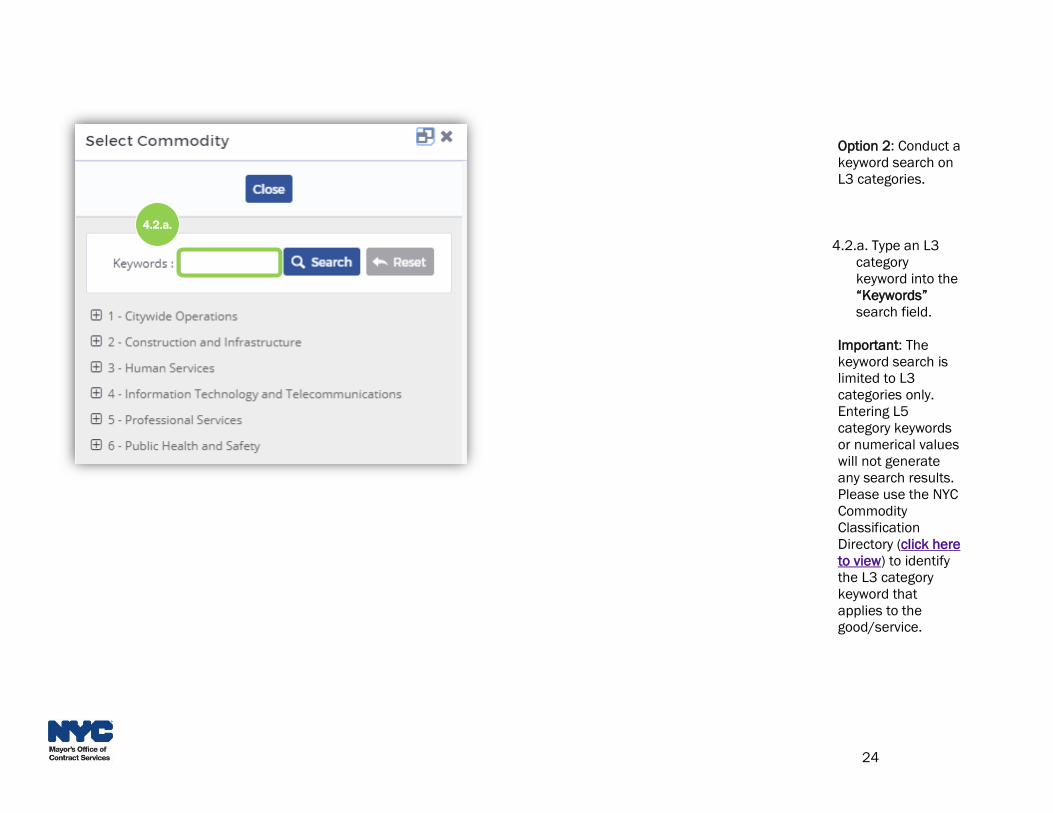
Option 2: Conduct a
keyword search on
L3 categories.
4.2.a. Type an L3
category
keyword into the
“Keywords”
search field.
Important: The
keyword search is
limited to L3
categories only.
Entering L5
category keywords
or numerical values
will not generate
any search results.
Please use the NYC
Commodity
Classification
Directory (click here
to view) to identify
the L3 category
keyword that
applies to the
good/service.
4.2.a.
25
The NYC
Commodity
Classification
Directory (click
here to view) is a
resource for
vendors to become
familiar with the
structure and
descriptions of the
NYC Commodity
Classification
Hierarchy. It
includes
commodity
descriptions for
L1, L2, L3, and L5
categories.

26
4.2.b. Once you
have identified
the applicable
L3 category
keyword using
the NYC
Commodity
Classification
Directory, copy
and paste, or
type, the L3
category
keyword into the
“Keywords”
search field and
click the
“Search” button.
Keyword search
example: In this
example, the
vendor searches
“Facilities
Equipment.”
4.2.c. Click the
relevant L3
category. Upon
selecting the L3
category, a list of
all associated L5
categories will
appear on the
screen. (Vendor will
then move to Step
5 below.)
4.2.b.
4.2.c.
27
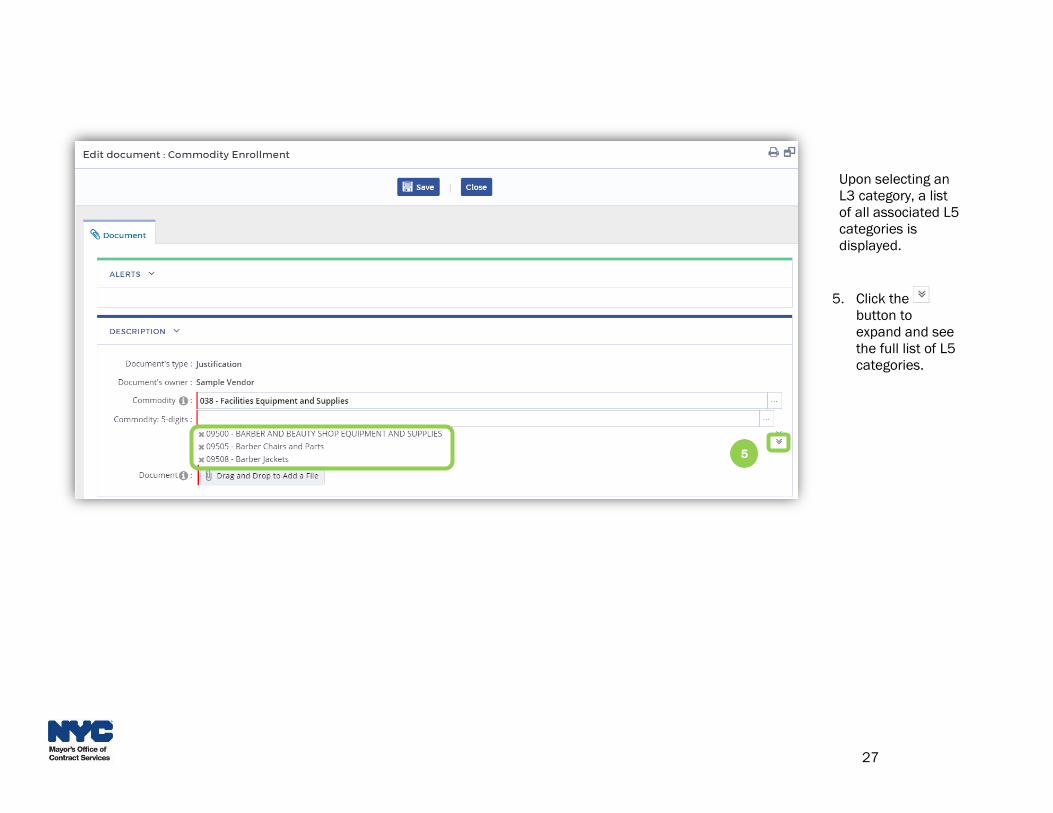
Upon selecting an
L3 category, a list
of all associated L5
categories is
displayed.
5. Click the
button to
expand and see
the full list of L5
categories.
5
28
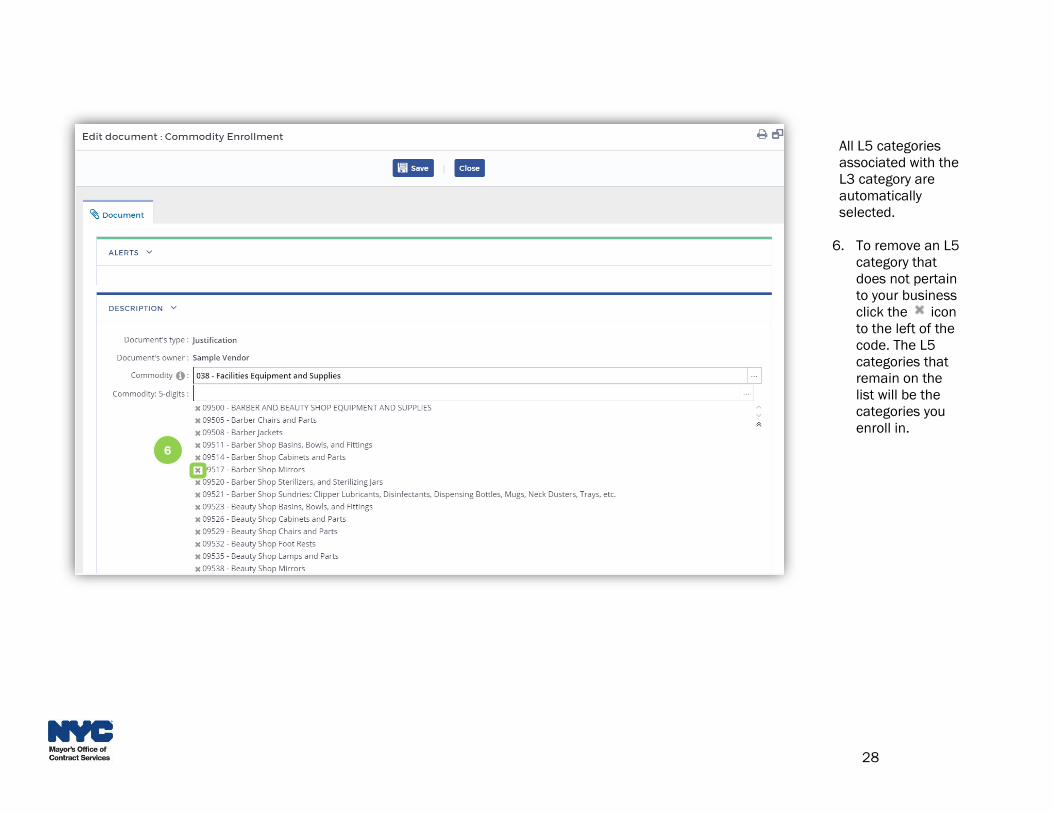
All L5 categories
associated with the
L3 category are
automatically
selected.
6. To remove an L5
category that
does not pertain
to your business
click the icon
to the left of the
code. The L5
categories that
remain on the
list will be the
categories you
enroll in.
6
29
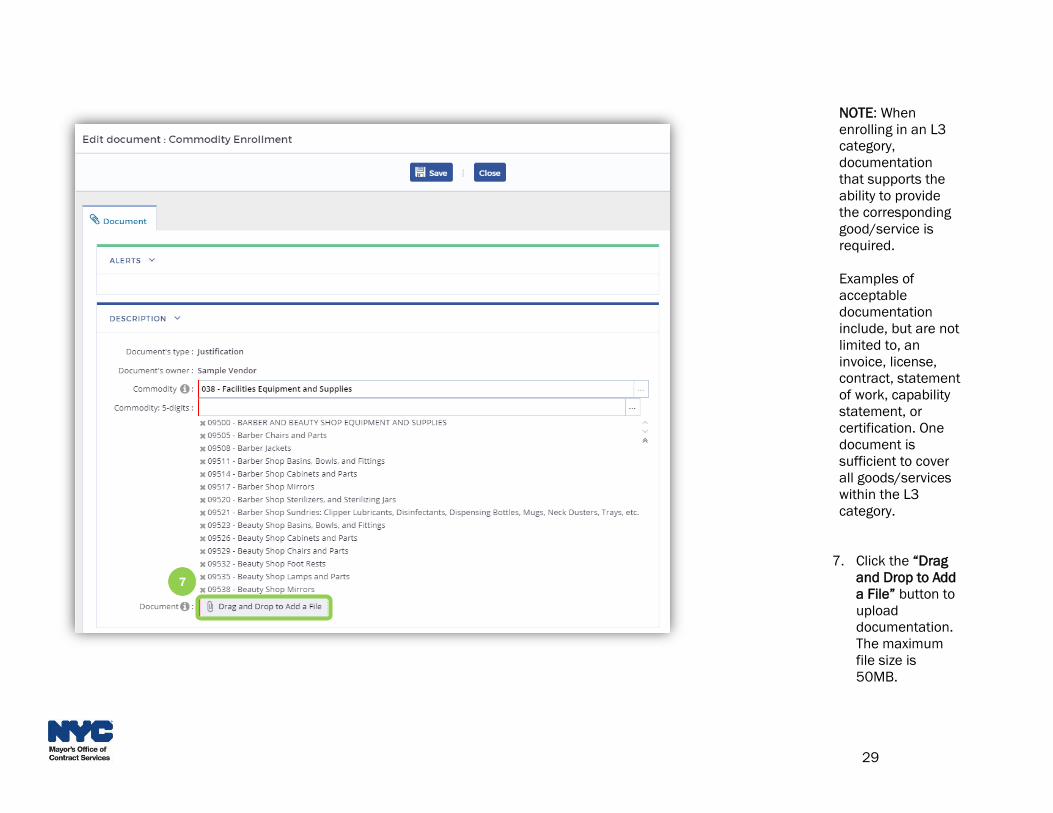
NOTE: When
enrolling in an L3
category,
documentation
that supports the
ability to provide
the corresponding
good/service is
required.
Examples of
acceptable
documentation
include, but are not
limited to, an
invoice, license,
contract, statement
of work, capability
statement, or
certification. One
document is
sufficient to cover
all goods/services
within the L3
category.
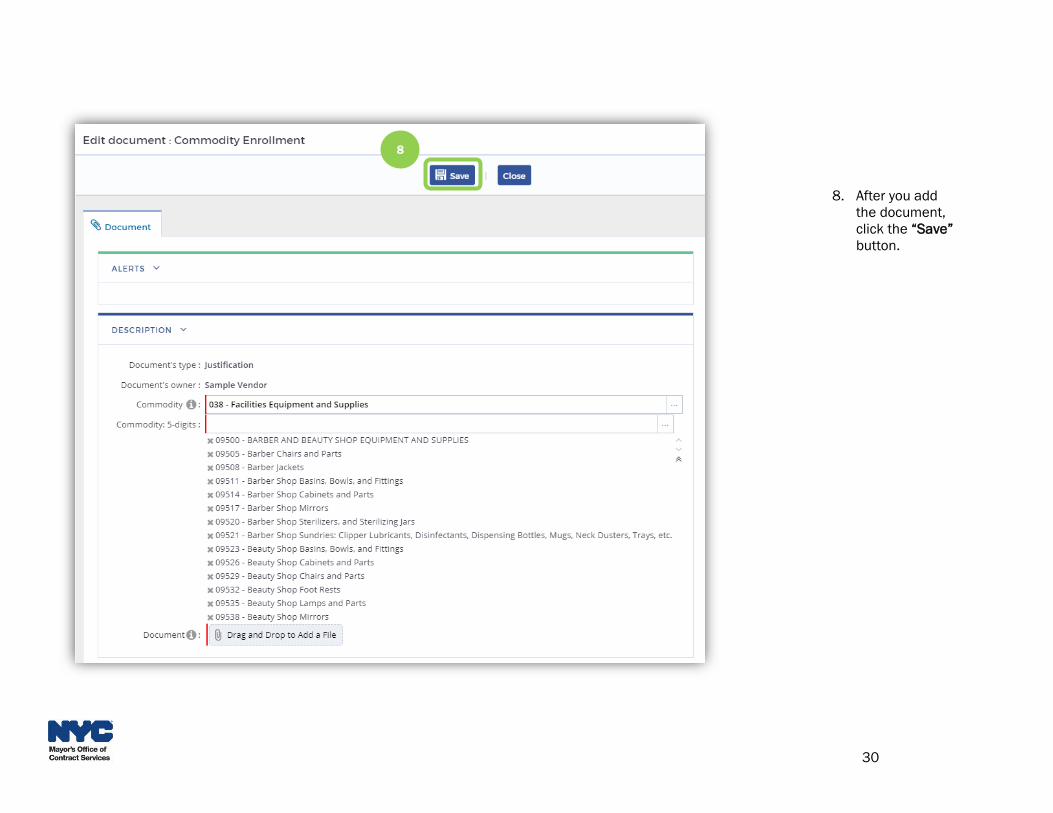
7. Click the “Drag
and Drop to Add
a File” button to
upload
documentation.
The maximum
file size is
50MB.
7
30
8. After you add
the document,
click the “Save”
button.
8

31
9. Click the
“Submit” button.
NOTE: You must
click “Submit” to
save your work.
You have
successfully
enrolled. The
documentation
you submitted
will be reviewed
by the City.
9
32
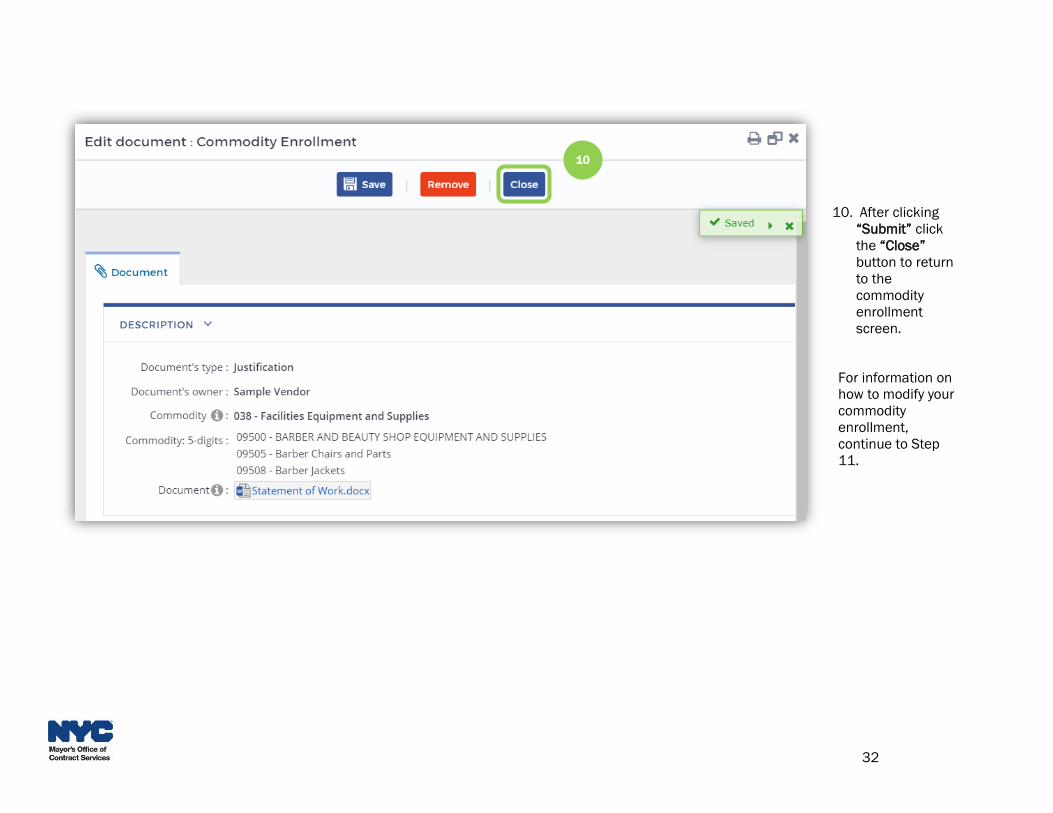
10. After clicking
“Submit” click
the “Close”
button to return
to the
commodity
enrollment
screen.
For information on
how to modify your
commodity
enrollment,
continue to Step
11.
10
33
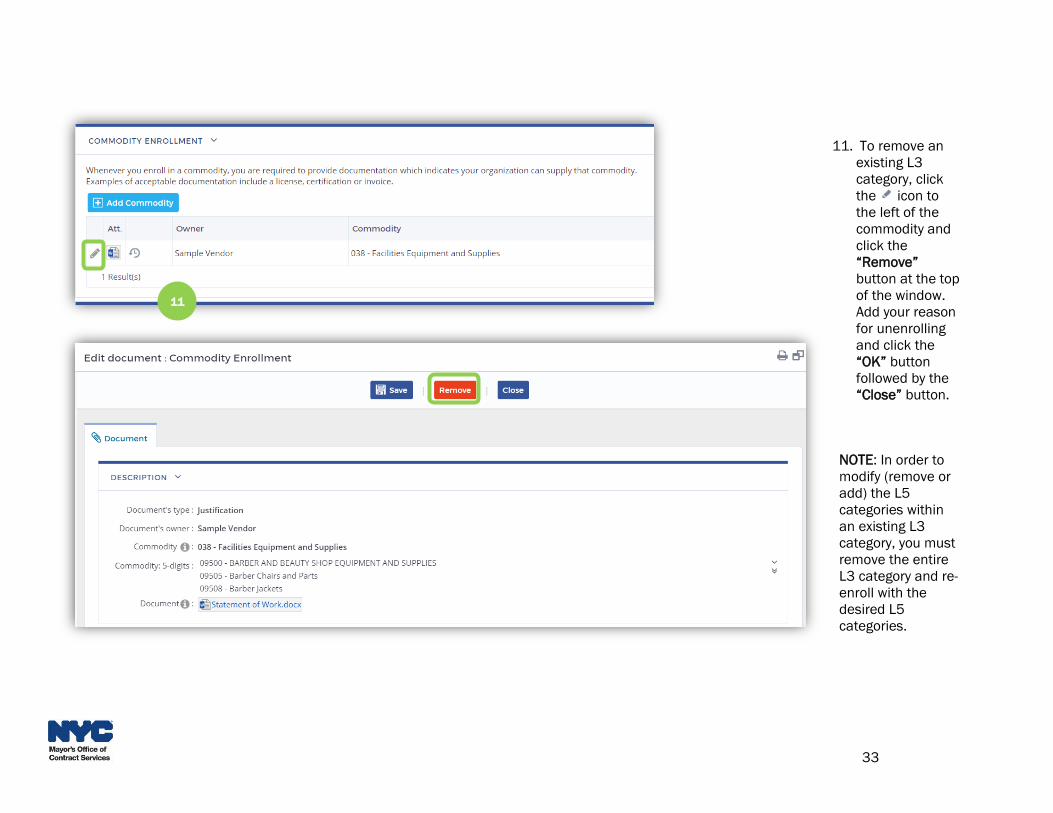
11. To remove an
existing L3
category, click
the icon to
the left of the
commodity and
click the
“Remove”
button at the top
of the window.
Add your reason
for unenrolling
and click the
“OK” button
followed by the
“Close” button.
NOTE: In order to
modify (remove or
add) the L5
categories within
an existing L3
category, you must
remove the entire
L3 category and re-
enroll with the
desired L5
categories.
11
34
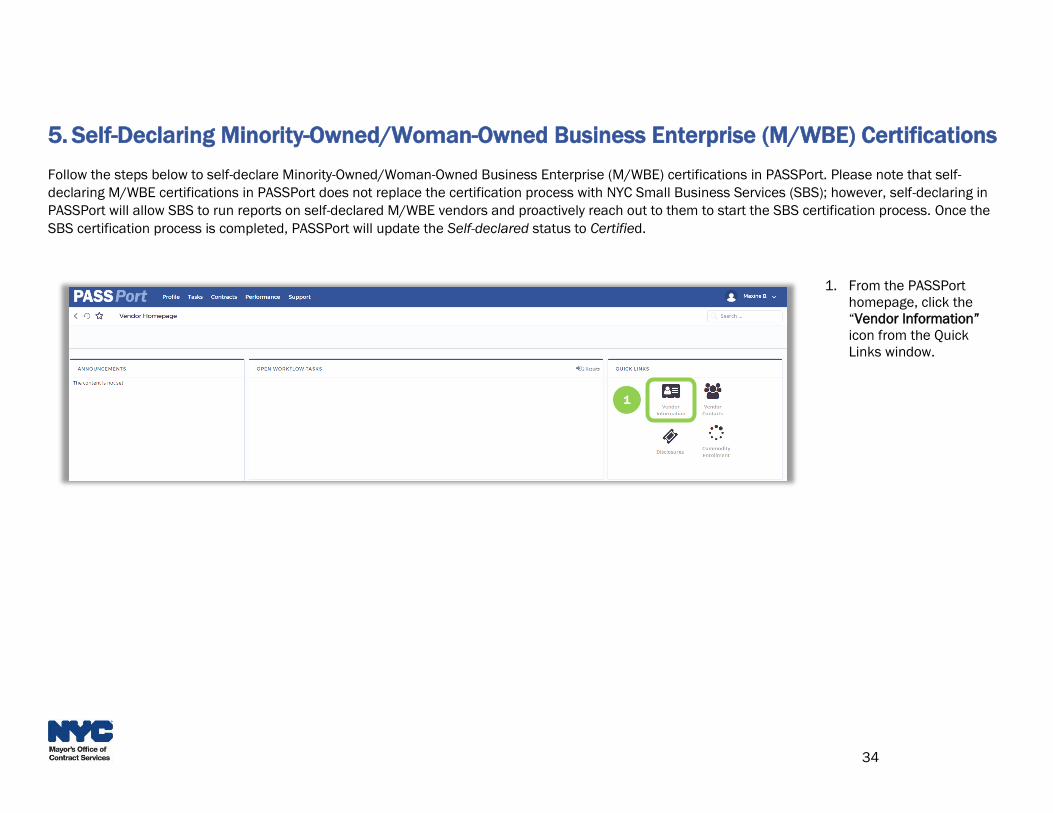
5. Self-Declaring Minority-Owned/Woman-Owned Business Enterprise (M/WBE) Certifications
Follow the steps below to self-declare Minority-Owned/Woman-Owned Business Enterprise (M/WBE) certifications in PASSPort. Please note that self-
declaring M/WBE certifications in PASSPort does not replace the certification process with NYC Small Business Services (SBS); however, self-declaring in
PASSPort will allow SBS to run reports on self-declared M/WBE vendors and proactively reach out to them to start the SBS certification process. Once the
SBS certification process is completed, PASSPort will update the Self-declared status to Certified.
1. From the PASSPort
homepage, click the
“Vendor Information”
icon from the Quick
Links window.
1
35
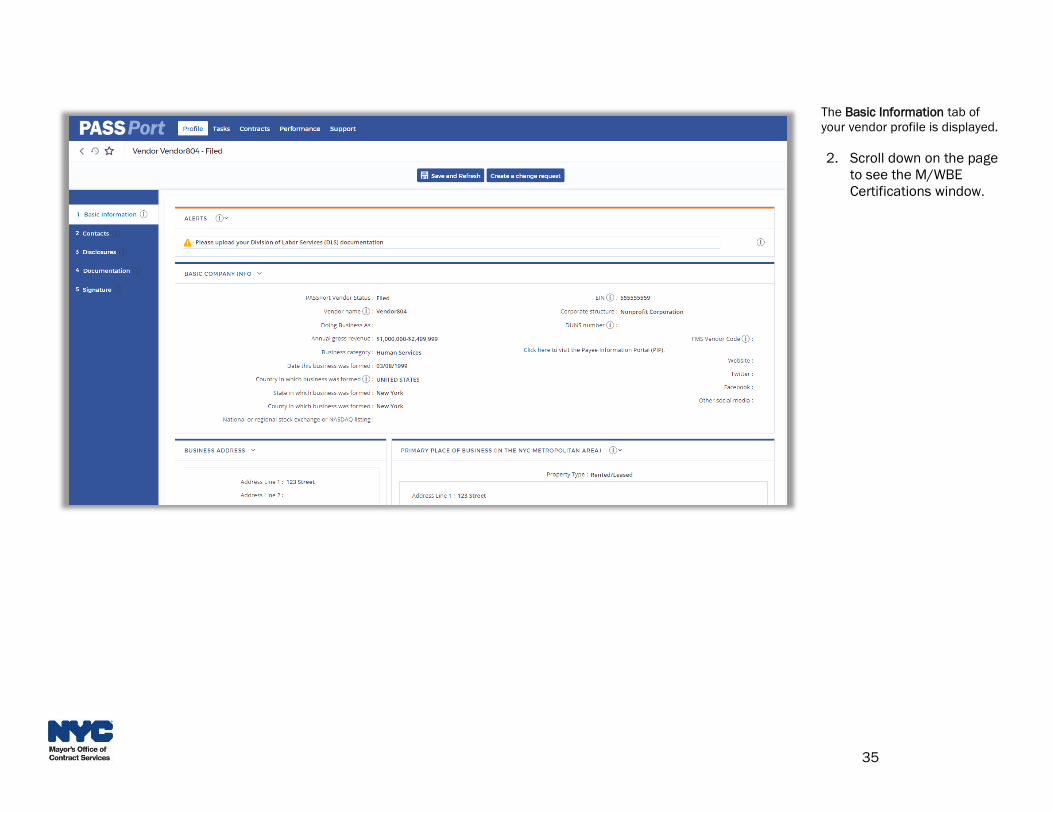
The Basic Information tab of
your vendor profile is displayed.
2. Scroll down on the page
to see the M/WBE
Certifications window.

36
3. To declare a new
M/WBE certification,
click the “Declare New
Certification” button.
3

37
4. Click the icon to
search for and select a
“Self-Declared
Certification.”
4

38
5. Search for and select
the self-declared
M/WBE certification you
wish to add. When you
have found the
certification you wish to
add, click the icon.
Note: Self-declaring a
certification here does not
replace the certification
process with Small Business
Services (SBS). Once you self-
declare a certification in
PASSPort, SBS will contact you
with next steps.
5

39
6. Click the “Save and
Close” button.
6
40
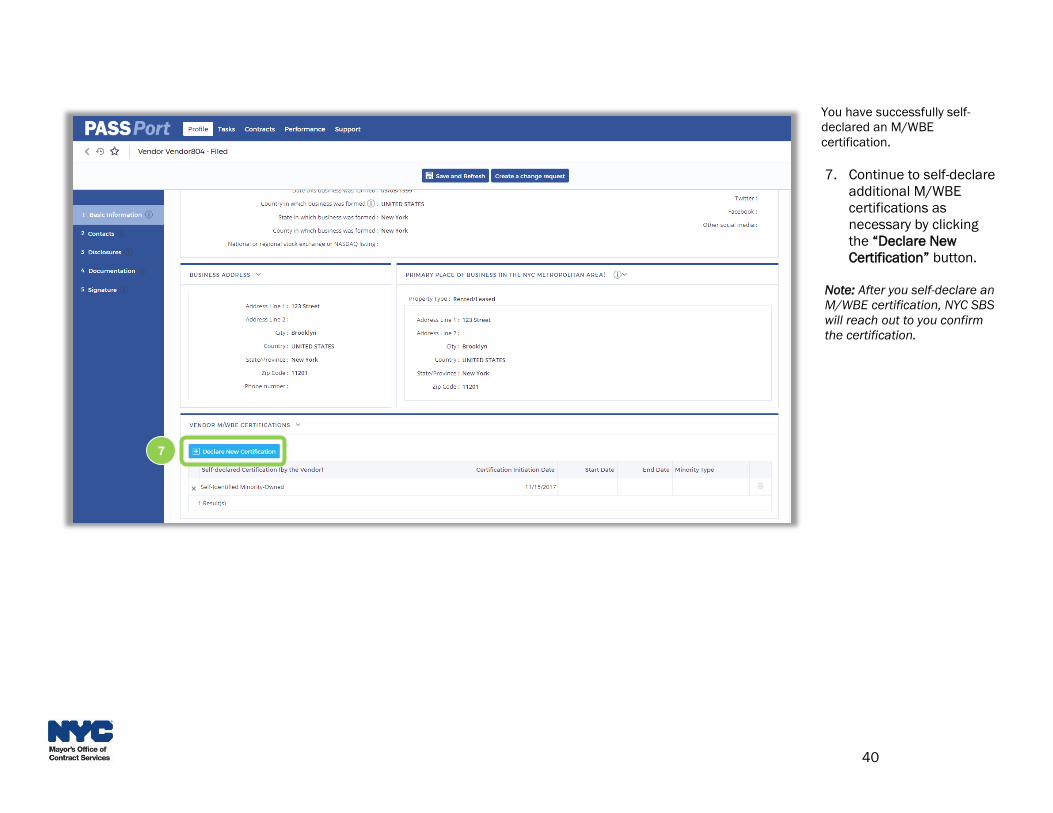
You have successfully self-
declared an M/WBE
certification.
7. Continue to self-declare
additional M/WBE
certifications as
necessary by clicking
the “Declare New
Certification” button.
Note: After you self-declare an
M/WBE certification, NYC SBS
will reach out to you confirm
the certification.
7
41
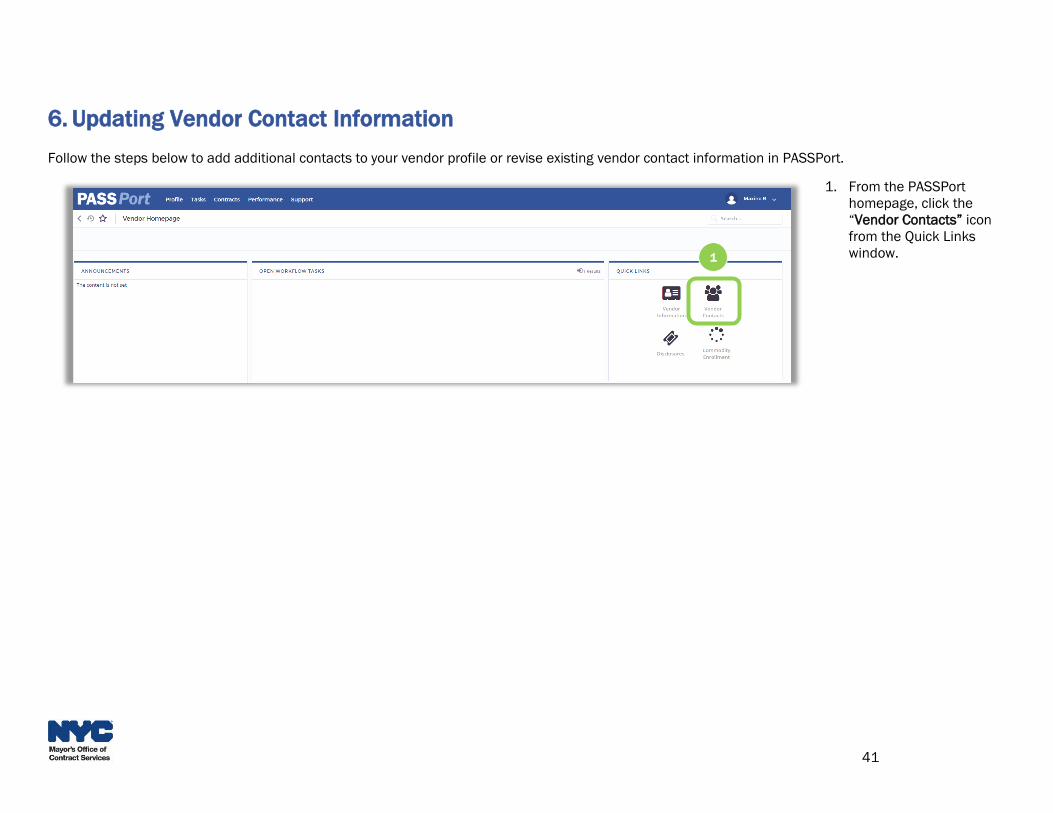
6. Updating Vendor Contact Information
Follow the steps below to add additional contacts to your vendor profile or revise existing vendor contact information in PASSPort.
1. From the PASSPort
homepage, click the
“Vendor Contacts” icon
from the Quick Links
window.1
42
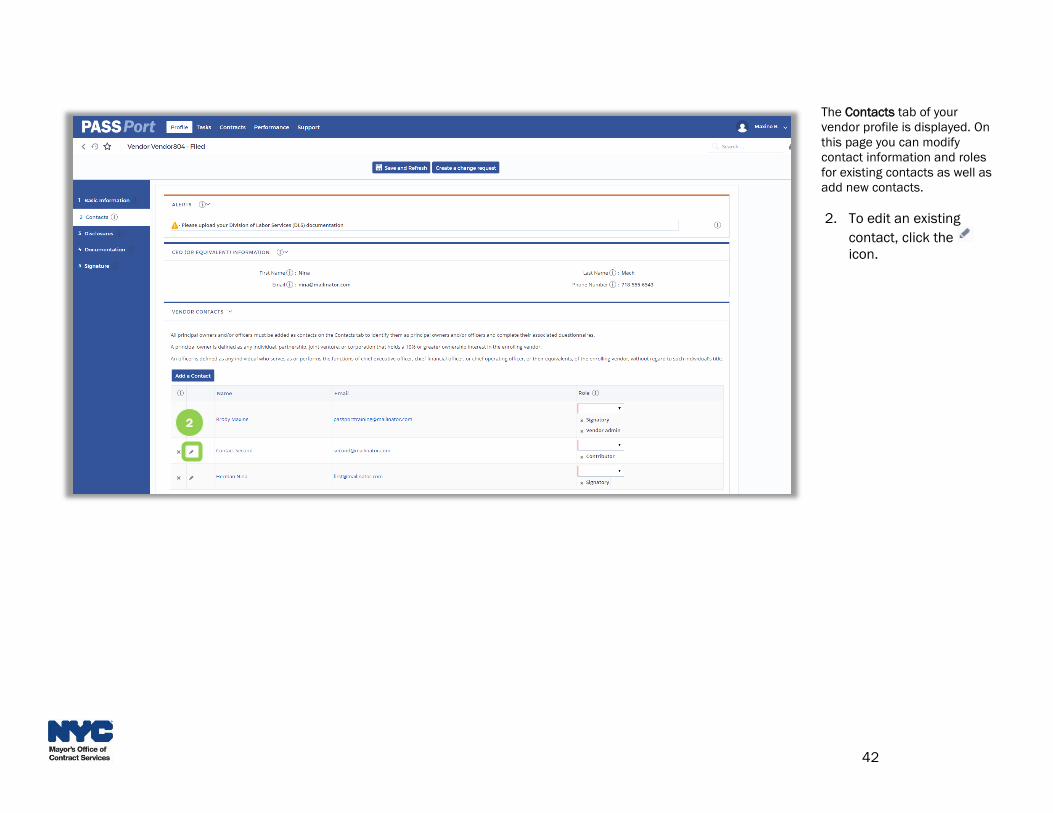
The Contacts tab of your
vendor profile is displayed. On
this page you can modify
contact information and roles
for existing contacts as well as
add new contacts.
2. To edit an existing
contact, click the
icon.
2

43
3. The contact information
is displayed. Make any
necessary changes
such as adding a
“Phone” and then click
the “Save and Close”
button.
Please note if a contact has
already logged into PASSPort
using their own NYC.ID, a user
with the vendor admin role will
not be able to edit the
contact’s email address.
3

44
4. Click the “Add a
Contact” button to add
a new contact.
4
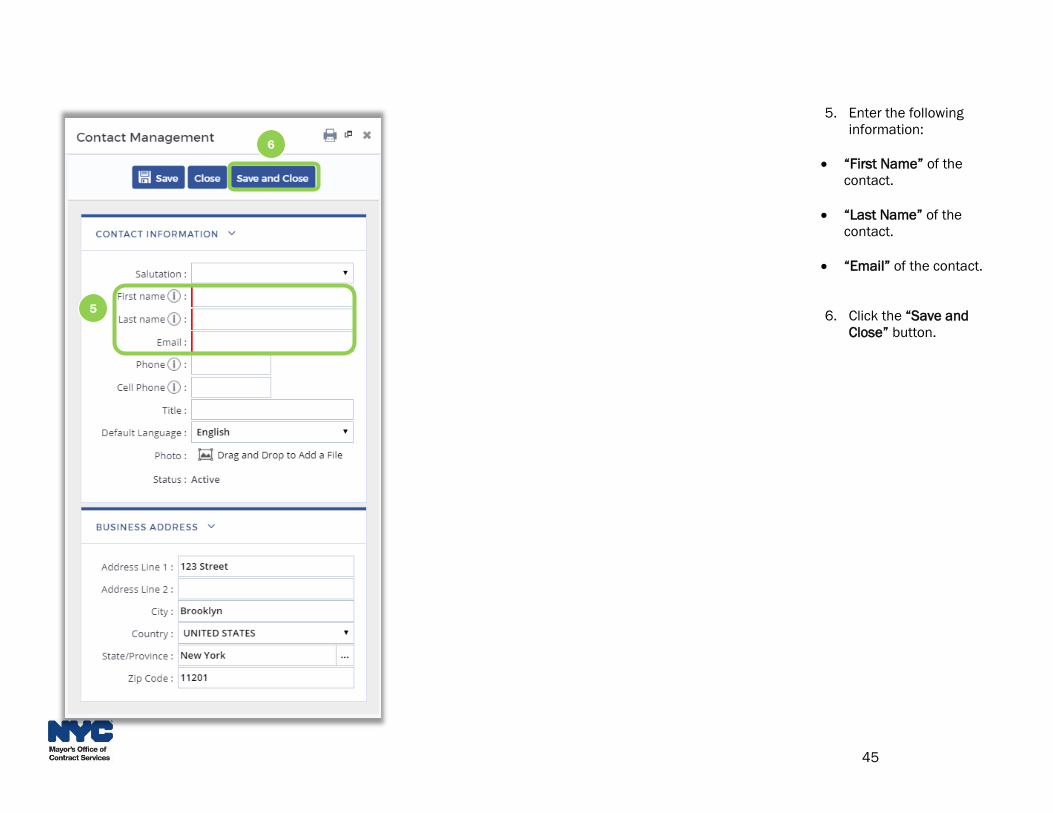
45
5. Enter the following
information:
• “First Name” of the
contact.
• “Last Name” of the
contact.
• “Email” of the contact.
6. Click the “Save and
Close” button.
5
6
46
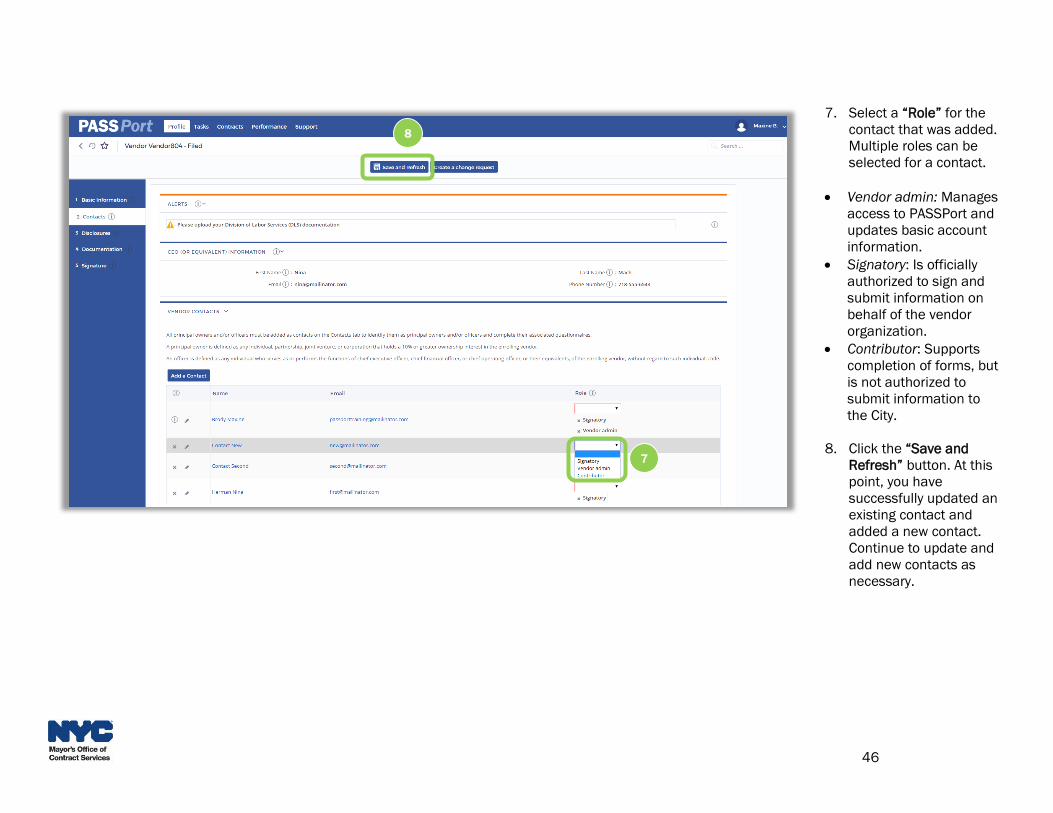
7. Select a “Role” for the
contact that was added.
Multiple roles can be
selected for a contact.
• Vendor admin: Manages
access to PASSPort and
updates basic account
information.
• Signatory: Is officially
authorized to sign and
submit information on
behalf of the vendor
organization.
• Contributor: Supports
completion of forms, but
is not authorized to
submit information to
the City.
8. Click the “Save and
Refresh” button. At this
point, you have
successfully updated an
existing contact and
added a new contact.
Continue to update and
add new contacts as
necessary.
8
7
47
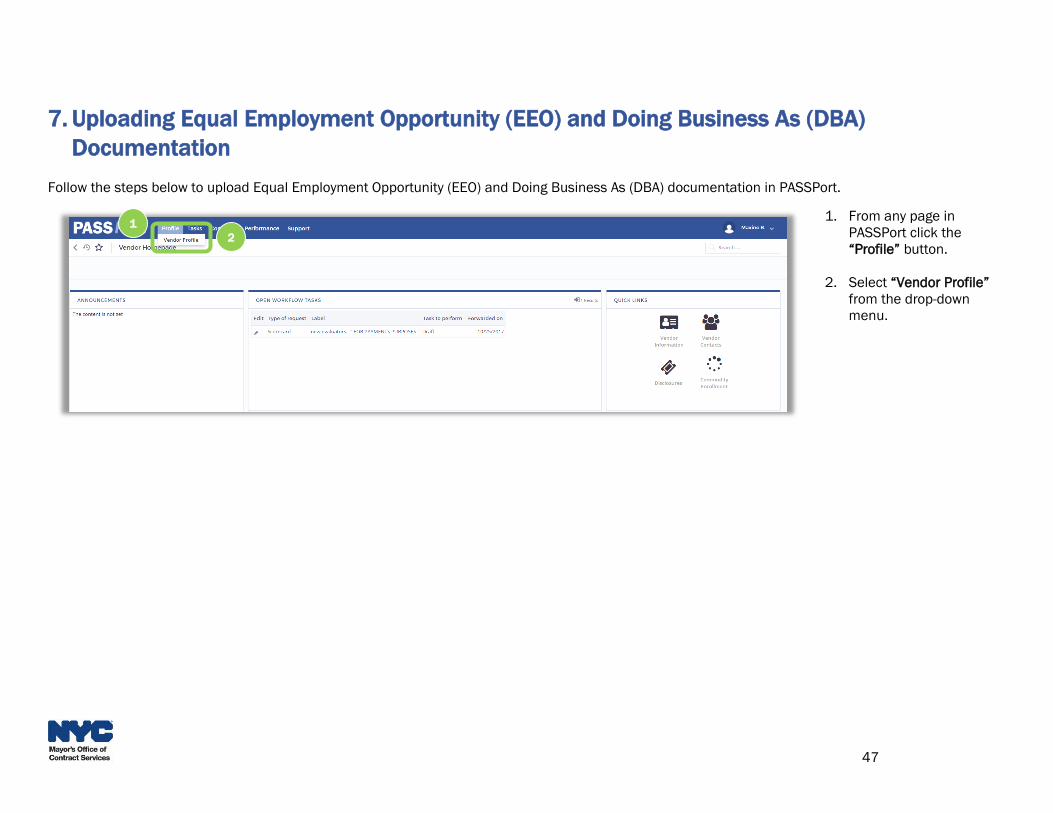
7. Uploading Equal Employment Opportunity (EEO) and Doing Business As (DBA)
Documentation
Follow the steps below to upload Equal Employment Opportunity (EEO) and Doing Business As (DBA) documentation in PASSPort.
1. From any page in
PASSPort click the
“Profile” button.
2. Select “Vendor Profile”
from the drop-down
menu.
1
2
48
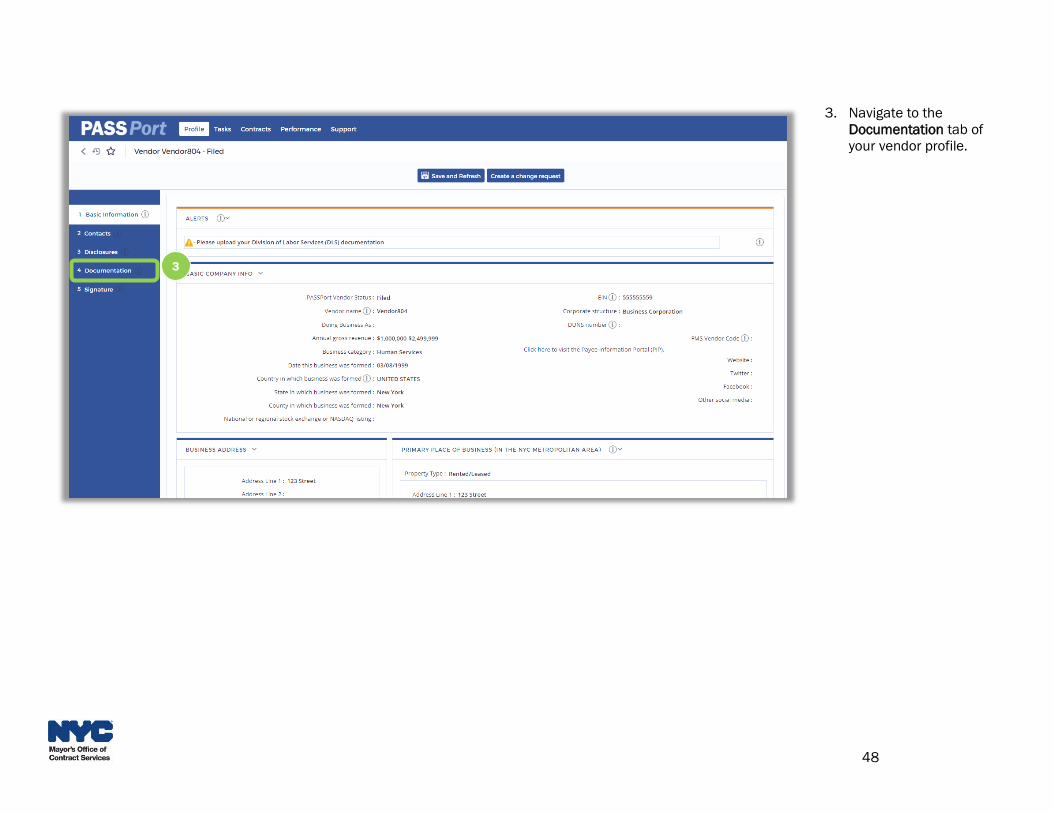
3. Navigate to the
Documentation tab of
your vendor profile.
3

49
The Documentation tab of your
vendor profile is displayed. On
this page you can enroll in
commodities and submit EEO,
COI, and DBA documentation.
4. To add EEO
documentation, click
the “Add EEO
Document” button.
4
50
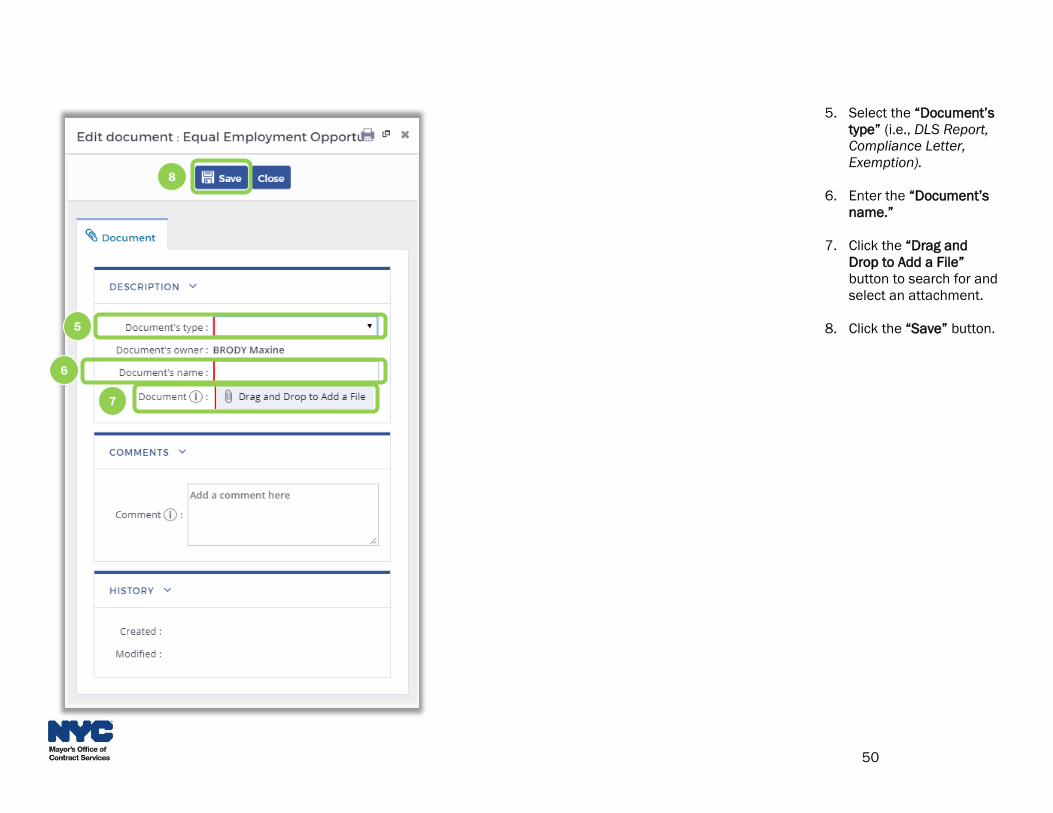
5. Select the “Document’s
type” (i.e., DLS Report,
Compliance Letter,
Exemption).
6. Enter the “Document’s
name.”
7. Click the “Drag and
Drop to Add a File”
button to search for and
select an attachment.
8. Click the “Save” button.5
8
6
7
51
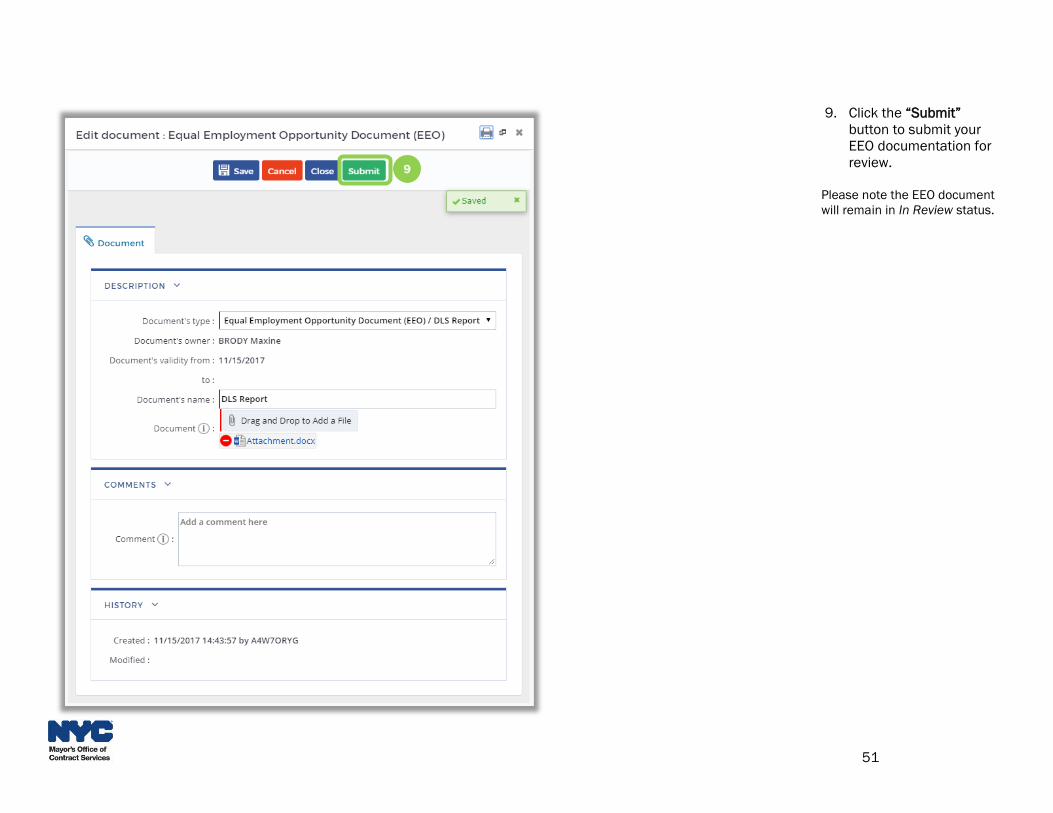
9. Click the “Submit”
button to submit your
EEO documentation for
review.
Please note the EEO document
will remain in In Review status.
9
52
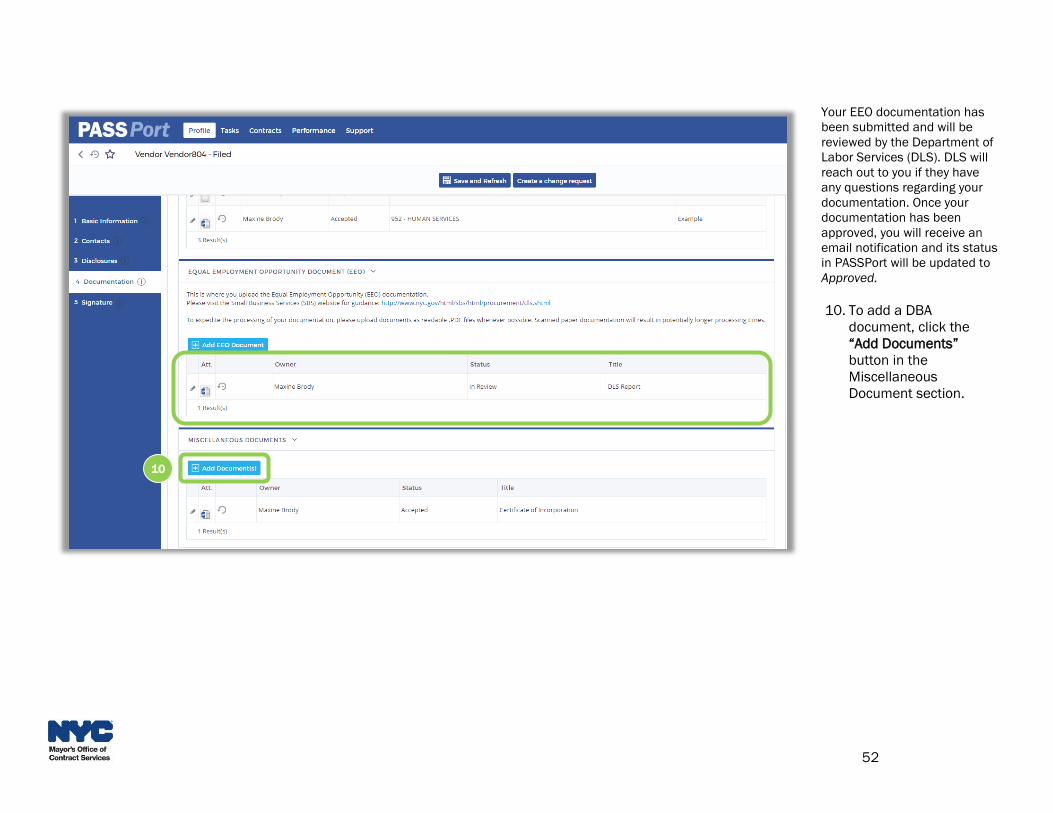
Your EEO documentation has
been submitted and will be
reviewed by the Department of
Labor Services (DLS). DLS will
reach out to you if they have
any questions regarding your
documentation. Once your
documentation has been
approved, you will receive an
email notification and its status
in PASSPort will be updated to
Approved.
10. To add a DBA
document, click the
“Add Documents”
button in the
Miscellaneous
Document section.
10

53
11. Select the “Document’s
type” (i.e., Doing
Business as).
12. Enter the “Document’s
name.”
13. Click the “Drag and
Drop to Add a File”
button to search for and
select an attachment.
14. Click the “Save” button11
12
13
14
54
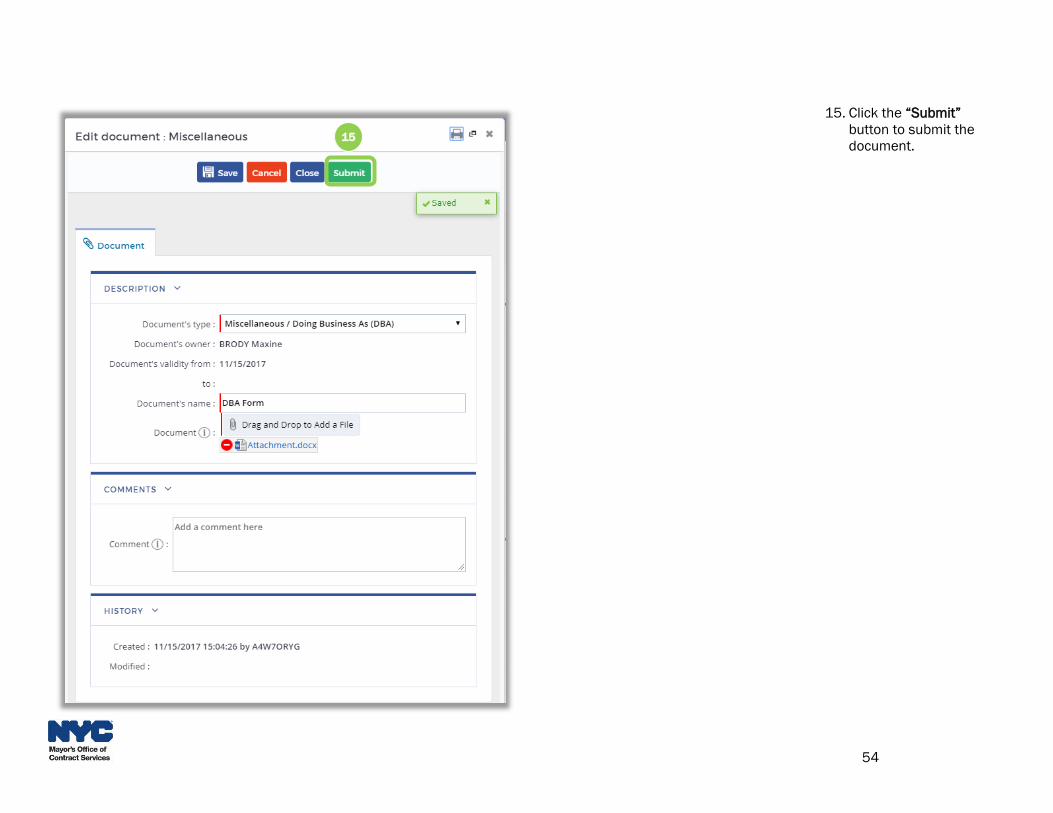
15. Click the “Submit”
button to submit the
document.15
55
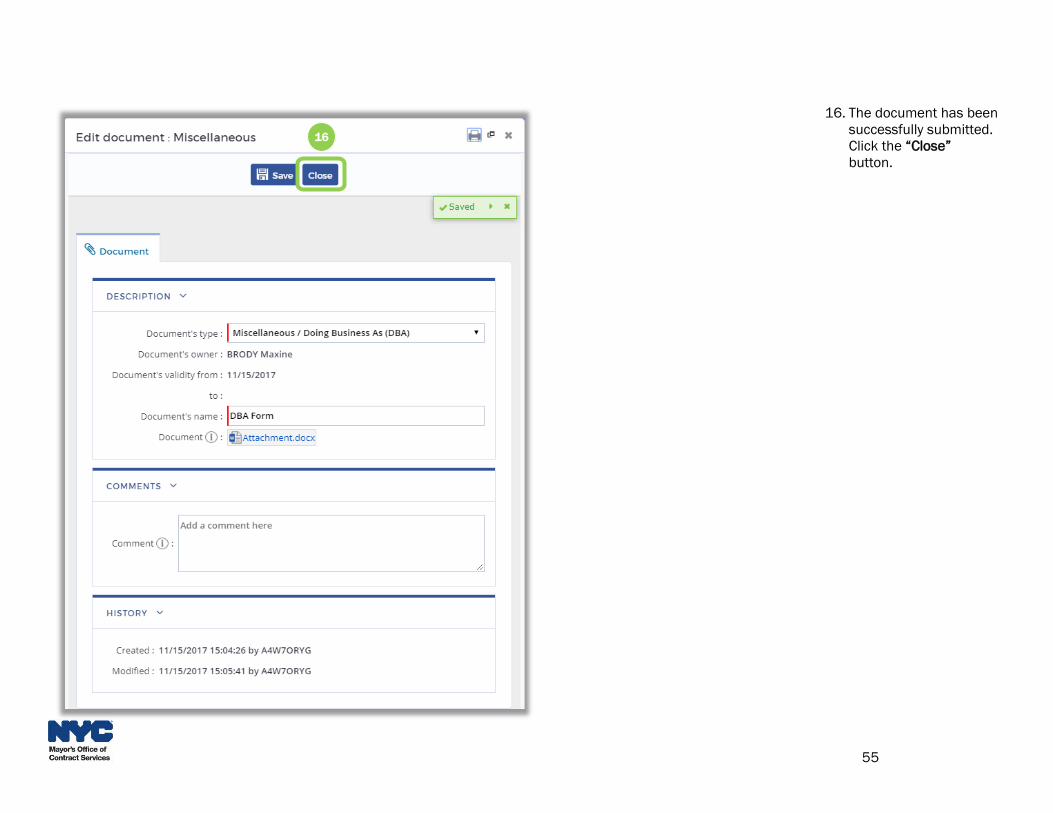
16. The document has been
successfully submitted.
Click the “Close”
button.
16
56
This user manual has provided you with step-by-step instructions on how to manage your account in PASSPort. If you have any questions on the Vendor
Account Management process, please contact MOCS at [email protected].
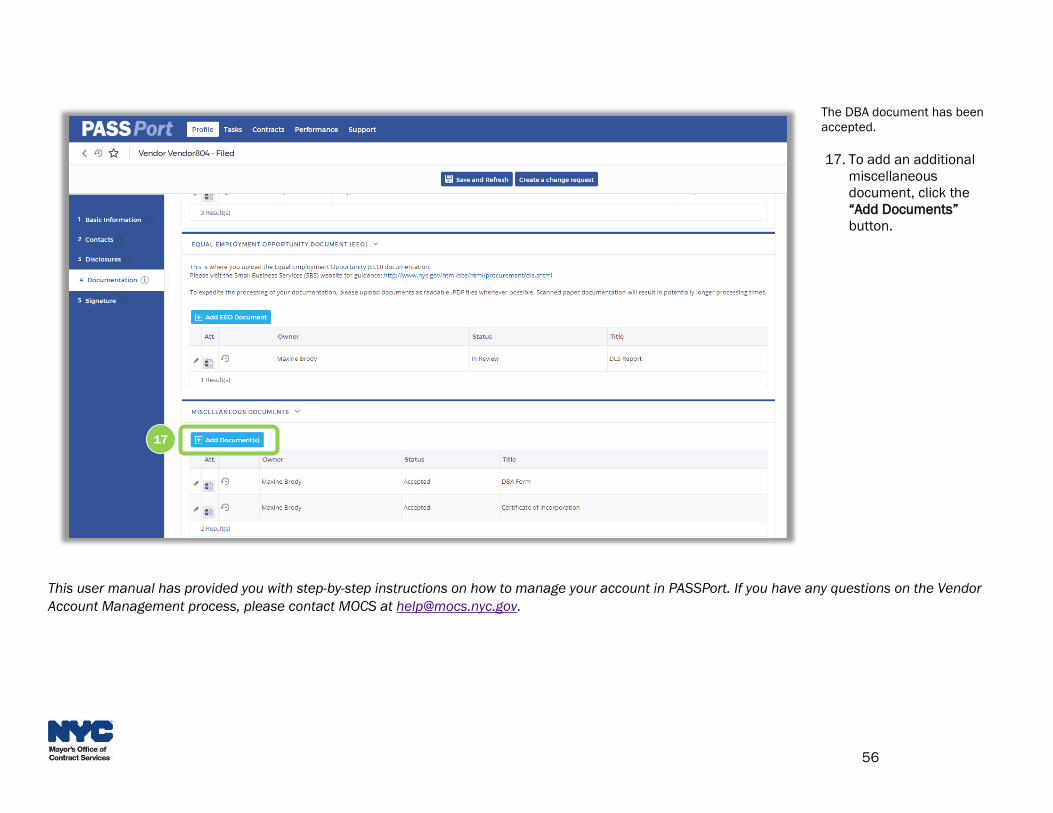
The DBA document has been
accepted.
17. To add an additional
miscellaneous
document, click the
“Add Documents”
button.
17