Vector for Smocking Design – Tutorial 1 Learning Goals for
17
Vector for Smocking Design – Tutorial 1 1 Learning Goals for Tutorial 1 Tutorial 1 is an introduction to vector software and assumes no previous knowledge of vector-based software. Complete a simple, one colour picture smocking plate, focussing on navigating around the software and utilizing the most common tools. Use a small number of pre-made symbols from the symbols library. What is Vector-based Software? There are two basic types of image files for computers: vector and bitmap. Each has their own strengths and limitations. Bitmaps are digital image files like those from a digital camera or scan, made up of pixels or individual dots of colour. Pros: can create extremely nuanced, detailed images. Cons: each pixel requires its own “mini-file” on its location, colour, intensity etc. Even a small image contains thousands, if not millions of mini-files, so bitmap files get large quickly. As well, the images don’t scale (grow big or small) well and quickly become blurry. Vector files are digital images that use lines and mathematical formulas to create shapes and images. Pros: they’re great for logos and patterns because they’re completely scaleable. A 1” image will look just as sharp as a 10’ image because the shapes are calculated mathematically and not with individual pixels. The file size is very small, so the files load quickly and are easily sent by email. Cons: they often look flat and “cartoony” and don’t have the subtlety of a bitmap image. Tools Used in Tutorial 1 Selection (Hotkey: V) Direct Selection (Hotkey: A) Lasso Tool (Hotkey: Q) Zoom (Hotkey: Z) Zoom Out (Hotkey: ALT+Z) Text (Hotkey: T) Eyedropper (Hotkey: I) Hand (Hotkey: Spacebar) Colour Palette
Transcript of Vector for Smocking Design – Tutorial 1 Learning Goals for
Vector for Smocking Design – Tutorial 1 1
Learning Goals for Tutorial 1
Tutorial 1 is an introduction to vector software and assumes no previous knowledge of vector-based
software. Complete a simple, one colour picture smocking plate, focussing on navigating around the
software and utilizing the most common tools. Use a small number of pre-made symbols from the
symbols library.
What is Vector-based Software?
There are two basic types of image files for computers: vector and bitmap. Each has their own strengths
and limitations.
Bitmaps are digital image files like those from a digital camera or scan, made up of pixels or individual
dots of colour. Pros: can create extremely nuanced, detailed images. Cons: each pixel requires its own
“mini-file” on its location, colour, intensity etc. Even a small image contains thousands, if not millions of
mini-files, so bitmap files get large quickly. As well, the images don’t scale (grow big or small) well and
quickly become blurry.
Vector files are digital images that use lines and mathematical formulas to create shapes and images.
Pros: they’re great for logos and patterns because they’re completely scaleable. A 1” image will look just
as sharp as a 10’ image because the shapes are calculated mathematically and not with individual pixels.
The file size is very small, so the files load quickly and are easily sent by email. Cons: they often look
flat and “cartoony” and don’t have the subtlety of a bitmap image.
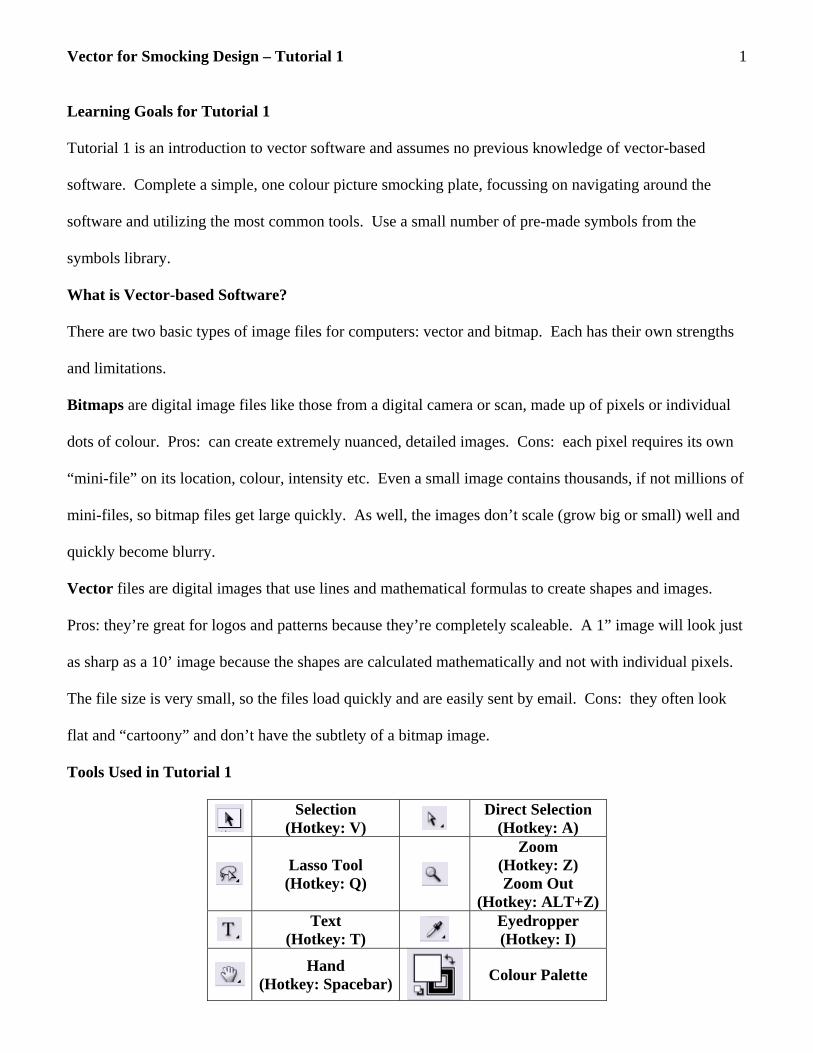
Tools Used in Tutorial 1
Selection (Hotkey: V)
Direct Selection (Hotkey: A)
Lasso Tool (Hotkey: Q)
Zoom (Hotkey: Z) Zoom Out
(Hotkey: ALT+Z)
Text
(Hotkey: T) Eyedropper (Hotkey: I)
Hand (Hotkey: Spacebar) Colour Palette
Vector for Smocking Design – Tutorial 1 2Instructions
1. Open the file “tutorial1.ai”.
2. Using the selection tool (Hotkey: V), click on the outline of the heart. It will be highlighted with a
bounding box.
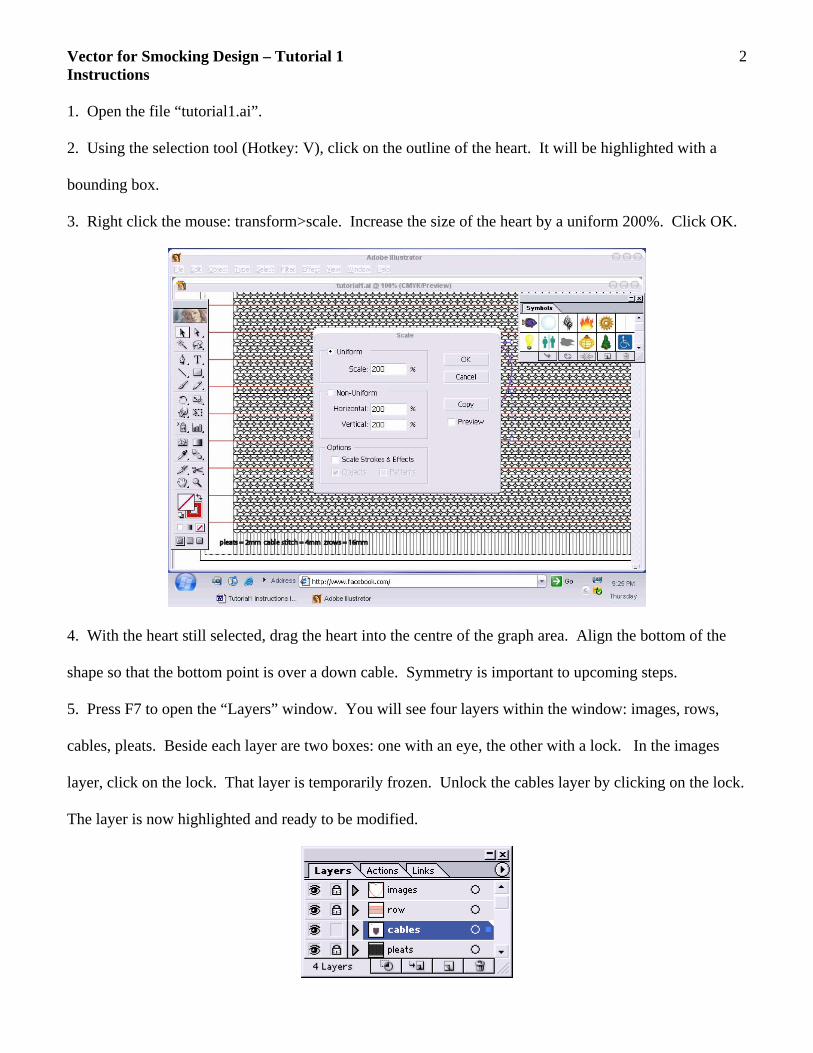
3. Right click the mouse: transform>scale. Increase the size of the heart by a uniform 200%. Click OK.
4. With the heart still selected, drag the heart into the centre of the graph area. Align the bottom of the
shape so that the bottom point is over a down cable. Symmetry is important to upcoming steps.
5. Press F7 to open the “Layers” window. You will see four layers within the window: images, rows,
cables, pleats. Beside each layer are two boxes: one with an eye, the other with a lock. In the images
layer, click on the lock. That layer is temporarily frozen. Unlock the cables layer by clicking on the lock.
The layer is now highlighted and ready to be modified.
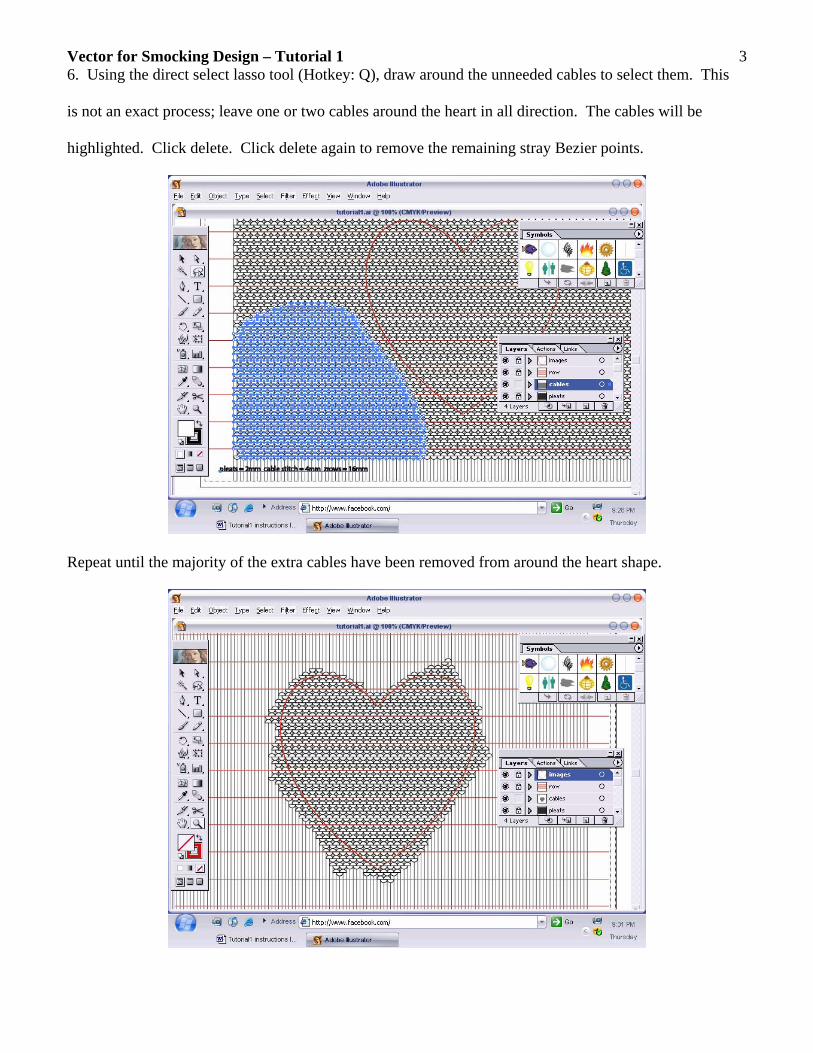
Vector for Smocking Design – Tutorial 1 36. Using the direct select lasso tool (Hotkey: Q), draw around the unneeded cables to select them. This
is not an exact process; leave one or two cables around the heart in all direction. The cables will be
highlighted. Click delete. Click delete again to remove the remaining stray Bezier points.
Repeat until the majority of the extra cables have been removed from around the heart shape.
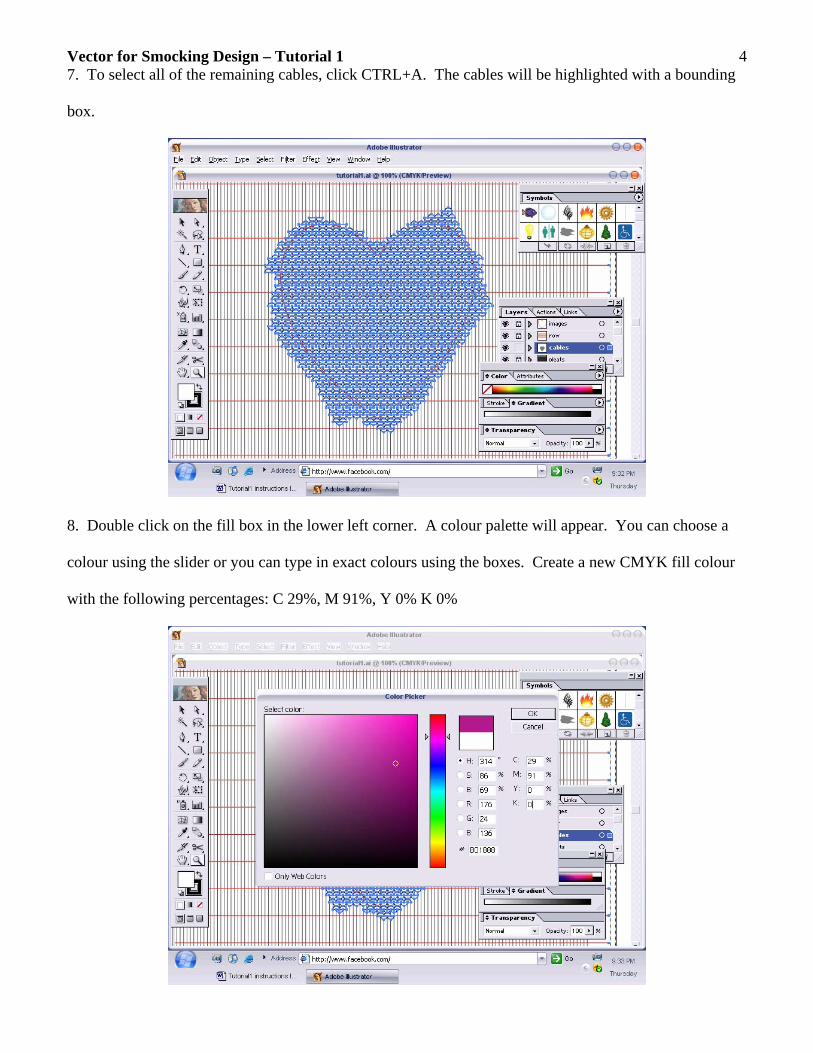
Vector for Smocking Design – Tutorial 1 47. To select all of the remaining cables, click CTRL+A. The cables will be highlighted with a bounding
box.
8. Double click on the fill box in the lower left corner. A colour palette will appear. You can choose a
colour using the slider or you can type in exact colours using the boxes. Create a new CMYK fill colour
with the following percentages: C 29%, M 91%, Y 0% K 0%
Vector for Smocking Design – Tutorial 1 5
TIP: CMYK (Cyan/Magenta/Yellow/Black) is the colour process used in paper printing. RGB
(Red/Green/Blue) is used in electronic and web design. CMYK offers several hundred thousand fewer
colour options than RGB. Therefore, always choose CMYK as your default colour setting. You can
switch from CMYK to RGB, but will distort the colours if you transform them from RGB to CMYK.
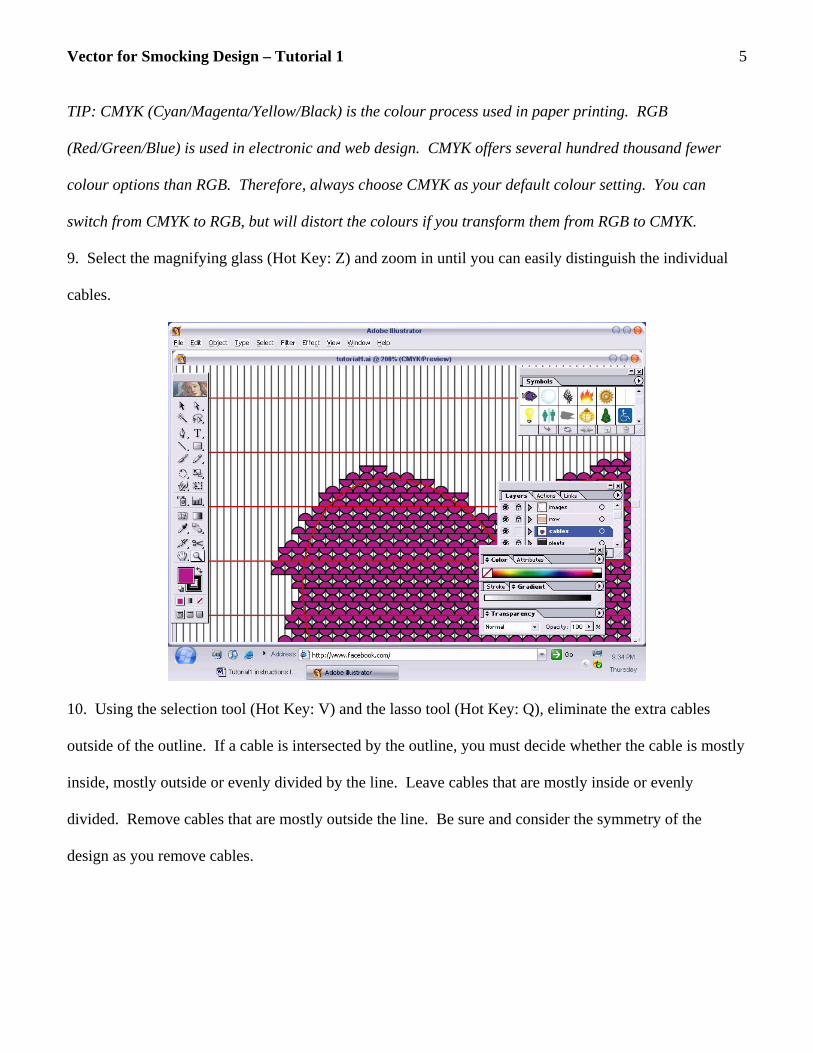
9. Select the magnifying glass (Hot Key: Z) and zoom in until you can easily distinguish the individual
cables.
10. Using the selection tool (Hot Key: V) and the lasso tool (Hot Key: Q), eliminate the extra cables
outside of the outline. If a cable is intersected by the outline, you must decide whether the cable is mostly
inside, mostly outside or evenly divided by the line. Leave cables that are mostly inside or evenly
divided. Remove cables that are mostly outside the line. Be sure and consider the symmetry of the
design as you remove cables.
Vector for Smocking Design – Tutorial 1 6
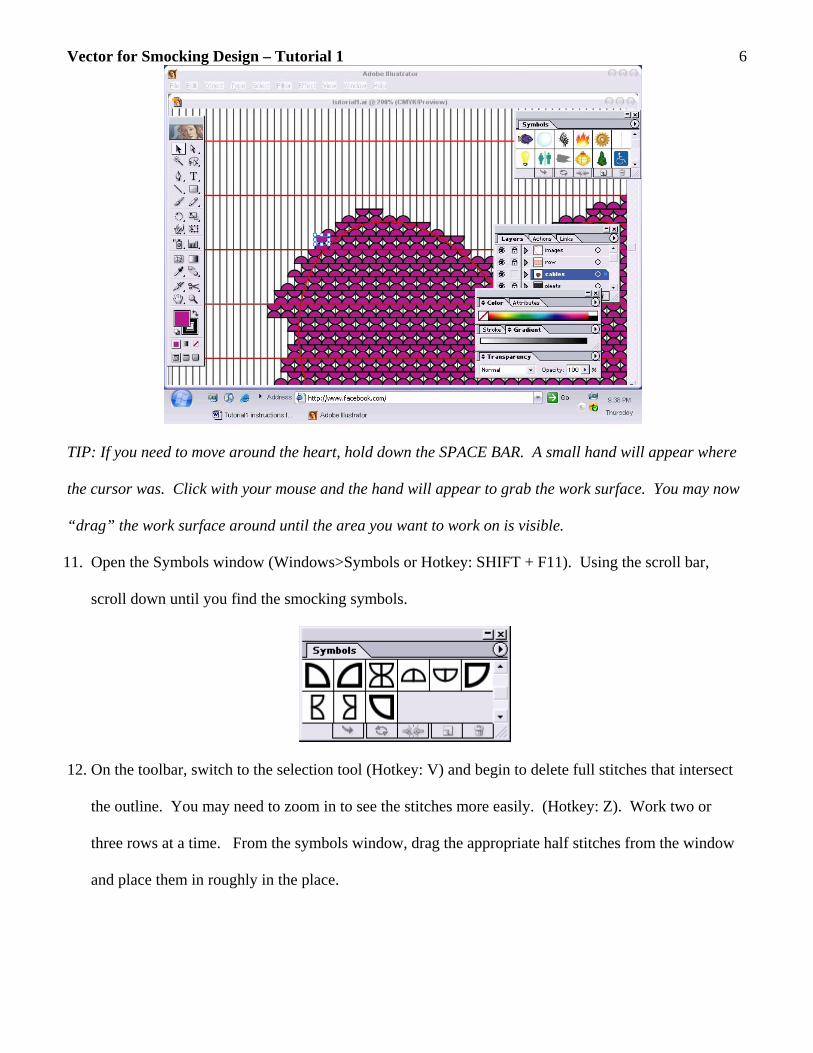
TIP: If you need to move around the heart, hold down the SPACE BAR. A small hand will appear where
the cursor was. Click with your mouse and the hand will appear to grab the work surface. You may now
“drag” the work surface around until the area you want to work on is visible.
11. Open the Symbols window (Windows>Symbols or Hotkey: SHIFT + F11). Using the scroll bar,
scroll down until you find the smocking symbols.
12. On the toolbar, switch to the selection tool (Hotkey: V) and begin to delete full stitches that intersect
the outline. You may need to zoom in to see the stitches more easily. (Hotkey: Z). Work two or
three rows at a time. From the symbols window, drag the appropriate half stitches from the window
and place them in roughly in the place.

Vector for Smocking Design – Tutorial 1 7
TIP: don’t worry about getting the stitches perfectly aligned. You will be correcting imperfections in
the next step. Simply put them in their approximate place and continue the deleting/replacing process
around the perimetre of the heart shape. Use the Zoom In (Hotkey: Z), Zoom Out (ALT+z) and the
SPACE BAR as necessary to complete the replacement process.
13. When all of the half stitches are in place, zoom in (Hotkey: Z) so that the magnification at the top
of the working window reads 1600%.
Vector for Smocking Design – Tutorial 1 8
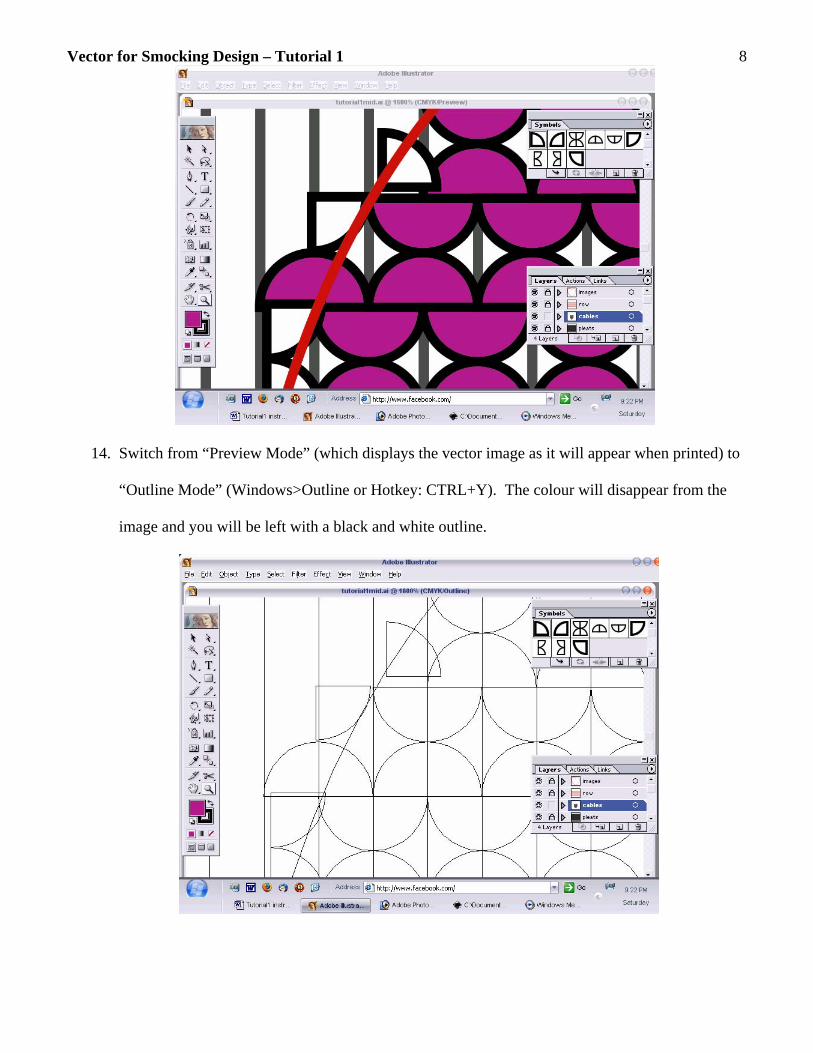
14. Switch from “Preview Mode” (which displays the vector image as it will appear when printed) to
“Outline Mode” (Windows>Outline or Hotkey: CTRL+Y). The colour will disappear from the
image and you will be left with a black and white outline.
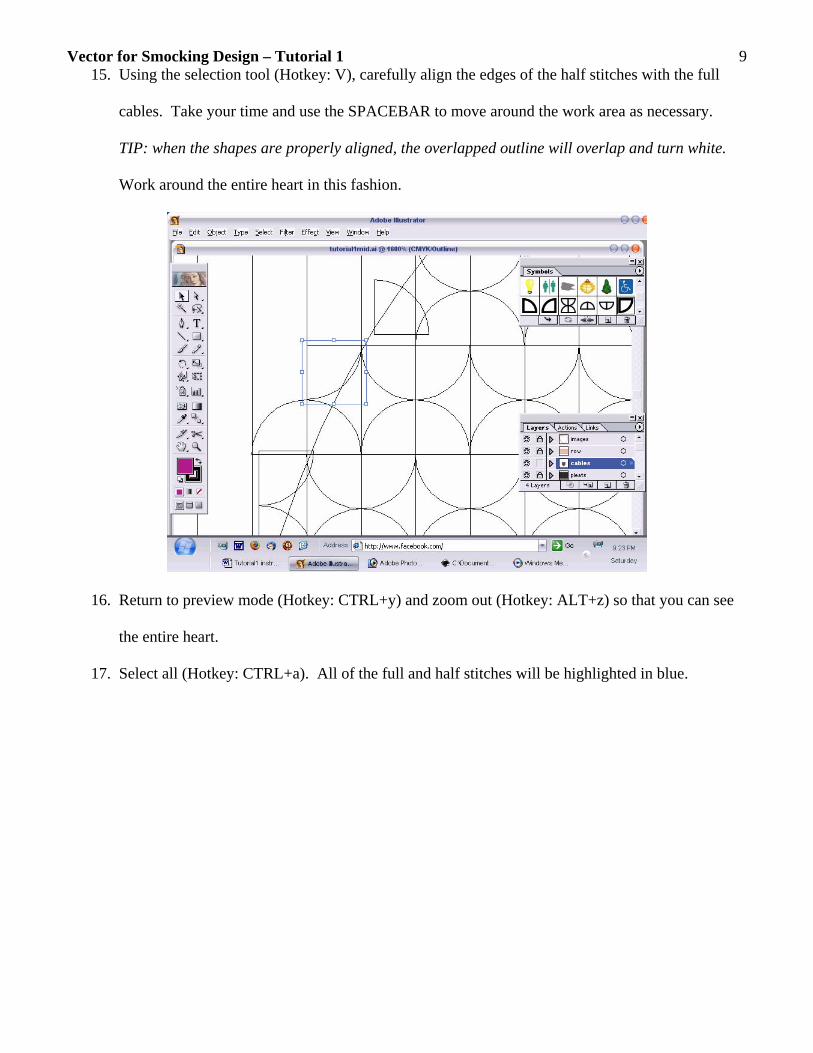
Vector for Smocking Design – Tutorial 1 915. Using the selection tool (Hotkey: V), carefully align the edges of the half stitches with the full
cables. Take your time and use the SPACEBAR to move around the work area as necessary.
TIP: when the shapes are properly aligned, the overlapped outline will overlap and turn white.
Work around the entire heart in this fashion.
16. Return to preview mode (Hotkey: CTRL+y) and zoom out (Hotkey: ALT+z) so that you can see
the entire heart.
17. Select all (Hotkey: CTRL+a). All of the full and half stitches will be highlighted in blue.
Vector for Smocking Design – Tutorial 1 10
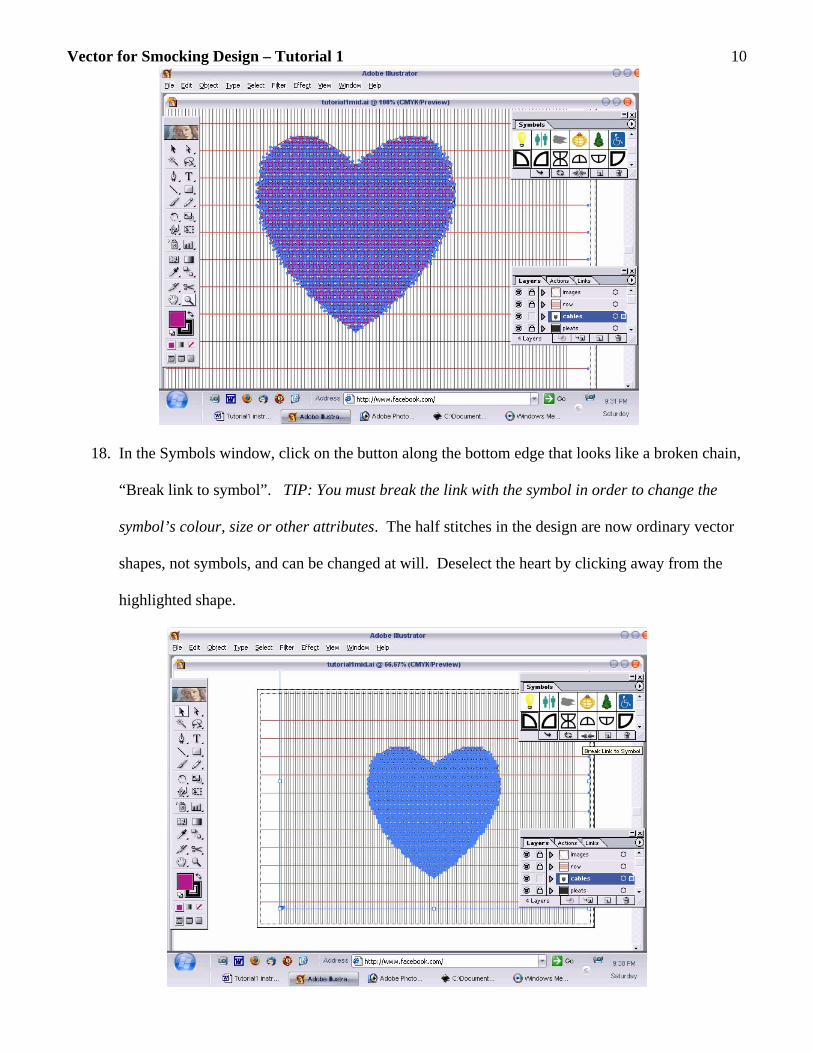
18. In the Symbols window, click on the button along the bottom edge that looks like a broken chain,
“Break link to symbol”. TIP: You must break the link with the symbol in order to change the
symbol’s colour, size or other attributes. The half stitches in the design are now ordinary vector
shapes, not symbols, and can be changed at will. Deselect the heart by clicking away from the
highlighted shape.
Vector for Smocking Design – Tutorial 1 11
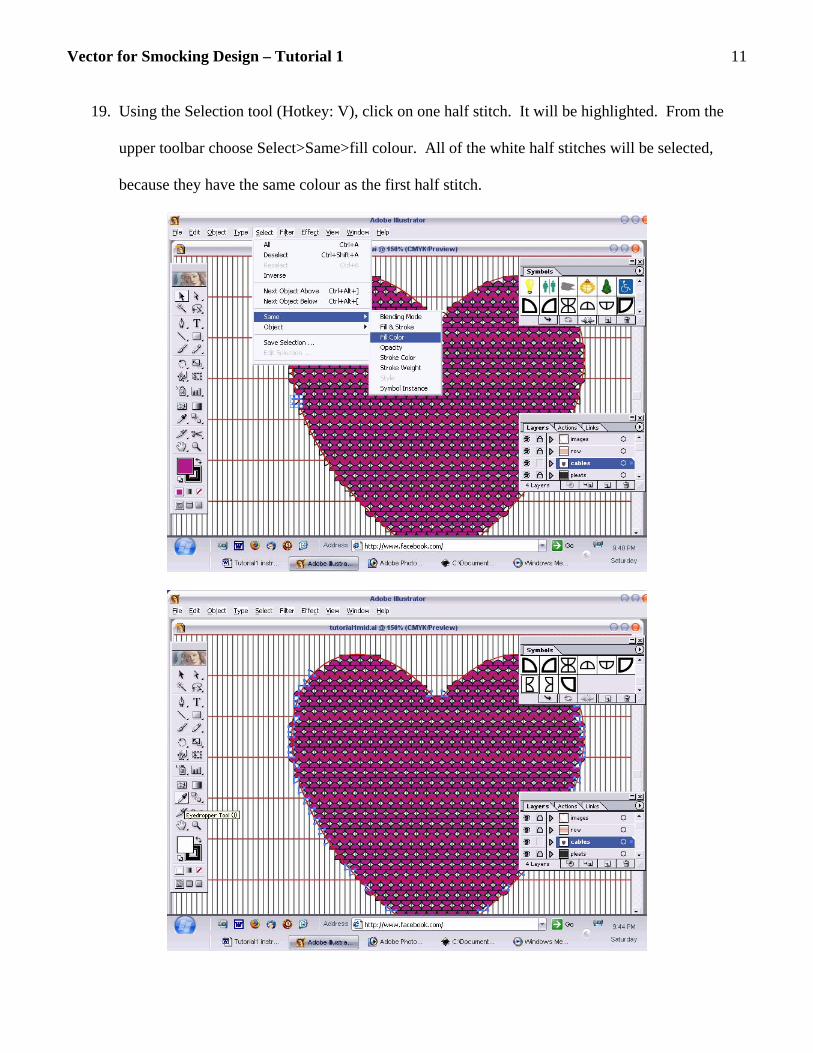
19. Using the Selection tool (Hotkey: V), click on one half stitch. It will be highlighted. From the
upper toolbar choose Select>Same>fill colour. All of the white half stitches will be selected,
because they have the same colour as the first half stitch.
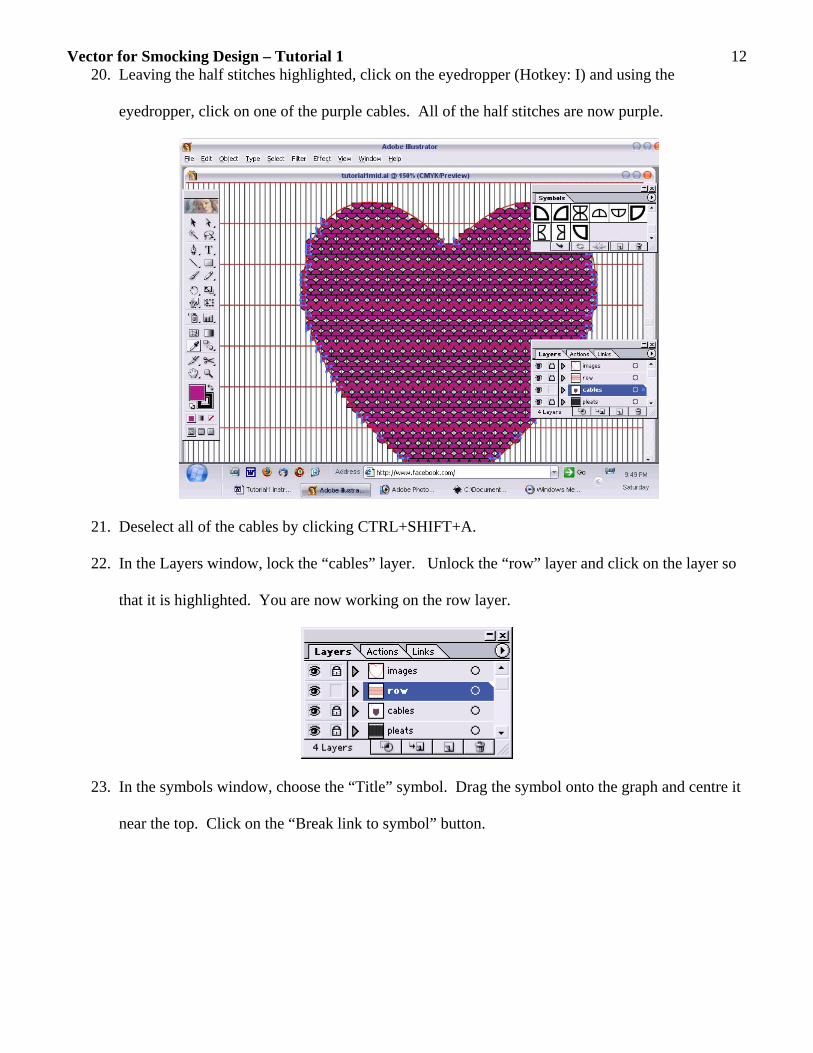
Vector for Smocking Design – Tutorial 1 1220. Leaving the half stitches highlighted, click on the eyedropper (Hotkey: I) and using the
eyedropper, click on one of the purple cables. All of the half stitches are now purple.
21. Deselect all of the cables by clicking CTRL+SHIFT+A.
22. In the Layers window, lock the “cables” layer. Unlock the “row” layer and click on the layer so
that it is highlighted. You are now working on the row layer.
23. In the symbols window, choose the “Title” symbol. Drag the symbol onto the graph and centre it
near the top. Click on the “Break link to symbol” button.

Vector for Smocking Design – Tutorial 1 13
24. Select the Type Tool (Hotkey: T). Click on the font inside the title box and change the title to
“Hearts” and add your name as designer.
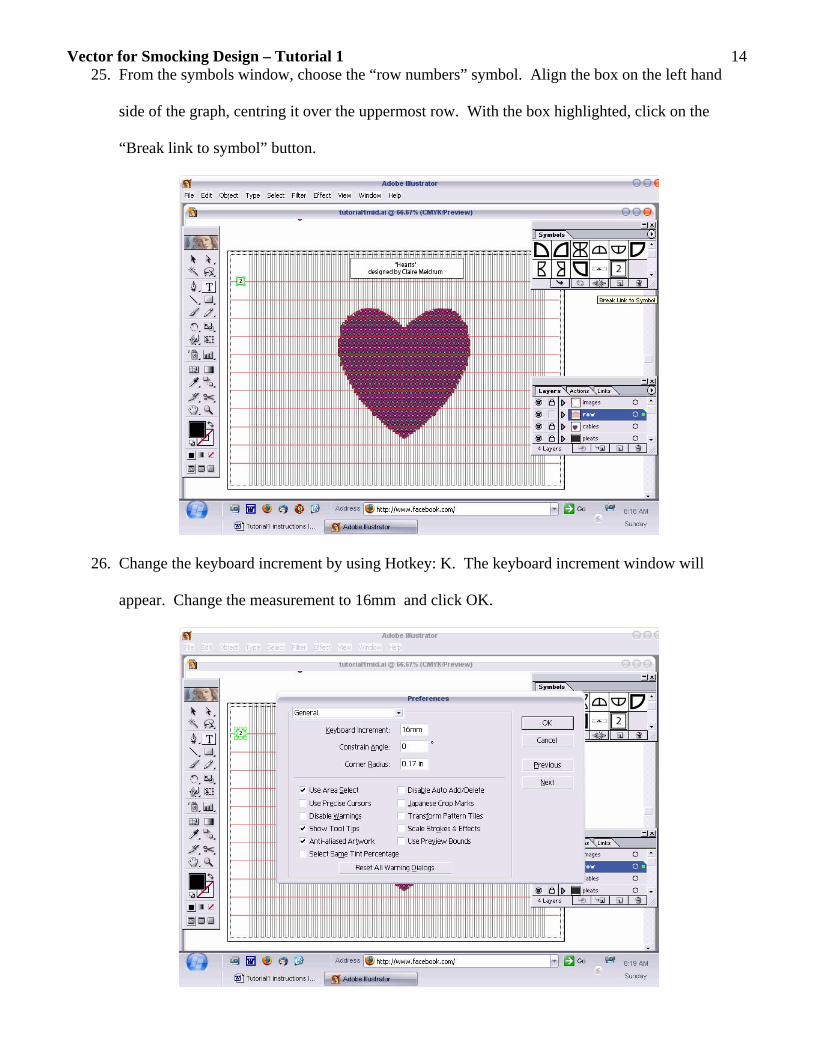
Vector for Smocking Design – Tutorial 1 1425. From the symbols window, choose the “row numbers” symbol. Align the box on the left hand
side of the graph, centring it over the uppermost row. With the box highlighted, click on the
“Break link to symbol” button.
26. Change the keyboard increment by using Hotkey: K. The keyboard increment window will
appear. Change the measurement to 16mm and click OK.
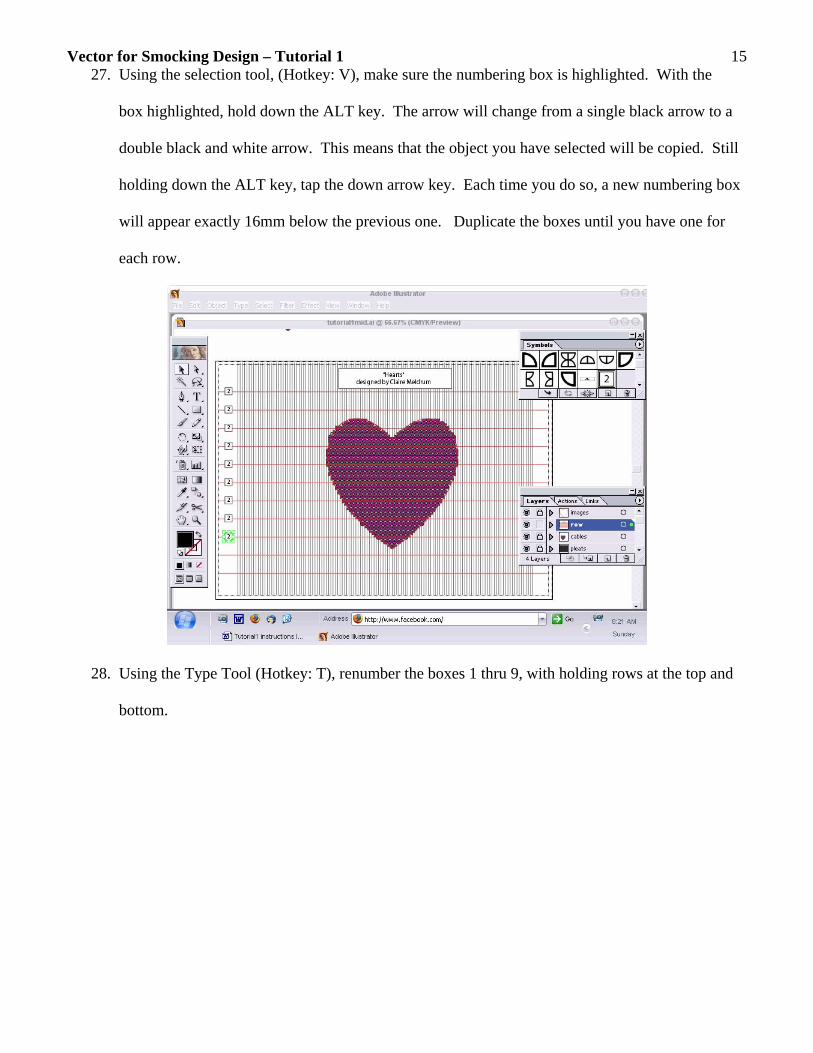
Vector for Smocking Design – Tutorial 1 1527. Using the selection tool, (Hotkey: V), make sure the numbering box is highlighted. With the
box highlighted, hold down the ALT key. The arrow will change from a single black arrow to a
double black and white arrow. This means that the object you have selected will be copied. Still
holding down the ALT key, tap the down arrow key. Each time you do so, a new numbering box
will appear exactly 16mm below the previous one. Duplicate the boxes until you have one for
each row.
28. Using the Type Tool (Hotkey: T), renumber the boxes 1 thru 9, with holding rows at the top and
bottom.

Vector for Smocking Design – Tutorial 1 16
29. Lock the “row” layer in the layer window. Click on the images layer and make it invisible by
clicking on the “eye” symbol.
30. Unlock the “cable” layer. Click on the layer to work on it.
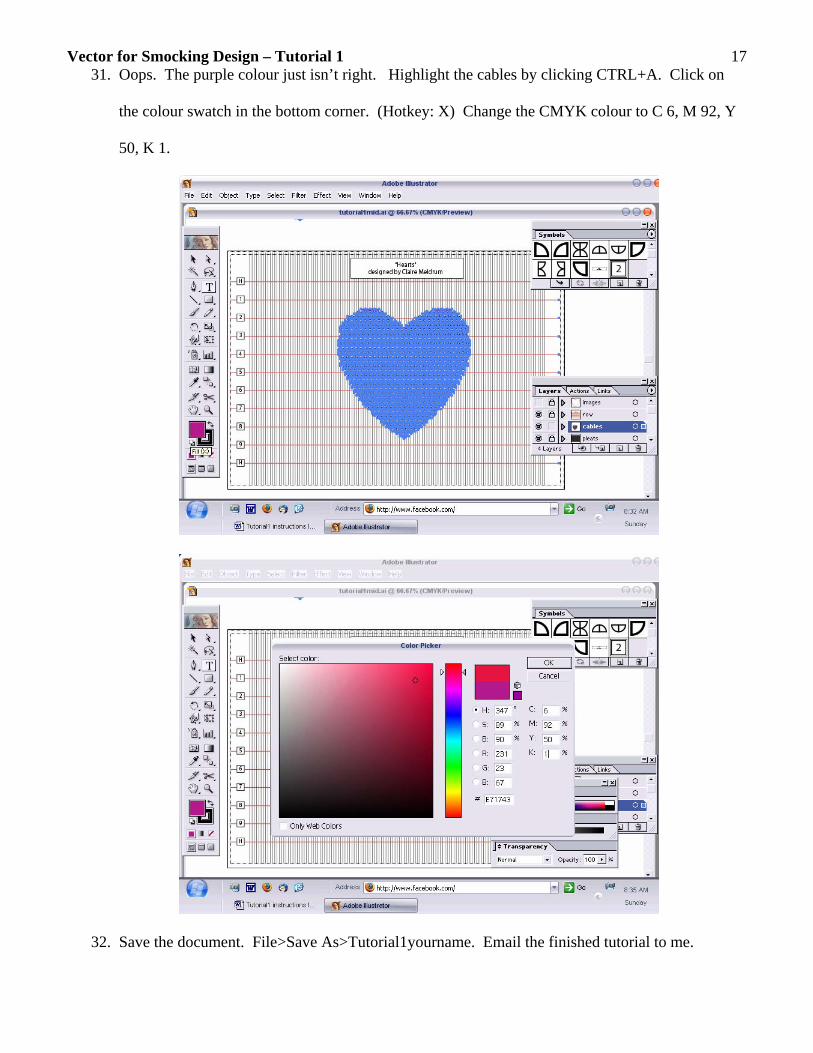
Vector for Smocking Design – Tutorial 1 1731. Oops. The purple colour just isn’t right. Highlight the cables by clicking CTRL+A. Click on
the colour swatch in the bottom corner. (Hotkey: X) Change the CMYK colour to C 6, M 92, Y
50, K 1.
32. Save the document. File>Save As>Tutorial1yourname. Email the finished tutorial to me.


![SK9822 REV.01 EN [兼容模张] · 2016. 3. 18. · 3/ 12 SK9822 SK9822: The default is RGB chips with IC integration 6. General Information](https://static.fdocuments.us/doc/165x107/60c8dd7214333e138a661027/sk9822-rev01-en-fafff-2016-3-18.jpg)