VDS Tutorial - Chapter 12
16
Vault Data Standard – Tutorial Chapter 12 – Custom Property Validation Introduction Static and Dynamic property fields validate property constraints of the Vault behaviors like Requires Value, Minimum Length, etc., defined in the property definition. Company individual rules may require extended logic or context-specific exceptions of constraints. This chapter is all about accessing and extending validation rules for individual properties of files and folders. Learning Objectives - Access and implement custom validations for CAD workflows - Access and implement custom validations for Vault Explorer workflows - Get insights into Data Standard script loading behavior Training Files You need to have installed all training files by following the instructions in Chapter 00 – Introduction and ReadMe First. This chapter requires access to these files in Vault: VDS configuration files added or changed in this chapter’s exercises can be found in .\Training Files\VDS Configuration Files\Chapter 12 – finished\.
Transcript of VDS Tutorial - Chapter 12

Vault Data Standard – Tutorial
Chapter 12 – Custom Property Validation Introduction
Static and Dynamic property fields validate property constraints of the Vault behaviors like Requires Value,
Minimum Length, etc., defined in the property definition. Company individual rules may require extended logic or
context-specific exceptions of constraints. This chapter is all about accessing and extending validation rules for
individual properties of files and folders.
Learning Objectives
- Access and implement custom validations for CAD workflows
- Access and implement custom validations for Vault Explorer workflows
- Get insights into Data Standard script loading behavior
Training Files
You need to have installed all training files by following the instructions in Chapter 00 – Introduction and ReadMe
First.
This chapter requires access to these files in Vault:
VDS configuration files added or changed in this chapter’s exercises can be found in .\Training Files\VDS
Configuration Files\Chapter 12 – finished\.

Vault Configuration
The workflow scenario and Exercises 1 and 2 expect having the User Defined Property “Part Number” being
enforced. Activate the constraint “Requires Value” as shown below:
Workflow
Our Vault is configured to enforce Part Number values for Engineering category file types. The behavior
configuration is handy to ensure that no part or assembly releases while missing a value.
However, if designers evaluate new design or design variants in an early stage, a Part Number is either not known
or should not be consumed before the model is decided to be kept and processed in further detailing.
Vault Data Standard allows extending the rules on initial save by implementing exceptions for the property
constraint given by the server. The completed rules of Exercise allow to leave the Part Number empty for new
files but enforces value in subsequent Edit workflows; a custom tooltip (4) extends the information about the
required value:

Another workflow being achieved in this chapter pre-checks folder names for uniqueness while running New
Standard Folder windows. The custom validation rule compares existing folder names during the user’s input
(1),(2). The tooltip returns a custom message (3):
Exercise 1 – Custom Validation for Part Number in VDS for Vault
Before you start following this exercise, ensure that the required Vault behavior described Vault Configuration is
implemented.
Step 1 – Create New Script File for Vault
Create a new script file of name PartNumberValidation.ps1 in the folder .\Vault.Custom\addinVault\.

Data Standard loads every script file found in the configuration folders .\Vault\ and .\Vault.Custom\; the name of
the file is not relevant, whereas all function names of any script get registered in the order of reading them.
Therefore, it is best practice to keep their names unique except you created an override of a function delivered as
default by Autodesk. We create two functions, “InitializePartNumberValidation” and “ValidatePartNumber”:
Step 2 – Initialize Custom Validation for Vault
Any VDS Property can add custom validation behavior by setting the Boolean property “.CustomValidation” to
True/False. You can do this as a static value, e.g., $Prop[“Part Number”].CustomValidation = $true. In most cases,
we need a dynamic result based on individual validation rules. We assign the return value of a function to this
property like this: $Prop[“Part Number”].CustomValidation = { ValidatePartNumber }. The function
ValidatePartNumber needs to return $true or $false based on an individual proofing rule. VDS runs the custom
validation on each event of property change; we do not need to implement this event handler; it is built-in.

Note – Custom Validations allow us to use variable property translations to adopt different Vault database
languages dynamically, e.g., $Prop[“_XLTN_PARTNUMBER”], instead of $Prop[“Part Number]. If you need to
support multiple database languages, the translation needs to be added to the file PropertyTranslation.xml in
each language subfolder, e.g., .\en-US\PropertyTranslations.xml. See also Chapter 08 for more details.
Enable the initialization in the .\Vault.Custom\addinVault\Default.ps1 script; the validation targets new files
only, and we call the new function from the related switch section:
Step 3 – Review Validation Behavior
Restart Vault, it is required to register the new script file and its functions. Turn on the Log Window (Tools ->
Show Data Standard Log Window) and create a new file in the .\Designs\Chapter 12\ folder.

As we type in the field “Part Number,” the log window adds the trace statement and the return value:
Step 4 – Complete Validation Rule
We successfully tested that the validation is initialized and continue adding the rules. Remind the workflow
target: the initial save of a new file should not enforce the restriction. We return $true if the context variable
“$Prop[“_CreateMode”].Value is $true:
For subsequent edits on existing files, the validation should return $true if multiple conditions apply; our rule
needs to include “_EditMode,” and indicators that not any text is accepted as a part number; we check against
our numbering scheme “Engineering” using case sensitive query on the label “ENG-“ and the fixed-length
including the six digits:
The alternate return value (else statement) must be $false, and we enhance the user interaction by adding a
tooltip clarifying the expected input:
Step 5 – Test Validation for New and Existing Files
The edits of step 4 do not require another restart of Vault Explorer; remember, only adding new script files or
additional functions require a restart to get them registered.
Perform these test cases within the folder $\Designs\Chapter 12\:
1. New Standard File: Once the File Name is given (1), the OK-button (2) activates while the Part Number
value is empty (3).
2. Edit one of the incompliant files and scroll to the Part Number field.
a. The field highlights the non-compliancy
b. The tooltip displays our custom validation message

3. Fill the Part Number value and match the requirements:
Note – In case the OK button does not disable for validation errors, please check the Dialog Definition File.xaml:
the OK button property IsEnabled might be set to IsNotReadOnly. This was the default configuration before Vault
Update 2020.3.1 and Vault 2021.1.0.
Correct it to Properties.IsValid:
Exercise 2 – Custom Validation for Part Number in VDS for CAD
We repeat the workflow of the previous exercise and implement the rules for CAD files.
Step 1 – Create New Script File for CAD
Create a new script file with the name “PartNumberValidation.ps1” in the customization folder
.\CAD.Custom\addins\:

VDS for Inventor and VDS for AutoCAD read all script files in the configuration folders .\CAD\ and .\CAD.Custom\.
The same loading and registration rules mentioned in Exercise 1, Step 1, apply here also.
Open the new file and create two functions, “InitializePartNumberValidation” and “ValidatePartNumber”:
Step 2 – Initialize Custom Validation for Inventor and AutoCAD
To initialize a custom validation for CAD the individual property again adds the Boolean attribute
.CustomValidation = $true/$false as a static value or dynamically by returning $true/$false by a function.
The difference is that each CAD application and each customer environment might use individual mappings, and
therefore, we do not have a common property name “Part Number”. Therefore, we can define a PowerShell
variable for the individual name, e.g., $mPartNumProperty, and use it globally (the validation repeatedly runs as
the user types and must not lose its value). The syntax of using the global variable instead of the “hardcoded”
name for a Vault Property is like this: $Prop[“$(<variable>)”]. The completed assignment is shown below.
Before this initialization can start, the new global variable has to be set for Inventor and AutoCAD. It is straight
forward for Inventor:

Remember, AutoCAD used different file property or attribute names, depending on the set-up chosen in Chapter
04. We solve this by adding both options:
The completed initialization function is as follows:
Now, we are ready to call the function from the InitializeWindow script in .\CAD.Custom\addins\Default.ps1:
add the command as shown here:

Step 3 – Complete Validation Rule
The logic for the validation itself is identical to the validation for Vault. A one to one copy completes the
validation quickly. Keep attention – one change is necessary: The Vault Property name “Part Number” needs to
be replaced by the global variable name “mPartNumProperty” for CAD.
Step 4 – Test Custom Validation in Inventor and AutoCAD
Start or restart AutoCAD and Inventor applications, create a new file and run the first save: you should see an
active OK button and no restriction on the Part Number field:
Save the file and continue editing the datasheet; now the Part Number field enforces a matching value: check
that the tooltip includes the custom validation error message (1) and the disabled OK button (2):

Exercise 3 – Custom Validation for Folder Names
We return to the Vault Explorer Client to implement a custom validation while creating new folders. Recall from
the workflow introduction that we liked to pre-check for existing folder names. So, instead of silently not creating
a folder if an existing name was chosen (the default behavior of VDS), the user should receive immediate
feedback while typing folder names. The five steps are well known from previous exercises, but the validation
mechanism is a new implementation.
Step 1 – Create New Script File for Vault
Create another script file in the Vault client customization folder
.\Vault.Custom\addinVault\FolderNameValidation.ps1:
Open the new file and add two functions with the names InitializeFolderNameValidation and
ValidateFolderName:
Step 2 – Initialize the Custom Validation for Vault Folder Names
The built-in VDS property for the custom validation is “_FolderName”. Using the VDS system property instead of
the Vault System property “Name” avoids additional steps for multi-language implementation.
Activate the custom validation as we learned before:

As a second step, the initialization itself needs to be called from the InitializeWindow script:
Step 3 – Complete Validation Rule
The validation reflects these considerations: Whenever a numbering scheme is used for folders, the uniqueness of
the name is guaranteed, and we can skip the validation:
Note – We learned to address any Dialog control by $dsWindow.Findname[“<Name of Control in XAML”] in
Chapter 10. Open the target xaml-file to review available control properties.
Next, we handle hand-typed names and look-up in Vault as the property “_FolderName” updates its value; as
long the value is empty, a custom validation error message returns; we start implementing this if..else statement
first:
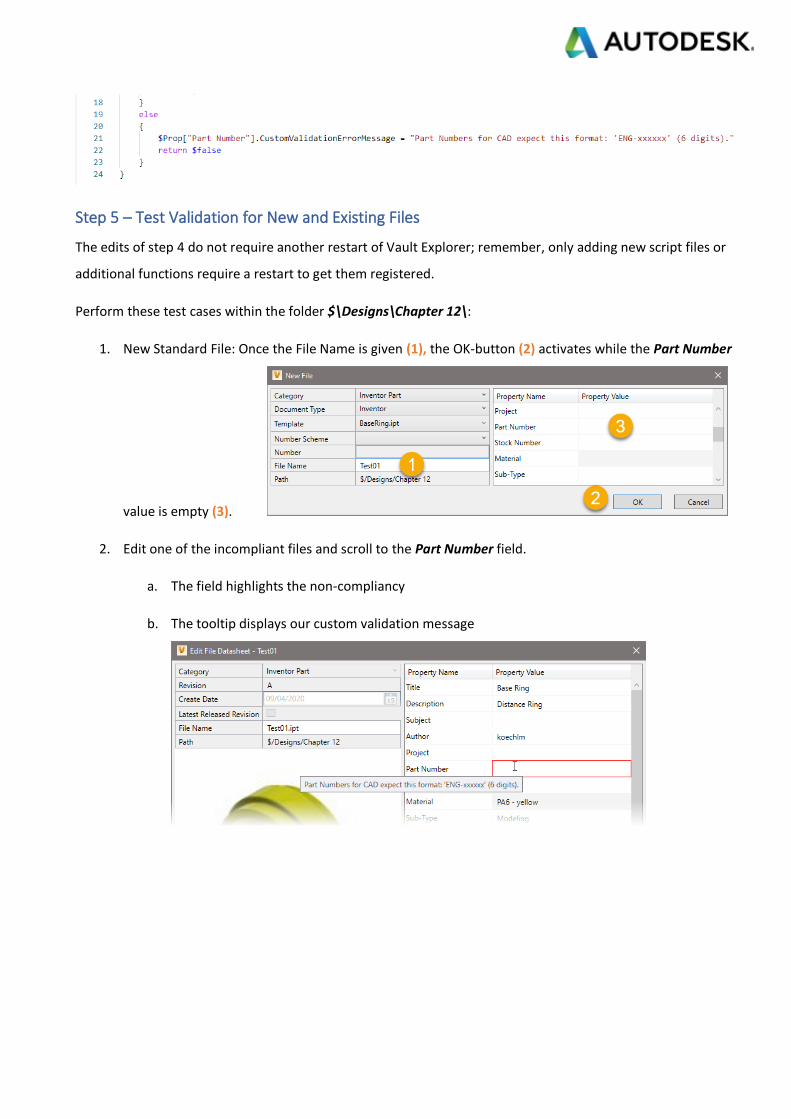
Whenever the property value is not empty, a Vault API call looks at whether the full pathname built from the
current path (1) plus new name (2) could be found. At this point, we need to know, that the API method
GetFolderByPath will throw an exception if the path does not exist; we need to handle this exception as our
desired result that allows creating the new folder (3):
Any unhandled exception within the try block immediately stops any further execution and jumps to the catch
block. Therefore, the custom validation error message is never reached if a new folder name is not present in the
current root.
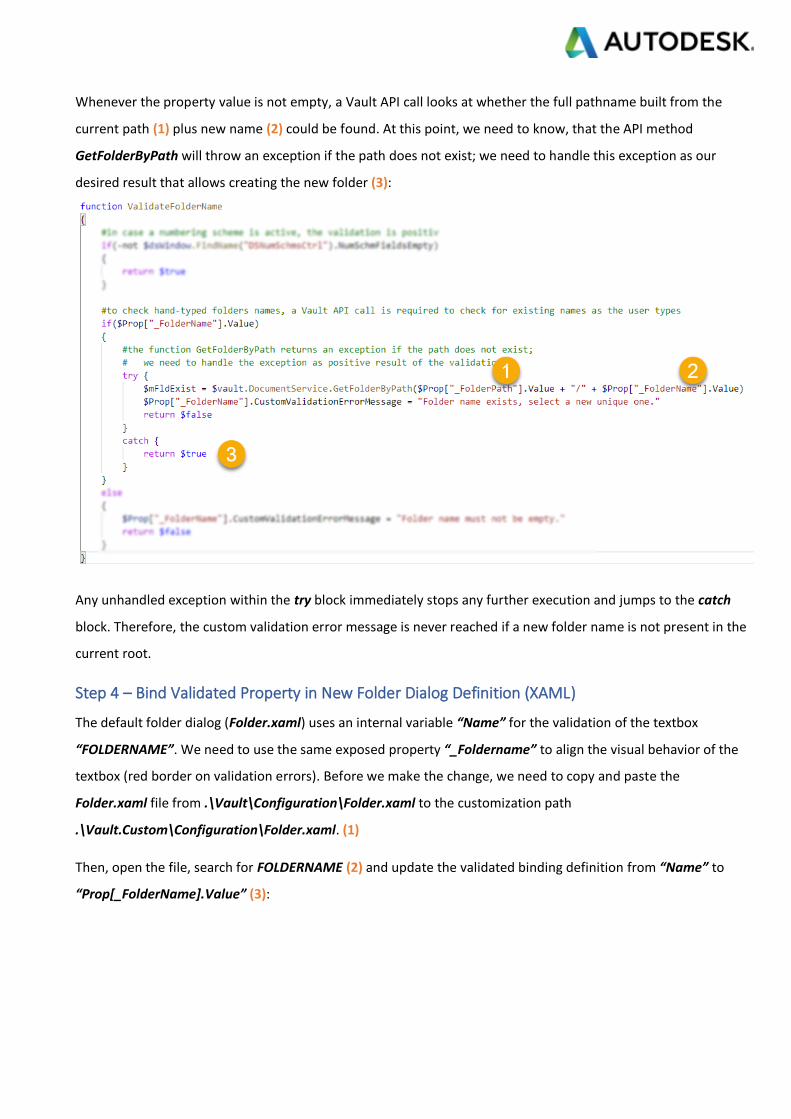
Step 4 – Bind Validated Property in New Folder Dialog Definition (XAML)
The default folder dialog (Folder.xaml) uses an internal variable “Name” for the validation of the textbox
“FOLDERNAME”. We need to use the same exposed property “_Foldername” to align the visual behavior of the
textbox (red border on validation errors). Before we make the change, we need to copy and paste the
Folder.xaml file from .\Vault\Configuration\Folder.xaml to the customization path
.\Vault.Custom\Configuration\Folder.xaml. (1)
Then, open the file, search for FOLDERNAME (2) and update the validated binding definition from “Name” to
“Prop[_FolderName].Value” (3):
Save the edited file.
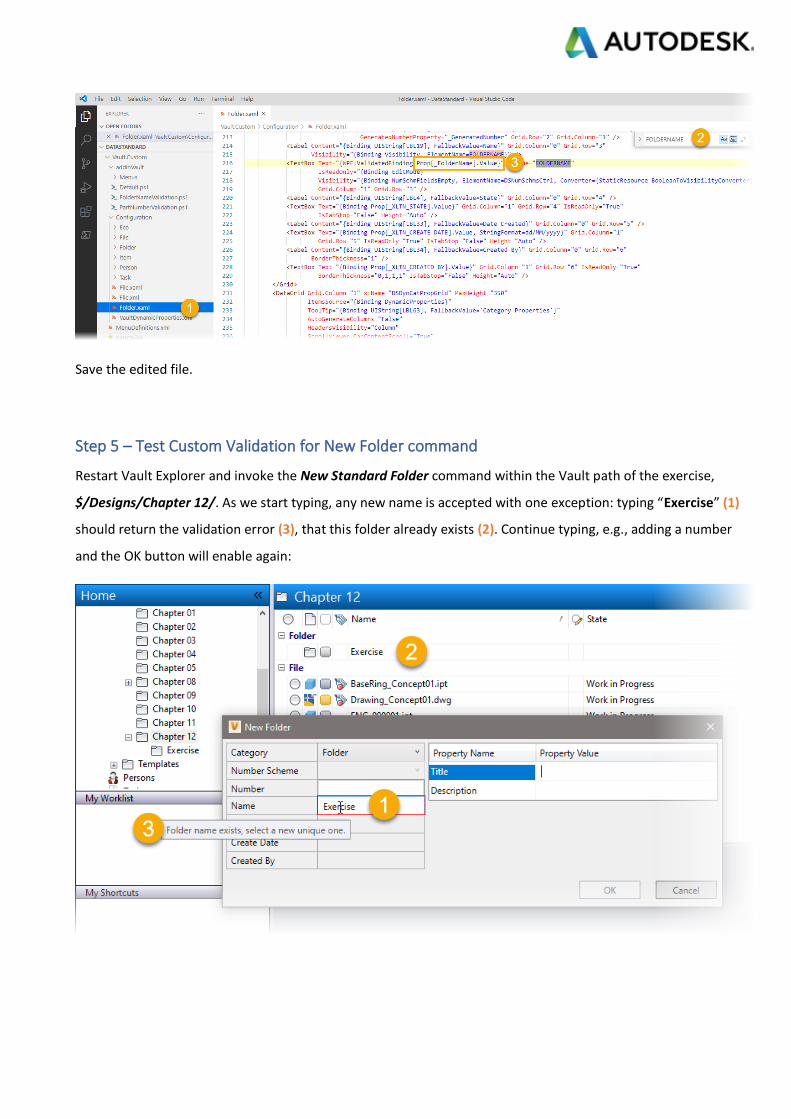
Step 5 – Test Custom Validation for New Folder command
Restart Vault Explorer and invoke the New Standard Folder command within the Vault path of the exercise,
$/Designs/Chapter 12/. As we start typing, any new name is accepted with one exception: typing “Exercise” (1)
should return the validation error (3), that this folder already exists (2). Continue typing, e.g., adding a number
and the OK button will enable again:

Take Away
This chapter is a “must-read” for readers eager also to learn the programming capabilities of Data Standard.
While creating new script files and functions, you should always bear in mind that all files residing in the
configuration files are loaded. VDS registers unique names of any function in the order a) default configuration
(delivered by Autodesk) and b) custom validation; so, re-using a default function name in your customizations will
overrule the default logic.
You also learned the powerful options of custom validation constraints. Always bear in mind, the custom
validation runs with any PropertyChanged event of the validated property. If you do even more extensive
validations, including Vault search, a user might experience delays interacting with Vault; and we might increase
the communication thread of Vault Clients to the server significantly. So, use custom validation wisely and only as
much as necessary.
Exercise 3 – Alternate Solution
In case you need to ensure unique folder names across an entire Vault, a custom search allows a high performant
query in any folder structure. E.g., start a new folder in the subfolder Chapter 13 and the search will find the
subfolder Exercise in the Chapter 12 structure:
Check-out the alternate solution for the script “FolderNameValidation.ps1” in the completed exercise sample
files …\Chapter 12 - Finished - Alt.Exercise 3\.


![[MS-VDS]: Virtual Disk Service (VDS) Protocol... · [MS-VDS]: Virtual Disk Service (VDS) Protocol Intellectual Property Rights Notice for Open Specifications Documentation](https://static.fdocuments.us/doc/165x107/5ece0e4751b19024473b3e8c/ms-vds-virtual-disk-service-vds-protocol-ms-vds-virtual-disk-service.jpg)