Vax V-124 User Guidelibrary.vax.co.uk/resource/98/v-124--v-124a/user-guide.pdf · Vax V-124 User...
20
www.vax.co.uk Please read carefully before using this cleaner. Always fully extend the mains cable before use. Retain for future reference. Vax careline 0870 6061248 instruction manual Carpet washer Vax model number: V-124 Vax V-124 User Guide v5.qxd 21/9/07 16:38 Page 1
Transcript of Vax V-124 User Guidelibrary.vax.co.uk/resource/98/v-124--v-124a/user-guide.pdf · Vax V-124 User...

www.vax.co.ukPlease read carefully before using this cleaner.
Always fully extend the mains cable before use.Retain for future reference.
Vax careline0870 6061248
inst
ruct
ion
man
ual
Carpet washer
Vax model number:
V-124
Vax V-124 User Guide v5.qxd 21/9/07 16:38 Page 1
V-124
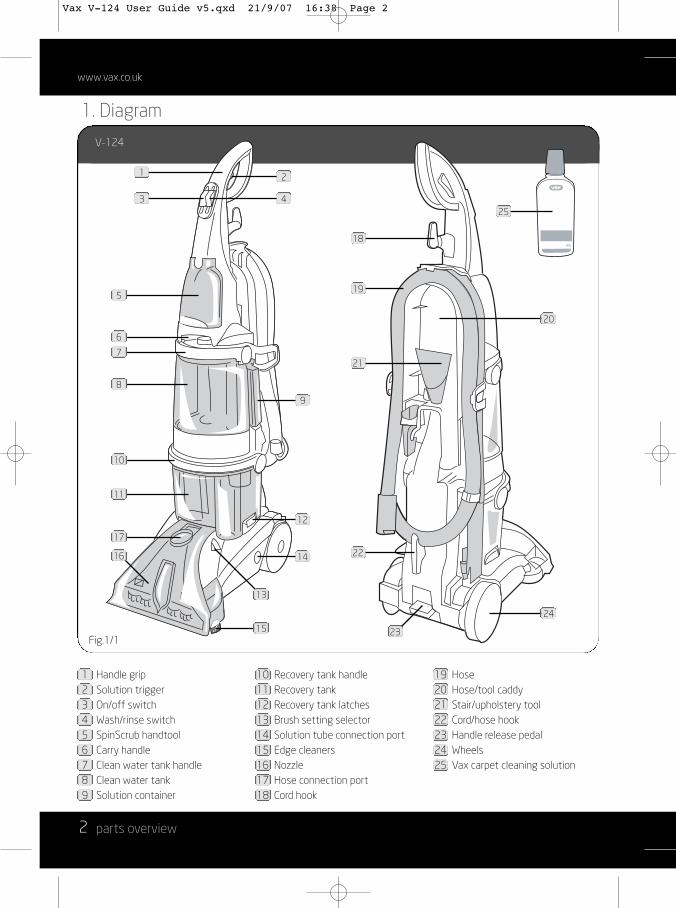
1. Diagram
www.vax.co.uk
2 parts overview
1
3
2
4
9
12
14
15
13
19
18
21
22
23
5
6
8
17
16
7
10
11
Fig.1/1
1 Handle grip2 Solution trigger3 On/off switch4 Wash/rinse switch5 SpinScrub handtool6 Carry handle7 Clean water tank handle8 Clean water tank9 Solution container
10 Recovery tank handle11 Recovery tank12 Recovery tank latches13 Brush setting selector14 Solution tube connection port15 Edge cleaners16 Nozzle17 Hose connection port18 Cord hook
19 Hose20 Hose/tool caddy21 Stair/upholstery tool22 Cord/hose hook23 Handle release pedal24 Wheels25 Vax carpet cleaning solution
20
24
25
Vax V-124 User Guide v5.qxd 21/9/07 16:38 Page 2

3
Vax Careline 0870 606 1248
safety information
2. Safety InformationFOR HOUSEHOLD USE ONLY.
When using the carpet washer, basic safety precautionsshould always be observed, including the following:
1. Do not leave the carpet washer unattended whenplugged in. Unplug it from socket when not in use.
2. To prevent electric shock do not use outdoors.
3. Not to be used as a toy. Children should be supervised toensure that they do not play with the appliance.
4. This appliance is not intended for use by persons(including children) with reduced physical, sensory ormental capabilities, or lack of experience and knowledge,unless they have been given supervision or instructionconcerning the use of the appliance by a personresponsible for their safety.
5. Use only as described in this manual.
6. Do not use with a damaged cord or plug. If the supplycord and/or plug is damaged, they must be replacedby the manufacturer, a Vax Service Agent or similarlyqualified persons in order to avoid hazard.
7. Do not pull or carry by the cord, use the cord as ahandle, allow the cord to come into contact with hotor sharp surfaces or close a door on the cord.
8. Do not unplug by pulling on the cord.
9. Do not handle the plug or carpet washer with wethands.
10. Do not put any objects into openings or operate withopenings blocked, keep them free of anything thatmay reduce airflow.
11. Keep hair, loose clothing, fingers and all parts of thebody away from openings and moving parts.
12. Do not use the carpet washer on any glowing,burning or smoking particles.
13. Do not use without the solution tank and dirty watertank in place.
14. Do not use the carpet washer without the dust bagin place.
15. Turn off all controls before unplugging.
16. Do not use to pick up flammable or combustibleliquids such as petrol, or use in areas where they maybe present.
17. Keep the unit on the floor.
18. Do not use an extension cord.
19. Do not attempt to remove blockages with sharpobjects as they may cause damage.
20. Store indoors put away after use to prevent trippingaccidents.
21. Using improper voltage may result in damage to themotor and possible injury to the user. The correctvoltage is listed on the rating label.
22. A hazard may occur if the carpet washer runs overthe power supply cord.
23. To prevent dirty water from running into motor, donot hold the appliance upside-down or lay on its side.Use appliance in normal vacuuming position.
24. Use extra care when cleaning on stairs.
25. Do not carry appliance while motor is running.
NOTE: Carpets should be dry vacuumed thoroughlybefore washing.
NOTE: The unit must be unplugged from the mainssocket outlet after use, and before cleaning ormaintaining the unit.
IMPORTANT: This unit is not intended forcommercial use.
PLEASE KEEP THESE INSTRUCTIONSFOR FURTHER USE.
!
Vax V-124 User Guide v5.qxd 21/9/07 16:38 Page 3

www.vax.co.uk
4 assembly
3. AssemblyAttach Upper HandleRemove clean water tank (upper tank) from cleaner(Fig.3/1).
NOTE: If the cord protector (A) on back of handleshould become dislodged during unpacking, make sureit is repositioned properly before continuing withassembly of your cleaner.With the arrow (B) on the cord protector pointing down,press groove (C) in the cord protector into slot in the lowerhandle (Fig.3/2).
With cord hook to back of cleaner, push upper handle downonto lower handle (Fig.3/3).
Push bolts into holes on front of handle. If bolts will not gothrough hole easily, handle is not pushed completely down.Place nuts in recessed areas on back of the handle. Holdeach nut in place while tightening each bolt securely (fromthe front of the handle) with a Phillips screw driver(Fig.3/4).
NOTE: Only two nuts are needed on this model. Theextra nut is not required but has been provided foryour convenience.
Replace clean water tank (upper tank) by positioningbottom first. Press tank into place (Fig.3/5)
Attach Hose/Cord Hook
Insert tabs on hook into slots on back of cleaner. Snaphook onto cleaner (Fig.3/6).
Fig.3/1Fig.3/4
Fig.3/5
Fig.3/6Fig.3/3
Fig.3/2
A
B
C
Vax V-124 User Guide v5.qxd 21/9/07 16:38 Page 4
5
Vax Careline 0870 606 1248
assembly
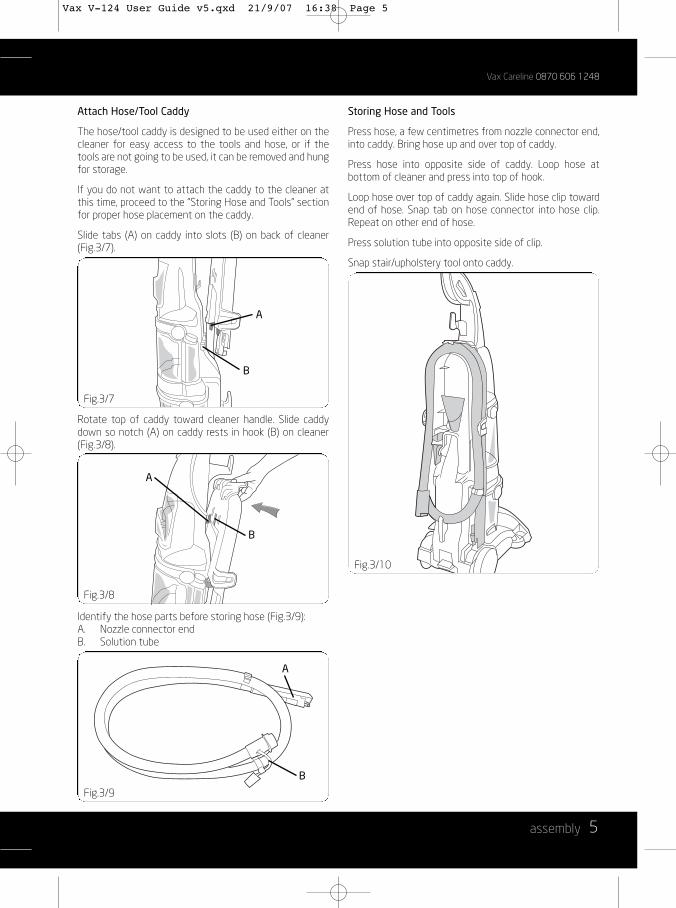
Attach Hose/Tool Caddy
The hose/tool caddy is designed to be used either on thecleaner for easy access to the tools and hose, or if thetools are not going to be used, it can be removed and hungfor storage.
If you do not want to attach the caddy to the cleaner atthis time, proceed to the “Storing Hose and Tools” sectionfor proper hose placement on the caddy.
Slide tabs (A) on caddy into slots (B) on back of cleaner(Fig.3/7).
Rotate top of caddy toward cleaner handle. Slide caddydown so notch (A) on caddy rests in hook (B) on cleaner(Fig.3/8).
Identify the hose parts before storing hose (Fig.3/9):A. Nozzle connector endB. Solution tube
Storing Hose and Tools
Press hose, a few centimetres from nozzle connector end,into caddy. Bring hose up and over top of caddy.
Press hose into opposite side of caddy. Loop hose atbottom of cleaner and press into top of hook.
Loop hose over top of caddy again. Slide hose clip towardend of hose. Snap tab on hose connector into hose clip.Repeat on other end of hose.
Press solution tube into opposite side of clip.
Snap stair/upholstery tool onto caddy.
Fig.3/7
Fig.3/8
Fig.3/9
Fig.3/10
A
A
A
B
B
B
Vax V-124 User Guide v5.qxd 21/9/07 16:38 Page 5

www.vax.co.uk
6 operation
4. OperationBefore You Begin Cleaning
Vacuum thoroughly - For carpet, use a Vax vacuumcleaner with an brushbar for best results. Vacuumupholstery with a vacuum cleaner with cleaning toolattachments. Use a crevice tool to reach into tufts andfolds. Do not use the Dual V cleaner as a dry vacuumcleaner. For upholstery, always check the manufacturersguidelines before washing.
Test for colorfastness - Wet a white absorbent cloth withthe solution. In a small, hidden area, gently rub the surfacewith the dampened cloth. Wait ten minutes and check forcolour removal or bleed with white paper towel or cloth. Ifsurface has more than one colour, check all colours.
When cleaning entire floor, move furniture out of areato be cleaned (may not be necessary if only high trafficareas are to be cleaned). For furniture too heavy to move,place aluminum foil or wax paper under legs. This willprevent wood finishes from staining carpet. Pin upfurniture skirts and curtains.
On/Off Switch
To turn cleaner ON, push switch down. To turn cleaner OFF,push switch up (Fig.4/1).
Handle Release Pedal
Step on pedal to lower handle to operating position.Handle does not lock into a single position but “floats” toallow convenient operation (Fig.4/2).
To Transport
To move your cleaner from room to room, put handle inupright and locked position, tilt cleaner back on wheels andpush forward (Fig.4/3).
Carrying Handle
The cleaner may also be lifted by placing a hand above theupper clean solution tank handle as shown (Fig.4/4).
Automatic Shut Off
When the recovery tank (lower tank) is full the automaticshutoff mechanism will shut off the cleaner suction(suction will be noticeably reduced).
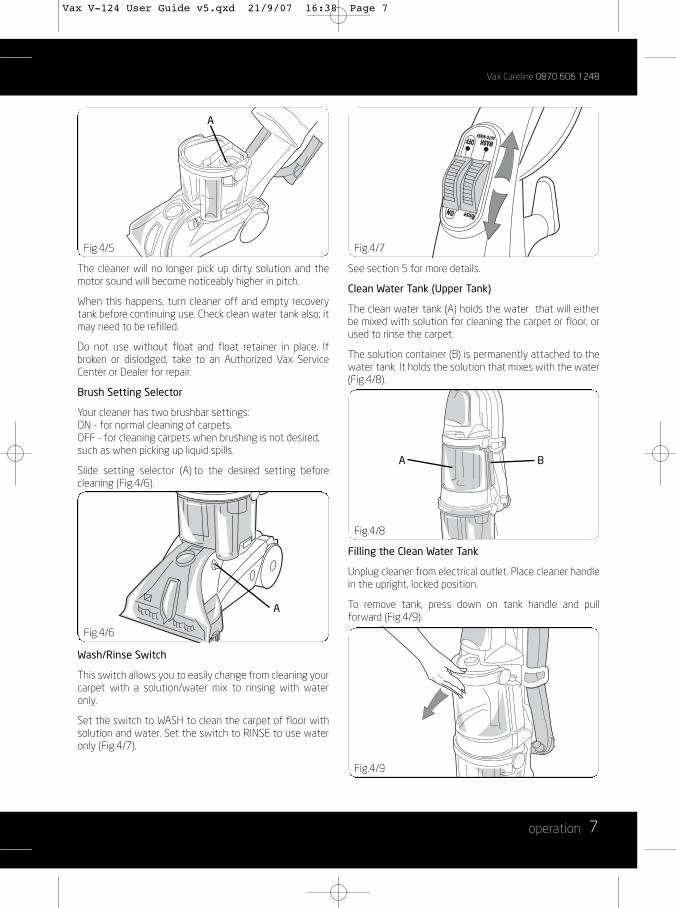
At that time, the yellow float disk will rise to the top of therecovery tank lid (A) (Fig.4/5).
ON
OFF WASH AUTORINSE
Rinse
Fig.4/1
Fig.4/4
Fig.4/2
Fig.4/3
Vax V-124 User Guide v5.qxd 21/9/07 16:38 Page 6
7
Vax Careline 0870 606 1248
operation
The cleaner will no longer pick up dirty solution and themotor sound will become noticeably higher in pitch.
When this happens, turn cleaner off and empty recoverytank before continuing use. Check clean water tank also; itmay need to be refilled.
Do not use without float and float retainer in place. Ifbroken or dislodged, take to an Authorized Vax ServiceCenter or Dealer for repair.
Brush Setting Selector
Your cleaner has two brushbar settings:ON - for normal cleaning of carpets.OFF - for cleaning carpets when brushing is not desired,such as when picking up liquid spills.
Slide setting selector (A) to the desired setting beforecleaning (Fig.4/6).
Wash/Rinse Switch
This switch allows you to easily change from cleaning yourcarpet with a solution/water mix to rinsing with wateronly.
Set the switch to WASH to clean the carpet of floor withsolution and water. Set the switch to RINSE to use wateronly (Fig.4/7).
See section 5 for more details.
Clean Water Tank (Upper Tank)
The clean water tank (A) holds the water that will eitherbe mixed with solution for cleaning the carpet or floor, orused to rinse the carpet.
The solution container (B) is permanently attached to thewater tank. It holds the solution that mixes with the water(Fig.4/8).
Filling the Clean Water Tank
Unplug cleaner from electrical outlet. Place cleaner handlein the upright, locked position.
To remove tank, press down on tank handle and pullforward (Fig.4/9).
ON
OFF WASH AUTORINSE
Rinse
Fig.4/7
Fig.4/9
Fig.4/8
Fig.4/6
Fig.4/5
A
A
A B
Vax V-124 User Guide v5.qxd 21/9/07 16:38 Page 7
www.vax.co.uk
8 operation
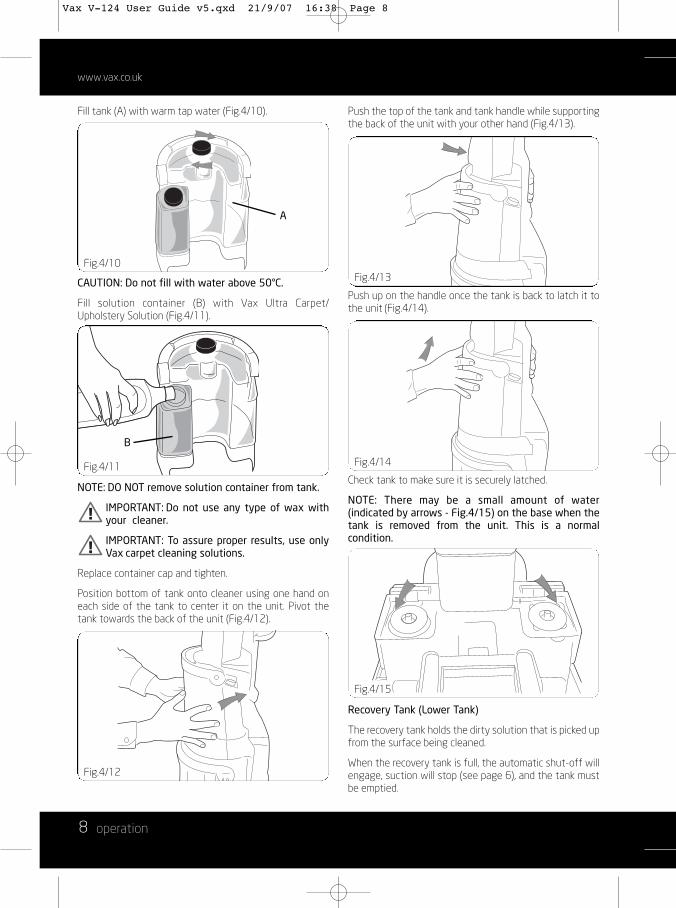
Fill tank (A) with warm tap water (Fig.4/10).
CAUTION: Do not fill with water above 50°C.
Fill solution container (B) with Vax Ultra Carpet/Upholstery Solution (Fig.4/11).
NOTE: DO NOT remove solution container from tank.
IMPORTANT: Do not use any type of wax withyour cleaner.
IMPORTANT: To assure proper results, use onlyVax carpet cleaning solutions.
Replace container cap and tighten.
Position bottom of tank onto cleaner using one hand oneach side of the tank to center it on the unit. Pivot thetank towards the back of the unit (Fig.4/12).
Push the top of the tank and tank handle while supportingthe back of the unit with your other hand (Fig.4/13).
Push up on the handle once the tank is back to latch it tothe unit (Fig.4/14).
Check tank to make sure it is securely latched.
NOTE: There may be a small amount of water(indicated by arrows - Fig.4/15) on the base when thetank is removed from the unit. This is a normalcondition.
Recovery Tank (Lower Tank)
The recovery tank holds the dirty solution that is picked upfrom the surface being cleaned.
When the recovery tank is full, the automatic shut-off willengage, suction will stop (see page 6), and the tank mustbe emptied.
!
!
Fig.4/12
Fig.4/15
Fig.4/13
Fig.4/14
Fig.4/10
Fig.4/11
A
B
Vax V-124 User Guide v5.qxd 21/9/07 16:38 Page 8

9
Vax Careline 0870 606 1248
operation / how to clean
Emptying the Recovery Tank
Turn cleaner off and unplug from electrical outlet.
To prevent possible leaking, remove clean water tank bypressing down on tank handle and pulling forward; settank aside (do not set tank on furniture).
Step on handle release pedal and lower handle until it restson the floor.
Turn recovery tank latches (A) outward (one on each sideof tank). Raise handle (B) straight up and lift tank offcleaner (Fig.4/16). Carry tank to sink or drain.
Lower handle toward back of tank to unlock lid. Lift lid offtank. Empty tank and reposition lid (Fig.4/17).
NOTE: For full suction, it is important that the recoverytank lid is properly secured before cleaning.
Raise tank handle to carrying position and place it ontocleaner. Lower handle to front of tank.
Turn latches (one on each side of tank) inward to lock tankin place. Raise handle of cleaner to upright position andreposition upper clean water tank.
5. How to CleanRead “Before you begin cleaning” instructions on page 6.
Fill clean water tank according to instructions for Fig. 4/8to Fig. 4/10.
Fill solution container with Vax Ultra Solution accordingto instructions for Fig4/11.
Slide brush setting selector to ON.
Dry hands and plug cord into a properly earthed outlet.
Do not clean over floor electrical outlets.
To avoid walking on damp carpet, start at the end of theroom farthest from the door or path to sink where tankswill be emptied and filled.
Step on handle release pedal and lower handle tooperating position.
Set Wash/Rinse switch to WASH. Turn cleaner ON (Fig. 5/1).
Squeeze trigger to release cleaning solution and slowlypush cleaner forward (equals one wet stroke).
Continue to squeeze trigger and slowly pull cleaner backtoward you(second wet stroke). Release trigger and slowlypush cleaner forward over area just sprayed with solution(dry stroke). Then slowly pull cleaner back toward youwithout squeezing trigger (dry stroke) (Fig. 5/2).
Fig.4/17
Fig.4/16
A
B
ON
OFF WASH AUTORINSE
Rinse
Fig.5/1
Fig.5/2
Wash Rinse
Vax V-124 User Guide v5.qxd 21/9/07 16:38 Page 9

www.vax.co.uk
10 how to clean
Continue using dry strokes until little water is visiblepassing through the recovery tank lid.
For best results, use straight, parallel strokes. Overlapstrokes by 3cm to help prevent streaking. Keep nozzle flaton floor for both forward and reverse strokes (Fig. 5/3).
If rinsing the carpet is desired, set Wash/Rinse switch toRINSE (Fig. 5/4).
Rinsing is not necessary, but will help remove solutionresidue and help your carpet look fresher.
For heavily soiled areas, repeat steps 5/2-5/4. Avoidsaturating carpet, as noted below.
NOTE: To avoid saturating carpet, do not use morethan 4 wet strokes over one area. Always end with drystrokes.
It is best to alternate wet and dry strokes as described above.
For best cleaning results and to aid in faster drying ofcarpet, end with more dry strokes. (Continue using drystrokes until little water is visible passing through therecovery tank lid.)
Empty recovery tank when the motor sound becomeshigher pitched and there is a loss in suction (see“Automatic shut-off”, Fig. 4/5).
When finished cleaning, follow “After cleaning”instructions on page 10.
Picking Up Spills
Your Vax Dual V cleaner may also be used to pick up smallliquid spills on carpet or upholstery.
For best results, pick up spills immediately by placing thestair/upholstery nozzle just above the spill and suction upany residue on top of the carpet. If the spill remains, placeeither the stair/ upholstery nozzle or floor nozzle with thebrush setting selector to OFF in front of the spill, pull thenozzle very slowey over the spill initially with suction only.Repeat with spray and suction.
If a spot is left, the stair/upholstery nozzle is generallymore effective for removing it. Although no cleaningsolution can completely remove all spots, they can betreated by following the instructions provided by themanufacturer of the carpet or upholstery surface to becleaned.
Do not use the Dual V cleaner to pick up flammable orcombustible liquids or chemicals.When finished, follow “After cleaning” instructions.
Attach Hose
Unplug cleaner from electrical outlet. Open hoseconnection port (A) (Fig. 5/5).
Insert short hose end, matching tabs on hose with same-sized slots in port. Push hose into port and lock in place(Fig. 5/6).
áá áá áá
Fig.5/3
ON
OFF WASH AUTORINSE
Rinse
Fig.5/4
Fig.5/5
Fig.5/6
A
Vax V-124 User Guide v5.qxd 21/9/07 16:38 Page 10

11
Vax Careline 0870 606 1248
how to clean / accessories
Plug solution tube firmly into solution connection port (B)(Fig. 5/7)
To remove hose: Squeeze latches (C) on top and bottom ofhose. Remove hose from port. Close door.Remove solution tube from solution connection port bypulling the connector outwards (Fig. 5/8).
6. AccessoriesSpinScrub hand tool
The SpinScrub™ hand tool has rotating brushes to agitatespots and stains. It is stored behind the tool door locatedon the front of the cleaner. To remove the tool, open tooldoor (Fig. 6/1).
Pull tool down and outward. To reposition the tool, reversethis procedure (Fig. 6/2).
How To Reattach Tool Cover
The tool cover is designed with a breakaway feature whichallows it to snap free if it is pushed open too far. To reattach, align hinges of cover with holes on sides oftool storage area. Snap door into place (Fig. 6/3).
Fig.5/7
Fig.5/8
C
B
Fig.6/1
Fig.6/2
Fig.6/3
Vax V-124 User Guide v5.qxd 21/9/07 16:38 Page 11

www.vax.co.uk
12 accessories
How To Attach Tools
Unplug cleaner from electrical outlet.
Place handle in upright position and remove hose fromrack. All tools attach to the hose in the same manner:
Connect tool to hose by sliding it onto connector until untilthe tab (A) locks it securely.Using your thumb, pushforward and up on the latch (B) to remove tool (Fig. 6/4).After Using Tool
Drain suction hose by turning cleaner ON and holdingnozzle up for several minutes. Do not press trigger.Unplug cleaner from electrical outlet. Disconnect hoseand solution tube from cleaner.
The tool caddy can be removed and hung on a coat hangerfor storage. Drain solution tube by placing round endin sink and raising nozzle above your head. Press thetrigger (Fig. 6/5).
The tool caddy can be removed and hung on a coat hangerfor storage (Fig. 6/6).
Cleaning Carpeted Stairs
Read “Before you begin cleaning” instructions on page 9.
Attach hose and solution tube as instructed previously.
Place handle in upright position. Brushbar brushes willnot rotate while handle is in upright position.
Fill clean water tank according to instructions for Figs. 4/8to 4/9.
Fill solution container with Vax Ultra Solution according toinstructions for Figs 4/10 to 4/11.
Attach tool to end of hose.Hose length may require that machine be placed at the topof the stairs to clean upper half of stairway and at bottomof stairs to clean lower half.
IMPORTANT: To prevent machine from falling,use extra caution when cleaning on stairs. Do
not place cleaner on stairs.
Do not point tools toward people or pets.
Dry hands and plug cleaner into a properly grounded outlet.
Set Wash/Rinse switch to WASH. Turn cleaner ON.
Pre-spray the carpeted stair by holding the tool (A) or (B)about one inch above the carpet and push it forwardwhile pressing the trigger (equals one wet stroke).
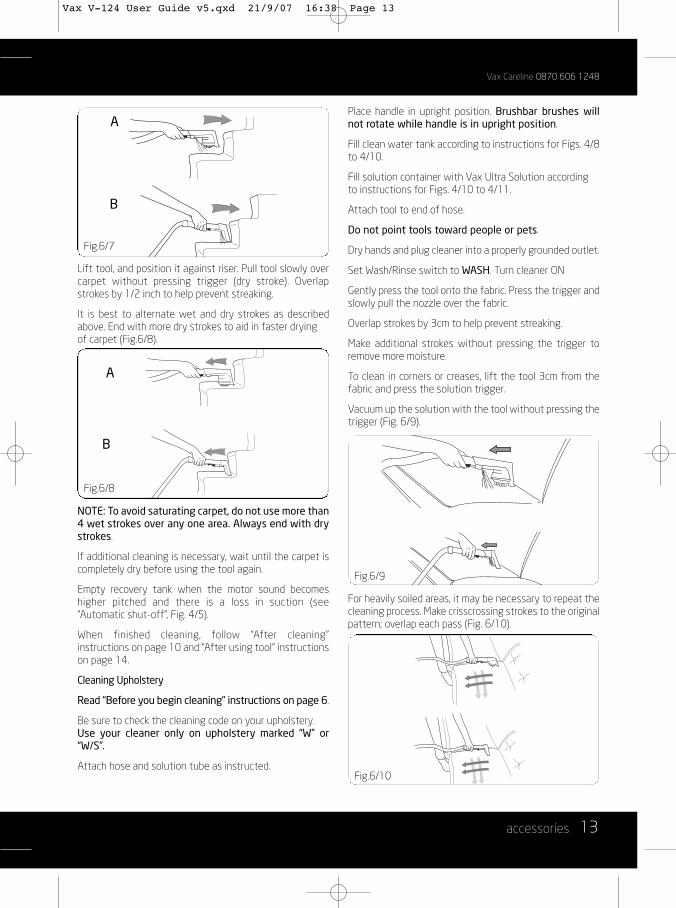
Position tool against the riser and slightly press it intocarpet pile. Press the trigger and pull the tool slowly overthe carpet (second wet stroke). Release trigger at endof stroke (Fig. 6/7).
Fig.6/4
A
B
Fig.6/5
Fig.6/6
!
Vax V-124 User Guide v5.qxd 21/9/07 16:38 Page 12
13
Vax Careline 0870 606 1248
accessories
Lift tool, and position it against riser. Pull tool slowly overcarpet without pressing trigger (dry stroke). Overlapstrokes by 1/2 inch to help prevent streaking.
It is best to alternate wet and dry strokes as describedabove. End with more dry strokes to aid in faster dryingof carpet (Fig.6/8).
NOTE: To avoid saturating carpet, do not use more than4 wet strokes over any one area. Always end with drystrokes.
If additional cleaning is necessary, wait until the carpet iscompletely dry before using the tool again.
Empty recovery tank when the motor sound becomeshigher pitched and there is a loss in suction (see“Automatic shut-off”, Fig. 4/5).
When finished cleaning, follow “After cleaning”instructions on page 10 and “After using tool” instructionson page 14.
Cleaning Upholstery
Read “Before you begin cleaning” instructions on page 6.
Be sure to check the cleaning code on your upholstery. Use your cleaner only on upholstery marked “W” or“W/S”.
Attach hose and solution tube as instructed.
Place handle in upright position. Brushbar brushes willnot rotate while handle is in upright position.
Fill clean water tank according to instructions for Figs. 4/8to 4/10.
Fill solution container with Vax Ultra Solution accordingto instructions for Figs. 4/10 to 4/11.
Attach tool to end of hose.
Do not point tools toward people or pets.
Dry hands and plug cleaner into a properly grounded outlet.
Set Wash/Rinse switch to WASH. Turn cleaner ON
Gently press the tool onto the fabric. Press the trigger andslowly pull the nozzle over the fabric.
Overlap strokes by 3cm to help prevent streaking.
Make additional strokes without pressing the trigger toremove more moisture.
To clean in corners or creases, lift the tool 3cm from thefabric and press the solution trigger.
Vacuum up the solution with the tool without pressing thetrigger (Fig. 6/9).
For heavily soiled areas, it may be necessary to repeat thecleaning process. Make crisscrossing strokes to the originalpattern; overlap each pass (Fig. 6/10).
Fig.6/7
Fig.6/8
B
B
A
A
Fig.6/9
Fig.6/10
Vax V-124 User Guide v5.qxd 21/9/07 16:38 Page 13
www.vax.co.uk
14 accessories / maintenance
NOTE: Make no more than 2 passes with the solutionor rinse over any one area to prevent over-wetting anddamage to fabric.If additional cleaning is necessary, wait until theupholstery is completely dry before using the tool again.
Empty recovery tank when the motor sound becomeshigher pitched and there is a loss in suction (see“Automatic shut-off”, Fig. 4/5).
When finished cleaning, follow “After cleaning”instructions on page 10 and “After using tool” instructionson page 14.
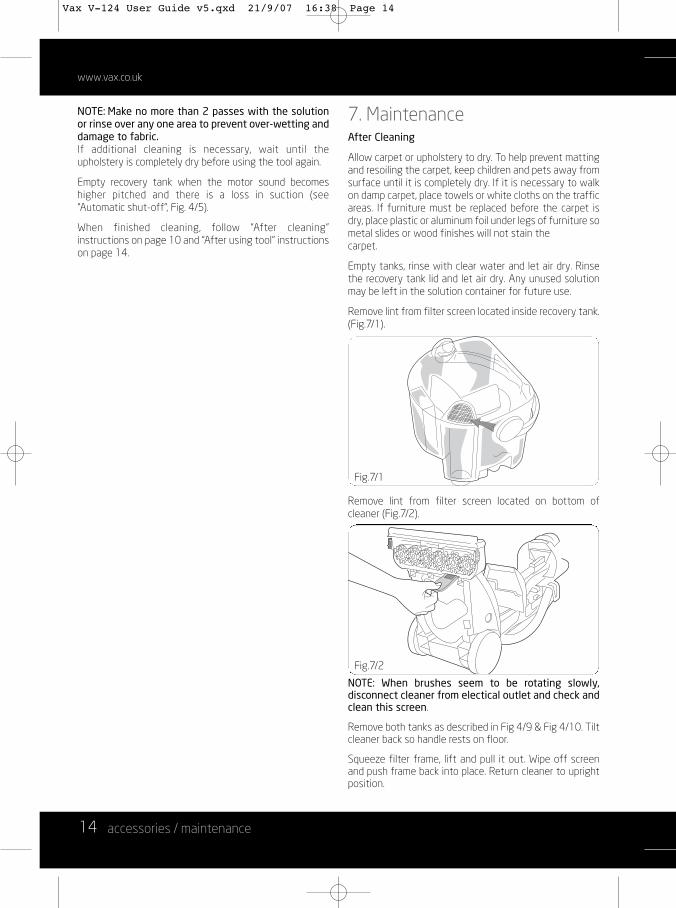
7. MaintenanceAfter Cleaning
Allow carpet or upholstery to dry. To help prevent mattingand resoiling the carpet, keep children and pets away fromsurface until it is completely dry. If it is necessary to walkon damp carpet, place towels or white cloths on the trafficareas. If furniture must be replaced before the carpet isdry, place plastic or aluminum foil under legs of furniture sometal slides or wood finishes will not stain thecarpet.
Empty tanks, rinse with clear water and let air dry. Rinsethe recovery tank lid and let air dry. Any unused solutionmay be left in the solution container for future use.
Remove lint from filter screen located inside recovery tank.(Fig.7/1).
Remove lint from filter screen located on bottom ofcleaner (Fig.7/2).
NOTE: When brushes seem to be rotating slowly,disconnect cleaner from electical outlet and check andclean this screen.
Remove both tanks as described in Fig 4/9 & Fig 4/10. Tiltcleaner back so handle rests on floor.
Squeeze filter frame, lift and pull it out. Wipe off screenand push frame back into place. Return cleaner to uprightposition.
Fig.7/1
Fig.7/2
Vax V-124 User Guide v5.qxd 21/9/07 16:38 Page 14
15
Vax Careline 0870 606 1248
maintenance
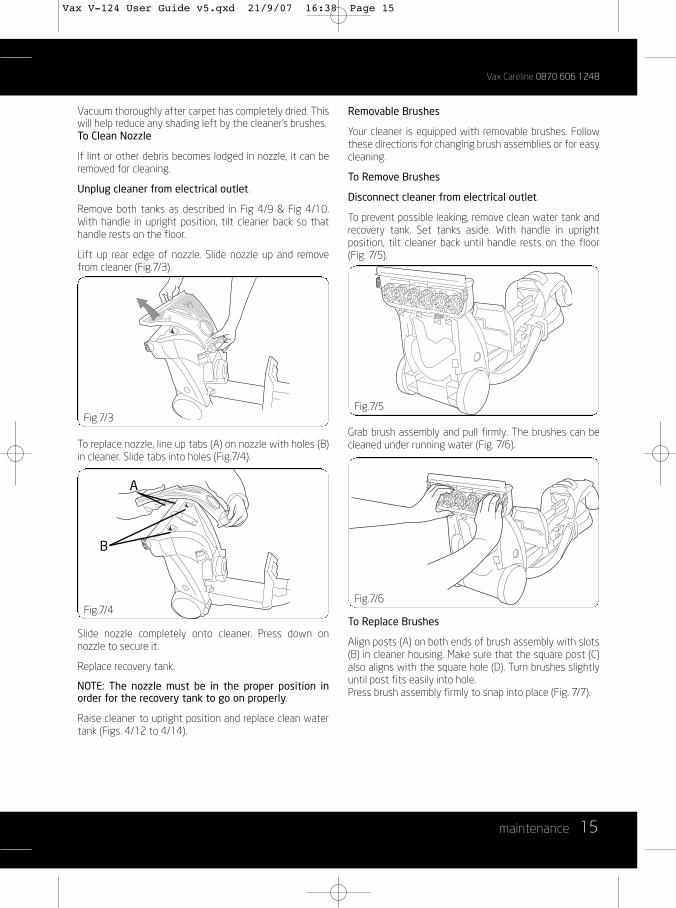
Vacuum thoroughly after carpet has completely dried. Thiswill help reduce any shading left by the cleaner’s brushes.To Clean Nozzle
If lint or other debris becomes lodged in nozzle, it can beremoved for cleaning.
Unplug cleaner from electrical outlet.
Remove both tanks as described in Fig 4/9 & Fig 4/10.With handle in upright position, tilt cleaner back so thathandle rests on the floor.
Lift up rear edge of nozzle. Slide nozzle up and removefrom cleaner (Fig.7/3).
To replace nozzle, line up tabs (A) on nozzle with holes (B)in cleaner. Slide tabs into holes (Fig.7/4).
Slide nozzle completely onto cleaner. Press down onnozzle to secure it.
Replace recovery tank.
NOTE: The nozzle must be in the proper position inorder for the recovery tank to go on properly.
Raise cleaner to upright position and replace clean watertank (Figs. 4/12 to 4/14).
Removable Brushes
Your cleaner is equipped with removable brushes. Followthese directions for changing brush assemblies or for easycleaning.
To Remove Brushes
Disconnect cleaner from electrical outlet.
To prevent possible leaking, remove clean water tank andrecovery tank. Set tanks aside. With handle in uprightposition, tilt cleaner back until handle rests on the floor(Fig. 7/5).
Grab brush assembly and pull firmly. The brushes can becleaned under running water (Fig. 7/6).
To Replace Brushes
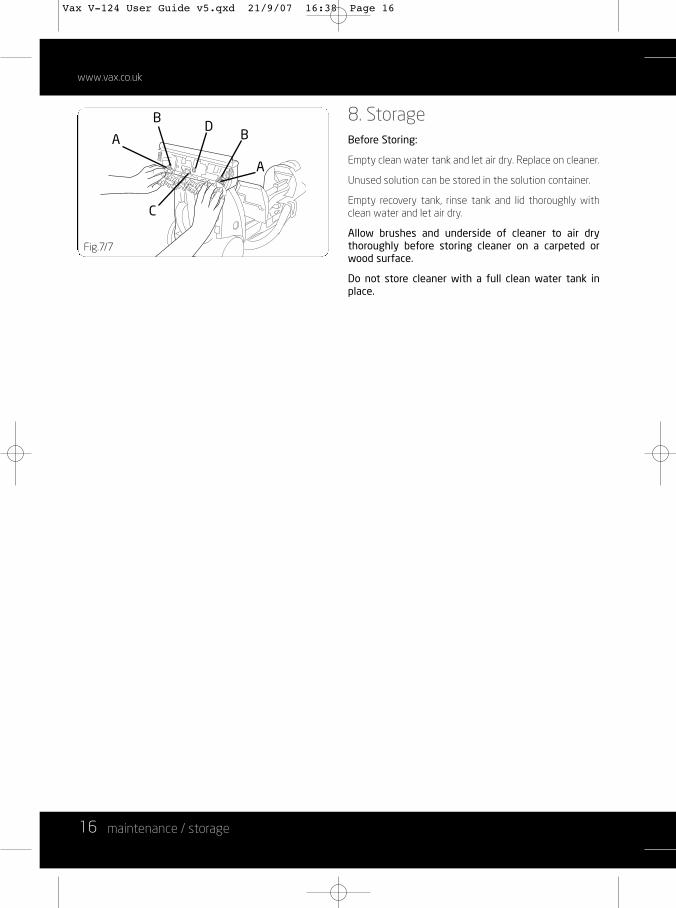
Align posts (A) on both ends of brush assembly with slots(B) in cleaner housing. Make sure that the square post (C)also aligns with the square hole (D). Turn brushes slightlyuntil post fits easily into hole.Press brush assembly firmly to snap into place (Fig. 7/7).
Fig.7/3
Fig.7/4
A
B
Fig.7/5
Fig.7/6
Vax V-124 User Guide v5.qxd 21/9/07 16:38 Page 15
www.vax.co.uk
16 maintenance / storage
8. StorageBefore Storing:
Empty clean water tank and let air dry. Replace on cleaner.
Unused solution can be stored in the solution container.
Empty recovery tank, rinse tank and lid thoroughly withclean water and let air dry.
Allow brushes and underside of cleaner to air drythoroughly before storing cleaner on a carpeted orwood surface.
Do not store cleaner with a full clean water tank inplace.
Fig.7/7
A
C
BD
B
A
Vax V-124 User Guide v5.qxd 21/9/07 16:38 Page 16

17
Vax Careline 0870 606 1248
troubleshooting
9. TroubleshootingWARNING: To reduce the risk of personal injury,unplug the vacuum cleaner before performing
maintenance or troubleshooting checks.
PROBLEM: Vacuum cleaner won't run
Cause: Not properly plugged into electrical outlet.Solution: Plug unit in firmly.
Cause: No electricity in the electrical outlet.Solution: Check fuse or breaker.
Cause: Cleaner requires service.Solution: Take your cleaner to a service centre. Call
0870 606 1248 to find your nearest Vaxapproved service agent.
PROBLEM: Cleaner won’t pick up/loss of suction.
Cause: Recovery tank full - automatic shut-offengaged.
Solution: Empty recovery tank.
Cause: Recovery tank not fitted securely.Solution: Ensure tank is fitted fully and tank cap is
securely latched.
Cause: Blockage in hose.Solution: Remove hose and tools, remove obstruction.
PROBLEM: Cleaning solution won’t dispense
Cause: Solution tank not fitted correctly.Solution: Ensure tank is fitted securely in place.
Cause: Solution tank empty.Solution: Refill solution tank.
PROBLEM: Brushes won’t rotate.
Cause: Brush filter clogged.Solution: Clean brush filter.
Cause: Brush Speed Selector set to OFF.Solution: Set Brush Speed Selector set to ON.
Cause: Unit standing in upright position.Solution: Recline unit.
PROBLEM: Clean water won’t dispense.
Cause: Clean water tank not firmly in place.Solution: Make sure tank is securely locked in position.
Cause: Clean water tank or solution container empty.Solution: Refill container according to instructions.
Cause: Recovery tank lid not on correctly.Solution: Make sure lid is firmly in place.
PROBLEM: Solution won’t dispense.
Cause: Valve cap clogged.Solution: Remove and clean valve cap.
Cause: Solution switch is turned off.Solution: Turn the solution switch on.
!
Vax V-124 User Guide v5.qxd 21/9/07 16:38 Page 17

www.vax.co.uk
18 uk service & help / technical specification
10. UK Service & HelpVax Care 0870 6061248Monday-Friday 8.00am to 6.00pm.Saturday-Sunday 9.00am to 5.00pm.
An answerphone will be available out of these hours. Anyqueries or concerns about using your Vax, call the VaxCareline. Calls are charged at the UK national rate.
Please make a not of the model number and serialnumber of your Vax before calling. There are over 400approved Vax Service Agents in the UK. For the nearestVax Service Agent, please call the Vax Careline or visitwww.vax.co.uk
11. Technical SpecificationVoltage: 220-240V ~50HzWattage: WCapacity: Clean water tank - 3.7 litres
Dirty water tank - 2 litresFilters: Dirty water tank filterCord length: mWeight: kg
Subject to technical change without notice.
Vax V-124 User Guide v5.qxd 21/9/07 16:38 Page 18
19
Vax Careline 0870 606 1248
This page has been left intentionally blank
Vax V-124 User Guide v5.qxd 21/9/07 16:38 Page 19
EEC STATEMENT OF COMPLIANCEManufacturer/EEC importer: Vax Limited, hereby on our own responsibility, declare thatthe product V-124 Dual V is manufactured in compliance with the following Directives:
Safety: 2006/95/EC Low Voltage DirectiveEMC: 2004/108/EC Electromagnetic Compatibility Directive
Waste electrical products should not be disposed of with household waste. Please recycle where facilities exist. Check with your Local Authority or retailer for recycling advice.
Vax Ltd., Kingswood Road, Hampton Lovett, Droitwich, Worcestershire, WR9 OQH, UKemail: [email protected] - website: www.vax.co.uk
Vax V-124 User Guide v5.qxd 21/9/07 16:38 Page 20