
Vandykebrown
27
-
Upload
armillabrava -
Category
Documents
-
view
4 -
download
0
description
fotografía analógica
Transcript of Vandykebrown

85

Historical and Alternative PhotographyVan Dyke Brown
Peter Mrhar
You can purchase the book at Amazon.com.
Learn about other books on the Author’s page.

2
Peter Mrhar
Van Dyke Brown
Historical and Alternative Photography
First edition: June 2015. All rights reserved. No part of this book may be in any way reproduced, stored, or copied without the prior written consent of the copyright owner.
Copyright © 2015 Peter Mrhar; Graphic design: Peter Mrhar
Downloadable files and other information can be found online at www.petermrhar.com/alternative.
Available from Amazon.com and other book stores.

3
ContentsPreface 5
About Van Dyke Brown and chemicals 7
About Van Dyke Brown prints 8
Materials and accessories 9
The general workflow 10
Home-made emulsions 12
Making a modern emulsion 13
Some older recipes 16
Problems with emulsions 24
Developing water 25
Fixing photos 28
Neutralizing the fixer 29
Final rinsing 30
Getting ready to print 31
Paper used in Van Dyke Brown 32
Sizing paper 34
Application of sensitizer 40
Border problem 44
Number of layers 49
Contact frames 51
Problems and corrections 53
Problems during development 54
Problems due to the paper 61
Coating problems 63
Printing and digital negatives 65
About digital negatives 66
Standard printing time 69
Finding bright tones 71
4
Creating a colored negative 73
Advanced techniques 77
Adding contrast 78
Reducers 84
Improving density of tones 88
Toners and toning 93
A brief description of toning 94
Selenium toner 96
Platinum toner 98
Palladium toner 100
Golden toners 103
Iron blue toner 107
Creative techniques 111
Local and double toning 112
Hand colored photographs 114
Colored paper 116
Printing on fabric 118
About varnishes and coatings 120
5
PrefaceThe present book is one in a series about Historical and Alternative Photography and is devoted to a historical process which was known as Brown and Sepia Paper in the past, but today is better known as the Van Dyke Process or Van Dyke Brown.
Basically, this is a process in which we mix an emulsion of ammonium ferric citrate (which is used for cyanotype) and silver nitrate (which is used in the salt print process) with a small amount of acid.
Although Van Dyke Brown is a fairly popular technique due to the easily available and low-priced chemicals required, quite a few fans of old and alternative processes often avoid it, because of the significant number of factors that lead to failure.
But with the correct initial preparation and proper knowledge, these first difficulties are overcome rather quickly, so that we are soon able to produce beautiful photos with the characteristic deep, dark brown color, with almost no trouble.
Like in the other books in this series, all procedures are described in an extremely comprehensible manner, step-by-step, and have been thoroughly checked and tested.
At the beginning of the book, we will describe how to produce some of the most popular recipes of light-sensitive emulsions for Van Dyke Brown prints. We will then learn about digital negatives, discover how to print and tone photographs, and towards the end of the book we will get acquainted with somewhat more advanced techniques for enhancing the contrast, bleaching photos, printing a photo on fabric, etc...
In this book, solutions for a significant number of problems that can occur in the photographic process are, for the first time, extensively described also. Thus, a user who closely follows the instructions will be able to produce high-quality photos without major problems.
But enough of the introduction...
Peter Mrhar

6
Warning and disclaimerAny use and handling of chemicals poses a potential threat to health and life. As a result, every user must, prior to beginning to work with such chemicals, learn all about the dangers, warnings, safe work methods, protection techniques, and procedures in case of accidents. This information can be found online in the form of documents, MSDS (Material Safety Data Sheet), and in books specialized in this area.
The author assumes no liability for any damage, injury, or loss arising from the use of the information in this book.
About Van Dyke
Brown and chemicals

8
About Van Dyke Brown printsThe photographic technique that we describe in this book was known as Brown or Sepia Paper or Sepia Printing in the 19th century. But at the beginning of the last century, someone renamed it, the “Van Dyke Process,” even though this was already the name reserved for describing the so-called photo-lithographic process, invented by F. Vandyke (Cassell’s cyclopaedia of photography, 1911).
Today, it is widely believed that the Van Dyke Brown technique is probably named after the color shade which is often seen in paintings by the Baroque painter Anthony van Dyck (1599 - 1641), because a photo formed by mixing ammonium ferric citrate and silver nitrate is recognized directly by this typical dark brown color.
The inventor of Brown Print is supposedly the English scientist John Frederick William Herschel (1792 - 1871), although similar research and results were also written in 1839 and 1841 in the book Researches on Light, by Robert Hunt (1807 – 1887). But whoever the inventor was, the first, second, or some third scientist, the initial procedures of those inquisitive people were almost identical. When Herschel discovered that iron salts are sensitive to light, he started with a series of tests which are described in the early publication, Philosophical Transactions of the Royal Society of London in the year 1842. The descriptions show that Herschel coated paper with ammonium iron citrate, tartrate, etc..., and he exposed the paper and coated it with various additional compounds. He came to surprising results. He first mentioned cyanotype (Philosophical Transactions of the Royal Society of London, 1842, p. 210) as follows: »The varieties of cyanotype seem to be innumerable, but that which I shall now describe deserves particular notice, not only for its pre-eminant beauty while in progress, but as illustrating the peculiar power of the ammoniacal and other persalts of iron above mentioned to receive a latent picture, susceptible of development by a great variety of stiumuli. This proces consist in simply passing over ammonio-citrated paper on which such a latent picture has been impressed, very sparingly and evenly, a wash of the solution of common yellow ferrocyanate (prussiate) of potash.«
The number of options with which we can make a photographic image on the basis of “ammonio-citrated paper” is not limited to cyanotype. Thus, on the same page, the author also describes the photographic process of chrysotype (printing using gold chloride) and the use of silver nitrate, »If paper prepared as above recommanded for the chrysotype, either with the ammonio-citrate or ammonio-tartrate of iron, and impressed, as in the process, with the latent picture, be washed with nitrate of silver instead of a solution of gold, a very sharp and beautiful picture is developed, of great intensity.«
In short, if the paper is impregnated with ammonium iron citrate, exposed and washed in various compounds, a photo of various shades, or better said, a photo of different currently-known photographic techniques, is obtained.

9
Materials and accessoriesThe modern process of making Van Dyke Brown Print is carried out in a number of stages. The paper is prepared for exposure in an enclosed space with an ordinary, somewhat weaker lamp of power of 20-40 W. Then it is exposed in the sun or by UV lamp and fixed in sodium thiosulfate.
The basic materials and accessories that we need for making Van Dyke Brown prints are as follows:
1. a bottle with a light-sensitive emulsion2. a syringe3. a container with water to clean syringes and brushes4. paper5. a brush or other device for applying a solution onto the paper6. paper towels for cleaning brushes7. a negative8. a hair dryer to accelerate the drying of paper9. a contact printing frame or glass plates10. at least two trays for the development of the image in a water11. a tray for fixing the image and, optionally, an additional tray for toning the pictures

10
The general workflowHere we will only briefly describe the general process of making pictures with the Van Dyke Brown process; the entire process is presented on the pages that follow.
Preparation of materialsOn the work table, we set out all materials and tools that we will use in the work. These depend on the way in which we want to make a photo.
Application of light sensitive emulsionFor the production of Van Dyke Brown Print, we need emulsion. This is applied onto the paper by any of a variety of techniques.
Ø see Making a modern emulsion on page 13
Ø see Application of sensitizer on page 40
Drying of the paperThe paper is dried for about 3 minutes in air, so that the emulsion is absorbed into the paper. Then it is thoroughly dried with a hair dryer or some other device.
ExposureThe negative is placed on a sheet of paper which is covered with a light-sensitive emulsion. The task of the negative is to block or transmit light through the negative. The negative and paper are then placed in a contact frame for exposure. The photo is exposed according to the selected standard printing time.
Ø see Getting ready to print on page 31
Ø see Contact frames on page 51
Ø see Standard printing time on page 69
3 min.
·+

11
3 min.
3 min.
15 min.
· ·
·
·
·
3 min. 2 min.Developing photosThe photo may be developed in one tray, but more often two trays are used, with slightly acidic water. In this case, the photo is first developed for 3 minutes in the first tray in slightly acidic distilled water and then for 2 minutes in the second tray filled with normal tap water or sometimes slightly acidic tap water.
Ø see Developing water on page 25
ToningAfter developing, the photo can be toned in any toner.
Ø see Toners and toning on page 93
FixingAfter exposure or toning, the photo is placed in a photographic fixer for 3 minutes.
Ø see Fixing photos on page 28
Neutralizing the fixerSince Van Dyke Brown is quite an unstable process, any residues of fixative must be removed from the paper with the help of sodium sulfite.
Ø see Neutralizing the fixer on page 29
Final rinsingAt the end of the process, the photograph is rinsed in tap water for 15 minutes. The photo is then dried and optionally protected with the desired protective coating.
Ø see Final rinsing on page 30
Ø see About varnishes and coatings on page 120
+

12
Like in all old photographic techniques, also in the Van Dyke Brown process we can observe quite a few different formulas being used. In our book, we will, of course, describe only those formulas that provide the highest quality and stability. First, we will describe the so-called modern formula, and then a few of the formulas of the old masters.
Preparation for the production of emulsionsBefore making the solutions, we must first read the instructions and warnings about working with the selected chemicals. Then we adequately protect ourselves, prepare the working environment, and collect up all the necessary material and tools. We will need the following:
1. a pair of protective, latex gloves 2. a plastic spoon and a number of sheets of paper of size A6 to be used to weigh
chemicals 3. the relevant chemicals 4. distilled water 5. a precision or kitchen scale (this is used only to weigh photographic chemicals) 6. a funnel 7. a brown glass bottle for storing the emulsion 8. plastic cups for mixing chemicals, and a variety of other tools, which will be
described for each process separately
Home-made emulsions

13
Below is described a recipe for a “modern” emulsion that, among the considerable number of solutions that I have tested, gives the best results. Tones in the photo are clean and saturated (see photo on next page), and most importantly, the photos we make with this solution are quite stable. For the production of this emulsion, we need the following chemicals:
• 10 g ammonium ferric citrate - C6H8O7 . x Fe3+ . y NH3 • 1.5 g tartaric acid - C4H6O6 • 4 g silver nitrate - AgNO3• 100 ml distilled water
Method for producing the solutionMaking the emulsion is quite simple. To begin with, we need three empty plastic cups.1. Into a cylindrical vessel, we pour 100 ml of distilled water (1). Approximately one
third of the water is poured into each of the three plastic cups (2), so that in each cup there is about 33 ml of distilled water.
2. On a precision scale, we place a sheet of paper and weigh 10 g of green ammonium ferric citrate (3). We pour this into the first glass of water. The contents are dissolved well with the help of a glass rod.
Making a modern emulsion
3. Then we weigh 4 g of silver nitrate (4), which is dissolved in the second glass
Prior to each production and use of solutions, it is best to read the instructions and warnings. Information on safety, the so-called MSDS (Material Safety Data Sheet), can be found online or in relevant manuals.W
arni
ng

14
Silver nitrate is toxic and causes severe skin burns and eye damage. When inhaled dust damages the respiratory system. Before each production and use of chemicals read the relevant instructions and warnings. Properly protect yourself.
War
ning
4. Using the precision scale and paper, we weigh 1.5 g of tartaric acid (5) and dissolve it in the third glass.
5. Then the mixing of the solution follows. We pour the dissolved tartaric acid (6) into the first glass of dissolved ammonium iron citrate. We mix the solution well.
6. To the solution we have just prepared, we add the content of the second glass, i.e. the solution of silver nitrate, slowly, drop-by-drop, while stirring continuously (7).
7. The resulting light-sensitive emulsion is poured into a brown bottle, tightly sealed, onto which a label with the relevant information about the compound and the date/time of production is glued. The solution cannot be used until the next day, when the compound has fully ripened.
Tartaric acid causes skin, respiratory tract and severe eye irritation. Before use, we must read the warnings and adequately protected ourselves.W
arni
ng
1 2 3

15

16
In this chapter, we will learn about some older recipes from the last century, which were some of the best, according to the old masters. Of course, we will notice that among them there are no very big differences, but maybe we will find a formula that is adequate for our way of working and desires.
Arndt and Troost One of the first and most popular emulsions in the last century was patented by Arndt and Troost in 1894. As mentioned by George E. Brown, the author of Ferric and Heliographic Processes, Arndt and Troost manufactured paper called Sepia Blitz-Lichtpaus papier. For making this recipe we will need the following:
• 10 g ammonium ferric citrate - C6H8O7 . x Fe3+ . y NH3
• 2 g tartaric acid - C4H6O6 • 2 g silver nitrate - AgNO3
• 100 ml distilled water
We notice that this one is just a little different from the modern recipe, since only slightly less silver nitrate is used and there is a quarter of a pinch more tartaric acid. Since the method for making this emulsion is the same as the production of modern emulsion just described, this will not be explained again here.
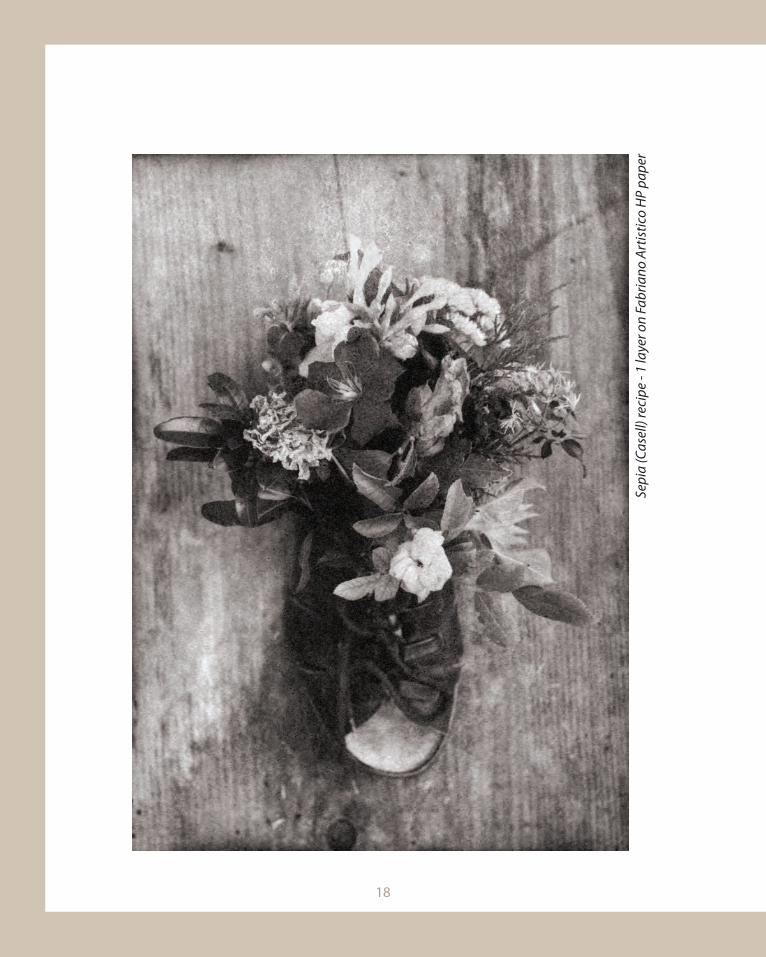
Sepia (Cassell) recipeThis recipe is also similar to the above-presented recipes: however, this time the ratio of chemicals is somewhat different. Unlike before, this time citric acid is used in place of tartaric acid.
• 22 g ammonium ferric citrate - C6H8O7 . x Fe3+ . y NH3
• 5 g citric acid - C6H8O7
• 5 g silver nitrate - AgNO3
• 100 ml distilled water
The emulsion does not display the image with the right sepia tones, but rather creates a gentle, somewhat softened drawing. In the book Cassell’s Cyclopaedia Of Photography (1911), in which this formula is written, it can be read that it is advisable to apply two layers of emulsion before exposure. However, the reality is somewhat different. When applying the two layers, there is a fairly strong leaching of the pigment, so it is better to apply only a single layer.
Some older recipes

17
Arnd
t and
Tro
ost r
ecip
e - 2
laye
rs o
n Fa
bria
no A
rtis
tico
HP
pape
r
18
Sepi
a (C
asel
l) re
cipe
- 1
laye
r on
Fabr
iano
Art
istic
o H
P pa
per

19
Glacial acetic acid accelerates combustion and causes skin burns and eye damage. Eye protection must be worn and care taken when using other mild acids, too.W
arni
ngSepia paperThe recipe for this emulsion was known in the last century as sepia paper.
Although the basic ingredients are still ammonium ferric citrate and silver nitrate, this time, unlike in the previous recipes, diluted gelatin and acetic acid are added to the emulsion.
The emulsion for sepia paper shown in the photograph is the once quite popular sepia tone, which is no longer so greatly appreciated.
For the production of this emulsion, we need the following chemicals:
• 20 g ammonium ferric citrate • 3 g silver nitrate• 0.25 ml glacial acetic acid (or 5 ml of vinegar)• 1.5 g gelatin• 500 ml distilled water
Making a gelatin solution
The gelatin used in this technique is a simple kitchen gelatin. This is made according to the manufacturer’s instructions or according to the procedure described below. We need the following:
• 20 g of gelatin• 100 ml of water
Most often, gelatin is made as follows:
1. From the above-mentioned half-liter of distilled water, 100 ml of water is poured into a small beaker into which we slowly pour 1.5 g of gelatin while constantly stirring.
2. We wait 15 minutes for the gelatin to swell. 3. We place the bowl with gelatin in a pot of water heated to about 45°C.

20
4. When the gelatin liquefies, we stir it slowly for a few minutes. We have to be very careful to avoid bubbles.
5. Bubbles generated during mixing can be removed with the edges of a paper towel.
Method for producing the emulsion
Once we have prepared the gelatin solution, we can make the remaining part of the solution.
1. With precision scales, we weigh 20 g of ferric ammonium citrate (1) and we pour it into the 400 ml of water that remains from the preparation of the gelatin.
2. The ammonium ferric citrate is stirred until completely dissolved. 3. We measure 3 g of silver nitrate (2), which is poured and stirred into the ammonium
ferric citrate that was just dissolved.
4. Using a syringe, we weigh 0.25 ml of acetic acid (3), which is added to the solution. All of the components are now again mixed together well.
5. Finally, we pour hot gelatin into the 400 ml of solution previously prepared (4). This is stirred slowly, so as to create as few bubbles as possible.
6. We slowly pour the liquid into a brown bottle and label it with the appropriate data.
This emulsion also shows a much nicer sepia tone if the surface of the paper is coated with only one layer of the emulsion.

21
Sepi
a Pa
per r
ecip
e - 1
laye
r on
Fabr
iano
Art
istic
o H
P pa
per

84
ReducersTo lighten photos which are made with the Van Dyke Brown process, dozens of different recipes can be used, which are useful both for brightening silver prints as well as for lightening the cyanotypes. Here we will, of course, mention only a few of the reducers that are easy to produce, and are especially suitable to the Van Dyke Brown process.
A general description of the process1. Lightening, brightening or bleaching the image is almost always done on
produced, fixed and washed-out images. 2. If the image is dry, it is best to immerse it for a few moments in tap water. In this
way, the chemicals of the reducer will be more evenly distributed throughout the surface of the paper.
3. The image is then placed in a tray with the reducer for the chosen amount of time, where it is most often continuously shaken.
4. We stop the act of bleaching by submerging the photo in a greater amount of tap water for a few minutes, and then, if necessary, the photo has to be fixed and washed in water.
Recipe with potassium ferricyanidePotassium ferricyanide is one of the most powerful chemicals used to bleach silver images, but today it is much better known as a basic component for making cyanotype emulsion. As a reducer, it is also used in so-called Iron blue toner (see Iron blue toner on page 107).
Years ago, bleaching took place in two steps. The first step was bleaching and the other was fixation. Of course, we can also make a one-component solution composed of fixer (see Fixing photos on page 28) and reducer. For the production of our two-step reducer, we need the following:
• 0.2 g potassium ferricyanide (K3Fe(CN)6)• 1000 ml water
The production is quite simple. We pour 0.2 grams of potassium ferricyanide into 1 liter of water and mix well. The reducer can be used immediately. If we want consistent results, we use the reducer only once.
1. Brightening takes place by first slightly soaking the image in water and then immersing it in the reducer for the desired time, usually for 1 to 2 minutes.
2. When the image is bright enough, it is quickly transferred to a larger amount of
85
plain water and washed for a few minutes. 3. The image is then transferred to the fixer, where it is fixed for 3 minutes. 4. Finally, the picture is washed for 25 minutes in plain water
On the next page, we see that a previously rather deep brown photo (1) lightens on the entire tonal range after two minutes of weakening, while colors become slightly cold (2). If the weakening time is extended, the image, under the influence of potassium ferrycianide, became increasingly light blue.
Recipe with potassium permanganateThe next group of reducers in traditional photography represents reducers which have been prepared on the basis of potassium permanganate and one of the acids. In our case, we will use the formula that I compiled from a number of recipes. Instead of conventional sulfuric acid, we will use citric acid.
As this reducer first brightens the bright tones, it can also be used to clean the whites on a photo. A brightened photo gets a slight green-brown hue (3).
As in the production of reducer, we use a very small amount of potassium permanganate; we will first make a 5% potassium permanganate solution for our recipe. This is made by dissolving 5 g of potassium permanganate into 100 ml of distilled water.
The solution of the reducer is made by mixing 0.2 ml of a 5% solution of potassium permanganate into 1.5 liters of water.
• 0.2 ml 5% potassium permanganate (KMnO4)• 1500 ml water
The process of weakening with potassium permanganate is similar to the previously described procedure. A moistened photo is immersed in reducer for the desired time and then washed for 25 minutes in the water. There is no need to fix the photos
Potassium permanganate diluted in water is a common disinfectant, but, undiluted, it is toxic by ingestion and accelerates combustion. Therefore, great caution is necessary.W
arni
ng

86

87
bleached with this reducer, but some authors recommend a short washing in sodium sulfite (see Neutralizing the fixer on page 29).

84
•
•
•
•
•
•


