Vaccine Storage Equipment - Marvel Scientific Refrigerator ... · Frost-Free Versus Manual Defrost...
22
Vaccine Storage Equipment Disclaimer: This chapter will give you details about the requirements and maintenance of each piece of vaccine storage equipment and will provide information about methods and equipment used to protect vaccines against equipment failure. Individual projects and state health department immunization programs may have specific requirements for providers who receive public vaccine. Check with the project/state for more information. The use of trade names and commercial sources in this toolkit is for identification only, and does not imply endorsement by the U.S. Department of Health and Human Services (DHHS), the U.S. Public Health Service (PHS), or the Centers for Disease Control and Prevention (CDC). Photographs from non-Federal organizations found in the toolkit are provided solely as a service to our users. These photographs do not constitute an endorsement of these organizations by CDC or the Federal Government and none should be inferred. General Requirements Vaccine storage units must be selected carefully and used properly. Refrigerators without freezers, and stand-alone freezers, may be better at maintaining the required temperatures. However, a combination refrigerator/freezer unit sold for home use is acceptable for vaccine storage if the refrigerator and freezer compartments each have a separate external door. Combination refrigerator/freezer. Stand-alone freezer. Any refrigerator or freezer used for vaccine storage must be able to maintain required vaccine storage temperatures year-round be large enough to hold the year’s largest inventory have a certified calibrated thermometer inside each storage compartment be dedicated to the storage of vaccines. Food and beverages should not be stored in a vaccine storage unit because this practice results in frequent opening of the door and destabilization of the temperature. Food and beverages should not be stored in a vaccine storage unit. Page 1 of 22
Transcript of Vaccine Storage Equipment - Marvel Scientific Refrigerator ... · Frost-Free Versus Manual Defrost...

Vaccine Storage Equipment Disclaimer: This chapter will give you details about the requirements and maintenance of each piece of vaccine storage equipment and will provide information about methods and equipment used to protect vaccines against equipment failure. Individual projects and state health department immunization programs may have specific requirements for providers who receive public vaccine. Check with the project/state for more information. The use of trade names and commercial sources in this toolkit is for identification only, and does not imply endorsement by the U.S. Department of Health and Human Services (DHHS), the U.S. Public Health Service (PHS), or the Centers for Disease Control and Prevention (CDC). Photographs from non-Federal organizations found in the toolkit are provided solely as a service to our users. These photographs do not constitute an endorsement of these organizations by CDC or the Federal Government and none should be inferred.
General Requirements Vaccine storage units must be selected carefully and used properly. Refrigerators without freezers, and stand-alone freezers, may be better at maintaining the required temperatures. However, a combination refrigerator/freezer unit sold for home use is acceptable for vaccine storage if the refrigerator and freezer compartments each have a separate external door.
Combination refrigerator/freezer.
Stand-alone freezer.
Any refrigerator or freezer used for vaccine storage must
be able to maintain required vaccine storage temperatures year-round be large enough to hold the year’s largest inventory have a certified calibrated thermometer inside each storage compartment
be dedicated to the storage of vaccines. Food and beverages should not be stored in a vaccine storage unit because this practice results in frequent opening of the door and destabilization of the temperature.
Food and beverages should not be stored in a vaccine storage unit.
Page 1 of 22

Backup Equipment No piece of vaccine storage equipment is infallible. At some point, equipment failure will occur because of a power failure, breakdown, or normal wear and tear. Vaccine security requires that these failures be anticipated and that backup equipment and backup plans be available.
Equipment Logbooks Consider keeping a logbook for each piece of cold chain storage equipment. This logbook should contain records indicating the serial numbers of each piece of equipment, the date each piece of equipment was installed, the dates of any routine maintenance tasks (such as cleaning), the dates of any repairs or servicing, and the name of the person performing each of these tasks. This logbook is also an ideal place to keep the instructions that came with the equipment.
Refrigerators and Freezers Equipment Requirements General Requirements
Vaccines that require storage temperatures between 35° and 46°F (2° and 8°C) may be stored in the refrigerator compartment of a household- or commercial-style refrigerator-freezer unit. Vaccines that require storage temperatures at 5°F (-15°C) or colder may be stored in the freezer compartments of such units. Sites that store large volumes of vaccine might prefer separate refrigerators and freezers since stand-alone refrigerator and freezer units may maintain the required temperatures better. Whatever type of storage unit is used, the refrigerator and freezer compartments must have separate external doors. The storage unit must have enough room to store the year’s largest inventory without crowding and to store enough water bottles (in the refrigerator) and frozen packs (in the freezer) to stabilize the temperature. Additionally, the unit must function properly and reliably maintain the appropriate temperatures.
Refrigerator and freezer
compartments must have separate external doors.
Dormitory-Style Units Small single-door (dormitory-style or bar-style) combined refrigerator-freezer units should not be used for permanent vaccine storage. The freezer compartment in this type of unit is incapable of maintaining temperatures cold enough to store MMRV, varicella, and zoster vaccines. If attempts are made to cool the freezer compartment to the appropriate temperature, the temperature in the refrigerator compartment will fall below the recommended
Page 2 of 22

range, potentially freezing the refrigerated vaccines. However, this type of unit may be adequate for temporarily storing small quantities of inactivated vaccines and MMR vaccine in the refrigerator compartment (not the freezer compartment) if the refrigerator compartment can maintain temperatures at 35° to 46°F (2° to 8°C). Make sure not to overstock the unit because this will impede cold air circulation and can result in temperature fluctuations that may expose the vaccines to inappropriate temperatures. Refrigerated vaccines stored in a dormitory-style unit should be returned to the main storage unit at the end of the clinic day.
Dormitory-style units may be used only for small quantities of inactivated vaccines and MMR
vaccine. Never use these units for MMRV, varicella, or zoster vaccines. Do not place vaccines directly beside or directly below the freezer compartment in a dormitory-style unit, as this may expose vaccines to temperatures below the recommended range. Place cold packs (not frozen packs) or water bottles in this space to provide a temperature buffer. To reduce the risk of exposing vaccine to freezing temperatures, consider using a compact refrigerator without a freezer compartment. Frost-Free Versus Manual Defrost Freezers MMRV, varicella, and zoster vaccines may be stored in either a manual defrost or a frost-free freezer at 5° F (-15° C) or colder.
Varicella, MMRV, and zoster vaccines in the freezer.
Page 3 of 22

Equipment Placement Good air circulation around the vaccine storage unit is essential for proper heat exchange and cooling functions. The unit should be placed in a well-ventilated room and should have space around the sides and top. If the unit has coils on the back, leave at least 4 inches (10 cm) of space between the grid or coils and the wall. If there are no
Keep the unit at least 4 inches (10 cm) away from the wall to allow air circulation.
coils on the back, you should still keep the unit at least 4 inches (10 cm) away from the wall to allow air circulation. Nothing should be blocking the cover of the motor compartment, which is normally located at the back or the side of the unit. Make sure that the unit stands firmly and level and that the wheels or leveling legs are adjusted so that the bottom of the unit sits 1 to 2 inches (2.5 to 5 cm) above the floor. Recommended Temperature Range Refrigerator The refrigerator compartment should maintain temperatures between 35° and 46°F (2° and 8°C). The temperature should never fall below 35°F (2°C) or rise above 46°F (8°C). Therefore, set the temperature mid-range to achieve an average of about 40°F (5°C). This temperature setting will provide the best safety margin. Freezer The freezer compartment should maintain an average temperature of 5°F (-15°C) or colder. Setting and Stabilizing the Temperature Who Should Adjust the Temperature?
Only the primary or backup vaccine coordinators should adjust the temperature of a vaccine storage unit.
Only the primary or backup vaccine coordinator should adjust the temperature of a vaccine storage unit. Limiting access to the thermostat reduces the risk that the temperatures will be adjusted inappropriately. If the thermostat requires adjustment, alert the vaccine coordinator or immediate supervisor. A warning sign should be posted on the storage unit that says, “Do not adjust refrigerator or freezer temperature controls. Notify (insert name) if adjustments are necessary” see example warning sign in the Resources section).
Only the primary or backup vaccine coordinators
should adjust the temperature of a vaccine storage unit.
Page 4 of 22

Thermostats Refrigerator and freezer thermostats are marked in various ways, depending on the brand. There are a variety of ways to indicate the temperature setting. For example, some have a series of numbers or letters on the control knob. Others may have "MIN," "MED," and "MAX" marked on the knob or a dial ranging from "cold" to "coldest." In general, thermostats do not show temperatures, but rather the levels of coldness. The only way to know the temperature inside the unit is to measure it with a thermometer. In combination refrigerator-freezer units, the thermostat actually controls the volume of cold freezer-temperature air that goes into the refrigerator. Consult the manual that came with the refrigerator for instructions on how to operate the thermostat.
Refrigerator and freezer thermostats.
How to Adjust the Temperature To adjust the temperature, first be sure the unit is plugged into a power source, then check the temperatures inside the refrigerator and freezer compartments. Next, turn the knob slightly toward a warmer or colder setting as necessary. Adjust the thermostat slowly so as not to exceed the recommended temperature range. Allow the temperature inside the unit to stabilize for 30 minutes then recheck the temperature. Adjust the thermostat again as necessary. Aim to stabilize the refrigerator temperature around 40°F (5°C). Make sure the temperature does not fall below the lower limit or rise above the upper limit of the recommended refrigerator temperature range of 35° to 46°F (2° to 8°C). Aim to stabilize the freezer temperature at 5°F (-15°C) or colder. If you are using a combined refrigerator-freezer unit, be careful not to lower the freezer temperature so much that the refrigerator temperature falls below the recommended temperature range. Combined refrigerator-freezer units use a cooling system that directs cold air from the freezer compartment into the main refrigerator compartment. This type of unit has two thermostat controls: one controls the freezer temperature and the other controls the volume of freezing air that enters the main refrigerator cabinet. Therefore, use care when adjusting the freezer temperature because this will affect the temperature of the air venting into the refrigerator compartment. Without careful and frequent temperature monitoring inside the refrigerator compartment there is a danger of inappropriately freezing the refrigerated vaccines. Frequent temperature monitoring of both the freezer and refrigerator compartments throughout the day as well as at the beginning and end of the work day is required whenever thermostats are adjusted. The temperature in a newly installed or newly repaired refrigerator may take 2 to 7 days to stabilize within the recommended range or 35° to 46°F (2° to 8°C). The temperature in a newly installed or newly repaired freezer unit may take 2 to 3 days to stabilize within the recommended range of 5°F (-15°C) or colder. Allow one week of twice daily refrigerator and freezer temperature recordings before using the unit to store vaccines.
Page 5 of 22

Allow 1 week of twice daily refrigerator and freezer temperature recordings before using a newly installed or newly repaired refrigeration unit to store vaccines. To maintain the cold chain during any period when the refrigerator or freezer is out of service, vaccines should be temporarily stored in an alternate vaccine storage unit until the temperature in the original unit can be stabilized within the recommended range. The alternate unit should be functioning properly and should have sufficient space to properly store the vaccines. Another option is to store the vaccines in an appropriately packed cooler if the storage unit will be out of service for a short time. However, if the refrigerator or freezer cannot be repaired in time to maintain the temperature in the cooler within the recommended range, move the vaccines to an alternate vaccine storage unit. Contact the state health department immunization program for policies regarding vaccine packing and procedures for maintaining the cold chain while the vaccine storage unit is not functioning properly or turned off (see Handling Inappropriate Vaccine Storage Conditions [Light and Temperature] in the Storage Troubleshooting section for details). When to Adjust the Temperature The refrigerator temperature should be adjusted if it is outside the recommended range or if, over time, the temperature appears to be moving toward the upper or lower temperature limit. It is best to set the temperature mid-range to achieve an average of about 40°F (5°C). This temperature setting will provide the best safety margin. The freezer temperature should be adjusted if it is outside the recommended range or if, over time, the temperature appears to be moving toward the upper temperature limit of 5°F (-15°C). In some situations, the thermostat may need to be reset in summer and winter, depending on the room temperature. If so, post instructions about this procedure on the vaccine storage unit door and include this information in the Routine Vaccine Storage and Handling Plan (see section on Storage and Handling Plans). Stabilizing the Temperature with Water Bottles and Frozen Packs You can help stabilize the temperature in the refrigerator by keeping at least two or three large containers of water inside. Store the water bottles against the inside walls and in the door racks. You can help stabilize the temperature in the freezer by keeping frozen packs or ice trays inside. Store the frozen packs along the walls, back, and bottom of the freezer compartment and inside the racks of the freezer door. Not only will water bottles and frozen packs help maintain an even temperature in the compartments with frequent opening and closing of the doors, they will also help keep the temperatures stable in the event of a power failure.
Page 6 of 22

Stabilize the temperatures in a freezer with frozen packs
and in a refrigerator with water bottles. Opening the Door Limit the number of times the vaccine storage unit doors are opened and avoid letting the doors stand open unnecessarily. Not only does this affect the temperature in the unit, it also exposes the vaccines to light (which can affect the potency of HPV, MMR, MMRV, rotavirus, varicella, and zoster vaccines). Routinely check the doors throughout the day and at the end of the day to ensure they are tightly closed. Vegetable Bins Consider removing the vegetable bins from the refrigerator. Removing the bins not only provides extra space for storing containers of water, but it also removes the temptation to use the bins for storage of food, beverages, or vaccines. Food and beverages should never be stored in a vaccine storage unit. Vaccines should never be stored near the floor of the refrigerator in the vegetable bins because the temperature in this area is different from that in the body of the refrigerator. Temperature Variations Temperatures can vary in a vaccine storage unit based on the contents, how often the door is opened, and power interruptions. The only way to be sure the temperature in the storage unit has remained within the recommended range is to frequently monitor and record the temperature using a thermometer.
Page 7 of 22

Equipment Maintenance General Principles The most important action to take if the vaccine storage unit is not working properly is to protect the vaccine supply. Activate the Emergency Vaccine Retrieval and Storage Plan (see section on Storage and Handling Plans). Move the vaccine to a properly functioning storage unit with internal temperatures within the recommended ranges. The most important action to take if the vaccine storage unit is not working properly is to protect the vaccine supply.
After this is accomplished, attempt to find the cause of the problem and correct it (see section on Storage Troubleshooting). Do not allow the vaccine to remain in a nonfunctioning unit for an extended period of time while you attempt to resolve the problem. If you are unsure how long the storage unit will not be functioning properly or you determine that the problem cannot be corrected in
time to maintain the internal temperature within the recommended range, activate the Emergency Vaccine Retrieval and Storage Plan (see section on Storage and Handling Plans). Consider keeping a logbook for each piece of cold chain storage equipment to document routine maintenance tasks and repairs. See Equipment Logbooks in this section for details. Regular maintenance is required to ensure proper operation, to maintain required temperatures, and to extend the useful life of the appliance. Maintenance tasks can be divided into daily, weekly, monthly, and periodic actions. Daily Maintenance Tasks Check the internal temperature The temperature inside each compartment of the vaccine storage unit must be checked with a certified calibrated thermometer at least twice each day, once in the morning when the door is first opened, and once at the end of the clinic day just before the door is closed for the last
The temperature inside each compartment of the vaccine storage unit must be checked with a certified calibrated thermometer at least twice each day.
time. More frequent temperature monitoring is required following thermostat adjustments. The temperatures should be recorded on a temperature log. If the temperature is outside the recommended range, the vaccine coordinator or supervisor should be notified without delay.
Immediate action must be taken (see Handling Inappropriate Vaccine Storage Conditions [Light and Temperature] in the Storage Troubleshooting section for details).
Page 8 of 22

Check that the doors are closed To maintain internal temperatures within the recommended ranges, the vaccine storage unit doors must fit securely and tightly against the unit. The rubber-like seals that run around the inner edges of the doors contain magnets that help hold the doors closed and create tight seals, keeping cold air inside. Check that the doors are properly sealed each time they are closed by giving a gentle tug on the door handles. The doors should also be checked at the end of each clinic day to make sure that they are properly closed and sealed.
Check that doors are properly sealed each time
they are closed and at the end of each day. Weekly Maintenance Tasks Defrost the freezer (manual defrost units only) If you have a manual defrost freezer, it is quite normal for ice and frost to accumulate inside the compartment. A thin layer of frost does not affect the cooling performance but a thick layer of frost negatively affects the efficiency of the system. Check the inside walls of the freezer compartment weekly. When frost has accumulated to a thickness of ¼ inch or so, the unit requires defrosting. Remove the vaccines from the freezer compartment (and from the refrigerator compartment of a combined refrigerator-freezer unit) and store them in a functioning unit (see Emergency Vaccine Retrieval and Storage Plan in the section on Storage and Handling Plans). Alternatively, vaccine may be stored in an appropriately packed cooler. Contact the state health department immunization program for policies regarding vaccine packing and procedures for maintaining the cold chain while the storage unit is turned off. Turn off the power and unplug the unit. Open the freezer door and allow all the frost to melt. Loose ice can be removed by hand, but no sharp tools or sharp instruments should be used to remove the ice. Remove all frozen packs from the freezer. Defrosting time can be reduced by putting a container of warm water (not greater than 122°F [50°C]) inside the compartment. Once the frost has melted completely, wipe the unit dry and clean thoroughly. This is also a good time to clean the refrigerator compartment. Plug in the unit and ensure that the thermostat is turned to an appropriately cold setting. Wait for each compartment of the unit to reach and stabilize at the proper temperature range then restock each compartment with vaccine. If defrosting is necessary once a month or more frequently, the door may not be sealing properly, the door may have been opened too frequently, or there may be other mechanical problems with the freezer (see Refrigerator and Freezer Door Problems in the Storage Troubleshooting section for details). Consult a technician and monitor temperatures carefully. Frost-free freezers do not need to be manually defrosted. They have regular defrost cycles three or four times a day when the freezer temperature increases and melts the ice automatically.
Page 9 of 22

Monthly Maintenance Tasks Clean the coils and motor Once a month, the vaccine storage unit coils should be examined and cleaned. Dust and dirt build-up affects the transfer of heat from the coils and, therefore, the efficiency of the unit. The coils are located either on the back of the unit or underneath the unit behind the toe kick plate. Unplug the unit and use a soft brush, cloth, or vacuum cleaner with an attachment hose to remove any dirt or dust from the surface of the coils. If the motor is accessible, it should Refrigerator coils. also be cleaned using a soft brush, cloth, or vacuum cleaner with an attachment hose. After cleaning, plug in the unit and document that the power is restored and that the temperature has been maintained. Avoid cleaning the coils and motor at the end of a Friday. Accidentally damaging the coils will cause a problem that may not be detected until the following Monday. This process should only take a few minutes; therefore, it is not necessary to transfer the vaccine to another storage unit as long as the doors remain tightly closed for the duration of the procedure. If cleaning will take longer than the expected few minutes, activate the Emergency Vaccine Retrieval and Storage Plan (see section on Storage and Handling Plans) and transfer the vaccine to a backup storage unit. Clean the refrigerator and freezer compartments Clean the refrigerator and freezer compartments every month to discourage bacterial and fungal growth. Remove the vaccines from the compartments and store them in a functioning unit (see Emergency Vaccine Retrieval and Storage Plan in the Storage and Handling Plans section for details). Alternatively, vaccine may be stored in an appropriately packed cooler. Contact the state health department immunization program for policies regarding vaccine packing and procedures for maintaining the cold chain while the storage unit is turned off. Unplug the unit or turn off the power and wash all inside surfaces and shelves with warm, slightly soapy water. Dry thoroughly then plug in the unit or turn the thermostat back to an appropriately cold setting. Wait for the unit to reach and stabilize at the proper temperature range and restock each compartment with vaccine. Check the door seals Once a month, perhaps while cleaning the vaccine storage unit compartments, check the integrity of the rubber-like door seals. They should not be torn or brittle and there should be no gaps between the seals and the body of the unit when the doors are closed. The doors should open and close properly and fit squarely against the body of the refrigerator. For this to happen, the hinges must be correctly adjusted. If there are any problems with the door seals, see Refrigerator and Freezer Door Problems in the Storage Troubleshooting section for details about troubleshooting. Consult a technician as necessary and monitor temperatures carefully. Periodic Maintenance Tasks Clean the drain pan Frost-free freezers have a drain pan at the bottom of the unit that holds the water that collects after frost melts during the defrost cycle. You do not need to empty the pan because the water will evaporate. However, over time, it may begin to smell and become moldy. You may be able to remove the pan for periodic cleaning by detaching the toe kick plate and sliding the pan out
Page 10 of 22
from the bottom of the unit. It is not necessary to unplug the unit or transfer the vaccine when the drain pan is cleaned.
Thermometers Certified Calibrated Thermometers
The National Center for Immunization and Respiratory Diseases, Centers for Disease Control and Prevention recommends using only certified calibrated thermometers for measuring vaccine storage unit temperatures.
The National Center for Immunization and Respiratory Diseases, Centers for Disease Control and Prevention recommends using only certified calibrated thermometers for measuring vaccine storage unit temperatures. Thermometers are a requirement for VFC providers.) All
thermometers are calibrated during manufacturing, meaning that they are given a temperature scale. Certified calibrated thermometers undergo a second individual calibration against a reference standard from an appropriate agency, such as the National Institute of Standards and Technology (NIST) or a laboratory recognized by NIST. Calibration can be traceable to NIST using American Society for Testing and Materials (ASTM) methods for the calibration process. They are then given a certificate indicating successful completion of this process, which is provided with the instrument when purchased. This certificate is different from the manufacturer’s warranty. Certified calibrated thermometers are available through laboratory and scientific supply companies. Avoid using thermometers that are not certified because they are not certified as accurate and they may not remain accurate with time. A thermometer costing a few dollars is not worth the risk of damaging thousands of dollars worth of vaccine because of inaccurate readings. In the long run, it is better to invest in a more expensive but more reliable certified calibrated thermometer because it is more cost-effective. Providers enrolled in the Vaccines for Children (VFC) Program are required to have certified calibrated thermometers in all refrigerators and freezers used for vaccine storage. Contact your state or local immunization program for more information.
Page 11 of 22

Examples of thermometer calibration certificates.
Types of Certified Calibrated Thermometers Overview The use of trade names and commercial sources in this section is for identification only, and does not imply endorsement by the U.S. Department of Health and Human Services (DHHS), the U.S. Public Health Service (PHS), or the Centers for Disease Control and Prevention (CDC). Individual projects and state health department immunization programs may have specific requirements for providers who receive public vaccine. Check with the project or state health department for more information. To ensure that refrigerators and freezers are maintaining the proper temperatures for vaccine storage, each compartment should have a certified calibrated thermometer and the temperature should be checked at least twice each day. Several types of thermometers can be used to monitor the temperatures within vaccine storage units.
Certified Calibrated Thermometers
Most information/ Highest cost <—————> Least information/
Lowest cost
Extent of data Continuous recording
Minimum/maximumtemperature reading
Single point reading
Types Chart recorders,
electronic data loggers
Fluid-filled, some digital
Fluid-filled, some digital, bi-metal stem
Any of the various types of thermometers are adequate for monitoring temperatures inside vaccine storage units. However, thermometers that provide continuous recording or
Page 12 of 22

minimum/maximum temperatures are preferred because they are the best indicators of temperature fluctuations outside of the recommended ranges. Out-of-range temperatures require immediate action. Fluid-Filled Biosafe Liquid Thermometers Fluid-filled biosafe liquid (bottle) thermometers consist of two parts. The first part is a glass sensing bulb connected to a glass tube with a numbered scale printed along the tube. Inside the tube is a liquid (usually mercury or colored alcohol) that rises and falls as the temperature changes in the immediate area of the sensing bulb. The second part is a bottle containing a
Fluid-filled biosafe liquid thermometer.
biosafe liquid, such as glycol. The glass sensing bulb is immersed in the liquid. The liquid provides a buffer around the sensing bulb so that the reading does not fluctuate when the refrigerator or freezer door is opened or closed. Fluid-filled biosafe liquid thermometers are available in refrigerator models and in freezer models. Care should be taken to obtain a thermometer with the appropriate temperature scale for refrigerator and freezer compartments. Some models may come with a magnet designed to attach the thermometer to the refrigerator or freezer wall. This is not the correct placement for a thermometer used in vaccine storage. Place the thermometer centrally in the compartment, with the vaccine.
Fluid-filled biosafe liquid thermometers can be difficult to read. When reading the thermometer, it should be vertical and your eyes should be level with the top of the liquid in the glass tube. The position of the top of the liquid along the scale indicates the temperature. These thermometers only indicate the temperature at the time they are read. They do not indicate temperature changes over time or the minimum/ maximum temperatures achieved. Therefore, temperature fluctuations outside the recommended range might not be detected. Instructions on How to Read a Fluid-Filled Biosafe Liquid Thermometer can be found in the Resources section. Fluid-filled biosafe liquid thermometers may be rendered inaccurate if the liquid column separates. This may be correctable; consult the manufacturer for detailed instructions for reuniting the liquid column. Bi-Metal Stem Thermometers
Bi-metal stem thermometer.
Bi-metal stem thermometers are typically circular in shape with a needle anchored in the center that points to one or two numbered scales (Fahrenheit and/or Celsius) located around the perimeter of the dial. The temperature is indicated by where the needle points on the scale. These thermometers may be difficult to read. When reading the thermometer, it should be vertical and your eyes should be level with the center of the dial. Certified bi-metal stem thermometers are quite accurate, but they only indicate the
temperature at the time they are read. They do not indicate the changes in temperature over time or the minimum/maximum temperatures achieved. Therefore, temperature fluctuations outside the recommended range may not be detected.
Page 13 of 22
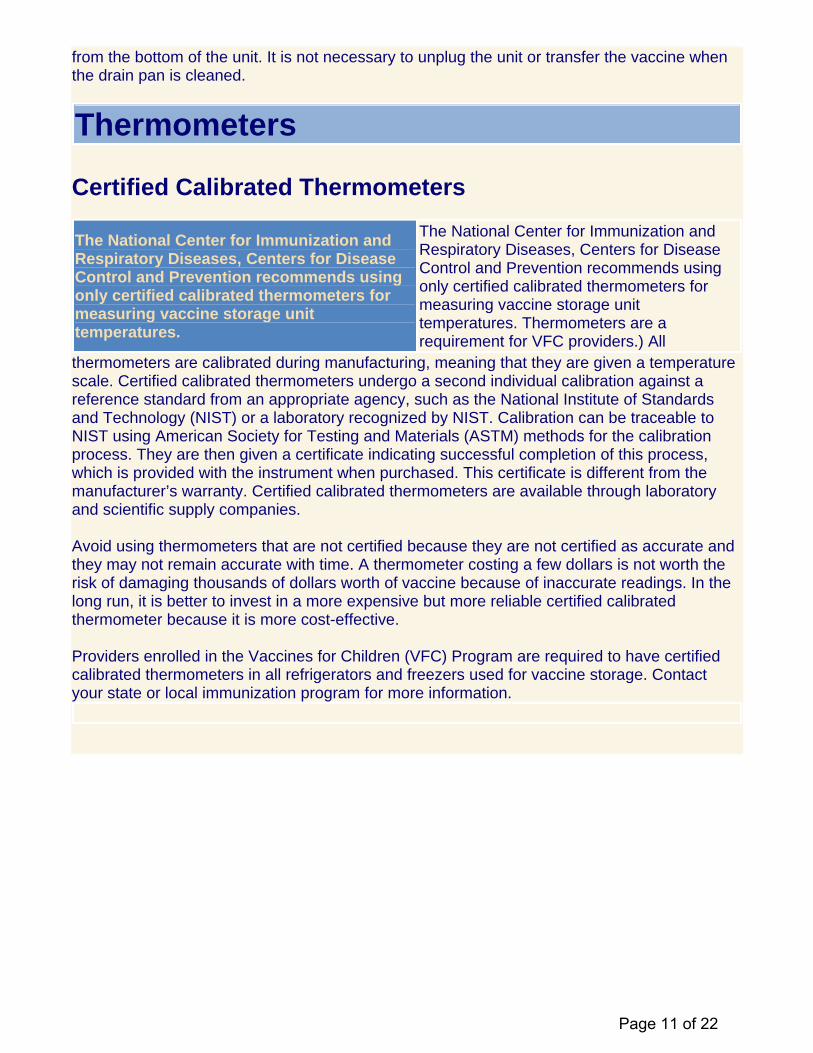
Minimum/Maximum Thermometers Minimum/maximum thermometers are available in fluid-filled and digital forms. The fluid-filled types may be difficult to read (see How to Read a Liquid Minimum/Maximum Thermometer— Print Version and How to Read a Liquid Minimum/Maximum Thermometer—Animated Version in the Resources section for details). Digital thermometers are easier to read. Minimum/ maximum thermometers show the current temperature and the minimum
Minimum/maximum
thermometers. and maximum temperatures achieved. Temperature fluctuations outside the recommended range can be detected by referring to the minimum and maximum temperature readings. Digital Thermometers Digital thermometers have a screen in which the temperature is displayed in Fahrenheit and/or Celsius. Some have optional features, including a display of the minimum and maximum temperatures, a temperature alarm that can be set to ring at a specified temperature, and a temperature probe. Some digital thermometers have two components: a display that mounts to the outside of the unit and a probe on a cord (usually 3 to 10 feet long) that is placed inside the unit. This arrangement allows the temperature to be read without opening the door of the storage unit.
Minimum/maximum digital thermometer.
Digital thermometer with
standard probe.
Digital thermometer with
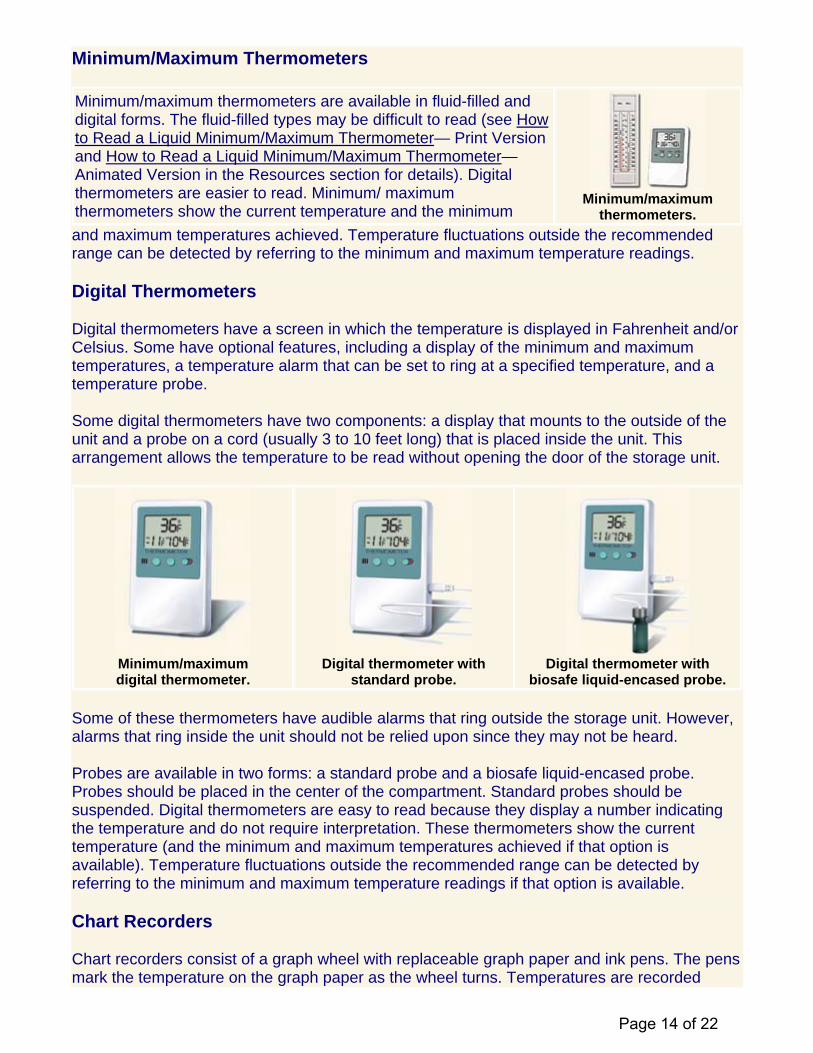
biosafe liquid-encased probe. Some of these thermometers have audible alarms that ring outside the storage unit. However, alarms that ring inside the unit should not be relied upon since they may not be heard. Probes are available in two forms: a standard probe and a biosafe liquid-encased probe. Probes should be placed in the center of the compartment. Standard probes should be suspended. Digital thermometers are easy to read because they display a number indicating the temperature and do not require interpretation. These thermometers show the current temperature (and the minimum and maximum temperatures achieved if that option is available). Temperature fluctuations outside the recommended range can be detected by referring to the minimum and maximum temperature readings if that option is available. Chart Recorders Chart recorders consist of a graph wheel with replaceable graph paper and ink pens. The pens mark the temperature on the graph paper as the wheel turns. Temperatures are recorded
Page 14 of 22
continuously, 24 hours a day. The graph paper has a Fahrenheit or Celsius scale on it and the temperature is read where the ink line falls on the scale. The graph paper must be changed when it completes a full circle, usually weekly. Record the date on the graph paper when it is fitted, and when you remove/change the graph paper. Keep old graphs as a permanent record of the performance of the vaccine storage unit. As with other thermometers, temperature readings should be checked and recorded at least twice each day and monitored to see if the temperatures are out of range. Some chart recorders may have a digital display showing a current temperature; however, this display may use a different temperature sensor than the recording pen. The reading from the digital display may vary by several degrees from the reading on the graphing wheel. In a certified chart recorder, the certification applies only to the temperature sensor used by the recording pen. When checking and recording temperatures, only the reading from the graphing wheel should be recorded. Some chart recorders have temperature probes. Probes are available in two forms: a standard probe and a biosafe liquid-encased probe. Probes should be placed in the center of the compartment. Standard probes should be suspended. Chart recorders are more difficult to read than digital thermometers because they require interpretation of the temperature graph (see How to Read a Chart Recorder—Print Version and How to Read a Chart Recorder—Animated Version in the Resources section for details). These are the only thermometers that record the current temperature, the minimum and maximum temperatures, and the continuous changes in temperature through time.
Chart recorder.
Graph paper— two-degree
increments.
Graph paper—range.
Temperature fluctuations outside the recommended ranges can be detected by referring to the minimum and maximum temperature readings. Out-of-range temperatures require
immediate action. Digital Data Loggers Digital data loggers are sometimes used to record temperatures in vaccine storage units. These miniature, battery-operated, electronic devices may be programmed to record temperatures at intervals throughout the day, with the frequency of reading set by the user. Data loggers are capable of recording hundreds or even thousands of individual temperature readings. Digital data loggers used in vaccine storage are accompanied by special software that is installed in a computer. This software allows the user to set the frequency of the temperature
Page 15 of 22

readings, download data from the device, and calculate temperature averages, minimums, and maximums. In order to review the temperature history, the user must download data from the digital data logger on a regular basis. When digital data loggers are used in vaccine storage, temperatures must still be manually checked and recorded twice a day. A second certified thermometer may be used for these manual temperature checks. Digital data loggers may have a variety of features in addition to their basic recording function. Some digital data loggers have digital displays showing the current temperature. This display may not use the same temperature sensor as the recorder. Some data loggers may have an audible alarm to alert the user to out-of-range temperature conditions. Other data loggers may have external lights that alert the user to out-of-range temperature events; a green light indicates that temperatures have remained in range and a red light indicates an inappropriate temperature occurred. If a data logger's alarm activates, or a red light is displayed, immediate action should be taken. Download and review the temperature readings and proceed as noted in Handling Inappropriate Vaccine Storage Conditions (Light and Temperature) in the Storage Troubleshooting section. Digital data loggers may also be used in vaccine transport (see Data Loggers in this section.) Other Thermometers—NOT RECOMMENDED Uncertified liquid (mercury or alcohol) thermometers and uncertified dial-type household refrigerator/freezer thermometers should not be used. These thermometers are not accurate enough to risk losing expensive vaccine. Do not use thermometers that are not certified calibrated thermometers. Generally, thermometers obtained in hardware and appliance stores are not certified instruments and are designed to monitor temperatures for domestic food storage. Thermometer Placement The thermometer should be placed in the center of the compartment away from the coils, walls, floor, and fan in order to obtain a true reading of the temperature. In the refrigerator, the thermometer should be placed on the middle shelf, adjacent to the vaccine, or hanging down from the upper shelf. In the freezer, the thermometer should be suspended from the ceiling of the compartment or placed on a box or some other item so that it is in the middle of the compartment off the floor. If the thermometer indicates a temperature outside the recommended range, check that the thermometer is appropriately situated.
Fluid-filled biosafe liquid thermometer in freezer.
Chart recorder in refrigerator.
Proper placement of thermometers in compartments.
Page 16 of 22

Thermometer Maintenance and Recertification Some thermometers require batteries. If you use one of these, have a supply of extra batteries on hand. Certified calibrated thermometers require periodic recertification and recalibration against reference thermometers in order to remain accurate.
Certified calibrated thermometers require periodic recertification and recalibration against reference thermometers in order to remain accurate. Contact the manufacturer for instructions regarding recalibration procedures. When choosing a certified
calibrated thermometer, be sure to consider the cost and frequency of required recalibration. Recalibration costs will vary by manufacturer, model, and type of thermometer. The National Center for Immunization and Respiratory Diseases recommends adhering to the recalibration schedule recommended by the manufacturer. Graphing thermometers, with their moving parts and frequent pen/paper changes, are likely to become less accurate with time; compliance with the manufacturer's recalibration schedule would be optimal. Digital thermometers may also become less accurate with time; however, these are relatively inexpensive, and may be less expensive to replace than to recalibrate. Bottle-type thermometers, which have no mechanical or electronic parts, are most likely to remain accurate for extended periods, and may be less expensive to replace than to recalibrate. However, bottle-type thermometers may be rendered inaccurate if the liquid column separates. If the certified calibrated thermometer indicates an out-of-range temperature and if it is properly positioned, assume it is accurate and take immediate steps to safeguard the vaccine (see Handling Inappropriate Vaccine Storage Conditions [Light and Temperature] in the Storage Troubleshooting section for details). Once the vaccine is safely stored under proper conditions, the accuracy of the thermometer can be checked. However, always check other causes of inappropriate storage temperatures first. Immunization programs may set their own policies regarding recalibration of thermometers. Please contact your state or local immunization program for more information.
Cold Chain Monitors General Principles There are three basic types of cold chain monitors (CCMs): those that indicate whether packages have reached temperatures that are too warm, those that indicate whether packages have reached temperatures that are too cold, and those that continuously record the temperature. These types of monitors are designed to be irreversible indicators of inappropriate temperatures. In general, CCMs are for single use only and should not be re-used. However, some models of digital data loggers may be used more than once. CCMs are not a substitute for twice-a-day temperature reading and recording. Every vaccine storage unit compartment should have its own certified calibrated thermometer for this purpose. CCMs should only be used to monitor the temperature of vaccine during transport.
Page 17 of 22
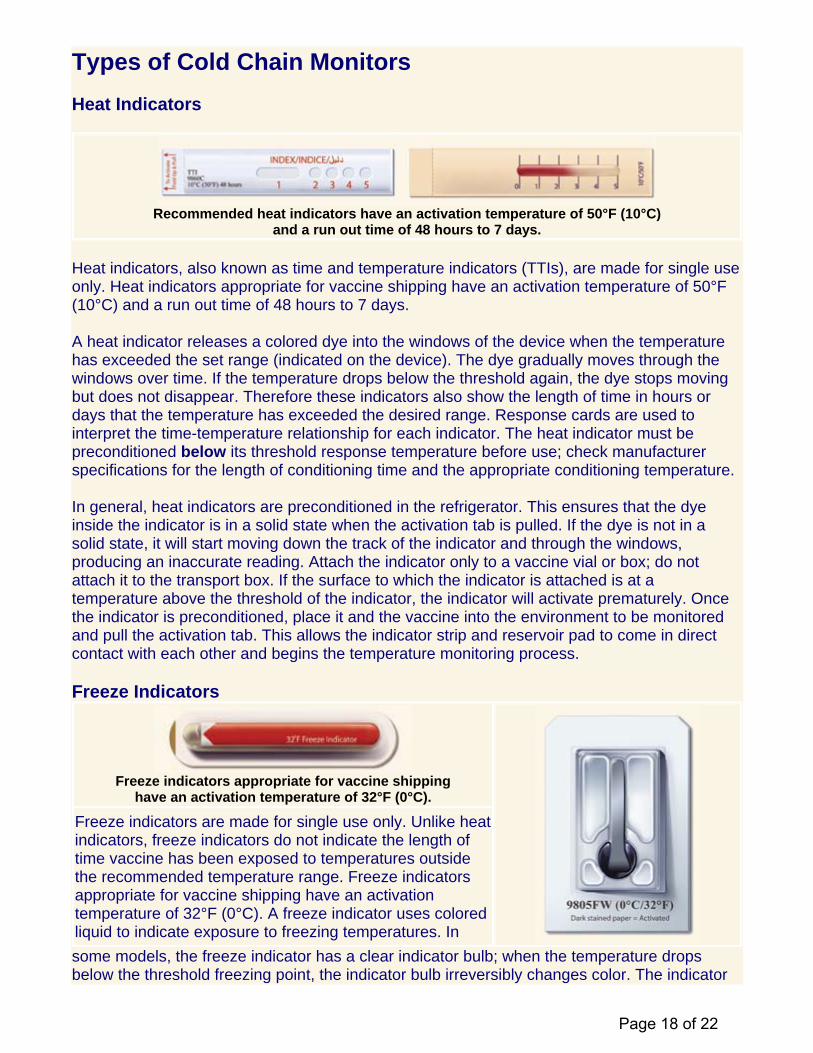
Types of Cold Chain Monitors Heat Indicators
Recommended heat indicators have an activation temperature of 50°F (10°C)
and a run out time of 48 hours to 7 days.
Heat indicators, also known as time and temperature indicators (TTIs), are made for single use only. Heat indicators appropriate for vaccine shipping have an activation temperature of 50°F (10°C) and a run out time of 48 hours to 7 days. A heat indicator releases a colored dye into the windows of the device when the temperature has exceeded the set range (indicated on the device). The dye gradually moves through the windows over time. If the temperature drops below the threshold again, the dye stops moving but does not disappear. Therefore these indicators also show the length of time in hours or days that the temperature has exceeded the desired range. Response cards are used to interpret the time-temperature relationship for each indicator. The heat indicator must be preconditioned below its threshold response temperature before use; check manufacturer specifications for the length of conditioning time and the appropriate conditioning temperature. In general, heat indicators are preconditioned in the refrigerator. This ensures that the dye inside the indicator is in a solid state when the activation tab is pulled. If the dye is not in a solid state, it will start moving down the track of the indicator and through the windows, producing an inaccurate reading. Attach the indicator only to a vaccine vial or box; do not attach it to the transport box. If the surface to which the indicator is attached is at a temperature above the threshold of the indicator, the indicator will activate prematurely. Once the indicator is preconditioned, place it and the vaccine into the environment to be monitored and pull the activation tab. This allows the indicator strip and reservoir pad to come in direct contact with each other and begins the temperature monitoring process. Freeze Indicators
Freeze indicators appropriate for vaccine shipping
have an activation temperature of 32°F (0°C). Freeze indicators are made for single use only. Unlike heat indicators, freeze indicators do not indicate the length of time vaccine has been exposed to temperatures outside the recommended temperature range. Freeze indicators appropriate for vaccine shipping have an activation temperature of 32°F (0°C). A freeze indicator uses colored liquid to indicate exposure to freezing temperatures. In some models, the freeze indicator has a clear indicator bulb; when the temperature drops below the threshold freezing point, the indicator bulb irreversibly changes color. The indicator
Page 18 of 22

does not require preconditioning and may be attached to any clean dry surface in the environment being monitored. There is no activation tab to pull; the indicator is working at all times. Other models use a specially designed ampoule filled with dye; when the temperature drops below the freezing threshold, the ampoule will break and release the dye that irreversibly stains the paper behind the ampoule. This type of freeze indicator requires preconditioning in a temperature above the freezing threshold; check manufacturer specifications for the duration of this preconditioning period. Leaving it out at room temperature will meet this requirement. After preconditioning, attach the indicator to any clean dry surface in the environment being monitored. There is no activation tab to pull. To determine if the product has been exposed to freezing temperatures, observe the paper behind the ampoule. If it is stained with color, the product being monitored was exposed. If there is no color, remove the indicator from the surface to which it is attached and vigorously tap the bottom edge of the device three times on a hard surface. If the paper becomes stained, the product being monitored was exposed. Tapping will not cause color staining in an unexposed indicator. Data Loggers Digital data loggers are miniature, battery-operated, electronic devices that may be programmed to record temperatures at intervals throughout the day. Data loggers are capable of recording hundreds or even thousands of individual temperature readings. They are available in single-use and multi-use models. Digital data loggers used in vaccine transport have external lights that alert the user to out-of-range temperature events-a green light indicating the cold chain was properly maintained and a red light indicating inappropriate temperature exposure occurred. If a red light is displayed, the vaccine shipment must await approval for use and the device must be sent back to the manufacturer to interpret the temperature data. A special software program must be used to download the temperature data to a computer. Digital data loggers may also be used in vaccine storage (see Digital Data Loggers in this section.)
Digital data loggers record hundreds or thousands of temperature readings.
Strip monitors are also available. These are battery-powered single-use units that record continuous temperature readings on a paper strip and may be used to monitor vaccine temperatures during transport.
Page 19 of 22
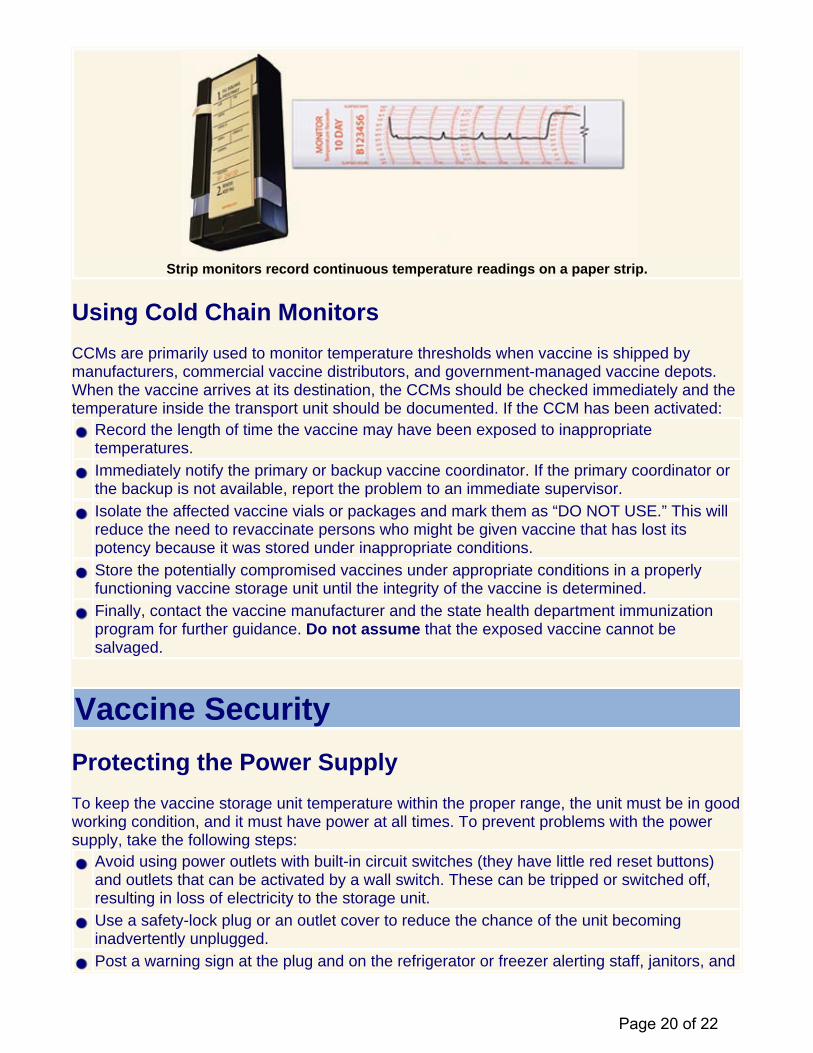
Strip monitors record continuous temperature readings on a paper strip.
Using Cold Chain Monitors CCMs are primarily used to monitor temperature thresholds when vaccine is shipped by manufacturers, commercial vaccine distributors, and government-managed vaccine depots. When the vaccine arrives at its destination, the CCMs should be checked immediately and the temperature inside the transport unit should be documented. If the CCM has been activated:
Record the length of time the vaccine may have been exposed to inappropriate temperatures.
Immediately notify the primary or backup vaccine coordinator. If the primary coordinator or the backup is not available, report the problem to an immediate supervisor.
Isolate the affected vaccine vials or packages and mark them as “DO NOT USE.” This will reduce the need to revaccinate persons who might be given vaccine that has lost its potency because it was stored under inappropriate conditions.
Store the potentially compromised vaccines under appropriate conditions in a properly functioning vaccine storage unit until the integrity of the vaccine is determined.
Finally, contact the vaccine manufacturer and the state health department immunization program for further guidance. Do not assume that the exposed vaccine cannot be salvaged.
Vaccine Security Protecting the Power Supply To keep the vaccine storage unit temperature within the proper range, the unit must be in good working condition, and it must have power at all times. To prevent problems with the power supply, take the following steps:
Avoid using power outlets with built-in circuit switches (they have little red reset buttons) and outlets that can be activated by a wall switch. These can be tripped or switched off, resulting in loss of electricity to the storage unit.
Use a safety-lock plug or an outlet cover to reduce the chance of the unit becoming inadvertently unplugged.
Post a warning sign at the plug and on the refrigerator or freezer alerting staff, janitors, and
Page 20 of 22

electricians not to unplug the unit. Label the fuses and circuit breakers to alert people not to turn off the power to the vaccine storage unit. These labels should include information concerning the immediate steps to take if power is interrupted. When the practice is located in a building owned by a third party and providers do not have access to the circuit breaker, ask the building manager to assist in labeling the appropriate circuit.
Finally, consider installing a temperature alarm to alert staff to after-hours emergencies, particularly if large vaccine inventories are maintained.
Avoid using power outlets with built-in circuit
switches and outlets that can be activated by a wall switch.
Safety-lock plug.
Consider using outlet covers. Post warning signs and labels.
Temperature Alarms A continuous-monitoring temperature alarm/notification system should be considered, especially for practices with a large inventory, to help prevent substantial financial loss if the temperatures in their storage units exceed the recommended ranges or if the storage units malfunction. These systems help alert staff to after-hours emergencies. Simple systems sound audible alarms when the temperatures inside the storage units exceed the recommended ranges. If feasible, a more sophisticated system that sounds an audible alarm and alerts one or more designated person(s) at a specified phone or pager number is preferable.
Page 21 of 22

Continuous-monitoring temperature alarm/notification systems.
Backup Generators Facilities storing large vaccine inventories may consider installing backup generators that automatically provide power to the storage units to maintain the recommended storage temperatures in the event of power outages. Backup generators should be tested quarterly and should receive maintenance at least annually (check manufacturer specifications for test procedures and maintenance schedules). Backup generators should be of a sufficient capacity to run continuously for 72 hours if necessary. Plans should be made to ensure that an adequate supply of fuel is on hand.
Backup generators.
Emergency Vaccine Retrieval and Storage Plans Prepare a written plan of action in the event of refrigerator or freezer malfunctions, power failures, natural disasters, or other emergencies that might compromise proper vaccine storage. See Emergency Vaccine Retrieval and Storage Plan in the Storage and Handling Plans section for more details.
Centers for Disease Control and Prevention
Page 22 of 22