UTS: Library Using EndNote X8 for Windows · transferred from EndNote into a Word document,...
22
UTS: Library Using EndNote X8 for Windows A guide to EndNote X8 for Windows by Information Services Staff April 2017
Transcript of UTS: Library Using EndNote X8 for Windows · transferred from EndNote into a Word document,...

UTS: Library
Using EndNote X8 for Windows
A guide to EndNote X8 for Windows
by Information Services Staff
April 2017

UTS CRICOS Provider Code: 0009F Page 2 of 22
Table of Contents
1. What is EndNote? 3
2. Getting started with an EndNote Reference Library 3
2.1 Reference libraries
2.2 Creating and Opening a reference library
2.3 Adding references manually to your reference library
2.4 Creating a backup copy of your reference library
3. Managing the references in your Reference Library 5
3.1 Editing references
3.2 Creating Groups of references within your reference library
3.3 Searching your reference library
3.4 Removing duplicate references
3.5 Find reference updates
4. EndNote and Attachments (such as the Full text of references) 7
4.1 Attaching saved files (pdf and other formats) to references 4.2 Using SFX to find and attach pdf files to your references
4.3 Importing pdf files directly into your EndNote library
5. Reference Styles 8
5.1 Reference styles at UTS
5.2 Adding more reference styles
5.3 Customising a reference style
6. Saving references from UTS Library Catalogue and Journal Databases 11
6.1 Direct export from some journal databases into EndNote
6.2 Connection files & Online searching
7. Transferring references into your Document and creating a Bibliography 14
7.1 Inserting in-text citations
7.2 Creating a bibliography and changing reference style
7.3 Changing the layout of your bibliography
7.4 Adding page numbers to in-text citations
7.5 Other changes to in-text citations
7.6 Unformatting a document and Merging Word documents
7.7 Removing Field Codes
7.8 Making a stand-alone bibliography in Word from part or all of your library
7.9 Creating a Subject Bibliography
8. Inserting Figures with Captions into your Document 19
8.1 Attaching a Figure to a reference in your EndNote library
8.2 Inserting (and referring to) a Figure in your document
8.3 Changing the Figure attached to an EndNote reference
9. EndNote Online & Sharing your EndNote Library 20
10. Editing EndNote Preferences 22

UTS CRICOS Provider Code: 0009F Page 3 of 22
1. What is EndNote?
EndNote is a software program that stores and organises your references. References can be
transferred from EndNote into a Word document, automatically generating in-text citations
and an end-of-paper bibliography, all correctly formatted in your choice of referencing style.
The version of EndNote covered by this Guide is EndNote X8 (version 18) for Windows.
The versions of Word covered are 2016 & 2013 for Windows.
UTS Library’s EndNote web pages can be reached from the Library Home Page via the
Referencing link in the Quick Links section on the right.
EndNote is available at no cost to UTS staff and students, but it must be downloaded
and installed onto your computer from the Library web pages (UTS login required).
2. Getting started with an EndNote Reference Library
2.1 Reference libraries
References (citations) are stored in an EndNote Library. You can create more than one
library, but it’s usually best to store all your references in a single library, even if they are
being used for several unrelated projects (you can use Groups to organise them: see Section
3.2). You will need to be able to access this library from each computer you may be working
on (see next section).
2.2 Creating and Opening a reference library
Once you install EndNote, you will be asked if you want to create a new reference library or
use an existing one. To create a new library, click on File, New, give the library a name,
select a location (which should be a USB or portable hard drive if you want to use it on
more than one computer), and click on Save. EndNote will try to open the library you used
most recently on your current computer. To open a different library, click on File, Open.
It is also possible to store EndNote libraries in cloud-based services such as Dropbox and
Cloudstor. EndNote has its own cloud-based service, EndNote Online that can be used to
access your library from multiple computers: see Section 9 for more information.
In EndNote, libraries have “panels”. You can change the way the panels are displayed by
using the Layout drop-downs: in the bottom right corner of the library (see Figure 1).
UTS CRICOS Provider Code: 0009F Page 4 of 22
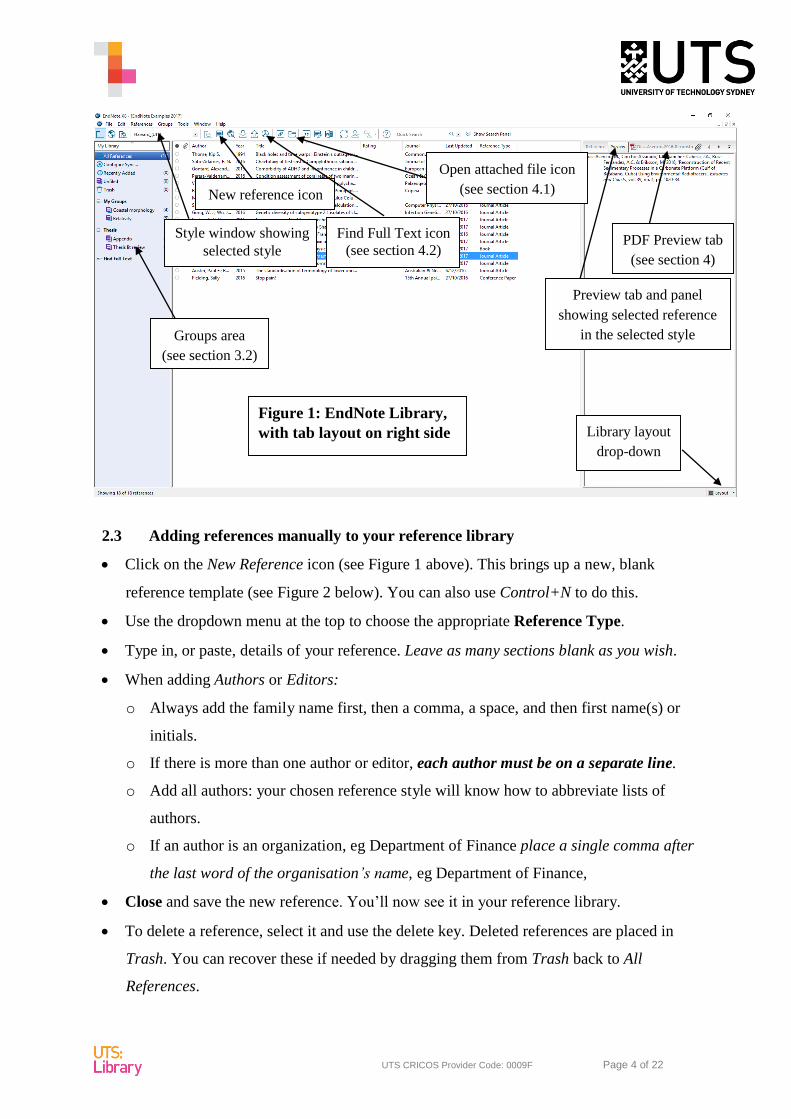
2.3 Adding references manually to your reference library
Click on the New Reference icon (see Figure 1 above). This brings up a new, blank
reference template (see Figure 2 below). You can also use Control+N to do this.
Use the dropdown menu at the top to choose the appropriate Reference Type.
Type in, or paste, details of your reference. Leave as many sections blank as you wish.
When adding Authors or Editors:
o Always add the family name first, then a comma, a space, and then first name(s) or
initials.
o If there is more than one author or editor, each author must be on a separate line.
o Add all authors: your chosen reference style will know how to abbreviate lists of
authors.
o If an author is an organization, eg Department of Finance place a single comma after
the last word of the organisation’s name, eg Department of Finance,
Close and save the new reference. You’ll now see it in your reference library.
To delete a reference, select it and use the delete key. Deleted references are placed in
Trash. You can recover these if needed by dragging them from Trash back to All
References.
Style window showing
selected style
Figure 1: EndNote Library,
with tab layout on right side
Open attached file icon
(see section 4.1)
Preview tab and panel
showing selected reference
in the selected style
New reference icon
Groups area
(see section 3.2)
PDF Preview tab
(see section 4)
Library layout
drop-down
Find Full Text icon
(see section 4.2)

UTS CRICOS Provider Code: 0009F Page 5 of 22
2.4 Creating a backup copy of your EndNote library
Do this regularly! The best way is to click on File (in EndNote’s menu bar), then
Compressed Library. Create your compressed library (ie your backup) With File
Attachments (see Section 4) and (normally) from All References in Library. Choose where to
save the backup (not on the same computer!). It’s a good idea to add the date into the name
of the backup, and possibly a word such as backup. A compressed library is a single file
containing both your EndNote Library and its .Data folder that contains any attachments
(see Section 4.1).
3. Managing the references in your Reference Library
3.1 Editing references
To edit a reference, double click on it in the library to bring up its template. You can add or
delete data, or change reference type. Then close the template window and save changes.
Use the Research Notes field for your own notes, such as summaries, useful features
they contain, and so on. You can add as much information here as you wish.
Use the Show/ Hide Empty Fields icon (see Figure 2 below) to show or hide any empty
fields (note that this will affect all the references in your library).
Figure 2: New reference
template
Drop down list of reference types
List of fields waiting
for you to add the
details of the reference
Formatting icons: useful for
changing case, or if you need
superscripts such as 2nd
Show / Hide empty
fields icon
Attach Figure icon
(see section 8)
Change case icon
UTS CRICOS Provider Code: 0009F Page 6 of 22
3.2 Creating Groups of references within your Reference Library
Right click in the Groups area on the left of your library (see Figure 1) and select
Create Group to create & name a new Group. You can create lots of Groups!
Copy references into a Group by selecting in All References, then drag and drop onto the
Group name. Each reference can be copied into as many Groups as you like.
Or, right click on selected references & Add References To your chosen Group.
Click on the name of a Group to show just the references in that Group.
Groups only contain copies of the references. If you delete a reference from a Group, or
even delete the entire Group, the references will still be in All References. (But if you
delete a reference from All References it is also deleted from all the Groups it was in).
Use Create Group Set to help you organise your Groups. Dragging a Group onto a
Group Set moves it under the Group Set heading.
You can also create Smart Groups: this lets you specify in advance certain properties
for all the references in the Smart Group (eg certain words appearing in certain fields).
References with these properties (including later additions) are automatically added to
the Smart Group.
The Unfiled group always shows those references that have not yet been added to any
Group.
When you import references from a database (see Section 6.1) a temporary Group is
created that contains the most recently imported references.
When you insert references into a Word document (see Section 7), a temporary Group is
created that contains all the inserted references in the document.
3.3 Searching your reference library
With your reference library open, click on All References and then use the Quick Search
window in the library menu bar. Use Show Search Panel if you want to search specific
fields of your references. You can force Match Case or Match Word if you wish.
3.4 Removing duplicate references
Click on References (in EndNote’s menu bar), then Find Duplicates. Pairs of duplicates are
displayed, allowing you to keep the ones you want. Differences between the pairs are
highlighted to help you decide which one you want to keep. Deleted duplicates are moved to
UTS CRICOS Provider Code: 0009F Page 7 of 22
Trash. If unsure, always keep the left reference of a pair, because this has been in your
library the longest.
3.5 Find reference updates
This allows you to update the data in the fields of your journal article references. It works
best if you have an article’s DOI (digital object identifier) but can sometimes work with
author, year and journal name instead. This is especially useful if you have a pdf file that
cannot be imported into your library (see Section 4.3) but which has a DOI (not all pdfs have
a DOI, unfortunately). Make sure the DOI is in a reference’s DOI field (all other fields can
be empty), select it in your EndNote library, and then select References, Find Reference
Updates … If updated data can be located, you will be shown a template with the updated
data, which you can transfer into your original reference in EndNote.
4. EndNote and Attachments (such as the Full text of references)
4.1 Attaching saved files (pdf or any other format) to a reference
Drag the icon of the saved file and drop it onto the reference in your EndNote library.
Alternatively, right click on the reference you want to attach the file to, and choose File
Attachments, Attach File ... Choose your file and then click on Open.
A paperclip symbol appears next to each reference with an attached file. (You may need
to open and then close the reference to see this paperclip). To open an attached file,
select the reference and click on the Open Attached File icon (see Figure 1).
You can attach more than one file to a reference, and the files can be in any format.
You can see which files have been attached to a reference by opening the reference and
scrolling down to the File Attachments field. You will see icons for any attached files.
Clicking on an icon will open its file. Deleting an icon deletes the attached file it
represents.
Once a file is attached, you no longer need the saved original: attaching a file copies and
stores it in a folder that was automatically created when you created your reference
library. This folder has the same name as the library, but with a .Data extension instead
of .enl. It contains all your attached files (so it is very important!) and is stored with its
associated library. The .Data folder is automatically backed up when you use File,
Compressed Library to create a backup copy of your reference library (see Section 2.4).
The .Data folder also contains details about your Groups (see Section 3.2) and attached
figures (see Section 8).

UTS CRICOS Provider Code: 0009F Page 8 of 22
4.2 Using SFX to find and attach pdf files to your references
If you have references in your library but no saved pdf files, you can get EndNote to find
and attach the pdfs, if UTS Library subscribes to a database that contains the required pdf.
Click on Edit, Preferences.
Select Find Full Text from the list of preferences on the left of the preferences window.
In the Open URL Path box, type: http://sfx.lib.uts.edu.au/sfx_local
In the Authenticate with box, type: http://www.lib.uts.edu.au/auth/login
Then click on OK. If you now select one or more references in your EndNote library
and click on the Find Full Text icon in EndNote’s menu bar, EndNote will search the
library’s databases for full text and (if successful) attach pdfs to the selected references.
4.3 Importing pdf files directly into your EndNote library
If you have saved pdf files but do not yet have references for them in your EndNote library,
you can import them into your EndNote library, automatically creating a reference from
data in each, and then attaching the pdf to it. This can be done for individual files, or for a
folder of saved pdfs.
However, the original pdf must be in a format that allows EndNote to extract citation data,
and unfortunately many pdfs are not in this format.
In EndNote, click on File, Import. Choose File... or Folder... Then select an individual
pdf file or folder of pdfs, set Import Option to PDF, and click Import.
A short cut for the above is to drag the pdf icon onto the Preview area of the Library
window.
You’ll see each new reference in your library, with its pdf attached. Note that if the pdf is
not in a compatible format the reference will have the name of the pdf file in <angle
brackets> in the title field and all other fields will be empty. If this happens, and your pdf
has a DOI, you can use Find reference updates (see Section 3.5) to correctly populate the
empty fields. Otherwise, you will need to copy details into each field from the attached pdf.
5. Reference Styles
5.1 Reference styles at UTS
Many areas of UTS use the reference style Harvard (UTS) which is derived from the
Australian Government’s Style Manual (6th edition, 2002). The Faculty of Law uses the
AGLC style which is based on the Australian Guide to Legal Citation (3rd edn, 2010).
UTS CRICOS Provider Code: 0009F Page 9 of 22
EndNote’s current style is shown in the style window at the top left (see Figure 1).
EndNote comes with many reference styles to choose from. To see them, use the style
window’s dropdown menu to Select Another Style.
Most of EndNote’s styles are based on the preferred style of various journals. Choosing
a style adds it to the dropdown menu in EndNote’s style window.
Harvard (UTS) and AGLC are not initially in the Select Another Style list (there are
other versions of Harvard which you should not use). Add them to the list from UTS
Library’s website: click on Referencing in Quick Links, EndNote, then Download
Referencing Styles.
5.2 Adding more reference styles
Harvard (UTS) style can be saved into EndNote from the library’s EndNote web pages.
You can also add more styles from EndNote’s website by clicking on Edit, Output
Styles, Open Style Manager and then on the Get More on the Web button in the
bottom right corner. Download individual styles by clicking on the Download link next
to each.
When adding new styles, if a download window appears, select Open (Internet
Explorer) or Open with EndNote (Firefox). In Chrome the style may be saved into
your downloads folder. If this happens, right click on the downloaded style and Open
with EndNote.
The style then opens in EndNote: click on File, Save As. Edit the style name if
necessary (there might be some unwanted text or symbols) and then click on Save.
Close the style window in EndNote and then use Select Another Style to choose it.
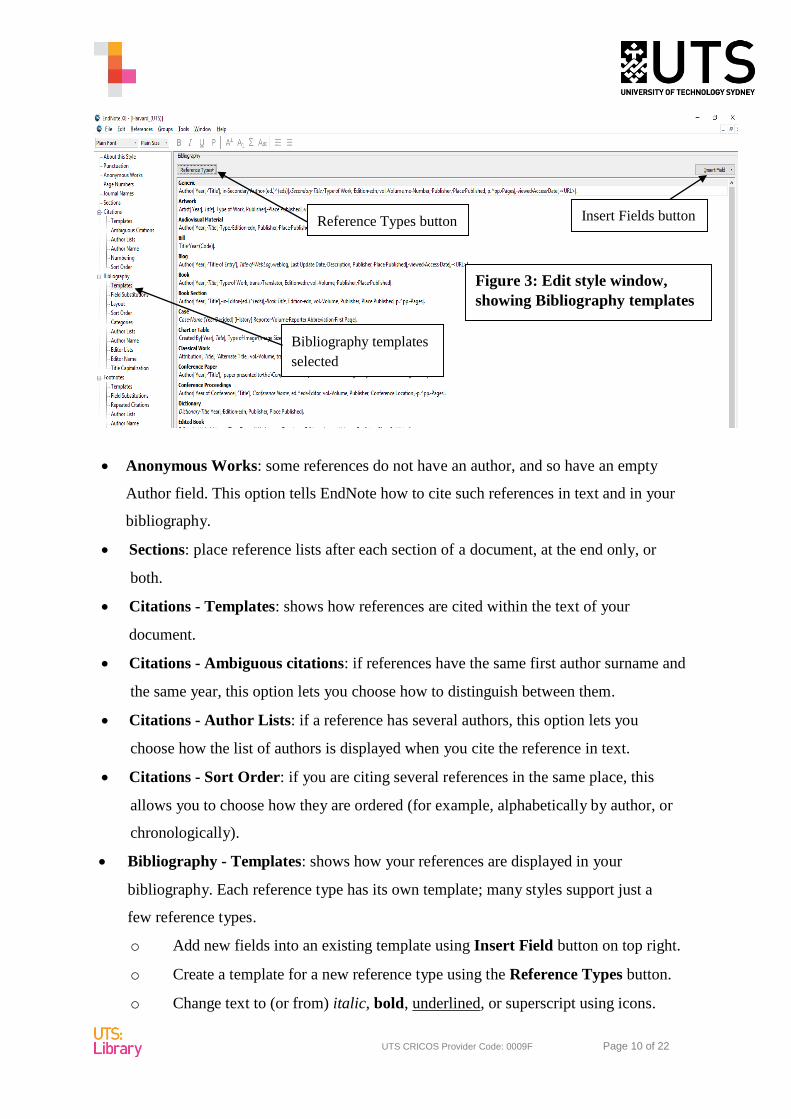
5.3 Customising a reference style
Reference styles in EndNote are easy to customise. To edit a reference style, first select it
in the style window. Then click on Edit, Output Styles, then Edit “your selected style”.
The Edit Style window appears (see Figure 3). You will see many options in the column
on the left.
UTS CRICOS Provider Code: 0009F Page 10 of 22
Anonymous Works: some references do not have an author, and so have an empty
Author field. This option tells EndNote how to cite such references in text and in your
bibliography.
Sections: place reference lists after each section of a document, at the end only, or
both.
Citations - Templates: shows how references are cited within the text of your
document.
Citations - Ambiguous citations: if references have the same first author surname and
the same year, this option lets you choose how to distinguish between them.
Citations - Author Lists: if a reference has several authors, this option lets you
choose how the list of authors is displayed when you cite the reference in text.
Citations - Sort Order: if you are citing several references in the same place, this
allows you to choose how they are ordered (for example, alphabetically by author, or
chronologically).
Bibliography - Templates: shows how your references are displayed in your
bibliography. Each reference type has its own template; many styles support just a
few reference types.
o Add new fields into an existing template using Insert Field button on top right.
o Create a template for a new reference type using the Reference Types button.
o Change text to (or from) italic, bold, underlined, or superscript using icons.
Bibliography templates
selected
Figure 3: Edit style window,
showing Bibliography templates
Reference Types button Insert Fields button
UTS CRICOS Provider Code: 0009F Page 11 of 22
o Place quotation marks, brackets, commas or other punctuation where needed.
o Insert your own text. If the inserted text refers to a Field, you should link it to
the Field with a Link Adjacent Text symbol by using the Insert Field button.
This is so that if the Field happens to be empty your text will not appear. For
example, if your template has Vol. Volume, using a Link Adjacent Text
symbol to link “vol.” to the field name “Volume” stops “vol.” appearing if the
Volume field of a reference is empty.
Bibliography - Author Lists and Editor Lists: allows you to specify how
references with multiple authors or multiple editors are displayed in your
bibliography. Note that “Editor Lists” only governs editors in references with both
authors and editors, eg Book Section.
Bibliography - Layout: allows you to add text, fields (eg Research Notes) or blank
lines, before or after each reference in your bibliography. Also controls if references
are indented.
Bibliography - Sort Order: allows you to specify how your bibliography is
ordered, for example by order of appearance (used for a numbered style), or
alphabetically by author.
Categories: group different reference types together as categories in your
bibliography.
Footnotes: determines whether references cited in footnotes have the same format as
the in-text citations, the same format as the bibliography, or some other, customised
format.
Figures and Tables: you can choose whether figures or tables appear in-text or as a list
at the end, and choose the location of figure labels and captions (see Section 8).
When you finish customising your style, click on File, Save As and give the customised style a
new name. This preserves the original style, which you may need later.
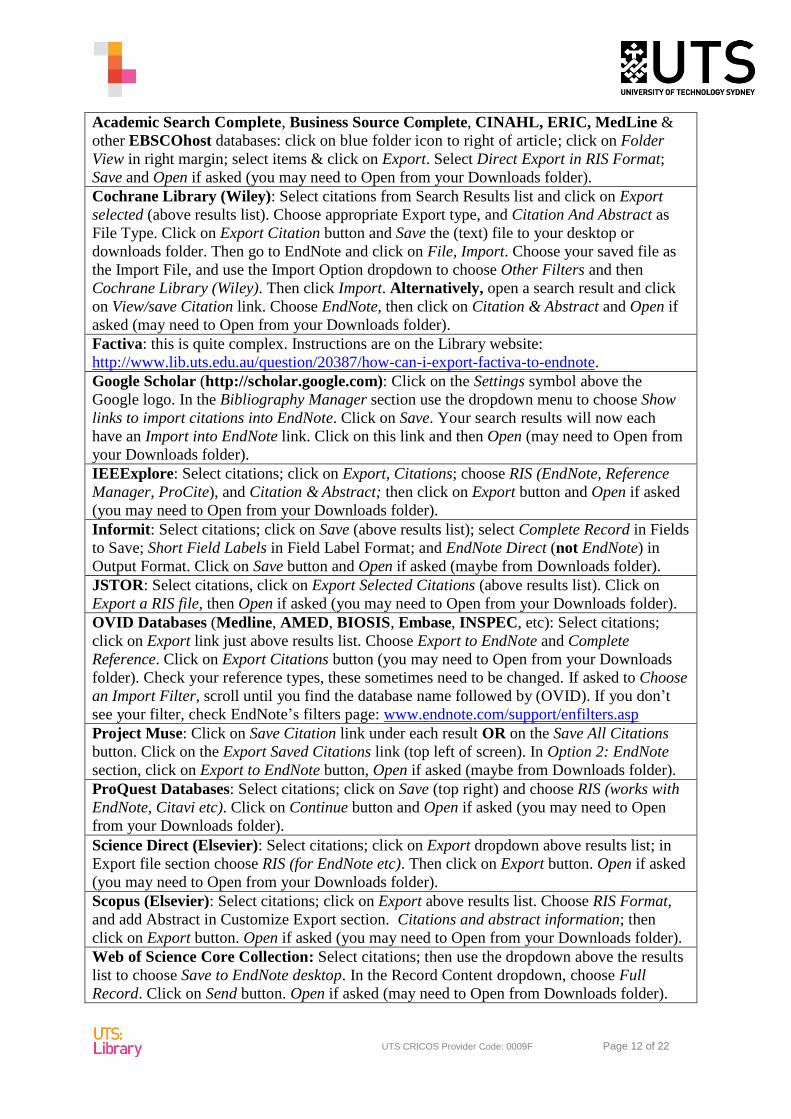
6. Saving references from UTS Library Catalogue and Journal Databases
6.1 Direct export from some journal databases into EndNote
Many databases allow “direct export” of citations into EndNote. The table below gives
brief instructions for some of these.
UTS CRICOS Provider Code: 0009F Page 12 of 22
Academic Search Complete, Business Source Complete, CINAHL, ERIC, MedLine &
other EBSCOhost databases: click on blue folder icon to right of article; click on Folder
View in right margin; select items & click on Export. Select Direct Export in RIS Format;
Save and Open if asked (you may need to Open from your Downloads folder).
Cochrane Library (Wiley): Select citations from Search Results list and click on Export
selected (above results list). Choose appropriate Export type, and Citation And Abstract as
File Type. Click on Export Citation button and Save the (text) file to your desktop or
downloads folder. Then go to EndNote and click on File, Import. Choose your saved file as
the Import File, and use the Import Option dropdown to choose Other Filters and then
Cochrane Library (Wiley). Then click Import. Alternatively, open a search result and click
on View/save Citation link. Choose EndNote, then click on Citation & Abstract and Open if
asked (may need to Open from your Downloads folder).
Factiva: this is quite complex. Instructions are on the Library website:
http://www.lib.uts.edu.au/question/20387/how-can-i-export-factiva-to-endnote.
Google Scholar (http://scholar.google.com): Click on the Settings symbol above the
Google logo. In the Bibliography Manager section use the dropdown menu to choose Show
links to import citations into EndNote. Click on Save. Your search results will now each
have an Import into EndNote link. Click on this link and then Open (may need to Open from
your Downloads folder).
IEEExplore: Select citations; click on Export, Citations; choose RIS (EndNote, Reference
Manager, ProCite), and Citation & Abstract; then click on Export button and Open if asked
(you may need to Open from your Downloads folder).
Informit: Select citations; click on Save (above results list); select Complete Record in Fields
to Save; Short Field Labels in Field Label Format; and EndNote Direct (not EndNote) in
Output Format. Click on Save button and Open if asked (maybe from Downloads folder).
JSTOR: Select citations, click on Export Selected Citations (above results list). Click on
Export a RIS file, then Open if asked (you may need to Open from your Downloads folder).
OVID Databases (Medline, AMED, BIOSIS, Embase, INSPEC, etc): Select citations;
click on Export link just above results list. Choose Export to EndNote and Complete
Reference. Click on Export Citations button (you may need to Open from your Downloads
folder). Check your reference types, these sometimes need to be changed. If asked to Choose
an Import Filter, scroll until you find the database name followed by (OVID). If you don’t
see your filter, check EndNote’s filters page: www.endnote.com/support/enfilters.asp
Project Muse: Click on Save Citation link under each result OR on the Save All Citations
button. Click on the Export Saved Citations link (top left of screen). In Option 2: EndNote
section, click on Export to EndNote button, Open if asked (maybe from Downloads folder).
ProQuest Databases: Select citations; click on Save (top right) and choose RIS (works with
EndNote, Citavi etc). Click on Continue button and Open if asked (you may need to Open
from your Downloads folder).
Science Direct (Elsevier): Select citations; click on Export dropdown above results list; in
Export file section choose RIS (for EndNote etc). Then click on Export button. Open if asked
(you may need to Open from your Downloads folder).
Scopus (Elsevier): Select citations; click on Export above results list. Choose RIS Format,
and add Abstract in Customize Export section. Citations and abstract information; then
click on Export button. Open if asked (you may need to Open from your Downloads folder).
Web of Science Core Collection: Select citations; then use the dropdown above the results
list to choose Save to EndNote desktop. In the Record Content dropdown, choose Full
Record. Click on Send button. Open if asked (may need to Open from Downloads folder).

UTS CRICOS Provider Code: 0009F Page 13 of 22
6.2 Connection files & Online searching
References can be electronically transferred into EndNote from library catalogues using
Online Search with Connection Files. EndNote comes with many connection files, but due
to access restrictions by commercial databases, it is not possible to use most of EndNote’s
database connection files. Connection files work fine with most library catalogues and the
PubMed database, because access to these is usually free. There are two methods of using
Online Search:
In the first method, click on the Online Search Mode icon in the menu bar (see Figure 4
below) and select a library from the Online Search list (click on more… to see the full list).
UTS Library is listed as “U Technology Sydney”. If you don’t see “U Technology Sydney”,
go to the library’s EndNote web page for instructions to add it to the list of connections.
When you select an online search, you’ll see its search window above your library.
Select which fields to search, type in your search terms, and click on Search. The
Confirm Online Search box will appear with the number of retrieved titles. This
number should not be too large (less than 30 is best), then select OK. If necessary,
modify your search (eg by adding extra terms, or best of all search for a known item by
title) to lower the number of results.
Click on a search result and then on the Copy to Local Library icon (see Figure 4) to
add it to your reference library. Hold down the Control key while clicking to select
Hide or show
the search panel
Integrated
Library & Online
Search Mode
icon
Online Search
Mode icon
(selected)
Local Library Mode
icon (this is selected
in Figure 1)
Online Search list with UTS
Library selected (use
“more…” to add to this list)
Search results Figure 4: Online
Search Mode
Copy to Local
Library icon
Search terms

UTS CRICOS Provider Code: 0009F Page 14 of 22
more than one.
Always check recently transferred references for errors.
Return to your reference library by clicking on the Local Library Mode icon.
In the second method, click on the Integrated Library & Online Search Mode icon (see
Figure 4 above) and choose an online search as above. In this mode, all found references
are automatically added to All References (ie to your main EndNote library). You will need
to delete any reference you don’t want to keep. This method is simpler but you may end up
doing a lot of deleting which can be very time-consuming, and which is avoided by the
first method.
7. Transferring references into a Word document and creating a
bibliography
Installing EndNote automatically creates an extra tab in Word (see Figure 5 below). The
options in the tab enable Word and EndNote to interact. Extra options are also created in
OpenOffice.
7.1 Inserting in-text citations
In Word you should see the EndNote X8 Tab, see Figure 5 below. Place your mouse
pointer over each of the options in the tab to show its function.
The current reference style of the Word document is indicated in the Style window in
the tab, and can be changed using the dropdown menu as in your EndNote library.
Return to EndNote and choose the reference you wish to insert. To select more than one
at a time, hold down the Control key.
Return to Word and place the cursor in the document where you wish to cite the
reference(s).
Click on Insert Citation, then Insert Selected Citation(s). (Make sure you click on the
Insert Citation text and not on the icon above it). The selected citation(s) will appear as
an in-text citation, and also in a reference list created at the end of the document.
EndNote usually automatically formats in-text citations into your chosen style, and
automatically creates a formatted bibliography from the inserted citations. This is called
Instant Formatting, or Cite-While-You-Write (CWYW).
Instant Formatting can be switched off and on using the Instant Formatting option .
Switching off can be useful if your document is large and contains many citations. When

UTS CRICOS Provider Code: 0009F Page 15 of 22
instant formatting is on, you may notice that adding each new citation causes Word to
pause while EndNote updates all the citations in the document: switching off instant
formatting stops this from happening. When you do this, citations are inserted in
unformatted format (see Section 7.6); you can format them all whenever you like using
Update Citations and Bibliography.
7.2 Creating a bibliography and changing reference style
EndNote normally creates the bibliography automatically, but if any citations have not
been automatically formatted, click on Update Citations and Bibliography.
To change the reference style of your document, just use the dropdown in the style
window.
7.3 Changing the layout of your bibliography
Click on the very small Bibliography preferences icon (see Figure 5 above), and then on
the Layout tab. You’ll see options to change the font and size of the bibliography text,
add space after each line or after each reference, and change the amount of hanging
indent (for references that cover more than one line).
These changes only apply to Word document you’re currently working on, unlike
changes made to styles which then apply to all documents that use that style.
7.4 Adding page numbers to in-text citations
Click on a formatted citation in your Word document. It should be “greyed out”. This is
due to the hidden “field codes” that enable Word and EndNote to communicate.
Figure 5: EndNote
tab in Word
Bibliography preferences icon
(very small!)
Insert Selected
Citation(s) and Insert
Figure options: to
see these, first click
on Insert Citation
drop down menu
Current reference
style in Style window
EndNote tab
Instant formatting
On/Off

UTS CRICOS Provider Code: 0009F Page 16 of 22
Click on Edit & Manage Citation(s) in the EndNote toolbar or tab. The EndNote Edit
& Manage Citations window then appears (see Figure 6 below).
In Harvard (UTS) style you can type page numbers into the Pages box, and then click
OK. However, these page numbers are not always displayed in other reference styles.
An alternative method, which works in all reference styles, is to type page numbers,
plus any associated text and punctuation, into the Suffix box (eg: , p. 9). Then click
on OK.
7.5 Other changes to in-text citations
Remove a citation by selecting it and then using the dropdown Edit Reference menu (see
Figure 6) to select Remove Citation. Then click on OK.
Instead of (Higgs 2001), you may want your formatted reference to read differently.
To make the changes listed below, highlight the reference, click on Edit & Manage
Citation(s), and use the Format dropdown menu (see Figure 6) as follows:
Formatting drop down menu
Drop down Edit Reference menu
(for removing in-text references)
Figure 6: Edit & Manage
Citations window

UTS CRICOS Provider Code: 0009F Page 17 of 22
o … according to Higgs (2001)… Select Exclude Author or Display as Author
(Year) depending on whether you’ve already typed the author’s name into the
text
o … this theory (see also Higgs 2001)… Type “see also” plus a space into Prefix
box
o (Higgs 2001, chapter 3)… Type “chapter 3”, with comma & space, into Suffix
box
o …in 1956, Brown (cited in Higgs 2001, p. 89)… Type “cited in” plus space into
Prefix box, and either “, p. 89” into the Suffix box or “89” into the Pages box
o Reference to Higgs hidden in text, only appearing in bibliography (select Show
Only in Bibliography). This is not advised, because the invisible field codes
remain in the text, and it is difficult to relocate these hidden in-text citations.
7.6 Unformatting a document & Merging Word documents
It is sometimes necessary to unformat your document. Unformatted documents have
no field codes and no bibliography; also, all the in-text citations are in “temporary
format” such as {Smith, 2000 #37}.
To unformat a document, click on Convert Citations and Bibliography and choose
Convert to Unformatted Citations.
To restore formatting for the in-text citations, and recreate the bibliography, click on
Update Citations and Bibliography. This also adds back all the field codes. Your
EndNote library must be open when you do this.
This is very useful if you have several separate documents, each with an EndNote
generated bibliography, and you want to merge them into one document with a
combined bibliography at the end. To do this, open a new blank document, and, in
order:
o Open each separate document
o Convert to Unformatted Citations
o Copy the whole unformatted document, and paste it into the new document
o Close the original document and don’t save changes (ie don’t save the
unformatted version)
o When all the unformatted documents have been pasted one after the other into
the new document, click on Update Citations and Bibliography to restore all
UTS CRICOS Provider Code: 0009F Page 18 of 22
the in-text formatting and to create the combined bibliography at the end.
Note that if your Word document contains references that are no longer in your
EndNote Library (the authors, years and record numbers from the library must all
match those in the unformatted citations in Word) then these will not be able to be
formatted. You may be able to find the correct reference in your Library with a
different record number, in which case you can insert it in place of the old one. If not
you will need to add the reference to your Library and then reformat.
7.7 Removing Field Codes
Once you are ready to publish your document, you can create a “clean” version of it,
without any of EndNote’s hidden field codes (these are what cause all the inserted text
to show as grey when you click on it), but retaining the properly formatted citations and
the formatted bibliography. A clean version is often required by publishers of journal
articles.
To create a copy of a document without field codes, click on Convert Citations and
Bibliography and choose Convert to Plain Text.
Your original document, with the field codes, is still preserved: and this is still the
main version of your document so it is important to save it. If at a later time you need
to add more citations, or edit citations or the bibliography, you will need to do this in
the original document using EndNote, and then create a new copy without the field
codes.
7.8 Making a standalone bibliography in Word from part or all of a reference
library
To make a list of all (or just some) of your references, first open your reference library.
Choose the reference style you require. Note that “Annotated” style displays abstracts,
while “Show All” style displays all the information on each reference card.
Select the references you want, or use Control+A to select them all.
Right click on the selected references and choose Copy Formatted from the menu that
appears.
Paste the copied references into a Word document where you want the list to appear.
Note that this list has no field codes, it is just normal Word text and can be edited as
such.
UTS CRICOS Provider Code: 0009F Page 19 of 22
7.9 Creating a Subject Bibliography
You can create a bibliography from your Library that is divided into subsets of your choice.
For example the subsets might be the different reference types, or keywords, authors, or
publishers.
In EndNote, click on Tools, Subject Bibliography.
From the list of fields, choose the ones you want your generated reference list to be
divided into (it is normally best only to pick a small number, such as one or two, but you
can pick as many as you wish), then click OK.
A list of the different possibilities for these fields then appears. You can Select All of
these, or make a choice. Then click OK.
Your subject bibliography appears. You can select the reference style, or change layout
(however, if you change the layout, the style of your bibliography might not be totally
correct any more). Use Print Preview to see how the references will be displayed. You
can then print or save (in Rich Text Format, which is similar to Word).
8. Inserting Figures with Captions into your document
EndNote allows you to attach figures to references, in formats such as jpg, gif, tiff and bmp.
These can then be inserted into Word documents, automatically adding a caption and an in-
text citation, for example (Figure 183). The actual images are stored in the same .Data
folder that contains attached pdfs (see Section 4.1). A linked mini-image appears in the
Figure field of the relevant reference. Unlike attaching files (Section 4), only one figure can
be attached to each reference.
8.1 Attaching a Figure to a reference in your EndNote library
Open the reference and click on the Attach Figure icon (see Figure 2).
Use Choose File to locate and choose the graphic you wish to attach.
You should see a mini-image of the graphic appear in the Figure field of your reference.
Type the image caption into the Caption field. Leave this field empty if you wish.
Close the reference and save changes. You’ll see a tick in the Figure column of your
library (you may need to change your Display Fields to show the Figure column: see
Section 10).
Note: you cannot edit your caption field text once you have closed and saved the
reference, except by deleting the inserted figure (see last dot point in Section 8.2

UTS CRICOS Provider Code: 0009F Page 20 of 22
below), then changing the caption in your EndNote reference, and then reinserting the
figure.
8.2 Inserting (and referring to) a Figure into your document
In your Word document, place your cursor where you want the in-text figure citation,
eg (Figure 183). Click on Insert Citations, then Insert Figure (see Figure 5 above).
Type a word from any field of the reference (including the caption) into the Find box,
and click on Search. EndNote will find all image references containing this word in
any field.
Select the reference with the figure you want to insert and click on Insert.
A figure citation, eg (Figure 183), is inserted in the text. The figure itself, with label (in
this example Figure 183) and caption, will be at the next paragraph break, or at the end
of the document, depending on the style.
As you insert more figures, more figure citations will be inserted into the text, and the
figures with their labels and captions will appear. Figure citations and labels are
automatically renumbered throughout the document to preserve correct numerical
order – this is the main benefit of inserting figures using EndNote.
The inserted images can be manipulated (eg made larger or smaller) in the same way
as you would with any normal image in your document text.
To delete a figure, select and delete all of its in-text figure citations (not the figure
itself), eg (Figure 183), including parentheses, one by one. Then click on Update
Citations and Bibliography to remove the figure itself.
8.3 Changing the Figure attached to an EndNote reference
Open the reference and attach the new figure. This automatically replaces the old image
in the .Data folder containing the figures themselves (see Section 4.1). If you have
already inserted the figure into a Word document, you’ll need to delete the old figure
citations in Word and reinsert them (see last dot point of Section 8.2).
9. EndNote Online and Sharing your EndNote Library
EndNote Online (formerly called EndNote Web) is a web-based EndNote library. You can
transfer references between your regular “desktop” library and your EndNote Online library.
EndNote X8 allows you to sync your EndNote Online library with EndNote libraries on

UTS CRICOS Provider Code: 0009F Page 21 of 22
different computers; this can be very convenient if you need to access your EndNote library
from several different locations.
To use EndNote Online you should register via the EndNote link in the Web of Science
database (via the Find Databases link on the library homepage). You must have an
email address and you can choose your own password.
To enable the sync process. open your desktop EndNote library and click on the Sync
Library icon in your library’s menu bar. In the preferences window that appears, make
sure you see, or type in, the following:
o In the E-mail Address box: the email address you used to register for EndNote
Online
o Type in the password you created when you registered
o It’s a good idea to remove the tick from the box labelled Sync Automatically, this
stops the library trying to sync when you don’t want it to
o Then click on OK.
See also the Sync preference in Section 10 below.
Although this is not normally necessary (because you would normally use your desktop
library and the Sync Library icon), you can log in to your EndNote Online account
directly (via www.myendnoteweb.com). You can add, edit and group references in your
EndNote Online library more or less like you do in your desktop EndNote library. Direct
export into EndNote Online only works from EBSCO or Web of Science databases.
You can insert references into Word from directly from EndNote Online. Click on
Preferences in Word’s EndNote tab, then Application. Select EndNote Web using the
drop-down, and make sure the EndNote Online details are the same as in the EndNote
preferences listed in the previous dot point. Then click on OK. You’ll see some of the
EndNote icons change in Word. To insert a citation, use the Find Citations icon to
search your EndNote Online library.
Note that the list of styles in EndNote Online is not the same list as in EndNote,
although both have many in common such as Harvard (UTS), AGLC and APA.
You can share your EndNote Library with up to 100 colleagues, provided you have all
registered with EndNote Online, and provided you know the email addresses they used to
register.
Click on the Share Library icon in the toolbar of your EndNote Library. Enter your
colleagues’ email addresses and click on the Invite button. When they accept the

UTS CRICOS Provider Code: 0009F Page 22 of 22
invitation they will be able to access your Library. You can use the Activity Feed
icon to monitor any changes they make. If necessary, you can remove colleagues
from the list of those having access to your library.
10. Editing EndNote Preferences
EndNote can be customised in several more ways by choosing Edit in the EndNote menu
bar at the top of the page, then Preferences.
Choose which reference library is opened automatically when you start EndNote, by
clicking on Libraries in the Preferences window.
Create a new reference type, or modify existing reference types, by clicking on
Reference Types, and then on Modify Reference Types. You can also Import a
whole set of new reference types, for example the legal reference types used with
the AGLC style.
Use Sorting to ignore certain words in titles or in author names when ordering your
bibliography (eg you may want de Gaulle with the G surnames rather than the D
surnames).
Use Change Case to tell EndNote how to capitalise certain words. This is only needed
for reference styles which have capitalisation built into the style. It is not needed for
most styles, like Harvard (UTS) and AGLC, which leave capitalisation of words as
entered.
Use Display Fields to change what is displayed in the columns of your reference library.
For example, you may wish to display the Record Number. Record numbers are
allocated when references are added to a library, so your most recently entered
references will have the largest record numbers and can thus be easily identified. You
may also wish to display the Figure column, which shows (using ticks) which references
have attached figures.
Use Sync to choose how your EndNote library synchronises with your EndNote Online
library (see Section 9); and Share Library to share your library with colleagues via
EndNote Online.
Use Find Full Text to set your Open URL Path and locate full text of articles (see
Section 4.2).