USING VMWARE HORIZON - USC Dana and David … · VMware Horizon software provides the ability to...
18
U N I V E R S I T Y O F S O U T H E R N C A L I F O R N I A USING VMWARE HORIZON USER’S GUIDE FOR WINDOWS NOVEMBER 2015
Transcript of USING VMWARE HORIZON - USC Dana and David … · VMware Horizon software provides the ability to...

U N I V E R S I T Y O F S O U T H E R N C A L I F O R N I A
USING VMWARE HORIZON
USER’S GUIDE FOR WINDOWS
NOVEMBER 2015
U N I V E R S I T Y O F S O U T H E R N C A L I F O R N I A
©2015 University of Southern California. All rights reserved.
© 2015 UNIVERSITY OF SOUTHERN CALIFORNIA. All rights reserved.
This manual, as well as the data and software implementation described in it, is furnished under license and may be used or copied only in accordance with the terms of such license. The content of this manual is furnished for informational use only, is subject to change without notice, and should not be construed as a commitment on the part of the University of Southern California.
Except as permitted by such license, no part of this publication may be reproduced, stored in a retrieval system, or transmitted, in any form or by any means, electronic, mechanical, recording, or otherwise, without the prior written permission of the University of Southern California.
The data and software implementation, as with all technical and computer-aided design software, is a tool intended to be used by trained professionals only. The data and the software implementation is not a substitute for the professional judgment of trained professionals. The software implementation is intended to assist with product design and is not a substitute for independent testing of product stress, safety and utility. The University of Southern California assumes no liability for any error or inaccuracies that may appear in this manual. The University of Southern California makes no warranties with respect to this manual and disclaims any implied warranties of merchantability and fitness for a particular purpose.
U.S. Government Customers:
The Products are provided to the Federal government and its agency with RESTRICTED RIGHTS. USE, DUPLICATION OR DISCLOSURE BY THE GOVERNMENT IS SUBJECT TO RESTRICTIONS SET FORTH IN SUB-PARAGRAPH (c)(1)(ii) OF THE RIGHTS IN TECHNICAL DATA AND COMPUTER SOFTWARE CLAUSE AT DFARS 252.227-7013 OR SUB-PARAGRAPHS (c)(1) O R (2) OF THE COMMERCIAL COMPUTER SOFTWARE-RESTRICTED RIGHTS AT 48 CFR 52.227-19, AS APPLICABLE.
TABLE OF CONTENTS
©2015 University of Southern California. All rights reserved. 2
TABLE OF CONTENTS Chapter 1: Using VMware Horizon ........................................................................................... 3
Installing the VMware Horizon Software ................................................................................................ 3
CHapter 2: Using the VMware Horizon Environment ............................................................ 15
Using the Options Menu ....................................................................................................................... 15 Using Your USB Drive with VMware Horizon Software ......................................................................... 16 Send Ctrl-Alt-Delete Menu Option ........................................................................................................ 16
Contact Dornsife Technology Services ................................................................................... 17
INSTALLING AND CONFIGURING
©2015 University of Southern California. All rights reserved. 3
CHAPTER 1: INSTALLING AND CONFIGURING VMWARE HORIZON
VMware Horizon software provides the ability to log into a virtual desktop environment and utilize full operating system functionality. Utilizing a virtual desktop environment enables users to run software and other programs that may not function on their workstation.
Installing the VMware Horizon Software Complete the following steps to install the VMware Horizon software on your workstation. You will need to connect to the USC VPN network in order to complete these steps.
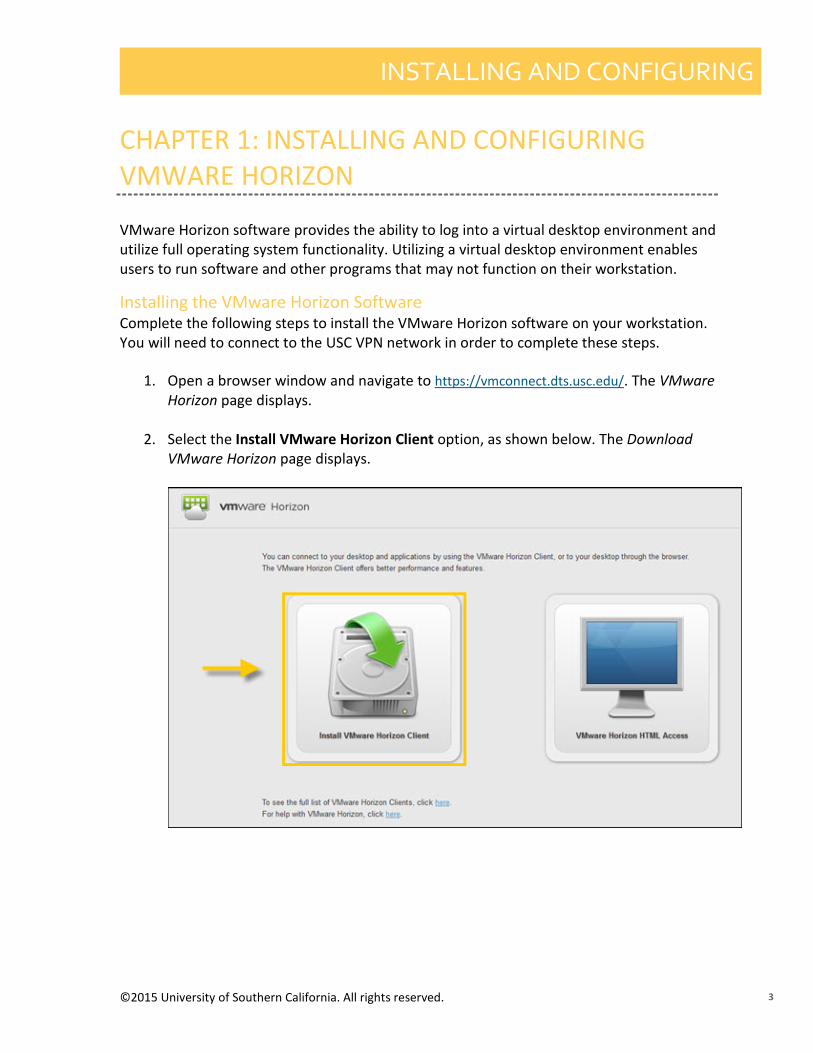
1. Open a browser window and navigate to https://vmconnect.dts.usc.edu/. The VMware Horizon page displays.
2. Select the Install VMware Horizon Client option, as shown below. The Download VMware Horizon page displays.
INSTALLING AND CONFIGURING
©2015 University of Southern California. All rights reserved. 4
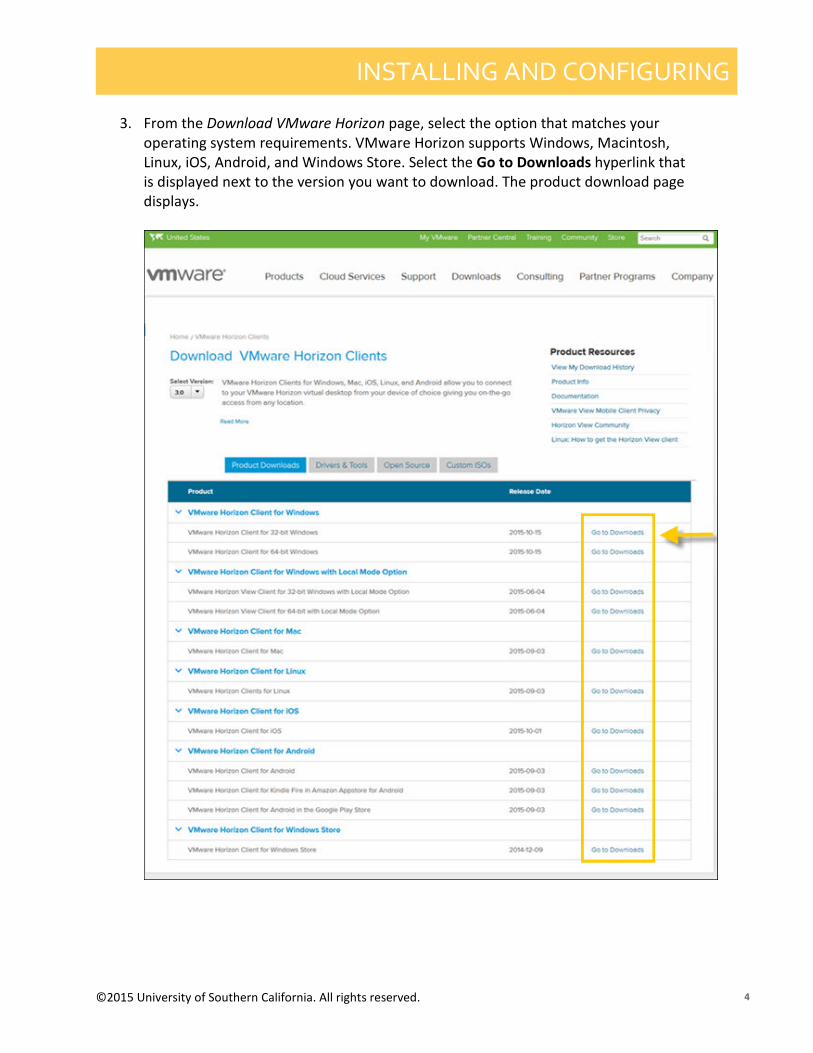
3. From the Download VMware Horizon page, select the option that matches your operating system requirements. VMware Horizon supports Windows, Macintosh, Linux, iOS, Android, and Windows Store. Select the Go to Downloads hyperlink that is displayed next to the version you want to download. The product download page displays.

INSTALLING AND CONFIGURING
©2015 University of Southern California. All rights reserved. 5
4. On the product download page, select the Download button. A prompt box displays.
5. Select the Save or Save File option (this will vary, depending on the browser you use). The file will download to your workstation.

INSTALLING AND CONFIGURING
©2015 University of Southern California. All rights reserved. 6
6. After the file has finished downloading, locate the file and double-click the file. Depending on your Windows Security settings, you may receive a User Account Control prompt that asks you to authorize the changes that are about to be made to your workstation. Select the Yes button to continue.
7. After selecting the Yes button. The VMware Horizon Client Setup Wizard displays.

INSTALLING AND CONFIGURING
©2015 University of Southern California. All rights reserved. 7
8. The VMware Horizon Client Setup Wizard begins to install the VM Horizon client (software) on your computer. Select the Next button.
9. Read the End User License Agreement (EULA), and then select the I accept the terms in the License Agreement checkbox.
10. Select the Next button to continue. The Advanced settings screen displays.
INSTALLING AND CONFIGURING
©2015 University of Southern California. All rights reserved. 8
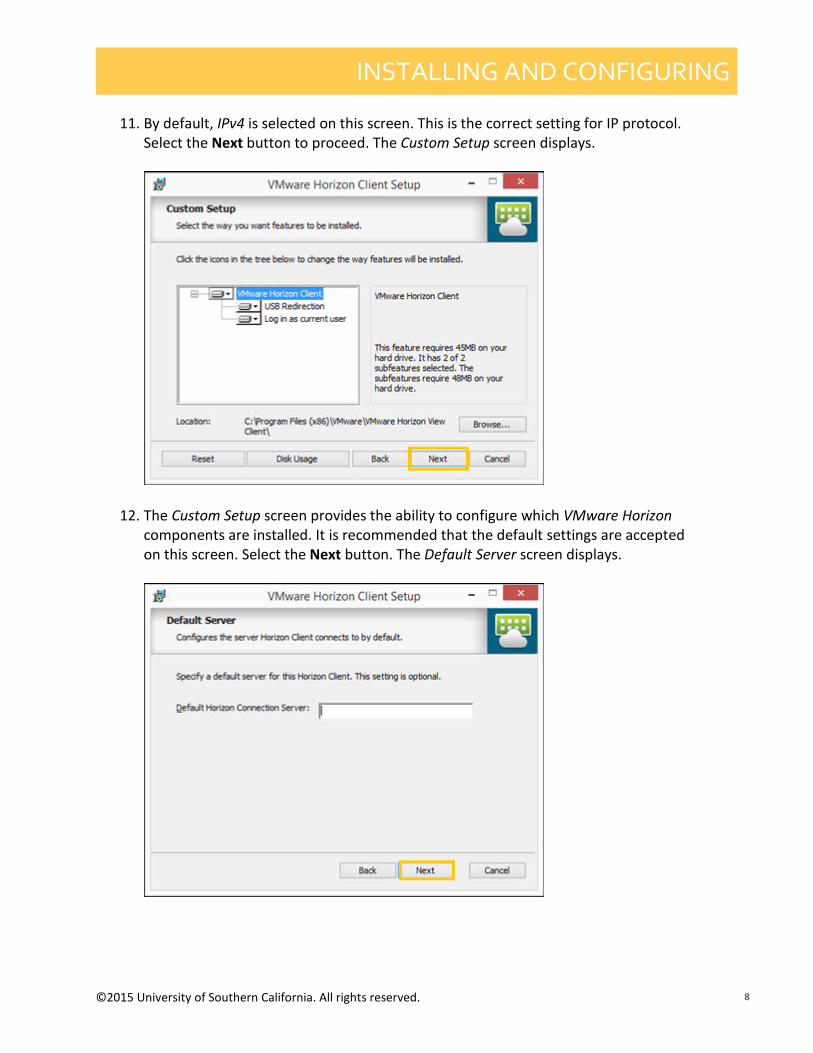
11. By default, IPv4 is selected on this screen. This is the correct setting for IP protocol. Select the Next button to proceed. The Custom Setup screen displays.
12. The Custom Setup screen provides the ability to configure which VMware Horizon components are installed. It is recommended that the default settings are accepted on this screen. Select the Next button. The Default Server screen displays.
INSTALLING AND CONFIGURING
©2015 University of Southern California. All rights reserved. 9
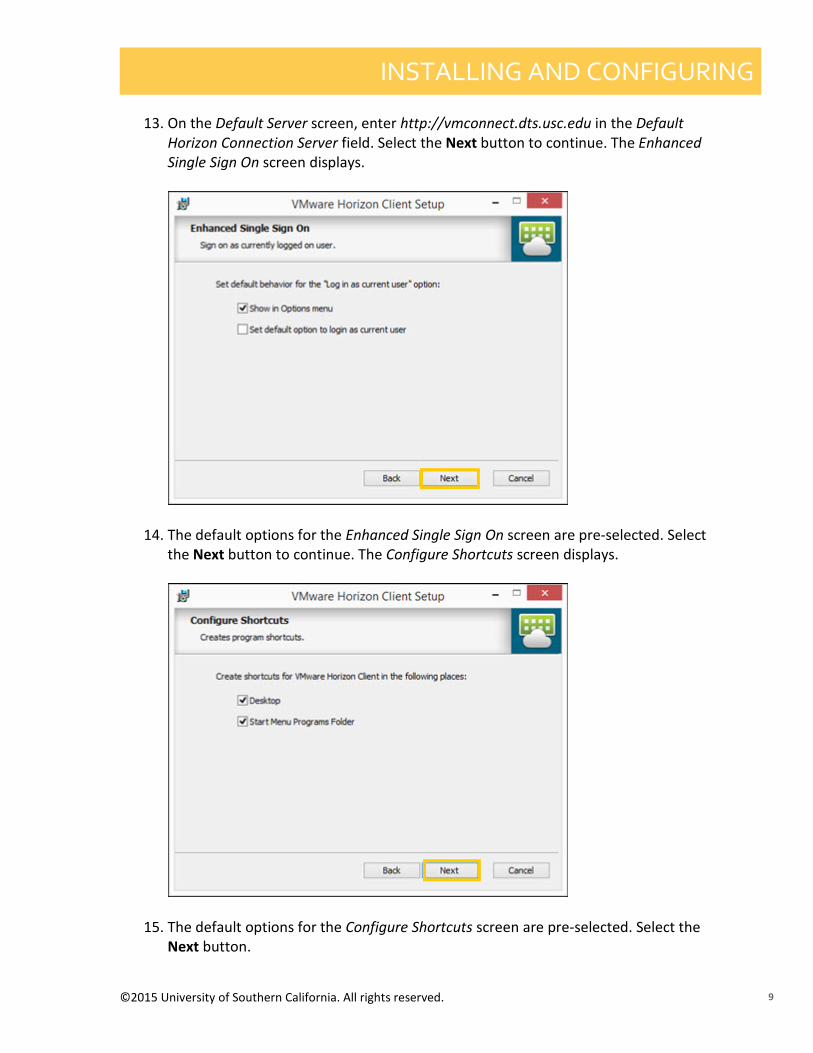
13. On the Default Server screen, enter http://vmconnect.dts.usc.edu in the Default Horizon Connection Server field. Select the Next button to continue. The Enhanced Single Sign On screen displays.
14. The default options for the Enhanced Single Sign On screen are pre-selected. Select the Next button to continue. The Configure Shortcuts screen displays.
15. The default options for the Configure Shortcuts screen are pre-selected. Select the Next button.

INSTALLING AND CONFIGURING
©2015 University of Southern California. All rights reserved. 10
16. The setup process is now complete and the VMware Horizon software will now install. Select the Install button to begin the installation. The installation begins.
17. The installation process begins. A status screen displays the installation progress.

INSTALLING AND CONFIGURING
©2015 University of Southern California. All rights reserved. 11
18. When the installation completes, the Setup Wizard displays a completed message. Select the Finish button.
19. Your workstation needs to restart. A restart prompt displays. Select the Yes button to restart your workstation. Your workstation will restart.
20. After your computer restarts, log into Windows and locate the VMware Horizon software in the Start menu. The VMware Horizon software displays.

INSTALLING AND CONFIGURING
©2015 University of Southern California. All rights reserved. 12
21. VMware Horizon displays the different servers to which you can connect. Select the option that corresponds to the server address you entered earlier (vmconnect.dts.usc.edu). The remote desktop connection opens.
22. After selecting the appropriate server address, you will be prompted to enter your login credentials. The username and password to be entered are the same credentials you use to log into your Dornsife-managed workstation

INSTALLING AND CONFIGURING
©2015 University of Southern California. All rights reserved. 13
23. Select the Login button. The available virtual desktops pools display. If you are checking out a single-use virtual desktop, select the Dornsife Temporary Use Pool. If you need a specific configuration of programs and settings within your virtual desktop, select the Dornsife Desktop Pool.
24. Select the Dornsife Desktop Pool. The virtual desktop preparation begins.
INSTALLING AND CONFIGURING
©2015 University of Southern California. All rights reserved. 14
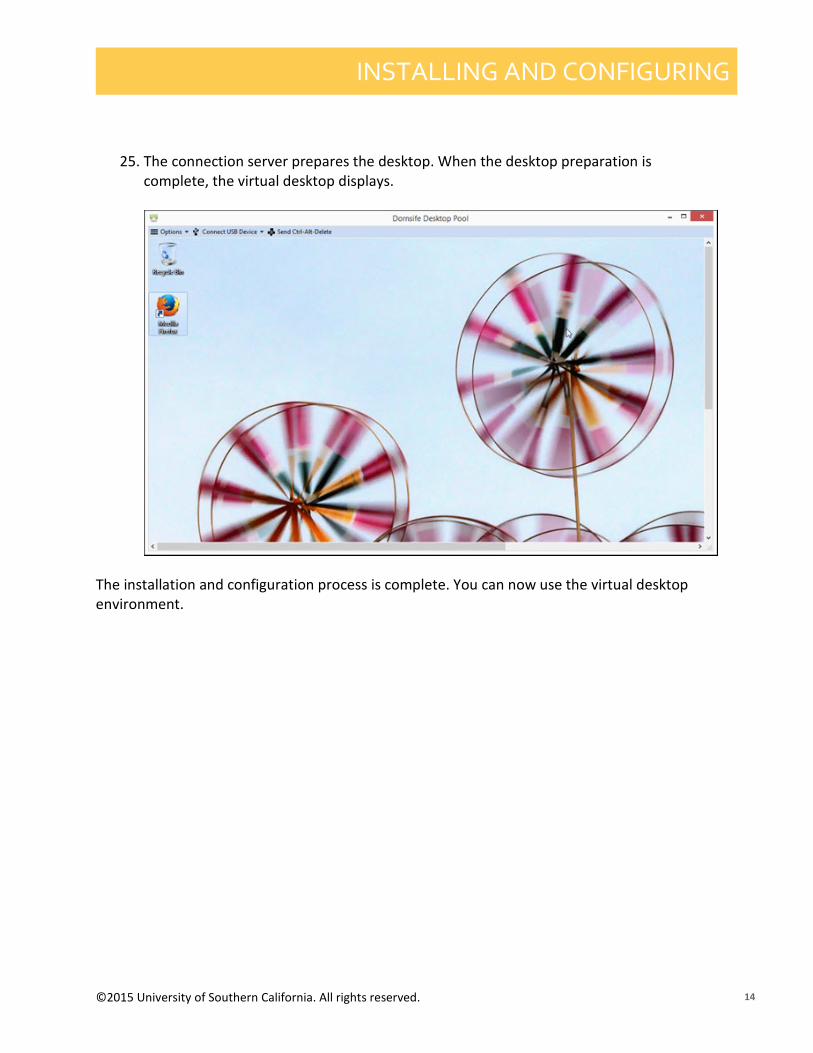
25. The connection server prepares the desktop. When the desktop preparation is complete, the virtual desktop displays.
The installation and configuration process is complete. You can now use the virtual desktop environment.
USING VMWARE HORIZON
©2015 University of Southern California. All rights reserved. 15
CHAPTER 2: USING THE VMWARE HORIZON ENVIRONMENT The VMware Horizon software contains several menus that provide additional functionality. Utilize these menus to maximize your use of VMware Horizon.
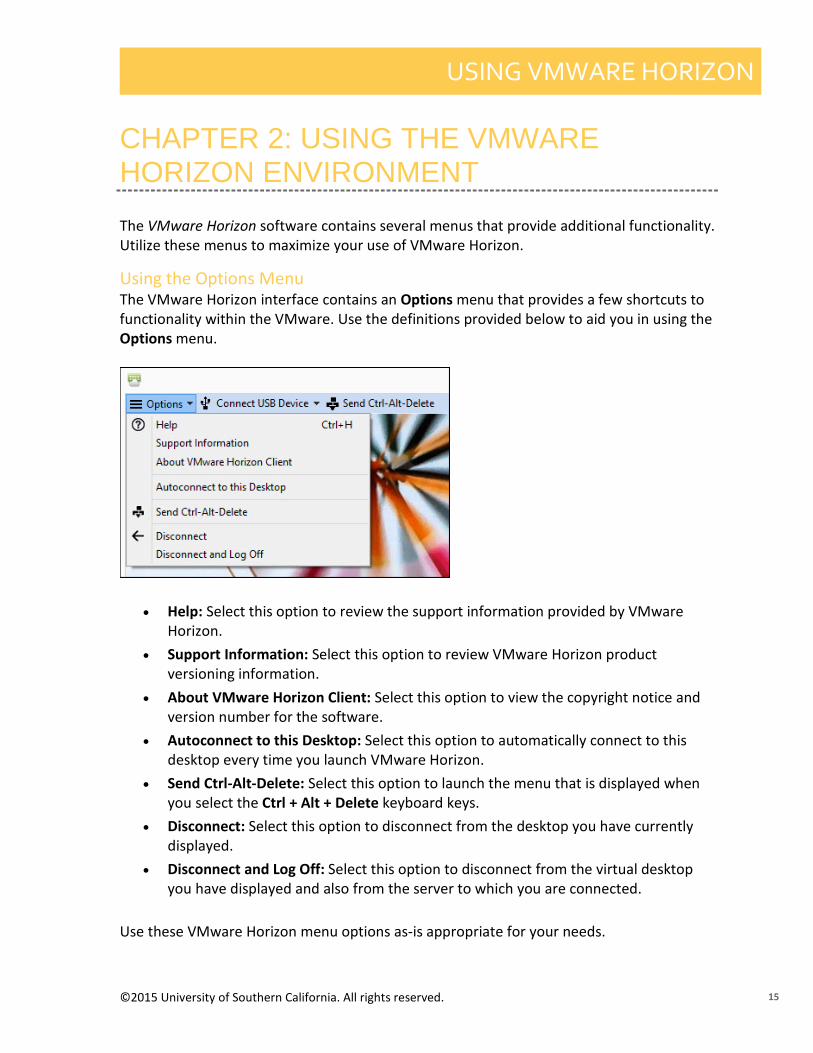
Using the Options Menu The VMware Horizon interface contains an Options menu that provides a few shortcuts to functionality within the VMware. Use the definitions provided below to aid you in using the Options menu.
• Help: Select this option to review the support information provided by VMware Horizon.
• Support Information: Select this option to review VMware Horizon product versioning information.
• About VMware Horizon Client: Select this option to view the copyright notice and version number for the software.
• Autoconnect to this Desktop: Select this option to automatically connect to this desktop every time you launch VMware Horizon.
• Send Ctrl-Alt-Delete: Select this option to launch the menu that is displayed when you select the Ctrl + Alt + Delete keyboard keys.
• Disconnect: Select this option to disconnect from the desktop you have currently displayed.
• Disconnect and Log Off: Select this option to disconnect from the virtual desktop you have displayed and also from the server to which you are connected.
Use these VMware Horizon menu options as-is appropriate for your needs.

USING VMWARE HORIZON
©2015 University of Southern California. All rights reserved. 16
Using Your USB Drive with VMware Horizon Software Complete the following steps to connect a USB device to your virtual desktop.
1. Start the VMware Horizon software and log in with your USC credentials. The VMware Horizon interface displays.
2. Select the Connect USB Device menu, located at the top of the screen. A drop-down menu displays.
3. The Connect USB Device menu provides several options. Select one of the options based on the description provided below.
• Automatically Connect at Startup: Select this option if you want VMware Horizon to only detect a USB device when the VMware is started.
• Automatically Connect when Inserted: Select this option if you want VMware Horizon to detect a USB device whenever one is inserted into a USB drive.
If a USB device is plugged into a USB drive, VMware Horizon will display the name of the USB device in the field labeled No suitable USB devices available.
Repeat these steps to connect a USB device to the VMware Horizon software.
Send Ctrl-Alt-Delete Menu Option The Send Ctrl-Alt-Delete menu option provides the ability to launch the Ctrl-Alt-Delete menu within your virtual desktop. This menu may not be easily accessed during a virtual machine session, thus, VMware Horizon has added it as a menu option for ease of access. Use this menu option whenever you need to access the Ctrl-Alt-Delete menu within your virtual desktop session.
CONTACT US
©2015 University of Southern California. All rights reserved. 17
CONTACT DORNSIFE TECHNOLOGY SERVICES
Campus Office: 825 Bloom Walk, ACB 530 Los Angeles, CA 90089-1486
Technical Support: 213-740-2775
E-mail: [email protected]