
Using the Lely Robot Sampler - CanWest DHIcanwestdhi.com/pdf_files/robot manuals/Lely.pdfPreparing &...
21
CanWest DHI Robot Manual Copyright © 2018 by CanWest DHI. All rights reserved. 4 Using the Lely Robot Sampler
Transcript of Using the Lely Robot Sampler - CanWest DHIcanwestdhi.com/pdf_files/robot manuals/Lely.pdfPreparing &...
CanWest DHI Robot Manual Copyright © 2018 by CanWest DHI. All rights reserved.
4
Using the Lely Robot Sampler
CanWest DHI Robot Manual Copyright © 2018 by CanWest DHI. All rights reserved.
5
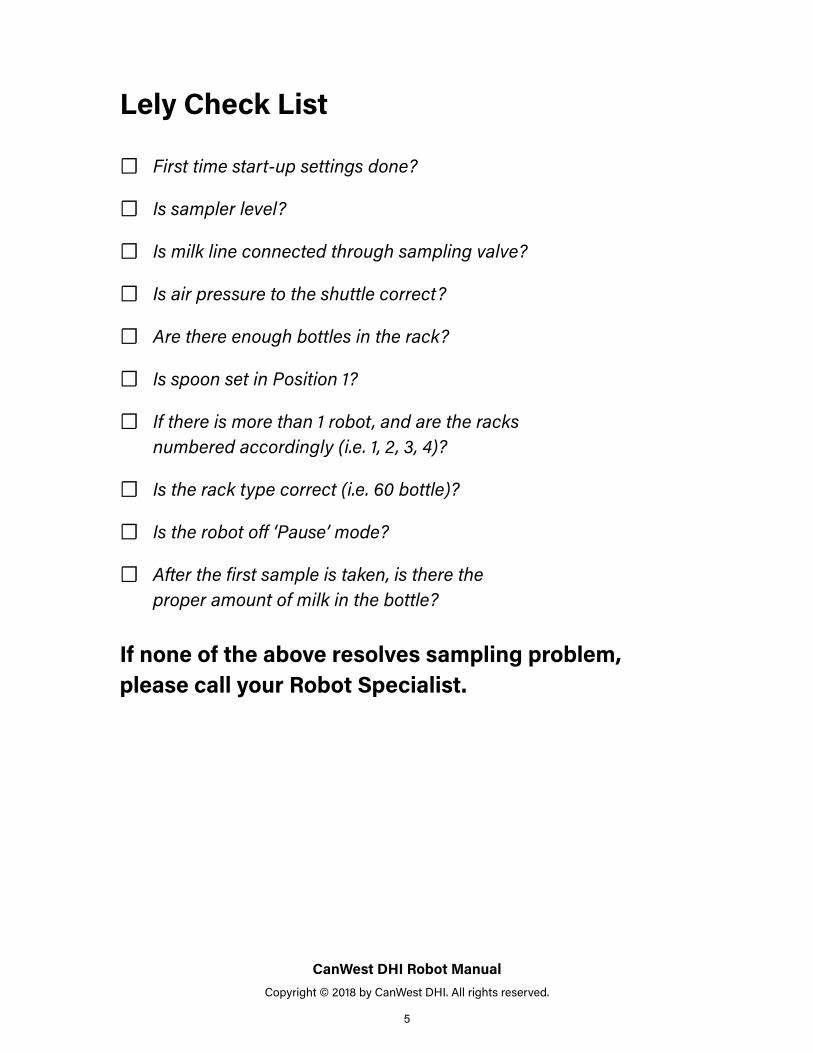
Lely Check List
☐ First time start-up settings done?
☐ Is sampler level?
☐ Is milk line connected through sampling valve?
☐ Is air pressure to the shuttle correct?
☐ Are there enough bottles in the rack?
☐ Is spoon set in Position 1?
☐ If there is more than 1 robot, and are the racks numbered accordingly (i.e. 1, 2, 3, 4)?
☐ Is the rack type correct (i.e. 60 bottle)?
☐ Is the robot off ‘Pause’ mode?
☐ After the first sample is taken, is there the proper amount of milk in the bottle?
If none of the above resolves sampling problem, please call your Robot Specialist.
CanWest DHI Robot Manual Copyright © 2018 by CanWest DHI. All rights reserved.
6
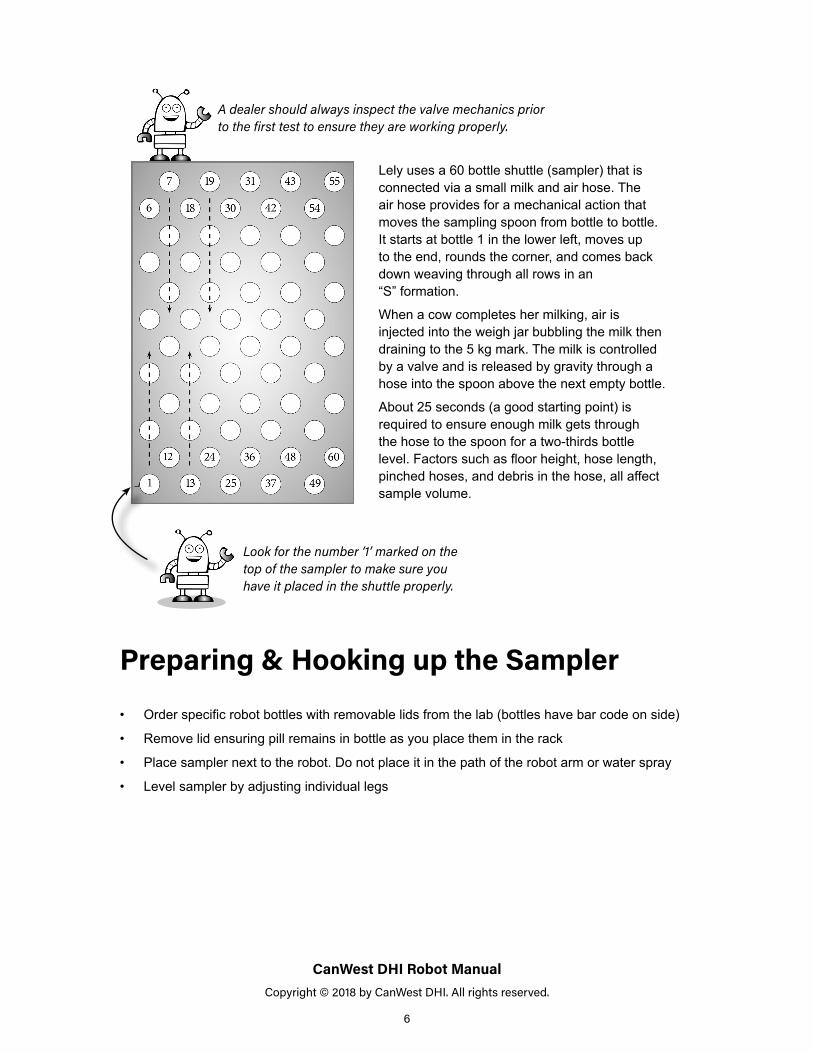
Lely uses a 60 bottle shuttle (sampler) that is connected via a small milk and air hose. The air hose provides for a mechanical action that moves the sampling spoon from bottle to bottle. It starts at bottle 1 in the lower left, moves up to the end, rounds the corner, and comes back down weaving through all rows in an “S” formation.
When a cow completes her milking, air is injected into the weigh jar bubbling the milk then draining to the 5 kg mark. The milk is controlled by a valve and is released by gravity through a hose into the spoon above the next empty bottle.
About 25 seconds (a good starting point) is required to ensure enough milk gets through the hose to the spoon for a two-thirds bottle level. Factors such as floor height, hose length, pinched hoses, and debris in the hose, all affect sample volume.
Look for the number ‘1’ marked on the top of the sampler to make sure you have it placed in the shuttle properly.
A dealer should always inspect the valve mechanics prior to the first test to ensure they are working properly.
Preparing & Hooking up the Sampler
• Order specific robot bottles with removable lids from the lab (bottles have bar code on side)
• Remove lid ensuring pill remains in bottle as you place them in the rack
• Place sampler next to the robot. Do not place it in the path of the robot arm or water spray
• Level sampler by adjusting individual legs
CanWest DHI Robot Manual Copyright © 2018 by CanWest DHI. All rights reserved.
7
4
5
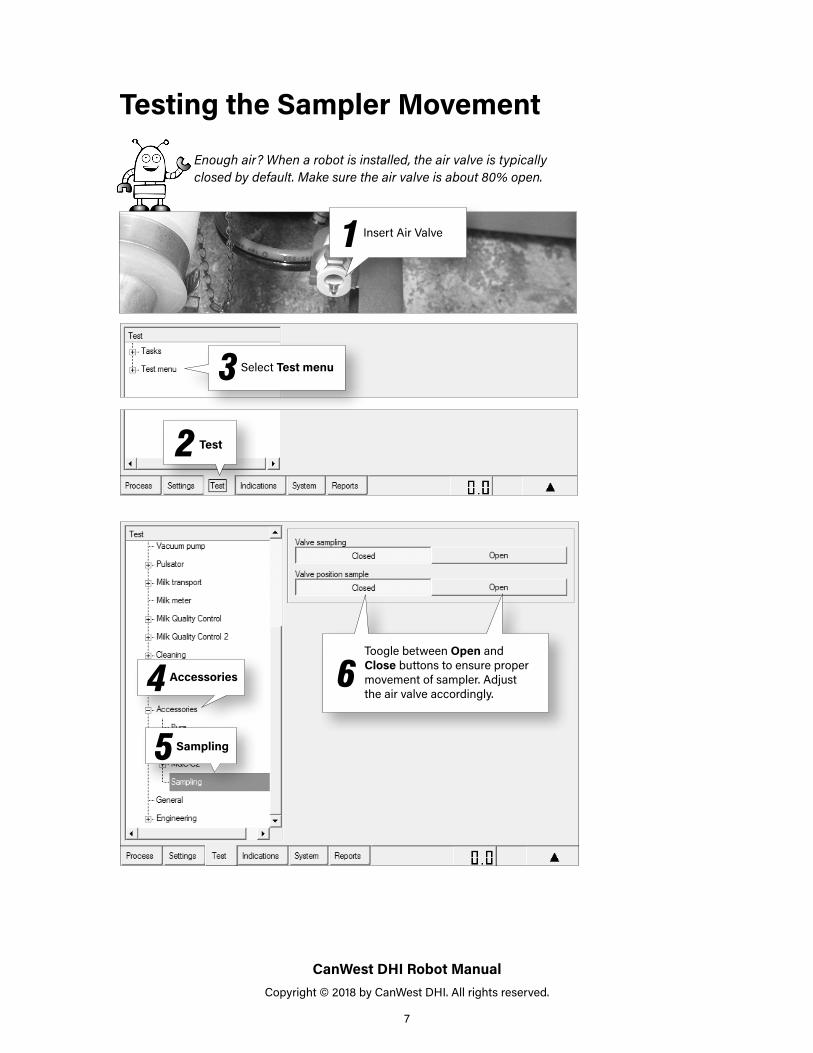
Toogle between Open and Close buttons to ensure proper movement of sampler. Adjust the air valve accordingly.
6
2
3
Enough air? When a robot is installed, the air valve is typically closed by default. Make sure the air valve is about 80% open.
Testing the Sampler Movement
Select Test menu
Test
Accessories
Sampling
Insert Air Valve1
CanWest DHI Robot Manual Copyright © 2018 by CanWest DHI. All rights reserved.
8
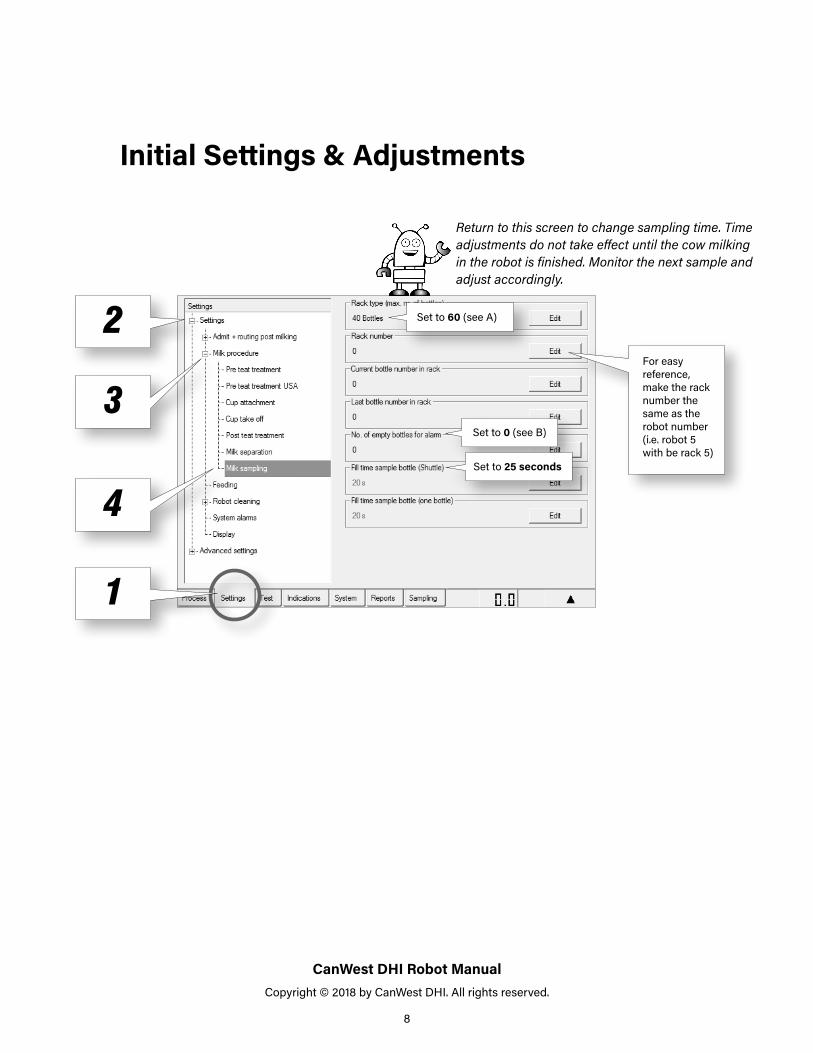
Set to 60 (see A)
Set to 0 (see B)
Set to 25 seconds
Initial Settings & Adjustments
Return to this screen to change sampling time. Time adjustments do not take effect until the cow milking in the robot is finished. Monitor the next sample and adjust accordingly.
1
2
3
4
For easy reference, make the rack number the same as the robot number (i.e. robot 5 with be rack 5)
CanWest DHI Robot Manual Copyright © 2018 by CanWest DHI. All rights reserved.
9
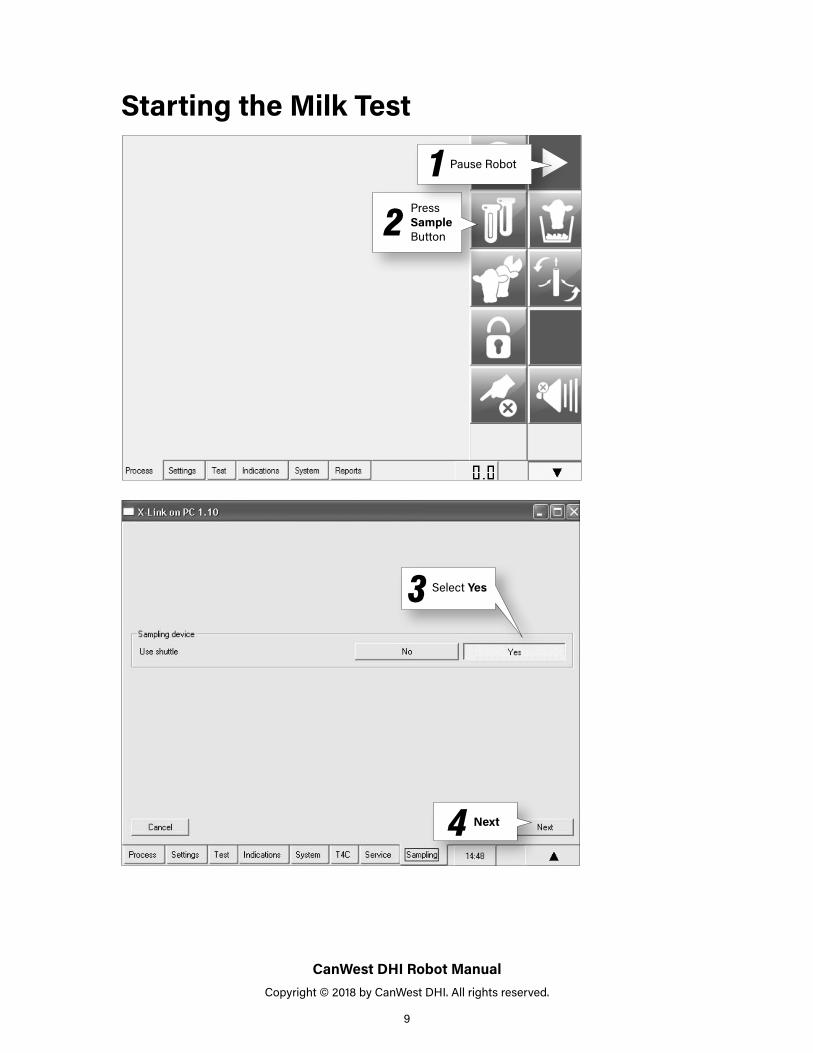
Starting the Milk Test
Press Sample Button
3
4
Pause Robot1
2
Select Yes
Next
CanWest DHI Robot Manual Copyright © 2018 by CanWest DHI. All rights reserved.
10
5
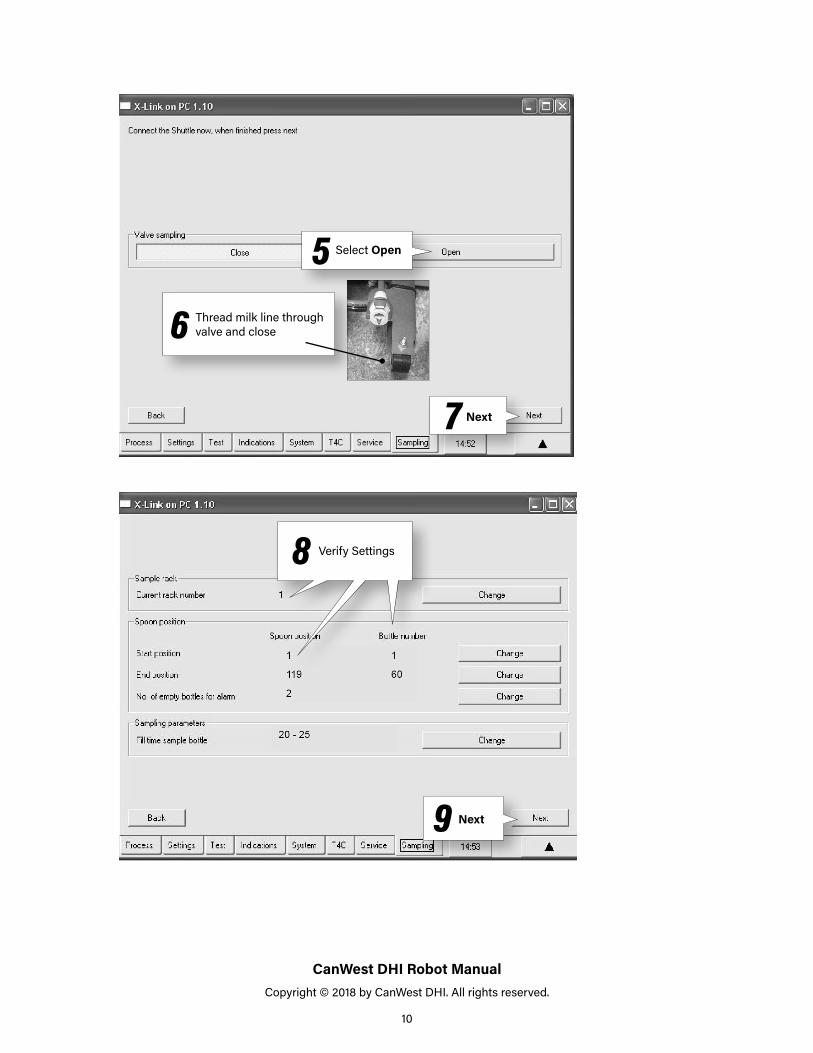
6 Thread milk line through valve and close
7
Select Open
Next
8 Verify Settings
9 Next
CanWest DHI Robot Manual Copyright © 2018 by CanWest DHI. All rights reserved.
11
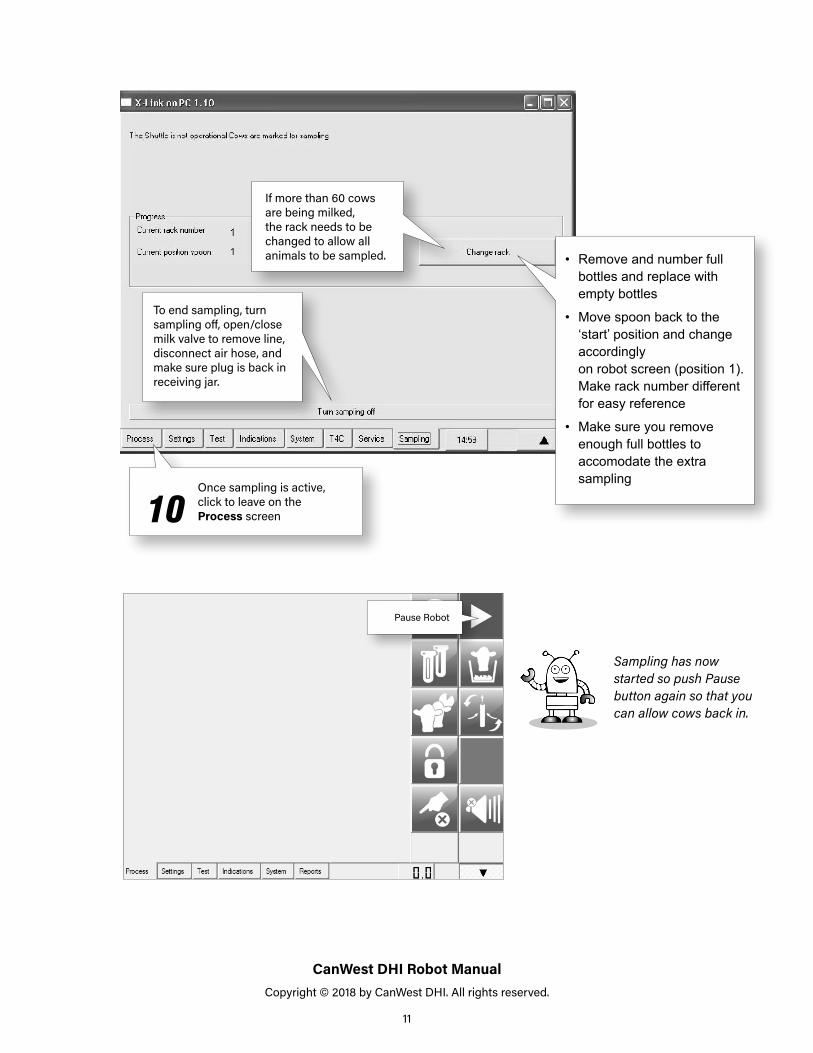
If more than 60 cows are being milked, the rack needs to be changed to allow all animals to be sampled.
To end sampling, turn sampling off, open/close milk valve to remove line, disconnect air hose, and make sure plug is back in receiving jar.
Sampling has now started so push Pause button again so that you can allow cows back in.
10Once sampling is active, click to leave on the Process screen
Pause Robot
• Remove and number full bottles and replace with empty bottles
• Move spoon back to the ‘start’ position and change accordingly on robot screen (position 1). Make rack number different for easy reference
• Make sure you remove enough full bottles to accomodate the extra sampling

CanWest DHI Robot Manual Copyright © 2018 by CanWest DHI. All rights reserved.
12
Initial Setup for Sampling
1
2
3
4
5 Change to One Sample Per Cow
It is always best practice to verify your settings before each test.
Play it safe! To avoid changing your settings by mistake, close this screen after Step 7 by returing to the ‘Home’ screen
Choose Milking
Select Main Herd
Settings
Data Entry
6 7Verify that this says 'yes'
CanWest DHI Robot Manual Copyright © 2018 by CanWest DHI. All rights reserved.
13
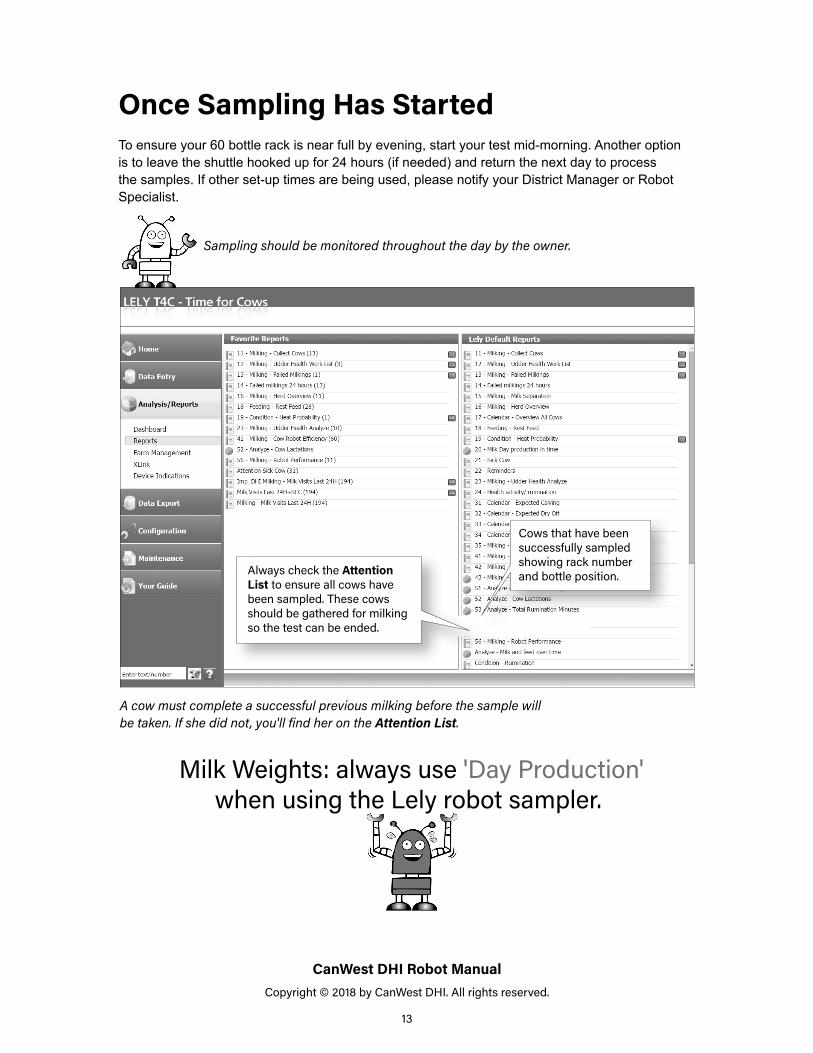
Once Sampling Has StartedTo ensure your 60 bottle rack is near full by evening, start your test mid-morning. Another option is to leave the shuttle hooked up for 24 hours (if needed) and return the next day to process the samples. If other set-up times are being used, please notify your District Manager or Robot Specialist.
Always check the Attention List to ensure all cows have been sampled. These cows should be gathered for milking so the test can be ended.
A cow must complete a successful previous milking before the sample will be taken. If she did not, you'll find her on the Attention List.
Sampling should be monitored throughout the day by the owner.
Cows that have been successfully sampled showing rack number and bottle position.
Milk Weights: always use 'Day Production' when using the Lely robot sampler.
CanWest DHI Robot Manual Copyright © 2018 by CanWest DHI. All rights reserved.
14
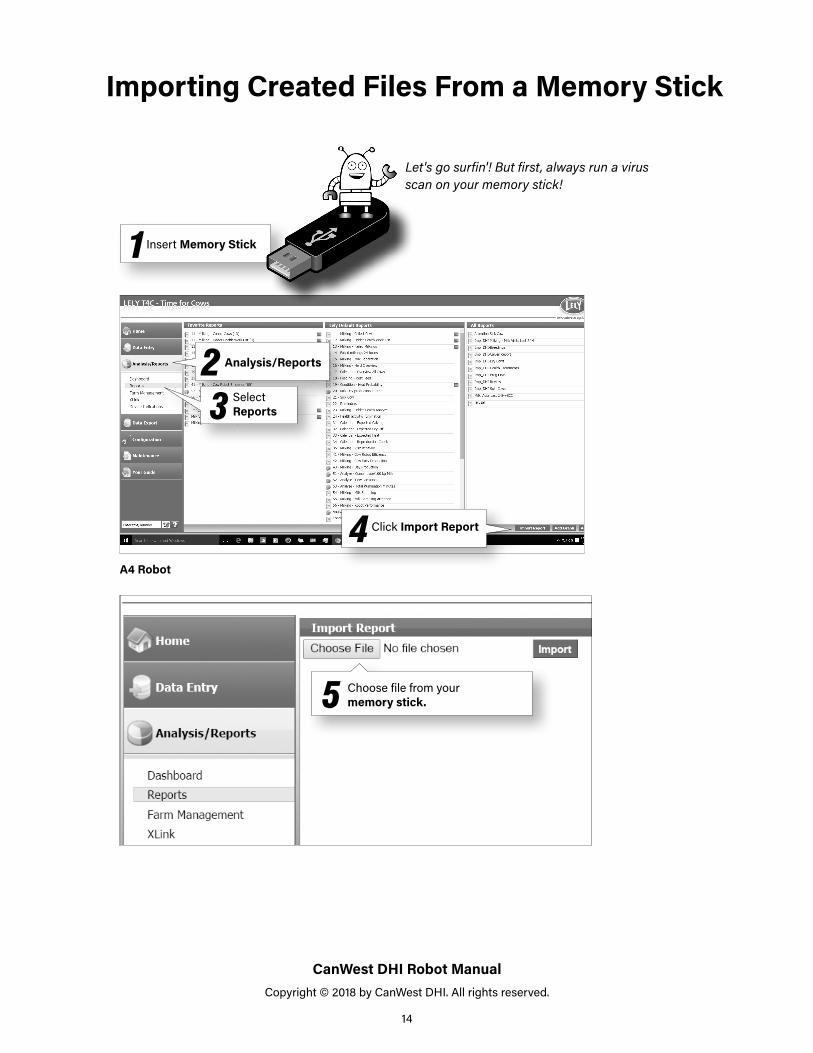
23 Select
Reports
A4 Robot
1Insert Memory Stick
Importing Created Files From a Memory Stick
4
Let's go surfin'! But first, always run a virus scan on your memory stick!
Analysis/Reports
Click Import Report
5 Choose file from your memory stick.
CanWest DHI Robot Manual Copyright © 2018 by CanWest DHI. All rights reserved.
15
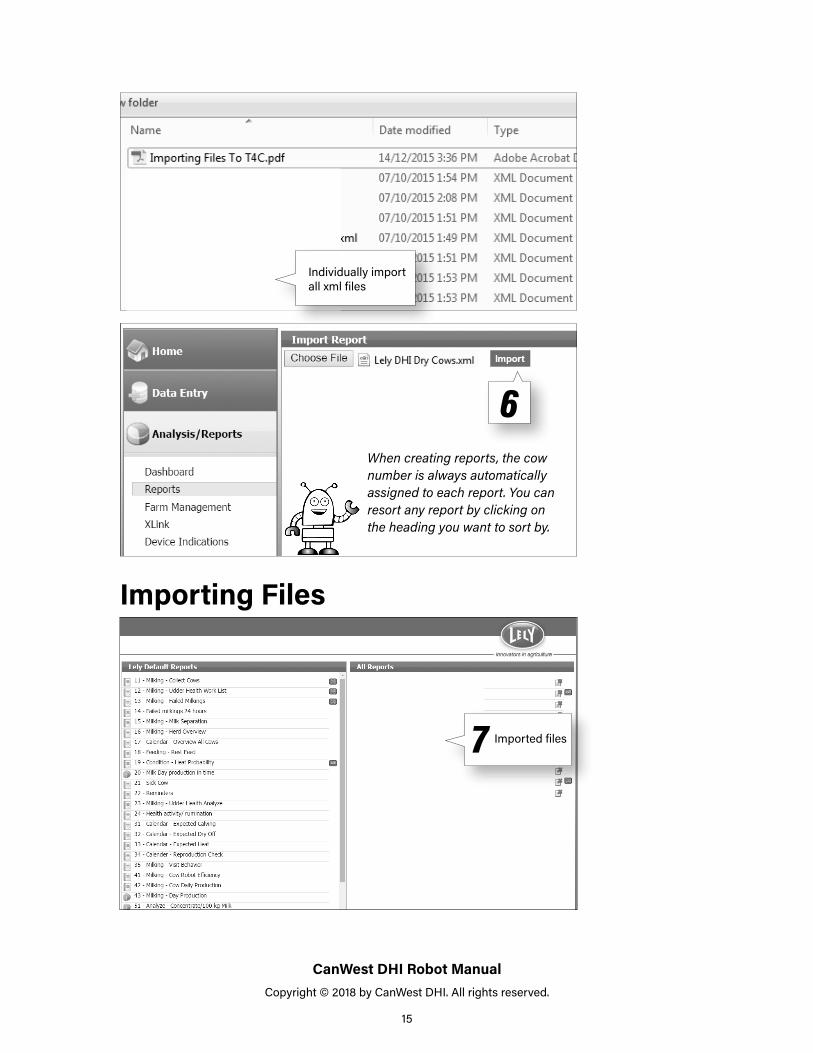
Individually import all xml files
6When creating reports, the cow number is always automatically assigned to each report. You can resort any report by clicking on the heading you want to sort by.
7 Imported files
Importing Files
CanWest DHI Robot Manual Copyright © 2018 by CanWest DHI. All rights reserved.
16
1
2
34
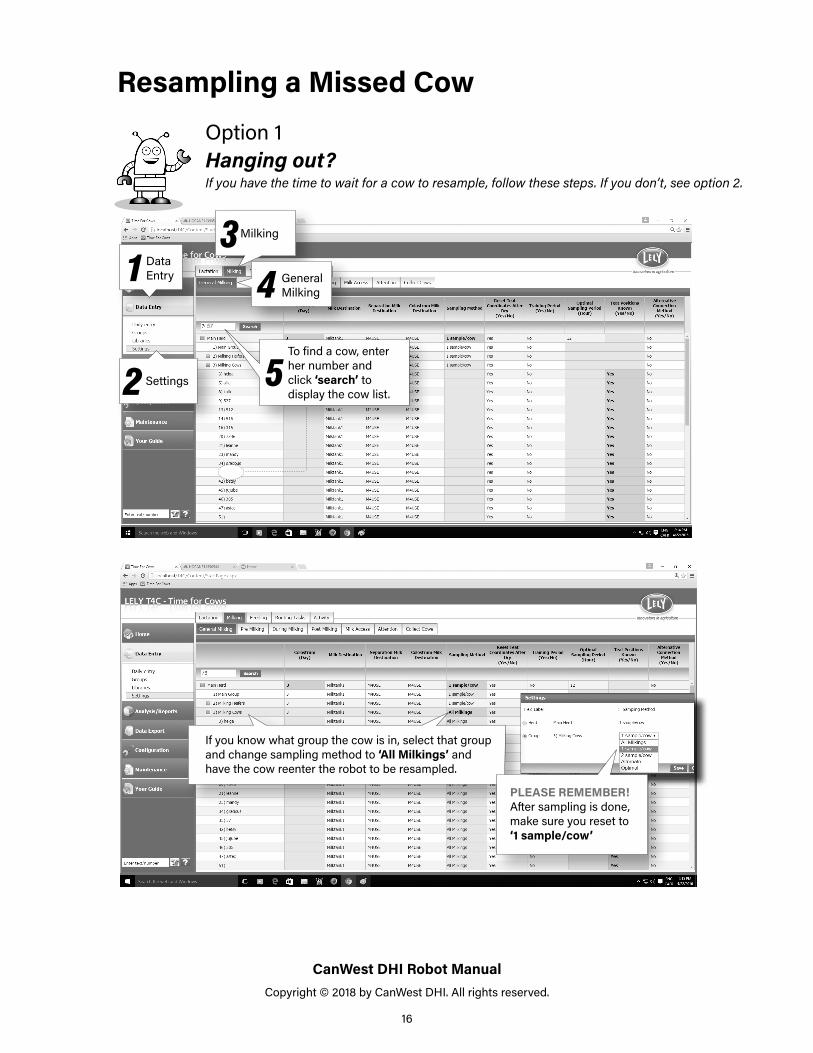
If you know what group the cow is in, select that group and change sampling method to ‘All Milkings’ and have the cow reenter the robot to be resampled.
Resampling a Missed Cow
5
PLEASE REMEMBER! After sampling is done, make sure you reset to ‘1 sample/cow’
57
To find a cow, enter her number and click ‘search’ to display the cow list.
Option 1Hanging out? If you have the time to wait for a cow to resample, follow these steps. If you don’t, see option 2.
Data Entry
Settings
Milking
General Milking

CanWest DHI Robot Manual Copyright © 2018 by CanWest DHI. All rights reserved.
17
3 4
Post Milking
Option 2Have to leave? Follow these steps if you are leaving before the cow enters the robot. Doing this ensures you won’t collect a bunch more samples than necessary.
Select ‘Group’
Select ‘No’
Click ‘Save’Double-Click
on the Group52
1
You’ve now turned off sampling for the whole group.

CanWest DHI Robot Manual Copyright © 2018 by CanWest DHI. All rights reserved.
18
9
7 8Select ‘Animal’
Select ‘Yes’
Double-Click on the Cow6
Click ‘Save’
When done, repeat steps 1-5 to return to group sampling.
Back in business. Cow 57 is now ready to be resampled (see below).
Cow #57 is set to be resampled
CanWest DHI Robot Manual Copyright © 2018 by CanWest DHI. All rights reserved.
19
Lely Sampler Troubleshooting Please Note! When troubleshooting, it is best to contact the Robot Specialist first
PROBLEM: Random samples missingCause 1: An airlock in the weigh jar prevents milk from flowing to the shuttle jar. Solution: Have dealer permanently remove check ball at the top of the jar.
Cause 2: Cow didn’t produce enough milk. This is robot-install dependent; limited distance to the shuttle affects cows producing less than 5 kg of milk.
PROBLEM: Group of missing samplesCause 1: Blockage inside milk line (rare). Solution: Disconnect, blow out and observe for milk flow.
Cause 2: Milk hose has come apart. Solution: Use alcohol swab on both ends to clean before reattaching.
PROBLEM: Partially filled bottlesCause 1: Not enough time allotted for bottles to fill. Solution: Increase time at the robot (Settings>Milking Procedure>Sampling>add seconds).
Cause 2: Milk is being sucked out of the spoon. Solution: Unscrew spoon ½ turn; cut off stem inside spoon; add a stainless washer under stem, but on top of the spoon for less milk to be sucked out.
Cause 3: Milk line is too long and the weigh jar is too low to the ground. Solution: If possible, move shuttle lower and shorten the milk line.
Cause 4: Milk Line valve is sticking. More typical of A3s or a robot that has not tested in a while. Solution: Lubricate Milk Valve with Vaseline or have dealer replace it.
Cause 5: Bottles not straight. Solution: Check that shuttle is free of being hit. Ensure bottles are clipped clean and inserted straight up and down in the rack. Considering stacking bottles on their rims on every other row if too tight.
CanWest DHI Robot Manual Copyright © 2018 by CanWest DHI. All rights reserved.
20
PROBLEM: Spoon is out of positionCause: Too much sway Solution: Check T4C and see where the spoon is supposed to be (noting the cow number) and compare that to the shuttle. Work backwards until you get to the problem spot and determine how many cows were missed. As you remove bottles, assign the proper cow to the correct bottle while working backwards from the end. If this happens early and you want to continue sampling, note the cow number on the last correctly filled bottle and continue.
PROBLEM: Extra sway Cause 1: Cylinders lift up unevenly (sticky). Solution: Lubricate cylinders.
Cause 2: Weak or uneven springs. Solution: Rotate springs and put the strongest spring on the single spring side or have springs replaced with new ones.
Cause 3: Shuttle is rocking. Solution: Adjust the legs/prop up in order to make the shuttle level.
Cause 4: Not enough air to operate the shuttle and spoon is not advancing properly. This can be caused by air line leaking or weak air line connectors which should be replaced, or weak air compressor. Some shuttles may have needle valve restrictors that should be open completely.
Cause 5: Spoon is hitting the shuttle lid. Solution: Lift and support the lid with a clipped vial lid.
• To check if shuttle is hitting the lid:
• Ensure gate is closed and no cows are milking
• On robot, push TEST; TEST MENU; ACCESSORIES; SAMPLING
• Toggle OPEN and CLOSE and watch the spoon travel to see if it is hitting a corner on the lid
PROBLEM: Some cows milked, but no sampleCause: Cow may not have successfully completed her prior milking
PROBLEM: Sampling a missed cow. If 1 or 2 cows need to be sampled, have the cows brought to the robot. After the cow is milked, a sample can be obtained manually from the agitation jar by pulling the plug at the bottom and catching a sample.
CanWest DHI Robot Manual Copyright © 2018 by CanWest DHI. All rights reserved.
21
Washing the Lely Sampler
The Lely sampler is cleaned using these 3 routine cycles: rinse, soapy wash cycle, final acid rinse (if available)
Items Required:• Rubber gloves
• Vasoline to lubricate the cylinders
• Liquid detergent or bootwash
• 50-100cc syringe
• Extra boot pail with long brush or a clean sink
1. Rinse Cycle: Disconnect sampler from robot and rinse milk hose, spoon and outside of sampler with a spray hose.
2. Half-fill boot pail with very warm water and add Leminee® boot wash or dishwashing soap.
3. Use the syringe to force soapy wash water through milk hose and fill the spoon. (A syringe that can screw onto the milk hose works best.) Move syringe in and out to force water and air into the milk hose. If you discover a pinhole leak, replace the hose, repair it, or cut it shorter.
4. Leave the milk hose and spoon full of solution. Remove the empty syringe and put the end of the milk hose into the top of the spoon to soak the milk hose. Soaking will help get rid of milk-stone build-up which can sour the next milk samples taken.
5. Drain soapy water from the hose and spoon. Use boot brush to wash entire sampler and cover with wash solution. Note: edges of the samplers can be very sharp so a long brush should be used to prevent injuries.
6. Using a brush, wash rack inside the boot pail or sink. Use a flask brush to clean the middle part of rack. After sampler is washed and rinsed, remove the end of the milk hose from the spoon and thoroughly rinse out the acid wash solution if it was used.
7. Disconnect the milk hose from the spoon and drain all water. Blow out water from the milk hose manually to dry it. Ensuring the hose is dried is important as any remaining water could freeze on route in winter, and bacteria could grow in summer months.
8. Disassemble the spoon and hand-wash with a brush either in a sink or in the boot pail. Be careful not to lose the ‘O’ ring and gasket.
9. Once cleaned and rinsed, reassemble the spoon making sure not to over-tighten (always leave it slightly loose).
10. Whenever possible, allow the sampler to air-dry before reassembling or putting the lid back on. This is especially important for the older style samplers where not all the parts are made of stainless steel and the moisture will cause rust.
11. Before the next test, push down on top of all 3 cylinders to ensure none are sticking and if springs are stiff. A weak spring can cause the spoon to not move forward properly and
CanWest DHI Robot Manual Copyright © 2018 by CanWest DHI. All rights reserved.
22
ruin the milk test. If any cylinder is sticking, use Vaseline on the cylinder shaft. Never use WD-40 as it will ruin the cylinder seal.
12. Position spoon in ‘Down’ position (not hanging), disassemble hose from spoon and turn feet inside.
Handling the Lely SamplerPark your vehicle close as possible to where robots are situated and use a trolley or cart where provided to bring samplers close to the robot.
Ask for help carrying over gates if no other options are available.

CanWest DHI Robot Manual Copyright © 2018 by CanWest DHI. All rights reserved.
23
Figure 1 Figure 2
Milk Drip
There are three areas for possible milk carry-over: spoon, hose, and weigh jar.
1) SpoonSpoon ‘fill times’ may need to be adjusted to insure the spoon does not overfill with milk and spill over into other vials. This adjustment is part of the normal setup for sampling. Therefore when starting the sampling, observe the spoon fill level and the vial fill level after the first couple of cows to ensure levels are normal. Make adjustments if needed to the fill time in the robot software.
Older robots move the spoon from sample to sample fairly gently with enough time in between samples to allow drainage of the milk into the vial. An area of concern is milk from the surface area of the spoon dripping into the next bottle (Figure 1). This should not affect lab test results.
On A4 robots, the vacuum to the shuttle is much higher and could result in spillage of milk from the full spoon as it drops down to empty. An air control valve can be installed on older robots to reduce vacuum.
We want quality samples and test results!In robotic milking systems, milk carry-over from one DHI sample to another can possibly affect test results. This should be kept in mind when interpreting any pregnancy, disease, or mastitis test results from DHI. By keeping the following information in mind, you will help ensure both quality sampling AND test results.
Avoiding Milk Carry-Over
CanWest DHI Robot Manual Copyright © 2018 by CanWest DHI. All rights reserved.
24
2) HoseAfter filling the spoon, the robot sucks out any remaining milk leaving traces on the inside lining which will collect in the lowest section of the hose (Figure 2). The residue milk in the hose is blown back into the weigh jar during the milking of the next cow. It is best to limit potential milk residue by keeping all hoses as short as possible.
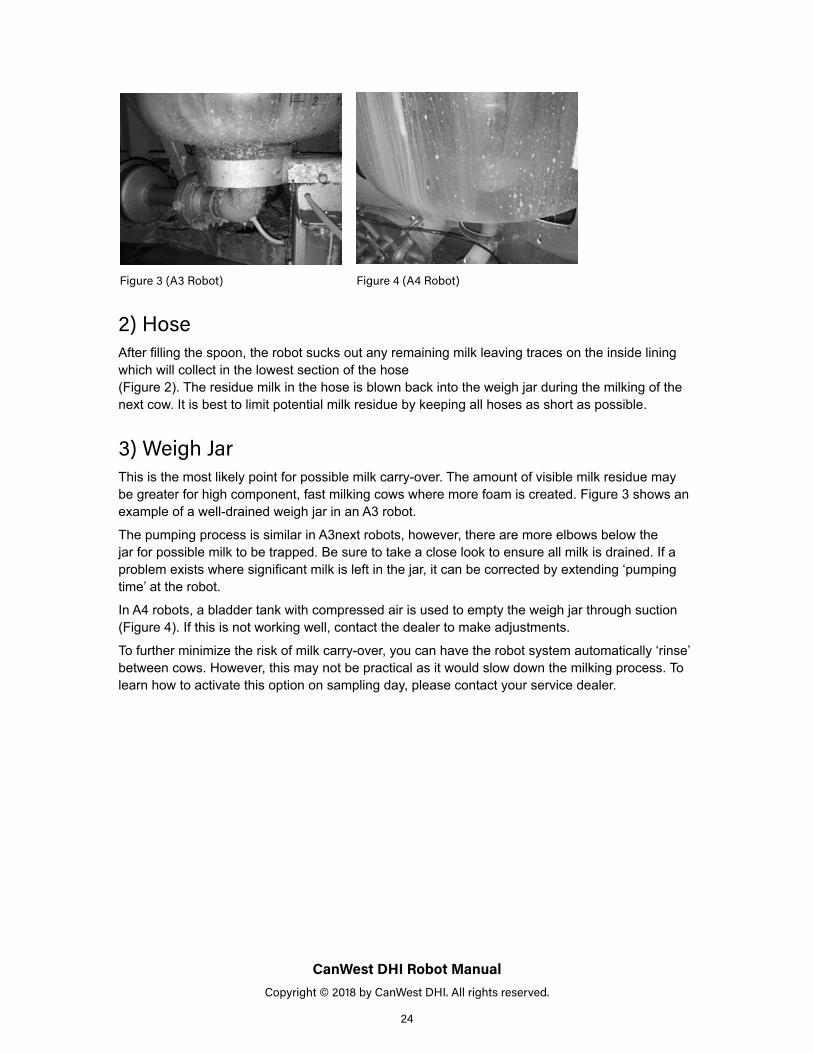
3) Weigh JarThis is the most likely point for possible milk carry-over. The amount of visible milk residue may be greater for high component, fast milking cows where more foam is created. Figure 3 shows an example of a well-drained weigh jar in an A3 robot.
The pumping process is similar in A3next robots, however, there are more elbows below the jar for possible milk to be trapped. Be sure to take a close look to ensure all milk is drained. If a problem exists where significant milk is left in the jar, it can be corrected by extending ‘pumping time’ at the robot.
In A4 robots, a bladder tank with compressed air is used to empty the weigh jar through suction (Figure 4). If this is not working well, contact the dealer to make adjustments.
To further minimize the risk of milk carry-over, you can have the robot system automatically ‘rinse’ between cows. However, this may not be practical as it would slow down the milking process. To learn how to activate this option on sampling day, please contact your service dealer.
Figure 3 (A3 Robot) Figure 4 (A4 Robot)