Using the Geographic LVM in AIX 5L - ps-2.kev009.comps-2.kev009.com/basil.holloway/ALL...
36
Using the Geographic LVM in AIX 5L September 2005 Steve Tovcimak IBM Corporation
Transcript of Using the Geographic LVM in AIX 5L - ps-2.kev009.comps-2.kev009.com/basil.holloway/ALL...

Using the Geographic LVM in AIX 5L
September 2005
Steve Tovcimak
IBM Corporation

pstrglvmstandalonewp093005.doc Page 2
Table of Contents Overview ....................................................................................................................................3 Basic Concepts ...........................................................................................................................3 GLVM Utilities...........................................................................................................................7 Quorum and Remote Physical Volume Failure............................................................................8 Avoiding Concurrent Access.....................................................................................................11 Installation ................................................................................................................................12 Security Considerations ............................................................................................................13 How to Configure GLVM .........................................................................................................13
Getting Started ......................................................................................................................13 RPV Server Configuration ....................................................................................................14 RPV Client Configuration .....................................................................................................17 Volume Group Configuration................................................................................................20
Handling a Production Site Outage ...........................................................................................25 Taking Down Production Site ...............................................................................................25 Moving Workload to Disaster Recovery Site.........................................................................26
Handling Production Site Recovery...........................................................................................28 Taking Down Disaster Recovery Site ....................................................................................29 Moving Workload Back to Production Site ...........................................................................29
Handling Remote Physical Volume Failures .............................................................................30 Diagnosing Remote Physical Volume Failures ......................................................................31 Recovering Failed Remote Physical Volumes .......................................................................33 Planned Outages....................................................................................................................34
Where Do You Go From Here?.................................................................................................35

pstrglvmstandalonewp093005.doc Page 3
Overview The Geographic Logical Volume Manager (GLVM) is a new AIX 5L™ software-based technology for real time geographic data mirroring over standard TCP/IP networks. GLVM can help protect your business from a disaster by mirroring your mission-critical data to a remote disaster recovery site. If a disaster, such as a fire or flood, were to destroy the data at your production site, you would already have an up-to-date copy of the data at your disaster recovery site.
GLVM builds upon the AIX 5L Logical Volume Manager (LVM) to allow you to create a mirror copy of data at a geographically distant location. Because of its tight integration with LVM, users who are already familiar with LVM should find GLVM very easy to learn. You configure geographically distant disks as remote physical volumes and then combine those remote physical volumes with local physical volumes to form geographically mirrored volume groups. These are managed by LVM very much like ordinary volume groups.
GLVM was originally made available as part of the XD (Extended Distance) feature of HACMP™ for AIX 5L Version 5.2. The HACMP documentation refers to this technology as HACMP/XD for GLVM. The AIX 5L GLVM technology provides the same geographic data mirroring functionality as HACMP/XD for GLVM, only without the automated monitoring and recovery which is provided by HACMP. This technology is intended for users who need real time geographic data mirroring but do not require HACMP to automatically detect a disaster and move mission-critical applications to the disaster recovery site.
Formal user documentation for GLVM is provided with the HACMP product. The HACMP/XD for Geographic LVM: Planning and Administration Guide is available online at the following HACMP documentation page:
http://www.ibm.com/servers/eserver/pseries/library/hacmp_docs.html
This book provides complete planning, installation, configuration and usage information for GLVM in an HACMP/XD environment. Using standalone GLVM in AIX 5L, apart from HACMP, is not covered in the above book. While many of the planning, configuration and usage steps are the same as for GLVM with HACMP/XD, there are a number of standalone procedures that are not covered in this book. This white paper provides some additional information you may find useful to manage a standalone GLVM configuration without HACMP.
Basic Concepts The basic concepts of GLVM can be easily explained by using an example configuration. Consider an IBM AIX 5L server that is running an airline reservation system. All of the data resides on two disks, PV1 and PV2. Each disk contains exactly half of the data. In other words, there is only one copy of the data which spans both disks. This configuration is shown in the following diagram:

pstrglvmstandalonewp093005.doc Page 4
As you are probably aware, the problem with this configuration is that it lacks disk redundancy. Either disk is potentially a single point-of-failure. If either disk fails, the airline reservation system suffers an outage until the failed disk can be replaced and the latest data backup can be restored from tape. After the system is restored and operational, the data is correct to the point of the last tape backup. All data changes that took place after the time of the tape backup are lost. These problems can be avoided by adding disk redundancy to the configuration. One way to accomplish this is by using AIX 5L LVM mirroring. This is shown in the following diagram:
Two more disks have been added to the system. The original data still resides on disks PV1 and PV2, and another copy of the data now resides on disks PV3 and PV4. Now, if any one disk fails, the data can still be accessed from the other mirror copy. Whether or not a system outage is required to replace the failed disk depends upon the type of disk subsystem. However, there is no loss of data, and no need to restore from a tape backup.
Basic LVM mirroring protects your system from disk and disk adapter failures, but that alone may not be enough protection. A disaster such as a fire or flood in your data center can destroy the server along with all of the disks. In such a scenario, all mirror copies of the airline
PV1
Node A
PV2
PV2 = hdisk2 PV1 = hdisk1
VG datavg
PV1
Node A
PV2
PV4 = hdisk4 PV3 = hdisk3
PV2 = hdisk2
PV3 PV4
Copy #1 Copy #2
VG datavg
PV1 = hdisk1

pstrglvmstandalonewp093005.doc Page 5
reservation system data would be lost, and the system would be unavailable until the hardware could be replaced and the data could be restored from tape backup. (Hopefully, the backup tapes were stored in a safe place.) Without proper planning and a disaster recovery plan (which is beyond the scope of this white paper), your system can be unavailable for a very long time, and this can seriously threaten your business.
GLVM helps you to solve this problem by building upon this very same AIX 5L LVM technology, which has been proven and reliable for many years. The solution is to take one set of disks containing a complete mirror copy and move them to a geographically distant location, which is often referred to as a disaster recovery site. Those disks are connected to another AIX 5L server at the disaster recovery site. Now there are two servers, one at the production site and another at the disaster recovery site and each site has a complete mirror copy of the data. Both servers are connected by a TCP/IP network. This can be any type of TCP/IP network. The production and disaster recovery sites do not have to be on the same physical network. Routers and gateways between the two sites are allowed. Instead of extremely long disk cables, the TCP/IP network and the Remote Physical Volume (RPV) device driver are used for remote disk access. This is shown in the following diagram:
This is the same volume group, containing the airline reservation system data, which was described earlier. This one volume group now actually spans both sites. We refer to this as a geographically mirrored volume group. In this diagram, the volume group is varied online at the production site. The RPV device driver allows the LVM at the production site to access the disks at the disaster recovery site as if they were locally attached. This is accomplished by defining disks PV3 and PV4 to the production site as remote physical volumes.
The RPV device driver consists of two parts. The RPV client resides on the system where the application runs. The RPV client appears like an ordinary disk, and usually has a name such as hdisk4. The RPV server resides on the system where the real disk is physically attached, and usually has a name such as rpvserver0. The RPV server’s job is to process I/O requests from a remote RPV client. An RPV client and server pair works together to enable the LVM at the
PV1
Node A Node B
Production Site D/R Site
PV2 PV4 PV3
Copy #1 Copy #2
Application or Filesystem
AIX 5L LVM
RPV client device driver
RPV server kernel extension
TCP/IP Network

pstrglvmstandalonewp093005.doc Page 6
production site to access a disk at the disaster recovery site. There can be many RPV client and server pairs defined, one for each disk that is to be remotely accessed.
Here is how it works: The application or file system reads and writes to a logical volume. LVM processes logical volume I/O requests by reading and writing to the underlying local and remote physical volumes. LVM accesses a remote physical volume by reading or writing to its RPV client. The RPV client communicates I/O requests to the RPV server at the remote site. The RPV server reads or writes to the real disk and passes the results back to the RPV client, which in turn passes the results back to LVM. This is done efficiently, and the AIX 5L LVM has been optimized to direct application reads to local physical volumes for faster performance.
Remote physical volumes look very much like ordinary local physical volumes, except they are slower and less reliable. Remote physical volumes are slower because of the added network delay. They are less reliable because long distance networks, especially those with several routers or gateways, tend to fail more often than local disks. The following diagram shows the disk configuration:
Now the production site has access to disks PV3 and PV4, because they are configured as remote physical volumes. However, the disaster recovery site does not have access to disks PV1 and PV2. (It is possible to create remote physical volumes to allow the disaster recovery site to access disks PV1 and PV2, but that is not covered in this white paper. Refer to the HACMP/XD for Geographic LVM: Planning and Administration Guide for further information.)
Under normal circumstances the airline reservation system runs at the production site, where the volume group is varied online. All data updates are applied to both mirror copies in real time, so the disaster recovery site always has an up-to-date copy of the data. If a disaster were to destroy the server and disks at the production site, the volume group can be varied online at the disaster recovery site, and the airline reservation system can be brought back online very quickly.
It is possible for something like a massive power outage to shutdown the production site without actually destroying any data there. In this scenario, you can still vary online the volume group at the disaster recovery site and run the airline reservation system there until the power is restored
PV1
Node A Node B
Production Site D/R Site
PV2 PV4 PV3
PV4 = hdisk4 PV3 = hdisk3
PV2 = hdisk2 PV1 = hdisk1
PV4 = hdisk3 PV3 = hdisk2
PV3 PV4
Real Copy #1 Real Copy #2 Virtual Copy #2
TCP/IP Network

pstrglvmstandalonewp093005.doc Page 7
at the production site. Once the production site has been recovered, you can stop the airline reservation system and take the volume group offline at the disaster recovery site. Then, you can bring the volume group online and start the airline reservation system at the production site. The physical volumes residing at the production site missed all data updates which occurred during the outage. LVM will know they are stale physical volumes and will automatically synchronize the stale mirror copy with the up-to-date mirror copy which resides at the disaster recover site.
LVM allows up to three mirror copies of a volume group. For GLVM, this means that you can have one or two mirror copies at the production site and only one mirror copy at the disaster recovery site. (You can have one mirror copy at the production site and two mirror copies at the disaster recovery site. However, this is very inefficient, because in such a configuration the amount of RPV client-server traffic sent across the TCP/IP network between the two sites is doubled.) Having only one mirror copy of the volume group may leave the disaster recovery site exposed to disk and disk adapter failures during an outage of the production site.
You can get additional protection against disk and disk adapter failures by using a disk subsystem which provides data mirroring or RAID capabilities. You can optionally use disk subsystem mirroring or RAID capabilities at both sites, and just have one LVM mirror copy at each site. LVM is not aware of the data protection that is being performed by the disk subsystem, so such a configuration provides the most protection while being easier to manage. On the other hand, GLVM does not require a disk subsystem that provides data protection. You can use any type of disk which is supported by AIX 5L. GLVM works the same way regardless of what type of disk subsystem is used.
GLVM Utilities The standard AIX 5L LVM commands and SMIT menus are not completely RPV-aware. This makes it possible to create geographically mirrored volume groups in such a way that neither site has a whole mirror copy of mission critical data. The following diagram illustrates an incorrect configuration:
PV1
Node A Node B
Production Site D/R Site
PV4 PV3
TCP/IP Network
Copy #1 PV2
Copy #2 Copy #1 Copy #2

pstrglvmstandalonewp093005.doc Page 8
As you can see, each site has half of mirror copy #1, as well as half of mirror copy #2. Neither site has a complete mirror copy of the data. If a disaster strikes the production site, the disaster recovery site will not have a complete copy of the data. The Geographic LVM Utilities make sure that each site has at least one whole copy of the mission critical data. The following diagram shows a correct configuration:
The GLVM Utilities are a set of SMIT menus which are modeled after a subset of the standard AIX 5L LVM SMIT menus, except they are RPV-aware. The GLVM Utilities SMIT menus actually call standard AIX 5L LVM commands under the covers. You can arrange geographically mirrored volume group mirror copies using standard AIX 5L LVM commands and SMIT menus, but this is not recommended. However, if you cannot resist the temptation, the GLVM Utilities also provide a menu option to verify that a geographically mirrored volume group is correctly configured.
Quorum and Remote Physical Volume Failure AIX 5L LVM has the concept of volume group quorum. The system administrator can decide whether to enable or disable quorum for a volume group. In general, enabling quorum helps to preserve the integrity of the volume group in the event of disk failures, and it helps to avoid scenarios where applications can mistakenly access stale data. However, if the volume group has more than one mirror copy, disabling quorum may help to increase data availability. Either choice has advantages and disadvantages, which vary depending on the configuration. Please refer to the AIX 5L documentation for a complete description of volume group quorum.
In short, when quorum is enabled, more than half of the volume group’s disks must be accessible in order for the volume group to be varied online. (Of course you can override this by forcing it to be varied online.) More than half of its disks must remain accessible in order for the volume group to stay online. If half or more of the disks fail or can no longer be accessed, then loss of quorum causes LVM to automatically take the volume group offline.
When quorum is disabled, all of its disks must be accessible in order for the volume group to be varied online. (This can also be overridden by forcing it to be varied online.) The nonquorum
PV1
Node A Node B
Production Site D/R Site
PV4 PV3 Copy #1
PV2 Copy #2 Copy #1 Copy #2
TCP/IP Network

pstrglvmstandalonewp093005.doc Page 9
volume group stays online as long as at least one of its disks remains accessible. LVM automatically takes the non-quorum volume group offline only after the last disk fails or can no longer be accessed.
In order for a remote physical volume to be accessible, its RPV client must be able to communicate with its RPV server, and its RPV server must be able to access the real disk. If the AIX 5L system which hosts the RPV server has an outage, either planned or unplanned, access to the remote physical volume is lost. Likewise, if the TCP/IP network connecting the two sites has an outage, either planned or unplanned, access to the remote physical volume is lost. (The remote physical volume does not fail immediately. The RPV client has a user-defined I/O timeout interval, which determines how long the RPV client waits for the RPV server to respond to I/O requests before assuming that it has failed or is unreachable.)
Enabling quorum for a geographically mirrored volume group can have unwanted consequences. A system outage at the disaster recovery site or a TCP/IP network outage between the two sites can cause all of the remote physical volumes to suddenly fail. If this results in a loss of quorum, then LVM automatically takes the volume group offline, which in turn causes an outage of the mission-critical application. In most cases it may be necessary to disable quorum for a geographically mirrored volume group. This can be better understood by examining the example airline reservation system, which was described previously:
From the production site’s point of view, the volume group has four disks, with two disks at each site. (Just forget about the disaster recovery site’s point of view for now.) Since there is a total of four disks, three disks must be accessible in order to have a quorum. If quorum is enabled, at least three disks must be accessible in order to vary on the volume group normally. If quorum is disabled, all four disks must be accessible in order to vary on the volume group normally. In either case you cannot vary on the volume group normally while both remote physical volumes are inaccessible.
Assume that all four disks are accessible, and the volume group is varied online at the production site. Later, if the server at the disaster recovery site crashes or is shutdown for planned
PV1
Node A Node B
Production Site D/R Site
PV2 PV4 PV3
PV4 = hdisk4 PV3 = hdisk3
PV2 = hdisk2 PV1 = hdisk1
PV4 = hdisk3 PV3 = hdisk2
PV3 PV4
Real Copy #1 Real Copy #2 Virtual Copy #2
TCP/IP Network

pstrglvmstandalonewp093005.doc Page 10
maintenance, both remote physical volumes become inaccessible, as shown in the following diagram:
Likewise, if the TCP/IP network fails, both remote physical volumes become inaccessible, as shown in the following diagram:
In either scenario, if quorum is enabled, the failure of remote physical volumes PV3 and PV4 results in a loss of quorum, which causes LVM to take the volume group offline. This in turn causes an outage of the airline reservation system. However, if quorum is disabled, LVM just notes the fact that the two remote physical volumes have failed, and are therefore stale, and I/O continues to the two local physical volumes.
PV1
Node A Node B
Production Site D/R Site
PV2 PV4 PV3
PV4 = hdisk4 PV3 = hdisk3
PV2 = hdisk2 PV1 = hdisk1
PV4 = hdisk3 PV3 = hdisk2
PV3 PV4
Real Copy #1 Real Copy #2 Virtual Copy #2
TCP/IP Network
PV1
Node A Node B
Production Site D/R Site
PV2 PV4 PV3
PV4 = hdisk4 PV3 = hdisk3
PV2 = hdisk2 PV1 = hdisk1
PV4 = hdisk3 PV3 = hdisk2
PV3 PV4
Real Copy #1 Real Copy #2 Virtual Copy #2
TCP/IP Network

pstrglvmstandalonewp093005.doc Page 11
If the volume group has more disks at the production site than at the disaster recovery site, then you might consider enabling quorum. However, that does not completely protect you from the possibility of having your mission-critical application access stale data. Suppose that the airline reservation system volume group has two mirror copies at the production site and one mirror copy at the disaster recovery site. Now there are four disks at the production site and two disks at the disaster recovery site for a total of six disks. Now four disks must be accessible in order to have a quorum.
If a massive power outage caused the production site to go down, you might vary the volume group online at the disaster recovery site (a forced vary on would be required) and run the airline reservation system there. The airline reservation system would only update the mirror copy at the disaster recovery site. The two mirror copies at the production site would become stale.
After recovering the production site, you would need to make its remote physical volumes (the disaster recovery site disks) accessible before varying the volume group online, so that the airline reservation system would have access to up-to-date data and the stale local physical volumes could be synchronized. If quorum was enabled, and you forgot to make the remote physical volumes accessible, then the four stale local physical volumes would be enough to satisfy the quorum requirement, and the volume group would be varied online with only the stale data. LVM would not even realize that the data is stale, and the airline reservation system would be allowed to access it. Such a scenario could harm your business. Imagine what can happen if travelers get their tickets from an airline reservation system which happens to be processing stale (old) data!
The important points to understand from this section are:
• Enabling quorum can have unwanted consequences for a geographically mirrored volume group. In most cases it is better to disable quorum. Before choosing to enable quorum, be sure to understand how it can affect the behavior of your geographically mirrored volume groups.
• If you are not careful, it is possible to run your mission critical system using stale data, even with quorum enabled. Always be aware of which site has the up-to-date mirror copy of your mission-critical data, and be sure to make the disks containing the up-to-date mirror copy accessible before varying the volume group online.
Avoiding Concurrent Access GLVM is intended for non-concurrent access only. You should not access a geographically mirrored volume group at one site, while it is already varied online at the other site. This is especially true if the volume group contains JFS or JFS2 file systems, because mounting a JFS or JFS2 file system on the production and disaster recovery sites at the same time can corrupt the file system or cause the system to crash.
In order to prevent accidental concurrent access, it is recommended that a geographically mirrored volume group not be automatically varied online during system startup. This avoids a scenario where the production site fails due to a power outage, and you decide to vary the volume group online at the disaster recovery site. Later, the power is restored and the production site server is restarted. The volume group must not be accessed during system startup at the production site, because it is already online at the disaster recovery site.

pstrglvmstandalonewp093005.doc Page 12
For this very reason RPV clients are not automatically configured into the available state during system startup. (Please do not create a script to do this during system startup!) Chances are that not having the RPV clients available would cause the varyonvg command to fail during system startup. However, the discussion in the previous section shows that a geographically mirrored volume group which has more disks at the production site and quorum enabled can be automatically varied online during system startup. The previous discussion also shows that this scenario can allow applications to access stale mission-critical data.
For these same reasons, any JFS or JFS2 file systems which reside in geographically mirrored volume groups should not be automatically mounted during system startup either. Chances are that not having the volume group online would cause the mount to fail anyway.
In fact, none of the system startup processing should automatically access a geographically mirrored volume group. After system startup of the production server completes, you should perform the tasks required to start your mission-critical workload manually, unless the volume group is already varied online at the disaster recovery site. These tasks vary widely, but often include the following:
• Make sure the RPV servers are available at the disaster recovery site.
• Configure the RPV clients into the available state.
• Vary the geographically mirrored volume group online.
• Mount any JFS or JFS2 file systems which reside in the volume group.
• NFS export directories which reside in the file systems belonging to the volume group.
• Start any databases which reside in the volume group.
• Start your mission-critical applications.
Without the benefits of monitoring and automation that are provided by HACMP, only a human being can decide whether it is safe and appropriate to access a geographically mirrored volume group on the production server after it is booted. Although these tasks must be performed manually, you could write a script to perform the tasks, and then run the script manually.
Contrary to their RPV client counterparts, RPV servers can be automatically configured into the available state during system startup. However, when the volume group is varied online at the disaster recovery site, it is recommended that you configure the RPV servers back into the defined state and change them to not be automatically configured into available state during system startup. This is intended as an extra precaution to prevent the production site server from accidentally accessing the volume group while it is varied online at the disaster recovery site.
Installation The GLVM software consists of the following installation filesets:
• glvm.rpv.client Remote Physical Volume Client • glvm.rpv.server Remote Physical Volume Server • glvm.rpv.util Geographic LVM Utilities • glvm.rpv.msg.en_US RPV Messages - U.S. English

pstrglvmstandalonewp093005.doc Page 13
The GLVM software requires AIX 5L Version 5.3 or later to be installed. More specifically, GLVM requires bos.rte.lvm 5.3.0.20 or higher to be installed.
During GLVM installation the following entry for the port number and connection protocol is automatically added to the /etc/services file:
rpv 6192/tcp
Security Considerations The RPV device driver does not encrypt the messages that are sent between the RPV client and RPV server. It is the system administrator’s responsibility to secure the RPV client-server network traffic between the two sites. Only the system administrator can determine whether physical security alone is sufficient.
IBM recommends the IP Security (IPsec) feature of AIX 5L for network security. You can either secure all network traffic or just RPV client-server traffic. The RPV device driver uses TCP port number 6192 for network communications.
How to Configure GLVM The easiest way to explain GLVM configuration is to just show how you might configure the example airline reservation system from the previous sections. Suppose that the production site is in Philadelphia, Pennsylvania and the disaster recovery site is in Poughkeepsie, New York.
Getting Started Geographic LVM mirroring can be added to a mission-critical system at any time. You can include GLVM mirroring in the initial deployment of the airline reservation system, or you can add GLVM mirroring after the airline reservation system has been deployed and running for a long time. In either case you start with an ordinary volume group at the production site.
Assume that the airline reservation system is already in production. At the starting point there is just a single IBM AIX 5L server with an ordinary volume group in Philadelphia. This ordinary volume group contains two logical volumes. One logical volume contains a JFS2 file system, which stores the airline reservation system data. The other logical volume contains the JFS2 file system log.
Now you need to add another server running AIX 5L in Poughkeepsie, as well as another set of disks which is capable of storing the airline reservation system data. A new mirror copy of the volume group is going to be added to the disks in Poughkeepsie. After all the GLVM configuration tasks have been completed, the geographically mirrored volume group will have two mirror copies, with one mirror copy at each site. (You could optionally have additional protection by having two mirror copies at the production site, or by using disk subsystem mirroring or RAID capabilities, but that is not shown in order to simplify the example configuration.)
Finally, the Philadelphia and Poughkeepsie sites must be connected by a TCP/IP network which is capable of handling all of the RPV client-server network traffic. Factors such as network latency and bandwidth can have a large impact upon application performance and response time.

pstrglvmstandalonewp093005.doc Page 14
Proper network planning is critical for a successful GLVM implementation. However, this is a broad topic and beyond the scope of this white paper.
The following diagram illustrates the configuration at the starting point:
RPV Server Configuration RPV server configuration is done at the disaster recovery site, which in this case is Poughkeepsie. RPV server configuration consists of the following two tasks:
• Defining the RPV server site name.
• Creating RPV servers for disks PV3 and PV4.
Before you can configure any RPV servers, you must first define the RPV server site name. This is a user-defined label which identifies the geographic location of the server and all of its local disks. The RPV servers running at the disaster recovery site communicate this site name back to the RPV clients running at the production site. The GLVM Utilities use this site name to determine where remote physical volumes are located.
To define the RPV server site name:
smitty rpvserver
1. Select Remote Physical Volume Server Site Name Configuration
2. Select Define / Change / Show Remote Physical Volume Server Site Name
3. Enter Poughkeepsie as the RPV server site name.
Now you are ready to create RPV servers for disks PV3 and PV4. Each RPV server appears like a device to the system administrator, but it is really just a definition which tells the RPV server kernel extension to process remote I/O requests for a given disk. You need to create two RPV
PV1
Node A Node B
Philadelphia Poughkeepsie
PV2 PV4 PV3
datavg
Application or Filesystem
AIX 5L LVM
TCP/IP Network
1.1.1.1 1.1.2.1
Two Unused Physical Volumes Ordinary Volume Group with Two Physical Volumes

pstrglvmstandalonewp093005.doc Page 15
servers, one for disk PV3 and another for disk PV4. Both RPV servers can be created at the same time:
smitty rpvserver
1. Select Add Remote Physical Volume Servers
2. Select disks PV3 and PV4 from the pick list. These disks are known to the Poughkeepsie server as hdisk2 and hdisk3 respectively:
Physical Volume Identifiers
Move cursor to desired item and press F7. Use arrow keys to scroll. ONE OR MORE items can be selected. Press Enter AFTER making all selections. # Physical Volume Physical Volume Identifier # --------------------------------------------- hdisk0 000dd32db904a048 hdisk1 000a5a9fc8907fdc > hdisk2 000dd32daa568b07 > hdisk3 000dd32db9b5ab41
3. This takes you to the following SMIT menu where the disk PVID values are already filled in.
Add Remote Physical Volume Servers
Type or select values in entry fields. Press Enter AFTER making all desired changes. [Entry Fields] Physical Volume Identifiers 000dd32daa568b07 00> * Remote Physical Volume Client Internet Address [] + Configure Automatically at System Restart? [no] + Start New Devices Immediately? [yes] +
4. The Remote Physical Volume Client Internet Address item is the RPV client’s IP address. The RPV server will only accept connection requests from this IP address. Enter 1.1.1.1, which is the Philadelphia server’s IP address.
5. Configure Automatically at System Restart? Answer yes if you want the RPV servers to be automatically configured into the available state during system startup. Otherwise, answer no.
6. Start New Devices Immediately? Answer yes if you want the RPV servers to be configured into the available state immediately. Otherwise, answer no.
7. The menu appears as follows after all the items have been completed:

pstrglvmstandalonewp093005.doc Page 16
Add Remote Physical Volume Servers
Type or select values in entry fields. Press Enter AFTER making all desired changes. [Entry Fields] Physical Volume Identifiers 000dd32daa568b07 00> * Remote Physical Volume Client Internet Address [1.1.1.1] + Configure Automatically at System Restart? [yes] + Start New Devices Immediately? [yes] +
8. Pressing the Enter key causes two RPV servers to be created and immediately configured into the available state:
COMMAND STATUS
Command: OK stdout: yes stderr: no Before command completion, additional instructions may appear below. rpvserver0 Available rpvserver1 Available
There are now two RPV servers, which appear as devices to the system administrator. Device rpvserver0 is the RPV server for disk PV3, and device rpvserver1 is the RPV server for disk PV4.
# lsdev -C -c rpvserver rpvserver0 Available Remote Physical Volume Server rpvserver1 Available Remote Physical Volume Server # lsattr -E -l rpvserver0 auto_online y Configure at System Boot True client_addr 1.1.1.1 Client IP Address True rpvs_pvid 000dd32daa568b070000000000000000 Physical Volume Identifier True # lsattr -E -l rpvserver1 auto_online y Configure at System Boot True client_addr 1.1.1.1 Client IP Address True rpvs_pvid 000dd32db9b5ab410000000000000000 Physical Volume Identifier True
There are additional SMIT menus to allow you to configure and manage your RPV servers. The mkdev and rmdev commands can also be used to move your RPV servers between the available and defined states. The following command moves an RPV server into the available state:
mkdev –l rpvserver0
The following command to moves the RPV server back to the defined state:
rmdev –l rpvserver0

pstrglvmstandalonewp093005.doc Page 17
At this point both RPV servers are in the available state, which means that they are ready to process disk I/O requests from remote RPV clients. Now the configuration looks like this:
This configuration is still an ordinary volume group in Philadelphia and two unused physical volumes in Poughkeepsie. However, the RPV server kernel extension in Poughkeepsie is now prepared to handle remote disk I/O requests.
RPV Client Configuration Now you are ready to create RPV clients at the production site, which in this case is Philadelphia. Each RPV client appears very much like an ordinary disk to the system administrator. You need to create two RPV clients, one for disk PV3 and another for disk PV4. Both RPV clients can be created at the same time:
smitty rpvclient
1. Select Add Remote Physical Volume Clients
2. This presents a SMIT menu containing one item. The Remote Physical Volume Server Internet Address item is the RPV server’s IP address. Enter 1.1.2.1, which is the Poughkeepsie server’s IP address.
3. The SMIT menu processing automatically determines possible values for the Remote Physical Volume Local Internet Address item. This is the RPV client’s IP address, from which the RPV server expects to receive connection requests. Select 1.1.1.1, which is the Philadelphia server’s IP address.
4. The SMIT menu processing contacts the RPV server in Poughkeepsie, obtains a list of possible remote physical volumes, and presents them in a pick list. Select disks PV3 and PV4 from the pick list:
PV1
Node A Node B
Philadelphia Poughkeepsie
PV2 PV4 PV3
datavg
Application or Filesystem
AIX 5L LVM RPV server
kernel extension
TCP/IP Network
1.1.1.1 1.1.2.1

pstrglvmstandalonewp093005.doc Page 18
Remote Physical Volume Server Disks
Move cursor to desired item and press F7. ONE OR MORE items can be selected. Press Enter AFTER making all selections. # These remote physical volumes are available # at site Poughkeepsie: # # (The physical volume names are as they are known # on the host named # nodeB) # # Physical Volume Physical Volume Identifier # ------------------------------------------------------- > hdisk2 000dd32daa568b070000000000000000 > hdisk3 000dd32db9b5ab410000000000000000
5. This takes you to the following SMIT menu where most of the items, including the disk PVID values, are already filled in.
Add Remote Physical Volume Clients
Type or select values in entry fields. Press Enter AFTER making all desired changes. [Entry Fields] Remote Physical Volume Server Internet Address 1.1.2.1 Remote Physical Volume Local Internet Address 1.1.1.1 Physical Volume Identifiers 000dd32daa568b07000> I/O Timeout Interval (Seconds) [180] # Start New Devices Immediately? [yes] +
6. The I/O Timeout Interval item determines how long the RPV client should wait for the RPV server to respond to I/O requests before giving up and assuming that the RPV server is down or unreachable. Once this time limit is reached, the RPV client fails all outstanding I/O requests. Then, LVM treats the remote physical volume as a failed disk and marks it as stale. Setting this value too low can lead to false failures, if a peak in network traffic slows response time. However, setting this value too high may cause the application to wait a very long time when an actual failure occurs. The default value is 180 seconds, or 3 minutes.
7. Start New Devices Immediately? Answer yes if you want the RPV clients to be configured into the available state immediately. Otherwise, answer no.
8. Assuming that you allow the RPV clients to be started immediately, pressing the Enter key causes two RPV clients to be created and immediately configured into the available state:

pstrglvmstandalonewp093005.doc Page 19
COMMAND STATUS
Command: OK stdout: yes stderr: no Before command completion, additional instructions may appear below. hdisk3 Available hdisk4 Available
There are now two RPV clients, which appear as ordinary disk devices to the system administrator. Device hdisk3 is the RPV client for disk PV3, and device hdisk4 is the RPV client for disk PV4.
# lsdev -C -c disk -t rpvclient hdisk3 Available Remote Physical Volume Client hdisk4 Available Remote Physical Volume Client # lsattr -E -l hdisk3 io_timeout 180 I/O Timeout Interval True local_addr 1.1.1.1 Local IP Address True pvid 000dd32daa568b070000000000000000 Physical Volume Identifier True server_addr 1.1.2.1 Server IP Address True # lsattr -E -l hdisk4 io_timeout 180 I/O Timeout Interval True local_addr 1.1.1.1 Local IP Address True pvid 000dd32db9b5ab410000000000000000 Physical Volume Identifier True server_addr 1.1.2.1 Server IP Address True
There are additional SMIT menus to allow you to configure and manage your RPV clients. The mkdev and rmdev commands can also be used to move your RPV clients between the available and defined states. The following command moves an RPV client into the available state:
mkdev –l hdisk3
The following command to moves the RPV client back to the defined state:
rmdev –l hdisk3
At this point both RPV clients are in the available state, which means that they are ready to redirect local disk I/O requests to the remote RPV servers. Now the configuration looks like this:

pstrglvmstandalonewp093005.doc Page 20
This configuration is still an ordinary volume group in Philadelphia and two unused physical volumes in Poughkeepsie. However, the Poughkeepsie physical volumes can now be accessed from Philadelphia.
Volume Group Configuration Now you are ready to take an ordinary volume group in Philadelphia and transform it into a geographically mirrored volume group that spans both the Philadelphia and Poughkeepsie sites. These tasks are done on the Philadelphia server.
First, prevent the volume group from being accessed by the Philadelphia server during system startup. You can issue the following command to keep the volume group from being varied online automatically during system startup:
chvg -a n datavg
You can issue the following command to keep the JFS2 file system from being mounted automatically during system startup:
chfs -A no /data
Refer to the AIX 5L documentation for further information about keeping volume groups and file systems from being activated during system startup. (The steps required to keep the airline reservation system from starting are not shown, because they are application-specific.)
To avoid mistakes later it is recommended that the same logical volume names be used at both sites. For each logical volume in the volume group, verify that a different logical volume by the same name does not already exist at the disaster recovery site. For example, when you created the logical volumes, you may have allowed AIX 5L to choose the names for you. In this case, they may have names like lv00 and loglv01. If these names are already in use on the Poughkeepsie server, you may want to rename the logical volumes on the Philadelphia server before proceeding with rest of these instructions. Choose meaningful names in order to avoid
PV1
Node A Node B
Philadelphia Poughkeepsie
PV2 PV4 PV3
datavg
Application or Filesystem
AIX 5L LVM
RPV client device driver
RPV server kernel extension
TCP/IP Network
1.1.1.1 1.1.2.1
PV3 PV4

pstrglvmstandalonewp093005.doc Page 21
future logical volume name conflicts. Refer to the AIX 5L documentation for more information about renaming logical volumes.
Before this can become a geographically mirrored volume group, each logical volume in the volume group must be configured to have a super strict allocation policy, so that the partitions allocated for one mirror copy cannot share a physical volume with the partitions from another mirror copy. You can use the chlv command to set a super strict allocation policy on an existing logical volume. Issue the following commands for the two airline reservation system logical volumes:
chlv -s s -u 2 datafslv
chlv -s s -u 2 dataloglv
Refer to the AIX 5L documentation for further information about setting a super strict allocation policy for your logical volumes.
Next, add remote physical volumes PV3 and PV4 to the datavg volume group:
smitty glvm_utils
1. Select Geographically Mirrored Volume Groups
2. Select Add Remote Physical Volumes to a Volume Group
3. Select datavg, which is the name of the volume group.
4. Select Poughkeepsie, which is the site name you defined during RPV server configuration.
5. A list of available remote physical volumes is presented in a pick list. Select remote physical volumes PV3 and PV4 from the pick list. They are known to the Philadelphia server as hdisk3 and hdisk4 respectively:
Select One or more Remote Physical Volumes
Move cursor to desired item and press F7. ONE OR MORE items can be selected. Press Enter AFTER making all selections. # All Free Physical Volumes in Poughkeepsie. # RPV PVID Site > hdisk3 000dd32daa568b07 Poughkeepsie > hdisk4 000dd32db9b5ab41 Poughkeepsie
6. This takes you to the following SMIT menu where the volume group name and remote physical volume names are already filled in:

pstrglvmstandalonewp093005.doc Page 22
Add Remote Physical Volumes to a Volume Group
Type or select values in entry fields. Press Enter AFTER making all desired changes. [Entry Fields] * VOLUME GROUP name datavg Force [no] + * REMOTE PHYSICAL VOLUME Name hdisk3 hdisk4
7. The Force question asks whether you want to force the remote physical volume to be added to the specified volume group. This may be necessary if the disk once belonged to a volume group, which no longer exists, and the disk contains LVM metadata indicating that it still belongs to that volume group.
8. Pressing Enter runs the extendvg command, which adds the remote physical volumes to the volume group.
Now the datavg volume group spans both the Philadelphia and Poughkeepsie sites. It contains disks PV1 and PV2, which are local physical volumes, and disks PV3 and PV4, which are remote physical volumes. However, there is still only one copy of the volume group data on disks PV1 and PV2. Now it is time to add a second mirror copy to disks PV3 and PV4.
smitty glvm_utils
1. Select Geographically Mirrored Volume Groups
2. Select Add a Remote Site Mirror Copy to a Volume Group
3. Select datavg, which is the name of the volume group.
4. Select Poughkeepsie, which is the site name you defined during RPV server configuration.
5. A list of available remote physical volumes belonging to the datavg volume group is presented in a pick list. Select remote physical volumes PV3 and PV4 from the pick list. They are known to the Philadelphia server as hdisk3 and hdisk4 respectively:
Select One or more Remote Physical Volumes
Move cursor to desired item and press F7. ONE OR MORE items can be selected. Press Enter AFTER making all selections. > hdisk3 000dd32daa568b07 Poughkeepsie > hdisk4 000dd32db9b5ab41 Poughkeepsie
6. This takes you to the following SMIT menu where the volume group name and remote physical volume names are already filled in:
pstrglvmstandalonewp093005.doc Page 23
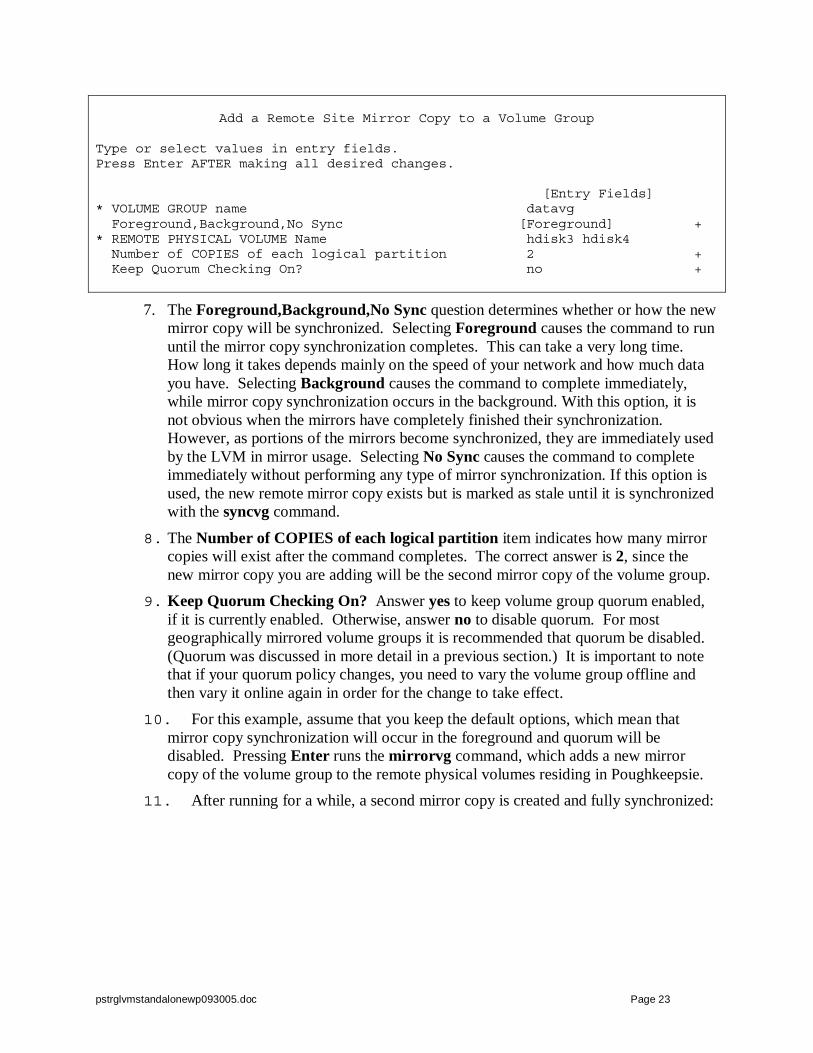
Add a Remote Site Mirror Copy to a Volume Group
Type or select values in entry fields. Press Enter AFTER making all desired changes. [Entry Fields] * VOLUME GROUP name datavg Foreground,Background,No Sync [Foreground] + * REMOTE PHYSICAL VOLUME Name hdisk3 hdisk4 Number of COPIES of each logical partition 2 + Keep Quorum Checking On? no +
7. The Foreground,Background,No Sync question determines whether or how the new mirror copy will be synchronized. Selecting Foreground causes the command to run until the mirror copy synchronization completes. This can take a very long time. How long it takes depends mainly on the speed of your network and how much data you have. Selecting Background causes the command to complete immediately, while mirror copy synchronization occurs in the background. With this option, it is not obvious when the mirrors have completely finished their synchronization. However, as portions of the mirrors become synchronized, they are immediately used by the LVM in mirror usage. Selecting No Sync causes the command to complete immediately without performing any type of mirror synchronization. If this option is used, the new remote mirror copy exists but is marked as stale until it is synchronized with the syncvg command.
8. The Number of COPIES of each logical partition item indicates how many mirror copies will exist after the command completes. The correct answer is 2, since the new mirror copy you are adding will be the second mirror copy of the volume group.
9. Keep Quorum Checking On? Answer yes to keep volume group quorum enabled, if it is currently enabled. Otherwise, answer no to disable quorum. For most geographically mirrored volume groups it is recommended that quorum be disabled. (Quorum was discussed in more detail in a previous section.) It is important to note that if your quorum policy changes, you need to vary the volume group offline and then vary it online again in order for the change to take effect.
10. For this example, assume that you keep the default options, which mean that mirror copy synchronization will occur in the foreground and quorum will be disabled. Pressing Enter runs the mirrorvg command, which adds a new mirror copy of the volume group to the remote physical volumes residing in Poughkeepsie.
11. After running for a while, a second mirror copy is created and fully synchronized:

pstrglvmstandalonewp093005.doc Page 24
COMMAND STATUS
Command: OK stdout: yes stderr: no Before command completion, additional instructions may appear below. 0516-1125 mirrorvg: Quorum requirement turned off, varyoff and varyon volume group for this to take effect.
As expected, quorum has been disabled, and the volume group must be varied offline and then back online for the change to take effect.
There is now a second mirror copy of the data at the Poughkeepsie site. This is now a geographically mirrored volume group, as shown in the following diagram:
The geographically mirrored volume group is now completely configured. Finally, you need to run the verification command, to be sure it is configured properly.
smitty glvm_utils
1. Select Geographically Mirrored Volume Groups
2. Select Verify Mirror Copy Site Locations for a Volume Group
3. Select datavg, which is the name of the volume group.
4. Press Enter.
This performs a verification test of the geographically mirrored volume group. The test completes quickly and shows that the geographically mirrored volume group has been configured correctly.
PV1
Node A Node B
Philadelphia Poughkeepsie
PV2 PV4 PV3
Copy #1
Application or Filesystem
AIX 5L LVM
RPV client device driver
RPV server kernel extension
TCP/IP Network
1.1.1.1 1.1.2.1
Real Copy #2
PV3 PV4
Virtual Copy #2

pstrglvmstandalonewp093005.doc Page 25
COMMAND STATUS
Command: OK stdout: yes stderr: no Before command completion, additional instructions may appear below. Checking Volume Group datavg. # Site Copy Physical Volumes #local PV1 hdisk1 hdisk2 Poughkeepsie PV2 hdisk3 hdisk4 Checking Logical Volume dataloglv. Checking Logical Volume datafslv.
You now have a complete and fully functional GLVM configuration. As the airline reservation system runs at the production site, all data updates are mirrored in real time to the disaster recovery site. The goal is to always run the airline reservation system in this normal operating mode. If the disaster recovery site always has an up-to-date mirror copy of the mission-critical data, then you will be better prepared for a disaster that hopefully will never occur.
Handling a Production Site Outage If one day a disaster suddenly causes an outage of your production site, you will need to know what to do. In the meantime you will also want to test your GLVM configuration to make sure that it works properly. This section continues the airline reservation system example to explain how to move your mission-critical workload over to the disaster recovery site.
Taking Down Production Site When testing your GLVM configuration, there are many different ways to intentionally cause a production site outage. Some ways are harsher than others. You can go to the Philadelphia server and pull out the power cable, press the On/Off switch, issue the halt –q command, or issue the reboot –q command, to name a few, in order to take the system down abruptly. You can also issue the shutdown command to take the system down gently. Before doing any of these things, be sure that the Philadelphia server will not try to access the geographically mirrored volume group during system startup.
If, for some reason, you do not want to take the system down, you can manually stop the airline reservation system and release all of its resources. The tasks to perform on the Philadelphia server include the following:
• Stop the airline reservation system application. (The commands to do this are application-specific.)
• Unmount any file systems that reside in the geographically mirrored volume group:
umount /data
• Vary the geographically mirrored volume group offline:
varyoffvg datavg

pstrglvmstandalonewp093005.doc Page 26
• Move the RPV clients back to the defined state:
rmdev -l hdisk3
rmdev -l hdisk4
At this point the production site in Philadelphia is no longer accessing the geographically mirrored volume group, and it is safe to begin running the airline reservation system at the disaster recovery site in Poughkeepsie.
Moving Workload to Disaster Recovery Site Be sure to make every reasonable effort to confirm that the production site is really down before accessing the geographically mirrored volume group at the disaster recovery site. In the event of an actual emergency in Philadelphia, it is most likely that the IT staff at the Poughkeepsie site will be responsible for getting the airline reservation system back online. A false alarm could cause the airline reservation system to be brought online at the Poughkeepsie site, while it is still running at the Philadelphia site. If possible, the Poughkeepsie IT staff should communicate with the Philadelphia IT staff to confirm that the production site is really down before taking any recovery action.
After the production site outage, the example airline reservation system configuration looks like this:
All that remains are the Poughkeepsie server and its local physical volumes, which may contain the last surviving up-to-date copy of the airline reservation system data.
Before accessing the geographically mirrored volume group at the disaster recovery site, you should move the RPV servers back to the defined state. This is accomplished by issuing the following commands on the Poughkeepsie server:
rmdev -l rpvserver0
rmdev -l rpvserver1
PV1
Node A Node B
Philadelphia Poughkeepsie
PV2 PV4 PV3
PV4 = hdisk4 PV3 = hdisk3
PV2 = hdisk2 PV1 = hdisk1
PV4 = hdisk3 PV3 = hdisk2
PV3 PV4
Real Copy #1 Real Copy #2 Virtual Copy #2
TCP/IP Network

pstrglvmstandalonewp093005.doc Page 27
If you intend to keep the airline reservation system running at the Poughkeepsie site for an extended length of time, then you do not want the RPV servers to be configured into the available state the next time the server is rebooted. If the RPV servers are configured to do this, issue the following commands to disable automatic RPV server configuration at system restart:
chdev -l rpvserver0 -a auto_online=n
chdev -l rpvserver1 -a auto_online=n
Now you are ready to access the geographically mirrored volume group at the disaster recovery site. At this point a mirror copy of the volume group already exists on disks PV3 and PV4. However, the volume group is still unknown to the AIX 5L operating system running on the Poughkeepsie server. The volume group must be identified to the operating system by running the importvg command.
The importvg command takes a physical volume name as one of its arguments. You only need to identify one of the volume group’s physical volumes, it does not matter which one, and the importvg command automatically finds the rest. It does this by reading the LVM metadata from the physical volume. From the LVM metadata the importvg command can tell that the volume group contains four physical volumes. Then, it determines that it can only access two out of the four physical volumes. The importvg command normally requires a quorum, in order to prevent accidentally importing from a stale physical volume. In this case a quorum requires three physical volumes. Since only two physical volumes are accessible, the quorum requirement is not met, so a normal call to the importvg command fails. You can bypass the quorum requirement by issuing the importvg command with the force option (-f flag). AIX 5L provides a SMIT menu interface to the importvg command, but the SMIT menu does not allow you to specify the force option. For this reason you must run the command to forcibly import the volume group directly from the command line.
Issue the following command to import the geographically mirrored volume group into the Poughkeepsie server:
# importvg -f -y datavg hdisk2 PV Status: hdisk2 000dd32daa568b07 PVACTIVE hdisk3 000dd32db9b5ab41 PVACTIVE 000dd31d58ba0ce8 NONAME 000dd31d714bfde2 NONAME varyonvg: Volume group datavg is varied on. 0516-510 synclvodm: Physical volume not found for physical volume identifier 000dd31d714bfde20000000000000000. 0516-510 synclvodm: Physical volume not found for physical volume identifier 000dd31d58ba0ce80000000000000000. 0516-548 synclvodm: Partially successful with updating volume group datavg. datavg PV Status: hdisk2 000dd32daa568b07 PVACTIVE hdisk3 000dd32db9b5ab41 PVACTIVE 000dd31d58ba0ce8 NONAME 000dd31d714bfde2 NONAME varyonvg: Volume group datavg is varied on.

pstrglvmstandalonewp093005.doc Page 28
The importvg command is successful, but it produces a lot of output because it cannot find disks PV1 and PV2.
In some cases, such as when the volume group contains NFS-exported directories, the volume group major number may need to be the same at both sites. In those cases you will need to specify the volume group major number when you import the volume group. Refer to the AIX 5L documentation for more information.
At this point the geographically mirrored volume group has been imported and varied online at the disaster recovery site. When a volume group is imported, it is configured to be automatically varied online at system startup and quorum is enabled. You may want to keep these settings if the production site server and its disks have actually been destroyed. Otherwise, you should disable quorum and prevent the volume group from being automatically varied online at system startup. You can run the following command on the Poughkeepsie server to accomplish both of these things at once:
chvg -a n -Q n datavg
The same considerations apply for mounting file systems and starting the airline reservation system application at system startup. The importvg command preserves the file system settings that were defined on the production server. Since you configured the file system to not be automatically mounted at system startup on the Philadelphia server, the importvg command will configure it the same way on the Poughkeepsie server. No further action is required if you do not want the file systems to be automatically mounted.
After the geographically mirrored volume group has been varied online on the Poughkeepsie server, the tasks required to get the airline reservation system up and running are the same as they were on the Philadelphia server. This includes mounting the JFS2 file system which contains the airline reservation system data:
mount /data
You may need to run the fsck command first, if the file system was not unmounted cleanly from the Philadelphia server. After the file system has been mounted, you can start the airline reservation system application. (The steps for starting the airline reservation system are application-specific.)
Congratulations! The airline reservation system has survived the disaster. It is now back up and running, with up-to-date data, at the disaster recovery site. Additional work may be required to redirect users and client applications to the disaster recovery site.
Handling Production Site Recovery If you are fortunate, and the outage does not destroy your production site server or its disks, then you will want to know how to move your mission-critical application back to the production site, after it has been repaired. In the meantime you will also want to test your GLVM configuration to make sure this works properly, too. This section continues the airline reservation system example to explain how to move your mission-critical workload back to the production site.

pstrglvmstandalonewp093005.doc Page 29
Taking Down Disaster Recovery Site If you want the RPV servers to be automatically configured into the available state during system startup, you can issue the following commands on the Poughkeepsie server. It is safe to issue these commands even before you stop the airline reservation system:
chdev -l rpvserver0 -a auto_online=y
chdev -l rpvserver1 -a auto_online=y
A gentle reboot of the Poughkeepsie server is the simplest way to stop the airline reservation system and give up its access to the geographically mirrored volume group. If you do not want to take the system down, you can manually stop the airline reservation system and release all of its resources. The tasks to perform on the Poughkeepsie server include the following:
• Stop the airline reservation system application. (The commands to do this are application-specific.)
• Unmount any file systems that reside in the geographically mirrored volume group:
umount /data
• Vary the geographically mirrored volume group offline:
varyoffvg datavg
At this point the Poughkeepsie server is no longer accessing the geographically mirrored volume group. Now the RPV servers must be configured into the available state on the Poughkeepsie server, so that the Philadelphia server can access the volume group mirror copy which resides in Poughkeepsie. If a reboot does not make this happen automatically, issue the following commands on the Poughkeepsie server:
mkdev -l rpvserver0
mkdev -l rpvserver1
Moving Workload Back to Production Site At this point only the Poughkeepsie site has an up-to-date mirror copy of the volume group. The Philadelphia site’s mirror copy is stale. Be sure that the Philadelphia server can access its remote physical volumes before it tries to access the volume group. Otherwise, the LVM on the Philadelphia server cannot determine that its local mirror copy is stale. Having quorum disabled should prevent this from happening, as long as you do not force the volume group to be varied online.
The RPV servers should already be configured into the available state on the Poughkeepsie server. All of the remaining tasks are to be performed on the Philadelphia server.
First, move the RPV clients into to the available state:
mkdev -l hdisk3
mkdev -l hdisk4
This next step is a bit tricky, and results from the fact that the Poughkeepsie server does not have access to disks PV1 and PV2. Earlier, when the geographically mirrored volume group was

pstrglvmstandalonewp093005.doc Page 30
varied online at the Poughkeepsie site, the LVM could not access disks PV1 and PV2. (You may recall that the importvg command produced a lot of output to warn about this.) At that time the LVM running on the Poughkeepsie server updated the LVM metadata on disks PV3 and PV4 to indicate that it could not find disks PV1 and PV2. Now, when you vary the volume group online, the LVM running on the Philadelphia server will see that disks PV1 and PV2 had experienced problems, so it will mark those disks as unavailable or removed. You need to make disks PV1 and PV2 available again. This is done by issuing the following commands on the Philadelphia server:
# varyonvg -n -s datavg PV Status: hdisk1 000dd31d714bfde2 PVREMOVED hdisk2 000dd31d58ba0ce8 PVREMOVED hdisk3 000dd32daa568b07 PVACTIVE hdisk4 000dd32db9b5ab41 PVACTIVE varyonvg: Volume group datavg is varied on. # chpv -v a hdisk1 # chpv -v a hdisk2 # varyoffvg datavg
Now, you can vary the geographically mirrored volume group online in the normal way:
varyonvg datavg
The normal varyonvg command causes the stale mirror copy in Philadelphia to be synchronized from the up-to-date mirror copy in Poughkeepsie. This synchronization processing occurs in the background. You can continue on and start the airline reservation system, while the synchronization processing occurs. Otherwise, you can perform the synchronization in the foreground or defer it to later if you want. Refer to the AIX 5L documentation for further details.
Next, mount any file systems that reside in the geographically mirrored volume group:
mount /data
Finally, start the airline reservation system application. (The commands to do this are application-specific.) Once the synchronization processing completes, you will be back to where you were before the production site outage occurred.
Handling Remote Physical Volume Failures Ideally, you want your GLVM configuration to always be in the normal operating mode, where your mission-critical application runs at the production site, and all data updates are mirrored in real time to the disaster recovery site. However, you have to expect your remote physical volumes to fail occasionally. When this happens, you will need to know how to diagnose and correct the problem. In the meantime you will also want to test your GLVM configuration to make sure that it works properly. This section continues the airline reservation system example to explain how to diagnose and recover from remote physical volume failures.

pstrglvmstandalonewp093005.doc Page 31
A previous section of this white paper explained how enabling quorum for a geographically mirrored volume group can lead to unwanted consequences, when the production site server loses access to its remote physical volumes. As you read this section, assume that quorum is disabled for the geographically mirrored volume group.
Also assume that the airline reservation system is running on the Philadelphia server throughout this entire section. It starts out mirroring data to the Poughkeepsie site. Then, a problem causes the Philadelphia server to lose access to the remote physical volumes, so mirroring to Poughkeepsie stops. Finally, the problem is corrected, mirroring to Poughkeepsie resumes, and LVM synchronizes the stale remote physical volumes from the up-to-date local physical volumes.
Diagnosing Remote Physical Volume Failures In order for a remote physical volume to be accessible, its RPV client must be able to communicate with its RPV server, and its RPV server must be able to access the real disk. This means that each RPV client running on the Philadelphia server must be able to communicate with its RPV server running on the Poughkeepsie server. If the Poughkeepsie server has an outage, either planned or unplanned, the Philadelphia server loses access to its remote physical volumes, as shown in the following diagram:
Likewise, if the TCP/IP network connecting the two sites has an outage, either planned or unplanned, the Philadelphia server loses access to its remote physical volumes, as shown in the following diagram:
PV1
Node A Node B
Philadelphia Poughkeepsie
PV2 PV4 PV3
PV4 = hdisk4 PV3 = hdisk3
PV2 = hdisk2 PV1 = hdisk1
PV4 = hdisk3 PV3 = hdisk2
PV3 PV4
Real Copy #1 Real Copy #2 Virtual Copy #2
TCP/IP Network

pstrglvmstandalonewp093005.doc Page 32
In either scenario all of the remote physical volumes which are processing I/O requests suddenly fail. However, they do not fail immediately. (Inactive remote physical volumes do not get a chance to notice the problem and will not fail.) Each RPV client has a user-defined I/O timeout interval, which determines how long it waits for the RPV server to respond to I/O requests before assuming that it has failed or is unreachable. Once this time limit expires, the RPV client fails all outstanding I/O requests (with errno = EIO). This causes LVM to treat the remote physical volume as a failed disk. LVM marks the remote physical volume as being stale, and logical volume I/O continues to the local physical volumes.
It is important to choose the I/O timeout interval wisely. It should be long enough that if it is reached, you are reasonably sure that there is a genuine problem, and not just a slow response due to a burst of network activity. On the other hand, it should not be so long such that users of the airline reservation system will have to wait for an extended period of time when a real problem does occur.
When a remote physical volume fails in this manner, an entry similar to the following is written to the AIX 5L Error Log on the Philadelphia server:
PV1
Node A Node B
Production Site D/R Site
PV2 PV4 PV3
PV4 = hdisk4 PV3 = hdisk3
PV2 = hdisk2 PV1 = hdisk1
PV4 = hdisk3 PV3 = hdisk2
PV3 PV4
Real Copy #1 Real Copy #2 Virtual Copy #2
TCP/IP Network

pstrglvmstandalonewp093005.doc Page 33
LABEL: RPVC_IO_TIMEOUT IDENTIFIER: D034B795 Date/Time: Tue Sep 20 10:29:36 EDT 2005 Sequence Number: 1770 Machine Id: 000DD31D4C00 Node Id: nodeA Class: U Type: PERM Resource Name: hdisk3 Resource Class: disk Resource Type: rpvclient Location: VPD: Description No response from RPV server within I/O timeout interval. Probable Causes RPV server is down or not reachable. Failure Causes There is a problem with the data mirroring network. The node or site which hosts the RPV server is down. RPV server is not configured in the Available state. Recommended Actions Correct the problem which has caused the RPV server to be down or not reachable. Then, tell the RPV client to resume communication with the RPV server by running the command: chdev -l <device> -a resume=yes where <device> is the name of this RPV client device.
A separate error log entry is written for each failed remote physical volume. These errors may be followed by LVM errors. You can use the errpt command to view AIX 5L Error Log entries. You can also define an error notification object to configure a user-specified command, which is usually a simple script, to run some kind of automated action in response to these errors. Often the command just sends email to the system administrators to make them aware of the problem. Refer to the AIX 5L documentation for further information about the AIX 5L Error Log.
Recovering Failed Remote Physical Volumes When one or more remote physical volumes fail, the first course of action is to determine why they failed. In the case of the example airline reservation system, you would first determine if the Poughkeepsie server is down or the TCP/IP network connecting the sites is down. There are also other possible explanations, such as failure to configure the RPV server at the Poughkeepsie site into the available state, or a disk failure or disk adapter failure at the Poughkeepsie site.
Then, of course, the next course of action is to correct the problem, which is the root cause of the remote physical volume failures.
After the problem has been corrected, and it is once again possible for the RPV clients to access their RPV servers at the Poughkeepsie site, and the RPV servers can access the real disks, then

pstrglvmstandalonewp093005.doc Page 34
you need to tell the RPV clients that it is okay to resume contact with their RPV servers. If a network outage had caused both of its remote physical volumes to fail, you would need to issue the following commands on the Philadelphia server:
chdev -l hdisk3 -a resume=yes
chdev -l hdisk4 -a resume=yes
These commands tell the RPV clients to resume communications with their RPV server counterparts. They should succeed, because the problem has been corrected. However, the LVM is not aware of this, so it does not know that it can resume sending disk I/O requests.
Finally, you need to tell LVM that it is okay to use these remote physical volumes again. This is accomplished by rerunning the varyonvg command on the Philadelphia server:
varyonvg datavg
Yes, the Philadelphia server already has the geographically mirrored volume group varied online. In this case the varyonvg command causes LVM to try to access all of the failed physical volumes again. This time LVM will be successful. Then, LVM will synchronize the stale remote physical volumes from the local physical volumes, and geographic data mirroring to the Poughkeepsie site will resume as before.
It is important to note that the airline reservation can stay in production on the Philadelphia server while this recovery procedure takes place.
Planned Outages At certain times you may want to shutdown the Poughkeepsie server or the TCP/IP network connecting the sites for a planned maintenance window. You can do this while the airline reservation system stays in production on the Philadelphia site.
If you intentionally shutdown the Poughkeepsie server or the network, everything will work exactly as described above. However, since you know what is going to happen, you may want the remote physical volumes to fail immediately, and avoid any needless application response delays that can occur, while the RPV clients wait for their I/O timeout intervals to expire.
If you want to tell the RPV clients on the Philadelphia server to immediately behave as if their I/O timeout limits have expired, you can issue the following commands:
chdev -l hdisk3 -a server_addr=none
chdev -l hdisk4 -a server_addr=none
These commands tell the two RPV clients that they have no RPV servers to communicate with. Then, they behave exactly as if their I/O time limits have expired, except no entries are written to the AIX 5L Error Log. (You do not need to be informed of the error, since you intentionally caused it.)
LVM behaves the same way as it would for an unplanned outage. It treats the remote physical volumes as failed disks and marks them as stale. LVM writes the same errors to the AIX 5L Error Log as it does for an unplanned outage.
After the outage is over, the RPV client recovery command is a bit different. Now you need to tell the RPV clients which IP address they should use to communicate with their RPV servers.

pstrglvmstandalonewp093005.doc Page 35
This is the same IP address that was used when you created the RPV clients. The commands to issue on the Philadelphia server to do this are:
chdev -l hdisk3 -a server_addr=1.1.2.1
chdev -l hdisk4 -a server_addr=1.1.2.1
These commands tell the RPV clients to resume communications with their RPV server counterparts using the specified IP address. They should succeed, because the outage is now over. However, the LVM is not aware of this, just like the unplanned outage case, so it does not know that it can resume sending disk I/O requests.
Finally, you need to tell LVM that it is okay to use these remote physical volumes again, just as you would do for an unplanned outage. This is also accomplished by rerunning the varyonvg command on the Philadelphia server:
varyonvg datavg
Once again, LVM behaves the same way as it does for the unplanned outage, and geographic data mirroring to the Poughkeepsie site will resume as before.
Just like the unplanned outage scenario, the airline reservation can stay in production on the Philadelphia server while this recovery procedure takes place.
Where Do You Go From Here? Hopefully, this white paper has provided lots of useful information about GLVM. For more information, especially how your mission-critical system can be even better protected from a disaster by using GLVM in an HACMP cluster, please refer to the HACMP/XD for Geographic LVM: Planning and Administration Guide, which is available online at the following HACMP documentation page:
http://www.ibm.com/servers/eserver/pseries/library/hacmp_docs.html

pstrglvmstandalonewp093005.doc Page 36
© IBM Corporation 2005
IBM Corporation Systems and Technology Group Route 100 Somers, New York 10589
Produced in the United States of America September 2005 All Rights Reserved
This document was developed for products and/or services offered in the United States. IBM may not offer the products, features, or services discussed in this document in other countries.
The information may be subject to change without notice. Consult your local IBM business contact for information on the products, features and services available in your area.
All statements regarding IBM future directions and intent are subject to change or withdrawal without notice and represent goals and objectives only.
IBM, the IBM logo, the e-business logo, ~, AIX 5L, HACMP are trademarks or registered trademarks of International Business Machines Corporation in the United States or other countries or both. A full list of U.S. trademarks owned by IBM may be found at: http://www.ibm.com/legal/copytrade.shtml.
Other company, product, and service names may be trademarks or service marks of others.
Copying or downloading the images contained in this document is expressly prohibited without the written consent of IBM.
Information concerning non-IBM products was obtained from the suppliers of these products or other public sources. Questions on the capabilities of the non-IBM products should be addressed with those suppliers.
All performance information was determined in a controlled environment. Actual results may vary. Performance information is provided “AS IS” and no warranties or guarantees are expressed or implied by IBM. Buyers should consult other sources of information, including system benchmarks, to evaluate the performance of a system they are considering buying
When referring to storage capacity, 1TB equals total GB divided by 1000; accessible capacity may be less
The IBM home page on the Internet can be found at: http://www.ibm.com.
The IBM ~ p5 and pSeries home page on the Internet can be found at: http://www.ibm.com/servers/eserver/pseries.