Using the eCraft2Learn teacher interface and learning ......It also includes powerful learning...
20
1 USER GUIDE Using the eCraſt2Learn teacher interface and learning analycs tools
Transcript of Using the eCraft2Learn teacher interface and learning ......It also includes powerful learning...

1
USER GUIDE
Using the eCraft2Learn teacher interface and learning analytics tools


3
TABLE OF CONTENTSOverview 4The Teacher Interface 5 Creating A New Session 5 Connecting To A Session 6Customising The Uui 6 Selecting Uui Tools 6 Adding Teacher Resources 7Call4action Tool 8 Creating A Task 8 Reflection Tasks 10Self Evaluation (Badges) Tool 11 Creating A Self-Evaluation Request 12 Evaluating Student Performance 14Sharing Tool 15Learning Analytics Tool 16 The Learning Analytics Dashboard 16 Data Analysis Tools 17

OvervieweCraft2Learn is an EU funded project centred around researching, designing, piloting and validating an ecosystem based on digital fabrication and making technologies for creating computer-supported artefacts.
You can learn more about the eCraft2Learn Project in Teacher Guide 1 Introducing eCraft2Learn which can be downloaded at: https://project.ecraft2learn.eu/introducing-ecraft2learn/
The 5 stage craft and project-based methodology of eCraft2Learn, requires digital tools that allows the learners to ideate, plan, create, program and share their work in a collaborative way. These are provided through a digital platform. The digital platform consists of a Unified User Interface (UUI) that provides a single user gateway to all the digital tools, software and resources students and teachers will require when participating in eCraft2Learn projects. It also consists of a teacher interface where the UUI can be configured for different student sessions/projects and the learning analytics tool can be accessed.
This guide has been created to introduce you to the eCraft2Learn teacher interface tools. The guide will take you through the following:
• The teacher interface
• Customising the UUI
• Call4action tool
• Self evaluation (badges) tool
• Sharing tool
• Learning analytics tool
Throughout the guide, you will be signposted to various other more detailed documentation from the eCraft2Learn academic research and project pilots. These documents provide a more detailed insight into how the eCraft2Learn ecosystem was developed and trialled along with the approach and outcomes from the project pilots. Follow the links in the guide to learn more.
4

55
The teacher interfaceThe teacher interface allows teachers to set up, monitor and control the students access to the digital tools within the UUI. It also includes powerful learning analytics tool that provides data that can be used to monitor and assess students progress in eCraft2Learn projects.
The teacher interface can be accessed at: ƘǘǘLJǎΥκκŜŎNJŀŦǘнƭŜŀNJƴΦƎƛǘƘdzōΦƛƻκƭŜŀNJƴƛƴƎπŀƴŀƭȅǘƛŎǎκ
CREATING A NEW SESSION
The data collected through the platform and the UUI display is controlled through the use of individual “sessions”. You can set up a new session through the teacher interface and students can connect to a session when logging into the UUI. This will allow you to track the activity in each session. Depending how you use eCraft2Learn in your school or organisation, you can set up different sessions for each class or project.
When you first access the teacher interface you can either create a new session or open an existing session. To create a new session, simply click on the green create new session button on the home screen.
Enter your email and click the purple “Send the session id to me” button. You will then be emailed a session id which you can then connect to. Note: It is important that all students log in every time they use the UUI using the session ID you have set up for that specific class/group or project.

CONNECTING TO A SESSION
From the side menu, you can select the session that you want to connect to. Enter the name of the session in the text field and press the connect button.
After you have selected the session, the system automatically connects to the selected session and loads the dataset from the UUI for that particular session and the teacher interface tools become accessible.
Customising the UUIThe UUI can be customised for each individual session, this will allow you to display specific tools and additional resources that you require students to access. The benefit of this is that you can create a unique experience for each class or group or each project.
SELECTING UUI TOOLS
You can customise the UUI interface so that students can only view and interact with the digital tools that you deem appropriate for that project, effectively hiding the tools you do not want them to use. This will allow students to focus their efforts in the best tools for the project. This feature is particularly useful when students are still learning the eCraft2Learn methodology and digital tools. In time when students become more experienced and are working on more open ended projects, you may wish to give them access to all the tools as they will have the experience to select and use the best tools for the job.To select the tools you wish students to access in a particular session, click on the “Select tools for UUI” button in the left menu.
This will display a list of the tools, enter a session ID then click on the toggles to the right of each tool to switch them on or off. By default, all tools are switched on with the toggle to the left, toggling to the right will switch them off.
Switching a tool off will grey it out in the UUI and students will not be able to open it.
6
7
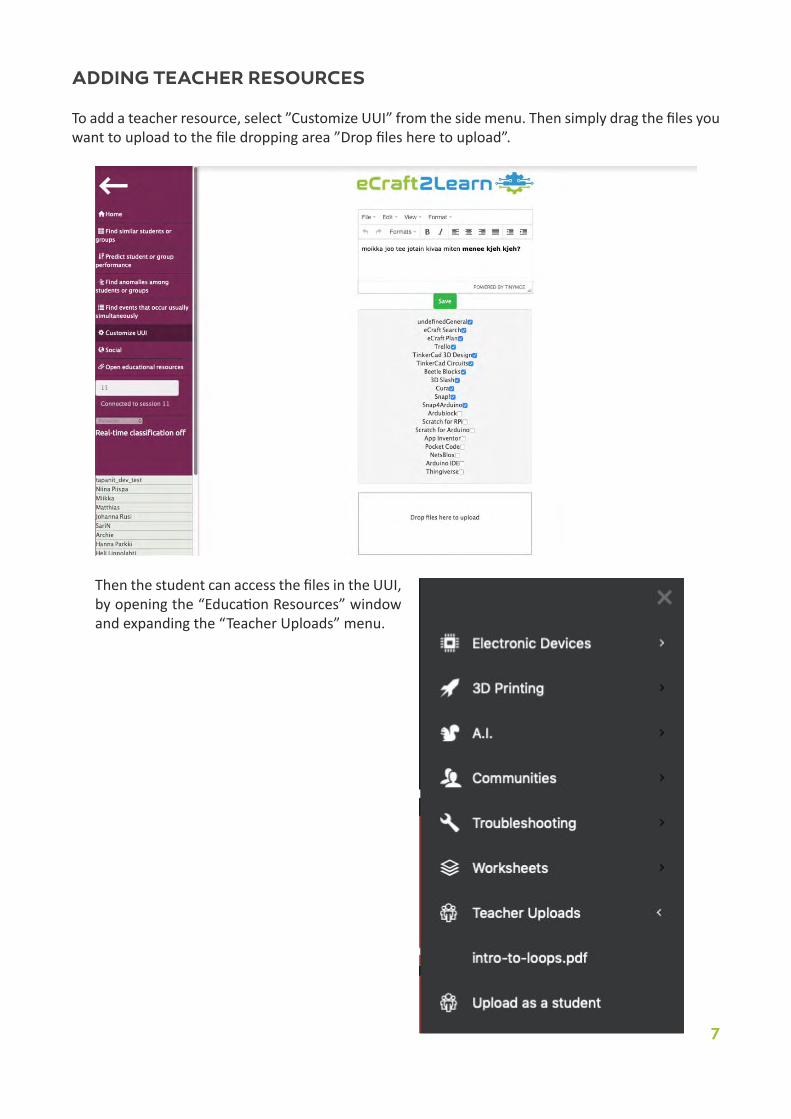
ADDING TEACHER RESOURCES
To add a teacher resource, select ”Customize UUI” from the side menu. Then simply drag the files you want to upload to the file dropping area ”Drop files here to upload”.
Then the student can access the files in the UUI, by opening the “Education Resources” window and expanding the “Teacher Uploads” menu.
7
Call4action toolThe “Call4action” tool is designed for teachers and allows requesting students to do certain activities while exploiting the tools available within the UUI, the requests appear in the UUI when students log in. With help of this tool, teachers will be able to create a specific call for action and assign it to students. Accordingly, these actions will appear in student’s UUI ensuring that the teachers are able to communicate the requests to their students.
Examples of actions: “Reflect about your work”, “Share your work”, “Use tool eCraft Plan to create the plan of your work”, etc.
There are three types of tasks available:
• Independent Task - a task that can be completed and does not require other tasks to be done.
• Dependent Task - a task that depends on the previous ones and will be available only after prerequisite were completed. There is also a Reflection Task that will open separate window in UUI where students can reflect on their work.
• Reflection Task - a specific task which require the students to reflect on their learnings and progress.
Each task has two states:
• Pending - for a task initiated by the teacher.
• Completed - for the phase in which the student declares that his/her work on a task is completed.
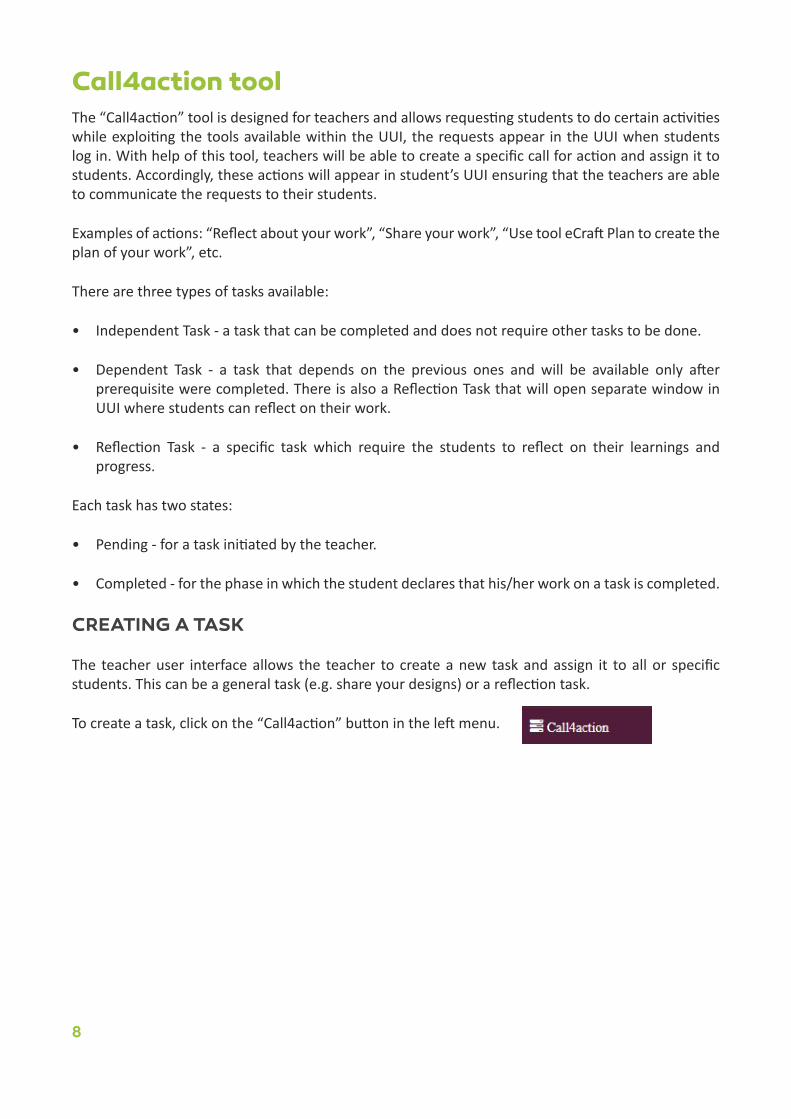
CREATING A TASK
The teacher user interface allows the teacher to create a new task and assign it to all or specific students. This can be a general task (e.g. share your designs) or a reflection task.
To create a task, click on the “Call4action” button in the left menu.
8
9
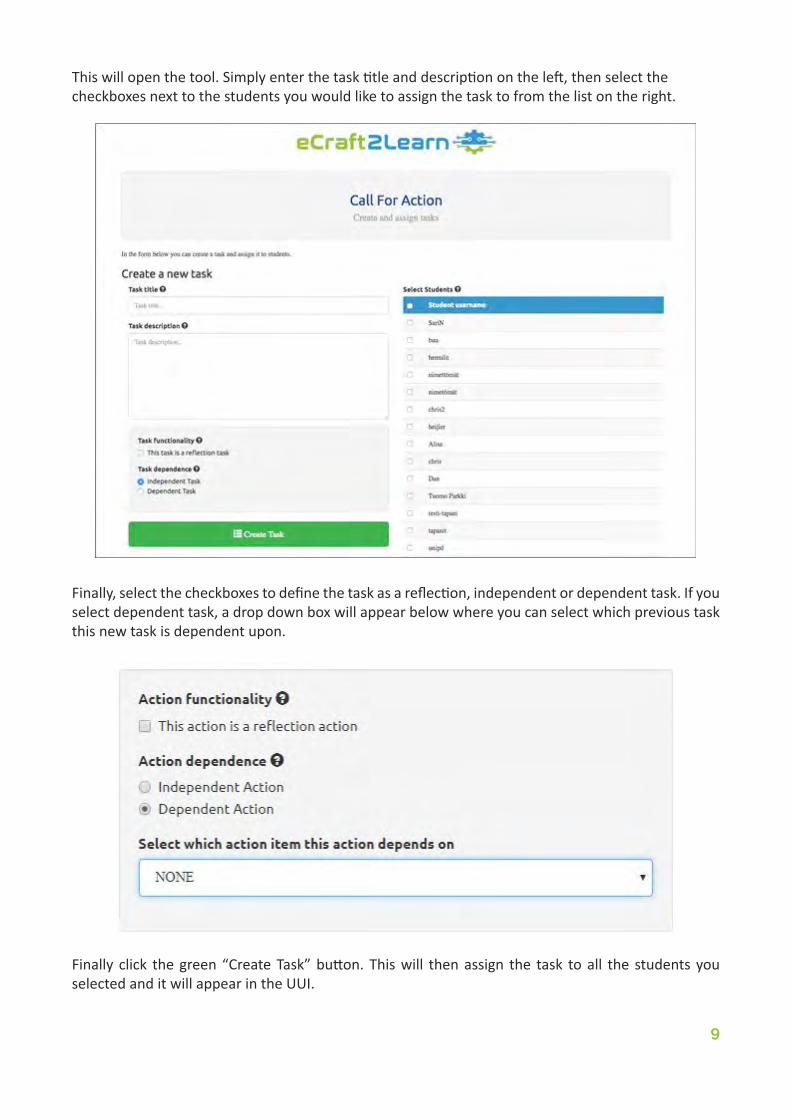
This will open the tool. Simply enter the task title and description on the left, then select the checkboxes next to the students you would like to assign the task to from the list on the right.
Finally, select the checkboxes to define the task as a reflection, independent or dependent task. If you select dependent task, a drop down box will appear below where you can select which previous task this new task is dependent upon.
Finally click the green “Create Task” button. This will then assign the task to all the students you selected and it will appear in the UUI.
9
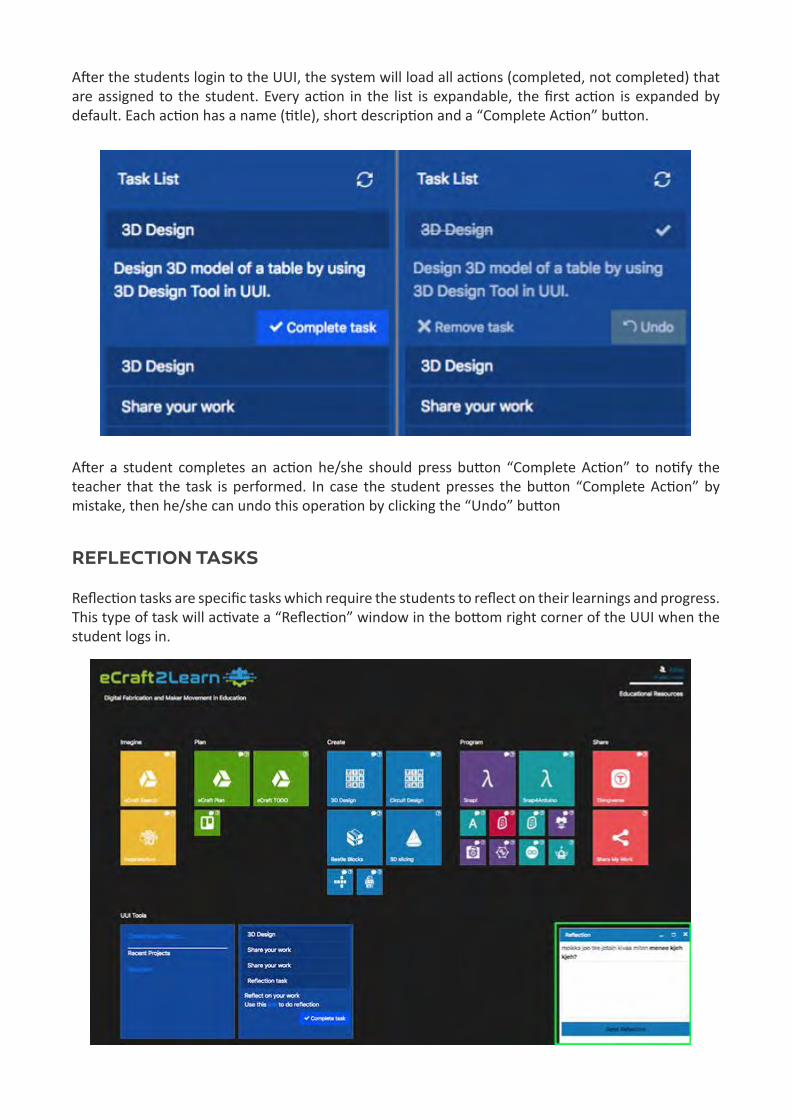
After the students login to the UUI, the system will load all actions (completed, not completed) that are assigned to the student. Every action in the list is expandable, the first action is expanded by default. Each action has a name (title), short description and a “Complete Action” button.
After a student completes an action he/she should press button “Complete Action” to notify the teacher that the task is performed. In case the student presses the button “Complete Action” by mistake, then he/she can undo this operation by clicking the “Undo” button
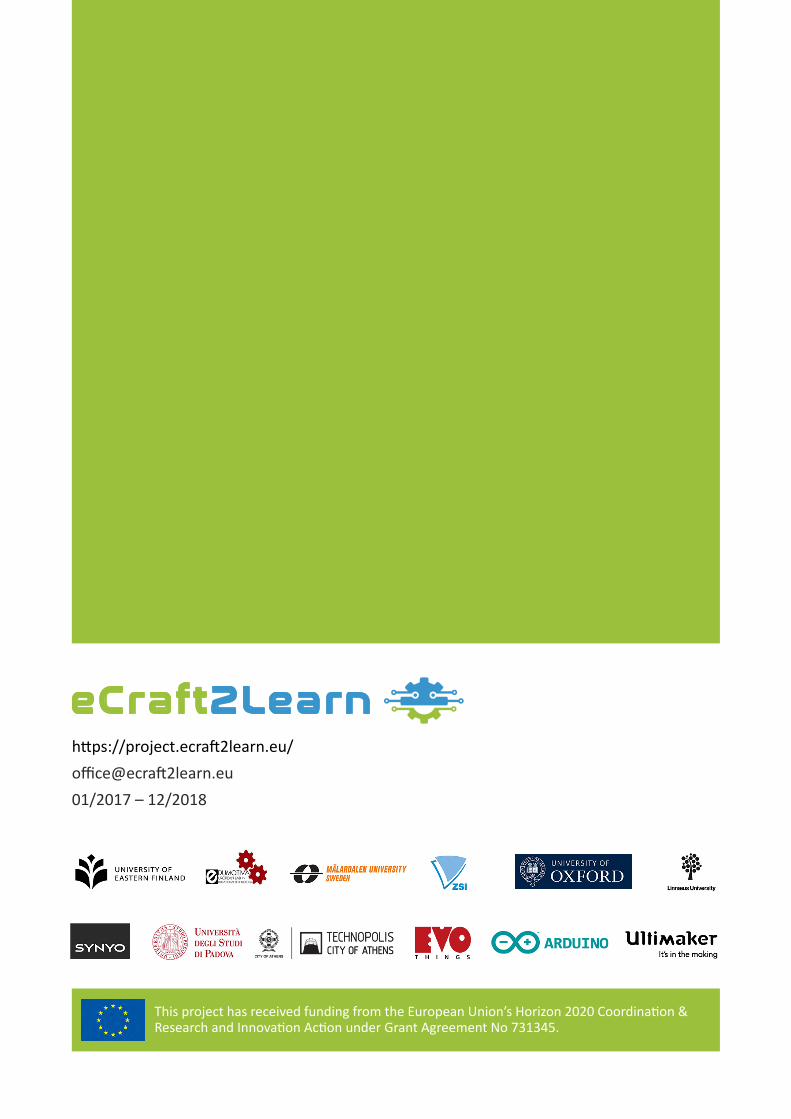
REFLECTION TASKS
Reflection tasks are specific tasks which require the students to reflect on their learnings and progress. This type of task will activate a “Reflection” window in the bottom right corner of the UUI when the student logs in.

11
Self evaluation (badges) toolThe eCraft2Learn digital platform provides a self-evaluation tool. With this badges are used within a self-assessment framework, where the students are requested to provide a self-evaluation of their own skills that they have developed during the practical activities.
The self-assessment is composed of a score (in a scale from 1 to 5) and a textual justification for the score. The teacher reviews this self-evaluation and if necessary revises it, explaining to the students the reasons for the modifications. The teacher evaluations are converted into graphical scores in the form of digital badges that are then awarded to students.
The tool provides six categories for self-assessment, corresponding to the various aspects of a digital fabrication project development:
1. Building electronic circuits
2. 3D design
3. Programming
4. Presentation of the project outcomes
5. Quality of the teamwork
6. Originality.
Parameters are provided for each of these categories which guide the students to achieve a reasoned and objective evaluation of their work.
You can learn more about why this framework has been adopted in Project Report D4.4 Section 2.8 at: https://project.ecraft2learn.eu/wp-content/uploads/2019/02/D4.4_The-uni-fied-user-interface-A-software-solution-for-3D-design-programming-and-making-comput-er-supported-artefacts.pdf
11

To create a self evaluation request in the teacher interface, click on the “Send self-evaluation requests” button in the left menu.
Add a title and a description for the evaluation, then click on the categories that the evaluation applies to to select them and finally select the submit button.
CREATING A SELF-EVALUATION REQUEST
12

13
The evaluation will then appear in the dashboard where you can edit or delete it at any time.
After the students login to the UUI, the system will load the evaluation in the “Achievements” tool. Clicking on the Achievements tool will open up a window containing all the evaluation requests. Here students can select the evaluation, complete the evaluation form and submit it.
13

EVALUATING STUDENT PERFORMANCE
When the students have completed their self evaluations, you will be able to evaluate them in the teacher interface. To do this, click on the “Evaluate student performance” button in the left menu.
Select a student evaluation from the list of completed evaluations.
Here you can view the student evaluation and assign your own teacher score and comments for each area.
When this form is submitted, scores are calculated and these will be displayed in the UUI as graphical badges when the student logs in.
14

15
Sharing toolThe sharing tool in the UUI aims at allowing the users/learners to share their work created with the various tools available in the UUI. The sharing feature lets the user/learner share the work in two primary ways: a) upload it manually or b) by sharing a file that is already associated with a project in the UUI. The sharing of the work needs to be authorized by a teacher, responsible for supervising the work being carried out, to be viewed publicly by any other user in the UUI.
In the teacher interface you can monitor and authorise the work that students wish to share. To do this, click on the “Evaluate student performance” button in the left menu.
Here you can see a list of all the work that has been shared by students logged into that session. You can see an overview of each item, the date shared and the status of the item.
The action buttons on the right of each item allow you to manage the shared items. Here you can download, approve, disapprove or delete the shared item by clicking on the relevant button.
You can learn more about the sharing tool in Project Report D4.4 Section 2.10 at: https://project.ecraft2learn.eu/wp-content/uploads/2019/02/D4.4_The-unified-user-inter-face-A-software-solution-for-3D-design-programming-and-making-computer-supported-ar-tefacts.pdf
15

Learning analytics toolLearning analytics is the measurement, collection, analysis and reporting of data about learners and their contexts, for purposes of understanding and optimizing learning and the environments in which it occurs. Within the eCraft2Learn learning ecosystem, the digital platform UUI also includes learning analytics tools.
The purpose of the analytics tools is to assist learners and teachers/coaches in the five-stage process by providing suitable information and visualisations. The analytics tools can track learners’ activities within the UUI, and offer immediate visual information regarding the students’ progress to both the teacher/coach and the students.
You can learn more about the learning analytics tool in Project Report D3.4 Section 2.5 at: https://project.ecraft2learn.eu/wp-content/uploads/2018/05/eCraft2Learn_D3.4_M16_Manual-of-Craft-and-Project-based-Learning-STEAM-Training-for-Teachers.pdf
THE LEARNING ANALYTICS DASHBOARD
When a session ID is entered in the teacher interface, the home screen displays a dashboard showing relevant information with all the data for that session loaded.
From this view, the teacher is able to view the students who are participating to the session. Also the teacher is able to perform all kinds of methods to edit the loaded dataset. For instance, the teacher is able to group the dataset item by the user, which means that because the UUI and its tools are recording individual actions and events, the teacher is able to view all events done by an individual student or a group of students. In addition, the teacher is able to select the data source for analysis, as each of the tools in the UUI can be viewed as a standalone tool in the context of the learning analytics.
16

17
DATA ANALYSIS TOOLS
The data analysis tools consist of a classifier, cluster analysis tool, anomaly detector and association rule learning tool.
Classifier
If the teacher chooses to predict the student performance, the teacher will see the view below.
The decision tree classifier is rendered based on the labels that the teacher assigned to the students (performing well, not performing well, neutral performance and so on). From the rendered tree, the teacher can see how the data flows in the classifier. The table at the bottom also shows the students grouped according with coloured performance labels. Red means that the student is not performing well; orange means the student’s performance is average and the green label means that the student is performing well. As it is expected, when the data flows automatically from the server, the new instances of the data are also labelled and thus the decision tree helps predict whether the students are currently performing well or not.
The dataset is displayed as a table, each cell of the table represents actions of the users (student or a group of students). From the table, the teacher is able to monitor which of the students are performing well, average or not so well. Or the teacher can select students for exclusion from the analysis. After making the decisions, the teacher can select any analysis tool the teacher wishes from the side menu.
17

Cluster analysis
If the teacher selects the cluster analysis tool, the following view is shown to the teacher. A tree is again rendered for the teacher; each of the leaf nodes represent a cluster. In Figure 25 the clusters are 0, 1, 3 and 4. N = 12 tells that the cluster 3 has 12 students in it. If the teacher clicks the node, then the teacher is able to see which of the students belong to that cluster and why; the students will traverse the tree based on the values of the nodes.
More similar clusters are in fact the siblings and so on. Therefore, we can tell from the pictures that even though there are only two clusters with data, the clusters are very similar to each other.
Anomaly detector
From the anomaly detection view, the teacher is shown a table as presented below.
In the table, the students that fall under the ‘anomaly’ class are shown in red and the regular students are shown in green. Again, when the data flows from the server, the new instances of the student data are labelled with either red (anomaly) or green (non-anomaly), based on the type of activities that the students have perform while interacting with the UUI.18

19
Association rule learning tool
The association rule learning tool allows the teachers to view which events usually are linked together. For instance, if many students who regularly launch a certain tool from UUI and additionally launch a help tool also, this will be shown to teacher in the form a directed graph as shown below.
You can also access a practical activity to help you to understand learning analytics more in Project Report D3.4 Section 3.8 at: https://project.ecraft2learn.eu/wp-content/up-loads/2018/05/eCraft2Learn_D3.4_M16_Manual-of-Craft-and-Project-based-Learning-STEAM-Training-for-Teachers.pdf
Further details of how the learning analytics tools can be accessed in Project Report D4.4 Section 3.2 at: https://project.ecraft2learn.eu/wp-content/uploads/2019/02/D4.4_The-uni-fied-user-interface-A-software-solution-for-3D-design-programming-and-making-comput-er-supported-artefacts.pdf
19
https://project.ecraft2learn.eu/[email protected]/2017 – 12/2018
This project has received funding from the European Union’s Horizon 2020 Coordination & Research and Innovation Action under Grant Agreement No 731345.