Using the AC Adapter
78
Transcript of Using the AC Adapter


About the AC Adapter
The AC adapter converts AC power to the DC power required by the computer. The AC adapter kit includes two cables: the AC adapter cable and an AC power cable.
You can connect the AC adapter with your computer either turned on or off. The AC adapter works with AC power sources worldwide. However, power connectors vary among countries. Before using AC power in a foreign country, you may need to obtain a new power cable designed for use with the electrical outlets in that country.
NOTICE: The AC adapter should be in a ventilated area, such as on a desk top or on the floor, when used to power the computer or charge the battery. Do not use the AC adapter in a poorly ventilated environment, such as inside a carrying case.
Connecting the AC Adapter
Connect the AC power cable to the AC adapter.
Plug the AC adapter cable into the AC adapter connector on the computer.
Plug the AC power cable into an electrical outlet.
Using the AC Adapter
About the AC Adapter
Connecting the AC Adapter
NOTE: If you are running your computer on AC power with a battery installed, the AC adapter charges the battery (if needed) and then maintains the battery's charge.

Windows® Explorer
Similar to My Computer, Microsoft® Windows Explorer displays the contents of your computer as an ordered list, or "tree" diagram. You can use this program to locate files on any drive or in any folder.
To open Windows Explorer, click the Start button, point to Programs, and then click Windows Explorer. Alternatively, you can right-click the Start button and then click Explore.
The left window pane shows drives and directories (folders), and the right pane lists the files in the drive or folder selected. A to the left of a drive or folder indicates the
presence of additional folders. Click to expand the view by one level. To collapse the view, click to the left of a drive or folder.
Finding Files
Click the Start button, point to Find, and then click Files or Folders.
The Find: All Files window opens with the Name & Location tab selected and the cursor in the Named: field.
Type the name of the file or folder you want to find.
Basic File Management
Windows Explorer
Finding Files Copying Files Moving Files
Renaming Files Deleting Files
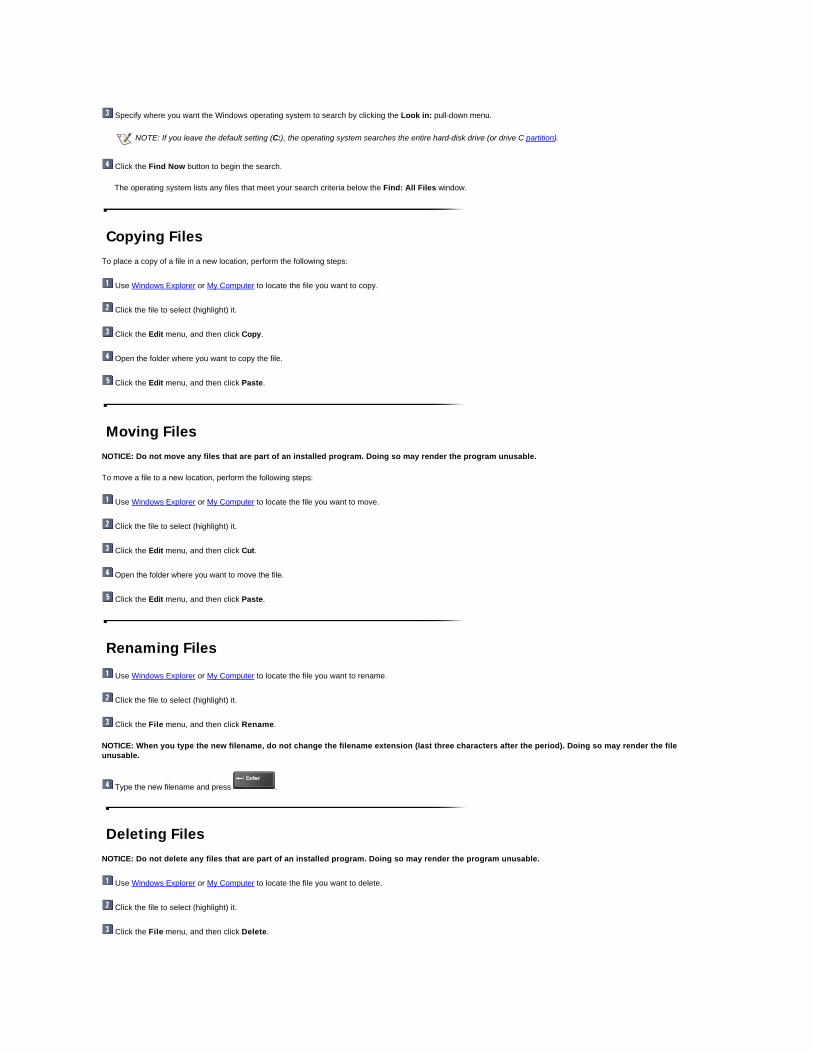
Specify where you want the Windows operating system to search by clicking the Look in: pull-down menu.
Click the Find Now button to begin the search.
The operating system lists any files that meet your search criteria below the Find: All Files window.
Copying Files
To place a copy of a file in a new location, perform the following steps:
Use Windows Explorer or My Computer to locate the file you want to copy.
Click the file to select (highlight) it.
Click the Edit menu, and then click Copy.
Open the folder where you want to copy the file.
Click the Edit menu, and then click Paste.
Moving Files
NOTICE: Do not move any files that are part of an installed program. Doing so may render the program unusable.
To move a file to a new location, perform the following steps:
Use Windows Explorer or My Computer to locate the file you want to move.
Click the file to select (highlight) it.
Click the Edit menu, and then click Cut.
Open the folder where you want to move the file.
Click the Edit menu, and then click Paste.
Renaming Files
Use Windows Explorer or My Computer to locate the file you want to rename.
Click the file to select (highlight) it.
Click the File menu, and then click Rename.
NOTICE: When you type the new filename, do not change the filename extension (last three characters after the period). Doing so may render the file unusable.
Type the new filename and press .
Deleting Files
NOTICE: Do not delete any files that are part of an installed program. Doing so may render the program unusable.
Use Windows Explorer or My Computer to locate the file you want to delete.
Click the file to select (highlight) it.
Click the File menu, and then click Delete.
NOTE: If you leave the default setting (C:), the operating system searches the entire hard-disk drive (or drive C partition).

Retrieving a Deleted File From the Recycle Bin
When you delete a file, it moves to the Recycle Bin. It is not removed from the computer until you empty the Recycle Bin.
NOTICE: Files deleted from a diskette or from a network drive are erased permanently. They are not sent to the Recycle Bin.
If you delete a file in error and need to retrieve it from the Recycle Bin, perform the following steps:
Double-click the Recycle Bin icon on the Windows desktop.
The Recycle Bin window opens and lists all deleted files, their previous locations, and the date you deleted them.
Click the file you want to retrieve.
Click the File menu, and then click Restore.
The file disappears from the Recycle Bin and is restored to its original location.
Emptying the Recycle Bin
Deleted files sent to the Recycle Bin still use space on the computer's hard-disk drive. To free up disk space, periodically empty the Recycle Bin by performing the following steps:
Double-click the Recycle Bin icon on the Windows desktop.
The Recycle Bin window opens and lists all deleted files, their previous locations, and the date you deleted them.
Click the File menu, and then click Empty Recycle Bin.
When a confirmation dialog box appears, click Yes to delete the file(s).
All files disappear from the Recycle Bin and are removed from the computer.

Battery Usage
Use the battery to power the computer when it is not connected to an electrical outlet. The battery comes standard in the battery bay.
A fully charged 6-cell, 34-WH battery provides approximately 2 hours of battery operating time; a fully charged 4-cell, 23-WH battery provides approximately 1 hour of battery operating time.
l A integrated charge gauge lets you check a battery's charge before you insert it into the computer.
l The battery's self-test capability alerts you to battery conditions, such as low charge.
NOTICE: The battery is designed to work with Dell™ Inspiron™ 2000 computers only. Do not use the battery with other computers, and do not use batteries from other computers in your Dell computer.
The battery is partially charged when you receive it. Charge the battery to full capacity before you use the computer for the first time. A number of factors affect battery operating time:
l Power conservation features
l PC Cards
l Application programs
l Capacity of optional memory modules (the higher the capacity, the more power used)
l Use of a CD-ROM drive or DVD-ROM drive, which uses more power than a hard-disk drive or a diskette drive
NOTICE: To avoid data loss, do not replace a battery while the computer is turned on unless the computer is connected to an electrical outlet.
Installing a Battery
For instructions on installing a battery, refer to "Installing a Battery," in Chapter 2 in the Reference and Troubleshooting Guide.
Checking the Battery Charge
If you are using the Microsoft® Windows® 98 operating system, click the Start button, point to Settings, and then click Control Panel. Double-click the Power Management icon to open the Power Management Properties window. For more information, check the documentation that came with your operating system.
You can also use the power meter, the charge gauge, the low-battery warning, and the battery status indicator for information about the status of the battery's charge.
Power Meter
The Windows 98 power meter displays a battery icon that indicates the amount of battery charge remaining. If an AC adapter is connected to the computer, the power meter displays a plug icon. The power meter icons are visible in the taskbar at the bottom of the desktop.
To access the power meter, place the cursor over the battery or plug icon.
Alternatively, click the Start button, point to Settings, and then click Control Panel. Double-click the Power Management icon to open the Power Management Properties window.
For more information about the power meter, see your Windows 98 documentation.
Running the System With a Battery
Battery Usage
Installing a Battery
Checking the Battery Charge
Charging the Battery
Conserving Battery Power
NOTE: Battery performance features such as charge time, operating time, and life span can vary according to the conditions under which the computer and battery are used.

Charge Gauge
The battery has a charge gauge with four charge indicator lights that show how much battery charge remains. Check the battery charge level before you insert the battery into your computer. Press the battery test button to the right of the lights to check the charge level. Each light represents approximately 25 percent of the total battery charge. For example, if the battery has 80 percent of its charge remaining, four of the lights are on. If none of the lights are on, the battery has no charge left. A charge indicator that blinks rapidly indicates a temporary failure, such as overheating. Allow the battery to cool for several minutes before checking the charge level again. If the battery status indicator turns red, allow the battery to charge overnight and check it the next day.
NOTICE: If only one or none of the charge indicator lights are lit, the battery's charge is critically low. Do not use the battery unless the computer is connected to an electrical outlet.
Low-Battery Warning
A low-battery warning occurs when the battery charge is about 90 percent depleted. The speaker beeps three times, and a battery warning icon appears on the screen. About 20 minutes of battery operating time remain. During that time, the speaker beeps periodically.
Your computer enters hibernate mode/save-to-disk suspend mode when it is using battery power and the battery charge is at a critically low level. You can also activate
hibernate mode in Windows 98 by pressing or any button that you programmed. In Windows NT, press (or on the French keyboard). To resume normal operation, press the power button. For information on power conservation modes or customizing the hibernate/save-to-disk suspend settings, refer to Conserving Power.
NOTICE: To avoid losing data (and possibly corrupting data on your hard-disk drive), save your work immediately after a low-battery warning. Then connect the computer to an electrical outlet. If the battery runs completely out of power, the computer activates save-to-disk suspend mode.
NOTICE: To avoid data loss, never turn off the computer while the green hard-disk drive access indicator is flashing.
Checking the Battery Status
The battery status indicator on the front of the computer indicates the battery's current operating status.
The indicator has the following states:
l Solid green, which indicates that the battery is fully charged.
l Solid amber, which indicates that the battery is charging.
l Solid red, which indicates a battery error.
You can also check the battery status on the screen by pressing . The battery status appears for a few seconds in the upper left corner of the display.
Charging the Battery
Each time you connect the computer to an electrical outlet or install a battery in a computer that is connected to an electrical outlet, the computer checks the battery's charge and temperature. The AC adapter then charges the battery (if necessary) and maintains the battery's charge.
The battery status indicator is amber while the battery is charging and then turns green when the charge cycle is complete.
If you remove a battery from the computer while the battery is being charged, the indicator lights on the battery stay lit for a few minutes.
The AC adapter needs 1.5 hours to fully charge a battery that is completely discharged.
1 Battery charge indicators (4)
2 Battery test button
NOTE: You can leave the battery in the computer without fear of overcharging.
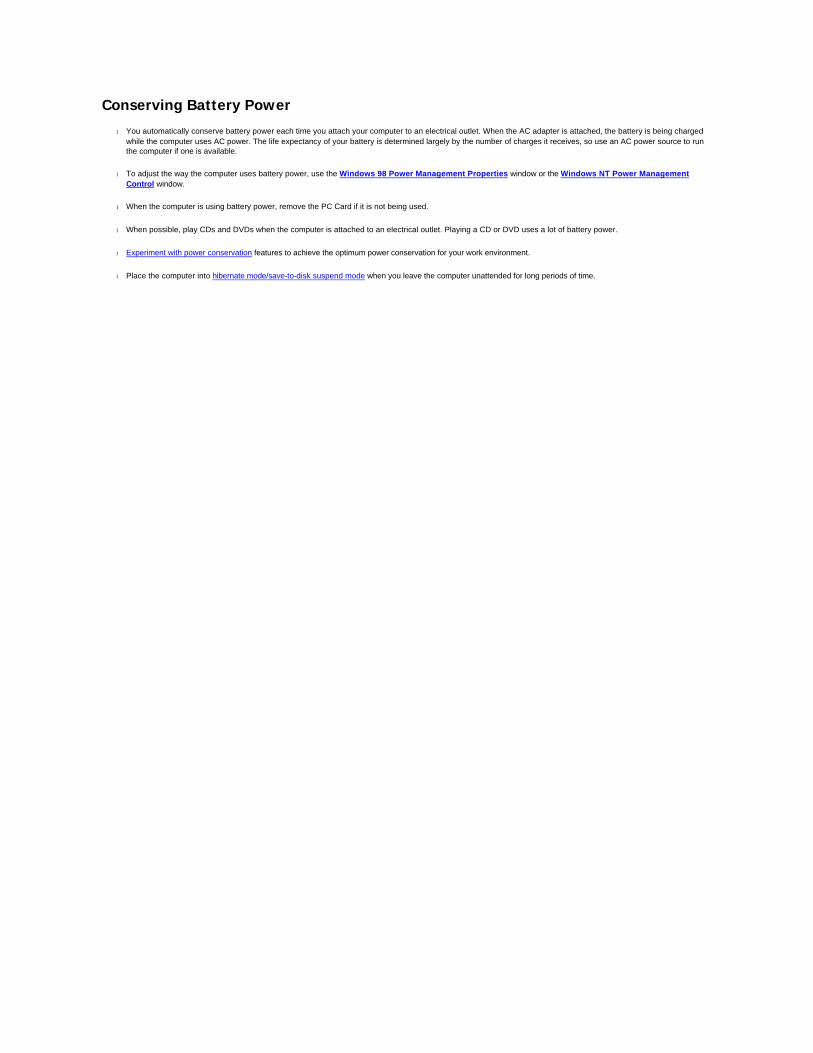
Conserving Battery Power
l You automatically conserve battery power each time you attach your computer to an electrical outlet. When the AC adapter is attached, the battery is being charged
while the computer uses AC power. The life expectancy of your battery is determined largely by the number of charges it receives, so use an AC power source to run the computer if one is available.
l To adjust the way the computer uses battery power, use the Windows 98 Power Management Properties window or the Windows NT Power Management
Control window.
l When the computer is using battery power, remove the PC Card if it is not being used.
l When possible, play CDs and DVDs when the computer is attached to an electrical outlet. Playing a CD or DVD uses a lot of battery power.
l Experiment with power conservation features to achieve the optimum power conservation for your work environment.
l Place the computer into hibernate mode/save-to-disk suspend mode when you leave the computer unattended for long periods of time.

Technical Assistance
If you need assistance with a technical problem, perform the following steps.
Complete the troubleshooting checks in Chapter 3, "Basic Troubleshooting," of the Reference and Troubleshooting Guide.
Use Dell's extensive suite of online services available at Dell's World Wide Web site for help with installation and troubleshooting procedures.
Run the Dell Diagnostics as described in "Running the Dell Diagnostics" in Chapter 3 of the Reference and Troubleshooting Guide.
Fill out a copy of the Diagnostics Checklist and call Dell for technical assistance.
If possible, turn on your computer before you call. You may be asked to type some commands, relay information, or try some troubleshooting steps.
Diagnostics Checklist
The Diagnostics Checklist contains the information a Dell technician needs to efficiently evaluate your problem. Print this Diagnostics Checklist, and complete it before calling Dell for technical assistance. If Dell issues you a Return Material Authorization Number after evaluating your problem, record the number on the checklist.
Date:
Name:
Address:
Phone number:
Service tag sequence:
Return Material Authorization Number (if provided by Dell Technical Support):
Operating system and version:
Peripherals:
Expansion cards:
Are you connected to a network?
Network, version, and network card:
Programs and versions:
Start-up file contents:
MS-DOS®: c:\autoexec.bat and c:\config.sys
Microsoft® Windows®: c:\windows\win.ini and c:\windows\system.ini
Error message:
Description of problem:
Troubleshooting procedures you performed:
Contacting Dell
Technical Assistance
Diagnostics Checklist
World Wide Web on the Internet
Dell Fax Service
Contact Numbers
NOTE: If you need help with hardware or software that was not Dell-installed, including DellWare™ items, contact the manufacturer of that item.
World Wide Web on the Internet
The Internet is your most powerful tool for obtaining information about your computer and other Dell products. From Dell's World Wide Web home page (http://www.dell.com), you can access product information, order status, and technical support.
From Dell's technical support page (http://support.dell.com), click one of the following:
Support Your Dell — Type your service tag sequence and then click Submit. The service tag sequence is listed on the system information label on the bottom of your computer.
From this page you can access a number of tools and information such as system documentation, drivers and BIOS updates, and self-diagnostic tools for resolving many computer-related issues by following interactive flowcharts.
Online Knowledge Center — This tool searches the Dell Knowledge Base and Dell Support for answers and related topics.
You can contact Dell electronically with the following addresses:
l World Wide Web site
http://www.dell.com/
http://www.dell.com/jp/ (for Japan only)
http://www.dell.com/ap/ (for Asian/Pacific countries only)
http://www.euro.dell.com (for Europe only)
http://www.dell.com/la/ (for Latin American countries)
l Anonymous FTP site
ftp.dell.com/
Log in as user: anonymous, and use your e-mail address as your password.
l Electronic Support Service
[email protected] (for Asian/Pacific countries only)
support.euro.dell.com
l Electronic Quote Service
[email protected] (for Asian/Pacific countries only)
l Electronic Information Service
Dell Fax Service
Dell takes full advantage of fax technology to serve you better. You can call the Dell Faxbox service for all kinds of technical information, including operating system and driver reinstallation procedures.
Using a touch-tone phone, you can receive a document list and select from a full directory of topics. The technical information you request is sent within minutes to the fax number you designate.
Contact Numbers
When you need to contact Dell, use the telephone numbers, codes, and electronic addresses provided in the following tables. If you are making a direct-dialed call to a location outside of your local telephone service area, determine which codes to use (if any) in addition to the local numbers. To place a long-distance call within your own country, use area codes instead of international access codes, country codes, and city codes.
For example, to place an international call from Paris, France to Bracknell, England, dial the international access code for France followed by the country code for the U.K., the city code for Bracknell, and then the local number as shown in the following illustration:

To place a long-distance call within your own country, use area codes instead of international access codes, country codes, and city codes. For example, to call Paris, France from Montpellier, France, dial the area code plus the local number as shown in the following illustration:
The codes required depend on where you are calling from as well as the destination of your call; in addition, each country has a different dialing protocol. If you need assistance in determining which codes to use, contact a local or an international operator.
International Dialing Codes
Click a listed country to obtain the appropriate contact numbers.
Asia and Other Regions Contact Numbers
NOTE: Toll-free numbers are for use only within the country for which they are listed. Area codes are most often used to call long distance within your own country (not internationally)—in other words, when your call originates in the same country you are calling.
Country (City) International Access Code Country Code City Code
Australia (Sydney) 0011 61 2
Austria (Vienna) 900 43 1
Belgium (Brussels) 00 32 2
Brazil 0021 55 51
Brunei — 673 —
Canada (North York, Ontario) 011 — Not required
Chile (Santiago) — 56 2
China (Xiamen) — 86 592
Czech Republic (Prague) 00 420 2
Denmark (Horsholm) 009 45 Not required
Finland (Helsinki) 990 358 9
France (Paris) (Montpellier) 00 33 (1) (4)
Germany (Langen) 00 49 6103
Hong Kong 001 852 Not required
Ireland (Bray) 16 353 1
Italy (Milan) 00 39 2
Japan (Kawasaki) 001 81 44
Korea (Seoul) 001 82 2
Luxembourg 00 352 —
Macau — 853 Not required
Malaysia (Penang) 00 60 4
Mexico (Colonia Granada) 95 52 5
Netherlands (Amsterdam) 00 31 20
New Zealand 00 64 —
Norway (Lysaker) 095 47 Not required
Poland (Warsaw) 011 48 22
Singapore (Singapore) 005 65 Not required
South Africa (Johannesburg) 09/091 27 11
Spain (Madrid) 07 34 91
Sweden (Upplands Vasby) 009 46 8
Switzerland (Geneva) 00 41 22
Taiwan 002 886 —
Thailand 001 66 —
U.K. (Bracknell) 010 44 1344
U.S.A. (Austin, Texas) 011 1 Not required
Country (City) Department Name or Service Area Code
Local Number or
Toll-Free Number
Australia Customer Technical Support toll free: 1-800-633-559
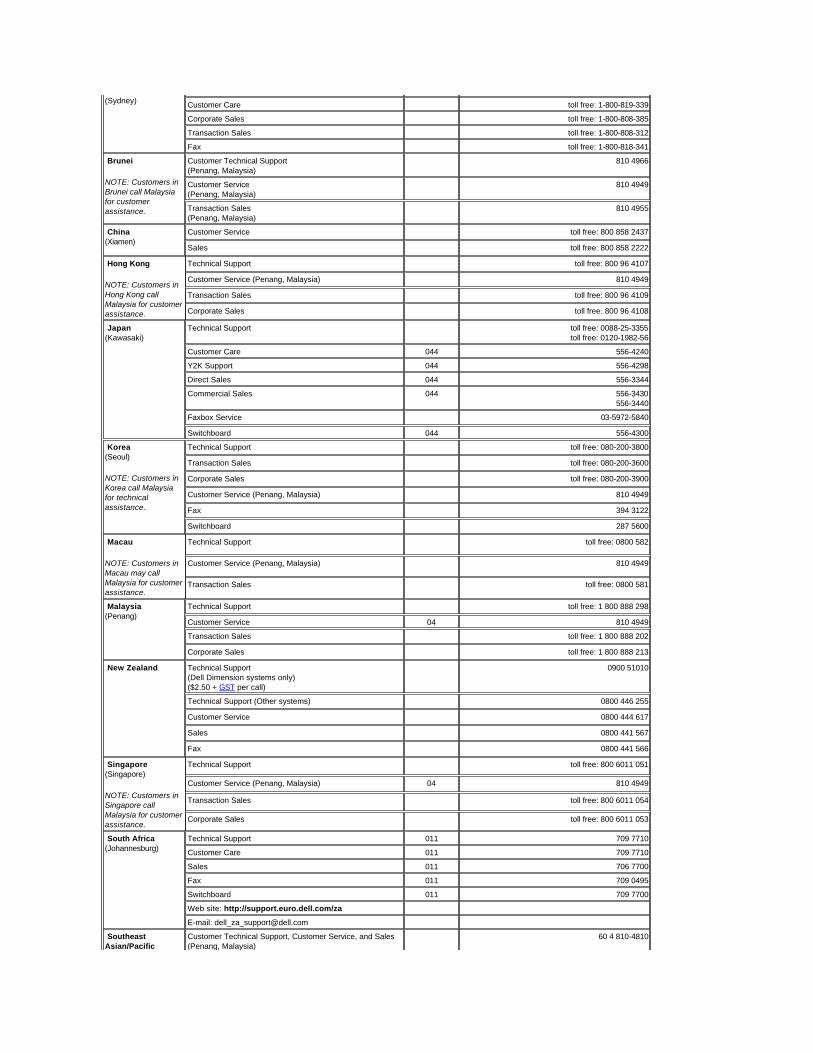
(Sydney) Customer Care toll free: 1-800-819-339
Corporate Sales toll free: 1-800-808-385
Transaction Sales toll free: 1-800-808-312
Fax toll free: 1-800-818-341
Brunei
NOTE: Customers in Brunei call Malaysia for customer assistance.
Customer Technical Support (Penang, Malaysia)
810 4966
Customer Service (Penang, Malaysia)
810 4949
Transaction Sales (Penang, Malaysia)
810 4955
China (Xiamen)
Customer Service toll free: 800 858 2437
Sales toll free: 800 858 2222
Hong Kong
NOTE: Customers in Hong Kong call Malaysia for customer assistance.
Technical Support toll free: 800 96 4107
Customer Service (Penang, Malaysia) 810 4949
Transaction Sales toll free: 800 96 4109
Corporate Sales toll free: 800 96 4108
Japan (Kawasaki)
Technical Support toll free: 0088-25-3355 toll free: 0120-1982-56
Customer Care 044 556-4240
Y2K Support 044 556-4298
Direct Sales 044 556-3344
Commercial Sales 044 556-3430 556-3440
Faxbox Service 03-5972-5840
Switchboard 044 556-4300
Korea (Seoul)
NOTE: Customers in Korea call Malaysia for technical assistance.
Technical Support toll free: 080-200-3800
Transaction Sales toll free: 080-200-3600
Corporate Sales toll free: 080-200-3900
Customer Service (Penang, Malaysia) 810 4949
Fax 394 3122
Switchboard 287 5600
Macau
NOTE: Customers in Macau may call Malaysia for customer assistance.
Technical Support toll free: 0800 582
Customer Service (Penang, Malaysia) 810 4949
Transaction Sales toll free: 0800 581
Malaysia (Penang)
Technical Support toll free: 1 800 888 298
Customer Service 04 810 4949
Transaction Sales toll free: 1 800 888 202
Corporate Sales toll free: 1 800 888 213
New Zealand Technical Support (Dell Dimension systems only) ($2.50 + GST per call)
0900 51010
Technical Support (Other systems) 0800 446 255
Customer Service 0800 444 617
Sales 0800 441 567
Fax 0800 441 566
Singapore (Singapore)
NOTE: Customers in Singapore call Malaysia for customer assistance.
Technical Support toll free: 800 6011 051
Customer Service (Penang, Malaysia) 04 810 4949
Transaction Sales toll free: 800 6011 054
Corporate Sales toll free: 800 6011 053
South Africa (Johannesburg)
Technical Support 011 709 7710
Customer Care 011 709 7710
Sales 011 706 7700
Fax 011 709 0495
Switchboard 011 709 7700
Web site: http://support.euro.dell.com/za
E-mail: [email protected]
Southeast Asian/Pacific
Customer Technical Support, Customer Service, and Sales (Penang, Malaysia)
60 4 810-4810

Americas Contact Numbers
Countries (excluding Australia, Brunei, China, Hong Kong, Japan, Korea, Macau, Malaysia, New Zealand, Singapore, Taiwan, and Thailand—refer to individual listings for these countries)
Taiwan
NOTE: Customers in Taiwan call Malaysia for customer assistance.
Technical Support toll free: 0080 651 226/0800 33 557
Customer Service (Penang, Malaysia) 810 4949
Transaction Sales toll free: 0080 651 228/0800 33 556
Corporate Sales toll free: 0080 651 227/0800 33 555
Thailand
NOTE: Customers in Thailand call Malaysia for customer assistance.
Technical Support toll free: 0880 060 07
Customer Service (Penang, Malaysia) 810 4949
Sales toll free: 0880 060 06
Country (City) Department Name or Service Area Code
Local Number or
Toll-Free Number
Brazil Sales, Customer Support, Technical Support 0800 90 3355
Canada (North York, Ontario)
NOTE: Customers in Canada call the U.S.A. for access to TechConnect BBS.
Automated Order-Status System toll free: 1-800-433-9014
AutoTech (Automated technical support) toll free: 1-800-247-9362
Customer Care (From outside Toronto) toll free: 1-800-387-5759
Customer Care (From within Toronto) 416 758-2400
Customer Technical Support toll free: 1-800-847-4096
Sales (Direct Sales—from outside Toronto) toll free: 1-800-387-5752
Sales (Direct Sales—from within Toronto) 416 758-2200
Sales (Federal government, education, and medical) toll free: 1-800-567-7542
Sales (Major Accounts) toll free: 1-800-387-5755
TechConnect BBS (Austin, Texas, U.S.A.) 512 728-8528
TechFax toll free: 1-800-950-1329
Chile (Santiago)
NOTE: Customers in Chile call the U.S.A. for sales, customer, and technical assistance.
Sales, Customer Support, and Technical Support toll free: 1230-020-4823
Latin America
NOTE: Customers in Latin America call the U.S.A. for sales, customer, and technical assistance.
Customer Technical Support (Austin, Texas, U.S.A.) 512 728-4093
Customer Service (Austin, Texas, U.S.A.) 512 728-3619
Fax (Technical Support and Customer Service) (Austin, Texas, U.S.A.)
512 728-3883
Sales (Austin, Texas, U.S.A.) 512 728-4397
SalesFax (Austin, Texas, U.S.A.) 512 728-4600 728-3772
Mexico (Colonia Granada)
NOTE: Customers in Mexico call the U.S.A. for access to the Automated Order-Status System and AutoTech.
Automated Order-Status System (Austin, Texas, U.S.A.) 512 728-0685
AutoTech (Automated technical support) (Austin, Texas, U.S.A.) 512 728-0686
Customer Technical Support 525 228-7870
Sales 525 228-7811 toll free: 91-800-900-37 toll free: 91-800-904-49
Customer Service 525 228-7878
Main 525 228-7800
U.S.A. (Austin, Texas)
Automated Order-Status System toll free: 1-800-433-9014
AutoTech (Automated technical support) toll free: 1-800-247-9362
Dedicated Technical Support for Inspiron 3700 Computers
toll free: 1-877-595-3355
Dell Home and Small Business Group:

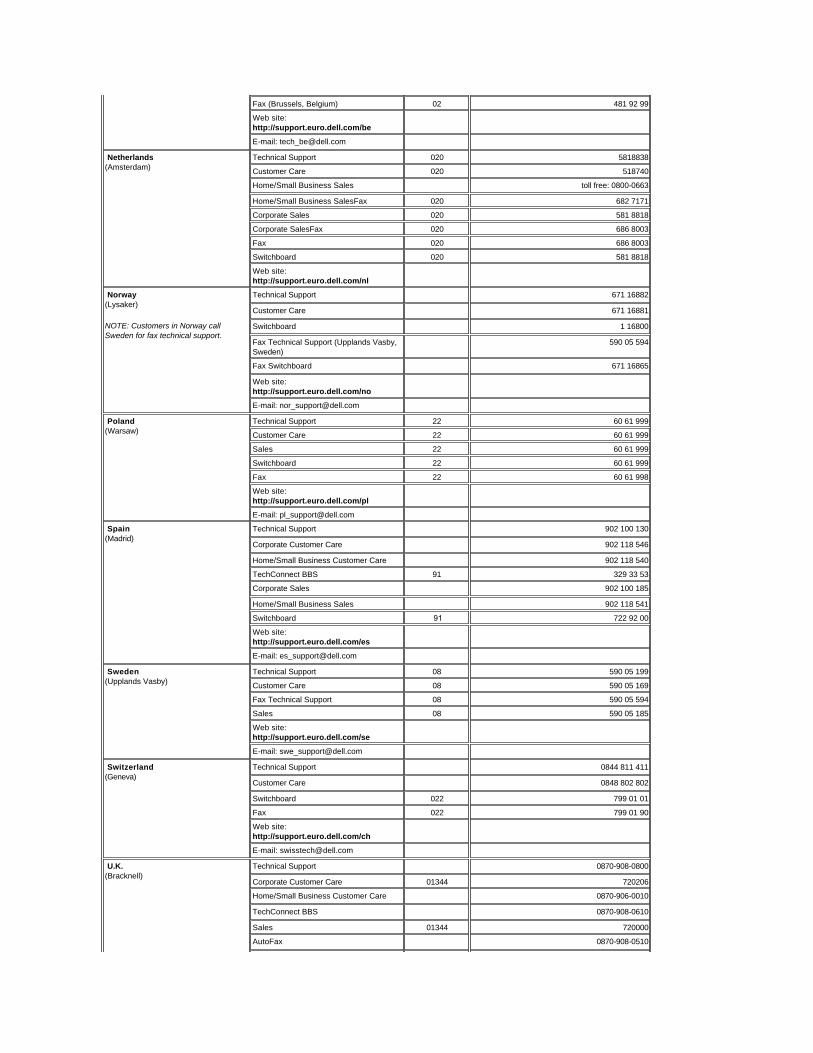
Europe Contact Numbers
Customer Technical Support (Return Material Authorization Numbers)
toll free: 1-800-624-9896
Customer Technical Support (Home sales purchased via http://www.dell.com)
toll free: 1-877-576-3355
Customer Service (Credit Return Authorization Numbers)
toll free: 1-800-624-9897
National Accounts (systems purchased by established Dell national accounts [have your account number handy], medical institutions, or value-added resellers [VARs]):
Customer Service and Technical Support (Return Material Authorization Numbers)
toll free: 1-800-822-8965
Public Americas International (systems purchased by governmental agencies [local, state, or federal] or educational institutions):
Customer Service and Technical Support (Return Material Authorization Numbers)
toll free: 1-800-234-1490
Dell Sales toll free: 1-800-289-3355 toll free: 1-800-879-3355
Spare Parts Sales toll free: 1-800-357-3355
DellWare toll free: 1-800-753-7201
DellWare FaxBack Service 512 728-1681
Fee-Based Technical Support toll free: 1-800-433-9005
Sales (Catalogs) toll free: 1-800-426-5150
Fax toll free: 1-800-727-8320
TechFax toll free: 1-800-950-1329
TechConnect BBS 512 728-8528
Dell Services for the Deaf, Hard-of-Hearing, or Speech-Impaired toll free: 1-877-DELLTTY (1-877-335-5889)
Switchboard 512 338-4400
Country (City) Department Name or Service Area Code
Local Number or
Toll-Free Number
Austria (Vienna)
NOTE: Customers in Austria call Germany for technical and customer assistance.
Switchboard 01 491 040
Home/Small Business Sales 01 795676-02
Home/Small Business Sales Fax 01 795676-05
Home/Small Business Customer Care 01 795676-03
Preferred Accounts/Corporate Customer Care
0660-8056
Home/Small Business Technical Support 01 795676-04
Preferred Accounts/Corporate Technical Support
0660-8779
Web site: http://support.euro.dell.com/at
E-mail: [email protected]
Belgium (Brussels) Technical Support 02 481 92 88
Customer Care 02 481 91 19
Home/Small Business Sales toll free: 0800 16884
Corporate Sales 02 481 91 00
Fax 02 481 92 99
Switchboard 02 481 91 00
Web site: http://support.euro.dell.com/be
E-mail: [email protected]
Czech Republic (Prague)
Technical Support 02 22 83 27 27
Customer Care 02 22 83 27 11
Fax 02 22 83 27 14
TechFax 02 22 83 27 28
Switchboard 02 22 83 27 11
Web site: http://support.euro.dell.com/cz
E-mail: [email protected]
Denmark (Horsholm)
Technical Support 45170182
Customer Care 45170181

NOTE: Customers in Denmark call Sweden for fax technical support.
Switchboard 45170100
Fax Technical Support (Upplands Vasby, Sweden)
859005594
Fax Switchboard 45170117
Web site: http://support.euro.dell.com/dk
E-mail: [email protected]
Finland (Helsinki)
Technical Support 09 253 313 60
Technical Support Fax 09 253 313 81
Customer Care 09 253 313 61
Fax 09 253 313 99
Switchboard 09 253 313 00
Web site: http://support.euro.dell.com/fi
E-mail: [email protected]
France (Paris/Montpellier)
Technical Support 0803 387 270
Customer Care (Paris) 01 47 62 68 92
Customer Care (Montpellier) 04 67 06 61 96
TechConnect BBS (Montpellier) 04 67 22 53 04
Fax (Montpellier) 04 67 06 60 07
Switchboard (Paris) 01 47 62 69 00
Switchboard (Montpellier) 04 67 06 60 00
Web site: http://support.euro.dell.com/fr
E-mail: [email protected]
Germany (Langen)
Technical Support 06103 971-200
Technical Support Fax 06103 971-222
Home/Small Business Customer Care 06103 971-530
Corporate Customer Care 06103 971-560
Preferred Accounts Customer Care 06103 971-420
TechConnect BBS 06103 971-666
Switchboard 06103 971-0
Web site: http://www.dell.de/support
E-mail: [email protected]
Ireland (Bray)
NOTE: Customers in Ireland call the U.K. for Home/Small Business customer assistance.
Technical Support 1-850-543-543
Customer Care 01 204 4026
Home/Small Business Customer Care (Bracknell, U.K.)
0870 906 0010
Sales 1-850-235-235
SalesFax 01 286 2020
Fax 01 286 6848
TechConnect BBS 01 204 4711
TechFax 01 204 4708
Switchboard 01 286 0500
Web site: http://support.euro.dell.com/ie
E-mail: [email protected]
Italy (Milan)
Technical Support 2 57782.690
Customer Care 2 57782.555
Sales 2 57782.411
Fax 2 57503530
Switchboard 2 57782.1
Web site: http://support.euro.dell.com/it
E-mail: [email protected]
Luxembourg
NOTE: Customers in Luxembourg call Belgium for sales, customer, and technical assistance.
Technical Support (Brussels, Belgium) 02 481 92 88
Home/Small Business Sales (Brussels, Belgium)
toll free: 080016884
Corporate Sales (Brussels, Belgium) 02 481 91 00
Customer Care (Brussels, Belgium) 02 481 91 19
Switchboard (Brussels, Belgium) 02 481 91 00
Fax (Brussels, Belgium) 02 481 92 99
Web site: http://support.euro.dell.com/be
E-mail: [email protected]
Netherlands (Amsterdam)
Technical Support 020 5818838
Customer Care 020 518740
Home/Small Business Sales toll free: 0800-0663
Home/Small Business SalesFax 020 682 7171
Corporate Sales 020 581 8818
Corporate SalesFax 020 686 8003
Fax 020 686 8003
Switchboard 020 581 8818
Web site: http://support.euro.dell.com/nl
Norway (Lysaker)
NOTE: Customers in Norway call Sweden for fax technical support.
Technical Support 671 16882
Customer Care 671 16881
Switchboard 1 16800
Fax Technical Support (Upplands Vasby, Sweden)
590 05 594
Fax Switchboard 671 16865
Web site: http://support.euro.dell.com/no
E-mail: [email protected]
Poland (Warsaw)
Technical Support 22 60 61 999
Customer Care 22 60 61 999
Sales 22 60 61 999
Switchboard 22 60 61 999
Fax 22 60 61 998
Web site: http://support.euro.dell.com/pl
E-mail: [email protected]
Spain (Madrid)
Technical Support 902 100 130
Corporate Customer Care 902 118 546
Home/Small Business Customer Care 902 118 540
TechConnect BBS 91 329 33 53
Corporate Sales 902 100 185
Home/Small Business Sales 902 118 541
Switchboard 91 722 92 00
Web site: http://support.euro.dell.com/es
E-mail: [email protected]
Sweden (Upplands Vasby)
Technical Support 08 590 05 199
Customer Care 08 590 05 169
Fax Technical Support 08 590 05 594
Sales 08 590 05 185
Web site: http://support.euro.dell.com/se
E-mail: [email protected]
Switzerland (Geneva)
Technical Support 0844 811 411
Customer Care 0848 802 802
Switchboard 022 799 01 01
Fax 022 799 01 90
Web site: http://support.euro.dell.com/ch
E-mail: [email protected]
U.K. (Bracknell)
Technical Support 0870-908-0800
Corporate Customer Care 01344 720206
Home/Small Business Customer Care 0870-906-0010
TechConnect BBS 0870-908-0610
Sales 01344 720000
AutoFax 0870-908-0510

Display Properties Window
The Display Properties window contains controls for customizing the way the Microsoft® Windows® operating system looks on your computer. For example, you can change your desktop's wallpaper and screen saver. To access display settings, perform the following steps:
Click the Start button, point to Settings, and then click Control Panel.
Double-click the Display icon.
The Display Properties window opens with the Background tab selected by default.
After you make any changes, click OK to accept the settings and close the Display Properties window.
Wallpaper
You can change the wallpaper on the Background tab of the Display Properties window.
To choose a wallpaper image, click the name of the wallpaper you want to display, or click (None) if you prefer not to use a wallpaper image. Click the Browse button to use images in a directory you specify. From the Display pull-down menu, choose Tile to tile a wallpaper image across the entire screen, or click Center to place a single copy of the image in the center of the screen.
Click the Pattern button to display a list of patterns for your desktop, or click (None) if you prefer not to use a pattern.
Screen Saver
Click the Screen Saver tab in the Display Properties window.
Changing Display Properties
Display Properties
Window Wallpaper Screen Saver Desktop Themes
Brightness Video Resolution
Refresh Rate
If You Have Display Problems
NOTE: This option is not available if the Tile option has been applied to a wallpaper selection.

Choose a screen saver from the Screen Saver pull-down menu, or click (None) if you prefer not to activate a screen saver.
When you select a screen saver, you can click Settings to change the various features of the screen saver. Click Preview to run the currently selected screen saver.
After you make any changes, click OK to accept them and close the Display Properties window.
Desktop Themes
You can change the way your desktop looks and add sound effects by using desktop themes. To change desktop themes, follow these steps:
Click the Start button, point to Settings, and click Control Panel.
Double-click the Desktop Themes icon.
The Desktop Themes window opens.
Select a theme from the Theme pull-down menu and click OK.
NOTE: External monitors may also have fields for other display controls, such as energy-saving features. For more information, refer to the documentation that came with your monitor.

Brightness
To accommodate local lighting conditions or video output from the software you are using, you can use key combinations to adjust the brightness of your display. Press
to decrease brightness, or press to increase brightness.
Video Resolution
Click the Start button, point to Settings, and then click Control Panel.
The Control Panel window appears.
Double-click the Display icon.
The Display Properties window appears.
Click the Settings tab, and then set the resolution by dragging the slider in the Desktop area box. In the Color Palette box, choose the number of colors from the menu provided.
If you need further information on using the Display Properties window, see the documentation that came with your operating system.
If you select a resolution higher than that supported by the integrated display, panning allows you to view the image in sections on the display. You can also use a high-resolution mode on an external multifrequency monitor connected to the computer. If you are not sure which resolutions your monitor can display, check the documentation that came with the monitor.
Refresh Rate
Click the Start button, point to Settings, and then click Control Panel.
The Control Panel window appears.
Double-click the Display icon and click the Settings tab.
The Display Properties window appears.
In Windows 98, click the Advanced button to change the refresh rate.
In Microsoft Windows NT®, use the Refresh Frequency menu in the Display Properties window to change the refresh rate.
If You Have Display Problems
If the computer is receiving power, but nothing appears on your display (such as light, text, or graphics) or the display image does not appear as you would expect, try the following measures to resolve the problem:
NOTE: When you run the computer on battery power, set the computer's brightness control to the lowest setting that affords comfortable viewing. You can conserve up to 5 percent of battery power by using the minimum brightness setting.
NOTE: The video drivers that Dell installed for you are designed to offer the best performance on the computer. Dell recommends that you use only these drivers with your Dell-installed operating system.
NOTE: If you are using an external monitor, see the documentation that came with the monitor to determine the correct refresh rate.
NOTE: You may need to adjust the vertical and horizontal size and position controls on your external multifrequency monitor to properly display extended-video modes.

Press any key on the integrated keyboard, and then wait several seconds. If the display image returns to normal, the computer was in standby mode to conserve power.
If the battery status indicator is blinking to report a low charge, connect the AC adapter to the computer or install a second battery in the media bay.
Adjust the brightness.
If the computer is attached to an external monitor, press so that the video image appears on the display.
If the computer is turned off, press the power button to turn on the computer.

I/O Connectors
The connectors on the I/O back panel are the gateways through which the computer communicates with the external device(s) attached to it.
Some external devices require you to load software called device drivers into system memory before the devices will work. These device drivers help the computer recognize the external device and direct its operation. Instructions for installing this software are usually included with the device.
Speakers and Other Audio Devices
You can connect a microphone, speakers, and headphones to the audio connectors on the left side of the computer. Dell recommends using amplified speakers for the best sound.
Connect headphones or speakers to the audio connector (line-out jack). Connect a microphone to the MIC IN connector.
See your Microsoft® Windows® 98 documentation for the location of sound application programs such as mixers and volume control.
You can control the sound coming from the external speakers and the computer's integrated speakers with the volume control dial. You can also use the keyboard to adjust
the volumes. Press to decrease the volume. Press to increase the volume.
Keyboard, Mouse, and Keypad
You can connect a keyboard with a standard connector to the PS/2 connector on the computer by using an adapter available from Dell. You can use the integrated keyboard even when an external keyboard is attached to the computer.
You can also connect a USB keyboard to the computer's USB port connector.
Connecting External Devices
I/O Connectors
Speakers and Other Audio Devices
Keyboard, Mouse, and Keypad
Monitor
Parallel Devices
Modem
NIC
External Media Options

Attach a PS/2 mouse to the PS/2-compatible connector on the computer or a USB-compatible mouse to the USB port connector. If you attach a USB mouse to the computer, you do not need to reboot the computer in order to use the mouse. The touch pad device drivers that Dell installed on your hard-disk drive work with a PS/2 mouse or USB mouse from Dell.
If you did not receive your mouse from Dell, you must install device drivers separately to use the mouse. This software is usually included with mouse installation kits.
Monitor
Connecting an External Monitor
NOTICE: Do not place the monitor directly on top of your computer, even if it is closed. Doing so can crack the computer case, the display, or both.
Turn off the external monitor and your computer. Set the monitor on a monitor stand, desk top, or other level surface near the computer.
Connect the external monitor's video cable to the computer.
Plug the monitor cable connector into the matching video connector at the back of the computer. If the cable is not permanently attached to the monitor, connect it to the monitor also.
Tighten all the screws on the monitor cable connector(s) to eliminate RFI.
Connect your external monitor to a grounded electrical outlet.
Plug the 3-prong connector on one end of the monitor's power cable into a grounded power strip or some other grounded power source. If the cable is not permanently attached to the monitor, connect it to the monitor also.
Using an External Monitor
The video image can be displayed on an external monitor, on the computer's display, or on both simultaneously. To toggle between the three display modes, press
.
Parallel Devices
To connect parallel devices to your computer, perform the following steps:
Turn off the computer.
Plug the connector on the device's I/O cable into the parallel port connector on the back of the computer.
Tighten all the screws on the cable connector to eliminate RFI.
NOTE: When you use the external monitor and integrated display simultaneously, the refresh rate is always 60 Hz.

If the device has a power cable, plug the cable into a grounded electrical outlet.
Restart the computer.
Modem
You can connect a telephone line to the integrated modem through the RJ11 modem connector on the back of the computer.
NOTICE: Do not confuse the modem and NIC connectors on your computer. Do not plug a telephone line into the NIC connector.
To connect the telephone line to your computer, perform the following steps:
Turn off the computer.
Connect the telephone line to the modem connector on the back of the computer.
Restart the computer.
NIC
You can connect to the integrated NIC through the RJ45 connector on the back of the computer.
NOTICE: Do not confuse the modem and NIC connectors on your computer. Do not plug a telephone line into the NIC connector.
To connect the network cable to your computer, perform the following steps:
Turn off the computer.
Connect the network cable to the NIC connector on the back of the computer.
Restart the computer.
External Media Options

You can connect external media options such CD-ROM, DVD-ROM, SuperDisk LS-120, and diskette drives to the external media bay connector on the back of the computer. For information on using devices in the external media bay, refer to External Media Bay.
NOTICE: To avoid overheating the computer, do not place the external media bay close to the air intake or fan exhaust vent.
To connect the external media bay to your computer, perform the following steps:
Turn off the computer.
Position the larger cable connector with its shiny metal lip down, and connect it firmly to the device through the slot in the back of the media bay.
Connect the other end of the cable to the media bay connector on the computer.
For both connections, make sure that the cable securing clips are fully engaged and the connector is fully seated.
NOTICE: When you remove the media bay cable from the computer or a device, press in on the cable securing clips while pulling the cable connector straight out. Do not insert or pull out the connector at an angle.
Restart the computer.

To find a term, scroll through the list of terms below or click one of the letter buttons above.
A
Abbreviation for ampere(s).
AC
Abbreviation for alternating current.
AC adapter
An external power supply that converts AC power to DC power for a portable computer. The AC adapter's cable connects to the portable computer. A power cable connects the AC adapter to an electrical outlet.
active-matrix display
A type of display that uses thin-film transistors. These transistors allow each picture element to be turned on or off.
ADI
Abbreviation for Autodesk Device Interface.
AGP
Abbreviation for accelerated graphics port. AGP is a dedicated graphics port that provides a faster interface between the video subsystem and the system memory than a PCI graphics device and allows conventional memory to be used for video-related tasks. The improved interface enables AGP to deliver a smooth, true-color video image.
ANSI
Acronym for American National Standards Institute.
application program
Software, such as a spreadsheet or word processor, designed to help you perform a specific task or series of tasks. Application programs run from the operating system.
ASCII
Acronym for American Standard Code for Information Interchange.
ASIC
Acronym for application-specific integrated circuit.
ATA
Abbreviation for Advanced Technology Attachment.
attribute
As it relates to DMI, an attribute is a piece of information related to a component. Attributes can be combined to form groups. If an attribute is defined as read-write, it may be defined by a management application.
autoexec.bat file
The autoexec.bat file is executed when you boot your computer (after executing any commands in the config.sys file). This start-up file contains commands that define the characteristics of each device connected to your computer, and it finds and executes programs stored in locations other than the active directory.
backup
Glossary
A B C D E F G H I J K L M N O P Q R S T U V W X Y Z
A copy of a program or data file. As a precaution, you should back up your computer's hard-disk drive on a regular basis. Before making a change to the configuration of your computer, you should back up important start-up files from your operating system.
base memory
Synonym for conventional memory.
batch file
An ASCII text file containing a list of commands that run in sequence. Instead of typing each command, you need only type the batch file name. The system executes the commands as if you had typed each one individually. Batch files must have a filename extension of bat.
battery
An internal power source used to operate a portable computer. To operate a portable computer on battery power, insert a charged battery into the main-battery compartment of the computer.
battery operating time
The amount of time the computer can run on battery power.
battery performance
Battery performance features such as charge time, operating time, and life span can vary according to the conditions under which the computer and battery are used.
baud rate
A measurement of data transmission speed. For example, modems are designed to transmit data at one or more specified baud rate(s) through the COM (serial) port of a computer.
BBS
Abbreviation for bulletin board service. A computer system that serves as a central location for accessing data or relaying messages by modem.
beep code
A diagnostic message in the form of a pattern of beeps from your computer's speaker. For example, one beep followed by two beeps is beep code 1-2.
binary
A base-2 numbering system that uses 0 and 1 to represent information. The computer performs operations based on the ordering and calculation of these numbers.
BIOS
Acronym for basic input/output system. Your computer's BIOS contains programs stored on a flash memory chip. The BIOS controls the following:
l Communications between the microprocessor and devices such as the keyboard and the video adapter
l Miscellaneous functions, such as system messages
bit
The smallest unit of information interpreted by your computer.
boot routine
The start-up process of a computer that clears all memory, initializes devices, and loads the operating system.
bootable diskette
A diskette from which you can boot your system. The Microsoft Boot Disk Windows 98 Series diskette is a bootable diskette.
bpi
Abbreviation for bits per inch.
bps
Abbreviation for bits per second.
BTU
Abbreviation for British thermal unit.

bus
An information pathway between the components of a computer. Your computer contains an expansion bus that allows the microprocessor to communicate with controllers for all the various devices connected to the computer. Your computer also contains an address bus and a data bus for communications between the microprocessor and RAM.
byte
Eight contiguous bits of information, the basic data unit used by your computer.
BZT
Abbreviation for Bundesamt fur Zulassungen in der Telekommunikation.
C
Abbreviation for Celsius.
cache
A fast storage area that keeps a copy of data or instructions for quicker data retrieval. Cache memory enhances the speed of many microprocessor operations by storing the most-recently accessed contents of system memory.
capitals lock mode
The key toggles between upper- and lowercase type.
CardBus
An I/O bus architecture that combines the PCMCIA form factor with 32-bit, 33-MHz PCI bus protocols.
carnet
A carnet is an international customs document (also known as a merchandise passport) that facilitates temporary imports into foreign countries and is valid for up to one year.
CD-ROM
Abbreviation for compact disc read-only memory. CD-ROM drives use optical technology to read data from CDs. CDs are read-only storage devices; you cannot write new data to a CD with standard CD-ROM drives.
CGA
Abbreviation for color graphics adapter.
cm
Abbreviation for centimeter(s).
CMOS
Acronym for complementary metal-oxide semiconductor. In computers, CMOS memory chips are often used for NVRAM storage.
COMn
The device names for the first through fourth serial ports on your computer are COM1, COM2, COM3, and COM4. The default interrupt for COM1 and COM3 is IRQ4, and the default interrupt for COM2 and COM4 is IRQ3. Therefore, you must be careful when configuring software that runs a serial device so that you don't create an interrupt conflict.
component
As they relate to DMI, manageable components are operating systems, application programs, desktop and server computer systems, adapter cards, or peripherals that are compatible with DMI. Each component is made up of groups and attributes that are defined as relevant to that component.
CON
The MS-DOS® device name for the console, which includes your computer's keyboard and text displayed on the screen.
config.sys
The config.sys file is executed when you boot your computer (before running any commands in the autoexec.bat file). This start-up file contains commands that specify which devices to install and which device drivers to use. This file also contains commands that determine how the operating system uses memory and controls files.
controller

A chip that controls the transfer of data between the microprocessor and memory or between the microprocessor and a device such as a disk drive or the keyboard.
conventional memory
The first 640 KB of RAM. Conventional memory is found in all computers.
coprocessor
A chip that relieves the computer's microprocessor of specific processing tasks. A math coprocessor, for example, handles numeric processing. A graphics coprocessor
handles video rendering. The Intel® Pentium® microprocessor includes a built-in math coprocessor.
cpi
Abbreviation for characters per inch.
CPU
Abbreviation for central processing unit. See also microprocessor.
cursor
A marker, such as a block, underscore, or pointer (possibly blinking), that represents the position at which the next keyboard or mouse action will occur.
DAT
Acronym for digital audio tape.
data file
All the files (documents, graphics, records, and so on) you create with your programs.
dB
Abbreviation for decibel(s).
DC
Abbreviation for direct current.
Dell Diagnostics
A comprehensive set of diagnostic tests for your Dell computer. To use the diagnostics, you must boot your computer from your System Software CD.
device driver
A program that allows the operating system or some other program to interface correctly with a device such as a printer. Some device drivers, such as network drivers—must be loaded from the config.sys file (with a device= statement) or as memory-resident programs (usually from the autoexec.bat file). Others—such as video drivers—must load when you start the program for which they were designed.
DIN
Acronym for Deutsche Industrie Norm.
directory
Directories help keep related files organized on a disk in an ordered, "inverted tree" structure. Each disk has a "root" directory. Additional directories that branch off of the root directory are called subdirectories. Subdirectories may contain additional directories branching off of them.
Disable Autoplay
The autoplay feature in Microsoft® Windows® 98 interferes with the operation of the computer's power management time-outs. If Dell installed Windows 98 on your hard-disk drive, the autoplay feature was disabled. If you enable autoplay, or if you installed Windows 98 yourself, Dell recommends that you disable autoplay.
See your Windows 98 documentation for instructions on changing the Auto Insert Notification option.
diskette drive
The diskette drive is a removable-storage device which comes installed in the computer's media bay. The diskette drive lets you install programs and transfer data using 3.5-inch diskettes.
display adapter
The logical circuitry that provides—in combination with the display or monitor—your computer's video capabilities. A display adapter may support more or fewer features than a specific display or monitor offers. Typically, a display adapter comes with video drivers for displaying popular application programs and operating environments in a variety of video modes. On Dell portable computers, a display adapter is integrated into the system board.
Display adapters often include memory separate from RAM on the system board. The amount of video memory, along with the adapter's video drivers, may affect the number of colors or shades of gray that can be simultaneously displayed. Display adapters can also include their own coprocessor for faster graphics rendering.
DMA
Abbreviation for direct memory access. A DMA channel allows certain types of data transfer between RAM and a device to bypass the microprocessor.
DMI
Abbreviation for Desktop Management Interface.
DMTF
Abbreviation for Desktop Management Task Force, a consortium of companies representing hardware and software providers, of which Dell Computer Corporation is a member.
DOC
Abbreviation for Department of Communications (in Canada).
dpi
Abbreviation for dots per inch.
DPMS
Abbreviation for Display Power Management Signaling. A standard developed by VESA® that defines the hardware signals sent by a video controller to activate power management states in a monitor. A monitor is said to be DPMS-compliant when it is designed to enter a power management state after receiving the appropriate signal from a computer's video controller.
DRAM
Abbreviation for dynamic random-access memory. A computer's RAM is usually made up entirely of DRAM chips. Because DRAM chips cannot store an electrical charge indefinitely, your computer continually refreshes each DRAM chip in the computer.
driver
See device driver.
DTE
Abbreviation for data terminal equipment. Any device, such as a computer system, that can send data in digital form by means of a cable or communications line. The DTE is connected to the cable or communications line through a data communications equipment (DCE) device, such as a modem.
DVD
Abbreviation for digital versatile disc. A large-capacity optical disc able to store more data than standard CDs.
DVD-ROM
Abbreviation for digital versatile disc read-only memory. DVD-ROM drives use optical technology to read data from DVDs. DVDs are read-only storage devices; you cannot write new data to a DVD with standard DVD-ROM drives. Most DVD-ROM drives also read standard CDs.
ECC
Abbreviation for error checking and correction.
ECP
Abbreviation for Extended Capabilities Port. ECP mode, while similar to EPP mode, may provide a performance enhancement to the Microsoft Windows operating system in that ECP mode can use DMA to transfer data. Also, ECP uses a FIFO buffer for sending or receiving data.
EEPROM
Acronym for electrically erasable programmable read-only memory.
EIDE
Abbreviation for enhanced integrated device electronics. EIDE devices add one or more of the following enhancements to the traditional IDE standard:

l Data transfer rates of up to 16 MB/sec
l Support for drives other than just hard-disk drives, such as CD-ROM and tape drives
l Support for hard-disk drives with capacities greater than 528 MB
l Support for up to two controllers, each with up to two devices attached
EMI
Abbreviation for electromagnetic interference.
EPP
Abbreviation for Enhanced Parallel Port. A parallel-port design that provides improved bidirectional data transmission.
ESD
Abbreviation for electrostatic discharge.
expansion bus
Your computer contains an expansion bus that allows the microprocessor to communicate with controllers for devices such as a network card or an internal modem.
expansion card
A printed circuit board that plugs into an expansion-card connector on the computer's system board. An expansion card adds some specialized function to the computer by providing an interface between the expansion bus and a device. An example of an expansion card is a sound card.
expansion-card connector
A connector on the computer's system board for plugging in an expansion card.
Express Service Code
The Express Service Code routes calls directly to the proper support personnel.
extended memory
RAM above 1 MB. Most software that can use it, such as the Windows 98 operating system, requires that extended memory be under the control of an XMM.
Extended PC Cards
NOTICE: Take extra precautions if you use extended PC Cards in the computer. Extended cards are longer versions of standard PC Cards. They fit into, and operate correctly with, the computer. However, they extend beyond the edge of the computer when installed. If something strikes the exposed end of an installed card, the card or the system board can be damaged. Always remove an extended PC Card before you pack the computer for traveling.
F
Abbreviation for Fahrenheit.
FAT
Acronym for file allocation table. The file system structure used by the MS-DOS and Windows operating systems to organize and keep track of file storage. The Windows
NT® operating system can optionally use a FAT file system structure.
FCC
Abbreviation for Federal Communications Commission.
FIFO
Acronym for first-in first-out.
flash code
When errors that occur during the boot routine cannot be reported on the display or on an external monitor (if attached), the numbers lock, capitals lock, and scroll lock indicators may flash together in a pattern of lights (or flash code) that identifies the problem. For example, one flash, followed by a second flash, and then a burst of three flashes (code 1-1-3) means that the computer was unable to read the data in NVRAM.
flash memory

A type of EEPROM chip that can be reprogrammed from a utility on diskette while still installed in a computer; most EEPROM chips can only be rewritten with special programming equipment.
format
To prepare a hard-disk drive or diskette for storing files.
ft
Abbreviation for feet.
FTP
Abbreviation for file transfer protocol.
g
Abbreviation for gram(s).
G
Abbreviation for gravities.
GB
Abbreviation for gigabyte(s). A gigabyte equals 1024 MB or 1,073,741,824 bytes.
graphics mode
A video mode that can be defined as x horizontal pixels by y vertical pixels by z colors.
GRMS
Abbreviation for gravity root mean squared.
GST
Abbreviation for Goods and Services Tax.
h
Abbreviation for hexadecimal. A base-16 numbering system, often used in programming to identify addresses in the computer's RAM and I/O memory addresses for devices. The sequence of decimal numbers from 0 through 16, for example, is expressed in hexadecimal notation as: 0, 1, 2, 3, 4, 5, 6, 7, 8, 9, A, B, C, D, E, F, 10. In text, hexadecimal numbers are often followed by h.
heat sink
A metal plate with metal pegs or ribs that help dissipate heat. Some microprocessors include a heat sink.
help file
A file containing descriptive or instructional information about a product that is organized and formatted for display by the Windows operating system. Some help files are associated with a particular program, such as Help in Windows. Other help files, such as this one for your computer, function as stand-alone reference sources. Help files typically have a filename extension of hlp or chm.
hibernate mode
In Windows 98, a power conservation mode that saves system data to the hard-disk drive and turns off the computer. See also save-to-disk suspend mode.
HMA
Abbreviation for high memory area. The first 64 KB of extended memory above 1 MB. A memory manager that conforms to the XMS can make the HMA a direct extension of conventional memory. See also upper memory area and XMM.
HRTF
Acronym for head related transfer function.
Hz

Abbreviation for hertz.
I/O
Abbreviation for input/output. The keyboard is an input device, and a printer is an output device. In general, I/O activity can be differentiated from computational activity. For example, when a program sends a document to the printer, it is engaging in output activity; when the program sorts a list of terms, it is engaging in computational activity.
ICES
Abbreviation for Interference-Causing Equipment Standard (in Canada).
ICU
Abbreviation for ISA Configuration Utility.
IDE
Abbreviation for integrated drive electronics. See also EIDE.
IrDA
Acronym for Infrared Data Association.
IRQ
Abbreviation for interrupt request. A signal that data is about to be sent to or received by a device travels by an IRQ line to the microprocessor. Each device connection must be assigned an IRQ number. For example, the first serial port in your computer (COM1) is assigned to IRQ4 by default. Two devices can share the same IRQ assignment, but you cannot operate both devices simultaneously.
ISA
Acronym for Industry-Standard Architecture. A 16-bit expansion bus design. The expansion-card connectors in an ISA computer are also compatible with 8-bit ISA expansion cards.
ISP
Abbreviation for Internet service provider. A company that allows you to dial into its host server to connect directly to the Internet.
JEIDA
Acronym for Japanese Electronic Industry Development Association.
jumper
Jumpers are small blocks on a circuit board with two or more pins emerging from them. Plastic plugs containing a wire fit down over the pins. The wire connects the pins and creates a circuit. Jumpers provide a simple and reversible method of changing the circuitry in a printed circuit board.
K
Abbreviation for kilo-, indicating 1000.
KB
Abbreviation for kilobyte(s), 1024 bytes.
Kb
Abbreviation for kilobit(s), 1024 bits.
KB/sec
Abbreviation for kilobit(s) per second.
Kbps
Abbreviation for kilobyte(s) per second.
key combination
A command requiring you to press multiple keys at the same time. For example, you can minimize all open windows by pressing .
kg
Abbreviation for kilogram(s), 1000 grams.
kHz
Abbreviation for kilohertz, 1000 hertz.
LAN
Acronym for local area network. A LAN system is usually confined to the same building or a few nearby buildings, with all equipment linked by wiring that is dedicated specifically to the LAN.
lb
Abbreviation for pound(s).
LCD
Abbreviation for liquid crystal display. An LCD consists of a liquid crystal solution between two sheets of polarizing material. An electric current causes each crystal to act like a shutter that can open to allow light past or close to block the light.
LED
Abbreviation for light-emitting diode. An electronic device that lights up when a current is passed through it.
local bus
On a computer with local-bus expansion capability, certain devices such as the AGP video card can be designed to run much faster than they would with a traditional expansion bus. Some local-bus designs allow devices to run at the same speed and with the same-width data path as the computer's microprocessor.
logical formatting
The method of setting up groups of sectors on a hard-disk drive to store system start-up information, sector status information, and directory information.
loopback device
A piece of hardware used for testing a serial port or parallel port. The loopback device contains a port connector and sometimes a looped cable. The connector attaches to the port on the computer and is used during testing to send a signal out through the port and immediately have it returned through the port.
LPTn
The device names for the first through third parallel ports on your computer are LPT1, LPT2, and LPT3.
LVDS
Acronym for low-voltage differential signaling.
m
Abbreviation for meter(s).
mA
Abbreviation for milliampere(s).
math coprocessor
A chip that relieves the computer's microprocessor of numeric-processing tasks. The Intel Pentium microprocessor, for example, includes a built-in math coprocessor.
Mb
Abbreviation for megabit(s), 1,048,576 bits.
MB

Abbreviation for megabyte(s). The term megabyte means 1,048,576 bytes; however, when referring to hard-disk drive storage, the term is often rounded to mean 1,000,000 bytes.
MB/sec
Abbreviation for megabytes per second.
Mbps
Abbreviation for megabits per second.
memory
A computer can contain several different forms of memory, such as RAM, ROM, and video memory. Frequently, the word memory is used as a synonym for RAM; for example, an unqualified statement such as "...a computer with 64 MB of memory" refers to a computer with 64 MB of RAM.
memory address
A specific location, usually expressed as a hexadecimal number, in the computer's RAM.
memory manager
A utility that controls the implementation of memory in addition to conventional memory such as extended memory.
memory module
A small circuit board containing SDRAM chips that connects to the system board.
MHz
Abbreviation for megahertz.
microprocessor
The primary computational chip inside the computer that controls the interpretation and execution of arithmetic and logic functions. Software written for one microprocessor must usually be revised to run on another microprocessor. CPU is a synonym for microprocessor.
MIDI
Acronym for musical instrument digital interface.
mm
Abbreviation for millimeter(s).
modem
A device that allows your computer to communicate with other computers over telephone lines.
mouse
A pointing device that controls the movement of the cursor on a screen. Mouse-aware software allows you to activate commands by clicking a mouse button while pointing at objects displayed on the screen.
MPEG
Acronym for Moving Picture Experts Group. MPEG is a digital video file format.
ms
Abbreviation for millisecond(s).
MS-DOS
Abbreviation for Microsoft Disk Operating System.
MSN
Abbreviation for the Microsoft Network.
multifrequency monitor
A monitor that supports several video standards. A multifrequency monitor can adjust to the frequency range of the signal from a variety of video cards.

mV
Abbreviation for millivolt(s).
NIC
Abbreviation for network interface controller.
NMI
Abbreviation for nonmaskable interrupt. A device sends an NMI to signal the microprocessor about hardware errors such as a parity error.
numbers lock mode
When you press on the keyboard, the numbers lock mode indicator comes on and the number keypad functions as a 10-key number pad. To exit the numbers
lock mode, press again and the indicator turns off.
ns
Abbreviation for nanosecond(s), one billionth of a second.
NTFS
Abbreviation for the NT File System option in the Windows NT operating system.
NTSC
Abbreviation for National Television Standards Committee. The governing body that dictates broadcast and consumer video guidelines and values. It ensures that all broadcast, video, and television products in the United States adhere to the NTSC Interface Scan System. NTSC is not compatible with PAL.
NVRAM
Abbreviation for nonvolatile random-access memory. Memory that does not lose its contents when you turn off your computer. NVRAM is used for maintaining the date, time, and system configuration information.
online access service
A service that typically provides access to the Internet, e-mail, bulletin boards, chat rooms, and file libraries.
OTP
Abbreviation for one-time programmable.
OpenGL
An environment for developing portable, interactive 2D and 3D graphics applications.
oz
Abbreviation for ounce.
PAL
Abbreviation for phase alternating line, a standard for television in many European countries. PAL is not compatible with NTSC, and is not marketed, sold, or serviced in the United States.
parallel port
An I/O port used most often to connect a parallel printer to your computer. You can usually identify a parallel port on your computer by its 25-hole connector.
parameter
A value or option that you specify to a program.
partition
A physical storage area on a hard-disk drive that is assigned to one or more logical storage areas known as logical drives. Each partition can contain multiple logical drives.
After partitioning the hard-disk drive, you must logically format the drive.
See also logical formatting.
PC Card
Slightly larger than a credit card, a PC Card is a removable I/O card, such as a modem, LAN, SRAM, or flash memory card, that adheres to the PCMCIA standards. PC Cards are sometimes referred to as PCMCIA cards.
PC Card types
Because a Type III card is thicker than Type I and Type II cards, it takes up the entire PC Card slot, although it uses only one PC Card connector. Your computer does not support Type III PC Cards.
PCI
Abbreviation for Peripheral Component Interconnect. A standard for local-bus implementation developed by Intel Corporation.
PCMCIA
Abbreviation for Personal Computer Memory Card International Association.
PIO
Abbreviation for Programmed I/O.
pixel
A single point on a video display. Pixels are arranged in rows and columns to create an image. A video resolution, such as 800 x 600, is expressed as the number of pixels across by the number of pixels up and down.
Plug and Play
An industry-standard specification that makes it easier to add devices to your personal computer. Plug and Play provides automatic installation and configuration, compatibility with existing hardware, and dynamic support of mobile computing environments.
POST
Acronym for power-on self-test. Before the operating system loads when you turn on your computer, the POST tests various system components, such as RAM, the disk drives, and the keyboard.
PS/2
Abbreviation for Personal System/2.
RAM
Acronym for random-access memory. The computer's primary temporary storage area for program instructions and data. Each location in RAM is identified by a number called a memory address. Any information stored in RAM is lost when you turn off your computer.
read-only
A read-only file is one that you are prohibited from editing or deleting. A file can have read-only status if:
l Its read-only attribute is enabled.
l It resides on a physically write-protected diskette or on a diskette in a write-protected drive.
l It is located on a network in a directory to which the system administrator has assigned read-only rights to you.
readme file
A text file included with a software package or hardware product that contains information updating or supplementing the documentation for the software or hardware. Typically, readme files provide installation information, describe new product enhancements or corrections that have not yet been documented, and list known problems or other things you need to be aware of as you use the software or hardware.
refresh rate
The rate at which the monitor redraws the video image on the monitor screen. More precisely, the refresh rate is the frequency, measured in Hz, at which the screen's horizontal lines are recharged (sometimes also referred to as its vertical frequency). The higher the refresh rate, the less video flicker can be seen by the human eye.

reserve battery
A coin-cell battery that maintains system configuration, date, and time information in a special section of memory when the computer is turned off.
resolution
See video resolution.
RFI
Abbreviation for radio frequency interference.
ROM
Acronym for read-only memory. Your computer contains some programs essential to its operation in ROM code. Unlike RAM, a ROM chip retains its contents even after you turn off your computer. Examples of code in ROM include the program that initiates your computer's boot routine and the POST.
rpm
Abbreviation for revolutions per minute.
RTC
Abbreviation for real-time clock. Battery-powered clock circuitry inside the computer that keeps the date and time after you turn off the computer.
save-to-disk suspend mode
In Windows NT, a power conservation mode that saves system data to the hard-disk drive and turns off the computer. Known as hibernate mode in Windows 98.
SCSI
Acronym for small computer system interface. An I/O bus interface with faster data transmission rates than standard ports. You can connect up to seven devices (15 for some newer SCSI types) to one SCSI connector.
SDRAM
Abbreviation for synchronous dynamic random-access memory. SDRAM is a memory technology that improves the performance of your computer's memory subsystem by reducing the need for wait states. SDRAM devices have a synchronous interface to the devices to which they are connected and are governed by the system clock. These features reduce the need for wait states often required for conventional memory devices to ensure that timing signals have been set up correctly.
screen saver
A program that prevents a static image from damaging the monitor. It starts automatically after a user-defined period of inactivity.
scroll lock mode
Pressing allows you to set the number of lines that are scrolled when you press or .
sec
Abbreviation for second(s).
securing clips
Metal clips on the side of the cable connector(s) for some devices, such as an external media bay. To disconnect the cable from the device or computer, press in on the securing clips while pulling the connector straight out.
serial port
An I/O port used most often to connect a modem to your computer. You can usually identify a serial port on your computer by its 9-pin connector.
service tag sequence
A bar code label on the computer that Dell technicians use to identify your computer when you call Dell for customer or technical support.
SGRAM
Acronym for synchronous graphics random-access memory.
shortcut
Icons that provide quick access to frequently used programs, files, folders, and drives. By double-clicking a shortcut, you can open its corresponding folder or file without
having to find it first. Shortcuts do not change the location of files; if you delete a shortcut, the original file is not affected.
SIMD
Abbreviation for single instruction, multiple data. SIMD is a technology incorporated into certain Intel microprocessors that extends the capabilities of these microprocessors to handle multimedia and communications software. This technology includes new instructions and data types that allows the microprocessor to process multiple data elements in parallel, thereby improving overall system performance.
SPD
Abbreviation for serial presence detect.
SRAM
Abbreviation for static random-access memory.
standby mode
A power conservation mode that turns off the display and reduces power to the microprocessor, VGA PCI bus, diskette drive or CD-ROM drive (if installed), serial and parallel ports, hard-disk drive, PC Card controller, internal speakers and microphone, and external speakers and microphone (if attached).
SuperDisk LS-120 drive
SuperDisk LS-120 drives provide high-capability storage and compatibility with older standard, lower capacity 3.5-inch diskettes and replaces 1.44-MB drives.
SVGA
Abbreviation for super video graphics array. VGA and SVGA are video standards for video cards and controllers with greater resolution and color display capabilities than previous standards.
To display a program at a specific resolution, you must install the appropriate video drivers and your monitor must support the resolution. Similarly, the number of colors that a program can display depends on the capabilities of the monitor, the video controller and its drivers, and the amount of video memory installed in the computer.
SXGA
Abbreviation for super extended graphics array.
system board
As the main circuit board, the system board usually contains most of your computer's integral components, such as the following:
l Microprocessor
l RAM
l Controllers for standard devices, such as the keyboard
l Various ROM chips
Frequently used synonyms for system board are motherboard and logic board.
system configuration information
Data stored in memory that tells a computer what hardware is installed and how the computer should be configured for operation.
system diskette
System diskette is a synonym for bootable diskette.
system memory
System memory is a synonym for RAM.
system.ini file
A start-up file for the Windows operating system. When you start Windows, it consults the system.ini file to determine a variety of options for the Windows operating environment. Among other things, the system.ini file records which video, mouse, and keyboard drivers are installed for Windows.
Running the Control Panel or Windows Setup program may change options in the system.ini file. On other occasions, you may need to change or add options to the system.ini file manually with a text editor, such as Notepad.
system setup program
A BIOS-based program that allows you to configure your computer's hardware and customize the computer's operation by setting such features as password protection. Because the system setup program is stored in NVRAM, any settings remain in effect until you change them again.

termination
Some devices (such as the last device at each end of a SCSI cable) must be terminated to prevent reflections and spurious signals in the cable. When such devices are connected in a series, you may need to enable or disable the termination on these devices by changing jumper or switch settings on the devices or by changing settings in the configuration software for the devices.
text editor
An application program such as Windows Notepad that is used for editing text files. Most word processors use proprietary file formats containing binary characters, although some can read and write text files.
text mode
A video mode that can be defined as x columns by y rows of characters.
TFT
Abbreviation for thin-film transistor. From one to four of these transistors control each pixel in an active-matrix display for portable computers.
time-out
A time-out is a system setup option that activates a power conservation feature after a specified period of inactivity.
tpi
Abbreviation for tracks per inch.
trackball
A pointing device built into a portable computer that controls the movement of the cursor on the screen. Trackball-aware software allows you to activate commands by rolling the trackball and clicking its buttons while pointing at objects displayed on the screen.
touch pad
A pointing device that detects the position of your finger over a touch-sensitive area. It is PS/2 compatible and provides full mouse functionality.
TSR
Abbreviation for terminate-and-stay-resident. A TSR program runs "in the background." Most TSR programs implement a predefined key combination (sometimes referred to as a hot key) that allows you to activate the TSR program's interface while running another program. When you finish using the TSR program, you can return to the other application program and leave the TSR program resident in memory for later use.
Because MS-DOS is not designed to support multiple programs running simultaneously, TSR programs can sometimes cause memory conflicts. When troubleshooting, rule out the possibility of such a conflict by rebooting your computer without starting any TSR programs.
UL
Abbreviation for Underwriters Laboratories.
UMB
Abbreviation for upper memory block.
upper memory area
The 384 KB of RAM located between 640 KB and 1 MB. A utility called a memory manager can create UMBs in the upper memory area, in which you can load device drivers and memory-resident programs.
UPS
Abbreviation for uninterruptible power supply. A battery-powered unit that automatically supplies power to your computer in the event of an electrical failure.
USB
Abbreviation for Universal Serial Bus. A USB port provides a single connection point for multiple USB-compliant devices such as mice, keyboards, printers, and computer speakers. USB devices can be connected and disconnected while the system is running.
UXGA
Abbreviation for ultra extended graphics array.
V
Abbreviation for volt(s).
VAC
Abbreviation for volt(s) alternating current.
VCCI
Abbreviation for Voluntary Control Council for Interference.
VDC
Abbreviation for volt(s) direct current.
VESA
Acronym for Video Electronics Standards Association.
VGA
Abbreviation for video graphics array. VGA and SVGA are video standards for video cards and controllers with greater resolution and color display capabilities than previous standards.
To display a program at a specific resolution, you must install the appropriate video drivers and your monitor must support the resolution. Similarly, the number of colors that a program can display depends on the capabilities of the monitor, the video controller and its drivers, and the amount of video memory installed in the computer.
video card
An expansion card that provides the video capabilities—in combination with the monitor—for your computer system. A video card may support more or fewer features than a specific monitor offers. Typically, a video card comes with video drivers for displaying popular application programs and operating systems in a variety of video modes.
Video cards can include memory separate from RAM on the system board. The amount of video memory, along with the card's video drivers, may affect the number of colors that can be simultaneously displayed. Video cards can also include their own coprocessor for faster graphics rendering.
video driver
A program that allows graphics-mode application programs and operating systems to be displayed at a chosen resolution with the desired number of colors. A software package may include some "generic" video drivers. Any additional video drivers may need to match the video card installed in the computer.
video memory
Most VGA and SVGA video cards include memory chips in addition to the computer's RAM. The amount of video memory installed primarily influences the number of colors that a program can display (with the appropriate video drivers and monitor capabilities).
video mode
Video cards normally support multiple text and graphics display modes. Character-based software, such as text editors, display in text modes that can be defined as x columns by y rows of characters. Graphics-based software, such as the Windows 98 operating system, displays in graphics modes that can be defined as x horizontal pixels by y vertical pixels by z colors.
video resolution
Video resolution—800 x 600, for example—is expressed as the number of pixels across by the number of pixels up and down. To display a program at a specific graphics resolution, you must install the appropriate video drivers and your monitor must support the resolution.
virus
A program designed to be an inconvenience, either by replicating itself until a computer or network runs out of memory or by corrupting files stored on a hard-disk drive.
The most common way that virus programs move from one computer to another is via "infected" diskettes and from software downloaded from the Internet. When an infected program is started, so is the embedded virus.
W
Abbreviation for watt(s).
wallpaper
The background appearance of the Windows desktop.

WH
Abbreviation for watt-hour(s).
win.ini file
A start-up file for the Windows operating system. When you start Windows, it consults the win.ini file to determine a variety of options for the Windows operating environment. Among other things, the win.ini file records what printer(s) and fonts are installed for Windows. The win.ini file also usually includes sections that contain optional settings for Windows application programs that are installed on the hard-disk drive.
Windows 98
An integrated and complete Microsoft Windows operating system that does not require MS-DOS and provides advanced operating system performance, improved ease of use, enhanced workgroup functionality, and simplified file management and browsing.
Windows NT
High-performance server and workstation operating system software intended for technical, engineering, and financial applications.
write-protected
Read-only files are said to be write-protected. You can write-protect a 3.5-inch diskette by sliding its write-protect tab to the open position or by setting the write-protect feature in the system setup program.
XGA
Abbreviation for extended graphics array. VGA, SVGA, and XGA are video standards for video adapters with greater resolution and color display capabilities than previous standards. XGA generally refers to a video resolution of 1024 x 768 pixels.
To display a program at a specific resolution, you must install the appropriate video drivers and your display and/or external monitor must support the resolution. Similarly, the number of colors that a program can display depends on the capabilities of the display and/or monitor, the video driver, and the amount of video memory installed in the computer.
XMM
Abbreviation for extended memory manager, a utility that allows applications and operating systems to use extended memory in accordance with the XMS.
XMS
Abbreviation for eXtended Memory Specification.
ZV port
Abbreviation for zoomed video port. A port to the video controller that provides hardware MPEG-1 decode (and encode) solutions in notebooks. These solutions could include PC Card (CardBus), or on-board solutions. ZV port must be integrated into portable computer board design to allow for these solutions to be passed directly through to the video processor, circumventing the processor, allowing for more efficient CPU utilization.
NOTE: Windows NT does not support zoomed video.

General Questions
Where can I find the specifications for my computer? For my installed devices?
The most specific specifications for your computer are available on Dell’s World Wide Web Support site at http://support.dell.com. Type your service tag sequence and click Submit. The service tag sequence is shown on the bottom of the computer.
If you don’t have a service tag available, you can still access the support information, but you have to click through a series of menus to locate the information specific to your computer.
System specifications are also provided in the Specifications section of this Help and in Appendix A, "Technical Specifications," of the Reference and Troubleshooting Guide.
Look for specifications for your installed devices in the device manufacturer's documentation that came with your computer.
How can I find information related to my computer on the Dell Web site?
Visit Dell’s Web support site at http://support.dell.com. Everything you need to know about your computer is presented in the support area. When prompted on any page, enter your service tag sequence and click Submit to go directly to information specific to your computer. If you don’t have a service tag available, you can still access the support information, but you have to click through a series of menus to locate the information specific to your computer.
Software Questions
Is a new BIOS or are newer drivers available for my computer? Should I update them?
BIOS and driver updates are available from Dell's File Library; they are released to either fix problems or to add features. Do not update the BIOS or a driver unless you are advised to do so by a Dell technical support representative or you are experiencing problems with your hardware configuration. Always read the release notes included with the update thoroughly before making a decision to upgrade the BIOS or a driver.
Where is the fax program in Microsoft® Windows® 98 Second Edition?
Microsoft does not support a native fax program with the Windows 98 Second Edition operating system. However, some application programs, such as Microsoft Office 98 Small Business Edition, include fax software.
Why am I having problems installing MSN on my computer running Microsoft Windows NT®?
MSN cannot be installed for use with the Microsoft Windows NT operating system.
Will my computer correctly handle the year 2000 (Y2K) problem?
Your computer is set to automatically correct the date after 1/1/2000 occurs. It will then continue to keep and update dates correctly. For more information about year 2000 issues, refer to the Research and Development section of the Dell Web site (http://www.dell.com) or see Appendix E, "Year 2000 Statement of Compliance for Dell-Branded Hardware Products," in the Reference and Troubleshooting Guide.
Hardware Questions
Why does the formatted capacity of my hard-disk drive seem to be smaller than what I ordered?
The operating system reports drive capacity assuming that 1 GB equals 1,073,741,824 bytes. This calculation is technically correct.
Drive manufacturers compute the size differently. They consider 1 GB to equal 1,000,000,000 bytes. This difference can cause confusion. If the drive is advertised as 8.4 GB (8,400,000,000 bytes), the operating system sees it as approximately 7.8 GB (8,400,000,000 /1,073,741,824 = 7.82310962677). If the drive is advertised as 10 GB (10,000,000,000 bytes), the operating system sees it as approximately 9.3 GB (10,000,000,000/1,073,741,824=9,313,225,746,155).
There is no sound coming from my computer. What's wrong?
If no sound comes from the speakers, check the volume control dial or press to increase the volume.
Frequently Asked Questions
General Questions
Software Questions
Hardware Questions
Getting Help

My display is blank! What should I do?
Your computer might be in standby mode, which is a battery power conservation mode. Press the power button to resume operation.
How do I know how much battery power I have?
Before you start the computer, remove the battery. Look for the charge gauge on the back of the battery, which tells you how much charge remains in the battery.
For more information, see Running the System With a Battery.
Why do I have a line (or two lines) across my monitor?
Trinitron monitors use aperture grill technology, which is analogous to a vertical grating. A horizontal wire (one for smaller monitors, two for larger monitors) is strung across the aperture grill to prevent image distortion.
The line that you are seeing is the shadow cast by the horizontal wire(s). Although the shadow can be distracting, it is usually not very noticeable, and Trinitron monitors are noted for their exceptional brightness and image sharpness.
My monitor flickers or shakes all the time. What can I do?
Many things can cause the monitor to flicker; they are all simple to fix and do not require hardware replacement.
First, turn the monitor off and then back on. You may also press the degauss button if your monitor has one (refer to the documentation that came with your monitor) to get rid of any magnetic field that may develop during normal monitor operation.
Next, try moving the monitor to the other end of the desk to get rid of the flicker. Also try separating the monitor from sources of electrical interference (such as speakers, power cables, fluorescent lights, or something in the wall or on the other side of the wall).
Finally, increase the refresh rate (or refresh frequency) if both the monitor and video controller support a higher rate at the chosen resolution. For instructions, see Video Resolution and Refresh Rate.
My monitor flashes different colors when I change screens. How do I fix it?
Click the Start button, point to Settings, and then click Control Panel.
Double-click the Display icon and then click the Settings tab.
Change the Color palette to High Color (16 bit) or True Color (32 bit). Then click OK.
In the Compatibility Warning window, click the Apply the settings without restarting? radio button, and then click OK.
When prompted, click OK to adjust the display.
When prompted, click Yes to accept the changes.
Getting Help
How can I get further assistance?
If you are unable to find the answer to your question, see Contacting Dell.
NOTE: This symptom applies to external monitors only—not to the computer display.
NOTE: This symptom applies to external monitors only—not to the computer display.
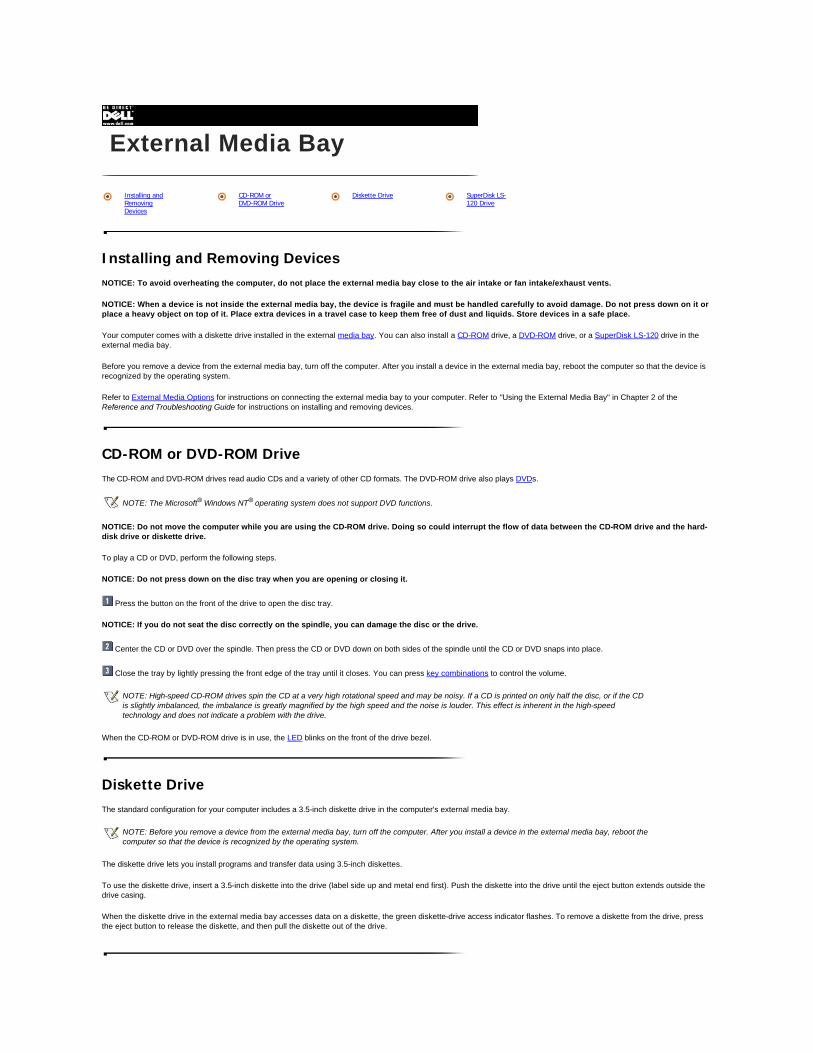
Installing and Removing Devices
NOTICE: To avoid overheating the computer, do not place the external media bay close to the air intake or fan intake/exhaust vents.
NOTICE: When a device is not inside the external media bay, the device is fragile and must be handled carefully to avoid damage. Do not press down on it or place a heavy object on top of it. Place extra devices in a travel case to keep them free of dust and liquids. Store devices in a safe place.
Your computer comes with a diskette drive installed in the external media bay. You can also install a CD-ROM drive, a DVD-ROM drive, or a SuperDisk LS-120 drive in the external media bay.
Before you remove a device from the external media bay, turn off the computer. After you install a device in the external media bay, reboot the computer so that the device is recognized by the operating system.
Refer to External Media Options for instructions on connecting the external media bay to your computer. Refer to "Using the External Media Bay" in Chapter 2 of the Reference and Troubleshooting Guide for instructions on installing and removing devices.
CD-ROM or DVD-ROM Drive
The CD-ROM and DVD-ROM drives read audio CDs and a variety of other CD formats. The DVD-ROM drive also plays DVDs.
NOTICE: Do not move the computer while you are using the CD-ROM drive. Doing so could interrupt the flow of data between the CD-ROM drive and the hard-disk drive or diskette drive.
To play a CD or DVD, perform the following steps.
NOTICE: Do not press down on the disc tray when you are opening or closing it.
Press the button on the front of the drive to open the disc tray.
NOTICE: If you do not seat the disc correctly on the spindle, you can damage the disc or the drive.
Center the CD or DVD over the spindle. Then press the CD or DVD down on both sides of the spindle until the CD or DVD snaps into place.
Close the tray by lightly pressing the front edge of the tray until it closes. You can press key combinations to control the volume.
When the CD-ROM or DVD-ROM drive is in use, the LED blinks on the front of the drive bezel.
Diskette Drive
The standard configuration for your computer includes a 3.5-inch diskette drive in the computer's external media bay.
The diskette drive lets you install programs and transfer data using 3.5-inch diskettes.
To use the diskette drive, insert a 3.5-inch diskette into the drive (label side up and metal end first). Push the diskette into the drive until the eject button extends outside the drive casing.
When the diskette drive in the external media bay accesses data on a diskette, the green diskette-drive access indicator flashes. To remove a diskette from the drive, press the eject button to release the diskette, and then pull the diskette out of the drive.
External Media Bay
Installing and Removing Devices
CD-ROM or DVD-ROM Drive
Diskette Drive SuperDisk LS-120 Drive
NOTE: The Microsoft® Windows NT® operating system does not support DVD functions.
NOTE: High-speed CD-ROM drives spin the CD at a very high rotational speed and may be noisy. If a CD is printed on only half the disc, or if the CD is slightly imbalanced, the imbalance is greatly magnified by the high speed and the noise is louder. This effect is inherent in the high-speed technology and does not indicate a problem with the drive.
NOTE: Before you remove a device from the external media bay, turn off the computer. After you install a device in the external media bay, reboot the computer so that the device is recognized by the operating system.

SuperDisk LS-120 Drive
The computer supports an optional SuperDisk LS-120 drive. The SuperDisk LS-120 drive has an electric (not manual) eject mechanism, so the computer must be powered on before you can eject the disk.
The SuperDisk LS-120 drive combination module spins at a very high rotational speed and may make a whirring sound at start-up. This phenomenon is inherent in the high-speed technology and does not indicate a problem with the drive.
NOTE: The SuperDisk LS-120 drive may not read disks properly if the external media bay is not on a relatively flat surface.

About PC Cards
You can install PC Cards that adhere to PCMCIA standards and Release 4.2 of the JEIDA standard.
The computer supports Type I and Type II PC Cards, including:
l Memory devices
— SRAM cards that emulate diskettes
— RAM cards
— OTP ROM cards
l ATA cards that emulate IDE hard-disk drives
The computer also supports I/O cards, including:
l Modem communication cards
l LAN cards
l Wireless LAN cards
l SCSI cards
l Sound cards
You can also use extended PC Cards in the computer.
The PC Card connector supports CardBus technology and ZV port cards.
Installing PC Cards
PC Cards are generally marked with a symbol (such as a triangle or an arrow) to indicate which end to insert into the slot. The cards are keyed to prevent incorrect insertion. If card orientation is not clear, see the documentation that comes with the card. You can install a PC Card while the computer is running. The PC Card is automatically detected.
To install a PC Card, hold the card with its orientation symbol pointing into the slot and the top side of the card facing up. Insert the card into the slot, and press in firmly until the card is completely seated in the internal PC Card connector. If you encounter too much resistance when you insert the card, do not force the card. Check the card's orientation, and try again.
The computer recognizes most I/O cards and automatically loads the appropriate device driver.
PC Cards
About PC Cards
Installing PC Cards
Removing PC Cards
Configuring PC Cards
NOTES: The Microsoft® Windows NT® operating system does not support ZV or DVD/MPEG functions.
A PC Card is not a bootable device.
"Type" of card refers to its thickness, not its functionality.

PC Card Blanks
Save the blank to use whenever you do not have a PC Card installed. The blank protects the PC Card slot from dust and other particles.
Removing PC Cards
NOTICE: Use the PC Card configuration utility on the taskbar to select and stop a card from functioning before you remove it from the computer. If you do not remove the card in the configuration utility, you could lose data from open application programs.
Press the eject button.
When the button slides out, press it again to release the card.
Gently remove the card.
Press the eject button once more until it is flush with the computer casing.
Configuring PC Cards
When you insert a PC Card into the computer, the operating system automatically loads the appropriate drivers and configures the PC Card for use with the computer. Use one of the following procedures to change the configuration of an installed PC Card.
Microsoft Windows® 98 Operating System
Click the Start button, point to Settings, and then click Control Panel.
Double-click the PC Card icon to open the PC Card (PCMCIA) Properties window.
For more information, check the documentation that came with your operating system.
Microsoft Windows NT Operating System
NOTE: If the configuration program tells you to load the manufacturer's drivers, use the diskette that came with the PC Card.

Click the Start button, point to Settings, and then click Control Panel.
Double-click the Softex PC Card Controller icon to open the Softex PC Card Controller window.
For more information, click the Help tab.

Using This Help
This system Help describes the features and operation of your computer. The Help is organized into sections and topics, which are listed on the Contents tab in the left window pane.
To display the section contents in the right window pane, click a section title or its book icon. Double-click a title or icon to view a list of each section's topics on the Contents tab.
To access a topic, either click the title on the Contents tab, or click the topic title in the menu at the beginning of the section displayed in the right window pane.
Within sections, click the blue underlined text to link to other topics or to activate pop-up definitions. To close a pop-up window, click inside the pop-up window.
You can use the Index tab to find information quickly. Click the Index tab to display an alphabetical list of index entries; then double-click an entry (or type a subject and click the Display button). If more than one topic is available for that entry, a Topics Found dialog box lists the topics. Double-click the topic you want to view.
The Search tab allows you to view topics that contain certain words or phrases you specify.
Click the Back and Forward buttons to browse backward or forward through previously viewed topics in the order you selected them.
Click the Print button to print the topic you are currently viewing, the section currently displayed, or the entire Help.
If you are new to the Microsoft® Windows® operating system, Windows Help can orient you to Windows operations. To access the Windows Help, click the Start button on the Windows desktop, and then click Help.
Conventions
Information Resources
Besides this Help, the following documentation is included with your Dell computer:
l The Getting Started sheet provides step-by-step instructions for connecting your computer.
l The Setup Guide explains how to set up your operating system and use additional hardware devices.
l The Reference and Troubleshooting Guide provides maintenance information, instructions on installing upgrades like memory, and troubleshooting procedures for
solving common problems.
l Operating system documentation.
Documentation is also included with any options you purchase separately from your computer. Installation instructions are provided in the Reference and Troubleshooting Guide.
Preface
Using This Help Conventions Information Resources
Copyright and Trademarks
Visual Cue Indication
Identifies a link in text or graphics that you can select by clicking it.
Blue underlined text
Links to a related topic or to a pop-up window. Click the text to jump to the new topic or to view the pop-up window.
Italics text Identifies variables. Also used for emphasis.
Courier text Identifies text you must type or system messages.
bold text Identifies commands, filenames, directory names, and interface components such as window titles, button and icon names, menu names and selections, and other options that appear on the monitor screen or display.
NOTICE Identifies notices. A notice indicates either potential damage to hardware or loss of data and tells you how to avoid the problem.
Identifies notes. A note conveys important information that helps you make better use of your computer system.
Identifies cautions. A caution indicates a potentially hazardous situation which, if not avoided, may result in minor or moderate injury.
NOTE: Information updates are sometimes included with your computer to describe changes to your computer or software. Always read these updates before consulting any other documentation because the updates often contain the most current information.

Copyright and Trademarks
Information in this document is subject to change without notice. © 1999 Dell Computer Corporation. All rights reserved.
Reproduction in any manner whatsoever without the written permission of Dell Computer Corporation is strictly forbidden.
Trademarks used in this document: Dell, Inspiron, the DELL logo, and DellWare are trademarks of Dell Computer Corporation; Microsoft, Windows, Windows NT, and MS-DOS are registered trademarks of Microsoft Corporation; Intel and Pentium are registered trademarks of Intel Corporation; 3Com is a registered trademark of 3Com Corporation; VESA is a registered trademark of Video Electronics Standards Association. As an ENERGY STAR partner, Dell Computer Corporation has determined that this product meets the ENERGY STAR guidelines for energy efficiency.
Other trademarks and trade names may be used in this document to refer to either the entities claiming the marks and names or their products. Dell Computer Corporation disclaims any proprietary interest in trademarks and trade names other than its own.
November 1999 Version A00

Backing Up Files
It is important to make backups of all your data files. In case of warranty replacement of your hard-disk drive, you will receive a blank, formatted drive from Dell. It is your responsibility to reinstall application programs and restore data files.
No backups need to be made for your operating system, as an operating system CD and boot diskette(s) came with your computer. Additionally, any software you purchase comes with diskettes or CDs.
Your Dell-installed drivers and documentation are preserved on the System Software CD. Use this CD if you ever need to restore the drivers and documentation that came on your Dell-installed hard-disk drive.
Scheduling Backups
Everyone inadvertently deletes files at one time or another, viruses can corrupt files, and hard-disk drives can fail after extended use. To avoid data loss, regularly back up the data files on the hard-disk drive. If you should lose the contents of your hard-disk drive, you can reinstall programs, but your data files will be lost if you do not have a backup.
Dell recommends that you back up the hard-disk drive at least once a week, with a daily backup of those files that have been changed. Following these guidelines ensures the loss of no more than a day's work. As further insurance against data loss, keep duplicate copies of the weekly and monthly backups at an off-site location. Doing so ensures that you lose no more than a week's work, even if one of the on-site backups becomes corrupted.
Backup Devices
Tape, Zip, and SuperDisk LS-120 drives are convenient and affordable devices that can back up data at rates of up to 2 MB/sec and can often run unattended. Dell recommends these drives and their associated backup software for use as system backup devices. Depending on how many data files you have, you can also use diskettes as backup devices.
Virus-Scanning Software and Data Transfers
With thousands of known viruses and with the prevalence of data transfers over telecommunications lines, it is important that you use virus-scanning software to protect your computer. Regularly update your virus-scanning software as described in the software documentation and load updates immediately.
NOTICE: It is particularly important to scan before installing any software from unlicensed sources, either downloaded from the Internet or from diskettes. Making regular backups provides insurance in case a virus does infect your computer.
Cleaning Diskette Drives
You can clean a diskette drive using a commercially available cleaning kit. These kits contain pretreated diskettes to nonabrasively remove contaminants that accumulate during normal operation.
If the kit does not contain instructions, insert a pretreated diskette into the drive and turn on the computer. After 20 or 30 seconds, remove the diskette from the drive.
NOTICE: Do not attempt to clean drive heads with a swab. You may accidentally misalign the heads, rendering the drive inoperable.
Preventive Maintenance
Backing Up Files Scheduling Backups
Backup Devices Virus-Scanning Software and Data Transfers
Cleaning Diskette Drives

Power Conservation Modes
The following power conservation modes are available for use on your computer:
l Standby mode
l Hibernate mode/save-to-disk suspend mode
Standby Mode
Standby mode turns off the display, stops the hard-disk drive, and turns off other internal devices so that the computer uses less battery power. When the computer resumes operation from standby mode, the desktop is restored exactly as it was before the computer entered standby mode.
NOTICE: If you lose AC or battery power while in the standby mode, you may experience data loss.
NOTICE: On computers using the Microsoft® Windows NT® operating system, data loss from RAM may occur if the battery discharges completely when the computer is in standby mode.
For information on activating standby mode, refer to Activating Standby Mode.
Hibernate Mode/Save-to-Disk Suspend Mode
Save-to-disk suspend mode copies all system data to a reserved area on the hard-disk drive and then turns off all power to the computer. When you resume normal operation, the same programs will be running and the same files will be open that were open before you activated this mode.
Place the computer in save-to-disk suspend mode if you do not intend to store the computer for longer than 40 days. Save-to-disk suspend mode preserves the configuration information stored in NVRAM. The reserve battery on the system board maintains this information, but it may run out of charge after 40 days.
Save-to-disk suspend mode helps preserve system data by quickly saving it onto the hard-disk drive if the computer is about to run out of battery power.
Some PC Cards may not operate correctly after exiting from save-to-disk suspend mode. If you encounter problems with a card, remove and replace it.
For information on activating save-to-disk suspend mode, refer to Activating Hibernate Mode/Save-to-Disk Suspend Mode.
Activating Standby Mode
To activate standby mode in the Microsoft Windows® 98 or Windows NT operating system, see the following subsections. To resume normal operation from the standby mode, press the power button or open the display cover.
Your computer automatically enters standby mode if the standby time-out setting of the selected power scheme expires.
Windows 98
Activate standby mode by taking one of the following actions:
l Click the Start button, click Shut Down, click Stand by, and then click OK.
Conserving Power
Power Conservation Modes
Activating Standby Mode
Activating Hibernate Mode/Save-to-Disk Suspend Mode
Using Windows 98 to Conserve Battery Power
Using Windows NT to Conserve Battery Power
Experimenting With Power Conservation
NOTE: Save-to-disk suspend mode requires a special file on your hard-disk drive that sets aside enough disk space to store the contents of the computer's memory. Dell creates an appropriately sized save-to-disk suspend file before shipping the computer to you. If you remove the file or if your hard-disk drive becomes corrupted, you must recreate the file before you can again use save-to-disk suspend mode.
For instructions on creating the file, refer to "Save-to-Disk Suspend Utility" in Chapter 4 of the Reference and Troubleshooting Guide.
NOTES: Opening the display recovers the computer from standby mode only if you programmed the display-close button to put the computer into standby mode (the default). For information on programming the display-close button, refer to Using Windows 98 to Conserve Battery Power or Using Windows NT to Conserve Battery Power.
Pressing a keyboard key or moving the mouse will not bring the computer out of standby mode.

l Close the display or press the button or the sleep key combination, , that you programmed to put the computer into standby mode.
To resume operation from standby mode, press the power button or open the display.
For information on programming your display-close button, power button, or sleep key combination to activate standby mode, refer to Customizing Standby or Hibernate Mode Settings.
For information on power management options, see Using Windows 98 to Conserve Battery Power.
Windows NT
Activate standby mode by pressing . You can also activate standby mode through the Power Management Control window. To resume operation from standby mode, press the power button.
For information on power management options, see Using Windows NT to Conserve Battery Power.
Activating Hibernate Mode/Save-to-Disk Suspend Mode
To activate hibernate mode (Windows 98) or save-to-disk suspend mode (Windows NT), see the following subsections.
Windows 98
Your computer enters hibernate mode (save-to-disk suspend mode) if any of the following events occurs:
l The battery charge level becomes critically low.
l You have either the power button or the sleep key combination, , programmed to put the computer into hibernate mode when pressed.
l You have the display-close button programmed to put the computer into the hibernate mode when you close the display cover.
To resume normal operations from hibernation, press the power button. It may take a few seconds for the computer to return to its previous state.
For information on power management options, see Using Windows 98 to Conserve Battery Power.
For information on programming your display button, power button, or sleep key combination to activate hibernate mode, refer to Customizing Standby or Hibernate Mode Settings.
Windows NT
To activate save-to-disk suspend mode immediately, press (or on the French keyboard). To resume normal operations from save-to-disk suspend mode, press the power button. It may take a few seconds for the computer to return to its previous state.
For information on power management options, see Using Windows NT to Conserve Battery Power.
Using Windows 98 to Conserve Battery Power
To access the Power Management Properties window and set the power management features in Windows 98, perform the following steps:
Click the Start button, point to Settings, and click Control Panel.
Double-click the Power Management Properties icon.
The Power Management Properties window contains the following tabs:
l Power Schemes allows you to select one of three power-mode settings.
l Alarms allows you to set the Low battery alarm and Critical battery alarm to alert you when the battery charge falls below a certain percentage. When you receive
your computer, the Low battery alarm and Critical battery alarm check boxes are selected. Dell recommends that you continue to use these these options.
NOTE: Opening the display recovers the computer from standby mode only if you programmed the display-close button to put the computer into standby mode (the default).
NOTE: Pressing a keyboard key or moving the mouse will not bring the computer out of hibernate mode.
NOTE: Dell recommends that you continue to use the Portable/Laptop power scheme. This power scheme conserves battery power.
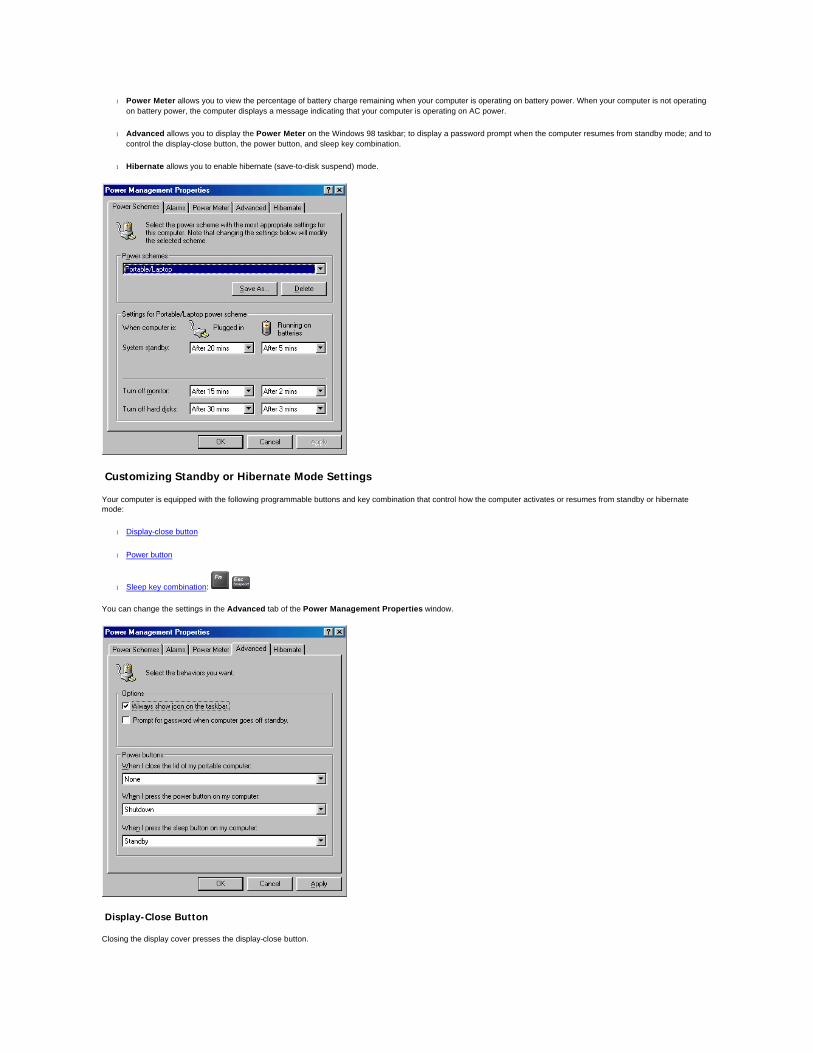
l Power Meter allows you to view the percentage of battery charge remaining when your computer is operating on battery power. When your computer is not operating
on battery power, the computer displays a message indicating that your computer is operating on AC power.
l Advanced allows you to display the Power Meter on the Windows 98 taskbar; to display a password prompt when the computer resumes from standby mode; and to
control the display-close button, the power button, and sleep key combination.
l Hibernate allows you to enable hibernate (save-to-disk suspend) mode.
Customizing Standby or Hibernate Mode Settings
Your computer is equipped with the following programmable buttons and key combination that control how the computer activates or resumes from standby or hibernate mode:
l Display-close button
l Power button
l Sleep key combination:
You can change the settings in the Advanced tab of the Power Management Properties window.
Display-Close Button
Closing the display cover presses the display-close button.

To program the display-close button, in the Advanced tab click an option from the pull-down menu for When I close the lid of my portable computer:, and then click OK.
You can set the computer to perform the following actions whenever you close the display:
l No action (None).
l Activate standby mode (the default).
l Activate hibernate mode (save-to-disk suspend) mode.
l Shut down Windows 98 and turn off the computer.
Power Button
To program the power button, in the Advanced tab click an option from the pull-down menu for When I press the power button on my computer:, and then click OK.
You can set the computer to perform the following actions whenever you press the power button:
l Activate standby mode.
l Activate hibernate mode (the default).
l Shut down Windows 98 and turn off the computer.
Sleep Key Combination
To program the sleep key combination, in the Advanced tab click an option from the pull-down menu for When I press the sleep button on my computer:, and then click OK.
You can set the computer to perform the following actions whenever you press :
l Activate standby mode.
l Activate hibernate mode (the default).
l Shut down Windows 98 and turn off the computer.
Using Windows NT to Conserve Battery Power
To access the Power Management Control window and set the power management features in Windows NT, perform the following steps.
Click the Start button, point to Settings, and click Control Panel.
Double-click the Softex Power Management icon.
The Softex Power Management Control window contains the following tabs:
l Power Status tells you if the computer is using battery power or AC power, the percent of battery charge remaining, and how much battery operating time remains.
l Power Control allows you to put the computer into save-to-disk suspend mode.
l Settings allows you to select one of three power mode settings—Advanced, Standard, and Off. This tab also allows you to enable the low-battery warning and to
place the Power Management icon on or remove it from the taskbar.
Click Advanced to let the operating system and BIOS work together for maximum power savings. You can use the Windows NT Power Management Control window or the Power menu of the system setup program to change power management settings.
Click Standard to allow the BIOS to control all power management settings. You must use the Power menu of the system setup program to change power management settings.
Click Off to disable power management features when you want the maximum performance from the computer.
NOTE: Do not press this button with your finger.
NOTE: To change the settings for the display-close button, you must use the Power menu of the system setup program. Do not press this button with your finger.

Experimenting With Power Conservation
In general, the lower the value you set for each time-out option, the longer your battery's charge lasts. On the other hand, setting high time-out values tends to optimize the computer's performance. For best results, experiment as follows:
l Use the computer with all the options set at their default values.
l Use the computer with all the time-out options disabled or set to Off.
l Use the computer with all the time-out options set to their minimum values.
Evaluate the way that the different time-out settings affect how long you can operate the computer on battery power versus the relative efficiency of how your software performs.

Passwords
When you receive the computer, the password features are disabled so that you can assign passwords. If you assign a password and then forget it, you have limited access to the computer, but you must enter the password to access the system setup program. Refer to Appendix B, "Using the System Setup Program," of the Reference and Troubleshooting Guide for information on assigning a password.
NOTICE: The password features provide a high level of security for the data in the computer. However, they are not foolproof. If your data requires more security, it is your responsibility to obtain and use additional forms of protection, such as data encryption programs or PC Cards with encryption features.
Physically Securing the Computer
The security cable slot lets you attach a commercially available antitheft device to the computer. Antitheft devices for portable computers usually include a segment of metal-stranded cable with an attached locking device and associated key. Complete instructions for installing this kind of antitheft device are usually included with the device. To prevent unauthorized removal of the computer, loop the cable around an immovable object, insert the locking device into the security cable slot, and lock the device.
Disabling the Parallel Port
You can disable the parallel port to prevent unauthorized access to the computer through an external parallel device. To disable the parallel port, perform the following steps:
Enter the system setup program.
Press the right arrow key to select the Advanced screen.
Press the down arrow key to highlight I/O Device Configuration.
Set the Parallel Port option to Disabled.
Disabling the parallel port also prevents the unauthorized downloading of data from that port.
Passwords and Security
Passwords
Physically Securing the Computer
Disabling the Parallel Port
NOTE: Antitheft devices are of differing designs. Before purchasing such a device, make sure it will work with the security cable slot in the computer.

Creating a Shortcut on the Desktop
Open the My Computer window or Windows Explorer.
To open the My Computer window, double-click the My Computer icon on the Microsoft® Windows® desktop.
To open Windows Explorer, right-click the Start button and then click Explore.
Find the item for which you want a shortcut.
Using your right mouse button, click the object and drag it to the Windows desktop.
Release the right mouse button.
A menu appears next to your cursor.
Click Create Shortcut(s) Here.
An icon appears on your desktop that you can double-click to activate the shortcut.
Arranging and Positioning Shortcuts
To individually move shortcuts, point your cursor at the icon, click it, and drag it to the desired location.
To arrange all of your shortcut icons at once, perform the following steps:
Move your cursor to an empty spot on the Windows desktop, and click the right mouse button.
From the pop-up menu, point to Arrange Icons.
Click the option for the icon arrangement you prefer.
The icons are automatically arranged.
Shortcuts
Creating a Shortcut on the Desktop
Arranging and Positioning Shortcuts

The most specific specifications for your computer are available on Dell’s World Wide Web support site at http://support.dell.com. Enter your service tag sequence and click Submit. The service tag is shown on the bottom of the computer.
If you don’t have a service tag available, you can still access the support information, but you have to click through a series of menus to locate the information specific to your computer.
Microprocessor
Chip Set and Bus
PC Cards
Memory
Connectors
Specifications
Microprocessor
Chip Set and Bus
PC Cards
Memory
Connectors
Audio
Video
Display
Touch Pad
Keyboard
Physical
Battery
AC Adapter
Environmental
Microprocessor type and speed Intel® mobile microprocessor
External bus frequency 100 MHz
Math coprocessor Internal to the microprocessor
System chip set Intel Mobile 443BX/PII4m
Data bus width 64 bits
DRAM bus width 64 bits
Address bus width 32 bits
Flash EEPROM 4 Mb
AGP bus 66 MHz
PCI bus 33 MHz
PCI controller Texas Instruments PCI 1211 CardBus controller
PC Card connector one (supports Type I and Type II cards, including ZV cards on computers using the Microsoft® Windows® 98 operating system)
Cards supported 3.3-V and 5-V cards
PC Card connector size 68 pins
Data width (maximum) 32 bits
Architecture SDRAM
Memory module sockets one
Memory module capacities 64- or 128-MB 3.3-V SDRAM module
Minimum RAM 64 MB
Maximum RAM 128 MB
Memory access time/clock frequency 100 MHz

Audio
Video
Display
Touch Pad
Keyboard
Parallel 25-hole connector; normal (unidirectional), bidirectional, or ECP
IDE IDE connector for external media bay
Video 15-hole connector
PS/2 6-hole mini-DIN connector
Audio microphone (minijack) and headphones/speaker
USB 4-pin connector
Modem RJ-45 connector
NIC RJ-11 connector
Docking 240-pin connector (not supported)
Audio type Sound Blaster (software emulation-capable)
Audio controller NeoMagic NMG5+AC97 CODEC
Conversion 16 bit (stereo analog-to-digital and digital-to-analog)
Interfaces:
Internal PCI bus/AC97
External microphone (minijack) and headphones/speaker
Speaker 2.5-ohm speaker
Internal speaker amplifier 0.5 W
Volume controls Key combinations and application program menus
Video type 256-bit hardware-accelerated 2X AGP
Data bus AGP
Video controller NeoMagic NM220
Video memory 2.5 MB
Type SVGA, active-matrix color (TFT)
Maximum resolution/colors 800 x 600 pixels; 262, 144 colors
Operating angle 0° (closed) to 180°
Response time (typical) 50 ms rise; 20 ms fall
Dot pitch 0.30 mm
Power consumption:
Panel (typical) 8.3 W
Backlight 2.9 W
Controls brightness can be controlled through a key combination
Interface PS/2-compatible
X/Y position resolution (graphics table mode) 20 points/mm (500 points/inch)
Size:
Thickness 0.69 ± 0.15 mm (0.027 ± 0.006 inch) at highest component
Width (sensor-active area) 64.88 mm (2.55 inches)
Height 48.88 mm (1.92-inch rectangle)
Weight 6.0 ± 0.5 g (0.21 oz)
Power:
Supply voltage 5 V ± 10%
Supply current 4.0 mA (normal operating)
Key travel 2.5 ± 0.2 mm (0.098 ± 0.008 inch)
Key spacing 18.0 mm (0.70 inch)

Physical
Battery
AC Adapter
Environmental
Height 25.7 mm (1.01 inches)
Width 272.0 mm (10.7 inches)
Depth 220.0 mm (8.66 inches)
Weight 1.665 kg (3.67 lb) with 6-cell battery 1.618 kg (3.57 lb) with 4-cell battery
Type lithium ion
Height 12.7 mm (0.5 inch)
Depth 58.8 mm (2.31 inches)
Width 159.1 mm (6.26 inches)
Weight 214.0 g (0.47 lb) for 4-cell; 288.0 g (0.63 lb) for 6-cell
Voltage 14.8 VDC for 4-cell; 11.10 VDC for 6-cell
Capacity 23 WH for 4 cell; 34 WH for 6 cell
Charge time (approximate) 1.5 hours (computer on or off)
Operating time (approximate, with no power management features enabled)
2 hours (fully charged 6-cell), 1 hour (fully charged 4-cell)
Life span (approximate) 350 discharge/charge cycles; 2000 partial charges
Temperature range:
Charge 0° to 40°C (32° to 104°F)
Storage –20° to 60°C (–4° to 140°F)
Input voltage 100 to 240 VAC
Input current (maximum) 1.5 A
Input frequency 50 to 60 Hz
Output current 2.64 A (maximum)
Rated output voltage 19.0 VDC
Physical:
Height 29 mm (1.14 inches)
Width 46.3 mm (1.82 inches)
Depth 108 mm (4.25 inches)
Weight (with cables) 355 g (0.78 lb)
Temperature range:
Operating 0° to 40°C (32° to 104°F)
Storage –20° to 60°C ( –4° to 140°F)
Altitude:
Operating –18 to 3048 m (–59 to 10,000 ft)
Storage –18 to 10,600 m (–59 to 35,000 ft)
Temperature:
Operating 0° to 40°C (32° to 104°F)
Storage –20° to 65°C (–4° to 149°F)
Relative humidity (maximum):
Operating 10% to 90% (noncondensing)
Storage 5% to 95% (noncondensing)
Maximum vibration:
Operating 0.9 GRMS using a random-vibration spectrum that simulates user environment
Storage 1.3 GRMS using a random-vibration spectrum that simulates shipment by air/truck
Maximum shock:
Operating 152.4 cm/sec (60 inches/sec) (equal to a half-sine pulse width of 2 ms)
Storage 203.2 cm/sec (80 inches/sec) (equal to a half-sine pulse width of 2 ms)

Hardware Features
Your computer includes the following hardware features:
l An Intel® mobile microprocessor incorporating the latest processor technology.
l A minimum of 64 MB of SDRAM system memory, with support for a maximum of 128 MB.
l An external media bay in which you can install a diskette drive, CD-ROM drive, DVD-ROM drive, or SuperDisk LS-120 drive.
l A 256-bit hardware-accelerated NeoMagic NM2200 AGP video controller with 2.5 MB of video memory.
l An active-matrix SVGA TFT color display.
l NeoMagic NMG5+AC97 CODEC audio controller with software wavetable support.
l Integrated stereo speakers and microphone.
l Miniature DIN connectors for connecting external speakers, headphones, or an external microphone to the computer.
l Ultra DMA/33 data transfer protocol for ATA/IDE hard-disk drive interface. Ultra DMA/33 allows data transfer rates of up to 33 MB/sec.
l An integrated keyboard that includes two special keys that support the Windows operating systems.
l A PS/2-compatible touch pad that provides full mouse functionality. This pointing device is positioned for both left- and right-handed users. You can also perform many
pointing functions by tapping the touch pad. Click-and-drag buttonless functions are also supported.
l USB capability, which simplifies connecting peripheral devices such as mice, printers, and computer speakers. The USB port connector on your computer's back panel
provides a single connection point for multiple USB-compliant devices such as keyboards, mice, printers, and computer speakers. Also, you can connect and disconnect USB-compliant devices while the computer is running.
l A lithium-ion battery in the battery bay. The battery charges in approximately 1.5 hours, whether the computer is turned on or off.
l A PC Card slot with one 3.3- or 5-V connector. The PC Card connector supports CardBus technology and ZV port cards.
l One parallel port connector that can be set to unidirectional, bidirectional, or ECP mode.
l One PS/2 keyboard/mouse port connector.
l An integrated 56-Kbps V.90 controllerless modem with support for telephone hardware worldwide.
l An integrated 3Com® 10/100-BASETX PCI bus master Ethernet NIC.
l A security cable connector to which you can attach a security cable to prevent unauthorized removal of the computer.
System Features
Hardware Features Software Features Front View
Back View Bottom View
NOTES: Your computer was shipped with a diskette drive in the media bay. For information on removing the diskette drive and installing a different device in the bay, see "Using the Media Bay" in Chapter 2 of the Reference and Troubleshooting Guide.
Because the Microsoft Windows NT® operating system does not support DVD technology, the DVD-ROM drive is available only on computers that use
the Windows® 98 Second Edition operating system.
NOTES: Windows NT does not support USB functions.
If you attach a USB device that was not included in your original system configuration, you may need to install a specific driver for that device to obtain its full functionality. Contact the USB device manufacturer for more information.
NOTE: Windows NT does not support zoomed video functions.
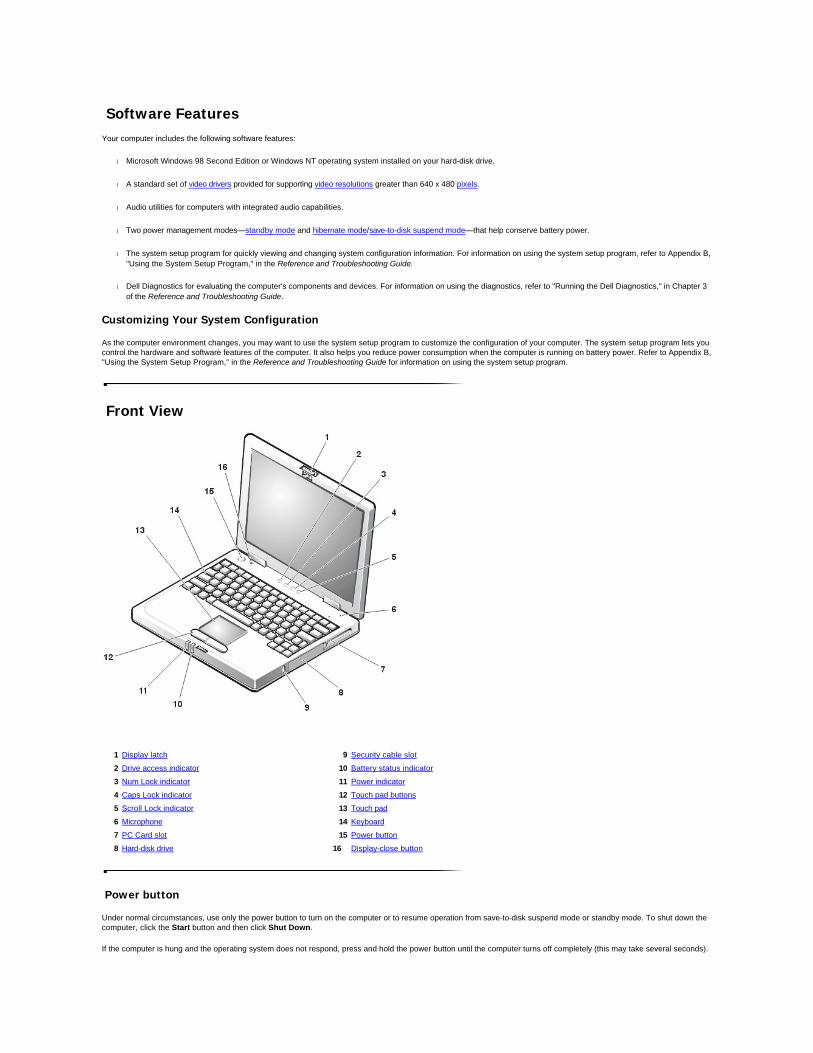
Software Features
Your computer includes the following software features:
l Microsoft Windows 98 Second Edition or Windows NT operating system installed on your hard-disk drive.
l A standard set of video drivers provided for supporting video resolutions greater than 640 x 480 pixels.
l Audio utilities for computers with integrated audio capabilities.
l Two power management modes—standby mode and hibernate mode/save-to-disk suspend mode—that help conserve battery power.
l The system setup program for quickly viewing and changing system configuration information. For information on using the system setup program, refer to Appendix B,
"Using the System Setup Program," in the Reference and Troubleshooting Guide.
l Dell Diagnostics for evaluating the computer's components and devices. For information on using the diagnostics, refer to "Running the Dell Diagnostics," in Chapter 3
of the Reference and Troubleshooting Guide.
Customizing Your System Configuration
As the computer environment changes, you may want to use the system setup program to customize the configuration of your computer. The system setup program lets you control the hardware and software features of the computer. It also helps you reduce power consumption when the computer is running on battery power. Refer to Appendix B, "Using the System Setup Program," in the Reference and Troubleshooting Guide for information on using the system setup program.
Front View
Power button
Under normal circumstances, use only the power button to turn on the computer or to resume operation from save-to-disk suspend mode or standby mode. To shut down the computer, click the Start button and then click Shut Down.
If the computer is hung and the operating system does not respond, press and hold the power button until the computer turns off completely (this may take several seconds).
1 Display latch 9 Security cable slot
2 Drive access indicator 10 Battery status indicator
3 Num Lock indicator 11 Power indicator
4 Caps Lock indicator 12 Touch pad buttons
5 Scroll Lock indicator 13 Touch pad
6 Microphone 14 Keyboard
7 PC Card slot 15 Power button
8 Hard-disk drive 16 Display-close button

Display-close button
When you close the display, this button activates a power conservation mode, such as standby mode. For information on power conservation or programming this button, refer to Conserving Power.
Display latch
To unlock the display, lift up on the display latch. To close the display, push it down toward the keyboard. When you hear a click, the display is locked in place.
Drive access indicator
Illuminates when the computer reads from or writes to the hard-disk drive.
Num Lock indicator
The green Num Lock indicator illuminates when you press .
Caps Lock indicator
The green Caps Lock indicator illuminates when you press .
Scroll Lock indicator
The green Scroll Lock indicator illuminates when you press .
Microphone
The internal microphone allows you to record audio from a distance of 1 m (3.3 ft ).
PC Card slot
The PC Card slot has one connector that supports Type I and Type II PC Cards.
Hard-disk drive
The hard-disk drive stores all of the software and data files Dell installed on your computer, including the Windows operating system.
Security cable slot
The security cable slot lets you attach an antitheft device to the computer.
Battery status indicator
The battery status indicator on the front of the computer indicates when the battery is charging (amber) and when the charge cycle is complete (green).
Power indicator
The power indicator illuminates when the computer is turned on.
Touch pad buttons
Use the touch pad buttons in the same way that you would use mouse buttons.
Touch pad
The PS/2-compatible touch pad gives the computer full mouse functionality.
Keyboard
The keyboard includes an embedded numeric keypad as well as two keys that support the Windows operating systems.
Back View
NOTE: Do not press this button with your finger.

USB port connector
Use the USB port connector to attach a USB device, such as a mouse, to the computer. USB is a peripheral bus standard that enables automatic detection of USB-compliant peripheral devices.
Speakers and headphones (line-out/speaker-out) jack
Connect headphones or speakers to the speaker-out (line-out) jack.
Microphone (MIC IN) jack
Connect an external microphone to the MIC IN jack.
Fan exhaust vent
The fan works with the air intake as part of the computer's automatic thermal management system. When operating conditions make it necessary, the small internal fan turns on and helps draw air through the air intake.
NOTICE: To avoid overheating the computer, do not place the external media bay close to the air intake or fan exhaust vent.
Air intake
The air intake works with the fan as part of the computer's automatic thermal management system. When operating conditions make it necessary, a small internal fan turns on and helps draw air through the air intake.
NOTICE: Do not push objects into the air intake. Keep the opening free from dust and other foreign particles. When you use the computer, do not block the air intake.
PS/2 connector
Use the 6-hole, miniature DIN PS/2 connector to attach PS/2-compatible devices such as a mouse, keyboard, or external numeric keypad.
1 USB port connector 8 AC adapter connector
2 Speakers and headphones (line-out/speaker-out) jack 9 External media bay connector
3 Microphone (MIC IN) jack 10 Parallel connector
4 Fan exhaust vent 11 Video connector
5 External media bay 12 Modem connector
6 Air intake 13 NIC connector
7 PS/2 connector
NOTE: Windows NT does not support USB functions.
CAUTION: Do not push objects into the fan opening. Doing so can cause fire or electric shock to the interior components. Keep the opening free from dust and other foreign particles. When you use the computer, do not block the fan opening.
NOTE: If the computer is in save-to-disk suspend mode when you attach a mouse, you can use the mouse when the computer resumes normal operation.

AC adapter connector
Use this connector to attach an AC adapter to the computer.
External media bay connector
Use this connector to connect the external media bay.
NOTICE: When you remove the media bay cable from the computer or a device, press in on the cable securing clips while pulling the cable connector straight out. Do not insert or pull out the connector at an angle.
Parallel port connector
Use the 25-hole parallel port connector to attach a parallel device to the computer. The parallel port connector is used primarily for printers.
Video connector
Use the 15-hole video connector to attach an external monitor to the computer.
Modem connector
You can connect a telephone line to the integrated modem through the RJ11 modem connector on the back of the computer.
NOTICE: Do not confuse the modem and NIC connectors on your computer. Do not plug a telephone line into the NIC connector.
NIC connector
You can connect to the integrated NIC through the RJ45 connector on the back of the computer.
NOTICE: Do not confuse the modem and NIC connectors on your computer. Do not plug a telephone line into the NIC connector.
External media bay
NOTICE: To avoid overheating the computer, do not place the external media bay close to the air intake or fan exhaust vent.
NOTICE: When a device is not inside the external media bay, the device is fragile and must be handled carefully to avoid damage. Do not press down on it or place a heavy object on top of it. Place extra devices in a travel case to keep them free of dust and liquids. Store devices in a safe place.
The external media bay can hold one of the following devices:
l Diskette drive
l CD-ROM drive
l DVD-ROM drive
l SuperDisk LS-120 drive
Bottom View

Reset switch access hole
If the operating system locks up and does not respond to the power button, you can restart the computer using the reset switch. To do so, straighten a paper clip and press it into the reset switch access hole for about one second.
Speaker
You can increase the volume on your integrated stereo speakers or external speakers by pressing and decrease speaker volume by pressing .
Battery bay latch
Slide the battery bay latch to the unlock position, causing the battery to pop up slightly on one side. While keeping the latch in the unlock position, pivot the battery up and out of the bay. Release the latch.
Battery charge gauge
To check the charge level, press the battery test button. The appropriate number of indicators lights up for a few seconds to indicate the amount of charge remaining in the battery.
Battery
The computer is shipped with a partially charged battery in the battery bay. Dell recommends that you connect an AC adapter to the computer and fully charge the battery as soon as possible after you unpack the computer.
1 Docking connector (not supported) 6 Speaker
2 Reset switch access hole 7 Battery bay latch
3 Microphone (MIC IN) jack 8 Battery charge gauge
4 Speakers and headphones (line-out/speaker-out) jack 9 Battery
5 USB port connector 10 Hard-disk drive
NOTE: Certain audio utilities installed on your computer also allow you to control speaker volume.

Touch Pad
You use the touch pad in place of the mouse. It detects the position of your finger over a touch-sensitive area and provides the computer with full mouse functionality. The touch pad's two buttons correspond to the left and right buttons on a standard mouse.
l To move the cursor, lightly slide your finger over the smooth sensor area.
l To select an object, gently tap once on the surface of the touch pad.
l To select and move (or drag) an object, position the cursor on the object and tap down-up-down on the touch pad. On the second down motion, leave your finger on the
touch pad and move the selected object by sliding your finger across the surface.
l To double-click an object, position the cursor on the object and then tap twice.
To customize touch pad and cursor features, perform the following steps:
Click the Start button, point to Settings, and then click Control Panel.
The Control Panel window appears.
Double-click the Mouse icon.
To use the touch pad, the Internal Pointing Device option in the System Devices menu of the Setup program must be set to Auto Disable. Dell has already installed the touch pad drivers for you. See Connecting External Devices for instructions on changing this option.
Keyboard
Embedded Numeric Keypad
As you work, you may want to use the embedded numeric keypad to enter numbers in spreadsheet or financial programs. The embedded numeric keypad shares some of the keys on your computer's keyboard. The keypad numbers and symbols are marked on the right of the keypad keys.
To activate the embedded numeric keypad, press (the Num Lock indicator illuminates). Press and hold to toggle between the letter and number keys.
Embedded Numeric Keypad Keys and Key Combinations
Using the Touch Pad and Keyboard
Touch Pad Keyboard
NOTE: Keep your fingers away from the touch pad while the computer is booting or loading the operating system. If you touch the touch pad at either time, the cursor will not move until you remove your finger from the touch pad surface.
When Keypad Is On Purpose
<key>
Temporarily disables the embedded numeric keypad; enables the lowercase characters/functions of the keyboard
<key>
Temporarily disables the embedded numeric keypad; enables the uppercase characters/functions of the keyboard
NOTE: The embedded numeric keypad is automatically disabled if you connect an external keyboard or keypad to the computer.

Display Key Combinations
Power Conservation Key Combinations
Speaker Key Combinations
System Functions Key Combinations
Each time you press this key combination, the computer switches the video image to the next display in the following sequence: the integrated display, an external monitor, and both displays simultaneously.
Incrementally increases brightness.
Incrementally decreases brightness.
In Windows 98, activates the power conservation mode of your choice. For information on programming this key combination for Windows 98, see Customizing Standby or Hibernate Mode Settings.
In Windows NT, activates standby mode.
(or on a French keyboard)
In Windows NT, activates save-to-disk suspend mode.
Increases the volume of the integrated speakers and the external speakers, if attached
Decreases the volume of the integrated speakers and the external speakers, if attached
Restarts (reboots) the computer
Enables and disables the embedded numeric keypad
Enables and disables scroll lock
Identifying Your Computer
l As an antitheft measure, assign a password to prohibit unauthorized access to the computer.
l Write down your service tag sequence and put it in a safe place separate from the computer or carrying case. If the computer is lost or stolen, use the service tag
sequence when reporting to law enforcement officials and to Dell. The service tag is on a bar code label near the regulatory label on the underside of your computer.
l Use a text editor (such as Microsoft® Windows® Notepad) to create a file in your root directory called if_found. Place information such as your name, address, and telephone number in this file. (See the documentation that came with your operating system for instructions on using the appropriate text editor.)
l Attach your business card or other name tag to the computer.
l Contact your credit card company, and ask if it offers coded identification tags that allow your property to be returned to you without the risk of revealing your name,
address, or telephone number.
l Use a permanent marking or stenciling device to write your driver's license number or some other unique identifying mark on the computer. If a lost or stolen computer
is recovered, such marking identifies the computer as your property.
Service Tag Sequence
The service tag sequence is a bar code label near the regulatory label on the underside of your computer. The sequence is unique to your computer.
Getting Ready to Go
Remove any external devices attached to the computer. Store them in a safe place. Remove any cables attached to an installed PC Card (you do not have to remove the PC Card).
To maximize battery operating time, check the charge on your batteries. Then fully charge the battery and any spare batteries you plan to carry with you.
Turn off the computer or enter hibernate mode/save-to-disk suspend mode.
NOTICE: When you disconnect the AC adapter from the computer, grasp the adapter cable's connector, not the cable itself, and pull firmly but gently to avoid damaging the cable.
Disconnect the AC adapter.
NOTICE: When the display is closed, extraneous items on the keyboard could damage the display.
Remove any extraneous items, such as paper clips, pens, paper, or notebooks, from the keyboard. Then close the display.
Pack all your computing accessories.
With the optional Dell™ carrying case, you can pack the computer and its accessories together.
Travel Tips
NOTICE: Do not use the CD-ROM or DVD-ROM drive while the computer is in motion. Doing so could interrupt the flow of data to and from the CD-ROM or DVD-ROM drive and the hard-disk drive or diskette drive.
l Consider changing the settings of your power management options to maximize battery operating time if you will be using battery power for extended periods.
Traveling With the Computer
Identifying Your Computer
Getting Ready to Go
Travel Tips
If Your Computer Is Lost or Stolen
Traveling by Air
Packing Your Computer and Accessories
NOTE: Follow the portable computer travel tips, and take special precautions if you are planning to travel by air.

l If you are traveling internationally, carry proof of ownership to speed your passage through customs. If the computer is provided by your employer, carry documentation
of your right to use the computer. Investigate the customs regulations of the countries you plan to visit and consider acquiring an international carnet from your government if you travel through many different countries.
l Make sure that you know which electrical outlets are used in the countries you will visit, and have appropriate power adapters.
l Power interruptions can occur frequently in some countries. Always have a charged battery available if you travel abroad.
l Credit card holders should check with their credit card companies for information about the kinds of emergency travel assistance they offer to users of portable
computers. Many companies provide services that help you solve problems, such as quickly locating diskettes or providing a direct-dial telephone line for your modem connection.
If Your Computer Is Lost or Stolen
Call a law enforcement agency to report the lost or stolen computer.
Include the service tag sequence in your description of the computer. Ask that a case number be assigned and write down the case number. Also write down the name, address, and telephone number of the law enforcement agency. If possible, obtain the name of the investigating officer.
If you know where the computer was lost or stolen, call a law enforcement agency in that area. If you do not know, call a law enforcement agency where you live.
If the computer belongs to a company, notify the security office of the firm.
Call Dell customer technical support to report the missing computer.
Provide the computer's service tag sequence, the case number, and the name, address, and telephone number of the law enforcement agency to which you reported the missing computer. If possible, give the name of the investigating officer.
The Dell support technician will log your report under the computer's service tag sequence and flag the computer as missing or stolen. If someone calls Dell for technical assistance and gives your service tag sequence, the computer is identified automatically as missing or stolen. The technician will attempt to get the phone number and address of the caller. Dell will then contact the law enforcement agency to which you made the report of the missing or stolen computer.
Traveling by Air
l Be sure to have a charged battery or the AC adapter and power cable available in case you are asked to turn on the computer.
l Do not check the computer as baggage.
l Do not put the computer through a metal detector.
NOTICE: Have airport security personnel check the computer by hand. If the computer passes through a metal detector, data loss may occur. If you must pass the computer through a metal detector, first remove the hard-disk drive.
l The computer can go through an airport X-ray security machine.
l Before you use the computer on an airplane, check the in-flight magazine or ask the flight crew to verify that such usage is permitted. Some airlines forbid the use of
electronic devices during the flight. All airlines forbid the use of electronic devices during takeoff and landing.
Packing Your Computer and Accessories
l Consider packing the following accessories when you travel:
— External media bay and its cable
— Additional storage devices such as the CD-ROM and diskette drives
— Spare batteries
— AC adapter and power cable
— Backup diskettes
— Appropriate printer driver files if you will be using a printer
— Cables for PC Cards (such as modem and network cards)
— Power adapters for foreign electrical outlets and modem cable adapters for foreign telephone networks
— Operating system CD

— System driver CD
l Dell has several carrying cases that protect the computer and accessories during travel.
l If you pack the computer in a suitcase, do not pack so tightly that the computer display breaks or so loosely that the computer slides around.
l Avoid packing the computer with items such as shaving cream, colognes, perfumes, or food.
l Protect the computer, the batteries, and the hard-disk drive from hazards such as extreme temperatures and overexposure to sunlight, dirt, dust, or liquids.
l Pack the computer so that it does not slide around in the trunk of your car or in an overhead storage compartment.
l If you are carrying a hard-disk drive separately from your computer, protect the drive from exposure to static electricity by placing it in the case you received it in or in
an antistatic bag, or wrapping it in a nonconductive fabric.
NOTICE: Carefully handle the hard-disk drive only by its carrier; do not touch the drive itself. The drive comes in a metal carrier for protection and easy installation. The drive is vulnerable to static electricity and scratches when outside the computer because the drive carrier protects only the sides of the drive, leaving the top and bottom of the drive exposed.
NOTICE: When a device is not inside the external media bay, the device is fragile and must be handled carefully to avoid damage. Do not press down on it or place a heavy object on top of it. Place extra devices in a travel case to keep them free of dust and liquids. Store devices in a safe place.

Accessing Programs
Click the Start button, and then point to Programs.
In the Programs menu, a folder icon appears next to program groups with multiple programs.
Click the program you want to start.
Title Bars
Each program and document has a title bar at the top of the window that displays the title of the window. The title bar includes three small icons on the right side. Each icon's function is described below.
Temporarily Disabling Virus-Scanning Software
When you install commercially available software, you may be prompted to temporarily disable any virus-scanning program running on your computer. To temporarily disable virus protection, perform the following steps.
NOTICE: When you disable virus-scanning software, your computer cannot detect viruses.
Locate the McAfee VirusScan Scheduler icon, , and the McAfee VShield icon, , in the Microsoft® Windows® taskbar.
Right-click each icon and select Exit.
Install the software package according to the manufacturer's instructions.
Restart the computer to enable the McAfee VirusScan program.
Run the McAfee VirusScan program to check for viruses.
Installing and Configuring Additional Software
If you are unsure whether Dell installed a particular software package you ordered, you can quickly check by clicking the Start button, pointing to Programs, and scanning the programs listed in the Programs menu. If the program is listed, it is already installed and you do not need to reinstall it from the diskettes or CDs you received with your computer. Store the diskettes and CDs in a safe place.
Before you install any new software, check the program's specifications to ensure that it is designed to run on your computer's installed hardware and software. For example, many software packages list the microprocessor, minimum memory configuration, and hard-disk drive space required for proper operation. They also list the operating system versions that are compatible with the software.
To install or configure new software on your computer, follow the manufacturer's instructions. If a program fails to install or run properly, contact the software manufacturer for technical support.
Using and Installing Software
Accessing Programs
Title Bars Temporarily Disabling Virus-Scanning Software
Installing and Configuring Additional Software
Removing Software
Windows Help
Click the minimize button to close the window and still leave the program running. You can restore the program at any time by clicking its button on the taskbar.
Click the maximize button to size the window to the screen. Click to return the window to its original size.
Click the close button to close the document or program.
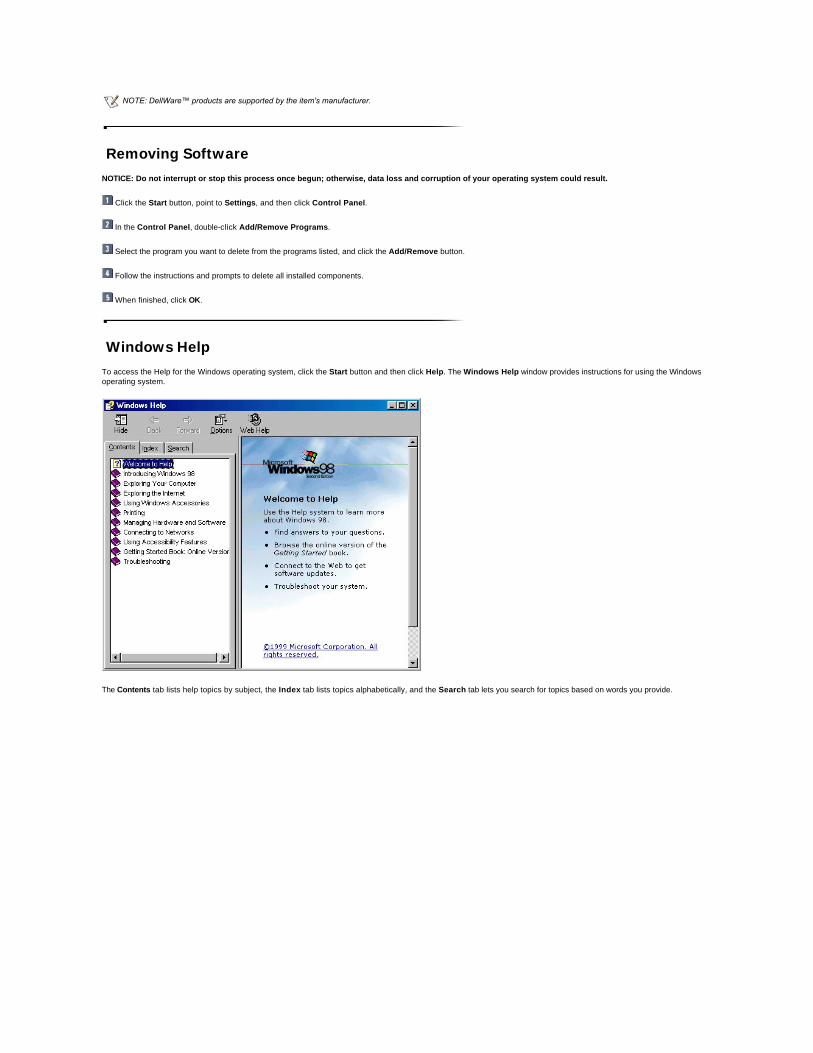
Removing Software
NOTICE: Do not interrupt or stop this process once begun; otherwise, data loss and corruption of your operating system could result.
Click the Start button, point to Settings, and then click Control Panel.
In the Control Panel, double-click Add/Remove Programs.
Select the program you want to delete from the programs listed, and click the Add/Remove button.
Follow the instructions and prompts to delete all installed components.
When finished, click OK.
Windows Help
To access the Help for the Windows operating system, click the Start button and then click Help. The Windows Help window provides instructions for using the Windows operating system.
The Contents tab lists help topics by subject, the Index tab lists topics alphabetically, and the Search tab lets you search for topics based on words you provide.
NOTE: DellWare™ products are supported by the item's manufacturer.

Taskbar
The gray area at the bottom of the screen is called the taskbar. The taskbar contains the Start button on the left and a clock on the right. You may also see other icons on the taskbar, depending on your computer's software and hardware features.
Each time you open a program, a button for that program appears on the taskbar. You can click the buttons to toggle between open programs.
Start Button
The Start button provides access to the contents of your computer. When you click the Start button on the Windows desktop, a menu appears that shows the system's main program and program group icons.
Menu items and their functions are described below.
My Computer
When you double-click the My Computer icon, a window appears with icons that represent the contents of your computer (installed drives, the Control Panel, printers, and so on).
Windows® Desktop
Taskbar Start Button My Computer Recycle Bin
Internet Explorer
Control Panel
Programs displays a list of installed programs you can start.
Favorites displays a list of favorite Web content and sites.
Documents displays a list of most-recently opened documents.
Settings displays a list of user-configurable system components, including the Control Panel.
Find displays a menu to help you find files, folders, or computers to which you are connected.
Help opens the Windows Help window that provides instructions for using the Windows operating system.
Run displays a window for starting a program or opening a file with an MS-
DOS® command.
Log Off logs off the current user so that a new user can log onto the system.
Shut Down displays a window with options for shutting down, restarting, or logging off the computer system.
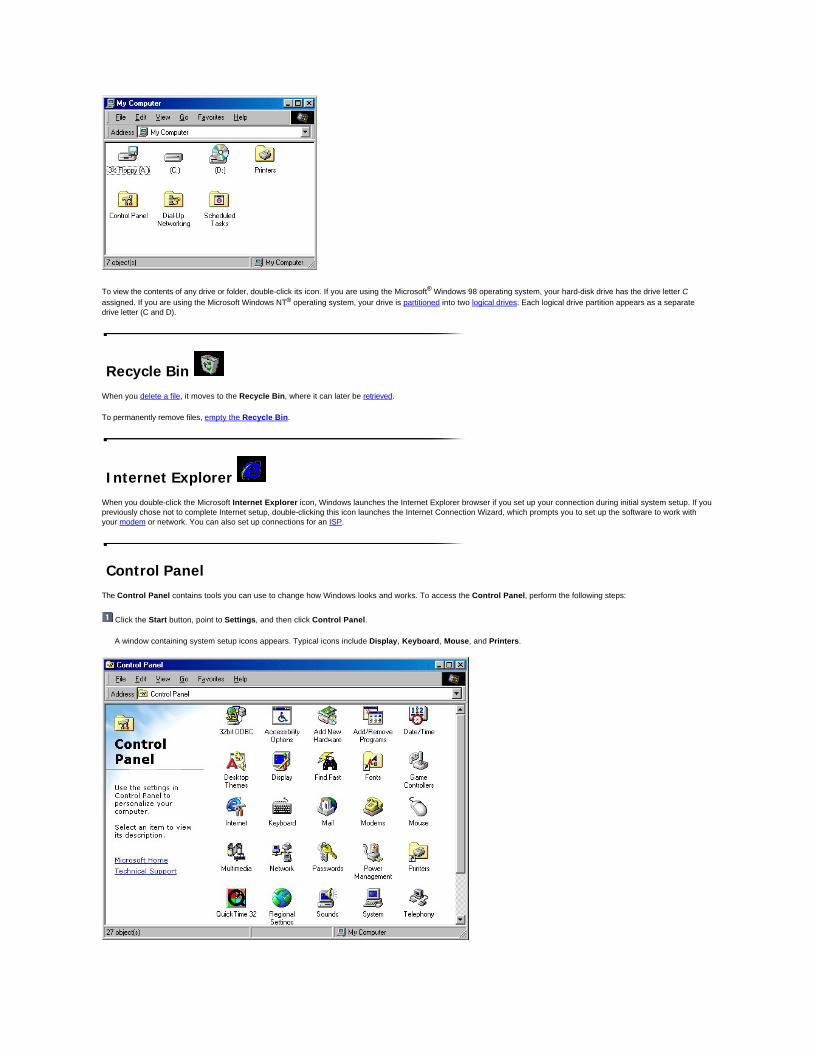
To view the contents of any drive or folder, double-click its icon. If you are using the Microsoft® Windows 98 operating system, your hard-disk drive has the drive letter C
assigned. If you are using the Microsoft Windows NT® operating system, your drive is partitioned into two logical drives. Each logical drive partition appears as a separate drive letter (C and D).
Recycle Bin
When you delete a file, it moves to the Recycle Bin, where it can later be retrieved.
To permanently remove files, empty the Recycle Bin.
Internet Explorer
When you double-click the Microsoft Internet Explorer icon, Windows launches the Internet Explorer browser if you set up your connection during initial system setup. If you previously chose not to complete Internet setup, double-clicking this icon launches the Internet Connection Wizard, which prompts you to set up the software to work with your modem or network. You can also set up connections for an ISP.
Control Panel
The Control Panel contains tools you can use to change how Windows looks and works. To access the Control Panel, perform the following steps:
Click the Start button, point to Settings, and then click Control Panel.
A window containing system setup icons appears. Typical icons include Display, Keyboard, Mouse, and Printers.

Double-click an icon to see the settings that you can change for that item.
NOTE: The icons in the Control Panel vary depending on the hardware and software configuration of your computer. Click an icon to display a short description of its settings.