Using Skype for Business 2016 - University of Houston · emoticon (smiley face) to choose from an...
25
Using Skype for Business 2016 for Windows
Transcript of Using Skype for Business 2016 - University of Houston · emoticon (smiley face) to choose from an...
Using Skype for Business 2016 for Windows

Contents
Sign‐in to Skype for Business ....................................................................................................... 1 The Skype for Business Window ................................................................................................. 3 Add a Contact ............................................................................................................................... 4 Create a Contact Group ................................................................................................................ 4 One‐click Calling ........................................................................................................................... 5 Answer a Call ................................................................................................................................ 5 Send an Instant Message (IM) ...................................................................................................... 5 Set‐up Voice Mail ......................................................................................................................... 5 Listen to Voice Mail in Outlook .................................................................................................... 6 Listen to Voice Mail in Skype for Business .................................................................................. 6 View Missed Calls in Outlook ....................................................................................................... 6 View Missed Calls in Skype for Business ...................................................................................... 7 Information for Skype for Business Meetings and Conference Calls .......................................... 7 Schedule a Phone Conference or Skype for Business Meeting in Outlook ................................. 8 Call Forwarding ............................................................................................................................ 8 Transfer a Call ............................................................................................................................... 9 Saved Conversations .................................................................................................................... 9 Set a Picture ................................................................................................................................. 9
Audio/Video Device Settings ................................................................................................. 10 Set Your Presence ................................................................................................................. 10 Change Your Personal Options.............................................................................................. 11 Self Help ................................................................................................................................ 11
Advanced Skype for Business Features ........................................................................................ 12 Start a Conference Call .......................................................................................................... 12 Dial a Long Distance Number ................................................................................................ 13 Add a Long Distance Number to a Conference Call .............................................................. 13 Start a Video Call ................................................................................................................... 13 Share Your Desktop or a Program ......................................................................................... 14 Transfer a File ........................................................................................................................ 14 Make a Video Recording of a Meeting.................................................................................. 14 Federated Contact List .......................................................................................................... 15
Administrative Work Group .......................................................................................................... 16 Assign a Delegate .................................................................................................................. 16 Response Group .................................................................................................................... 17
Dialing 911 with Skype for Business ............................................................................................ 17

USING SKYPE FOR BUSINESS 2016 3
To open Skype for Business:
• Click Start. • Select All Programs. • Select Microsoft Office 2016. • Select Skype for Business 2016.
To Sign‐in to Skype for Business 2016:
• Type your full Exchange email address (not an alias) in the Sign‐in Address field. An Exchange email address ends with central.uh.edu.
• Click Sign In. If someone other than you is logged into the computer you are using, Skype for Business requests your CougarNet password for verification.
Sign in to Skype for Business
USING SKYPE FOR BUSINESS 2016 4
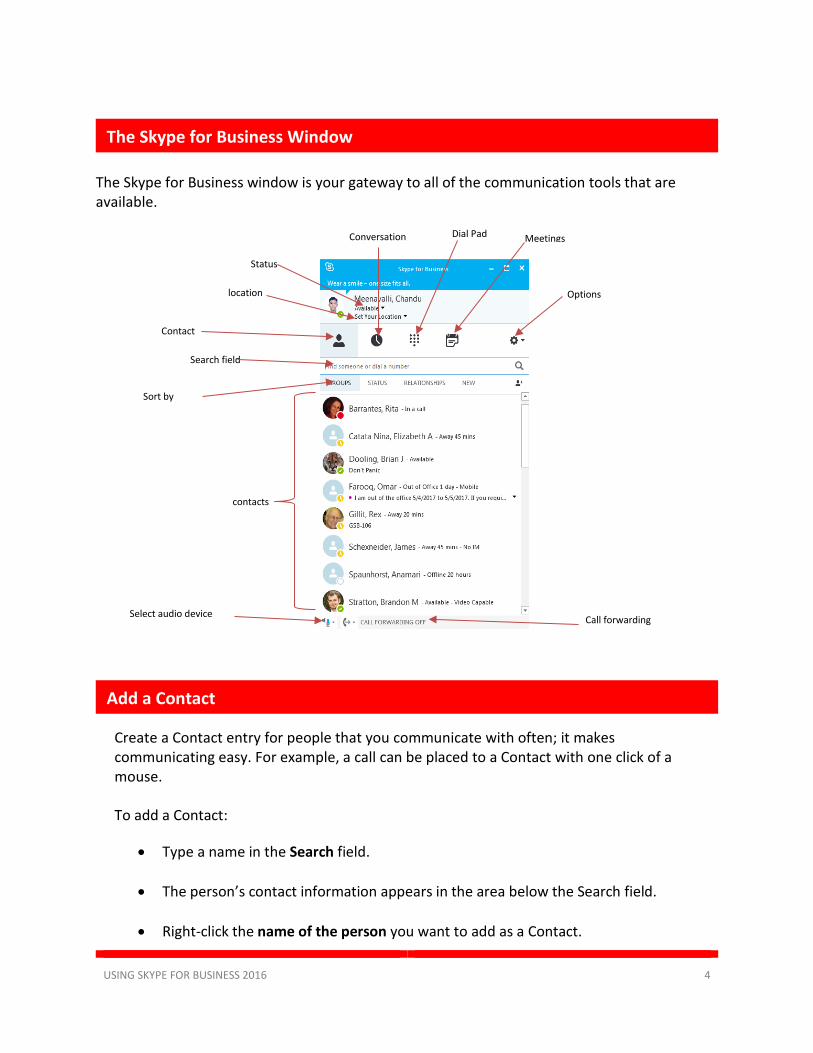
The Skype for Business window is your gateway to all of the communication tools that are available.
Create a Contact entry for people that you communicate with often; it makes communicating easy. For example, a call can be placed to a Contact with one click of a mouse.
To add a Contact:
• Type a name in the Search field.
• The person’s contact information appears in the area below the Search field.
• Right‐click the name of the person you want to add as a Contact.
Dial Pad Conversation
Status
location
Contact
Search field
Sort by
contacts
Select audio device Call forwarding
Options
Meetings
The Skype for Business Window
Add a Contact

USING SKYPE FOR BUSINESS 2016 5
• From the menu that appears, select Add to Contacts List.
• Select the desired Contact group.
p
Create groups to help you organize your Contacts. Create as many groups as you need for college, department, project team, students, family or friends. To create a Contact Group:
• Click the Add a Contact icon.
• From the menu that appears, select Create a New Group.
• A New Group heading appears at
the bottom of the window.
• Click on New Group then type the desired name for the new group.
Create a Contact Group

USING SKYPE FOR BUSINESS 2016 6
To move or copy a Contact to a group:
• From the menu that appears, right‐click a Contact and select Move or Copy.
To call a Contact with one click:
• Hover your mouse over a
Contact’s picture. • Click the Handset button
that appears.
Answer a Call
When you receive a phone call, a Call Invitation alert appears in the lower right corner of your screen. Choose an answering option:
• Click anywhere on the alert. • Click Ignore to send the call to voice mail. • Click Options to send the call to voice mail, to your
mobile phone, reply with instant message (IM) or set status to Do Not Disturb.
T send an Instant Message (IM):
• Hover your mouse over a Contact’s picture.
• Click the IM button that appears.
• Enter the desired message in the message input area of the IM window that appears. • Press <ENTER> to send the message.
On-Click Calling
Answer a Call
Send an Instant Message
USING SKYPE FOR BUSINESS 2016 7
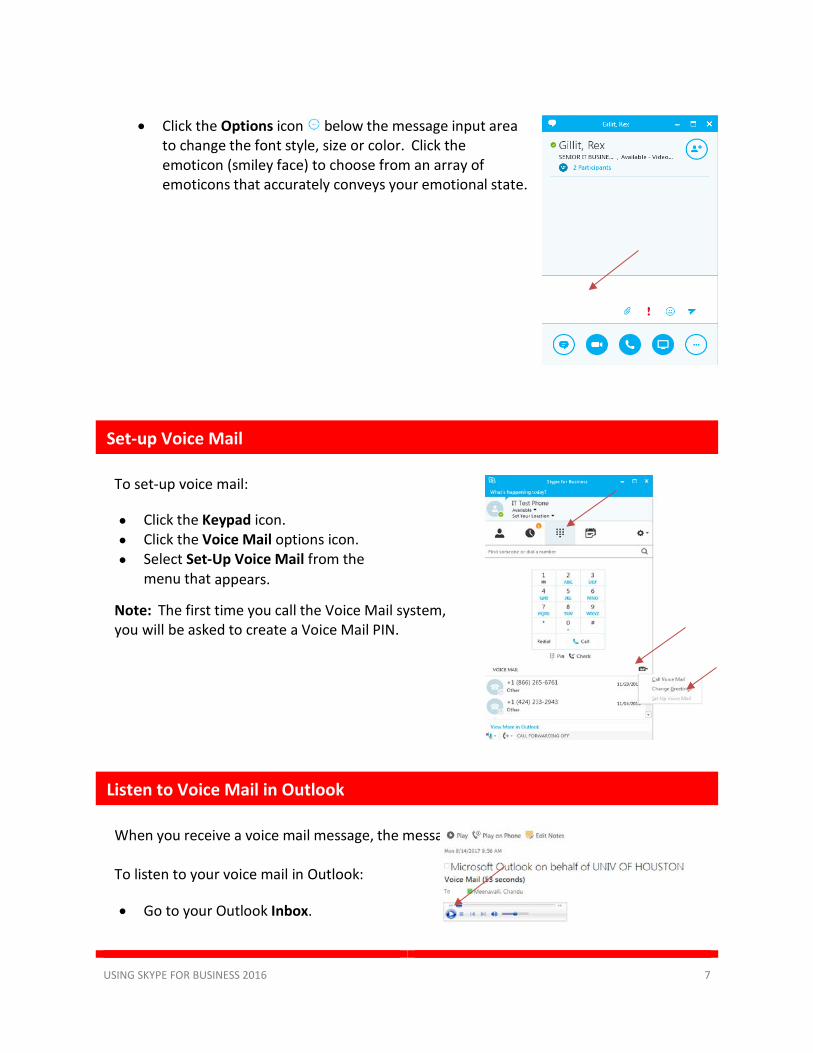
• Click the Options icon below the message input area
to change the font style, size or color. Click the emoticon (smiley face) to choose from an array of emoticons that accurately conveys your emotional state.
To set‐up voice mail:
• Click the Keypad icon. • Click the Voice Mail options icon. • Select Set-Up Voice Mail from the
menu that appears.
Note: The first time you call the Voice Mail system, you will be asked to create a Voice Mail PIN.
When you receive a voice mail message, the message appears in your Outlook Inbox. To listen to your voice mail in Outlook:
• Go to your Outlook Inbox.
Set-up Voice Mail
Listen to Voice Mail in Outlook

USING SKYPE FOR BUSINESS 2016 8
• Open any email with Voice Mail in the subject.
• Click the blue play button to listen to a message.
Listen to Voice Mail in Skype for Business
To listen to voice mail in Skype for Business, choose one of two options:
• Click . Your voice mail appears at the bottom of the window. Hover your mouse over the picture of the person who recorded the message. Click the Play button.
• Type 713-743-6111 in the Search field, press <ENTER>. Skype for Business dials the Voice Mail system. Follow the prompts.
Missed Calls in Outlook
When you have a missed call, a missed call notification appears in your Outlook Inbox. To view missed calls in Outlook:
• Go to your Outlook Inbox.
• Open any email with Missed Call in the subject.
Listen to Voice Mail in Skype for Business
View Missed calls in Outlook

USING SKYPE FOR BUSINESS 2016 9
View Missed Calls in Skype for Business
Two view missed calls in Skype for Business:
• Click the Recent icon.
There are four classifications for meeting participants: Organizer – the person who schedules a meeting or conference call. Leader – the first person to dial‐in to a conference call from a Skype for Business phone. Presenter – can invite others to an active meeting or conference call. During a meeting, a Presenter can change the classification of other Presenters to an Attendee. Only a Presenter can record a meeting, distribute files and share items, such as the desktop, a program, whiteboard and conduct a poll. By default, all faculty and staff members are a Presenter. If desired, the meeting Organizer can change the permissions level of any participant from Presenter to Attendee before the Meeting Invitation is sent. This is done using Meeting Options. For information on accessing Meeting Options, see UIT document Conferencing Quick Reference for Windows. Attendee – can initiate instant message (IM) conversations and view items that are shared. By default, meeting participants who dial‐in from a non‐Skype for Business phone (i.e., Rolm, Cisco, mobile or an off‐campus phone) must wait in the lobby until a Leader dials‐in. The first person to dial‐in from a Skype for Business phone becomes the Leader and anyone waiting in the lobby can be given access to the meeting. If you want to be a Leader or need to be (for instance, if all other participants are not affiliated with UH) and you dial‐in from a non‐Skype for Business phone, you must enter your Dial‐in PIN to become the Leader. The Dial‐in PIN is identical to the Sign‐in PIN for CX600 phones. If you cannot remember your Dial‐in PIN or if you never received a Dial‐in PIN, go to
View Missed calls in Skype for Business
Information for Skype for Business Meetings and Conference Calls
USING SKYPE FOR BUSINESS 2016 10
dialin.central.uh.edu to reset your PIN or obtain your first PIN. Before sending a Meeting Invitation, the Organizer can change the Meeting Options. It is very important to change Meeting Options before sending the Meeting Invitation because changing the options can potentially change the meeting link and Conference ID. The Conference ID is assigned by Skype for Business and appears in a Meeting Invitation. Meeting options include:
• Everyone waits in the lobby except the Organizer • No one waits in the lobby • Only the Organizer is a Presenter
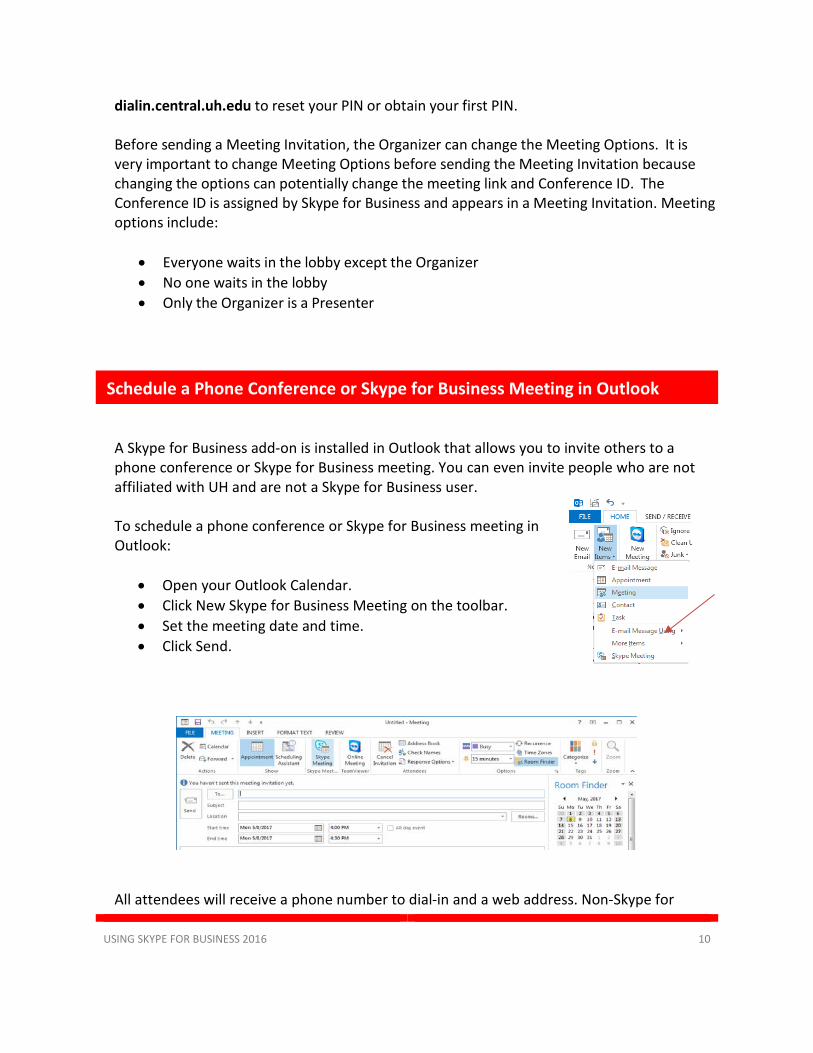
A Skype for Business add‐on is installed in Outlook that allows you to invite others to a phone conference or Skype for Business meeting. You can even invite people who are not affiliated with UH and are not a Skype for Business user.
To schedule a phone conference or Skype for Business meeting in Outlook:
• Open your Outlook Calendar. • Click New Skype for Business Meeting on the toolbar. • Set the meeting date and time. • Click Send.
All attendees will receive a phone number to dial‐in and a web address. Non‐Skype for
Schedule a Phone Conference or Skype for Business Meeting in Outlook

USING SKYPE FOR BUSINESS 2016 11
Business users may choose one of two options to join a meeting: Skype for Business Web App or Skype for Business Attendee. For more information, see UIT document Using Skype for Business Web App or Using Skype for Business Attendee.
Call Forwarding
There are three call‐forwarding options. To access all three options, click the Options button then click Call Forwarding in the Options dialog box.
Turn off call forwarding – calls will ring in Skype for Business and your desk phone. Forward my calls to – sends calls directly to voice mail, another number, a Contact, or a Delegate. Simultaneously ring – calls will ring in Skype for Business and your desk phone, while also ringing at another location that you set. Simultaneous ring must be selected to use the Skype for Business Mobile App.
Call Forwarding

USING SKYPE FOR BUSINESS 2016 12
Note: All Call Forwarding options can be accessed by clicking the Call Forward button at the bottom of the Skype for Business window. Select the desired option from the menu.

USING SKYPE FOR BUSINESS 2016 13
To transfer a call: • In the Conversation Window, hover over the
Call Options button. • Click Transfer Call.
• Select Another Person or Number or Park the
call.
If you have a UIT Exchange account, all of your IM conversations and phone logs are stored in Outlook, in a folder named Conversation History.
To manage how your IM conversations and phone logs are stored in Outlook:
• In the main Skype for Business window, click the Options button. • In the Skype for Business options dialog box, click Personal then select the desired
settings. • Click Ok.
Transfer Call
Saved Conversations
USING SKYPE FOR BUSINESS 2016 14
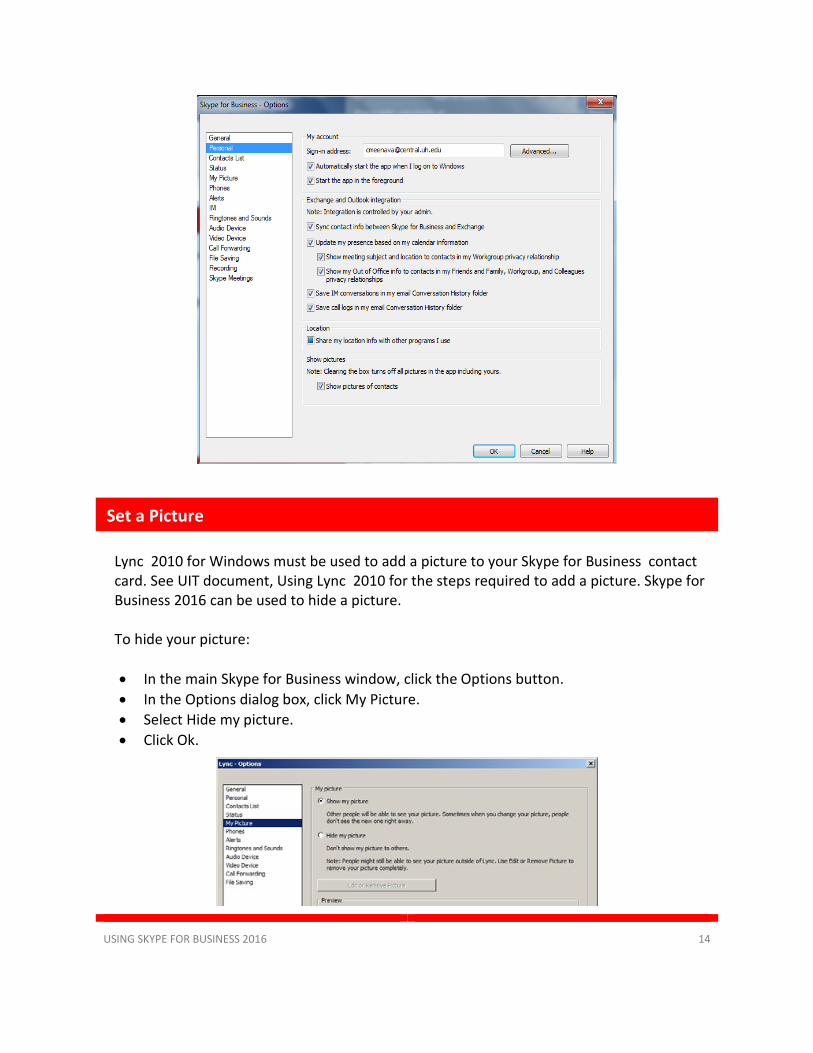
Lync 2010 for Windows must be used to add a picture to your Skype for Business contact card. See UIT document, Using Lync 2010 for the steps required to add a picture. Skype for Business 2016 can be used to hide a picture. To hide your picture: • In the main Skype for Business window, click the Options button. • In the Options dialog box, click My Picture. • Select Hide my picture. • Click Ok.
Set a Picture

USING SKYPE FOR BUSINESS 2016 15
Audio/Video Device Settings
The Options dialog box is used to adjust audio/video settings and check audio quality. To access audio/video device options:
• In the lower‐left corner of the Skype for Business window, click the Select Primary Device button, and select Audio Device Settings from the menu.
• In the Options dialog box,
click Audio Device or • Video Device.
• Select the desired settings.
• Click Ok.
To change your status:
• Click the Status field. • Select a Status from the menu.
To indicate your location:
• Click the Location field. • Type your location. • Press Enter.
Audio Video Device Settings
Set Your Presence

USING SKYPE FOR BUSINESS 2016 11
Change Your Personal Options
To change your Personal options:
• Click the Options button.
• In the Options dialog box, select the options you want to change.
• Click Ok.
To access Skype for Business Help:
• Click the arrow next to the Options button. • Select Help ‐> Skype for Business Help
from the menu
Change Your Personal Options
Self Help

USING SKYPE FOR BUSINESS 2016 12
This section covers advanced Skype for Business features. In this section, you will learn how to: Start a Conference Call Start a Video Call Share Your Desktop or a Program Transfer a File Record Video Use a Federated Contact List Assign a Delegate Response Group Dialing 911
If you are on a call and you decide that you need to have a conference call that includes the person to whom you are speaking and additional participants, this can be done in the Conversation window of the current call.
To escalate a call to a conference call:
• During a call, in the Conversation window, click the People button.
• In the box that appears, select Invite More
People.
• In the Invite by Name or Phone Number dialog box that appears, select a Contact or enter a phone number.
• Click Ok.
Advanced Skype for Business features
Start a Conference Call
USING SKYPE FOR BUSINESS 2016 13
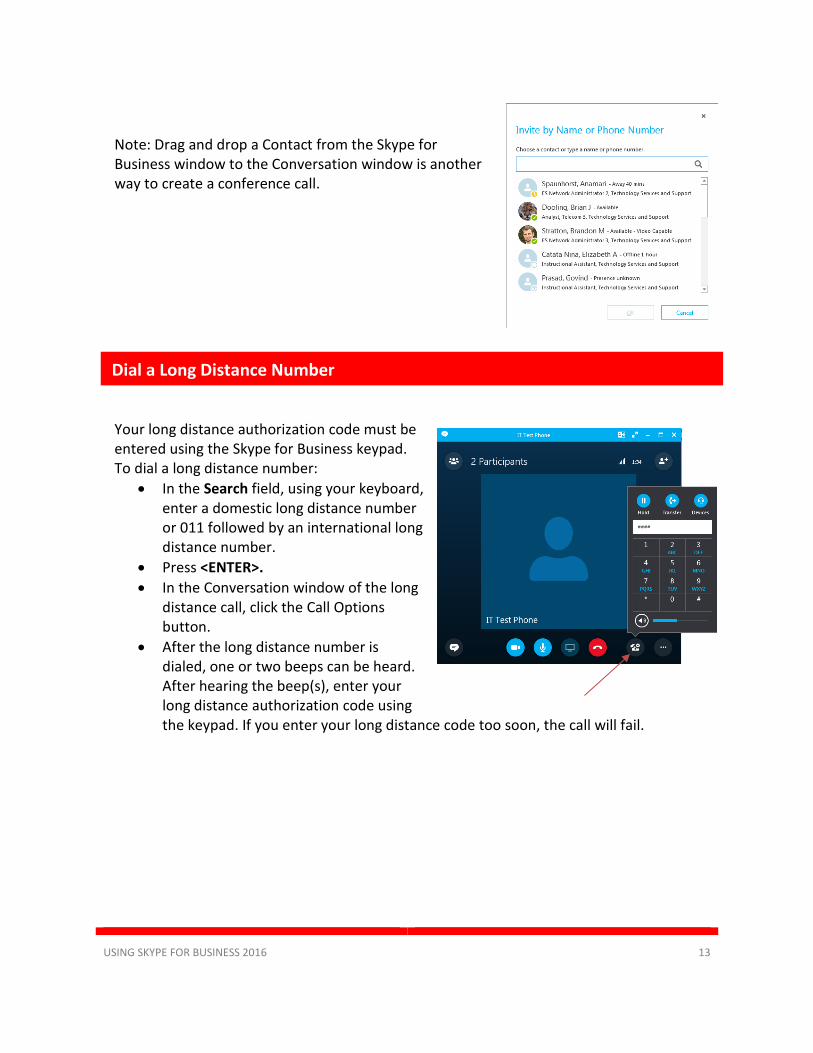
Note: Drag and drop a Contact from the Skype for Business window to the Conversation window is another way to create a conference call.
Your long distance authorization code must be entered using the Skype for Business keypad. To dial a long distance number:
• In the Search field, using your keyboard, enter a domestic long distance number or 011 followed by an international long distance number.
• Press <ENTER>. • In the Conversation window of the long
distance call, click the Call Options button.
• After the long distance number is dialed, one or two beeps can be heard. After hearing the beep(s), enter your long distance authorization code using the keypad. If you enter your long distance code too soon, the call will fail.
Dial a Long Distance Number
USING SKYPE FOR BUSINESS 2016 14
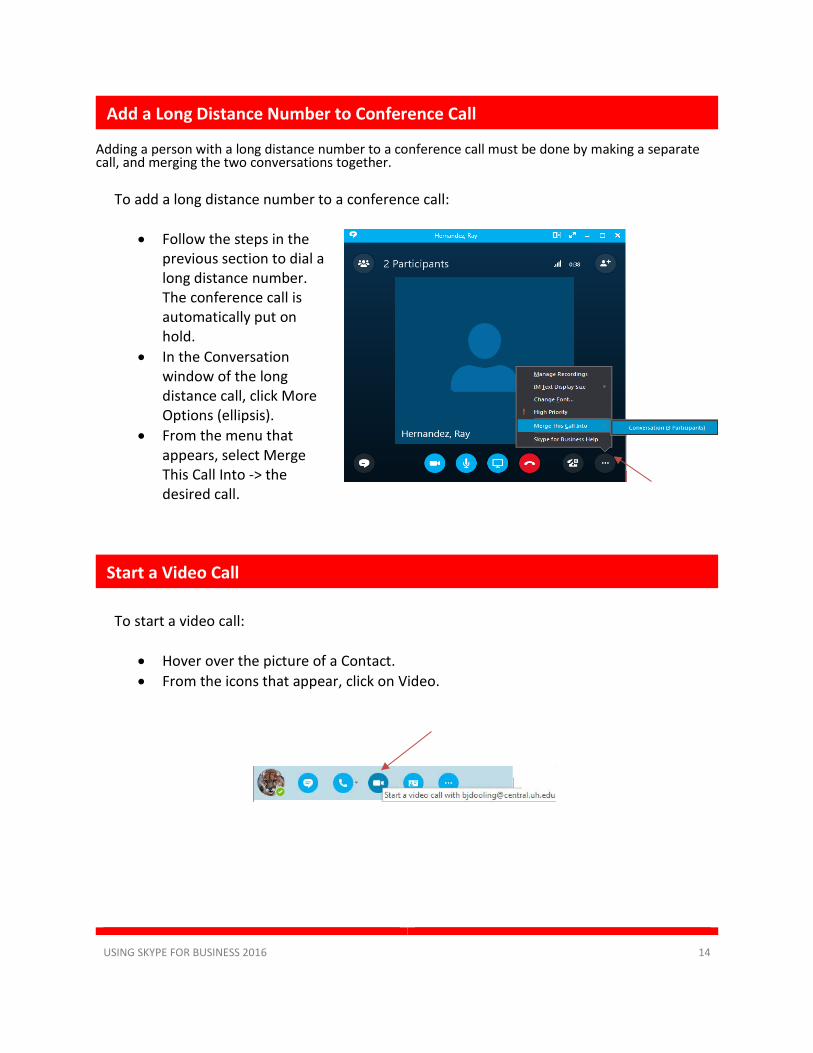
Adding a person with a long distance number to a conference call must be done by making a separate call, and merging the two conversations together.
To add a long distance number to a conference call:
• Follow the steps in the previous section to dial a long distance number. The conference call is automatically put on hold.
• In the Conversation window of the long distance call, click More Options (ellipsis).
• From the menu that appears, select Merge This Call Into ‐> the desired call.
To start a video call:
• Hover over the picture of a Contact. • From the icons that appear, click on Video.
Share Your Desktop or a Program
Add a Long Distance Number to Conference Call
Start a Video Call
USING SKYPE FOR BUSINESS 2016 15
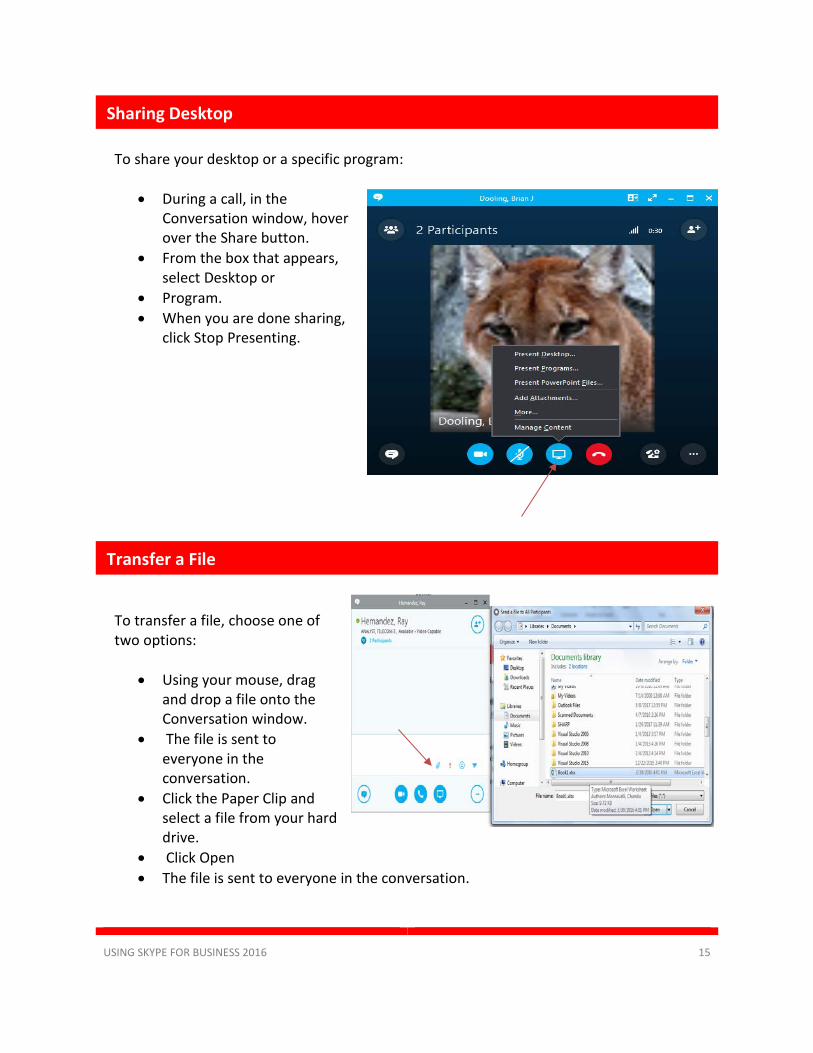
To share your desktop or a specific program:
• During a call, in the Conversation window, hover over the Share button.
• From the box that appears, select Desktop or
• Program. • When you are done sharing,
click Stop Presenting.
To transfer a file, choose one of two options:
• Using your mouse, drag and drop a file onto the Conversation window.
• The file is sent to everyone in the conversation.
• Click the Paper Clip and select a file from your hard drive.
• Click Open • The file is sent to everyone in the conversation.
Sharing Desktop
Transfer a File
USING SKYPE FOR BUSINESS 2016 16
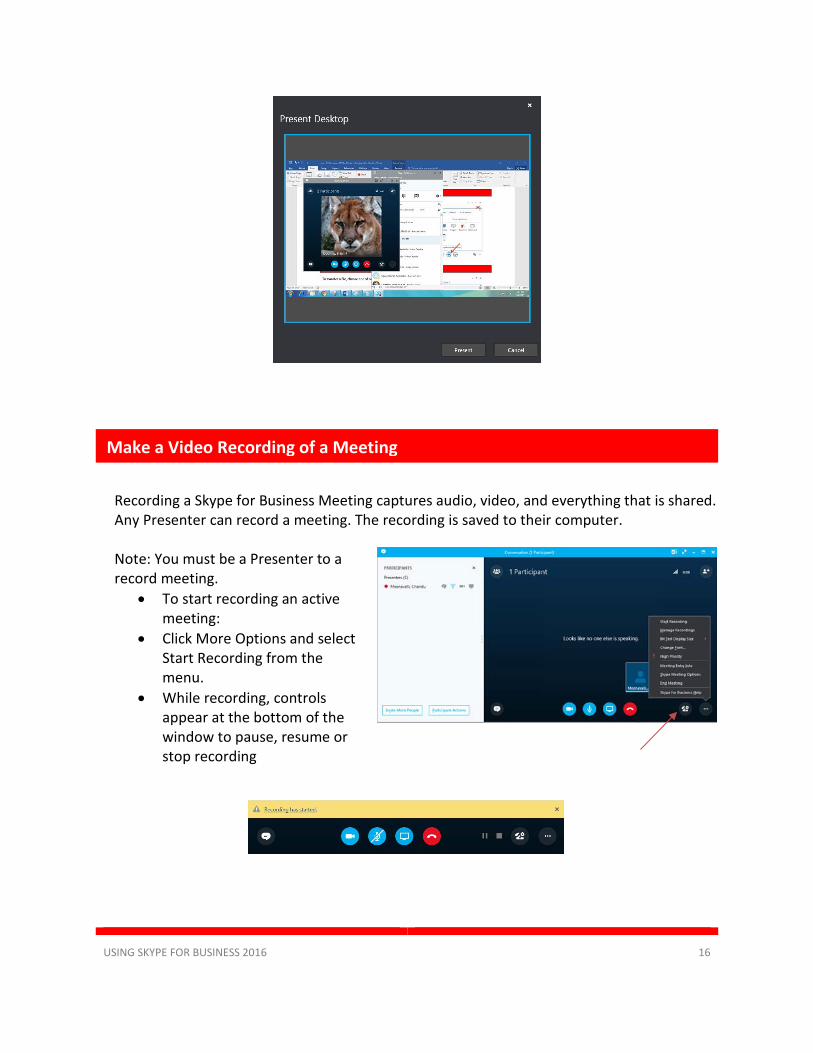
Recording a Skype for Business Meeting captures audio, video, and everything that is shared. Any Presenter can record a meeting. The recording is saved to their computer. Note: You must be a Presenter to a record meeting.
• To start recording an active meeting:
• Click More Options and select Start Recording from the menu.
• While recording, controls appear at the bottom of the window to pause, resume or stop recording
Make a Video Recording of a Meeting

USING SKYPE FOR BUSINESS 2016 17
• Click the Stop button at the bottom of the window to end recording.
Skype for Business Recording Manager appears after recording ends. Skype for Business Recording Manager is used to play your Skype for Business recordings or to publish recordings in MP4 format to share with others. To access the Skype for Business Recording Manager at any time: Click the arrow next to the Options button. From the menu,
• Select Tools • Recording Manager
The Skype for Business federation lets you communicate faster and more effectively with those outside of the university, such as partners, suppliers, vendors or other universities. Being federated allows you to:
• Add a user from another organization as a Skype for Business Contact. • Send instant messages to federated contacts. • Exchange presence information. • Escalate person‐to‐person instant messages to multi‐person conferences.
Federated Contact List

USING SKYPE FOR BUSINESS 2016 18
UH is openly federated. You can use all of Skype for Business has unified communication tools to communicate with someone who is at an openly federated organization. Skype for Business supports federation with Microsoft Messenger public instant messaging (IM). The federation makes audio calling and instant messaging possible between Skype for Business and Skype users. Note: At the address below, you can see which organizations are federated. Almost 5,000 organizations around the world have joined. http://windowspbx.blogspot.com/2011/09/usa‐microsoft‐Skype for Business ‐federation‐directory_0
A Delegate is a person with permission to receive calls, messages and schedule meetings on behalf of another. Deans, directors and department heads commonly use a Delegate, as well as department phones where a back‐up person is needed to answer the phone. If a phone must be answered at all times, delegation provides a solution by routing incoming calls to multiple phones. Using Outlook, Delegates can also have access to voice mail and missed call messages. For more information on delegation including how to delegate an Outlook mailbox, see UIT document Delegate Access in Skype for Business. To set‐up a Delegate:
• In the Skype for Business window, click the Options button.
• In the Options dialog box, click Call Forwarding.
• Near the bottom of the dialog box, click Edit my delegate members.
• In the Delegates dialog box, click Add.
• Select the person(s) you want to assign to be a Delegate.
• Click Ok.
Advanced Skype Features
Assign a Delegate

USING SKYPE FOR BUSINESS 2016 19
To rescind Delegate permission:
• Use the steps listed above to access the Delegates dialog box.
• Check the box next to the Delegate you no longer want to be a Delegate.
• Click Remove. • Click Ok.
Response Group
Response Group is a unified communications application that is used to create and configure workflows. Workflows can route and queue incoming calls to designated groups. An agent group is a collection of agents who handle incoming calls from the Response Group. When an administrator creates an agent group, he or she can select the agents that are assigned to the group, and specify whether the group requires agents to sign in and out. A person will be considered either an informal agent or a formal agent, depending on whether you are required to formally sign in to your agent group to begin receiving calls. Informal agents are agents that have been assigned to an agent group that does not require them to sign in and out. Informal agents are automatically signed in to the group when they sign‐in to Microsoft Office Communications Server 2007 R2. If you are an informal agent, you can receive calls routed to your group by using Microsoft Office Communicator 2007 R2 Attendant or Office Communicator 2007 R2. Formal agents are agents that have been assigned to an agent group that requires them to sign in and out. Formal agents must be signed in to the group before they can receive calls routed to the group. To view which Response Group you are in:
• In the Skype for Business window, click the arrow next to the Options button.
• Select Tools • Response Group Settings. • Sign‐in with your CougarNet username and
password.
Response Group
USING SKYPE FOR BUSINESS 2016 20
Your Skype for Business hard phone and the soft phone on your computer offer an amazing amount of flexibility. One of the most powerful features of Skype for Business is the ability to make calls from any location through the internet via your laptop computer. Unfortunately, the technology of the Emergency 911 system has not kept pace with Skype for Business technology, so even though you can place work calls from home, hotels, or even a cybercafé, the 911 system will recognize the call as being placed from your office. This problem is not unique to Skype for Business. It affects Skype, Vonage, and other IP phone service providers. Please remember, if you place a 911 call using your Skype for Business soft phone (the Skype for Business client), the 911 system will connect to the Houston emergency services and dispatch responders to your office location that is associated with your phone number. If you must place a 911 call from an off‐campus location using Skype for Business, you must specifically notify the first responder of your actual location. When possible, it would be preferable in those situations to use a local phone or a cellular phone for 911 calls.
Dialling 911 With Skype for Business