Using Protection Engine for Cloud Services for URL ...vox.veritas.com/legacyfs/online/veritasdata/SR...
47
Using Protection Engine for Cloud Services for URL Filtering, Malware Protection and Proxy Integration Hands-On Lab Description In this hands-on session, you will learn how to turn your proxy into a security gateway, how to add security features to FTP servers, how to protect portals, and much more. You’ll quickly learn why security professionals refer to Symantec Protection Engine as “the Swiss army knife of malware detection.” This lab assumes a prerequisite knowledge of: - Basic Web Security Skills/Understanding - Basic networking experience - Basic Proxy and Browser configuration At the end of this lab, you should be able to Understand Scan Engine technology Understand integration options and Integrate malware scanning with SharePoint Portal 2010 Perform scheduled scans for a SharePoint Portal Farm Understand basic function of a proxy server (SQUID) Basic Configuration of a caching proxy server Integrate URL filtering with a caching proxy server (SQUID) Optional: Integrate malware scanning with Network Attached Storage device (Netapp Filer)
Transcript of Using Protection Engine for Cloud Services for URL ...vox.veritas.com/legacyfs/online/veritasdata/SR...

Using Protection Engine for Cloud Services for URL Filtering, Malware Protection and Proxy Integration
Hands-On Lab
Description In this hands-on session, you will learn how to turn your proxy into a security gateway, how to add security features to FTP servers, how to protect portals, and much more. You’ll quickly learn why security professionals refer to Symantec Protection Engine as “the Swiss army knife of malware detection.”
This lab assumes a prerequisite knowledge of:
- Basic Web Security Skills/Understanding
- Basic networking experience
- Basic Proxy and Browser configuration
At the end of this lab, you should be able to
Understand Scan Engine technology
Understand integration options and
Integrate malware scanning with SharePoint Portal 2010
Perform scheduled scans for a SharePoint Portal Farm
Understand basic function of a proxy server (SQUID)
Basic Configuration of a caching proxy server
Integrate URL filtering with a caching proxy server (SQUID)
Optional: Integrate malware scanning with Network Attached Storage device (Netapp Filer)

2 of 47
Notes A brief presentation will introduce this lab session and discuss key concepts.
The lab will be directed and provide you with step-by-step walkthroughs of key features.
Feel free to follow the lab using the instructions on the following pages. You can optionally perform this lab at your own pace.
Be sure to ask your instructor any questions you may have.
Thank you for coming to our lab session.
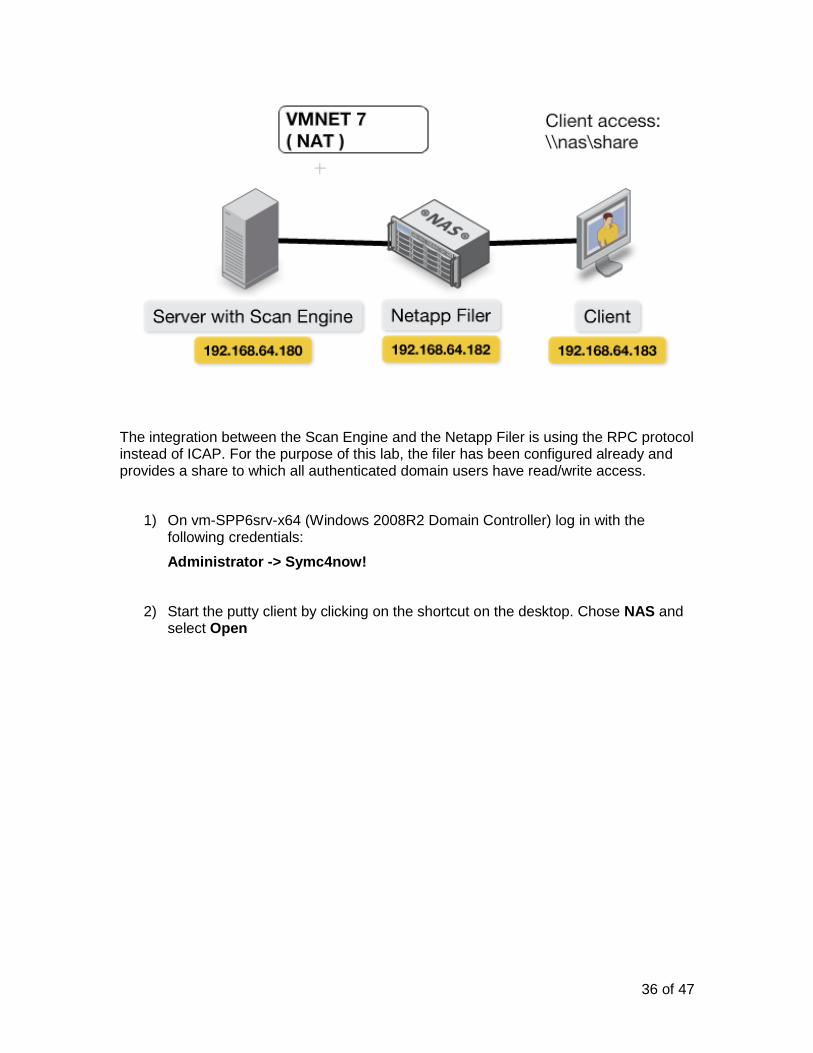
The lab consists of four virtual machines:
vm-SPP6srv-x64 – Domain Controller and SharePoint
vm-Squidsrv-x64 – CentOS with Squid 3.1
vm-netapp-x64 – Netapp Filer
vm-ws-x64 – Windows Client
Lab network diagram
The following diagram shows the lab network which consists of four virtual machines running on each students system.
IMPORTANT: This lab requires internet access.
3 of 47
Lab Overview
This lab consists of three different topics which will be covered by the participant. The order should be followed, though if participants have prior knowledge of the Scan Engine solution, the different chapters can be worked in any order provided the Scan Engine software is installed first.
Scan Engine Integration with SharePoint Portal 2010
Scan Engine Integration with Squid Proxy Server
Scan Engine Integration with Netapp Filer
Before starting this lab, please ensure that all required virtual machines have been started:
vm-SPP6srv-x64 – Domain Controller and SharePoint
vm-Squidsrv-x64 – CentOS with Squid 3.1
vm-netapp-x64 – Netapp Filer
vm-ws-x64 – Windows Client
Scan Engine Integration with SharePoint Portal 2010
Before starting this lab, please ensure that all four required virtual machines have been started.
1) On vm-SPP6srv-x64 (Windows 2008R2 Domain Controller) log in with the following credentials:
Administrator -> Symc4now!
2) Start the installation of Symantec Portal Protection, the installation files are located in C:\install\Symantec_Protection_6_0_for_SharePoint_Servers\autorun
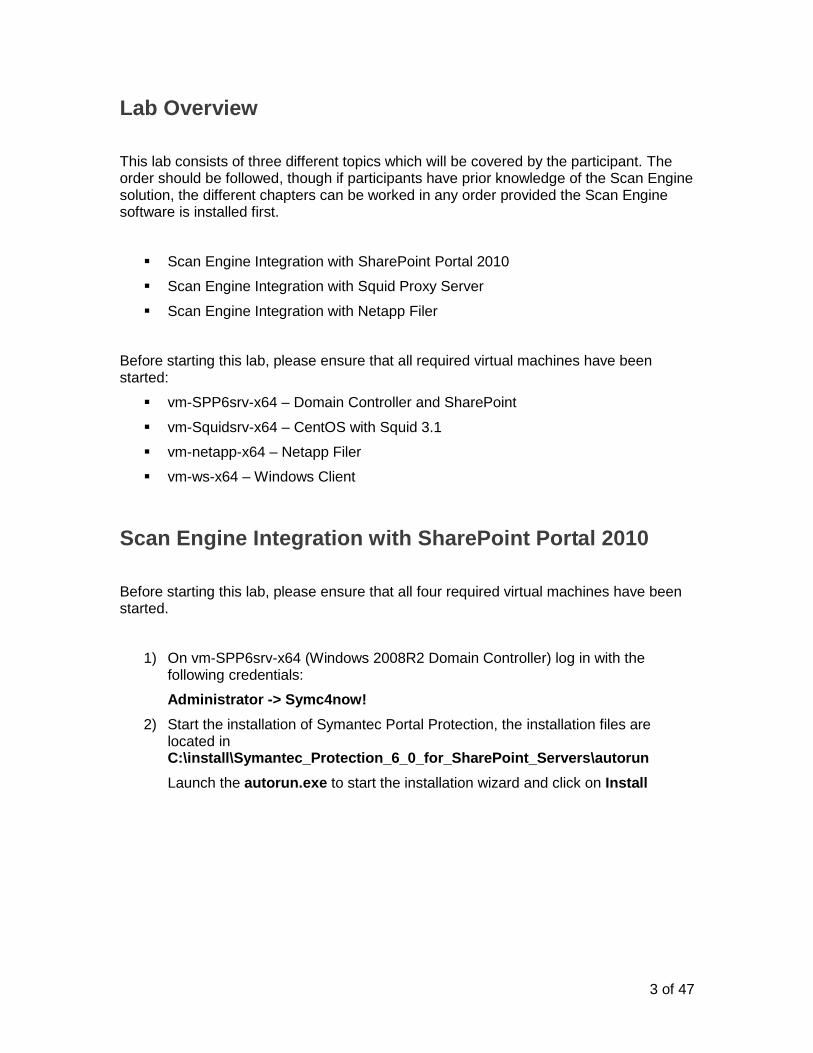
Launch the autorun.exe to start the installation wizard and click on Install
4 of 47
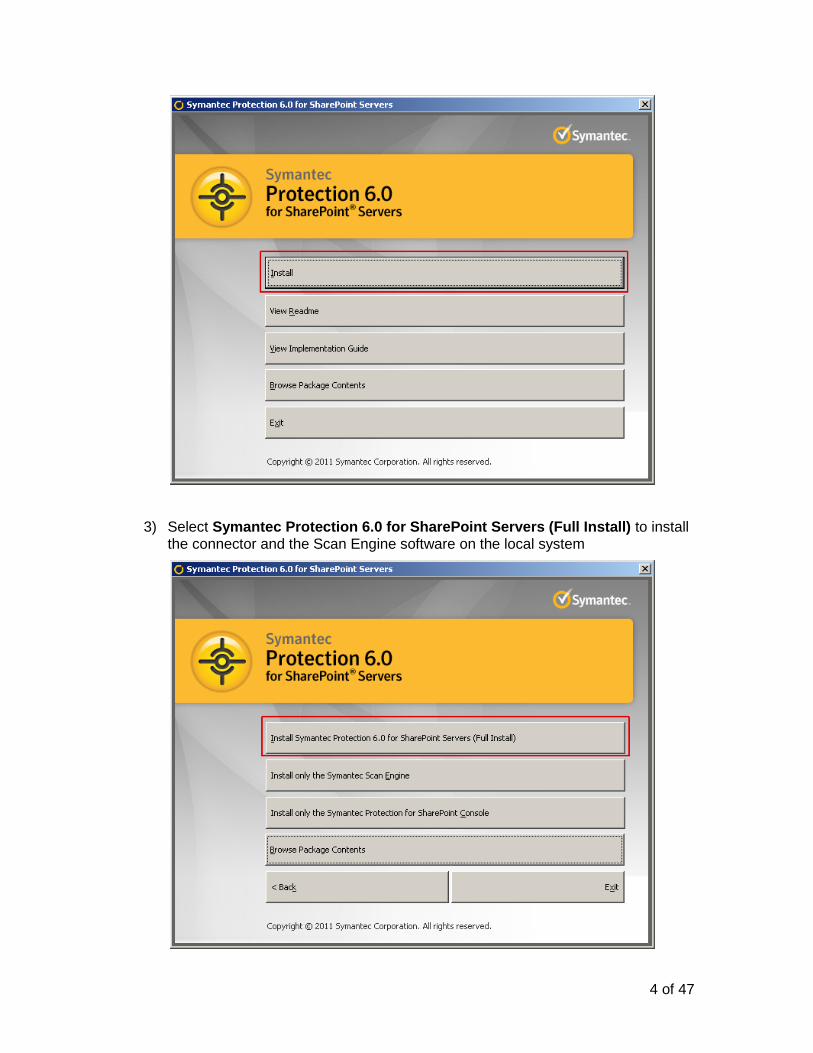
3) Select Symantec Protection 6.0 for SharePoint Servers (Full Install) to install the connector and the Scan Engine software on the local system
5 of 47
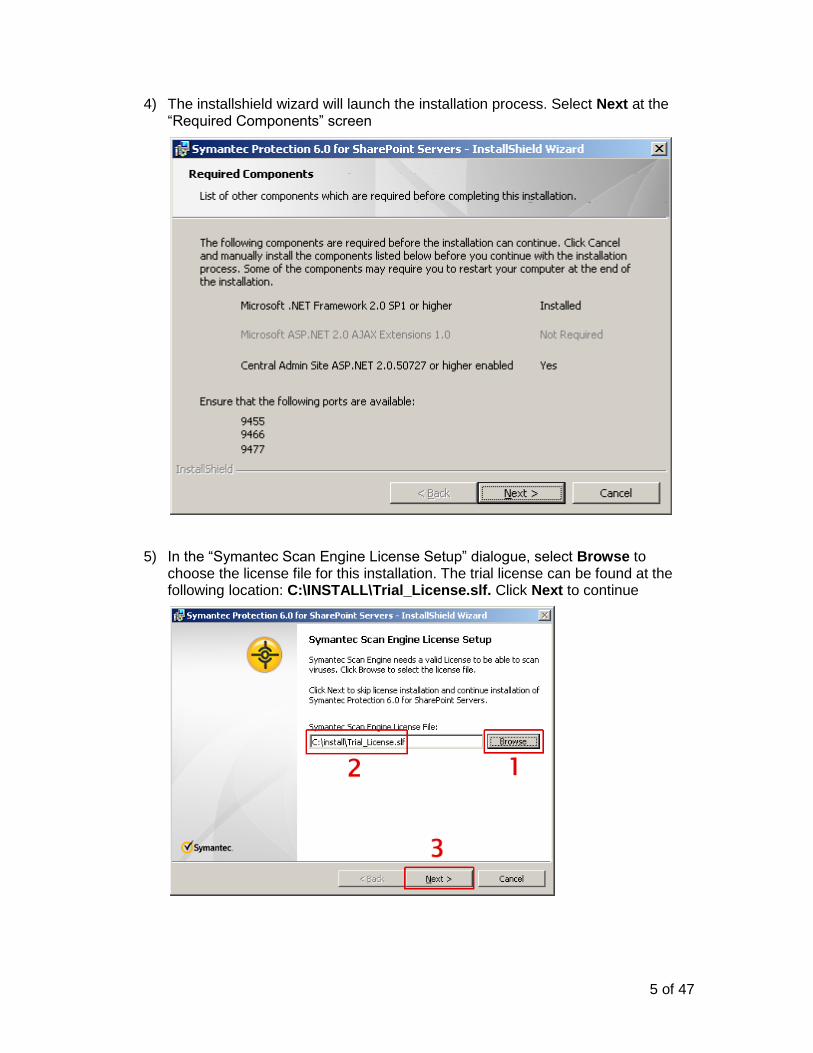
4) The installshield wizard will launch the installation process. Select Next at the “Required Components” screen
5) In the “Symantec Scan Engine License Setup” dialogue, select Browse to choose the license file for this installation. The trial license can be found at the following location: C:\INSTALL\Trial_License.slf. Click Next to continue

6 of 47
6) The Symantec Scan Engine setup is started automatically. Please be patient until the “Welcome” screen appears and select Next
7) In the “License Agreement” dialogue, accept the license agreement and select Next
8) In the “Destination Folder” dialogue, leave the default setting and select Next

7 of 47
9) In the “Administrative UI Setup” dialogue provide the password which will be used to access the Scan Engine UI after the installation. For this lab, type Symc4now! as the password. Leave the default ports and select Next
10) In the ”URL Filtering” dialogue enable URL filtering. NOTE: This is not required to perform malware scanning for SharePoint server; however we will use the same Scan Engine installation to integrate with the proxy solution in the next part of the lab.
Select Next

8 of 47
11) In the “Ready to Install Program” dialogue select Install. The installation of the Scan Engine software will take a couple of minutes.
12) After a successful installation, select Finish. After a short while the installation process for the SharePoint connector is launched.

9 of 47
13) In the “Welcome” dialogue of the Symantec Protection 6.0 for SharePoint Serves select Next
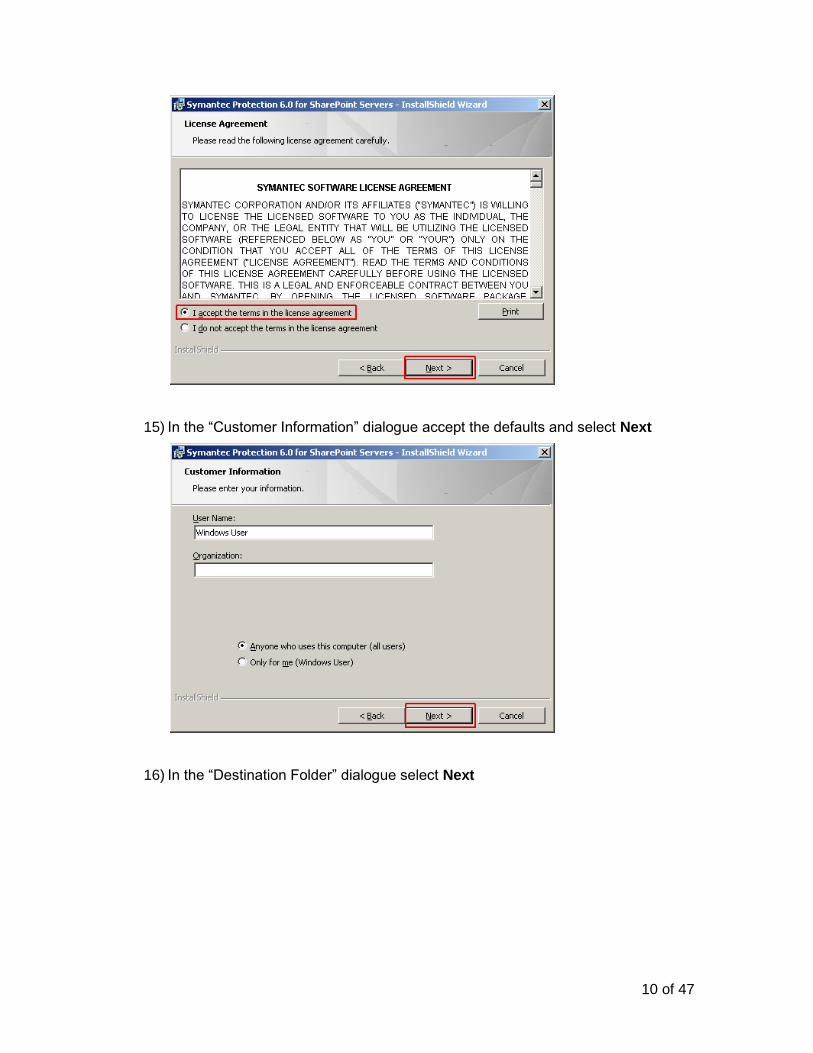
14) In the “License Agreement” dialogue, accept the license agreement and select Next
10 of 47
15) In the “Customer Information” dialogue accept the defaults and select Next
16) In the “Destination Folder” dialogue select Next

11 of 47
17) In the “Service Logon Information” dialogue, provide an appropriate account for the service. User Name: example\administrator, password: Symc4now!
Select Next
18) In the “SharePoint Service Stop Information” dialogue chose “I agree…” and select Next. The services mentioned on this screen will be restarted during the installation process
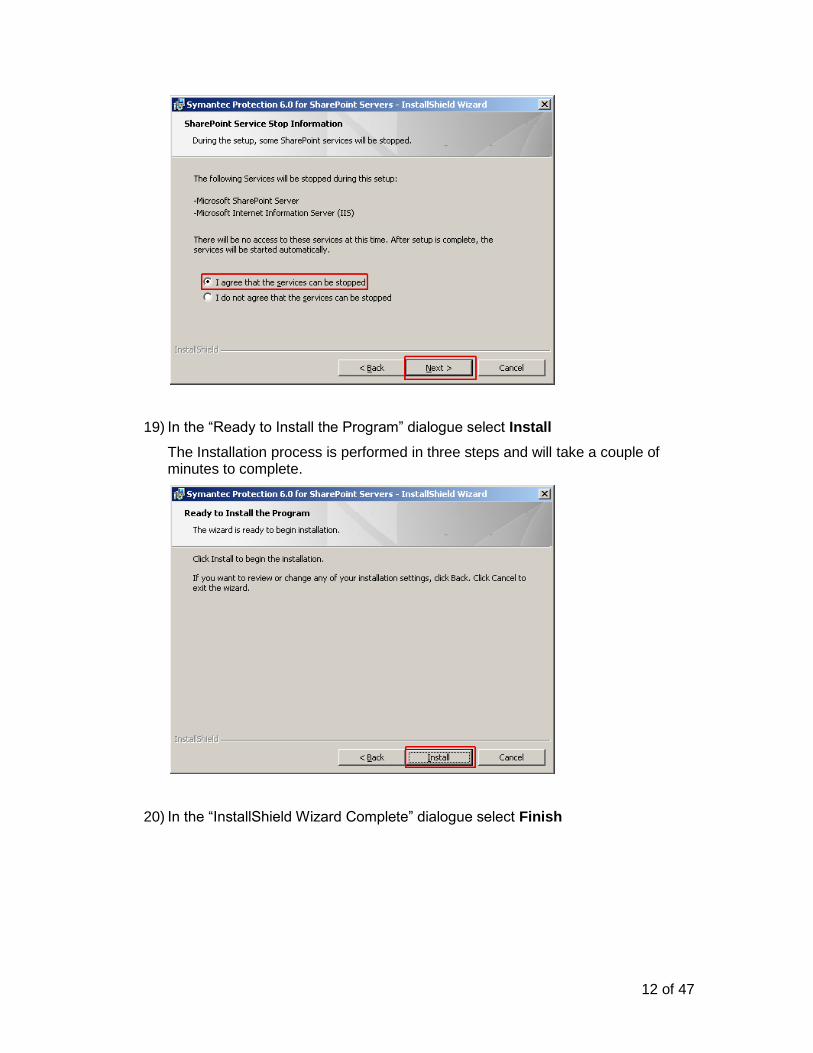
12 of 47
19) In the “Ready to Install the Program” dialogue select Install
The Installation process is performed in three steps and will take a couple of minutes to complete.
20) In the “InstallShield Wizard Complete” dialogue select Finish

13 of 47
21) In the “Configure Real-time scan settings” dialogue select OK.
NOTE: Please read these instructions careful – it is important to enable Real-time scanning after installing the protection software.
14 of 47
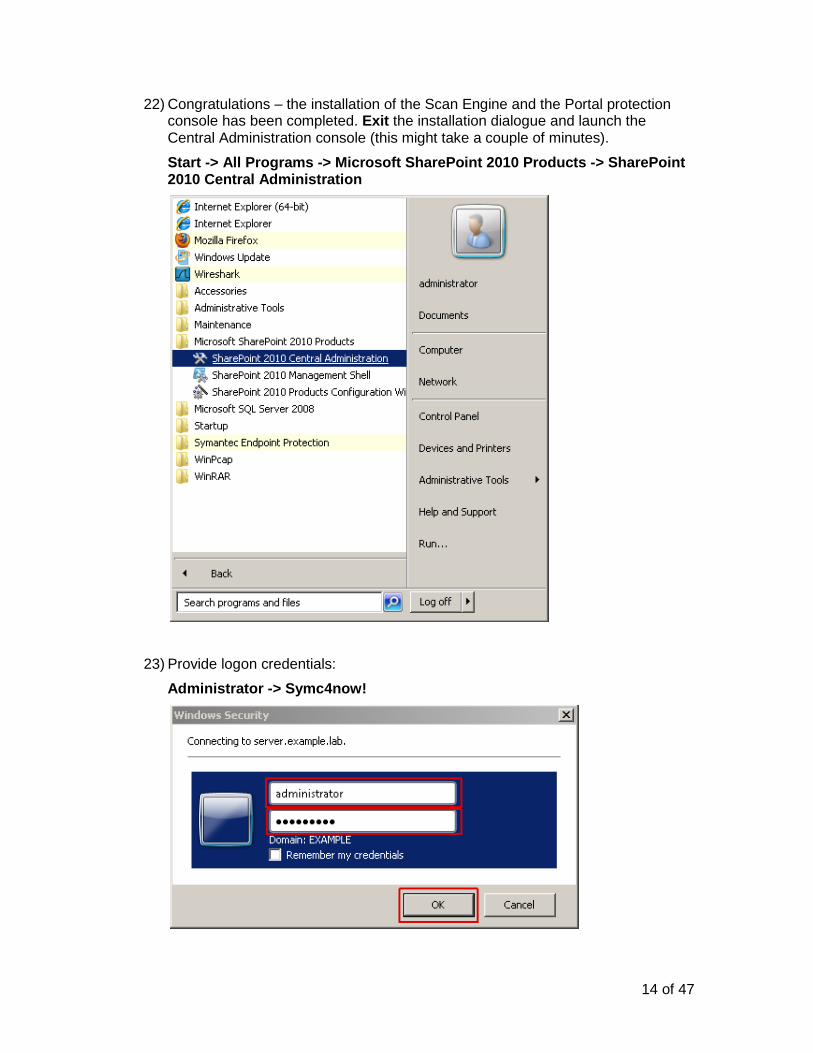
22) Congratulations – the installation of the Scan Engine and the Portal protection console has been completed. Exit the installation dialogue and launch the Central Administration console (this might take a couple of minutes).
Start -> All Programs -> Microsoft SharePoint 2010 Products -> SharePoint 2010 Central Administration
23) Provide logon credentials:
Administrator -> Symc4now!
15 of 47
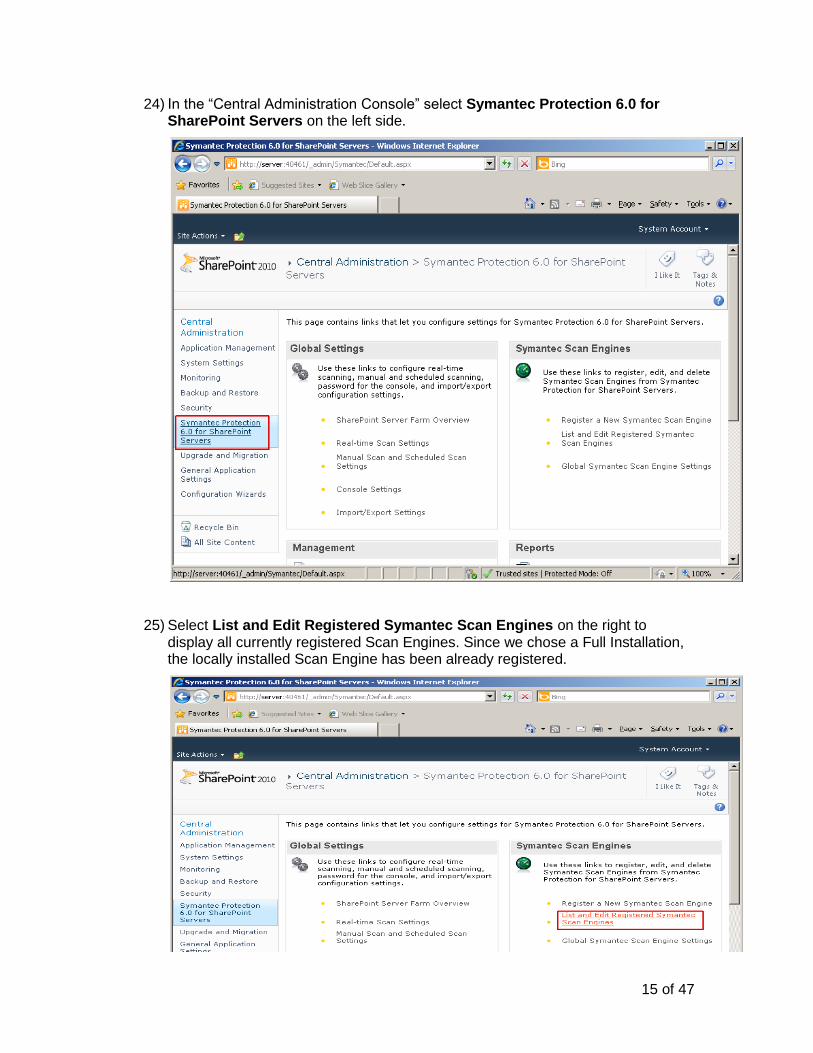
24) In the “Central Administration Console” select Symantec Protection 6.0 for SharePoint Servers on the left side.
25) Select List and Edit Registered Symantec Scan Engines on the right to display all currently registered Scan Engines. Since we chose a Full Installation, the locally installed Scan Engine has been already registered.
16 of 47
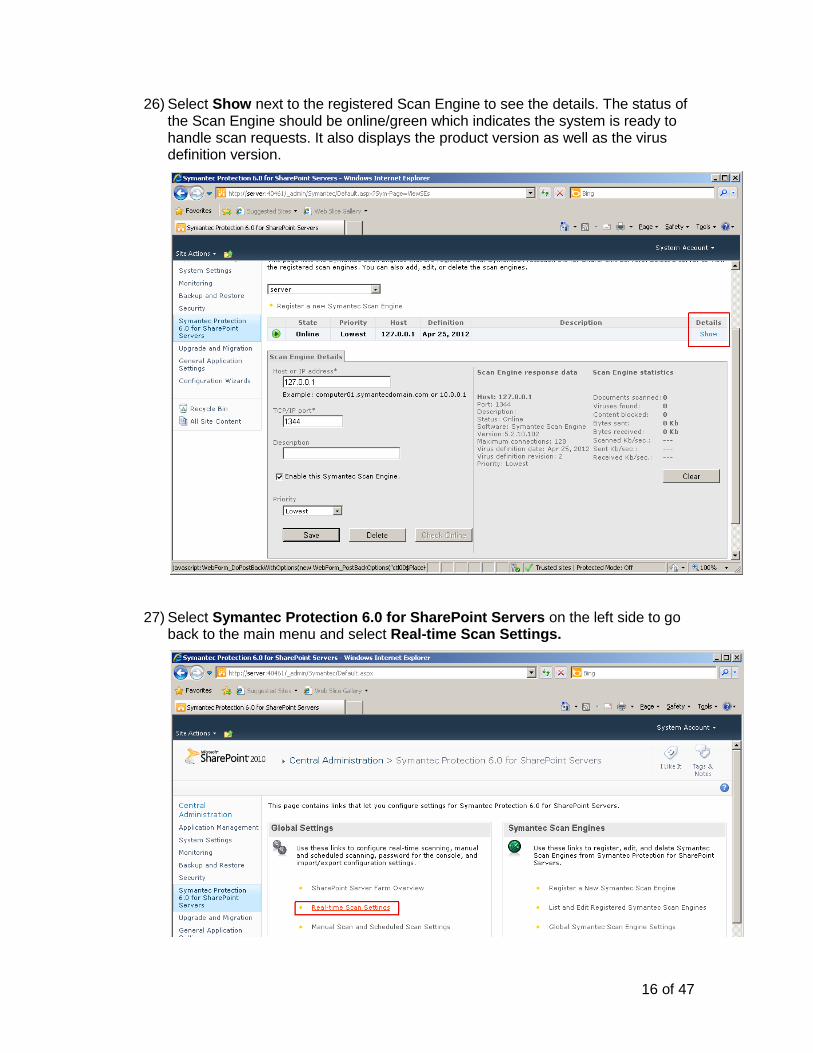
26) Select Show next to the registered Scan Engine to see the details. The status of the Scan Engine should be online/green which indicates the system is ready to handle scan requests. It also displays the product version as well as the virus definition version.
27) Select Symantec Protection 6.0 for SharePoint Servers on the left side to go back to the main menu and select Real-time Scan Settings.
17 of 47
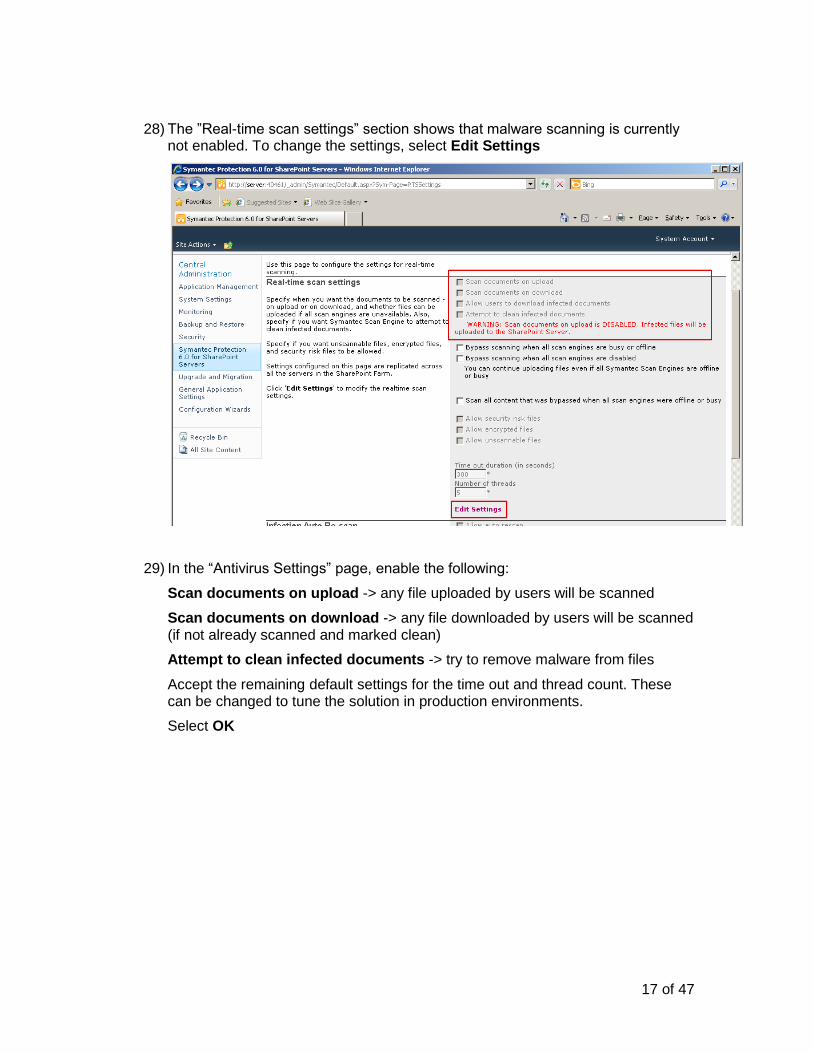
28) The ”Real-time scan settings” section shows that malware scanning is currently not enabled. To change the settings, select Edit Settings
29) In the “Antivirus Settings” page, enable the following:
Scan documents on upload -> any file uploaded by users will be scanned
Scan documents on download -> any file downloaded by users will be scanned (if not already scanned and marked clean)
Attempt to clean infected documents -> try to remove malware from files
Accept the remaining default settings for the time out and thread count. These can be changed to tune the solution in production environments.
Select OK

18 of 47
After enabling malware scanning all uploads and downloads are subject to a malware scan. For this lab, we will leave the remaining settings at their default values. If time permits, explore the settings for scheduled scans and global scan engine settings.
Next we will login to the client system and upload some files to the SharePoint Portal.
Scan Engine and SharePoint Portal – Client test
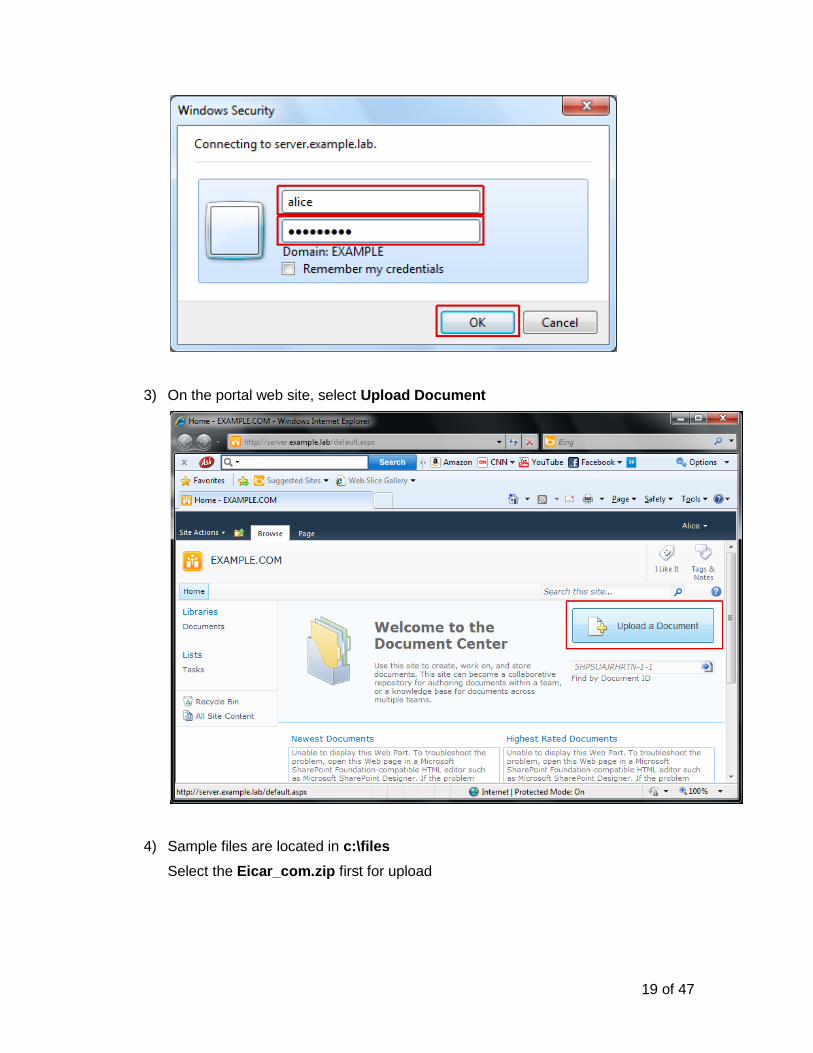
1) On vm-ws-x64 (Windows 7 client) log in with the following credentials:
Alice -> Symc4now!
2) Launch Internet Explorer – the SharePoint web site should load automatically.
http://server.example.lab
Login with Alice -> Symc4now!
(The login might take a while)
19 of 47
3) On the portal web site, select Upload Document
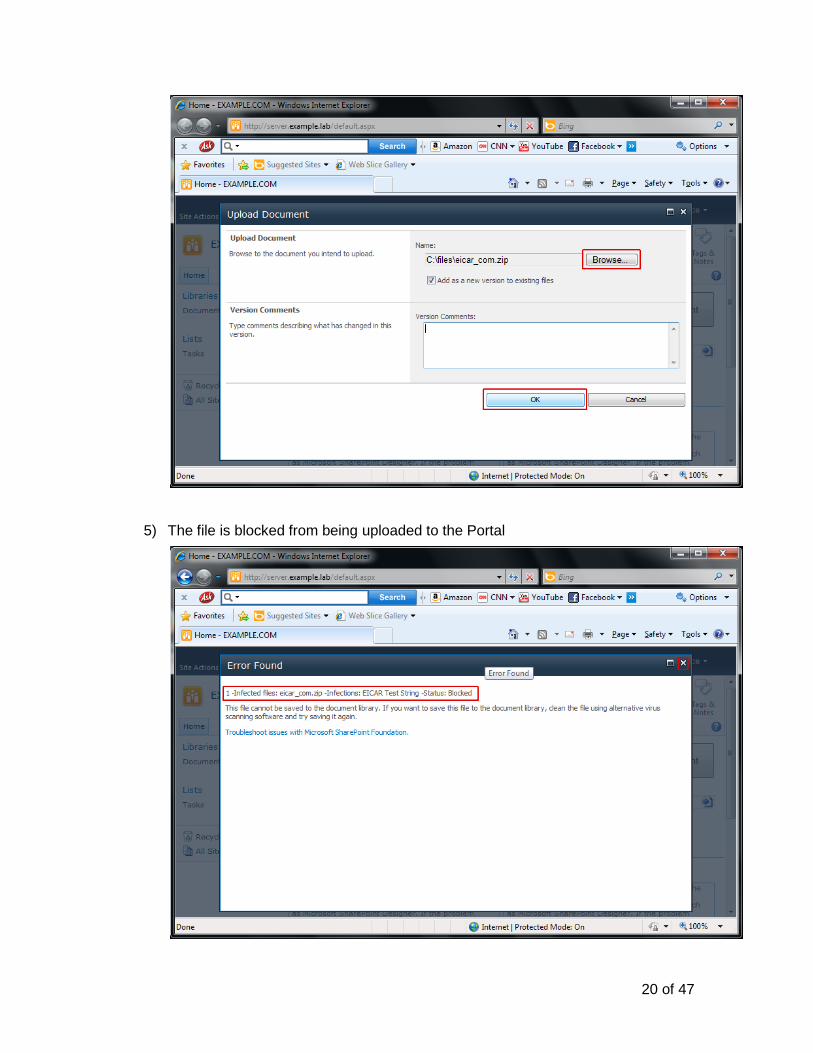
4) Sample files are located in c:\files
Select the Eicar_com.zip first for upload
20 of 47
5) The file is blocked from being uploaded to the Portal
21 of 47
This shows the successful scan of uploaded documents by Symantec Scan Engine. Try uploading some of the other files in c:\files to the portal and see the different outcome. (encrypted, corrupted, non-malicious…)
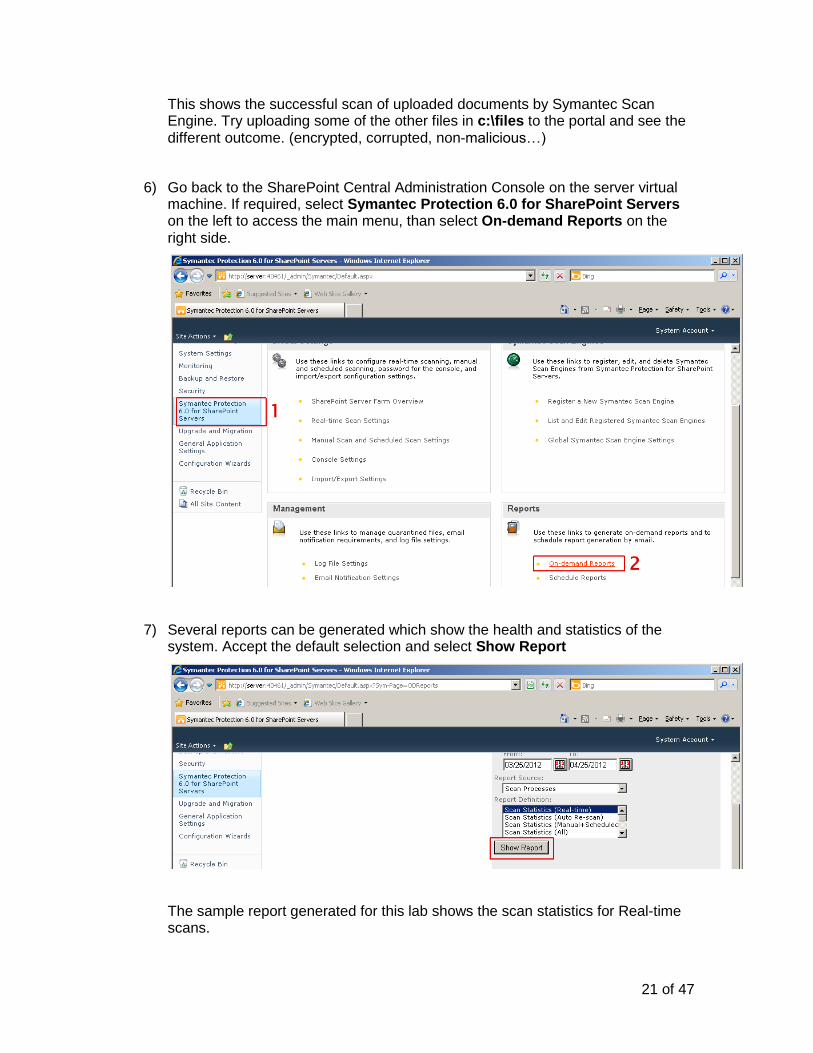
6) Go back to the SharePoint Central Administration Console on the server virtual machine. If required, select Symantec Protection 6.0 for SharePoint Servers on the left to access the main menu, than select On-demand Reports on the right side.
7) Several reports can be generated which show the health and statistics of the system. Accept the default selection and select Show Report
The sample report generated for this lab shows the scan statistics for Real-time scans.
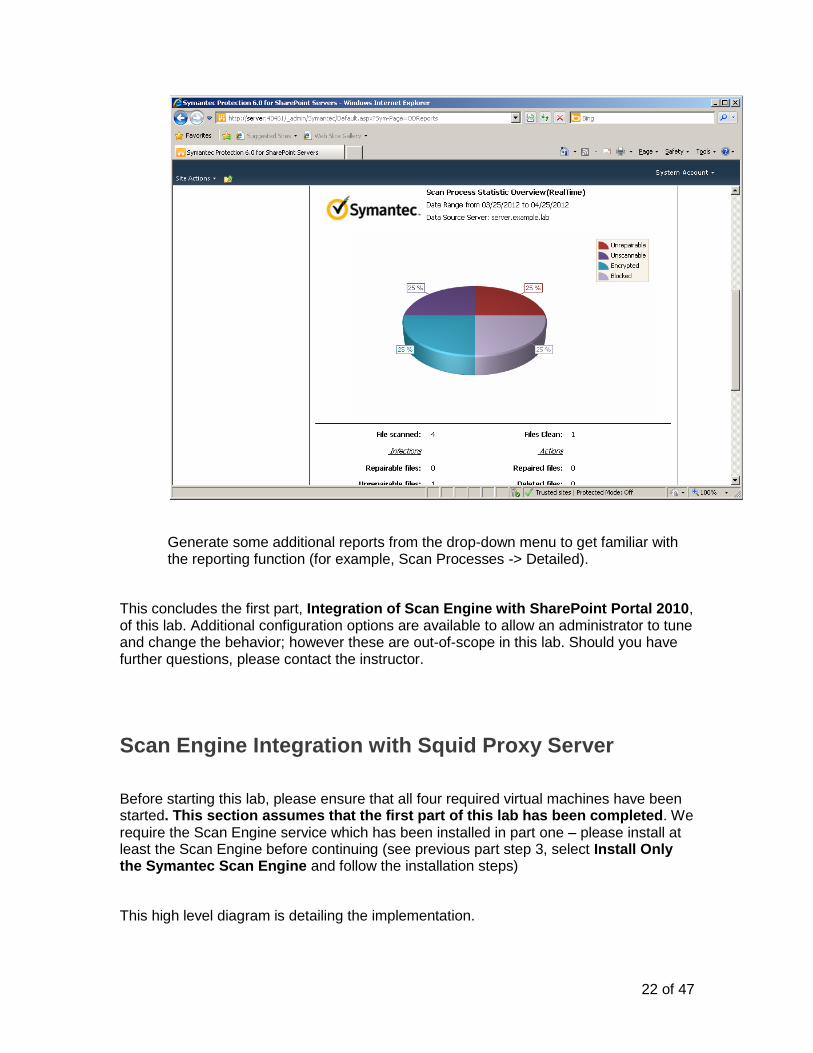
22 of 47
Generate some additional reports from the drop-down menu to get familiar with the reporting function (for example, Scan Processes -> Detailed).
This concludes the first part, Integration of Scan Engine with SharePoint Portal 2010, of this lab. Additional configuration options are available to allow an administrator to tune and change the behavior; however these are out-of-scope in this lab. Should you have further questions, please contact the instructor.
Scan Engine Integration with Squid Proxy Server
Before starting this lab, please ensure that all four required virtual machines have been started. This section assumes that the first part of this lab has been completed. We require the Scan Engine service which has been installed in part one – please install at least the Scan Engine before continuing (see previous part step 3, select Install Only the Symantec Scan Engine and follow the installation steps)
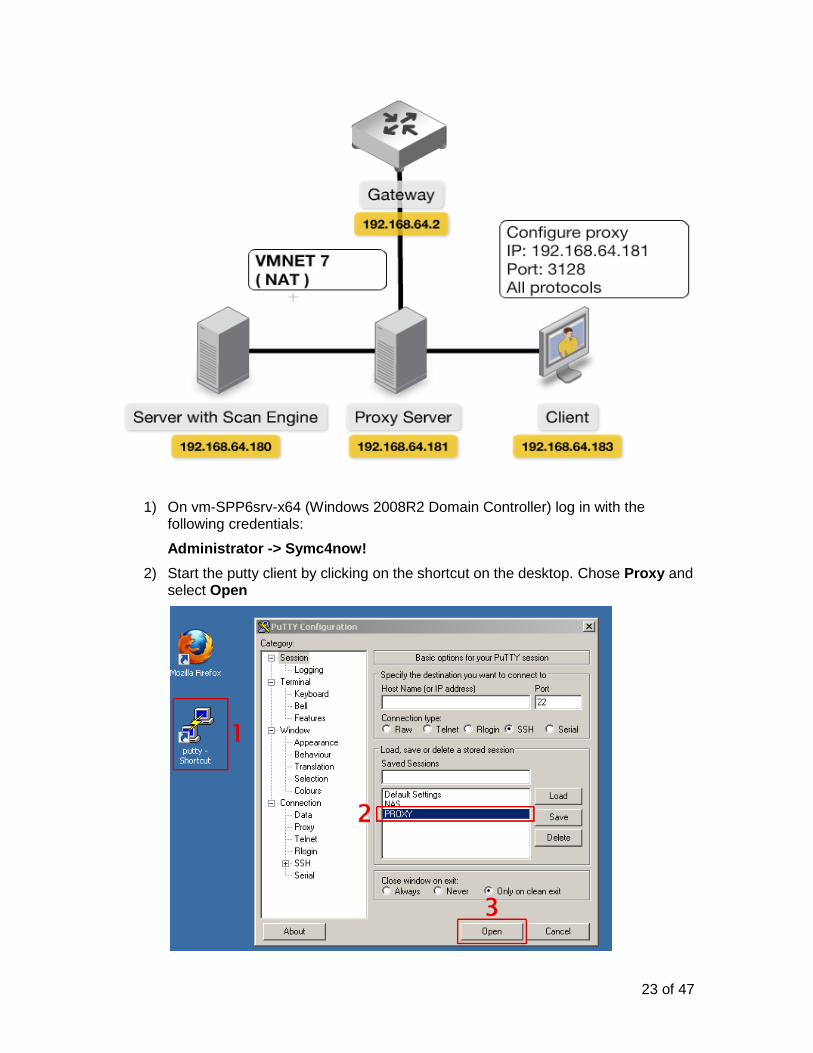
This high level diagram is detailing the implementation.
23 of 47
1) On vm-SPP6srv-x64 (Windows 2008R2 Domain Controller) log in with the following credentials:
Administrator -> Symc4now!
2) Start the putty client by clicking on the shortcut on the desktop. Chose Proxy and select Open

24 of 47
If a security warning appears, select Yes
3) An SSH session will be established to the server running the Squid proxy service. Login with the following credentials:
root -> Symc4now!
at the command prompt, type the following command and press enter:
netstat –anp | grep –i squid
The output of this command confirms that the squid proxy service is running and accepting proxy connections from clients on port 3128

25 of 47
4) On vm-ws-x64 (Windows 7 client) log in with the following credentials:
Alice -> Symc4now!
5) Launch Internet Explorer and click on Tools -> Internet options
6) In the “Internet Options” dialogue, perform the following steps:
1. Click on Connections
2. Click on LAN settings
3. Deselect Automatically detect settings
4. Select Use a proxy…
5. Enter Address: 192.168.154.181 and port: 3128
6. Select OK

26 of 47
Select OK in the “Internet Options” dialogue to close the window.
7) In Internet Explorer browse to a web site, for example http://www.symantec.com
The web site should load without any problem, verifying that the client is now successfully using the Squid proxy to access the internet.

27 of 47
8) Switch back to the server system vm-SPP6srv-x64 and go back into the putty session already established. If the session has been closed in the meantime, re-connect as discussed in step 3.
9) In a default configuration, Squid will not perform any URL filtering or malware scanning. We have prepared a squid configuration which uses the Scan Engine installed on our server to perform URL filtering.
In the putty session, type the following commands and press enter:
cp /etc/squid/squid.conf.icap /etc/squid/squid.conf
type y and press enter when asked to overwrite
tail -5 /etc/squid/squid.conf
The cp command copies the new squid configuration, which has the URL filtering enabled, as the new squid configuration. A service restart is required to activate the new configuration.
Type the following command followed by enter:
service squid restart
This will cause the service to restart – to verify it is up and running again, type the following command again:
netstat –anp | grep –i squid

28 of 47
This concludes the reconfiguration of the Squid proxy service. In the next step, we will change the configuration of the Symantec Scan Engine to enable URL filtering.
10) Still on the server, launch Internet Explorer and browse to the following location:
https://127.0.0.1:8004
Select Continue to this website (not recommended)
29 of 47
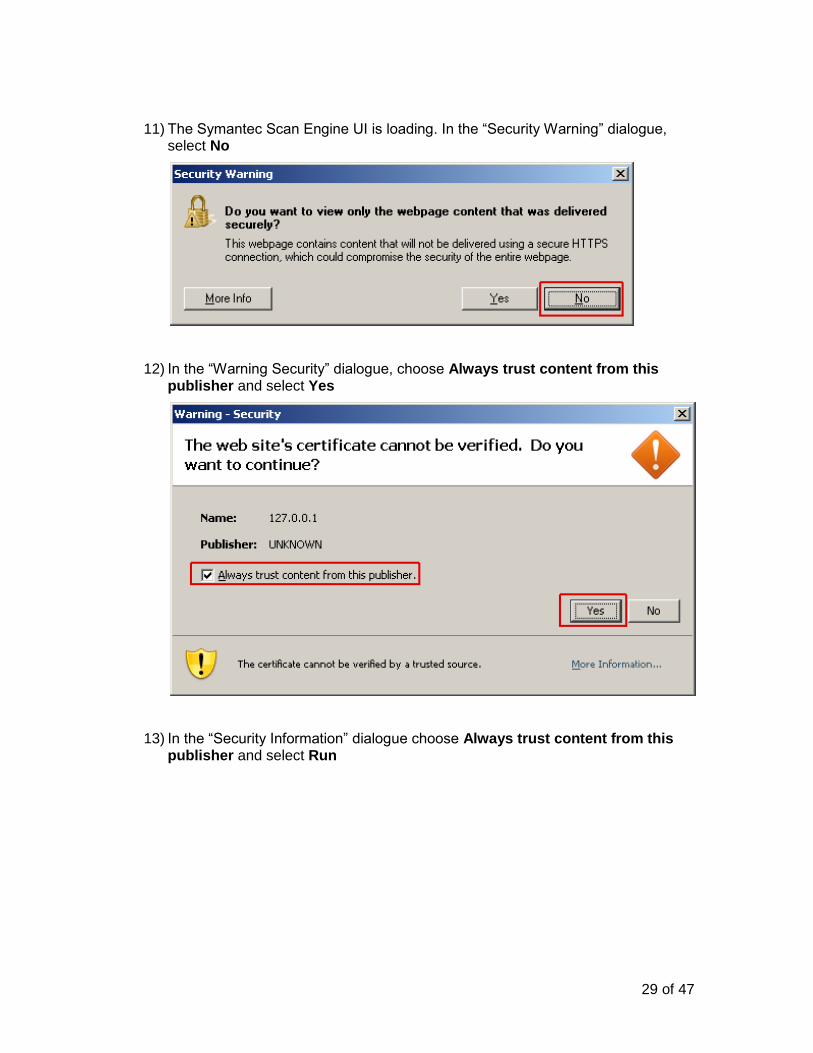
11) The Symantec Scan Engine UI is loading. In the “Security Warning” dialogue, select No
12) In the “Warning Security” dialogue, choose Always trust content from this publisher and select Yes
13) In the “Security Information” dialogue choose Always trust content from this publisher and select Run

30 of 47
14) In the “Warning Security” dialogue select No
NOTE: Ensure to select No here, it is very easy to click Yes which will result in a blank page
15) In the “Scan Engine” UI, type the password chosen during the installation and press enter (try Symc4now!)

31 of 47
16) After a successful login, the UI is loaded and ready.
32 of 47
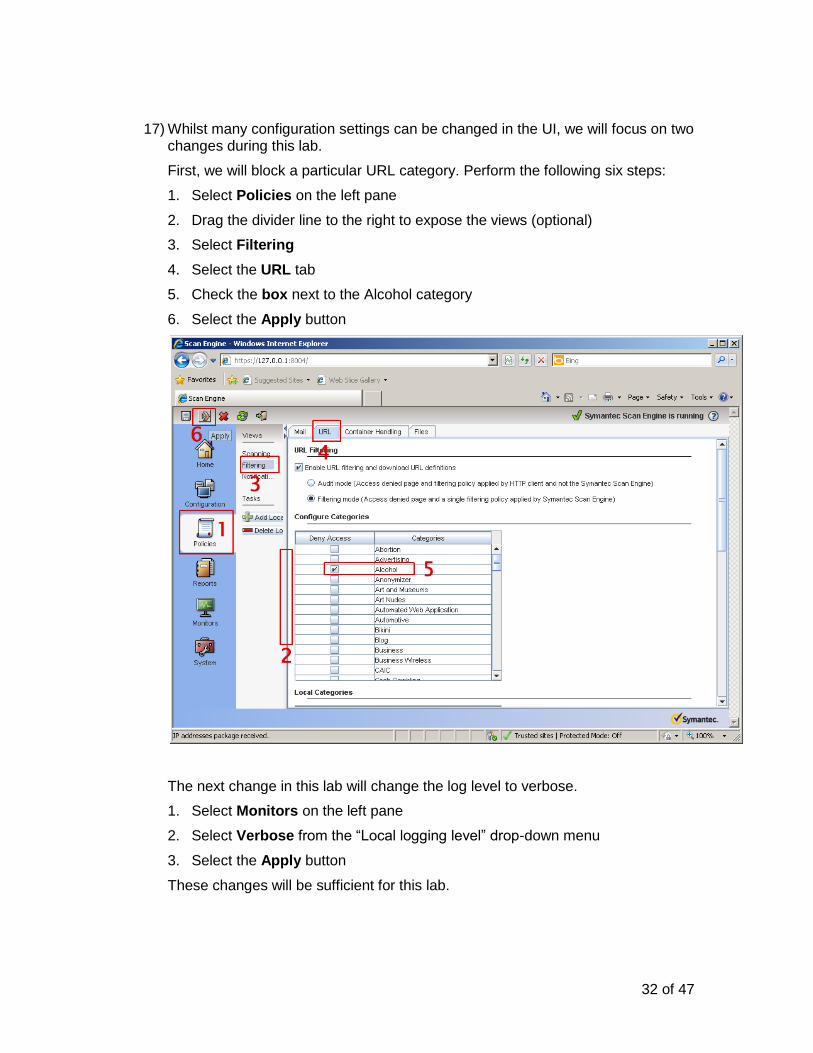
17) Whilst many configuration settings can be changed in the UI, we will focus on two changes during this lab.
First, we will block a particular URL category. Perform the following six steps:
1. Select Policies on the left pane
2. Drag the divider line to the right to expose the views (optional)
3. Select Filtering
4. Select the URL tab
5. Check the box next to the Alcohol category
6. Select the Apply button
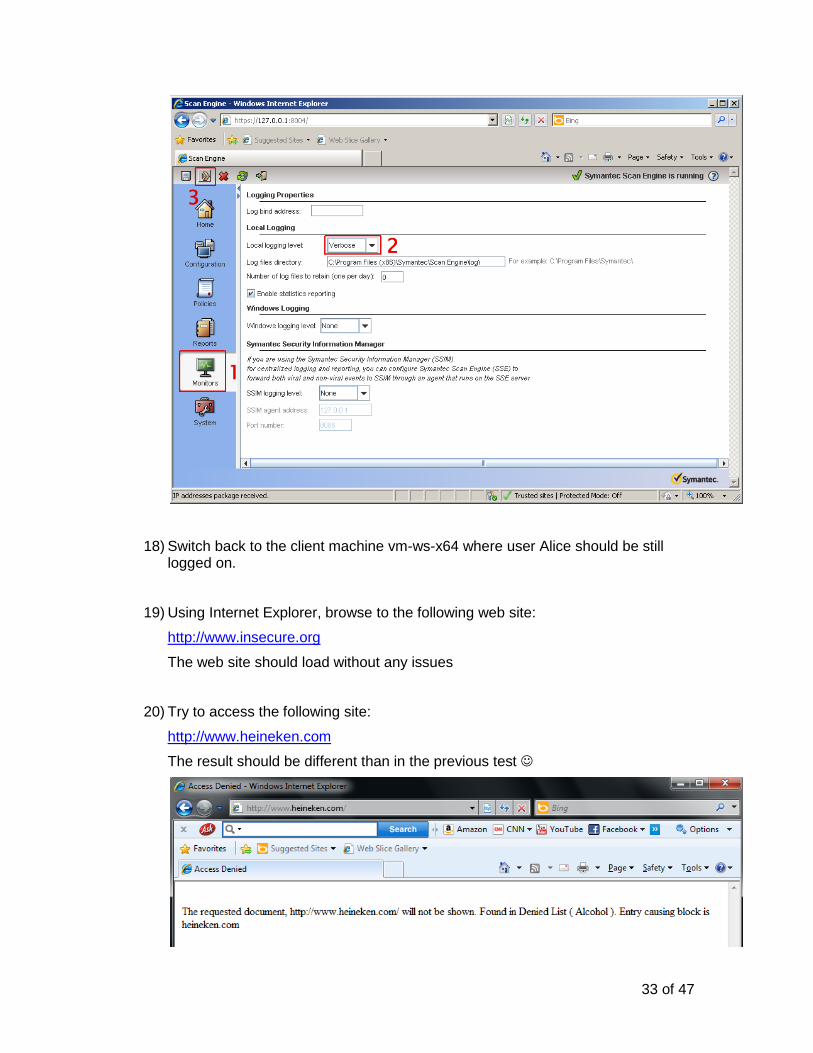
The next change in this lab will change the log level to verbose.
1. Select Monitors on the left pane
2. Select Verbose from the “Local logging level” drop-down menu
3. Select the Apply button
These changes will be sufficient for this lab.
33 of 47
18) Switch back to the client machine vm-ws-x64 where user Alice should be still logged on.
19) Using Internet Explorer, browse to the following web site:
http://www.insecure.org
The web site should load without any issues
20) Try to access the following site:
http://www.heineken.com
The result should be different than in the previous test

34 of 47
21) Switch back to the server machine vm-SPP6srv-x64 and access the Scan Engine UI again (Internet Explorer, https://127.0.0.1:8004)
The summary page should show the blocked URL
22) To run a detailed report, follow these steps:
1. Select Reports on the left pane
2. Select Detailed under “Views”
3. Select URL Scanned
4. Select URL Block
5. Select Generate Report
A new window containing the detailed report containing the filtered events opens.

35 of 47
This concludes the second part, Integration of Scan Engine with Squid Proxy Server, of this lab. Additional configuration options are available to allow an administrator to tune and change the behavior; however these are out-of-scope in this lab. Should you have further questions, please contact the instructor.
Scan Engine Integration with Netapp Filer
Before starting this lab, please ensure that all four required virtual machines have been started. This section assumes that the first part of this lab has been completed. We require the Scan Engine service which has been installed in part one – please install at least the Scan Engine before continuing (see previous part step 3, select Install Only the Symantec Scan Engine and follow the installation steps)
This high level diagram is detailing the implementation.
36 of 47
The integration between the Scan Engine and the Netapp Filer is using the RPC protocol instead of ICAP. For the purpose of this lab, the filer has been configured already and provides a share to which all authenticated domain users have read/write access.
1) On vm-SPP6srv-x64 (Windows 2008R2 Domain Controller) log in with the following credentials:
Administrator -> Symc4now!
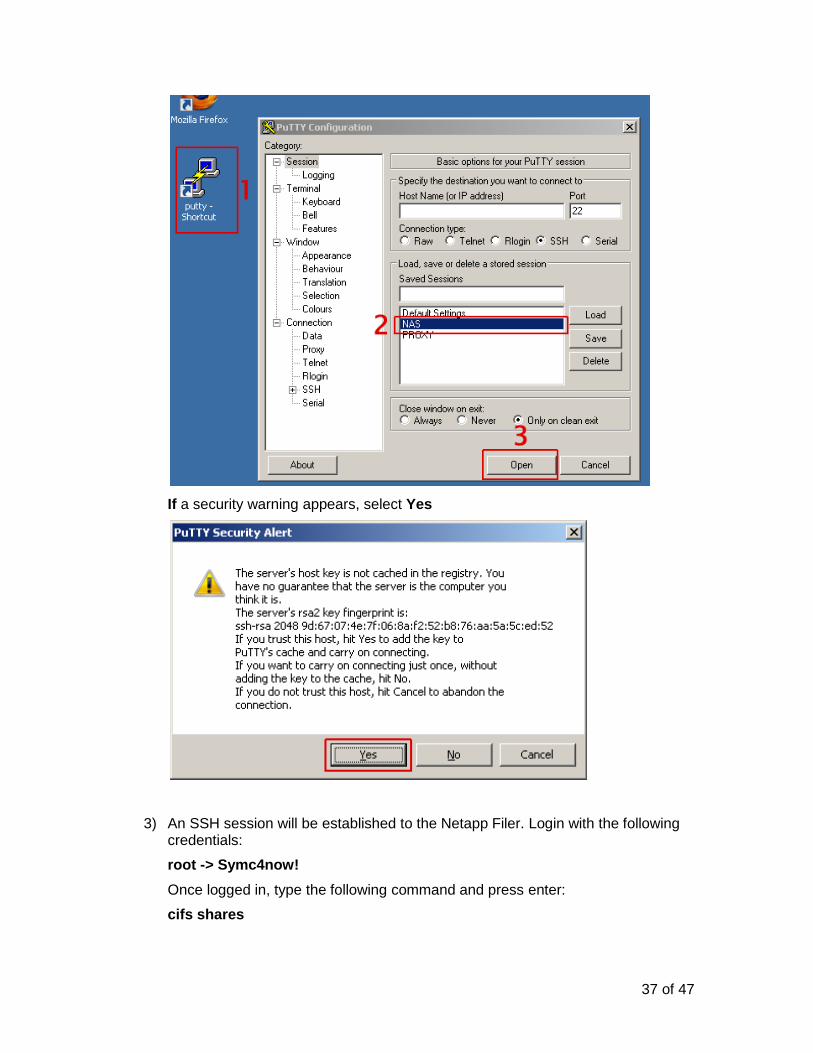
2) Start the putty client by clicking on the shortcut on the desktop. Chose NAS and select Open
37 of 47
If a security warning appears, select Yes
3) An SSH session will be established to the Netapp Filer. Login with the following credentials:
root -> Symc4now!
Once logged in, type the following command and press enter:
cifs shares

38 of 47
The output of that command shows the defined shares and the access rights.
Type the following command and press enter: vscan
The output provides some basic information about the current malware scanning settings on the filer:
1. Virus scanning is currently disabled – the default setting
39 of 47
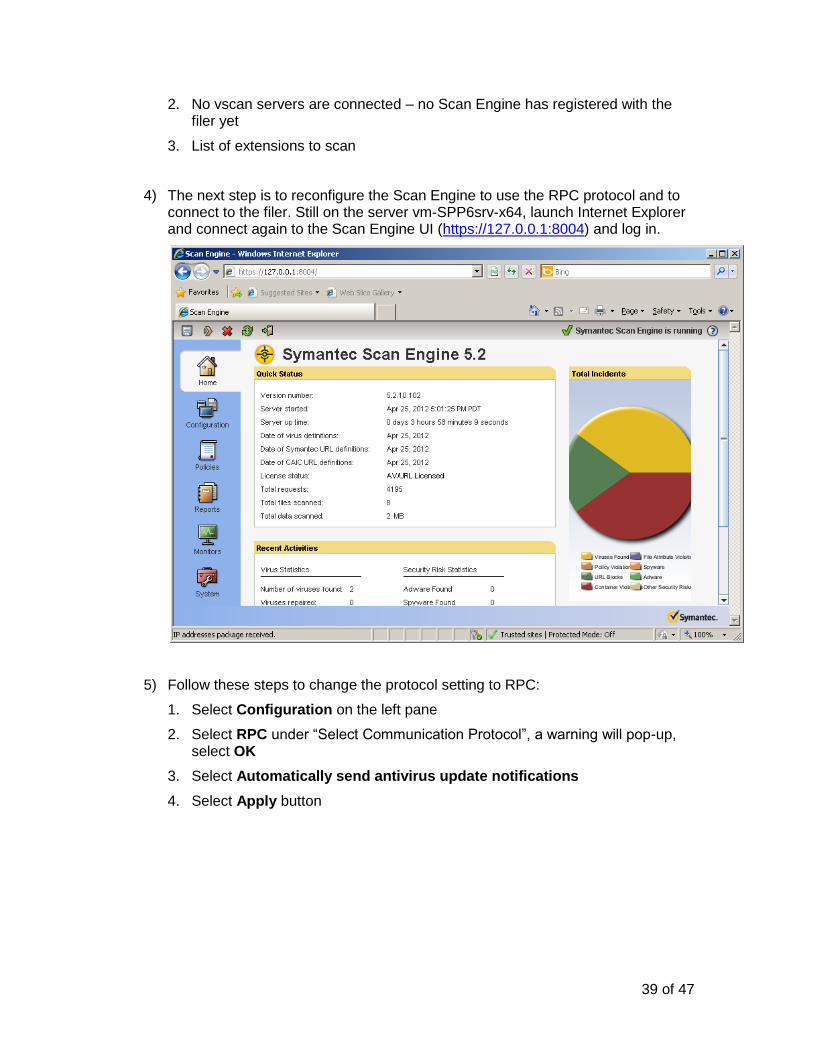
2. No vscan servers are connected – no Scan Engine has registered with the filer yet
3. List of extensions to scan
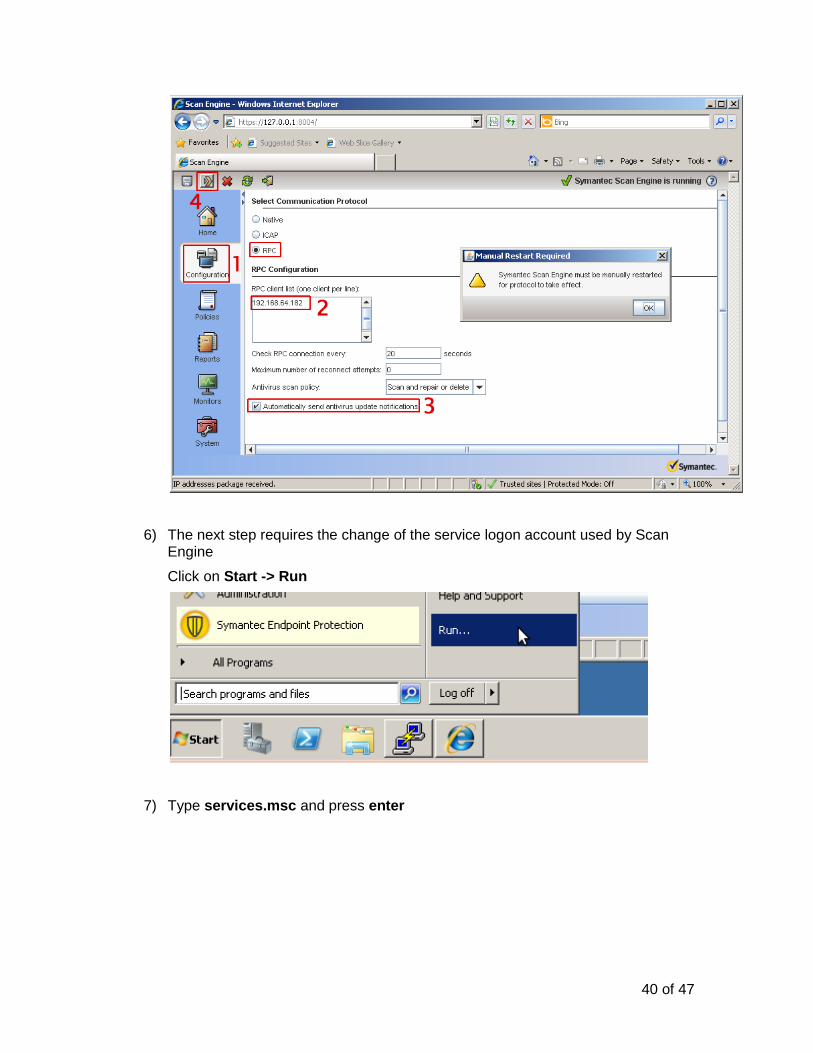
4) The next step is to reconfigure the Scan Engine to use the RPC protocol and to connect to the filer. Still on the server vm-SPP6srv-x64, launch Internet Explorer and connect again to the Scan Engine UI (https://127.0.0.1:8004) and log in.
5) Follow these steps to change the protocol setting to RPC:
1. Select Configuration on the left pane
2. Select RPC under “Select Communication Protocol”, a warning will pop-up, select OK
3. Select Automatically send antivirus update notifications
4. Select Apply button
40 of 47
6) The next step requires the change of the service logon account used by Scan Engine
Click on Start -> Run
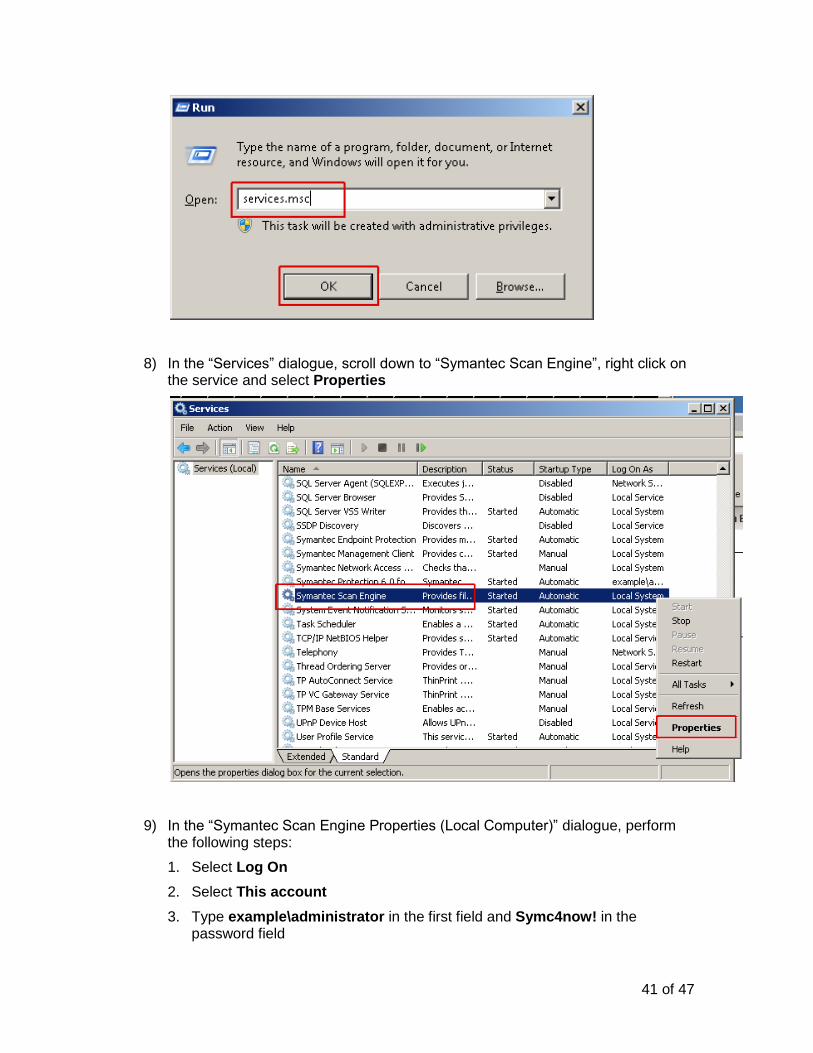
7) Type services.msc and press enter
41 of 47
8) In the “Services” dialogue, scroll down to “Symantec Scan Engine”, right click on the service and select Properties
9) In the “Symantec Scan Engine Properties (Local Computer)” dialogue, perform the following steps:
1. Select Log On
2. Select This account
3. Type example\administrator in the first field and Symc4now! in the password field
42 of 47
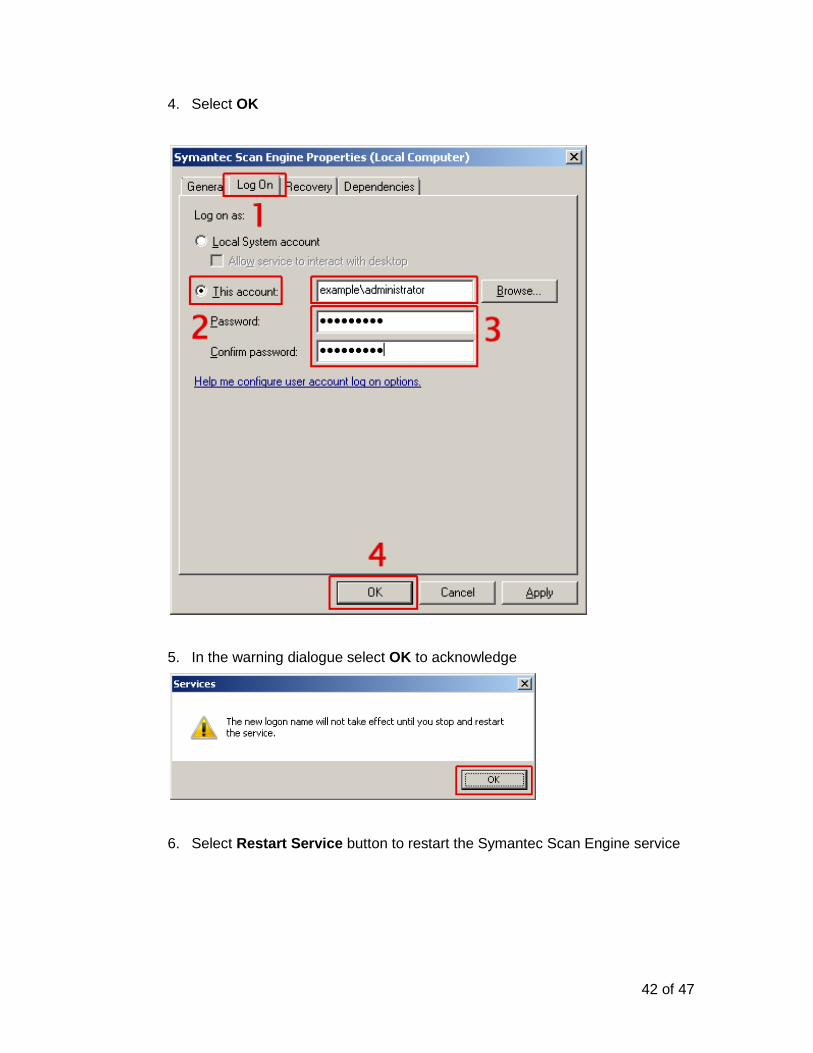
4. Select OK
5. In the warning dialogue select OK to acknowledge
6. Select Restart Service button to restart the Symantec Scan Engine service
43 of 47
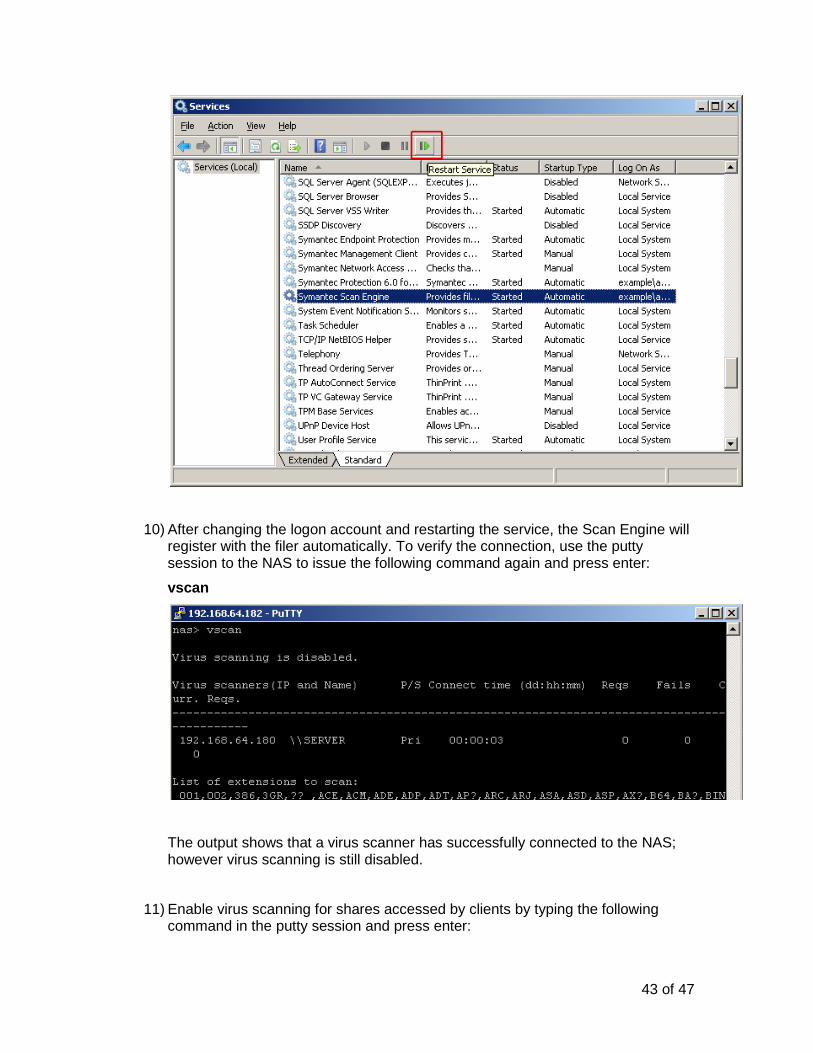
10) After changing the logon account and restarting the service, the Scan Engine will register with the filer automatically. To verify the connection, use the putty session to the NAS to issue the following command again and press enter:
vscan
The output shows that a virus scanner has successfully connected to the NAS; however virus scanning is still disabled.
11) Enable virus scanning for shares accessed by clients by typing the following command in the putty session and press enter:

44 of 47
vscan on
From this point forward, any file written to the shares or read from the share is subject to virus scanning provided its extension is in the include list
12) Switch to the client vm-ws-x64 and log on as Alice -> Symc4now!
13) Click Start and type the following into the “Search programs and files” dialogue and press enter \\nas\share
14) Once the share has been opened, copy the eicar_com.zip file from c:\files to this share.

45 of 47
The file will be copied to the share and then the virus scan will take place.
15) Once the file has been copied, open the eicar_com.zip file from the share and examine the content.

46 of 47
In this particular scenario, the “malware” has been removed from the archive and replaced with a marker file.
Repeat this test with the eicar.com file and refresh the \\nas\share view after copying.
16) Still on the server, log in to the Symantec Scan Engine UI (https://127.0.0.1:8004) and create a report which includes infections:

47 of 47
This concludes the third and final part, Integration of Scan Engine with Netapp Filer, of this lab. Additional configuration options are available to allow an administrator to tune and change the behavior; however these are out-of-scope in this lab. Should you have further questions, please contact the instructor.
Symantec Scan(Protection) Engine is a universal scanning utility to provide advanced malware detection and URL filtering – a true “Swiss-Army-Knife” .
We hope this session was useful.
THANK YOU