Using Modular Policy Framework
28
CHAPTER 16-1 Cisco Security Appliance Command Line Configuration Guide OL-12172-04 16 Using Modular Policy Framework This chapter describes how to use Modular Policy Framework to create security policies for TCP and general connection settings, inspections, IPS, CSC, and QoS. This chapter includes the following sections: • Information About Modular Policy Framework, page 16-1 • Identifying Traffic (Layer 3/4 Class Map), page 16-4 • Configuring Special Actions for Application Inspections (Inspection Policy Map), page 16-8 • Defining Actions (Layer 3/4 Policy Map), page 16-16 • Applying Actions to an Interface (Service Policy), page 16-23 • Modular Policy Framework Examples, page 16-24 Information About Modular Policy Framework Modular Policy Framework provides a consistent and flexible way to configure security appliance features. For example, you can use Modular Policy Framework to create a timeout configuration that is specific to a particular TCP application, as opposed to one that applies to all TCP applications. This section includes the following topics: • Modular Policy Framework Supported Features, page 16-1 • Modular Policy Framework Configuration Overview, page 16-2 • Default Global Policy, page 16-3 Modular Policy Framework Supported Features Modular Policy Framework supports the following features: • QoS input policing—See Chapter 57, “Configuring QoS.” • TCP normalization, TCP and UDP connection limits and timeouts, and TCP sequence number randomization—See the “Configuring TCP Normalization” section on page 24-12, and the “Configuring Connection Limits and Timeouts” section on page 24-17. • CSC—See the “Managing the CSC SSM” section on page 23-9. • Application inspection (multiple types)—See Chapter 26, “Configuring Application Layer Protocol Inspection.” • IPS—See the “Managing the AIP SSM” section on page 23-1.
Transcript of Using Modular Policy Framework
Cisco SecOL-12172-04
C H A P T E R 16
Using Modular Policy FrameworkThis chapter describes how to use Modular Policy Framework to create security policies for TCP and general connection settings, inspections, IPS, CSC, and QoS. This chapter includes the following sections:
• Information About Modular Policy Framework, page 16-1
• Identifying Traffic (Layer 3/4 Class Map), page 16-4
• Configuring Special Actions for Application Inspections (Inspection Policy Map), page 16-8
• Defining Actions (Layer 3/4 Policy Map), page 16-16
• Applying Actions to an Interface (Service Policy), page 16-23
• Modular Policy Framework Examples, page 16-24
Information About Modular Policy FrameworkModular Policy Framework provides a consistent and flexible way to configure security appliance features. For example, you can use Modular Policy Framework to create a timeout configuration that is specific to a particular TCP application, as opposed to one that applies to all TCP applications. This section includes the following topics:
• Modular Policy Framework Supported Features, page 16-1
• Modular Policy Framework Configuration Overview, page 16-2
• Default Global Policy, page 16-3
Modular Policy Framework Supported FeaturesModular Policy Framework supports the following features:
• QoS input policing—See Chapter 57, “Configuring QoS.”
• TCP normalization, TCP and UDP connection limits and timeouts, and TCP sequence number randomization—See the “Configuring TCP Normalization” section on page 24-12, and the “Configuring Connection Limits and Timeouts” section on page 24-17.
• CSC—See the “Managing the CSC SSM” section on page 23-9.
• Application inspection (multiple types)—See Chapter 26, “Configuring Application Layer Protocol Inspection.”
• IPS—See the “Managing the AIP SSM” section on page 23-1.
16-1urity Appliance Command Line Configuration Guide

Chapter 16 Using Modular Policy Framework Information About Modular Policy Framework
• QoS output policing—See Chapter 57, “Configuring QoS.”
• QoS standard priority queue—See Chapter 57, “Configuring QoS.”
• QoS traffic shaping, hierarchical priority queue—See Chapter 57, “Configuring QoS.”
Modular Policy Framework Configuration OverviewConfiguring Modular Policy Framework consists of the following tasks:
1. Identify the traffic on which you want to perform Modular Policy Framework actions by creating Layer 3/4 class maps. For example, you might want to perform actions on all traffic that passes through the security appliance; or you might only want to perform certain actions on traffic from 10.1.1.0/24 to any destination address.
See the “Identifying Traffic (Layer 3/4 Class Map)” section on page 16-4.
2. If one of the actions you want to perform is application inspection, and you want to perform additional actions on some inspection traffic, then create an inspection policy map. The inspection policy map identifies the traffic and specifies what to do with it. For example, you might want to drop all HTTP requests with a body length greater than 1000 bytes.
You can create a self-contained inspection policy map that identifies the traffic directly with match commands, or you can create an inspection class map for reuse or for more complicated matching. See the “Defining Actions in an Inspection Policy Map” section on page 16-9 and the “Identifying Traffic in an Inspection Class Map” section on page 16-12.
3. If you want to match text with a regular expression within inspected packets, you can create a regular expression or a group of regular expressions (a regular expression class map). Then, when you define the traffic to match for the inspection policy map, you can call on an existing regular expression. For example, you might want to drop all HTTP requests with a URL including the text “example.com.”
Layer 3/4 Class Map Layer 3/4 Class Map
2415
06
Inspection Class Map/Match Commands
Inspection Policy Map Actions
2415
07
16-2Cisco Security Appliance Command Line Configuration Guide
OL-12172-04
Chapter 16 Using Modular Policy Framework Information About Modular Policy Framework
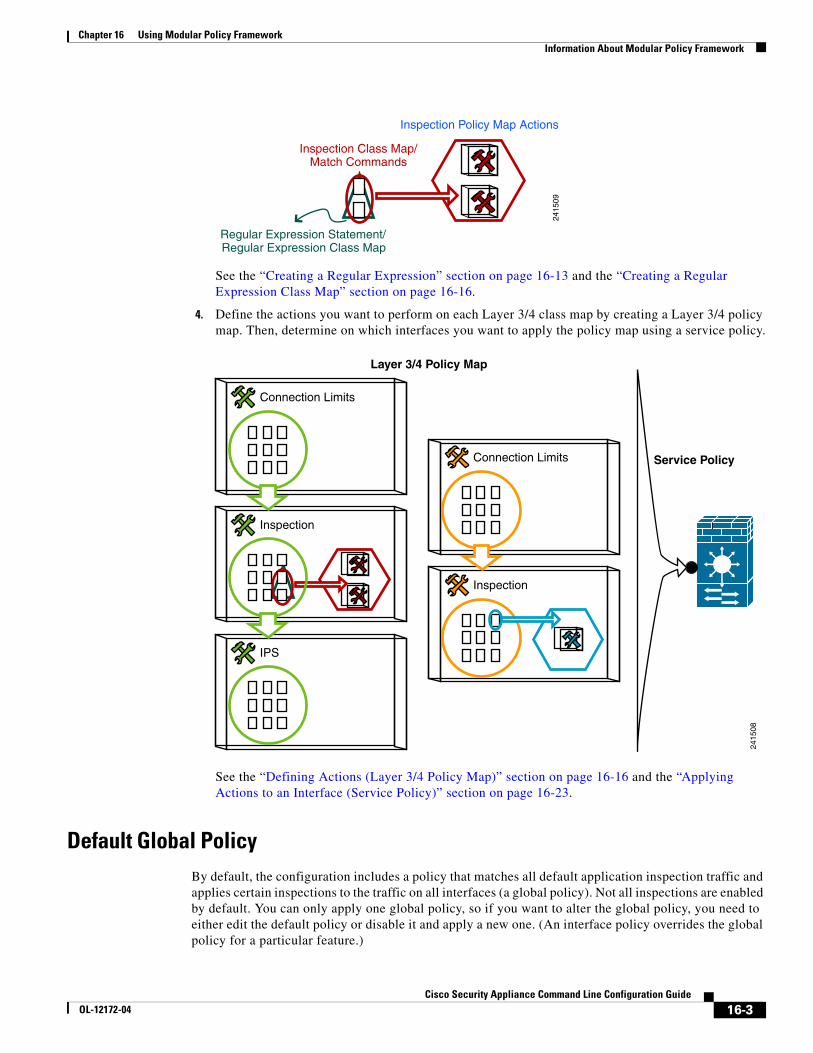
See the “Creating a Regular Expression” section on page 16-13 and the “Creating a Regular Expression Class Map” section on page 16-16.
4. Define the actions you want to perform on each Layer 3/4 class map by creating a Layer 3/4 policy map. Then, determine on which interfaces you want to apply the policy map using a service policy.
See the “Defining Actions (Layer 3/4 Policy Map)” section on page 16-16 and the “Applying Actions to an Interface (Service Policy)” section on page 16-23.
Default Global PolicyBy default, the configuration includes a policy that matches all default application inspection traffic and applies certain inspections to the traffic on all interfaces (a global policy). Not all inspections are enabled by default. You can only apply one global policy, so if you want to alter the global policy, you need to either edit the default policy or disable it and apply a new one. (An interface policy overrides the global policy for a particular feature.)
Regular Expression Statement/Regular Expression Class Map
Inspection Class Map/Match Commands
Inspection Policy Map Actions
2415
09
Inspection
Connection Limits
Layer 3/4 Policy Map
Service Policy
IPS
Inspection
Connection Limits
2415
08
16-3Cisco Security Appliance Command Line Configuration Guide
OL-12172-04

Chapter 16 Using Modular Policy Framework Identifying Traffic (Layer 3/4 Class Map)
The default policy configuration includes the following commands:
class-map inspection_default match default-inspection-trafficpolicy-map type inspect dns preset_dns_map parameters message-length maximum 512policy-map global_policy class inspection_default inspect dns preset_dns_map inspect ftp inspect h323 h225 inspect h323 ras inspect rsh inspect rtsp inspect esmtp inspect sqlnet inspect skinny inspect sunrpc inspect xdmcp inspect sip inspect netbios inspect tftp service-policy global_policy global
Note See the “Incompatibility of Certain Feature Actions” section on page 16-20 for more information about the special match default-inspection-traffic command used in the default class map.
Identifying Traffic (Layer 3/4 Class Map)A Layer 3/4 class map identifies Layer 3 and 4 traffic to which you want to apply actions. You can create multiple Layer 3/4 class maps for each Layer 3/4 policy map.
This section includes the following topics:
• Default Class Maps, page 16-4
• Maximum Class Maps, page 16-5
• Creating a Layer 3/4 Class Map for Through Traffic, page 16-5
• Creating a Layer 3/4 Class Map for Management Traffic, page 16-7
Default Class MapsThe configuration includes a default Layer 3/4 class map that the security appliance uses in the default global policy. It is called inspection_default and matches the default inspection traffic:
class-map inspection_default match default-inspection-traffic
Note See the “Incompatibility of Certain Feature Actions” section on page 16-20 for more information about the special match default-inspection-traffic command used in the default class map.
16-4Cisco Security Appliance Command Line Configuration Guide
OL-12172-04
Chapter 16 Using Modular Policy Framework Identifying Traffic (Layer 3/4 Class Map)
Another class map that exists in the default configuration is called class-default, and it matches all traffic:
class-map class-default match any
This class map appears at the end of all Layer 3/4 policy maps and essentially tells the security appliance to not perform any actions on all other traffic. You can use the class-default class map if desired, rather than making your own match any class map. In fact, some features are only available for class-default, such as QoS traffic shaping.
Maximum Class MapsThe maximum number of class maps of all types is 255 in single mode or per context in multiple mode. Class maps include the following types:
• Layer 3/4 class maps (for through traffic and management traffic)
• Inspection class maps
• Regular expression class maps
• match commands used directly underneath an inspection policy map
This limit also includes default class maps of all types, limiting user-configured class maps to approximately 235. See the “Default Class Maps” section on page 16-4.
Creating a Layer 3/4 Class Map for Through TrafficA Layer 3/4 class map matches traffic based on protocols, ports, IP addresses and other Layer 3 or 4 attributes.
To define a Layer 3/4 class map, perform the following steps:
Step 1 Create a Layer 3/4 class map by entering the following command:
hostname(config)# class-map class_map_namehostname(config-cmap)#
Where class_map_name is a string up to 40 characters in length. The name “class-default” is reserved. All types of class maps use the same name space, so you cannot reuse a name already used by another type of class map. The CLI enters class-map configuration mode.
Step 2 (Optional) Add a description to the class map by entering the following command:
hostname(config-cmap)# description string
Step 3 Define the traffic to include in the class by matching one of the following characteristics. Unless otherwise specified, you can include only one match command in the class map.
• Any traffic—The class map matches all traffic.
hostname(config-cmap)# match any
• Access list—The class map matches traffic specified by an extended access list. If the security appliance is operating in transparent firewall mode, you can use an EtherType access list.
hostname(config-cmap)# match access-list access_list_name
16-5Cisco Security Appliance Command Line Configuration Guide
OL-12172-04

Chapter 16 Using Modular Policy Framework Identifying Traffic (Layer 3/4 Class Map)
For more information about creating access lists, see the “Adding an Extended Access List” section on page 18-6 or the “Adding an EtherType Access List” section on page 18-9.
For information about creating access lists with NAT, see the “IP Addresses Used for Access Lists When You Use NAT” section on page 18-3.
• TCP or UDP destination ports—The class map matches a single port or a contiguous range of ports.
hostname(config-cmap)# match port {tcp | udp} {eq port_num | range port_num port_num}
Tip For applications that use multiple, non-contiguous ports, use the match access-list command and define an ACE to match each port.
For a list of ports you can specify, see the “TCP and UDP Ports” section on page C-11.
For example, enter the following command to match TCP packets on port 80 (HTTP):
hostname(config-cmap)# match tcp eq 80
• Default traffic for inspection—The class map matches the default TCP and UDP ports used by all applications that the security appliance can inspect.
hostname(config-cmap)# match default-inspection-traffic
This command, which is used in the default global policy, is a special CLI shortcut that when used in a policy map, ensures that the correct inspection is applied to each packet, based on the destination port of the traffic. For example, when UDP traffic for port 69 reaches the security appliance, then the security appliance applies the TFTP inspection; when TCP traffic for port 21 arrives, then the security appliance applies the FTP inspection. So in this case only, you can configure multiple inspections for the same class map (with the exception of WAAS inspection, which can be configured with other inspections. See the “Incompatibility of Certain Feature Actions” section on page 16-20 for more information about combining actions). Normally, the security appliance does not use the port number to determine the inspection applied, thus giving you the flexibility to apply inspections to non-standard ports, for example.
See the “Default Inspection Policy” section on page 26-3 for a list of default ports. Not all applications whose ports are included in the match default-inspection-traffic command are enabled by default in the policy map.
You can specify a match access-list command along with the match default-inspection-traffic command to narrow the matched traffic. Because the match default-inspection-traffic command specifies the ports to match, any ports in the access list are ignored.
• DSCP value in an IP header—The class map matches up to eight DSCP values.
hostname(config-cmap)# match dscp value1 [value2] [...] [value8]
For example, enter the following:
hostname(config-cmap)# match dscp af43 cs1 ef
• Precedence—The class map matches up to four precedence values, represented by the TOS byte in the IP header.
hostname(config-cmap)# match precedence value1 [value2] [value3] [value4]
where value1 through value4 can be 0 to 7, corresponding to the possible precedences.
• RTP traffic—The class map matches RTP traffic.
hostname(config-cmap)# match rtp starting_port range
16-6Cisco Security Appliance Command Line Configuration Guide
OL-12172-04
Chapter 16 Using Modular Policy Framework Identifying Traffic (Layer 3/4 Class Map)
The starting_port specifies an even-numbered UDP destination port between 2000 and 65534. The range specifies the number of additional UDP ports to match above the starting_port, between 0 and 16383.
• Tunnel group traffic—The class map matches traffic for a tunnel group to which you want to apply QoS.
hostname(config-cmap)# match tunnel-group name
You can also specify one other match command to refine the traffic match. You can specify any of the preceding commands, except for the match any, match access-list, or match default-inspection-traffic commands. Or you can enter the following command to police each flow:
hostname(config-cmap)# match flow ip destination address
All traffic going to a unique IP destination address is considered a flow.
The following is an example for the class-map command:
hostname(config)# access-list udp permit udp any anyhostname(config)# access-list tcp permit tcp any anyhostname(config)# access-list host_foo permit ip any 10.1.1.1 255.255.255.255
hostname(config)# class-map all_udphostname(config-cmap)# description "This class-map matches all UDP traffic"hostname(config-cmap)# match access-list udp
hostname(config-cmap)# class-map all_tcphostname(config-cmap)# description "This class-map matches all TCP traffic"hostname(config-cmap)# match access-list tcp
hostname(config-cmap)# class-map all_httphostname(config-cmap)# description "This class-map matches all HTTP traffic"hostname(config-cmap)# match port tcp eq http
hostname(config-cmap)# class-map to_serverhostname(config-cmap)# description "This class-map matches all traffic to server 10.1.1.1"hostname(config-cmap)# match access-list host_foo
Creating a Layer 3/4 Class Map for Management TrafficFor management traffic to the security appliance, you might want to perform actions specific to this kind of traffic. You can specify a management class map that can match an access list or TCP or UDP ports. The types of actions available for a management class map in the policy map are specialized for management traffic. Namely, this type of class map lets you inspect RADIUS accounting traffic and set connection limits.
To create a class map for management traffic to the security appliance, perform the following steps:
Step 1 Create a class map by entering the following command:
hostname(config)# class-map type management class_map_namehostname(config-cmap)#
16-7Cisco Security Appliance Command Line Configuration Guide
OL-12172-04
Chapter 16 Using Modular Policy Framework Configuring Special Actions for Application Inspections (Inspection Policy Map)
Where class_map_name is a string up to 40 characters in length. The name “class-default” is reserved. All types of class maps use the same name space, so you cannot reuse a name already used by another type of class map. The CLI enters class-map configuration mode.
Step 2 (Optional) Add a description to the class map by entering the following command:
hostname(config-cmap)# description string
Step 3 Define the traffic to include in the class by matching one of the following characteristics. You can include only one match command in the class map.
• Access list—The class map matches traffic specified by an extended access list. If the security appliance is operating in transparent firewall mode, you can use an EtherType access list.
hostname(config-cmap)# match access-list access_list_name
For more information about creating access lists, see the “Adding an Extended Access List” section on page 18-6 or the “Adding an EtherType Access List” section on page 18-9.
For information about creating access lists with NAT, see the “IP Addresses Used for Access Lists When You Use NAT” section on page 18-3.
• TCP or UDP destination ports—The class map matches a single port or a contiguous range of ports.
hostname(config-cmap)# match port {tcp | udp} {eq port_num | range port_num port_num}
Tip For applications that use multiple, non-contiguous ports, use the match access-list command and define an ACE to match each port.
For a list of ports you can specify, see the “TCP and UDP Ports” section on page C-11.
For example, enter the following command to match TCP packets on port 80 (HTTP):
hostname(config-cmap)# match tcp eq 80
Configuring Special Actions for Application Inspections (Inspection Policy Map)
Modular Policy Framework lets you configure special actions for many application inspections. When you enable an inspection engine in the Layer 3/4 policy map, you can also optionally enable actions as defined in an inspection policy map. When the inspection policy map matches traffic within the Layer 3/4 class map for which you have defined an inspection action, then that subset of traffic will be acted upon as specified (for example, dropped or rate-limited).
This section includes the following topics:
• Inspection Policy Map Overview, page 16-9
• Defining Actions in an Inspection Policy Map, page 16-9
• Identifying Traffic in an Inspection Class Map, page 16-12
• Creating a Regular Expression, page 16-13
• Creating a Regular Expression Class Map, page 16-16
16-8Cisco Security Appliance Command Line Configuration Guide
OL-12172-04
Chapter 16 Using Modular Policy Framework Configuring Special Actions for Application Inspections (Inspection Policy Map)
Inspection Policy Map OverviewSee the “Configuring Application Inspection” section on page 26-5 for a list of applications that support inspection policy maps.
An inspection policy map consists of one or more of the following elements. The exact options available for an inspection policy map depends on the application.
• Traffic matching command—You can define a traffic matching command directly in the inspection policy map to match application traffic to criteria specific to the application, such as a URL string, for which you then enable actions.
– Some traffic matching commands can specify regular expressions to match text inside a packet. Be sure to create and test the regular expressions before you configure the policy map, either singly or grouped together in a regular expression class map.
• Inspection class map—(Not available for all applications. See the CLI help for a list of supported applications.) An inspection class map includes traffic matching commands that match application traffic with criteria specific to the application, such as a URL string. You then identify the class map in the policy map and enable actions. The difference between creating a class map and defining the traffic match directly in the inspection policy map is that you can create more complex match criteria and you can reuse class maps.
– Some traffic matching commands can specify regular expressions to match text inside a packet. Be sure to create and test the regular expressions before you configure the policy map, either singly or grouped together in a regular expression class map.
• Parameters—Parameters affect the behavior of the inspection engine.
The default inspection policy map configuration includes the following commands, which sets the maximum message length for DNS packets to be 512 bytes:
policy-map type inspect dns preset_dns_map parameters message-length maximum 512
Note There are other default inspection policy maps such as policy-map type inspect esmtp _default_esmtp_map. These default policy maps are created implicitly by the command inspect protocol. For example, inspect esmtp implicitly uses the policy map “_default_esmtp_map.” All the default policy maps can be shown by using the show running-config all policy-map command.
Defining Actions in an Inspection Policy MapWhen you enable an inspection engine in the Layer 3/4 policy map, you can also optionally enable actions as defined in an inspection policy map.
To create an inspection policy map, perform the following steps:
Step 1 (Optional) Create an inspection class map according to the “Identifying Traffic in an Inspection Class Map” section on page 16-12. Alternatively, you can identify the traffic directly within the policy map.
Step 2 To create the inspection policy map, enter the following command:
hostname(config)# policy-map type inspect application policy_map_namehostname(config-pmap)#
16-9Cisco Security Appliance Command Line Configuration Guide
OL-12172-04
Chapter 16 Using Modular Policy Framework Configuring Special Actions for Application Inspections (Inspection Policy Map)
See the “Configuring Application Inspection” section on page 26-5 for a list of applications that support inspection policy maps.
The policy_map_name argument is the name of the policy map up to 40 characters in length. All types of policy maps use the same name space, so you cannot reuse a name already used by another type of policy map. The CLI enters policy-map configuration mode.
Step 3 To apply actions to matching traffic, perform the following steps:
a. Specify the traffic on which you want to perform actions using one of the following methods:
• Specify the inspection class map that you created in the “Identifying Traffic in an Inspection Class Map” section on page 16-12 by entering the following command:
hostname(config-pmap)# class class_map_namehostname(config-pmap-c)#
Not all applications support inspection class maps.
• Specify traffic directly in the policy map using one of the match commands described for each application in Chapter 26, “Configuring Application Layer Protocol Inspection.” If you use a match not command, then any traffic that matches the criterion in the match not command does not have the action applied.
b. Specify the action you want to perform on the matching traffic by entering the following command:
hostname(config-pmap-c)# {[drop [send-protocol-error] | drop-connection [send-protocol-error]| mask | reset] [log] | rate-limit message_rate}
Not all options are available for each application. Other actions specific to the application might also be available. See Chapter 26, “Configuring Application Layer Protocol Inspection,” for the exact options available.
The drop keyword drops all packets that match.
The send-protocol-error keyword sends a protocol error message.
The drop-connection keyword drops the packet and closes the connection.
The mask keyword masks out the matching portion of the packet.
The reset keyword drops the packet, closes the connection, and sends a TCP reset to the server and/or client.
The log keyword, which you can use alone or with one of the other keywords, sends a system log message.
The rate-limit message_rate argument limits the rate of messages.
Note You can specify up to 63 class or match commands in the policy map.
If a packet matches multiple different match or class commands, then the order in which the security appliance applies the actions is determined by internal security appliance rules, and not by the order they are added to the policy map. The internal rules are determined by the application type and the logical progression of parsing a packet, and are not user-configurable. For example for HTTP traffic, parsing a Request Method field precedes parsing the Header Host Length field; an action for the Request Method field occurs before the action for the Header Host Length field. For example, the following match commands can be entered in any order, but the match request method get command is matched first.
match request header host length gt 100reset
match request method getlog
16-10Cisco Security Appliance Command Line Configuration Guide
OL-12172-04
Chapter 16 Using Modular Policy Framework Configuring Special Actions for Application Inspections (Inspection Policy Map)
If an action drops a packet, then no further actions are performed in the inspection policy map. For example, if the first action is to reset the connection, then it will never match any further match or class commands. If the first action is to log the packet, then a second action, such as resetting the connection, can occur. (You can configure both the reset (or drop-connection, and so on.) and the log action for the same match or class command, in which case the packet is logged before it is reset for a given match.)
If a packet matches multiple match or class commands that are the same, then they are matched in the order they appear in the policy map. For example, for a packet with the header length of 1001, it will match the first command below, and be logged, and then will match the second command and be reset. If you reverse the order of the two match commands, then the packet will be dropped and the connection reset before it can match the second match command; it will never be logged.
match request header length gt 100log
match request header length gt 1000reset
A class map is determined to be the same type as another class map or match command based on the lowest priority match command in the class map (the priority is based on the internal rules). If a class map has the same type of lowest priority match command as another class map, then the class maps are matched according to the order they are added to the policy map. If the lowest priority command for each class map is different, then the class map with the higher priority match command is matched first. For example, the following three class maps contain two types of match commands: match request-cmd (higher priority) and match filename (lower priority). The ftp3 class map includes both commands, but it is ranked according to the lowest priority command, match filename. The ftp1 class map includes the highest priority command, so it is matched first, regardless of the order in the policy map. The ftp3 class map is ranked as being of the same priority as the ftp2 class map, which also contains the match filename command. They are matched according to the order in the policy map: ftp3 and then ftp2.
class-map type inspect ftp match-all ftp1match request-cmd get
class-map type inspect ftp match-all ftp2match filename regex abc
class-map type inspect ftp match-all ftp3match request-cmd getmatch filename regex abc
policy-map type inspect ftp ftpclass ftp3
logclass ftp2
logclass ftp1
log
Step 4 To configure parameters that affect the inspection engine, enter the following command:
hostname(config-pmap)# parametershostname(config-pmap-p)#
The CLI enters parameters configuration mode. For the parameters available for each application, see Chapter 26, “Configuring Application Layer Protocol Inspection.”
The following is an example of an HTTP inspection policy map and the related class maps. This policy map is activated by the Layer 3/4 policy map, which is enabled by the service policy.
hostname(config)# regex url_example example\.com
16-11Cisco Security Appliance Command Line Configuration Guide
OL-12172-04
Chapter 16 Using Modular Policy Framework Configuring Special Actions for Application Inspections (Inspection Policy Map)
hostname(config)# regex url_example2 example2\.comhostname(config)# class-map type regex match-any URLshostname(config-cmap)# match regex url_examplehostname(config-cmap)# match regex url_example2
hostname(config-cmap)# class-map type inspect http match-all http-traffichostname(config-cmap)# match req-resp content-type mismatchhostname(config-cmap)# match request body length gt 1000hostname(config-cmap)# match not request uri regex class URLs
hostname(config-cmap)# policy-map type inspect http http-map1hostname(config-pmap)# class http-traffichostname(config-pmap-c)# drop-connection loghostname(config-pmap-c)# match req-resp content-type mismatchhostname(config-pmap-c)# reset loghostname(config-pmap-c)# parametershostname(config-pmap-p)# protocol-violation action log
hostname(config-pmap-p)# policy-map testhostname(config-pmap)# class test (a Layer 3/4 class map not shown)hostname(config-pmap-c)# inspect http http-map1
hostname(config-pmap-c)# service-policy test interface outside
Identifying Traffic in an Inspection Class MapThis type of class map allows you to match criteria that is specific to an application. For example, for DNS traffic, you can match the domain name in a DNS query.
Note Not all applications support inspection class maps. See the CLI help for a list of supported applications.
A class map groups multiple traffic matches (in a match-all class map), or lets you match any of a list of matches (in a match-any class map). The difference between creating a class map and defining the traffic match directly in the inspection policy map is that the class map lets you group multiple match commands, and you can reuse class maps. For the traffic that you identify in this class map, you can specify actions such as dropping, resetting, and/or logging the connection in the inspection policy map. If you want to perform different actions on different types of traffic, you should identify the traffic directly in the policy map.
To define an inspection class map, perform the following steps:
Step 1 (Optional) If you want to match based on a regular expression, see the “Creating a Regular Expression” section on page 16-13 and the “Creating a Regular Expression Class Map” section on page 16-16.
Step 2 Create a class map by entering the following command:
hostname(config)# class-map type inspect application [match-all | match-any] class_map_namehostname(config-cmap)#
Where the application is the application you want to inspect. For supported applications, see the CLI help for a list of supported applications or see Chapter 26, “Configuring Application Layer Protocol Inspection.”
The class_map_name argument is the name of the class map up to 40 characters in length.
16-12Cisco Security Appliance Command Line Configuration Guide
OL-12172-04

Chapter 16 Using Modular Policy Framework Configuring Special Actions for Application Inspections (Inspection Policy Map)
The match-all keyword is the default, and specifies that traffic must match all criteria to match the class map.
The match-any keyword specifies that the traffic matches the class map if it matches at least one of the criteria.
The CLI enters class-map configuration mode, where you can enter one or more match commands.
Step 3 (Optional) To add a description to the class map, enter the following command:
hostname(config-cmap)# description string
Step 4 Define the traffic to include in the class by entering one or more match commands available for your application.
To specify traffic that should not match the class map, use the match not command. For example, if the match not command specifies the string “example.com,” then any traffic that includes “example.com” does not match the class map.
To see the match commands available for each application, see Chapter 26, “Configuring Application Layer Protocol Inspection.”
The following example creates an HTTP class map that must match all criteria:
hostname(config-cmap)# class-map type inspect http match-all http-traffichostname(config-cmap)# match req-resp content-type mismatchhostname(config-cmap)# match request body length gt 1000hostname(config-cmap)# match not request uri regex class URLs
The following example creates an HTTP class map that can match any of the criteria:
hostname(config-cmap)# class-map type inspect http match-any monitor-httphostname(config-cmap)# match request method gethostname(config-cmap)# match request method puthostname(config-cmap)# match request method post
Creating a Regular ExpressionA regular expression matches text strings either literally as an exact string, or by using metacharacters so you can match multiple variants of a text string. You can use a regular expression to match the content of certain application traffic; for example, you can match a URL string inside an HTTP packet.
Use Ctrl+V to escape all of the special characters in the CLI, such as question mark (?) or a tab. For example, type d[Ctrl+V]?g to enter d?g in the configuration.
See the regex command in the Cisco Security Appliance Command Reference for performance impact information when matching a regular expression to packets.
Note As an optimization, the security appliance searches on the deobfuscated URL. Deobfuscation compresses multiple forward slashes (/) into a single slash. For strings that commonly use double slashes, like “http://”, be sure to search for “http:/” instead.
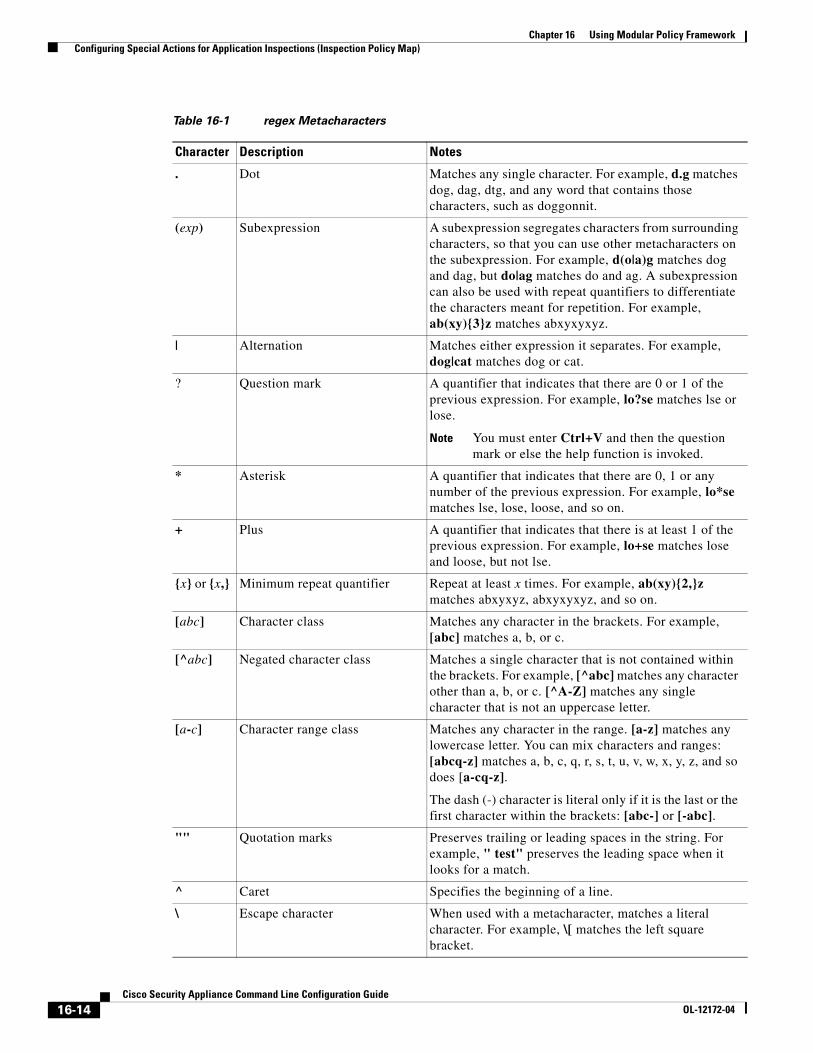
Table 16-1 lists the metacharacters that have special meanings.
16-13Cisco Security Appliance Command Line Configuration Guide
OL-12172-04
Chapter 16 Using Modular Policy Framework Configuring Special Actions for Application Inspections (Inspection Policy Map)
Table 16-1 regex Metacharacters
Character Description Notes
. Dot Matches any single character. For example, d.g matches dog, dag, dtg, and any word that contains those characters, such as doggonnit.
(exp) Subexpression A subexpression segregates characters from surrounding characters, so that you can use other metacharacters on the subexpression. For example, d(o|a)g matches dog and dag, but do|ag matches do and ag. A subexpression can also be used with repeat quantifiers to differentiate the characters meant for repetition. For example, ab(xy){3}z matches abxyxyxyz.
| Alternation Matches either expression it separates. For example, dog|cat matches dog or cat.
? Question mark A quantifier that indicates that there are 0 or 1 of the previous expression. For example, lo?se matches lse or lose.
Note You must enter Ctrl+V and then the question mark or else the help function is invoked.
* Asterisk A quantifier that indicates that there are 0, 1 or any number of the previous expression. For example, lo*se matches lse, lose, loose, and so on.
+ Plus A quantifier that indicates that there is at least 1 of the previous expression. For example, lo+se matches lose and loose, but not lse.
{x} or {x,} Minimum repeat quantifier Repeat at least x times. For example, ab(xy){2,}z matches abxyxyz, abxyxyxyz, and so on.
[abc] Character class Matches any character in the brackets. For example, [abc] matches a, b, or c.
[^abc] Negated character class Matches a single character that is not contained within the brackets. For example, [^abc] matches any character other than a, b, or c. [^A-Z] matches any single character that is not an uppercase letter.
[a-c] Character range class Matches any character in the range. [a-z] matches any lowercase letter. You can mix characters and ranges: [abcq-z] matches a, b, c, q, r, s, t, u, v, w, x, y, z, and so does [a-cq-z].
The dash (-) character is literal only if it is the last or the first character within the brackets: [abc-] or [-abc].
"" Quotation marks Preserves trailing or leading spaces in the string. For example, " test" preserves the leading space when it looks for a match.
^ Caret Specifies the beginning of a line.
\ Escape character When used with a metacharacter, matches a literal character. For example, \[ matches the left square bracket.
16-14Cisco Security Appliance Command Line Configuration Guide
OL-12172-04

Chapter 16 Using Modular Policy Framework Configuring Special Actions for Application Inspections (Inspection Policy Map)
To test and create a regular expression, perform the following steps:
Step 1 To test a regular expression to make sure it matches what you think it will match, enter the following command:
hostname(config)# test regex input_text regular_expression
Where the input_text argument is a string you want to match using the regular expression, up to 201 characters in length.
The regular_expression argument can be up to 100 characters in length.
Use Ctrl+V to escape all of the special characters in the CLI. For example, to enter a tab in the input text in the test regex command, you must enter test regex "test[Ctrl+V Tab]" "test\t".
If the regular expression matches the input text, you see the following message:
INFO: Regular expression match succeeded.
If the regular expression does not match the input text, you see the following message:
INFO: Regular expression match failed.
Step 2 To add a regular expression after you tested it, enter the following command:
hostname(config)# regex name regular_expression
Where the name argument can be up to 40 characters in length.
The regular_expression argument can be up to 100 characters in length.
The following example creates two regular expressions for use in an inspection policy map:
hostname(config)# regex url_example example\.comhostname(config)# regex url_example2 example2\.com
char Character When character is not a metacharacter, matches the literal character.
\r Carriage return Matches a carriage return 0x0d.
\n Newline Matches a new line 0x0a.
\t Tab Matches a tab 0x09.
\f Formfeed Matches a form feed 0x0c.
\xNN Escaped hexadecimal number Matches an ASCII character using hexadecimal (exactly two digits).
\NNN Escaped octal number Matches an ASCII character as octal (exactly three digits). For example, the character 040 represents a space.
Table 16-1 regex Metacharacters (continued)
Character Description Notes
16-15Cisco Security Appliance Command Line Configuration Guide
OL-12172-04
Chapter 16 Using Modular Policy Framework Defining Actions (Layer 3/4 Policy Map)
Creating a Regular Expression Class MapA regular expression class map identifies one or more regular expressions. You can use a regular expression class map to match the content of certain traffic; for example, you can match URL strings inside HTTP packets.
To create a regular expression class map, perform the following steps:
Step 1 Create one or more regular expressions according to the “Creating a Regular Expression” section.
Step 2 Create a class map by entering the following command:
hostname(config)# class-map type regex match-any class_map_namehostname(config-cmap)#
Where class_map_name is a string up to 40 characters in length. The name “class-default” is reserved. All types of class maps use the same name space, so you cannot reuse a name already used by another type of class map.
The match-any keyword specifies that the traffic matches the class map if it matches at least one of the regular expressions.
The CLI enters class-map configuration mode.
Step 3 (Optional) Add a description to the class map by entering the following command:
hostname(config-cmap)# description string
Step 4 Identify the regular expressions you want to include by entering the following command for each regular expression:
hostname(config-cmap)# match regex regex_name
The following example creates two regular expressions, and adds them to a regular expression class map. Traffic matches the class map if it includes the string “example.com” or “example2.com.”
hostname(config)# regex url_example example\.comhostname(config)# regex url_example2 example2\.comhostname(config)# class-map type regex match-any URLshostname(config-cmap)# match regex url_examplehostname(config-cmap)# match regex url_example2
Defining Actions (Layer 3/4 Policy Map)This section describes how to associate actions with Layer 3/4 class maps by creating a Layer 3/4 policy map. This section includes the following topics:
• Information About Layer 3/4 Policy Maps, page 16-17
• Default Layer 3/4 Policy Map, page 16-21
• Adding a Layer 3/4 Policy Map, page 16-22
16-16Cisco Security Appliance Command Line Configuration Guide
OL-12172-04

Chapter 16 Using Modular Policy Framework Defining Actions (Layer 3/4 Policy Map)
Information About Layer 3/4 Policy MapsThis section describes how Layer 3/4 policy maps work, and includes the following topics:
• Policy Map Guidelines, page 16-17
• Hierarchical Policy Maps, page 16-17
• Feature Directionality, page 16-18
• Feature Matching Guidelines Within a Policy Map, page 16-18
• Order in Which Multiple Feature Actions are Applied, page 16-19
• Incompatibility of Certain Feature Actions, page 16-20
• Order in Which Multiple Feature Actions are Applied, page 16-19
Policy Map Guidelines
See the following guidelines for using policy maps:
• You can only assign one policy map per interface. (However you can create up to 64 policy maps in the configuration.)
• You can apply the same policy map to multiple interfaces.
• You can identify multiple Layer 3/4 class maps in a Layer 3/4 policy map.
• For each class map, you can assign multiple actions from one or more feature types, if supported. See the “Incompatibility of Certain Feature Actions” section on page 16-20.
Hierarchical Policy Maps
If you enable QoS traffic shaping for a class map, then you can optionally enable priority queueing for a subset of shaped traffic. To do so, you need to create a policy map for the priority queueing, and then within the traffic shaping policy map, you can call the priority class map. Only the traffic shaping class map is applied to an interface.
See Chapter 57, “Information About QoS,” for more information about this feature.
Hierarchical policy maps are only supported for traffic shaping and priority queueing.
To implement a hierarchical policy map, perform the following tasks:
1. Identify the prioritized traffic according to the “Identifying Traffic (Layer 3/4 Class Map)” section on page 16-4.
You can create multiple class maps to be used in the hierarchical policy map.
2. Create a policy map according to the “Defining Actions (Layer 3/4 Policy Map)” section on page 16-16, and identify the sole action for each class map as priority.
3. Create a separate policy map according to the “Defining Actions (Layer 3/4 Policy Map)” section on page 16-16, and identify the shape action for the class-default class map.
Traffic shaping can only be applied the to class-default class map.
4. For the same class map, identify the priority policy map that you created in Step 2 using the service-policy priority_policy_map command.
5. Apply the shaping policy map to the interface accrding to “Applying Actions to an Interface (Service Policy)” section on page 16-23.
16-17Cisco Security Appliance Command Line Configuration Guide
OL-12172-04

Chapter 16 Using Modular Policy Framework Defining Actions (Layer 3/4 Policy Map)
Feature Directionality
Actions are applied to traffic bidirectionally or unidirectionally depending on the feature. For features that are applied bidirectionally, all traffic that enters or exits the interface to which you apply the policy map is affected if the traffic matches the class map for both directions.
Note When you use a global policy, all features are unidirectional; features that are normally bidirectional when applied to a single interface only apply to the ingress of each interface when applied globally. Because the policy is applied to all interfaces, the policy will be applied in both directions so bidirectionality in this case is redundant.
For features that are applied unidirectionally, for example QoS priority queue, only traffic that exits the interface to which you apply the policy map is affected. See Table 16-2 for the directionality of each feature.
Feature Matching Guidelines Within a Policy Map
See the following guidelines for how a packet matches class maps in a policy map:
1. A packet can match only one class map in the policy map for each feature type.
2. When the packet matches a class map for a feature type, the security appliance does not attempt to match it to any subsequent class maps for that feature type.
3. If the packet matches a subsequent class map for a different feature type, however, then the security appliance also applies the actions for the subsequent class map, if supported. See the “Incompatibility of Certain Feature Actions” section on page 16-20 for more information about unsupported combinations.
For example, if a packet matches a class map for connection limits, and also matches a class map for application inspection, then both class map actions are applied.
If a packet matches a class map for HTTP inspection, but also matches another class map that includes HTTP inspection, then the second class map actions are not applied.
Table 16-2 Feature Directionality
Feature Single Interface Direction Global Direction
Application inspection (multiple types) Bidirectional Ingress
CSC Bidirectional Ingress
IPS Bidirectional Ingress
QoS input policing Ingress Ingress
QoS output policing Egress Egress
QoS standard priority queue Egress Egress
QoS traffic shaping, hierarchical priority queue
Egress Egress
TCP normalization, TCP and UDP connection limits and timeouts, and TCP sequence number randomization
Bidirectional Ingress
16-18Cisco Security Appliance Command Line Configuration Guide
OL-12172-04
Chapter 16 Using Modular Policy Framework Defining Actions (Layer 3/4 Policy Map)
Note Application inspection includes multiple inspection types, and each inspection type is a separate feature when you consider the matching guidelines above.
Order in Which Multiple Feature Actions are Applied
The order in which different types of actions in a policy map are performed is independent of the order in which the actions appear in the policy map. Actions are performed in the following order:
1. QoS input policing
2. TCP normalization, TCP and UDP connection limits and timeouts, and TCP sequence number randomization
Note When a the security appliance performs a proxy service (such as AAA or CSC) or it modifies the TCP payload (such as FTP inspection), the TCP normalizer acts in dual mode, where it is applied before and after the proxy or payload modifying service.
3. CSC
4. Application inspection (multiple types)
The order of application inspections applied when a class of traffic is classified for multiple inspections is as follows. Only one inspection type can be applied to the same traffic. WAAS inspection is an exception, because it can applied along with other inspections for the same traffic. See the “Incompatibility of Certain Feature Actions” section on page 16-20 for more information.
a. CTIQBE
b. DNS
c. FTP
d. GTP
e. H323
f. HTTP
g. ICMP
h. ICMP error
i. ILS
j. MGCP
k. NetBIOS
l. PPTP
m. Sun RPC
n. RSH
o. RTSP
p. SIP
q. Skinny
r. SMTP
s. SNMP
16-19Cisco Security Appliance Command Line Configuration Guide
OL-12172-04

Chapter 16 Using Modular Policy Framework Defining Actions (Layer 3/4 Policy Map)
t. SQL*Net
u. TFTP
v. XDMCP
w. DCERPC
x. Instant Messaging
Note RADIUS accounting is not listed because it is the only inspection allowed on management traffic. WAAS is not listed because it can be configured along with other inspections for the same traffic.
5. IPS
6. QoS output policing
7. QoS standard priority queue
8. QoS traffic shaping, hierarchical priority queue
Incompatibility of Certain Feature Actions
Some features are not compatible with each other for the same traffic. For example, you cannot configure QoS priority queueing and QoS policing for the same set of traffic. Also, most inspections should not be combined with another inspection, so the security appliance only applies one inspection if you configure multiple inspections for the same traffic. In this case, the feature that is applied is the higher priority feature in the list in the “Order in Which Multiple Feature Actions are Applied” section on page 16-19.
For information about compatibility of each feature, see the chapter or section for your feature.
Note The match default-inspection-traffic command, which is used in the default global policy, is a special CLI shortcut to match the default ports for all inspections. When used in a policy map, this class map ensures that the correct inspection is applied to each packet, based on the destination port of the traffic. For example, when UDP traffic for port 69 reaches the security appliance, then the security appliance applies the TFTP inspection; when TCP traffic for port 21 arrives, then the security appliance applies the FTP inspection. So in this case only, you can configure multiple inspections for the same class map. Normally, the security appliance does not use the port number to determine the inspection applied, thus giving you the flexibility to apply inspections to non-standard ports, for example.
An example of a misconfiguration is if you configure multiple inspections in the same policy map and do not use the default-inspection-traffic shortcut. In Example 16-1, traffic destined to port 21 is mistakenly configured for both FTP and HTTP inspection. In Example 16-2, traffic destined to port 80 is mistakenly configured for both FTP and HTTP inspection. In both cases of misconfiguration examples, only the FTP inspection is applied, because FTP comes before HTTP in the order of inspections applied.
Example 16-1 Misconfiguration for FTP packets: HTTP Inspection Also Configured
class-map ftp match port tcp 21class-map http match port tcp 21 [it should be 80]policy-map test class ftp
16-20Cisco Security Appliance Command Line Configuration Guide
OL-12172-04

Chapter 16 Using Modular Policy Framework Defining Actions (Layer 3/4 Policy Map)
inspect ftp class http inspect http
Example 16-2 Misconfiguration for HTTP packets: FTP Inspection Also Configured
class-map ftp match port tcp 80 [it should be 21]class-map http match port tcp 80policy-map test class http inspect http class ftp inspect ftp
Feature Matching Guidelines for Multiple Policy Maps
For TCP and UDP traffic (and ICMP when you enable stateful ICMP inspection), Modular Policy Framework operates on traffic flows, and not just individual packets. If traffic is part of an existing connection that matches a feature in a policy on one interface, that traffic flow cannot also match the same feature in a policy on another interface; only the first policy is used.
For example, if HTTP traffic matches a policy on the inside interface to inspect HTTP traffic, and you have a separate policy on the outside interface for HTTP inspection, then that traffic is not also inspected on the egress of the outside interface. Similarly, the return traffic for that connection will not be inspected by the ingress policy of the outside interface, nor by the egress policy of the inside interface.
For traffic that is not treated as a flow, for example ICMP when you do not enable stateful ICMP inspection, returning traffic can match a different policy map on the returning interface. For example, if you configure IPS inspection on the inside and outside interfaces, but the inside policy uses virtual sensor 1 while the outside policy uses virtual sensor 2, then a non-stateful Ping will match virtual sensor 1 outbound, but will match virtual sensor 2 inbound.
Default Layer 3/4 Policy MapThe configuration includes a default Layer 3/4 policy map that the security appliance uses in the default global policy. It is called global_policy and performs inspection on the default inspection traffic. You can only apply one global policy, so if you want to alter the global policy, you need to either reconfigure the default policy or disable it and apply a new one.
The default policy map configuration includes the following commands:
policy-map global_policy class inspection_default inspect dns preset_dns_map inspect ftp inspect h323 h225 inspect h323 ras inspect rsh inspect rtsp inspect esmtp inspect sqlnet inspect skinny inspect sunrpc inspect xdmcp inspect sip
16-21Cisco Security Appliance Command Line Configuration Guide
OL-12172-04
Chapter 16 Using Modular Policy Framework Defining Actions (Layer 3/4 Policy Map)
inspect netbios inspect tftp
Note See the “Incompatibility of Certain Feature Actions” section on page 16-20 for more information about the special match default-inspection-traffic command used in the default class map.
Adding a Layer 3/4 Policy MapThe maximum number of policy maps is 64. To create a Layer 3/4 policy map, perform the following steps:
Step 1 Add the policy map by entering the following command:
hostname(config)# policy-map policy_map_name
The policy_map_name argument is the name of the policy map up to 40 characters in length. All types of policy maps use the same name space, so you cannot reuse a name already used by another type of policy map. The CLI enters policy-map configuration mode.
Step 2 (Optional) Specify a description for the policy map:
hostname(config-pmap)# description text
Step 3 Specify a previously configured Layer 3/4 class map using the following command:
hostname(config-pmap)# class class_map_name
where the class_map_name is the name of the class map you created earlier. See the “Identifying Traffic (Layer 3/4 Class Map)” section on page 16-4 to add a class map.
Step 4 Specify one or more actions for this class map.
• IPS. See the “Diverting Traffic to the AIP SSM” section on page 23-8.
• CSC. See the “Diverting Traffic to the CSC SSM” section on page 23-16.
• TCP normalization. See the “Configuring TCP Normalization” section on page 24-12.
• TCP and UDP connection limits and timeouts, and TCP sequence number randomization. See the “Configuring Connection Limits and Timeouts” section on page 24-17.
• QoS. See Chapter 57, “Configuring QoS.”
Note You can configure a hierarchical policy map for the traffic shaping and priority queue features. See the “Hierarchical Policy Maps” section on page 16-17 for more information.
• Application inspection. See Chapter 26, “Configuring Application Layer Protocol Inspection.”
Note If there is no match default_inspection_traffic command in a class map, then at most one inspect command is allowed to be configured under the class.
Step 5 Repeat Step 3 and Step 4 for each class map you want to include in this policy map.
16-22Cisco Security Appliance Command Line Configuration Guide
OL-12172-04

Chapter 16 Using Modular Policy Framework Applying Actions to an Interface (Service Policy)
The following is an example of a policy-map command for connection policy. It limits the number of connections allowed to the web server 10.1.1.1:
hostname(config)# access-list http-server permit tcp any host 10.1.1.1hostname(config)# class-map http-serverhostname(config-cmap)# match access-list http-server
hostname(config)# policy-map global-policyhostname(config-pmap)# description This policy map defines a policy concerning connection to http server.hostname(config-pmap)# class http-serverhostname(config-pmap-c)# set connection conn-max 256
The following example shows how multi-match works in a policy map:
hostname(config)# class-map inspection_defaulthostname(config-cmap)# match default-inspection-traffichostname(config)# class-map http_traffichostname(config-cmap)# match port tcp eq 80
hostname(config)# policy-map outside_policyhostname(config-pmap)# class inspection_defaulthostname(config-pmap-c)# inspect http http_maphostname(config-pmap-c)# inspect siphostname(config-pmap)# class http_traffichostname(config-pmap-c)# set connection timeout tcp 0:10:0
The following example shows how traffic matches the first available class map, and will not match any subsequent class maps that specify actions in the same feature domain:
hostname(config)# class-map telnet_traffichostname(config-cmap)# match port tcp eq 23hostname(config)# class-map ftp_traffichostname(config-cmap)# match port tcp eq 21hostname(config)# class-map tcp_traffichostname(config-cmap)# match port tcp range 1 65535hostname(config)# class-map udp_traffichostname(config-cmap)# match port udp range 0 65535hostname(config)# policy-map global_policyhostname(config-pmap)# class telnet_traffichostname(config-pmap-c)# set connection timeout tcp 0:0:0hostname(config-pmap-c)# set connection conn-max 100hostname(config-pmap)# class ftp_traffichostname(config-pmap-c)# set connection timeout tcp 0:5:0hostname(config-pmap-c)# set connection conn-max 50hostname(config-pmap)# class tcp_traffichostname(config-pmap-c)# set connection timeout tcp 2:0:0hostname(config-pmap-c)# set connection conn-max 2000
When a Telnet connection is initiated, it matches class telnet_traffic. Similarly, if an FTP connection is initiated, it matches class ftp_traffic. For any TCP connection other than Telnet and FTP, it will match class tcp_traffic. Even though a Telnet or FTP connection can match class tcp_traffic, the security appliance does not make this match because they previously matched other classes.
Applying Actions to an Interface (Service Policy)To activate the Layer 3/4 policy map, create a service policy that applies it to one or more interfaces or that applies it globally to all interfaces. Interface service policies take precedence over the global service policy for a given feature. For example, if you have a global policy with FTP inspection, and an interface
16-23Cisco Security Appliance Command Line Configuration Guide
OL-12172-04
Chapter 16 Using Modular Policy Framework Modular Policy Framework Examples
policy with TCP normalization, then both FTP inspection and TCP normalization are applied to the interface. However, if you have a global policy with FTP inspection, and an interface policy with FTP inspection, then only the interface policy FTP inspection is applied to that interface.
• To create a service policy by associating a policy map with an interface, enter the following command:
hostname(config)# service-policy policy_map_name interface interface_name
• To create a service policy that applies to all interfaces that do not have a specific policy, enter the following command:
hostname(config)# service-policy policy_map_name global
By default, the configuration includes a global policy that matches all default application inspection traffic and applies inspection to the traffic globally. You can only apply one global policy, so if you want to alter the global policy, you need to either edit the default policy or disable it and apply a new one.
The default service policy includes the following command:
service-policy global_policy global
For example, the following command enables the inbound_policy policy map on the outside interface:
hostname(config)# service-policy inbound_policy interface outside
The following commands disable the default global policy, and enables a new one called new_global_policy on all other security appliance interfaces:
hostname(config)# no service-policy global_policy globalhostname(config)# service-policy new_global_policy global
Modular Policy Framework ExamplesThis section includes several Modular Policy Framework examples, and includes the following topics:
• Applying Inspection and QoS Policing to HTTP Traffic, page 16-25
• Applying Inspection to HTTP Traffic Globally, page 16-25
• Applying Inspection and Connection Limits to HTTP Traffic to Specific Servers, page 16-26
• Applying Inspection to HTTP Traffic with NAT, page 16-27
16-24Cisco Security Appliance Command Line Configuration Guide
OL-12172-04

Chapter 16 Using Modular Policy Framework Modular Policy Framework Examples
Applying Inspection and QoS Policing to HTTP TrafficIn this example (see Figure 16-1), any HTTP connection (TCP traffic on port 80) that enters or exits the security appliance through the outside interface is classified for HTTP inspection. Any HTTP traffic that exits the outside interface is classified for policing.
Figure 16-1 HTTP Inspection and QoS Policing
See the following commands for this example:
hostname(config)# class-map http_traffichostname(config-cmap)# match port tcp eq 80
hostname(config)# policy-map http_traffic_policyhostname(config-pmap)# class http_traffichostname(config-pmap-c)# inspect httphostname(config-pmap-c)# police output 250000hostname(config)# service-policy http_traffic_policy interface outside
Applying Inspection to HTTP Traffic GloballyIn this example (see Figure 16-2), any HTTP connection (TCP traffic on port 80) that enters the security appliance through any interface is classified for HTTP inspection. Because the policy is a global policy, inspection occurs only as the traffic enters each interface.
Figure 16-2 Global HTTP Inspection
See the following commands for this example:
hostname(config)# class-map http_traffichostname(config-cmap)# match port tcp eq 80
1433
56
inside
port 80
outside
A
Host A Host B
port 80
Securityappliance
insp.
insp.police
inside
port 80
outside
A
Host A Host B
port 80 insp.
insp.
Securityappliance
1434
14
16-25Cisco Security Appliance Command Line Configuration Guide
OL-12172-04
Chapter 16 Using Modular Policy Framework Modular Policy Framework Examples
hostname(config)# policy-map http_traffic_policyhostname(config-pmap)# class http_traffichostname(config-pmap-c)# inspect httphostname(config)# service-policy http_traffic_policy global
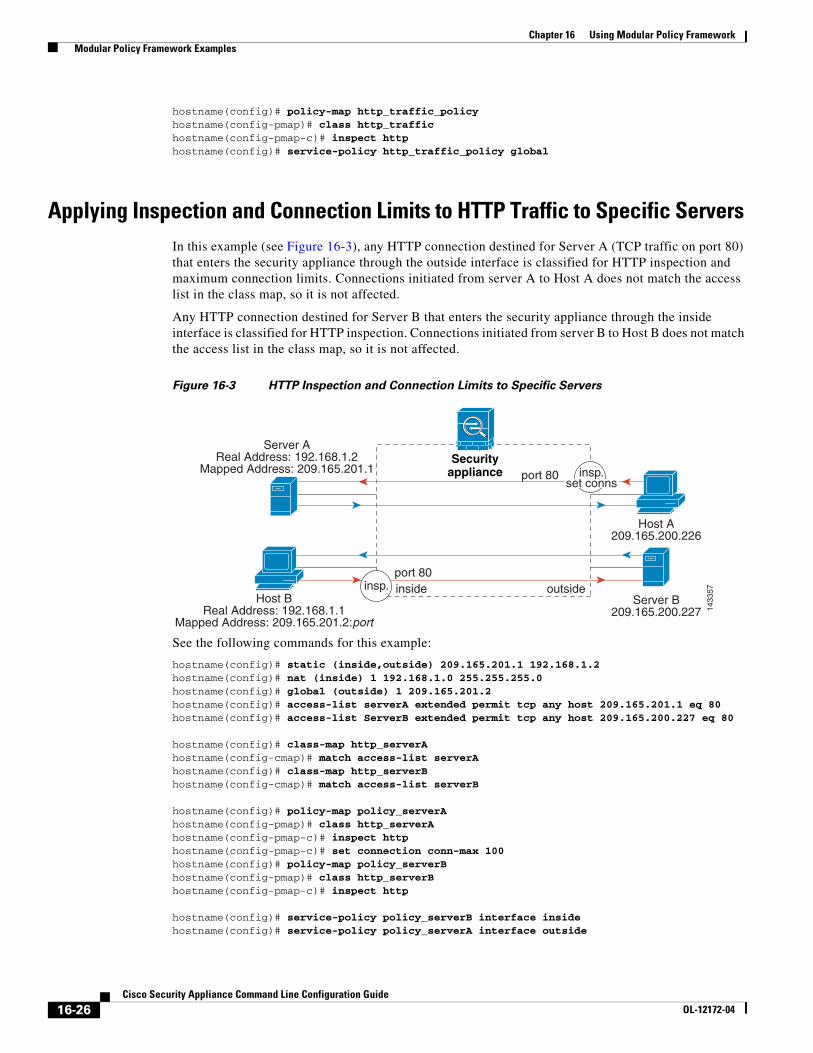
Applying Inspection and Connection Limits to HTTP Traffic to Specific ServersIn this example (see Figure 16-3), any HTTP connection destined for Server A (TCP traffic on port 80) that enters the security appliance through the outside interface is classified for HTTP inspection and maximum connection limits. Connections initiated from server A to Host A does not match the access list in the class map, so it is not affected.
Any HTTP connection destined for Server B that enters the security appliance through the inside interface is classified for HTTP inspection. Connections initiated from server B to Host B does not match the access list in the class map, so it is not affected.
Figure 16-3 HTTP Inspection and Connection Limits to Specific Servers
See the following commands for this example:
hostname(config)# static (inside,outside) 209.165.201.1 192.168.1.2hostname(config)# nat (inside) 1 192.168.1.0 255.255.255.0hostname(config)# global (outside) 1 209.165.201.2hostname(config)# access-list serverA extended permit tcp any host 209.165.201.1 eq 80hostname(config)# access-list ServerB extended permit tcp any host 209.165.200.227 eq 80
hostname(config)# class-map http_serverAhostname(config-cmap)# match access-list serverAhostname(config)# class-map http_serverBhostname(config-cmap)# match access-list serverB
hostname(config)# policy-map policy_serverAhostname(config-pmap)# class http_serverAhostname(config-pmap-c)# inspect httphostname(config-pmap-c)# set connection conn-max 100hostname(config)# policy-map policy_serverBhostname(config-pmap)# class http_serverBhostname(config-pmap-c)# inspect http
hostname(config)# service-policy policy_serverB interface insidehostname(config)# service-policy policy_serverA interface outside
inside outside
Server AReal Address: 192.168.1.2
Mapped Address: 209.165.201.1
Host BReal Address: 192.168.1.1
Mapped Address: 209.165.201.2:port
Host A209.165.200.226
Server B209.165.200.227
port 80
port 80insp.
insp.set conns
1433
57
Securityappliance
16-26Cisco Security Appliance Command Line Configuration Guide
OL-12172-04
Chapter 16 Using Modular Policy Framework Modular Policy Framework Examples
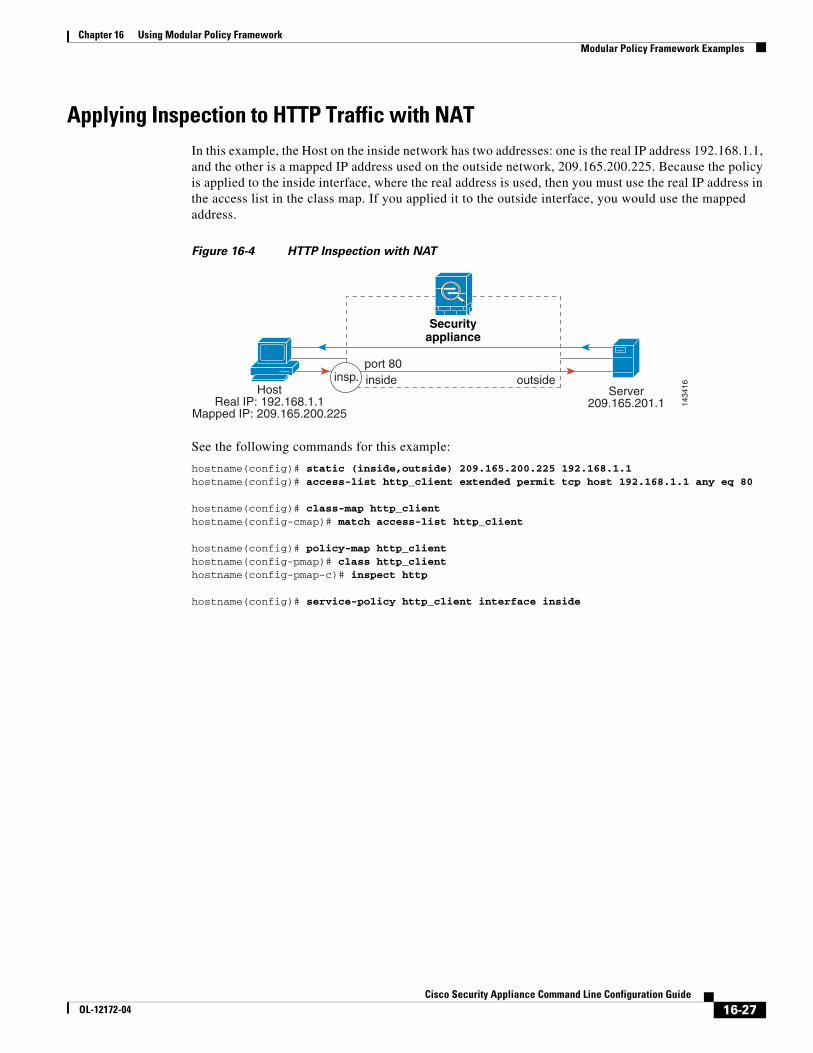
Applying Inspection to HTTP Traffic with NATIn this example, the Host on the inside network has two addresses: one is the real IP address 192.168.1.1, and the other is a mapped IP address used on the outside network, 209.165.200.225. Because the policy is applied to the inside interface, where the real address is used, then you must use the real IP address in the access list in the class map. If you applied it to the outside interface, you would use the mapped address.
Figure 16-4 HTTP Inspection with NAT
See the following commands for this example:
hostname(config)# static (inside,outside) 209.165.200.225 192.168.1.1hostname(config)# access-list http_client extended permit tcp host 192.168.1.1 any eq 80
hostname(config)# class-map http_clienthostname(config-cmap)# match access-list http_client
hostname(config)# policy-map http_clienthostname(config-pmap)# class http_clienthostname(config-pmap-c)# inspect http
hostname(config)# service-policy http_client interface inside
inside outsideHost
Real IP: 192.168.1.1Mapped IP: 209.165.200.225
Server209.165.201.1
port 80insp.
Securityappliance
1434
16
16-27Cisco Security Appliance Command Line Configuration Guide
OL-12172-04

Chapter 16 Using Modular Policy Framework Modular Policy Framework Examples
16-28Cisco Security Appliance Command Line Configuration Guide
OL-12172-04