Using Madagascar - NTNUpet.geo.ntnu.no/wordpress/msim/wp-content/uploads/sites/3/2016/01/... ·...
18
Using Madagascar Vegard Stenhjem Hagen 23rd January 2016 1 Getting started with Madagascar In this course we are going to use the software package Madagascar which is freely available from ahay.org for UNIX (Mac) and Linux systems. You are welcome to install the package on your local machine, but for most of you it will be easier to connect to a remote server and work with Madagascar there. 2 Connecting to a remote server We’ll be connecting to promax.ipt.ntnu.no which is running Red Hat 5.11, a Linux dis- tribution. In order to do this we need a secure shell (SHH) client, which is a UNIX-based command interface and protocol for securely getting access to a remote computer. We also need something called an X window system (X11) to display graphics. X11 is the most com- mon graphical user interface used in Linux distributions and is needed to display graphics the same way Quartz is used for OS X, or the Windows interface. Depending on which operating system you are on there are different ways of getting the connection to work. 2.1 Windows There are several ways to connect via SSH using windows. Some of these are using PuTTY & Xming, Cygwin, or X-Win32. The latter which is installed on the computers in the Schlum- berger (Munin) computer lab. 2.1.1 PuTTY & Xming My personal favourite on Windows. Grab PuTTY and Xming from folk.ntnu.no/vegahag/putty or google them. After installing and running Xming, drag PuTTY.exe to your desktop, it’s a standalone program so it doesn’t have to be installed. Open PuTTY and configure it as shown in figure 1. Starting in the session window, input promax.ipt.ntnu.no in the Host Name (or IP address) field, the Port field should read 22. Make sure the Protocol is set to SSH. Next navigate to the X11 tab under Connection → SSH 1
Transcript of Using Madagascar - NTNUpet.geo.ntnu.no/wordpress/msim/wp-content/uploads/sites/3/2016/01/... ·...
Using MadagascarVegard Stenhjem Hagen
23rd January 2016
1 Getting started with MadagascarIn this course we are going to use the software package Madagascar which is freely availablefrom ahay.org for UNIX (Mac) and Linux systems. You are welcome to install the package onyour local machine, but for most of you it will be easier to connect to a remote server andwork with Madagascar there.
2 Connecting to a remote serverWe’ll be connecting to promax.ipt.ntnu.no which is running Red Hat 5.11, a Linux dis-tribution. In order to do this we need a secure shell (SHH) client, which is a UNIX-basedcommand interface and protocol for securely getting access to a remote computer. We alsoneed something called an X window system (X11) to display graphics. X11 is the most com-mon graphical user interface used in Linux distributions and is needed to display graphics thesame way Quartz is used for OS X, or the Windows interface. Depending on which operatingsystem you are on there are different ways of getting the connection to work.
2.1 WindowsThere are several ways to connect via SSH using windows. Some of these are using PuTTY& Xming, Cygwin, or X-Win32. The latter which is installed on the computers in the Schlum-berger (Munin) computer lab.
2.1.1 PuTTY & Xming
My personal favourite on Windows. Grab PuTTY and Xming from folk.ntnu.no/vegahag/puttyor google them. After installing and running Xming, drag PuTTY.exe to your desktop, it’s astandalone program so it doesn’t have to be installed.
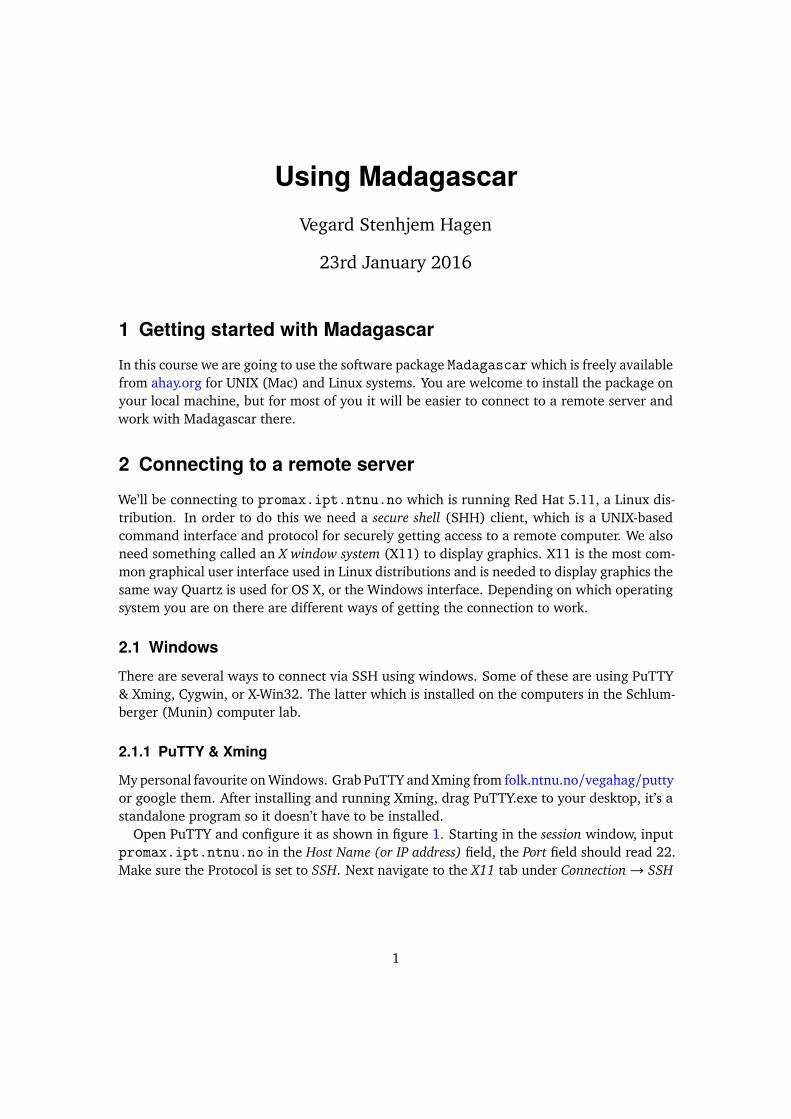
Open PuTTY and configure it as shown in figure 1. Starting in the session window, inputpromax.ipt.ntnu.no in the Host Name (or IP address) field, the Port field should read 22.Make sure the Protocol is set to SSH. Next navigate to the X11 tab under Connection→ SSH
1

Figure 1: Configuration of PuTTY in order to connect to Promax.
2

in the left menu. Check Enable X11 forwarding and input localhost:0.0 in the X displaylocation field. You may also add your username in the Data pane under Connection.
When you are finished configuring the connection navigate back to the Session panel andclick the save button. Press Open and you should be able to connect to Promax if you’vedone everything correct. Continue to section 3. Remember to start Xming before trying toconnect.
2.1.2 Cygwin & Xming
Cygwin is a linux-like environment for windows and which be downloaded from cygwin.com.This is your best bet if you want to install Madagascar locally on a Windows machine. Thedefault installation of Cygwin is pretty bare bones, so we want to add some packages toincrease usability using the dialogue shown in fig 2. The packages we want are openssh,
Figure 2: Cygwin package installer.
xorg-server and xinit. It’s also recommended to install at least one editor, be it vim,emacs, nano and/or gedit. Note that more packages are required for a fully functioninggraphical user interface locally, but it’s enough for our use.1
Download Xming2 from sourceforge.net/projects/xming, install it and run it. Open yourCygwin installation and type
export DISPLAY=localhost:0.0
this tells the terminal to send X11 windows to Xming locally on your machine. This commandneeds to be run each time you start Cygwin, this can be done by adding it to your .bashrcfile as explained in section 5.2.2. You should now be all set, continue to section 2.3.
1Installing all of the packages under the X11 tab might help with this.2It should be possible to display graphics without using Xming, but it’s more hassle.
3

As a sidenote you might be better off installing a Linux distribution like Ubuntu or Mintusing a so-called virtual machine, or dual-booting rather than mucking about with Cygwin. Iwon’t cover these options here, but feel free to google them or ask for help.
2.1.3 X-Win32
X-Win32 is a proprietary software (i.e. not open/free), it is however available from NTNU’ssoftware distribution server, progdist. You can find instructions on how to connect to progdistby googling NTNU progdist or by clicking this link. After you’re all set up, navigate to
campus/X-Win32/2014/Kilde/Windows
and find the X-Win32 2014.msi file. Copy it to your computer and run it. The readme.txtfile contains instructions on how to activate the license.
Run X-Win32, click Wizard, and start setting up the connection as shown in figure 3. Namethe connection Promax and choose ssh as the connection type. Click next and input theHost: as promax.ipt.ntnu.no. On the next screen input your login details that you’ve beengiven for this course. Continue to the last screen and choose Linux, /usr/bin/xterm -lswill then be displayed in the Command: input. Select your freshly made connection and clickLaunch before continuing to section 3.
4

Figure 3: X-Win32 configuration.
2.2 MacSince both Linux and OS X are UNIX-based, they come with a lot of the same core functionality.One such functionality is the Terminal which can easily be found by searching for it. Masterthe terminal and you’ll find yourself being more productive. Newer versions of OS X is missingX11 as Apple uses their own windowing system called Quartz. By installing XQuartz fromXQuartz.org you can enable X11 support in OS X. Open up Terminal and continue to section2.3.
2.3 LinuxYou’re all set with both a terminal and an X Server, hurray!3 Open the terminal of your choiceand type
ssh -Y <username>@promax.ipt.ntnu.no3Unless you have a very minimal installation, in which case I’ll assume you know your way around the terminal
and there’s not much you’ll learn from this section.
5

to connect to the promax server, substituting <username> with your given username. The-Y flag (make sure it’s a capital y) enables secure X11 forwarding. If this doesn’t work, trywith the -X flag instead.
The first time you connect via SSH you may get a message stating
The authenticity of host ’promax.ipt.ntnu.no (129.241.112.242)’can’t be established.
RSA key fingerprint is [...]Are you sure you want to continue connecting (yes/no)?
It may sound scary, but it really isn’t. Type yes and press enter to continue. You will now bepromted to input your password4
Password:
Note that your key-presses will not be shown on screen, but they are still being registered.This is a security feature, so just type like you normally would. Once you’re in you shouldchange your password, this is done with the passwd command.
You’re now all set to start using Madagascar, but read on for some tips & tricks.
3 Using the UNIX/Linux terminalIf you’ve successfully connected to Promax you should now be staring at a terminal windowthat says something like
[<username>@promax ~]$
Great! Now what? The terminal executes small programs in order to perform simple tasks.These tasks vary from changing the directory, creating new folders, telling the time, andopening or executing programs. Some commonly used terminal commands are found intable 1.
First let’s figure out where we are. This can be done by typing pwd and should displaysomething like
[<user>@promax ~]$ pwd/home/<user>
assuming you’re on Promax. Next let’s figure out what’s inside the directory we’re in usingthe ls command
[<user>@promax ~]$ ls
If this is your first time login into Promax it will probably not show anything,5 so let’s startpopulating your home directory. Create a new folder by typing
4the one you received on the paper slip, not you NTNU password.5try passing the -a flag to the ls command in order show all files, this should display some hidden configuration
files.
6

[<user>@promax ~]$ mkdir foo
Running the ls command should now show the folder.
[<user>@promax ~]$ lsfoo
Step into your freshly made folder by typing
[<user>@promax ~]$ cd foo
The terminal should now read
[<user>@promax foo]$
Notice that the tilde is replaced by our current directory. Try typing pwd again. Next we’llcreate a new folder and step into it right after, this can be done by executing two commandsin serial using the && operator.
[<user>@promax foo]$ mkdir bar && cd bar
You should now be standing in the bar directory. To step up one level you can type cd ..,or simply just cd to return to your home directory.
Typing gets tiring easily so let’s learn about auto-complete. Return to your home directoryand start typing cd f
[<user>@promax bar]$ cd[<user>@promax ~]$ cd f
now press the Tab-key and it should auto-complete to
[<user>@promax ~]$ cd foo
Easy, right? Now let’s test if your X11 forwarding is working. Do this by trying to open thegraphical editor gedit.
[<user>@promax foo]$ gedit test.txt &
A window similar to figure 4, but without the text should be displayed. The trailing ampersand(&) alows us to still use the terminal while gedit is running. Fill in the text
#!/bin/shecho Hello, world!echo The time is:date
Dont’t worry about the colours. Save and close the file. We’re now going to make it executableand run it by typing
7

Figure 4: gedit running on Promax
[<user>@promax foo]$ chmod +x test.txt[<user>@promax foo]$ ./test.txtHello, world!The time is:Wed Jan 6 13:06:57 CET 2016
Congratulations! You’ve made your first (dummy) script in bash and successfully run it!Next we’ll learn about grep and piping. We can send the output of any program directly
into the next by using the pipe (|) operator. Try writing
[<user>@promax foo]$ ./test.txt | grep ‘world’Hello, world!
Observe how only the line containing the phrase ‘world’ is displayed. This is because theoutput from our script is sent/piped to grep which filters the output based on the phrasegiven. We can pipe together as many commands as we want. Knowing a bit about how linuxworks we can easily figure out how many CPU threads the Promax server has6
[<user>@promax foo]$ more /proc/cpuinfo | grep ‘cpu MHz’ | wc24 96 480
The output shows us that the phrase ‘cpu MHz’ appears in 24 lines, these lines comprise atotal of 96 “words” and 480 bytes. The interesting number here is 24 which reflects the factthat Promax has 24 threads.
It’s also possible to dump output to a file using the > operator.7 Try writing
[<user>@promax foo]$ finger vegahag > out.txt[<user>@promax foo]$ vim out.txt
You’ve now opened the vim text editor instead of the gedit editor. Close vim by pressing Escand write
:q6This is an example, just ignore it if you don’t fully understand what’s happening.7You can also try with the >> operator, this appends a file instead of overwriting the existing information.
8

You can also input the contents of a file using the < operator. We’ll come back to this laterwhen using Madagascar.
That’s enough playing around for now. Let’s clean up the mess we made so we can beginusing madagascar.
[<user>@promax foo]$ rm out.txt[<user>@promax foo]$ cd[<user>@promax ~]$ rm foo/rm: cannot remove ‘foo/’: Is a directory[<user>@promax ~]$ rm -r foo/
Take note how we had to pass the -r flag to the rm command in order to recursively removethe folder. You can learn more about any command by typing man (for manual) in front of it.
You’ve made it. That’s (some of) the basics of using the terminal. It may seem scary atfirst, but you’ll get the hang of it. Lastly write
[<user>@promax ~]$ telnet towel.blinkenlights.nl
Pat yourself on the back, sit back, and have a small break. You’ve earned it.
9

Command Abbreviation Actionpwd Print working directory Echoes current directory to terminal.man Manual Print help for a command, e.g. man pwd.ls List Lists contents of current directory.cd Change directory Change working directory.mv Move Move/rename files.cp Copy Copy files.rm Remove Delete files.mkdir Make directory Create folder.passwd Password Used to change your password.echo Echo Print to terminal.chmod Change modifiers Change read/write/execute permissions.chown Change owner Change file/directory owner.date Date Echoes local time to terminal.
wc Word countOutputs number of lines,words and bytes of input.
top Table of proccesses Lists currently running processes.
grepGlobal regularexpressions print
Commonly used for searching/filtering.
write Write Send a message to another user.
finger FingerDisplay basic information aboutanother user.
vim Vi improved Open the vim text editor.gedit GNOME editor A simple graphical text editor.eog Eye of GNOME A simple image viewer.
ssh Secure shellEncryted network protocol toallow remote login.
scp Secure copyA means of copying files betweena local host and remote host.
Table 1: Some useful Linux commands. Most of these will also work in OS X.
10

4 MadagascarBefore we start using Madagascar we have to configure our .bashrc file so Madagascarknows where to find the data.
[<user>@promax ~]$ cd[<user>@promax ~]$ gedit .bashrc
Add the line
DATAPATH=$HOME/TPG4165/Data/
at the bottom of the file. Save it, close it and run it
[<user>@promax ~]$ . .bashrc
Next create the following directories (make sure to use the same capitalisation!)
[<user>@promax ~]$ mkdir TPG4165 && mkdir TPG4165/Data[<user>@promax ~]$ cd TPG4165/Data/[<user>@promax Data]$
We’ll now copy the raw data and SConstruct file
[<user>@promax Data]$ cp /home/vegahag/Data/shots-srme.rsf .[<user>@promax Data]$ cp /home/vegahag/Data/SConstruct .
The last dot (.) stand for ‘here’ as the cp command need the two arguments ‘from’ and ‘to’.Next we’ll create the folder for excercise 1 and copy the example files
[<user>@promax Data]$ cd ..[<user>@promax TPG4165]$ mkdir ex1[<user>@promax TPG4165]$ cp Data/* ex1/[<user>@promax TPG4165]$ cd ex1/[<user>@promax ex1]$ ls -ltotal 320808-rw-r--r-- 1 vegahag pmusr 438 Jan 6 16:38 SConstruct-rw-r--r-- 1 vegahag pmusr 328172772 Jan 6 16:38 shots-srme.rsf
Note the inclusion of a wildcard (*) which tells cp to copy everything in the Data/ directory.Most of the Madagascar commands are prepended with sf, making them easy to recognise.
Start using Madagascar by typing
[<user>@promax ex1]$ < shots-srme.rsf sfwindow f3=700 n3=1 > shot-srme.rsf[<user>@promax ex1]$ lsSConstruct shots-srme.rsf shot-srme.rsf
11

You’ve now snipped/windowed out a part of the shots-srme.rsf file and stored it in theshot-srme.rsf file. To understand what we just did we can break down the command justentered
< shots-srme.rsf︸ ︷︷ ︸
input this file
sfwindow︸ ︷︷ ︸
into this command
f3=700 n3=1︸ ︷︷ ︸
given these parameters
> shot-srme.rsf︸ ︷︷ ︸
output to this file
To understand what the parameters do we can look it up in the manual by typing8
[<user>@promax ex1]$ man sfwindow
which shows us that f3=700 means start the window at 700 in the 3rd dimension and n3=1means use just one slice in the 3rd dimension. What is the 3rd dimension? That depends onthe file. We can look this up by typing9
[<user>@promax ex1]$ < shots-srme.rsf sfinin:
in="stdin"esize=4 type=float form=nativen1=488 d1=0.008 o1=0 label1="Time" unit1="s"n2=120 d2=12.5 o2=75 label2="Offset" unit2="m"n3=1401 d3=25 o3=0 label3="Distance" unit3="m"
82042560 elements 328170240 bytes
learning that the 3rd dimension is distance. Piecing the information together we can thatwe’ve taken a time-offset slice at a towing distance of 25 m× 700 = 17 500m. To view thisslice we first create a folder to store the figure in, time-gain the data using sftpow, plot thisusing sfgrey and lastly view it using sfpen10
[<user>@promax ex1]$ mkdir Fig[<user>@promax ex1]$ < shot-srme.rsf sftpow tpow=1.5 |
sfgrey > Fig/shot-srme.vpl[<user>@promax ex1]$ < Fig/shot-srme.vpl sfpen
Though it is possible to use Madagascar solely through terminal commands, it is not ad-visable and will get messy quick. Enter scons (software construction) scripting! Open theSConstruct file by typing
[<user>@promax ex1]$ gedit SConstruct &
this will display the contents of the file using gedit while we can still interact with theterminal due to the trailing ampersand (&). You should now be seeing
8With Madagascar commands we’re spoiled and can type just the command to get the manual for it instead ofwriting man in front of it.
9typing sfin shots-srme.rsf will also work in this case.10typing sfpen Fig/shot-srme.vpl will also work in this case.
12

from rsf.proj import *#==================================================## Exercise 1##==================================================
#-------------------# Inital processing#-------------------
#Extract a single shotFlow("shot-srme","shots-srme","window f3=700 n3=1")Result("shot-srme","tpow tpow=1.5 | grey")
End()
The first line, from rsf.proj import *, tells scons to ready Madagascar commands,while the lines starting with a hashtag (#) are comments. The action happens in the Flowand Result commands. All scons script must terminate with an End() command to tell thecompiler that the script stops here.
A Flow is a function that takes three agruments. The first argument is the output file.Note that the extension for this file will be .rsf which is added automatically. The secondargument is the input file, while the last argument is the the command which will be executedusing the data from the input file. Some commands may not require an input file. The Resultcommand on the other hand takes two arguments, input and plotting command. A .vpl filewith the same name as the input file is created and placed in the Fig/ folder after running aResult command. Notice how we don’t need the sf prefix for the commands, nor the fileextensions when writing scons scipts. It will still work if you include them, you just save timenot writing them.
To summarise
Flow(" shot-srme︸ ︷︷ ︸
output to this file
","shots-srme︸ ︷︷ ︸
input this file
","window f3=700 n3=1︸ ︷︷ ︸
into this command
")
Result(" shot-srme︸ ︷︷ ︸
input this fileoutput to this file in /Fig
","tpow tpow=1.5 | grey︸ ︷︷ ︸
into this plotting command
")
You can run all of the commands in the SConstruct instruction file by typing
[<user>@promax ex1]$ sconsscons: Reading SConscript files ...[...]scons: done building targets.
or just parts of it by typing the appropriate output, either
13

[<user>@promax ex1]$ scons shot-srme.rsf
for just the data file, or
[<user>@promax ex1]$ scons shot-srme.view
to display a Result command, this creates the necessary files and opens the result usingsfpen. Note that scons automatically runs all necessary Flows in order to create yourdesired file and stores them on disk. If you want to clean up the mess you’re making you cansimply pass the -c flag to scons
[<user>@promax ex1]$ scons -c
Madagascar contains a lot of commands/programs, some of these are listed in table 2. Acomprehensive list can be found on the Madagascar documentation pages at ahay.org/RSF.You can also search for a command by keyword by passing the -k flag to sfdoc
[<user>@promax ex1]$ sfdoc -k <keyword>
Command Actionsfwindow Windowing of datasfspectra Fourier spectrum in one dimensionsfbandpass Bandpass filtersfgrey Grey scale plotsfpen Display plot on the screensfgraph Draw a graphsfspectra2 Fourier spectrum in two dimensionssfdipfilter F-K filtersffft1 Fourier transform along the time axissffft3 Fourier transform along spatial axissfshot2cmp Sort shot gathers into common midpoint gatherssfvscan Compute velocity spectrasfpick Pick velocity functions from velocity spectrasfnmo Normal moveout correctionsfstack Stack nmo-corrected datasfmig2 Prestack time migrationsfmutter Muting of datasftransp Transposing data
Table 2: Useful Madagascar commands for processing.
14

5 Additional comments5.1 Remote copyingFor the report it is possible to screenshot each plot, but it is much more elegant to convert the.vpl file to an image directly. Converting can be done by using the vpconvert11 command,the image can be opened using eog, or Eye of GNOME
[<user>@promax ex1]$ vpconvertpen=gd format=png bgcolor=l Fig/shot-srme.vpl
[<user>@promax ex1]$ eog Fig/shot-srme.png
If you’re on OS X, Linux, or using Cygwin, the image can easily be copied over to your localmachine by using the secure copy scp command. Open a new terminal locally and navigateto where you want to store your files, e.g.
<user>@ratatoskr ~ $ cd Documents/TPG4165/ex1/Fig<user>@ratatoskr ~/Documents/TPG4165/ex1/Fig $
scp <user>@promax.ipt.ntnu.no:~/TPG4165/ex1/Fig/*.png .
There are of course also ways of doing this on Windows. One alternative is F-Secure SSHFile Transfer which should be installed on the computers at IPT. Other free alternativesare PSCP or PSFTP in the same family as PuTTY.F-Secure SSH File Transfer is painfully simple to use; click the icon of a com-
puter or go to File → Connect and input your login details. The Host name and Port is stillpromax.ipt.ntnu.no and 22 respectively, as indicated in figure 5.
Figure 5: F-Secure SSH File Transfer configuration.
You should be greeted with an explorer-esque view of your home folder on Promax, fromthere you can copy the files you want.
11Using vpconvert format=pdf Fig*/.vpl procudes crisp figures for use in the report.
15

5.2 Advanced setupThese optional steps will make life easier for you, but they require some technical insight toperform. They will only work if you’re using OS X, Linux, or the Cygwin client in Windowsas they require you to edit local configuration files not present on normally Windows.
5.2.1 RSA keys
It’s possible to skip the password check by creating an RSA-key. First make sure that you’reon your local machine. If you’re logged into promax, type exit and press enter. You will beprompted for a password for some archaic reason, just press enter again. Type
ssh-keygen -t rsa
to create your RSA key pair. Next copy your public key to Promax by writing
ssh-copy-id <username>@promax.ipt.ntnu.no
You should now be able to connect to Promax without being promted for a password.
5.2.2 Aliases
Since we’re lazy and don’t want to type
ssh -Y <username>@promax.ipt.ntnu.no
every time we connect to Promax, we can assign an alias to this command. This can be abit tricky the first time you do it, but it shows some of the power of the terminal. Open your.bashrc12 (.bash_profile if you are on OS X) file using you editor of choice, with vim thiscommand is
vim $HOME/.bashrc
or equivalently13
vim ~/.bashrc
Go to the last line by pressing shift+G, then press o to insert a new line below and startinsert mode in vim. Now type
alias promax="ssh -Y <username>@promax.ipt.ntnu.no"
exit insert mode by pressing Esc and save and exit the file by writing
:wq12The .bashrc file is run every time you start a new shell/terminal.13The tilde ‘∼’ can be typed by pressing AltGr (win/linux) or cmd+alt (mac) and the key to the right of the ‘Å’
key on Norwegian keyboards, which is marked with ∧ · · ∼, followed by pressing space.
16

Notice that the cursor is no longer typing in the document, but rather a command to the vimeditor. The command you use gave the editor is w for write and q for quit. Now press enterto execute the command. Run the .bashrc file by typing
. .bashrc
If you’ve done everything correctly you should now be able to login to the promax server byjust typing
promax
in the terminal and pressing enter.
5.3 LaTeXThis document is typeset in LaTeX, a word processor and document markup language. UsingLaTeX you type in plain text as opposed to formatted text in word processors like MicrosoftWork, LibreOffice Writer, and Apple Pages. To stylise text in LaTeX you rely on markuptagging, e.g. you would type \textbf{bold} to get bold letters, or \section{LaTeX} tocreate a section heading like the one above this paragraph.
It can take some time getting comfortable with LaTeX if you’ve only used what-you-see-is-what-you-get word processors like Word, Writer, and Pages. But when you master LaTeXyou’ll be much more efficient at writing scientific texts. The result will in most cases alsolook a lot better.
I strongly recommend that you use LaTeX for writing the report in this course. There area lot of great resources for getting started with LaTeX, these are some I can recommend.
• Why should I use LATEX?
• MikTeX.org base package for Windows.
• tug.org/MacTeX base package for Mac OS X.
• Texmaker LaTeX editor for Windows, Mac OS X and Linux.
• HowToTex.com 5 minute guide to LaTeX.
• Getting started with LATEX, a primer.
5.4 EditorsDuring this tutorial we’ve briefly touched upon a couple different editors including geditand vim. Another great editor is emacs, though I’m not that familiar with it. If you’re seriousabout writing a lot, be it prose, code, or grants, learning a good editor is worth the timeinvestment.
I’ll leave you with some further reading if you’re interested
• What are the benefits of learning Vim?
17

• What are the pros and cons of Vim and Emacs?
• Absolute beginners guide to Emacs
• Getting started with Vim
18