Using Java RMI at Colby · 2016-05-12 · package example.hello; import java.rmi.Remote; import...
18
Using Java RMI at Colby Fall 2008 Stephanie Taylor “The Java Remote Method Invocation (RMI) system allows an object running in one Java virtual machine to invoke methods on an object running in another Java virtual machine.” (http://java.sun.com/docs/books/tutorial/rmi/overview.html ) This document describes my experience running, modifying, and re-running a distributed version of “Hello World” from http://java.sun.com/j2se/1.5.0/docs/guide/rmi/hello/hello-world.html . The basic setup for the “Hello World” example (and for any simple client-server example) is this: There are two machines - one we will call the server (lowercase), the other we will call the client (lowercase). 1 The server machine will run a Java program called Server (title case) and the client machine will run a java program called Client (title case). Server is a Remote object, i.e. an object with methods that can be invoked by Client via an internet/intranet connection. To initiate the communication between the server and client, a third program – the RMI registry must be running on the server. See Figure 1. Figure 1: The rmiregistry and Server run on the server. The Client runs on the client. The registry is used to initiate communication between Client and Server , but they then communicate “directly” (this “direct” communication may be mediated by a web server). Hello World Code The code for the “Hello World” example is in a package example.hello. This means that the .class files must be placed into a directory example/hello. I created a directory /Users/srtaylor/Documents/CS336/java_rmi for all of the examples in this tutorial. I then created a subdirectory example/hello for this example and placed Hello.java, Client.java, and Server.java in it. Let’s look at the code. Here is Hello.java: 1 In a client-server model there may be (and often is) more than one client. Each client is identical to every other, so I simply refer to “the” client here.
Transcript of Using Java RMI at Colby · 2016-05-12 · package example.hello; import java.rmi.Remote; import...
Using Java RMI at Colby
Fall 2008
Stephanie Taylor
“The Java Remote Method Invocation (RMI) system allows an object running in one Java virtual machine
to invoke methods on an object running in another Java virtual machine.”
(http://java.sun.com/docs/books/tutorial/rmi/overview.html)
This document describes my experience running, modifying, and re-running a distributed version of
“Hello World” from http://java.sun.com/j2se/1.5.0/docs/guide/rmi/hello/hello-world.html. The basic
setup for the “Hello World” example (and for any simple client-server example) is this: There are two
machines - one we will call the server (lowercase), the other we will call the client (lowercase).1 The
server machine will run a Java program called Server (title case) and the client machine will run a java
program called Client (title case). Server is a Remote object, i.e. an object with methods that can
be invoked by Client via an internet/intranet connection. To initiate the communication between the
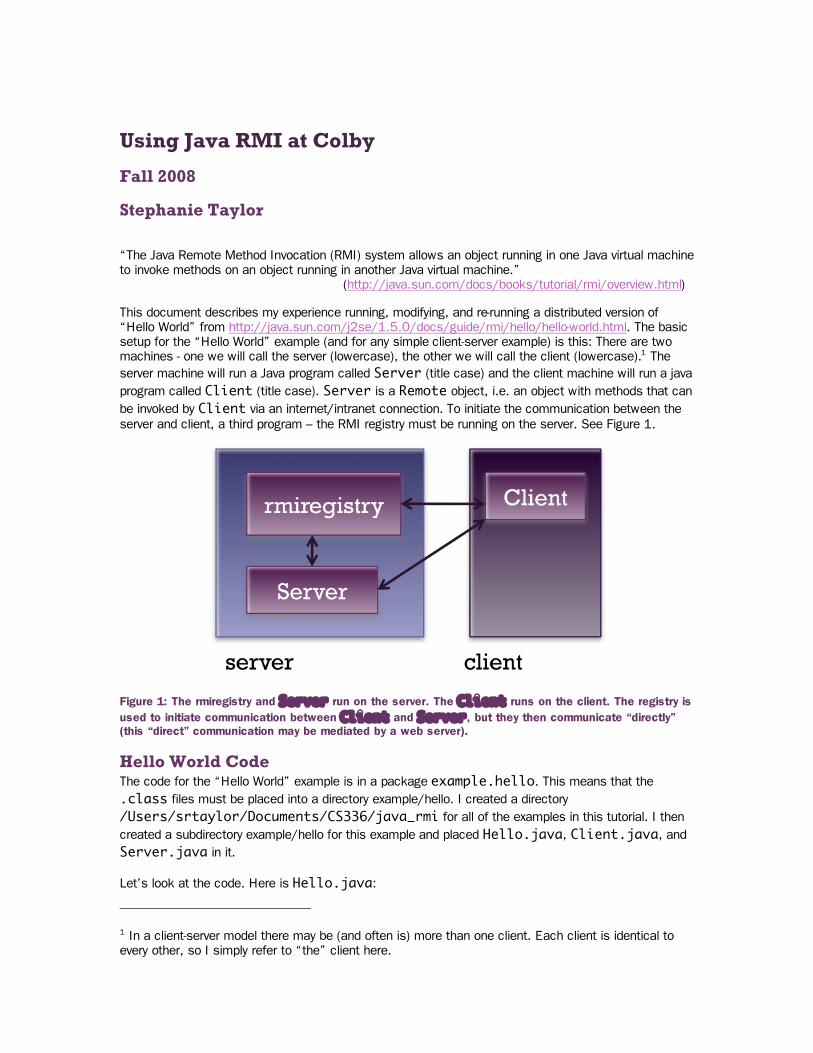
server and client, a third program – the RMI registry must be running on the server. See Figure 1.
Figure 1: The rmiregistry and Server run on the server. The Client runs on the client. The registry is
used to initiate communication between Client and Server, but they then communicate “directly”
(this “direct” communication may be mediated by a web server).
Hello World Code The code for the “Hello World” example is in a package example.hello. This means that the
.class files must be placed into a directory example/hello. I created a directory
/Users/srtaylor/Documents/CS336/java_rmi for all of the examples in this tutorial. I then
created a subdirectory example/hello for this example and placed Hello.java, Client.java, and
Server.java in it.
Let’s look at the code. Here is Hello.java:
1 In a client-server model there may be (and often is) more than one client. Each client is identical to
every other, so I simply refer to “the” client here.

package example.hello; import java.rmi.Remote; import java.rmi.RemoteException; public interface Hello extends Remote { String sayHello() throws RemoteException; }
It declares that it is in the example.hello package and imports the Remote and
RemoteException classes. The Hello interface extends the Remote class. This means that any
class implementing Hello will be a Remote class. Any method in a Remote object must throw a
RemoteException. Thus the method sayHello is declared as one that has the potential to throw
a RemoteException.
Let’s move on to Server.java. Here is its code:
package example.hello; import java.rmi.registry.Registry; import java.rmi.registry.LocateRegistry; import java.rmi.RemoteException; import java.rmi.server.UnicastRemoteObject; public class Server implements Hello { public Server() {} public String sayHello() { System.out.println("Running sayHello()"); return "Hello, world!"; } public static void main(String args[]) { int rport = (args.length < 1) ? 8080 : Integer.parseInt(args[0]); try { Server obj = new Server(); Hello stub = (Hello) UnicastRemoteObject.exportObject(obj,0); // Bind the remote object's stub in the registry Registry registry = LocateRegistry.getRegistry(rport); registry.rebind("Hello", stub); System.err.println("Server ready"); } catch (Exception e) { System.err.println("Server exception: " + e.toString()); e.printStackTrace(); } } }
First, we notice that Server is implementing Hello. This means that Server itself will be the
Remote object on which Client invokes methods. Because Server is implementing Hello, it
must provide a body for sayHello, which it does here. There is a line of output that will run on the
server indicating that the method has been invoked. The method then returns the string “Hello, world!”.

To get the Server object set up so that sayHello can be remotely invoked, the main routine
contains set-up code:
First, the command-line argument is parsed. It indicates the port number that the registry will
use, hence the variable name rport. If it is not given, then we default to port 8080.
Second, a new Server is instantiated.
Third, the RMI library is called to “export” the Server object to make it available to remote
calls. The first parameter is the object, the second parameter is the communication port to use
for the “direct” communication between the server and client. In this case, the port is 0, which
means that an anonymous port is used (note: this port cannot be the same port used for the
registry). The return value is a “stub”, which will eventually be sent to the client.
Next, we look for the rmiregistry so that the Server can register with it. The registry
communicates with the outside world using rport.
Once we have found the registry, we hand it our stub and tell it to associate the string name
“Hello” with it. Any Client will now be able to request the stub using the string “Hello”.
Finally, a message “Server ready” is printed out. The main routine completes, but the Server
persists. Basically, it sits, listening at the anonymous port for a request to invoke the
sayHello method.
Now, for the Client. Its code is:
package example.hello; import java.rmi.registry.LocateRegistry; import java.rmi.registry.Registry; public class Client { private Client() {} public static void main(String[] args) { String host = (args.length < 1) ? null : args[0]; int port = (args.length < 2) ? 8080 : Integer.parseInt(args[1]); try { Registry registry = LocateRegistry.getRegistry(host,port); Hello stub = (Hello) registry.lookup("Hello"); String response = stub.sayHello(); System.out.println("response: " + response); } catch (Exception e) { System.err.println("Client exception: " + e.toString()); e.printStackTrace(); } } }
The Client class contains just a main method:
It first parses its command-line input: It is expecting the address of the server (e.g.
137.146.215.22 or mudd_416.colby.edu) and the port to use to communicate with the
registry (for this example I will be using 8080).
Next, the Client “locates” the rmiregistry on the server. This is a bit of a misnomer
because no communication is actually done here. The call merely sets up the necessary data
structures for later calls which do require communication, such as the lookup on the next line.
This Client wants to call a method on Server. To do this it needs the stub (which is on the
server). To get it, it asks the rmiregistry on the server to lookup the string name “Hello”
and send the stub over the internet/intranet. The stub is cast to a Hello type.
Next is the actual remove method invocation. The sayHello method on the stub is called,
the sub sends the request to the server, the server executes its sayHello method and
returns a String which is then sent across the inter/intranet to the client.
Finally, Client proudly prints the result from the remote method invocation. In this case, it
will be “Hello, world!”.
Compiling “Hello World” The “Hello World” example involves a server and one or more clients. I am planning to continue using
this model – I intend to run my machine as the server and use other machines as clients. I will write all
code on my computer, then deploy code to the clients as necessary (i.e. only those classes necessary
to run the Client will ever make it to the client machine).
Given this setup, compiling is trivial. All of the “Hello World” code is in the subdirectory example/hello.
From a terminal window, I change directory (cd) to example/hello and type
javac Hello.java Client.java Server.java
This results in the creation of Hello.class, Client.class, and Server.class. Only
Client.class and Hello.class are needed on the client. To make it easy to deploy the compiled
code, I will package the two class files together using the Java archive tool jar. This will combine and
compress the files (using ZIP). At the command line, I type
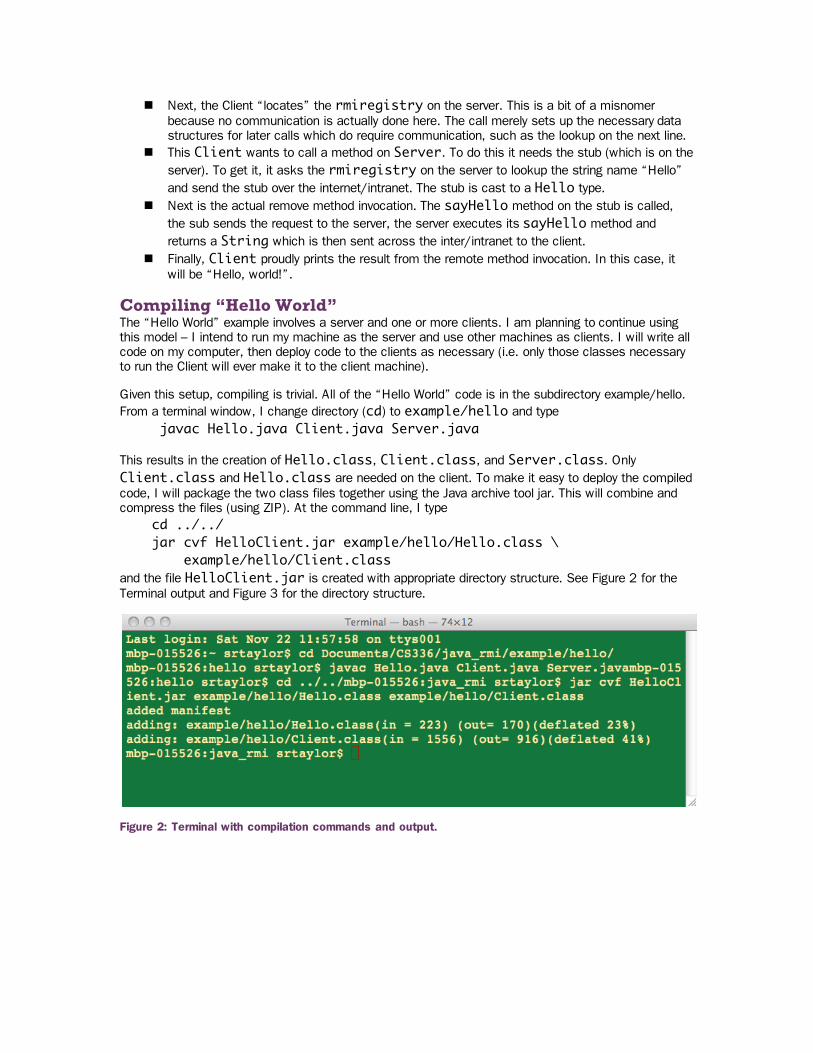
cd ../../ jar cvf HelloClient.jar example/hello/Hello.class \ example/hello/Client.class and the file HelloClient.jar is created with appropriate directory structure. See Figure 2 for the
Terminal output and Figure 3 for the directory structure.
Figure 2: Terminal with compilation commands and output.

Figure 3: View of the source code directory after compilation.
Running “Hello World”
Start the Registry To run the example, I begin by starting the rmiregistry. The rmiregistry is designed to interact
with Remote objects on the server using the same means of communication as it uses to
communicate with the client, i.e. the registry must be put in a position where it must use its port (e.g.
8080) and the RMI library to find any class file it needs. This means there are some unintuitive
restrictions placed on the way we call rmiregistry. To start the registry, I open a terminal window,
check to make sure the CLASSPATH environment variable does not exist (or at least does not include a
path to our code), and make sure I am not in /Users/srtaylor/Documents/CS336/java_rmi
(because it contains example/hello). Then, I type
rmiregistry 8080 to start the registry and tell it to use port 8080 for communication (see Figure 4). I leave it running and
use new terminal windows for the remainder of this section.
Figure 4: Terminal used to start registry on my computer (the server).
Start the Server This is the most complicated part of the entire endeavor because it requires lots of preparation. To
make my code available to others, I need my computer’s name or IP address and I must make sure my
computer can act as a web server.
My laptop doesn’t have a name permanently associated with it, so I will be looking up my IP
address and using it. An easy way to do this is to open a web browser and go to the site
http://whatismyip.com/. As I am writing this, I am at home but using VPN so that I have
Colby IP address, 137.146.215.22.
I don’t know how to make any computer a web server, but I can give you a brief description of
how I made my computer a web server (I am running Mac OS X v10.5.5). I opened the

System Preferences, selected the Sharing icon, then clicked the Web Sharing box. I don’t
remember if there was anything to do to get it working (if there was it was minimal). The end
result is that the Sharing page in the preferences now tells me the URL’s for my computer’s
web site, which is: http://137.146.215.22/.
I need to put Hello.class into my webspace so that the rmiregistry can access it when it
binds the Hello stub to the “Hello” string. I open a terminal window and cd to the main directory that
contains my webpage (for me, this is /Library/WebServer/Documents/). I then make a
subdirectory example/hello. I copy
/Users/srtaylor/Documents/CS336/java_rmi/example/hello/Hello.class into
/Library/WebServer/Documents/example/hello/ (but see below for a much more slick
solution using hard links). By doing this I have made the address http://137.146.215.22/ my server’s
“codebase”. The codebase will become much more important in later examples. See Figure 5 for a
view of the webspace/codebase directory structure.
Figure 5: View of my webspace/codebase.
Now I am finally ready to start the server. In my terminal window, I cd to
/Users/srtaylor/Documents/CS336/java_rmi and then type
java -Djava.rmi.server.codebase=http://137.146.215.22/ \ -Djava.rmi.server.hostname=137.146.215.22 example.hello.Server 8080
I am running the Java program example.hello.Server and setting two system properties. The
first is the codebase – I am telling the RMI library where this server’s codebase/webspace is. The
second is the hostname, for which I am using my IP address. The last argument on this line is 8080,
which indicates to Server that the rmiregistry is using port 8080 (i.e. this is the command line
argument that is parsed by the main program in Server).
In a few moments, the message “Server ready” is printed to my terminal window (see Figure 6) and
Server waits for Client to contact it.

Figure 6: Terminal used to start Server.
Start a Client Almost there! It is time to deploy and run the client code. I will be running on rocketcalc. In a new
terminal window, I ssh into rocketcalc. In my home directory (~), I create a directory java_rmi
and place HelloClient.jar in it (I can do this with Fugu, Finder, or secure copy). The secure copy
(scp) command is
scp helloClient.jar rocketcalc:~/java_rmi
To run Client, I cd into ~/java_rmi and type
java -cp helloClient.jar example.hello.Client 137.146.215.22 8080
The –cp flag tells java that the code it needs is in helloClient.jar. The program that is to run is
example.hello.Client and I am passing the IP address of the server and the port to use for
communication with the rmiregistry.
After a couple of moments, the terminal on the server displays
Running sayHello()
And the terminal on rocketcalc (see Figure 7) displays
response: Hello, world!

Figure 7: Terminal used to copy files to the client (rocketcalc) and to run Client once.
I can run Client ad infinitum (see Figure 8).
Figure 8: A screenshot on my computer after having run example.hello.Client multiple times. The green
Terminal is running the Server on my computer, the off-white Terminal is running the rmiregistry on my
computer, and the blue Terminal is running Client on rocketcalc.
I can also deploy the code on a computer in the Schupflab and run both clients at the same time (see
Figure 9).

Figure 9: A screenshot of my computer after running example.hello.Client on both rocketcalc and
schupflab. The red Terminal is running Client on schupflab.
This is fun, but what does it get us? Why would we ever want to do this? Let’s take one step closer to
a more useful example – an example in which the server is an employer and each client is a worker.
Worker Employer Example The “Worker and Employer” example requires small modifications to the “Hello World” code. Again, I
want to use a model in which my computer is the server and there are many computers who can act as
clients. Each client will perform some job for the server and return the result when it has finished. It will
then request new work. All the server does is keep track of what jobs need to be performed.
First, the Remote object will implement an Employer interface instead of a Hello interface. Here is
Employer.java:
package example.workOnClient; import java.rmi.Remote; import java.rmi.RemoteException; public interface Employer extends Remote { int giveWork() throws RemoteException; void acceptResult(int res) throws RemoteException; }
For this example, there is a new package (example.workOnClient) and the Remote object has
two methods – giveWork which returns an integer identifying the next job to be completed and
acceptResult which allows the Employer to accept an integer result from the caller (a
client/worker).

The Server class must extend the Employer interface. It must also keep track of which “work” has
been assigned. So we add two data fields and a constructor:
int curr_work; int last_work; public Server(int workstop) { curr_work = 0; last_work = workstop; }
The two Server methods implementing the Employer interface are:
public int giveWork() throws RemoteException { curr_work++; if (curr_work > last_work) return -1; else { System.out.println("Assigning work "+curr_work); return curr_work; } } public void acceptResult(int res) throws RemoteException { System.out.println("I got the result - it is "+res); }
The giveWork method increments the current work counter and returns its value. When there is no
more work, it returns -1. The acceptResult method just reports the result to the screen.
The the main method in example.workOnClient.Server is identical to that in
example.hello.Server with one exception – the new method needs to initialize the amount of
work: there is an additional command line argument, and it is then passed to the constructor.
The new Client class will enter a loop in which it “does work” as long as there is work to be done, i.e.
package example.workOnClient; import java.rmi.registry.LocateRegistry; import java.rmi.registry.Registry; public class Client { private static void busyWait(int seconds) { long t0 = System.currentTimeMillis( ); long t1 = System.currentTimeMillis( )+(seconds*1000); while (t0<t1) t0 = System.currentTimeMillis(); } private Client() {} public static void main(String[] args) { String host = (args.length < 1) ? null : args[0];
int rport = (args.length < 2) ? 8080 : Integer.parseInt(args[1]); try { Registry registry = LocateRegistry.getRegistry(host,rport); Employer stub = (Employer) registry.lookup("Employer"); int work = 1; while (work > 0) { work = stub.giveWork(); if (work < 0) break; System.out.println("Doing work for item "+work); busyWait(5); // simulate doing work by waiting 5 seconds int result = 5*work; stub.acceptResult(result); } } catch (Exception e) { System.err.println("Client exception: " + e.toString()); e.printStackTrace(); } } }
Work is simulated with a simple busy-wait.
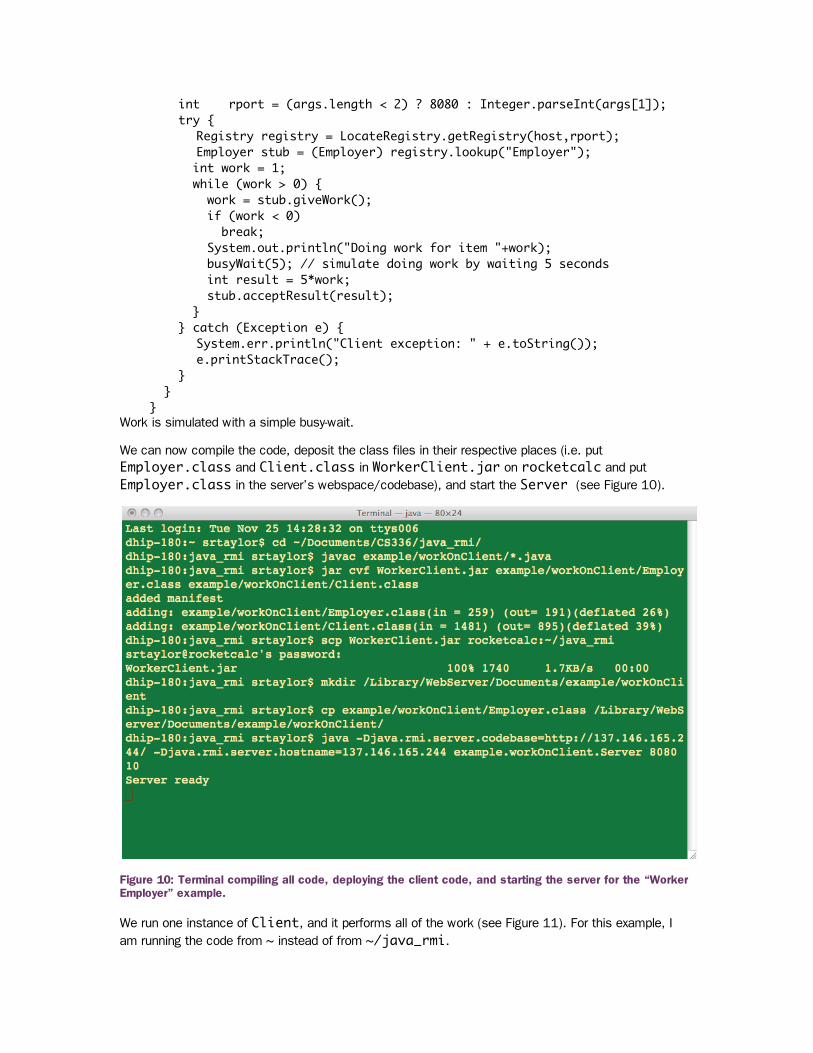
We can now compile the code, deposit the class files in their respective places (i.e. put
Employer.class and Client.class in WorkerClient.jar on rocketcalc and put
Employer.class in the server’s webspace/codebase), and start the Server (see Figure 10).
Figure 10: Terminal compiling all code, deploying the client code, and starting the server for the “Worker
Employer” example.
We run one instance of Client, and it performs all of the work (see Figure 11). For this example, I
am running the code from ~ instead of from ~/java_rmi.

Figure 11: Terminal running example.workOnClient.Client once on rocketcalc.
And the Server reports the assignment and result (see Figure 12).
Figure 12: Terminal showing the Server’s output when a Client is running.
This is all well and good, but when I introduced this example, I mentioned multiple clients performing
the work – not just one. I am going to take advantage of the fact that there are four nodes on
rocketcalc and run one Client on each node. To do this, I am going to write a script called work which will do this for me. But first, let me introduce another convenient Linux feature. When I log in to
rocketcalc from my computer using ssh, the hostname of my computer is automatically placed in an
environment variable REMOTEHOST. Since my computer is the server, I can use the REMOTEHOST
variable instead of typing in 137.146.165.244 or whatever IP address my computer happens to have
at the time. This means the command becomes

java -cp java_rmi/WorkerClient.jar example.workOnClient.Client $REMOTEHOST 8080
Then, in order to keep output from crowding the screen, I will redirect it to a text file. I will also add a &
operator which will force the entire command to run in the background. This means I do not need to
wait for one Client to finish before beginning another one. The command becomes
java -cp java_rmi/WorkerClient.jar example.workOnClient.Client $REMOTEHOST 8080 >> java_rmi/workOutput1.txt &
I place this command in my script, along with commands to create Clients on other nodes. Here are the
contents of work:
rm java_rmi/work_output?.txt java -cp java_rmi/WorkerClient.jar example.workOnClient.Client $REMOTEHOST
8080 >> java_rmi/work_output1.txt & ssh n2 "java -cp java_rmi/WorkerClient.jar example.workOnClient.Client
$REMOTEHOST 8080 >> java_rmi/work_output2.txt" & ssh n3 "java -cp java_rmi/WorkerClient.jar example.workOnClient.Client
$REMOTEHOST 8080 >> java_rmi/work_output3.txt" & ssh n4 "java -cp java_rmi/WorkerClient.jar example.workOnClient.Client
$REMOTEHOST 8080 >> java_rmi/work_output4.txt" &
Note that each command is on a single line – the lines just wrap so they fit on this page.
In order to run work, I must make it executable, which I do by changing its mode to include execution:
chmod +x work
Now, I restart the Server on the server with lots more work. And then start the clients with my work
script.
./work
After the code has run, I examine the contents of java_rmi/work_output2.txt to see what
work was assigned to the second node on rocketcalc (see Figure 13).

Figure 13: Terminals showing output of Server and the Client running on the second node of rocketcalc.
Another Worker and Employer Example The above example allows the Server to farm out work to willing Clients. But the code performing
the work resides in the Client class implementation. What about a more general design? I want the
Employer class to return an instance of a Job class instead of an integer. This Job class instance
will have all of the job-related code in it.
I create a new package example.workDistributedFromServer and make a new Employer
interface that has Job-returning method instead of an int-returning method. Employer.java is:
package example.workDistributedFromServer; import java.rmi.Remote; import java.rmi.RemoteException; public interface Employer extends Remote { Job giveJob() throws RemoteException; void acceptResult(int res) throws RemoteException; }
The method giveJob is analogous to example.workOnClient.giveWork. The
acceptResult method is identical to example.workOnClient.acceptResult.
Job is a new interface whose code is in Job.java:
package example.workDistributedFromServer; import java.io.Serializable; public interface Job extends Serializable { int doJob();
} Because Jobs will be transported from computer to computer, RMI requires that they implement the
Serializable interface, so Job extends Serializable. I intend to make Clients as versatile
as possible. So, I need to keep Jobs as general as possible. Thus, there is only one method – doJob.
It returns an int (which is not so general, but let’s do this one step at a time ).
Now, let’s create a class that implements the Job interface. Alas, it is an unrewarding job – the code
does nothing but watch the clock to see if its shift is over. The result is rather boring as well – it is
always 1. Here is the code for UnrewardingJob.java:
package example.workDistributedFromServer; public class UnrewardingJob implements Job { private static void busyWait(int seconds) { System.out.println("Performing my job"); long t0 = System.currentTimeMillis( ); long t1 = System.currentTimeMillis( )+(seconds*1000); while (t0<t1) t0 = System.currentTimeMillis(); } public int doJob() { busyWait(5); return 1; } }
The Server class is identical to that in example.workOnClient.Server with the exception that
the getJob replaces the getWork method:
public Job giveJob() throws RemoteException { curr_work++; if (curr_work > last_work) return null; else { System.out.println("Assigning work "+curr_work); return new UnrewardingJob(); } }
The Client class is much smaller than that in example.workOnClient.Client because the
Client no longer needs to know ahead of time what its work will be. Here is Client.java:
package example.workDistributedFromServer; import java.rmi.registry.LocateRegistry; import java.rmi.registry.Registry; public class Client { private Client() {}
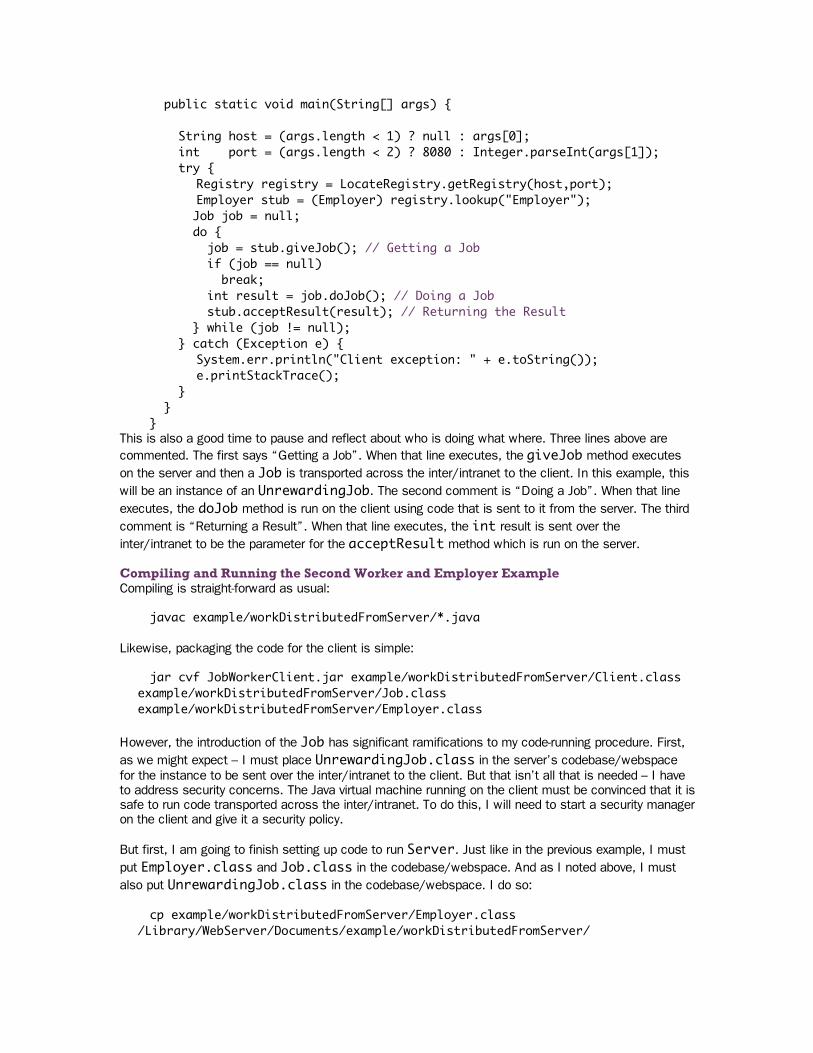
public static void main(String[] args) { String host = (args.length < 1) ? null : args[0]; int port = (args.length < 2) ? 8080 : Integer.parseInt(args[1]); try { Registry registry = LocateRegistry.getRegistry(host,port); Employer stub = (Employer) registry.lookup("Employer"); Job job = null; do { job = stub.giveJob(); // Getting a Job if (job == null) break; int result = job.doJob(); // Doing a Job stub.acceptResult(result); // Returning the Result } while (job != null); } catch (Exception e) { System.err.println("Client exception: " + e.toString()); e.printStackTrace(); } } }
This is also a good time to pause and reflect about who is doing what where. Three lines above are
commented. The first says “Getting a Job”. When that line executes, the giveJob method executes
on the server and then a Job is transported across the inter/intranet to the client. In this example, this
will be an instance of an UnrewardingJob. The second comment is “Doing a Job”. When that line
executes, the doJob method is run on the client using code that is sent to it from the server. The third
comment is “Returning a Result”. When that line executes, the int result is sent over the
inter/intranet to be the parameter for the acceptResult method which is run on the server.
Compiling and Running the Second Worker and Employer Example Compiling is straight-forward as usual:
javac example/workDistributedFromServer/*.java
Likewise, packaging the code for the client is simple:
jar cvf JobWorkerClient.jar example/workDistributedFromServer/Client.class example/workDistributedFromServer/Job.class example/workDistributedFromServer/Employer.class
However, the introduction of the Job has significant ramifications to my code-running procedure. First,
as we might expect – I must place UnrewardingJob.class in the server’s codebase/webspace
for the instance to be sent over the inter/intranet to the client. But that isn’t all that is needed – I have
to address security concerns. The Java virtual machine running on the client must be convinced that it is
safe to run code transported across the inter/intranet. To do this, I will need to start a security manager
on the client and give it a security policy.
But first, I am going to finish setting up code to run Server. Just like in the previous example, I must
put Employer.class and Job.class in the codebase/webspace. And as I noted above, I must
also put UnrewardingJob.class in the codebase/webspace. I do so:
cp example/workDistributedFromServer/Employer.class /Library/WebServer/Documents/example/workDistributedFromServer/

cp example/workDistributedFromServer/Job.class /Library/WebServer/Documents/example/workDistributedFromServer/ cp example/workDistributedFromServer/UnrewardingJob.class
/Library/WebServer/Documents/example/workDistributedFromServer/
I can start the server:
java -Djava.rmi.server.codebase=http://137.146.165.4/ -Djava.rmi.server.hostname=137.146.165.244 example.workDistributedFromServer.Server 8080 100
Now it’s time to get the client JVM to play nice with the server’s code. I begin by writing a security
policy file client.policy that resides in my home directory on rocketcalc:
grant codeBase "file:/home/srtaylor/java_rmi/-" { permission java.security.AllPermission; };
When this file is used, it will inform the JVM that any code started from my java_rmi directory has
the right to download and run code from the internet. Now, I can start a client. I ssh onto
rocketcalc. Then, from my home directory, I type:
java -Djava.security.manager -Djava.security.policy=client.policy -cp java_rmi/JobWorkerClient.jar example.workDistributedFromServer.Client $REMOTEHOST 8080
The –Djava.security.manager flag starts the security manager. The
-Djava.security.policy=client.policy tells the security manager to use the file
client.policy as its security policy.
Helpful Links For Sun’s RMI tutorial with the “Hello World” example, see
http://java.sun.com/j2se/1.5.0/docs/guide/rmi/hello/hello-world.html.
For more information about stubs, see the tutorial at
http://java.sun.com/docs/books/tutorial/rmi/overview.html.
There is a codebase tutorial at http://java.sun.com/j2se/1.5.0/docs/guide/rmi/codebase.html.
For more information about the Serializable interface, see the O’Reilly book at
http://www.onjava.com/pub/a/onjava/excerpt/JavaRMI_10/index.html.
Tricks and Tips
Hard Links Instead of copying .class files from the source tree (i.e. the directories in which I developed my
code) to the webspace/codebase, I will create “hard” links to them. Each “file” in the codebase will be
a link to the corresponding file in the source tree. For the “Hello World” example, there is only one file in
the codebase. I change to the appropriate subdirectory in the codebase, remove the old copy of
Hello.class I used earlier, and construct the link using ln:
cd /Library/WebSpace/Document s/example/hello rm Hello.class #get rid of copy of Hello.class

ln ~/Documents/CS336/java_rmi/example/hello/Hello.class Hello.class
Now I can edit the .java files in the source tree and compile them. Hello.class will be rewritten
in the source tree and the link in the webspace/codebase will automagically refer to the new content.
The advantage of this setup is that I do not have to copy .class files every time I update code – I am
reducing my bookkeeping work and forcing the two sets of Java bytecode to remain consistent. Of
course, you may ask “Why not just do the code development in the webspace?”. That certainly is a
viable option as long as I don’t mind making my source code available to the world.
Codebase When setting the codebase property for Server, remember to use the directory that contains the
packages, i.e. if the package is example.hello, then Hello.class must be in
example/hello. In this example, example/hello is a subdirectory of the main webspace directory.
This means that when my server’s IP address is 137.146.215.22, Hello.class will have the URL
http://137.146.215.22/example/hello/Hello.class. Thus, I set the flag
-Djava.rmi.server.codebase=http://137.146.215.22/ when I start example.hello.Server. Notice the “/” at the end of the directory name. This is
vitally important!
To include more than one “codebase”, I can surround the URL with double quotes and separate the two
locations using a space. For the ODE-solver example presented in class, I use the Tenua solver and
need to include a .jar file tenua.jar as well. My flag becomes
-Djava.rmi.server.codebase=”http://137.146.215.22/ http://137.146.215.22/tenua.jar”
where the linebreak is really just a space.


![Welcome [] · Zülküf Küçüközer TriangleCanvas.java import javax.microedition.lcdui.Graphics; import javax.microedition.lcdui.game.*; import javax.microedition.m3g.*;](https://static.fdocuments.us/doc/165x107/5d31f91d88c9937a3b8ccf67/welcome-zuelkuef-kuecuekoezer-trianglecanvasjava-import-javaxmicroeditionlcduigraphics.jpg)