Using BUSYUsing BUSY In this section, we will discuss about the steps to use BUSY. Using BUSY is a...
26
Using BUSY In this section, we will discuss about the steps to use BUSY. Using BUSY is a simple five-step process. The steps are: 1. Create Company in BUSY 2. Configure Company 3. Create Masters 4. Record Transactions 5. View/Print Report 1. Create Company in BUSY After installation of BUSY, the next step is to create a company in BUSY on which you can work upon. To create a company, perform the following steps: • Run BUSY application. • On running the BUSY application, a Security Checked message box appears. Click the OK button in the message box. On clicking the OK button, Start up screen of BUSY appears. Given here is the screenshot of Start up screen of BUSY. Start up Screen of BUSY • Click Company > Create option to create a new company. On clicking the Create option, a Create Company window appears. Given here is a screenshot of the Create Company window. Create Company window In the window there are various fields in which data needs to be entered. These fields are commonly referred to as Data Fields. Information about a company such as Name, Address and so on are required to be entered in different data fields. Various data fields in the Add New Company window are: • Name – Enter the name of the company in this data field. You can enter a name up to 40 characters. • Print Name – Enter the Print Name for the company in this data field. The name entered in this data field will appear in the header of the reports. By default, the name entered in the Name data field is displayed as Print Name. You can leave this data field blank if you do not want any name to appear on the Print Reports.
Transcript of Using BUSYUsing BUSY In this section, we will discuss about the steps to use BUSY. Using BUSY is a...
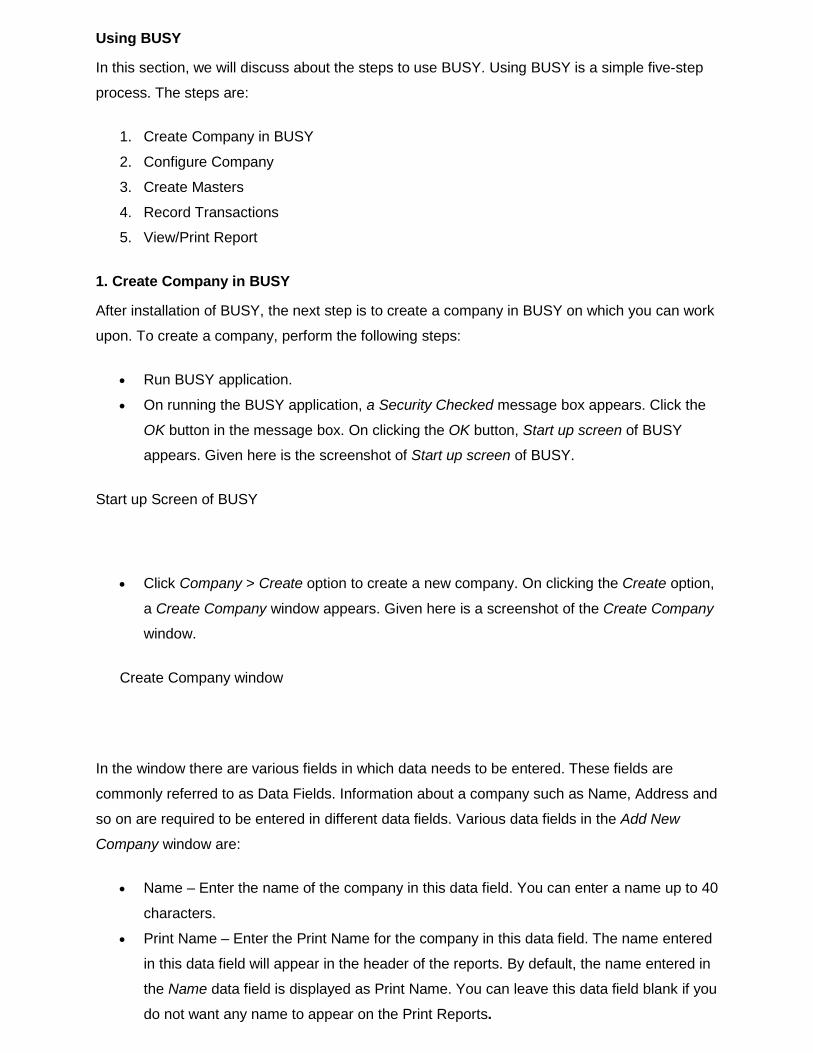
Using BUSY
In this section, we will discuss about the steps to use BUSY. Using BUSY is a simple five-step
process. The steps are:
1. Create Company in BUSY
2. Configure Company
3. Create Masters
4. Record Transactions
5. View/Print Report
1. Create Company in BUSY
After installation of BUSY, the next step is to create a company in BUSY on which you can work
upon. To create a company, perform the following steps:
• Run BUSY application.
• On running the BUSY application, a Security Checked message box appears. Click the
OK button in the message box. On clicking the OK button, Start up screen of BUSY
appears. Given here is the screenshot of Start up screen of BUSY.
Start up Screen of BUSY
• Click Company > Create option to create a new company. On clicking the Create option,
a Create Company window appears. Given here is a screenshot of the Create Company
window.
Create Company window
In the window there are various fields in which data needs to be entered. These fields are
commonly referred to as Data Fields. Information about a company such as Name, Address and
so on are required to be entered in different data fields. Various data fields in the Add New
Company window are:
• Name – Enter the name of the company in this data field. You can enter a name up to 40
characters.
• Print Name – Enter the Print Name for the company in this data field. The name entered
in this data field will appear in the header of the reports. By default, the name entered in
the Name data field is displayed as Print Name. You can leave this data field blank if you
do not want any name to appear on the Print Reports.
• F.Y. Beginning From – Financial Year refers to the accounting period. For example, in
India, the Financial Year is generally a 12 month period from April 1 to March 31. Enter
the financial year beginning date of the company in this data field. You cannot leave this
data field blank.
You cannot change the original beginning F. Y. once it is saved. You can go to the
successive financial years but cannot go to the F. Y. prior to the original
beginning financial year.
• Books Commencing From - In this data field, you have to enter the date from which you
start maintaining the books of accounts. By default, the F. Y. Beginning From date is
displayed as Books Commencing From date.
F.Y. Beginning Date and Books Commencing From Date can be different. For example, a
Company was incorporated on 1-Jun-2006. In such a case the F.Y. Beginning From will be
1-4-2006 while the Books Commencing From Date will be 1-6-2006.
• Address – In the Address sub-window there are six data fields. The data fields are:
• Country - Select the country in which the company exist.
If the Country selected is Nepal then a Date Type data field gets activated. In the Date
Type data field, you have to select the date type i.e. either Roman Date or Nepali Date in
which you want to maintain accounting records. If you select the Nepali Date option
then the date entered in F.Y. Beginning Date and Beginning Financial Year Date data field
will automatically be converted according to Nepali Date format.
• State – Select the State in which the company exist.
• Currency Symbol - Specify the currency symbol applicable. For example, Rs. $ etc.
• Currency String - Specify the currency string applicable. For example, Rupees, Dollar
etc.
• Currency Sub-String - Specify the currency sub-string applicable. For example, the sub-
string for Rupees is Paisa or for Dollar is Cent.
• Enable Sales Tax/VAT/GST - If you have selected the country as India then Enable
Sales Tax/VAT data field will appear otherwise if you have selected a country other than
India then Enable VAT/GST data field will appear. Specify 'Y' in this data field to enable
Sales Tax/VAT/GST in the company.
• Type - This data field appears if you have specified 'Y' in the Enable Sales
Tax/VAT/GST data field. Select the type of tax applicable in the company.
• TIN - This data field appears if you have selected the type of tax as VAT. Specify the TIN
i.e. Tax Identification Number of your company in this data field.
• LST No. - This data field appears if you have selected the type of tax as LST. Specify
the LST number of the company in this data field.
• GST No. - This data field appears if you have selected the type of tax as GST. Specify
the GST number of the company in this data field.
• CST No. - This data field appears only if the country selected is India and you have
specified 'Y' in the Enable SalesTax/VAT data field. Enter the CST number of your
company in this data field.
• Default Tax Rate-1 - This data field appears if you have selected a country other than
India and has specified 'Y' in the Enable VAT/GST data field. Specify the default tax rate
applicable for the company.
• Default Tax Rate-2 - This data field appears if you have selected a country other than
India and has specified 'Y' in the Enable VAT/GST data field. Specify the default tax rate
applicable for the company.
After entering data in the data field, click the OK button. On clicking the OK button, a Save
message box appears asking your confirmation to save the information entered by you.
• Click the Yes button if you want to save the information otherwise click the NO button.
On clicking the Yes button, a Copy Masters & Configuration message box appears. If you are a
first time user and creating first company in BUSY then this message box will not appear. It
appears only when a company already exist. In the message box there are two buttons. The
buttons are:
• Yes – Click this button if you want to copy masters and configurations from some other
company. On clicking this button, it will ask you to select an existing company from
where the Masters and Configuration settings will be copied.
• No – Click this button if you do not want to copy masters and configuration from any
other company.
Once the company is created, a Congratulations message box appears confirming the creation
of the company.
• Click the Ok button in the Congratulations message box. On clicking the Ok button, a
SuperUser Creation window appears. Given here is a screenshot of SuperUser -
Creation window.
In the window there are three data fields. The data fields are:
• Super User – Enter the name of SuperUser in this data field. A SuperUser is at the top
level of hierarchy. A SuperUser is like the owner of a business who has all the rights and
access privileges in the business. There can be only one SuperUser for a company. He
has the right to create or modify any number of users. In addition, he has the right to
enter, modify, delete and list any data of the company.
• Password - Enter the password for the SuperUser. You can enter a password containing
maximum of 20 characters. When you enter the password it will appear in the form of
asterisks (*) to maintain secrecy.
• Recheck Password - You are required to re-enter the password. This is done to
confirm your password. If the password entered in the Recheck Password data field
does not match with the password entered in the Password data field then an Error
message will appear. In such a case, you will need to enter the password again in
the Recheck Password data field.
After entering the data in the data fields, click the Save button. On clicking the Save button, a
Save message box appears.
• Click the Yes button in the Save message box to save the SuperUser. Next, BUSY
will create the SuperUser for the company.
After the creation of the SuperUser, BUSY automatically opens the Features / Options window
in which you can configure various features and options as required in the company.
2. Configure Company
Once the company is created, you can then configure the company as per your requirement.
BUSY provides you numerous features that you can use as per your company’s requirement.
By default some features are enabled in the newly created company. Let us understand the
need for configuring a company with the help of an example. Digitech Electronics, a computer
manufacturing company wants to have the following features in its company:
To enable above-mentioned and many other features, BUSY provides the Configuration menu.
To enable various features in BUSY, perform the following steps:
• Click Administration > Configuration menu.
• On clicking the Configuration menu, a list of option is displayed. Given here is a
screenshot of options displayed in the Configuration menu.
Configuration menu
In the Configuration menu, there are various options. We will discuss the Features/Options
option only. For details on all the other options in the Configuration menu, you can refer to the
Help provided in BUSY.
Features/Options
Features/Options option provides you numerous features and options that you can activate or
deactivate as per your requirement. On clicking the Features/Options option, a
Features/Options window appears. Given here is a screenshot of Features/Options window.
Features/Options window
There are many tabs in the Features/Options window. The tabs provided in the
Features/Options window are:
• General
• Accounts
• Inventory
• Sales Tax & VAT
• Excise
• Service Tax
• TDS
• POS
• Enterprise Features
Let us discuss each tab one by one.
General
When Features/Options window is opened then by default General tab is active. The above
screenshot shows the Features/Options window with active General tab. Under the General tab,
you can provide basic information about your accounting needs such as currency, date format
and so on. Various options available in General tab are:
• Currency Symbol - Enter the currency symbol of the country where your company exist.
For example, Rs, &.
• Currency String - Enter the currency string of the country where your company exist. For
example, Rupees, Dollar.
• Currency Sub string - Enter the currency sub-string of the country where your company
exist. For example the sub-string for Rupees is Paisa, for Dollar is Cent.
• Format for displaying numbers – Two options are listed in this data field. One is the
Indian Decimal System (9,99,99,999.99) and the other is the International Decimal
System (999,999,999.99). Select the appropriate option from the list.
• Skip Currency Separator in Numbers - Specify 'Y' in this data field if you do not want the
currency separator i.e. comma to appear in numbers. For example, nine thousand will
appear as 9000 in number if you specify 'Y'. On the other hand, if you specify 'N' in this
data field then nine thousand will appear as 9,000. By default, 'N' is the value in the data
field.
• Date Format - In this data field, two options are listed. One is the DD/MM/YYYY format
while the other is MM/DD/YYYY. Select the appropriate option as per your requirement.
• Date Separator - Enter a date separator for the dates. For example, you can select a
hyphen (-) or a colon (:) as a date separator.
• Currency Decimal Places - Enter the number for decimal places that you want. For
example, if you enter 2 then 2 digits after the decimal will be displayed. Thus, if the
number is 58.3456 then 58.34 will be displayed.
• Country and State Information - In this box there are two data fields. These are:
o Country - Select the country from the list that appears in the data field.
o State - This data field is active only when you select India as the country in
the Country data field. Select the appropriate state from the list that appears in
the data field.
• Maintain Data Checklist - Data checklist refers to the list of the actions (addition and
modification) taken by the users on vouchers and masters. Specify 'Y' in this data field if
you want to maintain a data checklist other wise specify 'N'. You can also delete the
checklist by clicking the Delete History button that appears when you specify ‘N’ in this
data field.
• Enable Notes Manager - Enable this option to enable Notes Manager in the company.
Notes Manager acts as a personal diary or organiser in which you can write various
tasks and notes and can set reminders for the same also.
Accounts
Under the Accounts tab, you can configure account related features such as credit limits,
budgets, Cost Centres and so on. Given here is a screenshot of the Features/Options window
with the active Accounts tab.
Features/Options window with the active Accounts tab

Various options available in the Accounts tab are:
• Bill-by-Bill Details – Enable this option if you want to maintain bill-by-bill balancing of
records.
• Broker-wise Reporting – Enable this option if you want to maintain brokers details. This
feature is useful if your organization interacts through brokers for business transactions.
In such a case, you will need to maintain broker related details such as the broker's
name, rate of brokerage and so on.
• Credit Limit - Enable this option if you want to fix credit limits for sundry debtors and
creditors.
• Budget – Enable this option if you want to fix annual/monthly budgets for expenses.
• Targets - Enable this option if you want to fix targets for income and sale.
• Royalty Calculation - Royalty is the amount paid to an author or any other such person
on sale of books, articles and so on. You can enable this feature if royalty is payable on
the items that you trade.
• Cost Centre - Enable this option if you want to maintain details of Cost Centres. Cost
Centre in an organisation refers to an entity to which incomes and expenses can be
allocated. The purpose of allocating income/expenses is that it helps you to do a cost-
benefit analysis for different Cost Centres. Depending on the type of business, Cost
Centres can be branches, departments, sales executives, or products of a company.
• Company’s Act Depreciation - By default, depreciation is charged according to the IT
Act. In case your organisation follows the Company's Act then you can enable
this feature to charge depreciation on fixed assets according to the Company's Act.
• Posting in Accounts through Sales Return & Purchase Return - By default, this feature is
enabled in a new company. This feature should be enabled if you want to post the sale
return/purchase return directly to sale/purchase account.
• Double Entry System for Payment and Receipt Vouchers – By default this feature is
enabled in a new company. You can disable this feature if you want to use Single Entry
System for payment and Receipt vouchers.
• Show Accounts Current Balance During Voucher Entry - By default, this feature is
enabled in a new company. If this feature is enabled then when you select an account in
a voucher, the current balance of the account appears in the voucher. This helps you to
know the current status of the account.
• Fringe Benefit Tax Reporting - Fringe Benefit Tax (FBT) is a tax on perquisites or fringe
benefits provided by an employer to his employees, in addition to the cash salary or
wages paid. If your company falls under the FBT system then you can enable this
feature.
• Multi Currency - Enable this option if you want to use more than one currency for making
transactions.
• Carry Uncleared bank Entries to Next Financial Year - Select this option if you want to
carry uncleared bank entries to the next financial year.
• Post Dated Cheques in Payment/Receipt Vouchers - Enable this option if you want to
enter post dated cheques in Payment/Receipt vouchers.
• Maintain Images/Notes with Master/Voucher - Enable this option to maintain
Image/Notes for Account master and to maintain image of Accounting vouchers.
Inventory
Under the Inventory tab, you can configure the inventory related features such as Stock
Valuation method, Alternate Unit of items, and so on. Given here is a screenshot of the
Features/Options window with the active Inventory tab.
Features/Options window with the active Inventory tab
Various options available in the Inventory tab are:
• Qty. Decimal Places - This value represents the number of decimal places that appear
for the quantity in the books. In other words, whenever you enter a quantity, the number
of digits that appear after the decimal places is determined by the value in this data field.
• Stock Val. Method - In this data field, you need to specify the stock valuation method
that you want to use for valuing the closing stock.
• Enable Manufacturing Features - Manufacturing Features refer to the features that are
required in a manufacturing concern. By default this feature is enabled in a new
company. You can disable this feature if your company is not in manufacturing business.
• Enable Multi-Godown Inventory - Enable this option if you want to maintain stock at
more than one Material Centre.
• Alternate Unit of Items - Enable this option if you want to maintain stock of items in
Alternate unit also. With Alternate unit of items, you can maintain an item in more than
one unit. For example, one box of CDs contains 50 CDs and if the company wants to
maintain stock of CDs in both boxes and pieces then the company can enable this
feature.
• Batch.-wise Details - Enable this option if you want to maintain batch-wise stock of
items.
• Enable Sale/Purchase Challan - Enable this option if you want to make
Sale/Purchase/Sale Return/Purchase Return against challan.

• Enable Free Quantity in Voucher - Enable this option if you want to enter free quantity
details in voucher.
• Enable Bill Sundry Narration - Enable this option if you want to enter narration for the Bill
Sundry at the time of voucher entry.
• Allocate Expense/Purc. to Items - Enable this option if you want to allocate the expenses
or purchases to items. The use of this feature is in doing the costing of the items. In
other words, by allocating expense/purchase to items you can determine the contribution
of different items in total expenses/purchases.
• Invoice Bar Code Printing - Enable this option if you want to print the information on the
invoice in the form of a Bar Code.
• Update Prices in Masters - Enable this option if the sale/purchase price of items changes
frequently and you want to update sales price in Masters with latest sale price entered in
Voucher.
• Skip Item Default Price During Voucher Entry – Enable this option if you want to skip the
default price of the item at the time of voucher modification.
• Enable Order Processing - Enable this option if your organisation receives
sales/purchase orders and makes adjustments against the same. In other words, if the
organisation implements a pre-purchase cycle/pre-sale cycle in which purchase/sale is
made against an order and the orders need to be tracked then you can enable this
feature.
• Maintain Drug License Number - Enable this option if you want to maintain drug license
number. This feature is useful for pharmaceutical firms. On enabling this option, a data
field next to it gets activated. Specify the drug license number of the company in this
data field.
• Show Items Current Balance during Voucher Entry - Enable this option to view item
current balance during voucher entry.
• Serial No. - wise Details - Enable this option to maintain serial number wise stock of
item.
• Carry Pending Material Issue/Receipt to next F.Y. - Specify 'Y' in this data field if you
want to carry pending Material Issued/Received balances to the next financial year.
• MRP-wise Details - Enable this option to maintain MRP wise details of the item.
• Pick Item Sizing Information from Description - Enable this option if you want to pick Item
sizing information from Item Description window.
• Parameterized Details - Enable this option to maintain parameterized stock.
• Separate Stock Updation Date in Dual Vouchers – Enable this feature if you want to
maintain separate stock updation date in dual vouchers. Let us understand this option
with the help of an example. Digitech Company purchased raw material on April 10,
2006 but it received the goods on April 15, 2006. Thus, although the transaction took
place on April 10, the stock was actually updated on April 15. In such a case, Digitech
will enable the Separate Stock Updation Date feature and enter April 10 as the voucher
date and April 15 as the stock updation date.
• Separate Sales/Purchase Account with Items - Enable this option if your organisation
wants to maintain separate sales/purchase account for different items. Let us
understand with the help of an example. Digitech Company maintains separate sales
account for garments based on different VAT rates. For example, it maintains two sales
accounts, Sales 4% and Sales 12.5%. Now it wants to associate the items with the
respective sales accounts. For this purpose, Digitech enables the Separate
Sales/Purchase Account with items feature.
• Separate Stock Valuation Methods for Items - Enable this option if you want to value the
closing stock of different items using different methods.
• Items Pricing Mode in Vouchers - Select the required pricing mode.
• Maintain Images/Notes with Master/Voucher - Enable this option if you want to maintain
images/notes with Item master and image of Inventory vouchers.
• Allow Purchase Return in Purchase voucher - Enable this option if you want to enter
purchase return quantity in Purchase voucher. Quantity entered with a (-) minus sign will
be treated as return quantity.
• Allow Sales Return in Sales voucher - Enable this option if you want to enter sales return
quantity in Sales voucher. Quantity entered with a (-) minus sign will be treated as return
quantity.
Sales Tax/VAT/GST
Under the Sales Tax/VAT/GST tab, you can enable Sales Tax/ VAT/GST for your company. In
addition, you can provide tax related information about your company such as registration
number, surcharge and so on. By default, this feature is enabled for a new company.
Excise
Under the Excise tab, you can enable excise reporting for your company. In addition you can
provide excise related information such as registration number, range, division and so on. Given
here is a screenshot of the Features/Options window with the active Excise tab.
Features/Options window with the active Excise tab
To enable the Excise Reporting, perform the following steps:
• Enable the Enable Excise Reporting checkbox.
• On enabling the Excise Reporting checkbox, various data fields get activated.
• Enter data in these data fields. You can also select the type of Excise duty you follow i.e.
Manufacturing Excise or Trading Excise.
• Click the Save button to save the details.
Service Tax
Under the Service Tax tab, you can enable service tax reporting for your company. In addition
you can provide service tax related information such as registration number.
TDS
Under the TDS tab, you can enable TDS reporting for your company. In addition you can
provide TDS related information such as TAN number, payer's category, address and so on.
For more information on implementing various features provided in Features/Options
window, you can refer to the Help provided in BUSY.
POS
Under this tab, you can enable advance POS data entry for Sale/Sale Return and
Purchase/Purchase Return vouchers.
Enterprise Features
This tab is active only for the Enterprise edition of BUSY. With this tab you can enable and
configure features available in Enterprise edition such as Voucher / Master Approval, Multi
Branch accounting and so on.
3. Create Masters
Once the company is created and configured, the next step is to create masters. In BUSY the
term 'Master' signifies the information that is generally entered once, usually at the time of
creating a company in accounting software. In a company numerous transactions take place. To
record these transactions some accounts are required. Generally in India, double entry system
is followed in which each transaction has a dual effect. With each transaction one account is
debited and one is credited. For example, if you are purchasing machinery in cash then
machinery account will be debited and cash account will be credited. To record such
transactions you need two accounts i.e. Machinery and Cash account. These accounts are
referred as Account master in BUSY. Let us take another example, you have sold 50 computers
and 20 Printers and you want to print a bill for the items sold. For this you have to create two
items in BUSY i.e. Computers and Printers. Such items are referred to as Item master in BUSY.
BUSY provides you with various masters such as Account master, Item master, Material Centre
master and so on. Given here is a screenshot of various Masters provided by BUSY.
Masters Menu
• Select the required Master. On selecting any master, three options are displayed. The
options are:
o Add – Select this option if you want to add a new master.
o Modify – Select this option if you want to modify an existing master.
o List – Select this option if you want to view/print the list of existing masters.
Let us now discuss the creation of masters in BUSY. For explaining the steps to create a
master, we will take example of Account and Item master.
For help on creation of other Masters, you can refer to Help provided in BUSY.
Create Account master
An Account is a summarized record of various transactions pertaining to a particular account
head. It is commonly referred to as a Ledger Account. In BUSY, it is called Account master. All
the transactions pertaining to a particular account head are recorded under one Account
master. For example, your company has many Sundry Creditors and Debtors hence you need
to create different accounts for different Sundry Creditors and Debtors. To create an Account
master in BUSY, perform the following steps:
• Click Administration > Masters > Account > Add option.
On clicking the Add option, an Account Master-Add window appears. Given here is a
screenshot of Account Master- Add window.
Account Master-Add window
In the Account Master-Add window there are various data fields. The data fields are:
• Name – Enter the name for the account in this data field. You can enter a name up to 40
characters. In the screenshot given above, the name is taken as Rich Styles.
• Alias – Enter an alias for the account in this data field. An alias refers to an abbreviation
or a short name for the account.
• Print Name – Print Name refers to the name that will appear on documents given to
external parties such as sales invoice, receipt, debit note and so on. Further the Print
Name is printed on the Statement of Account report. By default, the name entered in
the Name data field is displayed as Print Name. You can leave this data field blank if you
do not want any name to appear on the Print Reports.
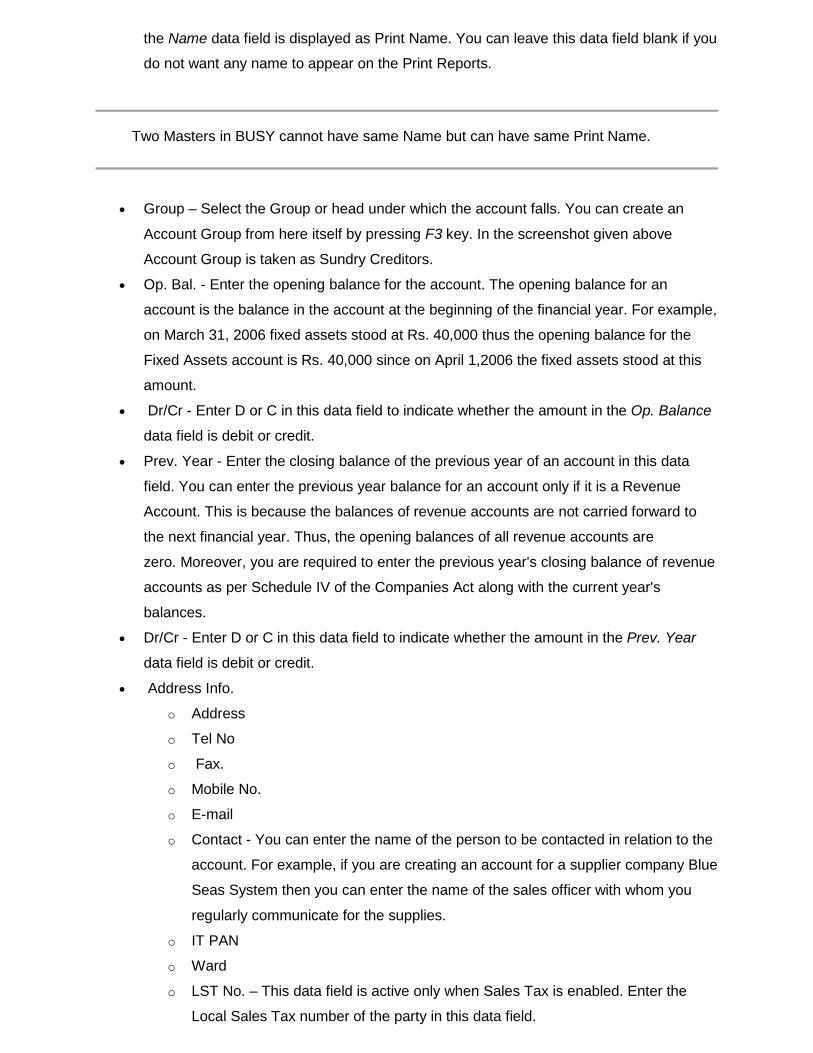
Two Masters in BUSY cannot have same Name but can have same Print Name.
• Group – Select the Group or head under which the account falls. You can create an
Account Group from here itself by pressing F3 key. In the screenshot given above
Account Group is taken as Sundry Creditors.
• Op. Bal. - Enter the opening balance for the account. The opening balance for an
account is the balance in the account at the beginning of the financial year. For example,
on March 31, 2006 fixed assets stood at Rs. 40,000 thus the opening balance for the
Fixed Assets account is Rs. 40,000 since on April 1,2006 the fixed assets stood at this
amount.
• Dr/Cr - Enter D or C in this data field to indicate whether the amount in the Op. Balance
data field is debit or credit.
• Prev. Year - Enter the closing balance of the previous year of an account in this data
field. You can enter the previous year balance for an account only if it is a Revenue
Account. This is because the balances of revenue accounts are not carried forward to
the next financial year. Thus, the opening balances of all revenue accounts are
zero. Moreover, you are required to enter the previous year's closing balance of revenue
accounts as per Schedule IV of the Companies Act along with the current year's
balances.
• Dr/Cr - Enter D or C in this data field to indicate whether the amount in the Prev. Year
data field is debit or credit.
• Address Info.
o Address
o Tel No
o Fax.
o Mobile No.
o E-mail
o Contact - You can enter the name of the person to be contacted in relation to the
account. For example, if you are creating an account for a supplier company Blue
Seas System then you can enter the name of the sales officer with whom you
regularly communicate for the supplies.
o IT PAN
o Ward
o LST No. – This data field is active only when Sales Tax is enabled. Enter the
Local Sales Tax number of the party in this data field.
o CST No. – This data field is active only when Sales Tax is enabled. Enter the
Central ales Tax number of the party in this data field.
o TIN No. - This data field is active only when VAT is enabled. In case VAT is not
enabled but Sales Tax Reporting is enabled then ST-37 data field is enabled in
place of TIN No.
o Service Tax - This data field is active only when Service Tax Reporting is
enabled.
After entering appropriate data in the data fields, click the Save button to save the account
information.
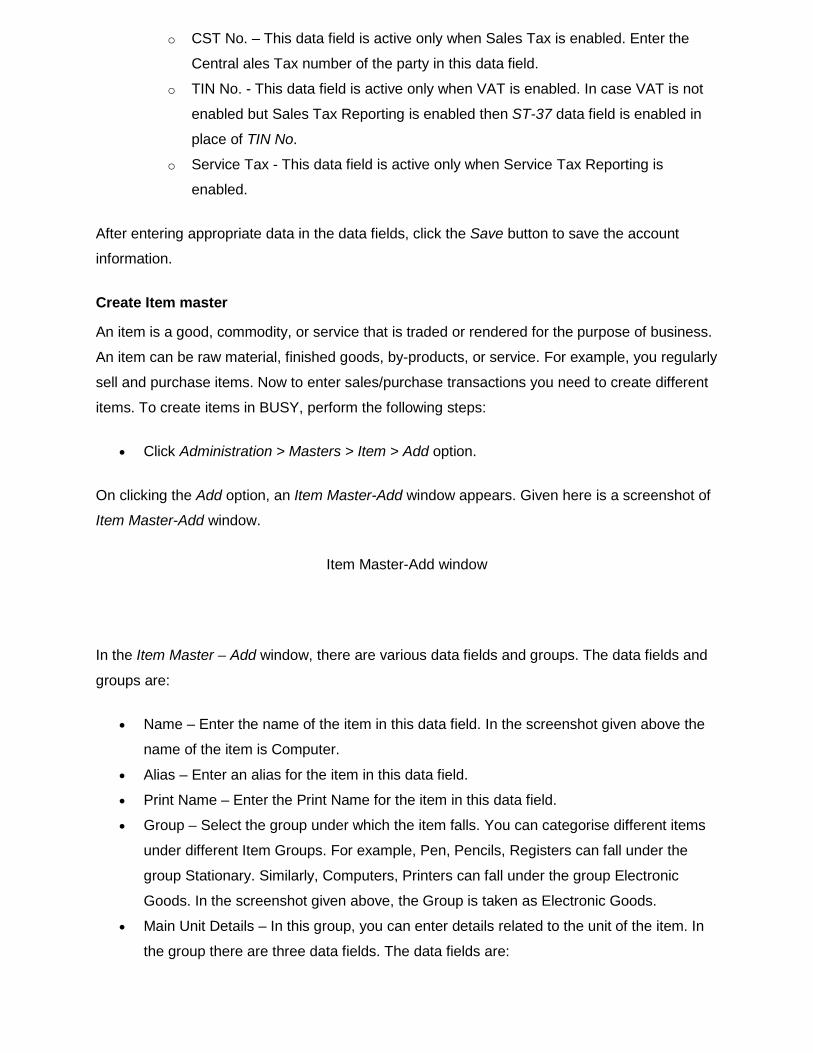
Create Item master
An item is a good, commodity, or service that is traded or rendered for the purpose of business.
An item can be raw material, finished goods, by-products, or service. For example, you regularly
sell and purchase items. Now to enter sales/purchase transactions you need to create different
items. To create items in BUSY, perform the following steps:
• Click Administration > Masters > Item > Add option.
On clicking the Add option, an Item Master-Add window appears. Given here is a screenshot of
Item Master-Add window.
Item Master-Add window
In the Item Master – Add window, there are various data fields and groups. The data fields and
groups are:
• Name – Enter the name of the item in this data field. In the screenshot given above the
name of the item is Computer.
• Alias – Enter an alias for the item in this data field.
• Print Name – Enter the Print Name for the item in this data field.
• Group – Select the group under which the item falls. You can categorise different items
under different Item Groups. For example, Pen, Pencils, Registers can fall under the
group Stationary. Similarly, Computers, Printers can fall under the group Electronic
Goods. In the screenshot given above, the Group is taken as Electronic Goods.
• Main Unit Details – In this group, you can enter details related to the unit of the item. In
the group there are three data fields. The data fields are:
o Unit – Select the unit of measurement of the item. You can create different units
by using the Unit master. In the screenshot given above the unit is taken as
Pieces.
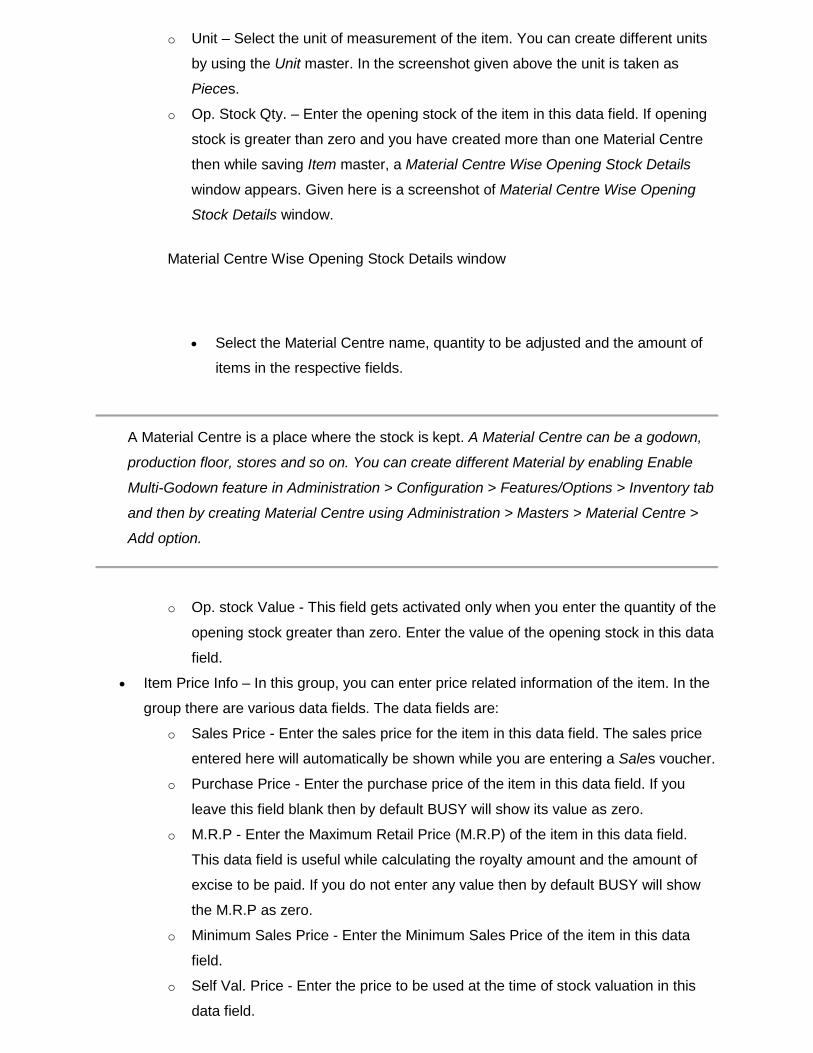
o Op. Stock Qty. – Enter the opening stock of the item in this data field. If opening
stock is greater than zero and you have created more than one Material Centre
then while saving Item master, a Material Centre Wise Opening Stock Details
window appears. Given here is a screenshot of Material Centre Wise Opening
Stock Details window.
Material Centre Wise Opening Stock Details window
• Select the Material Centre name, quantity to be adjusted and the amount of
items in the respective fields.
A Material Centre is a place where the stock is kept. A Material Centre can be a godown,
production floor, stores and so on. You can create different Material by enabling Enable
Multi-Godown feature in Administration > Configuration > Features/Options > Inventory tab
and then by creating Material Centre using Administration > Masters > Material Centre >
Add option.
o Op. stock Value - This field gets activated only when you enter the quantity of the
opening stock greater than zero. Enter the value of the opening stock in this data
field.
• Item Price Info – In this group, you can enter price related information of the item. In the
group there are various data fields. The data fields are:
o Sales Price - Enter the sales price for the item in this data field. The sales price
entered here will automatically be shown while you are entering a Sales voucher.
o Purchase Price - Enter the purchase price of the item in this data field. If you
leave this field blank then by default BUSY will show its value as zero.
o M.R.P - Enter the Maximum Retail Price (M.R.P) of the item in this data field.
This data field is useful while calculating the royalty amount and the amount of
excise to be paid. If you do not enter any value then by default BUSY will show
the M.R.P as zero.
o Minimum Sales Price - Enter the Minimum Sales Price of the item in this data
field.
o Self Val. Price - Enter the price to be used at the time of stock valuation in this
data field.
• Item Description - Enter the description of the item in different text boxes that appear in
this group.
• Sales Tax/VAT Info – In the Sales Tax/ VAT Info group, you can enter tax related details
about the item. In the group there are two data fields. The data fields are:
o Rate of Tax (Local) - Enter in this data field the Local Sales Tax (LST) rate to be
applied on the item.
o Rate of Tax (Central) - Enter in this data field the Central Sales Tax (CST) of rate
to be applied on the item.
If you want to specify Advanced configuration for tax rates then click the button that
appears in the Sales Tax/VAT Info sub-window. On clicking this button an Advance Sales
Tax/VAT Configuration window appears. Enter appropriate information in the window.
• Set Critical Levels - Critical levels implies setting the minimum or maximum level in
terms of quantity or number of days for an item. Setting critical levels for different items
will help in generating critical level reports and warning alarms whenever the quantity of
the item reaches its critical level. When you specify 'Y' in the Set Critical Level option
then Critical Level group gets activated. In the group there are three data fields. The
data fields are:
o Maximum Level – In Maximum Level, following two data fields appear:
Qty - Enter here the maximum quantity of item to be kept.
No. of days - Enter here the maximum number of days for which the
maximum level of stock is to be kept.
o Minimum Level - In Minimum Level, following two data fields appear:
Qty - Enter here the minimum quantity of item to be kept.
No. of days - Enter here the maximum number of days for which the
minimum level of stock is to be kept.
o Re-order Level - In Reorder Level, two data fields appear:
Qty - Enter here the quantity after which the item is to be reordered.
No. of days - Enter here the maximum number of days for which
the reorder level of item is to be kept.
After entering appropriate data in the data fields, click the Save button to save the item
information.
4. Record Transactions
After the masters are created, the next step is to record the transactions using vouchers.
Entering transactions means recording of entries in vouchers such as Sales/Sales Return,
Purchase/Purchase Return, Payment/Receipt and so on. For example, Digitech Electronics
made a sale of computers. To maintain accurate records the company will record this
transaction in a Sales voucher. To record day-to-day transactions BUSY provides you with
various vouchers. To record entries in the vouchers, perform the following steps:
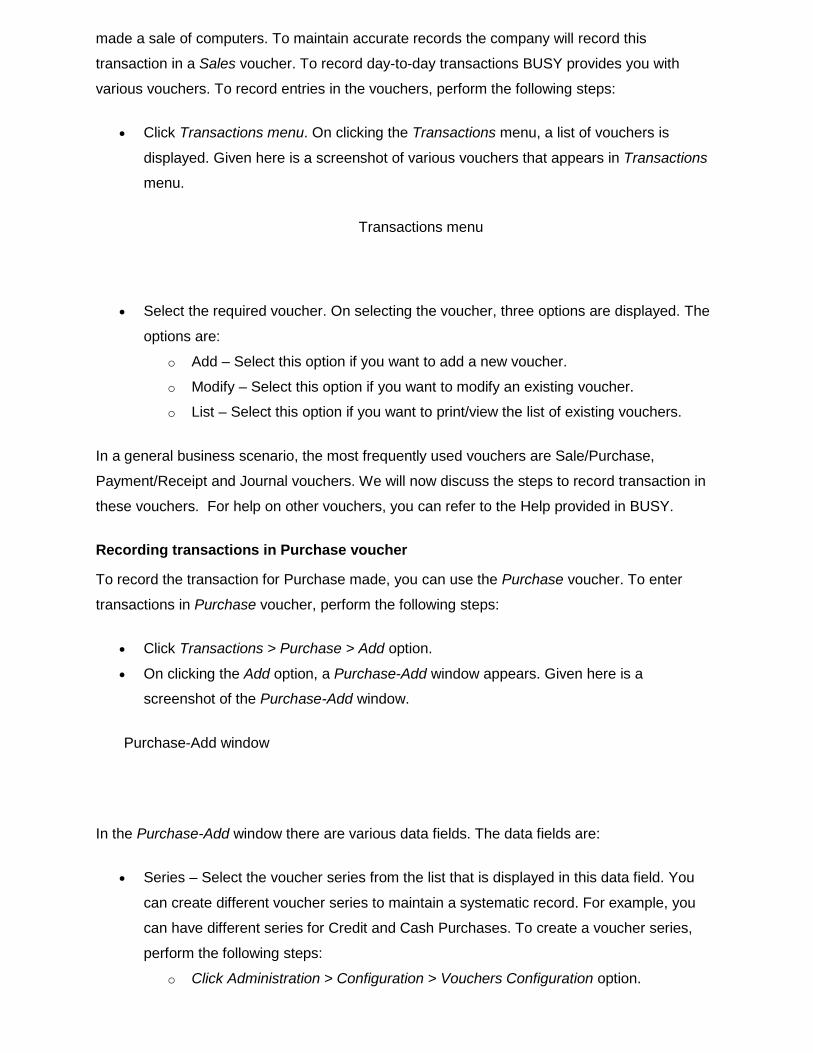
• Click Transactions menu. On clicking the Transactions menu, a list of vouchers is
displayed. Given here is a screenshot of various vouchers that appears in Transactions
menu.
Transactions menu
• Select the required voucher. On selecting the voucher, three options are displayed. The
options are:
o Add – Select this option if you want to add a new voucher.
o Modify – Select this option if you want to modify an existing voucher.
o List – Select this option if you want to print/view the list of existing vouchers.
In a general business scenario, the most frequently used vouchers are Sale/Purchase,
Payment/Receipt and Journal vouchers. We will now discuss the steps to record transaction in
these vouchers. For help on other vouchers, you can refer to the Help provided in BUSY.
Recording transactions in Purchase voucher
To record the transaction for Purchase made, you can use the Purchase voucher. To enter
transactions in Purchase voucher, perform the following steps:
• Click Transactions > Purchase > Add option.
• On clicking the Add option, a Purchase-Add window appears. Given here is a
screenshot of the Purchase-Add window.
Purchase-Add window
In the Purchase-Add window there are various data fields. The data fields are:
• Series – Select the voucher series from the list that is displayed in this data field. You
can create different voucher series to maintain a systematic record. For example, you
can have different series for Credit and Cash Purchases. To create a voucher series,
perform the following steps:
o Click Administration > Configuration > Vouchers Configuration option.
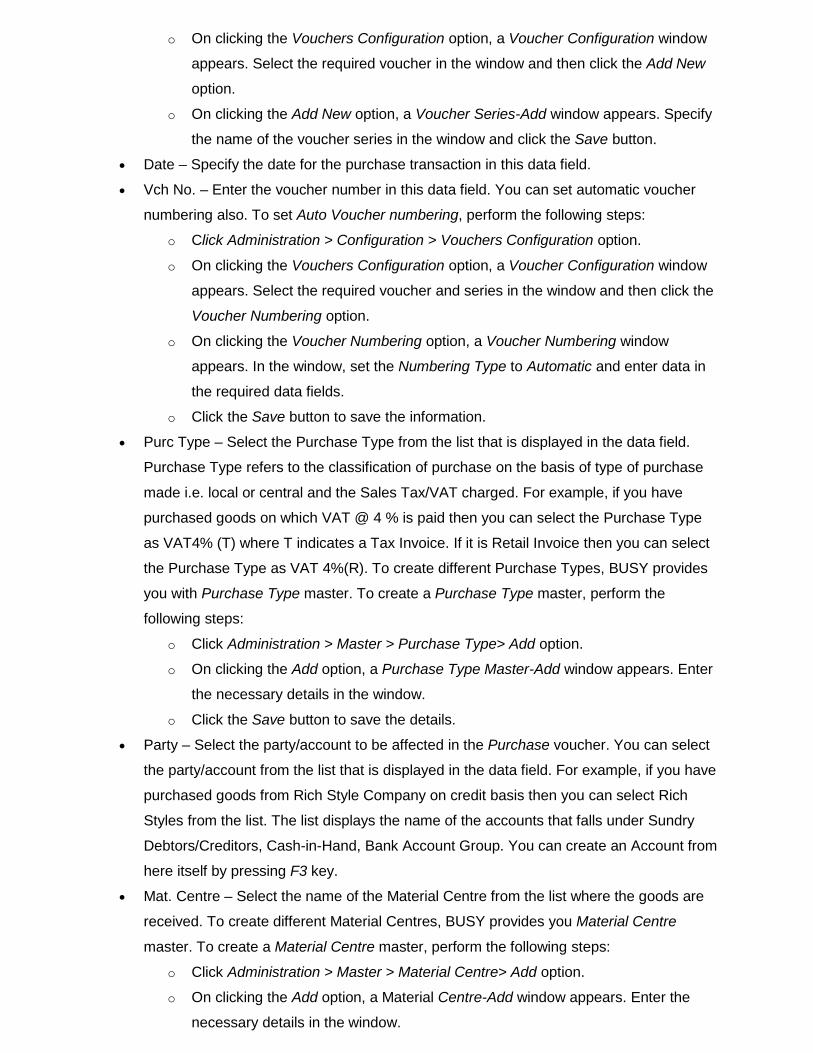
o On clicking the Vouchers Configuration option, a Voucher Configuration window
appears. Select the required voucher in the window and then click the Add New
option.
o On clicking the Add New option, a Voucher Series-Add window appears. Specify
the name of the voucher series in the window and click the Save button.
• Date – Specify the date for the purchase transaction in this data field.
• Vch No. – Enter the voucher number in this data field. You can set automatic voucher
numbering also. To set Auto Voucher numbering, perform the following steps:
o Click Administration > Configuration > Vouchers Configuration option.
o On clicking the Vouchers Configuration option, a Voucher Configuration window
appears. Select the required voucher and series in the window and then click the
Voucher Numbering option.
o On clicking the Voucher Numbering option, a Voucher Numbering window
appears. In the window, set the Numbering Type to Automatic and enter data in
the required data fields.
o Click the Save button to save the information.
• Purc Type – Select the Purchase Type from the list that is displayed in the data field.
Purchase Type refers to the classification of purchase on the basis of type of purchase
made i.e. local or central and the Sales Tax/VAT charged. For example, if you have
purchased goods on which VAT @ 4 % is paid then you can select the Purchase Type
as VAT4% (T) where T indicates a Tax Invoice. If it is Retail Invoice then you can select
the Purchase Type as VAT 4%(R). To create different Purchase Types, BUSY provides
you with Purchase Type master. To create a Purchase Type master, perform the
following steps:
o Click Administration > Master > Purchase Type> Add option.
o On clicking the Add option, a Purchase Type Master-Add window appears. Enter
the necessary details in the window.
o Click the Save button to save the details.
• Party – Select the party/account to be affected in the Purchase voucher. You can select
the party/account from the list that is displayed in the data field. For example, if you have
purchased goods from Rich Style Company on credit basis then you can select Rich
Styles from the list. The list displays the name of the accounts that falls under Sundry
Debtors/Creditors, Cash-in-Hand, Bank Account Group. You can create an Account from
here itself by pressing F3 key.
• Mat. Centre – Select the name of the Material Centre from the list where the goods are
received. To create different Material Centres, BUSY provides you Material Centre
master. To create a Material Centre master, perform the following steps:
o Click Administration > Master > Material Centre> Add option.
o On clicking the Add option, a Material Centre-Add window appears. Enter the
necessary details in the window.
o Click the Save button to save the details.
• Narration – Enter a narration for the voucher in this data field. A narration is a two or
three line explanation giving precise information about the voucher entry. You can create
narrations in advance using the Std. Narration master and then use them here with the
help of F4 key.
• Item Details Grid – In the Item Details grid, you can enter details of the items purchased.
Various data fields in the Item Details grid are:
o Item - Select the item purchased from the list that is displayed in the data field.
Items created in Item master are displayed in this data field.
o Qty. – Enter the quantity of the item purchased.
o Unit – By default the unit specified in the Item master appears here. You can
select the Main unit, Alternate Unit or any other unit that has a conversion factor
defined with the Main unit.
o Price - By default, the purchase price of the item specified in the Item master is
displayed here. You can change it as per your requirement.
o Amount - By default, the amount calculated by multiplying the quantity and price
is displayed in this data field. You can change the amount as per your
requirement. If you change the amount then the price will be adjusted
automatically.
• Bill Sundry Details grid – In the Bill Sundry Details grid, you can enter details related to
the Bill Sundry. Bill Sundry is an entity that is used to record the extra income/expense
over and above the sale/purchase amount. For example, you have purchased an item
on which you have paid VAT @ 4% and Freight and Forwarding charges amounting to
Rs 200. These extra income/expense are referred to as Bill Sundry and are recorded in
the Bill Sundry Details grid. You can create different Bill Sundries using Bill Sundry
master. To create Bill Sundry master, perform the following steps:
o Click Administration > Master > Bill Sundry> Add option.
o On clicking the Add option, a Bill Sundry Master-Add window appears. Enter
the required details in the window.
o Click the Save button to save the details.
In the Bill Sundry Details grid there are various data fields. The data fields are:
o Bill Sundry - Select the Bill Sundry to be levied on the purchase transaction. You
can select the Bill Sundry from the list that is displayed in the data field.
o @ - By default, the value specified in the Bill Sundry is displayed here. You can
change it as per your requirement.
o Bill Sundry Fed As - Although no name is given to this data field, we have
specified a name for your convenience. Depending on the settings in the Bill
Sundry master, either /Main Unit, /Alternate Unit, % is displayed in this data field.

This data field signifies how the Bill Sundry is calculated. For example, if the Bill
Sundry is calculated on percentage basis then % will appear in this data field.
You cannot change the value of this data field.
o Amount - By default, the amount calculated based on the value in the @ data
field is displayed in this data field. You can change this value as per your
requirement without affecting any other data field.
• Click the Save button to save the purchase transaction.
Recording transactions in Sales voucher
To record the transaction for sales made, you can use the Sales voucher. To enter transactions
in Sales voucher, perform the following steps:
• Click Transactions > Sales > Add option.
• On clicking the Add option, a Sales-Add window appears. Given here is a screenshot of
the Sales-Add window.
Sales-Add window
The data fields that appear in the Sales voucher are similar to those that appear in Purchase
voucher.
• Enter appropriate data in the data fields.
• Click the Save button to save the details.
Recording transactions in Payment voucher
You can enter the Payment transactions for the payment made in either cash or cheque/DD by
your organization/company to your suppliers/customers. In BUSY you can
enter payment related details by using the Payment voucher. For example, you have paid
telephone and electricity bills through cash. To record this transaction, you can use the Payment
voucher. To record transactions in a Payment voucher, perform the following steps:
• Click Transactions > Payment > Add option.
On clicking the Add option, a Payment Voucher-Add window appears. Given here is a
screenshot of Payment Voucher-Add window.
Payment Voucher-Add window
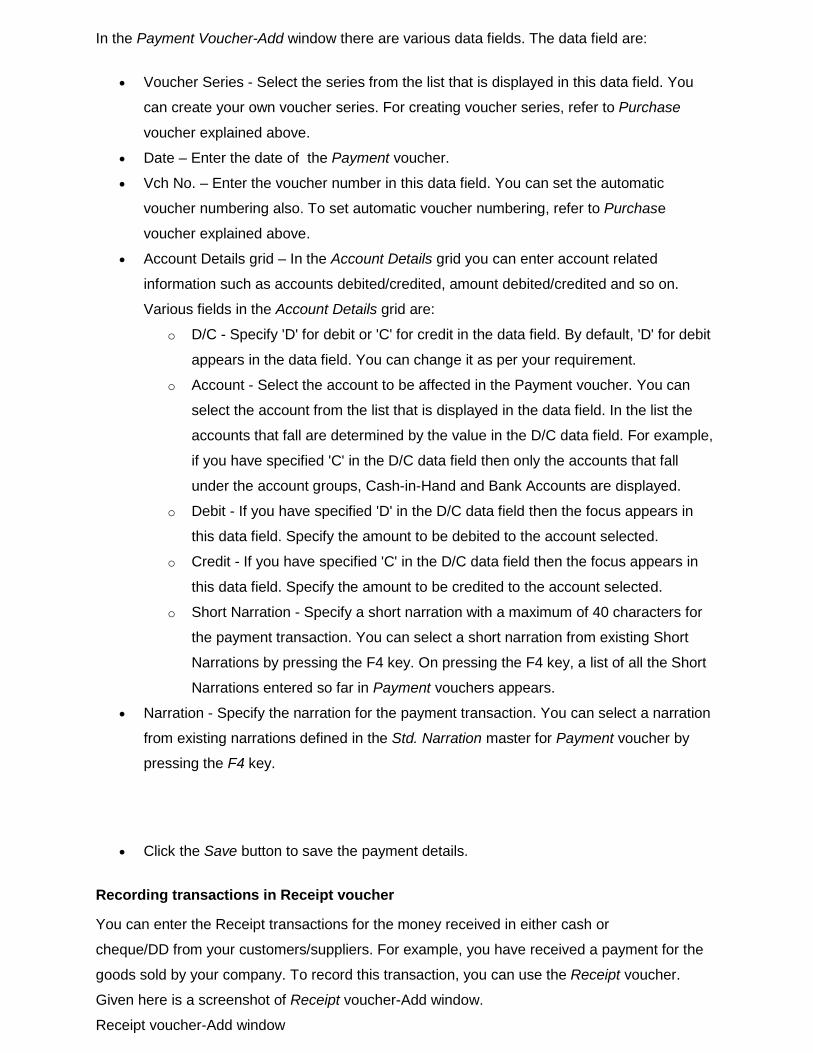
In the Payment Voucher-Add window there are various data fields. The data field are:
• Voucher Series - Select the series from the list that is displayed in this data field. You
can create your own voucher series. For creating voucher series, refer to Purchase
voucher explained above.
• Date – Enter the date of the Payment voucher.
• Vch No. – Enter the voucher number in this data field. You can set the automatic
voucher numbering also. To set automatic voucher numbering, refer to Purchase
voucher explained above.
• Account Details grid – In the Account Details grid you can enter account related
information such as accounts debited/credited, amount debited/credited and so on.
Various fields in the Account Details grid are:
o D/C - Specify 'D' for debit or 'C' for credit in the data field. By default, 'D' for debit
appears in the data field. You can change it as per your requirement.
o Account - Select the account to be affected in the Payment voucher. You can
select the account from the list that is displayed in the data field. In the list the
accounts that fall are determined by the value in the D/C data field. For example,
if you have specified 'C' in the D/C data field then only the accounts that fall
under the account groups, Cash-in-Hand and Bank Accounts are displayed.
o Debit - If you have specified 'D' in the D/C data field then the focus appears in
this data field. Specify the amount to be debited to the account selected.
o Credit - If you have specified 'C' in the D/C data field then the focus appears in
this data field. Specify the amount to be credited to the account selected.
o Short Narration - Specify a short narration with a maximum of 40 characters for
the payment transaction. You can select a short narration from existing Short
Narrations by pressing the F4 key. On pressing the F4 key, a list of all the Short
Narrations entered so far in Payment vouchers appears.
• Narration - Specify the narration for the payment transaction. You can select a narration
from existing narrations defined in the Std. Narration master for Payment voucher by
pressing the F4 key.
• Click the Save button to save the payment details.
Recording transactions in Receipt voucher
You can enter the Receipt transactions for the money received in either cash or
cheque/DD from your customers/suppliers. For example, you have received a payment for the
goods sold by your company. To record this transaction, you can use the Receipt voucher.
Given here is a screenshot of Receipt voucher-Add window.
Receipt voucher-Add window
The data fields that appear in the Receipt voucher are similar to those that appear in Payment
voucher.
• Enter appropriate data in the data fields.
• Click the Save button to save the details.
Recording Journal entries
You can enter Journal transactions for transactions that you cannot categorise as Sale,
Purchase, Payment, or Receipt. For example, you can record the depreciation charges on fixed
assets as a Journal transaction. In BUSY you can
enter miscellaneous transactions related details by using the Journal voucher. To enter a
Journal voucher, perform the following steps:
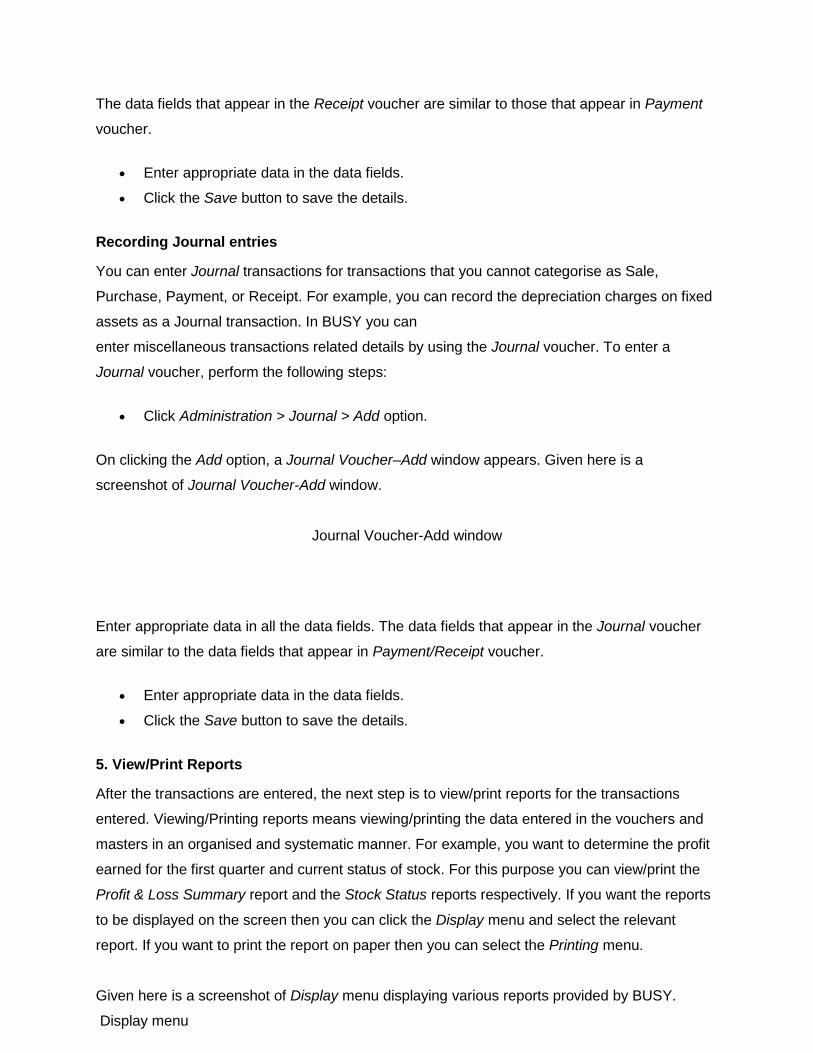
• Click Administration > Journal > Add option.
On clicking the Add option, a Journal Voucher–Add window appears. Given here is a
screenshot of Journal Voucher-Add window.
Journal Voucher-Add window
Enter appropriate data in all the data fields. The data fields that appear in the Journal voucher
are similar to the data fields that appear in Payment/Receipt voucher.
• Enter appropriate data in the data fields.
• Click the Save button to save the details.
5. View/Print Reports
After the transactions are entered, the next step is to view/print reports for the transactions
entered. Viewing/Printing reports means viewing/printing the data entered in the vouchers and
masters in an organised and systematic manner. For example, you want to determine the profit
earned for the first quarter and current status of stock. For this purpose you can view/print the
Profit & Loss Summary report and the Stock Status reports respectively. If you want the reports
to be displayed on the screen then you can click the Display menu and select the relevant
report. If you want to print the report on paper then you can select the Printing menu.
Given here is a screenshot of Display menu displaying various reports provided by BUSY.
Display menu
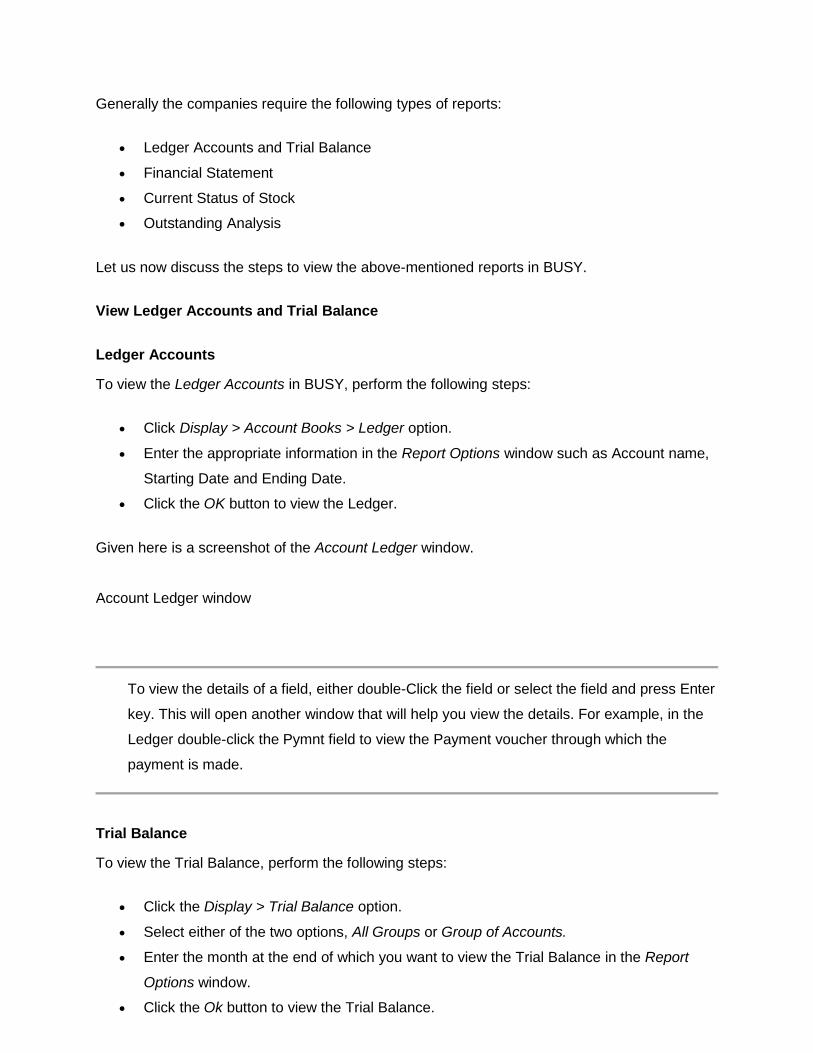
Generally the companies require the following types of reports:
• Ledger Accounts and Trial Balance
• Financial Statement
• Current Status of Stock
• Outstanding Analysis
Let us now discuss the steps to view the above-mentioned reports in BUSY.
View Ledger Accounts and Trial Balance
Ledger Accounts
To view the Ledger Accounts in BUSY, perform the following steps:
• Click Display > Account Books > Ledger option.
• Enter the appropriate information in the Report Options window such as Account name,
Starting Date and Ending Date.
• Click the OK button to view the Ledger.
Given here is a screenshot of the Account Ledger window.
Account Ledger window
To view the details of a field, either double-Click the field or select the field and press Enter
key. This will open another window that will help you view the details. For example, in the
Ledger double-click the Pymnt field to view the Payment voucher through which the
payment is made.
Trial Balance
To view the Trial Balance, perform the following steps:
• Click the Display > Trial Balance option.
• Select either of the two options, All Groups or Group of Accounts.
• Enter the month at the end of which you want to view the Trial Balance in the Report
Options window.
• Click the Ok button to view the Trial Balance.
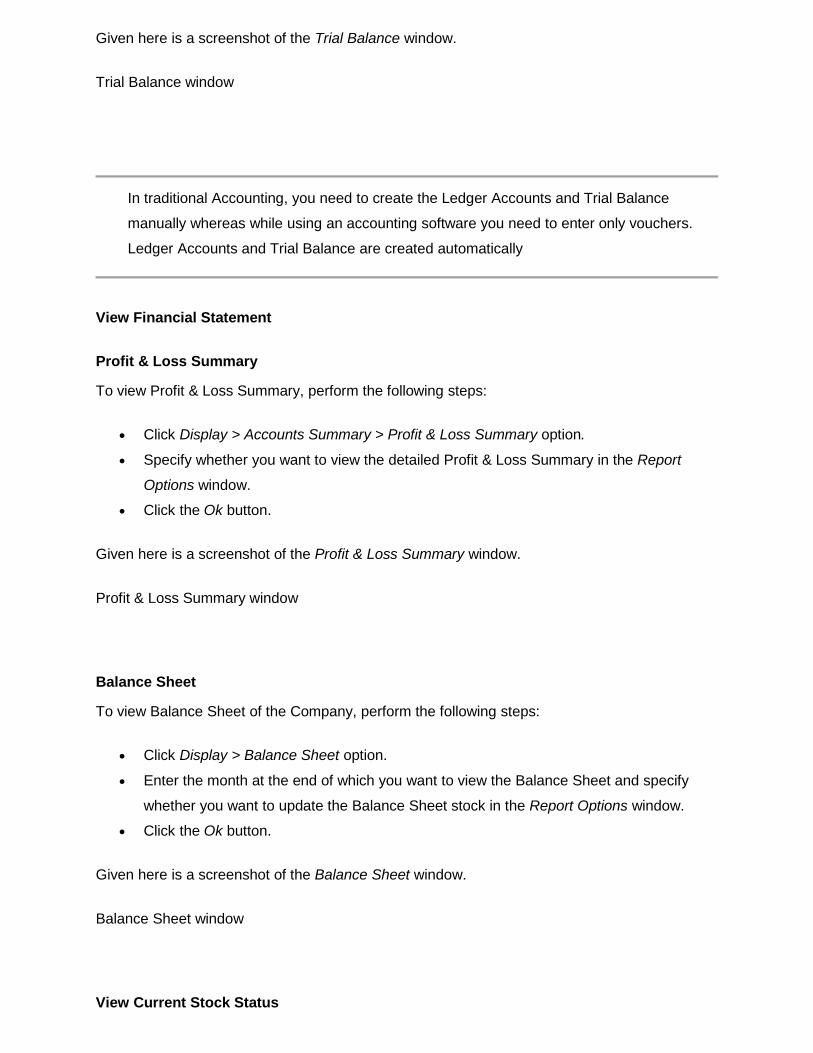
Given here is a screenshot of the Trial Balance window.
Trial Balance window
In traditional Accounting, you need to create the Ledger Accounts and Trial Balance
manually whereas while using an accounting software you need to enter only vouchers.
Ledger Accounts and Trial Balance are created automatically
View Financial Statement
Profit & Loss Summary
To view Profit & Loss Summary, perform the following steps:
• Click Display > Accounts Summary > Profit & Loss Summary option.
• Specify whether you want to view the detailed Profit & Loss Summary in the Report
Options window.
• Click the Ok button.
Given here is a screenshot of the Profit & Loss Summary window.
Profit & Loss Summary window
Balance Sheet
To view Balance Sheet of the Company, perform the following steps:
• Click Display > Balance Sheet option.
• Enter the month at the end of which you want to view the Balance Sheet and specify
whether you want to update the Balance Sheet stock in the Report Options window.
• Click the Ok button.
Given here is a screenshot of the Balance Sheet window.
Balance Sheet window
View Current Stock Status
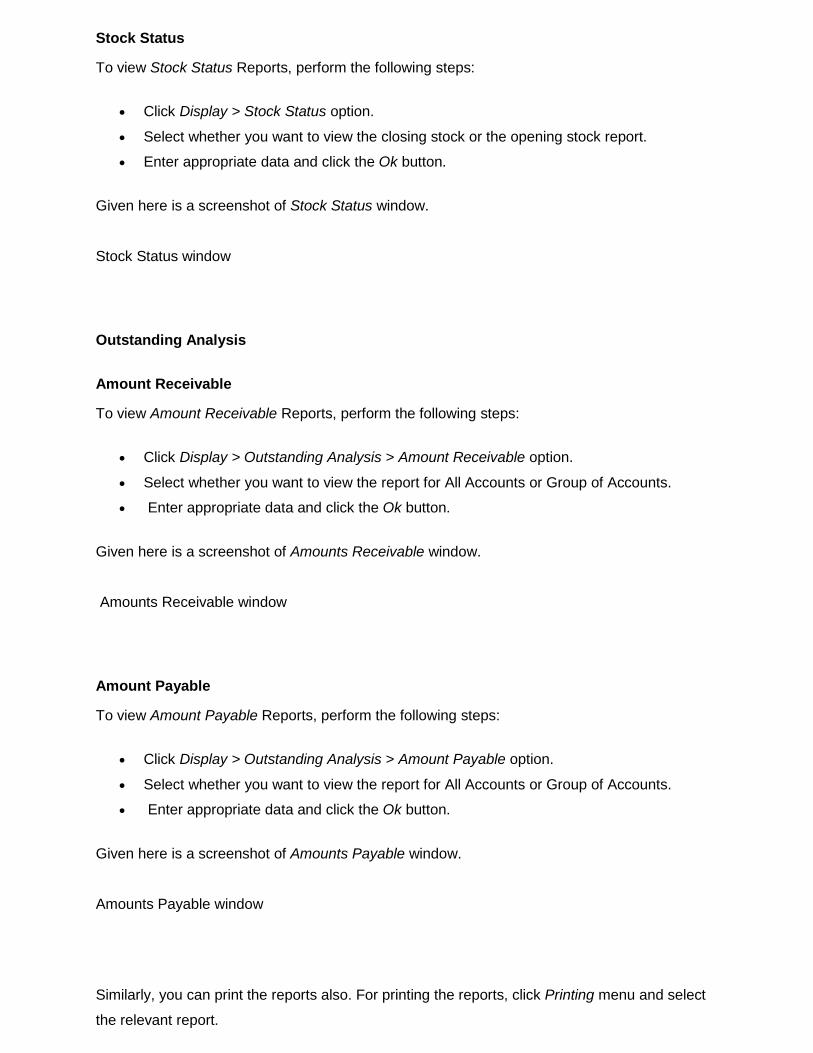
Stock Status
To view Stock Status Reports, perform the following steps:
• Click Display > Stock Status option.
• Select whether you want to view the closing stock or the opening stock report.
• Enter appropriate data and click the Ok button.
Given here is a screenshot of Stock Status window.
Stock Status window
Outstanding Analysis
Amount Receivable
To view Amount Receivable Reports, perform the following steps:
• Click Display > Outstanding Analysis > Amount Receivable option.
• Select whether you want to view the report for All Accounts or Group of Accounts.
• Enter appropriate data and click the Ok button.
Given here is a screenshot of Amounts Receivable window.
Amounts Receivable window
Amount Payable
To view Amount Payable Reports, perform the following steps:
• Click Display > Outstanding Analysis > Amount Payable option.
• Select whether you want to view the report for All Accounts or Group of Accounts.
• Enter appropriate data and click the Ok button.
Given here is a screenshot of Amounts Payable window.
Amounts Payable window
Similarly, you can print the reports also. For printing the reports, click Printing menu and select
the relevant report.
After going through the document, you will be able to successfully use BUSY in your company.
Back To Top
Copyright © Busy Infotech Pvt. Ltd., Delhi