User‘s ManUal - toneprints.com · User‘s ManUal Platform engineered and designed by in Germany...
36
TM7/TM9 TouchMonitor USER‘S MANUAL Platform engineered and designed by in Germany EN
Transcript of User‘s ManUal - toneprints.com · User‘s ManUal Platform engineered and designed by in Germany...

TM7/TM9TouchMonitor
User‘s ManUal
Platform engineered and designed by in Germany
EN
EN-2 Manual TouchMonitor TM7/TM9
User‘s Manual for
TC TouchMonitor TM7/TM9
Manual Version: 2.0Issued: 15.09.2011Software-Version: 2-nn (09.2011)
© 09/2011. Technical changes without prior notice!
TC Electronic A/S, Sindalsvej 34, DK-8240 Risskov, Denmark, www.tcelectronic.com, [email protected]
RTW GmbH & Co.KG, Elbeallee 19, 50765 Köln, Germany, www.rtw.de, [email protected]
WEEE Reg.-no.: DE 90666819Category: 9Device type: These instruments comply with and fall under category 9 Mo nitoring and control equipment of Annex 1B of the RoHS-Directive 2002/95/EC.
Please note:
The figures in this operating manual are carefully created and are used to illustrate the descriptions. However, they may differ a little bit from the displays of your unit.
This manual and the available firmware/firmware updates can be found on our web site:http://www.tcelectronic.com/touchmonitor-support.asp.
The package contains a USB flash device soruce by a third party company. The device is certified by Shenzhen BSE Tech-nology Co., Ltd. to be CE conform (E07002566) and RoHS compliant (R0808179).

EN-3Manual | TouchMonitor TM7/TM9 Safety Instructions
EN
Safety Instructions
The following symbols may be marked on the panels or covers of equipment or module and are used in this manuals with these terms:
Warning!This symbol alerts you to a potentially hazardous condition, such as the presence of dangerous voltage that could pose a risk of electrical shock. Refer to the accompanying Warning Label or Tag, and exercise extreme caution.
attention!This symbol alerts you to important operating considerations or a po-tential operating condition that could damage equipment. If you see this marked on equipment, consult the Operating manual for precauti-onary instructions.
noteThis symbol points your attention to specific characteristics that are no malfunctions.
general Safety instructions
• Studycarefullyandunderstandallsafetyandoperatinginstruc-tions before you install and operate the unit!
• Heedallwarningsontheunitandinthesafetyandoperatinginst-ructions before you install and operate the unit!
• Alwaysfollowtheseinstructionstoensureagainstinjurytoyour-selfanddamagetotheunitorotherobjectsconnectedtotheunit.
• Keepallsafetyandoperatinginstructionsforfuturereference!
Topreventpossibleelectricalshock,death,fire,injuriesandmalfunc-tions, use this product only as specified. The units of the TouchMonitor series are designed for indoor use only and may only be operated with a power supply unit provided for it.

Safety InstructionsEN-4 Manual | TouchMonitor TM7/TM9
Warning!
Alwaysfollowthesafetyprecautionsbelowtoavoidthepossibilityofseriousinjuryorevendeathfromelectricalshock,short-circuiting,dama-ges, fire, or other hazards. These precautions include, but are not limited to, the following:
• Avoidexposedcircuitry.Donottouchexposedconnectionsandcomponents when power is present.
• Powerdisconnect.Thepowercordoftheexternalpowersupplydisconnectstheproductfromthepowersource.Donotblockthepower cord or power supply; it must remain accessible to the user at any time.
• Turnoffanddisconnectthepowersupplyimmediatelyittheunitproduces unusual smells, noises or smoke, or if foreign substan-ces(e.g.liquids)orforeignobjectsentertheunit.
• Donotcovertheunitanddonotplaceanyobjectsoranythingcontaining liquids on it.
• Donotinsertyourfingersoranyotherobjectsintothehousing.• Donotoperatewithoutcoverplatesorpanels.• Donotoperatewithsuspectedfailures.Ifyoususpectthereisda-
mage to the unit, have it inspected by qualified service personnel.• Donotoperateinwet/dampconditions.• Donotoperateinexplosiveatmosphere.• Donotoperateindustyenvironments.
• Donotopenthehousing.Inside,therearenouser-serviceableparts.Anynecessaryservicingshallbeperformedbyaproperlyqualified technician.
• Donotattempttorepairanypartoftheunit.Repairsshallonlybecarried out by qualified personnel.
• Neverremoveanypartsfromtheunitanddonotmakeanymodi-fications to the unit without the express written consent of RTW. Modifications can cause both safety hazards and affect the unit’s EMI-CE conformity.
• Onlyusethepowercordandpowersupplyspecifiedforthispro-duct and certified for the country of use.
• Connectanddisconnectproperly.Useonlyconnectorsspecifiedfor this product and fix them tight before use.
• Observeallterminalratingsandmarkingsontheproduct.Consultthe operating manual for further ratings information before making connections to this product.
• Donotapplyapotentialtoanyterminalthatexceedsthemaxi-mum rating of that terminal.

EN-5Manual | TouchMonitor TM7/TM9 Safety Instructions
ENattention!
Alwaysfollowthesafetyprecautionsbelowtoavoidthepossibilityofphysicalinjurytoyouorothers,ordamagetotheunitorotherproperty.These precautions include, but are not limited to, the following:
• Donotoperatetheunitwithoutadequateventilationtopreventtheinternal temperature from becoming too high.
• Thereforealsokeepawaytheunitfromdirectincidentsolarradiation
• Keepproductsurfacescleananddry.Onlyuseadrycloth.• Neveruseanysolventbasedliquidsforcleaningthehousing
surfaces and the display.
• Donotplacetheunitinanunstablepositionwhereitmightaccidently fall over.
• Beforeconnectinganydevicestotheunitmakesurethatthepower supply is disconnected.
• Beforemovingtheunit,removeallconnectedcables.• Whentransportingormovingtheunit,alwaystakecarenotto
scratch or damage the housing surfaces and the display.

Environmental ConsiderationsEN-6 Manual | TouchMonitor TM7/TM9
Environmental Considerations
Observe the following information about the environmental impact of the product and the following guidelines when recycling an instru-ment or component (product end-of-life handling):
• EquipmentRecycling. Productionofthisequipmentrequiredtheextractionanduseof
natural resources. The equipment may contain substances that could be harmful to the environment or human health if improperly handled at the product’s end of life. In order to avoid release of such substances into the environ ment and to reduce the use of natural resources, we encourage you to recycle this product in an appropriate system that will ensure that most of the materials are reused or recycled appropriately.
• BatteryRecycling. ThisproductmaycontainaNickelCadmium(NiCd)orlithiumion
(Li-ion) re chargeable battery, which must be recycled or disposed ofproperly.Pleaseproperlydisposeoforrecyclethebatteryac-cording to your local government regulations.
• RestrictionofHazardousSubstances This product has been classified as Monitoring and Control equip-
ment,andisoutsidethescopeofthe2002/95/ECRoHSDirec-tive.Thisproductmaycontainlead,cadmiumand/ormercuryinslightquantities.Pleasedisposeoforrecycletheelectronicpartsor devices according to your local government regulations.
EN-7Manual | TouchMonitor TM7/TM9 Index of Content
EN
Index of Content
Safety instructions 3General Safety Instructions 3Warning! 4Attention!5
EnvironmentalConsiderations6
IndexofContent7
BeforeYouBegin9Introduction 9ScopeofDelivery11
installation 13Connection14PinAssignment15
GettingStarted17SystemStart-up17AdapttheTouchMonitortoyourAudioSystem18CreateYourOwnPreset20WorkingwithInstrumentsandPresets25
SoftwareModules(LicencesHandling)27
SoftwareUpdate31
Specifications(Extract)33
ECDeclarationofConformity35
LicensesoftheImplementedSoftware36

EN-8 Manual | TouchMonitor TM7/TM9

EN-9Manual | TouchMonitor TM7/TM9 Before You Begin | Introduction
EN
BeforeYouBegin
Introduction
Thank you for purchasing a model of the TouchMonitor series. With the TouchMonitor range you are able to meet the growing require-ments in today‘s production, post-production, and broadcast world. Equippedwithhigh-grade7“or9“touchscreensandaneasy-to-useGUI,TouchMonitorentersanewlevelofprofessionalaudiometeringin terms of precision, performance, efficiency and flexibility.

Before You Begin | IntroductionEN-10 Manual | TouchMonitor TM7/TM9
SimpleandflexibleThe graphical user interface used in the TouchMonitor range is con-trolled simply by using your finger or a mouse. Instruments can be scaled, randomly positioned and combined in almost every way for optimized use of available screen space. Even multiple instruments of the same type, assigned to different input channels and configurations, canbedisplayedsimultaneously.Acontext-sensitive,on-screenhelpfeature and the intuitive operatable menu system supports the user, allowing him to make setup changes with ease.
AudioI/OoptionsThe TouchMonitor perfectly integrates into today‘s analog and digital audio and video studio environments. It handles input signals of vari-ousformats:analog,AES3,andAES3id.Inaddition,theTouchMonitorTM9hasanoptiontoaccept3GSDIsignals.Thisoptionworksasanaudio deembedder for mixed use with other audio interfaces display-ing up to 32 input channels simultaneously.
LicencesAtotallymodularsoftwareconceptmeansthatyouonlyhavetopurchase features that you actually require. This puts you in control, defining the functionality of a TouchMonitor that suits your needs best.Newinstrumentsandfunctionscanbeaddedassoftwaremodules to the device at any time. Simply purchase and activate the corresponding licence.Many display functions are available to choose from: the unique RTW SurroundSoundAnalyzer,theReal-TimeAnalyzer(RTA),EBUR128-,ITUBS.1770/1771-,ATSC-A/85-,andARIB-compliantloudnessmeters, and the Radar Loudness display acc. to the Loudness Radar Meter of TC electronic®.

EN-11Manual | TouchMonitor TM7/TM9 Before You Begin | Scope of Delivery
EN
ScopeofDelivery
Unpacktheinstrument,findyourversionbelow,andcheck,ifyoureceivedallitemslisted.Ifcomponentsaremissing,pleasecontactyourdealer. Recommended accessories, options and software licences are also listed.
TouchMonitorTM7
Table-top unit 20700 Powersupply Quick Start Guide
Multichannel modeSW20001
Loudness and SPLdisplaySW20002
RTA-RealTimeAnalyzerSW20003
SSA-SurroundSoundAnalyzerSW20004
RadarDisplay
SW20005
PremiumPPM+ VectorscopeSW20006
8xAES38 x analogHW20711
8xAES3id8 x analogHW20712
> >
AudioInterfaceasordered SoftwareLicence,ifordered> >
USBstick
Before You Begin | Scope of Delivery EN-12 Manual | TouchMonitor TM7/TM9
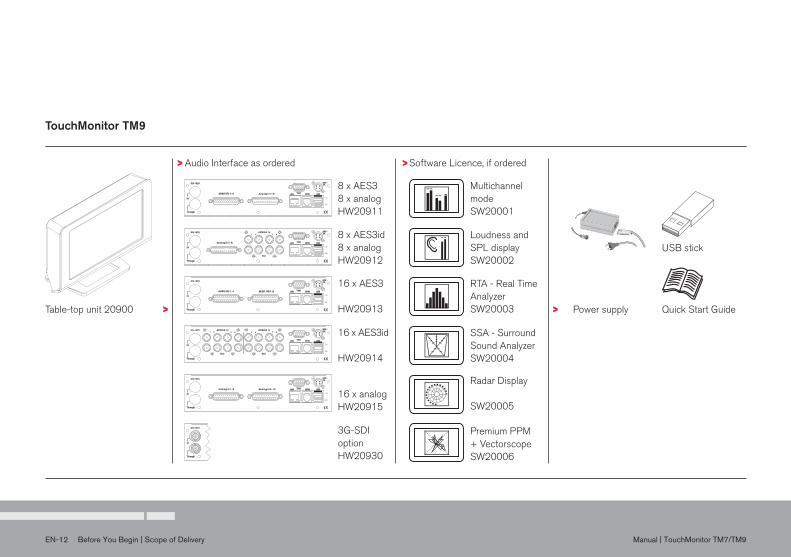
TouchMonitorTM9
Table-topunit20900 Powersupply Quick Start Guide
Multichannel modeSW20001
Loudness and SPLdisplaySW20002
RTA-RealTimeAnalyzerSW20003
SSA-SurroundSoundAnalyzerSW20004
RadarDisplay
SW20005
PremiumPPM+ VectorscopeSW20006
8xAES38 x analogHW20911
> >
AudioInterfaceasordered SoftwareLicence,ifordered> >
USBstick8xAES3id8 x analogHW20912
16xAES3
HW20913
16xAES3id
HW20914
16xanalogHW20915
3G-SDIoptionHW20930
EN-13Manual | TouchMonitor TM7/TM9 Installation
EN
Installation
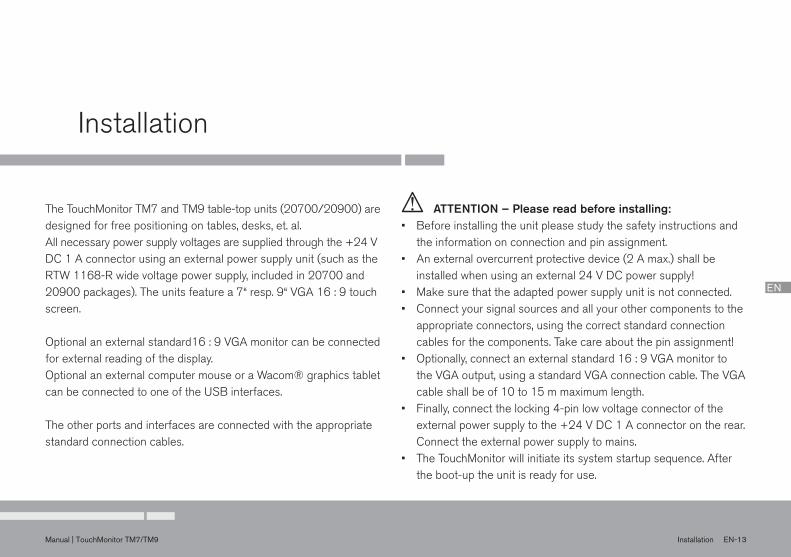
TheTouchMonitorTM7andTM9table-topunits(20700/20900)aredesigned for free positioning on tables, desks, et. al. Allnecessarypowersupplyvoltagesaresuppliedthroughthe+24VDC1Aconnectorusinganexternalpowersupplyunit(suchastheRTW1168-Rwidevoltagepowersupply,includedin20700and20900packages).Theunitsfeaturea7“resp.9“VGA16:9touchscreen.
Optionalanexternalstandard16:9VGAmonitorcanbeconnectedfor external reading of the display. Optional an external computer mouse or a Wacom® graphics tablet canbeconnectedtooneoftheUSBinterfaces.
The other ports and interfaces are connected with the appropriate standard connection cables.
attention–Pleasereadbeforeinstalling:• Beforeinstallingtheunitpleasestudythesafetyinstructionsand
the information on connection and pin assignment. • Anexternalovercurrentprotectivedevice(2Amax.)shallbe
installedwhenusinganexternal24VDCpowersupply!• Makesurethattheadaptedpowersupplyunitisnotconnected.• Connectyoursignalsourcesandallyourothercomponentstothe
appropriate connectors, using the correct standard connection cables for the components. Take care about the pin assignment!
• Optionally,connectanexternalstandard16:9VGAmonitortotheVGAoutput,usingastandardVGAconnectioncable.TheVGAcableshallbeof10to15mmaximumlength.
• Finally,connectthelocking4-pinlowvoltageconnectoroftheexternalpowersupplytothe+24VDC1Aconnectorontherear.Connect the external power supply to mains.
• TheTouchMonitorwillinitiateitssystemstartupsequence.Afterthe boot-up the unit is ready for use.

Installation | ConnectionEN-14 Manual | TouchMonitor TM7/TM9
Analog In 1 - 8 (Sub-D)AES3id In/Out 1 - 4 (8 x BNC)AES3 In/Out 5 - 8 (Sub-D)AES3id In/Out 5 - 8 (8 x BNC)Analog In 9 - 16 (Sub-D)
GP IO(RJ-11)
AES3 In/Out 1 - 4 (Sub-D)Analog In 1 - 8 (Sub-D)AES3 In/Out 1 - 4 (Sub-D)AES3id In/Out 1 - 4 (8 x BNC)Analog In 1 - 8 (Sub-D)
LAN(RJ-45)
USB A 2.0(Full Speed)
4-pin locking low voltage connector
External:USB mouseWacom® graphics tablet
External: VGA monitor 16 : 9
24 V DC, 1 A3G-SDI: In Through VGA
HW20911 (pictured):HW20912:
HW20913:
HW20914:
HW20915:
Optional: 3G-SDI interface optionHW20930
or
Connection
or
TouchMonitorTM9TouchMonitorTM7
4-pin locking low voltage connector
External: VGA monitor 16 : 9
24 V DC, 1 AVGA
Analog In 1 - 8 (Sub-D)Analog In 1 - 8 (Sub-D)
GP IO(RJ-11)
AES3 In/Out 1 - 4 (Sub-D)AES3id In/Out 1 - 4 (8 x BNC)
LAN(RJ-45)
USB A 2.0(Full Speed)
External:USB mouseWacom® graphics tablet
HW20711 (pictured):HW20712:
or

EN-15Manual | TouchMonitor TM7/TM9 Installation | Pin Assignment
EN
PinAssignment
AnalogIn1-8,AnalogIn9-16(electronicallybalanced,25-pinSub-D-F)
Pin: Function:
1 Inputanalog8resp.16(+,hot)14 Inputanalog8resp.16(–,cold)2 Shield/case15 Inputanalog7resp.15(+,hot)3 Inputanalog7resp.15(–,cold)16 Shield/case4 Inputanalog6resp.14(+,hot)17 Inputanalog6resp.14(–,cold)5 Shield/case18 Inputanalog5resp.13(+,hot)6 Inputanalog5resp.13(–,cold)19 Shield/case7 Inputanalog4resp.12(+,hot)20 Inputanalog4resp.12(–,cold)8 Shield/case21 Inputanalog3resp.11(+,hot)9 Inputanalog3resp.11(–,cold)22 Shield/case10 Inputanalog2resp.10(+,hot)23 Inputanalog2resp.10(–,cold)11 Shield/case24 Inputanalog1resp.9(+,hot)12 Inputanalog1resp.9(–,cold)25 Shield/case13 notused
(External view of the con-nector)
AES3I/O1-4,AES3I/O5-8(transformerbalanced,25-pinSub-D-F)
Pin: Function:
1 Outputdigital4resp.8(+,hot)14 Outputdigital4resp.8(–,cold)2 Shield/case15 Outputdigital3resp.7(+,hot)3 Outputdigital3resp.7(–,cold)16 Shield/case4 Output digital 2 resp. 6 (+, hot)17 Outputdigital2resp.6(–,cold)5 Shield/case18 Outputdigital1resp.5(+,hot)6 Outputdigital1bzw.5(–,cold)19 Shield/case7 Input digital 4 resp. 8 (+, hot)20 Inputdigital4resp.8(–,cold)8 Shield/case21 Inputdigital3resp.7(+,hot)9 Inputdigital3resp.7(–,cold)22 Shield/case10 Inputdigital2resp.6(+,hot)23 Inputdigital2resp.6(–,cold)11 Shield/case24 Inputdigital1resp.5(+,hot)12 Inputdigital1resp.5(–,cold)25 Shield/case13 notused
NOTE- TheAES3inputsarepermanentlyterminatedwith110Ohm.
(External view of the con-nector)

Installation | Pin AssignmentEN-16 Manual | TouchMonitor TM7/TM9
PinAssignment(continued)
24V-1A (4-pinlockinglowvoltageconnector,TypBinder710)
Pin: Function:
1-2 +24VDC3 - 4 0 V
note - Anexternalovercurrentprotectivedevice(2Amax.)shallbeinstalledwhenusinganexternal24VDCpowersupply!
gP io (RJ-116P6Csocket)
ExternalcontroloffunctionsdefinedintheGlobalKeyboardmenu.
Pin: Function:
1 GND2-6 Functionacc.todefinitioninthemenu
Pin2Pin1
Pin3Pin4
(External view of the connector)
AES3idIn/Out1-4,AES3idIn/Out5-8(unbalanced,BNC-F)
(External view of the connector)
Pin: Function:
Pin: SignalRing: Shield/case
note - TheAES3idinputsarepermanentlyterminatedwith75Ohm.
USB-A
2FullSpeedUSB2.0interfacesfortheconnectionofUSBsticks(Licencehand-ling, presets, updates) and an external mouse or Wacom® tablet
VGA(15-pinSub-D-F)
Pin: Function:
1 R |Videosignal2 G |3 B |4-8 GND9 +5V10-11 GND12 SDA13 H-sync14 V-sync15 SCI
note - The VGA cable shell not exceed 10 to 15 lenght!
LAN
RJ-45standardnetworkconnector(10/100MBit)
(External view of the connector)
(External view of the connector)

EN-17Manual | TouchMonitor TM7/TM9 Getting Started | System Start-up
EN
Getting Started
SystemStart-up
BeforeconnectingtheTouchMonitortothepowersupply,pleasemake sure, that the following connections are made according to your individual needs:
• Analogand/ordigitalaudioinputsignals• Digitaloutputs• Optionalexternalstandard16:9VGAmonitor• OptionalUSBmouse• LAN/Ethernet• Powersupply
When the TouchMonitor is connected to the power supply, it will ini-tiateitssystemstartupsequence.Aftertheboot-uptheunitisreadyfor use.
We assume that you are starting your TouchMonitor for the first time. You now should make some global settings to adopt the unit to your audiosystem.Afterthisshortprocedureyoucancreateyourfirstpre-set to work with.

Getting Started | Adapt the TouchMonitor to your Audio System EN-18 Manual | TouchMonitor TM7/TM9
4.
5.
AdapttheTouchMonitortoyourAudioSystem
The description below leads you through the main steps of the global settings to configure the TouchMonitor once for the use with your audio system. These settings are not altered by loading new presets.
1. Ifnotvisible,touchtheemptyspaceofthescreentodisplaythecontrol bar.
1.
2.
3.
2. Touch the Menu key in the right section of the control bar to access the menu system showing the Main Menu.
4. If needed, touch Language and select your language in the right half of the menu. The selection will be shown on the Language key.
4.
3. Touch the System key. This will access the SystemMenu. The general sub menu will be active (marked in the control bar).
5. TouchtheAudio button in the left section of the control bar to open the Audio sub menu.

EN-19Manual | TouchMonitor TM7/TM9 Getting Started | Adapt the TouchMonitor to your Audio System
EN
6. If your TM unit should use a defined reference source, touch the Sync reference key and select from the items in the right half of the menu.
7. Touch the Clock key, if you want to set the current date and time. Start the internal clock with touching the Settime key.
6.
8. Touch the Save key to store your global settings. The unit turns back to normal display mode.
7.
8.

Getting Started | Create Your Own PresetEN-20 Manual | TouchMonitor TM7/TM9
CreateYourOwnPreset
Presetsareusedtodefineandeditallthespecificsettingsforyourwork flow. So you can create audio groups containing a defined signal source selection and one or more instruments sharing this do-mainandshowingparametersofaudiosignals.Alsoyoucancreatenon-audio groups containing intruments, that are not related to audio input signals, like clock, hardware status monitor, or global keyboard.
If you want to create a preset from scratch, please proceed as follows:
1. Ifnotvisible,touchtheemptyspaceofthescreentodisplaythecontrol bar.
2. Touch the Menu key in the right section of the control bar to access the menu system starting with the Main Menu.
3. Touch the PresetManagement key. The internal Presets menu appears.
4. Touch the newbuttontocreateanewpreset.Apresetwithaneditabledefaultnameiscreated(seenextfigure,touchPresetNametoedit).
3.4.

EN-21Manual | TouchMonitor TM7/TM9 Getting Started | Create Your Own Preset
EN
7. The Mode key appears and is marked, select your channel mode in the right half of the menu.
The number of modes depends on the activated software licences.
5. TouchtheNewAudio key to create the first audio group.
5.
6. The Domain key is marked, select the domain of the required signal source in the right half of the menu.
6.
8. If the LoudnessandSPLdisplay software licence (SW20002) is activated, the SelectLoudness sub menu appears. Select the loudness type you prefer.
7.
8.

Getting Started | Create Your Own PresetEN-22 Manual | TouchMonitor TM7/TM9
9. TheInstruments field appears on the left, and a list of the availa-ble instruments is shown on the right.
The number of instruments depends on the activated soft-ware licences.
11.Ifyouhavedoneallyourselections,touchtheDone key. This re-turns you to the Preset menu.
9.
10.Touchthekeysoftheinstrumentsyouwanttouse.Theiconofevery selection is placed on the Instruments field on the left.
10.
11.
ThePresetmenunowshowstheaudiogroupyoujustcrea-ted, marked with a small colored triangle in the upper left edge. In normal operation, all instruments of this group will always be identified by this color. The identifier colors make it easy to distinguish the group an instrument belongs to, if you have created several groups.
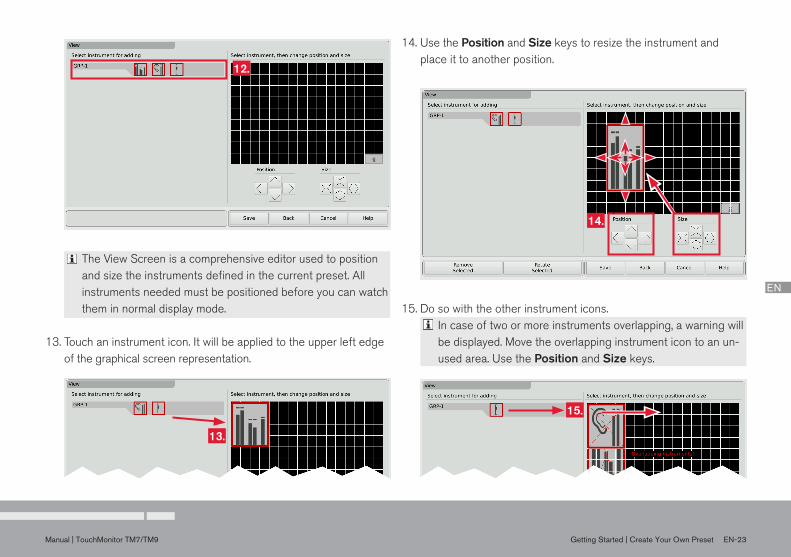
12.TouchtheView key to start arranging the instruments on the screen. The defined groups containing the instruments are shown on the left (see next figure).
12.
EN-23Manual | TouchMonitor TM7/TM9 Getting Started | Create Your Own Preset
EN
The View Screen is a comprehensive editor used to position andsizetheinstrumentsdefinedinthecurrentpreset.Allinstruments needed must be positioned before you can watch them in normal display mode.
13.Touchaninstrumenticon.Itwillbeappliedtotheupperleftedgeof the graphical screen representation.
14.UsethePosition and Size keys to resize the instrument and place it to another position.
12.
13.
15.Dosowiththeotherinstrumenticons.In case of two or more instruments overlapping, a warning will be displayed. Move the overlapping instrument icon to an un-usedarea.UsethePosition and Size keys.
14.
15.
Getting Started | Create Your Own PresetEN-24 Manual | TouchMonitor TM7/TM9
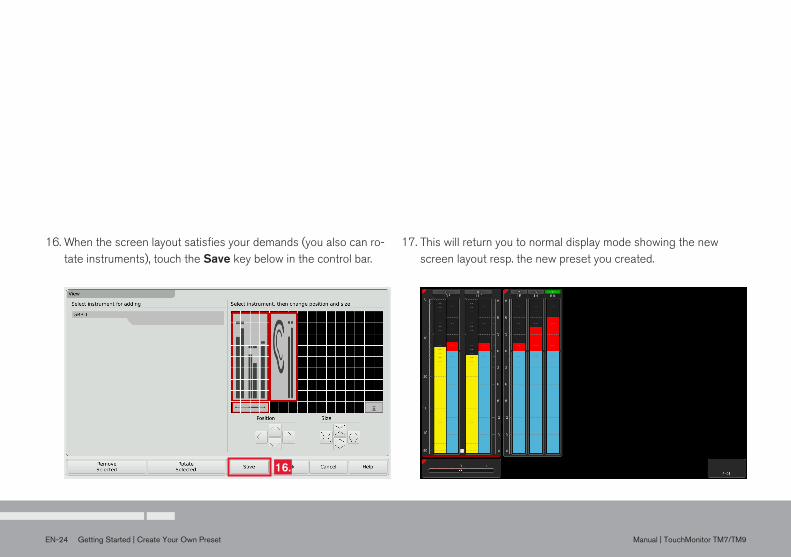
16.Whenthescreenlayoutsatisfiesyourdemands(youalsocanro-tate instruments), touch the Save key below in the control bar.
17.Thiswillreturnyoutonormaldisplaymodeshowingthenewscreen layout resp. the new preset you created.
16.

EN-25Manual | TouchMonitor TM7/TM9 Getting Started | Working with Instruments and Presets
EN
WorkingwithInstrumentsandPresets
In normal display mode the TouchMonitor shows the instruments and the screen layout defined in the currently loaded preset. You can use the control bar keys to operate a selected instrument or to load a new preset.
Ifthecontrolbarisnotvisible,justtouchthescreen.Thenitwillbedisplayedforsomesecondstomakeyourselection.
If you want to use the functions of an instrument, please proceed as follows:
1. Touchthescreenareaoftheinstrumentyouwanttouse.Itwillbeput into focus. The left section of the control bar now shows the specific functions of the focused instrument.
The current selected instrument is marked with a colored frame around. It represents the identifier color like the colored triangle.
2. Select the desired function.
If there are more than 6 functions, use the More key.If a function key opens another level of functions, then use the Close key to get back to the previous level.

Getting Started | Working with Instruments and PresetsEN-26 Manual | TouchMonitor TM7/TM9
If you want to load another preset, please proceed as follows:
2. Touch the preset you want to use.The current selected and used preset is marked as active. In normal display mode, the name of the active preset is dis-played in the lower right edge of the screen.
3. The selected preset is loaded. The unit automatically switches back to normal display mode and displays the selected preset.
1. TouchtheLoadPreset key in the right section of the control bar. Amenupagewithalistofpresetsavailableisshown.
1.
2.
TheLoudnessandSPLfunctionsshownonthescreenshotsareavailablewiththeLoudnessandSPLdisplaylicence!

EN-27Manual | TouchMonitor TM7/TM9 Software Modules (Licences Handling)
EN
SoftwareModules(LicencesHandling)
The TouchMonitor features a modular software concept that enables you to add new functions and instruments to your unit at any time. The Licences menu is used to view the licences currently installed on the TouchMonitor and to acquire new licences. Instruments and functions already activated are marked with an „Installed“ sign. Instruments and functions that are not installed have an „order“ key. On the Licences menu you only will find licencing options that were already available at the release date of the software version installed on the unit.

Software Modules (Licences Handling)EN-28 Manual | TouchMonitor TM7/TM9
4.
If you want to acquire new licences, please proceed as follows:
1. InsertaUSBmemorysticktooneoftheUSBportsontherearpanel.
2. Touch the empty space of the screen or one of the displayed ins-struments, the control bar appears.
2.
3.
4.
3. Touch the Menu key in the right section of the control bar to ac-cess the menu system showing the Main Menu.
5. Touchtheorder keys of the licences you want to acquire.
5.
4. Touch the Licences key. The available software licences are dis-played, the activated ones marked with Installed.
6.

EN-29Manual | TouchMonitor TM7/TM9 Software Modules (Licences Handling)
EN
6. Touch the ExportRequests key displayed in the left section of the control bar.
TheTouchMonitorwillestablishafolderstructureontheUSBsticknamed/rtw/touchmonitor/licence.Anencryptedlicencerequest file (nnn_nn.lrf) depending on the individual serial number of the hardware unit is stored to this folder.
7. Wait until the menu page confirming the successful export of the licence request file is displayed.
8. Touch the Done key. This turns you back to the Main Menu. WiththeUSBstickinserted,therearetwootherkeys.ExportPresetallowsyoutostorepresetsontheUSBstick,andIm-portPreset allows you to reload them.
9. RemovetheUSBstickfromtheTouchMonitor,insertittoaUSBport of your computer and send the licence request file to your sales representative.
10.Afterpurchasingthelicence,anewfile(nnn_nn.lf)containingthelicence request file will be sent to you.
The returned licence file is only valid for the individual unit the licence request file was created on.
11.Thelicencefile(nnn_nn.lf)shallbestoredtothesamefolderasthelicencerequestfileontheUSBstick.
12.RemovetheUSBstickfromyourcomputerandinsertittooneoftheUSBportsontherearpaneloftheTouchMonitor.
8.
8.
Software Modules (Licences Handling)EN-30 Manual | TouchMonitor TM7/TM9
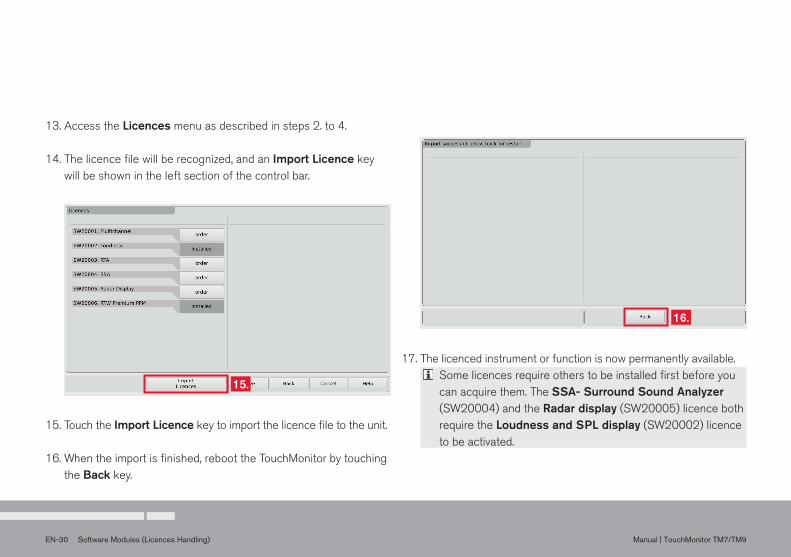
13.AccesstheLicences menu as described in steps 2. to 4.
14.Thelicencefilewillberecognized,andanImportLicence key will be shown in the left section of the control bar.
15.
15.TouchtheImportLicence key to import the licence file to the unit.
16.Whentheimportisfinished,reboottheTouchMonitorbytouchingthe Back key.
17.Thelicencedinstrumentorfunctionisnowpermanentlyavailable.Some licences require others to be installed first before you can acquire them. The SSA-SurroundSoundAnalyzer (SW20004) and the Radardisplay(SW20005)licencebothrequire the LoudnessandSPLdisplay (SW20002) licence to be activated.
16.
EN-31Manual | TouchMonitor TM7/TM9 Software Update
ENSoftwareUpdate
If you want to add new functions and instruments to your unit at any time, periodic maintenance of the system software is neccessary, be-cause you only will find options and licences that were already availa-ble at the release date of the software version installed on the unit. Software updates are available from your sales partner.

Software UpdateEN-32 Manual | TouchMonitor TM7/TM9
If you want to update your software, please proceed as follows:
1. Copytheupdatefiles(*-tm-release-n-n.tgzand/or*-tm-fw-n-n,n-n:firmwareversion)intothemaindirectoryofaUSBstick.
2. RemovetheUSBstickfromyourcomputerandinsertittooneoftheUSBportsontherearpaneloftheTouchMonitor.
3. If not visible, touch the empty space of the screen to display the control bar.
4. Touch the Menu key in the right section of the control bar, then the System key in the Main Menu.
7. When the update is finished, the TouchMonitor reboots auto-matically.
5. TouchtheSpecial key. The additional StartFirmwareUpdate:*-tm-release-n-n resp. *-tm-fw-n-nkey is displayed.
6. Touch the key. The update starts and takes about 20 minutes.
5.
5.

EN-33Manual | TouchMonitor TM7/TM9 Specifications (Extract)
EN
Specifications (Extract)
System
generalPowerrequirements: +24VDC(2Aovercurrentprotectivedeviceshallbeinstalled!)Currentdrain: 1Anominalcurrent,2.5Apower-upcurrent(10µsec.)Display: 7“(TM7)or9“(TM9)TFTtouchscreen16:9Connectors: 1x15-pinSub-D-F;VGAoutputwith800x480pixel(TM7)/
1024x600pixel(TM9),65,536colors,60Hz,forconnectionofanexternal16:9VGAmonitor,internalselectable4:3mode
1x4-pinlockinglowvoltagetyp710(DC) 2xUSBA;USB2.0FullSpeedconnectorsfor: • USBsticksforlicencehandling,presetexportandimport,
software updates • externalcomputermouseorWacom®graphicstablet 1xGPIO(RJ-11-6P6C,forremotecontrolofdefinedfunctions) 1xLAN(RJ-45)
withHW20711: 2x25-pinSub-D-F(analoganddigital)withHW20712: 1x25-pinSub-D-F(analog),8xBNC-F(digital)withHW20911: 2x25-pinSub-D-F(analoganddigital)withHW20912: 1x25-pinSub-D-F(analog),8xBNC-F(digital)withHW20913: 2x25-pinSub-D-F(digital)withHW20914: 16xBNC-F(digital)withHW20915: 2x25-pinSub-D-F(analog)
DimensionsTM7: • 20700: 198x163x46mm(WxHxD) • 20700OEM:188x109x45mm(WxHxD) • 20700-3U:19“:42HPx3Ux44.5mm(WxHxD) • 20700-VID:Half-19“/3U:214.1x132.6x49.5mm(WxHxD
without mounting adapters), fits to Video rack cabinetsDimensionsTM9: • 20900: 245x185.5x46.5mm(WxHxD) • 20900OEM:235x135x45mm(WxHxD)
Weight: approx.2,7kg(TM9table-topunitwithoutpowersupply)Operatingtemperature: intherangefrom+5°to+45°C
Functions (with all licences activated) • Operatingusingafinger(touchscreen),mouse,ortablet • Instrumentscanbefreelyscaledandrandomlypositioned • MultiformatsurroundPPM(3.1,5.0,5.1,7.1) • 2-channelandmultichannelpeakmeter • Loudness-Meter:EBUR128,ITUBS.1770-2/1771,
ATSCA/85,ARIB,andcustomerspecific,SPLmeter • LoudnessRangeinstrument(LRA) • RadarLoudnessMeter(TCelectronic®) • MovingCoilinstrument(BR,VU,Loudnessscales) • Gainreductioninstrument • SurroundSoundAnalyzer • 10-foldMulti-CorrelatorwithLFEmode,Stereocorrelator • 31and61bandspectrumanalyzer • 2-channelaudiovectorscope • AES3statusmonitor,Numericaldisplays
AnalogInputsHW20711: 8analoginputs,25-pinSub-D-FconnectorHW20712: 8analoginputs,25-pinSub-D-FconnectorHW20911: 8analoginputs,25-pinSub-D-FconnectorHW20912: 8analoginputs,25-pinSub-D-FconnectorHW20915: 16analoginputs,2x25-pinSub-D-Fconnectors
Referencelevel: adjustableintherangefrom0dButo+10dBuMax.inputlevel: +24dBuImpedance: >10kΩ, electronically balancedFrequencyrange: 20Hzto22kHzat48kHz
Specifications (Extract)EN-34 Manual | TouchMonitor TM7/TM9
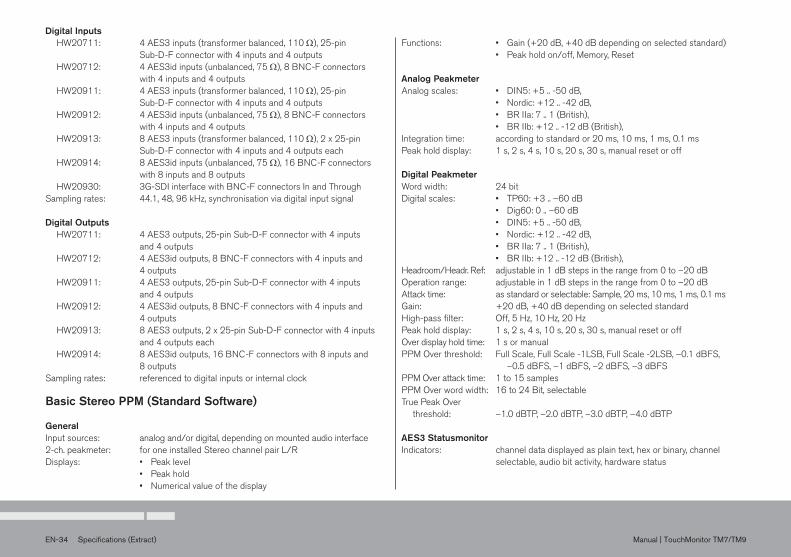
DigitalInputsHW20711: 4AES3inputs(transformerbalanced,110Ω),25-pin
Sub-D-Fconnectorwith4inputsand4outputsHW20712: 4AES3idinputs(unbalanced,75Ω),8BNC-Fconnectors
with 4 inputs and 4 outputsHW20911: 4AES3inputs(transformerbalanced,110Ω),25-pin
Sub-D-Fconnectorwith4inputsand4outputsHW20912: 4AES3idinputs(unbalanced,75Ω),8BNC-Fconnectors
with 4 inputs and 4 outputsHW20913: 8AES3inputs(transformerbalanced,110Ω),2x25-pin
Sub-D-Fconnectorwith4inputsand4outputseachHW20914: 8AES3idinputs(unbalanced,75Ω),16BNC-Fconnectors
with 8 inputs and 8 outputsHW20930: 3G-SDIinterfacewithBNC-FconnectorsInandThrough
Samplingrates: 44.1,48,96kHz,synchronisationviadigitalinputsignal
DigitalOutputsHW20711: 4AES3outputs,25-pinSub-D-Fconnectorwith4inputs
and 4 outputsHW20712: 4AES3idoutputs,8BNC-Fconnectorswith4inputsand
4 outputsHW20911: 4AES3outputs,25-pinSub-D-Fconnectorwith4inputs
and 4 outputsHW20912: 4AES3idoutputs,8BNC-Fconnectorswith4inputsand
4 outputsHW20913: 8AES3outputs,2x25-pinSub-D-Fconnectorwith4inputs
and 4 outputs eachHW20914: 8AES3idoutputs,16BNC-Fconnectorswith8inputsand
8 outputsSampling rates: referenced to digital inputs or internal clock
BasicStereoPPM(StandardSoftware)
generalInputsources: analogand/ordigital,dependingonmountedaudiointerface2-ch.peakmeter: foroneinstalledStereochannelpairL/RDisplays: • Peaklevel • Peakhold • Numericalvalueofthedisplay
Functions: • Gain(+20dB,+40dBdependingonselectedstandard) • Peakholdon/off,Memory,Reset
AnalogPeakmeterAnalogscales: • DIN5:+5..-50dB, • Nordic:+12..-42dB, • BRIIa:7..1(British), • BRIIb:+12..-12dB(British),Integrationtime: accordingtostandardor20ms,10ms,1ms,0.1msPeakholddisplay: 1s,2s,4s,10s,20s,30s,manualresetoroff
DigitalPeakmeterWord width: 24 bitDigitalscales: • TP60:+3..–60dB • Dig60:0..–60dB • DIN5:+5..-50dB, • Nordic:+12..-42dB, • BRIIa:7..1(British), • BRIIb:+12..-12dB(British),Headroom/Headr.Ref: adjustablein1dBstepsintherangefrom0to–20dBOperationrange: adjustablein1dBstepsintherangefrom0to–20dBAttacktime: asstandardorselectable:Sample,20ms,10ms,1ms,0.1msGain: +20dB,+40dBdependingonselectedstandardHigh-passfilter: Off,5Hz,10Hz,20HzPeakholddisplay: 1s,2s,4s,10s,20s,30s,manualresetoroffOverdisplayholdtime: 1sormanualPPMOverthreshold: FullScale,FullScale-1LSB,FullScale-2LSB,–0.1dBFS,
–0.5dBFS,–1dBFS,–2dBFS,–3dBFSPPMOverattacktime: 1to15samplesPPMOverwordwidth: 16to24Bit,selectableTruePeakOver
threshold: –1.0dBTP,–2.0dBTP,–3.0dBTP,–4.0dBTP
AES3StatusmonitorIndicators: channel data displayed as plain text, hex or binary, channel
selectable, audio bit activity, hardware status

EN-35Manual | TouchMonitor TM7/TM9 EC Declaration of Conformity
EN
ECDeclarationofConformity
ECDeclarationofConformity|Directive2004/108/EGandDirective2006/95/EG
EN61000-4-4:2005-09-01 EN61000-4-5:2007-08-01 EN61000-4-6+A1:2002-02-01 EN61000-4-11:2005-04-01
Safety2006/95/EG EN60950-1:2007-01-01
Tested and documented by the following companies:
SERCOGmbH,Bonn,accreditedEMClaboratoryRTWGmbH&Co.KG,Cologne
Dateandsignatureoftheresponsibleperson:
2010-12-01
We,RTWGmbH&Co.KG,Elbeallee19,50765Köln,Germany,declare under sole responsibility that the product:
RTWTouchMonitor20900Seriesand20700Series(OEMunits/table-topandplug-inunitswithmainsadapter) meettheintendoftheDirective2004/108/EGandDirective2006/95/EG.Compliancewasdemonstratedtothefollowingspecifi-cations as listed in the official Journal of the European Communities:
EMC2004/108/EGEN61000-6-3:2007-10-01Emissions: EN55022:2007-06-01ClassB,radiated EN55022:2007-06-01ClassB,conducted
EN61000-6-1:2007-12-01Immunity: EN61000-4-2+A1+A2:2002-02-01 EN61000-4-3:2007-11-01
Licenses of the Implemented SoftwareEN-36 Manual | TouchMonitor TM7/TM9
Licenses of the Implemented Software
In addition to the hardware the RTW TouchMonitor TM7 Serie and TouchMonitor TM9Serieproductsalsoincludeasoftwarepackageforwhichavarietyoflicensesapply:
A. SoftwareproducedbyRTWGmbH&Co.KG,whichmayonlybeusedfortheproper operation of the product as described in the documentation (application, DSPprograms,bootloader).ThissoftwareisthepropertyofRTWGmbH&Co.KGandisprotectedbyGermanandinternationalcopyrights.
B. Opensourcesoftware,releasedundertheGPL(GeneralPublicLicense)oftheFreeSoftwareFoundation(FSF):
1. LinuxKernel 2. TinyLogin 3. BusyBox 4. MTDTools 5. GDBServer
TheGPLislocatedathttp://www.gnu.org/licenses/gpl.html.Only the original English version is legally binding, however.
C. Software,releasedundertheLGPL(LesserGeneralPublicLicense)oftheFreeSoftwareFoundation(FSF):
Qt®libaryofNokiaCorporation
TheLGPLislocatedathttp://www.gnu.org/licences/lgpl-2.1.html. Qt®isregisteredtrademark(brand)ofNokiaCorporation,Finland.
D. Software,releasedunderthelicenseoftheOpenSSLProject: „ThisproductincludessoftwaredevelopedbytheOpenSSLProjectfor
useintheOpenSSLToolkit.(http://www.openssl.org/)“
Thislicenseislocatedathttp://www.openssl.org/source/license.html.
SomechangeshavebeenmadetothesoftwarepackagesaslistedunderB.Onrequest you can have the source code of the altered software sent to you within three years of purchasing the product.
Cologne,September2011
DependingonthemodelthestartscreenoftheTouchMonitorcontainsanadaptedimagebasedonthephotography“Cologne_CathedralNight-6.jpg”ofLukaszKryger,Edingburgh,Scotland.TheimagesfallundertheCreativeCommonsAttribution2.0GenericLicense(http://commons.wikimedia.org/wiki/File:Cologne_CathedralNight-6.jpg,http://creativecommons.org/licenses/by/2.0/deed.en).