User's Manual Template - FREE Digital Signage for · PDF fileUser’s Manual Page 1...
42
User’s Manual Page 1 mediaBOX User’s Manual version 3.0 For W7e (Windows 7 embedded) and Ubuntu DSe (Digital Signage embedded) We thank you for your purchase of the mediaBOX Media Player. The mediaBOX is a reliable small form factor device, which was designed to deliver uninterrupted playback of Digital Signage and Kiosk presentations. We are confident the device will perform to specification for years to come. We thank you for your interest in this Media Player. We have taken extreme measures to make sure the mediaBOX is 100% reliable and conforms to our certification process. Each mediaBOX Media Player is passed through rigorous system quality assurance of hardware and software prior to delivery. Be sure to notify your reseller if you find damaged components which may have resulted from shipment, or if you find something missing from the original packaging. DISCLAIMER: WHILE MAKING EVERY ATTEMPT TO PRESENT INFORMATION ACCURATELY IN THIS MANUAL / PUBLICATION, THE COMPANY DISCLAIMS LIABILITY FOR ANY LOSS OR DAMAGE ARISING FROM ITS USE. THIS MANUAL / PUBLICATION SHOULD NOT BE RELIED UPON AS A SUBSTITUTE FOR LEGAL, TECHNICAL OR OTHER PROFESSIONAL ADVICE. The manual should only be used with the supplied version of the software and hardware. Any other use may result in loss or damage to the operating system or to the device itself. This manual is for Windows embedded standard edition (W7e) or Ubuntu 9.04 32 /64 bit. The manual is to be used as a basic guideline for the mediaBOX Digital Signage and Kiosk Media Player.
Transcript of User's Manual Template - FREE Digital Signage for · PDF fileUser’s Manual Page 1...

User’s Manual Page 1
mediaBOX User’s Manual
version 3.0
For W7e (Windows 7 embedded) and Ubuntu DSe (Digital Signage embedded)
We thank you for your purchase of the mediaBOX Media Player. The mediaBOX is a reliable small form factor device, which was designed to deliver uninterrupted playback of Digital Signage and Kiosk presentations. We are confident the device will perform to specification for years to come. We thank you for your interest in this Media Player.
We have taken extreme measures to make sure the mediaBOX is 100% reliable and conforms to our certification process. Each mediaBOX Media Player is passed through rigorous system quality assurance of hardware and software prior to delivery. Be sure to notify your reseller if you find damaged components which may have resulted from shipment, or if you find something missing from the original packaging.
DISCLAIMER: WHILE MAKING EVERY ATTEMPT TO PRESENT INFORMATION
ACCURATELY IN THIS MANUAL / PUBLICATION, THE COMPANY DISCLAIMS LIABILITY FOR ANY LOSS OR DAMAGE ARISING FROM ITS USE.
THIS MANUAL / PUBLICATION SHOULD NOT BE RELIED UPON AS A SUBSTITUTE FOR LEGAL, TECHNICAL OR OTHER PROFESSIONAL ADVICE.
The manual should only be used with the supplied version of the software and hardware.
Any other use may result in loss or damage to the operating system or to the device itself.
This manual is for Windows embedded standard edition (W7e) or Ubuntu 9.04 32 /64 bit. The manual is to be used as a basic guideline for the mediaBOX
Digital Signage and Kiosk Media Player.

User’s Manual Page 2
TABLE OF CONTENTS
1.0 General Information ........................................................................................................... 4
1.1 Package content ........................................................................................................ 5 1.2 Pre installation requirements ..................................................................................... 6
1.2.1 Ethernet ......................................................................................................... 6 1.2.2 Wireless ......................................................................................................... 6 1.2.3 Video .............................................................................................................. 6 1.2.4 Sound ............................................................................................................ 6
1.3 Things to consider ..................................................................................................... 6 1.4 Overview.................................................................................................................... 7
1.4.1 Network .......................................................................................................... 7 1.4.2 Monitor and display setup .............................................................................. 7 1.4.3 Live TV via mediaTV (example source include Satellite, cable box, Security
cameras, DVD) .............................................................................................. 8 1.4.4 USB OS restore system ................................................................................. 8
1.5 Specifications .......................................................................................................... 13 1.6 Formats ................................................................................................................... 14 1.7 Panel configuration .................................................................................................. 14
2.0 The Digital Signage Network ............................................................................................ 15
2.1 Connecting to the Digital Signage Cloud ................................................................. 16 2.2 Registering into the Digital Signage networks .......................................................... 16 2.3 Broadband ............................................................................................................... 16 2.4 Security ................................................................................................................... 17 2.5 Firewall .................................................................................................................... 17
3.0 Windows Embedded Standard Setup and Configuration .................................................. 18
3.1 Basic user interface ................................................................................................. 19 3.2 Network setup.......................................................................................................... 21
3.2.1 Wired Network ............................................................................................. 21 3.2.2 Wireless Network ......................................................................................... 21 3.2.3 Host name ................................................................................................... 22
3.3 Display configuration ............................................................................................... 23 3.3.1 Single Display .............................................................................................. 23 3.3.2 Dual Display ................................................................................................. 23 3.3.3 Rotating the Display ..................................................................................... 24
3.4 Running the SignagePlayer ..................................................................................... 25 3.5 Unregistering & clearing cache ................................................................................ 25 3.6 Maintenance ............................................................................................................ 26 3.7 Remote Login .......................................................................................................... 27 3.8 White label setup ..................................................................................................... 27
4.0 Ubuntu Linux Setup and Configuration ............................................................................. 28
4.1 User Interface .......................................................................................................... 29 4.2 Network setup.......................................................................................................... 29
4.2.1 Wired Network ............................................................................................. 29

User’s Manual Page 3
4.2.2 Wireless Network ......................................................................................... 30 4.3 Display Configuration ............................................................................................... 33
4.3.1 Single display ............................................................................................... 33 4.3.2 Dual display ................................................................................................. 34 4.3.3 Rotating the display ...................................................................................... 35
4.4 Running the Signage Player .................................................................................... 35 4.5 HDMI Sound ............................................................................................................ 36 4.6 Maintenance ............................................................................................................ 36 4.7 Remote Login .......................................................................................................... 38 4.8 White label setup ..................................................................................................... 39
5.0 Monitoring and Administration ......................................................................................... 41
5.1 Signage Controller ................................................................................................... 42 5.2 Real time snapshots ................................................................................................ 42

1.0 General Information
User’s Manual Page 4
1.0 General Information
1.0 General Information
User’s Manual Page 5
1.1 Package content
The mediaBOX Media Player is shipped pre assembled and ready to play. It is a plug N play device which was designed to deliver seamless and easy integration even for none technical individuals. The following is a list of the products you receive with the purchase of your new mediaBOX Media Player and optional accessories.
Intel® H67 Express chipset with 2nd generation Intel® QuickPath tech (Core2/i3/i5/i7 supported)
Ethernet (10/100/1000Mbps) LAN connection
Wi-Fi module with dual antennas
HDMI / DVI / VGA / DisplayPort (power up to x 2 screens with different content on each one)
Intel® Clear Video HD technology (Direct-X and Open GL)
4 USB 3.0 ports (2 on back panel, 2 via header)
8 USB 2.0 ports (4 on back panel, 4 via header)
1 HD Audio Port (7.1-channel) with Digital Optical S/PDIF outputs
Slim hard drive powered by SATA
DDR3-1066/1333 2 x 240 pin DDR3 DIMM slots (Up to 16GB ransion)
PCI Express x16 (Supports live mediaTV Capture device for Live TV, sold separately)
Internal 150PSU DC-DC convertor
120V-240V AC-DC convertor
Supports USB Dynamic OS Restore system (sold separately)
mediaTV Live capture device (sold separately)
Mounting accessories (sold separately)

1.0 General Information
User’s Manual Page 6
1.2 Pre installation requirements
The following are things to consider before you install the mediaBOX Media Player.
1.2.1 Ethernet
The mediaBOX is equipped with Ethernet 10/100/1000MB onboard internal network interface card. If you wish to use a wired local area network connection, be sure to run Cat 5 twisted per Ethernet cable to the final mounting location of the Media Player. The cable must be plugged in to a LAN switch or router with a maximum distance of 100 meters. Distance may be extended with a repeater.
1.2.2 Wireless
The mediaBOX has a built in 802.1x compatible wireless network card. The wireless interface card must be connected to the supplied antennas (x2) to insure maximum reception of available Wi-Fi signal. To take advantage of the Wi-Fi capabilities of the mediaBOX Media Player be sure to install a Wireless router within close proximity. Actual signal strength and maximums wireless distance may vary due to local interference and building layout. You should perform signal quality tests to confirm the device will properly work with your current wireless configuration.
1.2.3 Video
The mediaBOX Media Player supports all high definition formats including 720P and 1080i. The Media Player is equipped with VGA / HDMI / DisplayPort and DVI video ports. Be sure to prepare the proper cabling to connect the Media Player directly to your LCD or Plasma screen. You may need a convertor (i.e.: HDMI to DVI) to establish proper connections between the Media Player and legacy devices. TV connectors and cables are not included.
1.2.4 Sound
The mediaBOX Media Player supports high definition sound. You have the option of using the optical, coax or mini jack sound ports. If you wish to have support for audio, be sure to consider the physical installation of the speakers. Refer to the back panel diagram for a complete layout of all audio ports.
1.3 Things to consider
The mediaBOX Media Player is an advanced device which needs to be handled with care. It’s important to install the device in areas where room temperature does not exceed 90 degrees Fahrenheit (32.22 Celsius). External heat may cause the device to overheat internally. Be sure to protect the device from theft by hiding it behind a monitor or other enclosed furniture. The mediaBOX is designed to auto restart after a power outage. Uninterrupted power supply is not necessary for safe operation of the Media Player. The mediaBOX does not ship with a keyboard or mouse; as you will not need them for standard operation. All controls are executed remotely from the SignageStudio. You will, however, need to get a USB Keyboard and USB mouse when setting the mediaBOX for the first time.
1.0 General Information
User’s Manual Page 7
1.4 Overview
1.4.1 Network
The mediaBOX depends on reliable internet connectivity to get data updates, stream down media files into its caching repository and report back to the server and SignageStudio on its own health status. Once files are cached, the Media Player will only communicate back with the hosted Digital Signage servers if an update is initiated from the SignageStudio, or if the Media Player is rebooted. A constant internet connection (a connection always up and active), is not required as the mediaBOX Media Player will cache content internally (using the internal hard drive). The mediaBOX also supports manually updating content via portable devices, such as a USB flash drive. Manual content update can be used in areas where internet connection is not available. You may choose to connect to the local area network via wireless or wired interface. The wireless method reduces cabling requirements and is normally the preferred way of connection when installing the Media Player behind a monitor. The mediaBOX is shipped with DHCP enabled. It will automatically retrieve an IP from a local area network DHCP Server or NAT enabled router. You may reconfigure TCP/IP settings. Refer to the Ubuntu / Windows W7e respectively for further information on configuring network connections. The mediaBOX does not require a static IP; auto assigned private IPs are fully supported. The mediaBOX internal firewall is disabled by default. All egress and ingress communication is done over the TCP/IP protocol and live socket connection exists between it and the backend digital signage server cloud.
1.4.2 Monitor and display setup
The mediaBOX supports up to two monitors consecutively. It includes VGA / DVI / HDMI / DisplayPort connections through the back panel. You may choose a combination of any two types of connectors to achieve a dual display setup (each screen running different or same content supported). Two monitors of same or different resolution may be connected to produce a total desktop width or height; which is the total resolution combined. A DVI to VGA connector is included with the mediaBOX. If the monitors are configured in a landscape mode, the total desktop width is monitor A width + monitor B width. If the monitors are configured in portrait mode, the total desktop height is monitor A height + monitor B height.

1.0 General Information
User’s Manual Page 8
1.4.3 Live TV via mediaTV (example source include Satellite, cable box, Security
cameras, DVD)
The mediaBOX may be purchased with a built in Capture device (also known as the mediaTV). A capture card allows you to connect external peripherals and display the output of these devices directly onto a specified screen division. The capture card connections include S-Video, Composite, Component and HDMI Audio / Video /inputs using the supplied dongle. It supports full HD 1920x1080 or smaller. When mediaTV is used, only a single screen can be used with the mediaBOX. The capture device can be connected to most common input sources, including external DVD players, satellite box, cable box, security camera systems and others. The capture device is configured using the SignageStudio. Use the External Application Component in the SignageStudio and select the AverMedia Center Capture device from the drop down menu. The mediaTV takes advantage of hardware acceleration and so no CPU processing is involved in the capturing process (frames processed by the Video card’s GPU) and no latency will be evident. The mediaBOX comes preloaded and ready to work with the mediaTV. When you purchase the mediaTV, no special configuration is needed as the mediaBOX is a Plug and Play device, ready to accept the certified mediaTV component. Note: MediaTV is only supported through the Win7e OS (and the legacy XPe OS). Linux and Apple OSX are not supported with the mediaTV.
1.4.4 USB OS restore system
The USB operating system restore device may be purchased separately as an add-on accessory for the mediaBOX Media Player. The USB OS restore system allows for a complete restore of the entire OS (W7e or Ubuntu) within 60 seconds. This is ideal for environments where customers are interacting with the device (Kiosks / Internet Cafés) and may corrupt the underline OS. In such environments the USB OS restore system allows for a quick and easy way to get the mediaBOX Media Player up and running. Another key advantage of the USB OS restore system is the ability to easily upgrade the entire OS to the latest software revision. Simply download the last released mediaBOX OS build from your reseller’s web site and onto the supplied USB flash device. Once the download is complete you may follow the steps below to apply the new OS image to the Media Player.

1.0 General Information
User’s Manual Page 9
The USB OS restore system includes a USB flash memory device. The USB device needs to be inserted in the back panel USB just above the SATA label. The following section describes in detail the process required to restore a Windows W7e or Ubuntu Linux OS back to factory defaults. Please be sure to follow the process meticulously to avoid confusion.
Attention: please note that imaging your mediaBOX Media Player will erase all its content including cached media files. It
will completely wipe out your existing hard disk. You should make backups of any files or data which you would like to
save. Note: You do not need to backup any files for proper operation of the mediaBOX. Once you reimage the Media
Player you will be prompted to re-register with your login email and password. Once you complete registration and select
the campaign to join, the SignagePlayer will download your digital signage or kiosk configuration and begin to re-cache
the entire campaign and all associated resource files.
Note: The BIOS is preset from the factory to support the USB restore drive. If you want to confirm the BIOS settings are properly set for USB Restore, press [DEL] at POST to enter the BIOS configuration. Go to Advanced > Storage Configuration > SATA Mode > AHCI Mode. Validate the SATA mode is set to the AHCI mode and Aggressive power managed is enabled.
Operating systems restore point procedures: 1. Connect a USB keyboard to the mediaBOX (not supplied). Next insert the supplied USB flash
memory device into the back panel USB port just above the panel labeled SATA
(Important you must use the correct USB port). 2. Next, turn on the mediaBOX Media Player. As soon as the first Vendor Logo bootup screen
appears, press the [F11] key to enter the boot option menu.
3. Select the USB Flash drive. It will most likely be called ut165 USB2Flash or something
close to it. Use the arrow keys to select and press [ENTER]
4. Select CloneZilla Live (the default) in the Orange screen

1.0 General Information
User’s Manual Page 10
5. Select en_US.UTF-8 English
6. Select -Don’t touch keymap
7. Select -Enter_shell
8. Select -#2 and press [ENTER]
9. Enter sudo –i and press [ENTER]
10. Type the command mount –t vfat /dev/sdb1 /home/partimag and press [ENTER]
11. Type exit and press [ENTER]
12. Again type exit and press [ENTER]
13. In the blue menu select Start_clonezilla
14. Select device-image work with disks or partitions using images
1.0 General Information
User’s Manual Page 11
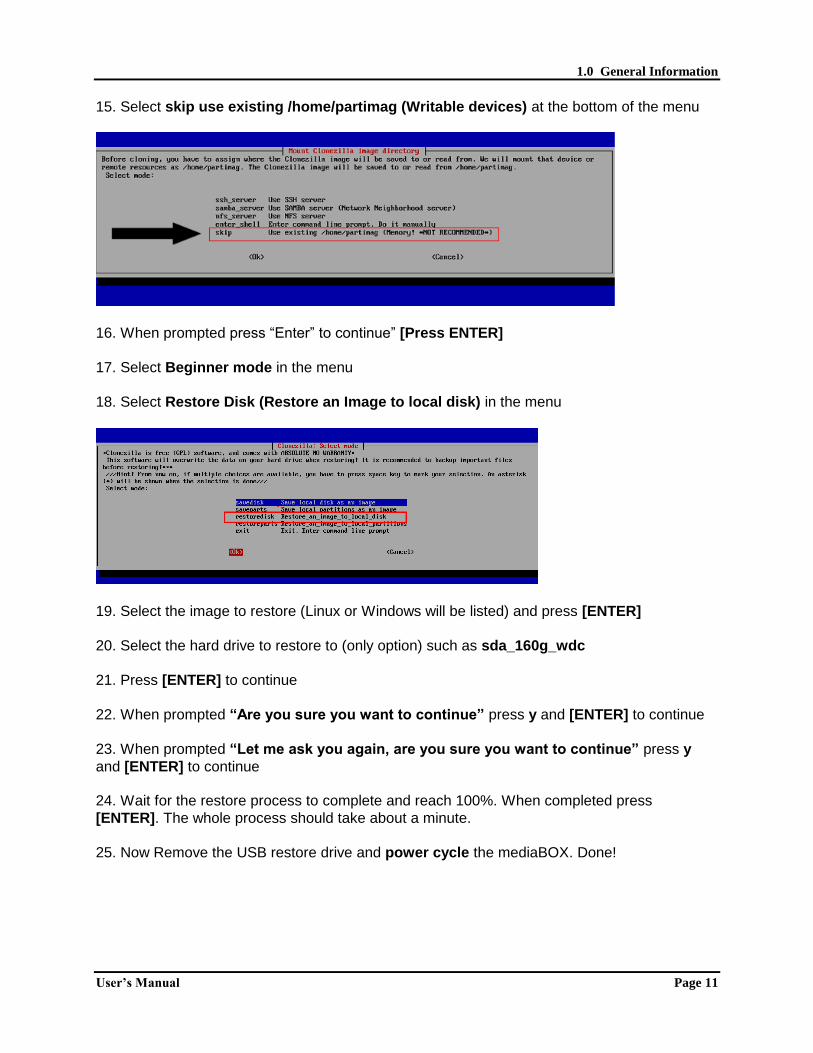
15. Select skip use existing /home/partimag (Writable devices) at the bottom of the menu
16. When prompted press “Enter” to continue” [Press ENTER]
17. Select Beginner mode in the menu
18. Select Restore Disk (Restore an Image to local disk) in the menu
19. Select the image to restore (Linux or Windows will be listed) and press [ENTER]
20. Select the hard drive to restore to (only option) such as sda_160g_wdc
21. Press [ENTER] to continue
22. When prompted “Are you sure you want to continue” press y and [ENTER] to continue
23. When prompted “Let me ask you again, are you sure you want to continue” press y
and [ENTER] to continue 24. Wait for the restore process to complete and reach 100%. When completed press
[ENTER]. The whole process should take about a minute.
25. Now Remove the USB restore drive and power cycle the mediaBOX. Done!

1.0 General Information
User’s Manual Page 12
Note: To update and re-image the entire operating system with a new version image, you must first download the new image from your reseller’s web site. The OS image is in a zipped file format. Unzip the file onto the 2
nd USB device labeled as “Image.”
Make sure the unzipped directory resides on the root of the USB drive. For example, if the unzipped image you downloaded contains a base folder name “Win7ZH67v14” then the “Win7ZH67v14” must reside directly on the root of the USB drive and not within any other sub directories. Once the newly downloaded folder is unzipped onto the USB flash drive, you may follow the steps above to complete the reimage process and restore the entire operating system with the newly released version.

1.0 General Information
User’s Manual Page 13
1.5 Specifications
Intel® H67 Express (B3 rev) chipset Socket LGA1155 Intel® QuickPath technology Low profile super quite, single fan system External DC-DC Power supply Ultra small form factor design Small form factor (about 2 Coke cans) mm: 192x210x62mm Inches: 7.5x8x2.4" Accessories sold separately including: Side Brackets Vesa mounts Mounting case / display holder Din Rale Extended antennas
4 x SATA cables 1 x DVI-to-VGA adapter 1 x I/O back plate 2 x Wi-Fi antennas 1 x 4-pin power extension cable 1 x USB 3.0 header (full-size bracket) 1 x USB 3.0 low-profile bracket 1 VGA 1 DVI (w/Audio) 1 HDMI (w/Audio) 1 DisplayPort (w/Audio) 4 x USB 3.0 ports (2 on back panel, 2 via header) 8 x USB 2.0 ports (4 on back panel, 4 via header) 1 x HD Audio Port (7.1-Channel) 1 x PS/2 keyboard/mouse port 1 x Digital Optical S/PDIF outputs 1 x Ethernet (10/100/1000Mbps) 1 x Front panel audio header 2 x Fan headers 2 x SATA 6.0 Gb/s 4 x SATA 3.0 Gb/s [w/ RAID 0, 1, 0+1 & 5] 1 x eSATA 3.0 Gb/s
2nd Generation Intel® Core™ series 2000 Series Intel® Core™ i3, i5 & i7 Intel® HD Graphics 2000/3000 ready
DDR3-1066/1333 2 x 240 pin DDR3 DIMM slots Up to 16GB ram
OS options: 1. No Operating system 2. Microsoft ™ embedded peripheral (W7e) 3. Linux Ubuntu™ 10.10 DSe optimized
Mini-ITX internal board size: Height: 6.7in - 170mm Width: 6.7in – 170mm
Plug N play installation Designed for the SignagePlayer 90 days direct warranty
All components are none proprietary and upgradable
Windows 7 embedded details: Requires licensing per single OS Ultra light Windows manager used No Desktop icons and no shortcuts Pre loaded with SignagePlayer Pro Disabled Adobe AIR auto build updates Disabled all screen saver Disabled all balloon & other OS messages Disabled scan disk and other file checks
Removed Taskbar (press ⊞ Win-key to open)
Set as appliance mode device Pre loaded with all supported drivers Removed services and TSRs not needed Support mediaTV PNP
Ubuntu Linux details: Requires no licensing, freely distributed OS Ultra light Windows manager (source Black Box) No Desktop icons and no shortcuts Pre loaded with SignagePlayer Pro Disabled Adobe AIR auto build updates Disabled all screen saver Disabled all balloon & other OS messages Disabled fstab and other file checks Removed Taskbar Set as appliance type application Pre loaded with all supported drivers Removed daemons and TSRs not needed

1.0 General Information
User’s Manual Page 14
1.6 Formats
The Player supports all of the native Flash 10.X+ formats which include the following:
Video Formats: Flash video FLV (H.263), MPEG-4 (H.264), MOV, M4A, MP4V, 3GP, 3G2, AAC (HE, LC), SWF
Animation: SWF
Images: JPG, PNG
Sound: MP3
You may also use the External Application component of the SignageStudio to integrate binary external applications into an assigned screen division. This allows you to use applications such as the open source freely distributed media player software called Video LAN (aka VLC). To learn more about VLC and its supported formats you may visit the following link: http://www.videolan.org/vlc/features.html
1.7 Panel configuration The image below maps the main ports of the mediaBOX back panel:

2.0 The Digital Signage Network
User’s Manual Page 15
2.0 The Digital Signage Network

2.0 The Digital Signage Network
User’s Manual Page 16
2.1 Connecting to the Digital Signage Cloud The Digital Signage network cloud is comprised of network servers and routers which are hosted at central data centers. The hosted servers provide all services to your Digital Signage
network. This type of service is often referred to as SaaS (software as an s service). The services include authentication, streaming of media files and database services. For the mediaBOX Media Player to join this cloud, you must first register the Media Player. Next you need to insure the Media Player can transmit ingress and egress data from and to the digital signage cloud. The following sections cover requirements for proper operation and transmission of your mediaBOX within the SaaS model.
2.2 Registering into the Digital Signage networks
The mediaBOX ships preloaded with a stable version of the SignagePlayer. When a Media Player boots up, the SignagePlayer is configured to automatically start. On the 1
st boot up you’ll
be prompted to enter your login email and password. These will be the same email and password you use to login to the SignageStudio. Once you provide this information, the Media Player will be associated with your account. After proper authentication is completed, the Media Player will be allowed to join your digital signage network. Once successfully registered, the SignagePlayer will prompt you to select the campaign and output you would like to connect to. The campaign and output can be modified at a later time through the SignageStudio “Stations.”
2.3 Broadband The mediaBOX Media Player relies on a broadband connection to download all of the campaign’s data. This includes RSA authentication, XML configuration and media files. It also uses the broadband to access external data sources such as RSS, video podcasts and other data. It is vital to a successful integration of a digital signage solution that you provide a fast reliable internet connection. It should be noted that the SignagePlayer will work with almost any type of connection; the SignagePlayer uses internal caching and retry mechanisms to insure smooth playback at all times. The SignagePlayer will not be affected when internet connection is down given in which all resources had an opportunity to cache locally. The SignagePlayer may also be rebooted when no connection exists; in such scenarios the SignagePlayer will roll back to the last good known campaign. However, a fast broadband connection will allow for rapid download of content, smoother transitions into new content and more reliable remote control functionality.

2.0 The Digital Signage Network
User’s Manual Page 17
2.4 Security
The SignagePlayer uses an elaborate authentication scheme to validate against the Digital Signage servers. Once fully authenticated, the SignagePlayer will be allowed to join the Digital Signage cloud. The SignagePlayer uses 128 bit private and public keys. It is powered by RSA ciphering cryptography to insure maximum security. All tokens used are validated on the server side before they are allowed to pass through. The SignagePlayer stores the authenticated password locally within the local file system as an encrypted key. If you plan on moving the Media Player or possibly shipping it to an offsite location, consider first unregistering the SignagePlayer. Unregistering the SignagePlayer will remove it from the Digital Signage cloud as well as remove all locally saved passwords.
2.5 Firewall The SignagePlayer communicates with the hosted servers over TCP/IP. The protocol uses http (as well as RSA public / private keys over standard http) and raw sockets. In order to insure proper operation, the SignagePlayer must be allowed to communicate with the hosted servers within the Digital Signage network. The mediaBOX does not include an internal firewall; therefore, no special configuration is required. However, if your local area or corporate network does have a firewall, you will need to insure proper rules exist within your firewall to allow traffic originating from the mediaBOX to pass through. If you are having issues connecting to our server, you more than likely, have issues with a local firewall. We support both LIVE Sockets as well as HTTP Polling. Under the SignageStudio > Stations you may get 3 color indicators: Yellow: Connected via Polling Green: Connected via live socket Red: Not connected at all To learn more about this and how it is setup, please watch this video tutorial: Note: If you have a firewall with an existing port 80 rule, this may NOT be enough. The reason is many firewalls will only allow HTTP traffic. However, the mediaBOX communicates using a persistent TCP/IP socket connection. You may need to add a rule in your gateway / router to specifically allow connection oriented traffic over port 80 (not just HTTP).
You should know opening port 80 on your firewall does not compromise in any way the security of your local area network. Allowing trusted traffic originating from within the LAN onto a specific destination is common practice. It does not induce any potential security breach. This is acceptable and standard procedure in internet security models.

4.0 Ubuntu Linux Setup and Configuration
User’s Manual Page 18
3.0 Windows Embedded Standard Setup and Configuration

4.0 Ubuntu Linux Setup and Configuration
User’s Manual Page 19
3.1 Basic user interface The mediaBOX Media Player was designed as a plug-N-play device. The Media Player requires very little maintenance after its initial setup. The Windows W7e was compiled with a light weight windows manager. To fully optimize memory and resources the windows were stripped down from both Desktop and other controls. The OS was deigned to honorably recover from power failures with resiliency in mind. The main user interface is the OS Toolbar. It is hidden by default by the SignageController.
To pull up the Toolbar use the WinKey or press Control-ESC.
To access the SignageController press the Eye icon on the SignagePlayer. The SignageController is a persistent task. This means even if you try and terminate the SignageController using the Task Manager, the SignageController will re-spawn. This is by design to make the mediaBOX as resilient as possible. The SignageController is an integral part of the mediaBOX and it is launched from the internal W7e registry startup key. The SignageController has two configurable modes which can be set during the initial registration of the Player, or at a later time from the SignageStudio > Stations section. These
modes include Test mode and Real mode. In Test mode the SignageController will monitor the SignagePlayer, but will not interfere with other OS activities. In Real mode however, the SignageController will terminate any pop up messages, or none certified digital signage application; thus delivering a true dedicated playback with no interruption or none related OS alerts. In real environment installs we recommend you operate under Real mode.
4.0 Ubuntu Linux Setup and Configuration
User’s Manual Page 20
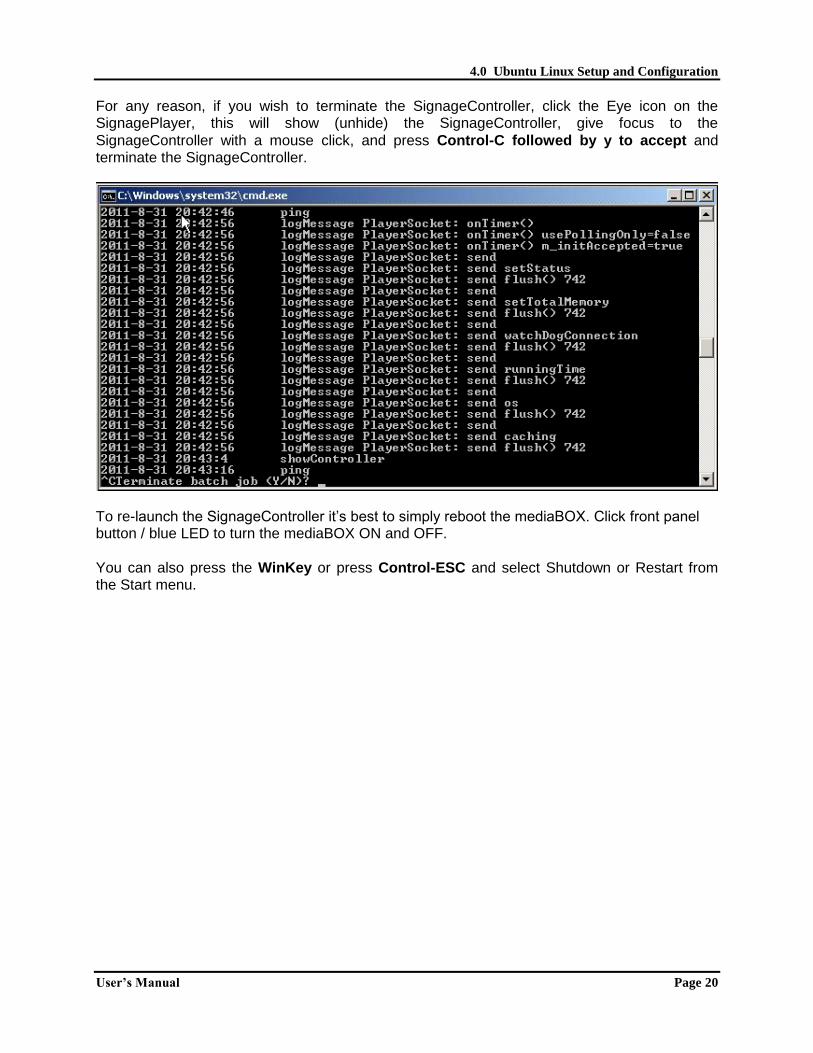
For any reason, if you wish to terminate the SignageController, click the Eye icon on the SignagePlayer, this will show (unhide) the SignageController, give focus to the
SignageController with a mouse click, and press Control-C followed by y to accept and terminate the SignageController.
To re-launch the SignageController it’s best to simply reboot the mediaBOX. Click front panel button / blue LED to turn the mediaBOX ON and OFF.
You can also press the WinKey or press Control-ESC and select Shutdown or Restart from the Start menu.

4.0 Ubuntu Linux Setup and Configuration
User’s Manual Page 21
3.2 Network setup
3.2.1 Wired Network
The mediaBOX ships with DHCP enabled by default. To access the wired network configuration:
1. Press WinKey or press Control-ESC 2. Select the Control Panel
3. Click network and Internet
4. Click Network and Sharing Center 5. Click Change Adapter settings
3.2.2 Wireless Network
The mediaBOX ships with DHCP enabled by default. To access the wireless network configuration:
1. Press WinKey or press Control-ESC 2. Select the Control Panel
3. Click network and Internet
4. Click Network and Sharing Center 5. Click Connect or Disconnect 6. Select one of the available Wireless networks from the pop up menu

4.0 Ubuntu Linux Setup and Configuration
User’s Manual Page 22
3.2.3 Host name
The mediaBOX comes preconfigured with a default host name called OEM. When running multiple mediaBOXes in the same virtual network, you may encounter an error on the screen since multiple mediaBOXes have the same host name. The Windows OS requires each host have a unique identifier. To apply a unique name to each one of your mediaBOXes follow these steps:
1. Press WinKey or press Control-ESC 2. Under “Search all programs and files” type regedit and then click OK. 3. Locate the following registry key:
HKEY_LOCAL_MACHINE\SOFTWARE\Microsoft\Windows NT\CurrentVersion 4. To change the company name, do the following:
In the right pane, double-click RegisteredOrganization. Under Value data, type the name that you want, and then click OK.

4.0 Ubuntu Linux Setup and Configuration
User’s Manual Page 23
To change the name of the registered owner, do the following:
In the right pane, double-click RegisteredOwner. Under Value data, type the name you want, and then click OK.
5. Click Exit on the File menu to quit Registry Editor.
3.3 Display configuration The mediaBOX Media Player comes with 4 types of display connections including VGA, DVI, HDMI and DisplayPort. You may use any one of these ports for your main display. The mediaBOX Media Player also supports up to two active monitors per single box. When using two monitors you’ll have a desktop space, which is a total of both monitor resolutions combined. In other words, you may create a signage presentation which spans both monitors. You can also configure the monitors in landscape or portrait mode.
3.3.1 Single Display
To configure the resolution of your display:
1. Press WinKey or press Control-ESC 2. Under “Search all programs and files” type display
3. Select Change display settings
3.3.2 Dual Display
The mediaBOX Media Player allows you to use any 2 of the 3 available video ports (i.e.: VGA and DVI, DVI and HDMI, HDMI and VGA, etc). Once you connect both displays, you should see both monitors appear under the Display settings.

4.0 Ubuntu Linux Setup and Configuration
User’s Manual Page 24
To enable the secondary display, select the 2nd
inactive monitor and click on the checkbox
“Extend these displays”. Note: You may also drag and drop each display box within the gray canvas to change the order and match your physical mounting installation. You should know in your Signage presentation a single screen division cannot surpass 4995 x 4995 pixels in width or height. If the total width or height of both monitors exceeds 4995 x 4995 pixels, you’ll need to break your screen setup into at least two divisions to compensate for this limitation. In most cases this is not a problem as multiple screen divisions are used. The SignagePlayer supports unlimited number of screen divisions.
3.3.3 Rotating the Display
The mediaBOX Media Player allows you to set each display in a landscape or portrait mode.
To configure rotation of your display:
1. Press WinKey or press Control-ESC 2. Under “Search all programs and files” type display 3. Select Change display settings 4. Change the orientation

4.0 Ubuntu Linux Setup and Configuration
User’s Manual Page 25
3.4 Running the SignagePlayer
Running the SignagePlayer should always be done via SignageController.exe. It is the SignageController which executes the SignagePlayer. The SignageController is set automatically to start upon bootup. The following registry key was modified to set the SignageController.exe to auto start.
To review this you can execute:
1. Press WinKey or press Control-ESC 2. Under “Search all programs and files” type regedit and then click OK. 3. Locate the following registry key:
HKEY_LOCAL_MACHINE\SOFTWARE\Microsoft\Windows\CurrentVersion\RUN
Note: The Registry is the main config database of the Windows W7e OS. Editing the registry is a high risk task. Modification of keys may cause the Windows registry to corrupt. Take special care when adding, modifying or deleting any entries in the registry.
3.5 Unregistering & clearing cache You can unregister your account directly on the SignagePlayer. Simply click on the “Unregister” button, provide your login email address and valid password and click ok. This will remove the local key and unregister your account with the SignagePlayer. It will also unregister the Player with the remote server and remove the Player from the list of available “Stations”. You may also delete the SignagePlayer local cache directory for one of the following reasons:
1. You forgot your login email or password 2. You want to remove all cached content from Player including media files and RSS data 3. SignagePlayer is not working properly & you want to troubleshoot the issue by clearing
everything The SignagePlayer stores all account information and local cached content under: C:\Users\user\AppData\Roaming\SignagePlayer.XXXXXXXXXXX To delete this directory follow the steps: To review this you can execute:
1. Press WinKey or press Control-ESC
2. Under “Search all programs and files” type Windows Explorer 3. Change dir to C:\Users\user\AppData\Roaming\
4. Delete the complete Dir: C:\Users\user\AppData\Roaming\SignagePlayer.* 5. Reboot the mediaBOX 6. Re-register the SignagePlayer

4.0 Ubuntu Linux Setup and Configuration
User’s Manual Page 26
3.6 Maintenance The mediaBOX Windows W7e edition does not require any special maintenance, as the scandisk and other normal disk utilities were removed as the OS is designed to work as a peripheral. It is, however, common practice to reboot your PC at least once a day. Although the SignagePlayer will run continuously without interruption for weeks or even months at a time, it is common practice to reboot once every 24-hours. Rebooting may help increase performance as system buffers will be refreshed and memory restored to zero fragmentation. To configure a daily reboot, first register the SignagePlayer. Once registered, open the SignageStudio, under “Stations” you’ll see your newly added mediaBOX player appear under the “Stations” data grid. Select it, and under its Properties > Reboot conditions and set the checkbox. Set a time when you wish to set the automatic daily reboot. By default the SignagePlayer will reboot at 0:0 which is 12:00AM. Note: There are other configurable reboot conditions as well which may cause the SignagePlayer to reboot; these include memory thresholds and internal errors. These settings are applicable to both the Windows W7e OS and the Ubuntu Linux OS. The Automatic Adobe AIR auto updates were disabled to prevent popup messages; which may come up during new Adobe AIR software releases. To enable the automatic updates temporarily so you can find out if a new Adobe AIR runtime is available, you can run:
"C:\Program Files\Adobe AIR Settings Manager\Adobe AIR Settings Manager.exe"
Then click “Enable Updates.”

4.0 Ubuntu Linux Setup and Configuration
User’s Manual Page 27
3.7 Remote Login The Desktop SignagePlayer can be remotely controlled using the SignageStudio (Web or Desktop version). The remote functions include Play, Stop, update software builds, receive a live screen capture, poll memory stats and more. Under normal circumstances you should not need any further remote functionality. However, it is a good idea to plan for disaster recovery. Part of this plan is to allow for secure remote desktop access to the mediaBOX over the internet. This type of access can be managed with the free service: LogMeIn®, Team Viewer® and others (visit http://www.LogMeIn.com or http://TeamViewer.com ). The services will allow you to bypass firewalls and other restrictions to gain remote access to the mediaBOX. With these type of services installed and pre-configured on your mediaBOX you will always have remote access to your Digital Signage player; just in case. Read the end user license agreement at LogMeIn® for further details on the service and commercial / none commercial offering.
A second option of gaining remote secure access to your mediaBOX is to use the free application Tight VNC (visit http://www.tightvnc.com/ ). Note: With TightVNC you will need to use a static IP or use a port forwarding rule on your local internet gateway / router. Again, both LogMeIn® and TightVNC are optional as the SignageStudio provides all of the essential remote management functions needed to operate and control the Desktop SignagePlayer.
3.8 White label setup The Windows W7e is configured to display a custom background image on login, bootup and during shutdown. The image may be replaced with your own custom image. To modify these images replace the
content located under: C:\Windows\System32\oobe\Info\Backgrounds folder with your own resource. The SignagePlayer branding and white label configuring is also available for resellers. Be sure to check with your reseller for additional information on customizing the SignagePlayer and the SignageStudio.
4.0 Ubuntu Linux Setup and Configuration
User’s Manual Page 28
4.0 Ubuntu Linux Setup and Configuration

4.0 Ubuntu Linux Setup and Configuration
User’s Manual Page 29
4.1 User Interface
The Ubuntu Linux operating system was specifically compiled to serve as an appliance type device. The OS was loaded with an ultra light X11 Window Manager. The Window Manager shell was stripped from al panels and desktop area to deliver the most efficient and reliable platform. However, you can still get the full power of the gnome Window Manager which is available for you to setup and management. To learn more about gnome you may visit: http://www.gnome.org
To access the gnome panel, right click on the black background and select Task Manager. Right clicking on the black background will pull additional menu options including reboot, open terminal and more. You should explore the gnome panel to familiarize yourself with the available applications and utilities. Some of these applications include computer management, task manager and others. In the following sections we’ll cover the core configuration utilities which help with setting up the network and display properties.
4.2 Network setup
4.2.1 Wired Network
The mediaBOX ships with DHCP enabled by default. You can check network status by
opening the gnome panel, right click the black background and select Task Manager, from the mouse, right click properties menu. This will run the gnome management top panel.
Once the Task Manager loads you’ll see arrows or wireless icon at the right corner of the top gnome panel: If the icon displays arrows it means you are connected to a wired network. A wireless signal strength icon indicates a connection to a wireless network. To configure your TCP/IP wired network connection:
1. Right click on the black background and select Task Manager
2. From the gnome Task Manager select System > Preferences > Network
Connections
3. Select the wired tab
4. Select network interface (Auth eth0)
5. Select Edit
6. Select the IP4 settings

4.0 Ubuntu Linux Setup and Configuration
User’s Manual Page 30
7. Select the type of connection you want and set the IP setting
8. Click apply to save changes
4.2.2 Wireless Network
The mediaBOX is preconfigured with a wireless module. The following section covers the wireless configuration necessary to enable wireless connectivity to your local secure wireless network. Note: You should have a strong wireless router in close proximity to the mediaBOX to achieve good enough signal strength for smooth operation of your SignagePlayer. If your wireless icon appears on the right corner it means you are currently not using the wired Ethernet connection. Also, if an exclamation appears next to it, it means your wireless network configuration is still not configured.
1. Right click on the black background and select Task Manager
2. From the gnome Task Manager select System > Preferences > Network
Connections
3. Select the wireless tab
OR instead of following steps 1-3, you can click on the wireless icon directly from the taskbar as shown below

4.0 Ubuntu Linux Setup and Configuration
User’s Manual Page 31
4. Once selected, you’ll be prompted to enter a wireless network key
Next you will need to provide the root password
The root password is: password
5. Once all fields are authenticated the wireless status bar and signal strength will appear on the gnome panel

4.0 Ubuntu Linux Setup and Configuration
User’s Manual Page 32
6. Next you will need to save and store the wireless password locally. This will eliminate the need to provide a password every time the mediaBOX boots up.
On the gnome panel click on System > Preferences > Network Connections.
This will open the Network connections Dialogue. Select the 2nd
tab: Wireless.
7. Click on your wireless network (Auto SignMon in our example ) and click on Edit
8. Now select the Wireless Security tab
9. Next enter the password key again under Key:\
10. And be sure to select the Available to all users checkbox (important)

4.0 Ubuntu Linux Setup and Configuration
User’s Manual Page 33
4.3 Display Configuration
The mediaBOX Media Player comes with 3 types of display connections including VGA, DVI and HDMI. You may use any one of these ports for your main display. The mediaBOX Media Player also supports up to two active monitors per single box. When using two monitors you’ll have a desktop space which is the total of both monitor resolutions combined. In other words, you may create a signage presentation that spans both monitors. You can also configure the monitors in landscape or portrait mode.
4.3.1 Single display
To configure the mediaBOX screen display
1. Right click on the black background and select Task Manager
2. System > Preferences > Monitor 3. This will open the monitor preferences. If you have two monitors configured; the
mediaBOX will detect each one and you can configure the resolution accordingly.

4.0 Ubuntu Linux Setup and Configuration
User’s Manual Page 34
The display configuration screen allows you to control resolution, video Hz and detect monitors.
4.3.2 Dual display
You may also drag and drop each display box within the gray canvas to change the order and match your physical mounting installation. In your Signage presentation a single screen division cannot surpass 2880 pixels in width or height. If the total width or height of both monitors combined exceeds 2880 pixels, you will need to break your screen setup into at least two divisions to compensate for this limitation. In most cases this is not a problem as multiple screen divisions are used. The SignagePlayer supports unlimited number of screen divisions.

4.0 Ubuntu Linux Setup and Configuration
User’s Manual Page 35
4.3.3 Rotating the display
The device driver allows you to rotate your display in portrait or landscape mode. To set this up,
selects the Rotation from the main configuration menu and set left, right or normal respectively.
4.4 Running the SignagePlayer
The mediaBOX Media Player is configured to preload the SignagePlayer and SignageController upon bootup. It is configured to run the gnome Windows Manager. The following is the main startup configuration file:
/home/user/.config/autostart/SignagePlayer.desktop This in turn runs: /opt/SignagePlayer/share/linux/startSignage.sh #!/bin/sh bbkeys & sudo chmod 777 -R /opt/SignagePlayer/share/linux sudo xterm -geometry 60x40+10+10 /opt/SignagePlayer/share/linux/signageController.sh & sleep 3 /usr/bin/blackbox
The Black Box startup config file (.bbstartup) will launch the signageController.sh which is the proper (and only) way of executing the Digital Signage and Kiosk presentation. The signageController.sh script is responsible for launching the SignageController and the SignagePlayer. It also maintains the health status of the SignageController and validates the integrity of all running processes.
The SignagePlayer installation resides in /opt/SignagePlayer
The SignagePlayer Linux configuration resides in /opt/SignagePlayer/share/linux
Cached content resides in /opt/SignagePlayer/share/buisnessXXX where XXX is your business account number. The Linux environment comes with several command line aliases. These aliases are quick shortcuts which can be executed from any open terminal. sign_run = runs the Signage shell startup script sign_cd = change to SignagePlayer Linux directory sign_unregister = unregister the account and clear all cached cookie info sign_clear = remove all cached content sign_showActive = print all active signage relayed processes sign_time = configure timezone

4.0 Ubuntu Linux Setup and Configuration
User’s Manual Page 36
4.5 HDMI Sound The Ubuntu mediaBOX is pre-configured with standard audio through the back green mini jack output port. To enable HDMI sound through the HDMI port you should follow these steps:
1. Right click on the black background and select Task Manager
2. System > Preferences > Sound
3. Switch to the Hardware tab
4. From the profile drop down select Digital Stereo HDMI output
You can go back and forth between HDMI and Analog stereo input depending on your configuration requirements. You can also control the audio output levels and other parameters through the sound configuration utility.
4.6 Maintenance The mediaBOX Linux edition does not require any special maintenance. The fstab auto validation and other normal disk utilities were removed as the OS is designed to work as a dedicated peripheral. It is, however, a common practice to reboot the mediaBOX at least once per day. Although the SignagePlayer will run continuously without interruption for weeks or even months at a time, it is

4.0 Ubuntu Linux Setup and Configuration
User’s Manual Page 37
recommended to reboot once every 24-hours. Rebooting may help increase performance as system buffers flush and memory restored to zero fragmentation. To configure a daily reboot, first register the SignagePlayer.
Once registered, open the SignageStudio, under “Stations”
and you’ll see your newly added mediaBOX player appear
under the “Stations” data grid. Select it, and under its
Properties > Reboot every day and set the radio button. Set a time when you wish to set the automatic daily reboot. By default the SignagePlayer will reboot at 0:0; which is 12:00AM. You can also choose between rebooting the whole mediaBOX (station) vs. restarting only the SignagePlayer (Player). Note: There are other configurable reboot conditions as well which may cause the SignagePlayer to reboot; this includes memory threshold and internal error. These settings are applicable to both the Windows W7e OS as well as Ubuntu Linux OS.
The Automatic Adobe AIR auto updates were disabled to prevent popup messages which may come up during new Adobe AIR software releases. To enable the automatic updates temporarily so you can find out if a new Adobe AIR runtime is available you can run:
/opt/ Adobe AIR Settings Manager/bin/Adobe AIR Settings Manager
And click “Enable Updates”. The Ubuntu automatic software updates were also disabled in order to prevent unnecessary downtime of the Media Player. If you would like to enable the automatic updates to check if new software is available:
1. Right click on the black background and select Task Manager
2. On the gnome panel select System > Administration > Update Manager
3. Click on Check to find new software updates
4. Once the check is done, click on Install Updates to proceed with the install

4.0 Ubuntu Linux Setup and Configuration
User’s Manual Page 38
4.7 Remote Login The Desktop SignagePlayer can be remotely controlled using the SignageStudio (Web or Desktop version). The remote functions include:
Play
Stop
Update Software Builds
Receive a Live Screen Capture
Poll Memory Stats
Much More
Under normal circumstances you should not need any further remote functionality. However, it is a good idea to plan for disaster recovery. Part of this plan is to allow for secure remote desktop access to the mediaBOX over the internet.
4.0 Ubuntu Linux Setup and Configuration
User’s Manual Page 39
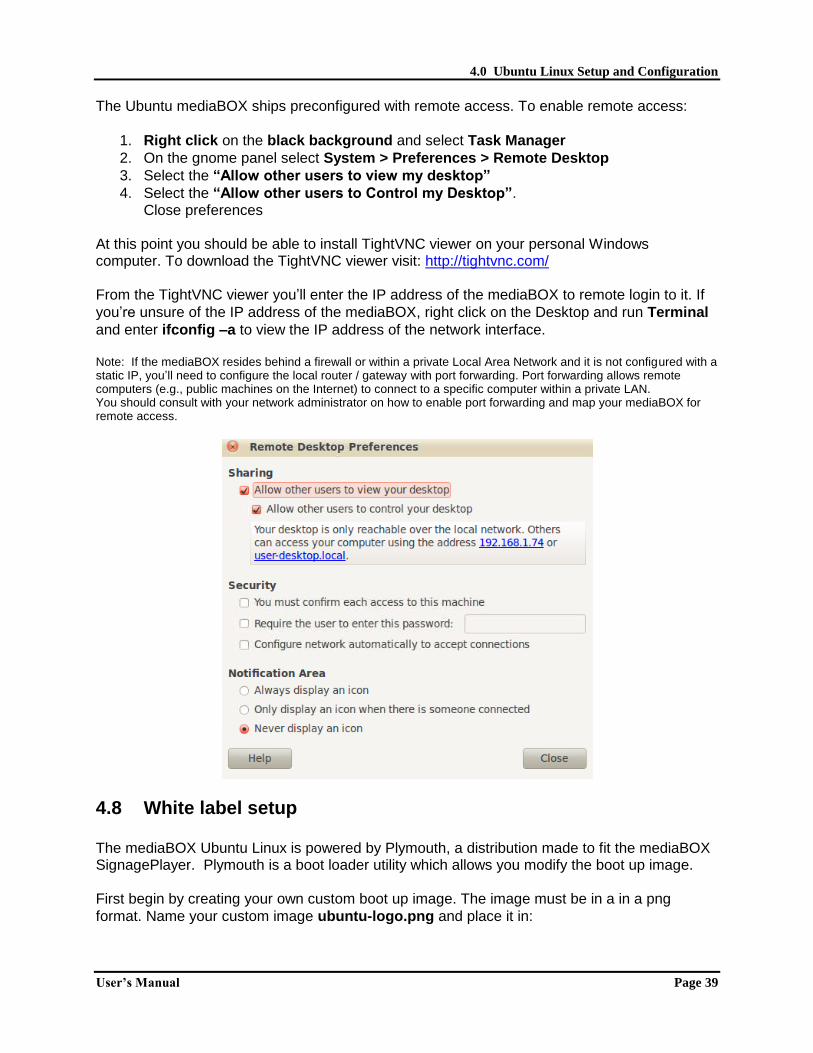
The Ubuntu mediaBOX ships preconfigured with remote access. To enable remote access:
1. Right click on the black background and select Task Manager
2. On the gnome panel select System > Preferences > Remote Desktop
3. Select the “Allow other users to view my desktop”
4. Select the “Allow other users to Control my Desktop”. Close preferences
At this point you should be able to install TightVNC viewer on your personal Windows computer. To download the TightVNC viewer visit: http://tightvnc.com/ From the TightVNC viewer you’ll enter the IP address of the mediaBOX to remote login to it. If
you’re unsure of the IP address of the mediaBOX, right click on the Desktop and run Terminal
and enter ifconfig –a to view the IP address of the network interface. Note: If the mediaBOX resides behind a firewall or within a private Local Area Network and it is not configured with a static IP, you’ll need to configure the local router / gateway with port forwarding. Port forwarding allows remote computers (e.g., public machines on the Internet) to connect to a specific computer within a private LAN. You should consult with your network administrator on how to enable port forwarding and map your mediaBOX for remote access.
4.8 White label setup The mediaBOX Ubuntu Linux is powered by Plymouth, a distribution made to fit the mediaBOX SignagePlayer. Plymouth is a boot loader utility which allows you modify the boot up image. First begin by creating your own custom boot up image. The image must be in a in a png
format. Name your custom image ubuntu-logo.png and place it in:

4.0 Ubuntu Linux Setup and Configuration
User’s Manual Page 40
/lib/Plymouth/ Once the image has been copied you’ll need to update the system with the following command:
update-initramfs –u This will apply your new custom bootup image as part of the internal system. Reboot the mediaBOX Media Player. You should be able to preview your image as part of the boot up and shutdown process.

5.0 Monitoring and Administration
User’s Manual Page 41
5.0 Monitoring and Administration

5.0 Monitoring and Administration
User’s Manual Page 42
5.1 Signage Controller The SignageController (also known as SignageController) is a vital part of the Media Player software suit. It insures that the SignagePlayer is running at all times and monitors the health status of the player. It is also responsible for rebooting the SignagePlayer, provides remote snapshots and more. You should confirm that the SignageController is running. You can tell if the SignageController is running using two methods: Method1: Using the SignageStudio switch to “Stations” and view the data grid. Each connected SignagePlayer is marked with a colored LED. If the LED icon is marked in yellow, it means that the SignagePlayer is connected to the backend server; however the SignageController is not running. A Red LED means the SignagePlayer is not connecting and a Green LED means that all systems are good; SignageController is running and the SignagePlayer is connected.
Method 2: Simply by looking at the graphical user interface of the SignagePlayer you can tell the status of both SignageController and status connection to the backend server.
5.2 Real time snapshots The SignagePlayer allows you to get live real time snapshot. These snapshots are a great tool to see what is running at a specific location. To get a live snapshot the SignageController must
be running. In the SignageStudio go to “Stations” and click on the camera icon to get a live preview of the remote SignagePlayer Desktop version.


![CONCEPT DEVELOPMENT · Stair Core Cladding Signage / Branding 01 illuminated signage 02 paint applied 03 extruded signage [block lettering] 04 neon signage 05 extruded signage [back](https://static.fdocuments.us/doc/165x107/5fb95a0d7a42e557e94b787a/concept-development-stair-core-cladding-signage-branding-01-illuminated-signage.jpg)