User's Guide - Alienware - Custom Gaming Computers - PC Gaming At

User's Manual
IM 77C01Y01-01E
POWERCERT PC parameter setting tool (For the PR300, UPM100, and UPM101)
IM 77C01Y01-01E 4th Edition

<Toc> <Ind> <Rev> i
IM 77C01Y01-01E
Foreword Thank you for purchasing the POWERCERT Power and Energy Meter. This manual explains how to set up the POWERCERT PC Parameter Setting Tool and use it basically on Windows. Please read this manual carefully before operating the PC Parameter Setting Tool to ensure its correct use. After you have read this manual, keep it in a safe place where it can be referred to anytime a question arises. For specifications and operations of the product, refer to the user’s manual provided with the product. This manual does not explain the basic operations of operating system. For the basic operations of the operating system, read the user’s guide of Windows.
Notes • The contents of this manual are subject to change without prior notice as a result of
continuing improvements to the performance and functions. • Every effort has been made in the preparation of this manual to ensure the accuracy
of its contents. However, should you have any questions or find any errors, please contact your nearest YOKOGAWA dealer.
• Copying or reproducing all or any part of the contests of this manual without the permission of Yokogawa Electric Corporation is strictly prohibited.
• Yokogawa Electric Corporation shall not be held responsible by any party for any losses or damage, direct or indirect, caused by the use or any unpredictable defect of the product.
Copyright Yokogawa Electric Corporation holds the copyright to the software.
Trademarks • All the brands or names of Yokogawa Electric’s products used in this manual are
either trademarks or registered trademarks of Yokogawa Electric Corporation. • Microsoft and Windows are either registered trademarks or trademarks of Microsoft
Corporation in the United States and/or other countries. • Adobe and Adobe Acrobat are trademarks of Adobe Systems Incorporated (Adobe
Systems). • Other company names and product names used in this manual are either registered
trademarks or trademarks of their respective holders.
Revisions 1st Edition May 2006 2nd Edition Feb. 2008 3rd Edition Sep. 2014 4th Edition Jan. 2020
4th Edition: Jan. 2020 (YK) All Rights Reserved, Copyright © 2006 Yokogawa Electric Corporation

<Toc> <Ind> Toc-1
IM 77C01Y01-01E
CONTENTS Foreword ............................................................................................................ i
1. Before Using the Software ......................................................... 1-1
1.1 Overview of the Configuration Software ........................................... 1-1 1.2 PC System Requirements .................................................................. 1-2 1.3 Installing the Software ....................................................................... 1-3 1.4 Connecting the Power and Energy Meter and the PC ...................... 1-4
2. Configuring the Power and Energy Meter ................................. 2-1
2.1 Starting/Closing the Software and Showing Version Information ... 2-1 2.2 Setting the Communication Mode for Connecting to the Power and
Energy Meter ........................................................................................ 2-2 2.3 Receiving the Setup Data or Creating New Setup Data ..................... 2-3 2.4 Sending the Setup Data ...................................................................... 2-7 2.5 Saving the Setup Data ....................................................................... 2-11 2.6 Printing the Setup Data ..................................................................... 2-12
3. Receiving or Setting the Energy Value ...................................... 3-1
POWERCERT PC parameter setting tool
IM 77C01Y01-01E 4th Edition

<Toc> <Ind> <1. Before Using the Software> 1-1
IM 77C01Y01-01E
1. Before Using the Software 1.1 Overview of the Configuration Software
The POWERCERT PC Parameter Setting Tool is the software having the following functions.
Function • Send and receive the parameter settings. • Set the display pattern (for the PR300 only). • Set and reset the energy value online. • Save the setup data to a file. • Edit the setup data. • Print the setup data.
Flow of Operation The flow of operation of the software is shown below.
To change the settings of thepower and energy meter
Connecting the power and energymeter and the PC
Starting the software
To change a setup data file
Setting the communication mode
Receiving the setup data of thepower and energy meter Opening a setup data file
Changing the settings
Sending setup data to the powerand energy meter Saving the setup data
(Section 1.4)
(Section 2.1)
(Section 2.2)
(Section 2.3) (Section 2.3)
(Section 2.3)
(Section 2.4) (Section 2.5)
Figure1.1 Flow of Operation

<Toc> <Ind> <1. Before Using the Software> 1-2
IM 77C01Y01-01E
1.2 PC System Requirements Table1.1 PC System Requirements
OS Windows 8.1 Pro (English version) (32bit/64bit)
Windows 10 Pro (64bit)
CPU 1.6 GHz or higher processor or SoC
Recommended Main Memory
4 GB or more
Hard Disk Free hard disk space: 1 GB or more
Communication Port
An RS-232 port (for Modbus/RTU) or an Ethernet port (for Modbus/TCP) supported by the OS.
For communication connection by Modbus/RTU (RS-485), use the RS-232/RS-485 communication converter.
Yokogawa’s ML2 RS-232C/RS-485 converter recommended.
Display A display supported by the OS.
Printer A printer supported by the OS. An appropriate printer driver for the OS is also required.
Note) Yokogawa will also stop supporting OSs that Microsoft Corporation no longer supports.

<Toc> <Ind> <1. Before Using the Software> 1-3
IM 77C01Y01-01E
1.3 Installing the Software Switch on a PC. Start Windows. Log onto Windows as an administrator. Exit memory resident programs such as virus protection programs before installation. When reinstalling the software, uninstall it first. Double-click “Add/Remove Programs” in the Control Panel and uninstall the software. As necessary, back up the setup data files with .P3D and .U1D extension. Please download the setup file after registering as a member in Partner Portal from the following URL. https://partner.yokogawa.com/global/ Please double-click the downloaded file to install the software.
Step1 Double-click PRCNFG_E_R*****.exe. (*****: Revision)
Step2 The User Account Control screen appears. Click Yes.
Step3 To continue, follow the message given in each dialog box.

<Toc> <Ind> <1. Before Using the Software> 1-4
IM 77C01Y01-01E
1.4 Connecting the Power and Energy Meter and the PC The following three methods are available for connecting the power and energy meter and the PC.
Serial Communication Connection
Figure1.2 Example of Serial Communication Connection
Ethernet Communication Connection (for the PR300 Only)
Figure1.3 Example of Ethernet Communication Connection

<Toc> <Ind> <1. Before Using the Software> 1-5
IM 77C01Y01-01E
Connection Using Ethernet-serial Gateway Function (for the PR300 Only)
Figure1.4 Example of Connection Using Ethernet-serial Gateway Function
For details of connection, refer to the user’s manual of each product.
About the connection to the UPM100
UPM100 Power Monitor User’s Manual <Installation>: IM 77C01H01-01E Communication connection in Chapter 4, “External Wiring”
About the connection to the UPM101
UPM101 Power Monitor User’s Manual <Installation>: IM 77C01J01-01E Communication connection in Chapter 4, “External Wiring”
About the connection to the PR300
PR300 Power and Energy Meter Startup Manual <Installation>: IM 77C01E01-02E Communication connection in Section 2.6, “Other Wiring” or PR300 Power and Energy Meter User’s Manual: IM 77C01E01-01E Communication connection in “Other Wiring” in Section 1.3, “Wiring”
The terminal numbers for communication of each product are as follows
A(-) B(+) SG
ML2 3 4 5
PR300 18 19 20
UPM100/UPM101 10 9 8
Terminal symbol Model

<Toc> <Ind> <2. Configuring the Power and Energy Meter> 2-1
IM 77C01Y01-01E
2. Configuring the Power and Energy Meter 2.1 Starting/Closing the Software and Showing
Version Information
Starting the Software From the task bar, click Start, point to All programs > Powercert, and choose PC parameter setting tool. The software starts.
Figure2.1 Model and Suffix Codes Screen (Example Screen of the PR300)
Closing the Software From the File menu, choose Exit, or click the X button. The configuration software window closes.
Showing Version Information From the Help menu, choose About. You can also click the About icon ( ) on the toolbar. The About dialog box opens. Click OK to close the About dialog box.
Menu bar
Machine information (for indication only)
Input parameters (for the PR300 only)
Toolbar

<Toc> <Ind> <2. Configuring the Power and Energy Meter> 2-2
IM 77C01Y01-01E
2.2 Setting the Communication Mode for Connecting to the Power and Energy Meter Modbus/RTU (serial communication) and Modbus/TCP (Ethernet communication) are available as communication mode.
1. From the Communication menu, choose Communication Setting. You can also click the Communication Setting icon on the toolbar. The Communication Setting dialog box opens.
2. Select the communication mode. Set the communication setting according to the
device. To execute the automatic detect, set the items other than the station number then click Automatic Detect.
Figure2.3 Serial Communication Setting Screen Figure2.4 Ethernet Communication Setting Screen
Figure2.5 Serial Communication Setting Screen
3. Click OK The dialog box closes, and the communication between the PC and the power and
energy meter is enabled. Click Cancel to cancel the settings and close the dialog box.
Note After starting the software, be sure to confirm the communication settings and click OK. Then Receive Setting, Send Setting, and Integral Energy of the Communication menu can be selected.
Select Modbus/RTU
Automatic Detect: 1. Click Start Detection. 2. The connected devices are displayed.
Then click the No. of device to be set. 3. Click OK.
Select Modbus/TCP
When using Ethernet-serial gateway function, enter the station number of serial communication device.

<Toc> <Ind> <2. Configuring the Power and Energy Meter> 2-3
IM 77C01Y01-01E
2.3 Receiving the Setup Data or Creating New Setup Data The following three methods are available for starting to create setup data. • Receive the setup data of the power and energy meter. • Open a setup data file. • Create new setup data.
Receiving the Setup Data of the Power and Energy Meter Before carrying out the following procedure, check to see that the communication mode and parameters are set correctly. For details, see Section 2.2, “Setting the Communication Mode for Connecting to the Power and Energy Meter.”
1. From the Communication menu, choose Receive Setting. You can also click the Receive Setting icon on the toolbar. A confirmation dialog box for receiving settings opens.
2. Click OK. The reception starts. When the reception of the settings is complete, a message
appears to indicate it.
3. Click OK.

<Toc> <Ind> <2. Configuring the Power and Energy Meter> 2-4
IM 77C01Y01-01E
4. The received setup data is displayed.
Figure2.6 Parameter Setting Screen (Example Screen of the PR300)
Figure2.7 Parameter Setting Screen (Example Screen of the UPM100/UPM101)

<Toc> <Ind> <2. Configuring the Power and Energy Meter> 2-5
IM 77C01Y01-01E
Figure2.8 Display Pattern Setting Screen (for the PR300 Only)
Opening a Setup Data File 1. From the File menu, choose Open. You can also click the Open icon on the tool bar.
The Open dialog box opens.
2. Select the desired file, and click Open. The setup data is displayed.
Note The extensions to setup data files are .P3D for the PR300 and .U1D for the UPM100/UPM101.

<Toc> <Ind> <2. Configuring the Power and Energy Meter> 2-6
IM 77C01Y01-01E
Creating New Setup Data 1. From the File menu, choose New. You can also click the New icon on the toolbar.
2. Set the machine information of the power and energy meter. If the set machine information is not correct, the setup data cannot be sent correctly.
Figure2.9 Model and Suffix Codes Screen (Example Screen of the PR300)

<Toc> <Ind> <2. Configuring the Power and Energy Meter> 2-7
IM 77C01Y01-01E
2.4 Sending the Setup Data The following four methods are available for sending the setup data. • Send the input parameters (for the PR300 only). • Send the parameter setting. • Send the display pattern setting (for the PR300 only). • Send collectively (input parameters, parameter setting, and display pattern setting)
Note To send the setup data, set the communication and machine information correctly.
Sending the Input Parameters (for the PR300 Only)
Send only the input parameter data to the device.
1. Set the input parameters, and then click Send Input Parameters. A confirmation dialog box for sending the setting opens.
2. Click OK. The sending starts. When the sending of the input parameters is complete correctly,
a message appears to indicate it.
3. Click OK.

<Toc> <Ind> <2. Configuring the Power and Energy Meter> 2-8
IM 77C01Y01-01E
Sending the Parameter Setting Send the parameter setting data to the device.
1. Set the parameter setting, and then click Send Parameter Setting. A confirmation dialog box for sending the setting opens. (The figure below shows
the Example Screen of the PR300.)
2. Click OK. The sending starts. When the sending of the parameter setting is complete
correctly, a message appears to indicate it.
3. Click OK.

<Toc> <Ind> <2. Configuring the Power and Energy Meter> 2-9
IM 77C01Y01-01E
Sending the Display Pattern Setting (For the PR300 Only) Send the display pattern setting data to the device. 1. Set the display pattern, and then click Send Display Pattern Setting. A confirmation dialog box for sending the setting opens.
2. Click OK. The sending starts. When the sending of the display pattern setting is complete
correctly, a message appears to indicate it.
3. Click OK.

<Toc> <Ind> <2. Configuring the Power and Energy Meter> 2-10
IM 77C01Y01-01E
Sending Collectively (Input Parameters, Parameter Setting, and Display Pattern Setting)
1. From the Communication menu, choose Send Setting. You can also click the Send Setting icon on the toolbar. A confirmation dialog box for sending the setting opens.
2. Click OK. The sending starts. When the sending of the input parameters, parameter setting,
and display pattern setting is complete correctly, a message appears to indicate it.
3. Click OK.

<Toc> <Ind> <2. Configuring the Power and Energy Meter> 2-11
IM 77C01Y01-01E
2.5 Saving the Setup Data Saving to a File by Specifying a Name
The setup data (input parameters, parameter setting, and display pattern setting) can be saved to a file by specifying the file name.
Note The extensions to setup data files are .P3D for the PR300 and .U1D for the UPM100/UPM101.
1. From the File menu, choose Save As. The Save As dialog box opens.
2. Specify the save destination, enter the file name, and click Save. The setup data is saved.
Saving (Overwriting) to the File From the File menu, choose Save. You can also click the Save icon on the toolbar. The setup data is saved (overwritten).
<Toc> <Ind> <2. Configuring the Power and Energy Meter> 2-12
IM 77C01Y01-01E
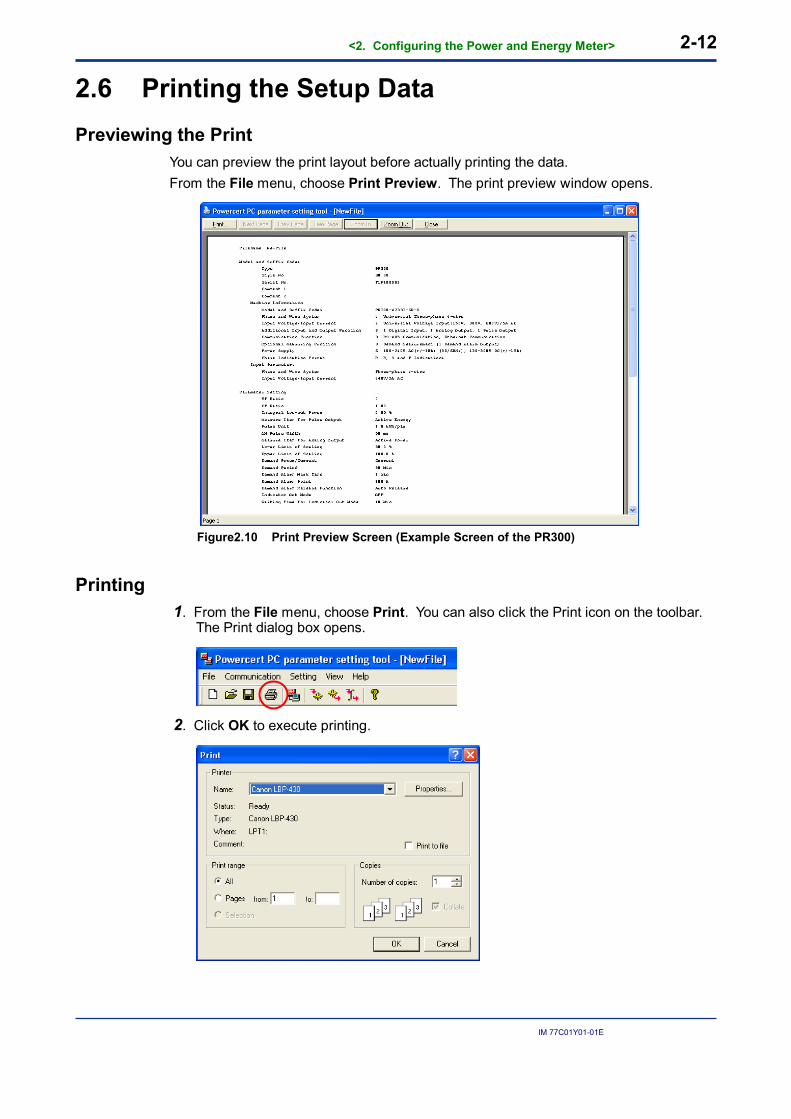
2.6 Printing the Setup Data Previewing the Print
You can preview the print layout before actually printing the data. From the File menu, choose Print Preview. The print preview window opens.
Figure2.10 Print Preview Screen (Example Screen of the PR300)
Printing 1. From the File menu, choose Print. You can also click the Print icon on the toolbar.
The Print dialog box opens.
2. Click OK to execute printing.

<Toc> <Ind> <2. Receiving or Setting the Energy Value> 3-1
IM 77C01Y01-01E
3. Receiving or Setting the Energy Value Before carrying out the following procedure, check to see that the communication mode and parameters are set correctly. For details, see Section 2.2, “Setting the Communication Mode for Connecting to the Power and Energy Meter.” 1. From the Communication menu, choose Integral Energy. You can also click the
Integral Energy icon on the toolbar. A confirmation dialog box for receiving setting opens.
2. Click OK. The reception starts. When the reception of the energy value is complete, a
message appears to indicate it.
3. Click OK. The received setup data is displayed.
Figure3.1 Energy Value Reset Screen
Note Use the energy value setting when the energy value needs to be set to the device in advance.
Sending the energy value: 1. Click the item in the Send
Subject. 2. Enter the energy value when
sending the energy value. 3. Click Send.