User’s Information Manual - Navien
21
WARNING If the information in these instructions is not followed exactly, a fire or explosion may result, causing property damage, personal injury or death. Do not store or use gasoline or other flammable vapors and liquids in the vicinity of this or any other appliance. What to do if you smell gas Do not try to light any appliance. Do not touch any electrical switch; do not use any phone in your building. Immediately call your gas supplier from a neighbor’s phone. Follow the gas supplier’s instructions. If you cannot reach your gas supplier, call the fire department. Installation and service must be performed by a qualified installer, service agency or the gas supplier. The installation must conform with local codes or, in the absence of local codes, the National Fuel Gas Code, ANSIZ223.1/NFPA 54 and/or CSA B149.1, Natural Gas and Propane Installation Code. When applicable, the installation must conform with the Manufactured Home Construction and Safety Standard, Title 24 CFR, Part 3280 and/or CAN/CSA Z240 MH Series, Mobile Homes. User’s Information Manual NPE Condensing Water Heaters Model NPE-180A NPE-210A NPE-240A NPE-150S NPE-180S NPE-210S NPE-240S Keep this manual near this water heater for future reference whenever maintenance or service is required. * The wetted surface of this product contacted by consumable water contains less than one quarter of one percent (0.25%) of lead by weight. *Lead Free
Transcript of User’s Information Manual - Navien
WARNING
If the information in these instructions is not followed exactly, a fire or explosion may result, causingproperty damage, personal injury or death.
Do not store or use gasoline or other flammable vapors and liquids in the vicinity of this or any other appliance.
What to do if you smell gas
Do not try to light any appliance. Do not touch any electrical switch; do not use any phone in your building. Immediately call your gas supplier from a neighbor’s phone. Follow the gas supplier’s instructions. If you cannot reach your gas supplier, call the fire department.
Installation and service must be performed by a qualified installer, service agency or the gas supplier.
The installation must conform with local codes or, in the absence of local codes, the National Fuel Gas Code, ANSIZ223.1/NFPA 54 and/or CSA B149.1, Natural Gas and Propane Installation Code.
When applicable, the installation must conform with the Manufactured Home Construction and Safety Standard, Title 24 CFR, Part 3280 and/or CAN/CSA Z240 MH Series, Mobile Homes.
User’s Information ManualNPE Condensing Water Heaters
Model NPE-180ANPE-210ANPE-240ANPE-150SNPE-180SNPE-210SNPE-240S
Keep this manual near this water heater for future reference whenever maintenance or service is required.* The wetted surface of this product contacted by consumable water contains
less than one quarter of one percent (0.25%) of lead by weight.*Lead Free
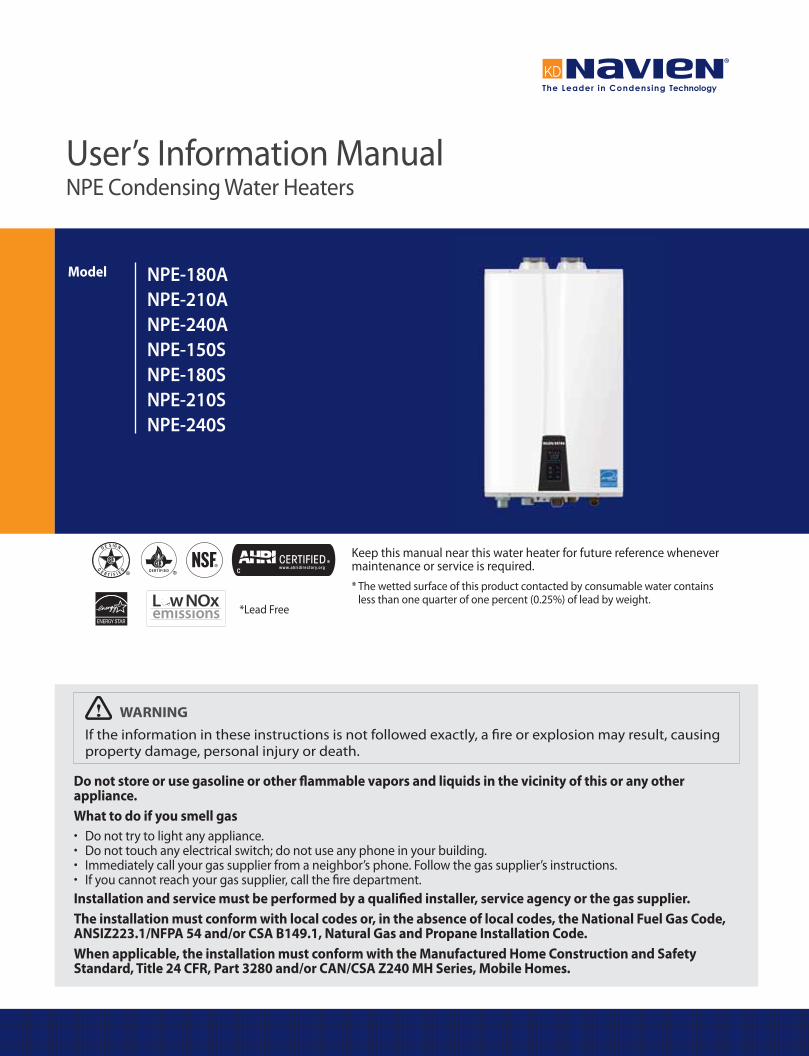
2 Contents
Contents
1. Safety Information 3
2. About the Water Heater 6
2.1 Description of the Water Heater 6
2.2 Parts of the Water Heater 6
2.3 The Front Panel 7
3. Operating the Water Heater 8
3.1 Turning the Water Heater On or Off 8
3.2 Adjusting the Water Temperature 8
3.3 Viewing Basic Information 9
3.4 Resetting the Water Heater 9
4. Maintaining the Water Heater 10
4.1 Cleaning the Water Heater 10
4.2 Draining the Water Heater 10
4.3 Flushing the Heat Exchanger 11
4.4 Cleaning the Inlet Water Filter and Recirculation Inlet Filter 12
4.5 Cleaning the Air Intake Filter 13
4.6 Protecting the Water Heater from Freezing 14
5. Troubleshooting 15
5.1 Solving Basic Problems 15
5.2 Understanding Error Codes 16
Safety Information 3
WARNING
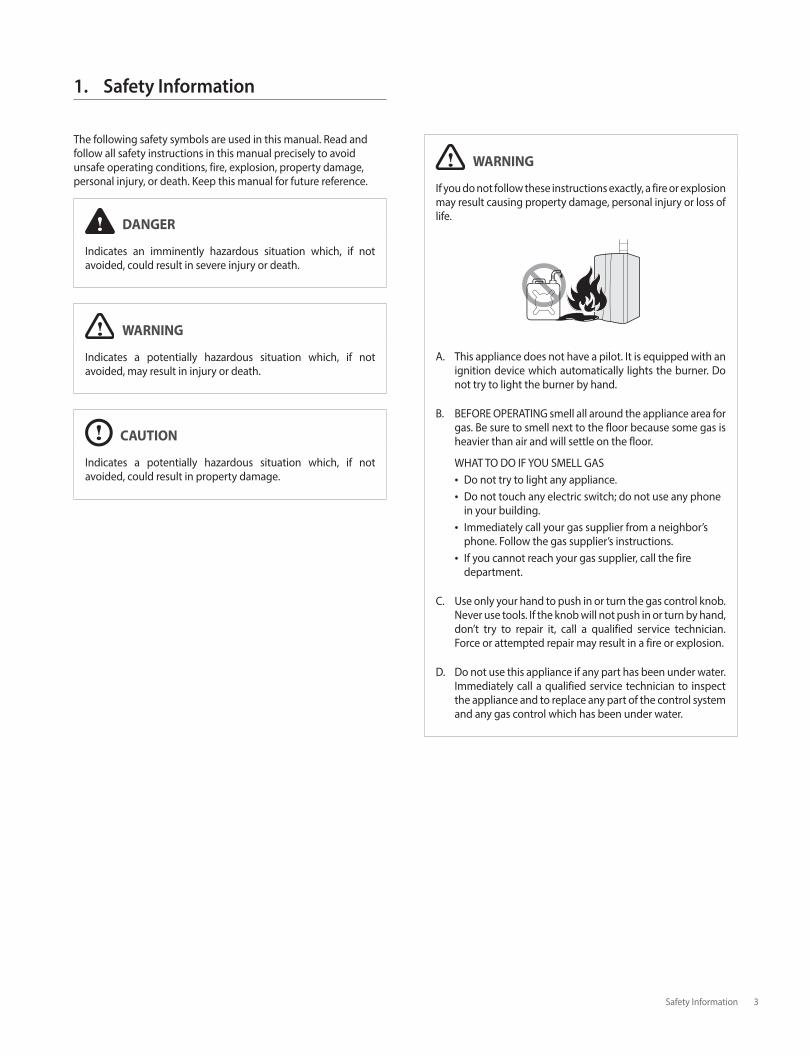
If you do not follow these instructions exactly, a fire or explosion may result causing property damage, personal injury or loss of life.
A. This appliance does not have a pilot. It is equipped with an ignition device which automatically lights the burner. Do not try to light the burner by hand.
B. BEFORE OPERATING smell all around the appliance area for gas. Be sure to smell next to the floor because some gas is heavier than air and will settle on the floor.
WHAT TO DO IF YOU SMELL GAS Do not try to light any appliance. Do not touch any electric switch; do not use any phone
in your building. Immediately call your gas supplier from a neighbor’s
phone. Follow the gas supplier’s instructions. If you cannot reach your gas supplier, call the fire
department.
C. Use only your hand to push in or turn the gas control knob. Never use tools. If the knob will not push in or turn by hand, don’t try to repair it, call a qualified service technician. Force or attempted repair may result in a fire or explosion.
D. Do not use this appliance if any part has been under water. Immediately call a qualified service technician to inspect the appliance and to replace any part of the control system and any gas control which has been under water.
The following safety symbols are used in this manual. Read and follow all safety instructions in this manual precisely to avoid unsafe operating conditions, fire, explosion, property damage, personal injury, or death. Keep this manual for future reference.
DANGER
Indicates an imminently hazardous situation which, if not avoided, could result in severe injury or death.
WARNING
Indicates a potentially hazardous situation which, if not avoided, may result in injury or death.
CAUTION
Indicates a potentially hazardous situation which, if not avoided, could result in property damage.
1. Safety Information

4 Safety Information
DANGER
This water heater is set to 120 °F (49 °C) at the factory for your safety and comfort. Increasing the temperature increases the risk of accidental scalding. Water temperatures at or above 125 °F (52 °C) can cause instant scalding, severe burns, or death. Before you decide to change the temperature setting, read the following charts carefully.
Water
Temperature
Time in which a young child can suffer a
full thickness (3rd degree) burn
160 °F (70 °C) Less than 1 second
140 °F (60 °C) 1 second
130 °F (55 °C) 10 second
120 °F (49 °C) 10 minutes
100 °F (37 °C) very low scald risk
Before setting the temperature at or above 125 °F (52 °C), consider installing a thermostatically-controlled mixing valve or temperature-limiting valve. Contact a licensed plumber or your local plumbing authority for more information.
California law requires the following Prop 65 warning to be provided:
WARNING
This product can expose you to chemicals including lead, lead compounds, and carbon bisulfide which are known to the
State of California to cause cancer and birth defects or other reproductive harm. For more information, go to
www.P65Warnings.ca.gov.
DANGER
HOT
BURN
To prevent burns:
Use the lowest operating temperature setting necessary to provide comfortably-hot water.
If your household has children or elderly or disabled residents, consider using a lower temperature setting.
Do not leave children, elderly, or disabled persons unsupervised.
Do not allow small children to play unsupervised in the bathroom.
Do not allow anyone to change the water temperature while hot water is running.
Read all the instructions in this manual carefully before changing the temperature setting.
Feel the water before using it on children, the elderly, or the disabled.
If it is necessary to set the water heater above 125 °F (52 °C), have a temperature-limiting valve or mixing valve installed on the water heater.
Safety Information 5
CAUTION
Do not attempt to repair or replace any part of the water heater, unless it is specifically recommended in this manual.
For all other service, contact an authorized technician or licensed professional. Improper adjustments, alterations, service, or maintenance may lead to property damage, personal injury, or death and will void your warranty.
Do not operate the water heater if you feel something is wrong with it. Doing so may result in product damage or personal injury.
Do not allow children to operate or access the water heater. Doing so may result in product damage or personal injury.
Do not attempt to change the water temperature while the water heater is being used. Doing so may result in personal injury.
Do not turn on the water heater unless the water and gas supplies are fully opened. Doing so may damage the water heater.
Do not turn on the water if the cold water supply shut-off valve is closed. Doing so may damage the water heater.
Do not use this water heater for anything other than its intended purpose, as described in this manual.
Do not remove the front cover unless the power to the water heater is turned off or disconnected.
Failure to do so may result in electric shock.
When servicing the controls, label all wires prior to disconnecting them.
Failure to do so may result in wiring errors, which can lead to improper or dangerous operation.
Do not use unapproved replacement or accessory parts. Doing so may result in improper or dangerous operation and will void the manufacturer’s warranty.
Do not place anything in or around the vent terminals, such as a clothes line, that could obstruct the air flow in or out of the water heater.
This water heater has been approved for use in the USA and Canada only. Using the water heater in any other country will void the manufacturer’s warranty.
Should overheating occur or the gas supply fail to shut off, turn off the manual gas valve to the appliance.
Do not use this appliance if any part has been under water.
Immediately call a qualified service technician to inspect the appliance and to replace any part of the control system and any gas control which has been under water.
WARNING
Shut off the gas supply if the water heater is damaged.
Have your installer or plumber show you the location of the gas shut off valve and demonstrate how to close the valve. If the water heater is damaged as a result of overheating, fire, flood, or any other reason, close the manual shut off valve and do not operate the water heater again until it has been inspected by a qualified technician.
Do not store or use gasoline or other flammable liquids
near this water heater.
Doing so may result in fire or explosion.
Do not place combustibles, such as newspapers or
laundry, near the water heater or venting system.
Doing so may result in a fire.
Do not place or use hair sprays, spray paints, or any other
compressed gases near the water heater or venting
system, including the vent termination.
Doing so may result in fire or explosion.
Do not operate the water heater with the front cover
opened. Doing so may result in fire or carbon monoxide (CO) poisoning, which may result in property damage, personal injury, or death.
Do not operate this water heater without proper venting. Doing so may result in fire or carbon monoxide (CO) poisoning, which may result in property damage, personal injury, or death. Inspect the vent termination and air intake supply annually to ensure proper operation of the water heater. Turn off and discontinue use of the water heater if any of the vent pipes, vent elbows, or intake pipes are damaged in any way, separated at a joint, or show evidence of corrosion, rusting, or melting.
Do not touch the power cord or internal components of
the water heater with wet hands.
Doing so may result in electric shock.
6 About the Water Heater
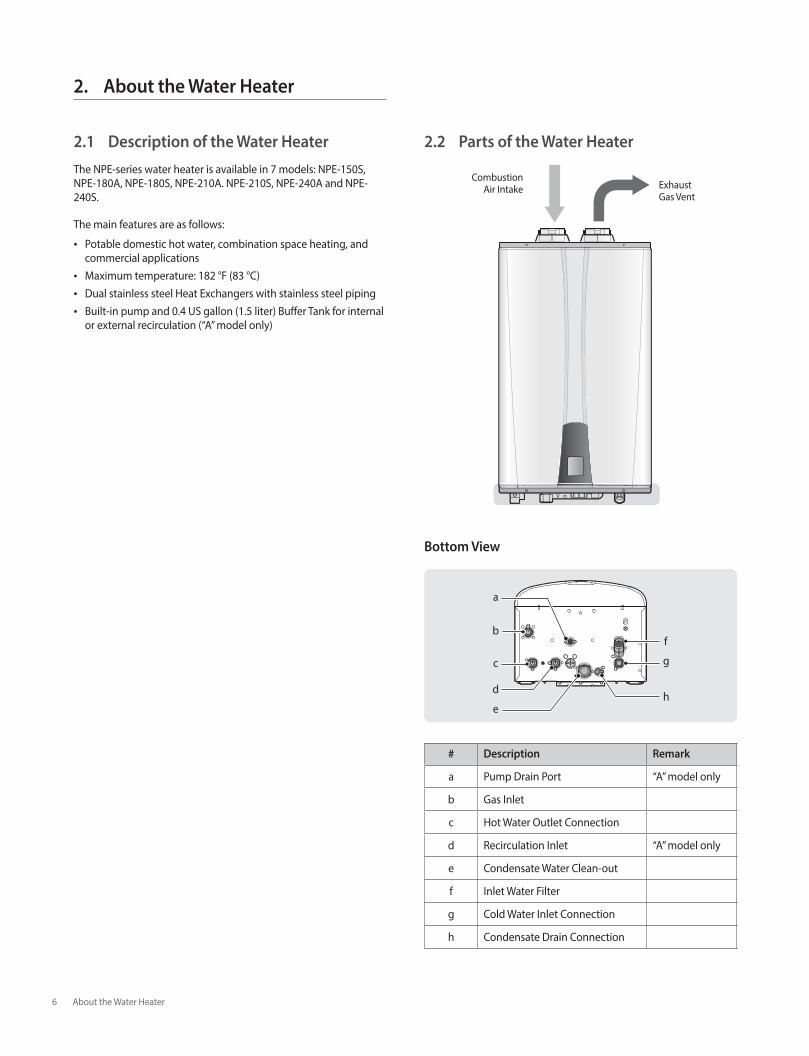
2.2 Parts of the Water Heater
Exhaust Gas Vent
Combustion Air Intake
Bottom View
a
b
c
d
e
f
g
h
# Description Remark
a Pump Drain Port “A” model only
b Gas Inlet
c Hot Water Outlet Connection
d Recirculation Inlet “A” model only
e Condensate Water Clean-out
f Inlet Water Filter
g Cold Water Inlet Connection
h Condensate Drain Connection
2.1 Description of the Water Heater
The NPE-series water heater is available in 7 models: NPE-150S, NPE-180A, NPE-180S, NPE-210A. NPE-210S, NPE-240A and NPE-240S.
The main features are as follows: Potable domestic hot water, combination space heating, and
commercial applications Maximum temperature: 182 °F (83 °C) Dual stainless steel Heat Exchangers with stainless steel piping Built-in pump and 0.4 US gallon (1.5 liter) Buffer Tank for internal
or external recirculation (“A” model only)
2. About the Water Heater
About the Water Heater 7
a
b
c
d
e
f
g
h
i
j
k
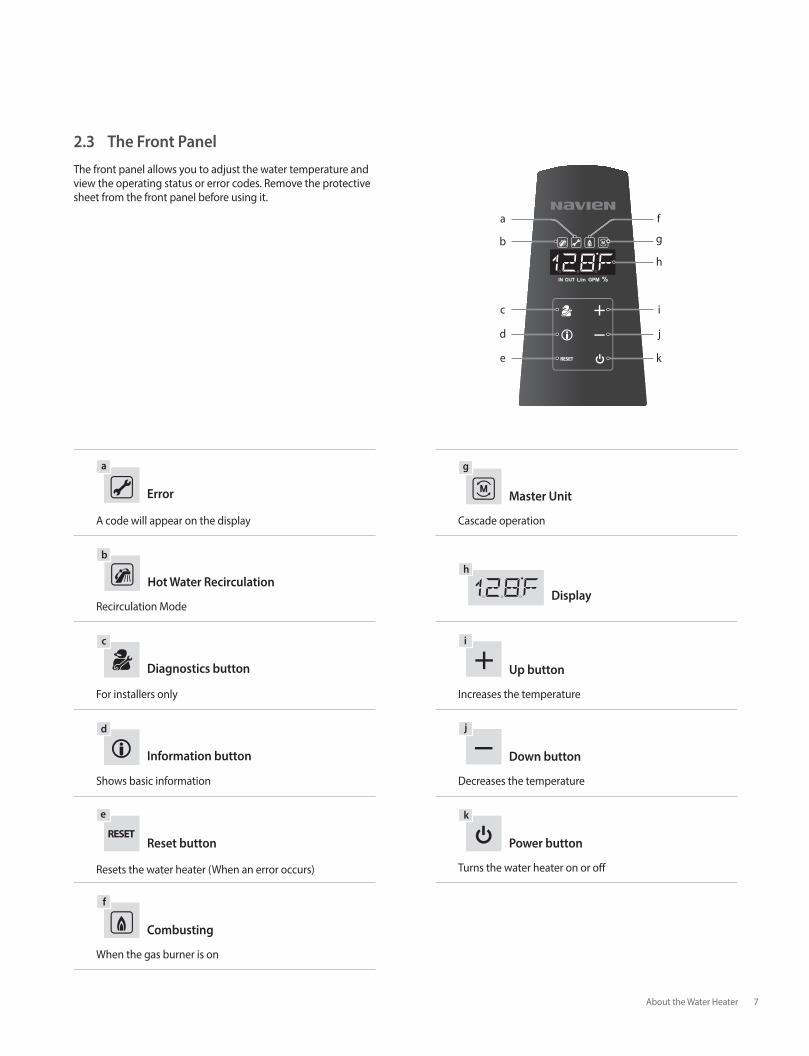
2.3 The Front Panel
The front panel allows you to adjust the water temperature and view the operating status or error codes. Remove the protective sheet from the front panel before using it.
a
Error
g
Master Unit
A code will appear on the display Cascade operation
b
Hot Water Recirculationh
DisplayRecirculation Mode
c
Diagnostics button
i
Up button
For installers only Increases the temperature
d
Information button
j
Down button
Shows basic information Decreases the temperature
e
Reset button
k
Power button
Resets the water heater (When an error occurs) Turns the water heater on or off
f
Combusting
When the gas burner is on
8 Operating the Water Heater
3.2 Adjusting the Water Temperature
WARNING
Before adjusting the water temperature, read “To prevent burns:” on page 4 carefully. Water above 120 °F can cause instant scalding, severe burns, or death.
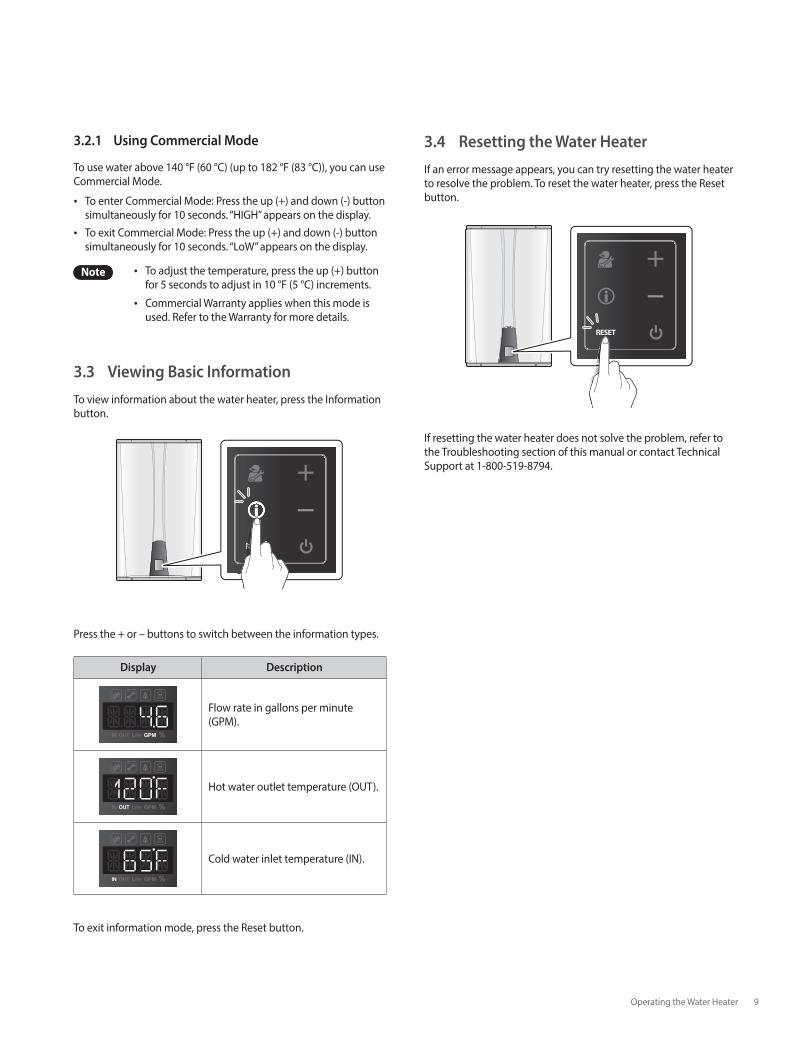
The water heater is set to 120 °F (49 °C) by default. To adjust the water temperature:
1. Make sure that all hot water faucets are closed, and ensure that the internal circulator and any external circulating pumps are off.
Note If a hot water faucet is open, you can adjust the temperature only from 98-110 °F (37-43 °C).
2. Press the + (Up) or – (Down) buttons until the desired temperature appears on the display. You can adjust the temperature while the display is flashing. Once the display stops flashing, the temperature setting is stored.
Note The water heater will retain your settings during a power outage.
You can adjust the temperature by the below 10-degree increments, depending on the temperature range:
Temperature rangeAdjusting the water
temperature
98 °F-120 °F (Fahrenheit mode)36 °C-50 °C (Celsius mode) 1 °F or 0.5 °C increments
120 °F-140 °F (Fahrenheit mode)50 °C-60 °C (Celsius mode)
Press for 2 seconds to adjust in 5 °F or 2 °C increments
The water heater will not provide hot water instantly at the hot water faucet unless a recirculation line has been installed from the furthest fixture back to the water heater. For “A” models, the unit must be set to “external recirculation” mode.
WARNING
Follow the instructions below to avoid unsafe operatingconditions that could cause property damage, severe personalinjury, or death.
Ensure that the water heater is filled with water before turning on the water heater.
If overheating occurs or the gas supply fails to shut off, shut off the gas supply to the water heater at the manual gas valve.
If any part of the water heater has been submerged in water, do not use this appliance and immediately call a qualified service technician. The water heater must be replaced.
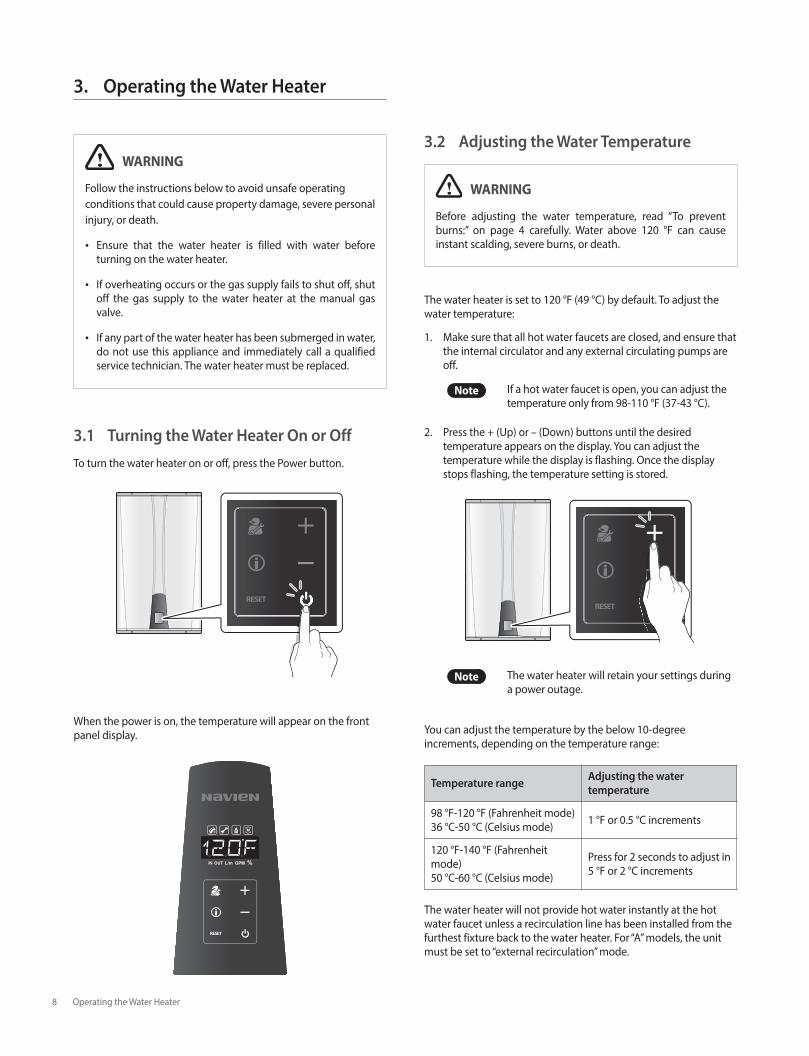
3.1 Turning the Water Heater On or Off
To turn the water heater on or off, press the Power button.
When the power is on, the temperature will appear on the front panel display.
3. Operating the Water Heater
Operating the Water Heater 9
3.4 Resetting the Water Heater
If an error message appears, you can try resetting the water heater to resolve the problem. To reset the water heater, press the Reset button.
If resetting the water heater does not solve the problem, refer to the Troubleshooting section of this manual or contact Technical Support at 1-800-519-8794.
3.2.1 Using Commercial Mode
To use water above 140 °F (60 °C) (up to 182 °F (83 °C)), you can use Commercial Mode.
To enter Commercial Mode: Press the up (+) and down (-) button simultaneously for 10 seconds. “HIGH” appears on the display.
To exit Commercial Mode: Press the up (+) and down (-) button simultaneously for 10 seconds. “LoW” appears on the display.
Note To adjust the temperature, press the up (+) button for 5 seconds to adjust in 10 °F (5 °C) increments.
Commercial Warranty applies when this mode is used. Refer to the Warranty for more details.
3.3 Viewing Basic Information
To view information about the water heater, press the Information button.
Press the + or – buttons to switch between the information types.
Display Description
Flow rate in gallons per minute (GPM).
Hot water outlet temperature (OUT).
Cold water inlet temperature (IN).
To exit information mode, press the Reset button.

10 Maintaining the Water Heater
4.1 Cleaning the Water Heater
CAUTION
Make sure the water heater is turned off and the power supply is disconnected before cleaning the water heater. The water heater may remain hot for several minutes after it is turned off. To prevent burns, wait until the water heater has cooled down before cleaning.
To clean the water heater, wipe the outside with a damp cloth. Use a non-acidic, non-abrasive cleaner to remove any surface stains. The front panel is moisture resistant, but it is not waterproof. Keep it as dry as possible.
4.2 Draining the Water Heater
You need to drain the water heater before performing maintenance tasks, such as cleaning the inlet water filter, or to prevent the water heater from freezing when it will not be used for an extended period.
Refer to the “2.2 Parts of the Water Heater” on page 6 for details about part locations.
To drain the water heater:
1. Place a bucket under the water heater, to collect the residual water inside the water heater.
2. Press the Power button on the front panel to turn off the power to the water heater.
3. Close the gas valve.
OpenedGas Valve
Closed
4. Close the water supply valve on the inlet to the water heater. If there is no valve, turn off the water supply at the water main.
5. Open all hot water faucets completely. The water that remains in the plumbing lines will drain out.
4. Maintaining the Water Heater
Maintaining the Water Heater 11
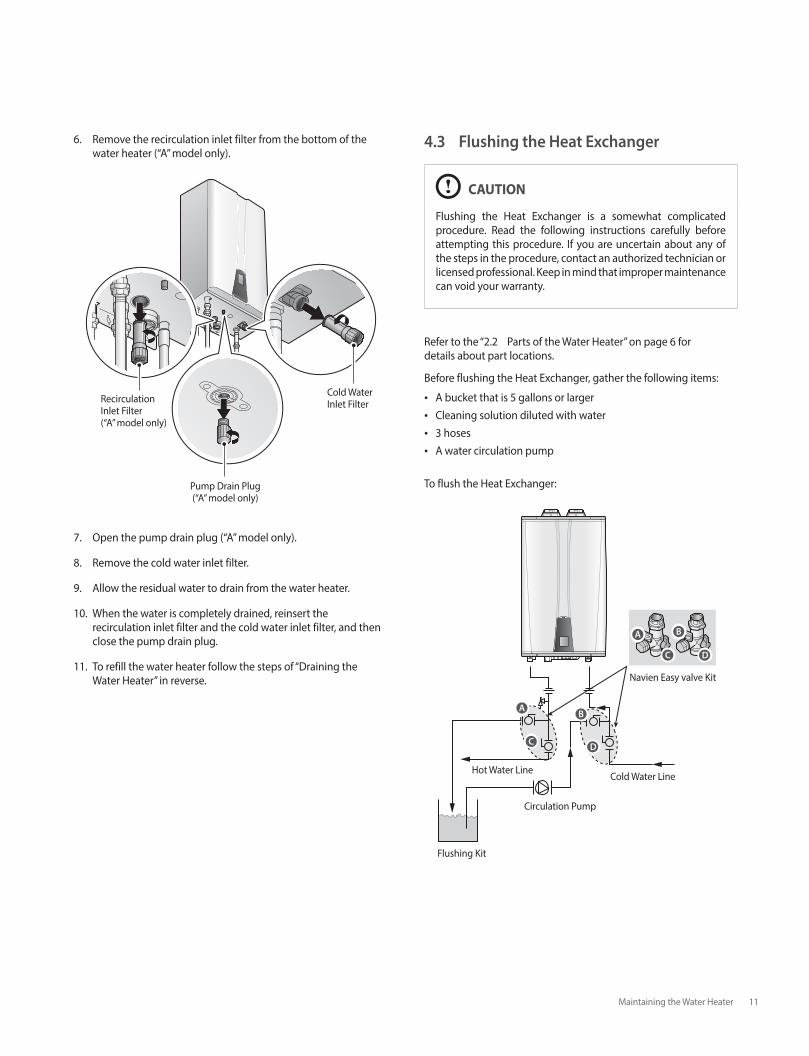
4.3 Flushing the Heat Exchanger
CAUTION
Flushing the Heat Exchanger is a somewhat complicated procedure. Read the following instructions carefully before attempting this procedure. If you are uncertain about any of the steps in the procedure, contact an authorized technician or licensed professional. Keep in mind that improper maintenance can void your warranty.
Refer to the “2.2 Parts of the Water Heater” on page 6 for details about part locations.
Before flushing the Heat Exchanger, gather the following items: A bucket that is 5 gallons or larger Cleaning solution diluted with water 3 hoses A water circulation pump
To flush the Heat Exchanger:
A
A
B
B
C
C
D
D
Navien Easy valve Kit
Cold Water LineHot Water Line
Circulation Pump
Flushing Kit
6. Remove the recirculation inlet filter from the bottom of the water heater (“A” model only).
Recirculation Inlet Filter(“A” model only)
Pump Drain Plug(“A” model only)
Cold Water Inlet Filter
7. Open the pump drain plug (“A” model only).
8. Remove the cold water inlet filter.
9. Allow the residual water to drain from the water heater.
10. When the water is completely drained, reinsert the recirculation inlet filter and the cold water inlet filter, and then close the pump drain plug.
11. To refill the water heater follow the steps of “Draining the Water Heater” in reverse.
12 Maintaining the Water Heater
1. Press the Power button on the front panel to turn off the water heater.
2. Disconnect the power supply to the water heater.
3. Close the “C” and “D” valves on the hot and cold water lines.
4. Connect one tube to the “A” valve and place the free end in the bucket.
5. Connect one of the tubes to the circulation pump outlet and the cold water line at the “B” valve.
6. Connect one tube to the circulation pump inlet and place the free end in the bucket.
7. Pour the cleaning solution into the bucket.
8. Open both “A” and “B” valves.
9. Turn on the circulation pump and allow the solution to circulate through the water heater for at least 45 minutes.
10. Rinse the cleaning solution from the water heater:a. Remove the free end of the drain tube from the bucket and
place it in the condensate drain or laundry tub (wherever the water heater drains).
b. Close the “B” valve and open the “D” valve. Do not open the “C” valve yet.
c. Allow water to flow through the water heater for 5 minutes.d. Close the “A” valve and open the “C” valve.
11. Disconnect all tubes.
12. Remove the cold water inlet filter from the water heater and clean out any residue.
13. Reinsert the filter and ensure the filter cap is securely tightened.
14. Reconnect the power supply to the Water Heater.
15. Press the Power button on the front panel to turn on the water heater.
4.4 Cleaning the Inlet Water Filter and Recirculation Inlet Filter
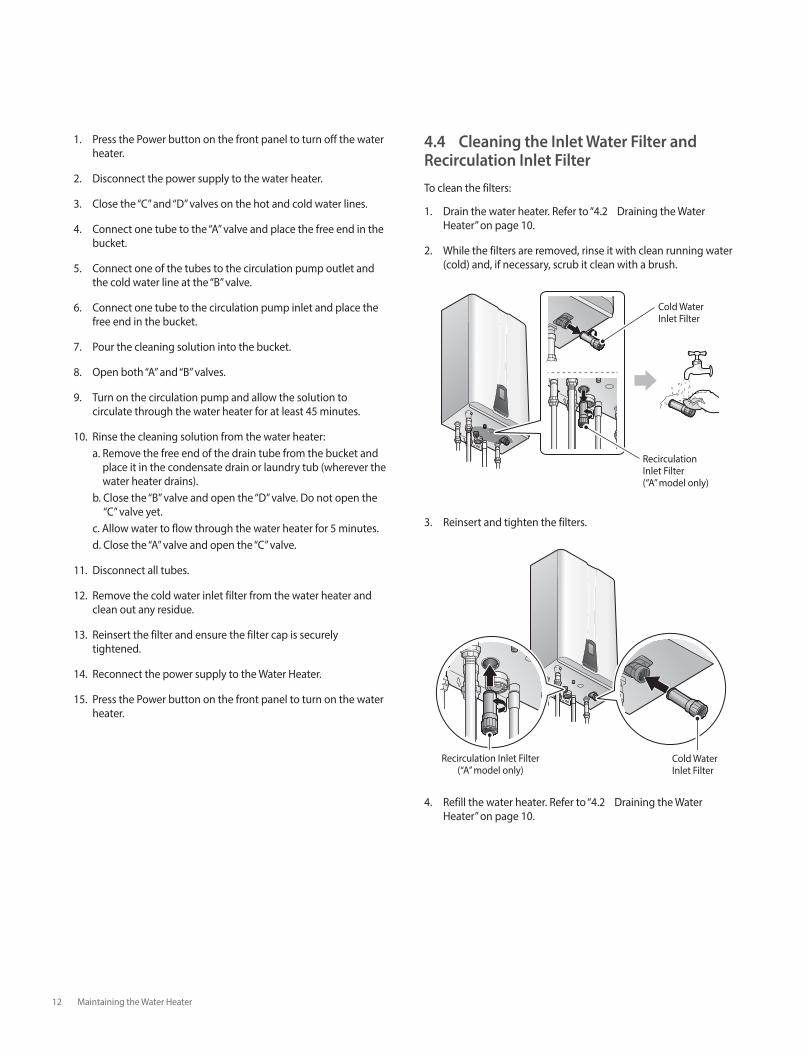
To clean the filters:
1. Drain the water heater. Refer to “4.2 Draining the Water Heater” on page 10.
2. While the filters are removed, rinse it with clean running water (cold) and, if necessary, scrub it clean with a brush.
Cold Water Inlet Filter
Recirculation Inlet Filter(“A” model only)
3. Reinsert and tighten the filters.
4. Refill the water heater. Refer to “4.2 Draining the Water Heater” on page 10.
Cold Water Inlet Filter
Recirculation Inlet Filter(“A” model only)
Maintaining the Water Heater 13
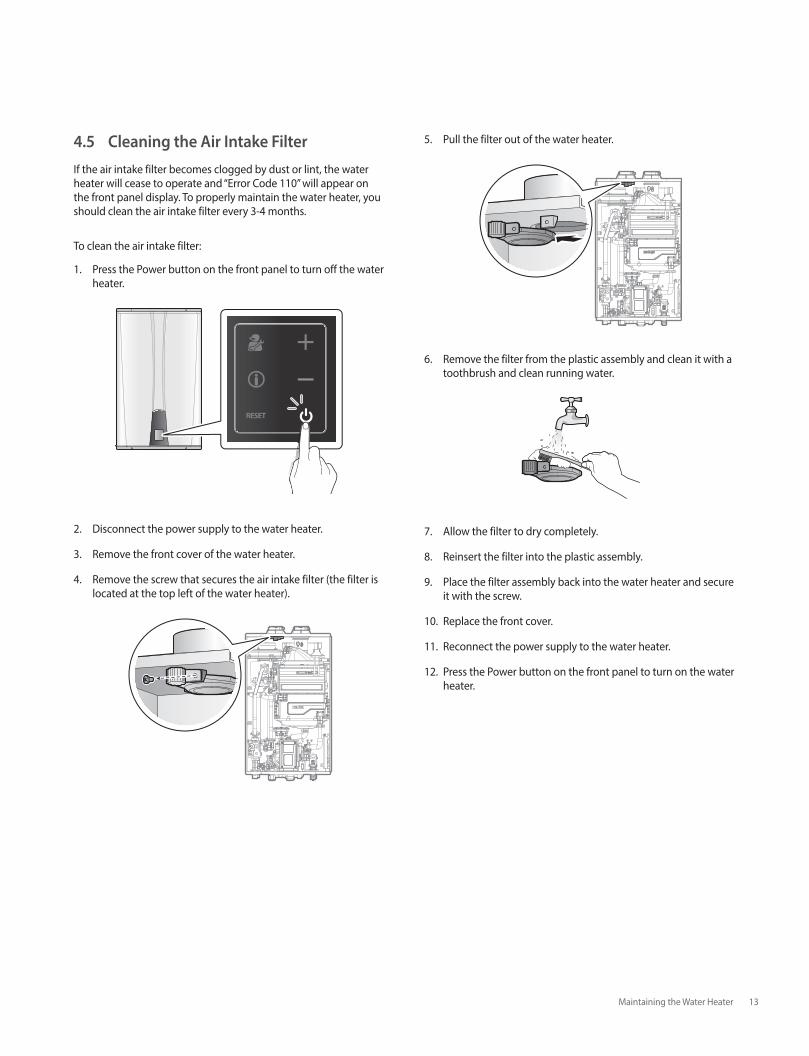
5. Pull the filter out of the water heater.
6. Remove the filter from the plastic assembly and clean it with a toothbrush and clean running water.
7. Allow the filter to dry completely.
8. Reinsert the filter into the plastic assembly.
9. Place the filter assembly back into the water heater and secure it with the screw.
10. Replace the front cover.
11. Reconnect the power supply to the water heater.
12. Press the Power button on the front panel to turn on the water heater.
4.5 Cleaning the Air Intake Filter
If the air intake filter becomes clogged by dust or lint, the water heater will cease to operate and “Error Code 110” will appear on the front panel display. To properly maintain the water heater, you should clean the air intake filter every 3-4 months.
To clean the air intake filter:
1. Press the Power button on the front panel to turn off the water heater.
2. Disconnect the power supply to the water heater.
3. Remove the front cover of the water heater.
4. Remove the screw that secures the air intake filter (the filter is located at the top left of the water heater).
14 Maintaining the Water Heater
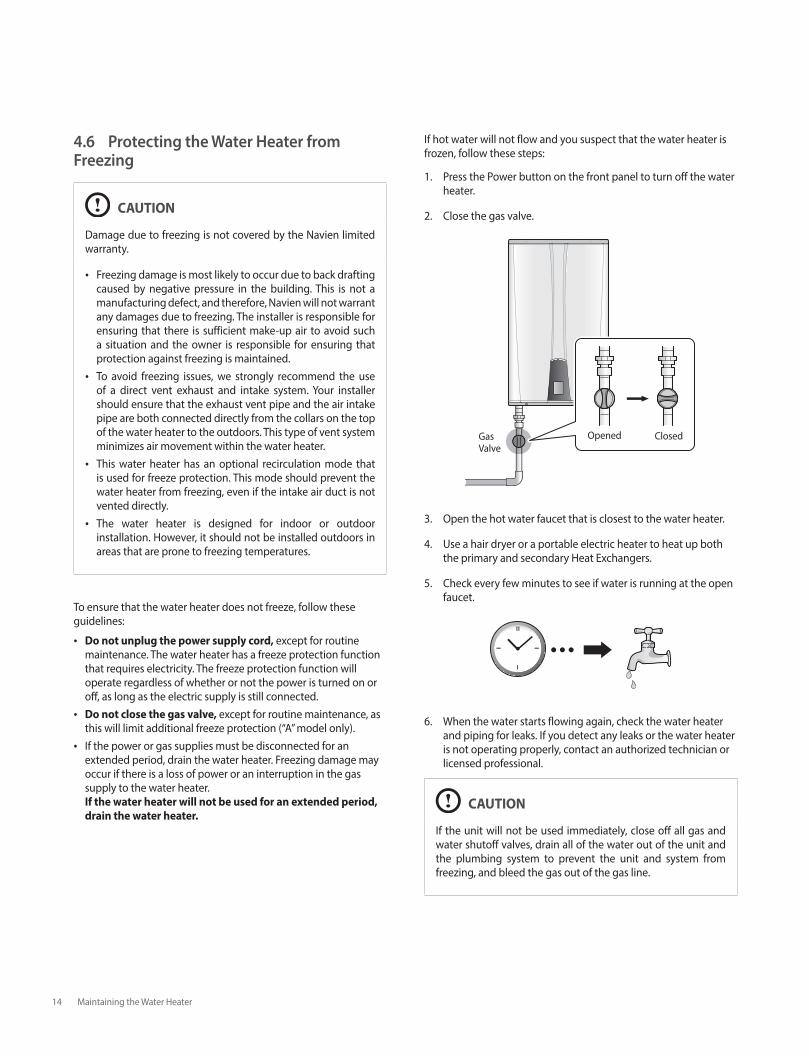
If hot water will not flow and you suspect that the water heater is frozen, follow these steps:
1. Press the Power button on the front panel to turn off the water heater.
2. Close the gas valve.
OpenedGas Valve
Closed
3. Open the hot water faucet that is closest to the water heater.
4. Use a hair dryer or a portable electric heater to heat up both the primary and secondary Heat Exchangers.
5. Check every few minutes to see if water is running at the open faucet.
6. When the water starts flowing again, check the water heater and piping for leaks. If you detect any leaks or the water heater is not operating properly, contact an authorized technician or licensed professional.
CAUTION
If the unit will not be used immediately, close off all gas and water shutoff valves, drain all of the water out of the unit and the plumbing system to prevent the unit and system from freezing, and bleed the gas out of the gas line.
4.6 Protecting the Water Heater from Freezing
CAUTION
Damage due to freezing is not covered by the Navien limited warranty.
Freezing damage is most likely to occur due to back drafting caused by negative pressure in the building. This is not a manufacturing defect, and therefore, Navien will not warrant any damages due to freezing. The installer is responsible for ensuring that there is sufficient make-up air to avoid such a situation and the owner is responsible for ensuring that protection against freezing is maintained.
To avoid freezing issues, we strongly recommend the use of a direct vent exhaust and intake system. Your installer should ensure that the exhaust vent pipe and the air intake pipe are both connected directly from the collars on the top of the water heater to the outdoors. This type of vent system minimizes air movement within the water heater.
This water heater has an optional recirculation mode that is used for freeze protection. This mode should prevent the water heater from freezing, even if the intake air duct is not vented directly.
The water heater is designed for indoor or outdoor installation. However, it should not be installed outdoors in areas that are prone to freezing temperatures.
To ensure that the water heater does not freeze, follow these guidelines:
Do not unplug the power supply cord, except for routine maintenance. The water heater has a freeze protection function that requires electricity. The freeze protection function will operate regardless of whether or not the power is turned on or off, as long as the electric supply is still connected.
Do not close the gas valve, except for routine maintenance, as this will limit additional freeze protection (“A” model only).
If the power or gas supplies must be disconnected for an extended period, drain the water heater. Freezing damage may occur if there is a loss of power or an interruption in the gas supply to the water heater. If the water heater will not be used for an extended period,
drain the water heater.
Troubleshooting 15
If resetting the water heater and attempting the remedies suggested below do not resolve the problem, contact an authorized technician, a licensed professional, or Technical Support at 1-800-519-8794 for service instructions.
Problem Possible Cause(s) What to do
No water comes out when the hot water tap is opened.
Is the cold water inlet filter clean? Is an error code displayed on the front
panel? Is the water heater frozen?
Ensure that the shut–off valves on the hot and cold pipes are open.
If an error code is displayed, refer to “5.2 Understanding Error Codes” on page 16.
The water from the hot water faucet is cold or turns cold and stays cold.
Is the cold water inlet filter clean? Is the hot water faucet open wide enough
draw at least 0.5 gallons of water per minute (GPM) through the water heater?
Is an error code displayed on the front panel?
If there is an external recirculation system installed, is there a check valve on the recirculation return line?
Clean the cold water inlet filter. See “4.4 Cleaning the Inlet Water Filter and Recirculation Inlet Filter” on page 12.
Open the hot water faucet completely. If an error code is displayed, refer to
“5.2 Understanding Error Codes” on page 16.
It takes too long for hot water to reach the fixtures. Are you using the external recirculation mode?
Have a contractor install a recirculation return line from the furthest faucet back to the water heater.
The water is not hot enough. Is the set temperature too low?
Check the water heater’s temperature setting. Refer to “3.2 Adjusting the Water Temperature” on page 8.
Check for cross plumbing between the cold and hot water lines.
The water is too hot. Is the set temperature set too high?Check the water heater’s temperature setting. See “3.2 Adjusting the Water Temperature” on page 8.
5. Troubleshooting
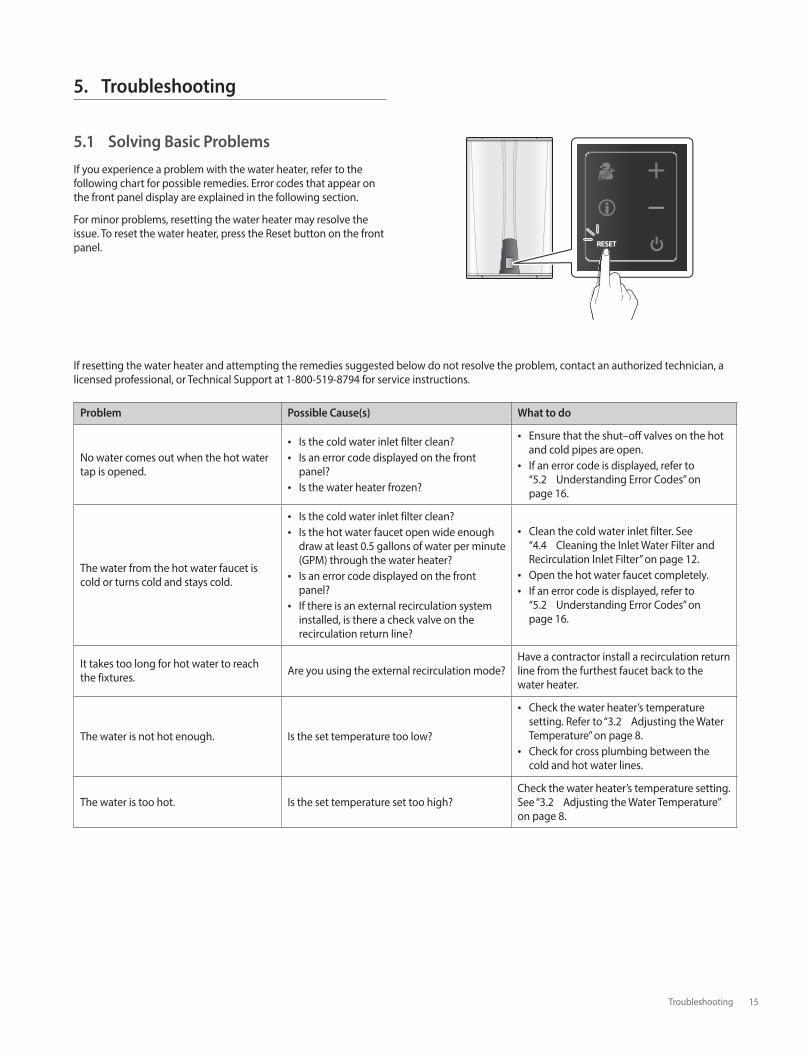
5.1 Solving Basic Problems
If you experience a problem with the water heater, refer to the following chart for possible remedies. Error codes that appear on the front panel display are explained in the following section.
For minor problems, resetting the water heater may resolve the issue. To reset the water heater, press the Reset button on the front panel.
16 Troubleshooting
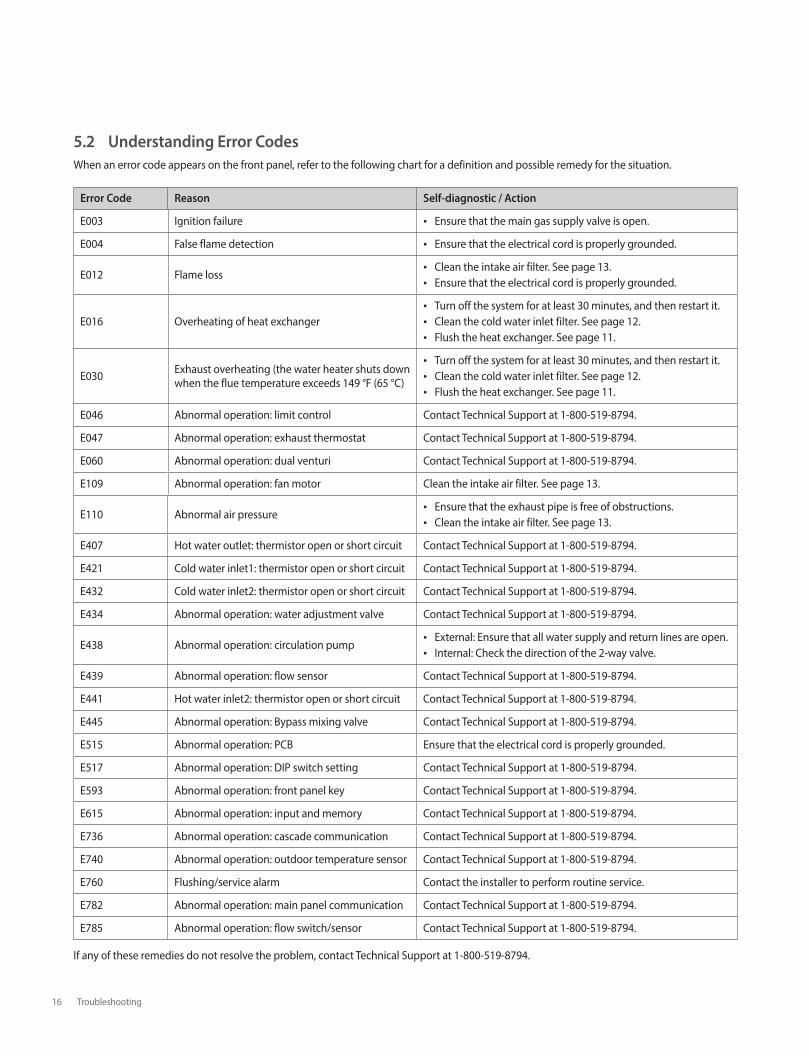
5.2 Understanding Error Codes
When an error code appears on the front panel, refer to the following chart for a definition and possible remedy for the situation.
Error Code Reason Self-diagnostic / Action
E003 Ignition failure Ensure that the main gas supply valve is open.
E004 False flame detection Ensure that the electrical cord is properly grounded.
E012 Flame loss Clean the intake air filter. See page 13. Ensure that the electrical cord is properly grounded.
E016 Overheating of heat exchanger Turn off the system for at least 30 minutes, and then restart it. Clean the cold water inlet filter. See page 12. Flush the heat exchanger. See page 11.
E030 Exhaust overheating (the water heater shuts down when the flue temperature exceeds 149 °F (65 °C)
Turn off the system for at least 30 minutes, and then restart it. Clean the cold water inlet filter. See page 12. Flush the heat exchanger. See page 11.
E046 Abnormal operation: limit control Contact Technical Support at 1-800-519-8794.
E047 Abnormal operation: exhaust thermostat Contact Technical Support at 1-800-519-8794.
E060 Abnormal operation: dual venturi Contact Technical Support at 1-800-519-8794.
E109 Abnormal operation: fan motor Clean the intake air filter. See page 13.
E110 Abnormal air pressure Ensure that the exhaust pipe is free of obstructions. Clean the intake air filter. See page 13.
E407 Hot water outlet: thermistor open or short circuit Contact Technical Support at 1-800-519-8794.
E421 Cold water inlet1: thermistor open or short circuit Contact Technical Support at 1-800-519-8794.
E432 Cold water inlet2: thermistor open or short circuit Contact Technical Support at 1-800-519-8794.
E434 Abnormal operation: water adjustment valve Contact Technical Support at 1-800-519-8794.
E438 Abnormal operation: circulation pump External: Ensure that all water supply and return lines are open. Internal: Check the direction of the 2-way valve.
E439 Abnormal operation: flow sensor Contact Technical Support at 1-800-519-8794.
E441 Hot water inlet2: thermistor open or short circuit Contact Technical Support at 1-800-519-8794.
E445 Abnormal operation: Bypass mixing valve Contact Technical Support at 1-800-519-8794.
E515 Abnormal operation: PCB Ensure that the electrical cord is properly grounded.
E517 Abnormal operation: DIP switch setting Contact Technical Support at 1-800-519-8794.
E593 Abnormal operation: front panel key Contact Technical Support at 1-800-519-8794.
E615 Abnormal operation: input and memory Contact Technical Support at 1-800-519-8794.
E736 Abnormal operation: cascade communication Contact Technical Support at 1-800-519-8794.
E740 Abnormal operation: outdoor temperature sensor Contact Technical Support at 1-800-519-8794.
E760 Flushing/service alarm Contact the installer to perform routine service.
E782 Abnormal operation: main panel communication Contact Technical Support at 1-800-519-8794.
E785 Abnormal operation: flow switch/sensor Contact Technical Support at 1-800-519-8794.
If any of these remedies do not resolve the problem, contact Technical Support at 1-800-519-8794.
Warranty 17
Warranty Period
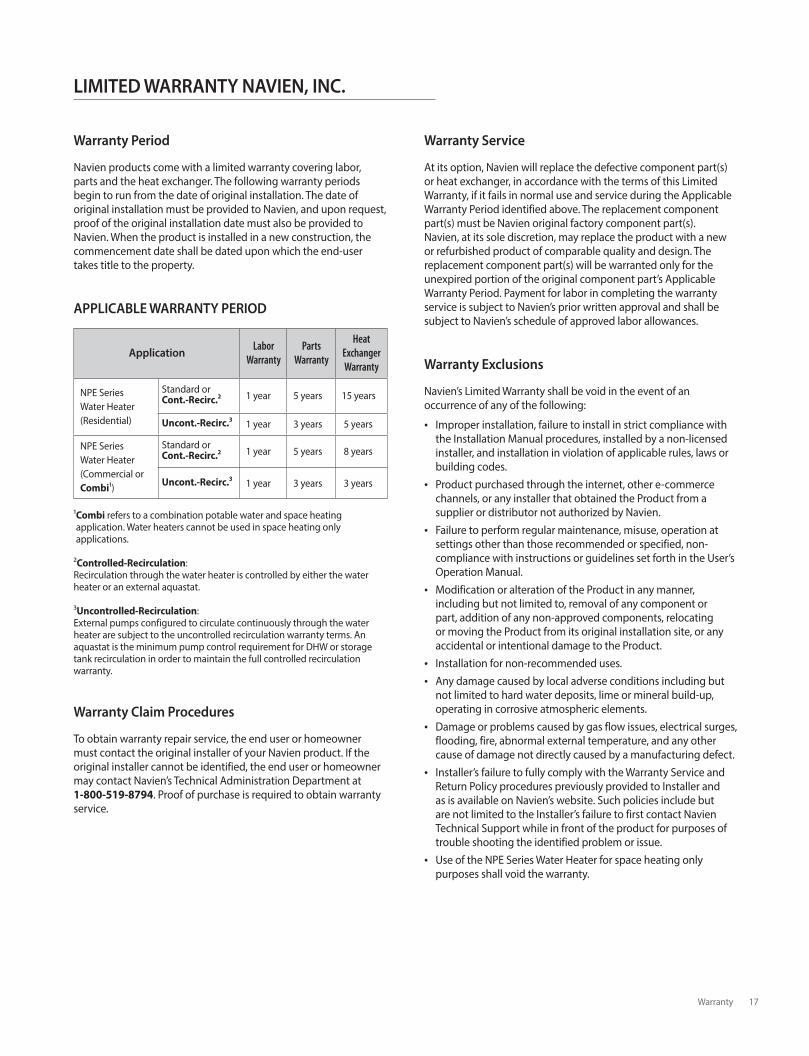
Navien products come with a limited warranty covering labor, parts and the heat exchanger. The following warranty periods begin to run from the date of original installation. The date of original installation must be provided to Navien, and upon request, proof of the original installation date must also be provided to Navien. When the product is installed in a new construction, the commencement date shall be dated upon which the end-user takes title to the property.
APPLICABLE WARRANTY PERIOD
ApplicationLabor
WarrantyParts
Warranty
Heat Exchanger Warranty
NPE Series Water Heater (Residential)
Standard or Cont.-Recirc.2 1 year 5 years 15 years
Uncont.-Recirc.3 1 year 3 years 5 years
NPE Series Water Heater (Commercial or Combi1)
Standard or Cont.-Recirc.2 1 year 5 years 8 years
Uncont.-Recirc.3 1 year 3 years 3 years
1 Combi refers to a combination potable water and space heating application. Water heaters cannot be used in space heating only applications.
2Controlled-Recirculation:Recirculation through the water heater is controlled by either the water heater or an external aquastat.
3Uncontrolled-Recirculation: External pumps configured to circulate continuously through the water heater are subject to the uncontrolled recirculation warranty terms. An aquastat is the minimum pump control requirement for DHW or storage tank recirculation in order to maintain the full controlled recirculation warranty.
Warranty Claim Procedures
To obtain warranty repair service, the end user or homeowner must contact the original installer of your Navien product. If the original installer cannot be identified, the end user or homeowner may contact Navien’s Technical Administration Department at 1-800-519-8794. Proof of purchase is required to obtain warranty service.
Warranty Service
At its option, Navien will replace the defective component part(s) or heat exchanger, in accordance with the terms of this Limited Warranty, if it fails in normal use and service during the Applicable Warranty Period identified above. The replacement component part(s) must be Navien original factory component part(s). Navien, at its sole discretion, may replace the product with a new or refurbished product of comparable quality and design. The replacement component part(s) will be warranted only for the unexpired portion of the original component part’s Applicable Warranty Period. Payment for labor in completing the warranty service is subject to Navien’s prior written approval and shall be subject to Navien’s schedule of approved labor allowances.
Warranty Exclusions
Navien’s Limited Warranty shall be void in the event of an occurrence of any of the following:
Improper installation, failure to install in strict compliance with the Installation Manual procedures, installed by a non-licensed installer, and installation in violation of applicable rules, laws or building codes.
Product purchased through the internet, other e-commerce channels, or any installer that obtained the Product from a supplier or distributor not authorized by Navien.
Failure to perform regular maintenance, misuse, operation at settings other than those recommended or specified, non-compliance with instructions or guidelines set forth in the User’s Operation Manual.
Modification or alteration of the Product in any manner, including but not limited to, removal of any component or part, addition of any non-approved components, relocating or moving the Product from its original installation site, or any accidental or intentional damage to the Product.
Installation for non-recommended uses. Any damage caused by local adverse conditions including but
not limited to hard water deposits, lime or mineral build-up, operating in corrosive atmospheric elements.
Damage or problems caused by gas flow issues, electrical surges, flooding, fire, abnormal external temperature, and any other cause of damage not directly caused by a manufacturing defect.
Installer’s failure to fully comply with the Warranty Service and Return Policy procedures previously provided to Installer and as is available on Navien’s website. Such policies include but are not limited to the Installer’s failure to first contact Navien Technical Support while in front of the product for purposes of trouble shooting the identified problem or issue.
Use of the NPE Series Water Heater for space heating only purposes shall void the warranty.
LIMITED WARRANTY NAVIEN, INC.
18 Warranty
Performance problems caused by improper sizing of the water heater, the gas supply line, the venting connection, combustion air openings, electric service voltage, wiring, fusing or any other components, parts or specifications.
Improper conversion from natural gas to LP gas or LP gas to natural gas or attempt to operate with a type of gas not specified for the water heater.
Any damage, malfunction or failure caused by abuse, negligence, alteration, accident, fire, flood, freezing, wind, lightning and other acts of God.
Operating, using or storing the water heater in a corrosive or contaminated atmosphere or environment.
Operating the water heater at water temperatures outside the factory calibrated temperature limits and/or exceeding the maximum setting of the high limit control.
Operating the water heater when it is not supplied with potable water at all times.
Subjecting the heat exchanger to pressures or firing rates greater or lesser than those shown on the rating plate.
Installation at any location outside the United States and Canada.
Removal or alteration of the rating plate.
Other Terms: This Limited Warranty is subject further to the terms and conditions set forth herein and as may be further specified in the Terms and Conditions page located on Navien’s website at www.navien.com. WITH THE EXCEPTION OF THIS LIMITED WARRANTY, NAVIEN DISCLAIMS ANY OBLIGATION OR LIABILITY WITH RESPECT TO THE PRODUCTS OR THEIR SALE AND USE, AND NAVIEN NEITHER ASSUMES NOR AUTHORIZES THE ASSUMPTION OF, ANY OBLIGATION OR LIABILITY IN CONNECTION WITH THE PRODUCTS. THIS DISCLAIMER INCLUDES ANY OTHER WARRANTIES, EXPRESS, IMPLIED OR STATUTORY RESPECTING THE PRODUCTS OR ANY PARTS OR COMPONENTS THEREOF, INCLUDING, BUT NOT LIMITED TO, ANY IMPLIED WARRANTY OF MERCHANTABILITY OR FITNESS FOR A PARTICULAR PURPOSE. Navien’s total liability for any claim arising hereunder shall not exceed the purchase price which you paid for the Product. NAVIEN SHALL NOT IN ANY EVENT BE LIABLE FOR INDIRECT, SPECIAL, CONSEQUENTIAL OR LIQUIDATED DAMAGES OR PENALTIES, INCLUDING CLAIMS FOR LOST REVENUE, PROFITS OR BUSINESS OPPORTUNITIES, EVEN IF NAVIEN HAD OR SHOULD HAVE HAD ANY KNOWLEDGE, ACTUAL OR CONSTRUCTIVE, OF THE POSSIBILITY OF SUCH DAMAGES.

Memo


Getting Service
If your water heater requires service, you have several options for getting service: Contact Technical Support at 1-800-519-8794 or on the website: www.navien.com. For warranty service, always contact Technical Support first. Contact the technician or professional who installed your water heater. Contact a licensed professional for the affected system (for example, a plumber or electrician).
When you contact Technical Support, please have the following information at hand: Model number Serial number Date purchased Installation location and type Error code, if any appears on the front panel display
Navien, Inc.800.519.8794 www.Navien.com20 Goodyear, Irvine, CA 92618
User’s Information ManualNPE Condensing Water Heaters
T H E L E A D E R I N C O N D E N S I N G T E C H N O L O G Y
Version: 5.3 (May 23, 2019)
2002
6535
G