User’s Guide - Autodeskdownload.autodesk.com/us/systemdocs/pdf/lustre2008_controlsurface... · To...
76
AUTODESK ® CONTROL SURFACE User’s Guide
-
Upload
truonghuong -
Category
Documents
-
view
225 -
download
3
Transcript of User’s Guide - Autodeskdownload.autodesk.com/us/systemdocs/pdf/lustre2008_controlsurface... · To...

AUTODESK®
CONTROL SURFACE
User’s Guide

© 2007 Autodesk Canada Co./Autodesk, Inc. All rights reserved. Except as otherwise permitted by Autodesk Canada Co./Autodesk, Inc., thispublication, or parts thereof, may not be reproduced in any form, by any method, for any purpose.
Copyright © 2003 NetGroup, Politecnico di Torino. All rights reserved.
Neither the name of "Politecnico di Torino" nor the names of its contributors may be used to endorse or promote products derived from this softwarewithout prior written permission. THIS SOFTWARE IS PROVIDED BY THE COPYRIGHT HOLDERS AND CONTRIBUTORS "AS IS" AND ANYEXPRESS OR IMPLIED WARRANTIES, INCLUDING, BUT NOT LIMITED TO, THE IMPLIED WARRANTIES OF MERCHANTABILITY ANDFITNESS FOR A PARTICULAR PURPOSE ARE DISCLAIMED.
IN NO EVENT SHALL THE COPYRIGHT OWNER OR CONTRIBUTORS BE LIABLE FOR ANY DIRECT, INDIRECT, INCIDENTAL, SPECIAL,EXEMPLARY, OR CONSEQUENTAL DAMAGES (INCLUDING, BUT NOT LIMITED TO, PROCUREMENT OF SUBSTITUTE GOODS ORSERVICES; LOSS OF USE, DATA, OR PROFITS; OR BUSINESS INTERRUPTION) HOWEVER CAUSED AND OR ANY THEORY OF LIABILITY,WHETHER IN CONTRACT, STRICT LIABILITY, OR TORT (INCLUDING NEGLIGENCE OR OTHERWISE) ARISING IN ANY WAY OUT OFTHE USE OF THIS SOFTWARE, EVEN IF ADVISED OF THE POSSIBILITY OF SUCH DAMAGE. This product includes software developed by theUniversity of California, Lawrence Berkeley Laboratory and its contributors.
Copyright 2007 Autodesk Canada Co./Autodesk, Inc. Licensed under the Apache License, Version 2.0 (the "License"); you may not use this file except incompliance with the License. You may obtain a copy of the License at http://www.apache.org/licenses/LICENSE-2.0. Unless required by applicable law oragreed to in writing, software distributed under the License is distributed on an "AS IS" BASIS, WITHOUT WARRANTIES OR CONDITIONS OF ANYKIND, either express or implied. See the License for the specific language governing permissions and limitations under the License.
Powered by Automatic Duck © 2006 Automatic Duck, Inc. All rights reserved.
Portions copyright 1991-2006 Compuware Corporation.
Portions of this product Copyright 2006 Glyph & Cog, LLC.
DIRAC Time Stretch/Pitch Shift technology licensed from The DSP Dimension, http://www.dspdimension.com Developed and (c) 2005 Stephan M.Bernsee
Trademarks
The following are registered trademarks or trademarks of Autodesk, Inc., in the USA and other countries: 3DEC (design/logo), 3December,3December.com, 3ds Max, ActiveShapes, Actrix, ADI, Alias, Alias (swirl design/logo), AliasStudio, Alias|Wavefront (design/logo), ATC, AUGI,AutoCAD, AutoCAD Learning Assistance, AutoCAD LT, AutoCAD Simulator, AutoCAD SQL Extension, AutoCAD SQL Interface, Autodesk, AutodeskEnvision, Autodesk Insight, Autodesk Intent, Autodesk Inventor, Autodesk Map, Autodesk MapGuide, Autodesk Streamline, AutoLISP, AutoSnap,AutoSketch, AutoTrack, Backdraft, Built with ObjectARX (logo), Burn, Buzzsaw, CAiCE, Can You Imagine, Character Studio, Cinestream, Civil 3D,Cleaner, Cleaner Central, ClearScale, Colour Warper, Combustion, Communication Specification, Constructware, Content Explorer,Create>what's>Next> (design/logo), Dancing Baby (image), DesignCenter, Design Doctor, Designer's Toolkit, DesignKids, DesignProf, DesignServer,DesignStudio, Design|Studio (design/logo), Design Your World, Design Your World (design/logo), DWF, DWG, DWG (logo), DWG TrueConvert, DWGTrueView, DXF, EditDV, Education by Design, Extending the Design Team, FBX, Filmbox, FMDesktop, Freewheel, GDX Driver, Gmax, Heads-up Design,Heidi, HOOPS, HumanIK, i-drop, iMOUT, Incinerator, IntroDV, Inventor, Inventor LT, Kaydara, Kaydara (design/logo), LocationLogic, Lustre, Maya,Mechanical Desktop, MotionBuilder, ObjectARX, ObjectDBX, Open Reality, PolarSnap, PortfolioWall, Powered with Autodesk Technology,Productstream, ProjectPoint, Reactor, RealDWG, Real-time Roto, Render Queue, Revit, Showcase, SketchBook, StudioTools, Topobase, Toxik, Visual,Visual Bridge, Visual Construction, Visual Drainage, Visual Hydro, Visual Landscape, Visual Roads, Visual Survey, Visual Syllabus, Visual Toolbox, VisualTugboat, Visual LISP, Voice Reality, Volo, and Wiretap.
The following are registered trademarks or trademarks of Autodesk Canada Co. in the USA and/or Canada and other countries: Backburner, Discreet, Fire,Flame, Flint, Frost, Inferno, Multi-Master Editing, River, Smoke, Sparks, Stone, Wire.
All other brand names, product names or trademarks belong to their respective holders.
DisclaimerTHIS PUBLICATION AND THE INFORMATION CONTAINED HEREIN IS MADE AVAILABLE BY AUTODESK CANADA CO./AUTODESK, INC."AS IS." AUTODESK CANADA CO./AUTODESK, INC., DISCLAIMS ALL WARRANTIES, EITHER EXPRESS OR IMPLIED, INCLUDING BUTNOT LIMITED TO ANY IMPLIED WARRANTIES OF MERCHANTABILITY OR FITNESS FOR A PARTICULAR PURPOSE REGARDING THESEMATERIALS.
Published by:
Autodesk Canada Co./Autodesk, Inc.
111 Mclnnis Parkway
San Rafael, CA 94903, USA
Title: Autodesk Control Surface User’s Guide
Document Version: 1
Date: September 17, 2007

contents
iii
Contents
1 The Autodesk Control Surface 1Summary . . . . . . . . . . . . . . . . . . . . . . . . . . . . . . . . . . . . . . . . . . . . . . . . . . . . . . . . . . . . . . . 1About the Autodesk Control Surface . . . . . . . . . . . . . . . . . . . . . . . . . . . . . . . . . . . . . . . 2Control Surface Panel Descriptions. . . . . . . . . . . . . . . . . . . . . . . . . . . . . . . . . . . . . . . . . 2Navigating the Storyboard. . . . . . . . . . . . . . . . . . . . . . . . . . . . . . . . . . . . . . . . . . . . . . . . . 5Toggling Play Modes . . . . . . . . . . . . . . . . . . . . . . . . . . . . . . . . . . . . . . . . . . . . . . . . . . . . . 8Activating Mouse Functionality . . . . . . . . . . . . . . . . . . . . . . . . . . . . . . . . . . . . . . . . . . . . 9Panning and Zooming the Image. . . . . . . . . . . . . . . . . . . . . . . . . . . . . . . . . . . . . . . . . . . 9Customizing the View . . . . . . . . . . . . . . . . . . . . . . . . . . . . . . . . . . . . . . . . . . . . . . . . . . . . 10Selective Backlighting of Active and Available Buttons . . . . . . . . . . . . . . . . . . . . . . . . 14Toggling Playheads. . . . . . . . . . . . . . . . . . . . . . . . . . . . . . . . . . . . . . . . . . . . . . . . . . . . . . . 14Using the Undo List . . . . . . . . . . . . . . . . . . . . . . . . . . . . . . . . . . . . . . . . . . . . . . . . . . . . . . 15Working with the Grade Bin . . . . . . . . . . . . . . . . . . . . . . . . . . . . . . . . . . . . . . . . . . . . . . . 16Adjusting Printer Lights. . . . . . . . . . . . . . . . . . . . . . . . . . . . . . . . . . . . . . . . . . . . . . . . . . . 17Copying Grades. . . . . . . . . . . . . . . . . . . . . . . . . . . . . . . . . . . . . . . . . . . . . . . . . . . . . . . . . . 18Adding Keyframes . . . . . . . . . . . . . . . . . . . . . . . . . . . . . . . . . . . . . . . . . . . . . . . . . . . . . . . 19Selecting Menus . . . . . . . . . . . . . . . . . . . . . . . . . . . . . . . . . . . . . . . . . . . . . . . . . . . . . . . . . 20Caching Memory . . . . . . . . . . . . . . . . . . . . . . . . . . . . . . . . . . . . . . . . . . . . . . . . . . . . . . . . 21Bypassing Functions. . . . . . . . . . . . . . . . . . . . . . . . . . . . . . . . . . . . . . . . . . . . . . . . . . . . . . 22Resetting Functions . . . . . . . . . . . . . . . . . . . . . . . . . . . . . . . . . . . . . . . . . . . . . . . . . . . . . . 22Repositioning Shots . . . . . . . . . . . . . . . . . . . . . . . . . . . . . . . . . . . . . . . . . . . . . . . . . . . . . . 23Performing Colour Grading . . . . . . . . . . . . . . . . . . . . . . . . . . . . . . . . . . . . . . . . . . . . . . . 24Performing Curves Grading . . . . . . . . . . . . . . . . . . . . . . . . . . . . . . . . . . . . . . . . . . . . . . . 34Generating Keys . . . . . . . . . . . . . . . . . . . . . . . . . . . . . . . . . . . . . . . . . . . . . . . . . . . . . . . . . 37Creating and Grading Geometries . . . . . . . . . . . . . . . . . . . . . . . . . . . . . . . . . . . . . . . . . . 41Cycling Among Geometries . . . . . . . . . . . . . . . . . . . . . . . . . . . . . . . . . . . . . . . . . . . . . . . 45Modifying the Appearance of the Autodesk Control Surface . . . . . . . . . . . . . . . . . . . 46

tentsCon
iv
2 The Tangent CP100 Control Surface 47Summary . . . . . . . . . . . . . . . . . . . . . . . . . . . . . . . . . . . . . . . . . . . . . . . . . . . . . . . . . . . . . . . 47About the Tangent CP100 Control Surface . . . . . . . . . . . . . . . . . . . . . . . . . . . . . . . . . . 47Customizing the View . . . . . . . . . . . . . . . . . . . . . . . . . . . . . . . . . . . . . . . . . . . . . . . . . . . . 49Toggling Play Mode . . . . . . . . . . . . . . . . . . . . . . . . . . . . . . . . . . . . . . . . . . . . . . . . . . . . . . 50Caching Memory . . . . . . . . . . . . . . . . . . . . . . . . . . . . . . . . . . . . . . . . . . . . . . . . . . . . . . . . 50Navigating the Storyboard. . . . . . . . . . . . . . . . . . . . . . . . . . . . . . . . . . . . . . . . . . . . . . . . . 51Undo List . . . . . . . . . . . . . . . . . . . . . . . . . . . . . . . . . . . . . . . . . . . . . . . . . . . . . . . . . . . . . . . 52Resetting Parameters . . . . . . . . . . . . . . . . . . . . . . . . . . . . . . . . . . . . . . . . . . . . . . . . . . . . . 54Copying Grades. . . . . . . . . . . . . . . . . . . . . . . . . . . . . . . . . . . . . . . . . . . . . . . . . . . . . . . . . . 55Adding and Moving Keyframes . . . . . . . . . . . . . . . . . . . . . . . . . . . . . . . . . . . . . . . . . . . . 56Repositioning Shots . . . . . . . . . . . . . . . . . . . . . . . . . . . . . . . . . . . . . . . . . . . . . . . . . . . . . . 57Primary Colour Grading . . . . . . . . . . . . . . . . . . . . . . . . . . . . . . . . . . . . . . . . . . . . . . . . . . 58Modifying the Hue, Saturation, and Lightness Curves. . . . . . . . . . . . . . . . . . . . . . . . . 61Secondary Colour Grading . . . . . . . . . . . . . . . . . . . . . . . . . . . . . . . . . . . . . . . . . . . . . . . . 61
Index 69
1
The Autodesk Control Surface
SummaryAbout the Autodesk Control Surface . . . . . . . . . . . . . . . . . . . . . . . . . . . . . . . . . . . . . . . 2
Control Surface Panel Descriptions . . . . . . . . . . . . . . . . . . . . . . . . . . . . . . . . . . . . . . . . 2
Navigating the Storyboard . . . . . . . . . . . . . . . . . . . . . . . . . . . . . . . . . . . . . . . . . . . . . . . . 5
Toggling Play Modes . . . . . . . . . . . . . . . . . . . . . . . . . . . . . . . . . . . . . . . . . . . . . . . . . . . . . . 8
Activating Mouse Functionality . . . . . . . . . . . . . . . . . . . . . . . . . . . . . . . . . . . . . . . . . . . . 9
Panning and Zooming the Image . . . . . . . . . . . . . . . . . . . . . . . . . . . . . . . . . . . . . . . . . . 9
Customizing the View . . . . . . . . . . . . . . . . . . . . . . . . . . . . . . . . . . . . . . . . . . . . . . . . . . . . 10
Selective Backlighting of Active and Available Buttons . . . . . . . . . . . . . . . . . . . . . 14
Toggling Playheads . . . . . . . . . . . . . . . . . . . . . . . . . . . . . . . . . . . . . . . . . . . . . . . . . . . . . . 14
Using the Undo List . . . . . . . . . . . . . . . . . . . . . . . . . . . . . . . . . . . . . . . . . . . . . . . . . . . . . . 15
Working with the Grade Bin . . . . . . . . . . . . . . . . . . . . . . . . . . . . . . . . . . . . . . . . . . . . . . 16
Adjusting Printer Lights . . . . . . . . . . . . . . . . . . . . . . . . . . . . . . . . . . . . . . . . . . . . . . . . . . 17
Copying Grades . . . . . . . . . . . . . . . . . . . . . . . . . . . . . . . . . . . . . . . . . . . . . . . . . . . . . . . . . . 18
Adding Keyframes . . . . . . . . . . . . . . . . . . . . . . . . . . . . . . . . . . . . . . . . . . . . . . . . . . . . . . . 19
Selecting Menus . . . . . . . . . . . . . . . . . . . . . . . . . . . . . . . . . . . . . . . . . . . . . . . . . . . . . . . . . 20
Caching Memory . . . . . . . . . . . . . . . . . . . . . . . . . . . . . . . . . . . . . . . . . . . . . . . . . . . . . . . . 21
Bypassing Functions . . . . . . . . . . . . . . . . . . . . . . . . . . . . . . . . . . . . . . . . . . . . . . . . . . . . . 22
Resetting Functions . . . . . . . . . . . . . . . . . . . . . . . . . . . . . . . . . . . . . . . . . . . . . . . . . . . . . . 22
Repositioning Shots . . . . . . . . . . . . . . . . . . . . . . . . . . . . . . . . . . . . . . . . . . . . . . . . . . . . . . 23
Performing Colour Grading . . . . . . . . . . . . . . . . . . . . . . . . . . . . . . . . . . . . . . . . . . . . . . . 24
Performing Curves Grading . . . . . . . . . . . . . . . . . . . . . . . . . . . . . . . . . . . . . . . . . . . . . . 34
Generating Keys . . . . . . . . . . . . . . . . . . . . . . . . . . . . . . . . . . . . . . . . . . . . . . . . . . . . . . . . . 37
Creating and Grading Geometries . . . . . . . . . . . . . . . . . . . . . . . . . . . . . . . . . . . . . . . . 41
Cycling Among Geometries . . . . . . . . . . . . . . . . . . . . . . . . . . . . . . . . . . . . . . . . . . . . . . . 45
Modifying the Appearance of the Autodesk Control Surface . . . . . . . . . . . . . . . . 46

The Autodesk Control Surface1
2
About the Autodesk Control SurfaceThe Autodesk® control surface provides improved interactivity when colour grading film and video footage. You can perform many of the same tasks you do in the Autodesk Lustre® user interface using the control surface. The modular design of the control surface also allows you to work on different grading stages simultaneously. For example, you can perform curves grading while modifying the image lift.
The Autodesk control surface consists of three panels. Although licensed separately, they are designed to work together.
For information on connecting the control surface, refer to the Autodesk Lustre Software Installation Guide for your platform. See the “Related Documentation” section in your release notes.
Control Surface Panel DescriptionsEach of the three control surface panels are designed to perform different functions.
The following image shows the Navigation panel.
.
Curve Key P&SInside
MiscOutside
#0001.000019
InPr OutPrGeomGrade
GRADE CURVES KEY GEOM P&S MISC MORE
1
-
4
7
5 6
98
2
0
+/- RECALL GRADE
3
ALT ENTER
CURSOR
REVERT COMP
UNDO REDO DO
RESET OFFSET
SCROLLCLIP A/B
MARK
MOREF1 F2 OUTIN
MEM
F4F3BYPASS

Control Surface Panel Descriptions
3
Use the Navigation panel to:
• Select menus. Pressing one of the menu buttons along the top of the panel activates a menu. For example, pressing the Grade button activates grading functionality.
• Reset or bypass the currently selected menu.
• Cache memory.
• Navigate the Storyboard.
• Pan and zoom the image.
• Copy grades.
• Activate mouse functionality.
• Add keyframes.
• Revert and compare grades.
• Toggle playback mode between Storyboard and clip loop.
• Switch playheads.
• Scroll shots.
• Undo and redo actions.
• Perform actions with the Grade bin.
• Adjust printer lights.
• Jump to specified frame number or timecode on the Storyboard.
• Show or hide user interface elements.
• Adjust the appearance of the panels.
The following image shows the Function panel.

The Autodesk Control Surface1
4
Use the Function panel to work in the menu you activated in the Navigation panel. For example, if you pressed the Key menu button in the Navigation panel, the functions for pulling a key are activated in the Function panel. The features available on the Function panel depend entirely on the menu selected in the Navigation panel. You can use the digital display at the top of the panel as a guide for understanding how functionality is distributed when a given menu is active.
You can also use the Function panel to set viewing modes. Some of the viewing functions included in the Function panel include multi-view, wipe, split, proxy, output, and print view.
The following image shows the Colour Grading panel.
HighHue Brightness Saturation
G+ B+ R+
R G B Sh MidBrightBright
+ G - B - R - -
Multi
MatteO/P
StillALT
WipeSplit
Proxy
F1F2
F3
F4F5 F6
F7
F8
F1
F1
F2
F3
F4
F5
F6
F1
F2
F3
F4
F5
F6
F2
F3
F4
F5
SHOW

Navigating the Storyboard
5
Use the Colour Grading panel for most grading functions. Colour grading functionality is split between the Colour Grading and the Function panels. The Colour Grading panel is always in grading mode. Depending on the colour space selected in the Setup Project menu, either Linear or Logarithmic functionality is available.
The Colour Grading panel also contains the tablet.
Navigating the StoryboardYou can use the Navigation panel to:
• Scrub the Storyboard.
• Scroll through the shots in the Storyboard.
• Toggle between the regular and large Storyboard viewing modes.
• Jump to a specified frame or timecode on the Storyboard.
• Jump ahead or back a frame at a time, or a shot at a time.
• Play forwards or backwards.
F1F2
F3F4
F5F6
F7F8
F9
Shadow Contrast Brightness25 25 25

The Autodesk Control Surface1
6
To scrub the Storyboard:
Use the ring portion of the trackball.
To scroll through shots on the Storyboard:
1. Press the Scroll button.
2. Use the ring portion of the trackball.
3. Press the Scroll or Do button to confirm the move.
To switch between regular and large Storyboard viewing modes:
1. Press the top More button on the Navigation panel.
The Label, Tnails, and GUI options appear in the digital display at the top of the panel. The location of each option in the digital display reflects their button position on the panel.
.
1
-
4
7
5 6
98
2
0
+/- RECALL GRADE
3
ALT ENTER
CURSOR
REVERT COMP
UNDO REDO DO
RESET OFFSET
SCROLLCLIP A/B
MARK
Shot back Shot forwardPlay / Stop
Enter TC/Frm
Frame back
Frame forward
Scrub timeline
Scroll shots
Play & Shotforward/back
ThumbsInside Outside
#0001.000019
InPr OutPrLabel
GRADE CURVES KEY GEOM P&S MISC MORE
Gui
MOREF1 F2 OUTIN
MEM
F4F3BYPASS
Storyboard

Navigating the Storyboard
7
2. If the Storyboard option does not appear, press the button for Thumbs (the P&S button) to display Storyboard thumbnails. This makes the Storyboard option appear in the digital display.
3. Press the button for Storyboard (the Key button). This switches Storyboard thumbnails to the large Storyboard option.
NOTE: This is equivalent to using the Q hot key.
To jump to a specified frame on the Storyboard:
1. Press the Enter button.
2. Do one of the following:
• To jump ahead, enter the frame number using the numeric pad on the right side of the panel.
• To jump back, press the +/- button on the numeric pad and then enter the frame number.
3. Press the Enter button to jump to the specified frame.
To jump to a specified timecode on the Storyboard:
1. Press the Enter button.
2. Enter a timecode using the numeric pad on the right side of the panel.
3. Press the Enter button to jump to the specified timecode.
To jump back or ahead a frame at a time:
1. To jump back a frame, do one of the following:
• Press the Frame Back button (left arrow button to the left of the trackball).
• Simultaneously press the Shot Back button (below the Redo button) and the Play button (below the Do button).
ThumbsInside Outside
#0001.000019
InPr OutPrLabel
GRADE CURVES KEY GEOM P&S MISC MORE
Gui
MOREF1 F2 OUTIN
MEM
F4F3BYPASS
Storyboard
Storyboard view mode switch

The Autodesk Control Surface1
8
2. To jump ahead a frame, do one of the following:
• Press the Frame Forward button (right arrow button to the right of the trackball).
• Simultaneously press the Shot Forward button (below the Undo button) and the Play button (below the Do button).
To jump to the beginning or end of a shot:
1. To jump to the first frame of the shot, press either of the two Shot Back buttons. One button is located to the left of the trackball, and the other is below the Redo button.
2. To jump to the last frame of the shot, press either of the two Shot Forward buttons. One button is located to the right of the trackball, and the other is below the Do button.
To play forwards or backwards:
1. To play the Storyboard forward, do one of the following:
• Press the Play Forward button (above the trackball).
• Press the Spacebar-style Play button (below the Undo button). This button operates like the Spacebar on the keyboard, in that you use it both to start and stop playback.
2. To play the Storyboard backwards, press the Play Backwards button (above the trackball).
3. To stop playback, do one of the following:
• Press the Stop button (above the trackball).
• Press the Spacebar-style Play button.
Toggling Play ModesYou can toggle the playback mode between looping a shot or looping the entire Storyboard.
To toggle play modes:
Press the Clip button on the Navigation panel.
This button corresponds to the Play Mode button in the user interface.
.
1
-
4
7
5 6
98
2
0
+/- RECALL GRADE
3
ALT ENTER
CURSOR
REVERT COMP
UNDO REDO DO
RESET OFFSET
SCROLLCLIP A/B
MARK

Activating Mouse Functionality
9
Activating Mouse FunctionalityYou can enable mouse functionality on the Navigation panel.
To activate mouse functionality:
1. Press the Cursor button on the Navigation panel.
2. Use the panel’s features as follows.
Panning and Zooming the ImageYou can use the Navigation panel to pan and zoom the image.
Use the: As the:
Trackball Mouse.
Backward play button Left mouse button.
Stop button Middle mouse button.
Forward play button Right mouse button.
.
1
-
4
7
5 6
98
2
0
+/- RECALL GRADE
3
ALT ENTER
CURSOR
REVERT COMP
UNDO REDO DO
RESET OFFSET
SCROLLCLIP A/B
MARK
.
1
-
4
7
5 6
98
2
0
+/- RECALL GRADE
3
ALT ENTER
CURSOR
REVERT COMP
UNDO REDO DO
RESET OFFSET
SCROLLCLIP A/B
MARK
Alt Zoom Pan

The Autodesk Control Surface1
10
To zoom the image:
Hold down the ALT button on the Navigation panel and use the ring on the trackball to zoom in and out.
To pan the image:
Hold down the ALT button on the Navigation panel and use the jog ball on the trackball to pan the image.
Resetting Zoom and PanYou can now reset the zoom and pan.
To reset the zoom and pan:
Hold down the ALT button on the Navigation panel and press the Reset button.
NOTE: The zoom and pan are always reset together.
Customizing the ViewThere are options for customizing the view on both the Navigation panel and the Function panel.
When working with secondaries, users can use the Function panel to view them in Saturated Mask view or Matte view. Saturated Mask view displays the range of colours you define through a greyscale image. The unselected colours remain grey. Matte view displays a black and white template indicating which parts of the image are transparent (black), and which are opaque and selected (white).
.
1
-
4
7
5 6
98
2
0
+/- RECALL GRADE
3
ALT ENTER
CURSOR
REVERT COMP
UNDO REDO DO
RESET OFFSET
SCROLLCLIP A/B
MARK
ALT
Reset

Customizing the View
11
To access view options available on the Navigation panel:
1. Press the top More button on the Navigation panel.
The Label, Tnails, and GUI options appear in the digital display at the top of the panel. The location of each option in the digital display reflects their button position on the panel.
2. Select one of the following options.
Press: To toggle the:
Label Shot name on or off the image.
Tnails Storyboard thumbnails on or off.
GUI Full-screen Player on or off.
ThumbsInside Outside
#0001.000019
InPr OutPrLabel
GRADE CURVES KEY GEOM P&S MISC MORE
Gui
MOREF1 F2 OUTIN
MEM
F4F3BYPASS
Storyboard

The Autodesk Control Surface1
12
To access view options available on the Function panel:
Use the viewport options to change the view as you work on your grades. For example, press Proxy to view a proxy version of your shot in the Player.
Viewport option Description
Multi Toggles multi-shot display on and off in the Player. You can view up to 16 shots. In order for Multi to function, you must enable split-view first by pressing the Split button on the panel, or F5 on the keyboard.
Wipe Toggles between horizontal and vertical split view in the Player. In order for Wipe to function, you must enable split-view first by pressing the Split button on the panel, or F5 on the keyboard.
Split Enables split-view in the Player, and the Multi and Wipe buttons.
Proxy Toggles between the full-resolution and half-resolution (proxy) version of your shot in the Player. If you have not rendered a proxy, an X appears in the Player.
Matte Toggles between secondary grading view and result view.
O/P Toggles between a rendered version of your shot (P) and the pre-rendered version with grading applied (O). If you have not rendered the shot, an X appears in the Player when in P mode. Press the ALT and O/P buttons simultaneously to toggle to I mode (this displays the image with colour corrections made in the Grading and Curves menus only).
Still Displays the stored reference image. Press the ALT and Still buttons simultaneously to store the current frame in the reference buffer.
HighHue Brightness Saturation
G+ B+ R+
R G B Sh MidBrightBright
+ G - B - R - -
Multi
MatteO/P
StillALT
WipeSplit
Proxy
Viewport options
F1F2
F3
F4F5 F6
F7
F8
F1
F1
F2
F3
F4
F5
F6
F1
F2
F3
F4
F5
F6
F2
F3
F4
F5
SHOW

Customizing the View
13
NOTE: You can also access the SHOW button in the Function panel. This button shows or hides
the geometry wireframe for the current secondary layer.
NOTE: There is no functionality assigned to the Function panel’s ALT button for this release.
To change fonts in the digital display:
On the keyboard, press SHIFT+F until you obtain the desired font.
NOTE: The change is only maintained for the current session.
To toggle between “O” view and Matte view:
1. Press the Matte button on the Function panel.
2. Hold down the ALT button on the Function panel while pressing Matte again to switch between Saturated Mask view and black and white Matte view.
HINT: You can go directly to Saturated Mask view mode from another mode, e.g. Output, by
holding down the ALT button and pressing Matte.
HighHue Brightness Saturation
G+ B+ R+
R G B Sh MidBrightBright
+ G - B - R - -
Multi
MatteO/P
StillALT
WipeSplit
Proxy
ALT
F1F2
F3
F4F5 F6
F7
F8
F1
F1
F2
F3
F4
F5
F6
F1
F2
F3
F4
F5
F6
F2
F3
F4
F5
SHOW
Matte

The Autodesk Control Surface1
14
Selective Backlighting of Active and Available ButtonsIn order to make it easier to determine which functions are currently available on the Autodesk Control Surface panels, you can select Mid from amongst the options accessible from the Navigation panel.
The Mid option highlights active buttons and available buttons.
An active button is one that has been enabled by the user. For example, if you enable secondary two for Inside grading, the 2 button on the numeric keypad and the Inside button are backlit on the Navigation panel.
An available button is one that has been enabled by the system based on a feature that you selected. For example, if you switch from the Geom menu to the Reposition menu, the backlighting on the Function panel changes to show which buttons are available for performing repositioning tasks.
To enable backlighting for active and available buttons:
1. Press the bottom More button on the Navigation panel.
The Low, Mid, High, and Screen options appear in the digital display.
2. Press the F4 button.
Active and available buttons are now backlit.
NOTE: The Low option is now accessible by pressing the F3 button.
Toggling PlayheadsYou can toggle between the images assigned to Playhead A and B.
Curve Key P&SHighLow
MiscScreen
#0001.000019GeomGrade
GRADE CURVES KEY GEOM P&S MISC MORE
MOREF1 F2 OUTIN
MEM
F4F3BYPASS

Using the Undo List
15
To toggle playheads:
Press the A/B button on the Navigation panel.
Using the Undo ListYou can access the undo list from the Navigation panel. The undo list works differently than it does in the user interface. When you use the panel, you must save your changes to the undo list using the Do button. Undo lists are saved on a shot-by-shot basis.
To save a change to the undo list:
Press the Do button.
To go through the undo list:
Press the Undo or Redo button.
Reverting to Previous GradesYou can use the Navigation panel to toggle between the grade that was applied to a shot when you first selected it in the Storyboard and the current grade.
.
1
-
4
7
5 6
98
2
0
+/- RECALL GRADE
3
ALT ENTER
CURSOR
REVERT COMP
UNDO REDO DO
RESET OFFSET
SCROLLCLIP A/B
MARK
.
1
-
4
7
5 6
98
2
0
+/- RECALL GRADE
3
ALT ENTER
CURSOR
REVERT COMP
UNDO REDO DO
RESET OFFSET
SCROLLCLIP A/B
MARK
Undo Redo Do
CompareRevert

The Autodesk Control Surface1
16
To revert to previous grades:
Press the Revert button on the Navigation panel.
To save the reverted stage to the undo list:
Press the Do button on the Navigation panel.
Comparing GradesYou can compare the current image with the grade you last committed to the undo list.
To toggle between the current image and the grade you last committed to the undo list:
Press the Comp button on the Navigation panel.
Working with the Grade BinYou can use the Navigation panel to access Grade bin functionality.
Saving a Grade to the Grade BinUse Grade Save mode to save one or more grades to the Grade bin.
To save a grade to the Grade bin:
1. On the Storyboard, use the ring to navigate to the shot with the grade you want to save.
HINT: This step can also be performed after you enter Grade Save mode.
2. Press the Grade button on the Navigation panel.
This activates Grade Save mode.
.
1
-
4
7
5 6
98
2
0
+/- RECALL GRADE
3
ALT ENTER
CURSOR
REVERT COMP
UNDO REDO DO
RESET OFFSET
SCROLLCLIP A/B
MARK
Grade Load-Recall mode
Save Grade mode
Select container Cycle grades

Adjusting Printer Lights
17
3. To select a storage container in the Grade bin, do one of the following:
• Use the jog ball on the trackball.
• Press the keypad number button that corresponds to the desired Grade bin container position.
4. To save the shot’s grade to the storage container, double-press the keypad number button that corresponds to the desired Grade bin container.
After the grade is saved, you are still in Grade Save mode and can save other grades. Use the trackball ring to navigate to other shots.
5. To exit Grade Save mode, press Grade.
Loading a Grade From the Grade BinUse Grade Load-Recall mode to load grades from the Grade bin to one or more shots on the Storyboard.
To load a grade from the Grade bin:
1. On the Storyboard, navigate to the shot to which you want to load one or more grades.
HINT: This step can also be performed after you enter Grade Load-Recall mode.
2. Press the Recall button on the Navigation panel.
This activates Grade Load-Recall mode.
3. To select a grade in the Grade bin, do one of the following:
• Use the jog ball on the trackball to navigate the Grade bin.
• Press the keypad number button corresponding to the desired Grade bin container position once to jump to it.
4. To load the grade to the current selected shot on the Storyboard, double-press the appropriate number button twice.
After the grade is loaded to the shot, you are still in Grade Load-Recall mode and can load other grades from the Grade bin to the shot. Use the trackball ring to navigate to other shots.
5. To exit Grade Load-Recall mode, press Recall.
Adjusting Printer LightsYou can adjust printer lights on the Navigation panel. Printer light values are displayed in the Colour Grading panel’s digital display.

The Autodesk Control Surface1
18
NOTE: You can also adjust printer lights on the Function panel when the Grade menu is enabled.
See “Grading in Logarithmic Mode Using the Function Panel” on page 28.
To adjust printer lights:
1. On the Navigation panel, double-press the ALT button.
The words “Shift ON” appear in the digital display.
2. Use the following buttons on the keypad to make printer light adjustments to the image.
Copying GradesYou can temporarily or permanently copy a grade to the current shot from another shot in the Storyboard.
Press: To:
7 Increase red brightness by one step.
4 Decrease red brightness by one step.
8 Increase green brightness by one step.
5 Decrease green brightness by one step.
9 Increase blue brightness by one step.
6 Decrease blue brightness by one step.
1 Increase cyan brightness by one step.
- (minus sign) Decrease cyan brightness by one step.
2 Increase magenta brightness by one step.
0 Decrease magenta brightness by one step.
3 Increase yellow brightness by one step.
. (period) Decrease yellow brightness by one step.
Curve Key P&SInside
MiscOutside
#0001.000019
InPr OutPrGeomGrade
GRADE CURVES KEY GEOM P&S MISC MORE
MOREF1 F2 OUTIN
MEM
F4F3BYPASS
Shift ON

Adding Keyframes
19
To copy a grade to the current shot from another shot in the Storyboard:
1. Scroll to the shot you would like to copy grades to by performing one of the following two actions:
• Hold down the ALT button on the Navigation panel and then press the Frame Forward or Frame Back button to temporarily apply the grade from the previous or next shot to the current shot.
NOTE: Each time you press ALT and Frame Forward or Frame Back, you move one shot at a
time through possible sources to copy back to the current Storyboard position. For example,
if you hold down ALT and press Frame Forward three times, you see a preview of the current
Storyboard position with the grade from three shots ahead applied.
• Press Offset on the Navigation panel and then scroll through the shots by pressing the Scroll button and using the ring portion of the trackball.
2. Press Do to permanently copy the grade from the shot outlined in blue to the current shot.
3. Press the ALT button to cancel the operation.
Adding KeyframesWhen you animate parameters, you can set keyframes using the Mark button.
To add keyframes:
1. Go to the frame where you want to add the keyframe.
2. Press Mark.
3. Modify the parameters.
4. Repeat the above steps as required.
.
1
-
4
7
5 6
98
2
0
+/- RECALL GRADE
3
ALT ENTER
CURSOR
REVERT COMP
UNDO REDO DO
RESET OFFSET
SCROLLCLIP A/B
MARK
ALT
Frame ForwardFrame BackOffset

The Autodesk Control Surface1
20
Selecting MenusSelecting a menu from the first row of buttons on the Navigation panel determines which options are available in the second row of buttons. What you select in the Navigation panel also determines the features available on the Function panel.
You can see which options are available by checking the digital display. For example, in the following illustration the Grade menu has been selected and the InPr, OutPr, Inside, and Outside options appear in the digital display. The location of these options in the digital display is the same as their location amongst the option buttons.
Curve Key P&SInside
MiscOutside
#0001.000019
InPr OutPrGeomGrade
GRADE CURVES KEY GEOM P&S MISC MORE
Digital DisplayMenu buttons
Option buttons
MOREF1 F2 OUTIN
MEM
F4F3BYPASS
Curve Key P&SInside
MiscOutside
#0001.000019
InPr OutPrGeomGrade
GRADE CURVES KEY GEOM P&S MISC MORE
Grade menuGrade Options
In Primary Inside OutsideOut Primary
MOREF1 F2 OUTIN
MEM
F4F3BYPASS

Caching Memory
21
To select a menu:
Choose one of the following.
NOTE: There is no functionality assigned to the Misc button for this release.
Caching MemoryWhen a shot does not play back in real time, you can cache the frames into memory using the Mem button.
Press: To:
Grade Enable the In Primary, Out Primary, Inside, and Outside options, and activate Logarithmic or Linear grading in the Function panel. See “Performing Colour Grading” on page 24.
Curves Enable the In Primary, Out Primary, Hue, and RGB options, and activate curves grading in the Function panel. See “Performing Curves Grading” on page 34.
Key Enable the Pick and SrcPrim options, and activate keying functionality in the Function panel. See “Generating Keys” on page 37.
Geom Enable the Rectangle, Circle, Wipe (split screen), Bezier (free-form geometry), Inside, and Outside options, and activate geometry grading in the Function panel. See “Creating and Grading Geometries” on page 41.
P&S Activate repositioning functionality in the Function panel. When this function is selected, no additional options are activated in the Navigation panel. See “Repositioning Shots” on page 23.
More (upper) Access the following additional options: Label, Thumbnails, and GUI. These options pertain to elements in the user interface. See “Customizing the View” on page 10.
More (lower) Access the following additional options: Low, High, and Screen. These options pertain to the control surface appearance. See “Modifying the Appearance of the Autodesk Control Surface” on page 46.
Curve Key P&SInside
MiscOutside
#0001.000019
InPr OutPrGeomGrade
GRADE CURVES KEY GEOM P&S MISC MORE
Cache
MOREF1 F2 OUTIN
MEM
F4F3BYPASS

The Autodesk Control Surface1
22
Bypassing FunctionsUse the Bypass button on the Navigation panel to bypass the currently selected menu.
Resetting FunctionsUse the Reset button on the Navigation panel to reset parameters for the current menu only, or to reset all parameters on the currently selected shot.
To reset parameters for the current menu only:
Press the Reset button once.
To reset all parameters on the shot:
Double-press the Reset button.
HINT: You can reset individual parameters by pressing its assigned Reset button. These buttons
are indicated throughout this chapter.
Curve Key P&SInside
MiscOutside
#0001.000019
InPr OutPrGeomGrade
GRADE CURVES KEY GEOM P&S MISC MORE
Bypass
MOREF1 F2 OUTIN
MEM
F4F3BYPASS
.
1
-
4
7
5 6
98
2
0
+/- RECALL GRADE
3
ALT ENTER
CURSOR
REVERT COMP
UNDO REDO DO
RESET OFFSET
SCROLLCLIP A/B
MARK
Reset

Repositioning Shots
23
Repositioning ShotsYou can reposition a shot by:
• Scaling
• Panning vertically and horizontally
• Rotating
• Changing the aspect ratio
• Flipping and flopping
To reposition a shot:
1. Press the P&S button on the Navigation panel.
Curve KeyInside
MiscOutside
#0001.000019
InPr OutPrGeomGrade P&S
.
GRADE CURVES KEY GEOM P&S MISC MORE
1
-
4
7
5 6
98
2
0
+/- RECALL GRADE
3
ALT ENTER
CURSOR
REVERT COMP
UNDO REDO DO
RESET OFFSET
SCROLLCLIP A/B
MARK
MOREF1 F2 OUTIN
MEM
F4F3BYPASS

The Autodesk Control Surface1
24
2. On the Function panel, use the following controls.
Performing Colour GradingYou can use the Autodesk control surface to perform input and output grading in Logarithmic or Linear mode.
As with other menus, you select the Grade menu from the Navigation panel. This activates colour grading functionality on the Function panel. The Colour Grading panel is enabled
Use: To:
Wheels Reposition the image.Wheel 1=Pan XWheel 2=Pan YWheel 3=ScaleWheel 4=RotateTo reset a wheel, press the button above it.
Knob at right Change the image’s aspect ratio. To reset, press the button below it.
First row of buttons at bottom right Flip or flop the image.F1=FlipF3=Flop
SHOW button Toggle the geometry wireframe on or off.
Pan X Pan Y ScaleFilp Flop
RotateAspect
Multi
MatteO/P
StillALT
WipeSplit
Proxy
Pan X Pan Y ScaleReset X Rotate
Aspect ratio
Reset aspect ratio
Reset rotate
FlipFlop
Reset Y Reset scaleGeom UI
F1F2
F3
F4F5 F6
F7
F8
F1
F1
F2
F3
F4
F5
F6
F1
F2
F3
F4
F5
F6
F2
F3
F4
F5
SHOW

Performing Colour Grading
25
regardless of which menu is active in the Function panel. The features available on these panels depend on whether you are in Logarithmic or Linear mode. You specify the colour architecture in the Setup Grade menu in the user interface.
Logarithmic ModeWhen Log is enabled in the Setup Grade menu, the Colour Grading panel and the Function panel are activated with logarithmic colour grading functionality.
Grading in Logarithmic Mode Using the Colour Grading PanelUse the Colour Grading panel to:
• Adjust brightness balance and contrast balance for the entire image or for a range of colours.
• Adjust brightness in the shadows, midtones, and highlights.
There are two available setups for the Colour Grading panel. You can switch between setups by pressing the F9 button.
The default setup allows you to modify contrast, overall brightness, and brightness in the shadows, midtones, and highlights. Adjusting brightness in the shadows, midtones, and highlights requires that you switch the functionality of the first trackball among the three. You use the second and third trackballs to adjust contrast and brightness in the overall image.
The alternate setup distributes brightness controls for the shadows, midtones, and highlights amongst the three trackballs. This allows you to balance the values without having to constantly switch the functionality of a single trackball.

The Autodesk Control Surface1
26
To colour grade using the Colour Grading panel default setup:
On the Colour Grading panel, use the following controls.
Use: To:
First ring Adjust brightness in the shadows, midtones, or highlights for the overall image. To reset, press F1.
First jog ball Adjust brightness in the shadows, midtones, or highlights for a range of colours. To reset, press F2.
F3 button Switch functionality for the first trackball between shadows, midtones, or highlights.
Second ring Adjust contrast/pivot in the overall image. To reset, press F4.
Second jog ball Adjust contrast/pivot in a range of colours. To reset, press F5.
F6 button Toggle functionality for the second trackball between contrast and pivot.
Third ring Adjust brightness in the overall image. To reset, press F7.
Third jog ball Adjust brightness in a range of colours. To reset, press F8.
F1F2
F3F4
F5F6
F7F8
F9
Shadow Contrast Brightness
Reset S/M/H brightness
S/M/H toggle
S/M/H balancebrightness
Reset contrast/pivot
Reset brightness
Balance brightness
S/M/H brightness incolour ranges
Brightness incolour ranges
Balancecontrast/pivot
Contrast/pivot incolour ranges
Toggle contrast/pivot
25 25 25

Performing Colour Grading
27
To colour grade using the Colour Grading panel alternate setup:
1. Press the F9 button to switch to the alternate setup.
2. On the Colour Grading panel, use the following controls.
Use: To:
First ring Adjust overall brightness in the shadows. To reset, press F1.
First jog ball Adjust brightness in the shadows for a range of colours. To reset, press F2.
Second ring Adjust overall brightness in the midtones. To reset, press F4.
Second jog ball Adjust brightness in the midtones for a range of colours. To reset, press F5.
Third ring Adjust overall brightness in the highlights. To reset, press F7.
Third jog ball Adjust brightness in the highlights for a range of colours. To reset, press F8.
F9 button Toggle between the panel default and alternate setup.
F1F2
F3F4
F5F6
F7F8
F9
Shadow Midtone Highlight
Highlights
Midtones
Setup toggle
Shadows
25 25 25
Reset brightnessin shadows
Reset brightnessin midtones
Reset brightnessin highlights

The Autodesk Control Surface1
28
Grading in Logarithmic Mode Using the Function PanelWhen the Grade menu is enabled, you can use the Function panel to:
• Adjust overall hue, brightness, and saturation.
• Balance brightness and contrast in the red, green, and blue channels.
• Balance brightness of colours in the shadows, midtones, and highlights.
• Adjust cutoff values.
• Increase or decrease printer light settings.
To colour grade in Logarithmic mode using the Function panel:
1. Press the Grade button on the Navigation panel.
The In Primary, Out Primary, Inside, and Outside options are activated.
2. Do one of the following:
• Press the F1 option button to work on the initial primary grade.
• Press the F2 option button to work on final curve modifications.
• If you are colour grading a secondary, either a key or a geometry, use the numeric keys on the Navigation panel to select and enable a secondary layer. Press the number key once to select the layer, and then press it a second time to enable it. To enable layer 10, press the
Curve Key P&SInside
MiscOutside
#0001.000019
InPr OutPrGeomGrade
In Primary Out Primary Inside Outside
.
GRADE CURVES KEY GEOM P&S MISC MORE
1
-
4
7
5 6
98
2
0
+/- RECALL GRADE
3
ALT ENTER
CURSOR
REVERT COMP
UNDO REDO DO
RESET OFFSET
SCROLLCLIP A/B
MARK
MOREF1 F2 OUTIN
MEM
F4F3BYPASS
Performing Colour Grading
29
minus button (-). To enable layer 11, press 0. To enable layer 12, press the decimal button (.).
3. If you are accessing the Grade menu after having created a geometry or key, do one of the following:
• Press the IN option button to grade inside the secondary.
• Press the OUT option button to grade outside the secondary.
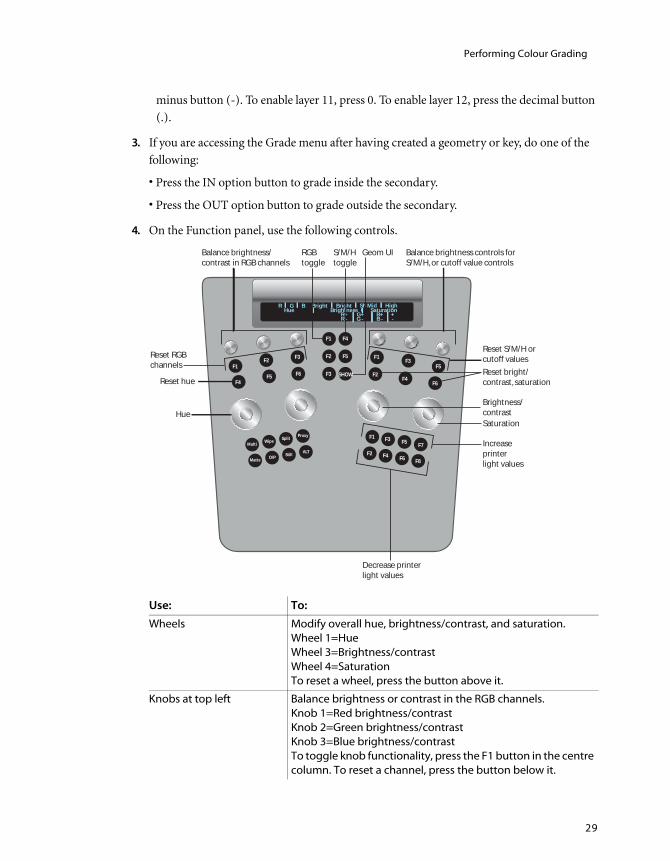
4. On the Function panel, use the following controls.
Use: To:
Wheels Modify overall hue, brightness/contrast, and saturation.Wheel 1=HueWheel 3=Brightness/contrastWheel 4=SaturationTo reset a wheel, press the button above it.
Knobs at top left Balance brightness or contrast in the RGB channels.Knob 1=Red brightness/contrastKnob 2=Green brightness/contrastKnob 3=Blue brightness/contrastTo toggle knob functionality, press the F1 button in the centre column. To reset a channel, press the button below it.
HighHue Brightness Saturation
G+ B+ R+
R G B Sh MidBrightBright
+ G - B - R - -
Multi
MatteO/P
StillALT
WipeSplit
Proxy
Reset hue
Decrease printer light values
Balance brightness/contrast in RGB channels
RGB toggle
Increase printerlight values
S/M/H toggle
Geom UI Balance brightness controls for S/M/H, or cutoff value controls
HueSaturation
Brightness/ contrast
Reset bright/contrast, saturation
Reset RGBchannels
Reset S/M/H or cutoff values
F1F2
F3
F4F5 F6
F7
F8
F1
F1
F2
F3
F4
F5
F6
F1
F2
F3
F4
F5
F6
F2
F3
F4
F5
SHOW

The Autodesk Control Surface1
30
Linear ModeWhen Lin is enabled in the Setup Grade menu, the Colour Grading panel and the Function panel are activated with linear colour grading functionality.
Grading in Linear Mode Using the Colour Grading PanelUse the Colour Grading panel to modify lift, gain, and gamma in the low, mid, and high levels of the image, or across the entire image.
Knobs at top right Balance S/M/H brightness of the colours, or adjust cutoff values.Knob 4=Brightness in shadows/cutoff valuesKnob 5=Brightness in midtones/cutoff valuesKnob 6=Brightness in highlightsTo toggle knob functionality, press the F4 button in the centre column. To reset a knob, press the button below it.
First row of buttons at bottom right
Increase printer light values.F1=RedF3=BlueF5=GreenF7=Overall
Second row of buttons at bottom right
Decrease printer light values.F2=RedF4=BlueF6=GreenF8=OverallPress ALT for half point adjustments.
SHOW button Toggle the geometry wireframe on or off.
Use: To:

Performing Colour Grading
31
To colour grade in Linear mode using the Colour Grading panel:
On the Colour Grading panel, use the following controls.
Grading in Linear Mode Using the Function PanelWhen the Grade menu is enabled, you can use the Function panel to:
• Modify hue, contrast, gain, and saturation values.
• Balance lift, gamma, and gain values for the red, green, and blue channels.
• Set black and white clip and reference values.
Use: To:
First ring Modify lift in the overall image. To reset, press the F1 button.
First jog ball Modify lift in a range of colours. To reset, press the F2 button.
Second ring Modify gain in the overall image. To reset, press the F4 button.
Second jog ball Modify gain in a range of colours. To reset, press the F5 button.
Third ring Modify gamma in the overall image. To reset, press the F7 button.
Third jog ball Modify gamma in a range of colours. To reset, press the F8 button.
F3 button Toggle between Master and Low levels.
F6 button Toggle between Master and Mid levels.
F9 button Toggle between Master and High levels.
F1F2
F3F4
F5F6
F7F8
F9
Low Lift Low Gamma Low Gain
Reset Lift
Toggle M/H
Lift Gain Gamma
Toggle M/L Toggle M/MReset gain Reset gamma
25 25 25

The Autodesk Control Surface1
32
To colour grade in Linear mode using the Function panel:
1. Press the Grade button on the Navigation panel.
The In Primary, Out Primary, Inside, and Outside options are activated.
2. Do one of the following:
• Press the F1 option button to work on the initial primary grade.
• Press the F2 option button to work on final curve modifications.
• If you are colour grading a secondary, either a key or a geometry, use the numeric keys on the Navigation panel to select and enable a secondary layer. Press the number key once to select the layer, and then press it a second time to enable it. To enable layer 10, press the minus button (-). To enable layer 11, press 0. To enable layer 12, press the decimal button (.).
3. If you are accessing the Grade menu after having created a geometry or key, do one of the following:
• Press the IN option button to grade inside the secondary.
• Press the OUT option button to grade outside the secondary.
Curve Key P&SInside
MiscOutside
#0001.000019
InPr OutPrGeomGrade
In Primary Out Primary Inside Outside
.
GRADE CURVES KEY GEOM P&S MISC MORE
1
-
4
7
5 6
98
2
0
+/- RECALL GRADE
3
ALT ENTER
CURSOR
REVERT COMP
UNDO REDO DO
RESET OFFSET
SCROLLCLIP A/B
MARK
MOREF1 F2 OUTIN
MEM
F4F3BYPASS

Performing Colour Grading
33
4. On the Function panel, use the following controls.
Use: To:
Wheels Modify overall hue, contrast, gain, and saturation.Wheel 1=HueWheel 2=ContrastWheel 3=GainWheel 4=SaturationTo reset a wheel, press the button above it.
Knobs at top left Balance the RGB channels.Knob 1=RedKnob 2=GreenKnob 3=BlueTo reset a knob, press the button below it.
Buttons in left centre column
Toggle the type of value to be adjusted in the RGB channels (Knobs 1-3).F1=LiftF2=GammaF3=Gain
Knobs at top right Define values to clamp minimum and maximum luminance.Knob 4=BlackKnob 5=White
WhClipHue Contrast Gain SaturationR G B BlClipLift
Low Mid High Master
Multi
MatteO/P
StillALT
WipeSplit
Proxy
RGB channels RGB toggle B/W toggle B/W values
Reset gain
Contrast
Hue Rotation
Reset contrast
Geom UI
Reset saturation
Saturation
Gain
Reset hue
Reset RGBchannels F1
F2F3
F4F5 F6
F7
F8
F1
F1
F2
F3
F4
F5
F6
F1
F2
F3
F4
F5
F6
F2
F3
F4
F5
SHOW

The Autodesk Control Surface1
34
Performing Curves GradingWhen the Curves menus is enabled, you can use the Function panel to:
• Modify Hue and RGB curves either after the initial primary colour grade, or after the addition of any Lustre Sparks® effects.
• Adjust the Hue, Lightness, Saturation, and Luminance curves separately.
• Modify the entire curve uniformly or modify individual vertices for RGBCMY channels (red, green, blue, cyan, magenta, and yellow).
To modify Hue and RGB curves:
1. Press Curves on the Navigation panel.
The In Primary, Out Primary, Hue, and RGB options are activated.
Buttons in right centre column
Toggle the type of black and white values to be adjusted (Knobs 4-5).F4=ClipF5=Reference
SHOW button Toggle the geometry wireframe on or off.
Use: To:
Grade Key P&SInside
MiscOutside
#0001.000019
Rect CircleGeomRGBHue
Curve
Hue RGB
.
GRADE
F1 F2
CURVES KEY GEOM P&S MISC MORE
MOREOUTIN
1
-
4
7
5 6
98
2
0
+/- RECALL GRADE
3
ALT ENTER
CURSOR
REVERT COMP
UNDO REDO DO
RESET OFFSET
SCROLLCLIP A/B
MARK
MEM
F4F3BYPASS

Performing Curves Grading
35
2. Do one of the following:
• Press the F1 option button to indicate that you are working on the initial primary grade.
• Press the F2 option button to indicate that you are working on final curve modifications.
3. Do one of the following:
• Press the F3 option button to work on Hue curves.
• Press the F4 option button to work on RGB curves.

The Autodesk Control Surface1
36
4. On the Function panel, use the following controls.
Use: To:
Wheels Make overall changes to curves.Wheel 1=Hue curvesWheel 2=Lightness curvesWheel 3=L-S curvesWheel 4=Saturation curvesTo reset a wheel, press the button above it.
Knobs at top left and top right Individually modify RGBCMY curve points. Knob 1=RedKnob 2=GreenKnob 3=BlueKnob 4=CyanKnob 5=MagentaKnob 6=YellowTo reset a knob, press the button below it.
MasterHue MasterLig LowL-S MasterR G B C M YHue
Multi
MatteO/P
StillALT
WipeSplit
Proxy
RGB curvepoints Curve types
Reset CMYcurve points
Geom UICMY curvepoints
Reset saturationcurve
Reset L-S curve
Saturation curve
L-S curveLightness curve
Hue curve
Reset hue curve
Reset RGBcurve points
Reset lightness curve
L/M/H/M pointsfor L-S curve
F1F2
F3
F4F5 F6
F7
F8
F1
F1
F2
F3
F4
F5
F6
F1
F2
F3
F4
F5
F6
F2
F3
F4
F5
SHOW

Generating Keys
37
Generating KeysWhen the Key menu is enabled, you can use the Function panel to:
• Generate a key from the original scan, or from the primary-graded result.
• Sample the image.
• Set one or more channels as the basis for the key.
• Adjust the key by setting softness and tolerance levels, modifying key edges, inverting the key, and linking layers.
Buttons in centre column Select the type of curve to be modified using the RGBCMY curve points.F1=HueF2=LightF3=SaturationIf you press the F1 button when working with RGB curves, you are toggled to Hue curves.
First row of buttons at bottom right Select the low point, mid point, high point, or all for the L-S curve.F1=LowF3=MidF5=HighF7=Master
SHOW button Toggle the geometry wireframe on or off.
Use: To:

The Autodesk Control Surface1
38
To generate a key:
1. Press the Key button on the Navigation panel once to activate the Keyer menu, and a second time to enable the Keyer channel.
The Pick and SrcPrim options are activated.
2. Use the numeric keys on the Navigation panel to select and enable a secondary layer. Press the number key once to select the layer, and then press it a second time to enable it. To enable layer 10, press the minus button (-). To enable layer 11, press 0. To enable layer 12, press the decimal button (.).
3. To sample the image, press the F3 option button. The trackball on the Navigation panel is activated as a picker, allowing you to move through the image. Press Pick again to pick the current pixel for the sample. To sample an area of the image, hold down the ALT button while in picker mode and draw a rectangular area of the image, and then release the ALT button.
4. To key after input primary grading has been performed and the input LUT has been applied, press the F4 option button. To switch back to the primary-graded result, press the button again.
Grade P&SInside
MiscOutside
#0001.000019
InPr OutPrGeomSrcPrPick
Curve Key
Pick SrcPrim
.
GRADE CURVES KEY GEOM P&S MISC MORE
1
-
4
7
5 6
98
2
0
+/- RECALL GRADE
3
ALT ENTER
CURSOR
REVERT COMP
UNDO REDO DO
RESET OFFSET
SCROLLCLIP A/B
MARK
MOREF1 F2 OUTIN
MEM
F4F3BYPASS

Generating Keys
39
5. On the Function panel, use the following controls to adjust the key for the sampled colour.
Use: To:
Wheels Set initial tolerance and softness around the picked colour.Wheel 1=ToleranceWheel 2=Softness
Knobs at top left Adjust min/max tolerance, centre tolerance, and min/max softness. Knob 1=Min/max toleranceKnob 2=CentreKnob 3=Min/max softness
Upper left F1 and F4 buttons Enable either minimum or maximum tolerance (Knob 1) adjustments.F1=Minimum F4=Maximum
BlurTolerance Softness Invert
OR MINUS AND
hTol hCen ShrClnhSoft
INVlnkTol + Soft -Tol - Soft+
Multi
MatteO/P
StillALT
WipeSplit
Proxy
Tolerance, Centre, Softness
Cleanup, Shrink, Blur
Reset cleanup, shrink, blur
Channels: Hue, Value, Saturation
Min tolerance
Max tolerance
Min softnessMax softness
Invert key
Layer link buttons
Additional softness controls
Tolerance Softness Geom UI
F1F2
F3
F4F5 F6
F7
F8
F1
F1
F2
F3
F4
F5
F6
F1
F2
F3
F4
F5
F6
F2
F3
F4
F5
SHOW

The Autodesk Control Surface1
40
Toggling the Keyer Button and Keyer Channels On and OffUsers can toggle the on or off status of the Keyer button visible on the control surface. Users also can enable or disable any or all of the Hue, Value, or Saturation channels.
To make the Keyer status visible on the control surface:
1. Press the Key button on the Navigation panel once to activate the Keyer menu, and then double-press to enable the Keyer channel and activate backlighting to show its enabled status.
2. Double-press the Key button again to disable the Keyer channel and de-activate backlighting.
Upper left F3 and F6 buttons Enable either minimum or maximum softness (Knob 3) adjustments.F3=MinimumF6=Maximum
Buttons in centre column Adjust tolerance, centre, and softness values separately for each of the channels forming the basis of the key.F1=HueF2=ValueF3=Saturation
Knobs at top right Modify key edges and remove stray pixels from a key.Knob 4=CleanupKnob 5=ShrinkKnob 6=BlurTo reset a knob, press the button below it.
Upper right F6 button Invert the key.
First row of buttons at bottom right Link secondary layers.F1=AddF3=IntersectF5=SubtractF7=Invert link
Second row of buttons at bottom right
Add or subtract tolerance and softness from the key. F2=Add toleranceF4=Subtract toleranceF6=Add softnessF8=Subtract softnessPress F3 to change the cursor into a picker prior to using any of the above buttons. When done adjusting tolerance and softness, press F3 again.
SHOW button Toggle the geometry wireframe on or off.
Use: To:

Creating and Grading Geometries
41
To enable or disable the Hue, Value, or Saturation channels:
On the Function panel, double-press F1, F2, or F3 to enable or disable Hue, Value, or Saturation.
Creating and Grading GeometriesWhen the Geom menu is enabled, you can create and colour grade up to 12 secondaries by using the Function panel to:
• Select a geometry type.
• Modify geometries.
• Link secondary layers.
• Delete geometries.
After you have created geometries, you can use the Grade menu to colour grade them.
BlurTolerance Softness Invert
OR MINUS AND
hTol hCen ShrClnhSoft
INVlnkTol + Soft -Tol - Soft+
Multi
MatteO/P
StillALT
WipeSplit
Proxy
Channels: Hue, Value, Saturation
F1F2
F3
F4F5 F6
F7
F8
F1
F1
F2
F3
F4
F5
F6
F1
F2
F3
F4
F5
F6
F2
F3
F4
F5
SHOW

The Autodesk Control Surface1
42
To create geometries:
1. Press the Geom button on the Navigation panel.
The Rectangle, Circle, Wipe (split screen), and Bezier (free-form geometry) options are activated.
2. Use the numeric keys on the Navigation panel to select and enable a secondary layer. Press the number key once to select the layer, and then press it a second time to enable it. To enable layer 10, press the minus button (-). To enable layer 11, press 0. To enable layer 12, press the decimal button (.).
3. Do one of the following:
• Press F1 to add a rectangle.
• Press F2 to add a circle.
• Press F3 to add a wipe.
• Press F4 to add a Bezier shape using the pen or mouse.
Grade Curve Key P&SInside
MiscOutside
#0001.000019
Rect Circle WipeGeomBezier
Rectangle WipeCircle Bezier
Select geometries
Move geometries
.
GRADE CURVES KEY GEOM P&S MISC MORE
MORE
1
-
4
7
5 6
98
2
0
+/- RECALL GRADE
3
ALT ENTER
CURSOR
REVERT COMP
UNDO REDO DO
RESET OFFSET
SCROLLCLIP A/B
MARK
F1 F2 OUTIN
MEM
F4F3BYPASS

Creating and Grading Geometries
43
4. Use the jog ball as a geometry mover and the backwards play button to select the geometries on the current active secondary layer.
5. On the Function panel, use the following controls to adjust the geometry.
Use: To:
Wheels Modify the geometry’s blur, colour, opacity, and softness.Wheel 1=BlurWheel 2=ColourWheel 3=OpacityWheel 4=SoftnessThe direction for edge softness is inwards or outwards depending on the direction that you rotate the wheel. To reset a wheel, press the button above it.
Knobs at top left Scale the geometry.Knob 1=Size XKnob 2=Size YKnob 3=Master (scales in locked proportions)To reset a knob, press the button below it.
RotBlur Color Opacity Softness
OR MINUS AND
SizeX SizeY MoveYMoveXSize
INVlnkIn OutSoftness: Variable Softer
Multi
MatteO/P
StillALT
WipeSplit
ProxyLayer link buttons
Additional softness controls
Blur Colour
Reset blurReset colour
Reset opacity
Reset softnessOpacity
Softness
Reset scaling
Scaling controls
Delete Geom
Reposition controls
Geom UI
Reset reposition
F1F2
F3
F4F5 F6
F7
F8
F1
F1
F2
F3
F4
F5
F6
F1
F2
F3
F4
F5
F6
F2
F3
F4
F5
SHOW

The Autodesk Control Surface1
44
6. To colour grade the geometry, select either the Inside or Outside option button depending on whether colour grading should occur inside or outside the geometry. See “Performing Colour Grading” on page 24.
Geometry Invert FunctionalityUsers can invert geometries on the current secondary layer using the Autodesk control surface.
Knobs at top right Move the geometry.Knob 1=Move XKnob 2=Move YKnob 3=RotateTo reset a knob, press the button below it.
First row of buttons at bottom right Link secondary layers.F1=AddF3=IntersectF5=SubtractF7=Invert link
Second row of buttons at bottom right
Further modify softness.F2=Apply softness inside mask borderF4=Apply softness outside mask borderF6=Apply variable softnessF8=Change softness type
F1 button in centre column Delete the currently active geometry.
SHOW button Toggle the geometry wireframe on or off.
Use: To:

Cycling Among Geometries
45
To invert geometries using the Autodesk control surface:
On the Function panel, press the F4 button in the centre column.
Cycling Among GeometriesYou can now move from one geometry to the next in the order of their creation.
RotBlur Color Opacity Softness
OR MINUS AND
SizeX SizeY MoveYMoveXSize
INVlnkIn OutSoftness: Variable Softer
Multi
MatteO/P
StillALT
WipeSplit
Proxy
Invert Geom
F1F2
F3
F4F5 F6
F7
F8
F1
F1
F2
F3
F4
F5
F6
F1
F2
F3
F4
F5
F6
F2
F3
F4
F5
SHOW
.
1
-
4
7
5 6
98
2
0
+/- RECALL GRADE
3
ALT ENTER
CURSOR
REVERT COMP
UNDO REDO DO
RESET OFFSET
SCROLLCLIP A/B
MARK
ALT
Shot ForwardShot Back

The Autodesk Control Surface1
46
To cycle among geometries:
With the Geom menu enabled, hold down the ALT button on the Navigation panel and then press the Shot Forward or Shot Back button to cycle forward or backwards.
Modifying the Appearance of the Autodesk Control SurfaceYou can customize the appearance of the control surface by accessing options from the bottom More button on the Navigation panel. Use these options to determine the brightness of:
• Backlighting for all buttons
• Backlighting for a button being pressed
• Backlighting for active and available buttons
• The digital display
To modify the appearance of the Autodesk control surface:
1. Press the bottom More button on the Navigation panel.
The Low, High, and Screen options appear in the digital display.
2. Press one of the following option buttons and use the ring portion of the trackball to increase or decrease brightness.
Press: To change the brightness of:
F4 Backlighting for all buttons on the control surface. The change is visible as you modify with the ring.
IN Backlighting for a button that is being pressed. The change is visible only when you press a button after having used the ring.
OUT The digital display. The change is visible as you modify with the ring.
Curve Key P&SHighLow
MiscScreen
#0001.000019GeomGrade
GRADE CURVES KEY GEOM P&S MISC MORE
MOREF1 F2 OUTIN
MEM
F4F3BYPASS

47
The Tangent CP100 Control Surface
SummaryAbout the Tangent CP100 Control Surface . . . . . . . . . . . . . . . . . . . . . . . . . . . . . . . . 47
Customizing the View . . . . . . . . . . . . . . . . . . . . . . . . . . . . . . . . . . . . . . . . . . . . . . . . . . . . 49
Toggling Play Mode . . . . . . . . . . . . . . . . . . . . . . . . . . . . . . . . . . . . . . . . . . . . . . . . . . . . . . 50
Caching Memory . . . . . . . . . . . . . . . . . . . . . . . . . . . . . . . . . . . . . . . . . . . . . . . . . . . . . . . . 50
Navigating the Storyboard . . . . . . . . . . . . . . . . . . . . . . . . . . . . . . . . . . . . . . . . . . . . . . . 51
Undo List . . . . . . . . . . . . . . . . . . . . . . . . . . . . . . . . . . . . . . . . . . . . . . . . . . . . . . . . . . . . . . . . 52
Resetting Parameters . . . . . . . . . . . . . . . . . . . . . . . . . . . . . . . . . . . . . . . . . . . . . . . . . . . . 54
Copying Grades . . . . . . . . . . . . . . . . . . . . . . . . . . . . . . . . . . . . . . . . . . . . . . . . . . . . . . . . . . 55
Adding and Moving Keyframes . . . . . . . . . . . . . . . . . . . . . . . . . . . . . . . . . . . . . . . . . . . 56
Repositioning Shots . . . . . . . . . . . . . . . . . . . . . . . . . . . . . . . . . . . . . . . . . . . . . . . . . . . . . . 57
Primary Colour Grading . . . . . . . . . . . . . . . . . . . . . . . . . . . . . . . . . . . . . . . . . . . . . . . . . . 58
Modifying the Hue, Saturation, and Lightness Curves . . . . . . . . . . . . . . . . . . . . . . 61
Secondary Colour Grading . . . . . . . . . . . . . . . . . . . . . . . . . . . . . . . . . . . . . . . . . . . . . . . 61
About the Tangent CP100 Control SurfaceThe Tangent CP100 control surface is designed to improve interactivity when colour grading film and video footage. You can accomplish many of the tasks you do in the Lustre user interface using the Tangent CP100 control surface.
The Tangent CP100 control surface is only supported on the Master Station.

The Tangent CP100 Control Surface2
48
You can do the following tasks with the control surface:
• Customize the view
• Toggle play mode
• Cache memory
• Navigate the Storyboard
• Undo and redo operations
• Copy grades from one shot to another
• Create and modify keyframes
• Reposition shots
• Perform primary colour grading
• Modify Hue curves
• Perform secondary colour grading
HINT: While you learn how to do each of these tasks, show the user interface so that you can view
the results in the menus.
Most buttons and dials on the control surface are labelled. For information on connecting the Tangent CP100 control surface, refer to the Autodesk Lustre Software Installation Guide for your platform (see the “Related Documentation” section in your release notes).
GRADE
F1 F2 F3
F4 F5 F6
F7 F8 F9
CUT
IN OUT
EDIT
PREV NEXT
DELETE MOVE SELECT
UNDO REDO
MARK MIX
ALT
CLEAR
RECALLMEM
MODE.000
-321
+654
987
ALT
=====Grade|PanScn|Curves|HueCrv|Keyer|Geom
===== InPr |Sec 1| OutPr | Reset |Inside|Outside
Cache |ClipPl | Gui |GeomUI| Matte | Split
Red Bright |Green Bright| Blue BrightPrimary
Shadow Brigh | Mid Bright | High BrightPrimary
Red Contr | Green Contr | Blue ContrPrimary
Primary
Shadow Brightness Primary
Contrast Primary
Brightness 25 25 25 Primary
#0003.000025PERFM
DO

Customizing the View
49
To operate the control surface:
Do any of the following:
• Press a button to select the displayed option.
• Turn a dial to increase or decrease the value of the displayed channel or parameter. Turn clockwise to increase the value. Turn counter-clockwise to decrease it.
• Use the Player controls to navigate the Storyboard.
• Use the trackballs to modify the displayed parameter.
Customizing the ViewUse the controls on the lower right of the control surface to change the view as you work on your grades. For example, enable Half to view a half-resolution version of your shot in the Player.
You can select any of the following options.
Control Surface Description Hot Key or UI Option
GUI Toggles the full-screen Player. ENTER
Geom UI Shows or hides a geometry for the current secondary.
Show button in Secondaries menu
Matte Switches between secondary view and result view. F11 and F12
Split Switches on and off split view in the Player. When you enable Split, you can press the PERFM button to enable multi-view and view up to 16 shots, or press the CUE button to switch between horizontal and vertical split view. These buttons are located on the upper right of the control surface.
F5, F3, and F4
Half Switches between the full-resolution and half-resolution (proxy) version of your shot in the Player. If you have not rendered a proxy, an X appears in the Player.
F9
Zoom/Home Switches between the 1x and 2x zoom. F10
Render Switches between a rendered version of your shot and output view. If you have not rendered the shot, an X appears in the Player.
P
Label Toggles the shot name text on the image. W
PRIM Toggles the display of your shot. Displays your shot as it appears after modifications are made from the Grading or Curves menu, or as it currently appears (with the entire colour grade applied). You can use this option only after you have added secondaries.
I
Result Displays the shot as it currently appears—with the grade applied.
O

The Tangent CP100 Control Surface2
50
NOTE: Press the MORE button to view all the available options.
Toggling Play ModeYou can loop play a shot or the entire Storyboard using the ClipPL button. This button corresponds to the Play Mode button in the user interface.
Caching MemoryWhen a shot does not play back in real time, you can cache the frames into memory using the Cache button or by pressing M.
ALT
======
Cache|ClipPl| Gui |GeomUI| Matte | SplitMORE
buttonnames
ALT
===== Half | Home | Render |Label|Prim | Result
MORE
ALT
======
Cache|ClipPl| Gui |GeomUI| Matte | SplitMORE

Navigating the Storyboard
51
Navigating the StoryboardUse the Player controls on the lower right and the scrolling controls on the left to navigate the Storyboard.
Use the left dial (jog knob) and transport controls to play and scrub the Storyboard. You can also use the Alt button to switch between shots assigned to Playhead A and Playhead B.
Use the right dial to scroll through the shots in the Storyboard. When you scroll, a yellow arrow in the Storyboard marks your position. You can then select the shot by pressing the button next to the dial.
NOTE: If the shot is outlined in blue, you are in copy mode. See “Copying Grades” on page 55.
ALT
======
Cache|ClipPl| Gui |GeomUI| Matte | SplitMORE
Playhead button
Player Controls
ALT

The Tangent CP100 Control Surface2
52
You can show the Storyboard all the time or only when you scroll. To show the Storyboard all the time, press TAB on the keyboard. To show the Storyboard only when you scroll, first hide it by pressing TAB, and then scroll the Storyboard. In this mode, you hide the Storyboard again by pressing the button next to the scroll dial.
Undo ListThe undo list works differently on the control surface than it does in the user interface. Use the buttons on the lower right of the control surface to work with the undo list.
Saving to the Undo ListWhen you use the control surface, you must save your changes to the undo list. Undo lists are saved on a shot-by-shot basis. To save a change to the undo list, press Do. You can then press Undo and Redo to go through the undo list.
CUT
IN OUT
EDIT
PREV NEXT
DELETE MOVE SELECT
UNDO REDO
MARK
ALT
CLEAR
RECALLMEM
MODE000
-321
+654
987
#0003.000025
GRADE
MIX
.
PERFM
DO
press to select
to scroll

Undo List
53
Reverting to Previous GradesUse the Alt button on the lower right to toggle between the grade that was applied to a shot when you first selected it in the Storyboard and the current grade.
HINT: To save the reverted stage to the undo list, press Do.
Comparing GradesYou can compare the current image with the grade you last committed to the undo list. To toggle between these settings, use the Mix button.
CUT
IN OUT
EDIT
PREV NEXT
DELETE MOVE SELECT
UNDO REDO
MARK
ALT
CLEAR
RECALLMEM
MODE000
-321
+654
987
#0003.000025
GRADE
MIX
.
PERFM
DO

The Tangent CP100 Control Surface2
54
Resetting ParametersOn a shot-by-shot basis, you can reset the parameters set in some menus. You can also reset a single parameter.
CUT
IN OUT
EDIT
PREV NEXT
DELETE MOVE SELECT
UNDO REDO
MARK
ALT
CLEAR
RECALLMEM
MODE000
-321
+654
987
#0003.000025
GRADE
MIX
.
PERFM
DO

Copying Grades
55
To reset a parameter:
Press the Reset button associated with the dial or trackball.
To reset a menu:
Select the menu and then enable Reset. For example, select Geom, and then press Reset to clear all secondaries.
Copying GradesYou can temporarily or permanently copy a grade from another shot in the Storyboard to the current shot.
F1 F2 F3
F4 F5 F6
F7 F8 F9
Secondary 1
Contrast
Brightness
Center Hue | Width Hue | Soft Hue Secondary 1
Center Val | Width Val | Soft Val
Secondary 1 Center Sat | Width Sat | Soft Sat
Secondary 1 Hue Rotation | Gain | Saturation
Secondary 1
Secondary 1
Secondary 1
blur resetdial
brightnessdial and reset
brightnesstrackballand reset
====== Rect | Circle | Quad | Bezier | Reset | ByPass
======
Prmry | PanScn |Curves|HueCrv|Selectv|Geom

The Tangent CP100 Control Surface2
56
To copy grades:
1. Do one of the following:
• Press Prev or Next to temporarily apply the grade from the previous or next shot to the current shot (outlined in red or magenta). Press Prev or Next multiple times to move through the shots in the Storyboard. The selected shot is outlined in blue.
• Press Offset and then scroll through the shots. As you scroll, the grades are temporarily applied to the current shot (outlined in red or magenta). The selected shot is outlined in blue.
HINT: Press the Offset button again to switch to scroll mode.
2. Press Do to permanently copy the grade from the shot outlined in blue to the current shot.
Adding and Moving KeyframesWhen you animate parameters, you can set keyframes using the Mark button. You can also adjust the timing of the first and last keyframes in the shot.
CUT
IN OUT
EDIT
PREV NEXT
DELETE MOVE SELECT
UNDO REDO
MARK
ALT
CLEAR
RECALLMEM
MODE000
-321
+654
987
#0003.00002
GRADE
MIX
.
PERFM
DO
offset button

Repositioning Shots
57
To add a keyframe:
1. Go to the frame where you want to add the keyframe.
2. Press Mark.
To adjust the timing of an existing keyframe:
Do any of the following:
• Press In and then use the right dial to move the first keyframe.
• Press Out and then use the right dial to move the last keyframe.
Repositioning ShotsYou can reposition a shot by scaling it, or by panning it vertically and horizontally.
To reposition a shot:
1. Enable PanScn.
UNDO REDO
MARK
ALT
MIXDO
CUT
IN OUT
EDIT
CLEAR
MODE000
-321
+654
987
Move Last Mark #0003.000025
GRADE
.
PERFM
======
Grade|PanScn|Curves|HueCrv|Keyer|Geom
======
InPr | Sec1 | OutPr | Reset | Inside | Outside

The Tangent CP100 Control Surface2
58
2. Use the following controls to reposition the shot.
Primary Colour GradingYou can use the dials and trackballs in the centre of the control surface to perform primary colour grading. Primary colour grading can be done from the Grade menu.
Logarithmic Mode: Modifying Brightness and ContrastYou can modify brightness and contrast in several ways from the Grade menu. You can modify:
• Overall brightness and contrast of the red, green, and blue channels together
• Overall brightness and contrast of the red, green, and blue channels separately
• Brightness balance and contrast balance
• Brightness in the shadows, midtones, and highlights
To modify brightness and contrast:
1. Enable Grade and then do one of the following:
• Enable InPr to modify the input primary values.
• Enable OutPr to modify the output primary values.
Pan & Scan
Pan X | Pan Y |
Pan & Scan
Pan & Scan
Scale | | Pan & Scan
modify X axis
modify Y axis
Scale
=====Grade|PanScn|Curves|HueCrv|Keyer|Geom
===== InPr |Sec1 | OutPr | Reset |Inside|Outside

Primary Colour Grading
59
2. Use the following controls to perform primary colour grading.
Linear Mode: Modifying Gamma, Gain, and LiftYou can modify gamma, gain, and lift in several ways from the Grading menu. You can modify:
• Overall gamma, gain, and lift settings of the red, green, and blue channels together
• Overall gamma, gain, and lift settings of the red, green, and blue channels separately
• Gamma, gain, and lift balance settings
F1 F2 F3
F4 F5 F6
F7 F8 F9
Red Bright | Green Bright | Blue BrightPrimary
Shadow Brigh | Mid Bright | High Bright
Primary
Red Contr | Green Contr | Blue ContrPrimary
Primary
Shadow Brightness Primary
Contrast Primary
Brightness 25 25 25 Primary
controls overall brightness
overall contrast
printer lightsettings
overall brightness
brightness balance
contrastbalance
balancebrightness in:-shadows (F1)-midtones (F2)-highlights (F3)
modifybrightnessshadows (F1)midtones (F2)highlights (F3)
separatecontrols(same purpose)
Hue Rotation | Gain | Saturation

The Tangent CP100 Control Surface2
60
To modify gamma, gain, and lift:
1. Enable Grade and then do one of the following:
• Enable InPr to modify the input primary values.
• Enable OutPr to modify the input primary values.
2. Use the following controls to perform primary colour grading.
=====Grade|PanScn|Curves|HueCrv|Keyer|Geom
===== InPr |Sec1 | OutPr | Reset |Inside|Outside
F1 F2 F3
F4 F5 F6
F7 F8 F9
Red Gain | Green Gain | Blue GainPrimary
Red Lift | Green Lift | Blue Lift
Primary
Red Gamma | Green Gamma | Blue GammaPrimary
Primary
Lift Primary
Gamma Primary
GainPrimary
overall gamma
overall gain
gain balance
gammabalance
liftbalance
overalllift

Modifying the Hue, Saturation, and Lightness Curves
61
Modifying the Hue, Saturation, and Lightness CurvesYou can modify the hue, saturation, and lightness curves that appear in the Curves menu. You can modify the entire curve uniformly or modify individual vertices for RGBCMY channels (red, green, blue, cyan, magenta, and yellow). You must toggle between controls that modify the position of the red, green, and blue vertices and those that modify the position of the cyan, magenta, and yellow vertices.
To modify hue, saturation, and lightness curves:
1. Enable HueCrv to access controls for the red, green, and blue vertices.
2. Use the following controls to modify the hue, saturation, and lightness curve at each displayed vertex.
3. Press HueCrv again to access controls for the cyan, magenta, and yellow vertices, and then modify the curves.
Secondary Colour GradingYou can colour grade up to eight secondaries from the control surface.
=====Prmry |PanScn|Curves|HueCrv|Keyer| Geom
===== InPr | Sec1 | OutPr | Reset |Inside| Outside
Hue Curves Red Hue | Red Lig | Red Sat
Hue Curves
Green Hue | Green Lig | Green Sat
Hue Curves
Blue Hue | Blue Lig | Blue Sat Hue Curves
Master Hue | Master Lig | Master Sat

The Tangent CP100 Control Surface2
62
To access a secondary:
1. Enable Keyer.
The secondary controls for the first secondary appear. Once you enable and key a secondary, you can modify hue, gain, and saturation. You can also modify the brightness and contrast of the current secondary.
Sec | Keyer | Invert | Reset | Inside | Outside
===== Prmry|PanScn|Curves|HueCrv|Keyer|Geom
MORE
F1 F2 F3
F4 F5 F6
F7 F8 F9
Secondary 1
Contrast
Brightness
Center Hue | Width Hue | Soft Hue Secondary 1
Center Lig | Width Lig | Soft Lig
Secondary 1 Center Sat | Width Sat | Soft Sat
Secondary 1 Hue Rotational | Gain | Saturation
Secondary 1
Secondary 1
Secondary 1

Secondary Colour Grading
63
2. On the right side of the control surface, press Recall and then press a number between one and eight to go to that secondary. You can also press Selectv to toggle through the eight secondaries.
Applying Secondaries to the ShotUse the second row of buttons on the left side of the control surface to set basic parameters for secondaries.
Enable the Sec button to apply the displayed secondary to the shot.
Creating KeysEnable the Keyer button and then use the controls in the centre of the control surface to create a key.
Press: To:
Sec Switch on and off the current secondary.
Keyer Switch on and off the Keyer for the current secondary.
Invert Invert the key for the current secondary.
Reset Reset the key for the current secondary.
CLEAR
RECALLMEM
MODE000
-321
+654
987
#0003.000025
.
Sec | Keyer | Invert | Reset| Inside |Outside
===== Grade|PanScn|Curves|HueCrv|Keyer|Geom
MORE

The Tangent CP100 Control Surface2
64
To create a key:
1. Enable Keyer in the upper control surface menu, and then enable Keyer in the lower menu.
2. To sample initial softness and tolerance, press F1 on the control surface and then use the left trackball to position the colour picker over the image. Press F1 again to sample the image.
NOTE: Sampling from the control surface works slightly differently than sampling from the
Lustre user interface. When you sample from the control surface, the value and saturation
channels are set to the maximum softness. When you sample from the user interface, the value
and saturation channels are not set to maximum values.
3. Set the hue, brightness/gain, and saturation levels for the key. Each value is modified according to the original sample—you can adjust the centre tolerance value, as well as the softness and tolerance ranges.
F1 F2 F3
F4 F5 F6
F7 F8 F9
Secondary 1
Contrast
Brightness
Center Hue | Width Hue | Soft Hue Secondary 1
Center Lig | Width Lig | Soft Lig
Secondary 1 Center Sat | Width Sat | Soft Sat
Secondary 1 Hue Rotational | Gain | Saturation
Secondary 1
Secondary 1
Secondary 1

Secondary Colour Grading
65
4. Press More (upper left) to shrink, blur, or clean up the edges of the key.
The Cleanup, Shrink, and Blur controls appear.
Creating GeometriesYou can create and apply basic and free-form geometries to each secondary.
Sec | Keyer | Invert | Reset | Inside | Outside
Grade |PanScn|Curves|HueCrv| Keyer |Geom
MORE
F1 F2 F3
F4 F5 F6
F7 F8 F9
Secondary 1
Contrast
Brightness
Center Hue | Width Hue | Soft Hue Secondary 1
Center Lig | Width Lig | Soft Lig
Secondary 1 Center Sat | Width Sat | Soft Sat
Secondary 1 CleanUp | Shrink | Blur
Secondary 1
Secondary 1
Secondary 1

The Tangent CP100 Control Surface2
66
To create a geometry:
1. Enable Geom and then select the shape from the second row.
2. Use the controls in the centre of the control surface to modify the shape of the geometry, as well as its colour, opacity, and position on the image. You can also apply a blur.
3. To set softness, use the Geometry Softness dial.
====== Rect | Circle | Wipe | Reset | Inside|Outside
geometries
====== Grade |PanScn|Curves|HueCrv| Keyer |Geom
Secondary 1
Center X | Center Y | Size Secondary 1
Colour | Opacity | Blur
Secondary 1 Size X | Size Y | Rotation
Secondary 1
Hue Rotational | Gain | Saturation
F1 F2 F3
F4 F5 F6
F7 F8 F9
Contrast
Brightness Secondary 1Geometry Softness
Secondary 1
Secondary 1

Secondary Colour Grading
67
4. To apply logical operations to the geometry, or invert the geometry, press the More button associated with the second row on the left.
Moving GeometriesYou can move geometries from the control surface.
To move a geometry:
1. To select a geometry, press F1 on the control surface and then use the left trackball to position the cursor over the geometry. Press F1 again to select it. Alternatively, press F2 and F3 to move back and forth through the geometries (listed in the Axes list).
2. Use the left trackball to move the geometry.
====== Prmry|PanScn|Curves|HueCrv|Selectv|Geom
====== Link | and | or | Minus | | Invert
F1 F2 F3
F4 F5 F6
F7 F8 F9
Contrast
Brightness Secondary 1Geometry Softness
Secondary 1
Secondary 1

The Tangent CP100 Control Surface2
68

index
69
Index
Aanimating
with the Tangent CP100 56Autodesk control surface
individual surface descriptions 2overview 2
Bbypassing
menus with the Autodesk control surface 22
Ccaching
memory with the Tangent CP100 50colour grading
curves grading 34, 61primaries with the Autodesk control surface
24secondaries with the Autodesk control sur-
face 41secondaries with the Tangent CP100 61
comparinggrades with the Autodesk control surface 16grades with the Tangent CP100 53
control surfacesAutodesk control surface 2Tangent CP100 47
copyinggrades with the Autodesk control surface 18grades with the Tangent CP100 55
cursoractivating on the Autodesk control surface 9
curves colour grading
with the Autodesk control surface 34with the Tangent CP100 61
customizingthe view with the Autodesk control surface 10the view with the Tangent CP100 49
Ggeometries
creating with the Autodesk control surface 41creating with the Tangent CP100 65
Grade binaccessing with the Autodesk control surface
16grades
applying from the Grade bin 16comparing with the Autodesk control surface
16comparing with the Tangent CP100 53copying with the Autodesk control surface 18copying with the Tangent CP100 55reverting to previous with the Autodesk con-
trol surface 15reverting to previous with the Tangent CP100
53grading
See colour grading
Kkeyframes
adding and moving with the Tangent CP100 56
keyingwith the Autodesk control surface 37with the Tangent CP100 63

70
Index
LLinear mode
grading with the Autodesk control surface 30grading with the Tangent CP100 59
Logarithmic modegrading with the Autodesk control surface 25grading with the Tangent CP100 58
loopingusing the Autodesk control surface 8using the Tangent CP100 50
Mmemory
caching with the Tangent CP100 50menus
bypassing with the Autodesk control surface 22
resetting with the Autodesk control surface 22
resetting with the Tangent CP100 54mouse functionality
activating on the Autodesk control surface 9
Nnavigating
with the Autodesk control surface 5with the Tangent CP100 51
Ppanning
with the Autodesk control surface 9parameters
resetting with the Tangent CP100 54play modes
toggling with the Autodesk control surface 8toggling with the Tangent CP100 50
playheadstoggling with the Autodesk control surface 14
primary colour gradingin Linear mode with the Autodesk control
surface 30in Linear mode with the Tangent CP100 59in Logarithmic mode with the Autodesk con-
trol surface 25in Logarithmic mode with the Tangent CP100
58
Rredoing
with the Autodesk control surface 15with the Tangent CP100 52
reference imagestoggling playheads with the Autodesk control
surface 14repositioning
shots with the Autodesk control surface 23shots with the Tangent CP100 57
resettingwith the Autodesk control surface 22with the Tangent CP100 54
reverting to previousgrades with the Autodesk control surface 15grades with the Tangent CP100 53
Ssecondary colour grading
creating geometries with the Autodesk con-trol surface 41
creating geometries with the Tangent CP100 65
creating keys with the Autodesk control sur-face 37
creating keys with the Tangent CP100 63with the Tangent CP100 61
shotsrepositioning with the Autodesk control sur-
face 23repositioning with the Tangent CP100 57
Storyboardnavigating with the Autodesk control surface
5storyboard
navigating with the Tangent CP100 51
TTangent CP100
overview 47
Uundoing
with the Autodesk control surface 15with the Tangent CP100 52

Index
71
Vview options
accessing with the Autodesk control surface 10
accessing with the Tangent CP100 49
Zzooming
with the Autodesk control surface 9

72
Index