User’s Guide Release 8 - Oracle Help Center Argus Interchange User’s Guide Release 8.1 ... (R3)...
70
Oracle® Argus Interchange User’s Guide Release 8.1 E74380-01 September 2016
Transcript of User’s Guide Release 8 - Oracle Help Center Argus Interchange User’s Guide Release 8.1 ... (R3)...
Oracle® Argus InterchangeUser’s Guide
Release 8.1
E74380-01
September 2016

Oracle Argus Interchange User’s Guide Release 8.1
E74380-01
Copyright © 2016 Oracle and/or its affiliates. All rights reserved.
This software and related documentation are provided under a license agreement containing restrictions on use and disclosure and are protected by intellectual property laws. Except as expressly permitted in your license agreement or allowed by law, you may not use, copy, reproduce, translate, broadcast, modify, license, transmit, distribute, exhibit, perform, publish, or display any part, in any form, or by any means. Reverse engineering, disassembly, or decompilation of this software, unless required by law for interoperability, is prohibited.
The information contained herein is subject to change without notice and is not warranted to be error-free. If you find any errors, please report them to us in writing.
If this is software or related documentation that is delivered to the U.S. Government or anyone licensing it on behalf of the U.S. Government, the following notice is applicable:
U.S. GOVERNMENT END USERS: Oracle programs, including any operating system, integrated software, any programs installed on the hardware, and/or documentation, delivered to U.S. Government end users are "commercial computer software" pursuant to the applicable Federal Acquisition Regulation and agency-specific supplemental regulations. As such, use, duplication, disclosure, modification, and adaptation of the programs, including any operating system, integrated software, any programs installed on the hardware, and/or documentation, shall be subject to license terms and license restrictions applicable to the programs. No other rights are granted to the U.S. Government.
This software or hardware is developed for general use in a variety of information management applications. It is not developed or intended for use in any inherently dangerous applications, including applications that may create a risk of personal injury. If you use this software or hardware in dangerous applications, then you shall be responsible to take all appropriate fail-safe, backup, redundancy, and other measures to ensure its safe use. Oracle Corporation and its affiliates disclaim any liability for any damages caused by use of this software or hardware in dangerous applications.
Oracle and Java are registered trademarks of Oracle and/or its affiliates. Other names may be trademarks of their respective owners.
Intel and Intel Xeon are trademarks or registered trademarks of Intel Corporation. All SPARC trademarks are used under license and are trademarks or registered trademarks of SPARC International, Inc. AMD, Opteron, the AMD logo, and the AMD Opteron logo are trademarks or registered trademarks of Advanced Micro Devices. UNIX is a registered trademark of The Open Group.
This software or hardware and documentation may provide access to or information about content, products, and services from third parties. Oracle Corporation and its affiliates are not responsible for and expressly disclaim all warranties of any kind with respect to third-party content, products, and services unless otherwise set forth in an applicable agreement between you and Oracle. Oracle Corporation and its affiliates will not be responsible for any loss, costs, or damages incurred due to your access to or use of third-party content, products, or services, except as set forth in an applicable agreement between you and Oracle.

iii
Contents
Preface ................................................................................................................................................................. vi
Audience....................................................................................................................................................... viThe Oracle Health Sciences Safety Suite .................................................................................................. viDocumentation Accessibility .................................................................................................................... viiRelated Documents .................................................................................................................................... viiChecking My Oracle Support .................................................................................................................. viiiConventions ............................................................................................................................................... viii
1 About Argus Interchange
Argus Interchange Process Overview .................................................................................................. 1-1ICSR ............................................................................................................................................................ 1-2
Minimum Requirement for Electronic Report Generation .......................................................... 1-3
2 Configuring Argus Interchange
ESM Mapping Utility .............................................................................................................................. 2-1Configuring Argus Interchange Service ......................................................................................... 2-1
Service INI File Setup Dialogue Box ........................................................................................ 2-2Adding a Database for Argus Interchange Service....................................................................... 2-3
Service DB Setup Fields ............................................................................................................. 2-3Argus Console ........................................................................................................................................... 2-5
Configuring Regulatory Authorities ............................................................................................... 2-5Configuring Code List Items ............................................................................................................ 2-6
3 Configuring Argus Interchange - Web
Web-based Interchange Mapping ......................................................................................................... 3-1Navigating to Interchange Mapping............................................................................................... 3-1Managing Profiles .............................................................................................................................. 3-1
Defining a Profile ........................................................................................................................ 3-2Printing a Profile ...................................................................................................................... 3-10Copying a Profile ..................................................................................................................... 3-10Deleting a Profile...................................................................................................................... 3-10
Comparing Profiles ......................................................................................................................... 3-11Comparing Profile Dialog Box Fields ................................................................................... 3-12
ICSR Codes Translation ................................................................................................................. 3-13ICSR Codes Translation Fields............................................................................................... 3-13
iv
Configuring ICSR Codes Translation ................................................................................... 3-13Viewing the Audit Log................................................................................................................... 3-14
Audit Log Dialog Box Fields .................................................................................................. 3-15E2B Extensions................................................................................................................................. 3-15
4 Validating ICSR Reports
Why perform an ICSR check? ................................................................................................................ 4-1Report Generation Validations .............................................................................................................. 4-2Validation Rules ....................................................................................................................................... 4-3
5 Transmitting and Monitoring Reports
Logging In and Out of Argus Safety .................................................................................................... 5-1To Log Out of the Argus Application ............................................................................................. 5-2
Scheduling Reports.................................................................................................................................. 5-2New Expedited Report Dialogue Fields ......................................................................................... 5-3Nullification Reports ......................................................................................................................... 5-5Follow-Up eMDR Reports ................................................................................................................ 5-7Follow-up eVAERS Reports ............................................................................................................. 5-8
Generating Reports .................................................................................................................................. 5-9Attachments in Reports..................................................................................................................... 5-9
Transmitting Reports ............................................................................................................................ 5-10Transmitting ICSR Reports ............................................................................................................ 5-10Transmitting Bulk Reports by Form............................................................................................. 5-10Monitoring ICSR Transmit Status................................................................................................. 5-12
ICSR Transmit Status Fields ................................................................................................... 5-13Message Acknowledgement Status Dialogue Fields .......................................................... 5-14
Monitoring ICSR Receive Status ................................................................................................... 5-14ICSR Receive Status Dialogue Fields .................................................................................... 5-14Message Acknowledgement Status Dialogue Fields .......................................................... 5-15Validation Check of Incoming Message ............................................................................... 5-16
Viewing Status................................................................................................................................. 5-19Viewing Acknowledgement Information.................................................................................... 5-19
6 Using the ICSR Viewer
Opening the ICSR Viewer ...................................................................................................................... 6-1Exporting an XML File ............................................................................................................................ 6-1
7 Importing E2B Reports
Incoming E2B Reports ............................................................................................................................. 7-1Conversion of E2B (R3) reports to E2B (R2) format (applicable only for E2B (R3) reports) ... 7-1Searching for Duplicate Cases.......................................................................................................... 7-1
Duplicate Search Dialogue Box Fields ..................................................................................... 7-2Using the View Differences Report ................................................................................................. 7-3
Displaying Differences ............................................................................................................... 7-4Viewing the E2B Report .................................................................................................................... 7-4

v
Accepting Single/Multiple E2B Reports ........................................................................................ 7-5E2B Initial/Follow-up Intake ........................................................................................................... 7-5E2B Follow-up Acceptance for Closed/Locked Cases ................................................................. 7-7
Processed ICSR Reports .......................................................................................................................... 7-7
vi
Preface
This Guide provides documentation on the tasks related to the handling of E2B reports in Argus Safety. These include configuration, validation, viewing, transmitting, monitoring and import of E2B reports.
AudienceThis document is intended for the users and administrators of the Argus Interchange application.
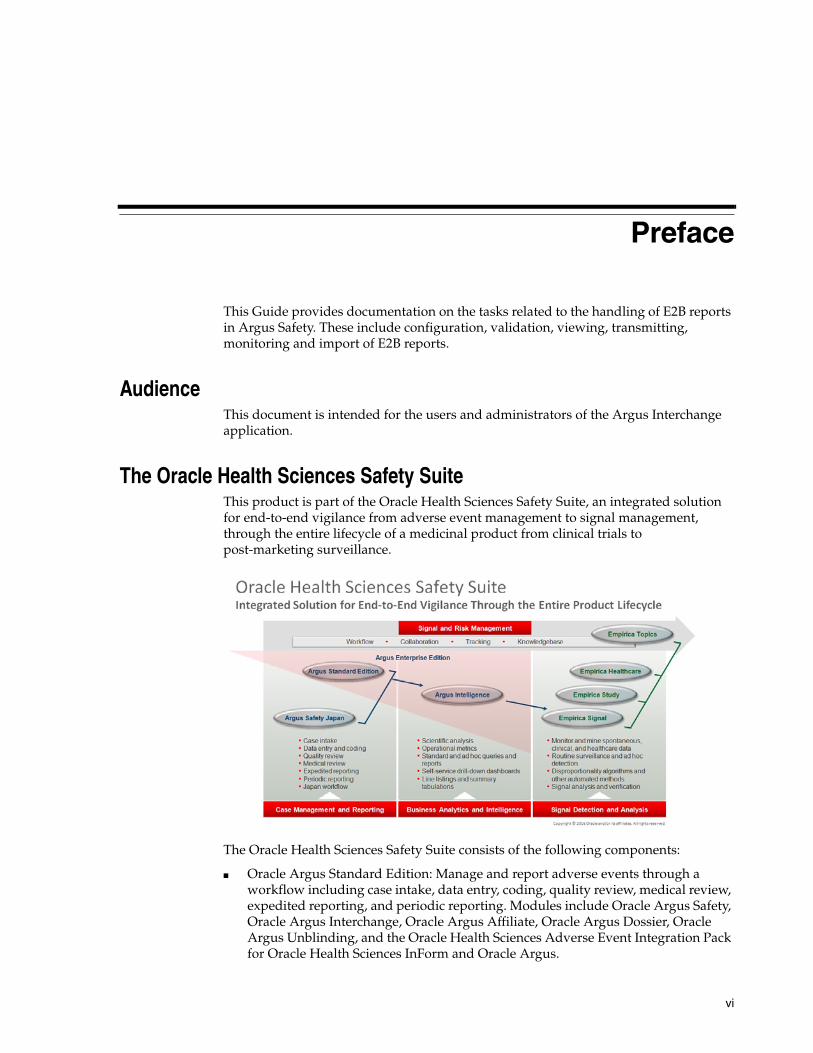
The Oracle Health Sciences Safety SuiteThis product is part of the Oracle Health Sciences Safety Suite, an integrated solution for end-to-end vigilance from adverse event management to signal management, through the entire lifecycle of a medicinal product from clinical trials to post-marketing surveillance.
The Oracle Health Sciences Safety Suite consists of the following components:
■ Oracle Argus Standard Edition: Manage and report adverse events through a workflow including case intake, data entry, coding, quality review, medical review, expedited reporting, and periodic reporting. Modules include Oracle Argus Safety, Oracle Argus Interchange, Oracle Argus Affiliate, Oracle Argus Dossier, Oracle Argus Unblinding, and the Oracle Health Sciences Adverse Event Integration Pack for Oracle Health Sciences InForm and Oracle Argus.
vii
■ Oracle Argus Enterprise Edition: In addition to managing the adverse event workflow and reporting, employ a powerful and flexible business analytics and intelligence platform for both scientific analysis and operational metrics. Modules include Oracle Argus Analytics, Oracle Argus Insight, Oracle Argus Mart, Oracle Argus Safety, Oracle Argus Interchange, Oracle Argus Affiliate, Oracle Argus Dossier, Oracle Argus Unblinding, and the Oracle Health Sciences Adverse Event Integration Pack for Oracle Health Sciences InForm and Oracle Argus.
■ Oracle Argus Safety Japan: Manage and report adverse events in Japan, and connect the global and local workflows using a single database.
■ Oracle Health Sciences Empirica Topics: Manage and document safety signals through a workflow including validation, prioritization, assessment, confirmation/refutation, and resulting actions.
■ Oracle Health Sciences Empirica Study: Detect and analyze safety signals in clinical trial data including adverse events, clinically significant labs, electrocardiograms, vital signs, and shifts from baseline.
■ Oracle Health Sciences Empirica Signal: Detect and analyze safety signals in post-marketing spontaneous adverse reaction data including public health authority databases and/or private inhouse databases such as Oracle Argus.
■ Oracle Health Sciences Empirica Healthcare Analysis: Evaluate safety signals in healthcare data including electronic medical records and administrative claims, and support pharmacoepidemiology, comparative effectiveness analysis, and health economics and outcomes research.
For more information on Argus Safety, visit the Oracle Health Sciences Safety suite page at:
http://www.oracle.com/goto/pharmacovigilance.html
Documentation AccessibilityFor information about Oracle's commitment to accessibility, visit the Oracle Accessibility Program website at http://www.oracle.com/pls/topic/lookup?ctx=acc&id=docacc.
Access to Oracle SupportOracle customers have access to electronic support through My Oracle Support. For information, visit http://www.oracle.com/pls/topic/lookup?ctx=acc&id=info or visit http://www.oracle.com/pls/topic/lookup?ctx=acc&id=trs if you are hearing impaired.
Related DocumentsThis section lists the manuals for Oracle Argus products. You can order printed manuals from the Oracle iStore.
Oracle Argus Documentation
The documentation set includes:
■ Argus Safety Affiliate User Guide

viii
■ Argus Safety Administrator’s User Guide
■ Argus Safety Dossier User Guide
■ Argus Safety Interchange User Guide
■ Argus Safety Installation Guide
■ Argus Safety Service Administrator Guide
■ Argus Safety Flexible Aggregate Reporting Extensibility Guide
■ Argus Safety BIP Aggregate Reporting User's Guide
■ Argus Safety User’s Guide
■ Argus Safety Unblinding User Guide
■ Argus Safety Minimum Security Configuration Guide
■ Argus Safety Japanese Administrator’s Guide
■ Argus Interchange Japanese User’s Guide
■ Argus Safety Japanese User’s Guide
Checking My Oracle SupportThe Oracle Argus Safety product suite continues to grow and evolve. To help you use it and stay abreast of updates we provide between releases, it is a good practice to check My Oracle Support for information that enhances our released documentation.
To open the Oracle Argus Safety product page on My Oracle Support, complete the following steps:
1. Open a Web browser to http:/support.oracle.com.
2. Click Sign In and enter your user information.
The My Oracle Support portal opens, displaying general news from several categories. If you do not yet have an account, click Register here and follow the instructions given on the registration page.
3. Click Knowledge.
4. In the Browse any Product, by Name field, enter Oracle Argus Safety.
5. Click Go. My Oracle Support loads the Oracle Argus Safety Knowledge Browser Product Page.
ConventionsThe following text conventions are used in this document:
Convention Meaning
boldface Boldface type indicates graphical user interface elements associated with an action, or terms defined in text or the glossary.
italic Italic type indicates book titles, emphasis, or placeholder variables for which you supply particular values.
monospace Monospace type indicates commands within a paragraph, URLs, code in examples, text that appears on the screen, or text that you enter.

1
About Argus Interchange 1-1
1About Argus Interchange
Oracle Argus Interchange is an electronic submission and exchange module that enables the transmission of required ICH:E2B reporting functionality as well as the exchange of vital drug safety information with regulators and partners worldwide. Cases are reported instantly and accurately using standardized, worldwide reporting and transmission processes.
A color-coded graphical display provides peace of mind by delivering real-time insight into transmission status. Further, Argus Interchange is seamlessly integrated with Oracle Argus Safety, facilitating import, export, and transmission of cases. In addition, it supports immediate case triage upon electronic intake of data.
Argus Interchange provides the critical link to connect the pre-clinical and post-marketing safety information domains. This is the crucial component enabling pharma companies to communicate between their e-clinical and safety systems, delivering immediate return on investment gains. Argus Interchange will allow any standards-based systems (ICH:E2B to CDISC:ODM) to instantly exchange adverse events data. It thereby eliminates costly data entry redundancy and any possibility for introduction of errors.
Argus Interchange Process OverviewThe following flowchart shows the steps to follow when using Argus Interchange.
The following table describes each of the steps in the preceding flowchart.
Note: The term E2B that is used in this document refers to E2B (R2), E2B (R3), eVAERS and E2B (R3)reports.

ICSR
About Argus Interchange 1-2
The following flowchart displays the steps to import E2B Reports through Argus Interchange:
The following table describes each of the steps in the preceding flowchart.
ICSRICSR is a a report that contains information describing a suspected adverse drug reaction related to the administration of one or more medicinal products to an individual patient.
Task Description
Logging on Explains how to log on to Argus Safety.
Schedule E2B Report Explains how to schedule an E2B Report for a case using the New Expedited Report Dialogue.
View E2B Report Explains how to view a scheduled E2B Report in the ICSR Viewer and check for validation errors.
Transmit E2B Report Explains how to transmit E2B reports by using the Bulk Reporting features in Argus Safety.
View Status Explains how to view and understand the status of a transmitted E2B report.
View Acknowledgement Explains how to view the detailed acknowledgement information from a trading partner or a regulatory authority.
Task Description
Incoming E2B Reports Explains how to view Incoming E2B Reports.
View E2B Reports Explains how to view an Incoming E2B Report in the ICSR Viewer.
Duplicate Search Explains how to search for possible duplicate cases in the Argus Safety system.
View Difference Report Explains how to view differences between the current XML being imported (a message not yet imported into the database), the current case data in the database and the last imported case.
Accept/Reject Explains how to accept or reject single/multiple E2B Follow-up/Initial reports.
View Process ICSR Reports Explains how to view the Processed ICSR Reports.

ICSR
About Argus Interchange 1-3
E2B is the international standard for transmitting medicine adverse event reports specified by the International Conference on Harmonisation of Technical Requirements for Registration of Pharmaceuticals for Human Use (ICH).
Minimum Requirement for Electronic Report GenerationThe minimum requirements (mandatory) for generating an ICSR report are as follows:
1. One identifiable patient - any one of several data elements is considered sufficient to define an identifiable patient (such as initials, age, sex)
2. One identifiable reporter - any one of several data elements is considered sufficient to define an identifiable reporter (such as initials, address, qualifications)
3. One adverse event/reaction (or outcome), and
4. One suspect or interacting drug
Reporting Destination can be configured with a message profile for E2B(R2), E2B(R3), eMDR or eVAERS report form.
E2B (R2) report contains the following information:
A: Administrative and Identification Information
A.1 - Identification of the case safety report
A.2 - Primary source(s) of information
A.3 - Information on sender and receiver of case safety report
B: Information on the Case:
B.1 - Patient characteristics
B.2 - Reaction(s)/event(s)
B.3 - Results of tests and procedures relevant to the investigation of the patient
B.4 - Drug(s) information
B.5 - Narrative case summary and further information
E2B (R3) and eVAERS reports are built using HL7 version 3 (V3) messaging standards with the following sections:
Section A:
C.1 - Identification of the Case Safety Report
C.2 - Primary Source(s) of Information
C.3 - Information on Sender of Case Safety Report
C.4 - Literature Reference(s)
C.5 - Study Identification
Section B
D - Patient Characteristics
E - Reaction(s)/Event(s)
F - Results of Tests and Procedures Relevant to the Investigation of the Patient
G - Drug(s) Information, and
H - Narrative Case Summary and Further Information

ICSR
About Argus Interchange 1-4
eMDR reports are built using HL7 version 3 (V3) messaging standards with the following sections:
A - Patient Information
B - Adverse Event or Product Problem
D - Suspect medical device
E - Initial Reporter
F - For Use by User Facility/Importer (Devices Only)
G - All manufacturers
H - Device manufacturers only
The following are the key features of reports in HL7 format:
1. Structure and Cardinality - Messages are built using Health Level 7 Version 3 (HL7 V3) messaging standard.
2. International Standard Code Sets - International Standard Code Sets are used in HL7 messages: ISO 5218, ISO 639-2, NCI and UCUM.
3. Null flavors - ICH ICSR uses the codes from the HL7 Messaging Standard to categorize exceptions. Null flavor such as NI, NA, UNK enables transmission of an empty element and provides an explanation for the reason for the lack of data using codes. Confidential information such as Patient or Reporter’s name and address can be masked by the sender due to security, privacy or other reasons by using MSK Null flavor.
4. Attachments can be presented in-line within the ICSR message itself. In-line data is transmitted as part of the encapsulated data value in the ICSR message.

2
Configuring Argus Interchange 2-1
2Configuring Argus Interchange
This section is intended for Argus Interchange Administrators. The flowchart shows the steps to follow when configuring, reviewing, and administering Argus Interchange.
ESM Mapping UtilityArgus Interchange mapping utility helps to configure the Argus Interchange Service. This chapter provides the following information:
■ Configuring Argus Interchange Service
■ Adding a Database for Argus Interchange Service
Configuring Argus Interchange ServiceYou can configure the Argus Interchange Service by updating the initialization (INI) file from the Argus Interchange Mapping interface.
1. In the Windows 2012/2012R2 server, navigate to Apps and click on ESM Mapping tool. This opens the Service INI set up Dialogue box.

ESM Mapping Utility
Configuring Argus Interchange 2-2
2. Use the items in the Service INI File Setup Dialogue to configure the Argus Interchange Service INI file.
3. Enter the data for each field as required.
Service INI File Setup Dialogue BoxThe following tables lists and describes the fields in the Service INI File Setup Dialogue box.
Item Description
IT E-mail Enter the e-mail address that Argus Interchange Service should use to send e-mails, if the transmit time out occurs for Physical Media or EDI Gateway.
Business E-mail Enter the e-mail address that Argus Interchange Service should use to send e-mails, if the Receive ACK time-out value is reached.
User E-mail Enter the e-mail address that Argus Interchange Service should use to send e-mails, when the user does not process the E2B Report within the time-out value. The Argus Interchange Service uses SMTP as its mail system.
Sender E-mail Enter the e-mail address that Argus Interchange Service should display, as the ’From’ address in the e-mails that it sends.
EDI Gateway Select the name for the EDI Gateway - from either Axway Cyclone or Oracle B2B.
EDI Database Name Enter the database name for the EDI software.
EDI User ID Enter the user name for EDI database.
EDI Password Enter the password for the user name associated with the EDI database.
DTD Path Enter the path for the DTD file.
Log File Path Enter the path where the Argus Interchange Service will write the log files.

ESM Mapping Utility
Configuring Argus Interchange 2-3
Adding a Database for Argus Interchange ServiceYou can configure the Argus Interchange Service to support multiple database.
To configure a database:
1. In the Setup INI File Dialogue box, double click Add New Process to open the Service DB Setup Dialogue.
2. Use the items in the Service DB Setup Dialogue to configure the ESM Service INI file.
3. Enter the data in the fields as required.
Service DB Setup FieldsThe following table lists and describes the fields in the Service DB Setup Dialogue box.
Multiple Database Section
Displays all the configured databases for ESM Service.
Delete Button Click Delete to remove the entire Database Configuration from ESM Service INI File.
Note: ESM Service.ini can be configured for MAX_FILES_IMPORT_PER_RUN at database level under the Database section. This should be set to a number. This determines how many files are read from incoming folder so as to allocate to Receive Process(es). This includes both ICSR reports and Acknowledgments. If it is not defined, an internal limit of 1000 is assumed.
Item Description
ESM Mapping Utility
Configuring Argus Interchange 2-4
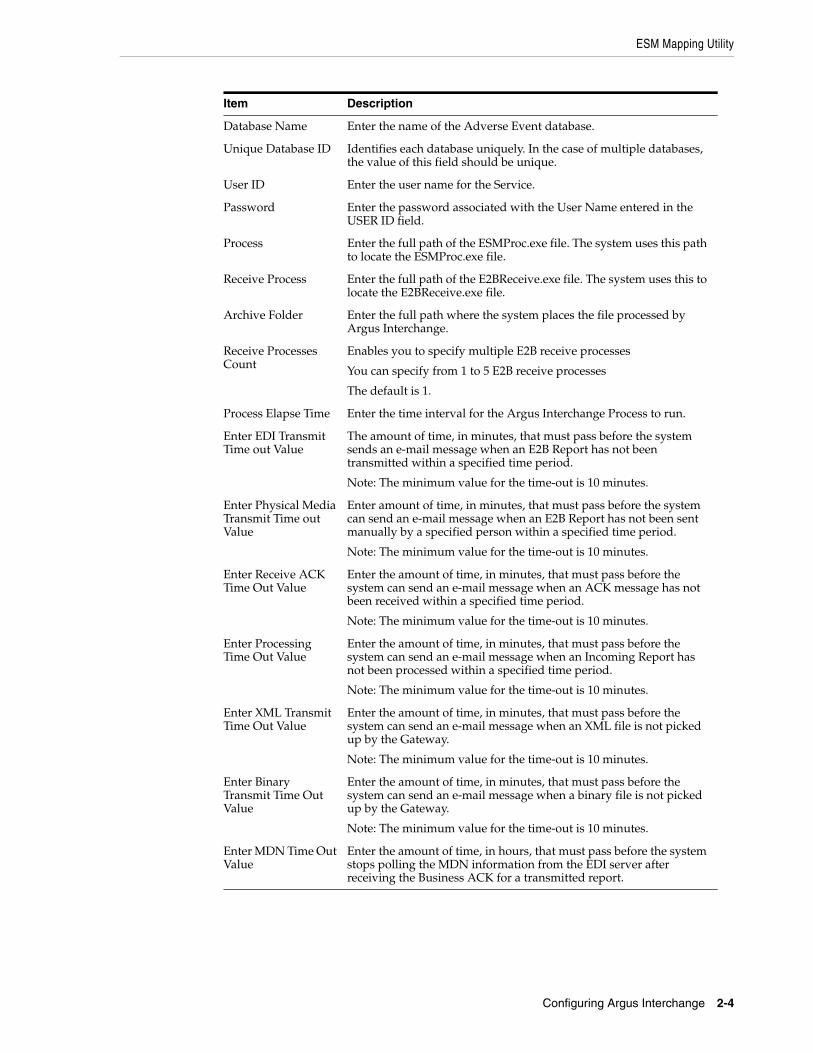
Item Description
Database Name Enter the name of the Adverse Event database.
Unique Database ID Identifies each database uniquely. In the case of multiple databases, the value of this field should be unique.
User ID Enter the user name for the Service.
Password Enter the password associated with the User Name entered in the USER ID field.
Process Enter the full path of the ESMProc.exe file. The system uses this path to locate the ESMProc.exe file.
Receive Process Enter the full path of the E2BReceive.exe file. The system uses this to locate the E2BReceive.exe file.
Archive Folder Enter the full path where the system places the file processed by Argus Interchange.
Receive Processes Count
Enables you to specify multiple E2B receive processes
You can specify from 1 to 5 E2B receive processes
The default is 1.
Process Elapse Time Enter the time interval for the Argus Interchange Process to run.
Enter EDI Transmit Time out Value
The amount of time, in minutes, that must pass before the system sends an e-mail message when an E2B Report has not been transmitted within a specified time period.
Note: The minimum value for the time-out is 10 minutes.
Enter Physical Media Transmit Time out Value
Enter amount of time, in minutes, that must pass before the system can send an e-mail message when an E2B Report has not been sent manually by a specified person within a specified time period.
Note: The minimum value for the time-out is 10 minutes.
Enter Receive ACK Time Out Value
Enter the amount of time, in minutes, that must pass before the system can send an e-mail message when an ACK message has not been received within a specified time period.
Note: The minimum value for the time-out is 10 minutes.
Enter Processing Time Out Value
Enter the amount of time, in minutes, that must pass before the system can send an e-mail message when an Incoming Report has not been processed within a specified time period.
Note: The minimum value for the time-out is 10 minutes.
Enter XML Transmit Time Out Value
Enter the amount of time, in minutes, that must pass before the system can send an e-mail message when an XML file is not picked up by the Gateway.
Note: The minimum value for the time-out is 10 minutes.
Enter Binary Transmit Time Out Value
Enter the amount of time, in minutes, that must pass before the system can send an e-mail message when a binary file is not picked up by the Gateway.
Note: The minimum value for the time-out is 10 minutes.
Enter MDN Time Out Value
Enter the amount of time, in hours, that must pass before the system stops polling the MDN information from the EDI server after receiving the Business ACK for a transmitted report.
Argus Console
Configuring Argus Interchange 2-5
Argus ConsoleThe Argus Console enables you to configure the Regulatory Authorities to which E2B Reports need to be submitted. In accordance with ICH Guidelines, you can configure additional Code List items with new E2B codes.
This section includes discussions of the following:
■ Configuring Regulatory Authorities
■ Configuring SMTP
■ Configuring Code List Items
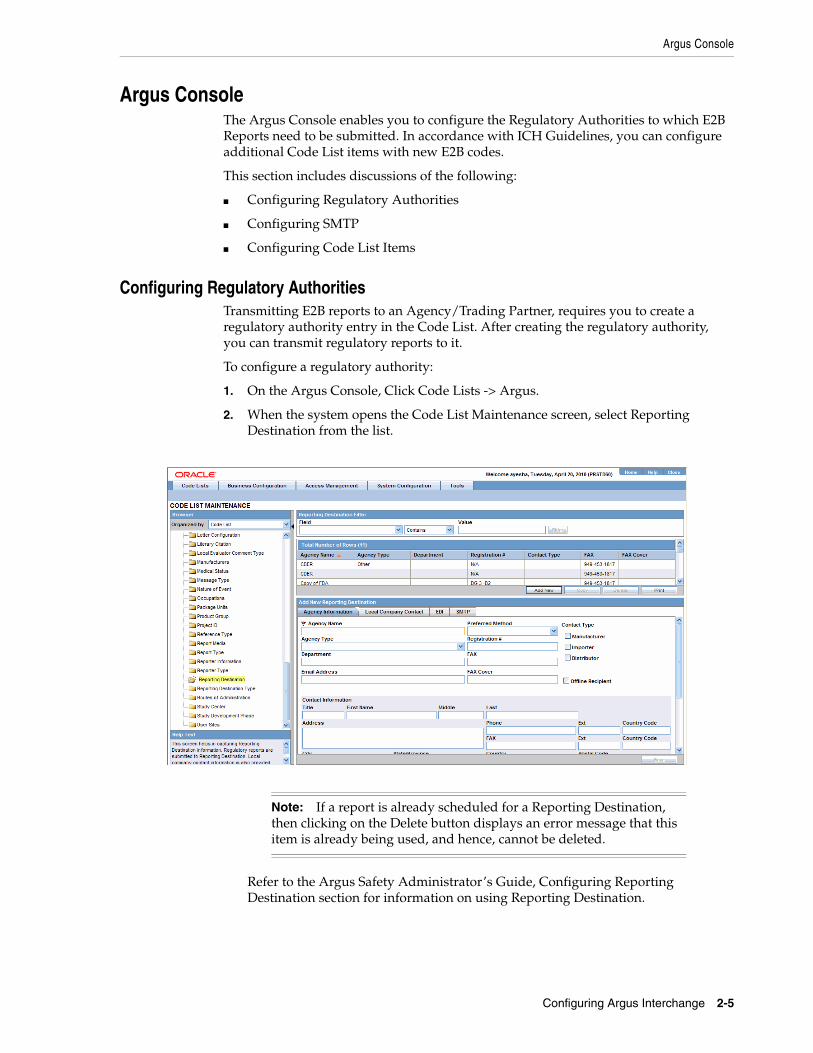
Configuring Regulatory AuthoritiesTransmitting E2B reports to an Agency/Trading Partner, requires you to create a regulatory authority entry in the Code List. After creating the regulatory authority, you can transmit regulatory reports to it.
To configure a regulatory authority:
1. On the Argus Console, Click Code Lists -> Argus.
2. When the system opens the Code List Maintenance screen, select Reporting Destination from the list.
Refer to the Argus Safety Administrator’s Guide, Configuring Reporting Destination section for information on using Reporting Destination.
Note: If a report is already scheduled for a Reporting Destination, then clicking on the Delete button displays an error message that this item is already being used, and hence, cannot be deleted.
Argus Console
Configuring Argus Interchange 2-6
Configuring Code List ItemsArgus Safety Codelist values are associated to E2B Codes for the applicable factory data items. If you enter new codelist values, appropriate E2B codes must be entered for sending the newly added data in E2B reports.

3
Configuring Argus Interchange - Web 3-1
3Configuring Argus Interchange - Web
This chapter provides information on configuring web-based Argus Interchange.
Web-based Interchange MappingThis section contains the following sections:
■ Navigating to Interchange Mapping
■ Managing Profiles
■ Comparing Profiles
■ ICSR Codes Translation
■ Viewing the Audit Log
■ E2B Extensions
Navigating to Interchange MappingThis section provides information on navigating to the Interchange Mapping menu.
To navigate to the Interchange Mapping menu:
1. Open Argus Console.
2. Go to System Configuration ->Interchange Mapping.
Managing ProfilesArgus Interchange Mapping provides the following standard Message and Acknowledgement profiles:
■ ICH-ICSR V2.1 MESSAGE TEMPLATE
■ ICH-ICSR V2.1 MESSAGE TEMPLATE - EMA

Web-based Interchange Mapping
Configuring Argus Interchange - Web 3-2
■ ICH-ICSR V2.1 MESSAGE TEMPLATE - FDA
■ ICH-ICSR V3.0 MESSAGE TEMPLATE
■ ICH-ICSR V1.1 ACKNOWLEDGEMENT TEMPLATE
■ ICH-ICSR V1.1 ACKNOWLEDGEMENT TEMPLATE - EMA
■ ICH-ICSR V1.1 ACKNOWLEDGEMENT TEMPLATE - FDA
■ CBER EVAERS V1.0 MESSAGE TEMPLATE
■ CDRH eMDR V1.0 MESSAGE TEMPLATE
This section provides information about working with profiles and includes discussions of the following:
■ Defining a Profile
■ Printing a Profile
■ Copying a Profile
■ Deleting a Profile
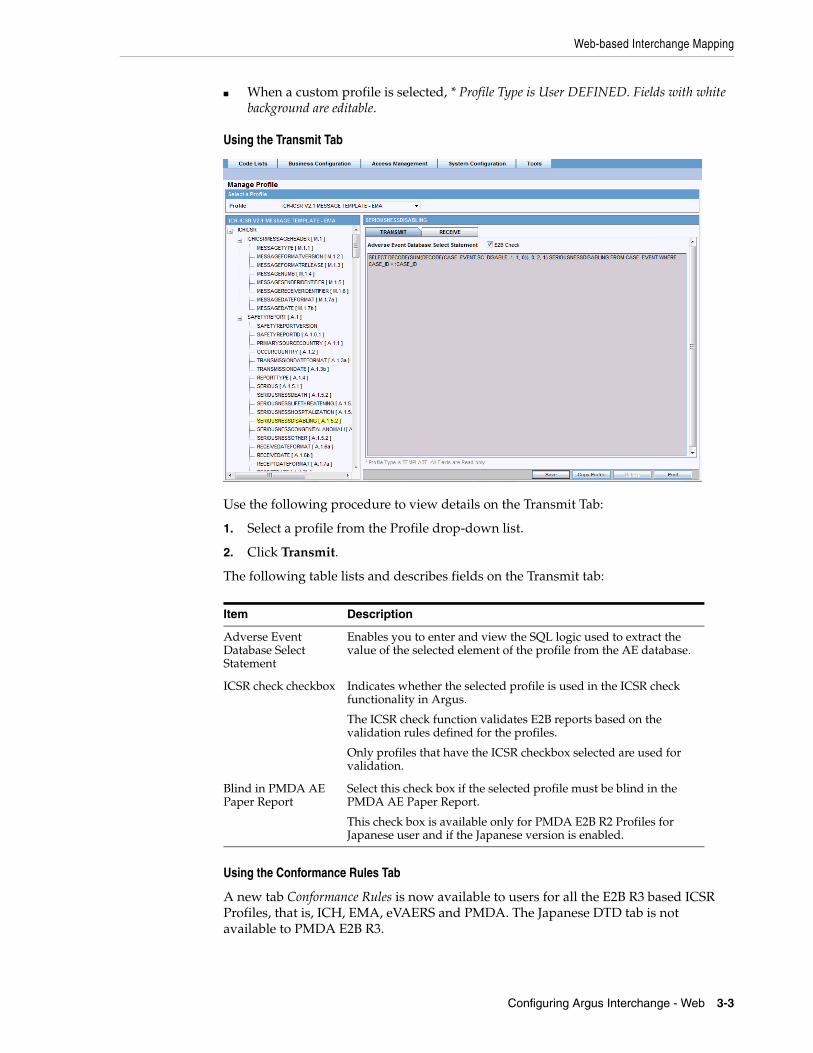
Defining a ProfileThis section describes viewing or modifying the rules of a profile in the Interchange Mapping. You can view profile details by selecting a Profile from the Interchange Mapping screen.
On selecting a Profile from the drop-down, the system displays the following information:
■ The tree view structure of ICSR elements
■ The Transmit and Receive tabs
The following notes are displayed at the bottom of the screen:
■ When a profile provided as part of the factory data is selected, * Profile Type is TEMPLATE. All Fields are Read-only.
Web-based Interchange Mapping
Configuring Argus Interchange - Web 3-3
■ When a custom profile is selected, * Profile Type is User DEFINED. Fields with white background are editable.
Using the Transmit Tab
Use the following procedure to view details on the Transmit Tab:
1. Select a profile from the Profile drop-down list.
2. Click Transmit.
The following table lists and describes fields on the Transmit tab:
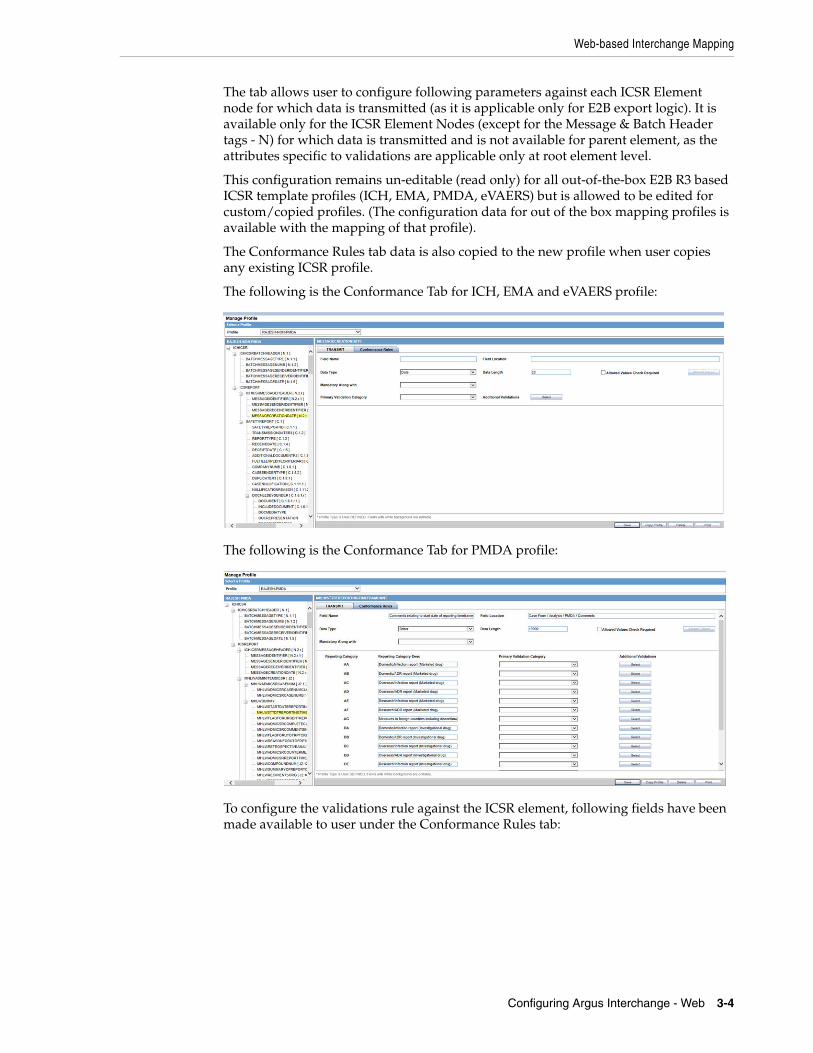
Using the Conformance Rules Tab
A new tab Conformance Rules is now available to users for all the E2B R3 based ICSR Profiles, that is, ICH, EMA, eVAERS and PMDA. The Japanese DTD tab is not available to PMDA E2B R3.
Item Description
Adverse Event Database Select Statement
Enables you to enter and view the SQL logic used to extract the value of the selected element of the profile from the AE database.
ICSR check checkbox Indicates whether the selected profile is used in the ICSR check functionality in Argus.
The ICSR check function validates E2B reports based on the validation rules defined for the profiles.
Only profiles that have the ICSR checkbox selected are used for validation.
Blind in PMDA AE Paper Report
Select this check box if the selected profile must be blind in the PMDA AE Paper Report.
This check box is available only for PMDA E2B R2 Profiles for Japanese user and if the Japanese version is enabled.
Web-based Interchange Mapping
Configuring Argus Interchange - Web 3-4
The tab allows user to configure following parameters against each ICSR Element node for which data is transmitted (as it is applicable only for E2B export logic). It is available only for the ICSR Element Nodes (except for the Message & Batch Header tags - N) for which data is transmitted and is not available for parent element, as the attributes specific to validations are applicable only at root element level.
This configuration remains un-editable (read only) for all out-of-the-box E2B R3 based ICSR template profiles (ICH, EMA, PMDA, eVAERS) but is allowed to be edited for custom/copied profiles. (The configuration data for out of the box mapping profiles is available with the mapping of that profile).
The Conformance Rules tab data is also copied to the new profile when user copies any existing ICSR profile.
The following is the Conformance Tab for ICH, EMA and eVAERS profile:
The following is the Conformance Tab for PMDA profile:
To configure the validations rule against the ICSR element, following fields have been made available to user under the Conformance Rules tab:

Web-based Interchange Mapping
Configuring Argus Interchange - Web 3-5
Field Type Description
Field Name / Field Name (J)
Textbox
Length:255 AN
Field Name/Label of the Case form or Console UI field to which the element's mapping logic corresponds to is specified in this field.
ICH, EMA, eVAERS : English
PMDA: Japanese
For PMDA E2B R3: Refer Mapping xls> Mapping(Sheet)> UI Field Name(J)
Field Location Textbox
Length:255 AN
UI Fields Location/path of the Case form or Console UI field to which the element's mapping logic corresponds to is specified in this field.
ICH, EMA, eVAERS : English
PMDA: Japanese
For PMDA E2B R3: Refer Mapping xls > Mapping(Sheet) > UI Field Name(J)
Data Type Drop-Down list This drop-down list has the following options in the below specified order:
Blank (Default)
Country
Date/Time
E2B Code
MedDRA Term/Code
MedDRA Version
Text
For PMDA E2B R3: Refer Mapping xls > Mapping(Sheet) > PMDA Data Type DTD R3
Data Length Textbox
Length: 9 chars
This text box allows user to enter only Numeric Values
For PMDA E2B R3: Refer Mapping xls > Mapping(Sheet) > PMDA Length DTD R3
Mandatory Along with
Drop-down list This drop-down list contains the DTD_ELEMENT name that are present under the same parent of the selected element (except the selected element itself), with blank as the first and the default option
Format: DTD_ELEMENT(DATA_ELEMENT)
Display Order : Same as they are listed in the Element navigation tree on the left
For PMDA E2B R3: Refer Mapping xls > Mapping(Sheet) > Mandatory Along with
Allowed Value Check Required
Checkbox This checkbox is left unchecked by default
For PMDA E2B R3: Refer Mapping xls > Mapping(Sheet) > Allowed Values
Allowed Values Button On Clicking this button opens up Allowed value configuration dialogue for configuring the allowed values for the selected elements against that profile
This button is enabled only if Allowed Value Check Required checkbox is checked
For PMDA E2B R3: Refer Mapping xls > Mapping(Sheet) > Allowed Values

Web-based Interchange Mapping
Configuring Argus Interchange - Web 3-6
Primary Validation Category
Drop-Down list This drop-down list is available for all ICH, EMA, eVAERS profiles only.
The following option is listed in the drop-down list in the below specified order:
Blank (Default)
Mandatory
Conditional Mandatory
Do not enter
Other Fatal Validation
Optional
Additional Validations
Button On clicking this button Additional Validation Configuration dialogue opens up, this dialogue enables users to configure the SQL based validations for the element.
This button is available for ICH, EMA, eVAERS
PMDA Specific
Reporting Category Label All Reporting Category R3 Codes (AA,AB,AC,AD,AE,AF,AG,DA,DB,DC,DD,DE,DF,DG,BC,BD) as configured in the Reporting_category (flex code list) are listed here, along with Nullification.
Reporting Category Description
Label Description of the corresponding Reporting Category is listed here.
Primary Validation Category
Drop-Down list This drop-down list is available for PMDA profile only.
The following option is listed in the drop-down list in the below specified order:
Blank (Default)
Mandatory
Mandatory for Completion Report
Conditional Mandatory for Completion Report
Conditional Mandatory
Do not Enter
Other Fatal Validation
Optional
For PMDA E2B R3: Refer Mapping xls > Mapping (Sheet) > Reporting Category wise Conformance
Additional Validations
Button On clicking this button Additional Validation Configuration dialogue opens up, this dialogue enables users to configure the SQL based validations for the element.
Available button available against each Reporting Category.
Field Type Description

Web-based Interchange Mapping
Configuring Argus Interchange - Web 3-7
The Allowed Values Configuration Dialogue
On clicking Allowed Values, the Allowed Values Configuration dialogue (modal Dialogue) opens. The Allowed Values Configuration dialogue lets users View, Add, Update, Delete and Associate/De-associate the Codes and Description attribute of the Allowed values for the particular ICSR element for that profile.
Description for fields/buttons on the Allowed Values Configuration dialogue:
Save Button On clicking the Save button the changes are committed to Data base and audit logged.
This committing of data includes any changes done in the Allowed Value Configuration and Additional Validation Configuration dialogues as well.
On clicking the Save button, the application logic validates that there exists a Primary category for the ICSR Element
■ In case of Non-PMDA profile: Element Level
■ In case of PMDA: Reporting category level
If there exists a row with primary category as blank, the application displays an error message: Please select a Primary Validation category for the element Title: ICSR Validation with OK Button.
Print Button On clicking the print button, the application prints all the Conformance rule tab data.
Table 3–1 Allowed Values Configuration dialogue fields
Code textbox This is a textbox where user enters the Code value that is being transmitted in the ICSR report. For example, E2B R3 Codes, ISO code and so on.
Description textbox This is a textbox where user enters the description against the Code that is being transmitted in the ICSR report.
Description (J) textbox This is a textbox where user enters the Japanese description against the Code that is being transmitted in the ICSR report. This is visible only to J user (when J module is enabled) and only for PMDA Profile
Field Type Description

Web-based Interchange Mapping
Configuring Argus Interchange - Web 3-8
The Additional Validation Configuration Dialogue
Clicking Additional Validations displays the Additional Validation Configuration dialogue which lets the user View, Add, Update, Delete, Associate/De-associate, categorize and mark a validation to be Primary for the ICSR element of that profile.
If user marks any validation as Primary, the Associated checkbox is checked and disabled by default.
On unchecking the Primary Validation checkbox, the Primary validation checkbox for all other validations and the Associated checkbox and Validation Category drop-down list for this particular validation is enabled.
For ICH, EMA and eVAERS profiles Additional Validation can be configured at the element level, whereas for the PMDA profile the validation can be configured individually against each reporting category for that element.
The OOTB validations are only allowed to be Associate, Disassociate, categorized or marked as primary for the element, and the Edit button always remains disabled for all such OOTB validations.
Description for fields/buttons on the Additional Values Configuration dialogue:
Edit button On clicking the edit button, the Code and Description textboxes become enabled for user to edit
Associate checkbox User associates or de-associates the allowed value for an element for the profile by checking and un-checking this checkbox.
Add button On clicking the Add button, a new row is added to the grid, with Code, Description text boxes and Associate checkbox (unchecked) enabled by default.
Delete button Deleted button is disabled by default, and is enabled only if user selects a user created custom allowed value row in the grid
Table 3–2 Additional Values Configuration dialogue fields
Message Text area In this text area, the user specifies the message that is printed in the validation report in case of a failure validation.
Table 3–1 Allowed Values Configuration dialogue fields

Web-based Interchange Mapping
Configuring Argus Interchange - Web 3-9
Using the Receive Tab Use the following procedure to view details on the Receive Tab:
1. Select a profile from the Profile drop-down list.
2. Click Receive.
The following table lists and describes the fields on the Receive tab:
Message (J) Text area In this text area, the user specifies the Japanese message that is printed in the validation report in case of a failure validation. This is visible only to J user (when J module is enabled) and only for PMDA Profile.
Validation SQL Text area In this text area, the user specifies the SQL condition for the validation that is executed in order to run this particular validation.
Edit button On clicking the edit button, the Message and Validation SQL text areas becomes enabled for user to edit.
Associate checkbox User associates or de-associates a validation against an element for the profile by checking and un-checking this checkbox.
Validation Category User specifies the category of validation by selecting an option from this drop-down list.
Primary Validation checkbox
User marks a validation as primary validation against an element for the profile by checking this checkbox.
Add button On clicking the Add button, a new row is added to the grid, with Message, Description text areas, Associate checkbox (unchecked) and Validation Type drop-down list (blank) enabled by default.
Delete button Deleted button is disabled by default, and is enabled only if user selects a user created custom validations row in the grid.
Item Description
Import Mapping Logic: PL/SQL Code
Enables you to enter and view the PL/SQL code to be processed for the selected element of the profile during the import.
Enable Post-Save checkbox
Enabled for Template and Custom profiles and is a profile level switch. When this checkbox is marked, then post-save routines are executed while importing an ICSR message.
Extended E2B Enabled only for Custom profiles and is a profile level switch.
When this checkbox is marked, the profile is considered as an Extended E2B Profile (E2B+ Profile).
Current Element is part of Primary Key
When this checkbox is marked, this field is treated as part of the Primary key. Values in Primary keys are used for matching data in an existing case while importing Follow-up reports.
Based on the results, either a new record is created or an existing record is updated.
Select AE column as a part of Primary Key
Displays the Argus Case Form Database column name to which the current primary key E2B element is mapped.
This relationship compares the E2B element from the incoming follow-up report to the related Case Form database column name value in the target case to identify matching records in repeater sections.
Table 3–2 (Cont.) Additional Values Configuration dialogue fields

Web-based Interchange Mapping
Configuring Argus Interchange - Web 3-10
Printing a ProfileUse the following procedure to print a profile.
1. Select the profile to print from the Profile list.
2. Click Print. This prints a PDF of the selected profile.
Copying a Profile
Use the following procedure to copy a profile.
1. Select the profile to copy from the Profile list.
2. Click Copy Profile, to open the Copy Profile dialog box.
3. Type the profile name in the To Profile field, and click Save.
Deleting a ProfileYou can only delete profiles created or modified in the Interchange Mapping interface. You cannot delete Template profiles.
Use the following procedure to delete a profile.
1. Select a custom profile to delete from the Profile list. The system enables the Delete button.
Always Import for Initial/Follow-up reports
Governs the default UI behavior of the Import checkbox that appears against each element in the E2B Difference Report screen. If this checkbox is checked for an element, the corresponding checkbox on the E2B Difference Report screen also appears as checked and disabled. By enforcing the behavior of always importing that element, the user cannot uncheck the checkbox on the E2B difference screen.
Note: The Copy Profile option can be used to create custom ICSR profiles with customized Export / Import mapping logic for any ICSR element. However, any new changes / fixes applied to factory ICSR profiles are not automatically applied on the custom ICSR profiles. Hence, the custom profile logic may get obsolete by any Argus Safety version upgrade which has changes / fixes applied to factory ICSR profiles. In such a scenario, customers should re-create their custom ICSR profile again, by copying the new factory ICSR profile and applying their custom Export / Import mapping logic manually.
Item Description

Web-based Interchange Mapping
Configuring Argus Interchange - Web 3-11
2. Click Delete.
3. Click Yes to confirm.
Comparing ProfilesYou can compare two profiles to find element-level differences. Select a source profile in the left pane and a target profile in right pane, and run Compare Profiles to generate the differences. Compare Profiles also lets you update the SQL statements (at the element level) of the Destination Profile elements with those of the Source Profile.
To compare profiles:
1. On the Argus Interchange Mapping menu, click Compare Profiles.
2. When the system opens the Compare Profiles dialog box, use the items in the Compare Profiles dialog to compare profiles.

Web-based Interchange Mapping
Configuring Argus Interchange - Web 3-12
3. Enter the data in the files.
Comparing Profile Dialog Box FieldsThe following table lists and describes the fields on the Compare Profile dialog box.
Item Description
Source Profile drop-down Is used for selecting a source profile from the available profiles configured in the system.
Destination Profile drop-down
Displays the profiles with the same version and type (message/acknowledgement) as the ones in the Source profile.
Note: The source profile is to be selected before selecting the destination profile. The destination profile is disabled if you have not selected the source profile.
Show Difference Only Displays those nodes that contain different SQL statements between the source and destination profiles when this checkbox is checked.
Compare Compares the differences between the source and destination profiles when this button is clicked.
Note: The elements that are different in the Source and Destination profiles are displayed in a light gray background color.
Source Profile pane Displays the source profile and its elements in a tree structure. When you click on any of the elements, the corresponding SQL statements are displayed on the source profile textbox, which is on the left-corner below the Source Profile pane.
Destination Profile pane Displays the destination profile and its elements in a tree structure. When you click on any of the elements, the corresponding SQL statements are displayed on the Destination profile textbox, which is on the right-corner below the Destination Profile pane.
Print Prints all the SQL statements of the source and the destination profile with differences highlighted.
Note: If there are no differences between the source and destination profiles, the following pop-up message appears: "No differences found and no report is printed."
Update Updates the individual SQL statements related to each element. Clicking the Update button also updates SQL statements in the destination profile.
Note: The Update button is enabled when the nodes with different SQL statements are clicked.
Update All Updates all the differences in SQL statements across all the elements between the source and destination profiles.
Note: When a user clicks the Update All button, the following pop-up message appears: "Are you sure you want to update all the SQL statements in Destination Profile with Source Profile?" Clicking Yes updates all the SQL statements whereas clicking No does not update.
Close Closes the Compare Profiles window.
Web-based Interchange Mapping
Configuring Argus Interchange - Web 3-13
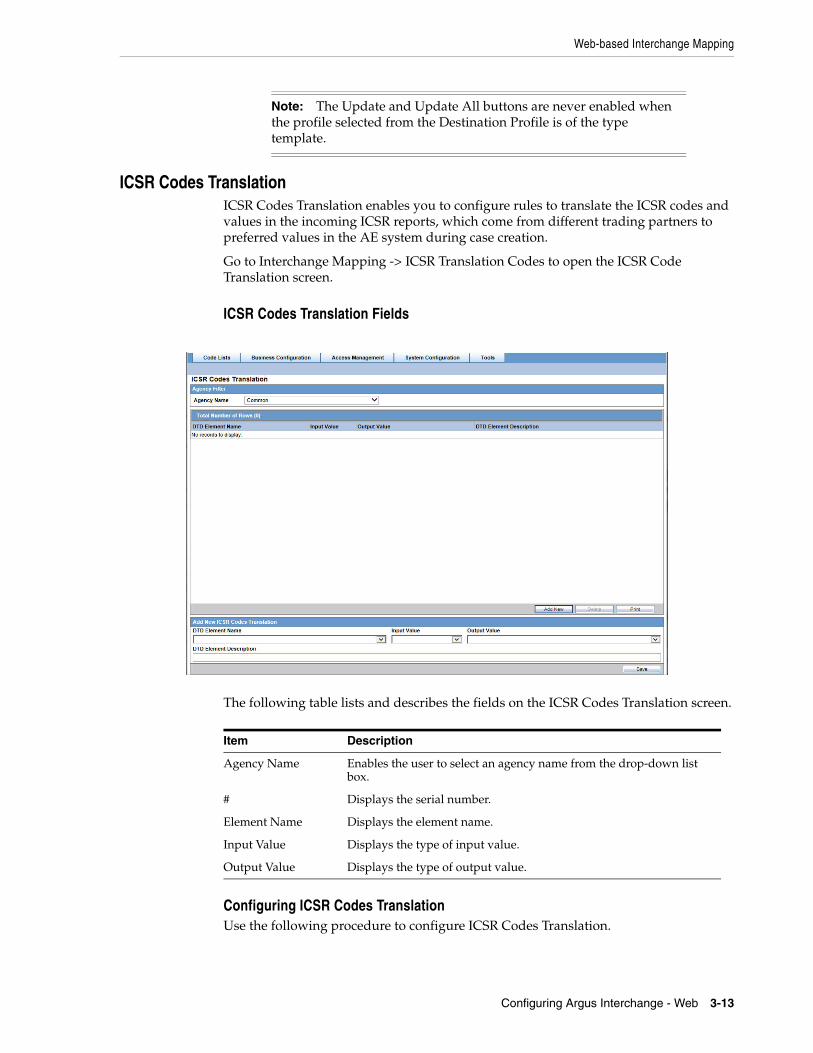
ICSR Codes TranslationICSR Codes Translation enables you to configure rules to translate the ICSR codes and values in the incoming ICSR reports, which come from different trading partners to preferred values in the AE system during case creation.
Go to Interchange Mapping -> ICSR Translation Codes to open the ICSR Code Translation screen.
ICSR Codes Translation Fields
The following table lists and describes the fields on the ICSR Codes Translation screen.
Configuring ICSR Codes TranslationUse the following procedure to configure ICSR Codes Translation.
Note: The Update and Update All buttons are never enabled when the profile selected from the Destination Profile is of the type template.
Item Description
Agency Name Enables the user to select an agency name from the drop-down list box.
# Displays the serial number.
Element Name Displays the element name.
Input Value Displays the type of input value.
Output Value Displays the type of output value.
Web-based Interchange Mapping
Configuring Argus Interchange - Web 3-14
1. Select the Agency Name from the drop-down list box to display the Elements and their descriptions.
2. Click on the respective field to edit the Element Name, Input Value, Output Value, and Element Description.
3. Click Save to save your changes.
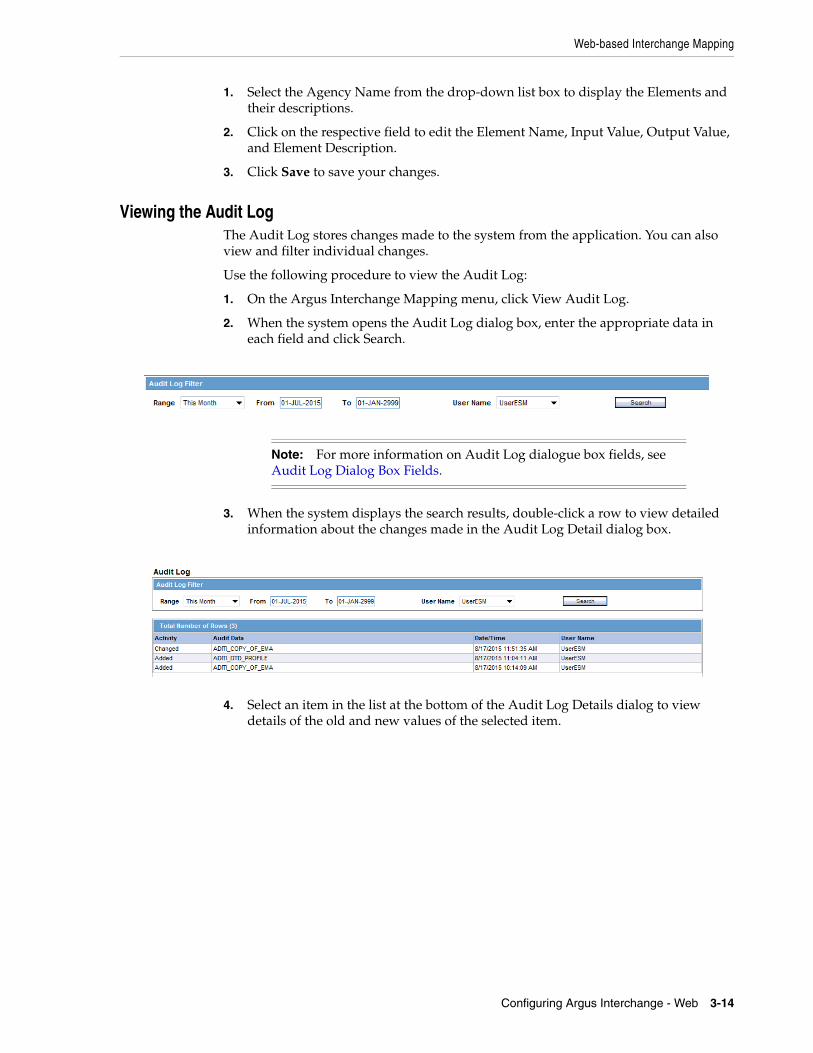
Viewing the Audit LogThe Audit Log stores changes made to the system from the application. You can also view and filter individual changes.
Use the following procedure to view the Audit Log:
1. On the Argus Interchange Mapping menu, click View Audit Log.
2. When the system opens the Audit Log dialog box, enter the appropriate data in each field and click Search.
3. When the system displays the search results, double-click a row to view detailed information about the changes made in the Audit Log Detail dialog box.
4. Select an item in the list at the bottom of the Audit Log Details dialog to view details of the old and new values of the selected item.
Note: For more information on Audit Log dialogue box fields, see Audit Log Dialog Box Fields.

Web-based Interchange Mapping
Configuring Argus Interchange - Web 3-15
Audit Log Dialog Box FieldsThe following table lists and describes the fields on the Audit Log dialog box.
E2B ExtensionsYou can use the existing reporting destination configuration to choose an extended E2B profile. The system uses the agency and company identifier to identify the profile to use and sends the information in the following XML elements:
<messagesenderidentifier>Company X</messagesenderidentifier>
<messagereceiveridentifier>Agency Y</messagereceiveridentifier>
The Interchange mapping utility also supports the defined extended E2B elements as follows:
■ A switch in the Interchange mapping tool identifies a profile as either a standard profile or an extended E2B profile but only for the Receive tab. The additional fields are formatted as follows:
<XXX>_EXTENSION []
where:
Item Description
From Enter the search start date.
To Enter the search end date.
Range Select a pre-configured date range on for the search.
Note: When the Argus Interchange Audit log is invoked, it shows the default range of the last 7 days.
User Name Select a user from the list of users.
Print Prints the current view.
Search Performs the search.

Web-based Interchange Mapping
Configuring Argus Interchange - Web 3-16
XXX is the tag name followed by _EXTENSION to indicate that this is an extended E2B tag element
When using this switch:
– Do not enter any blank spaces or underscore characters ( _ ) in the XXX naming convention.
– In the extended E2B tags, the element number in the brackets ( [ ] ) is always empty. For example, Patient Ethnicity, Event Hospitalized Start Date / Stop Date.
– This switch is enabled only for profiles copied from the Factory profiles (default unchecked). This flag is disabled for all factory profiles.
– During configuration, GPS updates the DTD profile with this information before it adds any additional E2B elements.
– The extended E2B fields are mapped to existing Argus fields or to user-defined fields, as appropriate. For example, the system maps the following extended E2B fields to the following Argus tables.
– The system sends an acknowledgement when the report is accepted or rejected by the user.
You can view the extended elements for the following:
■ ICSR Viewer
– No updates to the CIOMS / MedWatch Reports
– The Decoded View / SGML View displays the additional elements added as a part of the Extended E2B
E2B + FieldArgus Case Form UI Field Name
Argus Field Label Description
patientethnicity_extension PATIENT | Patient Ethnicity Patient Ethnicity
reactionintensity_extension EVENTS | Event Intensity Event Intensity
reactionhospstartdateformat_extension
Argus Date entry format YYYYMMDD or YYYYMM or YYYY
Hospitalized Start Date Format
reactionhospstartdate_extension
EVENTS | Hospitalized Start Date
Hospitalized Start Date
reactionhospstopdateformat_extension
Argus Date entry format YYYYMMDD or YYYYMM or YYYY
Hospitalized Stop Date Format
reactionhospstopdate_extension
EVENTS | Hospitalized Stop Date
Hospitalized Stop Date

Web-based Interchange Mapping
Configuring Argus Interchange - Web 3-17
■ E2B Selective Intake for Initial and E2B Difference Report for Follow-up E2B Reports
– You can selectively import the additional fields the system adds to the Extended E2B in the Argus case.
– The PDF reports display the additional fields added to the Extended E2B.
■ The E2B Warnings/Errors display the warnings/errors if warnings or errors defined for the fields added to the Extended E2B.
4
Validating ICSR Reports 4-1
4Validating ICSR Reports
In order to successfully transmit any E2B Report, it must validated for its mandatory components before transmitting the report.
Why perform an ICSR check?During case data entry and prior to E2B file generation, the user may want to verify that sufficient data and the quality of data collected will generate a valid E2B file.
To do so, a Data Validation check is required for E2B profiles and to provide a listing of data elements that do not satisfy the criteria required to generate an E2B report.
On performing an ICSR check, the system performs a validation and lists the following types of validation errors for the data elements that are failing the validations in 'E2B Report data check errors and warnings':
1. Mandatory
2. Mandatory Optional
3. Together DTD Element Validation
4. Other Validation
5. Date Validation
6. E2B Generation Validation (Fatal Validations)
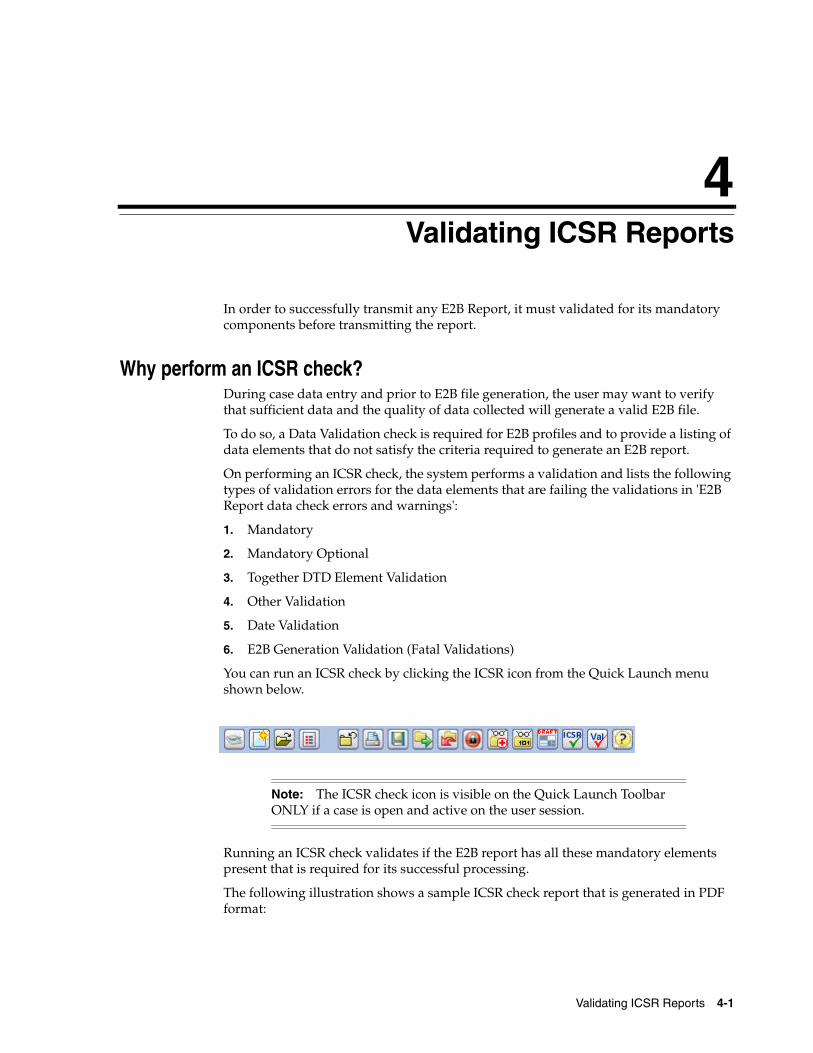
You can run an ICSR check by clicking the ICSR icon from the Quick Launch menu shown below.
Running an ICSR check validates if the E2B report has all these mandatory elements present that is required for its successful processing.
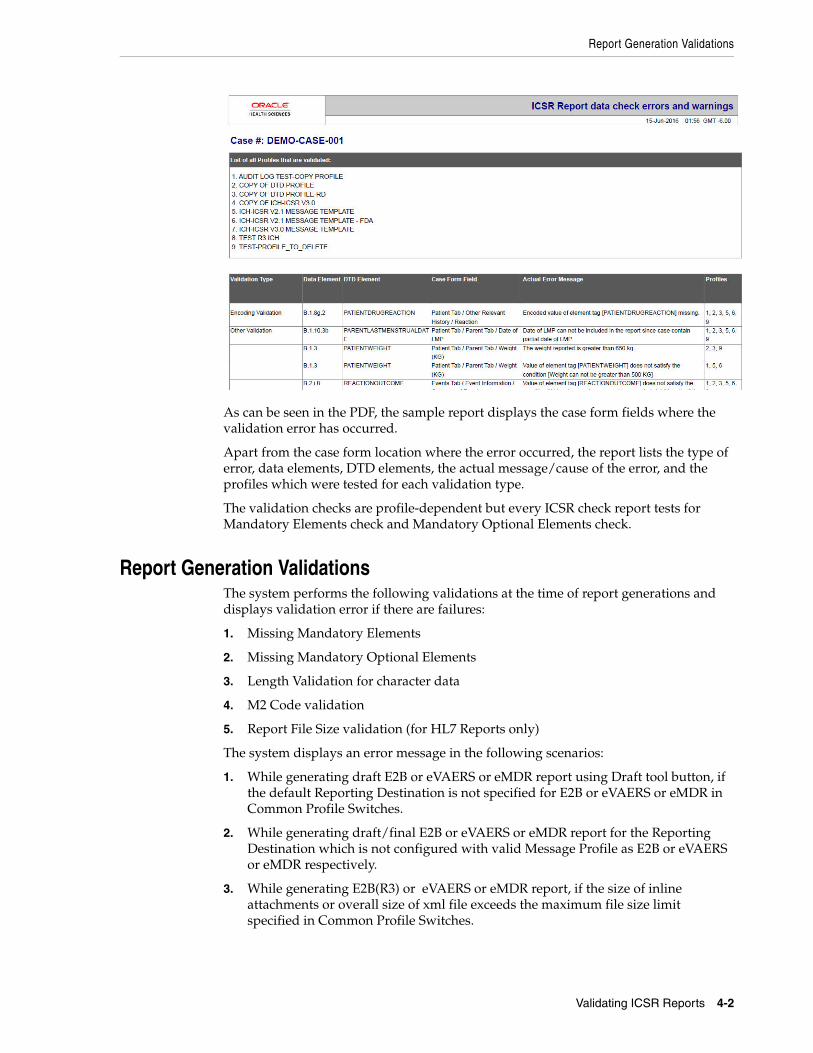
The following illustration shows a sample ICSR check report that is generated in PDF format:
Note: The ICSR check icon is visible on the Quick Launch Toolbar ONLY if a case is open and active on the user session.
Report Generation Validations
Validating ICSR Reports 4-2
As can be seen in the PDF, the sample report displays the case form fields where the validation error has occurred.
Apart from the case form location where the error occurred, the report lists the type of error, data elements, DTD elements, the actual message/cause of the error, and the profiles which were tested for each validation type.
The validation checks are profile-dependent but every ICSR check report tests for Mandatory Elements check and Mandatory Optional Elements check.
Report Generation ValidationsThe system performs the following validations at the time of report generations and displays validation error if there are failures:
1. Missing Mandatory Elements
2. Missing Mandatory Optional Elements
3. Length Validation for character data
4. M2 Code validation
5. Report File Size validation (for HL7 Reports only)
The system displays an error message in the following scenarios:
1. While generating draft E2B or eVAERS or eMDR report using Draft tool button, if the default Reporting Destination is not specified for E2B or eVAERS or eMDR in Common Profile Switches.
2. While generating draft/final E2B or eVAERS or eMDR report for the Reporting Destination which is not configured with valid Message Profile as E2B or eVAERS or eMDR respectively.
3. While generating E2B(R3) or eVAERS or eMDR report, if the size of inline attachments or overall size of xml file exceeds the maximum file size limit specified in Common Profile Switches.

Validation Rules
Validating ICSR Reports 4-3
Validation RulesE2B Generation validation logic has been enhanced such that rather than executing the validations directly on the case/LM data the validation rules is executed on the generated ICSR report data.
The validation rules that are applicable to individual element is governed by configuration in the Conformance Rules tab for that element for the respective profile.
Validation Rule the elements is categorized amongst the following categories:
■ Basic Data Validation: This category covers all the applicable validation based on the Length of the field.
Length - This validation check validates if the data type length of output is within with the configured Data length or not. If the data length is exceeding the configured length then validation error is listed in the validation report.
■ Allowed Values Data Check: The element for which the Allowed Value Check Required checkbox is checked is validated against the allowed values codes associated with them using Allowed Values Configuration Dialogueue for the respective profile.
■ Mandatory Along with (Together): Elements for which the Mandatory along with element is specified, validation rule validates for such elements in the generated ICSR the element itself and the configured Dependent element co-exist or none of them exists in the report.
■ Validation Category Based: The element is validated as per the value configured for that element in the Validation Category drop-down list in the Conformance rule tab.
The elements for which there exists a SQL based validation for which Primary Validation checkbox is checked in the Additional Validation Configuration Dialogueue, the framework based validation is not executed for them; rather the configured SQL based validations is executed for them.
These validations are categorized in two sub categories, one for the ICSR reports for ICH, EMA and eVAERS Profile and other ICSR Report for PMDA profile
■ ICH, EMA and eVAERS
The validation for the PMDA report is fired at each reporting category level:
Mandatory: The element which is configured as Mandatory should be present in the ICSR Report; if it is not present in the report output then application displays the validation failure in the validation report.
Conditional Mandatory: The element which is marked as Conditional Mandatory is present based on certain condition, hence it is expected that user will configure a Validation for it in the Additional Validation Dialogueue. There is no framework based validation for the elements configured with this validation type in Conformance rule tab.
Optional: The element which is marked as optional may or may not be present in the report, but still there could be a possibility that there might exist a validation under the Additional Validation Dialogueue and if any of the configured validation is failed it will be listed in the validation report.
Other Fatal: There is no framework based validation for the elements configured as other fatal validation type in Conformance rule tab.
■ PMDA E2B

Validation Rules
Validating ICSR Reports 4-4
Mandatory: The element which is configured as Mandatory should be present in the ICSR Report; if it is not present in the report output then application displays the validation failure in the validation report.
Mandatory for Completion: The element which is marked as Mandatory for completion should be present in the ICSR Report if J2.7.1 (MHLWADMICSRCOMPLETECLASS) = completed for that report; if it is not present then application displays the validation failure in the validation report.
Conditional Mandatory and Conditional Mandatory for Completion: The element which is marked as Conditional Mandatory or Conditional Mandatory for Completion is present in the report based on certain condition, hence it is expected that user will configure a Validation for it in the Additional Validation Dialogueue. There is no framework based validation for the elements configured with these validation types in Conformance rule tab.
Do not Enter: The element which is marked as Do not enter are not present in the report, and if they are present than application lists the validation failure in the validation report (Argus report generation logic removes the elements that are marked as Do not enter at the time on generation itself).
Optional: The element which is marked as optional may or may not be present in the report, but still there could be a possibility that there might exist a validation under the Additional Validation Dialogueue and if any of the configured validation fails, it is listed in the validation report.
Other Fatal: There is no framework based validation for the elements configured as other fatal validation type in Conformance rule tab.
■ Additional Validations: The Additional SQL based validations associated with elements in the respective ICSR profile (element level for E2B other than PMDA and Reporting category level for PMDA E2B), the validation is fire based on the SQL logic specified under the Validation SQL.
5
Transmitting and Monitoring Reports 5-1
5Transmitting and Monitoring Reports
Argus Safety provides utilities that enable you to schedule and transmit E2B reports. Using these utilities, you can also track the status of the transmitted E2B reports. This chapter includes discussions of the following:
■ Logging In and Out of Argus Safety
■ Scheduling Reports
■ Generating Reports
■ Transmitting Reports
Logging In and Out of Argus SafetyBefore starting Argus Safety, ensure that your company's Argus Safety Administrator of your company has created an account for you and that you have the correct Username and Password for the system. Be aware of the following:
■ If you enter an incorrect username or password three (3) consecutive times, the system disables the Login button and displays the following message:
The login button has been disabled due to 3 consecutive incorrect entries of Username or Password. Please refresh the page to enable the Login button.
■ The Date/Time format is DD-MMM-YYYY HH:MM:SS to reflect the 24-hour format used by the Web server.
To log in to the Argus Safety application:
1. Open Microsoft Internet Explorer and enter the Uniform Resource Locator (URL) of Argus Safety Web in the Address bar.
2. When the Argus login screen opens, enter your username and password in the appropriate fields.
3. Select the appropriate database from the Database drop-down list and click Login.
Note: The Sign-on screen displays all the products currently in the Oracle Health Sciences Safety Suite. Each product in the list has a hyperlink to open the Oracle Health Sciences Resources website page that provides the product data sheets.

Scheduling Reports
Transmitting and Monitoring Reports 5-2
4. Once the system authenticates your log in, you can access the modules that are enabled in the Console.
To Log Out of the Argus ApplicationClick Logout on the top-right frame of the window to log out of the application.
Scheduling ReportsArgus Safety enables you to schedule your E2B, eMDR and eVAERS reports. In addition, it allows you to generate these reports that comply with the adverse event reporting requirements of different regulatory agencies.
To schedule an E2B report:
1. Open a case in Argus Safety and click the Regulatory Reports tab.
2. When the system opens the Regulatory Reports tab, click Schedule New Report.
Note: When you generate an E2B report, some characters entered by the user in the case form may not be display in the same way in the E2B report. Some characters are represented differently in the E2B report such as & for (&), < for (<), > for (>), ' for (') and " for (") as per XML specifications.

Scheduling Reports
Transmitting and Monitoring Reports 5-3
3. When the system opens the New Expedited Report Dialogue box, enter the relevant information and click OK.
New Expedited Report Dialogue FieldsThe Schedule New Expedited Report window has a drop-down list on the top section.

Scheduling Reports
Transmitting and Monitoring Reports 5-4
The following table lists and describes the fields in the New Expedited Report Dialogue box.
Item Function
Product Select the Company Suspect Product from this drop-down list.
License Number Select the particular license for which the report is to be scheduled.
Destination Select the Regulatory Agency to which the report is to be sent.
Report Form Select the Report Form from this drop down list.
Message Type Select the message type from the drop-down list.
Note: This field is displayed when an E2B or eVAERS report is selected as the Report Form. If the Report Form is selected as eVAERS then the Message type is set to ichicsr and is disabled.
Aware Date List the date when you became aware of the case.
Select the Protect Confidentiality of Reporter and Patient checkbox if you do not wish to disclose the identity of the reporter and the patient of the case.
Group If you want to assign the report to a specific group, the group can be selected from this drop down list.
Notes This field is directly mapped to the License but you can modify this field to put in extra notes, as desired.
Due Date You can decide to schedule a report to be due in either 5, 15, or 30 days or any number of days or even on any specific date.
Note: Product, License Number, Destination, Report Form (E2B), and Due Date must be entered in the New Expedited Report Dialogue to schedule an E2B report.

Scheduling Reports
Transmitting and Monitoring Reports 5-5
Nullification ReportsThe system can automatically schedule, generate, and transmit a Nullification Report under the following circumstances:
■ When a case is deleted and an E2B Report is submitted to a reporting destination based on the Profile switch for sending E2B nullifications.
■ When an E2B report is submitted and marked as unsubmitted from Reports | Compliance | Submitted Reports:
– The Reason for Unsubmitting the report is sent as the nullification reason for the report.
– If the user selects the Send Nullification on Unsubmission of E2B Reports check box, the system also sends a nullification to the reporting destination where the E2B Report was previously submitted.
– If the user does not select the Send Nullification on Unsubmission of E2B Reports check box, the system does not send a nullification to the reporting destination where the E2B Report was previously submitted unless the user deletes the case.
– If a previous nullification for the E2B Report or an unsubmitted report is sent for a case and the case is deleted at a later date, the system does not send a duplicate nullification for the previous report.
– When the system generates the Nullification report, the system updates the following E2B items with updated values from the previous report.
Note: The system allows you to generate E2B reports through AG Service irrespective of the your access rights for blinded information. However, the Blind protected users are not allowed to view E2B reports despite having an Argus Interchange license. If such a user tries to view the E2B report, the system generates the message: "Report is generated but system is unable to show the report as user is protected from study information."
Updated E2B Items Update Content
M.1.4 System uses a different unique number from that used in the last report.
M.1.7a System enters the message date format.
M.1.7b System enters the message date.
M.2 System increments this value every time it transmits the report.
A.1.3a System enters the message date format.
A.1.3b System enters the message date.
A.1.13 System enters 1=Yes on the Nullification report.
A.1.13.1 System enters the reason for the Nullification report.
J.2 System increments this value every time it transmits the report.
J.4b System enters the PMDA Acknowledgement Number.
J.5 System increments this value every time it submits the report.
J.6 System will enter 1. 1 means that it is a completion report.

Scheduling Reports
Transmitting and Monitoring Reports 5-6
■ When you accept a Nullification report, the system creates an Action Item in the case. The action item tells you that the system will delete the case if you click OK on the acceptance Dialogue for all unarchived cases.
– Action Item is a type-ahead field and its default is blank.
– The field is populated with values from the action item configured in the code List.
– You can assign the number of days until the action item is due in the Due In field. The system enables this field after you select an Action Item type.
– The system calculates the due date as follows: System Date (local client date) + Due In number of days.
– The system puts the System Date (local client date) in the Date field.
■ When creating the action item, you can select a value from the Code List and the Action Item Description. The system uses the following format: Nullification: xxx
where:
xxx is the value entered in the Notes field.
■ By default, the system assigns the action item to the user group in the User Group field.
– There can be a maximum of 25 user groups in the drop-down list.
– The system performs a like search when you select a value in the User Group field.
– If the User Group field is blank, the system does not assign the action item.
– This is enabled after you select an action item.
■ If you do not select an action item, the system does not create an action item for the case.
■ If you accept multiple cases, the system creates action items for all accepted cases.
■ The system skips open, locked, or archived cases or cases you don't have permission to access.
■ If the system archives a case while you are accepting the nullification report, the system displays the Archived Case Dialogue to enable you to open the archived case.
■ After you reopen the case, the system displays the Accept Nullification E2B Dialogue.
■ If you do not have permission to reopen an archived case, the system displays the following message:
You do not have permission to Re-Open an archived/closed case.
■ Nullification reports are not scheduled for eMDR.
J.7 System will remove the value of this tag, if it was present in the previous report.
Updated E2B Items Update Content

Scheduling Reports
Transmitting and Monitoring Reports 5-7
Follow-Up eMDR ReportsIf an eMDR report is manually scheduled or automatically scheduled for the same reporting Destination, system either schedules Initial or Follow-up report based on the same logic (product license ID and status of previously scheduled report) that is currently existing for Device reports.
If the case was previously submitted to a Reporting Destination as MedWatch Device report and if the same reporting destination is configured for sending eMDR report:
1. System schedules the next eMDR as a follow-up report and displays the follow-up numbering in the Case Form ' Regulatory Reports ' Seq field by considering the previously reported MedWatch device report.
2. System uses the same report number (F.2 or G.9) that was used in MedWatch Device report in eMDR for the data element ufimporterrepnumber(F2) or mfrreportnumber (G9).
3. Follow-up number that is populated in (F7 uffollowupnumber or G7 gfollowupnumber) shall be incremented from (F7 or G7) of the previously submitted MedWatch Device report by considering the internal common profile switch Allow generation of Report.
Example : If F/p 1 report was submitted as 0000555-2014-00011 to CDRH in MedWatch format and the next follow-up report in eMDR format, then Mfr Report # shall be populated as 0000555-2014-00011 and F/p number as 2.
If the previous report was sent by eMDR and the subsequent report is being sent as MedWatch Device to the same destination, the system shall maintain the report numbering ( F2 or G9) same as of previously submitted eMDR.
1. System schedules a follow-up report by populating Follow-up' in the Case Form Regulatory Reports' Seq column.
2. System uses the same report number (F2 or G9) from the previously submitted eMDR report in the F2 or G9 of MedWatch Device report.
3. Follow-up number that is populated in (F7 or G7) is incremented from (F7 uffollowupnumber or G7 gfollowupnumber) of the previously submitted eMDR report by considering the internal common profile switch Allow generation of Report.
4. The MedWatch Device scheduled after the eMDR report does not respect the Common Profile Switch "Data to print on follow up MedWatch Device form "and system displays a warning message during manual scheduling of report as Delta data will not be printed MedWatch Device form for this Device license as it was previously submitted as an eMDR. In case automatic scheduling, this warning message is logged against the report without impacting report scheduling or generation.
Example : If F/p 1 report was submitted as 0000555-2014-00011 to CDRH in eMDR format and the next follow-up report in eMDR report fails due to some reason and company decides to send them in MedWatch device format, then MedWatch report shall print Mfr Report # as 0000555-2014-00011 and F/p number as 2
System includes complete data in follow-up eMDR as the other E2B (R3) reports.
Note: Common Profile Switch Data to print on follow up MedWatch Device form does not have any impact on eMDR follow-ups.

Scheduling Reports
Transmitting and Monitoring Reports 5-8
Downgrade report is scheduled automatically if the F/UP version does not satisfy the Regulatory Reporting Rules defined for eMDR for a case that was previously submitted in eMDR.
Follow-up eMDR is scheduled automatically if the Significant F/UP version is marked as Amendment for a case that was previously submitted in eMDR (existing functionality for non E2B (R3) reports).
Nullification reports are not scheduled for eMDR.
Follow-up eVAERS ReportsIf an eVAERS report is manually scheduled or automatically scheduled for the same reporting Destination, system either schedules Initial or Follow-up report based on the same logic (product license type and status of previously scheduled report) that is currently existing for E2B reports.
If the case was previously submitted to a Reporting Destination in VAERS PDF format and if the same reporting destination is configured for sending eVAERS report:
1. System schedules an initial report by populating Initial in the Case Form Regulatory Reports Seq column.
2. If any Follow-up reports are scheduled to the same destination at a later point of time, system schedules a follow-up report by populating'Follow-up<##> in Case Form Regulatory Reports Seq column.
3. System uses Case Number (as printed in the Manufacturer Control Number (that is listed in Box 24) of the previously submitted VAERS report) in data elements C.1.1. and C.1.8.1.
If a reporting destination is configured for eVAERS and VAERS reports and if the previous report was sent in eVAERS format and if the subsequent report is scheduled in VAERS PDF format to the same destination:
1. System schedules an initial report by populating Initial' in the Case Form Regulatory Reports Seq column.
2. If any Follow-up reports are scheduled to the same destination at a later point of time, system schedules a follow-up report by populating Follow-up<##> in Case Form Regulatory Reports Seq column.
3. System does not use (C.1.1) from the previously submitted eVAERS report as the Manufacturer Control Number of VAERS report.
Downgrade report is scheduled automatically if the Significant F/UP version does not satisfy the Regulatory Reporting Rules defined for eVAERS for a case was submitted in eVAERS.
System auto-schedules Amendment report instead of a follow-up report for a Reporting Destination configured with eVAERS profile, when:
a.eVAERS report was previously submitted to the same Reporting Destination for the same license type
Note: If user tries to generate eVAERS and VAERS in parallel for a Case, then system has different MCN for eVAERS and VAERS reports for the same case.
Generating Reports
Transmitting and Monitoring Reports 5-9
b.if the latest record in the 'Amendment / Follow-up section' of Case Form ' General is an Amendment and the Amendment record was created for previously submitted eVAERS report
System auto-schedules a Nullification report instead of follow-up report for a Reporting Destination configured with eVAERS, under the same conditions ( Case deletion and manually scheduling Nullification from Reports Compliance Submitted Reports Schedule Nullification) as per current functionality on Nullification reports for E2B profiles.
When Nullification report is generated, following data element items have updated values from the previous report.
■ N.1.2 batchmessagenumb
■ N.1.5 batchmessagedate
■ N.2.r.4 messagecreationdate
■ C.1.2 transmissiondater3
■ C.1.11.1 casenullification
■ C.1.11.2 nullificationreason
Generating ReportsUse the following procedure to generate a scheduled report.
1. E2B, eMDR and eVAERS report scan be manually generated by clicking the draft/final links in the row that corresponds to the scheduled E2B Report in In the Regulatory Reports tab. The report is generated and can be viewed in the ICSR Viewer. If a validation error occurs during E2B report generation, the validation details are stored in the Report Details Dialogue.
2. E2B, eMDR and eVAERS reports are generated by AG Services for a locked case which has scheduled E2B report.
Attachments in ReportsCase Form Attachments are sent to Reporting Destination with E2B(R2) report as described below:
1. If attachment classification in the case is specified in the Reporting Destination, system reads such Attachments and converts .XLS, .TXT, .TIF, .DOC, .RTF, .PNG, .JPG or .BMP them into PDF and combine with the PDF attachments if any in the case.
2. The single merged PDF has each attachment which is merged available as a link (bookmark) by the classification name provided for the attached file.
3. Attachments are sent only if there is a E2B report sent out for that Agency. Attachments are not sent for nullification reports.
Case Form Attachments are embedded within the ICSR that are sent in report format such as E2B(R3), eVAERS and eMDR. Attachments are encoded in B64 format and sent in the report, selection of attachments are based on Reporting Destination configuration.Attachments for E2B(R3) are compressed before embedding to ICSR using compression algorithm configured. Default algorithm used in DF(Deflate). Attachments are not compressed in eVAERS and eMDR reports

Transmitting Reports
Transmitting and Monitoring Reports 5-10
Transmitting Reports
Transmitting ICSR ReportsArgus Safety enables you to simultaneously submit multiple adverse event reports to ease the submission process.
After submission of ICSR, the Reporting Destination which receives the ICSR sends MDN and Business Acknowledgment to indicate the status of report acceptance.
The section below describes use of the Bulk Reporting screen to transmit E2B reports and ICSR Transmit Status, ICSR Receive Status and Bulk ICSR transmit screen to track the report submissions and acknowledgement.
Transmitting Bulk Reports by FormUse the following procedure to transmit Bulk Reports by Form:
1. Click Reports ->Bulk Reporting.
2. When the system opens the Bulk Reporting Dialogue box, enter the appropriate data in the fields.
3. In the Report Form list, select E2B, eMDR or eVAERS.
4. Under Printing Options, select Transmit.
5. Select the Mark as Submitted check box if it is required to mark the report as "submitted" after the transmission is successful. If Only eMDR or eVAERS are selected, then Mark as Submitted checkbox is disabled.
6. Click OK after all the required items in the Dialogue have been entered. Use the table at the end of this topic to understand the function of each item in the Dialogue.
7. For selection of single report eVAERS or eMDR, Dialogue for entering Transmission comments is not displayed. When Other Expedited reports are

Transmitting Reports
Transmitting and Monitoring Reports 5-11
selected along with eMDR or eVAERS, then the Mark as Submitted Dialogue is displayed as shown below:
8. Click OK to transmit the report(s)
OR
Click Cancel to close the Dialogue box without transmitting the report.
9. If the Marked as Submitted check box was selected in step 5, the system opens the Report Submission Information Dialogue box.
Enter the submission notes in the Notes field and click OK.

Transmitting Reports
Transmitting and Monitoring Reports 5-12
Monitoring ICSR Transmit StatusUse the following procedure to monitor ICSR Transmit Status:
1. Click Utilities -> ICSR -> ICSR Transmit Status
2. When the system opens the ICSR Transmit Status Dialogue, enter the appropriate data.
Note: eMDR and eVAERS are marked as submitted on receiving successful ACK3(Business Ack) and submission date is updated with the date when the eMDR, eVAERS was submitted to the FDA ESG in ACK1(MDN).
If Successful ACK3(Business Ack) is received and ACK1(MDN) are not received, eMDR is marked as submitted and submission date is updated with ACK3(Business Ack) received date.
If ACK1(MDN) is received after receiving ACK3(Business Ack) and eMDR is already marked as submitted, then the submission date is overwritten with ACK1(MDN) date only if it is earlier than the already populated submission date and Transmission status of ACK1(MDN) is displayed in the Bulk ICSR Transmit.
If ACK1(MDN) is received after marking the report submitted manually than, manually entered submitted date is overwritten by ACK1(MDN)date only if it is earlier than the already populated submission date.
If the Marked as Submitted check box was not selected, the Report Submission Information Dialogue does not appear automatically. In this case, once the report has been successfully transmitted, it can be marked as “submitted” from the Worklist as follows:
Go to Worklist ->Bulk ICSRTransmit and verify that the View All radio button is selected.
Scroll in the list to locate the required report. If the report status is “Success”, click the report icon and select Mark Report as Submitted.
In the Report Submission Information Dialogue box, enter the submission notes and click OK.

Transmitting Reports
Transmitting and Monitoring Reports 5-13
ICSR Transmit Status FieldsThe following table lists and describes the fields in the ICSR Transmit Status Dialogue box.
1. Select the appropriate agency or trading partner from the Agency/Trading Partner list.
2. Select the appropriate option, Transmit Date or Message # to search by transmit date or by message number.
3. Enter the appropriate search criteria beside the selected option and click Search.
4. In the search results, click the appropriate report.
5. The Message Acknowledgement Status Dialogue appears.
Item Description
Column Headers Clicking the column header sort the data by that column alternately in a ascending and descending order.
Agency / Trading Partner
Enables you to filter data by selecting the Agency / Trading Partner from the list.
Transmit Date Range From
The search start date.
Transmit Date Range To
The search end date
Range A pre-defined date that you select from the list.
Message # Range From
The beginning message number for the search.
Message # Range To The ending message number for the search.
Type Enables you to filter data by selecting the pre-defined Type of Message (MSG, ACK) from the list.
Print Enables you to print the current view.
Search Enables you to perform the search.
Note: The EDI Header control number is shown only for EDI files.
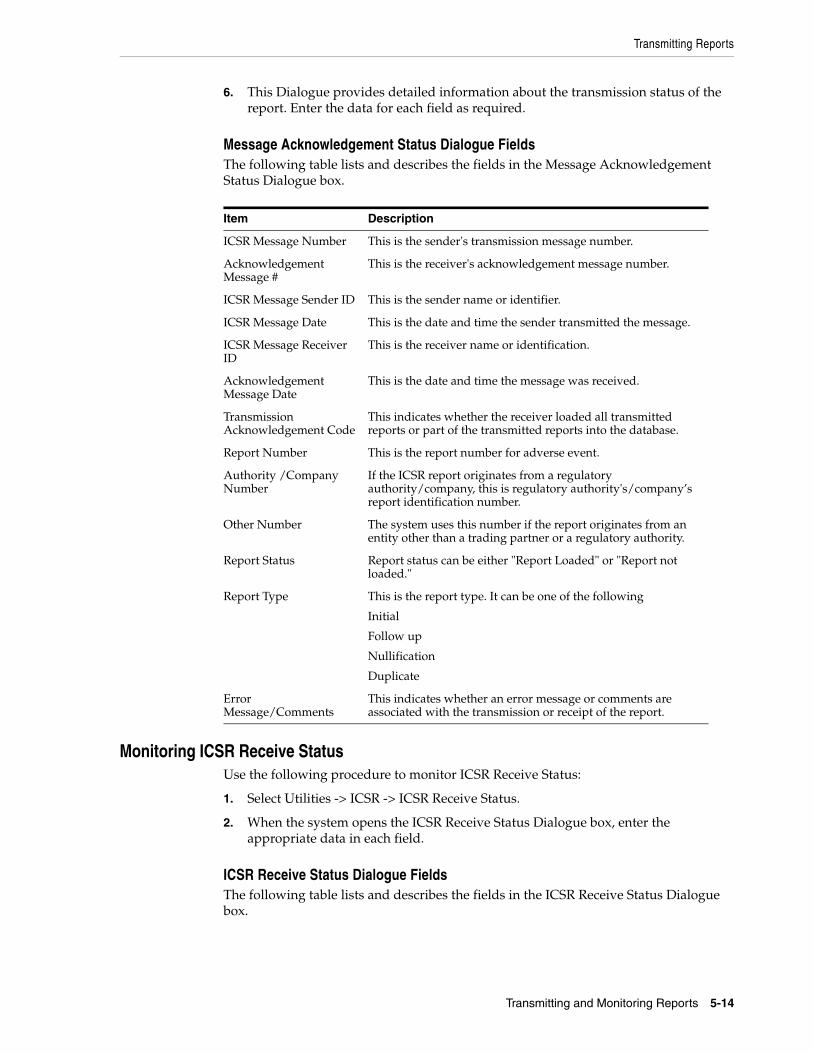
Transmitting Reports
Transmitting and Monitoring Reports 5-14
6. This Dialogue provides detailed information about the transmission status of the report. Enter the data for each field as required.
Message Acknowledgement Status Dialogue FieldsThe following table lists and describes the fields in the Message Acknowledgement Status Dialogue box.
Monitoring ICSR Receive StatusUse the following procedure to monitor ICSR Receive Status:
1. Select Utilities -> ICSR -> ICSR Receive Status.
2. When the system opens the ICSR Receive Status Dialogue box, enter the appropriate data in each field.
ICSR Receive Status Dialogue FieldsThe following table lists and describes the fields in the ICSR Receive Status Dialogue box.
Item Description
ICSR Message Number This is the sender's transmission message number.
Acknowledgement Message #
This is the receiver's acknowledgement message number.
ICSR Message Sender ID This is the sender name or identifier.
ICSR Message Date This is the date and time the sender transmitted the message.
ICSR Message Receiver ID
This is the receiver name or identification.
Acknowledgement Message Date
This is the date and time the message was received.
Transmission Acknowledgement Code
This indicates whether the receiver loaded all transmitted reports or part of the transmitted reports into the database.
Report Number This is the report number for adverse event.
Authority /Company Number
If the ICSR report originates from a regulatory authority/company, this is regulatory authority's/company’s report identification number.
Other Number The system uses this number if the report originates from an entity other than a trading partner or a regulatory authority.
Report Status Report status can be either "Report Loaded" or "Report not loaded."
Report Type This is the report type. It can be one of the following
Initial
Follow up
Nullification
Duplicate
Error Message/Comments
This indicates whether an error message or comments are associated with the transmission or receipt of the report.

Transmitting Reports
Transmitting and Monitoring Reports 5-15
1. Select the appropriate agency or trading partner from the Agency/Trading Partner list
2. You can search for the receive status by either receive date or message number. Select the appropriate option among Transmit Date and Message #.
3. Enter the appropriate search criteria beside the selected option and click Search.
4. In the search results, double-click the appropriate report.
5. When the system opens the Message Acknowledgement Status Dialogue, enter the appropriate data in each field.
Message Acknowledgement Status Dialogue FieldsThe following table lists and describes the fields in the Message Acknowledgement Status Dialogue box.
Item Description
Agency / Trading Partner Enables you to filter data by selecting the Agency / Trading Partner from the list.
Receive Date Range From The search start date.
Receive Date Range To The search end date.
Range Enables you to select a pre-defined date range
Message # Range From The beginning message number for the search.
Message # Range To The ending message number for the search.
Type Enables you to filter data by selecting the pre-defined Type of Message (MSG, ACK) from the list.
Control # The control number.
Local Msg # The local message number.
Remote Msg # The remote message number.
Total Reports The total number of reports.
Rejected Reports The number of rejected reports.
File Name The name of the received file.
Received from EDI The date and time the file was received.
Transmission Status The transmission status for the file.
Print Enables you to print the current view.
Search Enables you to initiate the search.
Note: The EDI Header control number is shown only for EDI files.
Item Description
ICSR Message Number This is the sender's transmission message number.
Acknowledgement Message #
This is the receiver's acknowledgement message number.
ICSR Message Sender ID This is the sender name or identifier.
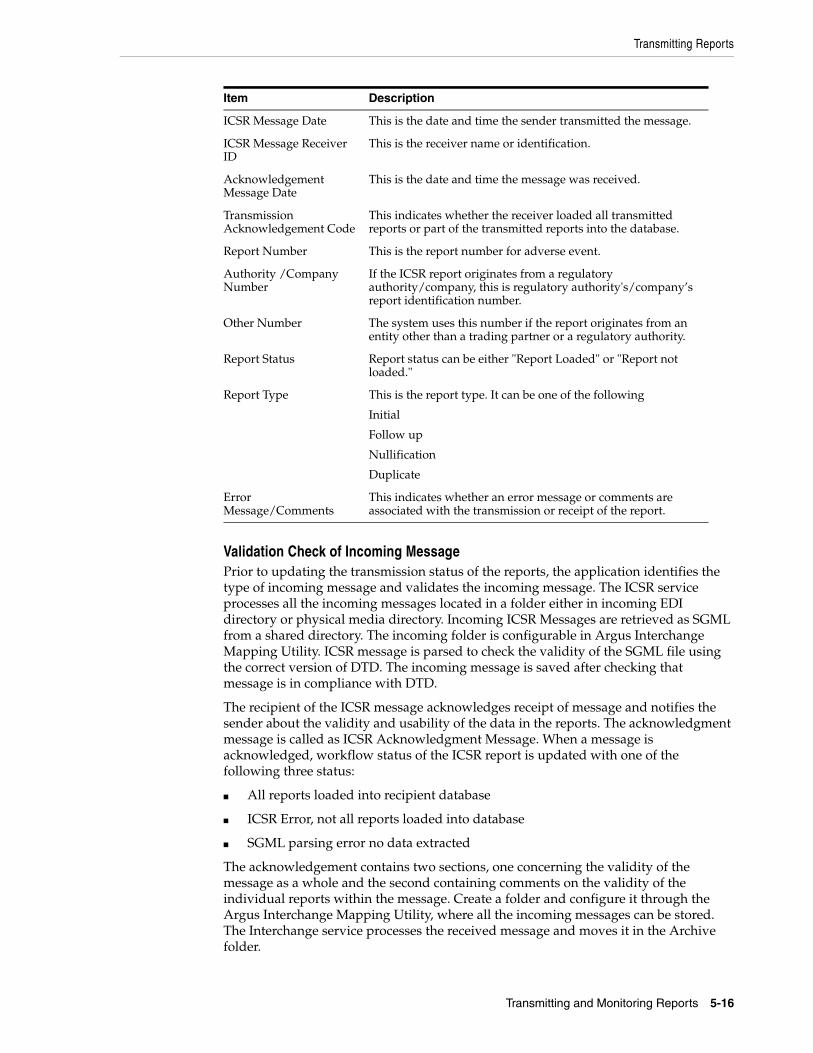
Transmitting Reports
Transmitting and Monitoring Reports 5-16
Validation Check of Incoming MessagePrior to updating the transmission status of the reports, the application identifies the type of incoming message and validates the incoming message. The ICSR service processes all the incoming messages located in a folder either in incoming EDI directory or physical media directory. Incoming ICSR Messages are retrieved as SGML from a shared directory. The incoming folder is configurable in Argus Interchange Mapping Utility. ICSR message is parsed to check the validity of the SGML file using the correct version of DTD. The incoming message is saved after checking that message is in compliance with DTD.
The recipient of the ICSR message acknowledges receipt of message and notifies the sender about the validity and usability of the data in the reports. The acknowledgment message is called as ICSR Acknowledgment Message. When a message is acknowledged, workflow status of the ICSR report is updated with one of the following three status:
■ All reports loaded into recipient database
■ ICSR Error, not all reports loaded into database
■ SGML parsing error no data extracted
The acknowledgement contains two sections, one concerning the validity of the message as a whole and the second containing comments on the validity of the individual reports within the message. Create a folder and configure it through the Argus Interchange Mapping Utility, where all the incoming messages can be stored. The Interchange service processes the received message and moves it in the Archive folder.
ICSR Message Date This is the date and time the sender transmitted the message.
ICSR Message Receiver ID
This is the receiver name or identification.
Acknowledgement Message Date
This is the date and time the message was received.
Transmission Acknowledgement Code
This indicates whether the receiver loaded all transmitted reports or part of the transmitted reports into the database.
Report Number This is the report number for adverse event.
Authority /Company Number
If the ICSR report originates from a regulatory authority/company, this is regulatory authority's/company’s report identification number.
Other Number The system uses this number if the report originates from an entity other than a trading partner or a regulatory authority.
Report Status Report status can be either "Report Loaded" or "Report not loaded."
Report Type This is the report type. It can be one of the following
Initial
Follow up
Nullification
Duplicate
Error Message/Comments
This indicates whether an error message or comments are associated with the transmission or receipt of the report.
Item Description
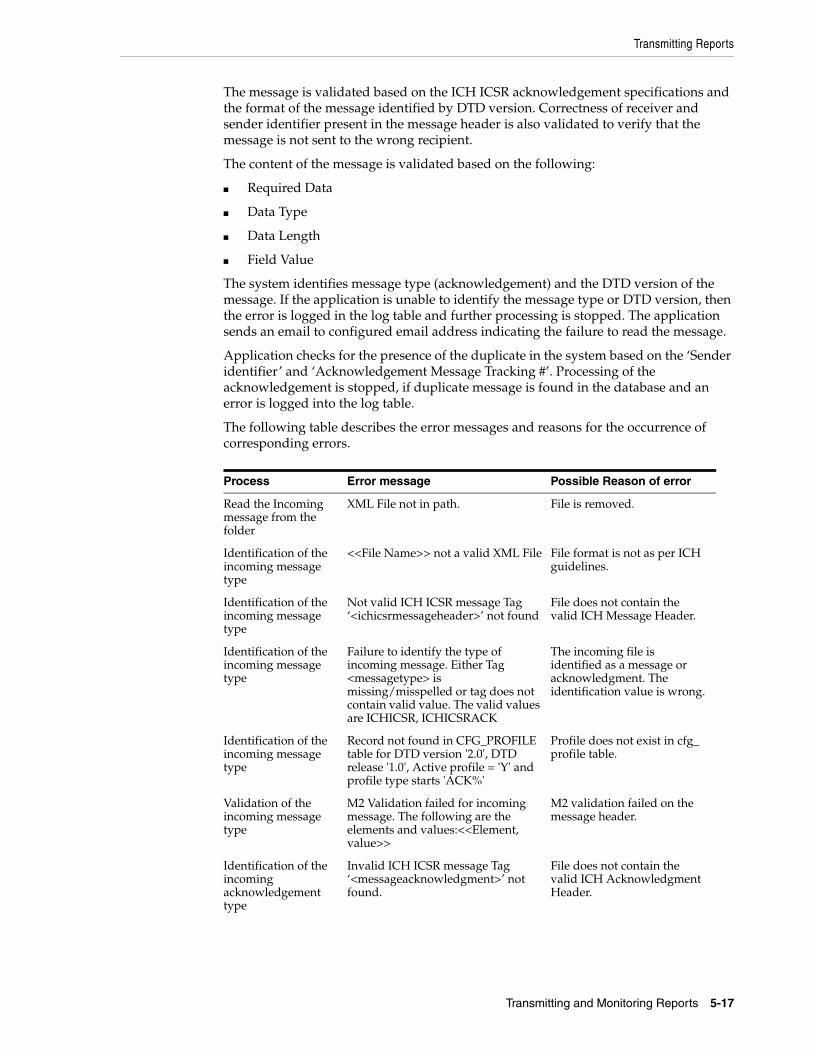
Transmitting Reports
Transmitting and Monitoring Reports 5-17
The message is validated based on the ICH ICSR acknowledgement specifications and the format of the message identified by DTD version. Correctness of receiver and sender identifier present in the message header is also validated to verify that the message is not sent to the wrong recipient.
The content of the message is validated based on the following:
■ Required Data
■ Data Type
■ Data Length
■ Field Value
The system identifies message type (acknowledgement) and the DTD version of the message. If the application is unable to identify the message type or DTD version, then the error is logged in the log table and further processing is stopped. The application sends an email to configured email address indicating the failure to read the message.
Application checks for the presence of the duplicate in the system based on the ‘Sender identifier’ and ‘Acknowledgement Message Tracking #’. Processing of the acknowledgement is stopped, if duplicate message is found in the database and an error is logged into the log table.
The following table describes the error messages and reasons for the occurrence of corresponding errors.
Process Error message Possible Reason of error
Read the Incoming message from the folder
XML File not in path. File is removed.
Identification of the incoming message type
<<File Name>> not a valid XML File File format is not as per ICH guidelines.
Identification of the incoming message type
Not valid ICH ICSR message Tag ‘<ichicsrmessageheader>’ not found
File does not contain the valid ICH Message Header.
Identification of the incoming message type
Failure to identify the type of incoming message. Either Tag <messagetype> is missing/misspelled or tag does not contain valid value. The valid values are ICHICSR, ICHICSRACK
The incoming file is identified as a message or acknowledgment. The identification value is wrong.
Identification of the incoming message type
Record not found in CFG_PROFILE table for DTD version '2.0', DTD release '1.0', Active profile = 'Y' and profile type starts 'ACK%'
Profile does not exist in cfg_profile table.
Validation of the incoming message type
M2 Validation failed for incoming message. The following are the elements and values:<<Element, value>>
M2 validation failed on the message header.
Identification of the incoming acknowledgement type
Invalid ICH ICSR message Tag ‘<messageacknowledgment>’ not found.
File does not contain the valid ICH Acknowledgment Header.

Transmitting Reports
Transmitting and Monitoring Reports 5-18
Refer to the sample email messages that are sent to the configured email address in case of message validation failure:
■ In case of invalid XML format:
From: ICSR service user
Subject: <<file name>> not valid XML formats file
Content: This mail has been sent by the system to notify that the system has failed to identify the file <<file name>> as a valid XML file.
Error has occurred on Line: <<line no>>, Source Text <<Error Text>>, Error Code <<Parsing Error Code>>, Error Reason <<Error Reason>>
Thanks,
<< ICSR service user >>
■ In case the application fails to identify the incoming message:
From: ICSR service user
Subject: Failure to Identify the Type of Incoming Message.
Content: This mail has been sent by the system to notify that the system has failed to identify the type of the incoming message (Acknowledgement or a Message) present in the file <<Incoming Message File Name>>.
Thanks,
<< ICSR service user >>
■ In case of validation failure of the incoming acknowledgement:
From: ICSR service user
Subject: Validation Failure of the Incoming Acknowledgement.
Content: This mail has been sent by the system to notify that the system has failed to further process the incoming acknowledgement present in the file <<Incoming Message File Name>>.
The following are the reasons for this failure:
Processing acknowledgment
Record not found in MESSAGES table for the ICSRMESSAGE number <<MessageNum>> ICSRMESSAGE receiver identifier <<receiver info>> for the received acknowledgment
Record is deleted from the database.
Processing acknowledgment
Duplicate acknowledgment received for ICSRMESSAGE number <<message number>> and ICSRMESSAGE RECEIVER IDENTIFIER <<receiver info>>
Acknowledgment already exists for this message number.
Processing acknowledgment
<reportacknowledgment> section is missing from the received acknowledgment, MESSAGE number <<message number>>
Acknowledgment does not contain the report acknowledgment body.
Processing acknowledgment
Record not found in SAFETYREPORT table for company number <<Company Number>> and msg_id <<message id>>
Record is deleted from SAFETYREPORT table from database.
Process Error message Possible Reason of error
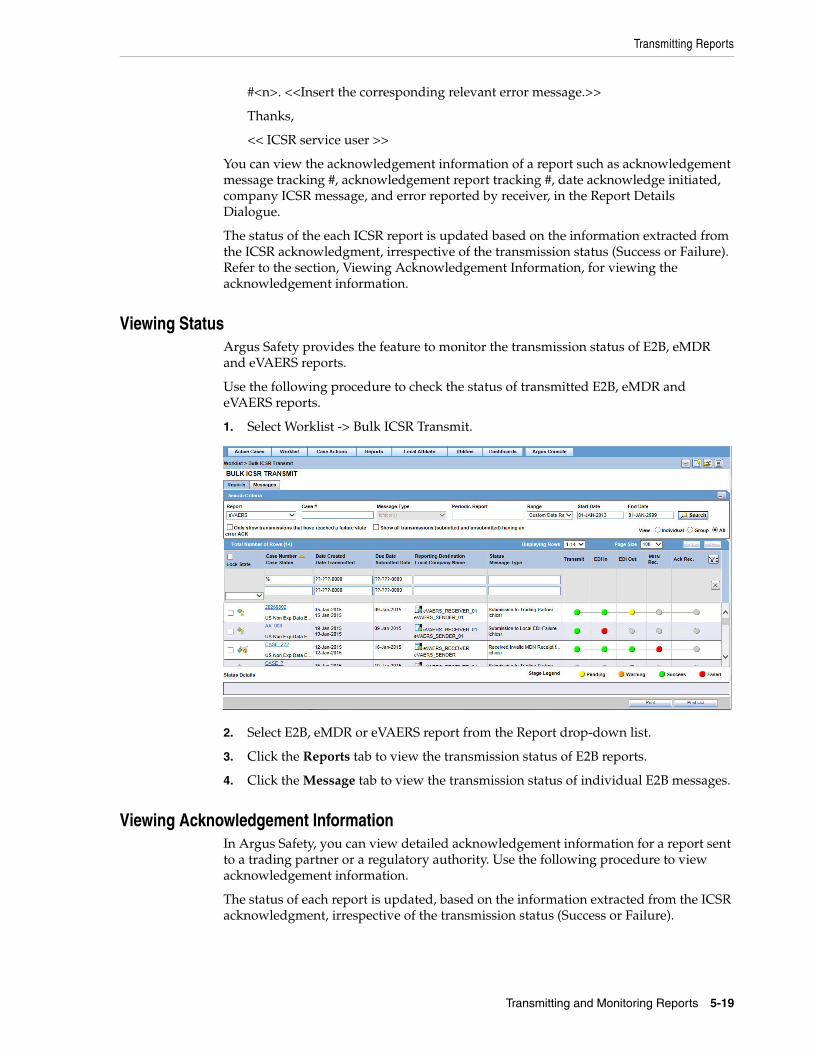
Transmitting Reports
Transmitting and Monitoring Reports 5-19
#<n>. <<Insert the corresponding relevant error message.>>
Thanks,
<< ICSR service user >>
You can view the acknowledgement information of a report such as acknowledgement message tracking #, acknowledgement report tracking #, date acknowledge initiated, company ICSR message, and error reported by receiver, in the Report Details Dialogue.
The status of the each ICSR report is updated based on the information extracted from the ICSR acknowledgment, irrespective of the transmission status (Success or Failure). Refer to the section, Viewing Acknowledgement Information, for viewing the acknowledgement information.
Viewing StatusArgus Safety provides the feature to monitor the transmission status of E2B, eMDR and eVAERS reports.
Use the following procedure to check the status of transmitted E2B, eMDR and eVAERS reports.
1. Select Worklist -> Bulk ICSR Transmit.
2. Select E2B, eMDR or eVAERS report from the Report drop-down list.
3. Click the Reports tab to view the transmission status of E2B reports.
4. Click the Message tab to view the transmission status of individual E2B messages.
Viewing Acknowledgement InformationIn Argus Safety, you can view detailed acknowledgement information for a report sent to a trading partner or a regulatory authority. Use the following procedure to view acknowledgement information.
The status of each report is updated, based on the information extracted from the ICSR acknowledgment, irrespective of the transmission status (Success or Failure).
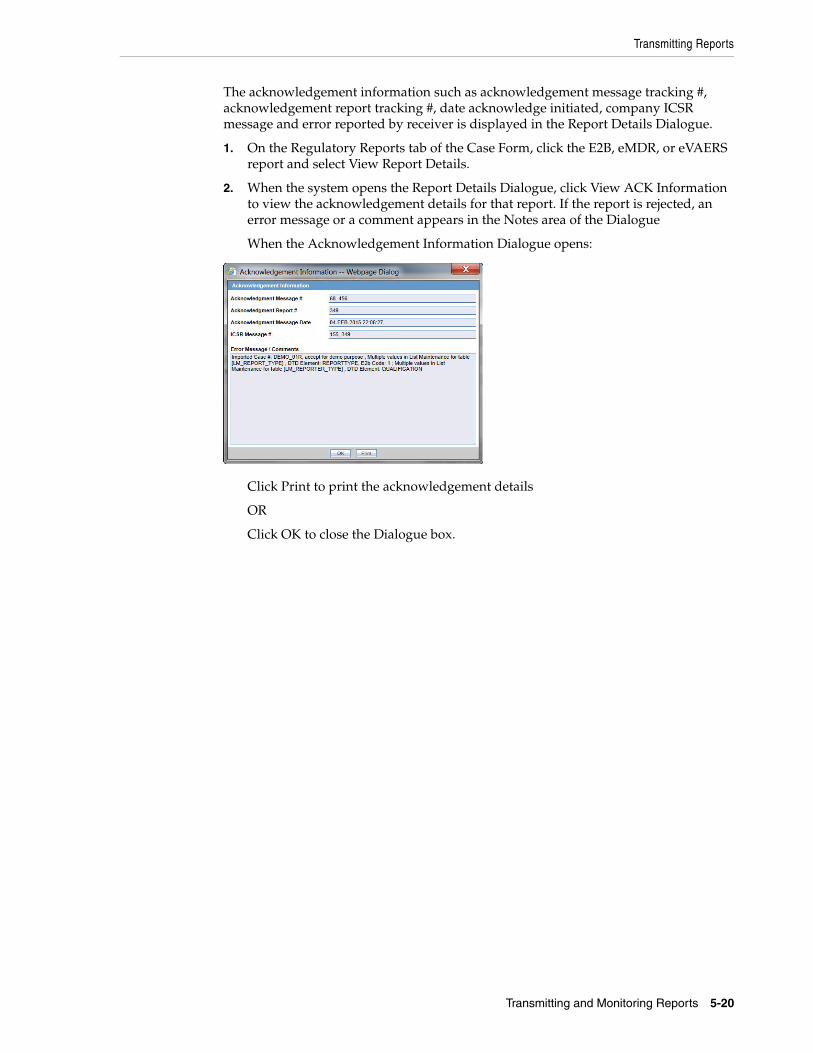
Transmitting Reports
Transmitting and Monitoring Reports 5-20
The acknowledgement information such as acknowledgement message tracking #, acknowledgement report tracking #, date acknowledge initiated, company ICSR message and error reported by receiver is displayed in the Report Details Dialogue.
1. On the Regulatory Reports tab of the Case Form, click the E2B, eMDR, or eVAERS report and select View Report Details.
2. When the system opens the Report Details Dialogue, click View ACK Information to view the acknowledgement details for that report. If the report is rejected, an error message or a comment appears in the Notes area of the Dialogue
When the Acknowledgement Information Dialogue opens:
Click Print to print the acknowledgement details
OR
Click OK to close the Dialogue box.

6
Using the ICSR Viewer 6-1
6Using the ICSR Viewer
The ICSR Viewer enables you to open E2B files and view them in different formats.
You can print these files from the ICSR viewer. This chapter includes discussions on the following:
■ Opening the ICSR Viewer
■ Exporting an XML File
Opening the ICSR ViewerThe ICSR Viewer enables you to view your E2B reports in the following views:
Exporting an XML FileThe system enables you to use the following procedure to export an XML file.
1. Click the Final E2B report type on the Regulatory Reports tab.
2. When the system opens the ICSR Viewer window, select XML from the View Format drop-down list.
Note: The term E2B that is used in this document refers to E2B (R2), E2B (R3), and eVAERS reports.
View Description
XML Displays the report in the XML format. This view is applicable for non-Japanese E2B reports.
Decoded View Displays all the data elements in groups and subgroups. Elements are eligible for decoding with their decoded values in parentheses. A link is provided in the Decoded View to view the attachments that are sent along with the report.
HL7 View This view is applicable for only E2B (R3) eMDR and eVAERS reports.This view displays the report in HL7 format.
CIOMS For details on the CIOMS view, refer to the "E2BCIOMSMapping" document. This view is applicable for only E2B (R2) reports.
MedWatch For details on the MedWatch view, refer to the "E2BMedWMapping" document. This view is applicable for only E2B (R2) reports.
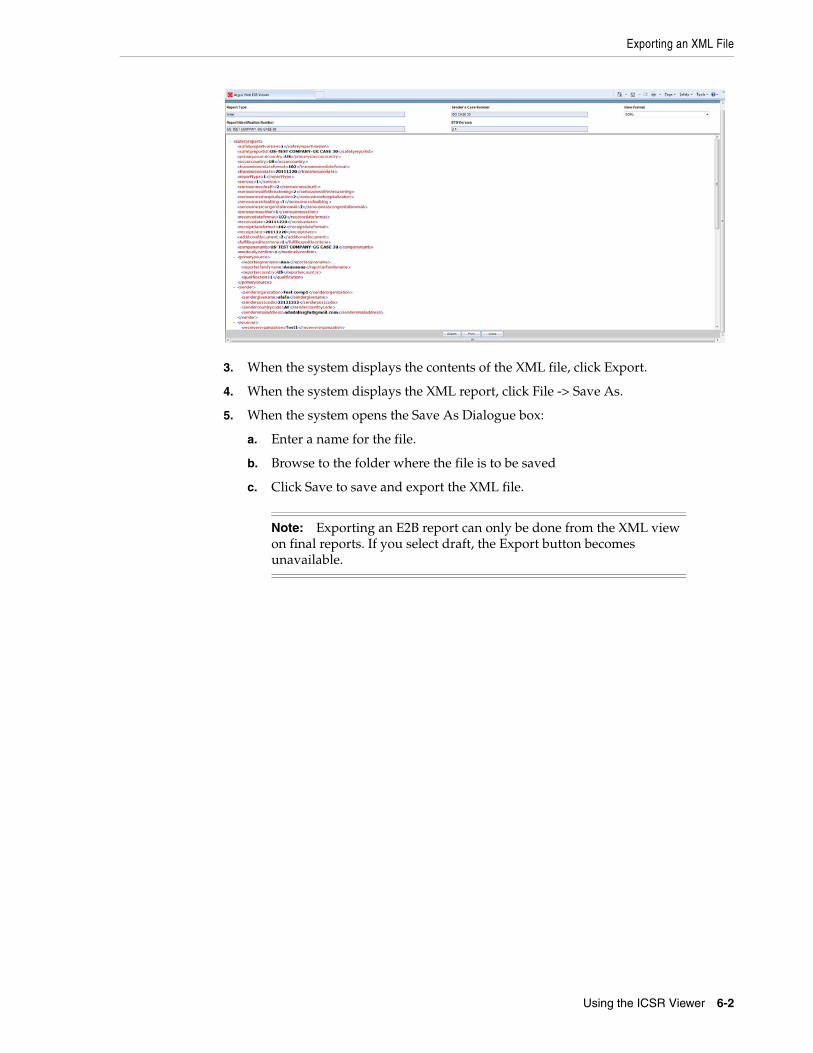
Exporting an XML File
Using the ICSR Viewer 6-2
3. When the system displays the contents of the XML file, click Export.
4. When the system displays the XML report, click File -> Save As.
5. When the system opens the Save As Dialogue box:
a. Enter a name for the file.
b. Browse to the folder where the file is to be saved
c. Click Save to save and export the XML file.
Note: Exporting an E2B report can only be done from the XML view on final reports. If you select draft, the Export button becomes unavailable.

7
Importing E2B Reports 7-1
7Importing E2B Reports
Incoming E2B ReportsIncoming E2B Reports can be viewed from the Incoming E2B Report screen.
This release does not support import of eVAERS.
This section includes discussions on the following:
■ Conversion of E2B (R3) reports to E2B (R2) format (applicable only for E2B (R3) reports)
■ Searching for Duplicate Cases
■ Using the View Differences Report
■ Viewing the E2B Report
■ Accepting Single/Multiple E2B Reports
Conversion of E2B (R3) reports to E2B (R2) format (applicable only for E2B (R3) reports)
On receiving E2B (R3) report from a Reporting Destination, it is converted to E2B (R2) format before displaying the report in ICSR Pending screen. System performs file format checks to be in HL7 format while receiving E2B report from an Agency configured with E2B (R3) profile. If the inbound E2B (R3) file format does not match the expected file format by sender, the inbound transmission is not processed. System converts the incoming E2B (R3) report to E2B (R2) format using BFC XSLs provided by ICH.
While converting E2B (R3) to E2B (R2) format, system extends the size of narrativeincludeclinical B.5.1 to 100.000 characters from the current size of 20,000 characters. If the text for B.5.1 goes beyond 100,000 characters due to BFC logic then characters beyond 100,000 characters is truncated.
The system performs other data checks such as format validation, M2 validation checks on the converted E2B (R2) report as per E2B (R2) profile that is configured in the internal common profile switch and displays the report in the ICSR Pending screen.
Searching for Duplicate CasesThe Duplicate Search Dialogue for E2B report allows you to search for possible duplicate cases in the Argus Safety system. You can select different combinations of

Incoming E2B Reports
Importing E2B Reports 7-2
search criteria. When more than one criterion is selected, only cases that satisfy all criteria are listed. By default, only the fields that are present in the E2B Report are checked for the Duplicate Search.
Use the following procedure to perform a duplicate search.
1. Select Reports -> ICSR Pending Report.
2. When the system opens the Incoming E2B Reports Dialogue, right-click a case to perform a duplicate search.
3. The system displays the search results at the bottom of the Dialogue box.
Duplicate Search Dialogue Box FieldsThe following table describes the fields present in the Duplicate Search Dialogue.
Field Description
Agency The name of the primary agency.
Original Case Number
The submitter's original case number.
Message Number The case message number.
Product Name The name of any product on XML.
Generic Name The active substance on XML.
Report Type The type of report.
Study ID The unique value that identifies the study.
Receipt Date The date Argus received the report and saved it in the system.
Center ID The ID of the center.
Sal. The salutation, such as Mr. or Mrs.
Suffix The suffix, if applicable, that follows the name (e.g., Jr., Sr.,III, etc.)
First Name The first name of the patient.
Last Name The last name of the patient.
Country of Incidence The country where the incident occurred.
State The state where the incident occurred.
Postal Code The postal code of the area where the incident occurred.
Patient Name The name of the patient.
Event Desc. A description of the adverse event.
Initials The initials of the patient.
Onset Date The date from the first reaction or adverse event occurred.
Pat. ID The unique value that identifies the patient.
Age/Units The age of the patient.
Pat. DOB The patient's date of birth.
Gender The gender of the patient.
Reference # National Regulatory Authority's Report Number, used as a Reference Number.
Journal The journal name of the literature reference.
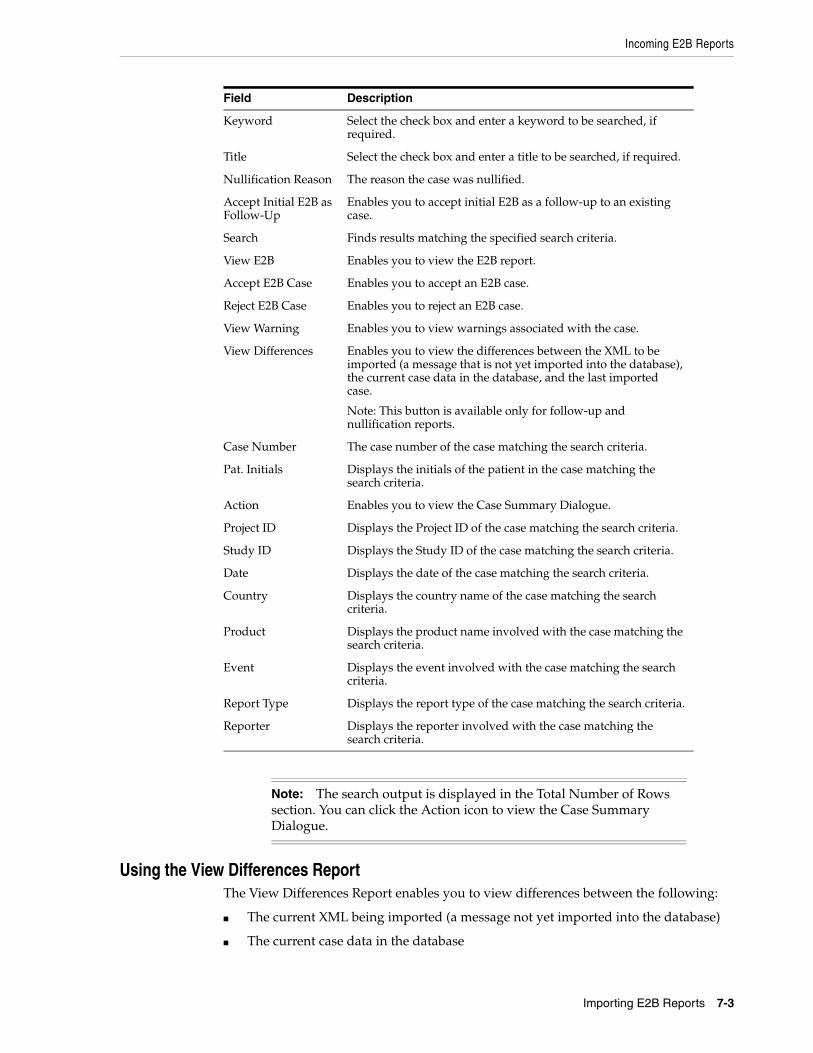
Incoming E2B Reports
Importing E2B Reports 7-3
Using the View Differences ReportThe View Differences Report enables you to view differences between the following:
■ The current XML being imported (a message not yet imported into the database)
■ The current case data in the database
Keyword Select the check box and enter a keyword to be searched, if required.
Title Select the check box and enter a title to be searched, if required.
Nullification Reason The reason the case was nullified.
Accept Initial E2B as Follow-Up
Enables you to accept initial E2B as a follow-up to an existing case.
Search Finds results matching the specified search criteria.
View E2B Enables you to view the E2B report.
Accept E2B Case Enables you to accept an E2B case.
Reject E2B Case Enables you to reject an E2B case.
View Warning Enables you to view warnings associated with the case.
View Differences Enables you to view the differences between the XML to be imported (a message that is not yet imported into the database), the current case data in the database, and the last imported case.
Note: This button is available only for follow-up and nullification reports.
Case Number The case number of the case matching the search criteria.
Pat. Initials Displays the initials of the patient in the case matching the search criteria.
Action Enables you to view the Case Summary Dialogue.
Project ID Displays the Project ID of the case matching the search criteria.
Study ID Displays the Study ID of the case matching the search criteria.
Date Displays the date of the case matching the search criteria.
Country Displays the country name of the case matching the search criteria.
Product Displays the product name involved with the case matching the search criteria.
Event Displays the event involved with the case matching the search criteria.
Report Type Displays the report type of the case matching the search criteria.
Reporter Displays the reporter involved with the case matching the search criteria.
Note: The search output is displayed in the Total Number of Rows section. You can click the Action icon to view the Case Summary Dialogue.
Field Description
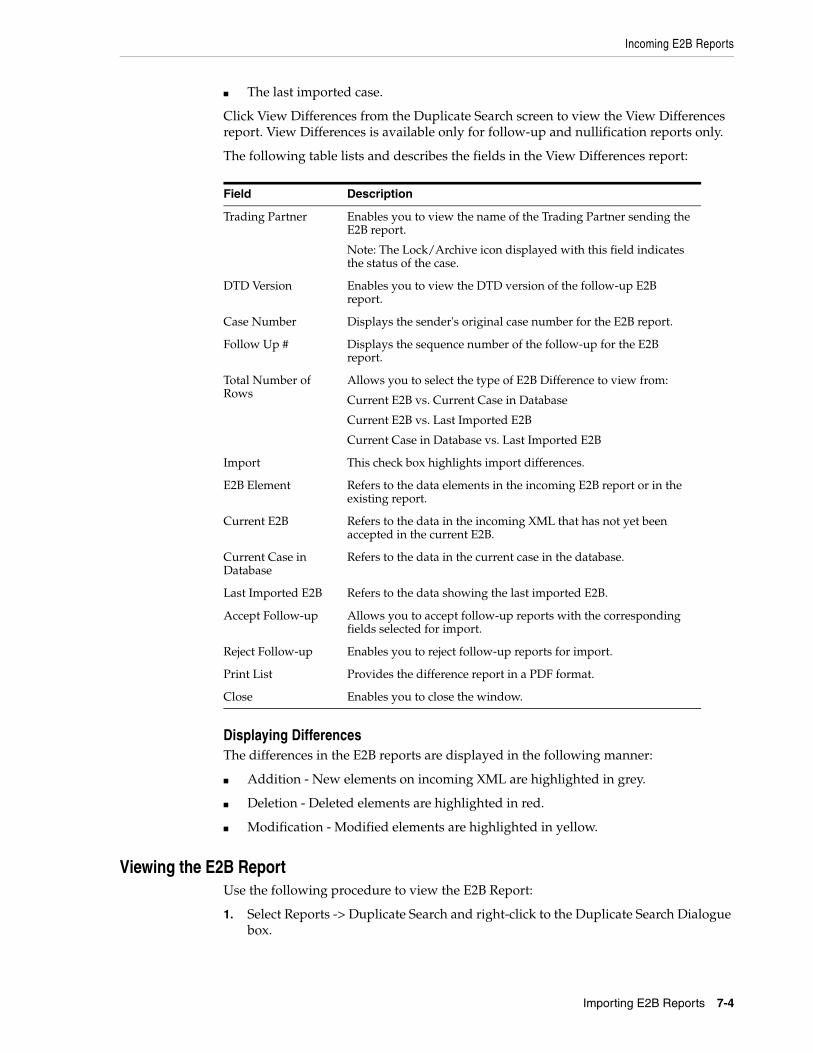
Incoming E2B Reports
Importing E2B Reports 7-4
■ The last imported case.
Click View Differences from the Duplicate Search screen to view the View Differences report. View Differences is available only for follow-up and nullification reports only.
The following table lists and describes the fields in the View Differences report:
Displaying DifferencesThe differences in the E2B reports are displayed in the following manner:
■ Addition - New elements on incoming XML are highlighted in grey.
■ Deletion - Deleted elements are highlighted in red.
■ Modification - Modified elements are highlighted in yellow.
Viewing the E2B ReportUse the following procedure to view the E2B Report:
1. Select Reports -> Duplicate Search and right-click to the Duplicate Search Dialogue box.
Field Description
Trading Partner Enables you to view the name of the Trading Partner sending the E2B report.
Note: The Lock/Archive icon displayed with this field indicates the status of the case.
DTD Version Enables you to view the DTD version of the follow-up E2B report.
Case Number Displays the sender's original case number for the E2B report.
Follow Up # Displays the sequence number of the follow-up for the E2B report.
Total Number of Rows
Allows you to select the type of E2B Difference to view from:
Current E2B vs. Current Case in Database
Current E2B vs. Last Imported E2B
Current Case in Database vs. Last Imported E2B
Import This check box highlights import differences.
E2B Element Refers to the data elements in the incoming E2B report or in the existing report.
Current E2B Refers to the data in the incoming XML that has not yet been accepted in the current E2B.
Current Case in Database
Refers to the data in the current case in the database.
Last Imported E2B Refers to the data showing the last imported E2B.
Accept Follow-up Allows you to accept follow-up reports with the corresponding fields selected for import.
Reject Follow-up Enables you to reject follow-up reports for import.
Print List Provides the difference report in a PDF format.
Close Enables you to close the window.
Incoming E2B Reports
Importing E2B Reports 7-5
2. Click View E2B to view the E2B report in the ICSR Viewer. You can also view an E2B report from the ICSR Pending screen by right-clicking on a row and selecting ICSR Viewer.
Accepting Single/Multiple E2B ReportsUse the following procedure to accept single and multiple E2B reports:
1. Select Reports -> ICSR Pending to open the Incoming E2B Report Dialogue box.
2. When the system opens the ICSR Pending screen:
To accept a single report, right-click on it and select Accept E2B
OR
To accept multiple reports, select the check boxes for each report and click Accept E2B.
3. When the system opens the Acceptance of Initial Report Confirmation Dialogue box, enter the password and any relevant notes.
4. Click OK to accept the case.
5. If the system is configured to automatically number cases, the system opens the case accepted Dialogue appears with the generated case number.
6. Click OK to close this Dialogue.
E2B Initial/Follow-up IntakeDuring case acceptance, you can access selective acceptance fields in the report.
■ The Selective Acceptance feature is enabled only for single initial ICSRs and is a right-click option.
■ If you select multiple ICSRs, the system disables this button.
■ If you select a single follow-up or nullification ICSR, the system disables this button.
■ When the system displays the E2B Difference Report Dialogue, you can select the elements required to create or update a case without the system displaying the Case Number and Follow-up Number in the difference report Dialogue for initial reports.
■ The following changes have been made to the Initial Intake and the Follow-up Difference Report Dialogues:
– The system displays the decoded view to enable you to select the elements (e.g., US [United States]).
– The system prints the check box options for the Initial Intake and Follow-up Difference Report Dialogues.
Note: The acceptance of multiple E2Bs can be performed only when the system numbering is set to Automatic.
Note: If the system is configured to manually number cases, you will be prompted to enter a case number for the case that is being accepted.
Incoming E2B Reports
Importing E2B Reports 7-6
– The label is updated to Select when selecting elements for the Initial Intake and the Follow-up Difference report Dialogue.
■ You must select the following fields before the system will permit you to accept the Initial case. By default, all the fields are selected.
– Country of Incidence (default and grayed out)
– Report Type (default and grayed out)
– Initial Receipt Date (default and grayed out)
– Any one Product
– Any one Event Term
■ If you fail to select these fields, the system displays the following message:
E2B cannot be imported as it does not meet minimum Argus requirements.
■ The system permits you to print the Initial ICSR report.
■ When you click Accept Initial, the system displays the Accept E2B Case Dialogue. When you complete the data elements and click OK, the system displays the Error/Warning message Dialogue for any elements you have selected.
■ Once you accept the case as an initial or follow-up case, the system attaches the Source XML (ICSR) and the Initial Selection PDF to the case in the Additional Info tab.
■ For Auto Accepted ICSRs, the system does not attach the source PDF in the case because the source XML is attached.
■ Initial/Follow-up Source XML
– Attachment Classification. As specified in the Reporting Destination for the XML source classification.
– Date. The system date when the case you accepted XML for the case.
– Description. The acceptance notes you entered for XML.
– When you click the Source ICSR, you can see the ICSR when opening the ICSR View (ICSR Viewer).
■ Initial Selection PDF
– Attachment Classification: As specified in the Reporting Destination for the Selection Source Classification.
– Date: The system date when you accepted XML for the case.
– Description: The date you entered acceptance notes for XML.
■ Follow-up Source XML
– When you click the Source ICSR PDF or the E2B Difference Report, you can view the Initial Selection PDF or the E2B Difference Report in a different IE window.
■ Once you accept a case as an initial or a follow-up ICSR, the system prefixes the Business Level Acknowledgement Notes with the case number in the following format:
Imported Case #: XXXXX
where:
XXXXX is the case number
Processed ICSR Reports
Importing E2B Reports 7-7
■ The system attaches the current notes sent in the Business Level Acknowledgement.
■ If the system receives the ICSR via the physical gateway (configured at the reporting destination level), the system sends a low level ACK to indicate the file was received by the Argus Interchange Service.
■ The system places this file in the Physical Out folders as configured for the reporting destination in the E2B Mapping Configuration.
■ For EDI received files, the system continues to let the EDI Gateway send the low level ACK as it does currently.
■ The Interchange Services does not process the low level ACK received in the Physical In destination folder, but enters any errors in the log file since the file will always be rejected by the Interchange Service.
E2B Follow-up Acceptance for Closed/Locked Cases■ If you try to accept follow-up information for a closed or locked case, the system
prompts you to unarchive or unlock the case for processing after entering the password and acceptance notes.
■ If the case is in archived state while you are accepting the report, the system displays the Case Re-open Dialogue to enable you to open the case.
■ If the case is in locked state while you are accepting a report, the system displays the Case Unlock Dialogue to enable you to unlock the case.
■ After you reopen the case, the system accepts all updates as defined in the follow-up information you selected.
■ If you do not have permission to reopen an archived or locked case, the system displays the following message:
■ You do not have permission to Re-open an Archived/Closed case or Locked Case.
■ If you select multiple open, locked, or archived cases or if you do not have permission to open the case, the system skips the cases.
■ The system does not create follow-up actions for cases that it accepts automatically.
Processed ICSR ReportsThe Processed ICSR Reports screen contains a list all Processed ICSR Reports. Click the Processed ICSR Reports tab on the Incoming Reports screen to view the Processed ICSR Reports screen.

Processed ICSR Reports
Importing E2B Reports 7-8
The Processed ICSR screen contains the following:
■ Search Criteria
■ Total Number of Rows
The following table lists and describes the fields in the Total Number of Rows section on the Processed ICSR screen.
Field Description
Originated Case# Displays the Originated Case Number of the case.
Initial/F-U/Nullification
Displays the Initial/F-U/Nullification status.
Trading Partner The name of the trading partner.
World Wide Unique# The World Wide Unique # for the case.
Import Status - Warnings/Errors
The import status of the case and any associated warnings/errors.
Case # Imported As The Case Number used when importing the case.
Accepted / Rejected By
Identifies who accepted or rejected the case.
Notes The case notes.
Interchange Date The Interchange Date.
Date Imported/Rejected
The date the case was imported/rejected.
ACK Gen Yellow indicates the case is still pending
Orange indicates the case is accepted with warnings / errors
Red indicates the user or system rejected the case.
Green indicates the case has been successfully imported.

Processed ICSR Reports
Importing E2B Reports 7-9
EDI Out Yellow indicates the system is waiting to send the report out of the EDI / XML or PHY out folders
Green indicates the report is already sent out of the EDI / XML or PHY out folders
Red indicates that the EDI gateway failed to send the report out of the EDI / XML or PHY out folders.
Field Description