User’s Guide - Home - HUSQVARNA VIKING® VHZLQJ PDFKLQH LV QRW LQWHQGHG IRU XVH E\ SHUVRQV...
56
KEEPING THE WORLD SEWING™ User’s Guide
-
Upload
hoangquynh -
Category
Documents
-
view
214 -
download
0
Transcript of User’s Guide - Home - HUSQVARNA VIKING® VHZLQJ PDFKLQH LV QRW LQWHQGHG IRU XVH E\ SHUVRQV...

KEEPING THE WORLD SEWING™
User’s Guide

This household sewing machine is designed to comply with IEC/EN 60335-2-28 and UL1594
IMPORTANT SAFETY INSTRUCTIONSWhen using an electrical appliance, basic safety precautions should always be followed, including the following:
Read all instructions before using this household sewing machine.
DANGER – To reduce the risk of electric shock:
from the electric outlet immediately after using and before cleaning.
WARNING or injury to person:
the sewing machine by a person responsible for their safety.
recommended by the manufacturer as contained in this manual.
been dropped or damaged, or dropped into water. Return the sewing machine to the nearest authorized
sewing machine and foot controller free from the accumulation of lint, dust, and loose cloth.
needle, changing needle, threading bobbin, or changing presser foot, etc.
SAVE THESE INSTRUCTIONS
SERVICING OF DOUBLE INSULATED PRODUCTS

Stitch and alphabet overview, page 7-10
Machine overview and accessories, page 5-6
1Getting ready to sew
Page 11-21
Operating the machine
Page 22-36
Basic sewing techniques
Page 37-49
Taking care of the machine
Page 50-52
2
3
4

Table of contentsMachine overview ............................................................5Included accessories ........................................................6
1. Getting ready to sew
Presser Feet .......................................................................6Stitch table - menu 1. Utility Stitches ..........................7Stitch overview ...............................................................10Alphabets .........................................................................10Unpacking ........................................................................11Packing away after sewing ............................................11Accessory box ................................................................11Extended Sewing Surface .............................................11Using the free arm .........................................................11Connecting the foot control cord..............................12Connect the power cord and foot control ..............12Lower the feed teeth ....................................................13Changing the presser foot............................................13Changing the needle ......................................................13Needles ............................................................................14Spool pins and spool caps ............................................15Threading the upper thread.........................................16Needle threader .............................................................17Cutting the thread .........................................................17Threading for twin needles ..........................................18Winding the bobbin with the machine threaded ...........................................................18Winding the bobbin using the vertical spool pin ....19Winding the bobbin using the auxiliary spool pin ..19Inserting the bobbin ......................................................20Thread tension................................................................20EXCLUSIVE SENSOR SYSTEM™ (ESS) .....................21Starting to sew ..............................................................21
2. Operating the machine
Function buttons ............................................................22Function buttons on the Touch Panel ........................24Sewing Mode ...................................................................26Selecting a stitch ............................................................27Selecting a font ..............................................................27Programming .................................................................28My Stitches Menu ........................................................31SET Menu ......................................................................32Pop-up messages ............................................................34Exclusive SEWING ADVISOR® ...................................37
3. Basic Sewing techniques
Seam ..................................................................................38Edge/Quilting Guide ......................................................38Overcast ...........................................................................39Seam and overcast .........................................................40Baste ..................................................................................41Darning and mending ....................................................41Blind hem .........................................................................42Hem...................................................................................43Sewing buttonholes .......................................................44Sewing on buttons .........................................................46Bartack (manual) ............................................................46Sewing zippers ................................................................47Free Motion Quilting .....................................................48Decorative Tapering Stitches .......................................49
4. Taking care of the machine
Cleaning the machine ....................................................50Trouble shooting ............................................................51

5
1
2
4
5
6
3
7
8
10111213
9
14
15
161718
19
20
222324
25
21
26
27
8
28
Machine overview
1. Lid
2. Pre-tension thread guide
3. Thread tension discs
5. Thread tension for bobbin winding
6. Function button panel
7. Thread cutter
9. socket
10. Needle threader
11. Presser foot
12. Needle plate
14. Free arm
16. Needle bar with needle clamp screw
17. Presser bar
18. Presser foot ankle
24. Thread cutter for bobbin thread
25. Handwheel
27. Touch Panel with function buttons
connectors for power cord and foot control

6
1
2 3 4
5
6
7
10
8
9
11
Included accessories
Presser Feet
Utility Foot A zigzag stitching with a stitch length longer than 1.0.
Utility Foot B less than 1.0 mm stitch length, use this foot. The tunnel on the underside of the foot is
Buttonhole Foot C
This foot is used for sewing buttonholes step by step. Use the guide lines on the toe of the foot to position the garment edge. The two tunnels on the bottom of the foot ensures
cording for corded buttonhole.
Blind Hem Foot D This foot is used for blind hem stitches. The inner edge of this foot guides the fabric. The right toe of the foot is designed to ride along the hem edge.
Zipper Foot EThis foot can be snapped on either to the right or to the left of the needle, making it easy
Non-Stick Glide Foot H leather to minimize the risk of these materials sticking to the foot.
Edging Foot J
Embroidery/Darning Foot R
Sensor One-Step Buttonhole Foot
When connected to the machine, the buttonhole is sewn in a suitable length to the button size that has been entered into the machine.
1. ™ Pen
9. Extra spool caps, one large, one small.10. Multipurpose tool/button reed

7
Stitch table - menu 1. Utility StitchesStitch No. Stitch name Presser Foot Application
0
1 center needle position
2
left needle position For seams in tricot and stretch fabric.
3
positionreinforce and topstitch sportswear and working clothes. For topstitch, increase the stitch length. 29 needle positions.
4
5
6
7 J
8
fabrics.
9 No presser foot
10 with FIX
11
12
13
14
15
16
17
18 stitch Repeat until the basting is done.
19
20

8
Stitch No. Stitch name Presser Foot Application
21 Shell Edge A/B For edgings, sew over the edge on light stretch fabrics, sew woven fabrics on bias.
22Elastic Stitch or
Smocking A/B Sew over two rows of elastic thread for elastic shirring.
23 Bridging stitch A/B
24Darning Stitch (forward and
backward)A/B Darn and mend small holes in work clothes, jeans, tablecloths and more. Stitch over the hole, press
reverse for continuous darning and auto stop.
25 Darning Stitch (side to side) A For mending small tears.
26 Bartack(manual) A/B Reinforce pockets, shirts openings, belt loops as well as at lower end of a zipper.
27 Belt Loop Stitch A For securing belt loops.
28 Round End
ButtonholeSensor One-StepButtonh. Foot/C For blouses and children’s garments.
29 Medium Reinforced
Buttonhole C For medium and heavy fabrics.
30 Heirloom
ButtonholeSensor One-StepButtonh. Foot/C the buttonhole. Use thicker thread.
31 Keyhole Buttonhole Sensor One-Step
Buttonh. Foot/C For tailored jackets, coats, etc.
32 Rounded Heirloom Buttonhole
Sensor One-StepButtonh. Foot/C
33 Heavy Duty
ButtonholeSensor One-StepButtonh. Foot/C With reinforced bartacks.
34 Leather Straight
Stitch Buttonhole A/B For leather and suede.
35 B For laces embellishment.
36 Eyelet B For belts, laces, etc.
37 Satin stitch, narrow B For appliqués, sewing on laces and trims. For light and medium fabrics.
38 Satin stitch, medium B For appliqués, sewing on laces and trims. For light and medium fabrics.
39 Satin stitch, wide B For appliqués, sewing on laces and trims. For heavy fabrics.
9
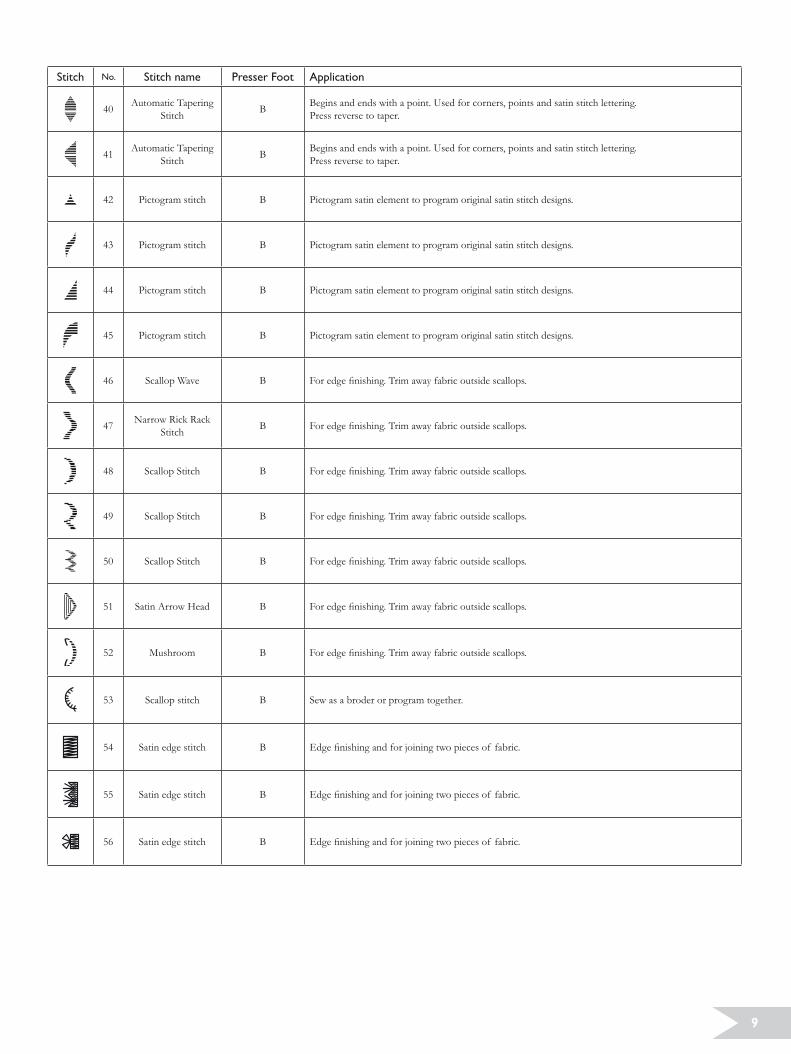
Stitch No. Stitch name Presser Foot Application
40
41
42 Pictogram stitch Pictogram satin element to program original satin stitch designs.
43 Pictogram stitch Pictogram satin element to program original satin stitch designs.
44 Pictogram stitch Pictogram satin element to program original satin stitch designs.
45 Pictogram stitch Pictogram satin element to program original satin stitch designs.
46
47 Narrow Rick Rack
48
49
50
51
52 Mushroom
53
54
55
56

10
Stitch overview
the same in all four stitch menus.
The stitches marked with a red box can be used for tapering.
Brush Line
Block
Cyrillic and Hiragana
Alphabets

11
1
Getting ready to sew
Unpacking
and a foot control cord.4. Wipe the machine, particularly around the needle and stitch
Note: Your ™ 930 sewing machine is adjusted to provide the best stitch result at normal room temperature. Extreme hot and cold temperatures can affect the sewn result.
Packing away after sewing
2. Unplug the cord from the wall socket and then from the machine.
3. Unplug the foot control cord from the machine. Wind the foot control cord inside the space on the underside of the foot control.
4. Check to ensure that all accessories are in the accessory box.
Accessory boxThere are special places for presser feet and bobbins in the
the accessories in the box so they are easily accessible.
Extended Sewing SurfaceThe space at the right side of the needle, between the needle
Using the free arm
and use the free arm.
in place.

12
1
1 23
Getting ready to sew
Connecting the foot control cord
the power cord. Connecting the foot control cord to the foot
the machine.
Connect the cord to the socket inside the space of the foot control.
3. Lay the cord in the slot on the underside of the foot control.
Connect the power cord and foot control
Before plugging in the foot control, check to ensure that it is of type “FR5” (see underside of foot control).
1. Connect the foot control cord to the front socket on the bottom right side of the machine.
2. Connect the power cord to the rear socket on the bottom right side of the machine.
3. Press the
For the USA and Canada
This sewing machine has a polarized plug (one blade wider than the other).
outlet. Do not modify the plug in any way.

13
1
Getting ready to sew
Lower the feed teeth
you wish to raise the feed teeth. The feed teeth will raise as you begin to sew. The feed teeth should be lowered when sewing on buttons and for free motion sewing.
Changing the presser foot Press the ON/OFF switch to “O”.
1. Make sure the needle is in the highest position and the presser foot is lifted. Pull the presser foot towards you.
2. Line up the cross pin on the foot with the gap in the presser foot ankle. Push back until the foot snaps into place.
Changing the needle Press the ON/OFF switch to “O”.
1. Use the hole in the multipurpose tool to hold the needle.2. Loosen the screw in the needle clamp with the
4. Insert the new needle using the multipurpose tool. With the
will go no further.

14
1A DB C
1
2
Getting ready to sew
NeedlesThe sewing machine needle plays an important role in successful
needles of system 130/705H. The needle package included with
Universal needle (A)
and weights.
Stretch needle (B)
synthetic suedes and leathers. Marked with a yellow band.
Denim needle (C)
Wing needle (D)The Wing needle has wide wings on the side of the needle to poke holes in the fabric when sewing entredeux and other
NOTE: Change the needle often. Always use a straight needle with a sharp point (1). A damaged needle (2) can cause skipped stitches, breakage of needles or snapping of thread. A damaged needle can also damage the stitch plate.

15
1A
B
Getting ready to sew
Spool pins and spool capsYour sewing machine has two spool pins, a main spool pin and an auxiliary spool pin. The spool pins are designed for all types
position for large spools or specialty threads.
Horizontal PositionLift the spool pin up slightly from its horizontal position to easily
the top, in a counterclockwise direction, as shown in the picture.
horizontal position.
Your machine comes with two spool caps on the spool pin. For
placed in front of the spool.
the spool. There should be no space between spool cap and thread spool.
Two extra spool caps, one small and one large, are also included as accessories for your machine. The small spool cap can be used for small thread spools. The second large spool cap can be used when winding a bobbin from a second spool of thread or when sewing with a twin needle.
Vertical PositionLift the spool pin up and all the way to the right. Lock the spool
the large spool cap. For spools smaller than the medium size spool cap or when using specialty threads, place a felt pad under
For larger spools, the felt pad is not needed.
Note: No spool cap should be placed on top of the spool as this prevents the spool from rotating.
Auxiliary Spool PinThe auxiliary spool pin is used when winding a bobbin from a second spool of thread or for a second spool when sewing with a twin needle.
spool cap. For spools smaller than the medium size spool cap,
from reeling off too fast. For larger spools, the felt pad shall not be used.

16
1A
B
CD
E
Getting ready to sew
Threading the upper threadMake sure the presser foot is raised and the needle is in the up position.
Press the ON/OFF switch to “O”.
1. Place the thread on the spool pin and the spool cap on the spool pin as described on page 11.
2. Spool pin in horizontal position:
Spool pin in vertical position:
4. Continue threading in the direction indicated by the arrows.

17
11 2
3
4
A
B
C
4
Getting ready to sew
Needle threaderThe needle must be in the up position to use the built-in needle threader. We also recommend lowering the presser foot.
1. Use the handle to pull the needle threader all the way down,
2. Push back to bring the needle threader forward until the
4. Let the needle threader gently swing back. The hook pulls the thread through the needle eye and forms a loop behind the needle. Pull the thread loop out behind the needle.
5. Place the thread under the presser foot.
Note: The needle threader is designed to be used for size 70-120 needles. You cannot use the needle threader for size 60 needles or smaller, the wing needle, twin needle, triple needle or when the Sensor One-Step Buttonhole Foot is on.
of the needle.
When threading the needle manually, make sure that the needle is threaded from front to back. The white presser foot ankle makes it easy to see the eye of the needle. The bobbin case cover can be used as a magnifying glass.
Cutting the thread
presser foot and pulling the threads from the back to the front into the thread cutter on the left side of the machine.

18
1 A
C
D
B
D
C
Getting ready to sew
Threading for twin needles Press the ON/OFF switch to OFF.
1. Insert a twin needle.2. Use a second thread spool or wind a bobbin with the thread
you are going to use as the second upper thread.3. Lift the spool pin up and all the way to the right. Lock the
spool pin in the
medium size spool cap, place a felt pad under the thread spool.
rotate in a clockwise direction when the thread reels off the spool.
5. LEFT NEEDLE: Thread the machine as described on page 16. Check to ensure that the thread lies between the left thread
6. Pull out the auxiliary spool pin and slide on the large spool cap. For spools smaller than the medium size spool cap, place a felt pad under the thread spool.
7. Place the second thread on the spool pin. The second spool should rotate in a counterclockwise direction when the thread reels off the spool.
8. RIGHT NEEDLE: Thread the machine as before but this thread
manually.Note: Only use symmetrical twin needles (C). Do not use this type of twin needle (D), since it may damage your sewing machine.
Note: If using specialty threads (such as metallic threads) its weight and irreglular surface increases the thread tension. By reducing the tension, the risk of needle breakage is prevented.
Winding the bobbin with the machine threadedMake sure that the presser foot is up and the needle is in the highest position.Note: Do not use a plastic presser foot when bobbin winding. 1. Place an empty bobbin on the bobbin spindle on the top of the
machine. The ® bobbins.
2. Pull the thread from the needle under the presser foot and to
inside to the outside. Note: When using an earlier version of HUSQVARNA VIKING® bobbins that do not have a hole, wind several turns of thread on the bobbin to get started.
When the bobbin is full, it will stop automatically. Push the
the thread on the thread cutter.

19
1A
BC
A
BC
D
Getting ready to sew
Winding the bobbin using the vertical spool pin1. Place an empty bobbin on the bobbin spindle on the top
of the machine. The ®
bobbins.2. Place the large spool holder and a felt pad under the spool on
the inside to the outside.
When the bobbin is full, it will stop automatically. Push the
off the thread on the thread cutter.
Winding the bobbin using the auxiliary spool pin1. Place an empty bobbin on the bobbin spindle on the top
of the machine. The ®
bobbins.2. Fold out the auxiliary spool pin. Place a large spool holder
and a felt pad under the spool.
the inside to the outside.
When the bobbin is full, it will stop automatically. Push the
off the thread on the thread cutter.
Note: Depending on the type of thread, wrap the thread one or two turns around the bobbin thread tension disc (B) to put more tension on the thread.
Note: When using an earlier version of HUSQVARNA VIKING® bobbins that do not have a hole, wind several turns of thread on the bobbin to get started.

20
1
1
2
3
E
F
G
1 2
3 4
I
H
Getting ready to sew
Inserting the bobbin Press the ON/OFF switch to “O”.
2. Place the bobbin in the bobbin case. It drops in only one way with the logo facing up. The thread unreels from the left of the bobbin. The bobbin will then rotate counter-clockwise when you pull the thread.
thread
Thread tensionYour machine automatically sets the best thread tension for the
Make a few tests on a scrap piece of the fabric you are going to sew and check the tension.
Correct and incorrect thread tensionTo understand the correct thread tension, sew a few sample straight stitches at different settings.
number. The bobbin thread will lie straight and the top thread will be drawn to the underside of the fabric.
2. If you set the tension at the highest number, the bobbin
may pucker and the top thread might break.3. The correct thread tension is set when the threads interlock
stitches, on the underside.

21
1
Getting ready to sew
EXCLUSIVE SENSOR SYSTEM™ (ESS)
Sensor Foot Pressure
with perfect fabric feeding.
If you want to see the actual setting of the presser foot pressure for
Menu.
Sensor Foot LiftThe presser foot on your sewing machine is raised and lowered in
The presser foot is automatically lowered when you start sewing. When you stop with the needle in the down position, the presser foot automatically senses the thickness of the fabric and raises
Starting to sew
® buttons that will help you to get the best stitch and settings when you are sewing.
Press the button for the type and weight of fabric you are using
Place top and bobbin thread under the presser foot and to the back. For best results when beginning at the edge of the fabric,
Place fabric in position under the presser foot.
lowered automatically.
Guide the fabric gently with your hands as the machine is feeding.

22
29
8
65
7
4
1 2
3
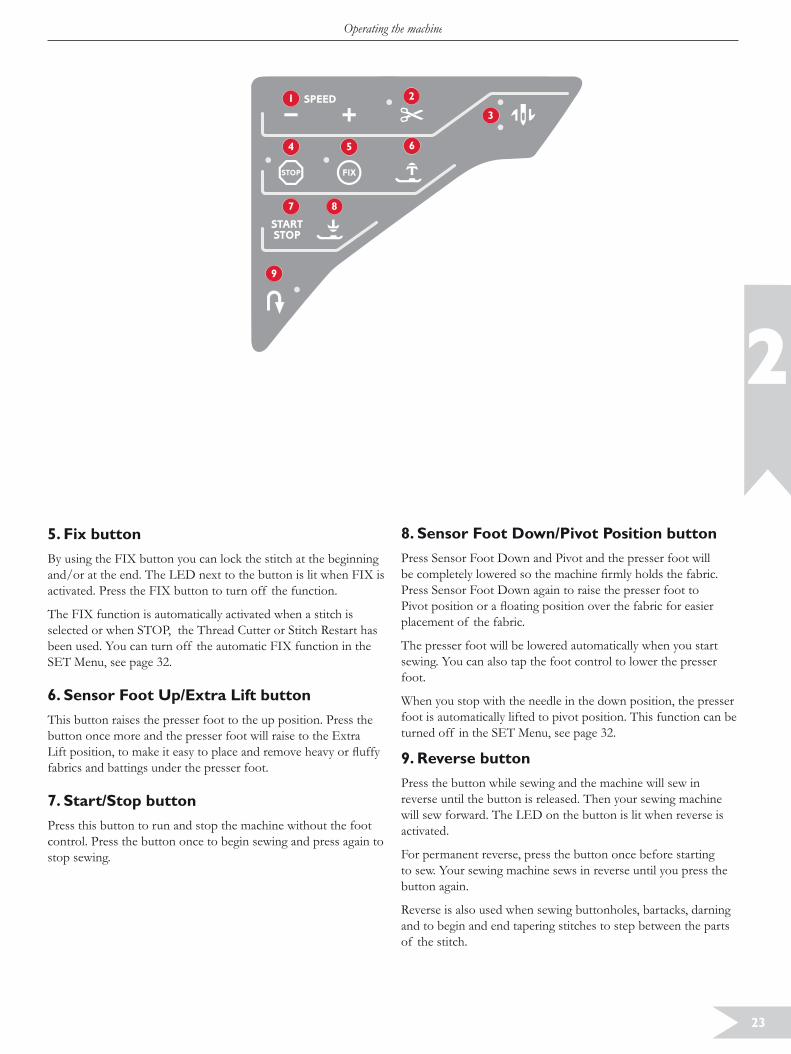
Operating the machine
1. Speed buttons
cannot select a higher speed than the default max speed for the selected stitch.
2. Thread CutterPress the Thread Cutter and your machine ties off the threads, cuts the top and bottom threads, raises the presser foot and the
threads at the end of a stitch or stitch program, press the Thread
program is completed, the upper thread and bobbin will be cut.
Note: After a buttonhole or an eyelet is sewn, your machine cuts automatically. Automatic Thread Cutter can be cancelled in the SET Menu, see page 32.
3. Needle Stop Up/Down button
the needle stop position is changed at the same time.
You can also tap the foot control to raise or lower needle. If both the needle and the presser foot are in up position, only the presser foot will be lowered when you tap the foot control the
4. Stop button
the stitch. Your sewing machine ties off the thread and stops automatically when one stitch unit or stitch program has been
Tip: If you want to repeat the STOP function for a stitch unit several times in a row you can save the stitch with a STOP at the end in a program (see Programming, page 29).
Function buttons
23
29
8
65
7
4
1 2
3
Operating the machine
5. Fix button
been used. You can turn off the automatic FIX function in the
6. Sensor Foot Up/Extra Lift buttonThis button raises the presser foot to the up position. Press the button once more and the presser foot will raise to the Extra
fabrics and battings under the presser foot.
7. Start/Stop buttonPress this button to run and stop the machine without the foot control. Press the button once to begin sewing and press again to stop sewing.
8. Sensor Foot Down/Pivot Position button
be completely
placement of the fabric.
The presser foot will be lowered automatically when you start sewing. You can also tap the foot control to lower the presser foot.
When you stop with the needle in the down position, the presser
9. Reverse buttonPress the button while sewing and the machine will sew in
button again.
and to begin and end tapering stitches to step between the parts of the stitch.

24
2
25
1816
15
17
14
10 1211 13
2119 20
2422 23
Operating the machine
Function buttons on the Touch Panel
10. Alternate ViewWhen you select a satin stitch the length and width settings will
button the stitch position settings will be shown instead of the stitch width and density will be shown instead of length.
11. Stitch Length/DensityWhen you select a stitch, your machine automatically sets the best
the density setting instead of the stitch length setting. You will
buttons to change the setting.
12. Stitch Width/Needle positionThe stitch width is set in the same manner as the stitch length.
stitch width.
Stitch Positioning
13. Clear
14. Stitch Selection Buttons
15. Navigator Arrow Buttons
buttons to select stitches step by step in numerical order within the selected stitch menu. The arrow buttons are also used when programming to select stitches within the program or to select letters to insert in the program. The up and down arrow buttons are also used to set the size of a buttonhole and to set the number of stitches when sewing on a button.

25
2
25
1816
15
17
14
10 1211 13
2119 20
2422 23
Operating the machine
16. Stitch MenuPress this button to select a stitch from any of the stitch menus
17. Font Menu
to select a font.
18. Shift to upper-case, lower-case or numbersPress this button to shift to lower or upper-case or numbers when programming letters.
19. Save to My Stitches
personal stitches or stitch programs. Press the button again to
20. Program ModePress this button to open the mode for programming. Press the button again to exit the program mode.
21. SET MenuPress this button to open the menu for machine settings. Make
22. Stitch Re-start
start to start sewing at the beginning of the stitch again without
23. Mirror End to End
Press this button to mirror the selected stitch end to end. If
24. Mirror Side to SidePress this button to mirror the selected stitch side to side. If the button is pressed when straight stitch with left needle position
25. Exclusive SEWING ADVISOR®
® feature sets the best stitch, stitch length, stitch width, sewing speed, thread tension and

26
2
Operating the machine
Sewing Mode
1. Recommended needle for the selected fabric.2. Recommended presser foot for the selected stitch.
Note: Needle position is shown instead of stitch width when the Alternate View button is pressed. Change the needle position by pressing the Stitch Width – and + buttons.
6. The selected stitch, both illustrated and displayed by number.
® feature.
tapering settings.
bartack or darning stitch is selected or when a satin stitch is
buttons.14. When sewing a manual buttonhole, the darning program or
darning stitch or the tapering stitch are sewn to the desired length.
down arrow buttons.16. The icon for lowering the feed teeth is shown when free motion is
17. Recommendation to use the multipurpose tool/button reed when sewing on a button. Place the thin end of the multipurpose tool/button reed under the button when sewing on light fabrics. Use the
and down arrow buttons.19. Recommendation to use stabilizer under your fabric.
Sensor One-Step Buttonhole
Normal Sewing Mode
Manual Buttonhole
Sewing on button
Normal Sewing Mode, Decorative stitch
1
2
35
6
7
4
8
9
12
10
11
13
14
15
1617
18
19

27
2
Operating the machine
Selecting a stitch
arrow buttons to select among the menus:
1. Utility stitches
2. Quilt stitches
The name and number of the selected menu is shown at the bottom of the display. The stitches are pictured inside the lid of your machine with the menu numbers on the left and the stitch numbers within the menus across the center.
the selection menu without making any selection.
on that button immediately, regardless of the selected stitch menu.
select a stitch from 10 and up from the selected stitch menu. If the stitch number does not exist in the selected menu you will
left and right arrow buttons to step stitch by stitch in numerical
change stitch menu and then select the stitch.
Selecting a font
Menu. Use the arrow buttons to select among the fonts:
programming letters, see page 28.
Font Menu

28
2
Operating the machine
Programming The Programming function on your machine makes it possible to create stitches with your own personal settings and to combine stitches and letters into stitch programs. You can add up to 40
sewing and bartacks.
Create a stitch program
when entering the Programming mode. To change the stitch
menu by using the arrow buttons.3. Press the number of the stitch you wish to use. The stitch
will appear in Programming Mode.4. Press the number of the next stitch and it will appear to the
right of the last entered stitch.Note: Two numbers are displayed above the stitch program on the left side
in the program. The second number, put in brackets, is the total number of stitches in the program. The number above the stitch program on the right side of the GraphicDisplay is the number of the selected stitch.
Add letters5. Press the Font Menu button. Use the arrow buttons to select
alphabet in Programming Mode.
the letter to the program.
button.
About programming letters
stitch width. If there are letters going below the baseline included
be reduced.
same program to ensure the letters are sewn out in the same height.
For instance, a name and an address should be in the same
Programming Mode
“Husqvarna” and “VIKING” are in the same program.
“Husqvarna” and “VIKING” have been programmed separately.

29
2
Operating the machine
Add stitches or letters at other positionsIf you wish to add a stitch or letter at another position in the
stitch or letter will be inserted to the right of the cursor.
Note: When programming letters, press the arrow down button to activate the cursor in the stitch program instead of in the alphabet.
Add the same stitch several times
inserted. The same stitch will be inserted each time you press
the right of the selected stitch.
Delete stitches or lettersTo delete a stitch in the program, select the stitch with the cursor
Add commands
the program. Each command takes one memory space in the program.
in the beginning of the program.
Join two stitch programs into one
program will be inserted in Programming Mode to the right of the cursor.
Adjust a single stitch or letter
width, stitch length, density, needle or stitch position or mirror the stitch. The settings for the selected stitch are shown on
between different settings.
Add commands
Adjust a single stitch or letter

30
2
Operating the machine
Adjust the entire stitch program
program.
Sew out the stitch program
machine will sew out your stitch program. The program will be
button to sew your stitch program only once.
It is possible to start sewing at any stitch in the program. Use the
Mode.
Sewing Mode

31
2
Operating the machine
My Stitches Menu
Your machine has 20 memories and each memory has a maximum space of 40 stitches.
Save a stitch or a program
is not empty, a pop-up message will appear asking if you wish
Mode or Programming Mode.
Load a saved stitch or program
Use the arrow buttons to select the stitch or program and press
sewn.
Delete saved stitches or programs

32
2
Operating the machine
SET Menu
Thread tensionYour machine will automatically set the best thread tension for the selected stitch and fabric.
Use the left/right arrow buttons if you
machine is turned off.
Presser foot pressure
8.5 in steps of 0.5. Your manual setting will be cancelled when you select another stitch or turn off the machine.
Note: When you save a stitch or program in My Stitches the setting of the presser foot pressure is also saved.
Sensor Foot auto
lifting the presser foot for example when stopping with the needle down. The setting will go back to default when the machine is turned off.
FIX auto
the beginning of each stitch. The setting will go back to default when the machine is turned off.
CUT AutoThe Thread Cutter will automatically cut the threads and the presser foot will
cut function. The setting will go back to default when the machine is turned off.
Twin needleIf you are using a twin needle, set the size of the needle to limit the width
Note: You cannot set the twin needle size if the Stitch Width Safety is on, or turn on the Stitch Width Safety if the machine is set for twin needle.

33
2
Operating the machine
Stitch Width Safety
using a straight stitch needle plate or a straight stitch presser foot. The stitch width will be limited to zero for all stitches
turn on the machine. Close the pop-up message by pressing
Free Motion FloatingTo sew in free motion with the included Embroidery/
presser foot, set the machine in Free Motion Floating mode.
reminds you of the setting when you turn on the machine.
Note: You cannot set the machine in Free Motion Floating Mode if Free Motion Spring Action is activated or vice versa.
When you are sewing free motion in low speed the foot will raise and lower with each stitch to hold the fabric on the stitch plate while the stitch is being formed. When sewing
manually.
Free Motion Spring Action
of the setting when you turn on the machine. Close the
spring and the arm on the presser foot. The feed teeth
presser feet that are only intended for straight stitch sewing.
Pivot height
raised or lowered in 15 steps by pressing the left/right arrow buttons.
will reduce the space between the presser foot and the fabric and eliminate the skipped stitches.
Note: Be careful not to reduce the pivot height too much. The fabric must still move freely under the presser foot.
Buttonhole balance
you select stitch 1:30, the columns in the buttonhole stitch will
the columns to appear with different density. Use the left/right buttons to balance the density between -7 and 7. The changes only affect the selected stitch. If another stitch is selected or
Audible Alarm
Contrast
LanguageUse the left/right arrow buttons to change the language of all
machine is turned off.
Software Version
displayed.

34
2
Operating the machine
Pop-up messages
Bobbin winding onThis pop-up message appears when the bobbin winding spindle
Presser foot too highYour machine will not sew if there is too much fabric under the
message.
Machine set for twin needle
Menu, a pop-up message is shown to remind you of the setting
foot control to close the pop-up message.
Stitch width limited for twin needleThis message is shown when the machine is set for twin needle
button.
Machine set for straight stitchThis message is shown when the stitch width safety is on and you
This stitch cannot be sewn with twin needleThis pop-up message appears when the machine is set for twin needle and you select a stitch that cannot be sewn with twin
35
2
Operating the machine
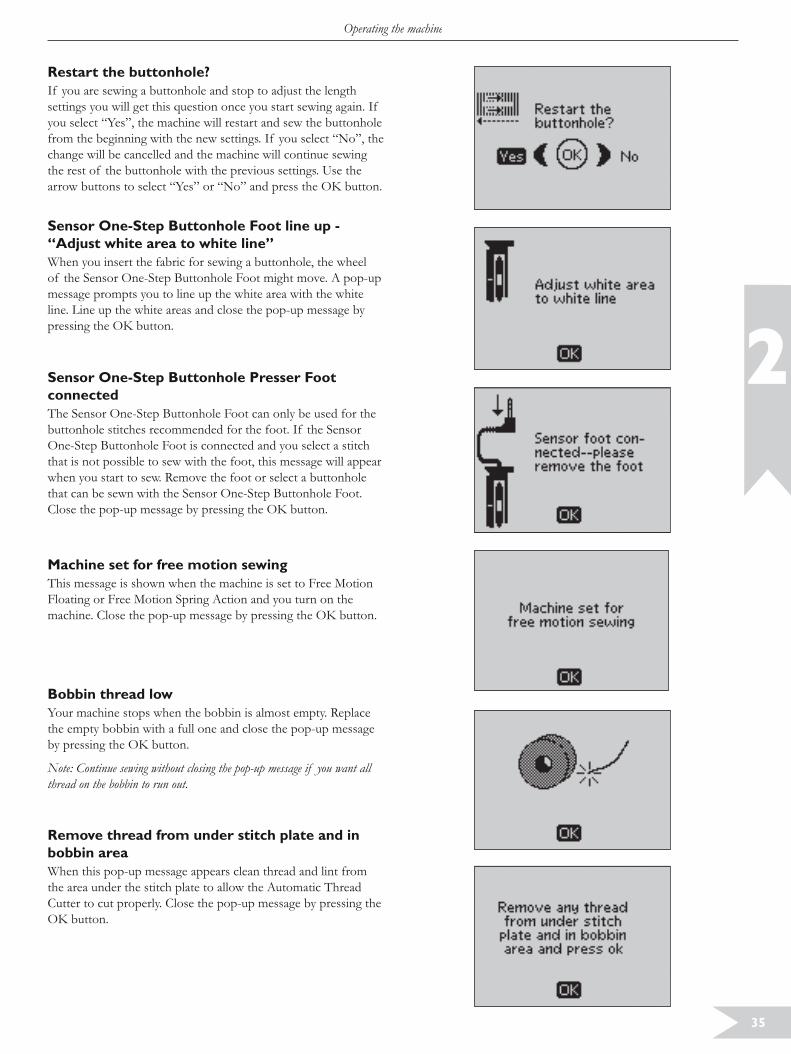
Restart the buttonhole?
change will be cancelled and the machine will continue sewing
Sensor One-Step Buttonhole Foot line up - “Adjust white area to white line”When you insert the fabric for sewing a buttonhole, the wheel
message prompts you to line up the white area with the white line. Line up the white areas and close the pop-up message by
Sensor One-Step Buttonhole Presser Foot connected
that is not possible to sew with the foot, this message will appear
Machine set for free motion sewingThis message is shown when the machine is set to Free Motion
Bobbin thread lowYour machine stops when the bobbin is almost empty. Replace the empty bobbin with a full one and close the pop-up message
Note: Continue sewing without closing the pop-up message if you want all thread on the bobbin to run out.
Remove thread from under stitch plate and in bobbin areaWhen this pop-up message appears clean thread and lint from
Cutter to cut properly. Close the pop-up message by pressing the
36
2
Operating the machine
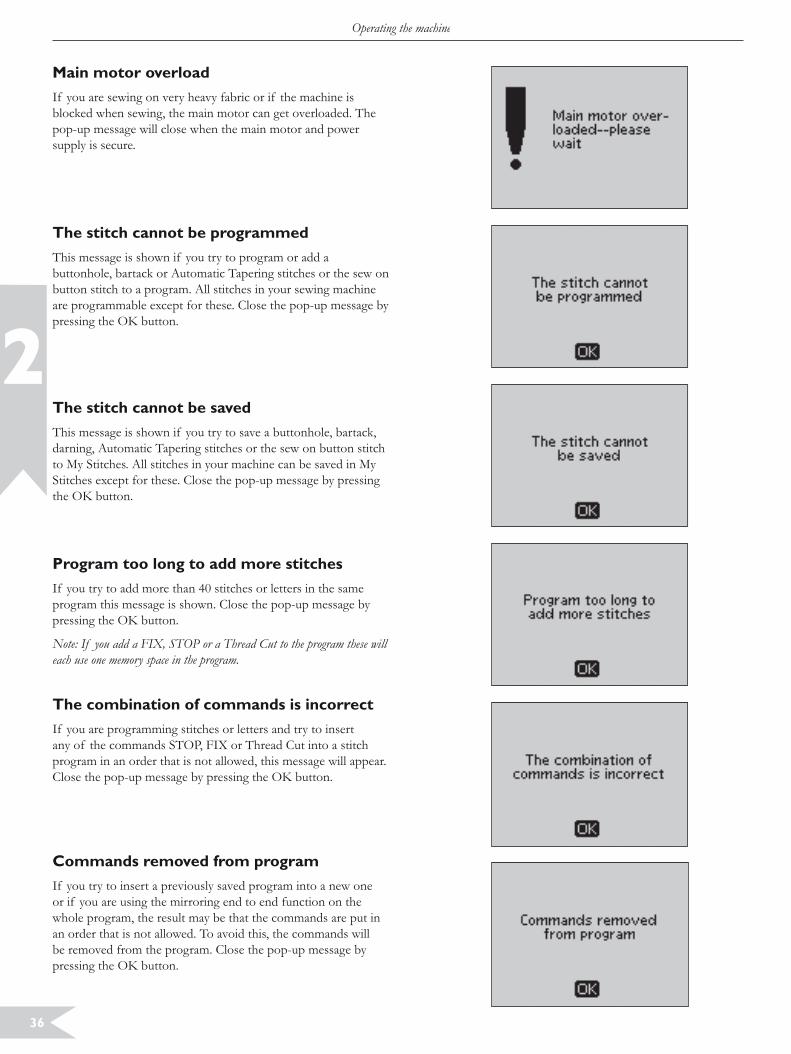
Main motor overload
pop-up message will close when the main motor and power supply is secure.
The stitch cannot be programmedThis message is shown if you try to program or add a
are programmable except for these. Close the pop-up message by
The stitch cannot be saved
Program too long to add more stitchesIf you try to add more than 40 stitches or letters in the same program this message is shown. Close the pop-up message by
each use one memory space in the program.
The combination of commands is incorrectIf you are programming stitches or letters and try to insert
program in an order that is not allowed, this message will appear.
Commands removed from program
or if you are using the mirroring end to end function on the whole program, the result may be that the commands are put in

37
3
Basic sewing techniques
Woven fabric Knit fabric
Fabric Selection
challis, etc.
crepe, broadcloth, etc.
etc.
synthetic leather.
Sewing technique
edge all at one time.
® feature automatically sets a long stitch length and reduces the tension so the threads are easy
Is not recommended for light weight fabric or for
your fabric type and weight.
® feature selects and sets the best buttonhole for your fabric.
Exclusive SEWING ADVISOR®
® ®
® feature automatically sets the best stitch, stitch length, stitch width, thread tension, sewing
displayed on screen with presser foot, thread tension and needle recommendations.
Note: If an unsuitable combination is selected (for example woven light-blind

38
3
Basic sewing techniques
Seam
that usually will be pressed open. In most cases, edges of the
the seam.
pieces of light stretch fabric. 1:1 Straight Stitch
Fabric:
Select
® feature
Use:needle as recommended.
Line up the fabric edge with the
1:2 Stretch Stitch
Fabric:
Select:
® feature selects the
Use:stretch needle as recommended.
Line up the fabric edge with the
Edge/Quilting GuideThe Edge/Quilting Guide is used for wide seam allowances,
39
3
Basic sewing techniques
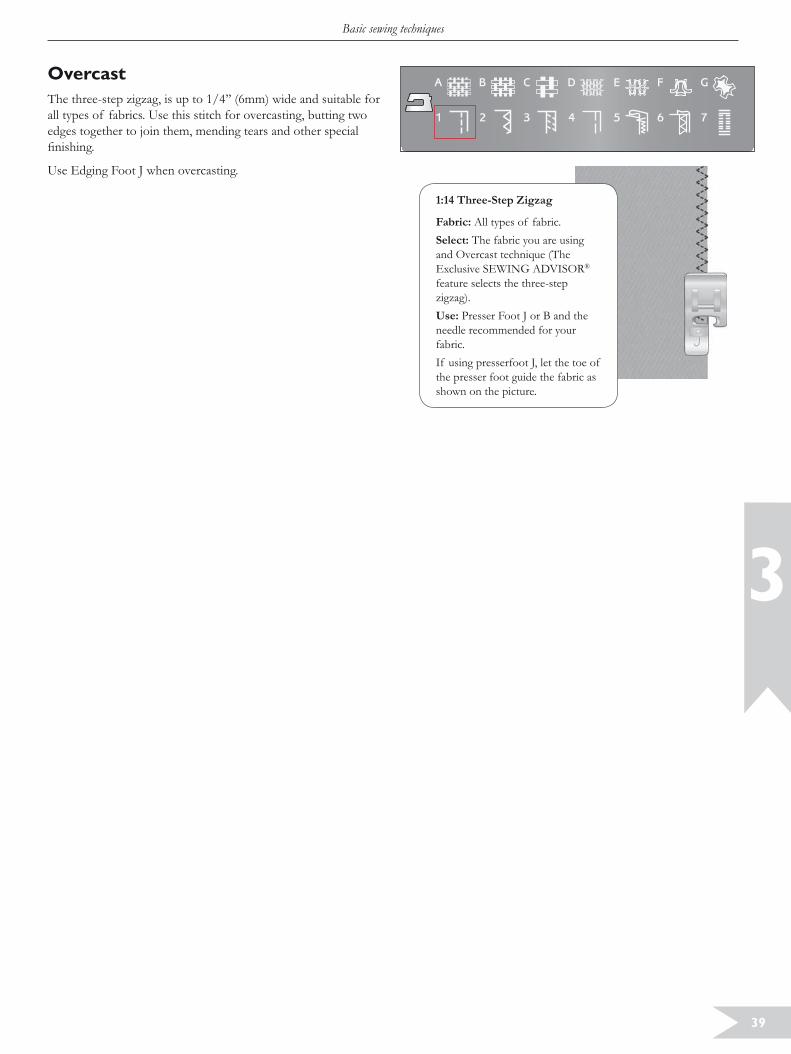
Overcast
1:14 Three-Step Zigzag
Fabric:
Select: The fabric you are using
® feature selects the three-step
Use:needle recommended for your fabric.
If using presserfoot J, let the toe of the presser foot guide the fabric as shown on the picture.

40
3 3
Basic sewing techniques
1:7 Overcast Stitch
Fabric:light/medium, cut in two.
Select:
® feature
Use: Presser Foot J and the needle recommended for your fabric.
Let the toe of the presser foot guide the fabric as shown on the picture.
1:8 Stretch Seam Overcast Stitch
Fabric:
Select:
®
Use:stretch needle as recommended.
1:11 Double Overlock Stitch
Fabric:
Select:
®
Use:needle as recommended.
Seam and overcast
chosen fabric.
41
3
Basic sewing techniques
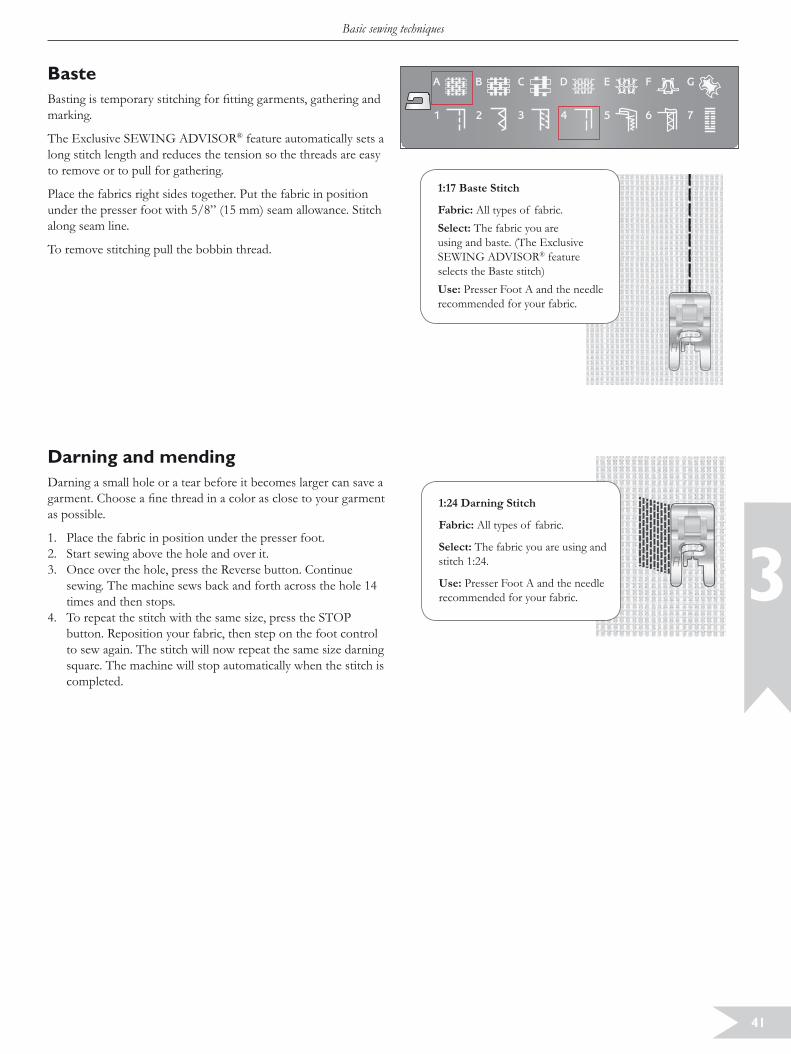
Baste
marking. ® feature automatically sets a
long stitch length and reduces the tension so the threads are easy
Place the fabrics right sides together. Put the fabric in position
along seam line.
Darning and mending
as possible.
1. Place the fabric in position under the presser foot.
sewing. The machine sews back and forth across the hole 14 times and then stops.
button. Reposition your fabric, then step on the foot control to sew again. The stitch will now repeat the same size darning
completed.
1:24 Darning Stitch
Fabric:
Select: The fabric you are using and stitch 1:24.
Use:recommended for your fabric.
1:17 Baste Stitch
Fabric:
Select: The fabric you are
® feature
Use:recommended for your fabric.

42
3
Basic sewing techniques
Blind hem
two types of blind hem; one is recommended for medium to
Fold the fabric as illustrated. Make sure the folded edge of the
folded fabric.
the fold.
or leather/vinyl. If you select the blind hem and light woven, light stretch or
Woven medium/ heavy fabric
Stretch medium/ heavy fabric
1:19 Stretch Blind Hem Stitch 1:20 Woven Blind Hem Stitch
Fabric:
Select:
®
Use:recommended for your fabric.

43
37
7
Basic sewing techniques
Hem®
straight stitch is selected. For stretch fabrics, stitches that stretch are selected.
Jeans Hem
multipurpose tool to balance the height of the presser foot as you sew.
stops with the needle in the fabric and raises the presser foot. Insert the multipurpose tool from behind.
the foot control to lower the presser foot and continue sewing
multipurpose tool and re-insert it under the presser foot from the front.
again. The needle is in the fabric, and the presser foot lifts.
Stretch Hem
®
make belt loops, too.
1:1 Jeans hem
Fabric:
Select:
® feature selects a
Use:recommended and size 80 denim needle.
Flatlock stitch to hem stretch fabric and for belt loops.
1:6 Flatlock Stitch
Fabric:
Select:
® feature selects the
Use:recommended and size 90 needle

44
3
Basic sewing techniques
Sewing buttonholes
for different kinds of fabric and garments. Look at the stitch
buttonhole.® feature will select the best
buttonhole and stitch settings for your fabric. Fabric should be interfaced and/or stabilized where buttonholes are to be sewn.
Automatic One-Step Sensor Buttonholes
buttons. When sewing, your sewing machine automatically
Note: The buttonhole size will vary with the thickness and style of your
3. Measure the button diameter using the button measuring chart on the front of the machine.
4. Use the up and down arrow buttons to set the button size on
lifting it, which makes it easier to place the fabric under the
with the white marking line on the foot.
from you stabilizing the left buttonhole column, then the satin column is sewn toward you. This is repeated for the right column. The bartacks are also sewn automatically.
The machine will stop automatically when the buttonhole is complete.
1:0, 1:28, 1:30-1:33 Buttonhole Stitches
Fabric:
Select: The fabric you are using and the
® feature selects a
Use:and the needle recommended for your fabric.

45
3
Basic sewing techniques
Manual Buttonholes
set the length of the buttonhole.
2. Place the fabric and stabilizer under the presser foot. Use the markings on the left toe of the buttonhole foot to position the garment edge. Place the edge of the garment at the
buttonhole.
button to step to the next part of the stitch. When the
button. Your sewing machine will bartack the end and stitch the right side.
when the buttonhole is complete.
1:0, 1:28-34 Buttonhole Stitches
Fabric:
Select: The fabric you are using
® feature selects a buttonhole suitable
Use: Presser Foot C and the needle recommended for your fabric.
Corded Buttonhole (Stretch fabrics)When sewing buttonholes in stretch fabrics we recommend cording the buttonhole to increase the stability and to keep the buttonhole from stretching out.
the back of Presser Foot C.
4. Cross the cord in front of the needle and stitch the end of

46
3
1. 2. 3. 4.
Basic sewing techniques
Sewing on buttons
machine.
2. Place the fabric, multipurpose tool/button reed and button under the ankle with the holes in the button lined up with the swing of the needle. Check the swing of the needle by pressing the mirror side to side button to be sure the needle
Note: The recommended width of 3.0 is set for most buttons. If you sew a tiny button or a very large coat button, decrease (–) or increase (+) the stitch width until the swing of the needle sews in the holes of the button.
normal.4. Press the foot control. The sewing machine will sew the
number of stitches set on the display and then tie off and stop.
5. Raise feed teeth when button sewing is completed.Tip: Place the thin end of the multipurpose tool/button reed under the button when sewing on light fabrics. Use the thick end for heavier fabrics. Hold in place on the fabric with transparent tape.
Bartack (manual)
with the same look as ready-to-wear.
1. Place fabric under the presser foot.
fabric if necessary.
automatically and stitch. Your machine will sew a straight stitch until you touch
stitches.
1:9 Sew on button
Fabric:
Select: The fabric you are using and the stitch for sewing on buttons, 1:9.
Use: The needle recommended for
foot.
Lower the feed teeth.
1:26 Bartack (manual)
Fabric:
Select:
Use:needle as recommended.

47
3
Basic sewing techniques
Sewing zippers
of the needle, making it easy to sew both sides of the zipper. To
zipper teeth or cording.
Center Zipper
placement.
Press the seam open. Place the zipper right side to the pressed open seam allowance, placing the zipper stop at the
of the foot. Place fabric under the foot right side up with the zipper foot on the right side of the zipper.
right.
the left side of the zipper sewing from the bottom to the top
Note: To adjust the position of the stitching line, adjust the needle position with the stitch width buttons.
Fig. 1
Fig. 3Fig. 2

48
3
Basic sewing techniques
Free Motion Quilting
Free Motion FloatingWhen sewing free motion at a low speed, the foot will raise and lower with each stitch to hold the fabric on the stitch plate while the stitch is being formed. When sewing at a high speed, the
Most free motion sewing is stitched with a straight stitch or
will determine how the stitch will look.
Note: Free Motion Spring Action – If you are using the optional Free Motion Spring Action presser foot, set the machine in Free Motion Spring Action mode. The “Drop Feed Teeth” recommendation will be activated. Lower the feed teeth. The setting remains when the machine is turned off. A pop-up message reminds you of the setting when you turn on the machine. Close the pop-up message by pressing OK. For normal sewing, turn off the Free Motion Spring Action mode in the SET menu.
the arm on the presser foot. The feed teeth must be lowered and
Tip: Use the optional Open Toe Free Motion Spring foot.
Free Motion Stippling
1. Touch needle stop up/down to select the needle down position.
should be fairly close together but not crossing. The stitching should look like puzzle pieces.
Tip: Use the optional Open Toe Stippling Foot for better visibility when free motion stippling.
Note: To set the machine to regular sewing mode go to SET Menu. Touch OK to deselect Free Motion setting. Touch SET Menu to exit.
1:1 Free Motion Stippling
Fabric: batting underneath.
Select: ®,
sewing mode. Lower feed teeth.
Use: Presser Foot R and size 80 needle as recommended.

49
3
Basic sewing techniques
Decorative Tapering Stitches
to form corners and points.
lid.
left and right arrow buttons to select beginning and/or end
your taper by using the arrow buttons.
Note: Its important to adjust your settings before starting to sew.
4. Place the fabric under the presser foot.
and at the end, the machine will sew the tapered point and
end tapering. When the tapering is completed the machine stops automatically.
Note: In Programming, more than one stitch that can be tapered, you do not need to press reverse to activate end tapering. The end taper will start automatically after the last stitch in the program.
Tip: For a narrower stitch, adjust the stitch width.Tip: To repeat a tapering stitch the same size, program the desired number of stitches and then add tapering at the beginning and/or end.
Note: The Automatic Tapering Stitches 1:30 and 1:31 will automatically taper the stitch. Follow step 4-5 to sew these stitches. To repeat the Automatic Tapering stitch press the STOP button.
Decorative Tapering Stitches
Fabric:
Select: The fabric you are using and the stitch you want to taper.
are marked with a blue color in the
Use:recommended and the needle recommended for your fabric.

50
4
1
2
A
Taking care of the machine
Cleaning the machineTo keep your sewing machine operating well, clean it often. No
Wipe the exterior surfaces of your sewing machine with a soft
Press the ON/OFF switch to “O”
Clean the Bobbin Area
the stitch plate. Clean the feed teeth with the brush.
Cleaning Under the Bobbin Area
accumulation of lint in the bobbin case area, the area under the bobbin case must be cleaned.
dust and lint built up.
Use caution when cleaning around the thread cut knife (A).
Put the bobbin case and the bobbin case holder back in place.
Note: Do not blow air into the bobbin case area. The dust and lint will be blown into your machine.
Replacing the Stitch Plate
the notch at the back. Press the stitch plate down until it clicks

51
4
Taking care of the machine
Trouble shooting
®
®
information than words.
Non-Original Parts and Accessories
Any time you experience a problem when sewing:® feature.
If you experience problems when sewing the Sensor One-Step Buttonhole:
area.
Fabric Puckers?® feature.
Skipped Stitches?
®
Needle Breaks?
Have your sewing machine serviced regularly by your authorized HUSQVARNA VIKING® retailer!

52
4
Taking care of the machine
Poor Tension?® feature.
Upper Thread Breaks?
special needle recommendations.
thread in the bobbin, not regular sewing thread.
Fabric Does Not Move?
Bobbin Thread Breaks?
Bobbin Winds Irregularly?
Wrong Stitch, Irregular or Narrow Stitches?
Machine Sews Slowly?
® retailer.
Machine Will Not Sew?
The sewing machine function buttons do not respond to touch?
® retailer.


CE - Authorised Representative
VSM Group AB, SVP WorldwideDrottninggatan 2, SE-56184, Huskvarna, SWEDEN
CE - Authorised Representative
VSM Group AB, SVP WorldwideDrottninggatan 2, SE-56184, Huskvarna, SWEDEN
performance or design.
the product.
Intellectual propertyPatents protecting this product are listed on a label positioned underneath the sewing machine.
Please note that on disposal, this product must be safely recycled in
electronic products. If in doubt please contact your retailer for guidance.

www.husqvarnaviking.com