Nymble blocking misbehaviouring users in anonymizing networks
Users’ Guide for PCs and Networks
2016-2017 English Edition
Waseda University
Users’ G
uide for PCs and Netw
orks 2016-2017 English EditionW
aseda University

Table of Contents
1. Introduction 3
1.1. Procedures for New Students ....................................................................41.2. Create Your Waseda Mail Address ...........................................................61.3. Change Your Password ................................................................................71.4. Create Your Waseda ID .................................................................................81.5. Computer Security Seminar for New Students and Information
Ethics Test..........................................................................................................91.6. ID Reinstatement Procedures ................................................................. 101.7. Plagiarism in Report Writing.................................................................... 11
2. MyWaseda 13
2.1. MyWaseda ...................................................................................................... 142.2. Waseda Mail .................................................................................................. 162.3. Online Course Registration ...................................................................... 182.4. Online Learning Support Portal: Course N@vi .................................. 21
3. Information Services 25
3.1. Waseda University On-Campus Network ........................................... 263.2. Connecting via On-campus Network ................................................... 283.3. Using a Wired LAN to Access Off-Campus Services ........................ 303.4. Connecting to On-Campus Services from Off-Campus (VPN)..... 313.5. Using Online Storage : Box ...................................................................... 323.6. Using Software Rental Service ................................................................ 333.7. Publishing a Website on the World Wide Web ................................. 343.8. Waseda E-Resource Portal ........................................................................ 353.9. stat system ..................................................................................................... 373.10. eduroam ......................................................................................................... 38

4. Computer Rooms 39
4.1. Waseda University Computer Rooms .................................................. 404.2. Using Terminals in Computer Rooms .................................................. 41
5. Appendix 45
5.1. Wireless LAN Connection Settings in Windows 7 ............................ 465.2. Wireless LAN Connection Settings in Windows 8 or Above ........ 495.3. Wireless LAN Connection Settings in Mac OS X ............................... 535.4. Wired LAN Connection Settings in Windows 7 ................................ 545.5. Wired LAN Connection Settings in Windows 8 or Above ............. 555.6. Wired LAN Connection Settings in Mac OS X .................................... 565.7. Proxy Settings in Internet Explorer ....................................................... 575.8. Proxy Settings in Firefox ........................................................................... 585.9. Proxy Settings in Chrome ......................................................................... 595.10. Proxy Settings in Safari .............................................................................. 605.11. Wired LAN: Login/Logout Procedures ................................................. 615.12. Other Important Matters .......................................................................... 625.13. Access Map .................................................................................................... 64
Troubleshooting 68
-3-
1. Introduction

-4-
1.1. Procedures for New Students
Welcome to Waseda University!University activities at Waseda require you to access the internet, ranging
from registering for courses online to submitting class reports to the Learning Management System (Course N@vi) or via email. Once you graduate, you will be expected to have mastered technological skills like those you’ll use at the university, so it is important that you learn the correct way to use computers and the internet while you are here.
Waseda University gives its students free access to the computer rooms and other convenient information services, but you must complete the following procedures in order to take advantage of these benefits. Students who fail to do so by the deadline will encounter major difficulties in carrying out their university activities, so please read the following carefully and be sure to complete the necessary procedures on time.
1. Create your Waseda Mail address (1.2)
You must create a Waseda Mail address which is an email service offered by Waseda University.
2. Change your password (1.3)
You must change your password. Since using the default password would create a security risk, be sure to change your password.
3. Create your Waseda ID (1.4)
You must create a Waseda ID in order to access the information systems at Waseda University. Since using the default ID would create a security risk, be sure to obtain your own ID.
4. Take the Computer Security Seminar for New Students and Information Ethics Test (1.4)
-5-
Introduction
1All incoming students must take the Computer Security Seminar
for New Students in order to learn how to properly use the information environment at Waseda University. The Seminar on the internet is mandatory for new students and you must complete it. Once you have completed it, you must take the Information Ethics Test to demonstrate that you have understood the contents of the Seminar. If you do not pass the Test by the stated deadline, your Waseda ID will be suspended and you may not be able to use various services, including MyWaseda.
Important Notes
- Students who already have a Waseda Mail address and Waseda ID and are continuing their education under a different student ID (for example, those going on to study in a Waseda University graduate program) only need to complete the ID reinstatement procedure (1.6).
- If you do not have regular access to an internet connection, you may use the Waseda University computer rooms.
Links
- Use of MyWaseda for New Studentshttp://www.waseda.jp/navi/e/mywaseda/entrance.html
- Computer Rooms Guidehttp://www.waseda.jp/navi/e/room/
- Computer Security Seminar for New Studentshttp://www.waseda.jp/inst/gec/en/gec/non-degree/computer/

-6-
1.2. Create Your Waseda Mail Address
This is an email service offered by Waseda University. You can create your Waseda Mail address but you must use the following format.
[email protected] XXX part must be between three and sixteen alphanumeric
characters. The YYY part is called the sub-domain and you must choose one of the following:
akane, asagi, fuji, moegi, ruri, suou, or tokiFor more information on how to get a Waseda Mail address, go to the
link given below.
Important Notes
- Since your Waseda Mail address will also be used to communicate with your instructors, job hunting, and research activities, choose something appropriate.
- Do not include your birthday, student ID number, or other personal information in your email address, as this may pose a security risk.
- You cannot change your Waseda Mail address once you have created it, so think about it carefully before making a decision.
- You must not borrow or lend Waseda Mail addresses. It is prohibited to lend or transfer your Waseda Mail address and password to others, including your family and friends, for any reason.
Links
- Initial Setup for MyWasedahttp://www.waseda.jp/navi/e/mywaseda/initial.html
-7-
Introduction
11.3. Change Your Password
Once you have obtained your Waseda Mail address, you need to change your password.
For more information on how to change the password, go to the link given below.
Important Notes
- It takes about 15 minutes for a new password to be updated in the system. Please wait before attempting to log in with it.
- Your password must be at least eight alphanumeric characters long.
- Due to system maintenance, passwords cannot be changed between 11:30 p.m. and 1 a.m. daily.
Link
- Initial Setup for MyWasedahttp://www.waseda.jp/navi/e/mywaseda/initial.html

-8-
1.4. Create Your Waseda ID
Once you have obtained your Waseda Mail address and changed your password, you need to create a Waseda ID.
Waseda ID is an ID for using information services, including MyWaseda.For more information on how to create the Waseda ID, go to the links
given below.
Important Notes
- You can change your Waseda ID you obtained one time a year only. Even if you obtained a new student ID for reasons such as going to graduate school in the same year, this is counted as one change by combining with your previous student ID.
Links
- Initial Setup for MyWasedahttp://www.waseda.jp/navi/e/mywaseda/initial.html
- Create or Change Waseda IDhttp://www.waseda.jp/navi/e/mywaseda/wasedaid.html

-9-
Introduction
11.5. Computer Security Seminar for New Students and Information Ethics Test
The Computer Security Seminar for New Students teaches basic knowledge on the safe and correct use of computers and the internet as well as information ethics. It is offered as an on-demand online course and can be taken at any time and anywhere as long as you have a computer with an internet connection. You must complete all course contents of the Computer Security Seminar for New Students by the specified deadline.
Once you have completed the Seminar, you must take the Information Ethics Test and pass it by the specified deadline as well. You may take the Test as many times as necessary in order to pass it.
Important Notes
- Failure to complete the Computer Security Seminar for New Students and/or pass the Information Ethics Test by the specified deadline may result in the suspension of your Waseda ID.
Links
- Computer Security Seminar for New Studentshttp://www.waseda.jp/inst/gec/en/gec/non-degree/computer/
- FAQ: How to Take the Computer Security Seminar for New Students (Japanese Only)http://www.waseda.jp/navi/faq/fre.html#section01-06
-10-
1.6. ID Reinstatement Procedures
If you already have a Waseda Mail address and Waseda ID, and your student ID changes because you go on to graduate school or change a department, you need to go through the ID continuation procedures to keep using it.
Important Notes
- Going through the ID continuation procedures will allow you to keep using your Waseda ID and Waseda Mail address you obtained previously as a student.
Links
- Use the MyWaseda as Studentshttp://www.waseda.jp/navi/e/mywaseda/entrance-type2.html
- How to perform the Waseda ID reinstatementhttp://www.waseda.jp/navi/e/mywaseda/id-continuation.html
-11-
Introduction
11.7. Plagiarism in Report Writing
Waseda University will not tolerate the submission of other writers’ work, whether from a printed or online source, as one’s own in reports or other assignments. Even a partial excerpt from another writer must be clearly marked as a quote. Waseda University treats reports and assignments containing plagiarism as misconduct in the same category as cheating on tests. If you are found to have plagiarized the content of a report or assignment, at the very least your Waseda ID will be suspended and you will fail the course. Depending on your undergraduate or graduate school, you may fail all of the courses in which you are currently enrolled and be expelled from the university. Plagiarism carries severe penalties; make sure you are always diligent about citing your sources.
Important Notes
- Students who are found to have engaged in misconduct will be severely punished.
Links
- Plagiarism in Report Writing (Japanese Only)http://www.waseda.jp/inst/gec/gec/academic/#accordion_13
- Introduction of Content Similarity Detection Feature for Submitted Reports (Japanese Only)http://www.waseda.jp/mnc/letter/2012dec/mnc_viewpoint.html

-12-
-13-
2. MyWaseda

-14-
2.1. MyWaseda
MyWaseda is a portal site and is your hub for various services offered by Waseda University, such as taking on-demand classes and using your email. With MyWaseda, you can use services which are necessary for your campus life, such as checking announcements from the university, using Waseda Mail, online course registration, and the online learning support system Course N@vi, so it is worth familiarizing yourself with MyWaseda. Figure 2.1 outlines some of the key services offered through MyWaseda.
Figure 2.1: Key MyWaseda services
You will need your Waseda ID and password to log in to MyWaseda. Access the MyWaseda login page (see the link on the next page) (Figure 2.2) by entering your Waseda ID in the “Login ID” field and your password in the “Password” field on the screen displayed after clicking the “Login” button (Figure 2.3).
Once you have logged in, the system will display the MyWaseda main page (Figure 2.4).
Figure 2.2: MyWaseda login page Figure 2.3: Login page

-15-
MyW
aseda
2
At the top of the page, “Global menu” will be displayed in a tabular form. When you click the global menu, the corresponding service menu will be displayed. Click the service you would like to use.
When you click the settings menu on the right side of the screen (the icon with three bars), the menu for various settings, such as “Logout,” “Change Password,” and “Create/Change Waseda ID,” etc. will be displayed.
Figure 2.4: MyWaseda main page
Important Notes
- Change your password regularly. - Always log out when you finish using MyWaseda. - MyWaseda supports smartphones but other websites and systems
linked to MyWaseda may not.
Link
- MyWaseda Login Pagehttps://my.waseda.jp/

-16-
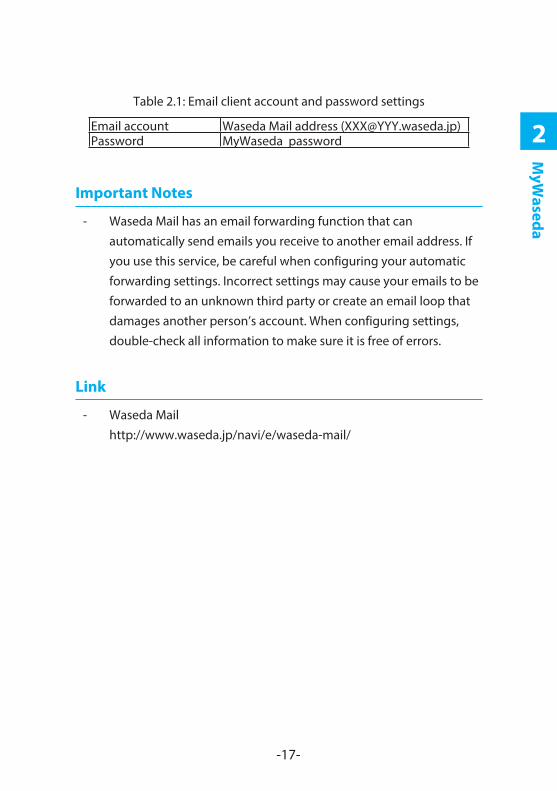
2.2. Waseda Mail
Waseda Mail is an email service provided by Waseda University. There are two ways to access the system.
- Read, write, send, and receive email through your web browser (Web Mail)
- Read, write, send, and receive email through an email client (like Mozilla Thunderbird)
In this guide, we’ll explain how to access the system via Web Mail and how to configure your settings to access the system through an email client. For detailed information such as customizing your incoming/outgoing mail settings or filters, click the link given below.
To access Web Mail, log in to MyWaseda first. Then, open the “Email” menu on the left on the MyWaseda main page and click “Waseda Mail.” This will take you to the main page of Waseda Mail.
Figure 2.5: Access to Waseda Mail
To access Waseda Mail through an email client, enter the account information shown in Table 2.1. You must configure your server information in order to send and receive email this way. Click the link on the next page to access the online manual that explains how to do this.
-17-
MyW
aseda
2Table 2.1: Email client account and password settings
Email account Waseda Mail address ([email protected])Password MyWaseda password
Important Notes
- Waseda Mail has an email forwarding function that can automatically send emails you receive to another email address. If you use this service, be careful when configuring your automatic forwarding settings. Incorrect settings may cause your emails to be forwarded to an unknown third party or create an email loop that damages another person’s account. When configuring settings, double-check all information to make sure it is free of errors.
Link
- Waseda Mailhttp://www.waseda.jp/navi/e/waseda-mail/

-18-
2.3. Online Course Registration
Online course registration allows you to search and register the courses you are eligible for by department, category, day of the week, and so on via the internet. This section outlines how to register for courses online. For details, click the link on page 20. Note that different undergraduate or graduate schools may have different registration procedures or registration periods, so be sure to check for any materials distributed by your school.
1. Access MyWaseda login page.
2. Click “Grades & Course registration” at the bottom left on the MyWaseda login page (Figure 2.6).
Figure 2.6: “Grades & Course registration”
Figure 2.7: “Login” page
3. The “Login” page will be displayed. Enter your Waseda ID and password in the fields marked “Login ID” and “Password.” Click “Login” (Figure 2.7).

-19-
MyW
aseda
2
4. Once you have successfully logged in, the “Menu for Course Guidance Week Page” will be displayed (Figure 2.8). Click “Course Registration” to display the “Course Registration Page” (Figure 2.9).
Figure 2.8: “Menu for Course Guidance Week Page”
Figure 2.9: “Course Registration Page”
5. Click “Course Search” to open the course search page. Select a school and course category from the menu on the left (Figure 2.10).
6. You can also search a course by entering the course title, term, day of the week, and/or period and clicking “Course Search”.
7. Click the checkbox on the left of the course for which you want to register (Figure 2.11) and click “Return to the first page”.
8. The message “‘Tentative Selection’ course is available on the list. Please click ‘Course Add’ to complete the registration” will be displayed (Figure 2.12). Click “Course Add”.
9. When the confirmation page is displayed, click “OK” to complete your course registration.

-20-
Figure 2.10: Course Search Figure 2.11: Checkbox
Figure 2.12: Tentatively selected courses
Important Notes
- When the online course registration system experiences heavy traffic, it will limit the number of users that can go online. If you try to access the system and get a restricted access page, wait a few moments then click “Resume” to attempt to access the system again.
- When you register for courses using the online registration system, a confirmation email will be sent to your Waseda Mail address the next morning. Make sure to confirm your registration information using the method specified by your undergraduate or graduate school.
Link
- Course Registration and Examination Information (Japanese Only)http://www.waseda.jp/mnc/kamoku/
-21-
MyW
aseda
2
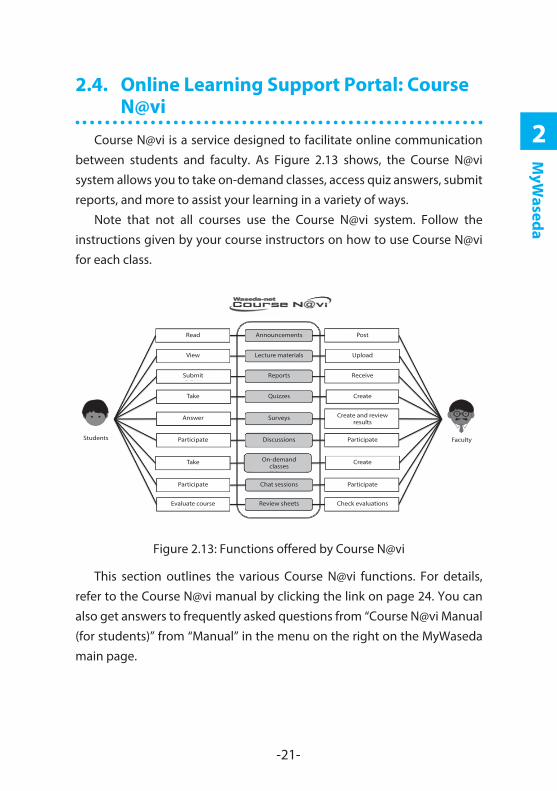
2.4. Online Learning Support Portal: Course N@vi
Course N@vi is a service designed to facilitate online communication between students and faculty. As Figure 2.13 shows, the Course N@vi system allows you to take on-demand classes, access quiz answers, submit reports, and more to assist your learning in a variety of ways.
Note that not all courses use the Course N@vi system. Follow the instructions given by your course instructors on how to use Course N@vi for each class.
Students Faculty
Read PostAnnouncements
View UploadLecture materials
Submit ReceiveReports
Take CreateQuizzes
Answer Create and review results
Surveys
Participate ParticipateDiscussions
Take CreateOn-demand classes
Participate ParticipateChat sessions
Evaluate course Check evaluationsReview sheets
Figure 2.13: Functions offered by Course N@vi
This section outlines the various Course N@vi functions. For details, refer to the Course N@vi manual by clicking the link on page 24. You can also get answers to frequently asked questions from “Course N@vi Manual (for students)” from “Manual” in the menu on the right on the MyWaseda main page.

-22-
Accessing Course N@vi
To access Course N@vi, first log in to MyWaseda. Open the “Course N@vi” menu on the left on the main page of MyWaseda and click “Course N@vi (Standard Version)” (Figure 2.14). Once you have successfully logged in to Course N@vi, the system will display the Course N@vi page (Figure 2.15).
Figure 2.14: Accessing Course N@vi
Figure 2.15: Course N@vi page
Screen Descriptions
The Course N@vi Website will show a list of the courses you are currently enrolled in (Figure 2.15). Click any course to see a list of lectures associated with that course.
The lecture list page shows “announcements” and the content for each

-23-
MyW
aseda
2
class. The “announcement” feature allows instructors to send information to students. It is important that you get into the habit of checking these announcements regularly as they often contain critical course information.
Course N@vi Content Descriptions
Table 2.2 shows a list of the content available through Course N@vi. Your course instructors will configure the viewing and submission periods for each item used in the course. Make sure you access content during the period when it is available as you will not be able to view or submit items during other times.
Table 2.2: Available Course N@vi contentLecture materials Download lecture materials used in class.Quizzes Take simple tests on-demand. Quizzes are provided in
various formats, including true-false, multiple choice, and free response.
Discussions A bulletin board service (BBS) provides a forum for discussions between instructors and students.
Questionnaires Instructors can create surveys that their students can answer online.
Submitting reports
Students can submit reports to instructors online.
On-demand internet classes
Students can take on-demand classes when they are offered as part of courses they are enrolled in. Video playback software is required to view on-demand course content. For details, talk to your course instructor or look for details in your course syllabus.
Review sheets Students can fill out review sheets with feedback for each course. Instructors can then read these reports and enter comments.
Attendance cards Submit attendance cards online.Chat sessions Students can chat with instructors or other students.

-24-
Important Notes
- Always click “Logout” to end a Course N@vi session. If you end it by closing your web browser, it may cause your data to be corrupted.
- Copying or secondary use of videos for on-demand classes is prohibited. You must get permission from the author before using any materials or text used in items uploaded to the Course N@vi system.
- Slander, abuse, and other inappropriate communications will not be tolerated on discussion (BBS) boards.
Link
- Course N@vi Manual for Studentshttp://www.wnpspt.waseda.jp/student_en/course_navi/
-25-
3. Information Services
-26-
3.1. Waseda University On-Campus Network
The servers and computers on the Waseda University campus are connected to a single network environment that is known as the “(Waseda University) on-campus network.” The on-campus network is linked to the internet, but both outgoing access and incoming access are limited for security reasons. If you want to access the on-campus network from your home or elsewhere off campus, you must use the on-campus network connection service that employs a Virtual Private Network (VPN).
More details about using the network are given below.
1. Connecting via the on-campus network
(3.2) Connecting via the on-campus network (wired/wireless LAN)
2. Using a wired LAN to access the internet or email through the on-campus network
(3.3) Using a wired LAN to access off-campus services from on campus
3. Using restricted on-campus network services from home
(3.4) Connecting to restricted on-campus services from off campus (VPN)
Important Notes
- Read all the Waseda University Information and Communication Systems Internal Regulations (Japanese only) before using these services. The university will punish any unauthorized activity.
- You are responsible for taking sufficient security precautions when using your own computer or tablet to connect to the network.

-27-
Information Services
3
Links
- Network Use Guidehttp://www.waseda.jp/navi/e/network/
- Waseda University Information and Communication Systems Internal Regulations (Japanese Only)http://www.waseda.jp/wits/rules.html
- Notice Regarding Unauthorized Downloads (Japanese Only)http://www.waseda.jp/mnc/letter/2012sep/mnc_viewpoint2.html
- Security Information (Japanese Only)http://www.waseda.jp/navi/security/

-28-
3.2. Connecting via On-campus Network
Waseda University offers a service which allows students who bring their laptops on campus to use the on-campus network to connect to the internet. This service is available either through a wired or wireless LAN connection.
Wireless LAN Connection Service
Students can also get network access without using a LAN cable by using the Wi-Fi feature on their laptops to capture the signal at designated wireless LAN access points (see the link on page 29).
You do not need to configure your proxy settings (3.3) in order to use the wireless LAN service.
Note that some off-campus services may require you to configure your proxy settings (3.3). In particular, databases, online journals, and e-books to which Waseda University subscribes require that you access them through a Waseda University proxy, so you may have to add proxy settings (3.3) even when you are accessing the network via wireless LAN connection. Check the Library Waseda E-Resource Portal (3.8) to find out which resources require proxy settings.
See supplemental sections (5.1) through (5.3) at the end of this guide for detailed connection procedures.
Wired LAN (DHCP) Connection Service
The wired LAN (DHCP) connection service enables students who bring their own laptops to easily access the internet from on-campus locations.
You must configure your proxy settings (3.3) in order to connect using the wired LAN (DHCP) service.
See supplemental sections (5.4) through (5.11) at the end of this guide
-29-
Information Services
3
for detailed connection procedures.
Important Notes
- Always log out when you finish using the wired LAN (DHCP) connection service (5.11).
- Always disable your laptop’s network file-sharing feature before connecting to the on-campus network. If you do not, people will be able to access the files in your laptop from other machines linked to the network.
Links
- Wireless LAN Connectionshttp://www.waseda.jp/navi/e/network/wireless_new.html
- Locations where wireless LAN is available (access points)http://www.waseda.jp/navi/e/network/wireless_ap.html
- Wired LAN (DHCP) Connectionshttp://www.waseda.jp/navi/e/network/dhcp.html
-30-
3.3. Using a Wired LAN to Access Off-Campus Services
Using Off-Campus Internet Services (HTTP Proxy)
For security reasons, the on-campus network typically allows connected computers to access the Waseda University servers only. A HTTP proxy is used in order to allow these computers to access internet websites and various other services. You will need to configure your proxy settings if you want to connect to the internet from campus. Refer to supplemental sections (5.7) through (5.11) for detailed connection procedures.
Using Off-Campus Email or SSH/FTP Services (General Proxy)
For security reasons, the on-campus network also limits access to off-campus email and FTP/SSH services that allow outside communications. A general proxy is used in order to access these information services. Setting up a general proxy will allow you to access the following off-campus services:
FTP-data (20), FTP (21), SSH (22), Telnet (23), SMTP (25), POP3 (110), IMAP (143), SMTPS (465), SUBMISSION (587), IMAPS (993), POP3S (995).
Important Notes
- Generally, it is not required to configure proxy settings when using a wireless LAN connection.
- Always delete your proxy settings when switching to an off-campus network when you use your computer at home or other off-campus locations.
Links
- Proxy Servicehttp://www.waseda.jp/navi/e/network/proxy.html

-31-
Information Services
3
3.4. Connecting to On-Campus Services from Off-Campus (VPN)
Waseda University provides a VPN connection service that allows you to access the on-campus network from your home or other off-campus location. VPN connection is a technology which allows multiple remote nodes to safely communicate over a public line as if they were communicating over a private line. It also gives you access to restricted on-campus websites from home.
Important Notes
- Users connected to the Waseda University on-campus network via VPN are considered part of that network and subject to the Waseda University Information and Communication Systems Internal Regulations. You must comply with these rules when you are using VPN services.
Link
- Off-Campus Access Using VPNhttp://www.waseda.jp/navi/e/network/ext-vpn.html

-32-
3.5. Using Online Storage : Box
The online storage service “Box” is a cloud service for storing data on the internet. If you are connected to the internet, you can store data in the Box or access the Box through a web browser or a Smartphone application. This service means you do not need to save data to a USB flash drive when you are at school and want to edit documents created at home.
To access the Box, log in to MyWaseda first. Then open the “Online storage” menu on the left on the main page of MyWaseda and click “Box” to display the Box.
Important Notes
- When using this storage service, you must comply with the rules and guidelines.
- There are restrictions on data that can be stored in the Box. You must confirm the Box usage guidelines. Do not store prohibited data and for restricted data, password-protect the files.
- Make sure not to infringe the copyright of others.
Link
- Boxhttp://www.waseda.jp/navi/e/services/box/
- Online Storage Service “Box” Usage Guidelines (Japanese Only)http://www.waseda.jp/wits/RULES/box_guideline.html
-33-
Information Services
3
3.6. Using Software Rental Service
Waseda University offers a service to lend a variety of software, including antivirus software and Microsoft Office.
- Office 365Office 365 is a cloud service provided by Microsoft. You can download
and use the latest version of Microsoft Office. - Sophos Anti-Virus (on-campus use version)
Sophos Anti-Virus is antivirus software and you can download and use it.
Since updates of virus definition files are available only in the on-campus network environment, you need to be able to use the on-campus network.
Go to the links given below for details on the qualifications for use and how to install each software.
Important Notes
- For copyright protection and compliance reasons, the university strictly deals with illegal use of software. You must comply with the terms of use of each software and the Waseda University Information and Communication Systems Internal Regulations.
Link
- Software Rental (Japanese Only)http://www.waseda.jp/navi/rental/soft/
- Office 365http://www.waseda.jp/navi/e/rental/soft/ms_o365.html
- Sophos Anti-Virushttp://www.waseda.jp/navi/e/rental/soft/sophos.html

-34-
3.7. Publishing a Website on the World Wide Web
Waseda University operates and provides a World Wide Web service so that it can publish various information on the internet. This service is primarily designed to be used for educational and research purposes (courses, seminars, and the like). The university also allows student groups to use its WWW publishing service but only for promoting the development of academic, cultural, or athletic activities at the university. This requires students to go through the following steps.
1. Apply for the “Waseda-net WWW Service” using the link given below.
2. Create web content for publication.
3. Use an FTP client and transfer the created web content to a WWW server.
Important Notes
- An FTP client is a general term for software that allows you to transfer files by FTP (File Transfer Protocol). The widely used “WinSCP” FTP client is already installed in the computers in the Waseda University computer rooms. See the link given below for information on how to use this software.
- Your advisor needs to apply to use the WWW server for you.
Link
- Waseda-net WWW Service (Japanese Only)http://www.waseda.jp/navi/waseda-net/www-service.html

-35-
Information Services
3
3.8. Waseda E-Resource Portal
The Waseda E-Resource Portal site allows you to search e-resources (databases, online journals, and e-books) that Waseda University subscribes to as well as useful internet websites. Some of the available databases are listed below.
- University Libraries in Japan: CiNii Books - National Diet Library (Japan): NDL-OPAC - Keio University: KOSMOS - Libraries worldwide: WorldCat.org - Japanese articles: CiNii Articles - English articles: Web of Science - English articles: Scopus - Articles in Sci, Tech, Med.: JDreamIII - Asahi Shimbun: Kikuzo II Visual - Yomiuri Shimbun: YOMIDAS - Mainichi Shimbun: MAISAKU - Nikkei Shimbun: NIKKEI TELECOM21 - US & UK newspapers: Proquest Newspapers - Encyclopedias, dictionaries: JapanKnowledge Lib - Japanese law reports: LEX/DB
You can also use the Waseda University Library Catalog (WINE) to search for materials in the Waseda University library system.
Important Notes
- Certain databases can only be accessed from campus. - The use of automatic data download programs is prohibited.
Note that even short-term manual downloads of large volumes of information or the systematic download of certain journals may be considered inappropriate usage.

-36-
- Malicious usage of the system may result not only in suspension of services for the individual but also Waseda University as a whole. If unauthorized activity results in damages to the university or the service provider, the university may hold unauthorized users liable for the damages and contact their department or impose the appropriate penalties.
Links
- Waseda University Library > Waseda E-Resource Portalhttp://www.wul.waseda.ac.jp/imas/index-e.html
- Library Catalog (WINE)http://wine.wul.waseda.ac.jp/search/
- User Instructions for Databases, Electronic Journals, etc. (Japanese Only)http://www.wul.waseda.ac.jp/db/db_notice.html
- A Guide to Proper Use of Digital Resources (Japanese Only)http://www.wul.waseda.ac.jp/CLIB/lib_guide/no27_e-resource.pdf
-37-
Information Services
3
3.9. stat system
The stat system allows users to access a UNIX-based statistical analysis system (SAS) and similar statistics processors. A Windows-version SAS is available on the terminals in some on-campus computer rooms and the internet-based stat system can also be accessed remotely. You must apply for permission to use the stat system.
Important Notes
- You must go through the application process to use the system. - Use of the stat system is limited to the current academic year. You
cannot use the system across multiple academic years.
Link
- stat system (Japanese Only)http://www.waseda.jp/navi/services/system/stat.html

-38-
3.10. eduroam
eduroam JP is a service provided by the National Institute of Informatics (NII) to allow universities and other education/research institutions to share on-campus wireless LAN among them. Since Waseda University participates in this project, you can use the wireless LAN network using your Waseda Mail address and password at the access points of any eduroam-participating institutions.
Link
- eduroam (Japanese Only)http://www.waseda.jp/navi/network/eduroam.html
- eduroam JP/National Institute of Informaticshttp://www.eduroam.jp/en/
-39-
4. Computer Rooms

-40-
4.1. Waseda University Computer Rooms
Waseda University provides computer rooms on campus where students can freely use computers at any time the rooms are not being used for a course or academic training. The time period that students can freely use the computer rooms is called “open use.” Different computer rooms are run by different parts of the university and not all of them have the same software or can be used in the same way.
For details about each computer room, see the links given below and access map (5.13).
You can check the availability of the computer rooms on the website of the “Computer Room Availability” service (see the link given below). This service can also be accessed by smartphones and mobile phones. It is recommended to check the computer room availability beforehand, especially during examination periods and the job hunting season when usage is high.
For details on how to use the computer rooms, see the link given below.
Link
- Computer Rooms Guidehttp://www.waseda.jp/navi/e/room/
- Computer Room Availability (Japanese Only)http://www.waseda.jp/navi/room/mobile.html
- Computer and Smartphone Version QR code for Computer Room Availability

-41-
Computer Room
s
4
4.2. Using Terminals in Computer Rooms
To use a computer in the computer room, you must go through an authentication process.
First, power on the computer. If the display remains black, check that it is connected to a power source. Then, a user authentication window will appear (Figure 4.1). Enter your Waseda Mail address and password into the “ユーザID (user ID)” and “パスワード (password)” fields and click “認証
(authentication).”
Figure 4.1: User authentication window
Once the authentication process has succeeded, you can use the computer.
Regarding software, click “スタート(start)” at the bottom right of the screen, click “すべてのプログラム (all programs)” to display the names of the programs, and then click the one you want to use (Figure 4.2).
Figure 4.2: All programs, shut down
When you have finished, always shut down the terminal. To do this,
-42-
click “スタート (start)” at the bottom right of the screen and select “シャット
ダウン (shut down)” (Figure 4.2). Note that any data you have saved on the computer will be deleted when you shut it down or restart, so be sure to save any important files on a USB flash drive first.
Available Software
Computers in the computer rooms are equipped with basic software like Microsoft Word and Excel. In addition to these common applications, certain computer rooms may have terminals with special software. Go to the link on page 44 to see a list of the software installed on computers in various computer rooms.
Using Printers
There are monochrome laser printers in most of the computer rooms. The computer rooms on the first basement level in Building 22, on the first floor in Building 9, and in Building 100 have computers specifically for printing tasks.
Paper for printing is not provided in the computer rooms. Purchasing paper is the responsibility of each student, so bring the materials you will need with you. Only put clean, unused paper for printing into the printers. Do not use non-standard paper sizes, paper not meant for copying (e.g. writing paper or thermal paper), or the back side of paper that has already been printed on, as it can jam or damage the machines. Note that printing of documents other than those used for research or academic courses is prohibited.
Other Facilities
Computers in the computer rooms have USB ports to allow the use of USB flash drives and other external storage devices.
All computers in the computer rooms are muted by default. Please bring

-43-
Computer Room
s
4
your own headphones if you want to listen to the sound. A headphone rental service is available at the computer rooms managed by the Global Education Center. Consult Teaching Assistant (TA) in the IT Counseling Office for Students.
Computers in the computer rooms have super multi drives, which can play CD-R, CD-RW, DVD-R, DVD-RW, DVD+R, DVD+RW, and DVD-RAM.
To maintain a quiet environment, chattering in the computer rooms is prohibited. You can use a group learning facility for group work. The Group Study Room on the first basement level in Building 22 and Room A in Building 24 are intended for group work.
Get into the habit of thinking and investigating on your own the causes of troubles and difficulties. Most software comes with a Help function, or try solving the problem by using Google, Yahoo!, etc. to search for similar symptoms and solutions.
Information on troubleshooting in the computer rooms can also be found in the Frequently Asked Questions section of the Information Technology Service Navigation. See the link on page 44.
If you cannot solve the problems even after looking at the FAQ, search engine results, or online help, visit the IT Counseling Office for Students. The TA on duty will give you advice.
You can also send an inquiry from the “Help Desk.” See “Troubleshooting” on the last page of this guide on how to make an inquiry.
Important Notes
- When using the computer rooms, observe the following so that everyone can use the rooms comfortably and quietly:
- Remain in your seat; do not leave your belongings unattended.
- Chattering is not allowed. - Do not bring food and drink (beverages with lids are

-44-
allowed in some places). - Do not talk on mobile phones. - Do not use USB devices other than external storage media. - Follow the instructions given by TA and security guards. - Do not fall asleep.
- To prevent unauthorized activity, you must always shut down and power off a computer when you have finished or even when you leave your seat. Keep in mind that any use of the computer between the time you log in and the time you power it off is your responsibility.
- When it is deemed that a user has left his/her seat without shutting down the computer, the computer may be forcibly shut down to free it up for other users.
- Never power off a computer by pushing the power button on the main unit. Unlike other electric devices, a computer must go through the proper shutdown procedures in order to work properly. Pressing the power button without shutting down may damage the processor.
- Always save your data on a USB flash drive or other external device prior to shutting down the computer.
- Computer room terminals automatically erase all in-progress files during the shutdown process.
- Do not connect any device not intended for research or educational purposes in the computer rooms.
Links
- Users Guide (Japanese Only)http://www.waseda.jp/navi/room/howtouse1.html
- Software Search (Japanese Only)http://www.waseda.jp/navi/room/app/
- Frequently Asked Questionshttp://www.waseda.jp/navi/e/faq/

-45-
5. Appendix
-46-
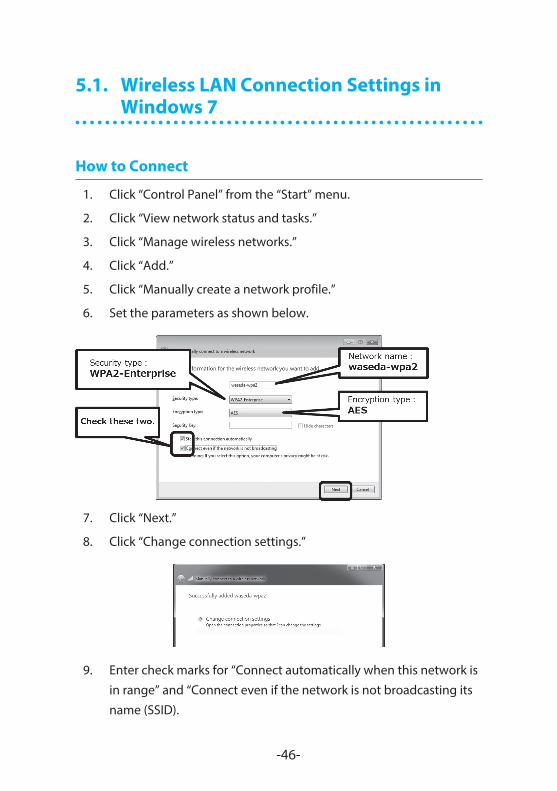
5.1. Wireless LAN Connection Settings in Windows 7
How to Connect
1. Click “Control Panel” from the “Start” menu.
2. Click “View network status and tasks.”
3. Click “Manage wireless networks.”
4. Click “Add.”
5. Click “Manually create a network profile.”
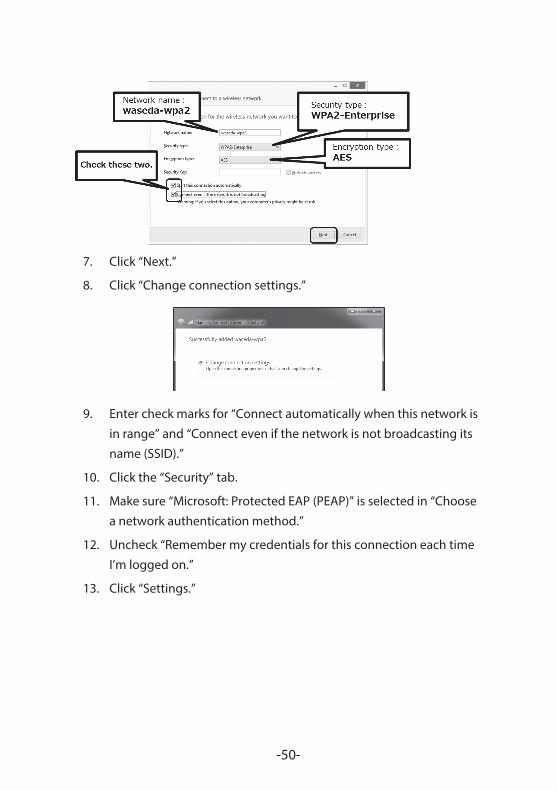
6. Set the parameters as shown below.
7. Click “Next.”
8. Click “Change connection settings.”
9. Enter check marks for “Connect automatically when this network is in range” and “Connect even if the network is not broadcasting its name (SSID).

-47-
Appendix
10. Click “Security” tab.
11. Make sure “Microsoft: Protected EAP (PEAP)” is selected in “Choose a network authentication method.”
12. Uncheck “Remember my credentials for this connection each time I’m logged on.”
13. Click “Settings.”
14. Make settings as follows.
15. Click “OK” to return to “waseda-wpa2 wireless network properties.”
16. Click “Advanced settings.”

-48-
17. Make the following settings on “802.1X settings” tab.
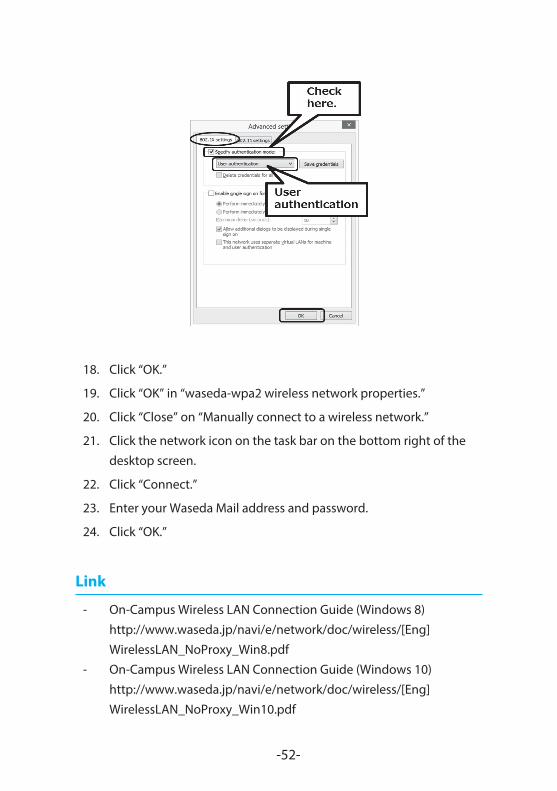
18. Click “OK.”
19. Click “OK” in “waseda-wpa2 wireless network properties.”
20. Click “Close” on “Manually connect to a wireless network.”
21. Click the network icon on the task bar on the bottom right of the desktop screen.
22. Select “waseda-wpa2” and click “Connect.”
23. Enter your Waseda Mail address and password.
24. Click “OK.” For the first time only: If Windows security alert appears, click “Connect.”
Connection from the Second Time
Follow the above Steps 21 to 24.
Link
- On-Campus Wireless LAN Connection Guide (Windows 7)http://www.waseda.jp/navi/e/network/doc/wireless/[Eng]WirelessLAN_NoProxy_Win7.pdf

-49-
Appendix
5.2. Wireless LAN Connection Settings in Windows 8 or Above
How to Connect
1. Click the network icon on the task bar on the bottom right of the desktop screen.
2. Select “waseda-wpa2” and click “Connect.”
3. Enter your Waseda Mail address and password.
4. Click “OK.”
5. For the first time only: If Windows security alert appears, click
“Connect.”
Advanced Settings
If you cannot perform wireless LAN connection in “How to Connect,” make the following advanced settings.
1. Windows 8, 8.1: Click “Control Panel” from the “Settings” menu on the desktop screen. Windows 10: Right-click the “Start” button and click “Control Panel” from the displayed menu.
2. Click “View network status and tasks.”
3. Click “Set up a new connection or network.”
4. Click “Manually connect to a wireless network.”
5. Click “Next.”
6. Set the parameters as shown below.
-50-
7. Click “Next.”
8. Click “Change connection settings.”
9. Enter check marks for “Connect automatically when this network is in range” and “Connect even if the network is not broadcasting its name (SSID).”
10. Click the “Security” tab.
11. Make sure “Microsoft: Protected EAP (PEAP)” is selected in “Choose a network authentication method.”
12. Uncheck “Remember my credentials for this connection each time I’m logged on.”
13. Click “Settings.”

-51-
Appendix
14. Make settings as follows.
15. Click “OK” to return to “waseda-wpa2 wireless network properties.”
16. Click “Advanced settings.”
17. Make the following settings on “802.1X settings” tab.
-52-
18. Click “OK.”
19. Click “OK” in “waseda-wpa2 wireless network properties.”
20. Click “Close” on “Manually connect to a wireless network.”
21. Click the network icon on the task bar on the bottom right of the desktop screen.
22. Click “Connect.”
23. Enter your Waseda Mail address and password.
24. Click “OK.”
Link
- On-Campus Wireless LAN Connection Guide (Windows 8)http://www.waseda.jp/navi/e/network/doc/wireless/[Eng]WirelessLAN_NoProxy_Win8.pdf
- On-Campus Wireless LAN Connection Guide (Windows 10)http://www.waseda.jp/navi/e/network/doc/wireless/[Eng]WirelessLAN_NoProxy_Win10.pdf

-53-
Appendix
5.3. Wireless LAN Connection Settings in Mac OS X
How to Connect
1. Click the AirMac icon on the menu bar on the desktop screen.
2. Click “Connect to other networks.”
3. Select “WPA2-Enterprise” in “Security.”
4. Type in “waseda-wpa2” for the network name.
5. Enter your Waseda Mail address and password.
6. Click the “Connect” button.
7. For the first time only: If “Verify certification” appears, click “Continue.” Then a window to change OS appears; enter a user name and password for OS and click “Update settings.”
Link
- On-Campus Wireless LAN (Mac OS X 10.7 – 10.9) http://www.waseda.jp/navi/e/network/doc/wireless/[Eng]WirelessLAN_NoProxy_Mac10-7_10-9.pdf

-54-
5.4. Wired LAN Connection Settings in Windows 7
1. Click “Control Panel” in the menu displayed in “Start” and click “View network status and tasks.”
2. “Network and Sharing Center” appears. Click “Local Area Connection.”
3. The “Local Area Connection Status” display appears. Click “Properties.”
4. Note: If the “User account control” warning display appears, click “Continue” to go to the next step.
5. The “Local Area Connection Properties” display appears. While “Internet Protocol Version 4 (TCP/IPv4)” is selected (“Internet Protocol Version 4 (TCP/IPv4)” is highlighted. Do not deselect the checkbox), click “Properties.”
6. The “Internet Protocol Version 4 (TCP/IPv4)” display appears. Enter checkmarks in “Obtain an IP address automatically (O)” and “Obtain DNS server address automatically (B),” and click “OK.”
Important Notes
- Setup is not completed yet. Proceed to (5.7) through (5.10) for proxy setting.
- Login / Logout (5.11) is necessary everytime you use the network.
Link
- Wired LAN (DHCP) connection settings in Windowshttp://www.waseda.jp/navi/e/network/doc/dhcp.pdf
-55-
Appendix
5.5. Wired LAN Connection Settings in Windows 8 or Above
1. Windows 8, 8.1: Click “Control Panel” from the “Settings” menu on the desktop screen. Windows 10: Right-click the “Start” button and click “Control Panel” from the displayed menu.
2. Click “View network status and tasks.”
3. “Network and Sharing Center” appears. Click “Ethernet.”
4. The “Ethernet status” display appears. Click “Properties.”
5. Note: If the “User account control” warning display appears, click “Continue” to go to the next step.
6. The “Ethernet properties” display appears. While “Internet Protocol Version 4 (TCP/IPv4)” is selected (“Internet Protocol Version 4 (TCP/IPv4)” is highlighted. Do not deselect the checkbox), click “Properties.”
7. The “Internet Protocol Version 4 (TCP/IPv4)” display appears. Enter checkmarks in “Obtain an IP address automatically (O)” and “Obtain DNS server address automatically (B),” and click “OK.”
Important Notes
- Setup is not completed yet. Proceed to (5.7) through (5.10) for proxy setting.
- Login / Logout (5.11) is necessary everytime you use the network.
Link
- Wired LAN (DHCP) connection settings in Windowshttp://www.waseda.jp/navi/e/network/doc/dhcp.pdf

-56-
5.6. Wired LAN Connection Settings in Mac OS X
1. Select “System preferences” in the menu displayed in “Apple menu.”
2. The “System preferences” display appears. Click “Network.”
3. The “Network” display appears. Select “Ethernet” from the list on the left.
4. Select “Use DHCP server” in “IPv4 setting.”
5. Click “Apply.”
6. Close the display.
Important Notes
- Setup is not completed yet. Proceed to (5.7) through (5.10) for proxy setting.
- Login / Logout (5.11) is necessary everytime you use the network.
Link
- Wired LAN (DHCP) connection settings in Machttp://www.waseda.jp/navi/e/network/doc/dhcp_mac.pdf

-57-
Appendix
5.7. Proxy Settings in Internet Explorer
1. Start Internet Explorer.
2. Select “Internet Options” from “Tools” in the menu bar.
3. When the “Internet Options” display appears, select the “Connections” tab. Click “LAN Settings.”
4. “Local Area Network (LAN) settings” appears. Deselect “Automatically detect settings” and “Use auto-configuration script.” Then, check the “Use a proxy server for your LAN” box and click “Advanced settings.”
5. The “Proxy settings” display appears. For “HTTP,” enter “www-proxy.waseda.jp” in “Proxy address to use” and “8080” in “Port.” Then, check the “Use the same proxy server for all protocols” checkbox. In addition, enter “*.waseda.ac.jp” in the field of “Do not use proxy server for addresses beginning with.” Then, click “OK."
-58-
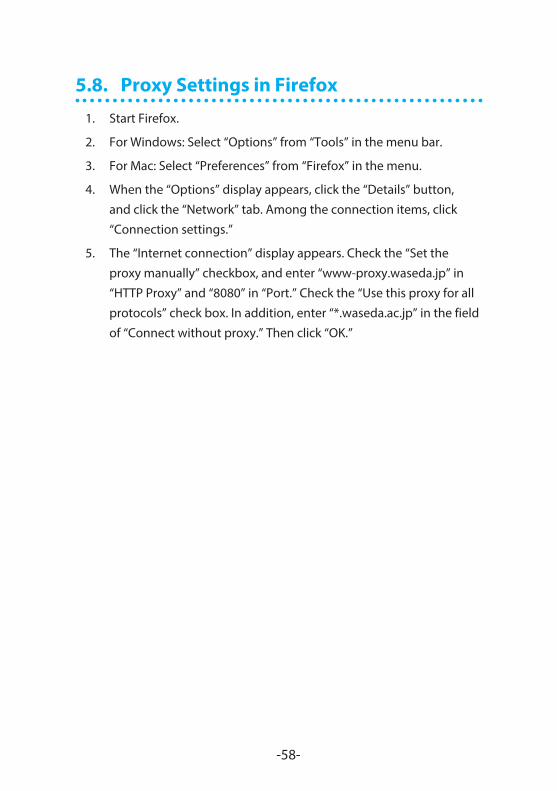
5.8. Proxy Settings in Firefox
1. Start Firefox.
2. For Windows: Select “Options” from “Tools” in the menu bar.
3. For Mac: Select “Preferences” from “Firefox” in the menu.
4. When the “Options” display appears, click the “Details” button, and click the “Network” tab. Among the connection items, click “Connection settings.”
5. The “Internet connection” display appears. Check the “Set the proxy manually” checkbox, and enter “www-proxy.waseda.jp” in “HTTP Proxy” and “8080” in “Port.” Check the “Use this proxy for all protocols” check box. In addition, enter “*.waseda.ac.jp” in the field of “Connect without proxy.” Then click “OK.”
-59-
Appendix
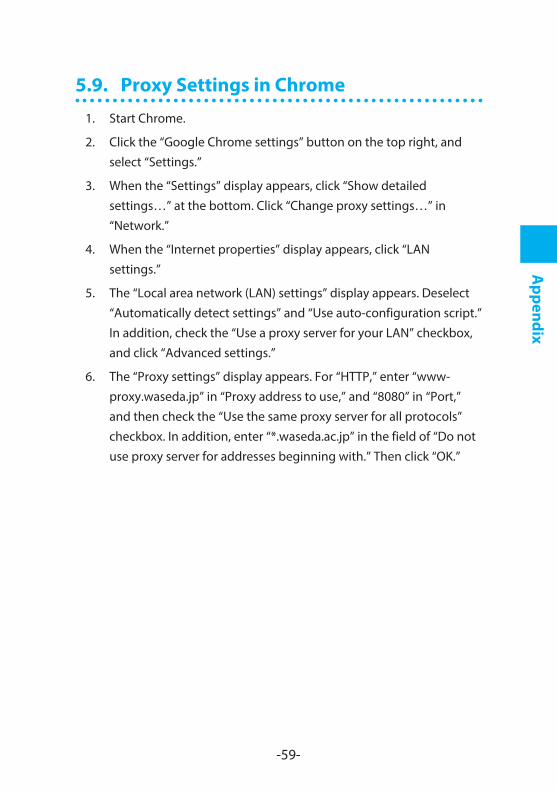
5.9. Proxy Settings in Chrome
1. Start Chrome.
2. Click the “Google Chrome settings” button on the top right, and select “Settings.”
3. When the “Settings” display appears, click “Show detailed settings…” at the bottom. Click “Change proxy settings…” in “Network.”
4. When the “Internet properties” display appears, click “LAN settings.”
5. The “Local area network (LAN) settings” display appears. Deselect “Automatically detect settings” and “Use auto-configuration script.” In addition, check the “Use a proxy server for your LAN” checkbox, and click “Advanced settings.”
6. The “Proxy settings” display appears. For “HTTP,” enter “www-proxy.waseda.jp” in “Proxy address to use,” and “8080” in “Port,” and then check the “Use the same proxy server for all protocols” checkbox. In addition, enter “*.waseda.ac.jp” in the field of “Do not use proxy server for addresses beginning with.” Then click “OK.”
-60-
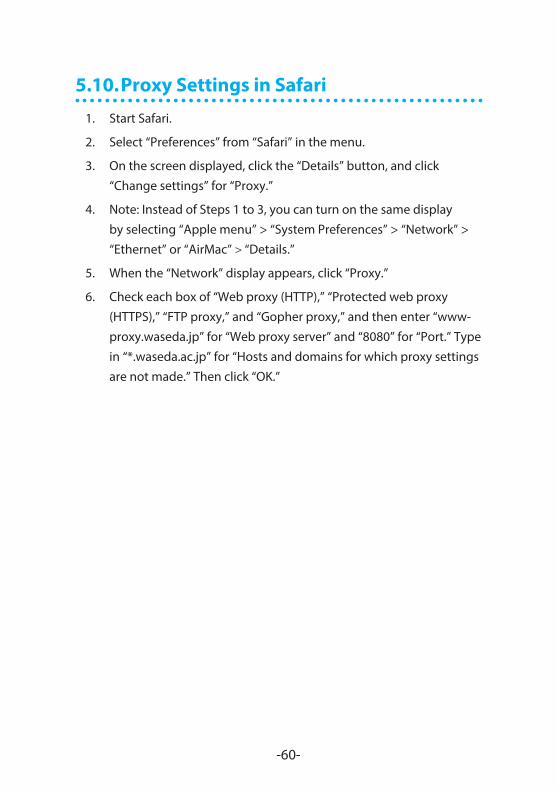
5.10. Proxy Settings in Safari
1. Start Safari.
2. Select “Preferences” from “Safari” in the menu.
3. On the screen displayed, click the “Details” button, and click “Change settings” for “Proxy.”
4. Note: Instead of Steps 1 to 3, you can turn on the same display by selecting “Apple menu” > “System Preferences” > “Network” > “Ethernet” or “AirMac” > “Details.”
5. When the “Network” display appears, click “Proxy.”
6. Check each box of “Web proxy (HTTP),” “Protected web proxy (HTTPS),” “FTP proxy,” and “Gopher proxy,” and then enter “www-proxy.waseda.jp” for “Web proxy server” and “8080” for “Port.” Type in “*.waseda.ac.jp” for “Hosts and domains for which proxy settings are not made.” Then click “OK.”

-61-
Appendix
5.11. Wired LAN: Login/Logout Procedures
Login Procedures
1. When a web browser is started, a web page of the backbone network authentication system appears automatically. If it does not appear, connect to the “Backbone Network Authentication System” directly (http://auth.net.waseda.ac.jp/).
2. Enter your Waseda Mail address and password in the user ID and password fields on the left of the page and click “Login.”
3. A dialog box may appear, asking whether you want to save the password on the computer. You should never save the password on the computer for security reasons.
4. Login is successful if a login successful message appears.
Logout Procedures (Required)
1. Start the web browser and connect to the Backbone Network Authentication System (http://auth.net.waseda.ac.jp/).
2. When an authentication successful screen appears, click “Logout.”
3. Logout is complete when a logout successful message appears.
Notes
- Once you are authenticated, your computer will not be cut off from the network even if you close the authentication screen (or exit the web browser). Authentication will be canceled if the computer is turned off or the LAN cable is disconnected.
- Authentication is required in advance if you are going to use software that requires a network connection for functions other than viewing web pages, such as mail client software, antivirus software that needs pattern file updates, etc.

-62-
5.12. Other Important Matters
Regulations
Users are obligated to read and comply with the related regulations before using the systems run by Waseda University. Be sure to read the regulations in the following link to use the internet and computers appropriately.
- Regulation (Japanese Only)http://www.waseda.jp/wits/rules.html
Environment to Use Each Service and System
Each service and system may not be available in a non-verified environment. Click the links given below to check the verified environment for each service and system.
- Recommended Environments for the Systemshttp://www.waseda.jp/navi/e/services/system/sys_requirements.html
- Caution Concerning Environment Other Than Verified Environment (Japanese Only)http://www.waseda.jp/navi/services/system/sys_requirements_caution.html
Reissuing a Password
If you forget your Waseda ID, Waseda Mail address, or password, you need to apply at the IT desk to have your password reissued. Click the links given below to find the help desk that can reissue passwords. Bring your student ID to apply for a new password. After reissuing the password, you will be required to take the Information Ethics Test and pass it within a specified time period. Failure to do so will result in suspension of your Waseda ID.
- Inquiries and IT Desks / Reissuing a Passwordhttp://www.waseda.jp/navi/e/inquiry.html
-63-
Appendix
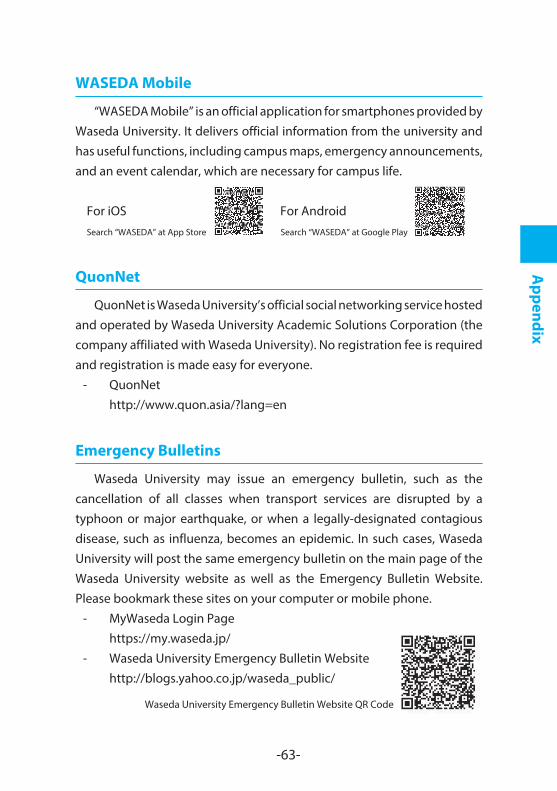
WASEDA Mobile
“WASEDA Mobile” is an official application for smartphones provided by Waseda University. It delivers official information from the university and has useful functions, including campus maps, emergency announcements, and an event calendar, which are necessary for campus life.
For iOS For AndroidSearch “WASEDA” at App Store Search “WASEDA” at Google Play
QuonNet
QuonNet is Waseda University’s official social networking service hosted and operated by Waseda University Academic Solutions Corporation (the company affiliated with Waseda University). No registration fee is required and registration is made easy for everyone.
- QuonNethttp://www.quon.asia/?lang=en
Emergency Bulletins
Waseda University may issue an emergency bulletin, such as the cancellation of all classes when transport services are disrupted by a typhoon or major earthquake, or when a legally-designated contagious disease, such as influenza, becomes an epidemic. In such cases, Waseda University will post the same emergency bulletin on the main page of the Waseda University website as well as the Emergency Bulletin Website. Please bookmark these sites on your computer or mobile phone.
- MyWaseda Login Pagehttps://my.waseda.jp/
- Waseda University Emergency Bulletin Websitehttp://blogs.yahoo.co.jp/waseda_public/
Waseda University Emergency Bulletin Website QR Code

-64-
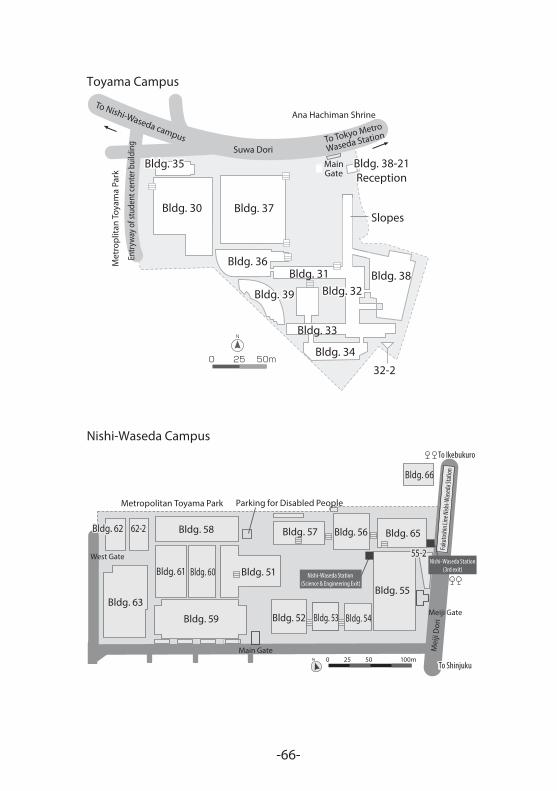
5.13. Access Map
Waseda Campus
Bldg. 29Bldg. 29
Bldg. 22
Bldg. 1
Bldg. 2 Bldg. 3Bldg. 4
Bldg. 5
Bldg. 6Bldg. 7Bldg. 8
Bldg. 9
Bldg. 10
Bldg. 11
Bldg. 12
Bldg. 14 Bldg. 15
Bldg. 16
Bldg. 17
Bldg. 18
Bldg. 19
Bldg. 20
Bldg. 23
Bldg. 24
Bldg. 25
Bldg. 26
Bldg. 28
Bldg. 99
Bldg. 120
Bldg. 27
Bldg. 22
Bldg. 1Bldg. 1Bldg. 1
Bldg. 2Bldg. 2Bldg. 2 Bldg. 3Bldg. 3Bldg. 3 Bldg. 4Bldg. 4Bldg. 4
Bldg. 5Bldg. 5Bldg. 5
Bldg. 6Bldg. 6Bldg. 6Bldg. 7Bldg. 7Bldg. 7Bldg. 8Bldg. 8Bldg. 8
Bldg. 9Bldg. 9Bldg. 9
Bldg. 10Bldg. 10Bldg. 10
Bldg. 11Bldg. 11Bldg. 11
Bldg. 12Bldg. 12Bldg. 12
Bldg. 14Bldg. 14Bldg. 14 Bldg. 15Bldg. 15Bldg. 15
Bldg. 16Bldg. 16Bldg. 16
Bldg. 17Bldg. 17Bldg. 17
Bldg. 18Bldg. 18Bldg. 18
Bldg. 19Bldg. 19Bldg. 19
Bldg. 20Bldg. 20Bldg. 20
Bldg. 23Bldg. 23Bldg. 23
Bldg. 24Bldg. 24Bldg. 24
Bldg. 25Bldg. 25Bldg. 25
Bldg. 26Bldg. 26Bldg. 26
Bldg. 28Bldg. 28Bldg. 28
Bldg. 99Bldg. 99Bldg. 99
Bldg. 120Bldg. 120Bldg. 120
Bldg. 27Bldg. 27Bldg. 27
17-217-2
29-229-2 29-429-4
29-629-6
29-729-7
19-319-3
27-827-8
27-927-9
27-1027-10
23-523-5
24-824-8
25-225-2
201-39201-39
CentralLibrary
Okuma Garden
Rihga RoyalHotel Tokyo
Statue ofShigenobu
Okuma
Okuma Memorial Tower
NorthGate
West Gate
West Gate 2
East Gate
South Gate
MainGate
Gate
To Toyama Campus
Police Box
To Waseda Station
Babashitacho
Waseda Dori Nishi-Waseda
Sodai
Dori
Housha R
oute 7
(Shin
-Mej
iro D
ori)Sodai Seimon
-65-
Appendix
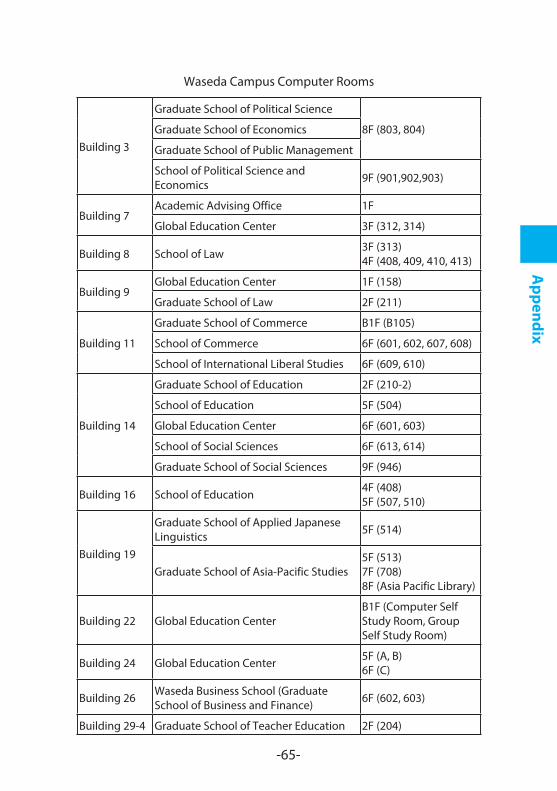
Waseda Campus Computer Rooms
Building 3
Graduate School of Political Science
8F (803, 804)Graduate School of Economics
Graduate School of Public Management
School of Political Science and Economics 9F (901,902,903)
Building 7Academic Advising Office 1F
Global Education Center 3F (312, 314)
Building 8 School of Law 3F (313)4F (408, 409, 410, 413)
Building 9Global Education Center 1F (158)
Graduate School of Law 2F (211)
Building 11
Graduate School of Commerce B1F (B105)
School of Commerce 6F (601, 602, 607, 608)
School of International Liberal Studies 6F (609, 610)
Building 14
Graduate School of Education 2F (210-2)
School of Education 5F (504)
Global Education Center 6F (601, 603)
School of Social Sciences 6F (613, 614)
Graduate School of Social Sciences 9F (946)
Building 16 School of Education 4F (408)5F (507, 510)
Building 19
Graduate School of Applied Japanese Linguistics 5F (514)
Graduate School of Asia-Pacific Studies5F (513)7F (708)8F (Asia Pacific Library)
Building 22 Global Education CenterB1F (Computer Self Study Room, Group Self Study Room)
Building 24 Global Education Center 5F (A, B)6F (C)
Building 26 Waseda Business School (Graduate School of Business and Finance) 6F (602, 603)
Building 29-4 Graduate School of Teacher Education 2F (204)
-66-
Toyama Campus
Bldg. 37Bldg. 30
Bldg. 35Bldg. 35
Bldg. 36
Bldg. 39Bldg. 39 Bldg. 32Bldg. 32Bldg. 31
Bldg. 33
Bldg. 34
Bldg. 38
32-2
Bldg. 38-21Reception
Bldg. 38-21Reception
Slopes
To Nishi-Waseda campusSuwa Dori
Met
ropl
itan
Toya
ma
Park
MainGate
To Tokyo Metro
Waseda Station
Ana Hachiman Shrine
Entry
way
of s
tude
nt ce
nter
bui
ldin
g
Nishi-Waseda CampusTo Ikebukuro
To ShinjukuTo Shinjuku
West Gate
N 0 25 50 100m
Parking for Disabled PeopleMetropolitan Toyama Park
62-262-2
Nishi-Waseda Station (Science & Engineering Exit)
Nishi-Waseda Station(3rd exit)Bldg. 51
Bldg. 52 Bldg. 53 Bldg. 54
Bldg. 55
Bldg. 56Bldg. 57
Bldg. 59
Bldg. 58
Bldg. 63
Bldg. 65Bldg. 62Bldg. 62
Bldg. 61 Bldg. 60
55-255-2
Bldg. 66
Main Gate
Meiji Gate
Mei
ji D
ori
Fuku
tosh
in Lin
e Nish
i-Was
eda S
tatio
n

-67-
Appendix
Toyama Campus Computer Rooms
Building 34School of Letters, Arts and Sciences
3F (356, 357)
4F (451)
Building 36 4F (MM1, MM2)
Nishi-Waseda Campus Computer Rooms
Building 57Faculty of Science and Engineering
1F (101)
Building 63 3F (A, B, C, D, E, F, G, H)
Higashifusimi Campus Computer Rooms
Building 79 School of Sport Sciences 4F (405, 406)
Tokorozawa Campus Computer Rooms
Building 100 School of Human Sciences,School of Sport Sciences
3F (E321-1, E321-2, E322)
Nihombashi Campus Computer Rooms
Building 201-50
Graduate School of Finance, Accounting and Law
5F (554)
Kitakyushu Campus Computer Rooms
Building 201-46
Graduate School of Information Production, and Systems
1F (N159, N162)

-68-
Troubleshooting
Using FAQ: Information Technology Service Navigation
If you have any problems, please read the FAQ at IT Service Navigation. Frequently asked questions and answers are listed there.
Making Inquiries by Email: Help Desk
We accept inquiries about information services online 24/7. Send inquiries from “Inquiry” in “Help Desk” in the service menu of “IT Service” in the global menu of MyWaseda.
If you cannot log in to MyWaseda, contact us from the link given below.
Support from IT Desk
Each campus has a IT desk that provides assistance regarding information services.
Campus LocationWaseda Academic Advising Office: Building 7 (1F)Toyama MM Preparation Room: Building 36 (4F)
Nishi-Waseda Administrative Office of Information and Multimedia Technology: Building 63 (3F) (help desk)
Tokorozawa Information Systems Management Room: Building 100 (3F)
Honjo Development Support Room 1: Building 93 (3F)Kitakyushu Information Management Room: Building 201-46 (1F)
Link
- FAQ : IT Service Navigationhttp://www.waseda.jp/navi/e/faq/
- Inquiries and IT Deskshttp://www.waseda.jp/navi/e/inquiry.html

Users’ Guide for PCs and Networks 2016-2017
Published on September 1st, 2016
Editor/publisher: Waseda University
1-104 Totsuka-cho, Shinjuku-ku, Tokyo 169-8050
The copyright of this book belongs to Waseda University. This book shall not be copied, reproduced, translated, or distributed without consent, whether as a whole or in part, to any storage media, such as papers, magnetics, or optical media. Please contact Waseda University when obtaining such permission. For any inquires or opinion about the contents of this book,
please send us an email at [email protected]

Users’ G
uide for PCs and Netw
orks 2016-2017 English EditionW
aseda University