USER’S GUIDE GUÍA DEL USUARIOsupport.casio.com/pdf/008/lk_40_01_e.pdf478B-E-003A E-1 Welcome......
59
LK40/42-ES-1 P USER’S GUIDE GUÍA DEL USUARIO
Transcript of USER’S GUIDE GUÍA DEL USUARIOsupport.casio.com/pdf/008/lk_40_01_e.pdf478B-E-003A E-1 Welcome......
LK40/42-ES-1
P
USER’S GUIDEGUÍA DEL USUARIO

478B-E-002A
GUIDELINES LAID DOWN BY FCC RULES FOR USE OF THE UNIT INTHE U.S.A. (not applicable to other areas).
NOTICEThis equipment has been tested and found to comply with the limits for a Class Bdigital device, pursuant to Part 15 of the FCC Rules. These limits are designedto provide reasonable protection against harmful interference in a residentialinstallation. This equipment generates, uses and can radiate radio frequencyenergy and, if not installed and used in accordance with the instructions, maycause harmful interference to radio communications. However, there is noguarantee that interference will not occur in a particular installation. If thisequipment does cause harmful interference to radio or television reception,which can be determined by turning the equipment off and on, the user isencouraged to try to correct the interference by one or more of the followingmeasures:
• Reorient or relocate the receiving antenna.• Increase the separation between the equipment and receiver.• Connect the equipment into an outlet on a circuit different from that to which
the receiver is connected.• Consult the dealer or an experienced radio/TV technician for help.
FCC WARNINGChanges or modifications not expressly approved by the party responsible forcompliance could void the user’s authority to operate the equipment.
CASIO ELECTRONICS CO., LTD.Unit 6, 1000North Circular RoadLondon NW2 7JD, U.K.
This mark is valid in the EU countries only.Please keep all information for future reference.
E-1478B-E-003A
Welcome...To the happy family of satisfied CASIO electronic musical instrument owners! To get the mostout of the many features and functions of the keyboard, be sure to carefully read this manualand keep it on hand for future reference.
Important!When using batteries, be sure to replace them or shift to one of the alternate power sourceswhenever you notice any of the following symptoms.• Dim power supply indicator• Instrument does not turn on• Dim, difficult to read display• Abnormally low speaker/headphone volume• Distortion of sound output• Occasional interruption of sound when playing at high volumes• Sudden power failure when playing at high volumes• Dimming of the display when playing at high volume• Abnormal rhythm pattern and demo tune play• Dimming of keyboard lights when notes sound• Loss of power, sound distortion, or low volume when playing from a connected computer
or MIDI device
Main Features 100 amazingly realistic tones
Enhanced auto-accompaniment function for greater versatility• 100 built in auto-accompaniment patterns.
100 Built-in Song Bank tunes• A total of 100 built-in Song Bank tunes comes built in for playback enjoyment or play-along
practice.
A three-step lesson function lets you develop your musical skills by followingthe keys as they light (Three Step Lesson System).
• First you become familiar with the timing of the notes by watching the keys light as youplayback one of the 100 built-in Song Bank tunes. Next, practice playing along at a pacethat’s comfortable for you. Finally, try playing along at the normal tempo for the Song Banktune.
Auto Accompaniment• Simply specify a chord and the keyboard automatically produces the matching rhythm,
bass, and chord patterns. One-touch fill-ins make accompaniments sound interesting andnatural.
Transpose Function• An easy operation instantly changes the key of the keyboard.
MIDI compatibility• Connecting to another MIDI device lets you sound notes on both this keyboard and the
connected device by playing on this keyboard. You can even playback commercially avail-able pre-recorded MIDI data.
E-1

E-2
Safety Precautions
Symbols
Various symbols are used in this operating manual and on the product itself to ensure that theproduct is used safely and correctly, and to prevent injury to the user and other persons as wellas damage to property. Those symbols along with their meanings are shown below.
Symbol Examples
This triangle symbol ( ) means that the user should be careful. (The example atleft indicates electrical shock caution.)
This circle with a line through it ( ) means that the indicated action must not beperformed. Indications within or nearby this symbol are specifically prohibited.(The example at left indicates that disassembly is prohibited.)
The black dot ( ) means that the indicated action must be performed. Indicationswithin this symbol are actions that are specifically instructed to be performed.(The example at left indicates that the power plug must be unplugged from theelectrical socket.)
WARNING
This indication stipulates matters that have the risk of causing death or serious injury if theproduct is operated incorrectly while ignoring this indication.
CAUTION
This indication stipulates matters that have the risk of causing injury as well as matters forwhich there is the likelihood of occurrence of physical damage only if the product isoperated incorrectly while ignoring this indication.
WARNING
Please use caution regarding the handling of the AC adaptor.• Do not use a voltage other than the indicated power supply voltage. Use of a
voltage other than that indicated may cause fire or electrical shock.• If the power cord should become damaged (exposed wires, disconnection,
etc.), purchase a new AC adaptor. Use of a damaged power cord may causefire or electrical shock.
• Do not cut or damage the power cord. Also do not place heavy objects on topof it or subject it to excessive heat. Damage to the power cord may cause fire orelectrical shock.
• Do not attempt to shape the power cord or subject it to excessive bending,twisting or pulling. This may cause fire or electrical shock.
• Please use the adaptor specified for this instrument. Use of another adaptormay cause fire, electrical shock, or malfunction.
Do not locate the instrument or its stand on an uneven or unstable surface.• Locating the instrument or its stand on an uneven or unstable surface can
cause it to fall, creating the danger of personal injury.
478B-E-004A
E-3
Do not place containers containing water or other liquids on the instrument.• Do not place the following objects on the instrument. Placing such objects on
the instrument may cause fire or electrical shock if they spill and get inside theinstrument.• Containers filled with water or other liquids (including vases, potted plants,
cups, cosmetics and medicines)• Small metal objects (including hairpins, sewing needles and coins)• Flammable objectsIn the event a foreign object should happen to get inside the instrument,please take the following actions:1. Turn power off.2. Unplug the AC adaptor from the wall outlet.3. If there are any batteries loaded in the keyboard, remove them.• Do not touch the batteries directly with your hands when removing them.
They may be hot or battery fluid may be leaking from them.4. Consult with the dealer where you purchased the keyboard or with an
authorized CASIO service provider.
Do not disassemble or modify the instrument.• Never attempt of take apart or modify the instrument, its accessories, or
separately sold options. Doing so may cause fire, electrical shock or malfunc-tion. Consult your dealer concerning all inspection, adjustment or repair ofinternal components.
Do not use if there is an abnormality or malfunction.• Do not use the instrument if there appear to be abnormalities such as the
presence of smoke or abnormal odor. Also do not use the instrument if thereappear to be malfunctions such as the power not coming on or sound notbeing produced. Use under such conditions may cause fire or electrical shock.In such cases, take the following actions immediately. Never attempt to repairthe instrument yourself.1. Turn power off.2. Unplug the AC adaptor from the wall outlet.3. If there are any batteries loaded in the keyboard, remove them.• Do not touch the batteries directly with your hands when removing them.
They may be hot or battery fluid may be leaking from them.4. Consult with the dealer where you purchased the keyboard or with an
authorized CASIO service provider.
When the instrument has been dropped:• In the case the instrument has been dropped or damaged, take the following
actions. Continued use may cause fire or electrical shock.1. Turn power off.2. Unplug the AC adaptor from the wall outlet.3. If there are any batteries loaded in the keyboard, remove them.• Do not touch the batteries directly with your hands when removing them.
They may be hot or battery fluid may be leaking from them.4. Consult with the dealer where you purchased the keyboard or with an
authorized CASIO service provider.
Be careful of the bags around children.• Never allow anyone to place the plastic bags of the instrument, its accessories,
and its separately sold options over their heads. Doing so may cause suffoca-tion. Particular caution is required in homes with small children.
478B-E-005A
E-4
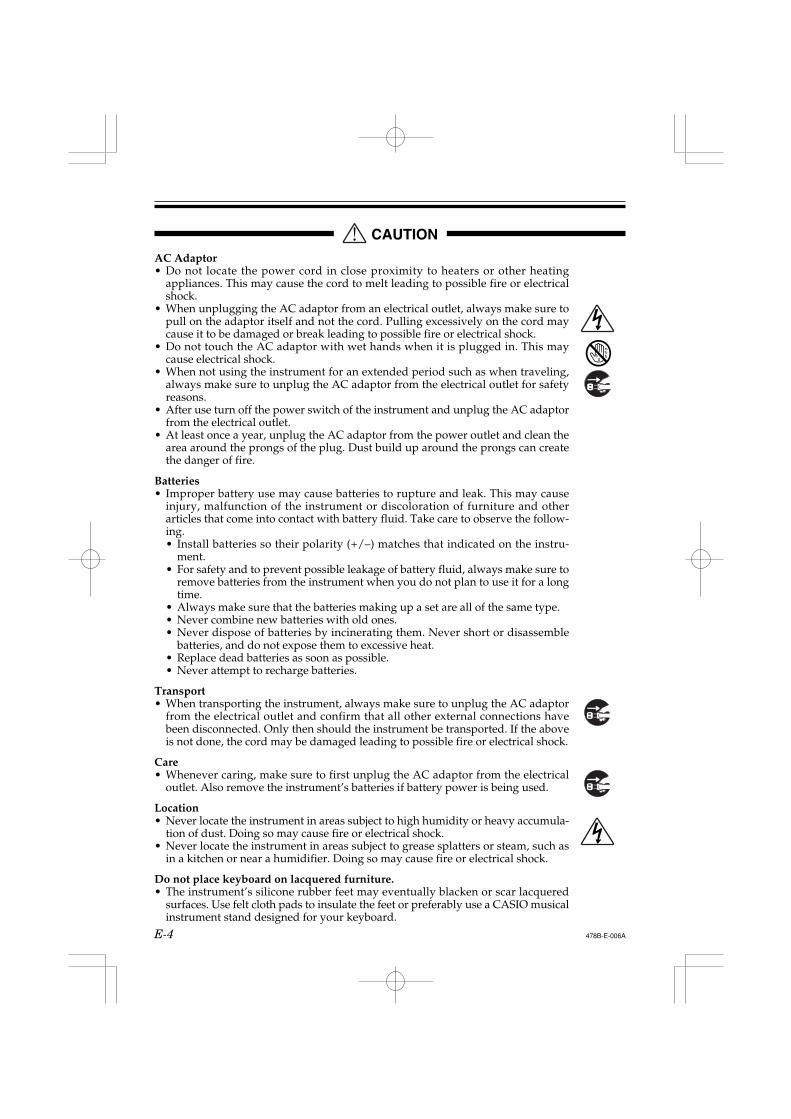
CAUTION
AC Adaptor• Do not locate the power cord in close proximity to heaters or other heating
appliances. This may cause the cord to melt leading to possible fire or electricalshock.
• When unplugging the AC adaptor from an electrical outlet, always make sure topull on the adaptor itself and not the cord. Pulling excessively on the cord maycause it to be damaged or break leading to possible fire or electrical shock.
• Do not touch the AC adaptor with wet hands when it is plugged in. This maycause electrical shock.
• When not using the instrument for an extended period such as when traveling,always make sure to unplug the AC adaptor from the electrical outlet for safetyreasons.
• After use turn off the power switch of the instrument and unplug the AC adaptorfrom the electrical outlet.
• At least once a year, unplug the AC adaptor from the power outlet and clean thearea around the prongs of the plug. Dust build up around the prongs can createthe danger of fire.
Batteries• Improper battery use may cause batteries to rupture and leak. This may cause
injury, malfunction of the instrument or discoloration of furniture and otherarticles that come into contact with battery fluid. Take care to observe the follow-ing.• Install batteries so their polarity (+/–) matches that indicated on the instru-
ment.• For safety and to prevent possible leakage of battery fluid, always make sure to
remove batteries from the instrument when you do not plan to use it for a longtime.
• Always make sure that the batteries making up a set are all of the same type.• Never combine new batteries with old ones.• Never dispose of batteries by incinerating them. Never short or disassemble
batteries, and do not expose them to excessive heat.• Replace dead batteries as soon as possible.• Never attempt to recharge batteries.
Transport• When transporting the instrument, always make sure to unplug the AC adaptor
from the electrical outlet and confirm that all other external connections havebeen disconnected. Only then should the instrument be transported. If the aboveis not done, the cord may be damaged leading to possible fire or electrical shock.
Care• Whenever caring, make sure to first unplug the AC adaptor from the electrical
outlet. Also remove the instrument’s batteries if battery power is being used.
Location• Never locate the instrument in areas subject to high humidity or heavy accumula-
tion of dust. Doing so may cause fire or electrical shock.• Never locate the instrument in areas subject to grease splatters or steam, such as
in a kitchen or near a humidifier. Doing so may cause fire or electrical shock.
Do not place keyboard on lacquered furniture.• The instrument’s silicone rubber feet may eventually blacken or scar lacquered
surfaces. Use felt cloth pads to insulate the feet or preferably use a CASIO musicalinstrument stand designed for your keyboard.
478B-E-006A
E-5
• You may not be able to see the keyboard keys light under direct sunlight or inother brightly lit areas.
Care of Your Keyboard
Avoid heat, humidity or direct sunlight.Do not overexpose the instrument to direct sunlight, or place it near an air conditioner,or in any extremely hot place.
Do not use near a TV or radio.This instrument can cause video or audio interference with TV and radio reception. Ifthis happens, move the instrument away from the TV or radio.
Do not use lacquer, thinner or similar chemicals for cleaning.Clean the keyboard with a soft cloth dampened in a weak solution of water and aneutral detergent. Soak the cloth in the solution and squeeze until it is almost dry.
Note• You may notice lines in the finish of the case of this keyboard. These lines are a result
of the molding process used to shape the plastic of the case. They are not cracks orbreaks in the plastic, and are no cause for concern.
478B-E-007A
Do not place heavy objects on the instrument.• Do not place heavy objects on the instrument. This may cause the instrument to
tip over or break resulting in injury.
Volume• Very high volume levels can damage hearing. Avoid using the instrument at very
high volume settings for long periods. Consult with a physician immediately ifyou experience impaired hearing or ringing in the ears.
Do not get onto the instrument or stand.• Do not crawl on top of the instrument or its optional stand. Particular caution is
required in homes having small children. This may cause the instrument or standto tip over and break resulting in injury.
Optional Stand (sold separately)• Carefully assemble the stand following the assembly instructions that come with
it. Securely tighten all bolts, nuts, and fasteners, and make sure that you mountthe instrument correctly onto the stand. Incorrectly or insufficiently tighteningscrews, or incorrectly mounting the instrument onto the stand can cause the standto tip over or the instrument to fall off the stand, possibly leading to injury.
Accessories and options• Use only accessories that come with the instrument or authorized CASIO options
(sold separately). Use of non-specified accessories or options may cause fire,electrical shock, or malfunction.
E-6
Contents
478B-E-008B
Welcome... ........................................................................................ E-1
Main Features ................................................................................... E-1
Safety Precautions ........................................................................... E-2
Care of Your Keyboard ................................................................... E-5
Contents ............................................................................................ E-6
Control Locations ............................................................................. E-8
Quick Reference ............................................................................ E-10
Connections ................................................................................... E-12Phones/Output Jack .......................................................................................... E-12
Accessories and Options ..................................................................................... E-13
Power Supply .................................................................................. E-14Using batteries ..................................................................................................... E-14
To load batteries ................................................................................................... E-14Important Battery Information ............................................................................ E-14
Using the AC Adaptor ........................................................................................ E-15
Auto Power Off .................................................................................................... E-16
Power On Alert .................................................................................................... E-16
To disable Auto Power Off and power on alert .............................................. E-16
Basic Operations ............................................................................ E-17To switch power on and off ............................................................................... E-17
To change tones ................................................................................................. E-17Keyboard split tones ............................................................................................. E-18Digital Sampling .................................................................................................... E-19Polyphony .............................................................................................................. E-19
Other Useful Functions ........................................................................................ E-19To change the key of the keyboard .................................................................. E-19To tune the keyboard .......................................................................................... E-20
Playing the demo tunes ..................................................................................... E-21To start demo tune play ....................................................................................... E-21To stop demo tune play ....................................................................................... E-21
Playing rhythms ................................................................................................... E-22To select and play a rhythm................................................................................ E-22
E-6
E-7478B-E-009A
Using auto-accompaniment ............................................................................. E-23About the accompaniment keyboard ............................................................. E-23Using the CASIO CHORD system ......................................................................... E-24To play a CASIO CHORD auto-accompaniment ............................................. E-24Using standard fingerings .................................................................................... E-25To play a FINGERED auto-accompaniment ...................................................... E-26
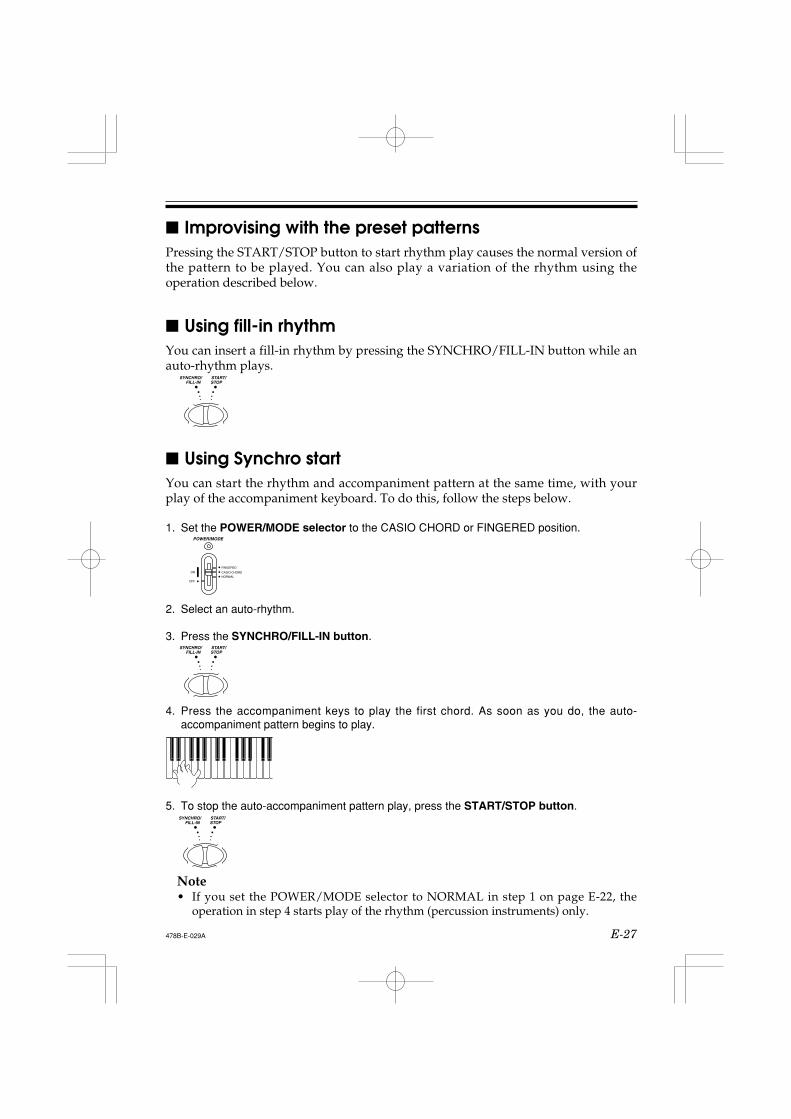
Improvising with the preset patterns ................................................................. E-27
Using fill-in rhythm ................................................................................................ E-27
Using Synchro start .............................................................................................. E-27
Three Step Lesson System.............................................................. E-28Using Three Step Lesson System ........................................................................ E-28
Three Step Lesson System Tempo Setting .......................................................... E-29To play a built-in Song Bank tune ....................................................................... E-29Using the Three Step Lesson System with Song Bank Tunes ............................. E-30How the Three Step Lesson System operates in Steps 1 through 3 ................. E-31Turning Off Key Lighting ....................................................................................... E-32Number of Simultaneously Lit Keys ..................................................................... E-32To change the tone used for the melody of a Song Bank tune ..................... E-32
Step 1: Easy Play .................................................................................................. E-33
Step 2: Slow Play ................................................................................................. E-33
Step 3: Normal Play ............................................................................................. E-34
To practice the left hand part ........................................................................... E-35To check if the right hand or left hand part is currently selected(two-hand tunes only) .......................................................................................... E-35
MIDI ................................................................................................. E-36What is MIDI? ....................................................................................................... E-36
MIDI Connections ................................................................................................. E-36MIDI Channels ....................................................................................................... E-37
General MIDI ....................................................................................................... E-37Messages ............................................................................................................... E-37
Technical Reference...................................................................... E-41Troubleshooting ................................................................................................... E-41
Specifications ...................................................................................................... E-43
Appendix ......................................................................................... A-1GM Tone Map List ................................................................................................ A-1
Rhythm List ............................................................................................................ A-3
Fingered Chord Charts ........................................................................................ A-4
MIDI Implementation ChartE-7
E-8
POWER/MODE
VOLUMEFILL-IN
SYNCHRO/STOP
FINGERED
CASIO CHORD
NORMAL
ON
OFF
START/
TEMPO KEY LIGHT
ONE KEY PLAY
NUMBER
3-STEP LESSON
DEMO
STEP 2
STEP 1 STEP 3
RHYTHM
TONETUNE
0
1
4
7
2
5
8
3
6
9
:VALUE UP
:VALUE DOWN
TRANSPOSE
SONG BANK
TEMPO
TEMPO
NUMBER
3-STEP LESSON
DEMO
STEP 2
STEP 1 STEP 3
RHYTHM
TONETUNE
0
1
4
7
2
5
8
3
6
9
:VALUE UP
:VALUE DOWN
TRANSPOSE
SONG BANK
TEMPO
TEMPO
POWER/MODE
VOLUMEFILL-IN
SYNCHRO/STOP
FINGERED
CASIO CHORD
NORMAL
ON
OFF
START/
TEMPO KEY LIGHT
ONE KEY PLAY
PHONES/OUTPUT
DC 9VOUT MIDI IN
SR
T U
1 32 6 7 8 9 B CD E FG
IHA5 04
J K M
L
* PNQ QO
V W
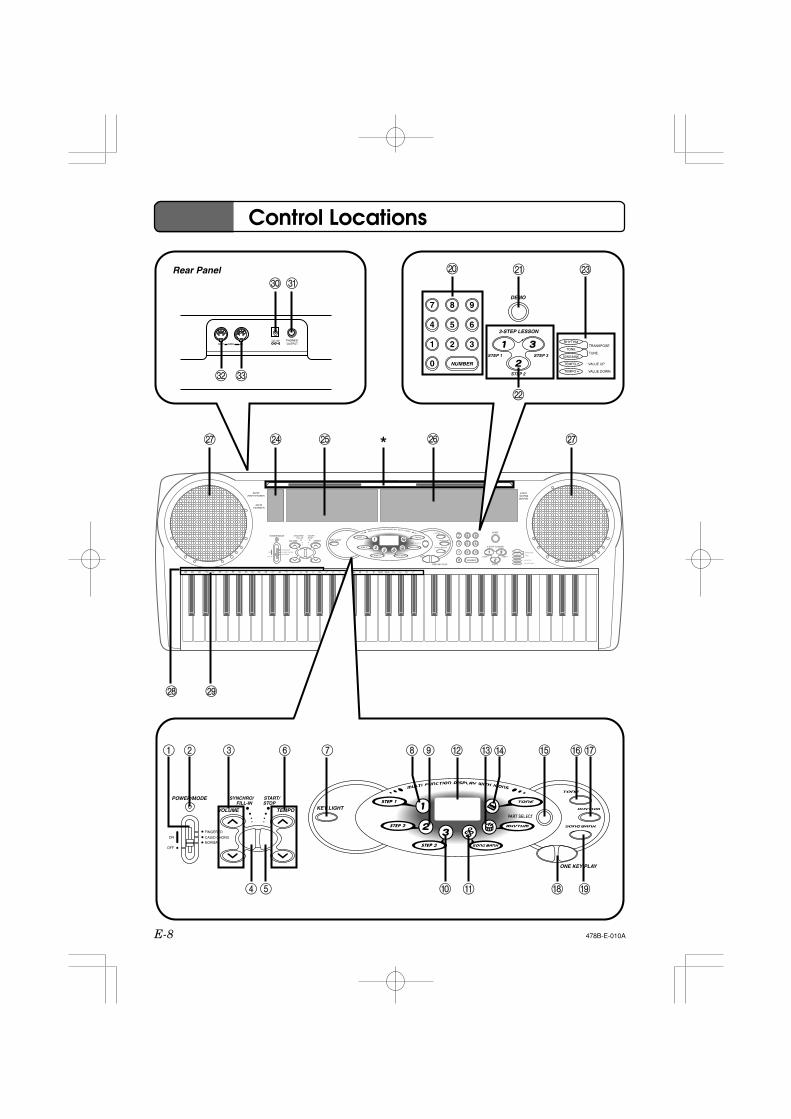
Control Locations
478B-E-010A
Rear Panel
E-9
* Attachment of Score StandInsert the score stand into the slot at the top of the keyboard as shown in theillustration.
11111 POWER/MODE selector
22222 Power indicator
33333 VOLUME buttons
44444 SYNCHRO/FILL-IN button
55555 START/STOP button
66666 TEMPO buttons
77777 KEY LIGHT button
88888 STEP 1 icon
99999 STEP 2 icon
00000 STEP 3 icon
AAAAA SONG BANK icon
BBBBB Display
CCCCC RHYTHM icon
DDDDD TONE icon
EEEEE PART SELECT button
FFFFF TONE button
GGGGG RHYTHM button
HHHHH ONE KEY PLAY buttons
IIIII SONG BANK button
478B-E-011A
JJJJJ Number buttons
KKKKK DEMO button
LLLLL 3-STEP LESSON buttons
MMMMM TRANSPOSE/TUNE operationguide
NNNNN 100 RHYTHMS listSee “Rhythm List” on page A-3 for de-tails.
OOOOO 100 TONES list
PPPPP 100 SONG BANK list
QQQQQ Speakers
RRRRR CHORD ROOT NAMES
SSSSS Percussion instrument list
TTTTT DC 9V jack
UUUUU PHONES/OUTPUT jackFor connection of commercially avail-able headphones. Output from thespeakers is automatically cut whenheadphones are connected.
VVVVV MIDI OUT terminal
WWWWW MIDI IN terminal

E-10
POWER/MODE
VOLUMEFILL-IN
SYNCHRO/STOP
FINGERED
CASIO CHORD
NORMAL
ON
OFF
START/
TEMPO KEY LIGHT
ONE KEY PLAY
NUMBER
STEP
0
1
4
7
2
5
8
3
6
9
5
4
1 2Set the POWER/MODE selector to NORMAL.
Play the melody part on the keyboard.
<If you pressed the STEP 1 button in ...>Play the notes with the ONE KEY PLAY buttons.• The accompaniment tempo automatically adjusts to play
along with your melody.
<If you pressedPlay the notes o• Keep the key d• If you selected goes out as soo• The key that co you need to pla• After you press
accompanimen
Press the SONG BANK button.
3Find the tune yoSong Bank list, number buttonnumber.• To select “20 AM
[2] and the [0].
POWER/MODE
FINGERED
CASIO CHORD
NORMAL
ON
OFF SONG BANK icon lights.
ONE KEY PLAY
Quick Reference
This section provides a quick overview of keyboard operation using steps one andtwo of the 3-step lesson feature. See page E-28 for detailed explanations of these steps.
478B-E-012A

E-11
EFILL-INNCHRO/
STOPSTART/
TEMPO KEY LIGHT
ONE KEY PLAY
NUMBER
3-STEP LESSON
DEMO
STEP 2
STEP 1 STEP 3
RHYTHM
TONETUNE
0
1
4
7
2
5
8
3
6
9
:VALUE UP
:VALUE DOWN
TRANSPOSE
SONG BANK
TEMPO
TEMPO
4
ons. to play
<If you pressed the STEP 2 button in ...>Play the notes on the keyboard, pressing keys as they light.• Keep the key depressed as long as it stays lit.• If you selected any song from number 85 through 99, the lit key goes out as soon as you press it.• The key that corresponds to the next note you need to play will flash.• After you press the correct melody key,
accompaniment proceeds to the next note.
4Press the STEP 1 button or STEP 2 button.• When you do, the STEP 1 icon
or STEP 2 icon lights.• The keyboard sounds a count
beat and waits for you to play something on the keyboard. The keys that you need to pressfirst flash.
3Find the tune you want to play in the Song Bank list, and then use the number buttons to input its two-digit number.• To select “20 AMAZING GRACE”, input
[2] and the [0].ghts.
NUMBER0
1
4
7
2
5
8
3
6
9
3-STEP LESSON
STEP 2
STEP 1 STEP 3
478B-E-013A

E-12
Phones/Output JackBefore connecting headphones or other external equipment, be sure to first turndown the volume settings of the keyboard and the connected equipment. You canthen adjust volume to the desired level after connections are complete.
[Rear Panel]
PHONES/OUTPUT
DC 9VOUT MIDI IN
LEFT RIGHTAUX IN or similar terminal
of audio amplifier
White Red PIN plug
Standard plug
PHONES/OUTPUT Jack
Keyboard amp,guitar amp,etc.
1
2
3
Connecting Headphones (Figure 1)Connecting headphones cuts off output from the keyboard’s built-in speakers, so youcan play even late at night without disturbing anyone.
Audio Equipment (Figure 2)Connect the keyboard to an audio equipment using a commercially available con-necting cord with a standard plug on one end and two PIN plugs on the other end. Inthis configuration, you normally set the input selector of the audio equipment to theterminal (usually marked AUX IN or something similar) where the cord from thekeyboard is connected. See the user documentation that comes with your audioequipment for full details.
Musical Instrument Amplifier (Figure 3)Use a commercially available connecting cord to connect the keyboard to a musicalinstrument amplifier.
Note• Be sure to use a connecting cord that has standard plugs on the ends you connect to
the keyboard and amplifier.
Connections
478B-E-014B
E-13478B-E-015B
Keyboard or guitar amp
To keyboard’s PHONES/OUTPUT jack
Standard plug
INPUT
Connection Example
Accessories and OptionsUse only the accessories and options specified for this keyboard. Use of non-author-ized items creates the danger of fire, electrical shock, and personal injury.
E-14
Power Supply
This keyboard can be powered by current from a standard household wall outlet(using the specified AC adaptor) or by batteries. Always make sure you turn thekeyboard off whenever you are not using it.
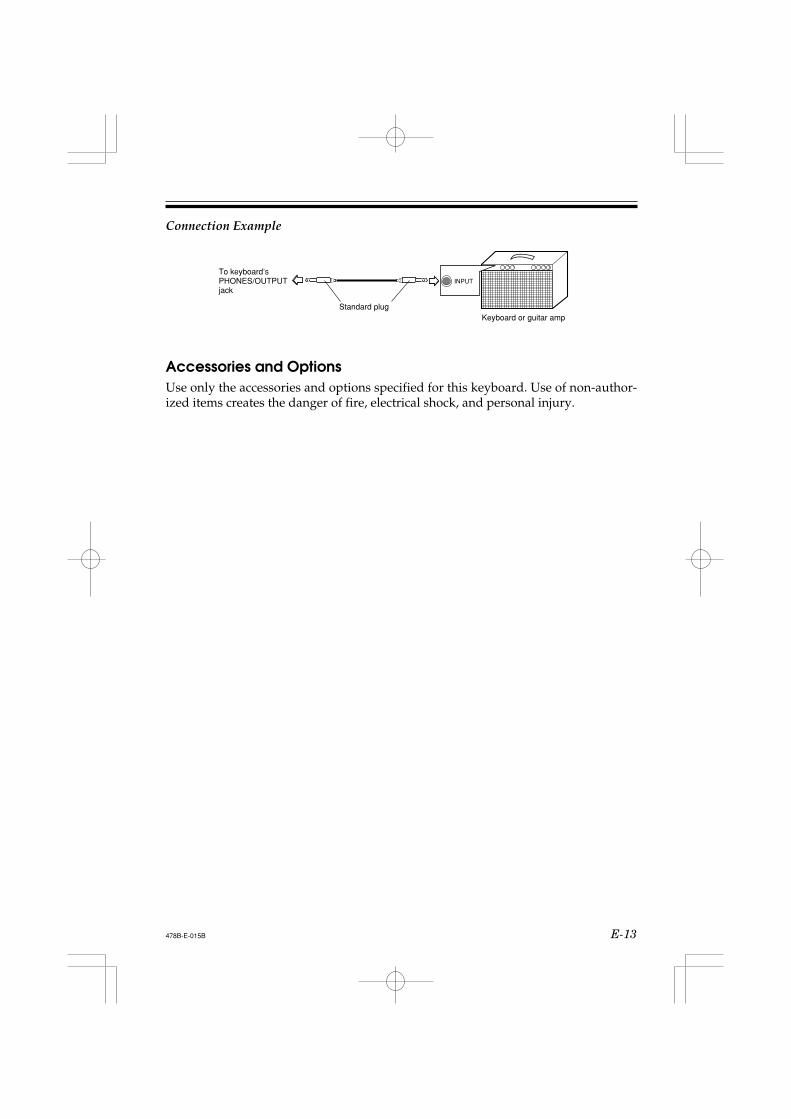
Using batteriesAlways make sure you turn off the keyboard before loading or replacing batteries.
To load batteries1. Remove the battery compartment cover.2. Load 6 AA-size batteries into the battery compartment.
• Make sure that the positive (+) and negative (–) endsare facing correctly.
3. Insert the tabs on the battery compartment cover into theholes provided and close the cover.
The keyboard may not function correctly if you load or replace batteries with powerturned on. If this happens, turning the keyboard off and then back on again shouldreturn functions back to normal.
Important Battery Information The following shows the approximate battery life provided by different battery
types.• Standard battery life: Approximately 1 hour (SUM3/R6P)
Approximately 4 hours (AM3/LR6)Both of the above values are standard battery life at normal temperature, with thekeyboard volume at a medium setting. Temperature extremes or playing at veryloud volume settings can shorten battery life.
Any of the following symptoms indicate low battery power. Replace batteries assoon as possible whenever any of the following occurs.• Dim power supply indicator• Instrument does not turn on• Dim, difficult to read display• Abnormally low speaker/headphone volume• Distortion of sound output• Occasional interruption of sound when playing at high volumes• Sudden power failure when playing at high volumes• Dimming of the display when playing at high volume• Abnormal rhythm pattern and demo tune play• Dimming of keyboard lights when notes sound• Loss of power, sound distortion, or low volume when playing from a con-
nected computer or MIDI device
478B-E-016A
E-15
Important!Improper handling of batteries can cause them to burst and leak, which creates thedanger of personal injury or damage due to contact with battery acid. Be sure to note thefollowing important precautions.• Always make sure that the positive (+) and negative (–) poles are facing correctly as
indicated inside the battery compartment.• To avoid damage caused by leaking batteries, be sure to remove batteries from the
keyboard whenever you leave it unattended for long periods (such as when leavingon a trip).
• Never mix batteries of different types.• Never mix old batteries with new ones.• Never discard batteries by incinerating them, do not allow their poles to be shorted
(connected to each other), never take batteries apart, and do not expose batteries todirect heat.
• Replace batteries as soon as possible after any sign they are getting weak.• Never attempt to recharge batteries.
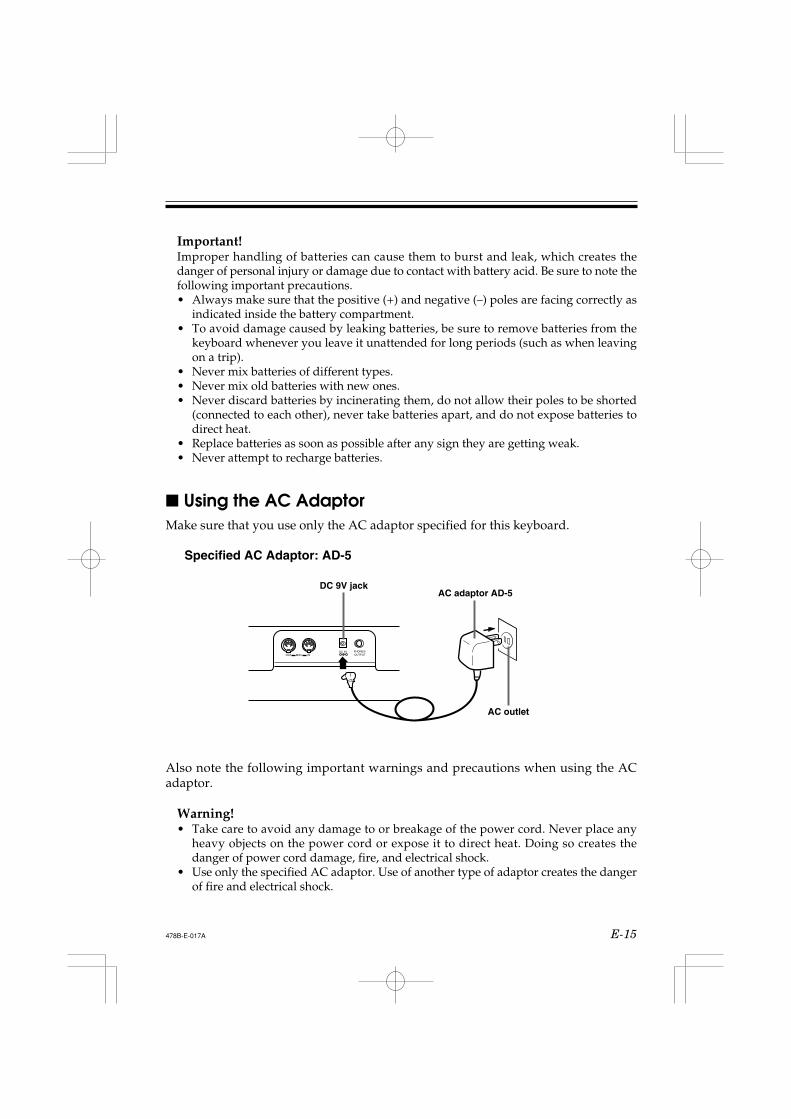
Using the AC AdaptorMake sure that you use only the AC adaptor specified for this keyboard.
Specified AC Adaptor: AD-5
Also note the following important warnings and precautions when using the ACadaptor.
Warning!• Take care to avoid any damage to or breakage of the power cord. Never place any
heavy objects on the power cord or expose it to direct heat. Doing so creates thedanger of power cord damage, fire, and electrical shock.
• Use only the specified AC adaptor. Use of another type of adaptor creates the dangerof fire and electrical shock.
PHONES/OUTPUT
DC 9VOUT MIDI IN
AC adaptor AD-5
AC outlet
DC 9V jack
478B-E-017A
E-16
Caution!• For safety sake, be sure to unplug the AC adaptor from the wall outlet whenever
leaving the keyboard unattended for a long time (such as when leaving on a trip).• Always turn off the keyboard and unplug the AC adaptor from the wall outlet when
you are not using the keyboard.
Important!• Make sure that the keyboard is turned off before connecting or disconnecting the AC
adaptor.• Using the AC adaptor for a long time can cause it to become warm to the touch. This
is normal and does not indicate malfunction.
Auto Power OffWhen you are using battery power, keyboard power turns off automatically when-ever you leave it on without performing any operation for about 6 minutes. Whenthis happens, move the POWER/MODE selector to the OFF position and then back toNORMAL, CASIO CHORD, or FINGERED to turn power back on.
Note• Auto Power Off is disabled (it does not function) when you are using the AC adaptor
to power the keyboard.
Power On AlertKeyboard keys light to alert you if you leave power on and do not perform anyoperation for about 6 minutes. Note that keys light only, and no sound is produced.When this happens, press any button or keyboard key to clear the power on alert.
Note• Power on alert operates only when you are powering the keyboard using the AC
adaptor. It does not operate when you are using batteries.
To disable Auto Power Off and power on alertHold down the TONE button while turning on the keyboard to disable Auto PowerOff and power on alert.• When these functions are turned off, the keyboard does not turn off automatically
and no alert is performed no matter how long it is left with no operation beingperformed.
• Auto Power Off and power on alert are enabled again when you manually turn offpower and then turn it back on again.
478B-E-018A
E-17
This part of the manual provides you with the basic information you need to use yourkeyboard.
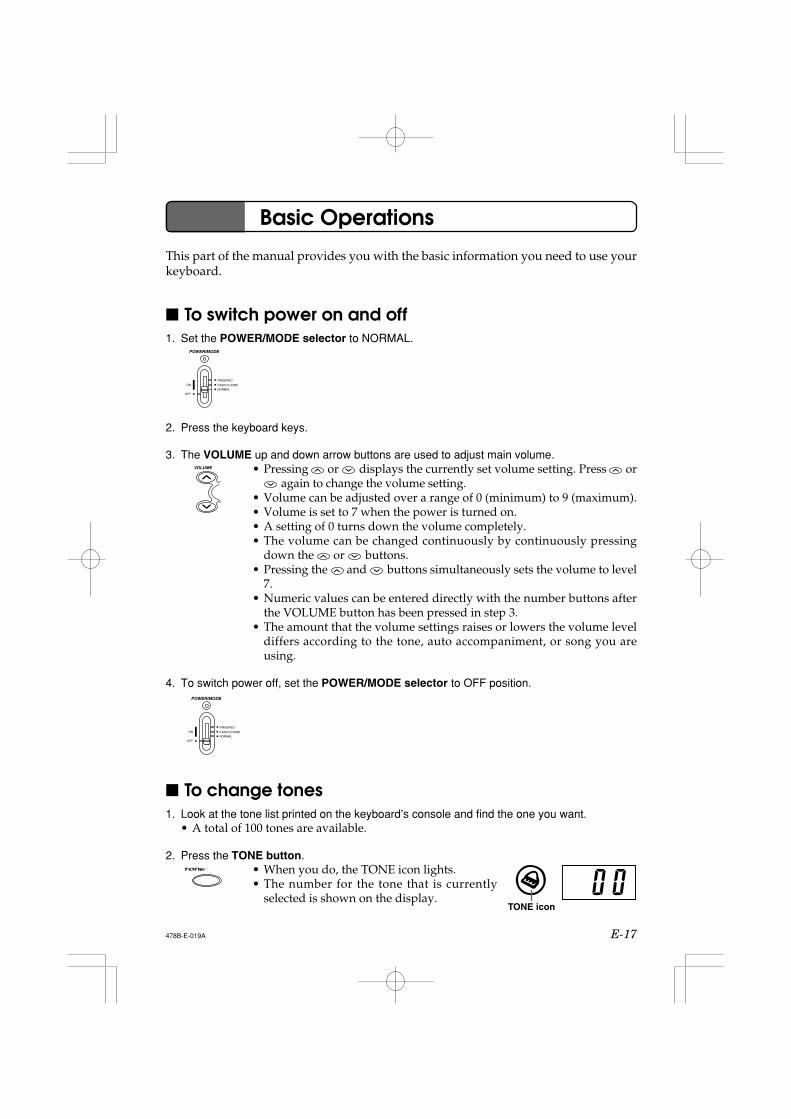
To switch power on and off1. Set the POWER/MODE selector to NORMAL.
2. Press the keyboard keys.
3. The VOLUME up and down arrow buttons are used to adjust main volume.• Pressing or displays the currently set volume setting. Press or
again to change the volume setting.• Volume can be adjusted over a range of 0 (minimum) to 9 (maximum).• Volume is set to 7 when the power is turned on.• A setting of 0 turns down the volume completely.• The volume can be changed continuously by continuously pressing
down the or buttons.• Pressing the and buttons simultaneously sets the volume to level
7.• Numeric values can be entered directly with the number buttons after
the VOLUME button has been pressed in step 3.• The amount that the volume settings raises or lowers the volume level
differs according to the tone, auto accompaniment, or song you areusing.
4. To switch power off, set the POWER/MODE selector to OFF position.
To change tones1. Look at the tone list printed on the keyboard’s console and find the one you want.
• A total of 100 tones are available.
2. Press the TONE button.• When you do, the TONE icon lights.• The number for the tone that is currently
selected is shown on the display.
Basic Operations
478B-E-019A
POWER/MODE
FINGERED
CASIO CHORD
NORMAL
ON
OFF
VOLUME
POWER/MODE
FINGERED
CASIO CHORD
NORMAL
ON
OFF
TONE icon
E-18
3. Use the number buttons to input the 2-digit number that identifies the tone you want toselect.
• Always enter two digits for the tone number. If you enter only onedigit, the display will automatically return to the previous tone numbersetting after a few seconds.
• If you change the tone setting while a keyboard key is depressed, thetone does not change until you release the key and press a keyboardkey again.
• With certain tones (such as percussion sounds and sound effects), theremay be very little or no change at all in the pitch, no matter whichkeyboard key you press.
• If you input the wrong first digit for a tone number, you can return tothe previous setting by pressing the TONE button.
Keyboard split tonesSome of the preset tones split the keyboard and assign two or more sounds. Withsuch a preset tone, the sound produced depends on what position of the keyboardyou play. For example, BASS/PIANO (tone 90) puts BASS on the left and PIANO onthe right of the keyboard.
<Example>
BASS/PIANO (No.90)
BASS PIANO
PERCUSSION (No.99)• PERCUSSION (tone 99) assigns 35 percussion sound to the keyboard as illustrated
below. The sound assigned to each key are indicated above the keyboard.
478B-E-020A
NUMBER0
1
4
7
2
5
8
3
6
9
BASS DRUM
SIDE STICK
ACOUSTIC SNARE
HAND CLAP
ELECTRIC SNARE
LOW FLOOR TOM
CLOSED HI-HAT
HIGH FLOOR TOM
PEDAL HI-HAT
LOW TOM
OPEN HI-HAT
LOW MID TOM
L
H
HIGH MID TOM
CRASH CYMBAL 1
HIGH TOM
RIDE CYMBAL 1
CHINESE CYMBAL
RIDE BELL
TAMBOURINE
SPLASH CYMBAL
COWBELL
CRASH CYMBAL 2
CLAVES
RIDE CYMBAL 2
HIGH BONGO
LOW BONGO
MUTE HIGH CONGA
OPEN HIGH CONGA
LOW CONGA
HIGH TIMBALES
LOW TIMBALES
HIGH AGOGO
LOW AGOGO
CABASA
MARACAS
E-19
• There are no sounds assigned to any keyboard keys from B4 onward when the “99PERCUSSION” tone is selected.
Digital SamplingA number of the tones that are available with this keyboard have been recorded andprocessed using a technique called digital sampling. To ensure a high level of totalquality, samples are taken in the low, mid, and high ranges and then combined toprovide you with sounds that are amazingly close to the originals. You may noticevery slight differences in volume or sound quality for some tones when you playthem at different positions on the keyboard. This is an unavoidable result of multiplesampling, and it is not a sign of malfunction.
PolyphonyThe term polyphony refers to the maximum number of notes you can play at thesame time. This keyboard has 12-note polyphony, which includes the notes you playas well as the rhythms and auto-accompaniment patterns that are played by thekeyboard. This means that when a rhythm or auto-accompaniment pattern is beingplayed by the keyboard, the number of notes (polyphony) available for keyboardplay is reduced. Also note that some of the tones offer only 6-note polyphony.
• When rhythm or auto accompaniment is playing, the number of sounds simultane-ously played is reduced.
• Though you can sound up to 12 notes at one time, only the last four keyboard keyspressed light up.
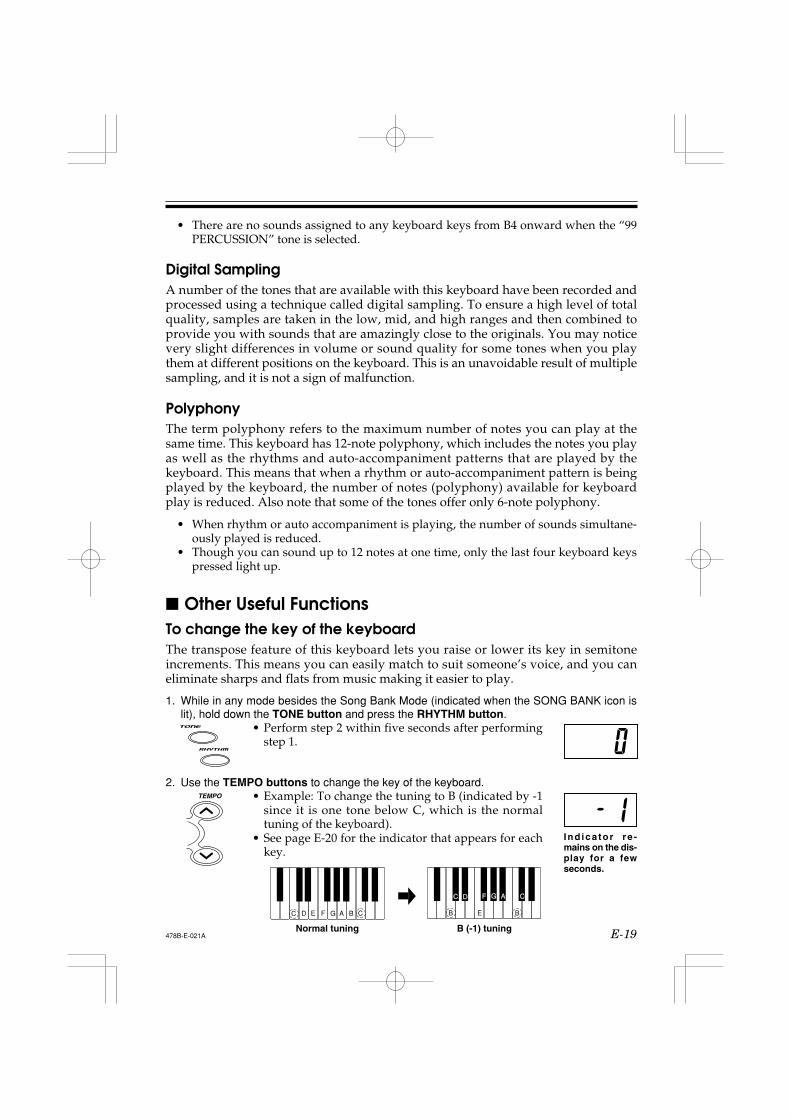
Other Useful FunctionsTo change the key of the keyboardThe transpose feature of this keyboard lets you raise or lower its key in semitoneincrements. This means you can easily match to suit someone’s voice, and you caneliminate sharps and flats from music making it easier to play.
1. While in any mode besides the Song Bank Mode (indicated when the SONG BANK icon islit), hold down the TONE button and press the RHYTHM button.
• Perform step 2 within five seconds after performingstep 1.
2. Use the TEMPO buttons to change the key of the keyboard.• Example: To change the tuning to B (indicated by -1
since it is one tone below C, which is the normaltuning of the keyboard).
• See page E-20 for the indicator that appears for eachkey.
I nd ica to r re -mains on the dis-play for a fewseconds.
478B-E-021A
D F G A
B
C
B
C
EC D E F G A B C
B (-1) tuningNormal tuning
TEMPO
E-20
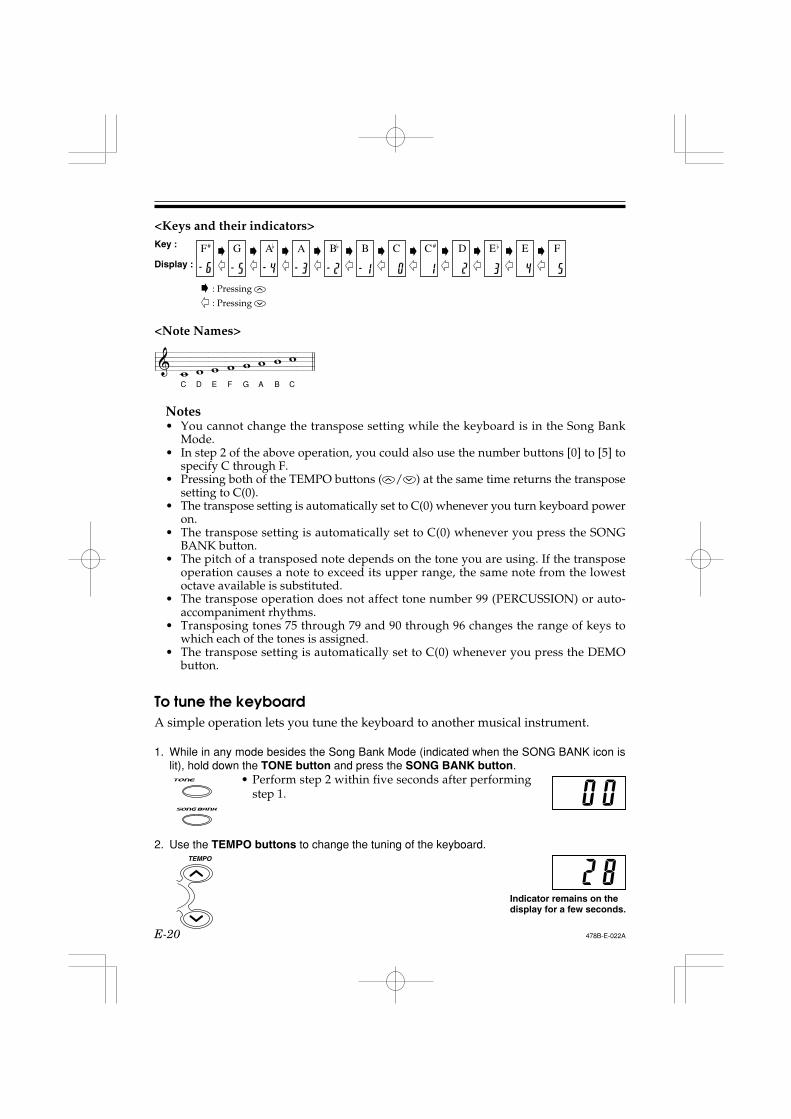
<Keys and their indicators>
<Note Names>
Notes• You cannot change the transpose setting while the keyboard is in the Song Bank
Mode.• In step 2 of the above operation, you could also use the number buttons [0] to [5] to
specify C through F.• Pressing both of the TEMPO buttons ( / ) at the same time returns the transpose
setting to C(0).• The transpose setting is automatically set to C(0) whenever you turn keyboard power
on.• The transpose setting is automatically set to C(0) whenever you press the SONG
BANK button.• The pitch of a transposed note depends on the tone you are using. If the transpose
operation causes a note to exceed its upper range, the same note from the lowestoctave available is substituted.
• The transpose operation does not affect tone number 99 (PERCUSSION) or auto-accompaniment rhythms.
• Transposing tones 75 through 79 and 90 through 96 changes the range of keys towhich each of the tones is assigned.
• The transpose setting is automatically set to C(0) whenever you press the DEMObutton.
To tune the keyboardA simple operation lets you tune the keyboard to another musical instrument.
1. While in any mode besides the Song Bank Mode (indicated when the SONG BANK icon islit), hold down the TONE button and press the SONG BANK button.
• Perform step 2 within five seconds after performingstep 1.
2. Use the TEMPO buttons to change the tuning of the keyboard.
Indicator remains on thedisplay for a few seconds.
478B-E-022A
B
C D E F G A C
F# G A B C D E FA B C# E Key :
Display :
: Pressing
: Pressing
TEMPO
E-21
Notes• In step 2 of the above procedure, you could also use the number buttons to input a
value from 00 to 50.• Pressing both of the TEMPO buttons ( / ) at the same time returns the tuning
setting to 00.• Pressing the SONG BANK button changes the tuning setting to 00.• The tuning setting does not affect any of Song Bank tunes.• You can tune the keyboard within a range of approximately ±50 cents (100 cents = 1
semitone).• The tuning setting is automatically set to 00 whenever you turn the keyboard on.• Pressing the DEMO button changes the tuning setting to 00.• The tuning operation does not affect rhythm (percussion).
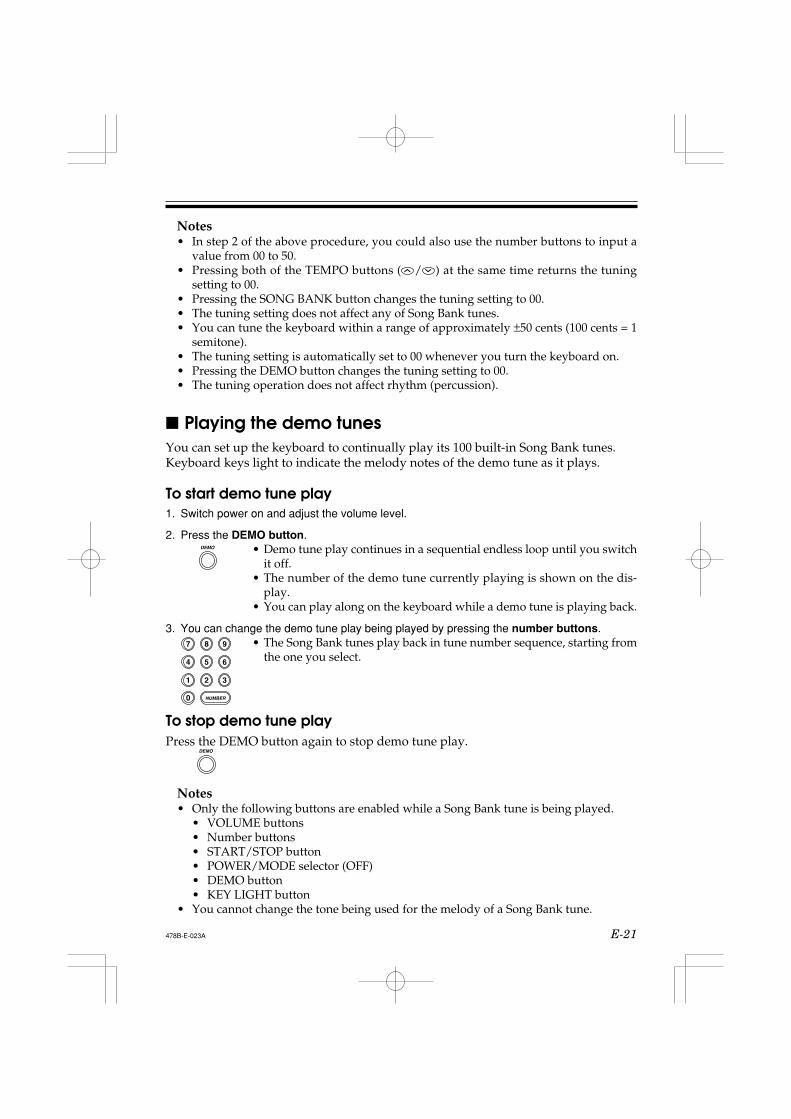
Playing the demo tunesYou can set up the keyboard to continually play its 100 built-in Song Bank tunes.Keyboard keys light to indicate the melody notes of the demo tune as it plays.
To start demo tune play1. Switch power on and adjust the volume level.
2. Press the DEMO button.• Demo tune play continues in a sequential endless loop until you switch
it off.• The number of the demo tune currently playing is shown on the dis-
play.• You can play along on the keyboard while a demo tune is playing back.
3. You can change the demo tune play being played by pressing the number buttons.• The Song Bank tunes play back in tune number sequence, starting from
the one you select.
To stop demo tune playPress the DEMO button again to stop demo tune play.
478B-E-023A
DEMO
NUMBER0
1
4
7
2
5
8
3
6
9
DEMO
Notes• Only the following buttons are enabled while a Song Bank tune is being played.
• VOLUME buttons• Number buttons• START/STOP button• POWER/MODE selector (OFF)• DEMO button• KEY LIGHT button
• You cannot change the tone being used for the melody of a Song Bank tune.
E-22
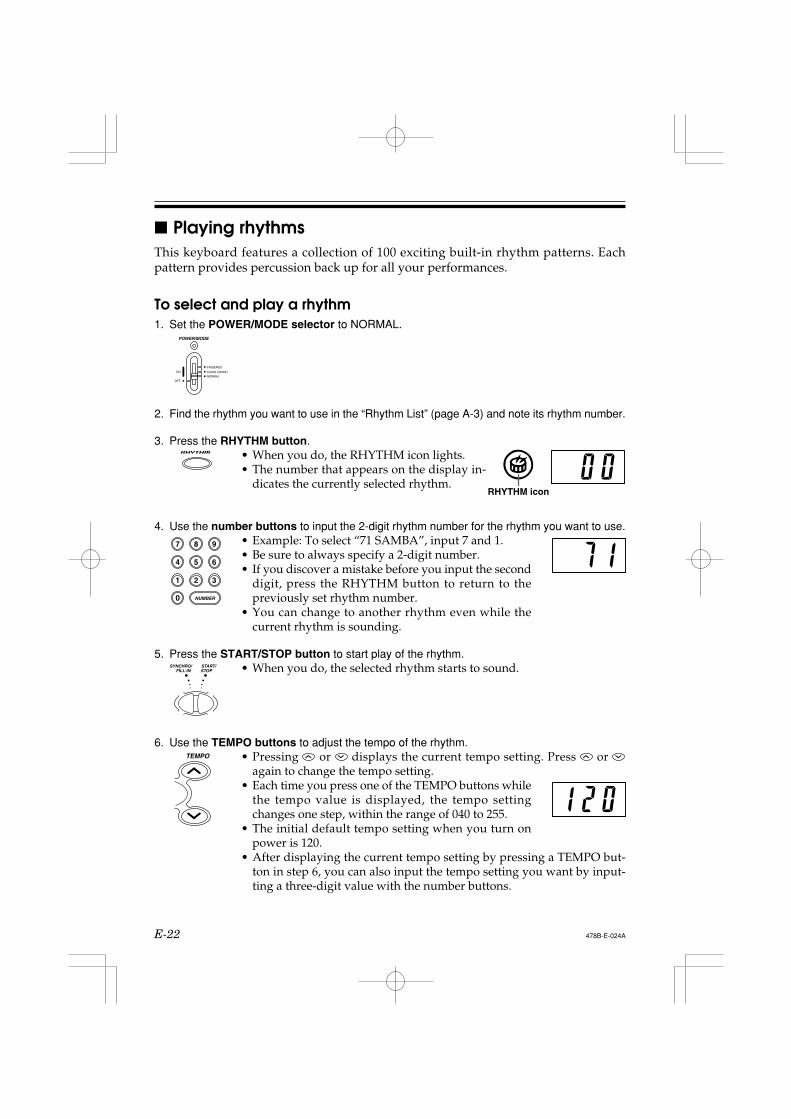
Playing rhythmsThis keyboard features a collection of 100 exciting built-in rhythm patterns. Eachpattern provides percussion back up for all your performances.
To select and play a rhythm1. Set the POWER/MODE selector to NORMAL.
2. Find the rhythm you want to use in the “Rhythm List” (page A-3) and note its rhythm number.
3. Press the RHYTHM button.• When you do, the RHYTHM icon lights.• The number that appears on the display in-
dicates the currently selected rhythm.
4. Use the number buttons to input the 2-digit rhythm number for the rhythm you want to use.• Example: To select “71 SAMBA”, input 7 and 1.• Be sure to always specify a 2-digit number.• If you discover a mistake before you input the second
digit, press the RHYTHM button to return to thepreviously set rhythm number.
• You can change to another rhythm even while thecurrent rhythm is sounding.
5. Press the START/STOP button to start play of the rhythm.• When you do, the selected rhythm starts to sound.
6. Use the TEMPO buttons to adjust the tempo of the rhythm.• Pressing or displays the current tempo setting. Press or
again to change the tempo setting.• Each time you press one of the TEMPO buttons while
the tempo value is displayed, the tempo settingchanges one step, within the range of 040 to 255.
• The initial default tempo setting when you turn onpower is 120.
• After displaying the current tempo setting by pressing a TEMPO but-ton in step 6, you can also input the tempo setting you want by input-ting a three-digit value with the number buttons.
478B-E-024A
POWER/MODE
FINGERED
CASIO CHORD
NORMAL
ON
OFF
NUMBER0
1
4
7
2
5
8
3
6
9
FILL-INSYNCHRO/
STOPSTART/
TEMPO
RHYTHM icon
E-23
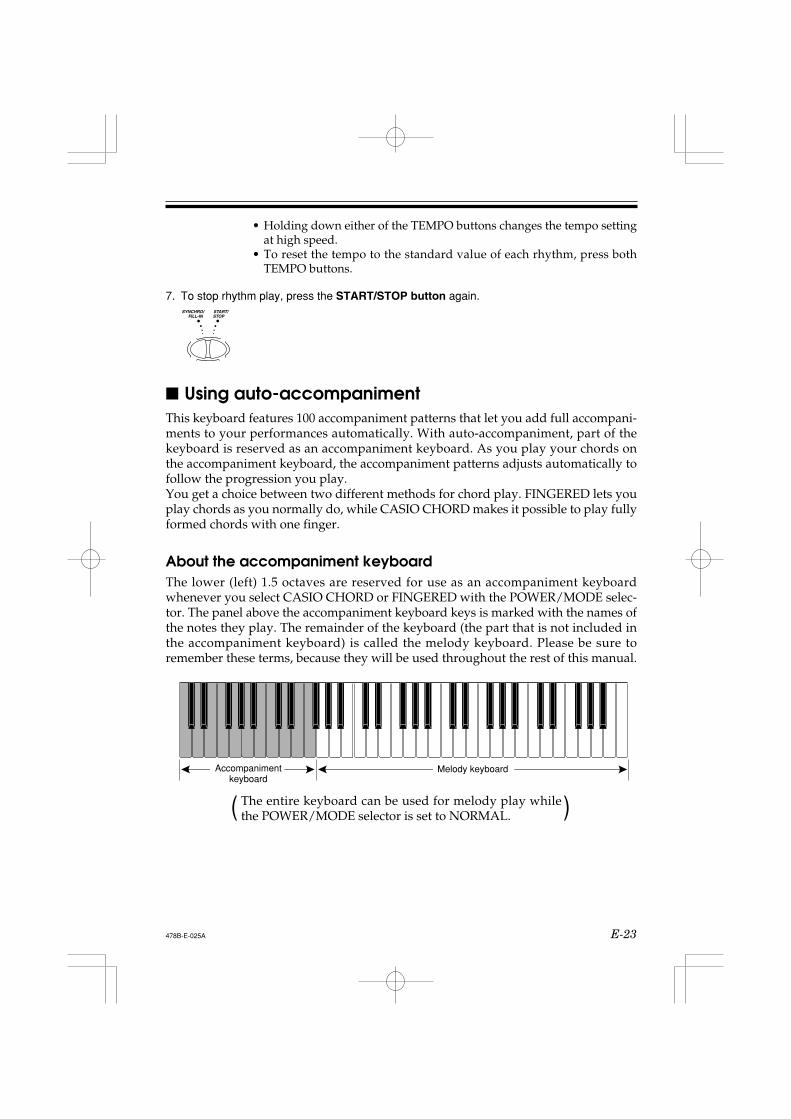
Using auto-accompanimentThis keyboard features 100 accompaniment patterns that let you add full accompani-ments to your performances automatically. With auto-accompaniment, part of thekeyboard is reserved as an accompaniment keyboard. As you play your chords onthe accompaniment keyboard, the accompaniment patterns adjusts automatically tofollow the progression you play.You get a choice between two different methods for chord play. FINGERED lets youplay chords as you normally do, while CASIO CHORD makes it possible to play fullyformed chords with one finger.
About the accompaniment keyboardThe lower (left) 1.5 octaves are reserved for use as an accompaniment keyboardwhenever you select CASIO CHORD or FINGERED with the POWER/MODE selec-tor. The panel above the accompaniment keyboard keys is marked with the names ofthe notes they play. The remainder of the keyboard (the part that is not included inthe accompaniment keyboard) is called the melody keyboard. Please be sure toremember these terms, because they will be used throughout the rest of this manual.
• Holding down either of the TEMPO buttons changes the tempo settingat high speed.
• To reset the tempo to the standard value of each rhythm, press bothTEMPO buttons.
7. To stop rhythm play, press the START/STOP button again.
478B-E-025A
FILL-INSYNCHRO/
STOPSTART/
Accompanimentkeyboard
Melody keyboard
The entire keyboard can be used for melody play whilethe POWER/MODE selector is set to NORMAL. ( )
E-24
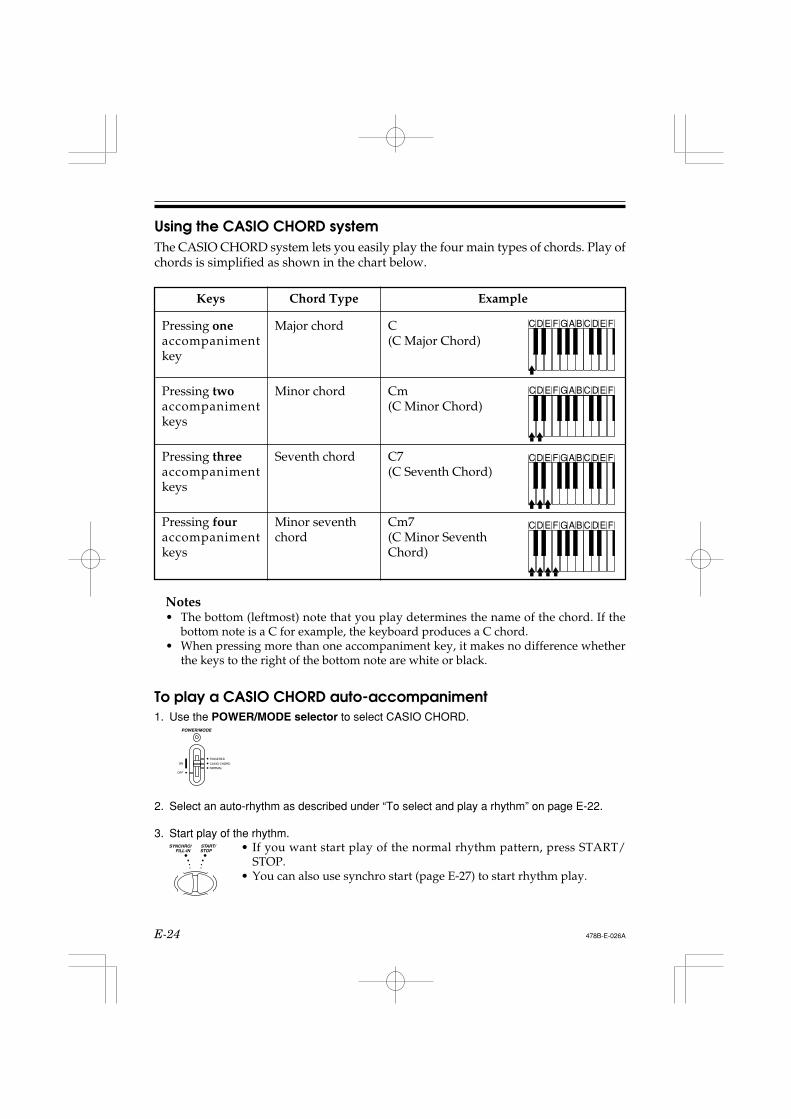
Using the CASIO CHORD systemThe CASIO CHORD system lets you easily play the four main types of chords. Play ofchords is simplified as shown in the chart below.
Notes• The bottom (leftmost) note that you play determines the name of the chord. If the
bottom note is a C for example, the keyboard produces a C chord.• When pressing more than one accompaniment key, it makes no difference whether
the keys to the right of the bottom note are white or black.
To play a CASIO CHORD auto-accompaniment1. Use the POWER/MODE selector to select CASIO CHORD.
2. Select an auto-rhythm as described under “To select and play a rhythm” on page E-22.
3. Start play of the rhythm.• If you want start play of the normal rhythm pattern, press START/
STOP.• You can also use synchro start (page E-27) to start rhythm play.
478B-E-026A
POWER/MODE
FINGERED
CASIO CHORD
NORMAL
ON
OFF
FILL-INSYNCHRO/
STOPSTART/
Pressing oneaccompanimentkey
Pressing twoaccompanimentkeys
Pressing threeaccompanimentkeys
Pressing fouraccompanimentkeys
C(C Major Chord)
Cm(C Minor Chord)
C7(C Seventh Chord)
Cm7(C Minor SeventhChord)
Keys Chord Type Example
Major chord
Minor chord
Seventh chord
Minor seventhchord
CD E F GAB C DE F
CD E F GAB C DE F
CD E F GAB C DE F
CD E F GAB C DE F
E-25
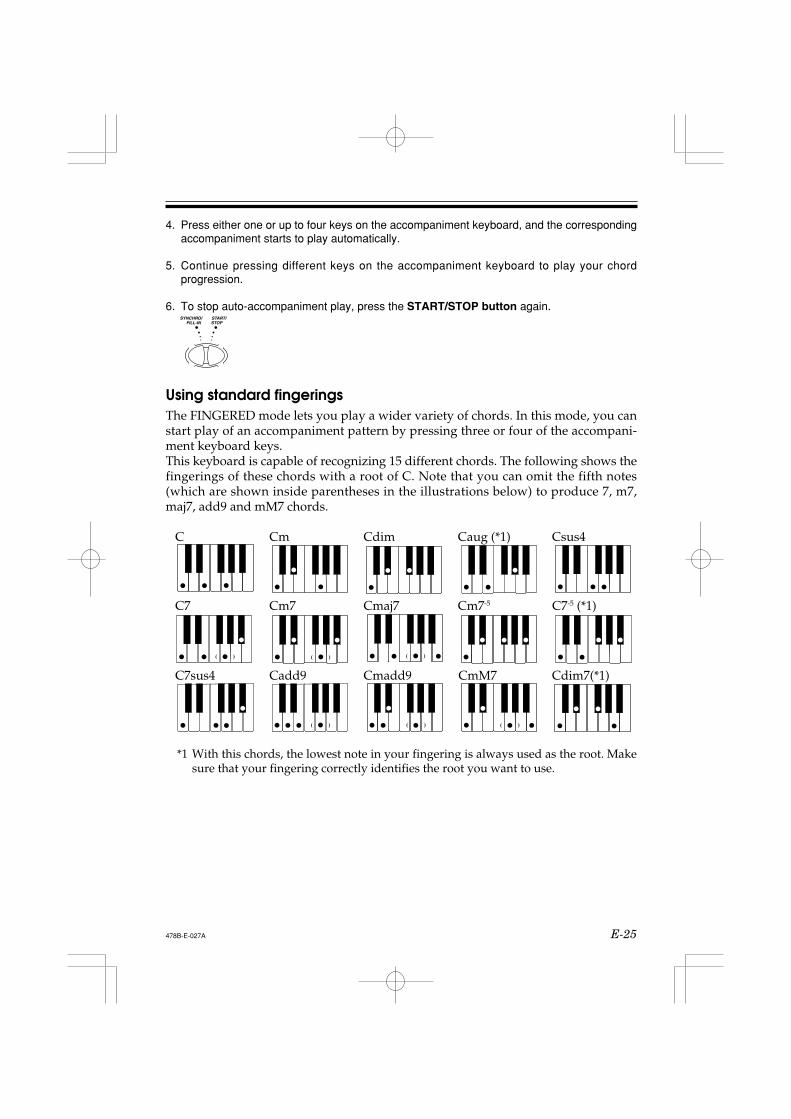
Using standard fingeringsThe FINGERED mode lets you play a wider variety of chords. In this mode, you canstart play of an accompaniment pattern by pressing three or four of the accompani-ment keyboard keys.This keyboard is capable of recognizing 15 different chords. The following shows thefingerings of these chords with a root of C. Note that you can omit the fifth notes(which are shown inside parentheses in the illustrations below) to produce 7, m7,maj7, add9 and mM7 chords.
478B-E-027A
4. Press either one or up to four keys on the accompaniment keyboard, and the correspondingaccompaniment starts to play automatically.
5. Continue pressing different keys on the accompaniment keyboard to play your chordprogression.
6. To stop auto-accompaniment play, press the START/STOP button again.FILL-IN
SYNCHRO/STOPSTART/
C Cm Cdim Caug (*1) Csus4
C7 Cm7 Cmaj7 Cm7-5 C7-5 (*1)
( ) ( ) ( )
C7sus4 Cadd9 Cmadd9 CmM7 Cdim7(*1)
( ) ( ) ( )
*1 With this chords, the lowest note in your fingering is always used as the root. Makesure that your fingering correctly identifies the root you want to use.
E-26
• See the “Fingered Chord Charts” on page A-4 for information on the fingerings ofchords for all roots.
To play a FINGERED auto-accompaniment1. Use the POWER/MODE selector to select FINGERED.
2. Select an auto-rhythm as described under “To select and play a rhythm” on page E-22.
3. Start play of the rhythm.• If you want start play of the normal rhythm pattern, press START/
STOP.• You can also use synchro start (page E-27) to start rhythm play.
4. Play a chord on the accompaniment keyboard to start play of the auto-accompaniment.
5. Continue pressing keys on the accompaniment keyboard to play your chord progression.
6. To stop auto-accompaniment play, press the START/STOP button again.
Important!• If you play one or two notes only in the left hand, or three notes that do not make up
a recognizable chord formation, no sound will be produced. FINGERED moderequires a conventional three or four-note chord formation to produce an auto-accompaniment. Also, note that auto-chords only work in conjunction with rhythmpatterns, and not independently of them.
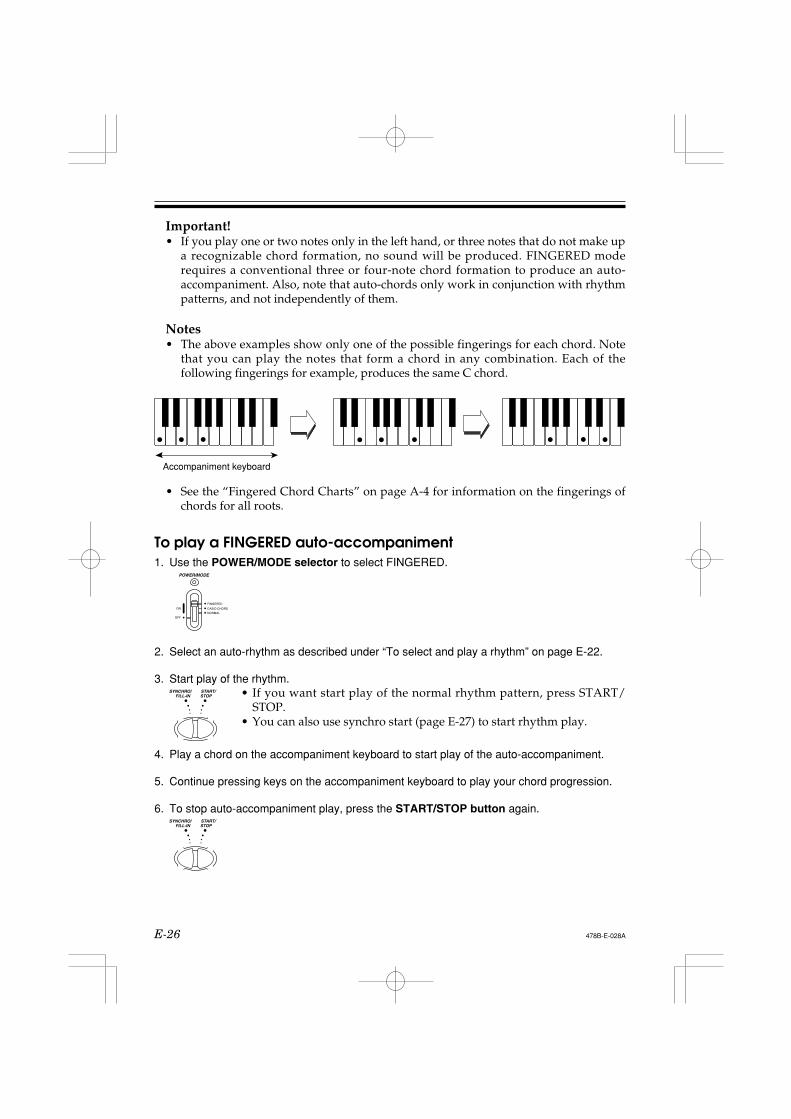
Notes• The above examples show only one of the possible fingerings for each chord. Note
that you can play the notes that form a chord in any combination. Each of thefollowing fingerings for example, produces the same C chord.
478B-E-028A
POWER/MODE
FINGERED
CASIO CHORD
NORMAL
ON
OFF
FILL-INSYNCHRO/
STOPSTART/
FILL-INSYNCHRO/
STOPSTART/
Accompaniment keyboard
E-27
Improvising with the preset patternsPressing the START/STOP button to start rhythm play causes the normal version ofthe pattern to be played. You can also play a variation of the rhythm using theoperation described below.
Using fill-in rhythmYou can insert a fill-in rhythm by pressing the SYNCHRO/FILL-IN button while anauto-rhythm plays.
Using Synchro startYou can start the rhythm and accompaniment pattern at the same time, with yourplay of the accompaniment keyboard. To do this, follow the steps below.
1. Set the POWER/MODE selector to the CASIO CHORD or FINGERED position.
2. Select an auto-rhythm.
3. Press the SYNCHRO/FILL-IN button.
4. Press the accompaniment keys to play the first chord. As soon as you do, the auto-accompaniment pattern begins to play.
5. To stop the auto-accompaniment pattern play, press the START/STOP button.
Note• If you set the POWER/MODE selector to NORMAL in step 1 on page E-22, the
operation in step 4 starts play of the rhythm (percussion instruments) only.
478B-E-029A
FILL-INSYNCHRO/
STOPSTART/
POWER/MODE
FINGERED
CASIO CHORD
NORMAL
ON
OFF
FILL-INSYNCHRO/
STOPSTART/
FILL-INSYNCHRO/
STOPSTART/
E-28
Using Three Step Lesson SystemEven individuals who cannot play the keyboard at all can follow along with the 100built-in Song Bank tunes with the ONE KEY PLAY buttons. You can also use theThree Step Lesson System to learn at your own pace. Play slowly at first until you areable to play along at normal speed.Of the 100 built-in tunes, numbers 00 through 84 feature auto-accompaniment (auto-accompaniment tunes), while 85 through 99 are played using both hands (two-handtunes).
The Three Step Lesson System can be used with the following three-step lesson planto master keyboard play.
Three Step Lesson System
Step 1: Easy PlayPressing the ONE KEY PLAY buttons plays the melody for an auto-accompa-niment tune or the right hand part for two-hand tunes. In both cases, the auto-accompaniment (the right hand part in the case of two-hand tunes) is playedautomatically by the keyboard. In place of the ONE KEY PLAY buttons, youcan also press any key of the keyboard to play the melody or right hand part.The purpose of this step is to familiarize yourself with the timing required toplay melody notes.
Step 2: Slow PlayPress the keys that light as they teach you the correct notes to play. You canplay at the pace you want, because the auto-accompaniment or left hand partwaits until you press the correct key.
Step 3: Normal PlayAt this level, the keyboard’s keys still light to indicate which notes to play, butthey no longer wait for you to press the correct key. The auto-accompanimentor left hand part is played at normal speed.
Notes• You may not be able to see the keyboard keys light under direct sunlight or in other
brightly lit areas.• You can press the ONE KEY PLAY, STEP 1, STEP 2, and STEP 3 buttons at any time,
except while a demo tune is playing. To return the keyboard to its normal mode,press the SONG BANK button.
478B-E-030A
E-29
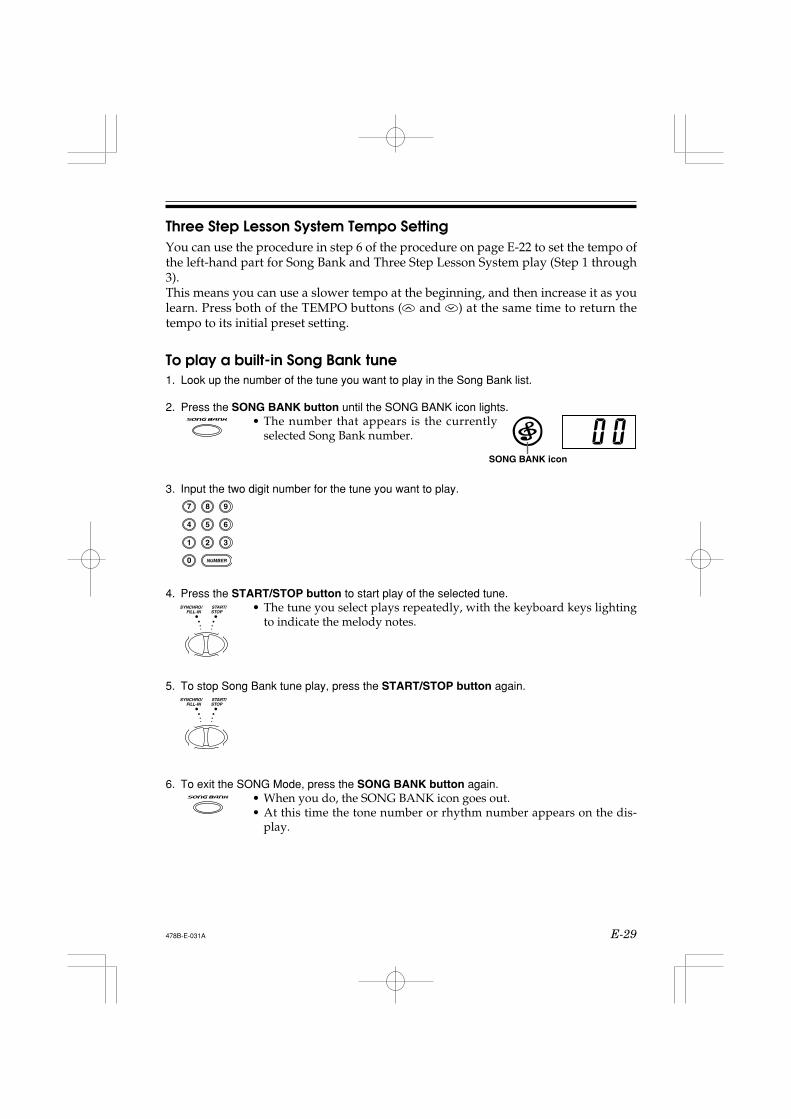
3. Input the two digit number for the tune you want to play.
4. Press the START/STOP button to start play of the selected tune.• The tune you select plays repeatedly, with the keyboard keys lighting
to indicate the melody notes.
5. To stop Song Bank tune play, press the START/STOP button again.
6. To exit the SONG Mode, press the SONG BANK button again.• When you do, the SONG BANK icon goes out.• At this time the tone number or rhythm number appears on the dis-
play.
478B-E-031A
NUMBER0
1
4
7
2
5
8
3
6
9
FILL-INSYNCHRO/
STOPSTART/
FILL-INSYNCHRO/
STOPSTART/
Three Step Lesson System Tempo SettingYou can use the procedure in step 6 of the procedure on page E-22 to set the tempo ofthe left-hand part for Song Bank and Three Step Lesson System play (Step 1 through3).This means you can use a slower tempo at the beginning, and then increase it as youlearn. Press both of the TEMPO buttons ( and ) at the same time to return thetempo to its initial preset setting.
To play a built-in Song Bank tune1. Look up the number of the tune you want to play in the Song Bank list.
2. Press the SONG BANK button until the SONG BANK icon lights.• The number that appears is the currently
selected Song Bank number.
SONG BANK icon
E-30
Notes• Always enter two digits for the Song Bank number.• You can input a Song Bank tune number even while another Song Bank tune is
playing.• If you input the wrong first digit for a Song Bank tune number, you can return to the
previous setting by pressing the SONG BANK button.• The RHYTHM button is disabled in the Song Bank Mode. If you want to play a
rhythm, press the SONG BANK button to return to the normal mode first.
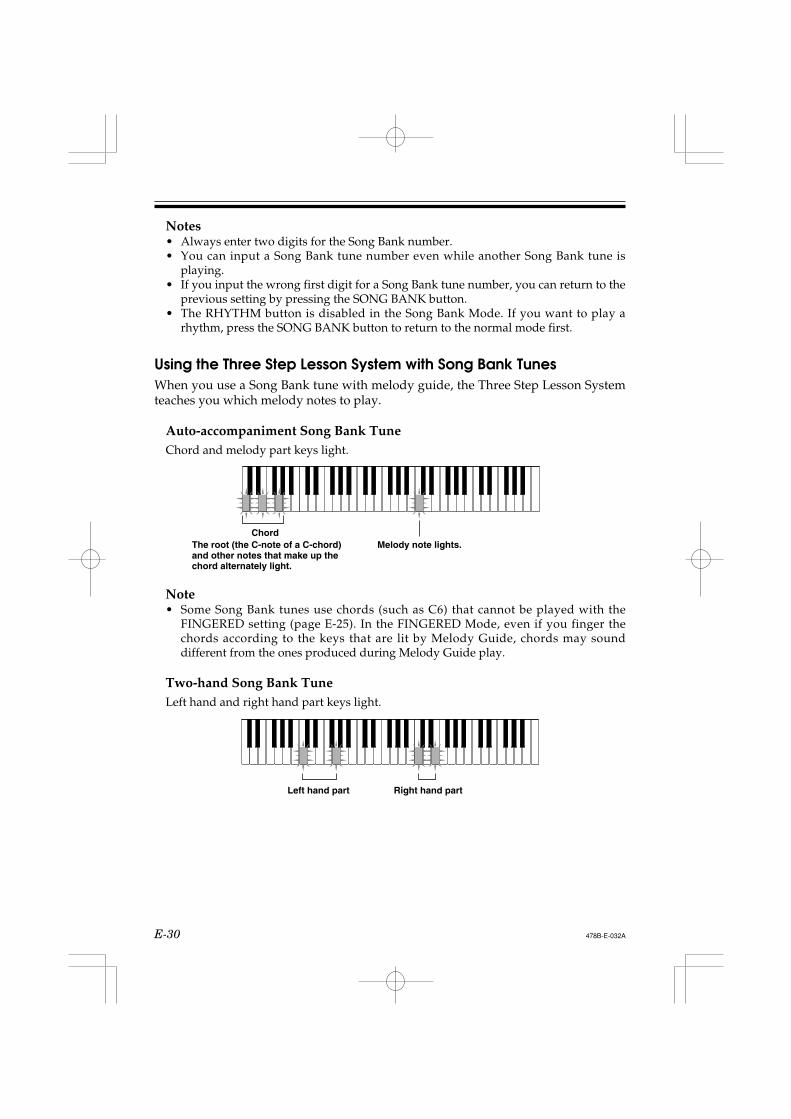
Using the Three Step Lesson System with Song Bank TunesWhen you use a Song Bank tune with melody guide, the Three Step Lesson Systemteaches you which melody notes to play.
Auto-accompaniment Song Bank TuneChord and melody part keys light.
ChordMelody note lights.
Note• Some Song Bank tunes use chords (such as C6) that cannot be played with the
FINGERED setting (page E-25). In the FINGERED Mode, even if you finger thechords according to the keys that are lit by Melody Guide, chords may sounddifferent from the ones produced during Melody Guide play.
Two-hand Song Bank TuneLeft hand and right hand part keys light.
The root (the C-note of a C-chord)and other notes that make up thechord alternately light.
478B-E-032A
Left hand part Right hand part
E-31
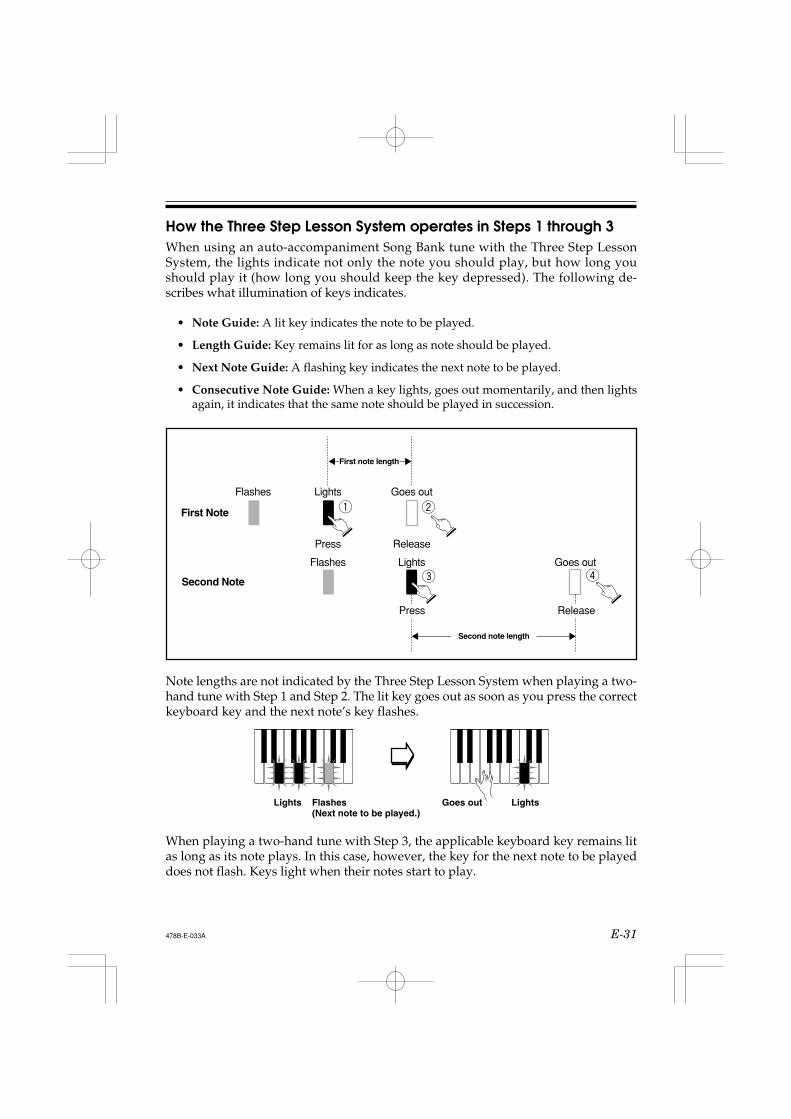
How the Three Step Lesson System operates in Steps 1 through 3When using an auto-accompaniment Song Bank tune with the Three Step LessonSystem, the lights indicate not only the note you should play, but how long youshould play it (how long you should keep the key depressed). The following de-scribes what illumination of keys indicates.
• Note Guide: A lit key indicates the note to be played.
• Length Guide: Key remains lit for as long as note should be played.
• Next Note Guide: A flashing key indicates the next note to be played.
• Consecutive Note Guide: When a key lights, goes out momentarily, and then lightsagain, it indicates that the same note should be played in succession.
1 2
Release
Lights
Press
Flashes3 4
Press
Goes outLights
Goes out
Release
Flashes
First note length
Second note length
First Note
Second Note
Note lengths are not indicated by the Three Step Lesson System when playing a two-hand tune with Step 1 and Step 2. The lit key goes out as soon as you press the correctkeyboard key and the next note’s key flashes.
Lights Flashes(Next note to be played.)
LightsGoes out
When playing a two-hand tune with Step 3, the applicable keyboard key remains litas long as its note plays. In this case, however, the key for the next note to be playeddoes not flash. Keys light when their notes start to play.
478B-E-033A
E-32
Turning Off Key Lighting1. Press the KEY LIGHT button.
• Press the KEY LIGHT button again to turn key lighting back on.
Note• Key lighting turns on automatically in any of the following cases:
• When keyboard power is turned on.• When demo tune play is started.• When the SONG BANK button is pressed in the normal mode (page E-29 to steps
1 to 3).• When the power on alert function operates (page E-16).
Number of Simultaneously Lit KeysUp to four keyboard keys can be lit at the same time.
To change the tone used for the melody of a Song Bank tune1. Following step 3 of the procedure on page E-29, press the TONE button.
• Both the SONG BANK icon and TONE icon light,along with the tone number of the tone that is cur-rently assigned to the keyboard.
2. Input a value to select the tone you want to use.• Example: 30 VIOLIN
Notes• You cannot change the tone of the two-hand Song Bank tunes (number 85 through
99).• Selecting another Song Bank tune switches the tone setting to the newly selected
tune’s preset melody tone.• The tone assigned to the keyboard is the same one specified for the melody of the
Song Bank tune.• The above procedure can be used to change the Song Bank melody tone before
starting play or while play is already in progress.
478B-E-034A
KEY LIGHT
NUMBER0
1
4
7
2
5
8
3
6
9
E-33
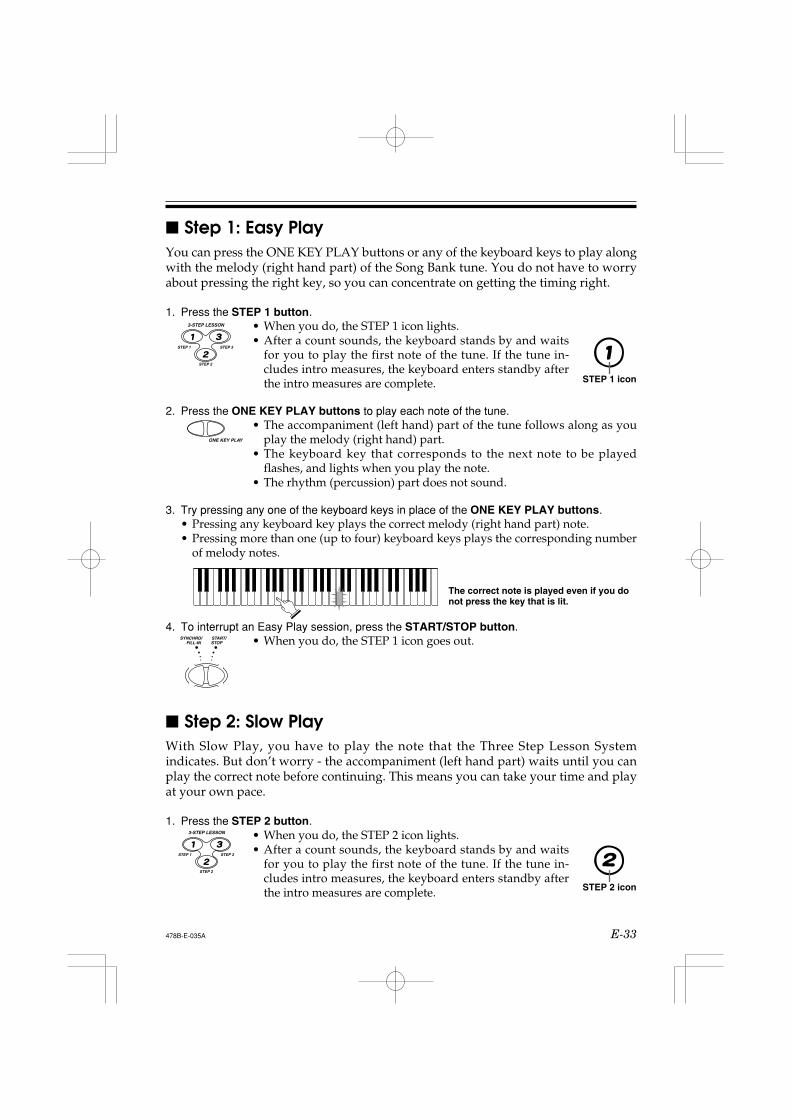
Step 1: Easy PlayYou can press the ONE KEY PLAY buttons or any of the keyboard keys to play alongwith the melody (right hand part) of the Song Bank tune. You do not have to worryabout pressing the right key, so you can concentrate on getting the timing right.
1. Press the STEP 1 button.• When you do, the STEP 1 icon lights.• After a count sounds, the keyboard stands by and waits
for you to play the first note of the tune. If the tune in-cludes intro measures, the keyboard enters standby afterthe intro measures are complete.
2. Press the ONE KEY PLAY buttons to play each note of the tune.• The accompaniment (left hand) part of the tune follows along as you
play the melody (right hand) part.• The keyboard key that corresponds to the next note to be played
flashes, and lights when you play the note.• The rhythm (percussion) part does not sound.
3. Try pressing any one of the keyboard keys in place of the ONE KEY PLAY buttons.• Pressing any keyboard key plays the correct melody (right hand part) note.• Pressing more than one (up to four) keyboard keys plays the corresponding number
of melody notes.
The correct note is played even if you donot press the key that is lit.
4. To interrupt an Easy Play session, press the START/STOP button.• When you do, the STEP 1 icon goes out.
Step 2: Slow PlayWith Slow Play, you have to play the note that the Three Step Lesson Systemindicates. But don’t worry - the accompaniment (left hand part) waits until you canplay the correct note before continuing. This means you can take your time and playat your own pace.
1. Press the STEP 2 button.• When you do, the STEP 2 icon lights.• After a count sounds, the keyboard stands by and waits
for you to play the first note of the tune. If the tune in-cludes intro measures, the keyboard enters standby afterthe intro measures are complete.
478B-E-035A
3-STEP LESSON
STEP 2
STEP 1 STEP 3
ONE KEY PLAY
FILL-INSYNCHRO/
STOPSTART/
3-STEP LESSON
STEP 2
STEP 1 STEP 3
STEP 2 icon
STEP 1 icon
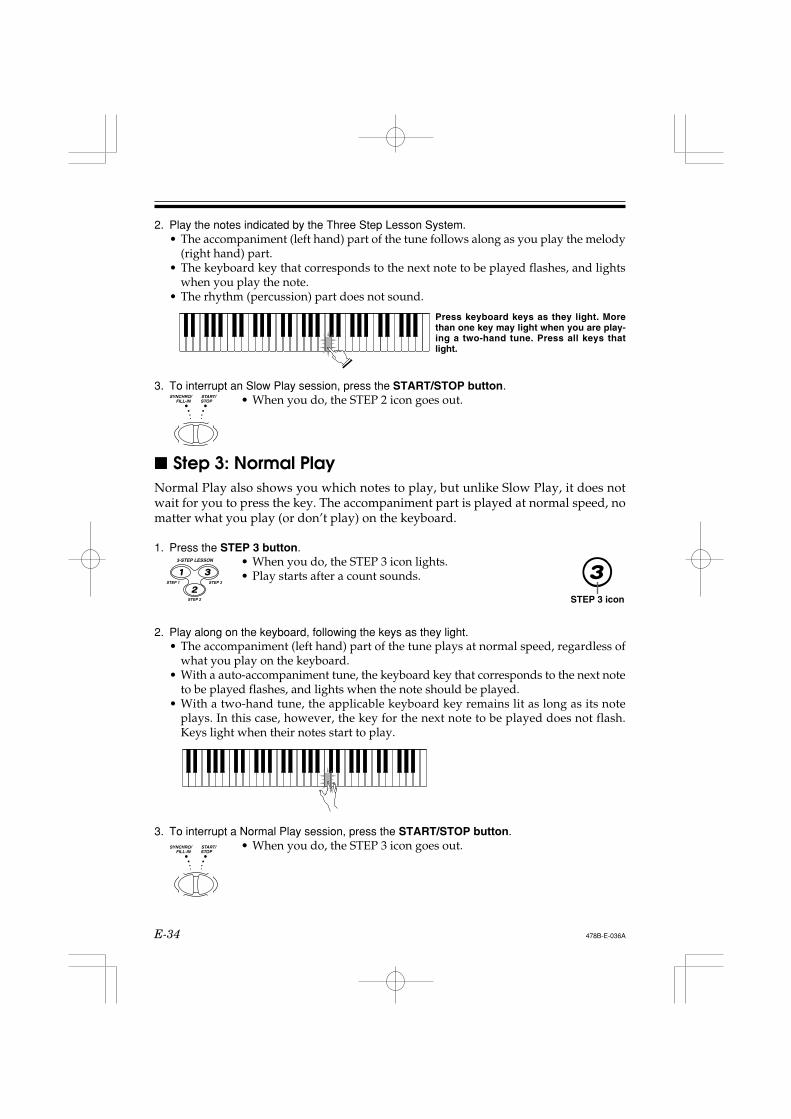
E-34
2. Play the notes indicated by the Three Step Lesson System.• The accompaniment (left hand) part of the tune follows along as you play the melody
(right hand) part.• The keyboard key that corresponds to the next note to be played flashes, and lights
when you play the note.• The rhythm (percussion) part does not sound.
Press keyboard keys as they light. Morethan one key may light when you are play-ing a two-hand tune. Press all keys thatlight.
3. To interrupt an Slow Play session, press the START/STOP button.• When you do, the STEP 2 icon goes out.
Step 3: Normal PlayNormal Play also shows you which notes to play, but unlike Slow Play, it does notwait for you to press the key. The accompaniment part is played at normal speed, nomatter what you play (or don’t play) on the keyboard.
1. Press the STEP 3 button.• When you do, the STEP 3 icon lights.• Play starts after a count sounds.
2. Play along on the keyboard, following the keys as they light.• The accompaniment (left hand) part of the tune plays at normal speed, regardless of
what you play on the keyboard.• With a auto-accompaniment tune, the keyboard key that corresponds to the next note
to be played flashes, and lights when the note should be played.• With a two-hand tune, the applicable keyboard key remains lit as long as its note
plays. In this case, however, the key for the next note to be played does not flash.Keys light when their notes start to play.
3. To interrupt a Normal Play session, press the START/STOP button.• When you do, the STEP 3 icon goes out.
478B-E-036A
FILL-INSYNCHRO/
STOPSTART/
3-STEP LESSON
STEP 2
STEP 1 STEP 3
FILL-INSYNCHRO/
STOPSTART/
STEP 3 icon
E-35
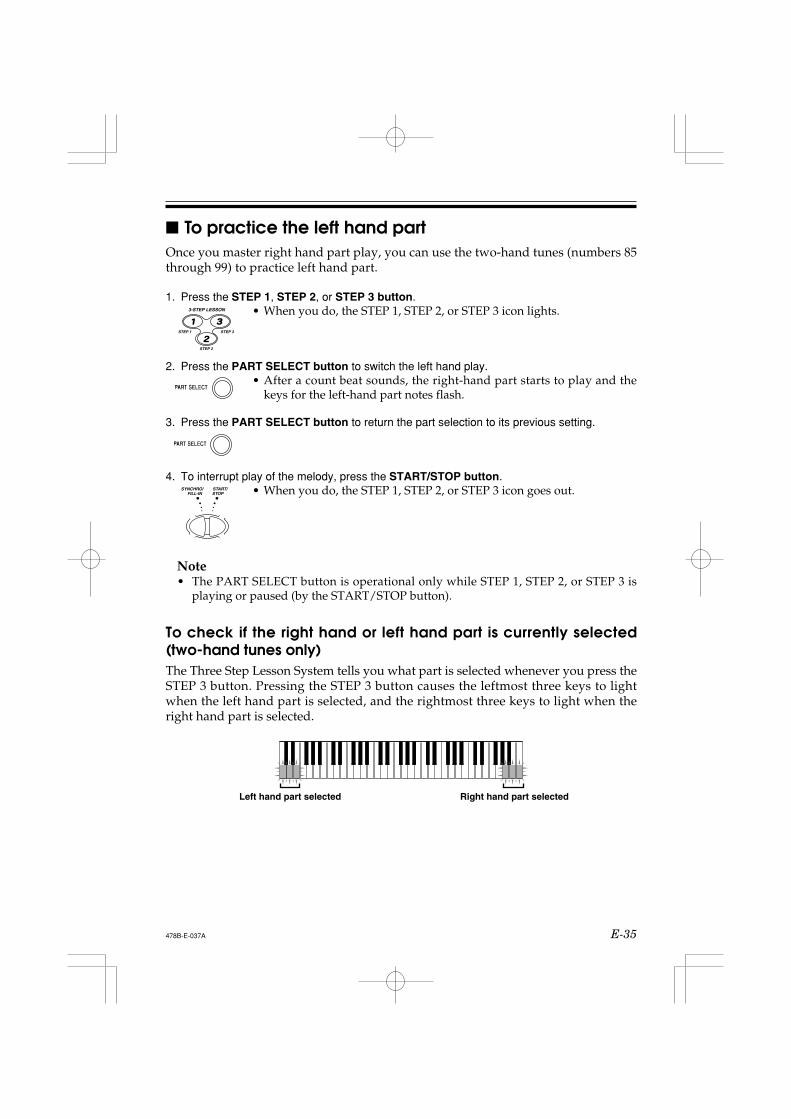
To practice the left hand partOnce you master right hand part play, you can use the two-hand tunes (numbers 85through 99) to practice left hand part.
1. Press the STEP 1, STEP 2, or STEP 3 button.• When you do, the STEP 1, STEP 2, or STEP 3 icon lights.
2. Press the PART SELECT button to switch the left hand play.• After a count beat sounds, the right-hand part starts to play and the
keys for the left-hand part notes flash.
3. Press the PART SELECT button to return the part selection to its previous setting.
4. To interrupt play of the melody, press the START/STOP button.• When you do, the STEP 1, STEP 2, or STEP 3 icon goes out.
Note• The PART SELECT button is operational only while STEP 1, STEP 2, or STEP 3 is
playing or paused (by the START/STOP button).
To check if the right hand or left hand part is currently selected(two-hand tunes only)The Three Step Lesson System tells you what part is selected whenever you press theSTEP 3 button. Pressing the STEP 3 button causes the leftmost three keys to lightwhen the left hand part is selected, and the rightmost three keys to light when theright hand part is selected.
478B-E-037A
3-STEP LESSON
STEP 2
STEP 1 STEP 3
FILL-INSYNCHRO/
STOPSTART/
Left hand part selected Right hand part selected

E-36
MIDI
478B-E-038A
What is MIDI?The letters MIDI stand for Musical Instrument Digital Interface, which is the name ofa worldwide standard for digital signals and connectors that makes it possible toexchange musical data between musical instruments and computers (machines) pro-duced by different manufacturers. MIDI compatible equipment can exchange key-board key press, key release, tone change, and other data as messages.Though you do not need any special knowledge about MIDI to use this keyboard as astand-alone unit, MIDI operations require a bit of specialized knowledge. This sec-tion provides you with an overview of MIDI that will help to get you going.
MIDI ConnectionsMIDI messages are send out through the MIDI OUT terminal of one machine to theMIDI IN terminal of another machine over a MIDI cable. To send a message from thiskeyboard to another machine, for example, you must use a MIDI cable to connect theMIDI OUT terminal of this keyboard to the MIDI IN terminal of the other machine.To send MIDI messages back to this keyboard, you need to use a MIDI cable toconnect the other machine’s MIDI OUT terminal to the MIDI IN terminal of thiskeyboard.To use a computer or other MIDI device to record and playback the MIDI dataproduced by this keyboard, you must connect the MIDI IN and MIDI OUT terminalsof both machines in order send and receive data.
MIDI IN MIDI OUTMIDI IN MIDI OUT
Computer etc.
E-37478B-E-039A
MIDI ChannelsMIDI allows you to send the data for multiple parts at the same time, with each partbeing sent over a separate MIDI channel. There are 16 MIDI channels, numbered 1through 16, and MIDI channel data is always included whenever you exchange data(key press etc.)Both the sending machine and the receiving machine must be set to the same channelfor the receiving unit to correctly receive and play data. If the receiving machine is setto Channel 2, for example, it receives only MIDI Channel 2 data, and all otherchannels are ignored.With this keyboard, messages received over MIDI Channels 1, 2, 3, 4, and 10 can beused for multi-timbre play of up to five different instrument parts. The tone andvolume settings for these five channels must be controlled by messages sent from anexternal device.Conversely, keyboard operations are sent to external devices over MIDI Channel 1.
General MIDIGeneral MIDI standardizes MIDI data for all sound source types, regardless ofmanufacturer. General MIDI specifies such factors as tone numbering, drum sounds,and available MIDI channels for all sound sources. This standard makes it possiblefor all MIDI equipment to reproduce the same nuances when playing General MIDIdata, regardless of the manufacturer of the sound source.Though the sound source of this keyboard is not General MIDI compatible, you canstill connect the keyboard to a computer or other MIDI equipment to playbackGeneral MIDI data that is widely available in stores, over computer networks, andfrom other sources.
Notes• General MIDI data made up of a large number of parts may not play correctly on this
keyboard.• You will have most success playing back General MIDI data that has few parts and is
made up of data on channels 1, 2, 3, 4, and 10.
MessagesThere is a wide variety of messages defined under the MIDI standard, and thissection details the particular messages that can be sent and received by this keyboard.
E-38
NOTE ON/OFFThis message sends data when a key is pressed (NOTE ON) or released (NOTE OFF).A NOTE ON/OFF message include a note number (to indicate note whose key isbeing pressed or released) and velocity (keyboard pressure as a value from 1 to 127).NOTE ON velocity is always used to determine the relative volume of the note. Thiskeyboard does not receive NOTE OFF velocity data.Whenever you press or release a key on this keyboard, the corresponding NOTE ONor NOTE OFF message is sent by constant velocity from the MIDI OUT terminal.
PROGRAM CHANGEThis is the tone selection message. PROGRAM CHANGE can contain tone datawithin the range of 0 to 127.A PROGRAM CHANGE message (0 to 99) is sent out through this keyboard’s MIDIOUT terminal whenever you manually change its tone number. Receipt of a PRO-GRAM CHANGE message from an external machine changes the tone setting of thiskeyboard.This keyboard can send tone data within the range of 00 to 99 and receive tone datawithin the range of 0 to 127*.
* When GM mapping is turned on. When turned off, tone data is received in therange of 0 to 99.
Note• Channel 10 is for the drum part only, and it does not receive Program Change
messages. When receiving MIDI data, it sounds percussion sounds produced by thiskeyboard.
PITCH BENDThis message carries pitch bend information for smoothly sliding the pitch upwardsor downwards during keyboard play. This keyboard does not send pitch bend data,but is can receive such data.
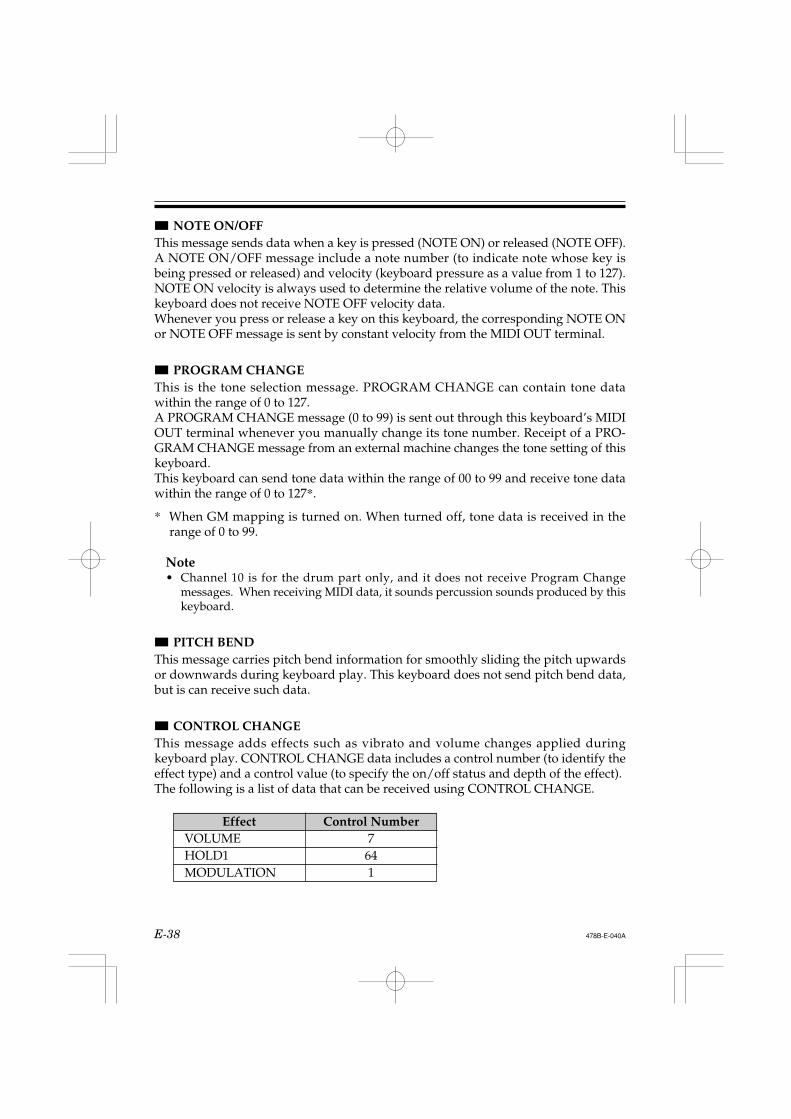
CONTROL CHANGEThis message adds effects such as vibrato and volume changes applied duringkeyboard play. CONTROL CHANGE data includes a control number (to identify theeffect type) and a control value (to specify the on/off status and depth of the effect).The following is a list of data that can be received using CONTROL CHANGE.
Effect Control NumberVOLUME 7HOLD1 64MODULATION 1
478B-E-040A
E-39
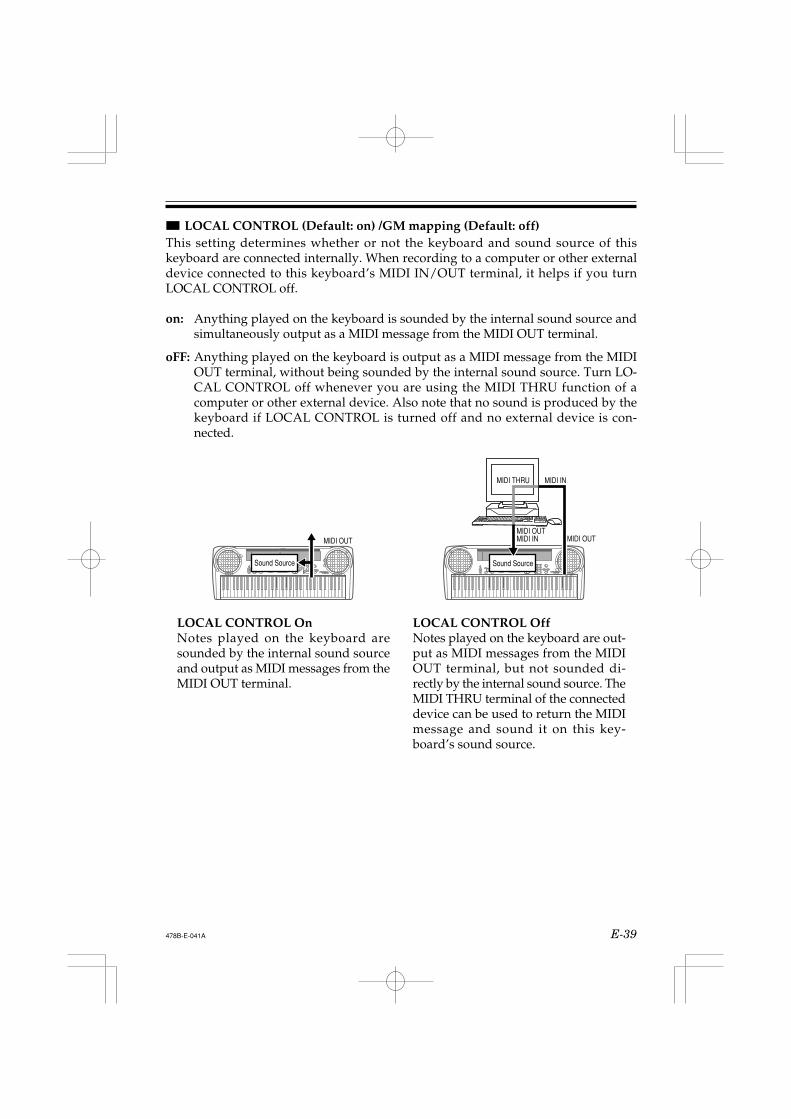
LOCAL CONTROL (Default: on) /GM mapping (Default: off)This setting determines whether or not the keyboard and sound source of thiskeyboard are connected internally. When recording to a computer or other externaldevice connected to this keyboard’s MIDI IN/OUT terminal, it helps if you turnLOCAL CONTROL off.
on: Anything played on the keyboard is sounded by the internal sound source andsimultaneously output as a MIDI message from the MIDI OUT terminal.
oFF: Anything played on the keyboard is output as a MIDI message from the MIDIOUT terminal, without being sounded by the internal sound source. Turn LO-CAL CONTROL off whenever you are using the MIDI THRU function of acomputer or other external device. Also note that no sound is produced by thekeyboard if LOCAL CONTROL is turned off and no external device is con-nected.
LOCAL CONTROL OnNotes played on the keyboard aresounded by the internal sound sourceand output as MIDI messages from theMIDI OUT terminal.
LOCAL CONTROL OffNotes played on the keyboard are out-put as MIDI messages from the MIDIOUT terminal, but not sounded di-rectly by the internal sound source. TheMIDI THRU terminal of the connecteddevice can be used to return the MIDImessage and sound it on this key-board’s sound source.
Sound Source
MIDI OUT
Sound Source
MIDI THRU
MIDI OUT
MIDI IN
MIDI INMIDI OUT
478B-E-041A

E-40
To turn off LOCAL CONTROLWhile holding down the RHYTHM button, press the SONG BANK button.• This also turns on GM mapping.
To turn on LOCAL CONTROLWhile holding down the RHYTHM button, press the PART SELECT button.• This turns off GM mapping.
Note that LOCAL CONTROL is also turned on automatically when any of thefollowing buttons are pressed.
POWER (to turn on power), START/STOP (to start rhythm or Song Banktune play), ONE-KEY PLAY, STEP 1, STEP 2, STEP 3, DEMO (to start demotune play).
Note• See the GM Tone Map List at the back of this manual for information about tone
assignments while GM mapping is turned on.
478B-E-042A
E-41
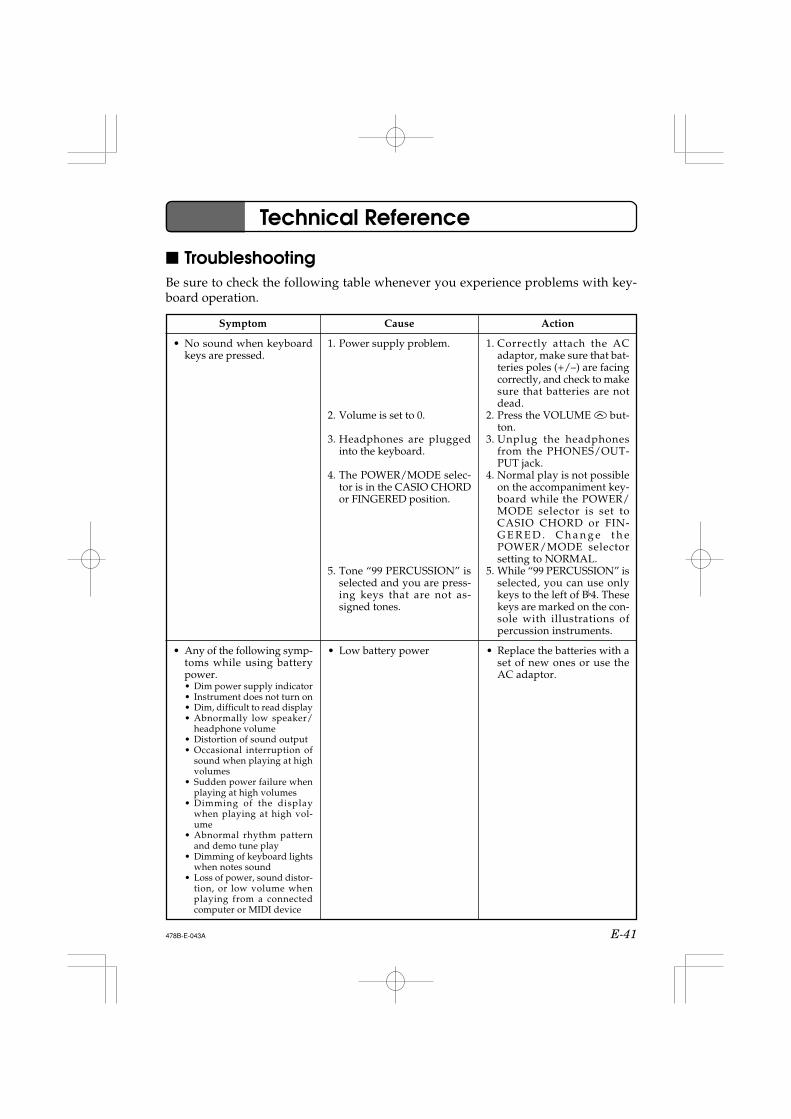
TroubleshootingBe sure to check the following table whenever you experience problems with key-board operation.
1. Power supply problem.
2. Volume is set to 0.
3. Headphones are pluggedinto the keyboard.
4. The POWER/MODE selec-tor is in the CASIO CHORDor FINGERED position.
5. Tone “99 PERCUSSION” isselected and you are press-ing keys that are not as-signed tones.
• Low battery power
• No sound when keyboardkeys are pressed.
• Any of the following symp-toms while using batterypower.• Dim power supply indicator• Instrument does not turn on• Dim, difficult to read display• Abnormally low speaker/
headphone volume• Distortion of sound output• Occasional interruption of
sound when playing at highvolumes
• Sudden power failure whenplaying at high volumes
• Dimming of the displaywhen playing at high vol-ume
• Abnormal rhythm patternand demo tune play
• Dimming of keyboard lightswhen notes sound
• Loss of power, sound distor-tion, or low volume whenplaying from a connectedcomputer or MIDI device
1. Correctly attach the ACadaptor, make sure that bat-teries poles (+/–) are facingcorrectly, and check to makesure that batteries are notdead.
2. Press the VOLUME but-ton.
3. Unplug the headphonesfrom the PHONES/OUT-PUT jack.
4. Normal play is not possibleon the accompaniment key-board while the POWER/MODE selector is set toCASIO CHORD or FIN-G E R E D . C h a n g e t h ePOWER/MODE selectorsetting to NORMAL.
5. While “99 PERCUSSION” isselected, you can use onlykeys to the left of B4. Thesekeys are marked on the con-sole with illustrations ofpercussion instruments.
• Replace the batteries with aset of new ones or use theAC adaptor.
Technical Reference
CauseSymptom Action
478B-E-043A
E-42 478B-E-044A
CauseSymptom Action
• Keyboard keys remain lit.
• Keyboard keys light but nosound is produced.
• RHYTHM button does notwork.
• Song Bank tone does notchange.
• Cannot change TRANS-POSE/TUNE settings.
• Cannot play correctly evenwhen the lit keyboard keysare pressed with Step 1.
• No sound is producedwhen playing MIDI datafrom a computer.
• Playing on the keyboardproduces an unnaturalsound when connected to acomputer.
• Keyboard is standing by forkeyboard play in Step 2.
• Power on alert is telling youthat power is left on.
• Keyboard is in the SongBank Mode.
• A two-hand Song Bank tune(number 85 through 99) isselected.
• Keyboard is in the SongBank Mode.
• Demo tune play is inprogress.
• More than one key is beingpressed at the same time,which causes accompani-ment to advance the corre-sponding number of notes(up to four).
• MIDI cables are not con-nected properly.
• The computer’s MIDI THRUfunction is turned on.
• Press the lit keys and con-tinue with Step 2 play.
• Press the START/STOP but-ton to stop Step 2.
• Press any button or key-board key to resume nor-mal operation with the key-board in its initial power onsetting.
• Press the SONG BANK but-ton to return to the NormalMode.
• Change to an auto accom-paniment Song Bank tune(number 00 to 84). You can-not change the tone settingof a two-hand Song Banktune (number 85 through99).
• Press the SONG BANK but-ton to return to the NormalMode.
• Stop demo tune play.
• When using Step 1, presskeyboard keys one by one.
• Connect MIDI cables prop-erly.
• Turn off the MIDI THRUfunction on the computer orturn off LOCAL CONTROLon the keyboard.
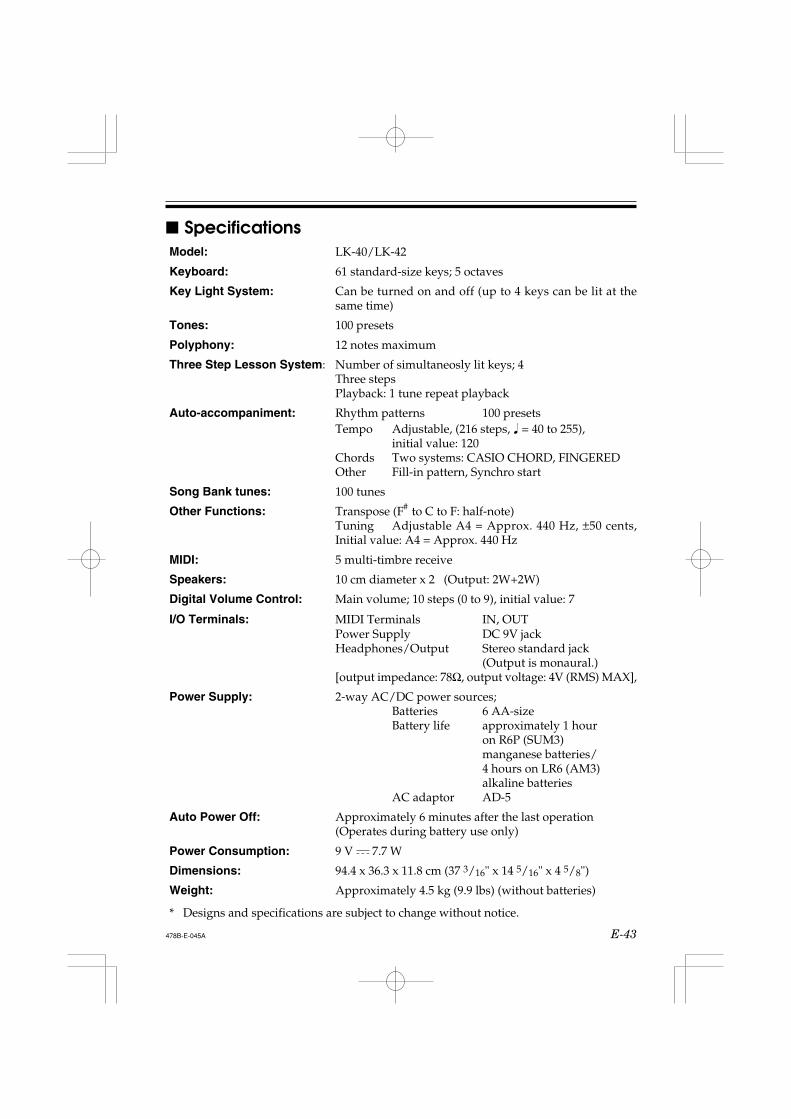
E-43
SpecificationsModel: LK-40/LK-42
Keyboard: 61 standard-size keys; 5 octaves
Key Light System: Can be turned on and off (up to 4 keys can be lit at thesame time)
Tones: 100 presets
Polyphony: 12 notes maximum
Three Step Lesson System: Number of simultaneosly lit keys; 4Three stepsPlayback: 1 tune repeat playback
Auto-accompaniment: Rhythm patterns 100 presetsTempo Adjustable, (216 steps, = 40 to 255),
initial value: 120Chords Two systems: CASIO CHORD, FINGEREDOther Fill-in pattern, Synchro start
Song Bank tunes: 100 tunes
Other Functions: Transpose (F# to C to F: half-note)Tuning Adjustable A4 = Approx. 440 Hz, ±50 cents,Initial value: A4 = Approx. 440 Hz
MIDI: 5 multi-timbre receive
Speakers: 10 cm diameter x 2 (Output: 2W+2W)
Digital Volume Control: Main volume; 10 steps (0 to 9), initial value: 7
I/O Terminals: MIDI Terminals IN, OUTPower Supply DC 9V jackHeadphones/Output Stereo standard jack
(Output is monaural.)[output impedance: 78Ω, output voltage: 4V (RMS) MAX],
Power Supply: 2-way AC/DC power sources;Batteries 6 AA-sizeBattery life approximately 1 hour
on R6P (SUM3)manganese batteries/4 hours on LR6 (AM3)alkaline batteries
AC adaptor AD-5
Auto Power Off: Approximately 6 minutes after the last operation(Operates during battery use only)
Power Consumption: 9 V 7.7 W
Dimensions: 94.4 x 36.3 x 11.8 cm (37 3/16" x 14 5/16" x 4 5/8")
Weight: Approximately 4.5 kg (9.9 lbs) (without batteries)
* Designs and specifications are subject to change without notice.
478B-E-045A
A-1
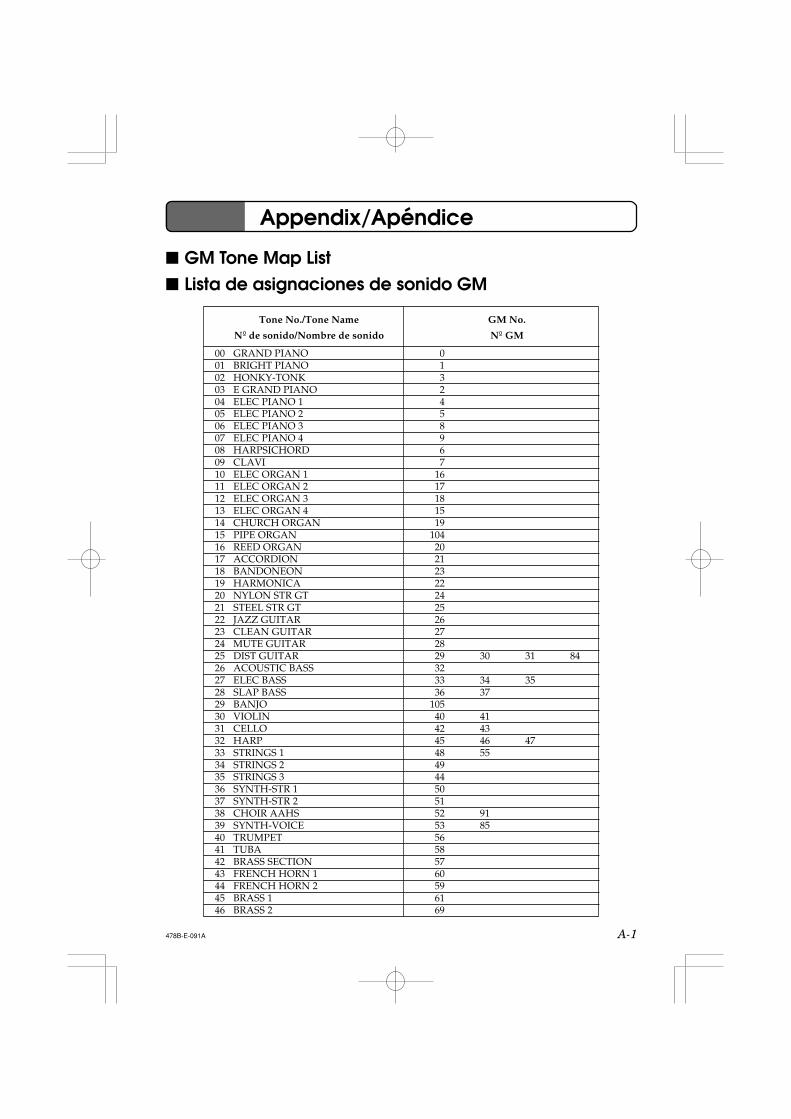
Appendix/Apéndice
GM Tone Map List Lista de asignaciones de sonido GM
478B-E-091A
00 GRAND PIANO01 BRIGHT PIANO02 HONKY-TONK03 E GRAND PIANO04 ELEC PIANO 105 ELEC PIANO 206 ELEC PIANO 307 ELEC PIANO 408 HARPSICHORD09 CLAVI10 ELEC ORGAN 111 ELEC ORGAN 212 ELEC ORGAN 313 ELEC ORGAN 414 CHURCH ORGAN15 PIPE ORGAN16 REED ORGAN17 ACCORDION18 BANDONEON19 HARMONICA20 NYLON STR GT21 STEEL STR GT22 JAZZ GUITAR23 CLEAN GUITAR24 MUTE GUITAR25 DIST GUITAR26 ACOUSTIC BASS27 ELEC BASS28 SLAP BASS29 BANJO30 VIOLIN31 CELLO32 HARP33 STRINGS 134 STRINGS 235 STRINGS 336 SYNTH-STR 137 SYNTH-STR 238 CHOIR AAHS39 SYNTH-VOICE40 TRUMPET41 TUBA42 BRASS SECTION43 FRENCH HORN 144 FRENCH HORN 245 BRASS 146 BRASS 2
Tone No./Tone Name
Nº de sonido/Nombre de sonido
GM No.
Nº GM
0132458967
1617181519
10420212322242526272829 30 31 843233 34 3536 37
10540 4142 4345 46 4748 554944505152 9153 8556585760596169
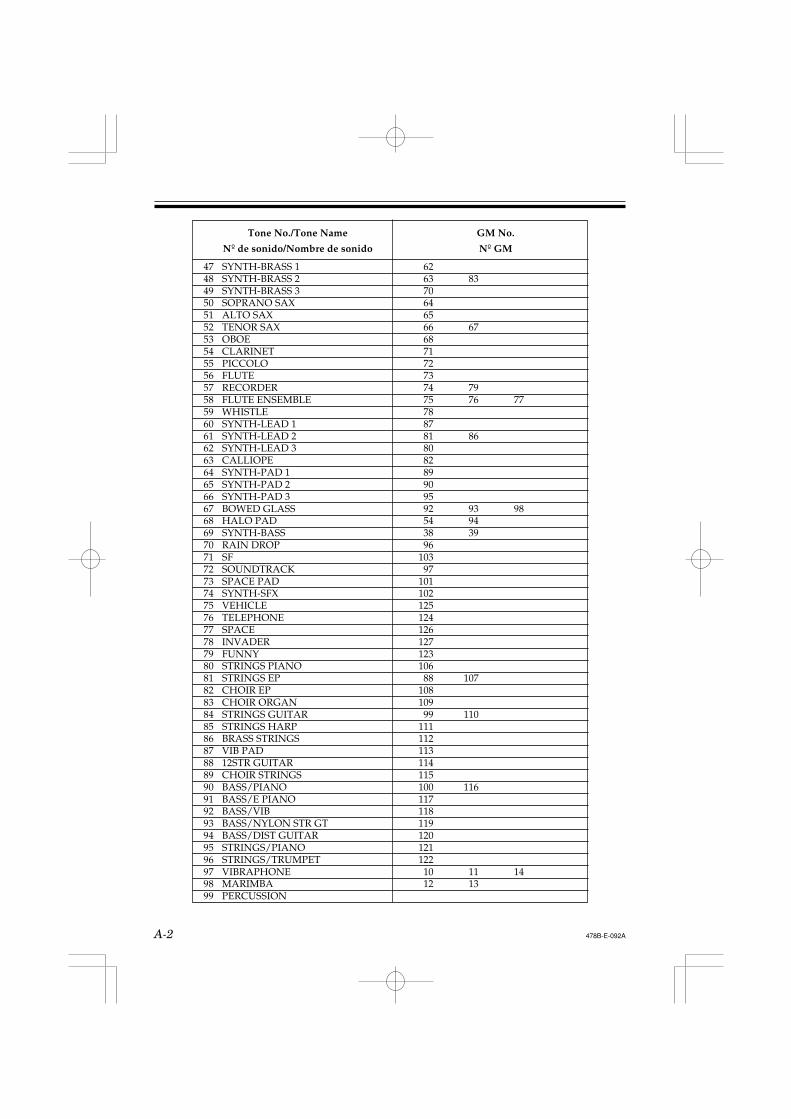
A-2 478B-E-092A
47 SYNTH-BRASS 148 SYNTH-BRASS 249 SYNTH-BRASS 350 SOPRANO SAX51 ALTO SAX52 TENOR SAX53 OBOE54 CLARINET55 PICCOLO56 FLUTE57 RECORDER58 FLUTE ENSEMBLE59 WHISTLE60 SYNTH-LEAD 161 SYNTH-LEAD 262 SYNTH-LEAD 363 CALLIOPE64 SYNTH-PAD 165 SYNTH-PAD 266 SYNTH-PAD 367 BOWED GLASS68 HALO PAD69 SYNTH-BASS70 RAIN DROP71 SF72 SOUNDTRACK73 SPACE PAD74 SYNTH-SFX75 VEHICLE76 TELEPHONE77 SPACE78 INVADER79 FUNNY80 STRINGS PIANO81 STRINGS EP82 CHOIR EP83 CHOIR ORGAN84 STRINGS GUITAR85 STRINGS HARP86 BRASS STRINGS87 VIB PAD88 12STR GUITAR89 CHOIR STRINGS90 BASS/PIANO91 BASS/E PIANO92 BASS/VIB93 BASS/NYLON STR GT94 BASS/DIST GUITAR95 STRINGS/PIANO96 STRINGS/TRUMPET97 VIBRAPHONE98 MARIMBA99 PERCUSSION
6263 8370646566 676871727374 7975 76 77788781 86808289909592 93 9854 9438 3996
10397
10110212512412612712310688 107
10810999 110
111112113114115100 11611711811912012112210 11 1412 13
Tone No./Tone Name
Nº de sonido/Nombre de sonido
GM No.
Nº GM

A-3478B-E-093A
POPS I
00 CLUB POP01 FUNKY POP 102 RAP POP03 FUNKY POP 204 SOUL BALLAD05 POP BALLAD06 LOVE BALLAD07 FUNKY POP 308 EPIC BALLAD09 LITE POP
POPS II
10 16 BEAT SHUFFLE11 16 BEAT POP12 16 BEAT FUNK13 8 BEAT POP14 8 BEAT SOUL15 8 BEAT SHUFFLE16 DANCE POP 117 DANCE POP 218 POP FUSION19 FOLKIE POP
ROCK I
20 ROCK WALTZ21 SLOW ROCK 122 SLOW ROCK 223 SOFT ROCK 124 SOFT ROCK 225 SOFT ROCK 326 POP ROCK 127 POP ROCK 228 50’S ROCK29 60’S SOUL
ROCK II
30 4 BEAT ROCK31 ROCK
32 HEAVY ROCK33 8 BEAT ROCK34 STRAIGHT ROCK35 HEAVY METAL36 TWIST37 NEW ORLNS R&R38 CHICAGO BLUES39 R & B
JAZZ/FUSION
40 BIG BAND41 SLOW SWING42 SWING43 FOX TROT44 JAZZ WALTZ45 MODERN JAZZ46 COOL47 HARD BOP48 ACID JAZZ49 LATIN FUSION
DANCE/FUNK
50 TECHNO POP51 RAVE52 CLUB GROOVE53 TECHNO54 TRANCE55 HOUSE56 GROOVE SOUL57 DISCO58 RAP59 FUNK
EUROPEAN
60 POLKA 161 POLKA 262 MARCH 163 MARCH 264 WALTZ65 VIENNESE WALTZ
66 FRENCH WALTZ67 SLOW WALTZ68 SERENADE69 TANGO 1
LATIN I
70 BOSSA NOVA71 SAMBA72 MAMBO73 RHUMBA74 CHA-CHA-CHA75 MERENGUE76 REGGAE77 BOLERO78 TANGO 279 LAMBADA
LATIN II/VARIOUS I
80 PUNTA81 CUMBIA82 SKA83 TEX-MEX84 SALSA85 FOLKLORE86 PASODOBLE87 RUMBA CATALANA88 SEVILLANA89 FOLK
VARIOUS II
90 COUNTRY91 BLUEGRASS92 TOWNSHIP93 FAST GOSPEL94 SLOW GOSPEL95 ADANI96 BALADI97 BAROQUE98 ENKA99 NEW AGE
Rhythm List Lista de ritmos
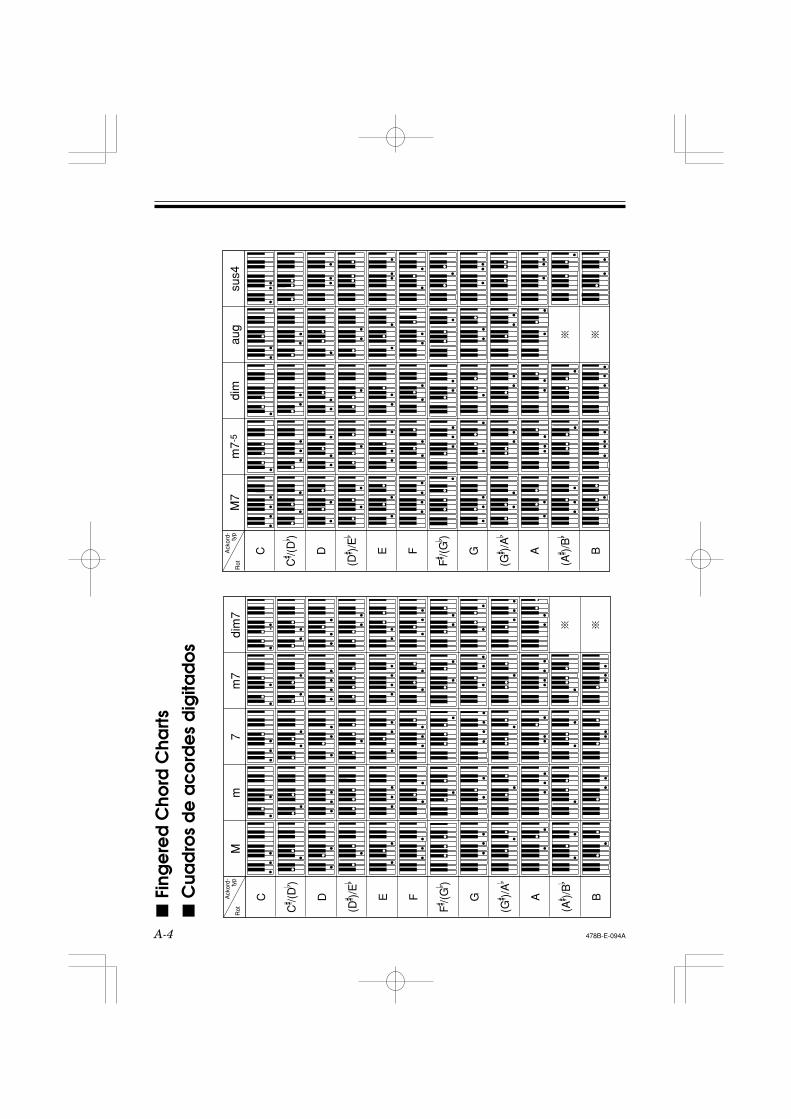
A-4 478B-E-094A
Fi
nge
red
Cho
rd C
harts
C
uad
ros
de
ac
ord
es
dig
itad
os
Ack
ord- typ
Rot
Mm
7m
7di
m7
C
C /(
D )
D
(D )/
E
E F
F /(
G )
G
(G )/
A
A
(A )/
B
B
M7
m7-
5di
mau
gsu
s4
C
C /(
D )
D
(D )/
E
E F
F /(
G )
G
(G )/
A
A
(A )/
B
BAck
ord- typ
Rot
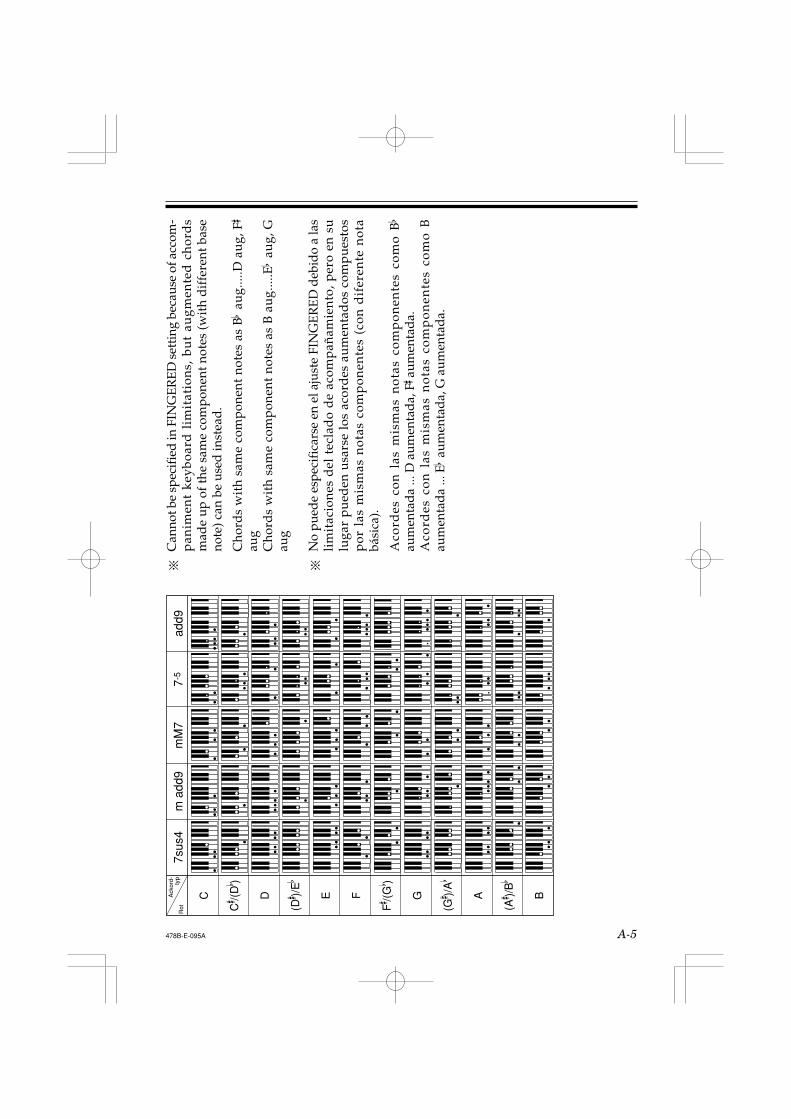
A-5
7sus
4m
add
9m
M7
7-5
add9
C
C /(
D )
D
(D )/
E
E F
F /(
G )
G
(G )/
A
A
(A )/
B
BAck
ord- typ
Rot
478B-E-095A
Can
not b
e sp
ecif
ied
in F
ING
ER
ED
set
ting
bec
ause
of a
ccom
-p
anim
ent
keyb
oard
lim
itat
ion
s, b
ut
augm
ente
d c
hor
ds
mad
e u
p of
the
sam
e co
mpo
nent
not
es (w
ith
dif
fere
nt b
ase
note
) can
be
used
inst
ead
.
Cho
rds
wit
h sa
me
com
pon
ent
note
s as
B au
g....
.D a
ug,
F
aug
Cho
rds
wit
h sa
me
com
pon
ent
note
s as
B a
ug.
....E
aug,
Gau
g
No
pued
e es
peci
fica
rse
en e
l aju
ste
FIN
GE
RE
D d
ebid
o a
las
lim
itac
ione
s d
el t
ecla
do
de
acom
pañ
amie
nto,
per
o en
su
luga
r p
ued
en u
sars
e lo
s ac
ord
es a
um
enta
dos
com
pu
esto
sp
or l
as m
ism
as n
otas
com
pon
ente
s (c
on d
ifer
ente
not
abá
sica
).
Aco
rdes
con
las
mis
mas
not
as c
omp
onen
tes
c om
o B
au
men
tad
a ...
D a
umen
tad
a, F
aum
enta
da.
Aco
rdes
con
las
mis
mas
not
as c
omp
onen
tes
c om
o B
aum
enta
da
... E
aum
enta
da,
G a
umen
tad
a.

478B-E-096A
478B-E-097A
478B-E-098A
478B-E-099A

478B-E-100A
478B-E-101A
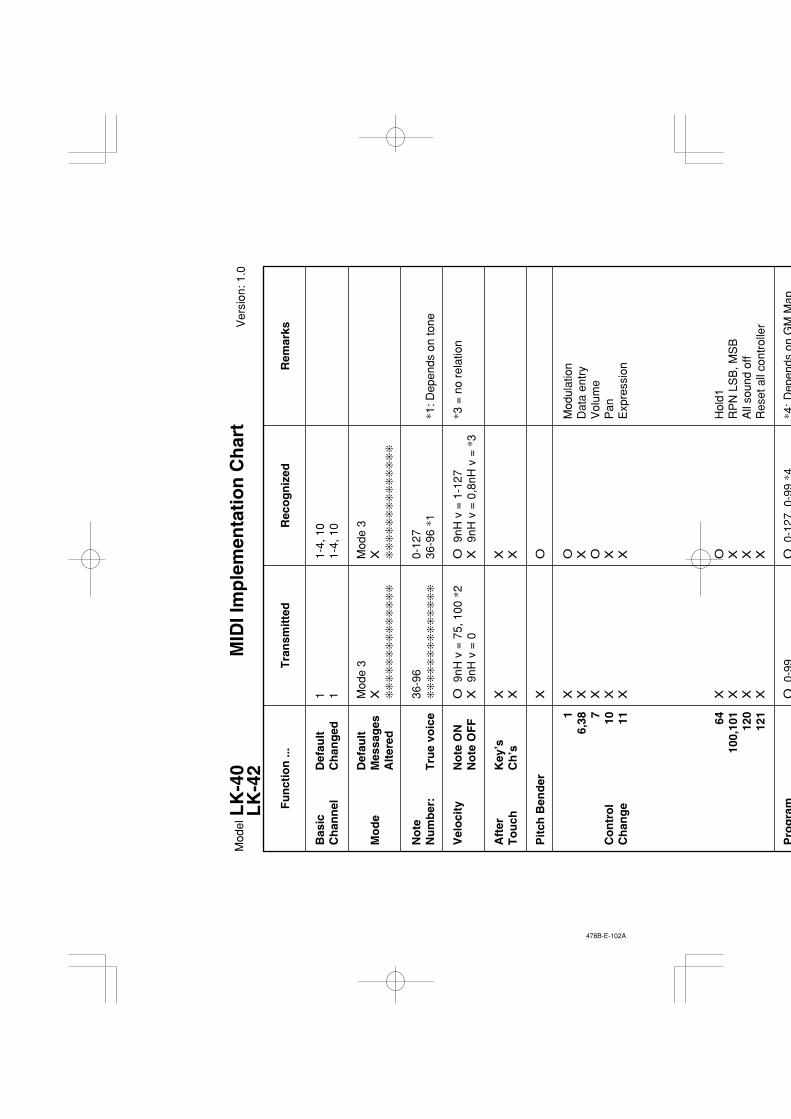
478B-E-102A
Fu
nct
ion
...
Bas
icC
han
nel
Mo
de
No
teN
um
ber
:
Vel
oci
ty
Aft
erT
ou
ch
Pit
ch B
end
er
Co
ntr
ol
Ch
ang
e
Pro
gra
m
Def
ault
Ch
ang
ed
Def
ault
Mes
sag
esA
lter
ed
Tru
e vo
ice
No
te O
NN
ote
OF
F
Key
’sC
h’s
16,
38 7 10 11 6410
0,10
112
012
1
1 1 Mod
e 3
X
36-9
6
O 9
nH v
= 7
5, 1
00 *
2X
9nH
v =
0
X X X X X X X X X X X X O0-
99
1-4,
10
1-4,
10
Mod
e 3
X
0-12
736
-96
*1
O 9
nH v
= 1
-127
X 9
nH v
= 0
,8nH
v =
*3
X X O O X O X X O X X X O0-
127,
0-99
*4
*1: D
epen
ds o
n to
ne
*3 =
no
rela
tion
Mod
ulat
ion
Dat
a en
try
Vol
ume
Pan
Exp
ress
ion
Hol
d1R
PN
LS
B, M
SB
All
soun
d of
fR
eset
all
cont
rolle
r
*4:
Dep
ends
onG
MM
ap
Tra
nsm
itte
dR
eco
gn
ized
Rem
arks
MID
I Im
ple
men
tati
on
Ch
art
Ver
sion
: 1.0
Mod
elL
K-4
0L
K-4
2
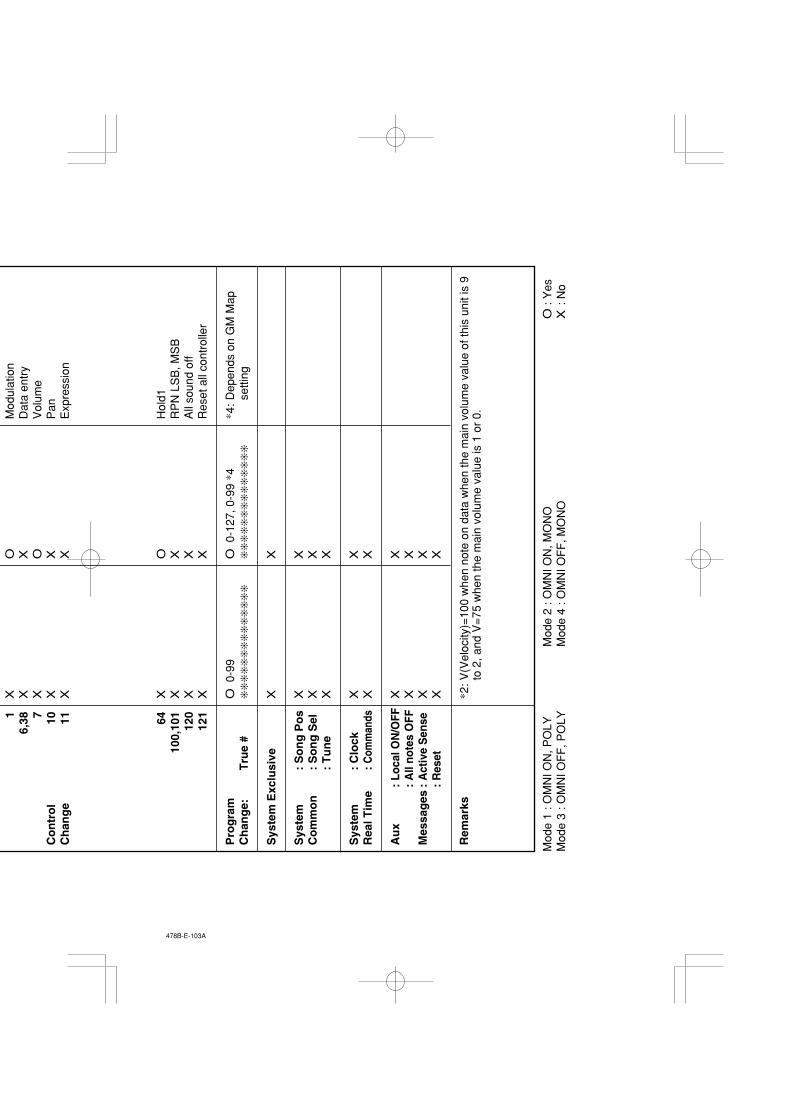
478B-E-103A
Co
ntr
ol
Ch
ang
e
Pro
gra
mC
han
ge:
Sys
tem
Exc
lusi
ve
Sys
tem
Co
mm
on
Sys
tem
Rea
l Tim
e
Au
x
Mes
sag
es
Rem
arks
Tru
e #
: S
on
g P
os
: S
on
g S
el:
Tu
ne
: C
lock
: C
omm
ands
: Lo
cal O
N/O
FF:
All
note
s O
FF:
Act
ive
Sen
se:
Res
et
16,
38 7 10 11 6410
0,10
112
012
1
X X X X X X X X X O 0
-99
X X X X X X X X X X
O X O X X O X X X O 0
-127
, 0-9
9 *4
X X X X X X X X X X
Mod
ulat
ion
Dat
a en
try
Vol
ume
Pan
Exp
ress
ion
Hol
d1R
PN
LS
B, M
SB
All
soun
d of
fR
eset
all
cont
rolle
r
*4:
Dep
ends
on
GM
Map
se
tting
*2:V
(Vel
ocity
)=10
0 w
hen
note
on
data
whe
n th
e m
ain
volu
me
valu
e of
this
uni
t is
9 to
2, a
nd V
=75
whe
n th
e m
ain
volu
me
valu
e is
1 o
r 0.
Mod
e 1
: OM
NI O
N, P
OLY
Mod
e 3
: OM
NI O
FF
, PO
LYM
ode
2 : O
MN
I ON
, MO
NO
Mod
e 4
: OM
NI O
FF
, MO
NO
O :
Yes
X :
No
MA0104-B Printed in MalaysiaLK40/42-ES-1
This recycle mark indicates that the packaging conforms to the environmental protection legislation in Germany.
Esta marca de reciclaje indica que el embalaje se ajusta a la legislación de protección ambiental en Alemania.
PCASIO COMPUTER CO.,LTD.6-2, Hon-machi 1-chome
Shibuya-ku, Tokyo 151-8543, Japan