User manual Twist 212 - Proximus
32
Transcript of User manual Twist 212 - Proximus


2
TECHNICAL DETAILSFree Field Range Up to 300 metres*
Indoor Range Up to 50 metres*
Handset Battery Life (average values)
10 hours talk time**100 hours standby**
Number of Handsets Up to 5
Intercom Mode Yes
Three-Way Conference(1 outside correspondent + 2 internal correspondents)
Yes
Electrical Connection/Base Mains Adaptor
Base main adaptor:Model No.: S004LV0600030Input: 100-240 V/50-60 Hz/0.15 AOutput: 6 V DC/300 mA
Only use the adaptor supplied with the telephoneSingle-phase AC, excluding IT installations defined by the EN60950 standard.Caution: The network voltage is classified as a hazard by the criteria of this standard.
Telephone Connection Appliance designed for connection to a TNV3 class (telecommunications network voltage) analogue Belgacom telephone line as defined by the EN60950 standard.
Batteries AAA – 1.2 V – 400 mAOnly use the batteries supplied with the telephone.Use any other type of battery presents a risk of explosion. Used batteries must be disposed of in compliance with current environmental protection regulations.
Operating Temperature From 5°C to 40°C
* Values may vary according to environment.** Depending on initial battery charge.

3
TABLE OF CONTENTS
1 IMPORTANT SAFETY INSTRUCTIONS ......................................... 51.1 Package Contents..........................................................................61.2 Precautions ..................................................................................6
2 INSTALLING YOUR PHONE ........................................................ 72.1 Installing and Charging the Batteries ...............................................72.2 Connecting the Base Station ...........................................................82.3 Set the Handset Language .............................................................8
3 GETTING TO KNOW YOUR PHONE .............................................. 93.1 Twist 212 Handset Overview ...........................................................93.2 Base Station Overview ................................................................113.3 Display Icons and Symbols ...........................................................12
4 USING YOUR PHONE ................................................................ 134.1 Make a Call ................................................................................134.2 Answer a Call .............................................................................134.3 End a Call ..................................................................................144.4 Adjust Earpiece and Handsfree Volume ............................................... 144.5 Mute a Call .................................................................................144.6 Set the Silent Mode .....................................................................144.7 Turn on the Keypad Lock ..............................................................144.8 Redial the Last Number ................................................................144.9 Find the Handset .........................................................................154.10 Make an Internal Call ...................................................................15
5 PRIVATE PHONEBOOK.............................................................. 175.1 Add a New Phonebook Entry .........................................................175.2 Search a Phonebook Entry ............................................................175.3 View a Phonebook Entry ...............................................................175.4 Edit a Phonebook Entry ................................................................185.5 Delete a Phonebook Entry ............................................................185.6 Delete the Entire Private Phonebook ..............................................185.7 Check the Phonebook Usage .........................................................18
6 CALLER DISPLAY ....................................................................... 196.1 View the Call List ........................................................................196.2 Store a Call List Number into the Phonebook ...................................196.3 Delete an Entry in the Call List ......................................................196.4 Delete the Entire List of the Call List ..............................................206.5 View the Details of the Call List Entry .............................................206.6 Set the Category of the Call List ....................................................20

4
7 PHONEMAIL ............................................................................. 21
8 PHONE SETTINGS .................................................................... 218.1 Date and Time Settings ................................................................218.2 Alarm Settings ............................................................................228.3 Handset Settings.........................................................................238.4 Base Settings .............................................................................248.5 Registration ................................................................................268.6 Reset Your Phone ........................................................................26
9 TROUBLESHOOTING ................................................................. 27
10 GUARANTEE TERMS .................................................................. 28
11 SAFETY .................................................................................... 30
12 ENVIRONMENT ......................................................................... 31

5
1 IMPORTANT SAFETY INSTRUCTIONS
When using your telephone equipment, basic safety precautions should always be followed to reduce the risk of fire, electric shock and injury, including the following:
1) Read and understand all the instructions.
2) Follow all warnings and instructions marked on the product.
3) Unplug this product from the wall outlet before cleaning. Do not use liquid cleaners or aerosol cleaners. Use a damp cloth for cleaning.
4) Do not use this product near water (for example, near a bath tub, kitchen sink, swimming pool).
5) Do not expose the telephone to direct sunlight or extreme cold environment. Do not put the telephone close to a heating source such as radiators, cookers, etc.
6) Do not overload wall outlets and extension cords as this can result in the risk of fire or electric shock.
7) NEVER use your phone outdoors during a thunderstorm-unplug the base from the telephone line and the mains socket when there are storms in your area.
8) Do not use the telephone to report a gas leak in the vicinity of the leak.
9) Use only the supplied NiMH (Nickel Metal Hydride) batteries! The operation periods for the handsets are only applicable with the default battery capacities.
10) The use of other battery types or non-rechargeable batteries can be dangerous. These may cause interference and/or unit damages. The manufacturer will not be held liable for damage arising from such non-compliance.
11) Do not use third party chargers. The batteries may be damaged.
12) Please note the correct polarity while inserting the batteries.
13) Dispose of batteries safely. Do not immerse them in water, burn them, or put them where they could get punctured.

6
1.1 Package ContentsThe package contains the following items:• 1 Handset• 1 Base station• 1 Mains power adapter• 1 Telephone line cord• 2 rechargeable batteries• 1 User’s guide• 1 Telephone connector
Please read this guide carefully to get to know the main features of your Twist 212, and read the safety instructions before using it. We also invite you to share the safety guidelines contained in this guide with all familymembers, and especially children.
1.2 PrecautionsAs with all radio communications, the signal quality will depend on the location and environment of the base and handset.Your Twist 212 must be kept away from sources of excessive heat (radiators, direct sunlight, etc.) and protected against vibrations and dust. Never allow your telephone to come into contact with water or other liquids, or with aerosols.To reduce the risk of interference and optimise reception, take particular care not to install the base in the immediate vicinity of windows, large metal objects, reinforced concrete, televisions, music centres, halogen lamps or heating devices, fluorescent lighting, burglar alarms, microwave ovens, computers, etc.To clean your set, use an antistatic cloth lightly moistened with water.

7
2 INSTALLING YOUR PHONE
2.1 Installing and Charging the Batteries1. Slide down to open the battery compartment cover.2. Place the 2 supplied AAA batteries as indicated. Pay extra attention to
direction of polarity.3. Slide the battery compartment cover back.4. Put the handset on the base and charge for 15 hours before using the
handset for the first time. The handset will give a beep when it is properly placed on the base or charger.
Note:Only use rechargeable batteries with exactly the same specifications as those supplied with the product.
Using non-rechargeable or non-conforming batteries can damage the product and could pose a health hazard (see Chapter “Technical details”).
Batteries can split or leak if incorrectly inserted, opened or exposed to heat.Never dispose of batteries in a fire: they could explode.

8
2.2 Connecting the Base Station1. Plug one end of the telephone line cord into the telephone jack on base
bottom.2. Plug the small end of power adapter into a power jack on base bottom.3. Connect the power supply plug to the base jack horizontally, and route the
power supply cord through the slot.4. Plug the large end of power adapter into a wall power outlet.5. Plug the other end of the telephone line cord in to the telephone jack or
micro-filter.6. Always use the cables provided in the box.
2.3 Set the Handset Language1. Press M and +/- to select HS SETTINGS.2. Press M and +/- to select LANGUAGE.3. Press M and +/- to select the desired language.4. Press M to confirm.

9
3 GETTING TO KNOW YOUR PHONE
3.1 Twist 212 Handset Overview
1. M In idle mode: Press to access the main menu In sub-menu mode: Press to confirm the selection During a call: Press to access Intercom/Phonebook/Redial list/Call list2. C In main menu mode: Press to go back to idle screen In sub-menu mode: Press to go back to previous level In sub-menu mode: Press and hold to go back to idle screen In editing/predialing mode: Press to clear a character/digit In editing/predialing mode: Press and hold to delete all the characters/
digits During a call: Press to mute/unmute the microphone In idle mode: Press to intercom another handset In ringing: Press to suppress handset ringer

10
3. + In idle mode: Press to access the call list In menu mode: Press to scroll up the menu items In Phonebook list/Redial list/Call List: Press to scroll up the list During a call: Press to increase the volume In ringing: Press to increase the ringer volume4. - In idle mode: Press to access the redial list In menu mode: Press to scroll down the menu items In Phonebook list/Redial list/Call List: Press to scroll down the list During a call: Press to decrease the volume In ringing: Press to decrease the ringer volume5. O During a call: Press to end a call and go back to idle screen In menu/editing mode: Press to go back to previous menu In menu/editing mode: Press and hold to go back to idle screen In idle mode: Press and hold to power off the handset In idle mode: Press and hold to power on/off the handset6. R In idle/predialing mode: Press to insert a flash During a call: Press to dial a flash7. P In idle mode: Press to access the phonebook list8. S During a call: Press to turn on/off the speakerphone. In Idle mode/predialing mode/Redial list/Call list/Phonebook entry: Press
to make a call with speakerphone During ringing: Press to answer a call with speakerphone9. ALPHANUMERIC KEYPAD, *, #
* key in idle mode: Press and hold to enable or disable the keypad lock * key during a call (in Pulse mode): Press to switch to tone mode # key in idle mode: Press and hold to turn on/off the ringer # key in call list mode: Press to review caller’s number if applicable. 0 key in predialing/number editing mode: Press and hold to insert a pause 1, 2, 3 key in idle/off hook mode: Press and hold to dial the stored direct
memory number (Key 1 : direct access to Belgacom voicemail server* (PhoneMail))**10. T In idle/predialing mode: Press to make a call In Redial list/Call list/Phonebook entry: Press to make a call to the selected
entry in the list

11
During ringing: Press to answer a call
*Subject to technical availability and to subscription from Belgacom.
**See Chapter 8.3.8 on how to program the memory key.
3.2 Base Station Overview
1. A Press A on the base station to page your handset. It will ring for
approximately 60 seconds. Press and hold A on the base station for about five seconds, the base
station is entered into registration mode and allows handset registration.
2. , @ Steadily on while the handset is charging or in use. (Applicable only when
the LED I/O switch is slid to “I”) Flash when receiving an incoming call. (Applicable only when the LED I/O
switch is slid to “I”)3. LED I/O SWITCH (Bottom of the Base) Slide the switch to "O" position to turn off the base LED Slide the switch to "I" position to turn on the base LED when the handset is
charging on the base or in use

12
3.3 Display Icons and Symbols The LCD display gives you information on the current status of the telephone.
h Steadily on when the handset is in range of the base. Flash when out of range of the base or not registered to the base.
j Steadily on when an intercom is in progress.Flash when there is an incoming internal call.
k Indicates a call is in progress.
l Indicate that handsfree is being used.
x Steadily on when an alarm is set. Flash when the alarm time set before reaches.
a Indicate that the keypad is locked.
g Indicate when there are new received Voice Message on Phonemail. Disappear when all the voice messages have been read.
n Indicate that the ringer is switched off.
b Indicate when the battery is fully charged.Whole icon flashes when the battery performs initial charging. Internal block icon flashes when the battery is in final charging stage.
v Indicate when the battery needs charging.Flash when low battery power level is detected.
[ Indicate when more characters are existed before the text currently displayed.
] Indicate when more characters are existed after the text currently displayed.
s Indicate when new call is received. Turn off when new call has been read.
f Scroll up/down the menu items/Phonebook list/Redial list/Call List.

13
4 USING YOUR PHONE
4.1 Make a Call4.1.1 Preparatory DialingEnter the phone number and press T or S to dial the number. Press C to clear the entry.
4.1.2 Direct DialingPress T or S to take the line and enter the phone number.
4.1.3 Dial from Direct Memory KeysIn idle or off hook mode, press and hold 1/2/3 to dial the direct memory number. You have to store number to the related key first. See section 8.3.8 for reference.
4.1.4 Call from the PhonebookPress P to access the phonebook and press +/- to select the desired phonebook entry. Press T or S to dial out to the selected phonebook entry. Alternatively, press M to access the phonebook to get the desired phonebook entry.
4.1.5 Call from the Call ListPress + to access the Call List and press +/- to select the desired Call List entry. Press T or S to dial out to the selected Call List entry. Alternatively, press M to access the Call List from the main menu.
4.1.6 Call TimerYour handset automatically times the duration of every call. The call timer will display a few seconds after the call has made. It is shown in hours, minutes and seconds format (HH:MM:SS).
4.1.7 Call from the Redial ListPress - to access the redial list and press +/- to select the desired redial number. Press T or S to dial out to the selected redial number.
4.2 Answer a CallIf the handset is not on the charging cradle:When the phone rings, press Tor S to answer a call.
If the handset is on the base station and if AUTO ANSWER is set to ON:When the phone rings, pick up the handset to answer a call.

14
4.3 End a CallDuring a call connection, press O to end the call.ORPut the handset on the base station to end the call.
4.4 Adjust Earpiece and Handsfree VolumeThere are 5 levels (VOLUME 1 to VOLUME 5).
During a call:Press +/- to select volume 1-5. The current setting is shown. When you end the call, the setting will remain at the last selected level.
4.5 Mute a CallYou can talk to someone nearby without letting the caller hear you during a call.
During a call:Press C to mute the microphone and “MUTED” will display on the LCD. Your caller cannot hear you. Press C again to unmute the microphone.
4.6 Set the Silent ModeIn idle mode, press and hold # to turn off the handset ringer. The n icon is displayed on the LCD.In silent mode, press and hold # to turn on the handset ringer. The n icon will disappear.
4.7 Turn on the Keypad LockIn idle mode, press and hold * to turn on the keypad lock. The a icon is displayed on the LCD.In keypad lock mode, if you press any key other than holding the * key, the screen will display “KEYS LOCKED” for around 2 seconds, and then “HOLD *” displays. You can press and hold * to turn off the keypad lock. The a icon will disappear.
4.8 Redial the Last NumberYou can redial up to 10 of the last numbers called. If you have stored a name in the phonebook to go with the number, the name will be displayed instead. The most recent last number will display at the top of the redial list.

15
4.8.1 Redial a Number from the Redial List 1. In idle mode, press - to access the redial list. Remarks: If redial entry with name, press # to view the number.2. Press +/- to browse the redial list.3. Press T or S to dial to the selected redial number.
Note: If there are no numbers in the redial list, the display shows “EMPTY”.
4.8.2 Store a Redial Number into the Phonebook1. Follow Steps 1 and 2 in section 4.8.1.2. Press M and +/- to select ADD TO PB.3. Press M to enter the name.4. Press M to store the redial number into the phonebook.5. Press M to select phonebook melody.6. Press +/- to browse the melody list. The respective melody will be played
when browsing the melody list.7. Press M to confirm.
4.8.3 Delete a Redial Number1. Follow Steps 1 and 2 in section 4.8.1.2. Press M and +/- to select DELETE.3. Press M to confirm.
4.8.4 Delete the Entire Redial List1. Follow Steps 1 and 2 in section 4.8.1.2. Press M and +/- to select DELETE ALL.3. Press M to confirm.4. Press M to confirm again.
4.9 Find the HandsetYou can locate the handset by pressing A on the base station. All the handsets registered to the base will produce the paging tone and “PAGING” is displayed on the LCD. You can stop the paging by pressing T/O/C/S on any handset or A on the base again.Note: If there is an incoming call during paging, the phone will ring with the
incoming call instead of paging.
4.10 Make an Internal CallThis feature is only applicable when there are at least two registered handsets. It allows you to make internal calls, transfer external calls from one handset to another handset and make conference calls. If the called handset is not answered within 60 seconds, the called handset will stop ringing and the calling
16
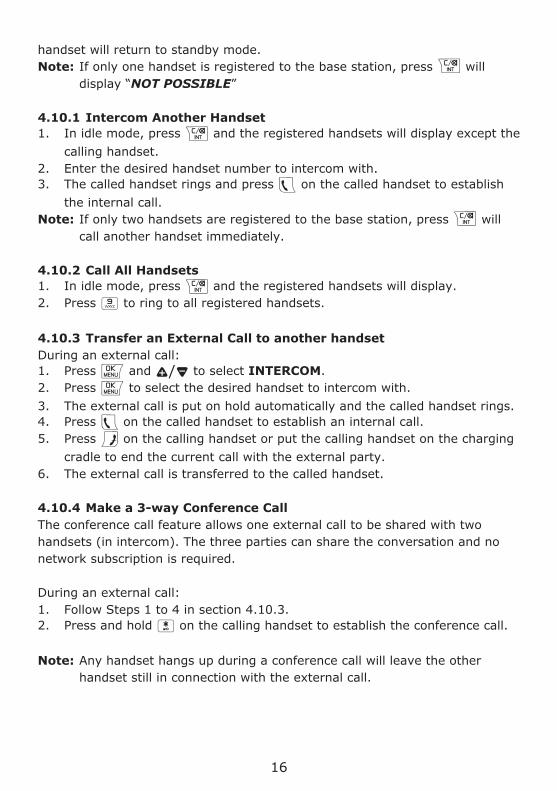
handset will return to standby mode.Note: If only one handset is registered to the base station, press C will
display “NOT POSSIBLE”
4.10.1 Intercom Another Handset1. In idle mode, press C and the registered handsets will display except the
calling handset.2. Enter the desired handset number to intercom with.3. The called handset rings and press T on the called handset to establish
the internal call.Note: If only two handsets are registered to the base station, press C will
call another handset immediately.
4.10.2 Call All Handsets1. In idle mode, press C and the registered handsets will display.2. Press 9 to ring to all registered handsets.
4.10.3 Transfer an External Call to another handsetDuring an external call:1. Press M and +/- to select INTERCOM.2. Press M to select the desired handset to intercom with.
3. The external call is put on hold automatically and the called handset rings.4. Press T on the called handset to establish an internal call.5. Press O on the calling handset or put the calling handset on the charging
cradle to end the current call with the external party.6. The external call is transferred to the called handset.
4.10.4 Make a 3-way Conference CallThe conference call feature allows one external call to be shared with two handsets (in intercom). The three parties can share the conversation and no network subscription is required.
During an external call:1. Follow Steps 1 to 4 in section 4.10.3.2. Press and hold * on the calling handset to establish the conference call.
Note: Any handset hangs up during a conference call will leave the other handset still in connection with the external call.

17
5 PHONEBOOK
Your phone can store up to 50 private phonebook entries with names and numbers. Each phonebook entry can have a maximum of 20 digits for the phone number and 12 characters for the name. You can also select different ringtones for your phonebook entries. Phonebook entries are stored alphabetically by name.
5.1 Add a New Phonebook EntryIn idle:1. Press P to access the phonebook.
OR Press M and +/- to select PHONEBOOK main menu item and then press M to access the phonebook.2. Press M to select ADD.3. Press M to enter the name.4. Press M to enter the number.5. Press M and +/- to select the desired ringtone for your phonebook
entry.6. Press M to store the phonebook entry.
5.2 Search a Phonebook EntryIn idle:1. Press P to access the phonebook.
2. Enter the first character of the name by multi-tap.
5.3 View a Phonebook EntryIn idle:1. Press P to access the phonebook.2. Press +/- to select the desired phonebook entry.3. Press M and +/- to select VIEW.4. Press M and +/- to review the name, number and melody of the
selected phonebook entry. Note: If number is more than 12 digits, press M or C to view the
remaining digits.

18
5.4 Edit a Phonebook EntryIn idle:1. Press P to access the phonebook.2. Press +/- to select the desired phonebook entry.3. Press M and +/- to select EDIT.4. Press M and the current contents of the selected phonebook entry displays.5. Edit the name (press C to delete a character) and press M.6. Edit the number (press C to delete a digit) and press M.7. Press +/- to select the ringtone and press M to confirm.
5.5 Delete a Phonebook EntryIn idle:1. Press P to access the phonebook.2. Press +/- to select the desired phonebook entry.3. Press M and +/- to select DELETE.4. Press M to confirm.
5.6 Delete the Entire Private Phonebook1. Press P to access the phonebook.2. Press M and +/- to select DELETE ALL.3. Press M to confirm.4. Press M to re-confirm.
5.7 Check the Phonebook UsageYou can check how many phonebook entries have been occupied in your phone and how many phonebook entries are available for you to store in the phonebook.1. Press P to access the phonebook.2. Press M and +/- to select PB STATUS.3. Press M to confirm.

19
6 CALLER DISPLAY
This feature is available if you have subscribed the Caller Line Identification service with Belgacom. Your phone can store up to 20 received calls with date/time information in the Call List. The number will be shown on the LCD when the phone is ringing. If the number matches with one of the entries in your Private Phonebook, the caller’s name stored in the private phonebook will be displayed alternatively with the number. The handset will ring with the melody associated with that phonebook entry.
If the caller number is disabled to send caller information, “WITHHELD” will display.If the caller number is not provided, “OUT OF AREA” will display.In standby, if three unanswered calls are received, “3 NEW CALLS” will be displayed.
6.1 View the Call ListAll received calls are saved in Call List with the latest call putting at the top of the list. When the call list is full, the oldest call will be replaced by a new call. The unanswered call which has not been read is marked with a s at the centre of the bottom line of the display.
1. Press + to access the call list.
OR Press M and +/- to select CALL LIST.2. Press +/- to select the desired entry.3. Press # to view the caller’s number if applicable.
6.2 Store a Call List Number into the Phonebook1. Follow Steps 1 and 2 in Section 6.1.2. Press M and +/- to select ADD TO PB.3. Press M to enter the name.4. Press M and the selected call list number is displayed.
5. Edit the number if necessary.6. Press M and +/- to select the melody.7. Press M to confirm.
6.3 Delete an Entry in the Call List1. Follow Steps 1 and 2 in Section 6.1.2. Press M and +/- to select DELETE.3. Press M to confirm.

20
6.4 Delete the Entire List of the Call List1. Follow Steps 1 and 2 in Section 6.1.2. Press M and +/- to select DELETE ALL.3. Press M to confirm.4. Press M to re-confirm.
6.5 View the Details of the Call List Entry1. Follow Steps 1 and 2 in Section 6.1.2. Press M and +/- to select DETAILS.3. Press M to display the date and time of the selected call list entry.4. Press M to go back to previous screen.
6.6 Set the Category of the Call ListYou can choose to store the missed calls only or all incoming calls in call list.
1. Follow Steps 1 and 2 in Section 6.1.2. Press M and +/- to select CATEGORY.3. Press M and +/- to select MISSED CALLS or ALL CALLS.4. Press M to confirm.

21
7 PHONEMAIL
By subscription to Belgacom, you can have your calls diverted to Phonemail when you are absent. For more details, contact Belgacom.
When new messages are received, the icon appears on the screen. The g icon disappears once you have consulted the voicemail messages. If the icon doesn't disappear, press and hold 4 during call list review will turn off the voicemail icon manually.
8 PHONE SETTINGS
Your phone comes with a selection of settings that you can change to personalize your phone the way you like it to work.
8.1 Date and Time SettingsYou will need to set the correct time and date so that you know when you received call list entries.
8.1.1 Change the Date Format1. Press M and +/- to select HS SETTINGS.2. Press M and +/- to select DATE & TIME.3. Press M and +/- to select DATE FORMAT.4. Press M and +/- to select your desired date format (DD-MM-YY or
MM-DD-YY).5. Press M to confirm.
8.1.2 Change the Time Format1. Press M and +/- to select HS SETTINGS.2. Press M and +/- to select DATE & TIME.3. Press M and +/- to select TIME FORMAT.4. Press M and +/- to select your desired time format (12 HR or 24 HR).5. Press M to confirm.

22
8.1.3 Set the Time1. Press M and +/- to select HS SETTINGS.2. Press M and +/- to select DATE & TIME.3. Press M and +/- to select SET TIME.4. Press M to enter the time information. The time entered will be in the
format you set in Section 8.1.2.5. Press M to confirm.
Note: If time has been set before, the current time will display, otherwise, “HH:MM” will display.
8.1.4 Set the Date1. Press M and +/- to select HS SETTINGS.2. Press M and +/- to select DATE & TIME.3. Press M and +/- to select SET DATE.4. Press M to enter the date information. The date entered will be in the
format you set in Section 8.1.1.5. Press M to confirm.
Note: If date has been set before, the current date will display, otherwise, “DD-MM-YY” will display.
8.2 Alarm SettingsYou can use this phone to set an alarm clock. When an alarm is set, the x icon displays on the LCD. When the alarm time is reached, the x icon and “ALARM ON” flash on the LCD ringing with the alarm melody for a duration of 45 seconds. You can press any key to disable the alarm. If snooze function is activated, the alarm will sound again at the end of the snooze period of 7 minutes.
8.2.1 Turn on/off the Alarm 1. Press M and +/- to select HS SETTINGS.2. Press M and +/- to select ALARM.3. Press M and +/- to select ON/OFF.4. Press M to confirm.
Note: If ON is selected, you will be asked to set the alarm time.
8.2.2 Set the Alarm Time (if the Alarm is set to be ON)1. Follow Steps 1 to 4 in Section 8.2.1.2. Enter the alarm time.3. Press M to set the snooze function.4. Press M and +/- to select ON or OFF.5. Press M to confirm.

23
8.3 Handset Settings8.3.1 Set the Ringer Melody for Internal/External Calls1. Press M and +/- to select HS SETTINGS.2. Press M and +/- to select RING SETUP.3. Press M and +/- to select INT RING or EXT RING.4. Press M and +/- to select the desired ringer melody from the melody
list.Note: The respective ringer melody will be played while browsing the melody list.
5. Press M to confirm.
8.3.2 Set the Ringer Volume1. Press M and +/- to select HS SETTINGS.2. Press M and +/- to select RING SETUP.3. Press M and +/- to select RING VOLUME.4. Press M and +/- to select the desired ringer volume (a total of 6 ringer
volume levels including VOLUME OFF). Note: The respective ringer volume will be played during your selection.
If VOLUME OFF is selected, n icon will display.5. Press M to confirm.
8.3.3 Set Alert TonesA single beep is emitted when you press a key. You can turn on or off the key tone. You can also turn on the alert tones when low battery and out of range are detected. Low battery tone will be emitted while you are talking with the phone to alert you that you need to charge up your battery.
1. Press M and +/- to select HS SETTINGS.2. Press M and +/- to select TONE SETUP.3. Press M and +/- to select KEY TONE/BATTERY TONE/OUT OF
RANGE.4. Press M and +/- to turn on or off these tones.5. Press M to confirm.
8.3.4 Set the Handset Language1. Press M and +/- to select HS SETTINGS.2. Press M and +/- to select LANGUAGE.3. Press M and +/- to select the desired language.4. Press M to confirm.

24
8.3.5 Rename the Handset1. Press M and +/- to select HS SETTINGS.2. Press M and +/- to select RENAME HS.3. Press M and enter the name of your handset.4. Press M to confirm.
8.3.6 Choose the Information to be displayed in idleYou can choose to display time or handset name in your idle screen.
1. Press M and +/- to select HS SETTINGS.2. Press M and +/- to select HS DISPLAY.3. Press M and +/- to select HANDSET NAME or TIME.4. Press M to confirm.
8.3.7 Set the Auto Answer If you turn on the Auto Answer, you can pick up the call from the cradle without pressing any key.
1. Press M and +/- to select HS SETTINGS.2. Press M and +/- to select AUTO ANSWER.3. Press M and +/- to turn on or off the auto answer feature.4. Press M to confirm.
8.3.8 Set the Direct Memory Number1. Press M and +/- to select HS SETTINGS.2. Press M and +/- to select DIRECT MEM.3. Press M and +/- to select the desired direct memory key from KEY 1,
KEY 2 and KEY 3.4. Press M and input the number to be stored.5. Press M to confirm. Note: Press and hold 1, 2 or 3 to call the stored number.
8.4 Base SettingsThe current settings are marked an asterisk which is displayed at the rightmost of the menu item.
8.4.1 De-register a HandsetYou are requested to enter the 4-digit PIN in order to de-register a handset from the base station. The antenna icon on the de-registered handset will blink.Note: You cannot de-register the handset that you are currently using.

25
1. Press M and +/- to select BS SETTINGS.2. Press M and +/- to select DELETE HS.3. Press M and you are requested to enter the 4-digit system PIN.
4. Enter the 4-digit system PIN (default PIN is 0000).5. Press M and a list of registered handsets is displayed.6. Press +/- to select one of the handsets that you want to de-register.7. Press M to confirm.
8.4.2 Change the Flash TimeOn the Belgian public network, the recall time is 120 ms (SHORT).
1. Press M and +/- to select BS SETTINGS.2. Press M and +/- to select FLASH TIME.3. Press M and +/- to select your desired flash time (SHORT, MEDIUM,
LONG).4. Press M to confirm.
8.4.3 Change the System PIN CodeA 4-digit system PIN code is used for changing the system settings of the base station. It is used to protect your phone against unauthorized use. The default system PIN code is 0000.
1. Press M and +/- to select BS SETTINGS.2. Press M and +/- to select CHANGE PIN.3. Press M and you are requested to enter the 4-digit system PIN.
4. Enter the old system PIN.5. Press M and enter the new system PIN.6. Press M and enter the new system PIN again.
Note: If the new PIN entered in Step 6 is not matched with the new system PIN entered in Step 5, user is requested to enter the valid system PIN again in Step 5.
7. Press M to confirm.
8.4.4 ECO Mode Setting1. Press M and +/- to select BS SETTINGS.2. Press M and +/- to select ECO MODE.3. Press M and +/- to select ON or OFF.4. Press M to confirm.

26
8.5 RegistrationYour handset and base station is pre-registered. Up to five handsets can be registered to a single base station.If for some reason, the handset is not registered to the base station (h flashes even when the handset is near the base station), register your handset according to the following procedure.
1. Press and hold A on the base station for about five seconds, the base
station is entered into registration mode.2. Press M and +/- to select REGISTRATION.3. Press M and you are requested to enter the 4-digit system PIN (default
PIN is 0000).4. Enter the 4-digit system PIN.5. Press M to confirm.
If the handset registration is successful, the h will stop flashing. The handset will automatically be allocated the next available handset number. This handset number is shown in the handset display in standby mode. If the handset registration is unsuccessful, the h will still flash.
8.6 Reset Your PhoneYou can reset your phone to the default settings. After reset, all you personal settings and call list entries will be deleted, but your phonebook remains unchanged.
1. Press M and +/- to select DEFAULT.2. Press M and you are requested to enter the 4-digit system PIN (default
PIN is 0000).3. Enter the 4-digit system PIN.4. Press M to confirm.5. Press M to re-confirm.

27
9 TROUBLESHOOTING
If you have difficulty with your phone, please try the suggestions listed below. As a general rule, if a problem occurs, remove the batteries from all the handsets in your installation for about 1 minute, then disconnect and reconnect the power supply to the base and reinstall the handset batteries.
Problem Cause SolutionsNo dialing tone when pressing T key
a. The connection cord of the base station is not plugged in.
a. Check the connections. Unplug and plug back in the mains. Check that the telephone line cord has been plugged into the base station and the phone socket.
b. Check the base station plug and the 220V plug (remove and plug-in).
c. Wait until the line is unoccupied.
d. Use the original connection cord.
“OUT OF RANGE’’ is displayed.
a. Base station out of range.
b. Base station not connected to mains.
a. Reduce the range.b. Connect base station to
mains.
The call does not work.
Service not activated or wrong operator.
Check your Subscription with network.
No display. Empty battery Recharge battery

28
10 GUARANTEE TERMS
The Equipment you have bought has been carefully selected by Belgacom and is covered by a two-year warranty on spare parts and labor in the event of any material or manufacturing defect, unless otherwise specified. The warranty shall be valid from the date on which the equipment is collected or delivered.
If you have any problems with the equipment, you should take it to a Teleboutique or to one of our authorized agents, in its entirety and in its original packaging, or in packaging providing the same degree of protection, together with the original receipt. The addresses for our Teleboutiques and authorized agents are given in the Information Section of the White Pages.
Your equipment will be repaired or replaced free of charge, on presentation of the receipt, in the event of any material or manufacturing defect.
Belgacom alone shall determine what repairs and/or replacements are necessary. The warranty on the repaired or replaced equipment shall end on the date on which the original warranty on the purchased equipment expires, but shall not be less than 3 months.
The warranty shall not cover:
- damage of any kind that does not predate the sale;
- any damage, faults or defects attributable to the Customer or to causes unrelated to the Equipment: lightning, power surges, humidity, accidental damage, improper use or poor maintenance, failure to comply with the instructions in the user manual, and force majeure;
- the repair or replacement of movable parts (cords, wires, plugs, aerials,etc.), consumables (cells, batteries, paper, ink, etc.) needing regular replacement and the supply of cleaning products.
The warranty shall not apply:
- to any changes or repairs to the terminal Equipment undertaken by the Customer himself/herself or through the services of persons not designated by Belgacom;
- if the Customer removes or tampers with the manufacturer’s serial numbers and/or brand names on the terminal Equipment;

29
Belgacom shall not be liable for any indirect or immaterial loss sustained by the Customer as a result of the malfunctioning of the terminal Equipment, such as any loss of production, revenue or contracts.
! The General Terms and Conditions for the Sale of Terminal Equipment can be obtained on request from any Belgacom service available to the public or at www.belgacom.be.
Belgacom shall not be liable for any indirect or immaterial loss sustained by the Customer as a result of the malfunctioning of the terminal Equipment, such as any loss of production, revenue or contracts.
Belgacom SA under public law Bd. du Roi Albert II 27, B-1030 Brussels VAT BE 0202.239.951, Brussels Register of Legal Entities

30
11 SAFETY
In the event of an electrical hazard, the mains adapter acts as 230V power isolating device. It should therefore, as a precaution, be installed close to the appliance and be easily accessible. To disconnect the device from the primary power source, the mains adapter must be removed from the 230V AC/50 Hz socket.
If the mains adapter fails, it must be replaced by an identical model.
If not connected to the mains power or if there is a mains power failure, telephones that use cordless handsets will not work.
You will then be unable to make or receive calls in the event of an emergency.
This is why we recommend that you also keep a conventional telephone – one that doesn’t require a power supply – as a backup.
! Do not use your telephone to notify a gas leak when standing in the vicinity of the leak.
It is recommended that you avoid using this device during electrical storms.Do not attempt to open the batteries, as they contain chemical substances. In the event of leakage, avoid contact with the skin, eyes, nose and mouth. In the event of contact, rinse the affected part for about twenty minutes with running water and seek urgent medical attention. Clean the product with absorbent paper or a dry cloth and contact your reseller for replacement batteries.

31
12 ENVIRONMENT
The equipment that you bought has required the extraction and use of natural resources for its production. It may contain hazardous substances for the health and the environment.
In order to avoid the dissemination of those substances in our environment and to diminish the pressure on the natural resources, we encourage you to use the appropriate take-back systems. Those systems will reuse or recycle most of the materials of your end life equipment in a sound way.
The crossed-bin symbol invites you to use those systems.
If you need more information on the collection, reuse and recycling systems, please contact your local or regional waste administration.
You can also contact us for more information on the environmental performances of our products.

32
Twist 212
A/W No.:10000545 Rev.0(EN)