User Manual I C H - kostal-automobilelektrik.cn · User Manual I nventory C ollaboration H ub Vers....
30
User Manual Inventory Collaboration Hub Vers. 1.0 1 1 GLOBAL INFORMATION 2 1.1 Preconditions 2 1.2 Logon 2 1.3 Logout 2 1.4 Navigation 2 1.5 Search, Filter, Find 3 1.6 Open/Close Tray 4 1.7 Personalize 5 1.8 Maintain own product number 6 2 RELEASE PROCESS 6 2.1 Release Process Overview 6 2.2 Release Details 7 2.3 Release Comparison 8 2.4 Due List for Purchasing Documents 9 3 DELIVERY/ASN 10 3.1 ASN Overview Supplier 10 3.2 Create ASN from Due list 10 3.3 Print Labels and Delivery Notes 12 4 PACKAGING 14 4.1 Manual Packaging 15 4.2 Automatic Packing 19 4.3 Packaging Specifications (SNC) 20 4.3.1 Display Packaging Specifications 20 4.3.2 Create Packaging Specification 21 5 ALERTING 26 5.1 Selection of Alerts 26 5.2 Alert message generation 27 5.2.1 Selection profile arrangement 27 5.2.2 Message profile creating 28 6 QUICK-GUIDE 30
Transcript of User Manual I C H - kostal-automobilelektrik.cn · User Manual I nventory C ollaboration H ub Vers....

User Manual Inventory Collaboration Hub
Vers. 1.0 1
1 GLOBAL INFORMATION 2
1.1 Preconditions 2
1.2 Logon 2
1.3 Logout 2
1.4 Navigation 2
1.5 Search, Filter, Find 3
1.6 Open/Close Tray 4
1.7 Personalize 5
1.8 Maintain own product number 6
2 RELEASE PROCESS 6
2.1 Release Process Overview 6
2.2 Release Details 7
2.3 Release Comparison 8
2.4 Due List for Purchasing Documents 9
3 DELIVERY/ASN 10
3.1 ASN Overview Supplier 10
3.2 Create ASN from Due list 10
3.3 Print Labels and Delivery Notes 12
4 PACKAGING 14
4.1 Manual Packaging 15
4.2 Automatic Packing 19
4.3 Packaging Specifications (SNC) 20 4.3.1 Display Packaging Specifications 20 4.3.2 Create Packaging Specification 21
5 ALERTING 26
5.1 Selection of Alerts 26
5.2 Alert message generation 27
5.2.1 Selection profile arrangement 27 5.2.2 Message profile creating 28
6 QUICK-GUIDE 30
User Manual Inventory Collaboration Hub
Vers. 1.0 2
1 Global information
1.1 Preconditions
Install Adobe Reader Cersion 7.0 or higher.
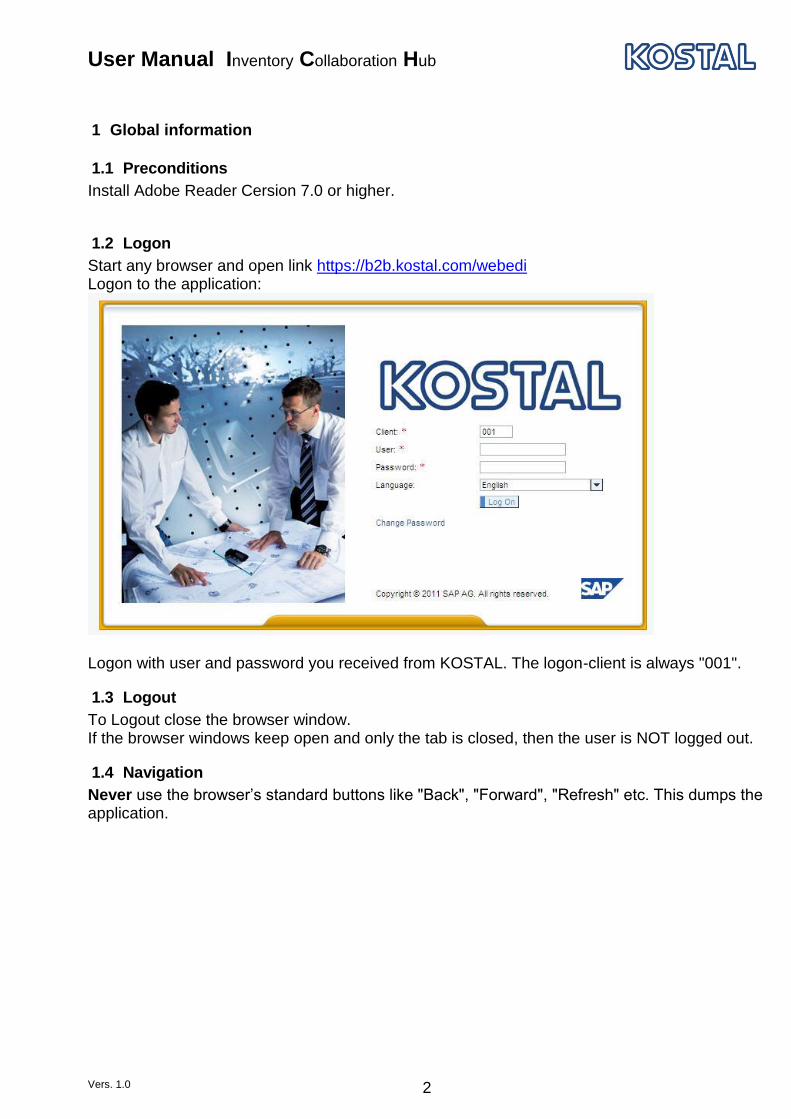
1.2 Logon
Start any browser and open link https://b2b.kostal.com/webedi Logon to the application:
Logon with user and password you received from KOSTAL. The logon-client is always "001".
1.3 Logout
To Logout close the browser window. If the browser windows keep open and only the tab is closed, then the user is NOT logged out.
1.4 Navigation
Never use the browser’s standard buttons like "Back", "Forward", "Refresh" etc. This dumps the application.
User Manual Inventory Collaboration Hub
Vers. 1.0 3
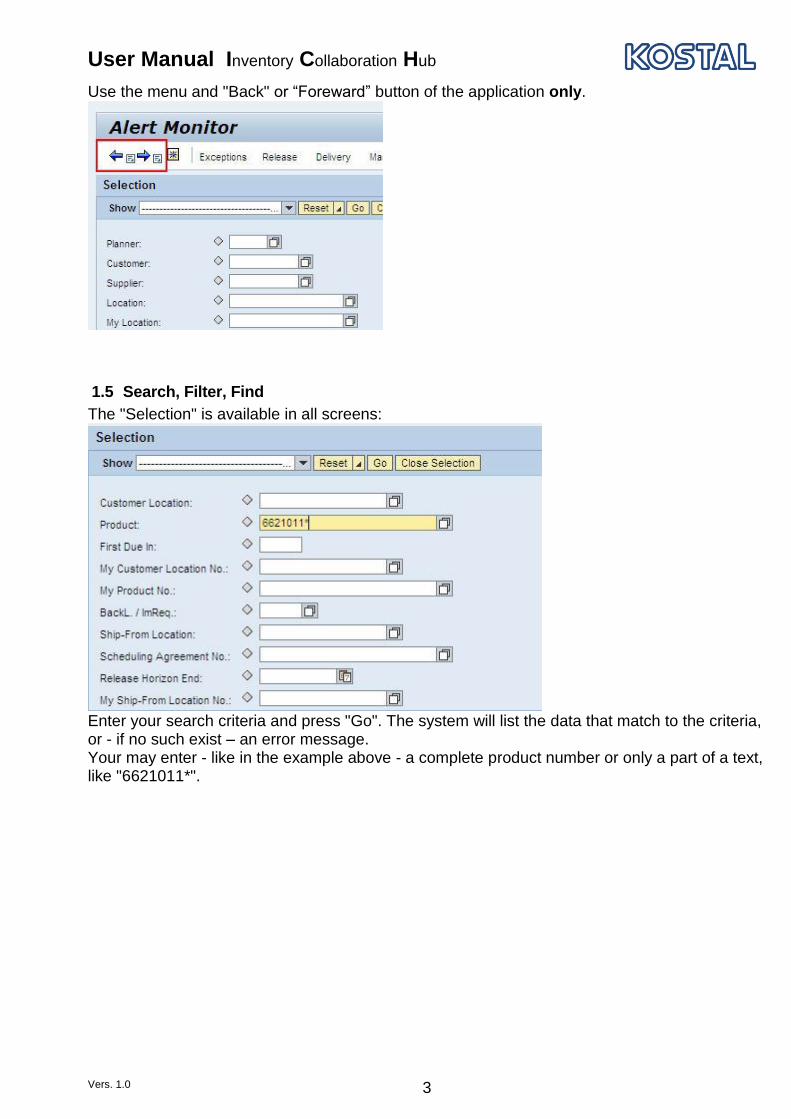
Use the menu and "Back" or “Foreward” button of the application only.
1.5 Search, Filter, Find
The "Selection" is available in all screens:
Enter your search criteria and press "Go". The system will list the data that match to the criteria, or - if no such exist – an error message. Your may enter - like in the example above - a complete product number or only a part of a text, like "6621011*".

User Manual Inventory Collaboration Hub
Vers. 1.0 4
Every field with at the end, offers a value help. Click once with the mouse on this symbol and you will get a new screen with the possible values:
To transfer a value from the search results, click the value you like or mark the line and press "OK".
1.6 Open/Close Tray
In the work areas release details and release comparison very large tables are used. To create more space for important information, it is possible to close less important parts of the screen
with (at the right border of the window). Before:
Afterwards:

User Manual Inventory Collaboration Hub
Vers. 1.0 5
1.7 Personalize
Nearly all tables offer a personalize functionality: - change the order of columns to your individual needs - hide columns not needed - change the number of rows Press "Settings" on the top right-hand side of the table header and maintain the new table layout in the new screen. Change the sequence or change the displayed or hidden columns by using the “add” and “remove” buttons.
On the other tabs you may change the sort order of the rows, filters and other display options, like number of displayed rows. Click “Save as…” to save the settings for future use. Enter a name for the view and decide if you like it as the standard view.

User Manual Inventory Collaboration Hub
Vers. 1.0 6
The column sequence may be changed by moving the columns directly in the table, too. Don’t forget to save the settings, if you want the for future use.
1.8 Maintain own product number
In order to facilitate the identification of products in the application, you can add your own product numbers or description. For this purpose select "Partner-dependant Product Data" in the navigation menu and list all available entries with "Go".
Click "Append Row" to create a line which accepts input. Following data items are relevant:
- "Product" for product number of KOSTAL - "Product name at the partner" for your product number and - "Description" for your product description
In further data fields you can enter descriptions of your own choice. "Save" your data entries.
2 Release Process
2.1 Release Process Overview

User Manual Inventory Collaboration Hub
Vers. 1.0 7
In the release process overview you can find all KOSTAL- delivery plans with the date of each last release. Every release can be
printed (displayed as PDF file and then printed) or
downloaded as a CSV file or
display the schedule lines IMPORTANT: Please confirm all new releases !! If the new releases are not confirmed, you will automatically receive a daily reminder by email after the 5th day of opening the release. In order to confirm a release, please mark it and click "Acknowledge". In the column "Acknowledged" the actual date will be set automatically. This means releases without a date in the column "Acknowledged" were not yet confirmed by you!
2.2 Release Details
From the release overview you can achieve the release details or you click this point directly in the menu and then further corresponding selection criteria.

User Manual Inventory Collaboration Hub
Vers. 1.0 8
You will get an overview of all releases to one material and delivery plan. The last release will be shown with all its details.
At this point the functions
printing (displayed as PDF file and then printed) or
acknowledge are available as well. With the point "Compare Releases" you can find out which changes resulted in the past.
2.3 Release Comparison
If you select this function, the actual release will be compared with the previous one automatically.

User Manual Inventory Collaboration Hub
Vers. 1.0 9
Should a different comparison be made, please mark both releases and select "Compare Releases"
2.4 Due List for Purchasing Documents
All schedule line of the actual releases are listed in the due list, too. In this list you are able to examine the planned deliveries about all products, purchase documents by delivery date and quantity. This is an example of a personalized due list view:
For this overview you are able to:
create a new delivery (ASN) directly, or
download/export all data to a CSV-file, or
navigate to a release Use the due list to create new ASNs / deliveries. Use Refesh to update the due list.
User Manual Inventory Collaboration Hub
Vers. 1.0 10
3 Delivery/ASN
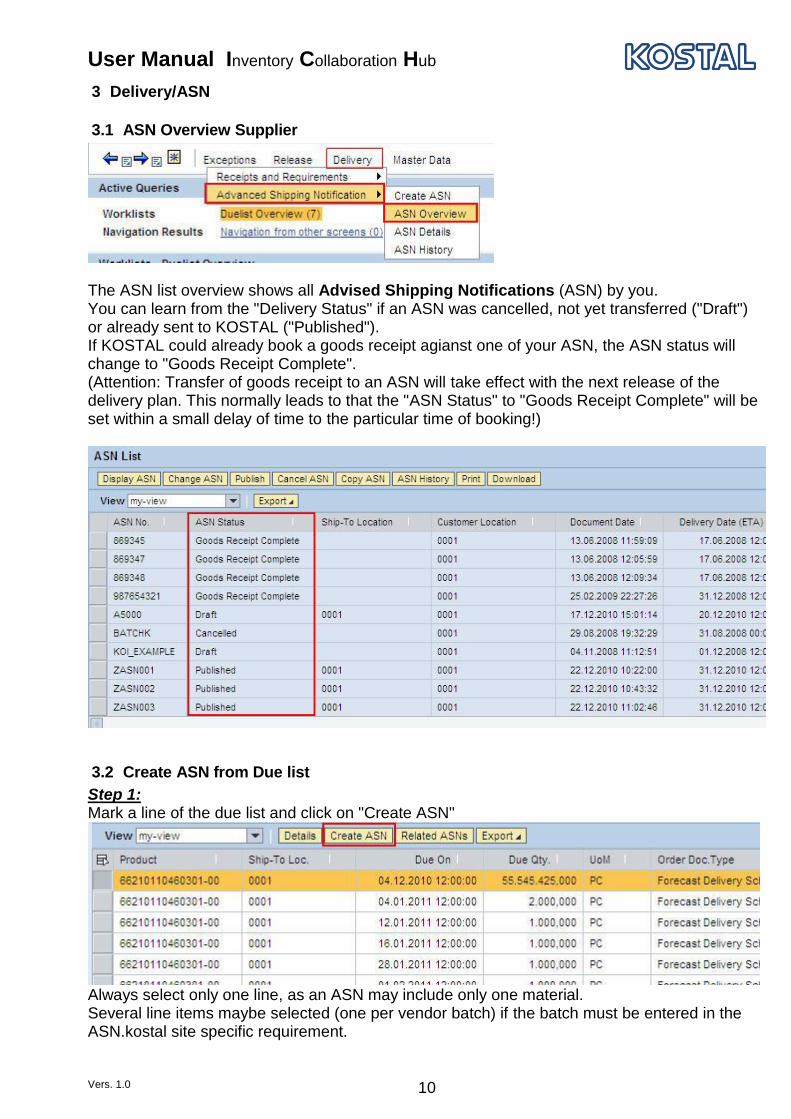
3.1 ASN Overview Supplier
The ASN list overview shows all Advised Shipping Notifications (ASN) by you. You can learn from the "Delivery Status" if an ASN was cancelled, not yet transferred ("Draft") or already sent to KOSTAL ("Published"). If KOSTAL could already book a goods receipt agianst one of your ASN, the ASN status will change to "Goods Receipt Complete". (Attention: Transfer of goods receipt to an ASN will take effect with the next release of the delivery plan. This normally leads to that the "ASN Status" to "Goods Receipt Complete" will be set within a small delay of time to the particular time of booking!)
3.2 Create ASN from Due list
Step 1: Mark a line of the due list and click on "Create ASN"
Always select only one line, as an ASN may include only one material. Several line items maybe selected (one per vendor batch) if the batch must be entered in the ASN.kostal site specific requirement.
User Manual Inventory Collaboration Hub
Vers. 1.0 11
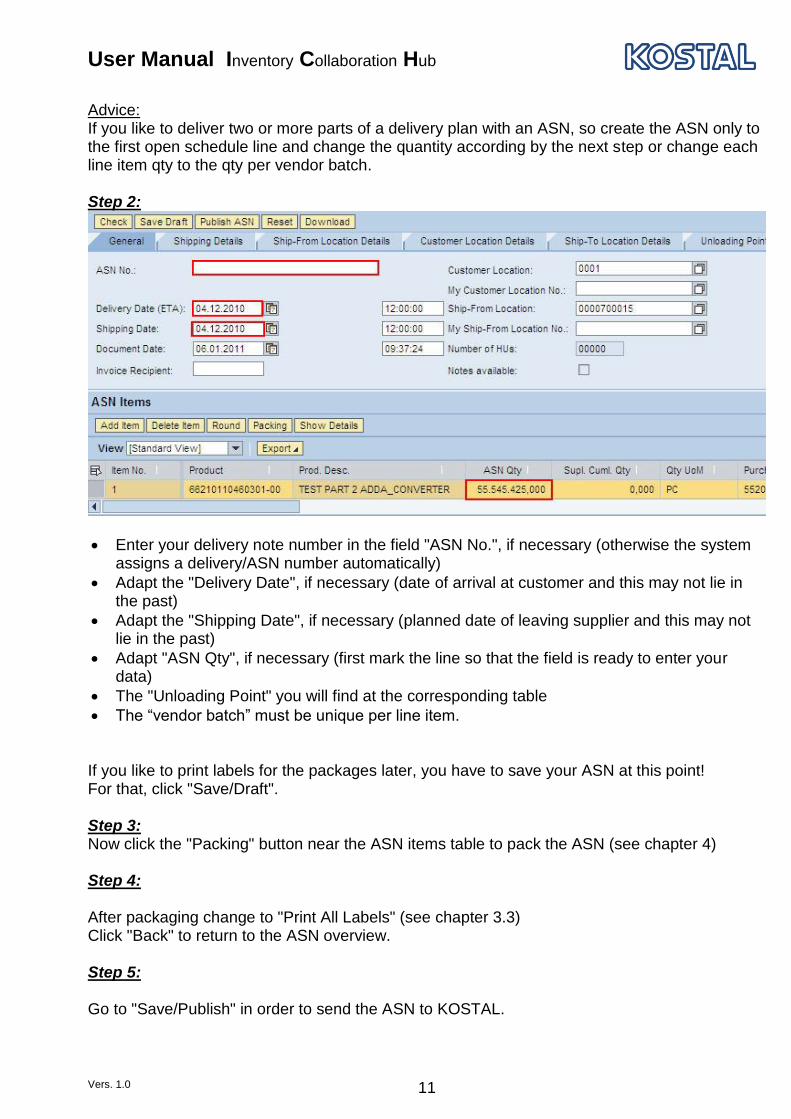
Advice: If you like to deliver two or more parts of a delivery plan with an ASN, so create the ASN only to the first open schedule line and change the quantity according by the next step or change each line item qty to the qty per vendor batch. Step 2:
Enter your delivery note number in the field "ASN No.", if necessary (otherwise the system assigns a delivery/ASN number automatically)
Adapt the "Delivery Date", if necessary (date of arrival at customer and this may not lie in the past)
Adapt the "Shipping Date", if necessary (planned date of leaving supplier and this may not lie in the past)
Adapt "ASN Qty", if necessary (first mark the line so that the field is ready to enter your data)
The "Unloading Point" you will find at the corresponding table
The “vendor batch” must be unique per line item. If you like to print labels for the packages later, you have to save your ASN at this point! For that, click "Save/Draft". Step 3: Now click the "Packing" button near the ASN items table to pack the ASN (see chapter 4) Step 4: After packaging change to "Print All Labels" (see chapter 3.3) Click "Back" to return to the ASN overview. Step 5: Go to "Save/Publish" in order to send the ASN to KOSTAL.

User Manual Inventory Collaboration Hub
Vers. 1.0 12
Afterwards go to "Printing" in order to print the delivery note. If you intend to send the ASN at a later point of time, please go to "Save/Draft". So you can select it later in the ASN overview and revise it by "Change" (see chapter 3.1).
3.3 Print Labels and Delivery Notes
Labels can be printed via the packaging dialogue (ASN create/change -> packing). For that, please select "Print all labels". As well, you can print the labels single: mark the desired Handling Unit and go to "Print Label". The delivery note can be printed out by the ASN details (clicked by ASN create/change). Therefore, please click "Print". As long as the ASN has not been published, the item "Draft" occurs on the delivery note. Following a new screen or tab is displayed starting the application AcrobatReader. Now a PDF-document with labels res. delivery notes to be printed will be loaded. For each pallet (group-HU) a separate PFG-file will be generated.

User Manual Inventory Collaboration Hub
Vers. 1.0 13
You can print out the document now and afterwards close the screen. Advice to print labels in format DIN A 5:
In order to print labels in paper-size DIN A5 correctly, you should change the following setting of the printing dialogue of AcrobatReader: Go to printer settings and select the paper size A5.

User Manual Inventory Collaboration Hub
Vers. 1.0 14
Select "Auto-Rotate and Center" in printing dialogue of AcrobatReader and the page adjustment "Fit to Printer Margins".
4 Packaging
It is essential that in the ASNs the exact packaging structure of the physical delivery is displayed. Only complete packaged Advised Shipping Notes can be sent to KOSTAL! You have the possibility to create the handling units of an ASN manually or to let determine them automatically. In the latter case, it is provided that a packaging instruction ("Packaging Specification") has been maintained (see chapter 4.3). By the button "Packing" you will reach the packaging dialogue from the ASN. Buttons in packaging dialogue: Reload ASN: Reset to the last saved packing Save ASN Draft : Saves the actual packaging status, handling can be continued later. Automatic Packing: Packaging according specifications automatically Check ASN: Revises, whether ASN corresponds to miscellaneous criteria:
ASN includes only one item
Quantity is packed completely Create HU: Opens an area in which the packing material for the new HU can be entered Cut: Copies the marked HU with all substructures in the clipboard Paste: Inserts an HU with all substructures from the clipboard Pack: Allocation of material to HU

User Manual Inventory Collaboration Hub
Vers. 1.0 15
Unpack: Unpacking of the marked HU Print label: Printing label of marked HU Print all labels: Printing of all labels Print HU subtree: Printing all labels of the marked HU tree Expand: Displays subtree of marked HU or - if no HU has been marked - all HUs Collapse: Closes the HUs again
4.1 Manual Packaging
As a matter of principle, all ASNs should be packed automatically with packing terms. In the case that one ASN should be packed unusually, it can be packed manually. For traceability purposes only items of the same vendor batch can be packed in one HU! While manual packing all packages (Handling Units/HU) will be created single and the products get packed. HUs can be provided with own numbers. Example: Following structure will be created: 2 boxes with x parts material on one pallet
Procedure: 1. Create HU with packaging material "pallet" 2. Create HU with packaging material "box" 3. Pack ASN position (=material) in "box" 4. Cut HU-"box" 5. Paste HU-"box" twice on "pallet" Click "Packing" in ASN You will see from the overview which material in which quantity is to be packed. The actual status of packaging, as well as absolute and in percent values will be shown by color codes with regard to the legend.

User Manual Inventory Collaboration Hub
Vers. 1.0 16
Step 1: Click "Create HU". Now create an HU for your "pallet" and select the fitting packing material. If you like to provide the HU number manually, you will have to do this at this point.
Following, please confirm with "OK". You will go back automatically to the packaging overview and see your "pallet" on the Pack Level01. The packing material, as well as the number of HU will be shown (separated by a dash). Step 2: Now you have to mark the "pallet HU" and go to "Create HU" again.
User Manual Inventory Collaboration Hub
Vers. 1.0 17
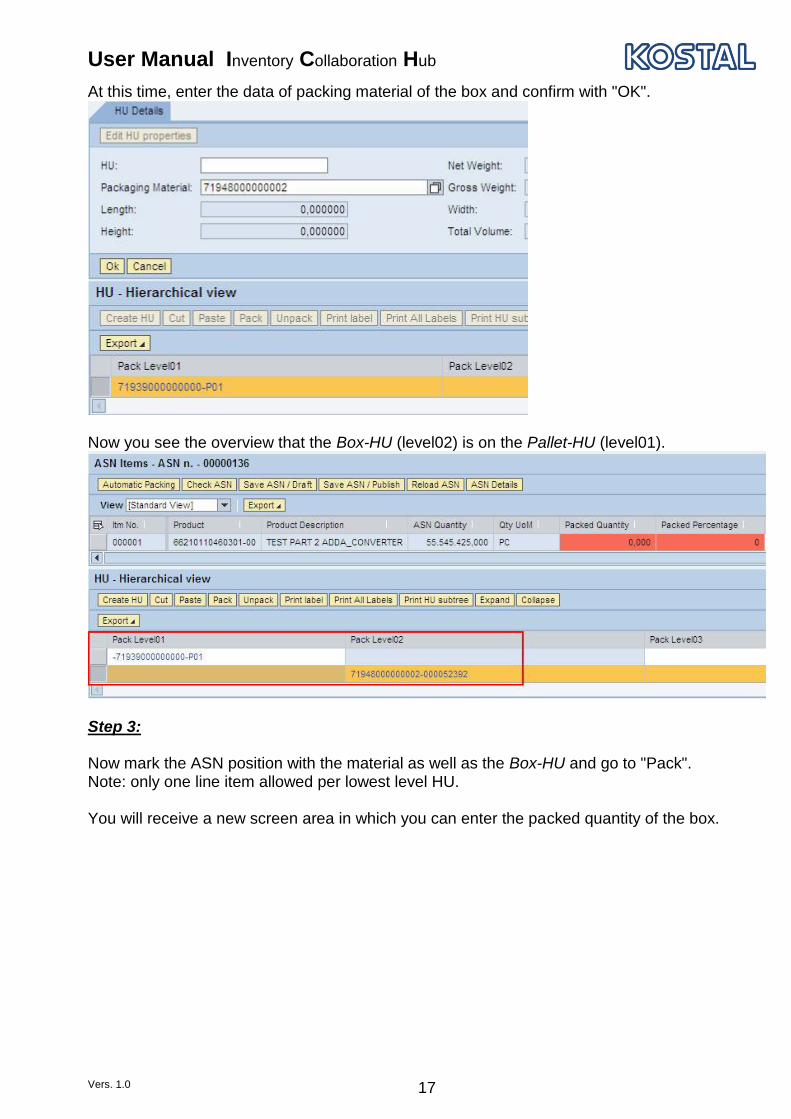
At this time, enter the data of packing material of the box and confirm with "OK".
Now you see the overview that the Box-HU (level02) is on the Pallet-HU (level01).
Step 3: Now mark the ASN position with the material as well as the Box-HU and go to "Pack". Note: only one line item allowed per lowest level HU. You will receive a new screen area in which you can enter the packed quantity of the box.

User Manual Inventory Collaboration Hub
Vers. 1.0 18
After entering the quantity confirm with "OK". Following, you can see in the structure, that 10.000 pieces of material (step 3) have been packed in the box (step 2).
Step 4: In the case the quantity of material in each box is dissimilar (or if you like to provide the HU number manually) repeat step 2 and 3 as far as the material has completely been packed (color legend green). If the quantity in all or nearly all is identical, so you have to mark the box-HU and go to "Cut". Mark now the pallet-HU and go to "Paste". Paste the box with the packed quantity as often until the total quantity has been packed. If you like to copy a complete pallet-HU (step 1 ) including the box-HUs (step 2), so mark the pallet-HU and go to "Cut".

User Manual Inventory Collaboration Hub
Vers. 1.0 19
Ensure that no line is marked and go as often to "Paste" as the pallet has been replicated in the sum requested.
4.2 Automatic Packing
In order to pack automatically, you have to create a packing specification first and assign it to the corresponding material (see chapter 4.3). If this is done correctly, the packaging specification will be shown automatically in the packing dialogue:
If you have assigned different packaging specifications to one material (e.g. for different packaging materials), you can now mark a line and select a different packaging specification by the value help of the field. Now refer to "Automatic Packing" and the system packs the total quantity according to the input of packaging specification.

User Manual Inventory Collaboration Hub
Vers. 1.0 20
4.3 Packaging Specifications (SNC)
In order to pack a material automatically, you have to create at least one guideline (packaging specification) and to assign it to the material. A Packaging Specification (PS) consists of Level, Content and Element. Level: In general, a PS consists of two levels: pallet and boxes At the area of the levels, you have to define first the level of boxes (level 1) and enter the maximum quantity of material per box. Following you enter the maximum quantity of boxes of each pallet (level 2) Elements: At least one element belongs each level. Elements define the exact packing material (plus possible added facilities like covers or blister) of each level. Content: Content is the product (material number) and will be assigned blanketly (not to each level separately)
4.3.1 Display Packaging Specifications
Before creating a packaging specification for the product, you should check if one does already exist. Select in menu "Packaging" -> "Overview Packaging Specification"
You will receive a list of all already created packaging specifications.

User Manual Inventory Collaboration Hub
Vers. 1.0 21
You can see the created packaging structure when marking the packaging specifications and click to "Pack Spec Details".
At this point of PS-Content you can see the material for which the packaging structure has been created.
4.3.2 Create Packaging Specification
If no packaging specification is found, please click, "Packaging -> "Details Packing specification" in the menu. Go to the button "Create" and enter the packaging specification description. First create the "Content". Afterwards, the levels with their elements will be created. Following structure will be arranged in the example:

User Manual Inventory Collaboration Hub
Vers. 1.0 22
Step 1: Content In the PS-Content it will be specified, which product has to be packed. ("What will be put into the box?") As only one product may always be packed, only one line will be created. For that, mark the line and click to the particular field.
Content Sequence: always enter "1"
Product: select the material to be packed from the value selection

User Manual Inventory Collaboration Hub
Vers. 1.0 23
Quantity: always enter the smallest possible quantity in which the product can be packed (as a rule 1 piece)
By "Add Content" you can create further lines. By "Delete Content" you can delete your data entered. Now change to the table "Level" Step 2: Create Level With the PS-levels the packaging structure will be determined:
Level "1" is the smallest packaging unit (KLT), e.g. a box
Level "2" is the next larger packaging unit (GLT), the pallet. Please check with KOSTAL site how many packaging levels are accepted.
Level sequence: "1" for "box level", "2" for "pallet level" or outer level and so on per level
Target Quantity: maximum quantity of products in each box or maximum number of boxes on pallet
Minimum Quantity: minimum quantity of products in each box or minimum number of boxes on pallet
Round Quantity: as a rule: packaging unit
HU: select this field always. Now select the levet to define the packing material Step 3: Create elements per level

User Manual Inventory Collaboration Hub
Vers. 1.0 24
Mark to "Level sequence" where the next element is to be defined and push "Elements" button. A new table is opened. Please push "Add Element".
Element Seq: Start always with "1" for the box where the product is packed into. If additional returnables are used for packing (like top cover, blister), addtional elements with increasing sequence number have to be created.
Packaging Material: Enter or select the used packing material from the value help
HU-Relevance: Enter "1" in the line for packing material (box, pallet) and "2" for auxiliary material (top cover, blister etc.). Label will be printed for HU-relevant elements.
Quantity: In HU-relevant line enter always "1". For auxiliary material enter the number of materials per box (e.g. "4" for 4 blister per box).
Mark now the second Level. The lower table for "Elements" will be shown again blank. At this place click on "Add Element" and proceed as above mentioned! Step 4: Pack specification completement and saving
Enter a description in the field "Pack Spec.-ID Desc." to the PS
Save the PS
Activate the "Pack Spec Status", otherwise the PS can not be used

User Manual Inventory Collaboration Hub
Vers. 1.0 25
The system allocates a definite number automatically. The new PS has to be assigned now. Step 5: Pack specification assignment Select in menu "Packaging -> Supplier View -> Assign Pack Specification". Check the actual assignment first by selecting them. Then click on " Create/Change PS Assignments" and “Insert line” in order to create a new assignment. Enter the product to be packed, priority and the number of pack specification. Do not forget to save your data entry.
This PS will be automatically proposed for packing the next ASN in future! Advice:
The material of Allocation has to agree on the Content of the PS!!
Please ensure that you have entered the data in all fields in the PS as above mentioned. (Fields like quantity and UoM have to be completed as well, otherwise the PS can not be shown in the packaging dialogue.)
For the same material you can define and allocate different PS. In this case, please regard to define different priorities. The PS with the lowest priority number will be automatically proposed in the packaging dialogue, but it can be changed manually.

User Manual Inventory Collaboration Hub
Vers. 1.0 26
5 Alerting
Alerting means, that you will be kept informed about exceptional circumstances or important modifications by email. Alerting will be initialized by KOSTAL for you.
5.1 Selection of Alerts
Select in Alert Monitor e.g. the most important Alerts for the Release Process:
0023 New Release
0024 Unconfirmed Release
Click on the number and you receive a list of all Alerts.

User Manual Inventory Collaboration Hub
Vers. 1.0 27
You can mark all Alerts of one page and select following function:
Acknowledge (later you can use it as a selection criteria and display only the not acknowledged and therewith new Alerts)
Delete Alert
See Details (in this example you will receive the new release)
User action and Notes are not active at present.
5.2 Alert message generation
The basic data administration of Alerts will be done in the ICH. Based on the selection profile (which Alerts?) a notification profile will be deposited, which in turn does affect how the particular message will be sent. KOSTAL will make a presetting for you, which - as far as possible - should not be changed. Only refer to the message profile in order to change your email address.
5.2.1 Selection profile arrangement
The selection criteria Alert Type, Ship-to Location and Product of the message profile will be "continued in use", this means they provide as basis for the selection of creating messages. All further selection criteria serve only for restriction of Alert screen and will not be used when creating an Alert message.
Select Alert-Type 0023 to 0024

User Manual Inventory Collaboration Hub
Vers. 1.0 28
Refer now to "Save als… " in order to save your data entered. At this place you have the possibility to assign a name for this selection.
Decide if you need the selection user specific or partner specific and you you like it as
default.
Press “OK” to save
Having created (Save) the selection profile, the message profile can be created by the button “Set Notification”
5.2.2 Message profile creating
Create a new selection profile or select an existent profile

User Manual Inventory Collaboration Hub
Vers. 1.0 29
Click now to the Button "Set Notification" All fields, which have to be maintained for sending Alerts are boxed in green. Fields in red boxes should not be maintained.
Following fields are of importance: E-Mail-Address: The system sends the message to the address being deposited. Message Channel: Selection of medium by which a message will be sent. Always select : EMAILD (the message will be edited and set by email) Message profile: Definition of parameter which have to be maintained in the message. Minimum priority: Only Alerts will be included in the message which priority is equal or higher. Alerts of lower priority will not be considered. Minimum Age / Maximum Age: If a period of time was deposited at this place, only Alerts would be included in the message which were created within this period of time. Immediate Notification: This character operates that when creating an Alert the corresponding notification will be sent.

User Manual Inventory Collaboration Hub
Vers. 1.0 30
Periodic Notification: Alerts, which have set this character in their notification profile, will be collected and sent every night. Unacknowledged Alerts only: The Alert messages should only contain Alerts, which have not been confirmed yet.
6 Quick-Guide
In this range you will find the most important information for working with ICH in a brief summarized version.
Alerting You will receive an email automatically, as soon as a new due list release is available in the ICH. In the same way, you will get informed by email, if you do not acknowledge new releases within 5 days in the ICH.
Acknowledgement of releases You have to confirm all releases within 5 days. Refer to the release overview, see the new releases and click to the button "Acknowledge". The releases will be marked as confirmed. This acknowledgement is no acceptance for delivery and does only serve for securing that you have registered a new release.
Pack specifications Please create packing specification according to the agreed with KOSTAL packaging structure for all materials. This is a one-time expense per each material and simplifies considerably the creating of ASN.
Due list You will find the scheduling of all releases ordered by date in the due list. Thus, you will record which materials in which quantity have to be delivered next. You can create an ASN for KOSTAL directly from the list.