User Manual For Kerala E-Governance IT …cprcs.kerala.gov.in/COMBINED_HELP_DOC.pdfDepartment User...
23
Department User Manual - V1.1 Page | 1 User Manual For Kerala E-Governance IT Procurement Portal (CPRCS) VERSION 1.1 Kerala State Electronics Development Corporation Keltron House, Vellayambalam Thiruvananthapuram – 695033 Phone: 0471 4094444 (Ext – 225) Fax: 0471 2724545
Transcript of User Manual For Kerala E-Governance IT …cprcs.kerala.gov.in/COMBINED_HELP_DOC.pdfDepartment User...

Department User Manual - V1.1
Page | 1
User Manual For
Kerala E-Governance IT
Procurement Portal (CPRCS)
VERSION 1.1
Kerala State Electronics Development Corporation
Keltron House, Vellayambalam
Thiruvananthapuram – 695033
Phone: 0471 4094444 (Ext – 225)
Fax: 0471 2724545

Department User Manual - V1.1
Page | 2
Document Control Data Sheet
Classification CONFIDENTIAL
Project Name Centralised Procurement and Rate Contract System (CPRCS)
Doc. Issue No: 01 Document Revision No: 1.1
Document ID:
Privacy Policy
This document is being submitted by Keltron to IT MISSION, with the explicit understanding that the content
would not be divulged to any third party without prior consent from Keltron.
Document Name Date
Prepared by Kerala State Electronics Development Corporation Ltd. (KELTRON ) 26/03/2019
Verified By Kerala IT MISSION

Department User Manual - V1.1
Page | 3
Table of Contents
1. Introduction ....................................................................................................................................... 4
2. Common Operations .......................................................................................................................... 4
Kerala e-Governance IT Procurement Portal ...................................................................................... 4
Sign In .............................................................................................................................................. 5
Existing User .................................................................................................................................... 5
New User Registration .................................................................................................................... 5
Home Screen ....................................................................................................................................... 6
3. Menu Details ................................................................................................................................... 7
3.1 Requirement Generation ........................................................................................................ 8
3.2 New Requirement Suggestion ................................................................................................ 9
3.3 Proforma Invoice Generation ............................................................................................... 10
3.4 Work Order Generation ........................................................................................................ 11
3.5 Reports .................................................................................................................................. 12
Requirement Analysis Report ....................................................................................................... 12
Performa Invoice Report ............................................................................................................... 13
Work Order Analysis Report ......................................................................................................... 14
Order Acknowledgment ................................................................................................................ 15
3.6 Track Order ........................................................................................................................... 16
3.7 Complaint Management ....................................................................................................... 17
New Complaint Registration ......................................................................................................... 17
Close/Re-Assign Complaint ........................................................................................................... 20
Cancel Complaint .......................................................................................................................... 20
Complaint Status ........................................................................................................................... 21
Complaint Details .......................................................................................................................... 21
3.8 Change Password .................................................................................................................. 22
Department User Manual - V1.1
Page | 4
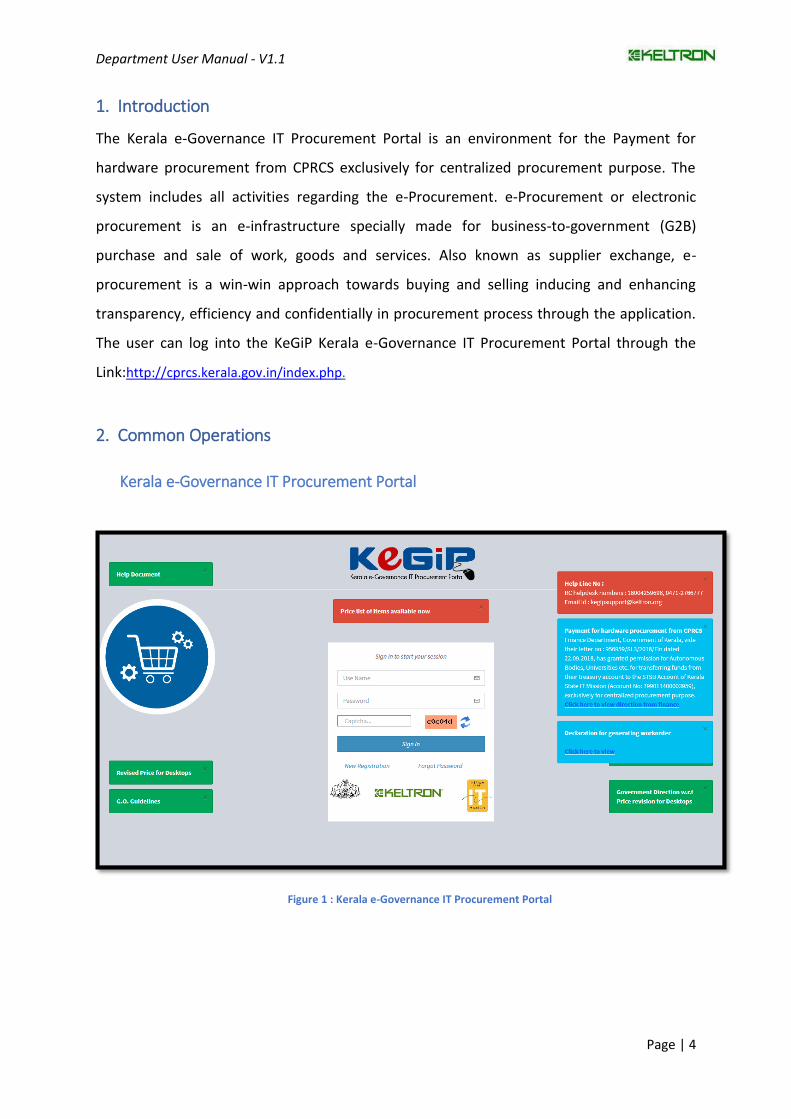
1. Introduction
The Kerala e-Governance IT Procurement Portal is an environment for the Payment for
hardware procurement from CPRCS exclusively for centralized procurement purpose. The
system includes all activities regarding the e-Procurement. e-Procurement or electronic
procurement is an e-infrastructure specially made for business-to-government (G2B)
purchase and sale of work, goods and services. Also known as supplier exchange, e-
procurement is a win-win approach towards buying and selling inducing and enhancing
transparency, efficiency and confidentially in procurement process through the application.
The user can log into the KeGiP Kerala e-Governance IT Procurement Portal through the
Link:http://cprcs.kerala.gov.in/index.php.
2. Common Operations
Kerala e-Governance IT Procurement Portal
Figure 1 : Kerala e-Governance IT Procurement Portal

Department User Manual - V1.1
Page | 5
Sign In
Existing User
A user must login to the system for using different functionality of this software. User can
login to this software using his/her Username (email) and Password, Then enter the captcha
in the corresponding fields and clicking the Sign In button. If the entered Username and
Password are valid then the user will be logged in to this software. Otherwise login prompt
will appear again and the user will have to re-enter the correct Username and Password.
Please type the image in Captcha correctly. You can click on the image, if you want a new
captcha. Remember all the fields (Username, Password & Captcha) are case sensitive. If you
have any issue in Log in to your page please contact the help desk team of IT MISSION.
New User Registration
1. If you were not enrolled into the Portal, and you are applying for Requirement
analysis for the first time, you can do a new registration.
2. Type in your Name, Email, Mobile number, and Designation. Please note the
Username will be your email id.
2.1. Email: This should be an email address on which further alerts and notification will be sent in future. So please provide a valid email address.
2.2 Mobile Number: This should be an active number on which we contact you
if you have any query and the OTP will be sent to this number in future.
3. Enter the CAPTCHA as seen in the image in the text box provided.
4. Then click Submit button
5. If your Username already exists and cannot login, please contact IT
Mission with your Username to reset the Password. Or email to
6. Now Login into the portal with the Username and Password given.

Department User Manual - V1.1
Page | 6
Home Screen
The website is privilege based which means based on the privileges the user is having
the screen which will be customized automatically. In short, the privilege given to user
will decides what screen a user has to see and what not.
When you login to your home page you can see few set of menus in the left side menu
bar.
If you need to log out, click the button in the right top Corner.
As of Now the default home screen will showcase the current order details you have
placed.
Figure 2: New Registration

Department User Manual - V1.1
Page | 7
3. Menu Details
Figure 3: Department User Menu
There are 8 different menus for the Departmental users.
Requirement Generation New Requirement Suggestion Proforma Invoice Generation Work Order Generation Reports Track Order Complaint Management Change Password

Department User Manual - V1.1
Page | 8
3.1 Requirement Generation
Figure 4: Requirement Analysis
Click Requirement Generation on left side panel it is required for the Requirement Analysis.
Select Product Name from the List, while choosing Product Name corresponding Product
Type, OS/ Compatibility appears in the list, enter Quantity and Special Requirements deals
with specifications required.
Then click on Add Button.
While click on Save button the details saved and displays in the below table.
Table entries are Requirement Number, Date and Quantity.

Department User Manual - V1.1
Page | 9
3.2 New Requirement Suggestion
Figure 5: New requirement Suggestion
In New Requirement Suggestion, there will be provision to save Exceptional Requirement.
Enter Product, Type (Example: Medium End, High End, Entry Level), OS Compatibility
(Example: Ubuntu, Windows 10 Home, Windows 10 Pro), Quantity and Description.
Then Click on Save Button to save the entered details.
There is the provision to clear the entered details by click on Clear Button.
Table displays Exceptional requirement number, Date, Product, Type, Compatibility,
Quantity, and Status with View provision.

Department User Manual - V1.1
Page | 10
3.3 Proforma Invoice Generation
Figure 6: Proforma Invoice Generation
View / Edit provision of the table contents such as Requirement number, Date, Quantity.
Table displays Invoice number, Date, Quantity, and Status (whether approved/ pending)
with View Only provision.
Search Provision is available here.
Department User Manual - V1.1
Page | 11
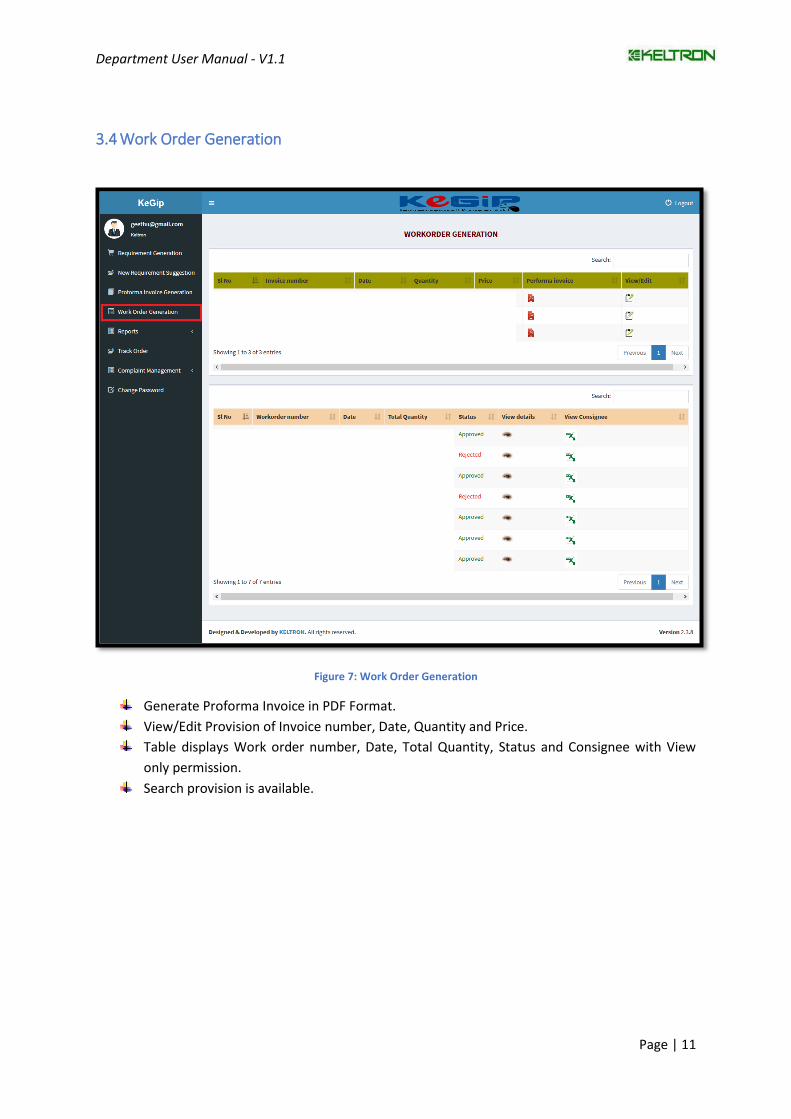
3.4 Work Order Generation
Figure 7: Work Order Generation
Generate Proforma Invoice in PDF Format.
View/Edit Provision of Invoice number, Date, Quantity and Price.
Table displays Work order number, Date, Total Quantity, Status and Consignee with View
only permission.
Search provision is available.

Department User Manual - V1.1
Page | 12
3.5 Reports
Figure 8: Reports Menu
Requirement Analysis Report
Figure 9: Requirement Analysis Report
Enter Requirement Number then click on View button.
Department User Manual - V1.1
Page | 13
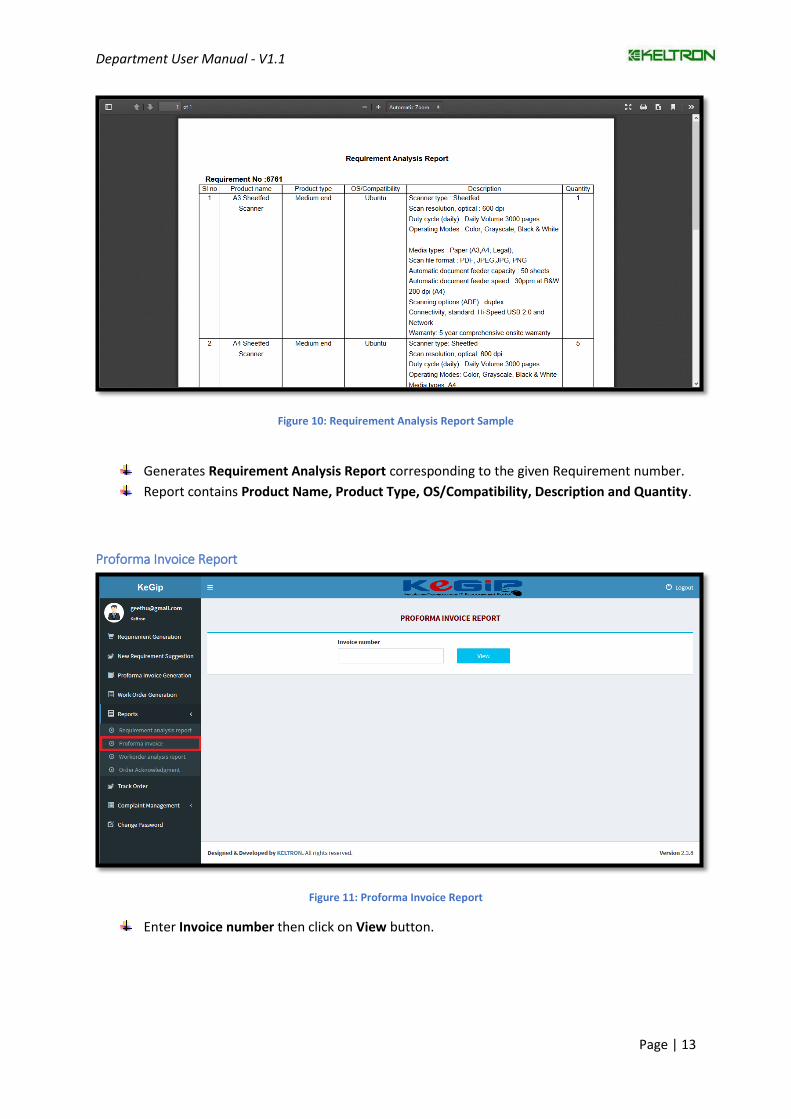
Figure 10: Requirement Analysis Report Sample
Generates Requirement Analysis Report corresponding to the given Requirement number.
Report contains Product Name, Product Type, OS/Compatibility, Description and Quantity.
Proforma Invoice Report
Figure 11: Proforma Invoice Report
Enter Invoice number then click on View button.

Department User Manual - V1.1
Page | 14
Figure 12: Proforma Invoice Sample
Generates Proforma Invoice in PDF Format.
Work Order Analysis Report
Figure 13: Work Order Report
Enter Work Order number then click on View button.

Department User Manual - V1.1
Page | 15
Figure 14: Work Order Details Sample
Generate Work Order details in PDF format.
Order Acknowledgment
Figure 15: Order Acknowledgement Report
Enter Work Order number then click on View button.

Department User Manual - V1.1
Page | 16
Figure 16: Order Acknowledgement Sample
Generate Order Acknowledgment in PDF Format.
3.6 Track Order
Figure 17: Track Order Details
Displays Track Order Details with View Permission.
Track Order details includes Requirement, Invoice, Work Order details and Delivery Status.

Department User Manual - V1.1
Page | 17
3.7 Complaint Management
Figure 18: Complaint Management
New Complaint Registration
Figure 19: New Complaint Registration
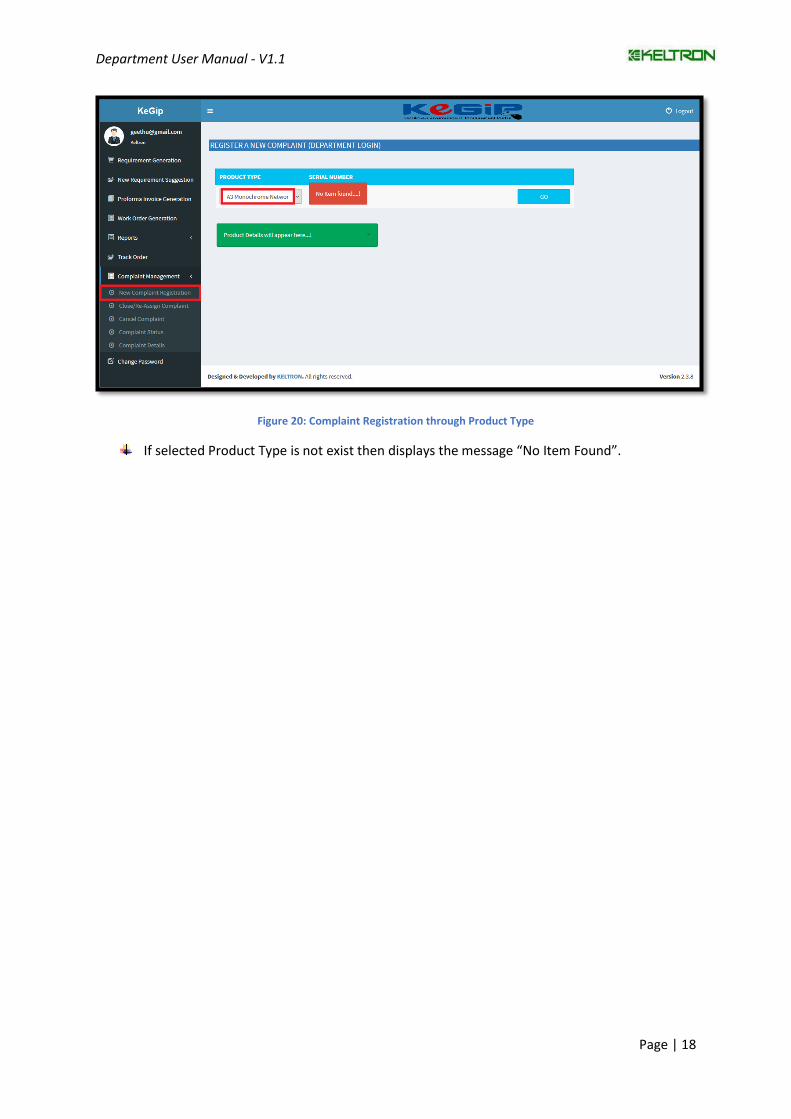
Select Product Type from the drop down.
Select suitable Serial number from the automatically generated list against the Product Type.
Then click on Go button.
Department User Manual - V1.1
Page | 18
Figure 20: Complaint Registration through Product Type
If selected Product Type is not exist then displays the message “No Item Found”.

Department User Manual - V1.1
Page | 19
Figure 21: Register New Complaint Via Complaint Entry Form
While selecting Product Type, Serial Number and click on Go button displays Product
Details, Office Details and Complaint Entry Form.
Product Details includes Type, Make & Model, Serial number, Description and Service By.
Office Details includes Name, Address, Pin code and Phone number.
In Complaint Entry Form, Select Complaint Type if any Others click on the Check box and
Please specify in the below box. Then Enter Complaint Description.
To register the complaint click on Register Button. To cancel the same click on Cancel
Button.
Enter Officer Name with Mobile number in the Contact person Details Entry section.
After registering the complaint, the E-Mail and SMS Notification will be sending to the
corresponding Service Providers.

Department User Manual - V1.1
Page | 20
Close/Re-Assign Complaint
Figure 22: Close/Reassign Complaint
Count of Pending Complaints displays here.
Click on Complaints load the details.
Cancel Complaint
Figure 23: Cancel Complaints
Count of New Complaints displays here.
Click on Complaints below displays the Complaints Details (Cancel Complaint).
To cancel the complaint click on Cancel Complaint Button.
Quit option is also exist.

Department User Manual - V1.1
Page | 21
Complaint Status
Figure 24: Complaint Status
List of Complaints displays the table with entries of Complaint Status and Total Count.
Click on the Complaint Status to load the details.
Table displays Complaint Number & Date, Service By, Product Details and Complaint
Details.
Complaint Details
Figure 25: Complaint Details
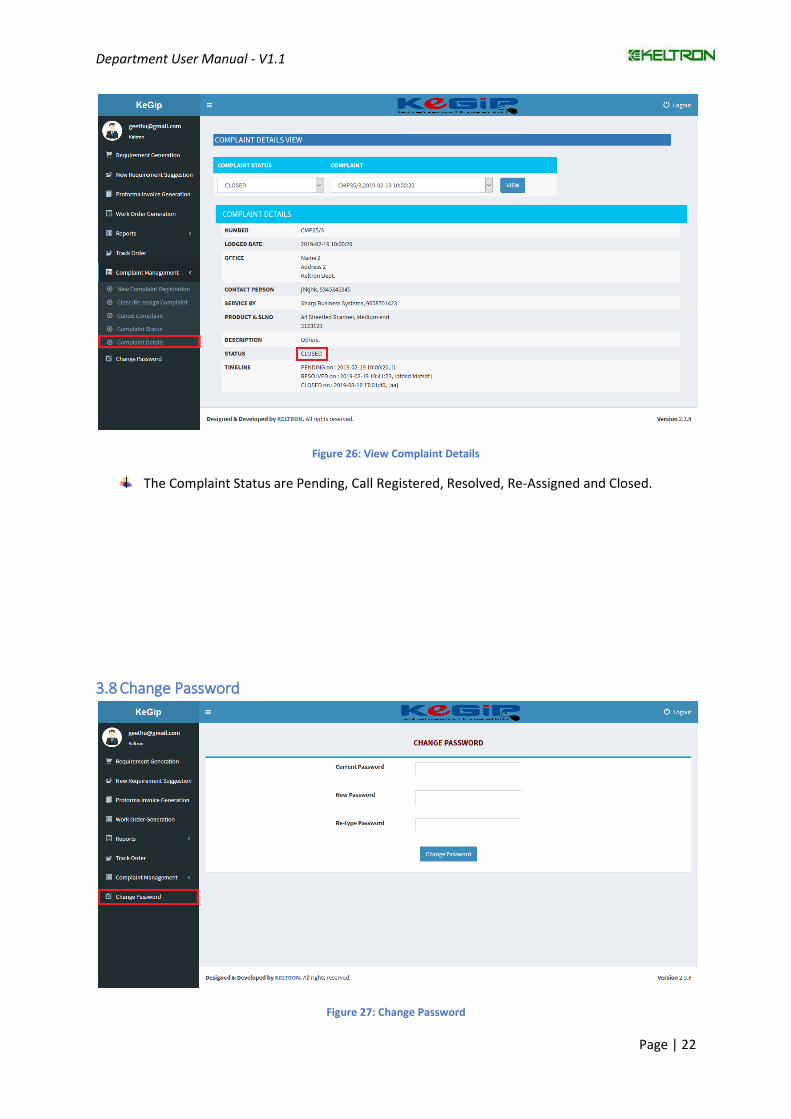
Select Complaint Status and Complaint Number from the list.
While click on View button displays Complaint Details.
Department User Manual - V1.1
Page | 22
Figure 26: View Complaint Details
The Complaint Status are Pending, Call Registered, Resolved, Re-Assigned and Closed.
3.8 Change Password
Figure 27: Change Password

Department User Manual - V1.1
Page | 23
You can access the change password option by clicking on Change Password option.
Type the Current password once and new password twice, and then click on Change Password button.
To reset the password you can get assistance from the IT MISSION or sent a email to [email protected]