USER MANUAL EN IN 5564 Air Magnetic Rower inSPORTline … · 3 INTRODUCTION Welcome to the world of...
27
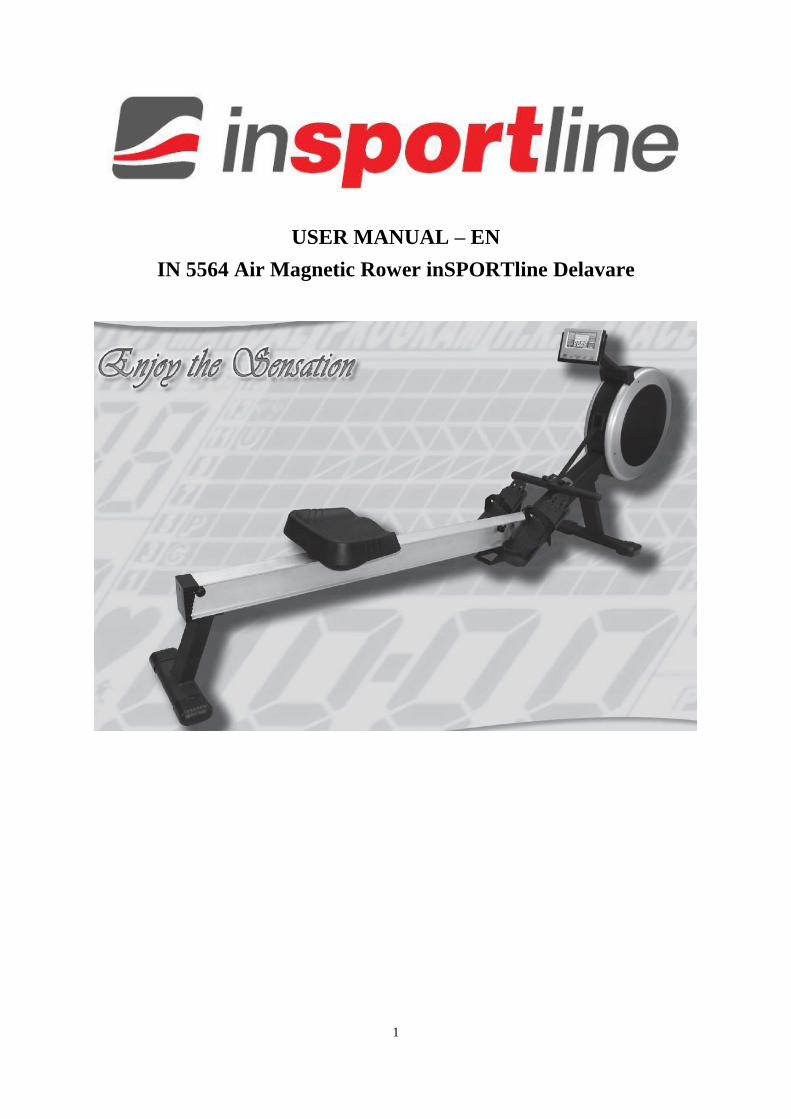
1 USER MANUAL – EN IN 5564 Air Magnetic Rower inSPORTline Delavare
Transcript of USER MANUAL EN IN 5564 Air Magnetic Rower inSPORTline … · 3 INTRODUCTION Welcome to the world of...
1
USER MANUAL – EN
IN 5564 Air Magnetic Rower inSPORTline Delavare
2
CONTENTS
INTRODUCTION .................................................................................................................................................. 3
BENEFITS OF EXERCISE .................................................................................................................................... 3
MEDICAL / SAFETY NOTICE ............................................................................................................................. 3
CARE AND MAINTENANCE .............................................................................................................................. 4
FEATURES OF THE AIR MAGNETIC ROWER................................................................................................. 4
TRAINING TIPS .................................................................................................................................................... 5
TRAINING GUIDELINES ..................................................................................................................................... 5
SETTING UP YOUR ROWER .............................................................................................................................. 8
CORRECT ROWING GUIDE ............................................................................................................................. 11
STRETCHING ...................................................................................................................................................... 15
EXPLODED VIEW .............................................................................................................................................. 17
PARTS LIST ......................................................................................................................................................... 18
ASSEMBLY INSTRUCTIONS ............................................................................................................................ 21
TERMS AND CONDITIONS OF WARRANTY, WARRANTY CLAIMS ....................................................... 26

3
INTRODUCTION
Welcome to the world of the Air Magnetic Rower. The Air Magnetic Rower is one of the finest and most
comprehensive rowing machines available. We know as we have been designing rowing machines for over a
decade.
By choosing Air Magnetic Rower, you have made a decision that will improve the health and fitness and well
being for you and your family. Being fit and healthy will improve your energy levels and your quality of life.
Cardiovascular training is vital for all ages and the Air Magnetic Rower provides a more effective workout,
producing better results and will encourage you to reach your fitness goals and maintain the body you have
always wanted.
All you need to do is to spend 15 to 30 minutes three times a week to start seeing the benefits of a regular
exercise program on the Air Magnetic Rower.
We want you to enjoy the full benefits of your exercise program and so we recommend that you read this manual
thoroughly and by doing so you will:
Save valuable exercise time in the long run.
Exercise safely and more effectively.
Learn proper techniques.
Be able to better define your fitness goals.
BENEFITS OF EXERCISE
Regular exercise improves both the quality and quantity of life.
The benefits of regular participation in a well-balanced fitness program include:
1. Weight loss
2. Improved body shape and definition
3. Increased muscle mass, strength, endurance, power and definition
4. Enhanced flexibility
5. Increased metabolism
6. Injury prevention
7. Improved self-esteem
8. Improved aerobic fitness
9. Improved coordination and agility
A regular exercise program will improve the quality of your life, give you more energy, and slow down the aging
process.
Fifteen to thirty minutes, three times a week, or only one and a half hours a week is a small price to pay for huge
benefits of a regular exercise program.
MEDICAL / SAFETY NOTICE
Failure to read and follow the safety instructions below and in the Owner’s Manual may result in serious injury
or even death.
1. Read the Owner’s manual and all safety instructions thoroughly and familiarize yourself with the Air
Magnetic Rower before using it.
2. Before beginning any exercise program, consult your physician. He or she can help evaluate your
present fitness level and determine the exercise program that is the most appropriate for your age and
physical condition.
4
3. If you experience any pain or tightness in your chest, irregular heartbeat, and shortness of breath,
faintness or unusual discomfort during exercising, stop and consult a physician before continuing.
4. Adult supervision is required at all times when a child is on or near the Rower.
5. Keep fingers and limbs, loose clothing and hair away from moving parts.
6. All equipment should be checked for wear before each use. Do not use this equipment unless all moving
parts are working correctly.
7. Care should be taken when getting on or off this or any exercise equipment.
8. Use only the accessory attachments recommended by the manufacturer.
9. All equipment should be set up and operated on solid, level surfaces.
CARE AND MAINTENANCE
Your Rower is made of the highest quality materials. It is so important that you take care of your Rower on a
regular basis.
1. Your Air Magnetic Rower is for indoor use only and should not be used or stored in damp areas. Wipe
all perspiration from your Air Magnetic Rower after each use.
2. The Air Magnetic Rower should be dusted and cleaned on a regular basis to stop build-up of dust. Use
Windex or an alcohol-based cleaner on a clean cloth on a regular basis. Do not use any abrasive
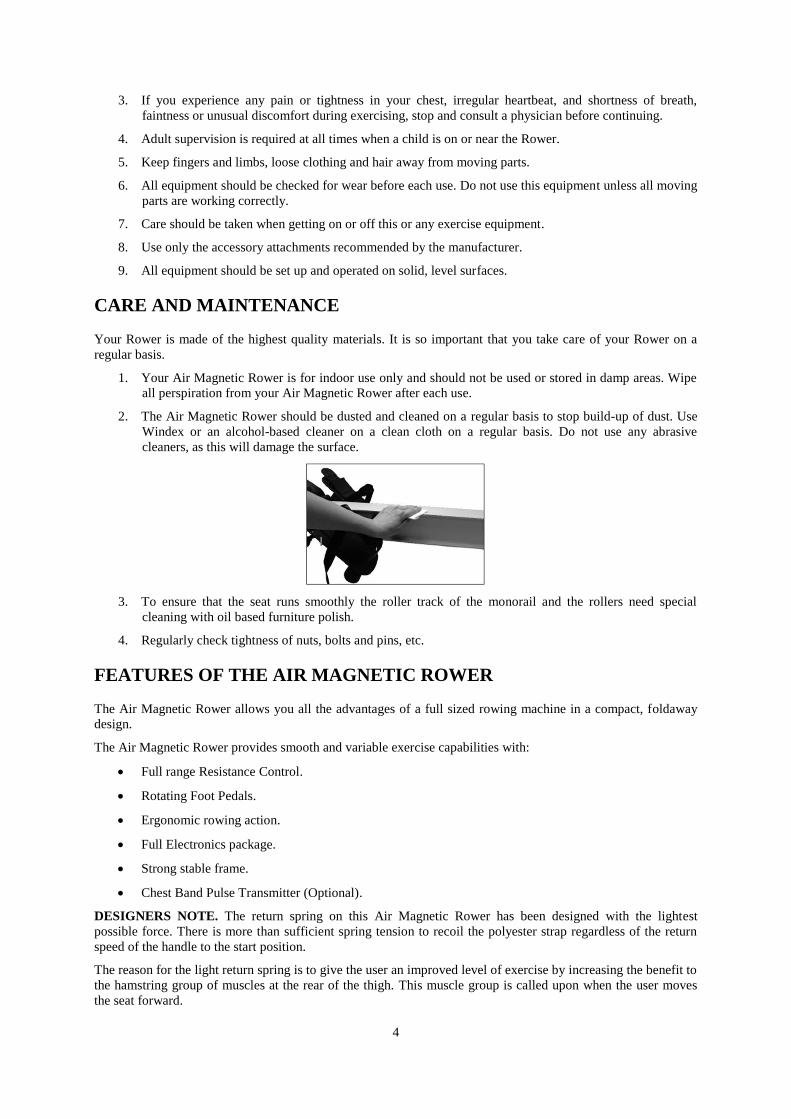
cleaners, as this will damage the surface.
3. To ensure that the seat runs smoothly the roller track of the monorail and the rollers need special
cleaning with oil based furniture polish.
4. Regularly check tightness of nuts, bolts and pins, etc.
FEATURES OF THE AIR MAGNETIC ROWER
The Air Magnetic Rower allows you all the advantages of a full sized rowing machine in a compact, foldaway
design.
The Air Magnetic Rower provides smooth and variable exercise capabilities with:
Full range Resistance Control.
Rotating Foot Pedals.
Ergonomic rowing action.
Full Electronics package.
Strong stable frame.
Chest Band Pulse Transmitter (Optional).
DESIGNERS NOTE. The return spring on this Air Magnetic Rower has been designed with the lightest
possible force. There is more than sufficient spring tension to recoil the polyester strap regardless of the return
speed of the handle to the start position.
The reason for the light return spring is to give the user an improved level of exercise by increasing the benefit to
the hamstring group of muscles at the rear of the thigh. This muscle group is called upon when the user moves
the seat forward.

5
We have faithfully duplicated the “normal” rowing action one would get when rowing on water where the oar is
not pulled forward.
1. CHEST BAND TRANSMITTER
(OPTIONAL)
2. REAR SEAT STOP
3. SEAT
4. FOOT STRAP
5. HANDLEBAR
6. COMPUTER
7. FOOT REST
8. WHEEL
9. FRONT STABILIZER
10. FRONT SEAT STOP
11. ALUMINUM BEAM
12. REAR STABILIZER
13. STANDARD CAP
TRAINING TIPS
Rowing machines have been around for many years and where perhaps one of the first indoor exercise machines
on the market.
Almost everyone knows how to row on one of these machines and there is very little one can do wrong.
However, there are few pointers we can give you to reduce strain on your back and other joints and muscles.
Rowing, more than any other aerobic exercise, utilizes the back muscles and the spine to transfer the pulling
force from the arms (holding the handle) to the legs (providing most the pulling power).
To reduce exercise strain on the back muscles, spine, shoulders, arms and wrists we strongly suggest that you to
keep your back straight throughout the entire rowing action. When moving forward to the start position bend at
the hips, don’t overreach (trying to stretch forward too much) and keep your arms straight. Pull the handle to
your stomach, not your chest and keep your elbows in at your sides during the entire stroke with your wrists
straight.
TRAINING GUIDELINES
Exercise
Exercise is one of the most important factors in the overall health of an individual. Listed among its
benefits are:
Increased capacity for physical work (strength endurance).
Increased cardiovascular (heart and arteries / veins) and respiratory efficiency.
Decreased risk of coronary heart disease changes in body metabolism, e.g. losing weight.
Delaying the physiological effects of age physiological effects, e.g. reduction in stress, increase in self-
confidence, etc.
Your Rower’s unique design provides an excellent opportunity for a high level of overall fitness.
BASIC COMPONENTS OF PHYSICAL FITNESS
There are four all-encompassing components of physical fitness and we need to briefly define each and clarify its
role.
6
Strength is the capacity of a muscle to exert a force against resistance. Strength contributes to power and speed
and is of great importance to a majority of sports people.
Muscular Endurance is the capacity to exert a force repeatedly over a period of time, e.g. it is the capacity of
your legs to carry you 10 km without stopping.
Flexibility is the range of motion about a joint. Improving flexibility involves the stretching of muscles and
tendons to maintain or increase suppleness, and provides increased resistance to muscle injury or soreness.
Cardio-Respiratory Endurance is the most essential component of physical fitness. It is the efficient
functioning of the heart and lungs.
WHAT TO WEAR
Wear clothing that will not restrict your movement in any way while exercising.
Cloths should be light enough to allow the body to cool. Excessive clothing that causes you to perspire more
than you normally would while exercising, gives you no advantage. The extra weight you lose is body fluid and
will be replaced with the next glass of water you drink.
It is advisable to wear a pair of gym or running shoes or “sneakers”.
BREATHING DURING EXERCISE
Do not hold your breath while exercising. Breathe normally as much as possible. Remember, breathing involves
the intake and distribution of oxygen, which feeds the working muscles.
REST PERIODS
Once you start your exercise program, you should continue through to the end. Do not break off halfway through
and then restart at the same place later on without going through the warm-up stage again.
The rest period required between strength training exercises may vary from person to person. This will depend
mostly on your level of fitness and the program you have chosen. Rest between exercises by all means, but do
not allow this to exceed two minutes. Most people manage with half minute to one-minute rest periods.
AEROBIC FITNESS
The largest amount of oxygen that you can use per minute during exercise is called your maximum oxygen
uptake (MVO2). This is often referred to as your aerobic capacity.
The effort that you can exert over a prolonged period of time is limited by your ability to deliver oxygen to the
working muscles. Regular vigorous exercise produces a training effect that can increase your aerobic capacity by
as much as 20 to 30%. An increased MVO2 indicates an increased ability of the heart to pump blood, of the
lungs to ventilate oxygen and of the muscles to take up oxygen.
ANAEROBIC TRAINING
This means “without oxygen” and is the output of energy when the oxygen supply is insufficient to meet the
body’s long-term energy demands. (For example, 100-meter sprint).
THE TRAINING THRESHOLD
This is the minimum level of exercise, which is required to produce significant improvements in any physical
fitness parameter.
PROGRESSION
As you become fitter, a higher intensity of exercise is required to create an overload and therefore provides
continued improvement.

7
OVERLOAD
This is where you exercise at a level above that which can be carried out comfortably. The intensity, duration
and frequency of exercise should be above the training threshold and should be gradually increased as the body
adapts to the increasing demands. As your fitness level improves, so the training threshold should be raised.
Working through your program and gradually increasing the overload factor is important.
SPECIFICITY
Different forms of exercise produce different results. The type of exercise that is carried out is specific both to
the muscle groups being used and to the energy source involved. There is little transfer of the effects of exercise,
e.g. from strength training to cardiovascular fitness. That is why it is important to have an exercise program
tailored to your specific needs.
REVERSIBILITY
If you stop exercising or do not do your program often enough, you will lose the benefits you have gained.
Regular workouts are the key to success.
WARM UP
Every exercise program should start with a warm up where the body is prepared for the effort to come. It should
be gentle and preferably use the muscles to be involved later.
Stretching should be included in both your warm up and cool down, and should be performed after 3~5 minutes
of low intensity aerobic activity or callisthenic type exercise.
WARM DOWN OR COOL DOWN
This involves a gradual decrease in the intensity of the exercise session. Following exercise, a large supply of
blood remains in the working muscles. If it is not returned promptly to the central circulation, pooling of blood
may occur in the muscles.
HEART RATE
As you exercise, so the rate at which your heart beat also increases. This is often used as a measure of the
required intensity of exercise. You need to exercise hard enough to condition your circulatory system, and
increase your heart rate, but not enough to strain your heart.
Your initial level of fitness is important in developing an exercise program for you. If you are starting off, you
can get a good training effect with a heart rate of 110-120 beats per minute (BPM). If you are fitter, you will
need a higher threshold of stimulation.
To begin with, you should exercise at a level that elevates your heart rate to about 65 to 70% of your maximum
heart rate. If you find this is too easy, you may want to increase it, but it is better to lean on the conservative side.
As a rule of thumb, the maximum heart rate is 220 BPM minus your age. As you increase in age, so your heart,
like other muscles, loses some of its efficiency. Some of its natural loss is won back as fitness improves.
The following table is a guide for those who are “starting fitness”.
Age 25 30 35 40 45 50 55 60 65
Target heart rate
10 seconds count 23 22 22 21 20 19 19 18 18
Beats per minute 138 132 132 126 120 114 114 108 108
Pulse Count
The pulse count (on your wrist or carotid artery in the neck, taken with two index fingers) is done for ten
seconds, taken a few seconds after you stop exercising. This is for two reasons: (a) 10 seconds is long enough for

8
accuracy, (b) the pulse count is to approximate your BMP rate at the time you are exercising. Since heart rate
slows as you recover, a longer count isn’t as accurate.
The target is not a magic number, but a general guide. If you are above average fitness, you may work quite
comfortably a little above that suggested for your age group.
The following table is a guide to those who are keeping fit. Here we are working at about 80% of maximum.
Age 25 30 35 40 45 50 55 60 65
Target heart rate
10 seconds count 26 26 25 24 23 22 22 21 20
Beats per minute 156 156 150 144 138 132 132 126 120
Don’t push yourself too hard to reach the figures on this table. It can be very uncomfortable if you overdo it. Let
it happen naturally as you work through your program. Remember, the target is a guide, not a rule, a little above
or below is just fine.
Two final comments: (1) don’t be concerned with day to day variations in your pulse rate, being under pressure
or not enough sleep can affect it; (2) your pulse rate is a guide, don’t become slaves to it.
ENDURANCE CIRCUIT TRAINING
Cardiovascular endurance, muscle strength, flexibility and coordination are all necessary for maximum fitness.
The principle behind circuit training is to give a person all the essentials at one time by going through your
exercise program moving as fast as possible between each exercise. This increases the heart rate and sustains it,
which improves the fitness level. Do not introduce this circuit training effect until you have reached an
advantaged program stage.
PERIODIZATION
This is the term used to vary your exercise program for both physiological and psychological benefits. In your
overall program, you should vary the workload, frequency and intensity. The body responds better to variety and
so do you. In addition, when you feel yourself getting “stale”, bring in periods of lighter exercise to allow the
body to recuperate and restore its reserves. You will enjoy your program more and feel better for it.
MUSCLE SORENESS
For the first week or so, this may be the only indication you have that you are on exercise program. This, of
course, does depend on your overall fitness level. A confirmation that you are on the correct program is a very
slight soreness in most major muscle groups. This is quite normal and will disappear in a matter of days.
If you experience major discomfort, you may be on a program that is too advanced or you have increased your
program too rapidly.
If you experience PAIN during or after exercise, your body is telling you something. Stop exercising and consult
your doctor.
SETTING UP YOUR ROWER
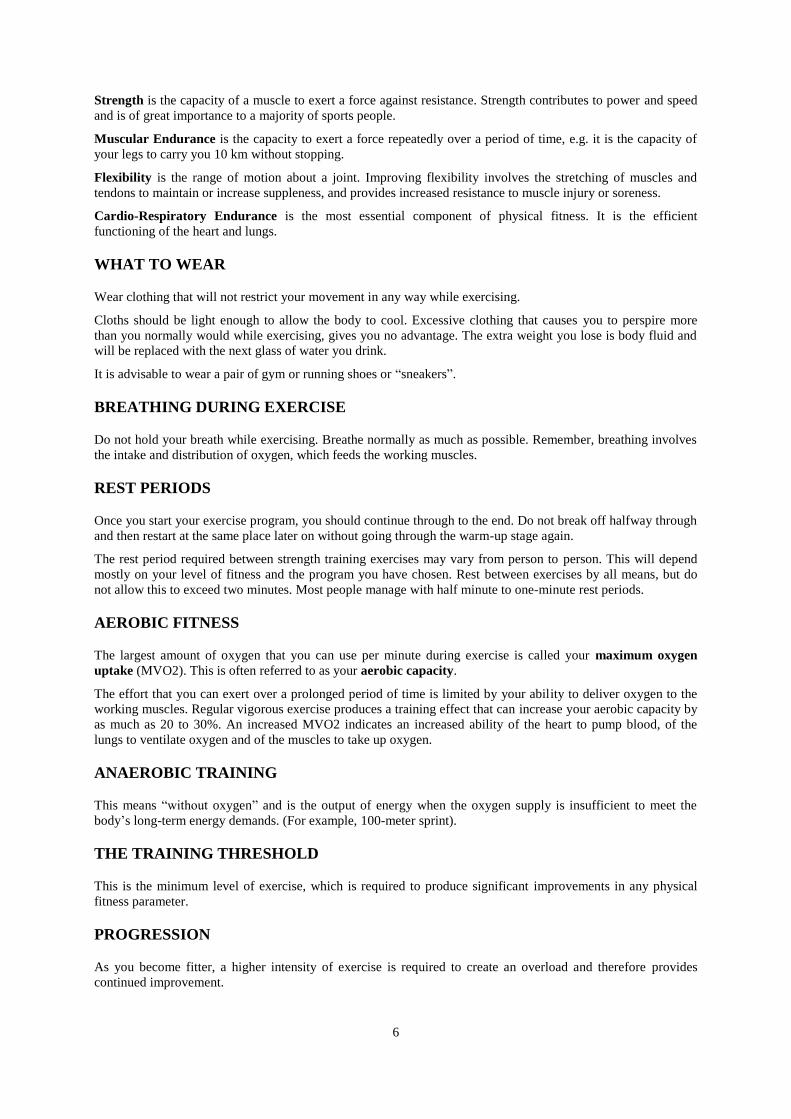
COMPUTER ANGLE ADJUSTMENT
The COMPUTER and COMPUTER ARM are designed to rotate and pivot giving you full adjustment to almost
any height and angle.
NOTE: For safety reasons, while exercising avoid the DRIVE STRAP touching the COMPUTER.
9
Hold the COMPUTER with both hands as shown in the diagram above. Rotate and pivot the COMPUTER to the
desired height and angle.
For safety reasons, avoid the DRIVE STRAP touching the COMPUTER.
GETTING ON SAFELY
Getting on safely is a simple procedure. Just be careful that the SEAT is directly underneath you before sitting
down.
1. Straddle the ALUMINUM BEAM.
2. Correctly position the SEAT beneath you.
3. Sit down taking care that the SEAT has not moved.
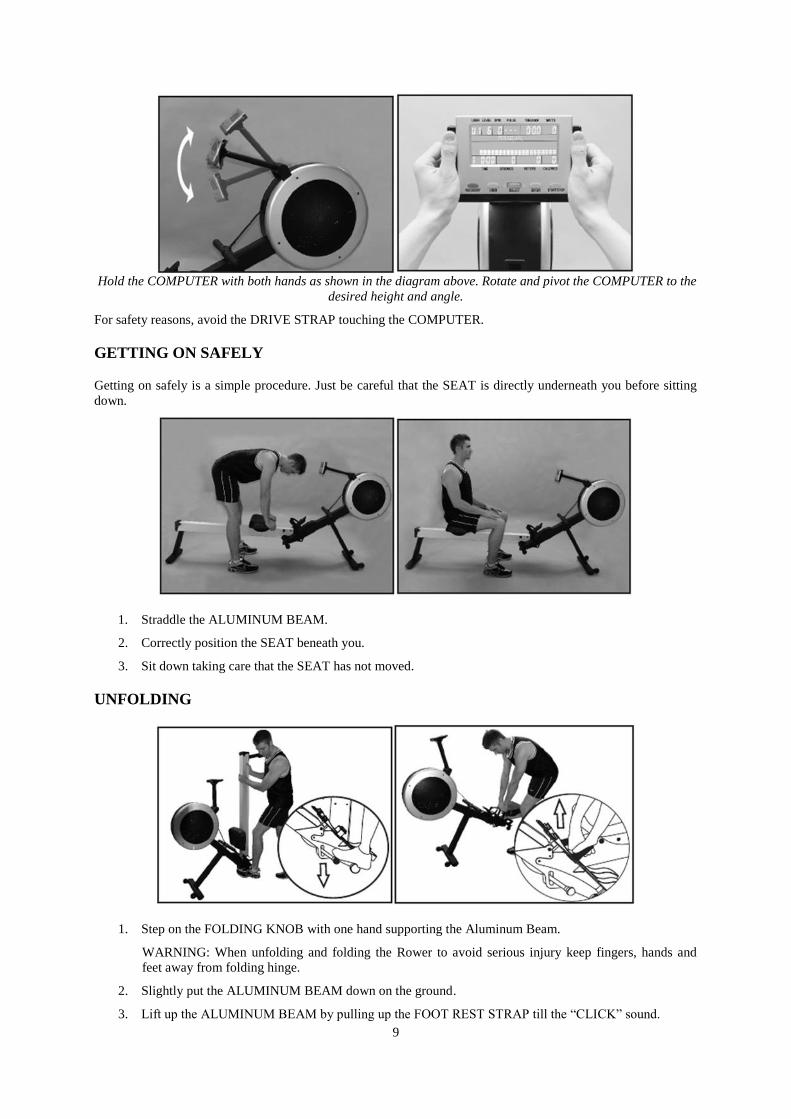
UNFOLDING
1. Step on the FOLDING KNOB with one hand supporting the Aluminum Beam.
WARNING: When unfolding and folding the Rower to avoid serious injury keep fingers, hands and
feet away from folding hinge.
2. Slightly put the ALUMINUM BEAM down on the ground.
3. Lift up the ALUMINUM BEAM by pulling up the FOOT REST STRAP till the “CLICK” sound.
10
4. Ensure the FOLDING KNOB at the correct position.
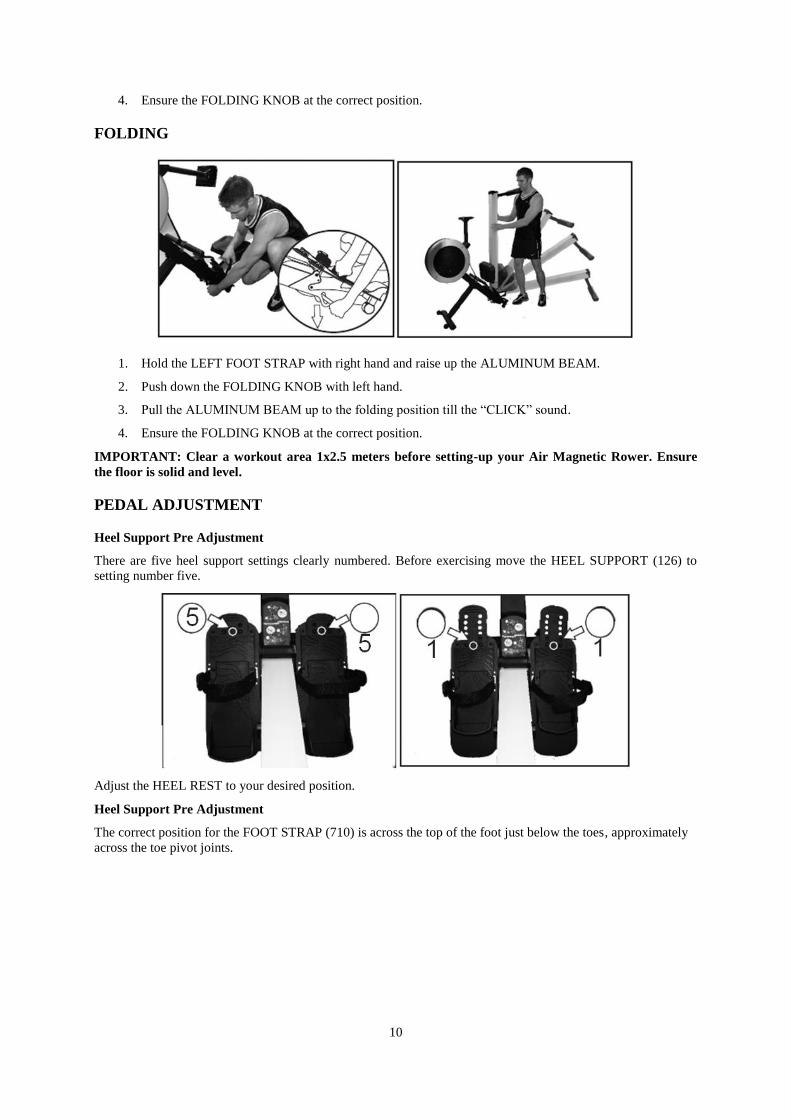
FOLDING
1. Hold the LEFT FOOT STRAP with right hand and raise up the ALUMINUM BEAM.
2. Push down the FOLDING KNOB with left hand.
3. Pull the ALUMINUM BEAM up to the folding position till the “CLICK” sound.
4. Ensure the FOLDING KNOB at the correct position.
IMPORTANT: Clear a workout area 1x2.5 meters before setting-up your Air Magnetic Rower. Ensure
the floor is solid and level.
PEDAL ADJUSTMENT
Heel Support Pre Adjustment
There are five heel support settings clearly numbered. Before exercising move the HEEL SUPPORT (126) to
setting number five.
Adjust the HEEL REST to your desired position.
Heel Support Pre Adjustment
The correct position for the FOOT STRAP (710) is across the top of the foot just below the toes, approximately
across the toe pivot joints.

11
Ensure the foot strap is tight.
Heel Support Adjustment
The HEEL SUPPORT has a sprung loaded locking system designed for easy adjustment. Memorize the setting
number best suited for future reference.
With your feet tightly secured by the FOOT REST. Memorize the setting number best suited to you for future
reference.
CORRECT ROWING GUIDE
OVER REACHING
INCORRECT
The body stretches too far forward. The shins may be past vertical. The head and shoulders tend to drop towards
the feet. The body is in a weak position for the stroke.
SOLUTION
The shins are vertical. The body is pressed up to the legs. The arms are fully extended and relaxed, body tilted
slightly forward. This position should feel comfortable.

12
ROWING WITH ARMS BENT
INCORRECT
The user starts the stroke by pulling with the arms rather than pushing with the legs.
SOLUTION
The user starts the stroke by pushing the legs and bracing the back with the arms fully extended and relaxed.
BENT WRISTS
INCORRECT
The user bends their wrists at any time through the stroke.

13
SOLUTION
Always row with flat wrists through the entire stroke.
PULLING THE BODY TO THE HANDLE
INCORRECT
At the finish, the user, instead of pulling the handle to the body, pulls themselves forward to the handle.
CORRECT
At the finish the user leans back slightly, holds the legs down and draws the handle to the body using the upper
body as a firm platform.

14
FLYING ELBOWS
INCORRECT
The user’s elbows are sticking out from the body at the finish and the handle is at chest level.
SOLUTION
Draw the handle to the body. The wrists are flat and the elbows pass close to the body. Elbows extend behind the
body as the handle is drawn to the waist.
LOCKING THE KNEES
INCORRECT
At the end of the stroke the user locks the knees making the legs straight.
SOLUTION
Always keep the legs slightly bend in the fully extended position, do not lock the knees.
15
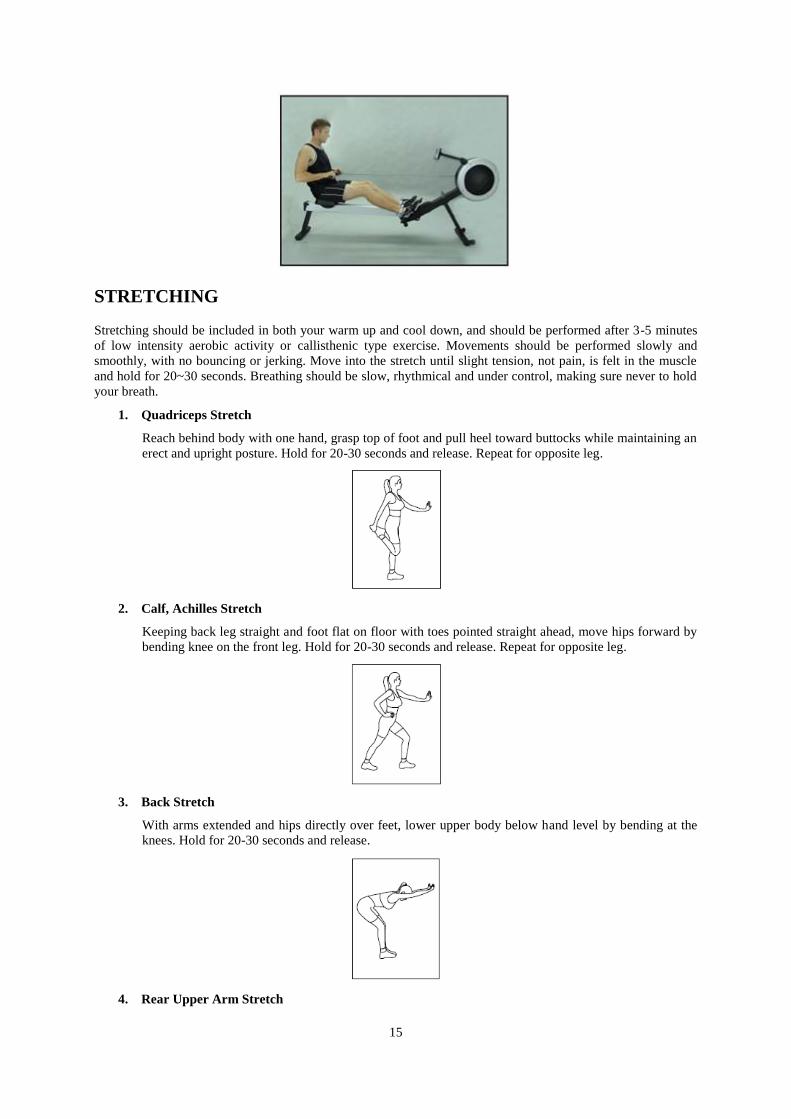
STRETCHING
Stretching should be included in both your warm up and cool down, and should be performed after 3-5 minutes
of low intensity aerobic activity or callisthenic type exercise. Movements should be performed slowly and
smoothly, with no bouncing or jerking. Move into the stretch until slight tension, not pain, is felt in the muscle
and hold for 20~30 seconds. Breathing should be slow, rhythmical and under control, making sure never to hold
your breath.
1. Quadriceps Stretch
Reach behind body with one hand, grasp top of foot and pull heel toward buttocks while maintaining an
erect and upright posture. Hold for 20-30 seconds and release. Repeat for opposite leg.
2. Calf, Achilles Stretch
Keeping back leg straight and foot flat on floor with toes pointed straight ahead, move hips forward by
bending knee on the front leg. Hold for 20-30 seconds and release. Repeat for opposite leg.
3. Back Stretch
With arms extended and hips directly over feet, lower upper body below hand level by bending at the
knees. Hold for 20-30 seconds and release.
4. Rear Upper Arm Stretch

16
Grasp elbow and pull hand toward midline of the body while maintaining an erect and upright posture.
Hold for 20-30 seconds. Repeat for opposite leg.
5. Hamstring, Lower Back Stretch
Holding thigh against upper body, extend leg toward ceiling. Hold for 20-30 seconds. Repeat for
opposite leg.
6. Buttocks, Hips, Abdominal Stretch
While keeping both shoulders in contact with the ground, gently pull knee toward the ground. Hold for
20-30 seconds and release. Repeat for opposite side.
7. Inner Thigh Stretch
With soles of feet together, lean forward from the waist while applying downward pressure to the inside
of the knees. Hold for 20-30 seconds and release.
8. Chest, Shoulder, Upper Arm Stretch
Move buttocks forward away from arms while keeping arms extended back and palms on ground. Hold
for 20-30 seconds and release.
17
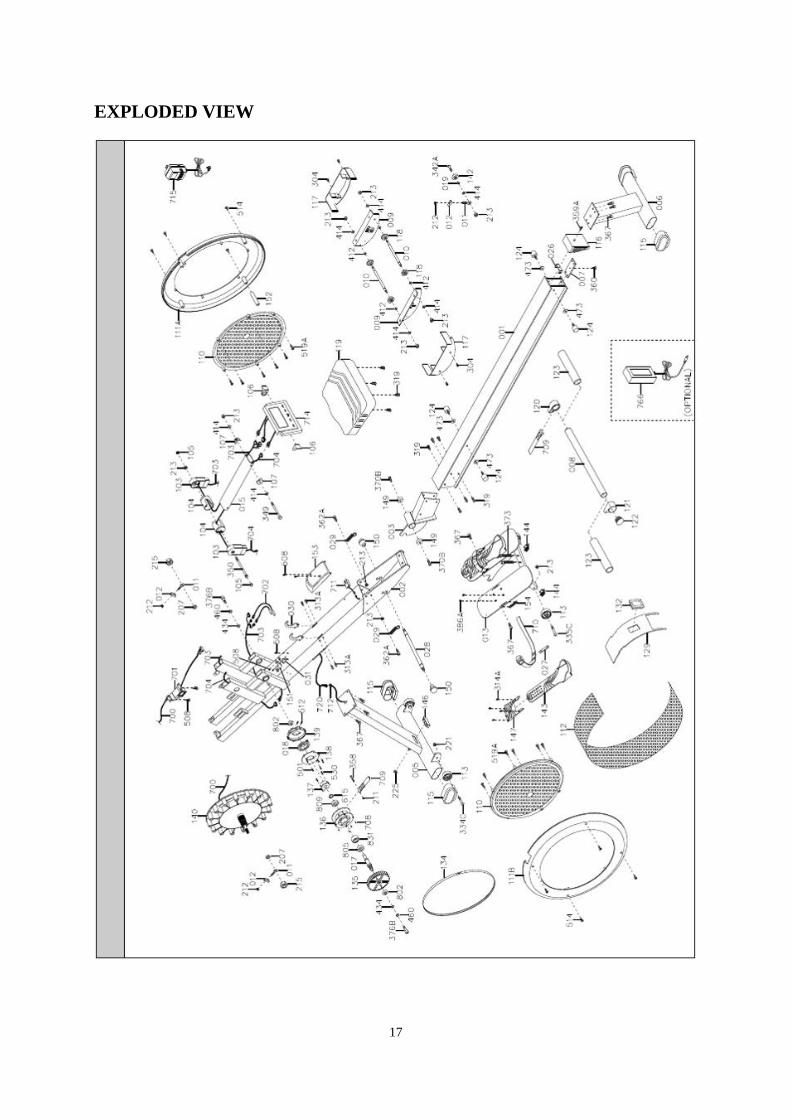
EXPLODED VIEW
18
PARTS LIST
No. DESCRIPTION QTY
001 ALUMINUM BEAM 1
002 MAIN FRAME 1
003 PIVOT BRACKET 1
005 STABILIZER - FRONT 1
006 STABILIZER - REAR 1
007 REAR BRACKET 1
008 ALI HANDLE BAR 1
009 SEAT CARRIAGE 2
010 SEAT CARRIAGE SHAFT 2
011 ROLLER ADJUSTMENT BOLT 4
012 ROLLER ADJUSTMENT PLATE 4
013 FOOT PEDAL 1
015 COMPUTER ARM 1
017 CLUTCH SHAFT 1
018 RETURN SPRING 1
019 ROLLER SPACER 2
026 STOPPER BRACKET 1
027 STRAP HOLDER 2
028 KNOB STUD 1
029 SPRING 2
030 HANDLE BAR HOLDER 2
031 SENSOR HOLDER BRACKET 1
103 COMPUTER ARM PLUG 2
104 COMPUTER ARM PIVOT 2
105 COMPUTER ARM NUT COVER 2
106 COMPUTER CASE PLUG COVER 2
107 COMPUTER ARM SPACER 2
110 COVER - HUB 2
111A COVER MAIN - RIGHT 1
111B COVER MAIN - LEFT 1
112 MESH 1
113 WHEEL 4
115 STANDARD CAP 4
116 ALUMINUM BEAM END CAP 1
117 CARRIAGE COVER 2
118 SEAT CARRIAGE ROLLER 4

19
119 SEAT 1
120 STRAP COVER - RIGHT 1
121 STRAP COVER - LEFT 1
122 PLUG 2
123 FOAM GRIP 2
124 CARRIAGE STOPPER 4
129 COVER VENT 1
132 STRAP SLOT TRIM 1
134 POLY “V” DRIVE BELT 1
135 DRIVE PULLEY 1
136 STRAP DRUM 1
137 RETURN SPRING - DRUM 1
138 RETURN SPRING - COVER 1
139 RETURN SPRING - HOLDER 1
140 FLYWHEEL FAN 1
142 SPECIAL SEAT ROLLER 2
143 HEEL REST 2
144 PLUG 2
146 PLUG 1
147 HEEL REST HOLDER 2
149 BUSHING 2
150 BALL KNOB 2
151 SENSOR HOLDER 1
152 MAIN COVER JOINT POST 1
153 RECEIVER COVER 1
154 STRAP TRIM 4
207 NUT 2
211 NUT 1
212 NUT 4
213 NUT 12
215 NUT 2
221 NUT 2
225 NUT 1
304 BOLT 4
313A BOLT 4
314A BOLT 8
319 BOLT 10
334C BOLT 2

20
335C BOLT 2
342A BOLT 2
349 BOLT 1
350 BOLT 1
358 BOLT 1
359A BOLT 1
360 BOLT 1
362A BOLT 2
367 BOLT 10
370B BOLT 2
373 BOLT 2
376B BOLT 2
386A BOLT 4
412 WASHER 4
414 WASHER 8
434 WASHER 2
460 WASHER 2
473 WASHER 4
501 SCREW 5
508 SCREW 7
512 SCREW 2
514 SCREW 8
519A SCREW 12
530 SCREW 2
615 RETAINING RING 1
700 TENSION CABLE 1
701 MOTOR with CABLE 1
702 MOTOR SENSOR CABLE 2
703 COMPUTER CABLE 1
704 COMPUTER CABLE 1
708 SENSOR MAGNET 4
709 DRIVE STRAP ASSEMBLY 1
710 FOOT STRAP 2
711 CHEST BAND RECEIVER 1
712 AC ADAPTOR CABLE 1
714 COMPUTER 1
715 AC ADAPTOR 1
720 AC CABLE 1
21
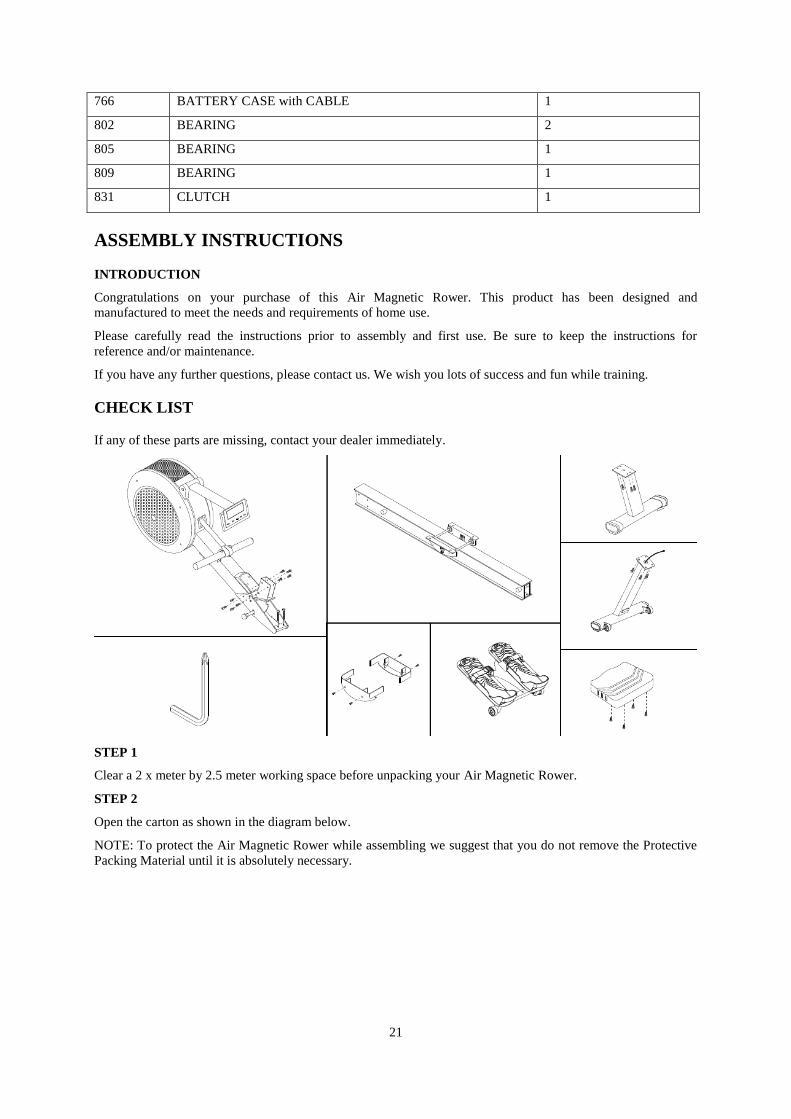
766 BATTERY CASE with CABLE 1
802 BEARING 2
805 BEARING 1
809 BEARING 1
831 CLUTCH 1
ASSEMBLY INSTRUCTIONS
INTRODUCTION
Congratulations on your purchase of this Air Magnetic Rower. This product has been designed and
manufactured to meet the needs and requirements of home use.
Please carefully read the instructions prior to assembly and first use. Be sure to keep the instructions for
reference and/or maintenance.
If you have any further questions, please contact us. We wish you lots of success and fun while training.
CHECK LIST
If any of these parts are missing, contact your dealer immediately.
STEP 1
Clear a 2 x meter by 2.5 meter working space before unpacking your Air Magnetic Rower.
STEP 2
Open the carton as shown in the diagram below.
NOTE: To protect the Air Magnetic Rower while assembling we suggest that you do not remove the Protective
Packing Material until it is absolutely necessary.

22
STEP 3
a) Remove the partly assembled rower from the carton lid and place it the correct way up as shown in the
diagram below.
b) Remove the SAFETY STRAP HOLDER and discard. Place the HANDLE BAR in its HOLDER.
c) Remove 2 x BOLT (367) from the MAIN FRAME (002) and 2 x BOLT (373) with the TOOL provided.
d) Assemble FOOT PEDAL (013) with the same 2 x BOLT (367) with 2 x BOLT (373) then tighten
firmly.
STEP 4
a) Turn over the MAIN FRAME (002) in the Carton Lid as shown in the diagram below.
b) Remove 4 x BOLT (367) from MAIN FRAME (002) with the tool provided.
c) Connect AC ADAPTOR CABLE (712) to AC CABLE (720).
d) Assemble the FRONT STABILIZER (005) with the same 4 x BOLT (367) and tighten firmly. Before
assembling make sure the FRONT STABILIZER (005) is not pressing the AC ADAPTOR CABLE
(712) and the AC CABLE (720).

23
STEP 5
a) Remove the ALUMINUM BEAM (001) from the carton and place it on top of the carton lid as shown
in the diagram below.
b) Remove 4 x BOLT (367) from ALUMINUM BEAM (001) with the TOOL provided.
c) Assemble REAR STABILIZER (006) with the same 4 x BOLT (367) and tighten firmly.
d) Remove the Cable Tie and discard.
STEP 6
a) Remove 6 x BOLT (319) from PIVOT BRACKET (003) with the TOOL provided.
b) Assemble the ALUMINUM BEAM (001) with the same 6 x BOLT (319) and tighten firmly.
24
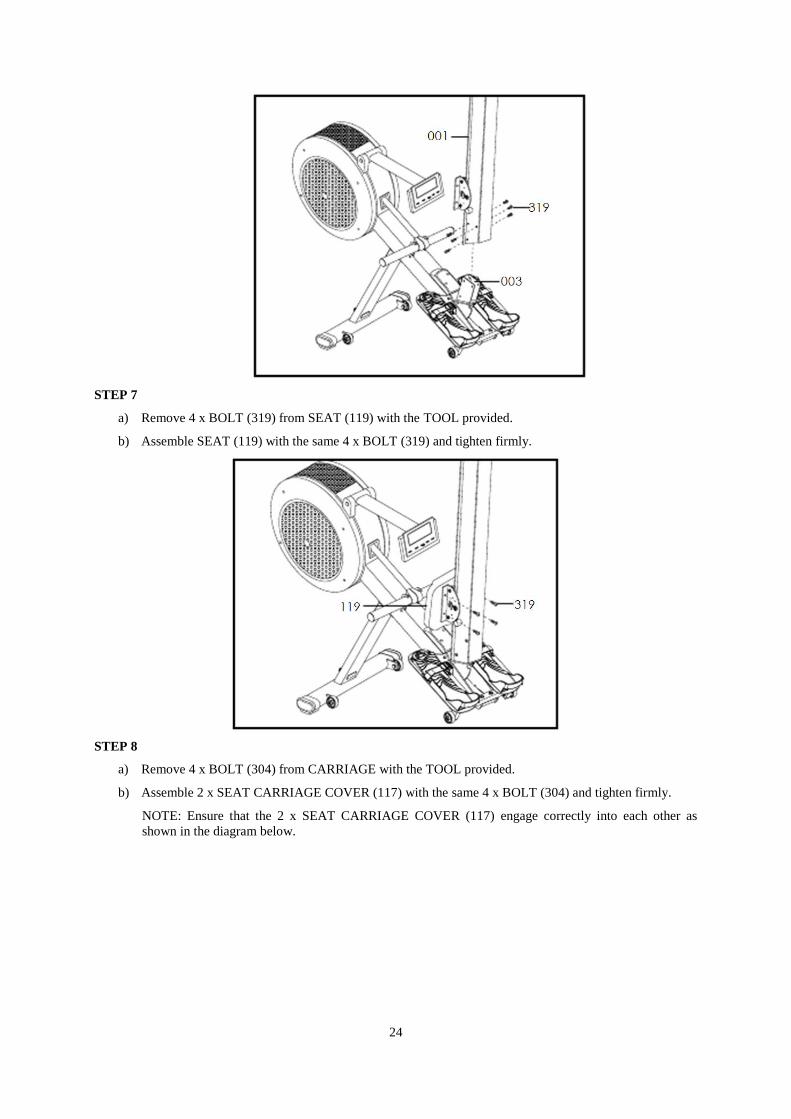
STEP 7
a) Remove 4 x BOLT (319) from SEAT (119) with the TOOL provided.
b) Assemble SEAT (119) with the same 4 x BOLT (319) and tighten firmly.
STEP 8
a) Remove 4 x BOLT (304) from CARRIAGE with the TOOL provided.
b) Assemble 2 x SEAT CARRIAGE COVER (117) with the same 4 x BOLT (304) and tighten firmly.
NOTE: Ensure that the 2 x SEAT CARRIAGE COVER (117) engage correctly into each other as
shown in the diagram below.

25
STEP 9
Connect the AC ADAPTOR (715) into the main power socket.
STEP 10
Remove all Protective Packing Material and discard.
ASSEMBLY COMPLETE!
It is important to read the Owner’s Manual and all safety instructions thoroughly to familiarize yourself with the
Air Magnetic Rower before using it.
26
TERMS AND CONDITIONS OF WARRANTY, WARRANTY CLAIMS
General Conditions of Warranty and Definition of Terms
All Warranty Conditions stated hereunder determine Warranty Coverage and Warranty Claim Procedure.
Conditions of Warranty and Warranty Claims are governed by Act No. 40/1964 Coll. Civil Code, Act No.
513/1991 Coll., Commercial Code, and Act No. 634/1992 Coll., Consumer Protection Act, as amended, also in
cases that are not specified by these Warranty rules.
The seller is SEVEN SPORT s.r.o. with its registered office in Borivojova Street 35/878, Prague 13000,
Company Registration Number: 26847264, registered in the Trade Register at Regional Court in Prague, Section
C, Insert No. 116888.
According to valid legal regulations it depends whether the Buyer is the End Customer or not.
“The Buyer who is the End Customer” or simply the “End Customer” is the legal entity that does not conclude
and execute the Contract in order to run or promote his own trade or business activities.
“The Buyer who is not the End Customer” is a Businessman that buys Goods or uses services for the purpose of
using the Goods or services for his own business activities. The Buyer conforms to the General Purchase
Agreement and business conditions to the extent specified in the Commercial Code.
These Conditions of Warranty and Warranty Claims are an integral part of every Purchase Agreement made
between the Seller and the Buyer. All Warranty Conditions are valid and binding, unless otherwise specified in
the Purchase Agreement, in the Amendment to this Contract or in another written agreement.
Warranty Conditions
Warranty Period
The Seller provides the Buyer a 24 months Warranty for Goods Quality, unless otherwise specified in the
Certificate of Warranty, Invoice, Bill of Delivery or other documents related to the Goods. The legal warranty
period provided to the Consumer is not affected.
By the Warranty for Goods Quality, the Seller guarantees that the delivered Goods shall be, for a certain period
of time, suitable for regular or contracted use, and that the Goods shall maintain its regular or contracted
features.
The Warranty does not cover defects resulting from:
User’s fault, i.e. product damage caused by unqualified repair work, improper assembly, insufficient insertion of
seat post into frame, insufficient tightening of pedals and cranks
Improper maintenance
Mechanical damages
Regular use (e.g. wearing out of rubber and plastic parts, joints etc.)
Unavoidable event, natural disaster
Adjustments made by unqualified person
Improper maintenance, improper placement, damages caused by low or high temperature, water, inappropriate
pressure, shocks, intentional changes in design or construction etc.
Warranty Claim Procedure
The Buyer is obliged to check the Goods delivered by the Seller immediately after taking the responsibility for
the Goods and its damages, i.e. immediately after its delivery. The Buyer must check the Goods so that he
discovers all the defects that can be discovered by such check.
When making a Warranty Claim the Buyer is obliged, on request of the Seller, to prove the purchase and validity
of the claim by the Invoice or Bill of Delivery that includes the product’s serial number, or eventually by the
documents without the serial number. If the Buyer does not prove the validity of the Warranty Claim by these
documents, the Seller has the right to reject the Warranty Claim.
If the Buyer gives notice of a defect that is not covered by the Warranty (e.g. in the case that the Warranty
Conditions were not fulfilled or in the case of reporting the defect by mistake etc.), the Seller is eligible to

27
require a compensation for all the costs arising from the repair. The cost shall be calculated according to the
valid price list of services and transport costs.
If the Seller finds out (by testing) that the product is not damaged, the Warranty Claim is not accepted. The
Seller reserves the right to claim a compensation for costs arising from the false Warranty Claim.
In case the Buyer makes a claim about the Goods that is legally covered by the Warranty provided by the Seller,
the Seller shall fix the reported defects by means of repair or by the exchange of the damaged part or product for
a new one. Based on the agreement of the Buyer, the Seller has the right to exchange the defected Goods for a
fully compatible Goods of the same or better technical characteristics. The Seller is entitled to choose the form of
the Warranty Claim Procedures described in this paragraph.
The Seller shall settle the Warranty Claim within 30 days after the delivery of the defective Goods, unless a
longer period has been agreed upon. The day when the repaired or exchanged Goods is handed over to the Buyer
is considered to be the day of the Warranty Claim settlement. When the Seller is not able to settle the Warranty
Claim within the agreed period due to the specific nature of the Goods defect, he and the Buyer shall make an
agreement about an alternative solution. In case such agreement is not made, the Seller is obliged to provide the
Buyer with a financial compensation in the form of a refund.
SEVEN SPORT, s.r.o.
Borivojova 35/878 130 00 Praha 3, Czech Rebublic CRN: 268 47 264, VAT ID: CZ26847264
Orders: +420 556 300 970, [email protected]
Warranty Claims: +420 556 770 190, Mobile: +420 604 853 019, [email protected]
Service: +420 556 770 190, Mobile: +420 604 853 019, [email protected]
Fax: +420 556 770 192, (Service +420 556 770 191)
Web: www.insportline.cz, www.worker.cz, www.worker-moto.cz
INSPORTLINE, s.r.o.
Bratislavska 36, 911 05 Trencin, Slovakia CRN: 36311723, VAT ID: SK2020177082
Orders: +421(0)326 526 701, +421(0)917 649 192, [email protected]
Warranty Claims: +421(0)326 526 701, +421(0)918 408 519, [email protected]
Fax: +421(0)326 526 705
Web: www.insportline.sk, www.worker.sk, www.worker-moto.sk
Date of Sale: Stamp and Signature of Seller: