USER INSTRUCTIONS - Freestanding & Built-In Home ... ENG REFRIGERATOR USER INSTRUCTIONS GKFI7030...
40
ENG www.grundig.co.uk REFRIGERATOR USER INSTRU CTIONS GKFI7030 FOR A GOOD REASON
Transcript of USER INSTRUCTIONS - Freestanding & Built-In Home ... ENG REFRIGERATOR USER INSTRUCTIONS GKFI7030...
E NG
www.grundig.co.uk
REFRIGER ATORUSER INSTRUCTIONS
GKFI7030
FOR A GOOD REASON


3
Contents
Introduction & safety warnings............................................................................4Electrical requirements.......................................................................................5Transportation instructions.................................................................................6Important Installation instructions ......................................................................7Getting to know your fridge / freezer..................................................................8Suggested arrangement of food in the fridge / freezer.......................................9Operating the product.......................................................................................10Starting..............................................................................................................11Storing frozen food............................................................................................11Freezing fresh food............................................................................................11Making ice cubes...............................................................................................11Defrosting..........................................................................................................12
Cleaning and care.............................................................................................13Replacing the interior light bulb.........................................................................13Do's and don'ts..................................................................................................14Energy saving tips.............................................................................................15Problem solving ................................................................................................15Installation instructions detailed step by step....................................................16Reversing the doors..........................................................................................32Guarantee details..............................................................................................33How to obtain service........................................................................................36
Please keep this handbook for future reference, or for anyone else who may use the appliance.
Zero temperature compartment.........................................................................12

4
Congratulations on your choice of a GRUNDIG quality Appliance which has been designed to give you service for many years.
WARNING !IMPORTANT !DO NOT connect your appliance to the electricity supply until all packing and transit protectors have been removed.• Leave to stand for at least 4 hours before switching on to allow compressor oil to settle if transportedhorizontally.
r, disable the lock/latch, ensure that it is left in a safe condition to prevent the entrapment of young children.• This fridge/freezer must only be used for its intended purpose i.e the storing and freezing of edible
GRUNDIGan ongoing commitment. This appliance which is among the latest range introduced is particularly environment friendly. Your appliance contains non CFC / HFC natural substances in the cooling
transporignition source and immediately ventilate the room where the appliance is situated.• We suggest you contact your local authority for disposal information and facilities available• See Installation Instructions on page 7 for information on suitable location.• To obtain the best possible performance and trouble free operation from your appliance it is very important to carefully read these instructions.• On delivery, check to make sure that the product is not damaged and that all the parts and accessories are in perfect condition.• Ensure that the plug remains readily accessible. Do not use a multiple adapter bar or extension cable. • Failure to observe these instructions may invalidate your right to free service during the guarantee period.WARNING- Keep ventilation openings, in the appliance enclosure or in the built-in structure, clear of obstruction.WARNING- Do not use mechanical devices or other means to accelerate the defrosting process, other than those recommended by the manufacturer.WARNING- Do not damage the refrigerant circuit.WARNING- Do not use electrical appliances inside the food storage compartments of the appliance, unless they are of the type recommended by the manufacturer.• We suggest you keep these instructions in a safe place for easy reference.• This appliance is not intended for use by persons (including children) with reduced physical, sensory or mental capabilities, or lack of experience and knowledge,unless they have been given supervision or instruction concerning use of the appliance by a person responsible for their safety. • Children should be supervised to ensure that they do notplay with the appliance.
PERFORMANCE
Energy efEnergy consumption - Kwh/yearNet storage - vol fresh food ltrs (cu.ft.)
Total net vol - ltrs (cu.ft.)Frozen food compartment ratingConservation time from failureFreezing capacity fresh food - kg (lb) / 24 hrs.Climate classOperating noise level dB(A)
Net storage - vol frozen food ltrs (cu.ft.)
A++
186 (6.57)
255 (9.0)
13 h.4 (8.8)
4 STAR
69 (2.43)
240
40
Frost Free Combi Fridge Freezer GKFI7030
SN-ST

5
ELECTRICAL REQUIREMENTSBefore you insert the plug into the wall socket make sure that the voltage and the frequency shown in the rating plate inside the appliance corresponds to your electricity supply.Rating label is on the left hand side of fridge inner liner.We recommend that this appliance is connected to the mains supply via asuitable switched and fused socket in a readily accessible position.WARNING: When positioning the appliance ensure the supply cord is not trapped or damaged.Should the mains lead of the appliance become damaged or should it need replacing at any time, it must be replaced by a special purpose made mains lead which can only be obtained from a GRUNDIG Authorised Service Agent
WARNING! THIS APPLIANCE MUST BE EARTHEDIf the f tted moulded plug is not suitable for your socket, then the plug should be cut off and an appropriate plug f tted. Destroy the old plug which is cut off as a plug with bared cord could cause a shock hazard if inserted into a socketelsewhere in the house.The moulded plug on this appliance incorporates a 13 A fuse. Should the fuse need to be replaced an ASTABEAB approved BS 1362 fuse of the same rating must be used. Do not forget to ref t the fuse cover. In the event of losing the fuse cover the plug must not be used until a replacement fuse cover has been f tted. Colour of the replacement fuse cover must be the same colour as that visible on the pin face of the plug. Fuse covers can be obtained from a authorised service agent.
IMPORTANT! FITTING A DIFFERENT PLUGAs the colours of the wires in themains lead of thisappliance may not correspond with the colouredmarkings identifying the terminals in your plug proceed as follows: (See diagram).
1. Connect the green-yellow or green (Earth) wireto the terminal in the plug marked 'E' or with thesymbol or coloured green and yellow or green.
2. Connect the blue (Neutral) wire to the te minalin the plug marked 'N' or coloured black.
3. Connect the brown (Live) wire to the terminal inthe plug marked 'L' or coloured red.With alternative plugs a 13A fuse must bef tted either in the plug or adaptor or in the main fuse box.If in doubt contact a qualif ed electrician.
WARNING: Do not locate extension sockets or charging transformers/power supplies or Lithium-Iron battery operated products adjacent to the compressor as they could overheat.

6
TRANSPORTATION INSTRUCTIONS1. The appliance should be transported only in a vertical upright position. The packing
as supplied must be intact during transportation.2. If during the course of transport the appliance has to be transported horizontally, it
must only be laid on its left hand side when standing in the front of the appliance.After bringing it to upright position,it must not be operated for at least 4 hours toallow the system to settle.
3. Failure to comply with the above instructions could result in damage occuring to theappliance. The manufacturer will not be held responsible if these instructions aredisregarded.
4. The appliance must be protected against rain, moisture and other atmosphericinfluences.
5. When positioning your appliance take care not to damage your flooring, kitchenfurniture, related parts and doors, pipes, wall coverings etc. Do not move theappliance by pulling by the door.
6. Empty any water in the drain tray before moving. See section ‘Defrosting’ and ‘Care& cleaning’ for further information.
7. Make sure that the defrost water pipe at the back of the product is fixed to theplastic evaporating pan on the top of the compressor, to avoid defrost water spillageon the floor.
IMPORTANT : Care must be taken while cleaning / carrying the appliance to avoid touching the bottom of the condenser metal wires at the back of the appliance as you might injure your fingers and hands.
Do not attempt to sit or stand on top of your appliance as it is not designed for such use. You could injure yourself or damage the appliance.
"IMPORTANT: Make sure that mains cable is not caught under the appliance during and after carrying / moving the appliance, to avoid the mains cable becoming cut or damaged."
Do not allow children to play with the appliance or tamper with the controls. GRUNDIG declines to accept any liability should the instructions not be followed.
• This appliance is not intended for use by persons (including children) with reducedphysical, sensory or mental capabilities, or lack of experience and knowledge, unlessthey have been given supervision or instruction concerning use of the appliance by aperson responsible for their safety.
• Children should be supervised to ensure that they do not play with the appliance.

7
1. The space in the room where the appliance is installed must not be smaller than 10 cubic metres.
2. See pages 16 to 32 for detailed Installation Instructions including reversing door opening direction.
3. This appliance has been designed to operate in ambient temperatures up to 38 degrees C (90 degrees F) and is equipped with Freezer Guard technology which ensures that even if the ambient temperature falls to -15 °C, frozen food in the freezer does not thaw thanks to this. So you may then install your appliance in a garage or an unheated room without having to worry about frozen food in the freezer being spoilt. However at low ambient temperatures mentioned above, fridge contents are likely to freeze, so check and consume food in the fridge accordingly. When the ambient temperature returns to normal, you may change the knob setting to suit your needs.If the ambient temperature is below 0°C, the food in the fridge compartment will freeze. So, we recommend you don’t use the fridge compartment in such low ambient conditions. You can continue using the freezer compartment as usual.4. Do not place the appliance near cookers, radiators or in direct sunlight as this will cause your appliance to work harder. If installed next to a source of heat or freezer, maintain the following minimum side clearances:
From Cookers 50 mm (2")
From Radiators 300 mm (12")
From Freezers 25 mm (1")
5. Refer to cleaning and care section to prepare your appliance for use.6.
IMPORTANTINSTALLATION INSTRUCTIONS
A special receptacle is supplied to store the mains plug during transit. The receptacle is fixed at the back of the cabinet, on the side of the compressor. (See diagram) Gently remove the plug from the receptacle. Never pull the mains cord, you may damage the appliance. In the case of transportation,ensure you locate the plug in the receptacle provided to avoid transit damage.

8
GETTING TO KNOW YOUR COMBI FROST FREE FRIDGE / FREEZER
Interior light
Control panel
Cabinet shelves
Wine rack
0 °C Compartment
Defrost water collection channel
Salad crisper
Freezer fan
Ice bank
Frozen foodstorage drawers
Egg tray
Door shelf
Shelf wire
CFigures in this user manual are schematic and may not match the product exactly. If the subject parts are not included in the product you have purchased, then those parts are valid for other models.
Door shelf
Door shelf
Bottle shelf

9
Arrangement Examples (See diagram)1. Baked, chilled cooked food,
dairy products, cans.2. Wine rack3. Meat, sausages, cold cuts.4. Fresh fish, meat and easily
perishable food5. Fresh fruit and vegetables6. Frozen food and
freezing of fresh food.7. Frozen food.8. Small bottles, cans, tubes.9. Eggs.
10. Tall, large bottles, beverages.The following guidelines and recommendations are suggested to obtain the best results andstorage hygiene.2/ Uif gsjehf dpnqbsunfou jt gps uif tipsu ufsn tupsbhf pg gsfti gppe boe esjolt/3/ Uif gsff{fs dpnqbsunfou jt sbufe boe tvjubcmf gps uif gsff{joh boe tupsbhf pg qsfgsp{fo gppe/ Uif sfdpnnfoebujpo gps tupsbhf bt tubufe po uif gppe qbdlbhjoh tipvmecf pctfswfe bu bmm ujnft/4/ Dpplfe ejtift nvtu cf tupsfe jo bjsujhiu dpwfsfe dpoubjofst/5/ Gsfti xsbqqfe qspevdf dbo cf qmbdfe po uif tifmg/ Gsfti gsvju boe wfhfubcmft tipvme cfdmfbofe boe tupsfe jo uif dsjtqfs cjot/6/ Cpuumft dbo cf qmbdfe jo uif epps tfdujpo/7/ Up tupsf sbx nfbu, xsbq jo qpmzuifof cbht boe qmbdf po uif mpxftu tifmg/ Ep opu bmmpx updpnf joup dpoubdu xjui dpplfe gppe up bwpje dpoubnjobujpo/ Gps tbgfuz, pomz tupsf sbx nfbu gpsuxp up uisff ebzt/8/ Lffq uif gppe qbdlfe xsbqqfe ps dpwfsfe/ Bmmpx ipu gppe boe cfwfsbhft up dppm cfgpsfqmbdjoh uifn jo uif gsjehf/ Ep opu tupsf fyqmptjwf tvctubodft/ Ijhi qsppg bmdpipm nvtu cftupsfe vqsjhiu jo tfbmfe dpoubjofst/ Mfgu pwfs dboofe gppe tipvme opu cf tupsfe jo uif dbo/9/ Gj{{z esjolt tipvme opu cf gsp{fo boe qspevdut tvdi bt gmbwpvsfe xbufs jdft tipvme opu cfdpotvnfe upp dpme/:/ Tpnf gsvju boe wfhfubcmft tvggfs ebnbhf jg lfqu bu ufnqfsbuvsft ofbs 1ëD/ Uifsfgpsf xsbqqjofbqqmft, nfmpot, dvdvncfst, upnbupft boe tjnjmbs qspevdf jo qpmzuifof cbht/21/ Qmbdf dijmmfe dpplfe gppe boe tjnjmbs gppe ofbs uif sfbs pg uif gsjehf joofs mjofs xifsf uifdpme xbmm jt mpdbufe/22/ Tifmwft, sbdlt, dsjtqfs cjot, esbxfst, gmbqt, cpuumf hsjqqfst bsf bmm sfnpwbcmf/ 23/ Ep opumfbwf gsp{fo gppe bu sppn ufnqfsbuvsf up uibx< uif cftu xbz up efgsptu gppe jt up qvu ju jo uifgsjehf up uibx tmpxmz/ Nblf tvsf zpv bwpje efgsptujoh gppe ps gppe kvjdft esjq poup puifs gppe/24/ Gps izhjfof sfbtpot, bmxbzt xsbq gppe vtjoh b tvjubcmf qbdlbhjoh nbufsjbm cfgpsf tupsjohjo zpvs bqqmjbodf up bwpje dpoubdu xjui uif bqqmjbodf tvsgbdf/ 25/ Nbyjnvn gsp{fo gppetupsbhf wpmvnf dbo cf bdijfwfe xjuipvu vtjoh uif vqqfs tifmg dpwfs mpdbufe jo uif gsff{fs/Fofshz dpotvnqujpo pg zpvs bqqmjbodf jt efdmbsfe xijmf uif gsff{fs dpnqbsunfou jt gvmmz mpbefexjuipvu uif vtf pg vqqfs tifmg dpwfs/
1
2
1
3
4
5
6
7
7
8
8
8
9
10
SUGGESTED ARRANGEMENT OF FOOD IN THE FRIDGE/FREEZER

10
OPERATING THE PRODUCTIndicator panel
1 2 3 4 5 6
8 7
1. On/Off IndicatorWhen the fridge is off, ( ) symbolis lit. All the other symbols are turned off. 2. Quick fridge functionThe button has two functions. To activate or deactivate the quick cool function, press it briefly. Quick Cool indicator will turn off and the productreturn to its normal settings.
Use the quick cooling function when you want to quickly cool the food placed in the fridge compartment. If you want to cool large amounts of fresh food, activate this function before putting the food into the product. If you do not cancel it, quick cooling will cancel itself automatically after 1 hours at the most or when the fridge compartment reaches to the required temperature.
3. Fridge compartment temperaturesetting buttonPress this button to set the temperature of the fridge compartment to 8, 7,6, 5,4,3, 2, 8... respectively. Press this button to set the fridge compartment temperature to the desired value. ( )
4. Freezer compartment temperaturesetting buttonPress this button to set the temperature of the freezer compartment to -18,-19,-20,-21, -22, -23,-24, -18...respectively. Press this button to set thefreezer compartment temperature to thedesired value.( )5. Quick freeze function button
Press this button to activate or deactivatethe quick freeze function. When you activate the function, the freezer compartment will be cooled to a temperature lower than the set value.
Use the quick freeze function when you want to quickly freeze the food placed in freezer compartment. If you want to freeze large amounts of fresh food, activate this function before putting the food into the product. If you do not cancel it, Quick Freeze will cancel itself automatically after 25 hours at the most or when the fridge compartment reaches to the required temperature.
6. Alarm off warningIn case of power failure/high temperature alarm, after checking the food located in the freezer compartment press the alarm off button ( ) to clear the warning.
7. Eco fuzzyPress and hold the eco fuzzy button for 1seconds to activate the eco� fuzzy function. The freezer will start� to operate in the most economic � mode at least 6 hours later and the� economic usage indicator will be on. ( ) Press and hold the eco fuzzy function button for 3 seconds to disable the eco fuzzy function. This indicator will be on after 6��hours when eco fuzzy is activated, provided the doors are not opened.
8. Vacation FunctionIn order to activate vacationfunction, press the this button ( ) for 3 seconds, and the vacation mode indicator ( ) will be activated. When the vacation function is activated, “- -” is displayed on the fridge compartment temperature indicator and no active cooling is performed in the fridge compartment. It is not suitable to keep the food in the fridge compartment in this function. Other compartments will continue to be cooled according to their set temperatures. To cancel this function press Vacation function button again.

11
STORING FROZEN FOODPrepacked commercially frozen food should be stored in accordance with the frozen food manufacturer's instructions for a frozen food storage compartment. To ensure that the high quality achieved by the frozen food manufacturer and the food retailer is maintained, the following should be remembered:1. Put packets in the freezer as quickly as possible after purchase.2. Ensure that contents are labelled and dated.3. Do not exceed "Use By", "Best Before" dates on the packaging.If there is a power failure do not open the door. Frozen food should not beaffected if the failure lasts for less than 13 hrs. If the failure is longer, then thefood should be checked and either eaten immediately or cooked and then re-frozen.
STARTINGFinal CheckBefore you start using the fridge/freezer check that:1. The interior is dry and air can circulate freely at the rear of the cabinet.2. Clean the interior as recommended under "CLEANING AND CARE."3. Insert the plug into the wall socket and switch on the electricity supply.• When the door is open the fridge interior light will come on
4. You will hear a noise as the compressor starts up. The liquid and gases sealed withinthe refrigeration system may also give rise to noise, whether the compressor is runningor not which is quite normal.5. Front edges of the cabinet may feel warm. This is normal. These areas are designedto be warm to avoid condensation.6. "Do not load the appliance immediately it is switched on Wait until the correctstorage temperature has been reached. We recommend that you check thetemperature with an accurate thermometer (see; Temperature Control andAdjustment)"
FREEZING FRESH FOODPlease observe the following instructions to obtain the best results.Do not freeze too large a quantity at any one time. The quality of the food is best preserved when it is frozen right through to the core as quickly as possible.Do not exceed the freezing capacity of your appliance in 24 h which is 4 kg (8.8 lb)Placing warm food into the freezer compartment causes the refrigeration compressor to operate continuously until the food is frozen solid. This can temporarily lead to excessive cooling of the refrigeration compartment.You may place fresh food to be frozen in any part of the freezer.
Take special care not to mix already frozen food and fresh food.
MAKING ICE CUBESFill the ice - cube tray 3/4 full with water. Loosen frozen trays with the handle of a spoon, never use sharp edged objects such as knives, forks.Note: If freshly made ice cubes are not consumed for several weeks, they will slowly reduce in size and eventually disappear completely.

12
DEFROSTING
A) FRIDGE COMPARTMENTThe fridge compartment defrosts automatically. The defrosting water runs tothe drain tube via a collection container at the back of the appliance (1).(seediagram) During defrosting water droplets may form at the back of the fridgecompartment where concealed evaporator is located. Some droplets mayremain on the liner and refreeze when defrosting is completed. Do not usepointed or sharp edged objects such as knives, forks to remove the dropletswhich have frozen.If at any time the defrost water does not drain from the collection channel,check to ensure that no food particles have blocked the drain tube. The draintube can be cleared by pushing the special plastic plunger provided down thedrain tube (2). If the frost layer reaches about 1/4"(7 mm), reduce the setting(i.e. from 4 to 1) to restart automatic defrosting.
B) FREEZER COMPARTMENTThe freezer compartment defrostsautomatically.
Warnings!
The fan inside the freezer compartment circulates cold air. Never insert any object through the guard. Do not allow children to play with the freezer fan. Never store products that contain inflammable propellant gas (eg dispensers, spray cans etc.) or explosive substances.Don’t cover the shelves with any protective materials, which may obstruct air circulation.Do not allow children to play with the appliance or tamper with the controls. Do not obstruct the freezer fan guard to ensure that you obtain the best possible performance from your appliance.
Zero temperature compartmentThis compartment has been designed to store frozen food which would be thawed slowly (meat, fish, chicken,etc.) as required. Zero temperature compartment is the coldest place of your refrigerator in which dairy products (cheese, butter), meat, fish or chicken may be kept at ideal storage conditions. Vegetables and/or fruits must not be placed in this compartment.

13
CLEANING AND CARE
** We recommend that you switch off the appliance at the socket outlet and pull out the mains plug before cleaning.
** Never use any sharp abrasive instrument, soap, household cleaner, detergent and wax polish for cleaning.
** Use luke warm water to clean the cabinet of the appliance and wipe it dry.
** Use a damp cloth wrung out in a solution of one teaspoon of bicarbonate of soda to one pint of water to clean the interior and wipe it dry.
** Make sure that no water enters the lamp housing.
** Excess deposits of ice should be removed on a regular basis with the handle of a spoon. Large accumulation of ice will impair the performance of the appliance.
** If the appliance is not going to be used for a long period of time, unplung the
appliance, remove all food, clean it and leave the door open.
** Check door seals regularly to ensure they are clean and free from food particles.
** Removal of door tray• To remove door racks, remove all the contents and then simply push the
door rack upwards from the base.
** To remove a freezer drawer, pull it as far as possible, and then tilt it upwards, and then pull it out completely.
REPLACING THE INTERIOR LIGHT BULB To change the Bulb/LED used for illumination of your refrigerator, call your AuthorisedService.The lamp(s) used in this appliance is not suitable for household room illumination. The intended purpose of this lamp is to assist the user to place foodstuffs in the refrigerator/freezer in a safe and comfortable way.The lamps used in this appliance have to withstand extreme physical conditions such as temperatures below -20°C.
14
DO'S AND DON'TSDo- Clean and defrost your appliance regularly (See "Defrosting")Do- Keep raw meat and poultry below cooked food and dairy products.Do- Take off any unusable leaves on vegetables and wipe off any soil.Do- Leave lettuce, cabbage, parsley and caulif ower on the stem.Do- Wrap cheese f rstly in greaseproof paper and then in a polythene bag excluding as much air as possible. For best results take out of the fridge compartment an hour before eating.Do- Wrap raw meat and poultry loosely in polythene or aluminium foil. This prevents drying.Do- Wrap f sh and offal in polythene bags.Do- Wrap food which have a strong odour or can dry out in polythene bags, aluminium foil or place in an airtight container.Do- Wrap bread well to keep it fresh.Do- Chill white wines, beer, lager and mineral water before serving.Do- Check contents of the freezer every so often.Do- Keep food for as short a time as possible and adhere to "Best Before", "Use by" etc. dates.Do- Store commercially frozen food in accordance with the instructions given on the packets that you buy.Do- Always choose high quality fresh food and be sure it is thoroughly clean before you freeze it.Do- Prepare fresh food for freezing in small portions to ensure rapid freezing.Do- Wrap all food in aluminium foil or freezer quality polythene bags and make sure any air is excluded.Do- Wrap frozen food when you buy it and put it in to the freezer as soon as possible.Do- Defrost food in the fridge compartment.Do- Remove ice cream from the freezer 10-20 minutes before serving.
Don't- Store bananas in your fridge compartment.Don't- Store melon in your fridge. It can be chilled for short periods as long as
it is wrapped to avoid it f avouring other food.Don't- Store poisonous or any dangerous substances in your appliance. It has been designed for the storage of edible foodstuffs only.Don't- Consume food which has been stored for an excessive time in the fridge. Don't- Store cooked and fresh food together in the same container. They should be packaged and stored seperately.Don't- Let defrosting food or food juices drip onto food.Don't- Leave the door open for long periods as this will make the appliance more costly to run and cause excessive ice formation.Don't- Use pointed sharp edged objects such as knives, forks to remove the ice. Don't- Put hot food into the appliance. Let it cool down f rst.Don't- Put liquid-f lled bottles or sealed cans containing carbonated liquids into the freezer as they may burst.Don't- Exceed the maximum freezing loads (4 kg in any 24 hours) when freezing fresh food.Don't- Give children ice-cream and water ices direct from the freezer. The low temperature may cause 'freezer burns' on lips.Don't- Freeze f zzy drinks.Don't- Try to keep frozen food which has thawed, it should be eaten within 24 hours or cooked and refrozen.Don't- Remove items from the freezer with wet hands.Don't- Close the freezer door before placing the compartment cover in its place. Don’t- Leave frozen food at room temperature to thaw; the best way to defrost
food is to put it in the fridge to thaw slowly. Make sure you avoid defrosting food or food juices drip onto other food.

15
ENERGY SAVING TIPS
1- Ensure your appliance is installed in a well ventilated area. If the ambienttemperature is low (but in no case lower than 5 degrees C), then the energysaving will be more. In this case, check temperatures of fridge and freezercompartments with an accurate thermometer and lower the temperaturesetting if necessary.
2- Ensure the time between buying chilled/frozen food and placing them in yourappliance is kept at minimum, particularly in summer. We recommend youuse a cool bag or a special carrier bag to carry frozen food.
3- Do not leave the door (s) of your appliance open longer than necessary andensure they are closed properly after each opening.
4- Defrost your appliance regularly (see "Defrosting")
5- Defrost frozen food in the fridge compartment, so that frozen food acts as
an ice pack to assist cooling in the fridge.
PROBLEM SOLVINGIf the appliance does not operate, check whether:
• The plug is inserted properly in the socket and that the power supply is on. (Tocheck the power supply to the socket, plug in another appliance)
• The fuse has blown/circuit breaker has tripped/main distribution switch hasbeen turned off.
• The temperature control has been set correctly.
• New plug is wired correctly if you have changed the fitted moulded plug.
If the appliance is still not operating after the above checks, please refer to the section on “How To Obtain Service”.
Please ensure that above checks have been made as a charge will be made if no fault is found.

1781
629
1001
min. 200 cm2
1784
-178
8
71
40
545540
min. 560
1775
32
1617
81
No woodenBackwall
min. 555
Adjusting the legs (*optional)If your refrigerator is unbalanced;You can balance your refrigerator by turning the legs of it as illustrated in the figure. The corner where the leg exists is lowered when you turn in the direction of black arrow and raised when you turn in the opposite direction. Taking help from someone to slightly lift the refrigerator will facilitate this process.* If the subject parts are not included in the product you have purchased, then it is valid forother models.
The backwall of the wooden cabinet must be left open completely to kitchen wall in order to allow sufficient air circulation to cool down the condenser unit for energy efficiency.
16
INSTALLATION INSTRUCTIONS DETAILED STEP BY STEP

7140
200 cm2
min 200 cm2
629
1001
16
17
1784
-178
8

90°
1
Note: Installation step for 2, screws for connecting top plastic part should not be screwed very hard, because of moving the plastic part easily left or right side.
PS
* Spares Included
1
34
Torx(T)x4
Wood(W)x27
Plastic Sheet(PS)x4
Wood(1TW)x10
18
2

19
1.A
1.B
1.C

20
(2T)
1.D
40.5 mm
1.E
40.5 mm
(1TW)
1.F
1.F'
1.G 1.H
12
click
2click
1
1.F''

(T)
2.A 2.B
2.D
40.5 mm
40.5 mm
(1TW)
2.C'
2.C
2
21
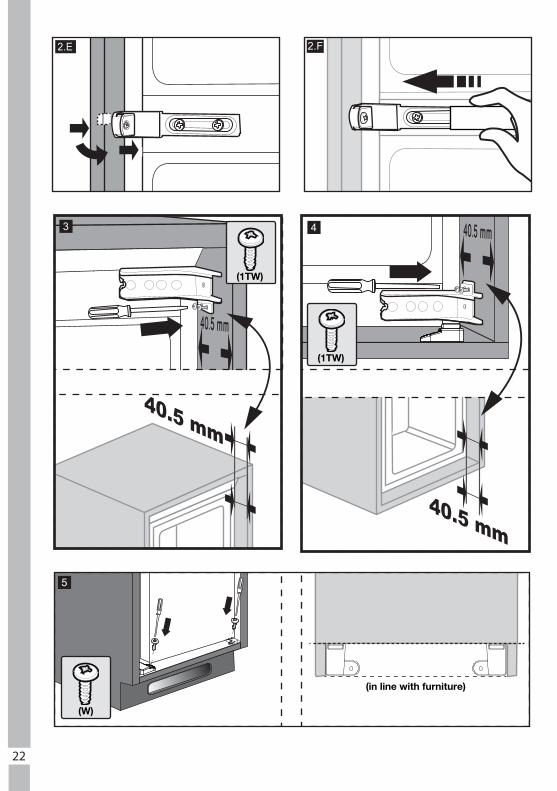
2.E 2.F
40.5 mm
40.5 mm
(1TW)
40.5 mm
40.5 mm
(1TW)
(W)
3 4
5
(in line with furniture)
22

8.5
8.5
11
2 box x
1 x 2 x 2 x 2 x
2 x 2 x 2 x 1 x
6
23

7
8 9
24

10
25

X
A A
E
A = 2 mm is recommended.Top view
Ansicht von oben A = 2 mm empfohlen
11
26

X W
y W
C=(HD1) - (X)y=1072 - (HD3) - (C)
HD
3
CHD
1
CHD
1
12
13
27

14
15
28

16
17
29

(W)
A2
A2 A2
A1=A2
A1=A2
A1
A2A1
A2
18 19
20
21
30

2 mm
2 mm
2 mm
31

Reversing the doorsProceed in numerical order
1 1
3
711
2
4
5
2
49
6
8
5
14
13
12
10
2515
17
18
19
24
21
28
2223
26
27
20 16
19
24
23
18
32

33
Guarantee Details
Your new Grundig product is guaranteed against faulty materials, defective components or manufacturing defects. The guarantee starts from the date of original purchase of the product for a period of three (3) years unless Beko plc (the “Manufacturer”) agrees to extend the guarantee for the product in writing. If you have any questions about the guarantee on your product (including how long it is valid), please contact your retailer or our Call Centre on 0333 207 9920. This guarantee does not in any way diminish or affect your statutory rights in connection with the product. This guarantee is in addition to your statutory rights as a consumer. If you have any question about these rights, please contact the retailer from which you purchased the product. In certain circumstances, it is possible that your statutory rights may offer additional or higher levels of protection than those offered under the terms of this guarantee.
What is covered by this guarantee? • Repairs to the product required as a result of faulty materials,
defective components or manufacturing defects.• Functional replacement parts to repair a product.• The costs of a Grundig Approved Engineer to carry out the repair.
What is not covered? • Transit and delivery damage.• Cabinet or appearance parts, including but not limited to control
knobs, flaps and handles.• Accessories and/or consumable items including but not limited to
ice trays, scrapers, cutlery baskets, filters and light bulbs.• Repairs necessary as a direct or indirect result of:
- Accidental damage, misuse or abuse of a product.- An attempted repair of a product by anyone other than a
Grundig Approved Engineer (the “Engineer”).- Installation or use of a product where such installation or
use fails to meet the requirements contained in thisguarantee or the User Instructions Booklet.
• Repairs to a product operated at any time on commercial or non-residential household premises (unless we have previously agreedto the installation environment).
This guarantee is limited to the cost of repairing the product. To the extent permitted by law, Beko plc (the “Manufacturer”) does not accept and will

34
not be held liable for any financial loss incurred in connection with the failure of any product to operate in accordance with the expected standards. Such financial loss includes but is not limited to loss arising from:
• Time taken off work.• Damaged food, clothing or other items.• Meals taken at restaurants or from takeaways.• General compensation for inconvenience.
Important Notes • Your product is designed and built for domestic household use
only.• The guarantee will automatically be void if the product is installed
or is used in commercial or non-residential domestic householdpremises, unless we have previously agreed to the installationenvironment.
• The product must be correctly installed, located and operated inaccordance with the instructions contained in the User InstructionsBooklet provided with your product.
• Professional installation by a qualified Electrical DomesticAppliance Installer is recommended for all Washing Machines,Dishwashers and Electric Cookers (as incorrect installation mayresult in you having to pay for the cost of repairing the product).
• Gas Cookers must be professionally installed by a Gas Safe (orGas Networks Ireland for Republic of Ireland) registered gasinstaller.
• This guarantee is given in respect of products purchased and usedwithin the United Kingdom and the Republic of Ireland.
• This guarantee is effective from the initial date of purchase of anew product from an authorised retailer and will be void if theproduct is resold.
• This guarantee does not apply to graded sales (where the productis purchased as a “second”).
• Possession of a copy of these terms and conditions does notnecessarily mean that a product has the benefit of this guarantee.If you have any questions, please call our Call Centre on thenumber set out above.
• The Manufacturer reserves the right to terminate the guarantee ifits staff or representatives are subjected to physical or verbalabuse in the course of carrying out their duties.
• Optional extras, where available (i.e. extendable feet) are suppliedon a chargeable basis only.

35
Does Grundig offer replacements? This is a repair-only guarantee. On occasion, the Manufacturer may at its sole discretion, replace your product with a new product instead of carrying out a repair. Where a replacement is offered, this would normally be an identical model, but when this is not possible, a model of similar specification will be provided. The Manufacturer will cover the costs and arrange for the delivery of the new product and for the return of the old product. Any costs related to disconnecting the faulty product and installing the replacement product will not be borne by the Manufacturer unless previously agreed to in writing. The original guarantee will continue to apply to the replacement product; the new product will not come with a new guarantee. When will the repair take place? Our Engineers work Monday to Friday 9.00am to 5.00pm. Appointments outside these hours may be possible at the sole discretion of the Manufacturer but cannot be guaranteed. Whilst our Engineers will endeavour to minimize inconvenience and to meet requests for specific timed appointments, this cannot be guaranteed. We will not be liable for delays or if it is unable to carry out a repair because a convenient appointment cannot be arranged. Will there be any charge for the repairs? It is your responsibility to provide evidence to the Engineer that your product is covered by this guarantee with a proof of purchase. The Manufacturer reserves the right to charge for the reasonable cost of any service call if:
• You cannot provide evidence that your product is covered by thisguarantee.
• Where a service call has been made and the engineer finds thatthere is no fault with your product.
• That your product has not been installed or operated inaccordance with the User Instructions Booklet.
• That the fault was caused by something other than faulty materials,defective components or manufacturing defects.
• For missed appointments.Payment of these costs are due immediately upon the Engineer providing you with an invoice. The Manufacturer reserves the right to terminate the guarantee if you fail to pay the costs for the service call in a timely manner. If you are a resident of the United Kingdom, this guarantee will be governed by English law and subject to the English Courts, save where you live in another part of the United Kingdom, in which case the law and courts of that location will apply. If you are resident in the Republic of Ireland, this guarantee will be governed by Irish law and the Irish courts will have jurisdiction.
36
HOW TO OBTAIN SERVICE
Please keep your purchase receipt or other proof of purchase in a safe place; you will need to have it should the product require attention under guarantee. It will be useful if you complete the details below, as it will help us assist you when requesting service (the model number is printed on the Instruction Booklet and the serial number is printed on the Rating Label affixed to the appliance). Recording of these details alone will not count as proof of purchase. A valid proof of purchase is required for under guarantee service. The area around the product must be easily accessible to the Engineer without the need for cabinets or furniture being removed. It is your responsibility to ensure our Engineers have a clean and safe environment to carry out any repairs. …………………………………………………………………………………………Model No: Serial No: Retailer: Date of purchase: …………………………………………………………………………………………For service under guarantee simply telephone the appropriate number below UK Mainland & Northern Ireland 0333 207 9920 or [email protected]
Republic of Ireland: 01 691 0203
Register your appliance at: grundig.co.uk/support/register Before requesting service please check the troubleshooting guide in the Operating Instructions as a charge may be levied where no fault is found even though your product may still be under guarantee.
Service once the manufacturers guarantee has expired If you have purchased an extended guarantee please refer to the instructions contained within the extended guarantee agreement document, otherwise please call the appropriate number above where service can be obtained at a charge. Should you experience any difficulty in obtaining service contact the Grundig Customer Helpline on Tel: 0333 207 9920 or e-mail: [email protected] ………………………………………………………….............................................This guarantee is provided by Beko plc. Beko House, 1 Greenhill Crescent, Watford, Herts, WD18 8QU. Beko plc is registered in England and Wales with company registration number 02415578.

37
Recycling This product bears the selective sorting symbol for waste electrical and electronic equipment (WEEE).This means that this product must be handled pursuant to European Directive 2002/96/EC in order to be recycled or dismantled to minimize its impact on the environment. For further information, please contact your local or regional authorities.
Electronic products not included in the selective sorting process are potentially dangerous for the environment and human health due to the presence of hazardous substances.

Notes.................................................................................................................................................................................................................
.................................................................................................................................................................................................................
.................................................................................................................................................................................................................
.................................................................................................................................................................................................................
.................................................................................................................................................................................................................
.................................................................................................................................................................................................................
.................................................................................................................................................................................................................
.................................................................................................................................................................................................................
.................................................................................................................................................................................................................
.................................................................................................................................................................................................................
.................................................................................................................................................................................................................
.................................................................................................................................................................................................................
.................................................................................................................................................................................................................
.................................................................................................................................................................................................................
.................................................................................................................................................................................................................
.................................................................................................................................................................................................................
.................................................................................................................................................................................................................
.................................................................................................................................................................................................................
.................................................................................................................................................................................................................
.................................................................................................................................................................................................................
.................................................................................................................................................................................................................
.................................................................................................................................................................................................................
.................................................................................................................................................................................................................
.................................................................................................................................................................................................................
.................................................................................................................................................................................................................
.................................................................................................................................................................................................................
.................................................................................................................................................................................................................
.................................................................................................................................................................................................................
.................................................................................................................................................................................................................
................................................................................................................................................................................................................

www.grundig.co.uk4578336341/AA
Grundig1 Greenhill CrescentWatfordHERTSWD18 8QUTel: 0845 603 1234Fax: 0845 600 4922 www.grundig.co.uk