USER GUIDE - · PDF fileTesco/RSH014349/022012 1 1 COMPETITOR 4 Burner Gas BBQ with side...
22
HELPLINE 0844 809 4871 or visit www.masterchef-bbq.com and follow link. THE OUTDOOR COLLECTION INSTRUCTIONS FOR USE: READ ALL WARNINGS AND INSTRUCTIONS BEFORE USE, AND RETAIN. Tesco/RSH-014349/022012 USER GUIDE Model No. RSH014349 4 BURNER COMPETITOR STAINLESS STEEL GAS BBQ
-
Upload
nguyendung -
Category
Documents
-
view
216 -
download
2
Transcript of USER GUIDE - · PDF fileTesco/RSH014349/022012 1 1 COMPETITOR 4 Burner Gas BBQ with side...

HELPLINE 0844 809 4871or visit www.masterchef-bbq.com and follow link.
T H E O U T D O O R C O L L E C T I O N
INSTRUCTIONS FOR USE:READ ALL WARNINGS AND INSTRUCTIONS BEFORE USE, AND RETAIN.
Tesco/RSH-014349/022012
U S E R G U I D E
Model No. RSH014349
4 BURNER COMPE T ITORSTA INLESS STEEL GAS BBQ

Tesco/RSH014349/022012 1
1
COMPETITOR 4 Burner Gas BBQ with side burner Model No.: RSH-014349
MasterChef Helpline
For assistance, please call 0844 809 4871 or visit www.masterchef-bbq.com.
This website offers further advice including images to assist with the use of the
gas regulator and assembly of the side burner venturi pipe.
Warnings
Read before starting! We recommend reading the relevant sections of these instructions prior to assembly and before each use. Follow the
steps in the order they are specified and please observe the safety warnings.
Failure to observe these instructions can affect or damage the barbecue and lead to personal injury.
These instructions should always be stored with the product and passed onto each subsequent user.
Propane LPG bottle is the only form of fuel to use with this barbecue (see ‘Gas System’ for full details).
The regulator supplied with this product is the new generation easy-use model. These are compatible with all current
gas cylinders eg: Calor, Flo-gas and other suppliers.
Always check for gas leaks regularly and when connecting or reconnecting the regulator and hose. See ‘Checking for
Leaks’.
Check all the parts are included before commencing assembly. If any parts are missing please call the MasterChef
Helpline number above or visit www.masterchef-bbq.com. If the barbecue is faulty or damaged ensure all the parts are
back in the box and return to the store with your receipt as proof of purchase.
It is recommended this barbecue is assembled by two people.
A medium sized Phillips screwdriver and a suitable spanner (flat spanner or box spanner) are required for assembly.

Tesco/RSH014349/022012 2
2
Specifications
Authorization
Intertek Testing Services Ltd. (ITS) Notify Body Number CE – 0359
Barbecue
Device category I3+(28-30/37) according to EN498
Total weight: 40.5 kg approx.
Dimensions (L x H x W) 1290 x 575 x 1105mm approx.
Barbecue surface (L x W) 650 x 370 mm approx.
Gas system
Heat output approx. 13.15 kW 939g/h) total rate
Type of gas Propane at 37mbar
Injector size 0.82mm for the grill burners
0.70mm for the side burner
Preset and approved pressure reducer
Flow rate: 1.5 kg/h max.
Operating pressure: Propane at 37mbar
Gas cylinder Standard gas cylinder with 5 to 13kg Liquid Petroleum
Gas (LPG) max.
Gas hose CE-approved hose comply with EN1763-1
Ignition Automatic ignition
Control valve Adjustable 0 - max.
** Liquid Petroleum Gas = LPG or LP Gas throughout this document
Safety Instructions
Definition of terms used
The following pictograms and signal words are used in these instructions to point out hazards and important information:
PICTOGRAM AND SIGNAL WORD Note on …
Danger
… a possible danger that can result in severe personal injury or damage to
property if the stated measures are not observed.
Caution
… a possible danger that can result in damage to property if the specified
measures are not observed.
For safety:
FOR OUTDOORS USE ONLY
(Outside any enclosure)

Tesco/RSH014349/022012 3
3
Warning
To avoid injury and damage to property, be sure to
follow all the warnings and instructions carefully,
before every use.
CAUTION!
ALWAYS KEEP THIS APPLIANCE CLEAN. To
help avoid fat flash fires/ flare ups and therefore
possible injury or damage to property, it is vital that
this appliance is clean before it is used. Always
follow the Care Instructions.
CAUTION!
KEEP OUT OF REACH OF CHILDREN and PETS
DURING and AFTER USE, as accessible surfaces
will be extremely hot during use and will remain hot
for sometime thereafter. KEEP CHILDREN &
PETS WELL AWAY!
CAUTION!
SIDE BURNER: For safety, when using the side
burner it is strongly recommended to use pots less
then 20cm diameter. Pots larger then 20cm are not
suitable for this appliance.
WARNING!
DO NOT USE INDOORS - FOR OUTDOOR USE
ONLY
NEVER LEAVE A BARBECUE UNATTENDED.
If ever in doubt, before use consult a qualified gas
engineer.
WHEN LIGHTING FOR THE FIRST TIME
ALWAYS take extra care. Keep your head and
arms from hanging over the barbecue cooking
surface.
ALWAYS make sure the barbecue is completely
cool before applying covers.
CAUTION!
This barbecue will become very hot during
operation - always wear suitably protective heat
proof gloves during use.
NOTE:
This is a gas appliance. DO NOT USE any other
type of fuel/accelerants or lava rock in this
barbecue.
Protect from the elements and damp.
Stand the barbecue on a safe, solid, level surface,
well away from flammable items such as wooden
fences or over-hanging tree branches.
ALWAYS close and disconnect from the gas bottle
after use and for storage.
DO NOT MOVE DURING USE. ALWAYS allow to
cool before moving.
Please retain instructions for future use.
ONLY store away when the barbecue is
completely extinguished and cool.
In construction of this barbecue use all and only the
components provided. If parts are missing, do not use
and call MasterChef Helpline on 0844 809 4871.
Utilisation
Proper use
The barbecue is a gas barbecue for outdoor use. It is
designed to be used exclusively in accordance with
these instructions for preparing foods that are suitable for
barbecue cooking.
For private/domestic use only!
Improper use
Any other application or applications extending beyond
the stated purpose are not authorised. This applies in
particular to misuse involving the following possible
scenarios:
Do not operate the barbecue with coal or any fuel
other than LPG.
Apart from the side burner (see earlier Side
Burner Caution), do not operate the barbecue as a
stove using pots and pans.
Do not operate the barbecue as a heater.
Any modification of the appliance may be
dangerous.
Parts sealed by the manufacturer must not be
altered by the user.
Do not use the barbecue to heat materials and
substances other than foods that are suitable for
barbecuing.
The barbecue has been manufactured according to the
general engineering rules – that were valid at the time
manufacturing was started – and the requirement of the
CE- sign. It is certified and approved by INTERTEK
Testing Services Ltd. (ITS) (Test number CE-0359). The
barbecue left the factory in good order and condition in
terms of its function and safety.

Tesco/RSH014349/022012 4
4
Danger “Hot surface and parts”
During operation some parts of the barbecue can
become very hot, particularly those close to the fire bowl.
Possible consequences:
Severe burns from touching parts near the fire bowl.
Fire, or smouldering fire, if flammable materials or
substances are near the barbecue.
Safety measures prior to using the barbecue:
Select a place to set up the barbecue so that:
There are not, and will not be, flammable material or
substances nearby or any overhead obstruction
above and at the sides. Allow a minimum of one
metre distance to highly flammable materials or
substances, e.g. walls and fences.
The barbecue is positioned firmly on a sufficiently
large, flat, solid surface area. It must not be moved
during operation.
Do not use the barbecue on a surface that may be
damaged by excessive heat.
Safety measures during barbecuing:
Wear heat-protective barbecue gloves.
Never leave the hot barbecue unattended.
TAKE PARTICULAR CARE TO ENSURE THAT
CHILDREN AND PETS ARE KEPT AWAY FROM
THE BARBECUE.
Never fit the gas bottle right next to the barbecue.
Always place the gas bottle at the rear of the
appliance sited as far away as possible without
straining the hose.
No part of the hose should touch any part of the
barbecue.
Danger “Gas is highly flammable”
Liquid gas is highly flammable and explosive.
Possible consequences:
Serious personal injury or damage to property if
escaping gas ignites in an environment in which it is
not controlled.
Safety measures when using gas:
Only use the barbecue outdoors and ensure that the
area is well ventilated.
Protect the gas bottle and gas hose from direct
sunlight and other heat sources (max. 50°C). Take
special care to ensure that the gas hose does not
touch any part of the hot barbecue.
DO NOT place the gas bottle on the lower shelf,
as it is too near the burner.
DO NOT lean over the barbecue when igniting the
gas flame.
Close the regulator attached to the gas bottle after
each use by turning the lever clockwise. Also turn off
the control knobs (fully clockwise to OFF).
Never leave the hot barbecue unattended. If the
flame extinguishes, relight immediately or cut off the
supply from the gas bottle.
When connecting the gas bottle, ensure that there are
no ignition sources within a 5m radius.
Take special care not to light any naked flames, do
not smoke or switch on electric appliances (devices,
lights, door bells), etc. as sparkover possible.
Before each use, check to ensure that all connections
through which the gas is supplied are sealed and
intact.
If necessary, ensure when replacing the hose it
meets with national requirements. Always use
hose-clips to secure the hose to the regulator and
barbecue.
If the connections for the gas supply are porous or
faulty, the barbecue must not be used. This also
applies, for example, to hoses or fittings blocked by
insects, as this can lead to a dangerous flashback.

Tesco/RSH014349/022012 5
5
Parts List
Ref Description Illustration QTY Ref Description Illustration QTY
1. Thermometer
1 11. Trolley base board
1
2. Body
1 12. Universal wheel
4
3. Side burner
grate
1 13. Base cross bar
1
4.
Side burner with
venturi hole** in
pipe
1 14,
15. door
2
5. Side burner
shelf
1 16a
16b
Trolley legs (right
front), Trolley legs
(right back)
2
6. Left side shelf
decoration bar
1 17. Upper decoration bar
1
7. Warming rack
1 18. Crossbeam
1
8. Back board
1 19. Fixing sheet for door
2
9a,
9b.
Trolley legs (left
front), Trolley
legs (left back)
2 20. Drip tray
1
10. Trolley side
panel
2 21. Handle for drip tray
1

Tesco/RSH014349/022012 6
6
22. Right side shelf
decoration bar
1 25. Cooking grill
1
23. Right side shelf
1 26. Griddle
1
24. Flame tamer
3
** Part 4. Side burner: the venturi is a small hole in the side burner pipe which allows the intake of air as the gas is
sucked through the pipe. Adding the air to the intake of LP gas creates combustion – a flame. NB: the side burner
pipe will always be loose fitting to allow for expansion/movement during the intake of gas and air.
NB: Rotisserie equipment is not included. It is available from specialist garden centres and is adjustable.
Screws and Nuts
A. M5x35 8pcs B. M5x12 36pcs C. M4x6 4pcs D. M5 2pcs
E. M4x8 4pcs F. M5x20 4pcs L. Spare screws 1pcs
A+B+C+D+E+F
Assembly tools: A medium sized Phillips screwdriver and a suitable spanner (flat spanner or box spanner) are
required for assembly.
(Not included)
Regulator, Hose & Clips (supplied with the gas barbecue)
(1) Regulator 1pc
(2) Hose 1pc
(3) Hose clips 2pcs
WARNING: It is recommended in the course of normal wear and tear to replace the hose every two years.

Tesco/RSH014349/022012 7
7
Getting to know the barbecue

Tesco/RSH014349/022012 8
8
Operational Elements
POSITION DESCRIPTION FUNCTION
A Control knob- OFF position Flame will go out/off
B Control knob- MAX position Flame will be at its highest after ignition.
Ignition will take place
C Control knob- MIN position Flame will be at its lowest after ignition
G1 Regulator Reduces gas pressure
G2 Operating lever/ Release A separate safety facility with 2 settings:
OFF: Turn the
lever clockwise
180° so the thin
rectangular line is
showing on top of
the horizontal lever.
RELEASE: To release the regulator from
the gas bottle, press in the lever only
when in the off position.
ON: Turn the lever
180° anti-clockwise
so the flame symbol
is showing on top of
the horizontal lever.
G3 Regulator valve To connect the hose to the regulator
G4 Gas bottle with bottle valve Fuel container
G5 Gas hose with hose clip Directs gas to burner
G6 Coupling nut Connects regulator to gas bottle valve
Function
With the gas bottle lever in the ON position (“FLAME” sign on G2 facing upward) and the control knob pointing between
position B and C, the gas flows through the gas hose (G5) and the setting device (behind the front panel) into the burner.
While turning each control knob from position A to B, sparks will be emitted from the electrode on the burner which then
ignites the gas. The heat output can be adjusted for the burners by turning the control knob to position (B) for maximum
and (C) for minimum heat.
For more details, please refer to “Operating the Barbecue”.

Tesco/RSH014349/022012 9
9
Assembly Instructions
Before starting:
Here are a few tips to help assemble the barbecue quickly
and successfully:
Check that no parts are missing by placing all of the
individual parts on an empty surface (we reserve the
right to make minor technical alterations, such as the
content of the small parts bag). If, despite careful
factory checks, a component is missing, please
contact the MasterChef Helpline. If the barbecue is
faulty or damaged ensure all the parts are back in the
box and return to the store with your receipt as proof of
purchase.
Carefully sort out the small parts, as some of the
screws and bolts, for example, are very similar and can
be easily confused.
A medium sized screwdriver and a suitable spanner
(flat spanner or box spanner) are required for
assembly.
Make sure all the protective packaging has been
removed before assembling.
Even if not experienced at DIY, it does not generally
take more than one hour when two people work
together on the assembly.
Please note:
Only use tools that are intact and suitable. Worn or
unsuitable tools will not allow sufficient tightening of
the screws and bolts, and will damage them to the
extent that they can no longer be turned.
Always fit all joining parts (screws, nuts, etc) as shown
in the following illustrations. If a joining part is
misplaced, replace with an appropriate part. Only by
doing this can the construction be strong and safe.
It is essential that the instructions are followed in the
order they are specified!
Read the text for each step before carrying it out, as
useful information is sometimes only provided at the
end of the section.
2.
01 02 2.

Tesco/RSH014349/022012 10
10
B
4pcs
.
A
8pcs
04
B
4pcs
03
B
4pcs
05 06

Tesco/RSH014349/022012 11
11
B
4pcs
07
11
11
B
4pcs
08
10.
E
4pcs
10
B
4pcs
09

Tesco/RSH014349/022012 12
12
B
1pc
D
1pc
B
1pc
D
1pc
11 12
13 14
Tesco/RSH014349/022012 13
13
F
2pcs
15 16
17 18
B
4pcs
C
2pcs
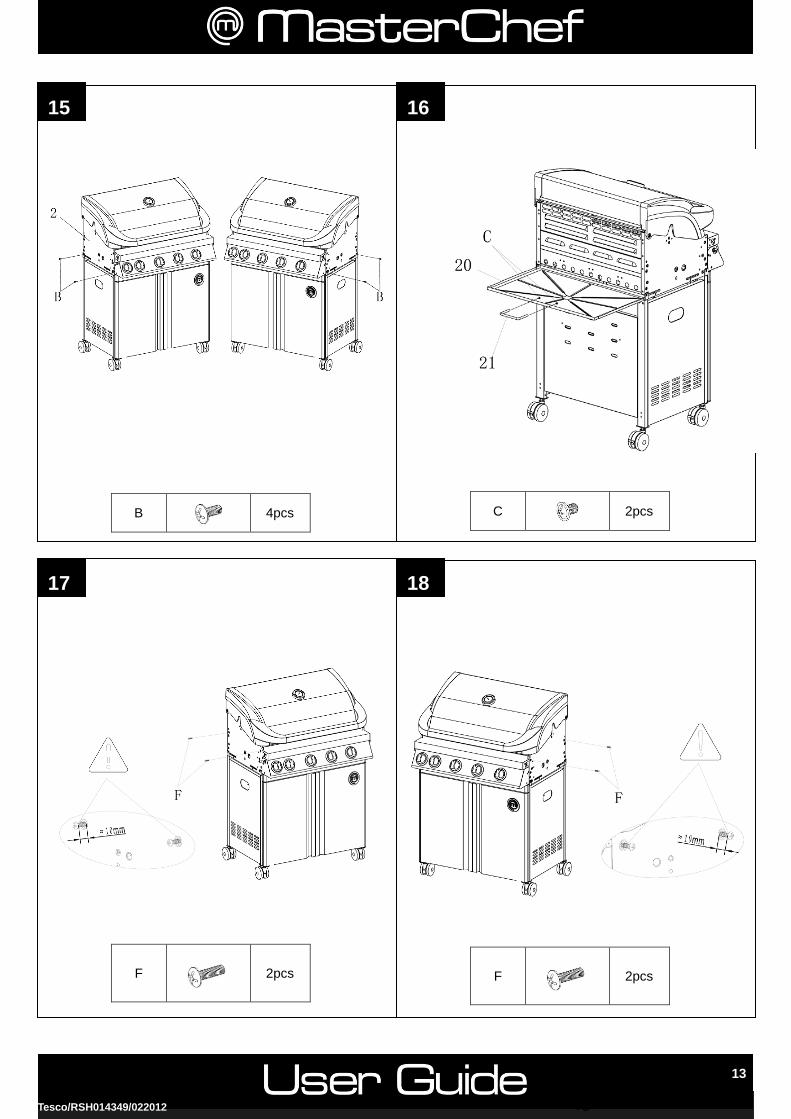
F
2pcs
Tesco/RSH014349/022012 14
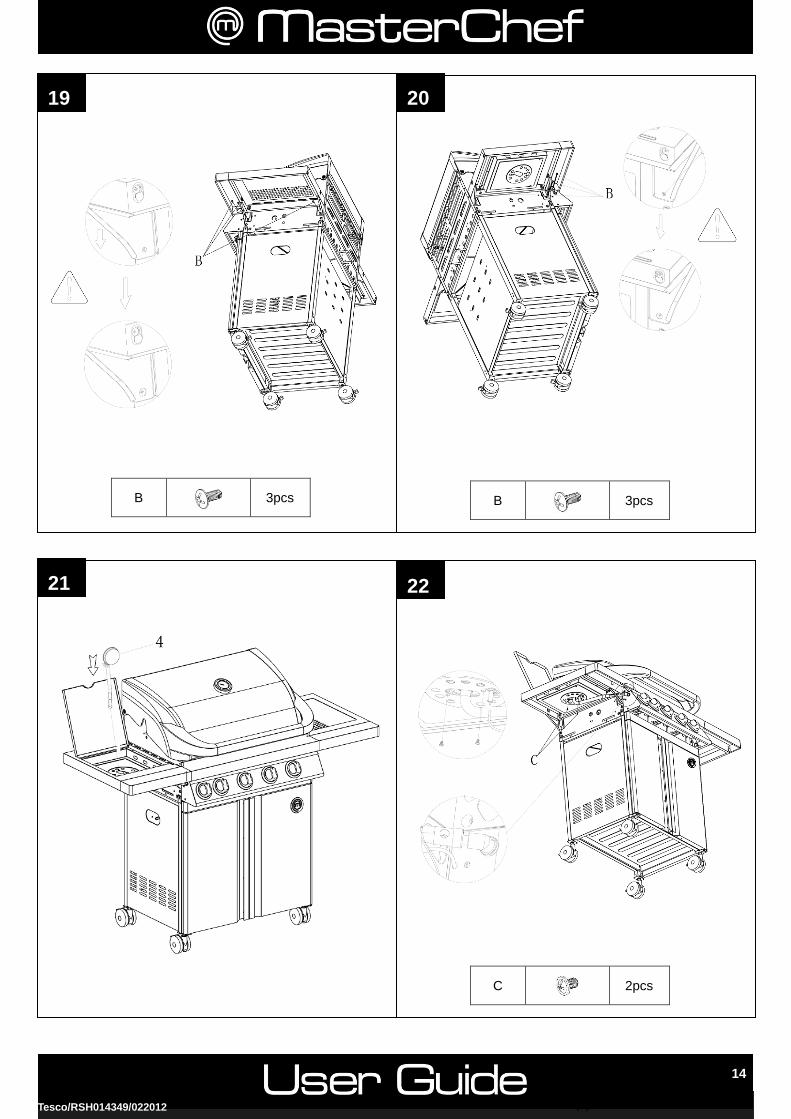
14
B
3pcs
19 20
21
B
3pcs
C
2pcs
22

Tesco/RSH014349/022012 15
15
25
23 24
Attach the hose to the air-in vent on right
under side shelf. (Refer to “Connecting
and Disconnecting the gas bottle).

Tesco/RSH014349/022012 16
16
Connecting and disconnecting
the gas bottle
Gas bottle - Standard LPG gas bottle with weight
between 5kg to 13kg LPG (ie: propane). These are
available from most garden centres, DIY stores and
camping sites.
The following parts are included with the barbecue.
They correspond to the standards applicable in the
country to which they have been supplied.
Gas hose- CE approved hose of sufficient length,
allowing installation without any kinks (length shall
not exceed 1.5m).
Regulator – Preset and CE-approved pressure
regulator, operating pressure suitable for the LP gas
bottle. This type of regulator is also available from
your local gas bottle stockist. It is the easy-use,
clip-on model, compatible with current Calor,
Flo-Gas and other gas bottle suppliers.
Danger “Ignition of escaping gas”
LPG is highly flammable and explosive.
Possible consequences:
Serious personal injury or damage to property if
escaping gas ignites in an environment in which it is
not controlled.
Safety measures:
When connecting the gas bottle, ensure there are no
ignition sources within a 5m radius.
Do not light near any naked flames, do not smoke or
switch on electrical appliances (devices, lights,
door-bells), etc as sparkover possible.
Ensure the flexible hosing is routed so there are no
kinks and it is not subject to twisting.
Do not obstruct ventilation of the barbecue.
If necessary, ensure that a replacement hose meets
with BS3212 national requirements.

Tesco/RSH014349/022012 17
17
Connecting the Gas Bottle (fig 1 above) 1. Select a suitable position to set up the barbecue.
Ensure that:
There are not, and will not be, flammable material
or substances nearby, or any overhead
obstruction above and at the sides. Allow a
minimum of one metre distance to highly
flammable materials or substances, e.g. walls and
fences.
The barbecue is positioned firmly on a sufficiently
large, flat, solid surface area. It must not be moved
during operation.
Do not use the barbecue on a surface that may be
damaged by excessive heat.
Never place or fit the gas bottle right next to the
barbecue.
Always place the gas bottle at the rear of the
appliance sited as far away as possible without
straining the hose.
No part of the hose should touch any part of the
barbecue.
2. Never lay the gas bottle on its side or place on the
lower shelf. The gas hose must not be bent or
under tension.
3. Check the gas bottle and the regulator are in good
working order.
4. Turn the operating lever G2 clockwise to OFF, and
push the regulator (G1) down onto the gas bottle
valve (G4) until it clicks.
5. Check it is correctly connected by pulling the
regulator upwards. The regulator must not
disconnect from the bottle valve.
6. Check the connection between the regulator and
the gas hose G5, and the gas hose to the
regulator valve (G3) to ensure they are secured.
7. Open the gas bottle’s valve by turning the
operating lever G2 anti-clockwise to the ON
position.
Checking for Leaks
WARNING: Never check for leaks if there is an
open flame. Listening for leaks is not a reliable
method of detection.
ALWAYS test for leaks when fitting a new gas bottle,
or it has been removed, stored away or not used in the
last month.
Testing for Leaks
NEVER check for leaks with a naked flame.
With the regulator lever in the ON position:
Use a standard gas leak detector (available from DIY
stores and camping sites) to ensure all connections
are tight. Please observe the instructions for the leak
indicator. If there is a leak, tighten the connections and
test again.
An alternative option to check for leaks - brush a
solution of approximately 50:50 water to soap
(washing-up liquid can be used but make sure the
solution does not have too many bubbles before
applying) over the regulator and hose connections.
There is a leak if bubbles form over any of the
connections. Immediately turn off the gas supply and
retighten all connections. Repeat the soap/water test.
If there is still a leak replace the leaking part. Repeat
the leak test to ensure the leak has stopped before
using. If there is still a leak replace the leaking part.
Repeat the leak test to ensure the leak has stopped
before using.
8. If not using the barbecue immediately, close the gas
bottle valve by turning the operating lever G2
clockwise to OFF.
Disconnecting the gas bottle (Fig.2 above) 1. Close the bottle valve by turning the operating lever
G2 clockwise to OFF.
2. Press in the operating lever G2 and pull the
regulator G1 upwards.
3. Store the regulator G1 with the gas hose under the
barbecue. Ensure the hose is not kinked or twisted.
4. Store the gas bottle correctly:
Fit the gas bottle valve with the safety cap
(supplied with the gas bottle).
Do not store the gas bottle in areas below
ground level, in or near stairways, hallways or
passages for pedestrians, in cars or between
buildings. Always store gas bottles outside.
Always store gas bottles upright, even if they
are empty!

Tesco/RSH014349/022012 18
18
Operating the Barbecue
NB: When using the barbecue for the first time, follow
the instructions below and heat the barbecue for about
20minutes without food so that the food-safe coating is
hardened (as with any barbecue).
Have heat-proof gloves, appropriate meat thermometer
and long-handled barbecue utensils (available from
most DIY stores and garden centres) to hand.
Starting up the barbecue
1. Check to ensure the barbecue is in a suitable
position.
There are not, and will not be, flammable material
or substances nearby or any overhead
obstruction above and at the sides. Allow a
minimum of one metre distance to highly
flammable materials or substances, e.g. walls and
fences.
The barbecue is positioned firmly on a sufficiently
large, flat, solid surface area. It must not be
moved during operation.
Do not use the barbecue on a surface that may be
damaged by excessive heat.
Check to ensure the barbecue is fully assembled
and has no apparent faults, the grill has been
inserted and that the fat-catcher (drip) tray is
clean and underneath the fire bowl.
2. Turn the regulator lever (G2) anti-clockwise to ON.
3. Check to ensure that the gas system is sealed (if not,
turn the operating lever (G2) clockwise to OFF and
follow the Checking For Leaks section on previous
page.
4. OPEN the lid of the fire bowl.
ALWAYS keep open while igniting the flame.
Caution: Do not lean over the barbecue during step
6, 7 and 8. Keep a safe distance.
5. Press in and turn a control knob for a grill burner to
position (B) anti-clockwise.
6. When in position (B), the burner will ignite.
7. If necessary, repeat the above until the burner
ignites.
8. Wait for a few seconds and then release the control
knob. If the flame goes out, turn the control knob to
‘OFF’ position (A), wait 3 minutes and repeat the
above for ignition. Repeat steps 6, 7, 8 and 9 to
light the other burners.
9. Close the lid and allow the barbecue to heat up at
full power.
10. When the barbecue is hot, turn the control knob to
the appropriate setting.
11. Place the food on the grill rack using long-handled
utensils. Wear barbecue gloves or other heat-proof
gloves to protect from the heat.
12. Use an appropriate cooking/meat thermometer to
check the internal temperature of barbecued meats
have met the appropriate minimum temperatures
before serving. Meats not cooked through properly
can lead to illness.
Switching on the side burner
Lift the lid and repeat the above from step 5, using the
control knob for the side burner.
Lighting with a taper/long match
If the control knob is not igniting the gas, light it with a
long match or taper through the small hole in the side of
the body of the barbecue directly underneath the shelf.
(The lighting hole can be seen in diagrams 19 and 20).
It is the round hole nearest the control panel (not the
larger hole in the side panel). If the left hand burner is
alight the other burners will ignite when switching on the
control knobs.

Tesco/RSH014349/022012 19
19
Switching off the barbecue:
1. Close off the gas by turning the lever (G2) clockwise.
2. Turn the control knobs to the “OFF POSITION” (A).
3. Wait until all of the barbecue has cooled down and
then clean all soiled parts.
4. Close the lid.
5. If the barbecue is not to be used for some time:
Disconnect the gas bottle (see the section
“Disconnecting the gas bottle”).
Store the barbecue in a dry place.
Care Instructions
Checking
Please note to inspect the barbecue before every
use. The barbecue should be clean and in good
working order.
it is important to replace barbecue parts if they show
signs of fatigue, corrosion or damage.
Please note: Continuing to use an appliance which
is damaged could cause injury or damage to
property.
Cleaning the barbecue
To remove food debris on the grill, keep the grill on for a
further 10-15 minutes after cooking to burn off the
debris.
To ensure the longevity of this barbecue for many years
to come, it should be cleaned after each use with
washing- up liquid, a brush and cloth – ensure that all
parts have cooled down first. It is much easier than
cleaning it at a later stage when the dirt has dried hard.
If the inside surface of the barbecue lid has the
appearance of peeling paint, then baked-on grease
build-up has turned to carbon and is flaking off.
Clean thoroughly with a strong, hot soapy water
solution. Rinse with clean water and allow to
completely dry. NEVER USE OVEN CLEANER.
Cleaning the drip tray
The drip tray (for fat collection) must be cleaned after
every use, as fat is flammable and could cause a fire if
not kept clean, which could lead to injury or damage to
property.
Caution: “Electrode on burner can be bent”
The electrode on the burner can be bent or may snap
off during cleaning.
Possible consequences:
Burner no longer lights.
Safety measures:
Take special care when cleaning the area around
the burner.
Cleaning the gas system
If necessary, the gas outlet jet (under the right hand side
shelf) and the venturi hole can be cleaned with a pipe
cleaner or use an opened up paper clip. All other parts
through which gas is passed may only be cleaned by an
expert.
Never dismantle the valve!
Maintenance
Perform maintenance checks at regular intervals. The
intervals will depend on how often the barbecue is used
and the environment to which it is exposed.
Maintaining the barbecue
Check to ensure that all parts of the barbecue are
present and assembled (visual check).
Check to ensure that all connections are present
and securely fastened; tighten if necessary.
Maintaining the gas system
The gas system needs to be checked every time a gas
bottle is connected (see section “Connecting and
disconnecting the gas bottle”).
If necessary, ensure to replace the hose to meet with
national requirements.
Environment information and disposal measures
To dispose of the barbecue, disassemble it into its
individual parts. Recycle the metal and plastic parts.

Tesco/RSH014349/022012 20
20
Troubleshooting
Problem Possible Cause Prevention/Cure
Burner will not
light using igniter
Wires or electrode covered with cooking
residue.
Clean wire and/or electrode with rubbing
alcohol.
Electrode and burners are wet. Wipe dry with cloth.
Electrode cracked or broken - sparks at
crack.
Replace electrode.
Wire loose or disconnected. Reconnect wire or replace electrode/wire
assembly
Wire is shorting (sparking) between igniter
and electrode.
Replace igniter wire/electrode assembly.
Burner will not
light with long
match or taper.
No gas flow. Check if LP gas bottle is empty. If empty,
replace or refill. If LP gas bottle is not empty,
refer to “Sudden drop in gas flow or reduced
flame height”.
Coupling nut and regulator not fully
connected.
Turn the coupling nut an additional one-half
to three quarters until firm. Tighten by hand
only - do not use tools.
Obstruction of gas flow. Clear burner pipe. Check for bent or kinked
hose.
Disengagement of burner to valve. Re-engage burner and valve.
Spider webs or insect nest in venturi. Clean venturi.
Burner ports clogged or blocked. Clean burner ports.
Sudden drop in gas
flow or reduced
flame height
Out of gas. Replace or refill LP gas bottle.
Excess flow safety device may have been
activated.
Turn control knobs to “OFF”. Wait 30
seconds and re-ignite grill. If flames are still
too low, reset the excessive flow safety
device (built-in within the internal structure
of the regulator) by turning control knobs
“OFF” and LP gas bottle valve to “CLOSED”
using the regulator lever. Disconnect
regulator. Turn control knobs to “HIGH”.
Wait 1 minute. Turn control knobs to “OFF”.
Reconnect regulator and check connections
for leaks. Slowly turn the regulator lever to
“OPEN” (flame showing on lever). Wait 30
seconds and then light grill per lighting
instructions.
Irregular flame
pattern, flame does
not run the full
length of burner.
Burner ports are clogged or blocked. Clean burner ports.
Flame is yellow or
orange.
New burner may have residual
manufacturing oils.
Burn grill for 15 minutes with the lid closed
Spider webs or insect nest in venturi Clean venturi.
Food residue, grease or seasoning salt on
burner.
Clean burner.

Tesco/RSH014349/022012 21
21
Poor alignment of valve to burner venturi. Ensure side burner/venturi is properly
engaged with valve.
Flame blow out High or gusting winds. Do not use grill in high winds.
Low on LP Gas. Replace or refill LP gas bottle.
Excess flow valve tripped. Refer to “Sudden drop in gas flow or
reduced flame height”
Flare-up Grease build up. Clean grill.
Excess fat in meat. Trim fat from meat before grilling.
Excessive cooking temperature. Adjust (lower) temperature accordingly.
Persistent grease
fire.
Grease trapped by food build up around
burner system.
Turn control knobs to “OFF”. Turn LP gas
bottle valve to “CLOSED”. Leave lid in
closed position and let fire burn out. After
grill cools, remove and clean all parts.
Flashback (fire in
burner pipe(s).
Burner and/or burner pipe are blocked. Clean burner and/or burner pipe.
Care & Protection of Stainless Steel Surfaces
This barbecue features stainless steel components. All stainless steel grades require a level of care and protection to
retain their appearance. Stainless steels are not immune to corrosion and they ARE NOT maintenance-free, contrary
to popular public perception. Stainless steel requires frequent cleaning with fresh water to avoid oxidation and other
corrosive issues.
Brushed-finish stainless steel requires frequent cleaning and care, to maintain its quality of appearance. Without
adequate care it is realistic to expect that it will show signs of corrosion in time.
Protection/Cleaning of Stainless Steel Parts After assembly, and/or cleaning, we recommend applying a thin layer of olive oil with a clean rag, to all exposed
stainless steel areas. This should then be polished in and buffed off with another clean rag to a non-oily finish. This
process will aid protection against dirt and other corrosive contaminants, by providing a temporary food-safe shield.
The olive oil layer also makes later polishing and removal of fingerprints easier. This process should be repeated
frequently when cleaning your grill.
Barbecue Cover It is recommended that a barbecue cover should be used at all times when it is not in use to protect against the
weather. However it is vital to understand that unless the barbecue is cool, clean and dry when the cover is
fitted, use of a cover can in fact be detrimental. A cover placed on a warm, wet or unclean barbecue (or any mix
of these factors) can in fact be a very effective corrosion breeder!
The barbecue should always be cool, cleaned of any surface contaminants or dirt and be thoroughly dry before a
protective cover is fitted. This is especially important before a barbecue is stored for any length of time ie: if the
barbecue doesn’t get frequent use, or when the barbecue is stored away over winter months.
In order to maintain the quality of the finish of the stainless steel parts of this barbecue, be vigilant with care and
maintenance according to this advice.